english tÜrkÇe - p4c.philips.com · english tÜrkÇe hd4675 hd4674 hd4637 2 3 4 5 introduction....
TRANSCRIPT
ENGLISH TÜRKÇE
HD4675HD4674
HD4637
2 3
4 5
Introduction.
Congratulations on acquiring your new Philips kettle! In these instructions for use youwill find all important information, so you can optimally enjoy your kettle as long aspossible.
General description.
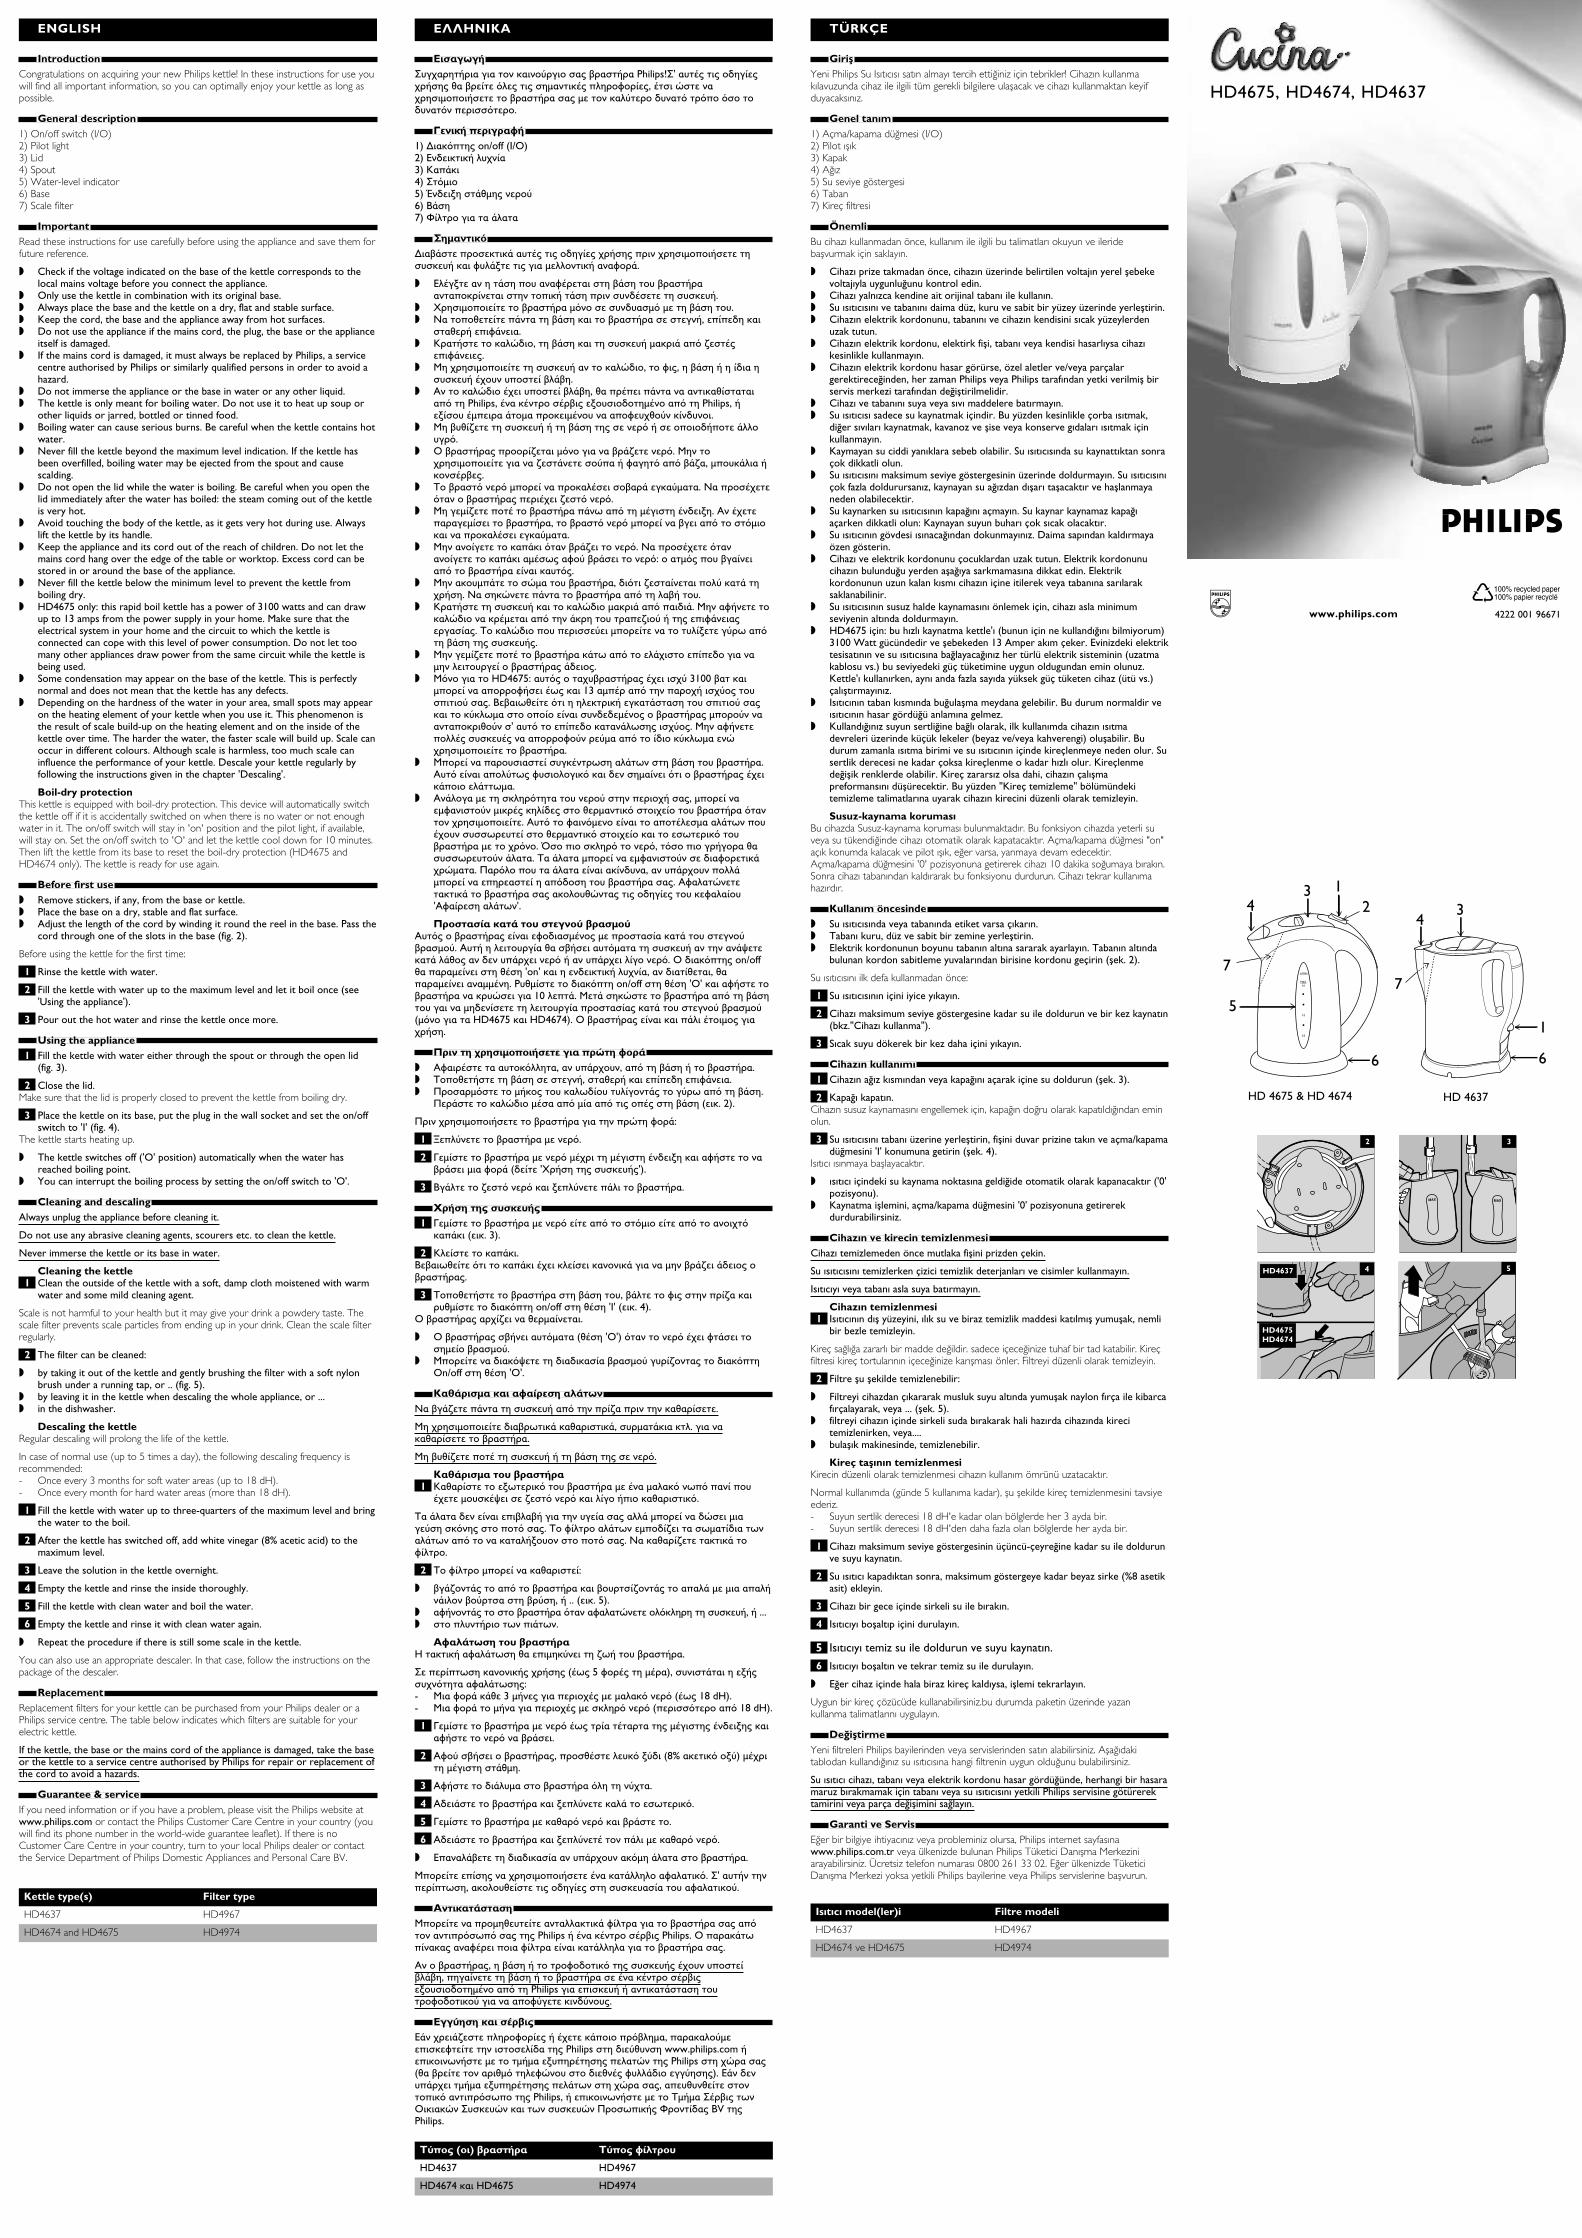
1) On/off switch (I/O)2) Pilot light3) Lid4) Spout5) Water-level indicator6) Base7) Scale filter
Important.
Read these instructions for use carefully before using the appliance and save them forfuture reference.
Check if the voltage indicated on the base of the kettle corresponds to thelocal mains voltage before you connect the appliance.
Only use the kettle in combination with its original base. Always place the base and the kettle on a dry, flat and stable surface. Keep the cord, the base and the appliance away from hot surfaces. Do not use the appliance if the mains cord, the plug, the base or the appliance
itself is damaged. If the mains cord is damaged, it must always be replaced by Philips, a service
centre authorised by Philips or similarly qualified persons in order to avoid ahazard.
Do not immerse the appliance or the base in water or any other liquid. The kettle is only meant for boiling water. Do not use it to heat up soup or
other liquids or jarred, bottled or tinned food. Boiling water can cause serious burns. Be careful when the kettle contains hot
water. Never fill the kettle beyond the maximum level indication. If the kettle has
been overfilled, boiling water may be ejected from the spout and causescalding.
Do not open the lid while the water is boiling. Be careful when you open thelid immediately after the water has boiled: the steam coming out of the kettleis very hot.
Avoid touching the body of the kettle, as it gets very hot during use. Alwayslift the kettle by its handle.
Keep the appliance and its cord out of the reach of children. Do not let themains cord hang over the edge of the table or worktop. Excess cord can bestored in or around the base of the appliance.
Never fill the kettle below the minimum level to prevent the kettle fromboiling dry.
HD4675 only: this rapid boil kettle has a power of 3100 watts and can drawup to 13 amps from the power supply in your home. Make sure that theelectrical system in your home and the circuit to which the kettle isconnected can cope with this level of power consumption. Do not let toomany other appliances draw power from the same circuit while the kettle isbeing used.
Some condensation may appear on the base of the kettle. This is perfectlynormal and does not mean that the kettle has any defects.
Depending on the hardness of the water in your area, small spots may appearon the heating element of your kettle when you use it. This phenomenon isthe result of scale build-up on the heating element and on the inside of thekettle over time. The harder the water, the faster scale will build up. Scale canoccur in different colours. Although scale is harmless, too much scale caninfluence the performance of your kettle. Descale your kettle regularly byfollowing the instructions given in the chapter 'Descaling'.
Boil-dry protectionThis kettle is equipped with boil-dry protection. This device will automatically switchthe kettle off if it is accidentally switched on when there is no water or not enoughwater in it. The on/off switch will stay in 'on' position and the pilot light, if available,will stay on. Set the on/off switch to 'O' and let the kettle cool down for 10 minutes.Then lift the kettle from its base to reset the boil-dry protection (HD4675 andHD4674 only). The kettle is ready for use again.
Before first use.
Remove stickers, if any, from the base or kettle. Place the base on a dry, stable and flat surface. Adjust the length of the cord by winding it round the reel in the base. Pass the
cord through one of the slots in the base (fig. 2).
Before using the kettle for the first time:
1 Rinse the kettle with water.
2 Fill the kettle with water up to the maximum level and let it boil once (see'Using the appliance').
3 Pour out the hot water and rinse the kettle once more.
Using the appliance.
1 Fill the kettle with water either through the spout or through the open lid (fig. 3).
2 Close the lid.Make sure that the lid is properly closed to prevent the kettle from boiling dry.
3 Place the kettle on its base, put the plug in the wall socket and set the on/offswitch to 'I' (fig. 4).
The kettle starts heating up.
The kettle switches off ('O' position) automatically when the water hasreached boiling point.
You can interrupt the boiling process by setting the on/off switch to 'O'.
Cleaning and descaling.
Always unplug the appliance before cleaning it.
Do not use any abrasive cleaning agents, scourers etc. to clean the kettle.
Never immerse the kettle or its base in water.
Cleaning the kettle1 Clean the outside of the kettle with a soft, damp cloth moistened with warm
water and some mild cleaning agent.
Scale is not harmful to your health but it may give your drink a powdery taste. Thescale filter prevents scale particles from ending up in your drink. Clean the scale filterregularly.
2 The filter can be cleaned:
by taking it out of the kettle and gently brushing the filter with a soft nylonbrush under a running tap, or .. (fig. 5).
by leaving it in the kettle when descaling the whole appliance, or ... in the dishwasher.
Descaling the kettleRegular descaling will prolong the life of the kettle.
In case of normal use (up to 5 times a day), the following descaling frequency isrecommended:- Once every 3 months for soft water areas (up to 18 dH).- Once every month for hard water areas (more than 18 dH).
1 Fill the kettle with water up to three-quarters of the maximum level and bringthe water to the boil.
2 After the kettle has switched off, add white vinegar (8% acetic acid) to themaximum level.
3 Leave the solution in the kettle overnight.
4 Empty the kettle and rinse the inside thoroughly.
5 Fill the kettle with clean water and boil the water.
6 Empty the kettle and rinse it with clean water again.
Repeat the procedure if there is still some scale in the kettle.
You can also use an appropriate descaler. In that case, follow the instructions on thepackage of the descaler.
Replacement.
Replacement filters for your kettle can be purchased from your Philips dealer or aPhilips service centre. The table below indicates which filters are suitable for yourelectric kettle.
If the kettle, the base or the mains cord of the appliance is damaged, take the baseor the kettle to a service centre authorised by Philips for repair or replacement of the cord to avoid a hazards.
Guarantee & service.
If you need information or if you have a problem, please visit the Philips website atwww.philips.com or contact the Philips Customer Care Centre in your country (youwill find its phone number in the world-wide guarantee leaflet). If there is noCustomer Care Centre in your country, turn to your local Philips dealer or contactthe Service Department of Philips Domestic Appliances and Personal Care BV.
HD4675, HD4674, HD4637
www.philips.comu
4222 001 96671
.
Philips!' ! " #!$, & "# " ! # # .
.
1) * # on/off (I/O)2) 2 ! 3) 4#54) "5) 8 9 5" 6) ;57) =! 5!
.
*5 #5 # "# $!59 "!! $5.
2!9 5 # $ 5 # # 5 # .
>"# " " " 5 . ? # #5 5 , ##
#$5 . 4 !&, 5 "5 # @
#$5 . A "# !&, $, 5
# !5. B !& # !5, ## #5
# Philips, 9" # Philips, 9 "# 5" #" #$ .
A @ 5 ## 5!! .
C #@ " 5@ . A "# @5 # $ # 5@, "#5! .
D "# #! 5 ". ? # # @ .
A "@ # #5 E # " 9. B #" , "# # " #! ".
A #5 5@ . ? # #5 "E $ 5 : " # # .
A "#5 &" , @ #! 5 . ? & #5 # ! .
4 !& "5 # #5. A $ !& " # 5 #@ #$5 . D !& # # "# !9 E # 5 .
A "@ # 5E # !5 ## " ! 5.
A HD4675: 3100 "# #$ E 13 "# # # # . ;E ! 5 # !E" # " "# # ' ## 5!E . A $ #!! #$ " # !E" &"# .
A# # E !5E 5 .B #!E $! " 5# !5E".
B 5! " ! # , "# "$ " ! " "#. B $ " #!" !5E # E " E " . J # ! , # E 5!. D 5! "# "$ $5&". K ! # 5! , #5 #!!5"# # # . B$!& 5 !& $!'B$ !5E '.
! "!B $" " # 5 ". B ! " 5L5 !5 #5 #5 ! . C # on/off #" 'on' ! , , #" "" . M" # on/off 'C' $ & 10 !#5. A5 & # 5 " ! # 5 "(" HD4675 HD4674). C #5! " .
# $ .
B$ !!, #5 , # 5 . D# 5 , ## #$5 . K" " !E ! 5 E # 5.
K5 !& " # " # # 5 (. 2).
K "# #& $5:
1 O#! " .
2 P" " " " 9 $ 5 " $5 ( '> ').
3 ;5! @ 9#! #5! .
( ) ).
1 P" " # " # #5 (. 3).
2 4! #5.;E #5 ! 5 " 5@ 5 .
3 D# 5 , 5! $ #@ " # on/off 'Q' (. 4).
C @ " .
C " ( 'C') $5 " ".
A# L " @ #On/off 'C'.
* + .
? 5@ #5 # #@ # .
A "# E5 5, "5 !. .
A @ # 5 .
* "1 4 9E " "! E# # #
"L @ ! # .
D 5! #! !!5 "# & " # . D $! !5E "#@ E" E !5E # !9 # . ? @ 5 $!.
2 D $! "# :
5@ 5 # @ 5 #!5 " " #! 5! , .. (. 5).
$ 5 $!& ! ! , ... #! E #5E .
+ "R $!5E #" @E .
##E (E 5 $ "), 5 9 $!5E:- A $5 5 3 " # " "! (E 18 dH).- A $5 " # " ! (# # 18 dH).
1 P" " E " 9 $ 5.
2 B$ , # ! 9 (8% 9) " " 5".
3 B$ 5!" ! .
4 B5 9#! !5 E .
5 P" " 5 .
6 B5 9#! #5! " .
2# !5 #5 " 5! .
A# # "# 5!!! $! . ' ##E, ! $!.
.
A# #" !!5 $! # # E# Philips Philips. C #5E# $ # $! 5!!! .
B , 5 $ # !5, # 5 9" # Philips # 5 $ #$ .
! /").
25 5@ #!$ 5# # !", #!"#$ ! Philips www.philips.com # E " "" 9# #!& Philips & ( " !$& $!!5 ). 25 #5 "" 9# #!5E & , # # # E# Philips, # E " D"" E C& & E & KE# = BV Philips.
Giriş.
Yeni Philips Su Isıtıcısı satın almayı tercih ettiğiniz için tebrikler! Cihazın kullanmakılavuzunda cihaz ile ilgili tüm gerekli bilgilere ulaşacak ve cihazı kullanmaktan keyifduyacaksınız.
Genel tanım.
1) Açma/kapama düğmesi (I/O)2) Pilot ışık3) Kapak4) Ağız5) Su seviye göstergesi6) Taban7) Kireç filtresi
Önemli.
Bu cihazı kullanmadan önce, kullanım ile ilgili bu talimatları okuyun ve ileridebaşvurmak için saklayın.
Cihazı prize takmadan önce, cihazın üzerinde belirtilen voltajın yerel şebekevoltajıyla uygunluğunu kontrol edin.
Cihazı yalnızca kendine ait orijinal tabanı ile kullanın. Su ısıtıcısını ve tabanını daima düz, kuru ve sabit bir yüzey üzerinde yerleştirin. Cihazın elektrik kordonunu, tabanını ve cihazın kendisini sıcak yüzeylerden
uzak tutun. Cihazın elektrik kordonu, elektirk fişi, tabanı veya kendisi hasarlıysa cihazı
kesinlikle kullanmayın. Cihazın elektrik kordonu hasar görürse, özel aletler ve/veya parçalar
gerektireceğinden, her zaman Philips veya Philips tarafından yetki verilmiş birservis merkezi tarafından değiştirilmelidir.
Cihazı ve tabanını suya veya sıvı maddelere batırmayın. Su ısıtıcısı sadece su kaynatmak içindir. Bu yüzden kesinlikle çorba ısıtmak,
diğer sıvıları kaynatmak, kavanoz ve şise veya konserve gıdaları ısıtmak içinkullanmayın.
Kaymayan su ciddi yanıklara sebeb olabilir. Su ısıtıcısında su kaynattıktan sonraçok dikkatli olun.
Su ısıtıcısını maksimum seviye göstergesinin üzerinde doldurmayın. Su ısıtıcısınıçok fazla doldurursanız, kaynayan su ağızdan dışarı taşacaktır ve haşlanmayaneden olabilecektir.
Su kaynarken su ısıtıcısının kapağını açmayın. Su kaynar kaynamaz kapağıaçarken dikkatli olun: Kaynayan suyun buharı çok sıcak olacaktır.
Su ısıtıcının gövdesi ısınacağından dokunmayınız. Daima sapından kaldırmayaözen gösterin.
Cihazı ve elektrik kordonunu çocuklardan uzak tutun. Elektrik kordonunucihazın bulunduğu yerden aşağıya sarkmamasına dikkat edin. Elektrikkordonunun uzun kalan kısmı cihazın içine itilerek veya tabanına sarılaraksaklanabilinir.
Su ısıtıcısının susuz halde kaynamasını önlemek için, cihazı asla minimumseviyenin altında doldurmayın.
HD4675 için: bu hızlı kaynatma kettle'ı (bunun için ne kullandığını bilmiyorum)3100 Watt gücündedir ve şebekeden 13 Amper akım çeker. Evinizdeki elektriktesisatının ve su ısıtıcısına bağlayacağınız her türlü elektrik sisteminin (uzatmakablosu vs.) bu seviyedeki güç tüketimine uygun oldugundan emin olunuz.Kettle'ı kullanırken, aynı anda fazla sayıda yüksek güç tüketen cihaz (ütü vs.)çalıştırmayınız.
Isıtıcının taban kısmında buğulaşma meydana gelebilir. Bu durum normaldir veısıtıcının hasar gördüğü anlamına gelmez.
Kullandığınız suyun sertliğine bağlı olarak, ilk kullanımda cihazın ısıtmadevreleri üzerinde küçük lekeler (beyaz ve/veya kahverengi) oluşabilir. Budurum zamanla ısıtma birimi ve su ısıtıcının içinde kireçlenmeye neden olur. Susertlik derecesi ne kadar çoksa kireçlenme o kadar hızlı olur. Kireçlenmedeğişik renklerde olabilir. Kireç zararsız olsa dahi, cihazın çalışmapreformansını düşürecektir. Bu yüzden "Kireç temizleme" bölümündekitemizleme talimatlarına uyarak cihazın kirecini düzenli olarak temizleyin.
Susuz-kaynama korumasıBu cihazda Susuz-kaynama koruması bulunmaktadır. Bu fonksiyon cihazda yeterli suveya su tükendiğinde cihazı otomatik olarak kapatacaktır. Açma/kapama düğmesi "on"açık konumda kalacak ve pilot ışık, eğer varsa, yanmaya devam edecektir.Açma/kapama düğmesini '0' pozisyonuna getirerek cihazı 10 dakika soğumaya bırakın.Sonra cihazı tabanından kaldırarak bu fonksiyonu durdurun. Cihazı tekrar kullanımahazırdır.
Kullanım öncesinde.
Su ısıtıcısında veya tabanında etiket varsa çıkarın. Tabanı kuru, düz ve sabit bir zemine yerleştirin. Elektrik kordonunun boyunu tabanın altına sararak ayarlayın. Tabanın altında
bulunan kordon sabitleme yuvalarından birisine kordonu geçirin (şek. 2).
Su ısıtıcısını ilk defa kullanmadan önce:
1 Su ısıtıcısının içini iyice yıkayın.
2 Cihazı maksimum seviye göstergesine kadar su ile doldurun ve bir kez kaynatın(bkz."Cihazı kullanma").
3 Sıcak suyu dökerek bir kez daha içini yıkayın.
Cihazın kullanımı.
1 Cihazın ağız kısmından veya kapağını açarak içine su doldurun (şek. 3).
2 Kapağı kapatın.Cihazın susuz kaynamasını engellemek için, kapağın doğru olarak kapatıldığından eminolun.
3 Su ısıtıcısını tabanı üzerine yerleştirin, fişini duvar prizine takın ve açma/kapamadüğmesini 'I' konumuna getirin (şek. 4).
Isıtıcı ısınmaya başlayacaktır.
ısıtıcı içindeki su kaynama noktasına geldiğide otomatik olarak kapanacaktır ('0'pozisyonu).
Kaynatma işlemini, açma/kapama düğmesini '0' pozisyonuna getirerekdurdurabilirsiniz.
Cihazın ve kirecin temizlenmesi.
Cihazı temizlemeden önce mutlaka fişini prizden çekin.
Su ısıtıcısını temizlerken çizici temizlik deterjanları ve cisimler kullanmayın.
Isıtıcıyı veya tabanı asla suya batırmayın.
Cihazın temizlenmesi1 Isıtıcının dış yüzeyini, ılık su ve biraz temizlik maddesi katılmış yumuşak, nemli
bir bezle temizleyin.
Kireç sağlığa zararlı bir madde değildir. sadece içeceğinize tuhaf bir tad katabilir. Kireçfiltresi kireç tortularının içeceğinize karışması önler. Filtreyi düzenli olarak temizleyin.
2 Filtre şu şekilde temizlenebilir:
Filtreyi cihazdan çıkararak musluk suyu altında yumuşak naylon fırça ile kibarcafırçalayarak, veya ... (şek. 5).
filtreyi cihazın içinde sirkeli suda bırakarak hali hazırda cihazında kirecitemizlenirken, veya....
bulaşık makinesinde, temizlenebilir.
Kireç taşının temizlenmesiKirecin düzenli olarak temizlenmesi cihazın kullanım ömrünü uzatacaktır.
Normal kullanımda (günde 5 kullanıma kadar), şu şekilde kireç temizlenmesini tavsiyeederiz.- Suyun sertlik derecesi 18 dH'e kadar olan bölglerde her 3 ayda bir.- Suyun sertlik derecesi 18 dH'den daha fazla olan bölglerde her ayda bir.
1 Cihazı maksimum seviye göstergesinin üçüncü-çeyreğine kadar su ile doldurunve suyu kaynatın.
2 Su ısıtıcı kapadıktan sonra, maksimum göstergeye kadar beyaz sirke (%8 asetikasit) ekleyin.
3 Cihazı bir gece içinde sirkeli su ile bırakın.
4 Isıtıcıyı boşaltıp içini durulayın.
5 Isıtıcıyı temiz su ile doldurun ve suyu kaynatın.
6 Isıtıcıyı boşaltın ve tekrar temiz su ile durulayın.
Eğer cihaz içinde hala biraz kireç kaldıysa, işlemi tekrarlayın.
Uygun bir kireç çözücüde kullanabilirsiniz.bu durumda paketin üzerinde yazankullanma talimatlarını uygulayın.
Değiştirme.
Yeni filtreleri Philips bayilerinden veya servislerinden satın alabilirsiniz. Aşağıdakitablodan kullandığınız su ısıtıcısına hangi filtrenin uygun olduğunu bulabilirsiniz.
Su ısıtıcı cihazı, tabanı veya elektrik kordonu hasar gördüğünde, herhangi bir hasaramaruz bırakmamak için tabanı veya su ısıtıcısını yetkili Philips servisine götürerektamirini veya parça değişimini sağlayın.
Garanti ve Servis.
Eğer bir bilgiye ihtiyacınız veya probleminiz olursa, Philips internet sayfasınawww.philips.com.tr veya ülkenizde bulunan Philips Tüketici Danışma Merkeziniarayabilirsiniz. Ücretsiz telefon numarası 0800 261 33 02. Eğer ülkenizde TüketiciDanışma Merkezi yoksa yetkili Philips bayilerine veya Philips servislerine başvurun.
Filter type
HD4967
HD4974
Kettle type(s)
HD4637
HD4674 and HD4675
0!) +
HD4967
HD4974
0!) () "
HD4637
HD4674 HD4675
Filtre modeli
HD4967
HD4974
Isıtıcı model(ler)i
HD4637
HD4674 ve HD4675
.
ü !"#$"%& ü'(#)"*!+!#,&"+!!*$ü!ü-./-!) 0*#, # 1
.
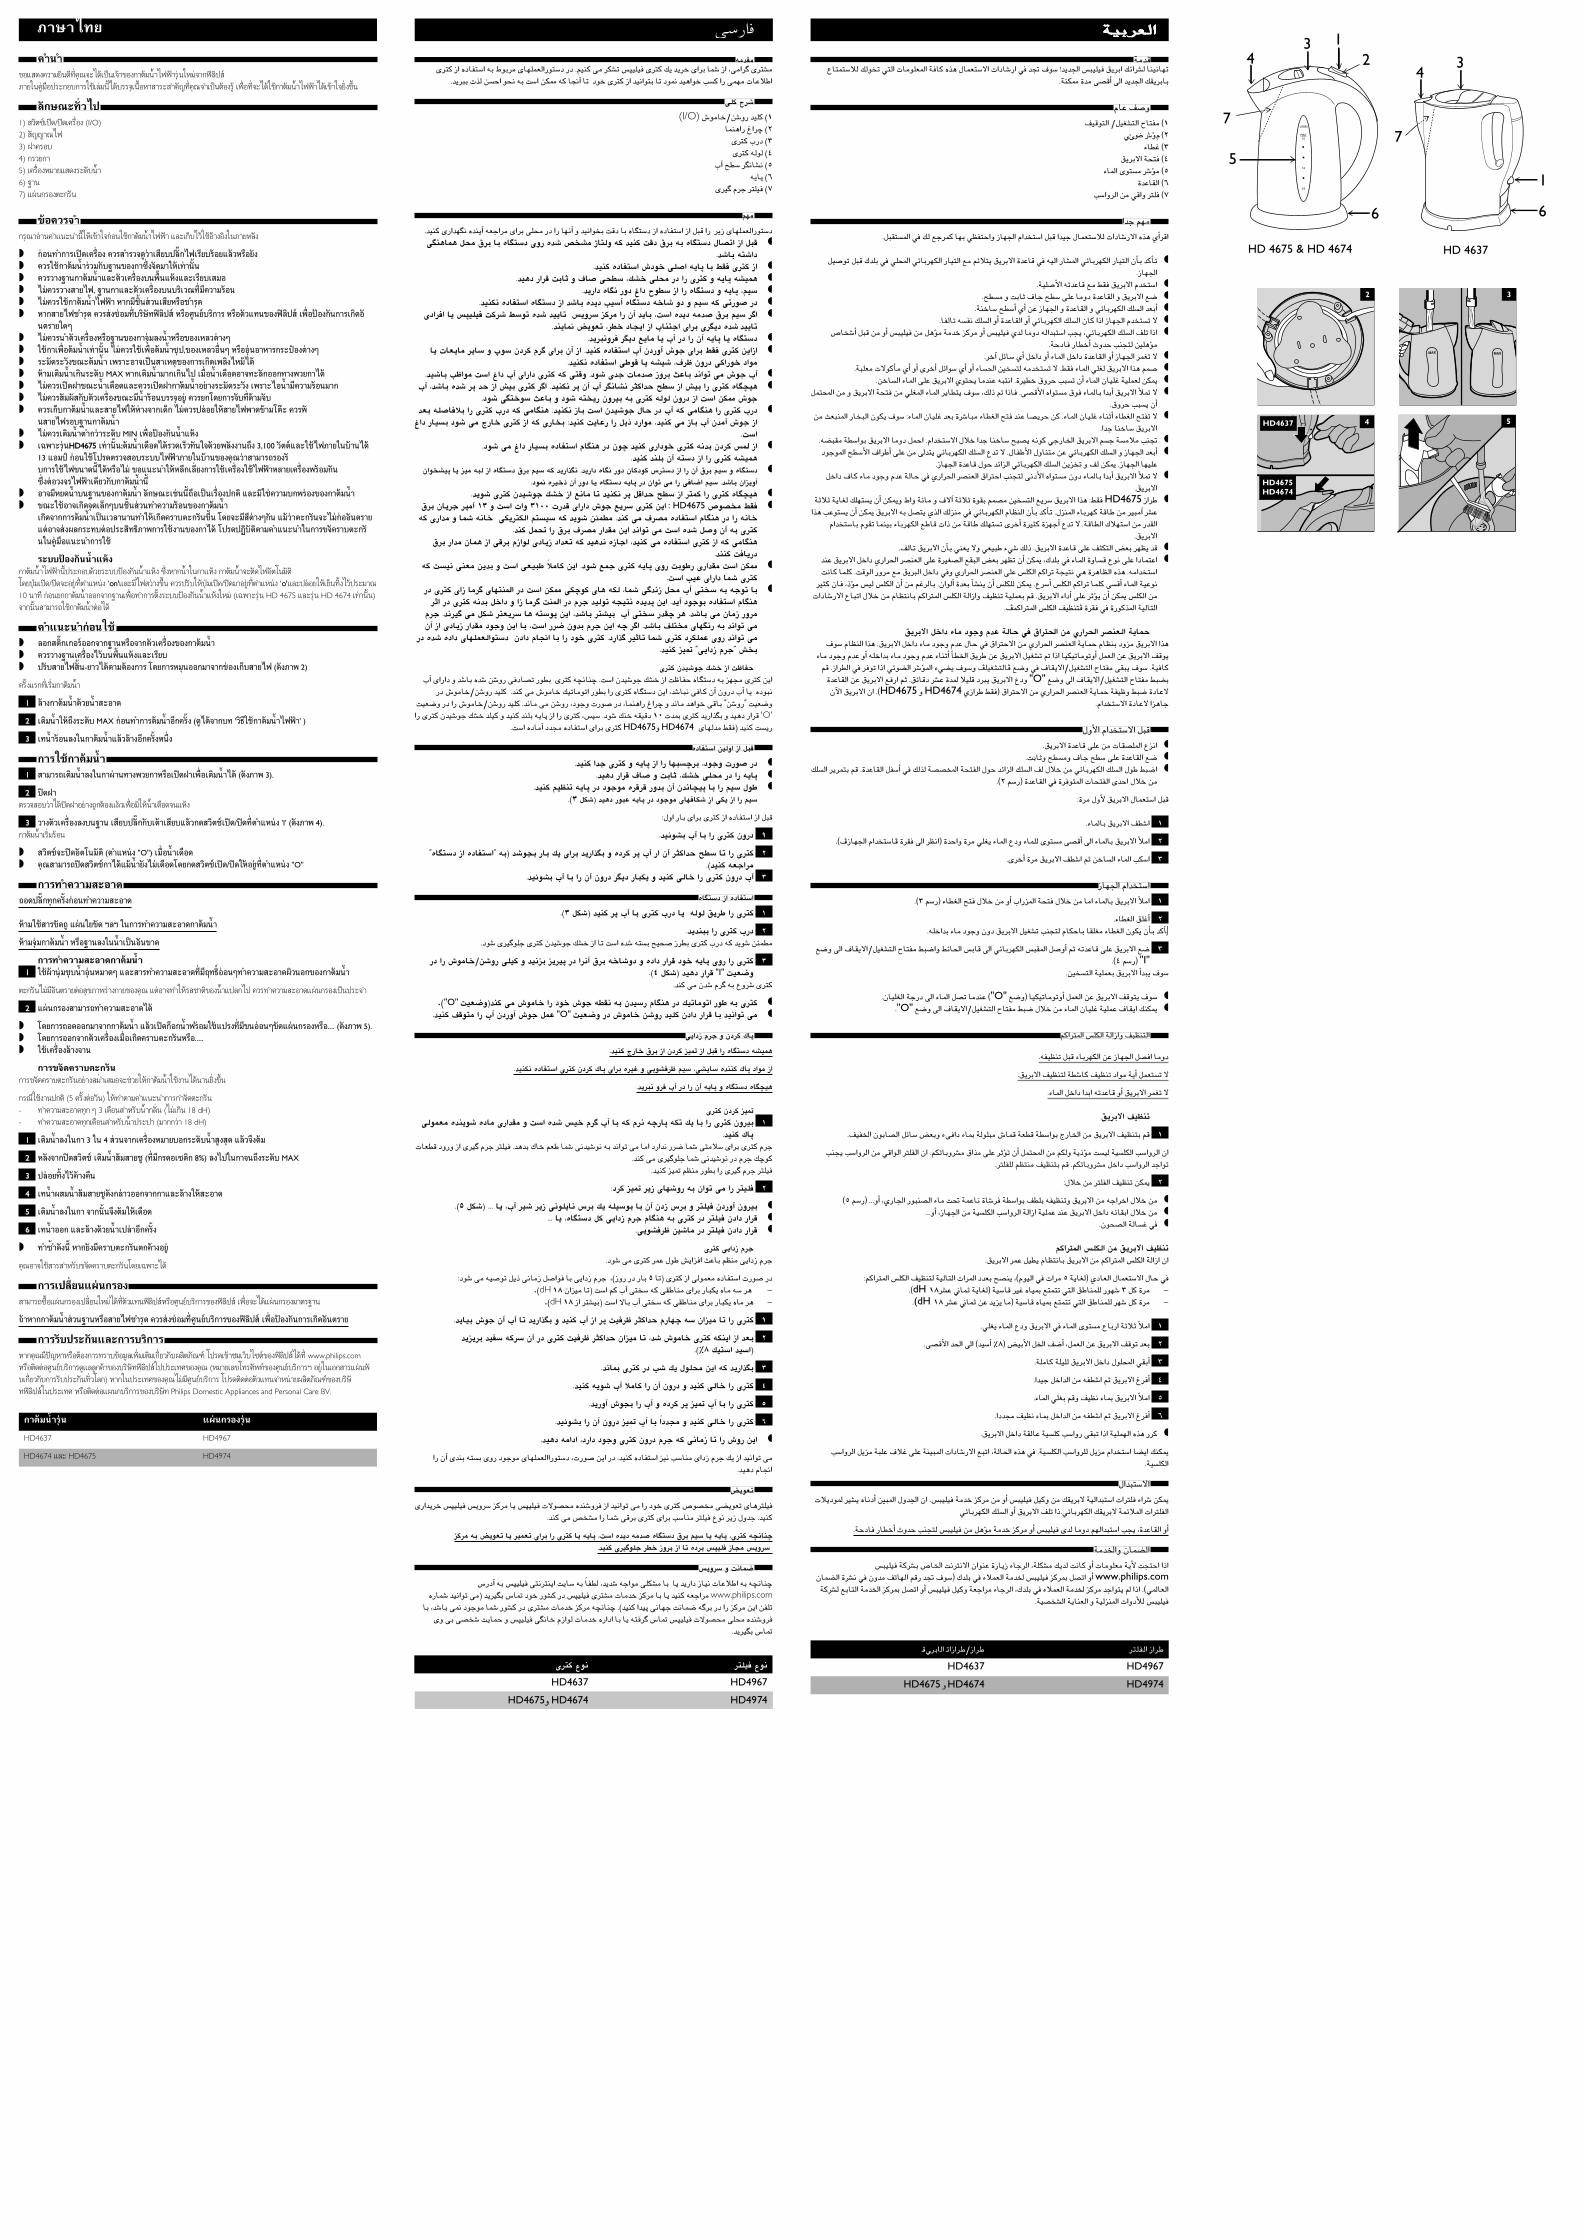
1) ü 4'%/%!* (I/O)2) ü.//3) ;!+4) !5) !*$ü!.+6) ?7) A"!!.
.
!"--#$#"#, &B+#, #($&.
ü ü !"#$%&$'()* $! & '#$%&+#,& +ü$ $ü, '+#./$$ $!"#$%&0 $".&üü "1 ü"1 ü)$.2.ü3 43. #(.ü3 ,0.
#! 5 $# '(1$%& ( #5 !",#$%&& $!",#$%&)1,( 5 1 +6#5 +$ +(/+#$%& ,+7ü #1(. ,. $ $#.$%&.+ MAX #.$%&$. $%& +, $ ;(/+%& + ;#0$%&<+$ + ,+%&$$$ $ü$=ü#(/+$%&1 > $ ?#$%&+ü! ? $! ü, ($>#@+ ,
ü'#$%& $#.$%&#+ MIN ,0%& C,+1HHDD44667755 &::#$%& ?! ,K* 3,100 ##3+!"O!
13 $P !"> #ü+0O!(1/ü$K!"( & $ (+! !"!"0 ,$)*#0 #$%&&
$ %&'(#$%& 2/+"&K7#. +$.!"$,(#$%& (/+!". 1 ?5".&ü$(#$%&
. #$%&7! . #+(*& > +$ü#5 $#++$##ü=+#+ü.Q.O,!"( > R.#.#$+!(#+!$+!"
!+!++ .$ 41$#$ ..C. C"%/%)D-$" 'oonn''&ü"1 !!.+#$"%/%)D-$" 'oo''&&"#$B !10 "?0*-!.!++ .$#$" (I0!" HD 4675 &!" HD 4674 ".).ü!L#,"
!".
ü#.3' #(#$%& ',& + üü&- #$# > $1$"?ü ( O, 2)
!.!!
11 #$%& %&ü+
22 #.$%&! K*+ MAX #$%&& ( '.Q!"#$%&0' )
33 %&!#$%&& *
!"#$.
11 ü$K#.$%&!=, ;,#.$%& ( O, 3).
22 ;!ü+D %;DL) & 0* #$*$
33 #' ü#ü ü.#"3 / # 'I' ( O, 4).! !
ü.#"3+ #>$#. (# "O") $%& 1/ü$K ü.#"3 $%&$ > ü.#"3 / ! 0<# "O"
$ü&.
K 1&$ü+
$!"ü( K =!( \\ !$ü+ #$%&
$1$#$%& '!%&7(
$ü&#$11 !"=1$"1%&1 $ 5 +ü$ü+ $]Q.^5$ü+ =.(#$%&
!.".!"ü(0!" "-#$!ü, & !-üA"!!-
22 =ü$K$ü+
> K $#$%& ?%&,0$!"0$(5( = .... ( O, 5). > #$. #+ ..... !"
&# !.!+!."ü-ü,"#$#, 1
!#, (5 !.".) #$---!-.!.- -ü N 3 *ü-$!.+&. (" 18 dH)- -ü*ü-$!.+! (" 18 dH)
11 #.$%&! 3 ! 4 ü $+ %&üü1 *#$
22 ü.#"3 #.$%&ü$ü" ($ )#. 8%) !K*+ MAX
33 .&
44 %&=ü$%&ü$ü" +! ü+
55 #.$%&! &*#$!
66 %& + %&&
)& & $#+#
#,ü!ü-$!.+.!+!.CI0
'() .
ü!L4*A"!&#$".%& ü'$!*Q)'+! !%& ü' 0*A"!!?
K #$%&ü' ü"1 ü)$43.(.ü3 ,0. #
*.
$R/$$!*!!+)&0 .+A& (.S' C!,B+4'%& ü' www.philips.com$!* "Q)'+! !)&&)+! ].%& ü'#!Q ($&C!Q.0'Q)'+! !^ )"#ü!A"0.+.+!!.+!..C&) $#!Q"Q)'+! ! C! ".-$"A& (.S'+! ].%& ü'#!Q $!* "A+! !+! ]. Philips Domestic Appliances and Personal Care BV.
HD4675HD4674
HD4637
2 3
4 5
) +
HD4967
HD4974
#$+
HD4637
HD4674 & HD4675
áeó≤´Éàªà°SÓd ∂dƒîJ »àdG äÉeƒ∏©ŸG áaÉc √òg ∫ɪ©à°S’G äGOÉ°TQG ‘ óŒ ±ƒ°S !ójó÷G ¢ùÑ«∏«a ≥jôHG ∂FGô°ûd Éæ«fÉ¡J
.á浇 Ióe ≈°übCG ¤G ójó÷G ∂≤jôHÉH
ΩÉY ∞°Uh
∞«bƒàdG /𫨰ûàdG ìÉàØe (1»ÅƒV QTDhº (2
AÉ£Z (3≥jôH’G áëàa (4
AÉŸG iƒà°ùe ô°TDƒe (5IóYÉ≤dG (6
Ö°SGhôdG øe »bGh Î∏a (7
GóL º¡e
.πÑ≤à°ùŸG ‘ ∂d ™Lôªc É¡H »¶ØàMGh RÉ¡÷G ΩGóîà°SG πÑb Gó«L ∫ɪ©à°SÓd äGOÉ°TQ’G √òg …CGôbG
æπ«°UƒJ πÑb ∑ó∏H ‘ »∏ÙG »FÉHô¡µdG QÉ«àdG ™e ºFÓàj ≥jôH’G IóYÉb ‘ ¬«dG QÉ°ûŸG »FÉHô¡µdG QÉ«àdG ¿CÉH ócCÉJ.RÉ¡÷G
æ.á«∏°UC’G ¬JóYÉb ™e §≤a ≥jôH’G Ωóîà°SGæ.í£°ùe h âHÉK ±ÉL í£°S ≈∏Y ÉehO IóYÉ≤dG h ≥jôH’G ™°Væ.áæNÉ°S í£°SCG …CG øY RÉ¡÷G h IóYÉ≤dG h »FÉHô¡µdG ∂∏°ùdG ó©HCGæ.ÉØdÉJ ¬°ùØf ∂∏°ùdG hCG IóYÉ≤dG hCG »FÉHô¡µdG ∂∏°ùdG ¿Éc GPG RÉ¡÷G Ωóîà°ùJ ’æ¢UÉî°TCG πÑb øe hCG ¢ùÑ«∏«a øe πgDƒe áeóN õcôe hCG ¢ùÑ«∏«a …ód ÉehO ¬dGóÑà°SG Öéj ,»FÉHô¡µdG ∂∏°ùdG ∞∏J GPG
.áMOÉa QÉ£NCG çhóM Öæéàd Ú∏gDƒeæ.ôNBG πFÉ°S …CG πNGO hCG AÉŸG πNGO IóYÉ≤dG hCG RÉ¡÷G ôª¨J ’æ.áÑ∏©e ä’ƒcCÉe …CG hCG iôNCG πFGƒ°S …CG hCG AÉ°ù◊G Úî°ùàd ¬eóîà°ùJ ’ .§≤a AÉŸG »∏¨d ≥jôH’G Gòg ºª°Uæ.øNÉ°ùdG AÉŸG ≈∏Y ≥jôH’G …ƒàëj ÉeóæY ¬ÑàfG .IÒ£N ¥hôM ÖÑ°ùJ ¿CG AÉŸG ¿É«∏Z á«∏ª©d øµÁæπªàÙG øe h ≥jôH’G áëàa øe »∏¨ŸG AÉŸG ôjÉ£àj ±ƒ°S ,∂dP ” GPÉa .≈°übC’G √Gƒà°ùe ¥ƒa AÉŸÉH GóHCG ≥jôH’G CÓ“ ’
.¥hôM ÖÑ°ùj ¿CGæøe å©ÑæŸG QÉîÑdG ¿ƒµj ±ƒ°S :AÉŸG ¿É«∏Z ó©H Iô°TÉÑe AÉ£¨dG íàa óæY É°üjôM øc .AÉŸG ¿É«∏Z AÉæKCG AÉ£¨dG íàØJ ’
.GóL ÉæNÉ°S ≥jôH’Gæ.¬°†Ñ≤e ᣰSGƒH ≥jôH’G ÉehO πªMG .ΩGóîà°S’G ∫ÓN GóL ÉæNÉ°S íÑ°üj ¬fƒc »LQÉÿG ≥jôH’G º°ùL á°ùeÓe ÖæŒæOƒLƒŸG í£°SC’G ±GôWCG ≈∏Y øe ¤óàj »FÉHô¡µdG ∂∏°ùdG ´óJ ’ .∫ÉØWC’G ∫hÉæàe øY »FÉHô¡µdG ∂∏°ùdG h RÉ¡÷G ó©HCG
.RÉ¡÷G IóYÉb ∫ƒM óFGõdG »FÉHô¡µdG ∂∏°ùdG øjõîJ h ∞d øµÁ .RÉ¡÷G É¡«∏YæπNGO ±Éc AÉe OƒLh ΩóY ádÉM ‘ …QGô◊G ô°üæ©dG ¥GÎMG Öæéàd ≈fOC’G √Gƒà°ùe ¿hO AÉŸÉH GóHCG ≥jôH’G CÓ“ ’
.≥jôH’Gæ RGôWHD4675áKÓK ájɨd ∂∏¡à°ùj ¿CG øµÁh •Gh áFÉe h ±’BG áKÓK Iƒ≤H ºª°üe Úî°ùàdG ™jô°S ≥jôH’G Gòg :§≤a
Gòg ÖYƒà°ùj ¿CG øµÁ ≥jôH’G ¬H π°üàj …òdG ∂dõæe ‘ »FÉHô¡µdG ΩɶædG ¿CÉH ócCÉJ .∫õæŸG AÉHô¡c ábÉW øe ÒÑeBG ô°ûYΩGóîà°SÉH Ωƒ≤J ɪæ«H AÉHô¡µdG ™WÉb äGP øe ábÉW ∂∏¡à°ùJ iôNCG IÒãc Iõ¡LCG ´óJ ’ .ábÉ£dG ∑Ó¡à°SG øe Qó≤dG
.≥jôH’Gæ.∞dÉJ ≥jôH’G ¿CÉH »æ©j ’h »©«ÑW A»°T ∂dP .≥jôH’G IóYÉb ≈∏Y ∞ãµàdG ¢†©H ô¡¶j óbæóæY ≥jôH’G πNGO …QGô◊G ô°üæ©dG ≈∏Y IÒ¨°üdG ™≤ÑdG ¢†©H ô¡¶J ¿CG øµÁ ,∑ó∏H ‘ AÉŸG IhÉ°ùb ´ƒf ≈∏Y GOɪàYG
âfÉc ɪ∏c .âbƒdG Qhôe ™e ≥jÈdG πNGO ‘h …QGô◊G ô°üæ©dG ≈∏Y ¢ù∏µdG ºcGôJ áé«àf »g IôgɶdG √òg .¬eGóîà°SGÒãc ¿Éa ,PDƒe ¢ù«d ¢ù∏µdG ¿CG øe ºZôdÉH .¿GƒdCG Ió©H CÉ°ûæj ¿CG ¢ù∏µ∏d øµÁ .´ô°SCG ¢ù∏µdG ºcGôJ ɪ∏c ≈°ùbCG AÉŸG á«Yƒf
äGOÉ°TQ’G ´ÉÑJG ∫ÓN øe ΩɶàfÉH ºcGΟG ¢ù∏µdG ádGRGh ∞«¶æJ á«∏ª©H ºb .≥jôH’G AGOCG ≈∏Y ôKDƒj ¿CG øµÁ ¢ù∏µdG øe.&ªcGΟG ¢ù∏µdG ∞«¶æà" Iô≤a ‘ IQƒcòŸG á«dÉàdG
≥jôH’G πNGO AÉe OƒLh ΩóY ádÉM ‘ ¥GÎ◊G øe …QGô◊G ô°üæ©dG ájɪM±ƒ°S ΩɶædG Gòg .≥jôH’G πNGO AÉe OƒLh ΩóY ∫ÉM ‘ ¥GÎM’G øe …QGô◊G ô°üæ©dG ájɪM ΩɶæH Ohõe ≥jôH’G Gòg
AÉe OƒLh ΩóY hCG ¬∏NGóH AÉe OƒLh ΩóY AÉæKCG CÉ£ÿG ≥jôW øY ≥jôH’G 𫨰ûJ ” GPG É«µ«JÉeƒJhCG πª©dG øY ≥jôH’G ∞bƒjºb .RGô£dG ‘ ôaƒJ GPG »Fƒ°†dG ô°TDƒŸG A»°†j ±ƒ°Sh &∏«¨°ûàdÉ" ™°Vh ‘ ±É≤j’G/𫨰ûàdG ìÉàØe ≈≤Ñj ±ƒ°S .á«aÉc
™°Vh ¤G ±É≤j’G/𫨰ûàdG ìÉàØe §Ñ°†H"O"IóYÉ≤dG øY ≥jôH’G ™aQG ºK .≥FÉbO ô°ûY IóŸ Ó«∏b OÈj ≥jôH’G ´Oh …RGôW §≤a) ¥GÎM’G øe …QGô◊G ô°üæ©dG ájɪM áØ«Xh §Ñ°V IOÉY’HD4674 hHD4675¿B’G ≥jôH’G ¿G .(
.ΩGóîà°S’G IOÉY’ GõgÉL
∫hC’G ΩGóîà°S’G πÑb
æ.≥jôH’G IóYÉb ≈∏Y øe äÉ≤°ü∏ŸG ´õfGæ.âHÉKh í£°ùeh ±ÉL í£°S ≈∏Y IóYÉ≤dG ™°Væ∂∏°ùdG ôjôªàH ºb .IóYÉ≤dG πØ°SCG ‘ ∂dòd á°ü°üıG áëàØdG ∫ƒM óFGõdG ∂∏°ùdG ∞d ∫ÓN øe »FÉHô¡µdG ∂∏°ùdG ∫ƒW §Ñ°VG
.(2 º°SQ) IóYÉ≤dG ‘ IôaƒàŸG äÉëàØdG ióMG ∫ÓN øe
:Iôe ∫hC’ ≥jôH’G ∫ɪ©à°SG πÑb
1.AÉŸÉH ≥jôH’G ∞£°TG
2.(<RÉ¡÷G ΩGóîà°SÉ" Iô≤a ¤G ô¶fG) IóMGh Iôe »∏¨j AÉŸG ´Oh Aɪ∏d iƒà°ùe ≈°übCG ¤G AÉŸÉH ≥jôH’G CÓeG
3.iôNCG Iôe ≥jôH’G ∞£°TG ºK øNÉ°ùdG AÉŸG Öµ°SG
RÉ¡÷G ΩGóîà°SG
1.(3 º°SQ) AÉ£¨dG íàa ∫ÓN øe hCG ÜGQõŸG áëàa ∫ÓN øe ÉeG AÉŸÉH ≥jôH’G CÓeG
2.AÉ£¨dG ≥∏ZCGJ.¬∏NGóH AÉe OƒLh ¿hO ≥jôH’G 𫨰ûJ Öæéàd ΩɵMÉH É≤∏¨e AÉ£¨dG ¿ƒµj ¿CÉH ócCÉ
3™°Vh ¤G ±É≤j’G/𫨰ûàdG ìÉàØe §Ñ°VGh §FÉ◊G ¢ùHÉb ¤G »FÉHô¡µdG ¢ùÑ≤ŸG π°UhCG ºK ¬JóYÉb ≈∏Y ≥jôH’G ™°V"I".(4 º°SQ)
.Úî°ùàdG á«∏ª©H ≥jôH’G CGóÑj ±ƒ°S
æ ™°Vh) É«µ«JÉeƒJhCG πª©dG øY ≥jôH’G ∞bƒàj ±ƒ°S"O".¿É«∏¨dG áLQO ¤G AÉŸG π°üJ ÉeóæY (æ ™°Vh ¤G ±É≤j’G/𫨰ûàdG ìÉàØe §Ñ°V ∫ÓN øe AÉŸG ¿É«∏Z á«∏ªY ±É≤jG ∂æµÁ"O".
ºcGΟG ¢ù∏µdG ádGRGh ∞ѶæàdG
.¬Ø«¶æJ πÑb AÉHô¡µdG øY RÉ¡÷G π°üaG ÉehO
.≥jôH’G ∞«¶æàd ᣰTÉc ∞«¶æJ OGƒe ájCG πª©à°ùJ ’
.AÉŸG πNGO GóHG ¬JóYÉb hCG ≥jôH’G ôª¨J ’
≥jôH’G ∞«¶æJ
1.∞«ØÿG ¿ƒHÉ°üdG πFÉ°S ¢†©Hh A≈aGO AÉà ádƒ∏Ñe ¢Tɪb á©£b ᣰSGƒH êQÉÿG øe ≥jôH’G ∞«¶æàH ºb
Öæéj Ö°SGhôdG øe »bGƒdG Î∏ØdG ¿G .ºµJÉHhô°ûe ¥Gòe ≈∏Y ôKDƒJ ¿CG πªàÙG øe ºµdh ájPDƒe â°ù«d á«°ù∏µdG Ö°SGhôdG ¿G.Î∏Ø∏d º¶àæe ∞«¶æàH ºb .ºµJÉHhô°ûe πNGO Ö°SGhôdG óLGƒJ
2:∫ÓN øe Î∏ØdG ∞«¶æJ øµÁ
æ(5 º°SQ) ...hCG ,…QÉ÷G QƒÑæ°üdG AÉe â– áªYÉf IÉ°Tôa ᣰSGƒH ∞£∏H ¬Ø«¶æJh ≥jôH’G øe ¬LGôNG ∫ÓN øeæ...hCG ,RÉ¡÷G øe á«°ù∏µdG Ö°SGhôdG ádGRG á«∏ªY óæY ≥jôH’G πNGO ¬FÉ≤HG ∫ÓN øeæ.¿ƒë°üdG ádÉ°ùZ ‘
ºcGΟG ¢ù∏µdG øe ≥jôH’G ∞«¶æJ.≥jôH’G ôªY π«£j ΩɶàfÉH ≥jôH’G øe ºcGΟG ¢ù∏µdG ádGRG ¿G
:ºcGΟG ¢ù∏µdG ∞«¶æàd á«dÉàdG äGôŸG Oó©H í°üæj ,(Ωƒ«dG ‘ äGôe 5 ájɨd) …OÉ©dG ∫ɪ©à°S’G ∫ÉM ‘-18ô°ûY ÊɪK ájɨd) á«°SÉb ÒZ √É«Ã ™àªàJ »àdG ≥WÉæª∏d Qƒ¡°T 3 πc IôedH.(-18 ô°ûY ÊɪK øY ójõj Ée) á«°SÉb √É«Ã ™àªàJ »àdG ≥WÉæª∏d ô¡°T πc Iôe(dH.
1.»∏¨j AÉŸG ´Oh ≥jôH’G ‘ AÉŸG iƒà°ùe ´ÉHQG áKÓK CÓeG
2.≈°übC’G ó◊G ¤G (ó«°SCG %8) ¢†«HC’G πÿG ∞°VCG ,πª©dG øY ≥jôH’G ∞bƒJ ó©H
3.á∏eÉc á∏«∏d ≥jôH’G πNGO ∫ƒ∏ÙG »≤HCG
4.Gó«L πNGódG øe ¬Ø£°TG ºK ≥jôH’G ÆôaCG
5.AÉŸG »∏¨H ºbh ∞«¶f AÉà ≥jôH’G CÓeG
6.GOó› ∞«¶f AÉà πNGódG øe ¬Ø£°TG ºK ≥jôH’G ÆôaCG
æ.≥jôH’G πNGO á≤dÉY á«°ù∏c Ö°SGhQ ≈≤ÑJ GPG á«∏ª¡dG √òg Qôc
Ö°SGhôdG πjõe áÑ∏Y ±ÓZ ≈∏Y áæ«ÑŸG äGOÉ°TQ’G ™ÑJG ,ádÉ◊G √òg ‘ .á«°ù∏µdG Ö°SGhô∏d πjõe ΩGóîà°SG É°†jG ∂æµÁ.á«°ù∏µdG
∫GóÑà°S’G
äÓjOƒŸ Ò°ûj √ÉfOCG ÚÑŸG ∫hó÷G ¿G .¢ùÑ«∏«a áeóN õcôe øe hCG ¢ùÑ«∏«a π«ch øe ∂≤jôH’ á«dGóÑà°SG äGÎ∏a AGô°T øµÁ »FÉHô¡µdG ∂∏°ùdG hCG ≥jôH’G ∞∏J GP.»FÉHô¡µdG ∂≤jôH’ áªFÓŸG äGÎ∏ØdG
.áMOÉa QÉ£NCG çhóM Öæéàd ¢ùÑ«∏«a øe πgDƒe áeóN õcôe hCG ¢ùÑ«∏«a iód ÉehO º¡dGóÑà°SG Öéj ,IóYÉ≤dG hCG
áeóÿGh ¿Éª°†dG
¢ùÑ«∏«a ácô°ûH ¢UÉÿG âfÎf’G ¿GƒæY IQÉjR AÉLôdG ,á∏µ°ûe ∂jód âfÉc hCG äÉeƒ∏©e ájC’ âéàMG GPGwww.philips.com¿Éª°†dG Iô°ûf ‘ ¿hóe ∞JÉ¡dG ºbQ óŒ ±ƒ°S) ∑ó∏H ‘ AÓª©dG áeóÿ ¢ùÑ«∏«a õcôà π°üJG hCG
ácô°ûd ™HÉàdG áeóÿG õcôà π°üJG hCG ¢ùÑ«∏«a π«ch á©LGôe AÉLôdG ,∑ó∏H ‘ AÓª©dG áeóÿ õcôe óLGƒàj ⁄ GPG .(»ŸÉ©dG.á«°üî°ûdG ájÉæ©dG h á«dõæŸG äGhOCÓd ¢ùÑ«∏«a
QJdadG RGQW
HD4967
HD4974
b»QHGdG JGRGQW/RGQW
HD4637
HD4674 ƒHD4675