gn02 wall builder examples - fr5.com.au
TRANSCRIPT

1
FirstRate5® Guidance Note
GN02 Wall Builder – Examples (version 1.0, 9 May 2014, FR5 v5.1.11b)
Prior Reading
Before proceeding with this Guidance Note it is essential that you read the following:
GN01 Wall Builder & Project File Upgrade Process
Contents
This Guidance Note will demonstrate the following:
Example 1 – Using a System Wall .................................................................................................................... 2
Example 2 – Creating a Weatherboard wall from the Wall Library tab ............................................................. 4
Example 3 – Creating a Brick Veneer wall from the Wall Types tab ................................................................. 7
Example 4 – Creating a Polystyrene clad wall from the Wall Library tab ........................................................ 10
Further Reading ................................................................................................................................................ 12
Using This Guidance Note Numbers in red on images refer to the steps described below each image.

2
Example 1 – Using a System Wall
We want to create a wall with the following build-up:
Outside
12mm Timber (softwood)
90mm Air Gap (ventilated with no foils) to fill remainder of void after bulk insulation
void added (see below)
Glass fibre batt R1.5
10mm Plasterboard
Inside This build-up is identical to the Weatherboard System wall, with the exception of the added insulation. We can use System wall FR5-WB and add the appropriate bulk insulation and air gap details.
1. Draw the building’s walls. In this case we’ll draw a simple four wall room.
2. Click on the Zoning tab and then on the Wall tab. You’ll notice that all four walls have been drawn in
the default System wall type, FR5-BV (brick veneer).
3. In the Type column click the first wall and change it to FR5-WB from the drop down menu.
4. In the Insulation & Air Gaps column click on the edit button to open the Insulation & Air Gaps editor.
(Note: Alternatively we could have reached this point by selecting the wall in the Plan tab and editing
the Type and Insulation & Air Gaps fields in the Properties Pane).
2a 2b
3 4

3
5. Click on the insulation placeholder. By default you will see an insulation placeholder containing a
non-reflective air gap.
6. In addition to the non-reflective air gap we want to add a layer of bulk insulation. So click Add Layer
to add a second layer to the placeholder.
7. Click on the edit button on the innermost insulation layer (the bottom layer in the table).
Specify the type and R-value of the insulation from the Specified resistance list (Glass fibre batt
R1.5) and click OK. Note that the thickness displayed is 66mm. This means the remaining air gap in
the void will be 24mm (90mm-66mm = 24mm).
8. Now click on the edit button on the outermost insulation layer (the top layer in the table).
Select the Air gaps (ventilated 17-30mm; 20 nominal) > Vertical > Air gap vertical 17-30mm (20
nominal) ventilated non-reflective (0.9/0.9; E = 0.82) and click OK. General building materials are
considered to have an emissivity of 0.9, reflective foils have a lower emissivity value. Note that the
thickness displayed will be the nominal thickness (ie 20mm). Manually change this to 24mm. The
graphic changes at the top of the dialogue box to 90mm total for the insulation placeholder. If
necessary use the Up, Down, or Flip buttons to arrange the order of the insulation layers. When
you’re satisfied, click OK.
9. We have changed the wall type and insulation specification of just one wall. We want the remaining
three to match. Highlight all four walls. In the Type column, change any of the FR5-BV entries to
FR5-WB. All selected walls change to FR5-WB. Finally, with all four walls still selected, click on the
edit button of the completed wall (the top wall in the table) in the Insulation & Air Gaps column to
open the editor and then click OK. You will notice all walls have now inherited the insulation
properties of the completed wall.
10. You have just specified the insulation properties of a standard weatherboard wall using a System
wall. These insulation properties will be saved to this project only.
5
6
7 & 8

4
Example 2 – Creating a Weatherboard wall from the Wall Library tab
In the following example a Custom wall will be created from a System wall and saved as a Favourite wall in a
new library. The wall will be built with the following build up:
Outside
20mm Timber (softwood)
50mm Air gap (unventilated with single sided foil (e = 0.2 from manufacturer’s
literature)
50mm Rockwool batt R1.5
10mm Plasterboard
Inside This wall construction is very similar but not identical to the System wall FR5-WB. For that reason we will use the System wall as a starting point for the construction of our Custom wall.
1. Click on the Wall Library tab.
2. If you have not already done so, create a custom library by clicking on the New Library button.
3. Type Library Code and Library Name followed by the Save button. A new folder with these details
will be created in the Custom Walls library.
4. Click on System Walls > FR5: Standard FR5 and select the System wall to be modified, in this case
FR5-WB.
5. Right click on the wall to be modified and click Copy. Ensure the correct folder in your Custom
Library is displayed below and click Save.
6. Navigate to the copied wall in your Custom Library.
7. Right click on the copied wall and click Edit.
1
2
3
4 & 5
6, 7&16
15
5
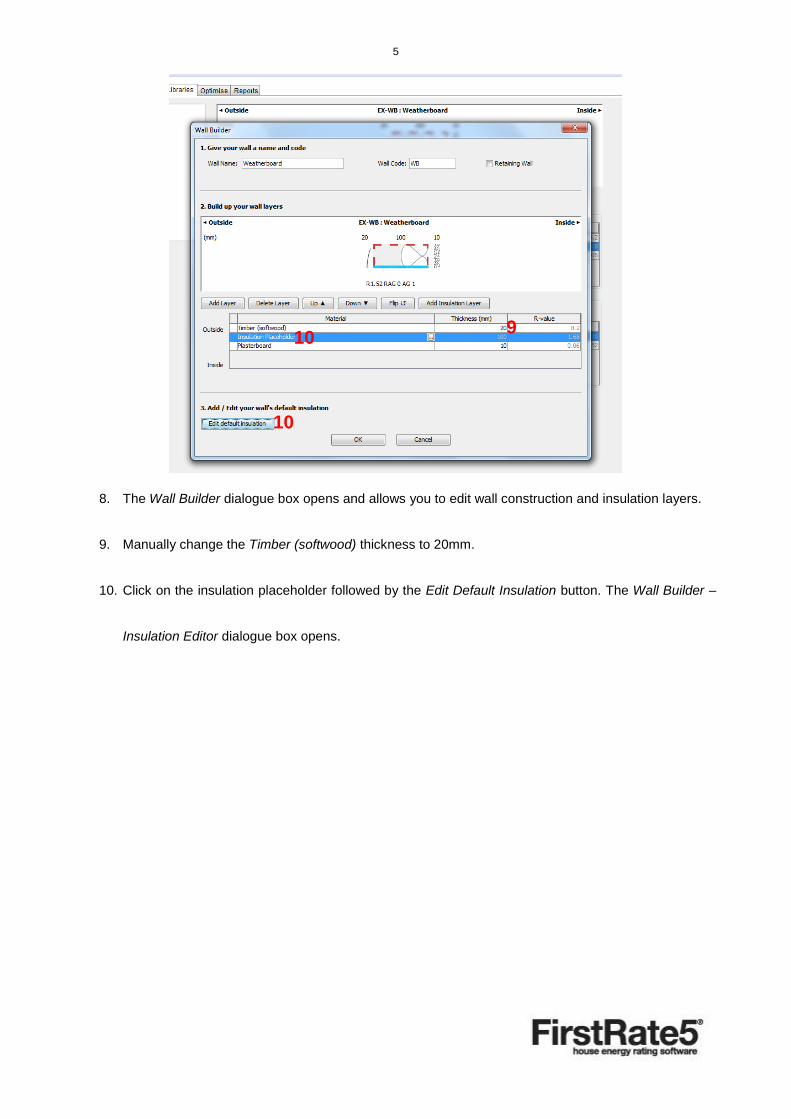
8. The Wall Builder dialogue box opens and allows you to edit wall construction and insulation layers.
9. Manually change the Timber (softwood) thickness to 20mm.
10. Click on the insulation placeholder followed by the Edit Default Insulation button. The Wall Builder –
Insulation Editor dialogue box opens.
9 10a
10b

6
11. Add Layer.
12. Click the Edit button on the outermost layer (top layer in the table) and select the Air gaps (ventilated
31-65mm; 40 nominal) > Vertical > Air gap vertical 31-65mm (40 nominal) unventilated reflective
(0.2/0.9; E = 0.20) and click OK. Manually change the nominal thickness of 40mm to 50mm.
13. Edit the innermost layer (bottom layer in the table) and select Insulation (bulk) > Specific resistance
> Rockwool batt: R 1.5 and click OK.
14. Click OK to save your wall.
15. Make sure your new Custom wall is highlighted in green and click on the Import Favourites to Project
button. If you only want to import this one wall then click Unselect All Favourites before carrying out
this step.
16. It will now appear in the Wall Types tab and be available for use in the project and also be stored in
your library for future projects.
11 12&13
14

7
Example 3 – Creating a Brick Veneer wall from the Wall Types tab
In the following example a Custom wall will be created from scratch in the Wall Types tab and then
subsequently saved into the Wall Library. The wall will be built with the following build up:
Outside
110mm Brickwork: generic extruded clay brick (typical density)
40mm Air gap (unventilated with single sided foil (e = 0.2 from manufacturer’s
literature))
90mm Rigid insulation with the highest possible R value (lowest conductivity)
10mm Plasterboard
Inside This construction resembles Brick Veneer, so we could use that as a starting point for this Custom wall. However, for the purposes of this exercise we will start from scratch.
1. Go to the Wall Types tab and click on the New Wall Type button.
2. Give your wall a name. Note that the Wall Code field will automatically populate with the initials of
the wall name.
3. Add two construction layers (click Add Layer twice) and one insulation placeholder (click Add
Insulation Layer once).
4. Move the insulation placeholder between the two construction layers by using the Up button.
5. Select the materials for the construction layers and their thickness: General > Brickwork, generic
extruded clay brick (typical density) and General > Plasterboard.
6. Highlight the insulation placeholder and then click on the Edit Default Insulation button.
2
3a 3b
4
5
6
EXAMPLE 3 Brick veneer
E3BV
5

8
7. Add two insulation layers (click Add Layer twice).
8. Change the outermost layer and select the Air gaps (ventilated 31-65mm; 40 nominal) > Vertical >
Air gap vertical 31-65mm (40 nominal) unventilated reflective (0.2/0.9; E = 0. 20) and click OK. Note
that the thickness displayed is 40mm (ie the nominal thickness of the selection). As this matches the
required width, there is no need for any manual changes.
9. Edit the innermost layer selecting a rigid bulk insulation material from the Specified conductivity list.
Select the Extruded Polystyrene which has the lowest k-value (0.028) and click OK. Note that the
thickness displayed is 0mm. Manually change this to 90mm.
10. Click OK to save the wall. Note that this has only been created in the Wall Types tab and will be
saved project file only.
7 8
9
10

9
11. In order to save it to the Wall Library locate the wall in the Wall Types table. Right click on the wall
and click on Add To Library.
12. Select the appropriate Custom Library folder and click Save.
11
12

10
Example 4 – Creating a Polystyrene clad wall from the Wall Library tab
In the following example a Custom wall will be created with the following build up in the Wall Library and
saved into the current project.
Outside
75mm Polystyrene extruded (k=0.028)
40mm Air gap (unventilated and non-reflective)
10mm Plasterboard
Inside
1. Go to the Wall Library tab.
2. Right click on the Custom library folder where you want to create the new wall and click on New Wall
Type.
1
2

11
3. Give your wall a name.
4. Insert one insulation placeholder (click Add Insulation Layer once) and one construction layer (click
Add Layer once).
5. Click on the construction layer and select General > Plasterboard.
6. Highlight the insulation placeholder and then click the Edit Default Insulation button.
3
4a 4b
5
6

12
7. Click Add Layer twice.
8. Highlight the outermost insulation layer, click the Edit button and select Insulation (bulk) > Specific
conductivity > Polystyrene extruded (k = 0.028) and click OK.
9. Highlight the innermost insulation layer, click on the Edit button and select Air gaps (ventilated
>66mm; 90 nominal) > Vertical > Air gap vertical >66mm; (90 nominal) unventilated non-reflective
(0.9/0.9; E = 0. 82) and click OK.
10. Click OK to save the wall to your Custom Library folder.
11. Make sure your new Custom wall is highlighted in green and click on the Import Favourites to Project
button.
12. It will now be available for use in the project and stored in your library for future projects.
Further Reading
Please refer to the FR5 User Manual (v5.1.11b) for further detail. The FR5 User Manual is a PDF
document that can be located by going to your Start > All Programs > FirstRate5-5.1.11 >
FirstRate5-5.1.11 Manual.
Please also refer to FAQs on the FirstRate5 website (www.fr5.com.au/faqs)
8 & 9 7
10