inbank e-commerce extension for magento 2 · the inbank e-commerce extension for magento connects...
TRANSCRIPT

Inbank E-commerce Extension for Magento 2
v1.02, 06.05.2020

Table of Contents:
Introduction 3
Changelog 4
Installation 5
Testing 5
Configuration 7
Inbank Payments 8
Inbank Payments Estonia/Inbank Payments Poland 9
API Settings 10
Slice Settings 11
Hire Purchase Settings 15
Updates 19
Extension Update 19
API Data Update 20
Extension Settings Update 21
Storefront Flow 22
2
Introduction
Here at Inbank we strive to help our partners sell more by simplifying purchases and making financing
more accessible to customers. For exactly this reason we offer a number of buy-now-pay-later (BNPL)
solutions. Our most known credit offering is hire-purchase, also known as payment by instalments.
The Inbank e-commerce extension for Magento connects partner e-shops with our e-POS solution. With Inbank e-POS, partners only need to add Inbank as a payment method and Inbank will take
care of all the rest. Customers are redirected to the e-POS environment to complete the financing of the
purchase. After a successful financing process we redirect the customer back to you.
Inbank e-POS is supplemented with Inbank Partner Portal where merchants can see the overview
of submitted credit applications, create applications for customers and conduct contract
withdrawals.
For any questions regarding the integration process, contact Inbank at [email protected]. We will be happy to help.
The Inbank e-commerce extension for Magento gives merchants access to the following Inbank
products:
Inbank Hire Purchase
Inbank has been in the hire purchase market since 2011 with about 300 partners today. The hire
purchase solution gives customers the opportunity to pay for purchases in installments with an
affordable interest rate. Hire purchase credit contracts can be signed both digitally in e-shops and on
paper in the physical shop of the merchant.
Offering hire purchase will not create any additional expenses for your company, but it will give
you the opportunity to offer added value to clients in the form of a convenient financing solution.
Read more about Inbank Hire Purchase on our website.
Inbank Slice
The Slice payment solution offers clients to buy goods and services and pay for them later in a
number of equal instalments. With the Slice solution, customers do not have to postpone
purchases which means more completed transactions for the merchant.
Slice is free of charge for customers, while merchants get paid upfront in full the next working
day. Returns are managed just like with any other payment method.
Read more about Inbank Slice on our website.
3

Changelog
Version Date Updates
1.01 24.04.2020 Initial document
1.02 06.05.2020 Added support for several period options for the Slice payment product. Added contact email address for questions regarding integration - [email protected].
4

Installation
Your Inbank representative will send the extension over to you. To install the Inbank e-commerce
extension you just need to follow these steps:
1. Copy the extension folder into the /app/code/ directory.
2. Enable the extension using the following command:
php bin/magento --clear-static-content module:enable Inbank_InbankPaymentsPlugin
3. Upgrade the database by running:
php bin/magento setup:upgrade
4. If you are in production mode, you also need to compile and deploy by running the following
commands:
php bin/magento setup:di:compile php bin/magento setup:static-content:deploy
5. As the last step, clear the cache by running:
php bin/magento cache:flush
Testing
Inbank provides a dedicated staging environment for testing the integration with payment solutions.
For testing purposes, you need to specify several parameters in the payment methods settings at Stores
> Settings > Configuration > Sales > Payment Methods.
● Test API Key in the API Settings. This API key will be used for all enabled Inbank payment
methods. The API key is provided by Inbank.
● Test Shop Key in the API Settings. The shop key is used for authentication. The shop key is
provided by Inbank.
● Test Product Code in Slice Settings and/or Hire Purchase Settings. The product code needs to be
indicated for each financing product individually. The product code is provided by Inbank.
● Connected to in Slice Settings and/or Hire Purchase Settings. For testing purposes, select Test
API.
5

For testing purposes, the system will return preconfigured decisions. Positive decision is given for
amounts < 500, 1001 - 3000, 15 000 - 16 000.
Testing Inbank Payments Estonia products
To test the financing products in Estonia, you can safely use your own Estonian ID-code and ID-card, as
the demo environment does not initiate real binding contracts. Alternatively, you can generate a
random identity code, using an online generator. Besides the identity code, you will also need a name
and a unique phone number for authentication and signing.
To use an ID-card or Mobile-ID in the demo environment, you need to register them at:
● ID-card - https://demo.sk.ee/upload_cert/
● Mobile-ID - https://demo.sk.ee/MIDCertsReg/
You can also use Smart-ID by downloading the following apps:
● Android: https://play.google.com/apps/testing/com.stagnationlab.sk
● iOS: https://testflight.apple.com/join/DoWddZjR
To use Smart-ID for testing, your account level should be ‘Qualified’. You can check the account level at
https://sid.demo.sk.ee/portal/login.
The credit application process may include an OTP code exchange via SMS. The demo environment does
not send out SMS messages, but lists them in the simulator available at: http://testsms.inbank.tech/. You need to specify in the search query the phone number you have indicated in the credit application,
for example: http://testsms.inbank.tech/search?query=37253630000.
Please provide the IP address from which you plan to access the SMS simulator to an Inbank
representative, as it needs to be whitelisted.
Testing Inbank Payments Poland products
The credit application process may include an OTP code exchange via SMS. The demo environment does
not send out SMS messages, but lists them in the simulator available at: https://testsms.inbank.pl/. You
need to specify in the search query the phone number you have indicated in the credit application.
For example: https://testsms.inbank.pl/search?query=48503456789.
Credentials for the SMS simulator:
● username: inbank
● password: XUJc8CncaVKvkEQvNgsTvqdw
6

Configuration
After successful installation of the Inbank e-commerce extension, you can configure Inbank products as
payment methods in your store.
Payment method configuration is done at Stores > Settings > Configuration > Sales > Payment
Methods.
The Other Payments Methods section will list Inbank Payments as an option, click on it to expand the
settings.
Depending on the Inbank branch you are cooperating with, you need to configure the Inbank Payments
Estonia or Inbank Payments Poland section, or both. The sections include the initial parameters, which
include the API Key, Shop Key, etc. These parameters need to be configured irrespective of the Inbank
payment solution you wish to offer within your shop. Next you configure the available Inbank products:
Hire Purchase and Slice. You can offer one of the available products or several, depending on the
agreement you have with Inbank.
The following configuration parameters are predefined by Inbank:
● Minimum Order Amount
● Maximum Order Amount
● Period
● Marketing Message
● Product Name
● Consent Text
Note that the predefined values will be updated if they change on the Inbank side. The exceptions are
the Product Name and Consent Text values which are customizable. The Product Name and Consent Text
are updated if set to default, but are not updated if they have been customized.
For more information on updates, refer to the Inbank Extension Updates section.
7

Inbank Payments
The setting in the Inbank Payments section defines whether or not Inbank financing products will be
presented as options at checkout. This setting affects both the Inbank Payments Estonia and Inbank
Payments Poland sections and all the payment products under them.
If the Enabled parameter here is set to No, further configurations under Inbank Payments will not be
available.
Field Scope Description
Enabled store view Whether or not Inbank products are available as payment options at checkout. If this parameter is set to No, all further parameters will be unavailable.
8

Inbank Payments Estonia/Inbank Payments Poland
The Inbank Payment Estonia/Inbank Payment Poland sections define whether or not their payment
methods will be available during checkout.
The Enabled parameter affects all the payment methods under Inbank Payments Estonia/Inbank
Payments Poland. If the Enabled parameter here is set to No, further configurations will not be
available.
Field Scope Description
Enabled website Whether or not products under Inbank Payments Estonia/Inbank Payments Poland are available as payment methods on the website. If this parameter is set to No, all further parameters under Inbank Payments Estonia/Inbank Payments Poland will be unavailable.
9

API Settings
The API Settings section includes the keys required for the functioning of the extension. Here you can
set the keys for both production and testing environments. These keys will later be used when you
select the environment for specific payment options.
Inbank representatives will provide you with the API and shop keys needed for the configuration.
Make sure to fill in the keys correctly, as they are essential to the configuration of Inbank payment
products.
Field Scope Description
Live API Key website The API authentication key used for production purposes. The API key should be kept private.
Test API Key website The API authentication key used for testing purposes. The API key should be kept private.
Live Shop Key website The unique key of the shop used in the production environment for building API requests through which the shop communicates with Inbank.
Test Shop Key website The unique key of the shop used in the testing environment for building API requests through which the shop communicates with Inbank.
10

Slice Settings
The Slice Settings section contains parameters related to the Slice payment method. Here you need to
specify the Live Product Code/Test Product Code supplied by Inbank and click Save Config. The code
defines the credit conditions available to customers and also automatically sets the following
parameters:
● Product Name
● Minimum Order Amount
● Maximum Order Amount
● Period
● Marketing Message
● Consent Text
To apply the Product Code to your Slice Settings configuration click Save Config.
A banner will appear informing you of the need to flush the cache. Click the link in the banner to go to
the Cache Management page. You can also access this page at System > Tools > Cache Management. Click the Flush Cache button at the top of the page.
Once the cache is flushed, a banner will appear at the top of the page notifying you of incoming updates
to data retrieved via API, if there are any. Click the link in the banner to update. The extension will
update the configuration settings and you will be redirected to the Payment Methods configuration
page.
After that, the predefined fields will be automatically filled with payment method details.
Note that if you have security keys enabled for URLs in your admin panel, the update link in the banner
will redirect you to the Dashboard page instead of Payment Methods page.
11

Field Scope Description
Enabled store view Whether the Inbank Slice product appears as a payment method at checkout. If this parameter is set to No, all further parameters under Slice Settings will be unavailable.
Connected to store view Select the environment to which the payment method is connected:
● Live API for production purposes ● Test API for testing purposes
If you select Test API, the payment option will be available on the test store front, but hidden from the live storefront. Depending on the selected option, next you will need to enter either the Live Product Code or the Test Product Code.
By default, Test API is selected, but the setting can be customized.
12
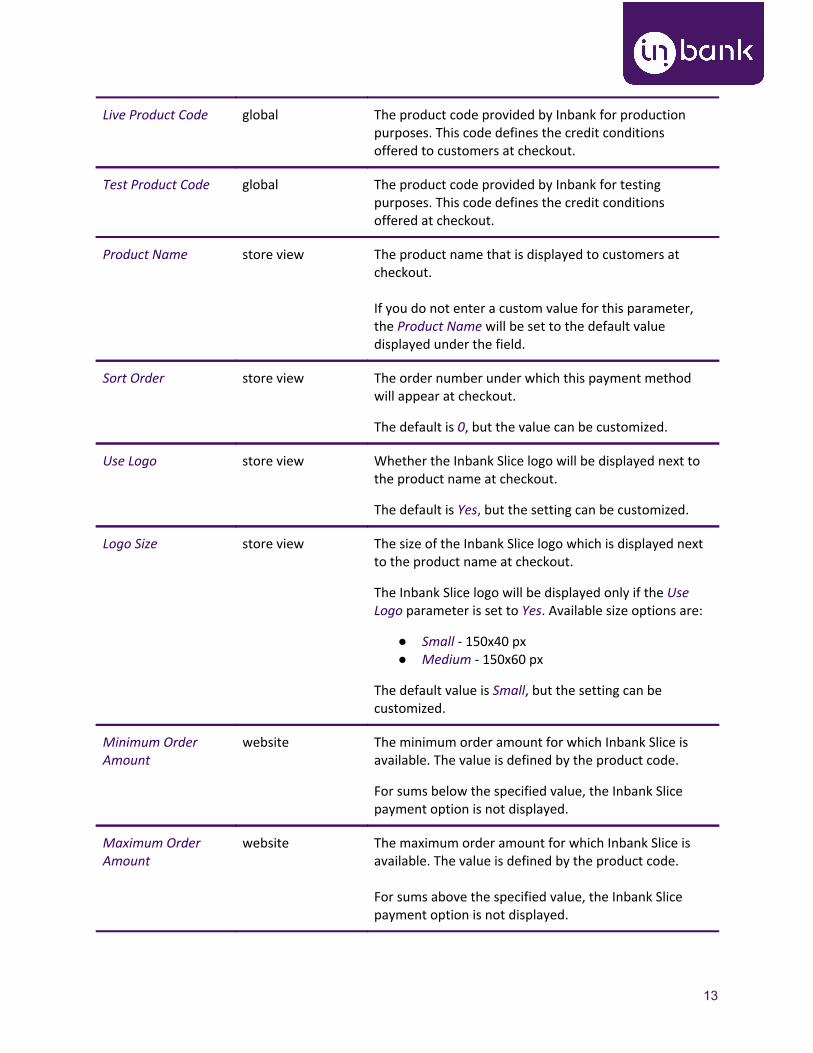
Live Product Code global The product code provided by Inbank for production purposes. This code defines the credit conditions offered to customers at checkout.
Test Product Code global The product code provided by Inbank for testing purposes. This code defines the credit conditions offered at checkout.
Product Name store view The product name that is displayed to customers at checkout. If you do not enter a custom value for this parameter, the Product Name will be set to the default value displayed under the field.
Sort Order store view The order number under which this payment method will appear at checkout.
The default is 0, but the value can be customized.
Use Logo store view Whether the Inbank Slice logo will be displayed next to the product name at checkout.
The default is Yes, but the setting can be customized.
Logo Size store view The size of the Inbank Slice logo which is displayed next to the product name at checkout.
The Inbank Slice logo will be displayed only if the Use Logo parameter is set to Yes. Available size options are:
● Small - 150x40 px ● Medium - 150x60 px
The default value is Small, but the setting can be customized.
Minimum Order Amount
website The minimum order amount for which Inbank Slice is available. The value is defined by the product code.
For sums below the specified value, the Inbank Slice payment option is not displayed.
Maximum Order Amount
website The maximum order amount for which Inbank Slice is available. The value is defined by the product code. For sums above the specified value, the Inbank Slice payment option is not displayed.
13

Period website The period options in months for which Inbank Slice credit is granted.
The values are defined by the product code.
Marketing Message website The marketing message displayed under the Inbank Slice payment method at checkout.
The text is defined by the product code.
Consent Text store view The consent message displayed under the Inbank Slice payment method at checkout. If you do not enter a custom value for this parameter, the Consent Text will be set to the default value displayed under the field.
14

Hire Purchase Settings
The Hire Purchase Settings section contains parameters related to the Hire purchase payment method.
Here you need to specify the Product Code supplied by Inbank and click Save Config. The code defines
the credit conditions offered to customers and also sets the following parameters:
● Product Name
● Minimum Order Amount
● Maximum Order Amount
● Period
● Marketing Message
● Consent Text
To apply the Product Code to your Hire Purchase Settings configuration click Save Config.
A banner will appear informing you of the need to flush the cache. Click the link in the banner to go to
the Cache Management page. You can also access this page at System > Tools > Cache Management. Click the Flush Cache button at the top of the page.
Once the cache is flushed, a banner will appear at the top of the page notifying you of incoming updates
to data retrieved via API, if there are any. Click the link in the banner to update. The extension will
update the configuration settings and you will be redirected to the Payment Methods configuration
page.
After that, the predefined fields will be automatically filled with payment method details.
Note that if you have security keys enabled for URLs in your admin panel, the update link in the banner
will redirect you to the Dashboard page instead of Payment Methods page.
15
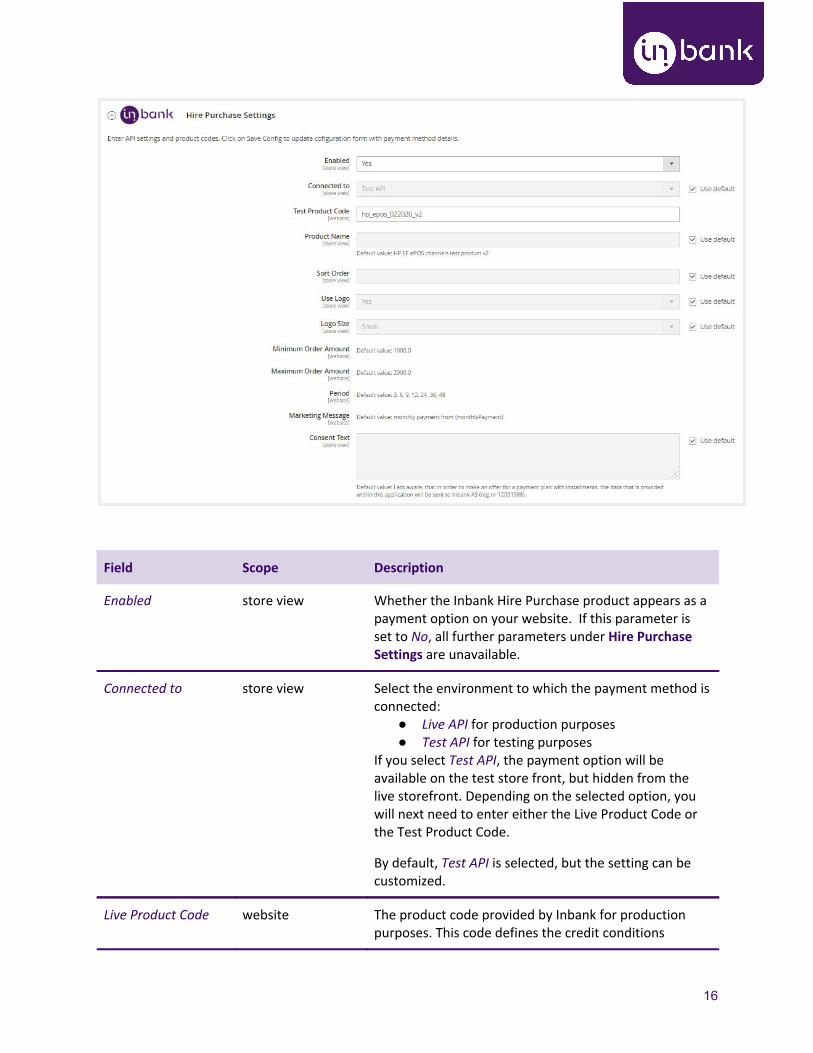
Field Scope Description
Enabled store view Whether the Inbank Hire Purchase product appears as a payment option on your website. If this parameter is set to No, all further parameters under Hire Purchase Settings are unavailable.
Connected to store view Select the environment to which the payment method is connected:
● Live API for production purposes ● Test API for testing purposes
If you select Test API, the payment option will be available on the test store front, but hidden from the live storefront. Depending on the selected option, you will next need to enter either the Live Product Code or the Test Product Code.
By default, Test API is selected, but the setting can be customized.
Live Product Code website The product code provided by Inbank for production purposes. This code defines the credit conditions
16

offered to customers at checkout.
Test Product Code website The product code provided by Inbank for testing purposes. This code defines the credit conditions offered at checkout.
Product Name store view The product name which will be displayed to customers at checkout. If you do not enter a custom value for this parameter, the Product Name will be set to the default value displayed under the field.
Sort Order store view The order number under which this payment method will appear at checkout.
The default value is 0, but the setting can be customized.
Use Logo store view Whether the Inbank Hire Purchase logo will be displayed next to the product name at checkout.
The default is Yes, but the setting can be customized.
Logo Size store view The size of the Inbank Hire Purchase logo which will be displayed next to the product name at checkout.
The Inbank Hire Purchase logo will be displayed only if the Use Logo parameter is set to Yes. Available size options are:
● Small - 150x40 px ● Medium - 150x60 px
The default value is Small, but the setting can be customized.
Minimum Order Amount
website The minimum order amount for which Inbank Hire Purchase is available. The value is defined by the product code.
For sums below the specified value, the Inbank Hire Purchase payment option is not displayed.
Maximum Order Amount
website The maximum order amount for which Inbank Hire Purchase is available. The value is defined by the product code.
For sums above the specified value, the Inbank Hire
17
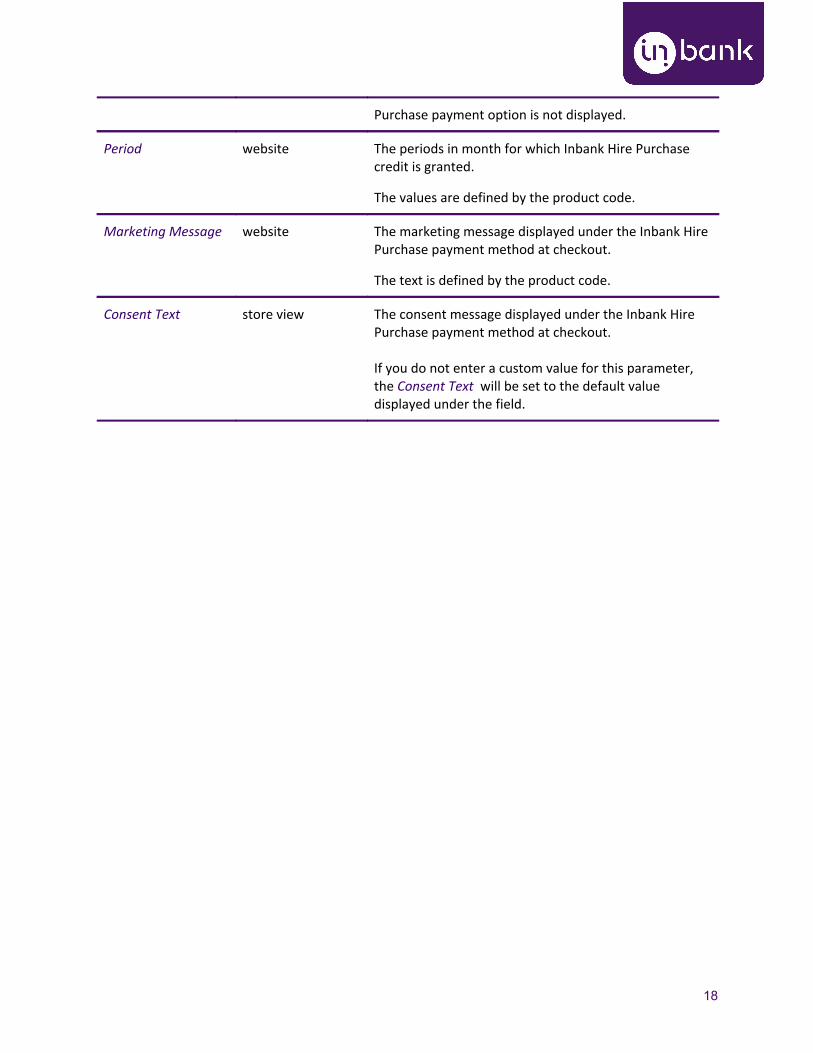
Purchase payment option is not displayed.
Period website The periods in month for which Inbank Hire Purchase credit is granted.
The values are defined by the product code.
Marketing Message website The marketing message displayed under the Inbank Hire Purchase payment method at checkout.
The text is defined by the product code.
Consent Text store view The consent message displayed under the Inbank Hire Purchase payment method at checkout. If you do not enter a custom value for this parameter, the Consent Text will be set to the default value displayed under the field.
18

Updates
There are a couple of things which can be updated in the Inbank extension for Magento:
● The plugin itself can have new versions and will need to be updated to support added
functionality.
● The data which the extension retrieved from Inbank via API can undergo changes on the Inbank
side and need to be updated on the extension side.
● Finally, you might need to make changes to extension configuration in Magento.
The following sections cover all the update procedures.
Extension Update
If a new version of the Inbank extension for Magento comes out and you want to make use of the
functionality it offers, updating the extension is quick and easy.
Do not worry about the configuration settings. While the extension is updated, all settings, including API
keys, product codes, etc., are migrated into the new version of the extension.
1. Download the .zip package containing the new version of the extension. Inbank will provide
you with the package containing the new version.
2. Unpack the files and copy them to the root folder of your Magento installation.
3. Enable the module using the following command:
php bin/magento --clear-static-content module:enable Inbank_InbankPaymentsPlugin
4. Upgrade the database by running:
php bin/magento setup:upgrade
5. If you are in production mode, compile and deploy by running the following commands:
php bin/magento setup:di:compile php bin/magento setup:static-content:deploy
6. Finally, clear cache by running:
php bin/magento cache:flush
19

API Data Update
After you set a product code for an Inbank payment method, the extension retrieves product related
parameters via API from Inbank. Inbank can make changes to these data and the changes need to be
synchronized with the settings of the extension. Of course, you do not need to keep track of the possible
updates, the Inbank extension will check for updates and let you know if changes are incoming.
Configuration parameters which can receive updates:
● Product Name
● Minimum Order Amount
● Maximum Order Amount
● Period
● Marketing Message
● Consent Text
You can also manually have the Inbank extension check for updates whenever you need. To do this just
go to Content > Inbank > Check for Updates.
Whether the extension automatically detects changes or you manually check for updates and there are
some, a banner at the top of your admin panel will notify you of incoming updates.
Click the link in the banner. The extension will update the configuration settings and you will be
redirected to the Payment Methods configuration page. Here you can have a look at the updated
settings.
And that is it! Now your extension has all the latest data from Inbank.
Note that if you have security keys enabled for URLs in your admin panel, the update link in the banner
will redirect you to the Dashboard page instead of Payment Methods page.
20

Extension Settings Update
If at any point you need to make changes to the extension settings, you can access the configuration at
Stores > Settings > Configuration > Sales > Payment Methods.
To update the settings for the Inbank e-commerce extension, follow these steps:
1. Set the new code in the Product Code parameter.
2. Click Save Config to apply changes.
3. A banner will appear informing you of the need to flush the cache. Click the link in the banner to
go to the Cache Management page. You can also access this page at System > Tools > Cache
Management.
4. Click the Flush Cache button and the top of the page.
5. Once the cache is flushed, a banner will appear at the top of the page notifying you of incoming
updates to data retrieved via API, if there are any. Click the link in the banner to update. The
extension will update the configuration settings and you will be redirected to the Payment
Methods configuration page.
That is it. Your extension settings are now updated.
Note that if you have security keys enabled for URLs in your admin panel, the update link in the banner
will redirect you to the Dashboard page instead of Payment Methods page.
21

Storefront Flow
This section showcases how Inbank payment options work at checkout.
Note that the following screenshots are only demonstrational. The actual way the Inbank payment
solution appears in your Magento store depends on the extension settings, the Inbank branch with
which you have concluded the contract and the locale of your store.
1. Inbank products appear at checkout as available payment methods:
2. Once customers choose Inbank products as their payment method, they are redirected to the Inbank
e-POS environment. Here customers go through a number of dialogs to complete the financing of the
purchase.
22

3. After completing the procedure in Inbank e-POS, customers are redirected back to the shop.
If the purchase has been financed by Inbank, the customer will be redirected to the page configured in
your Magento instance as the payment success page. Otherwise, the customer will be redirected back to
the cart where they can choose an alternative payment method.
Successful payment transactions can be viewed at Sales > Transactions and at Sales > Orders > Order >
View > Transactions.
23