internal lut version upgrading procedure/ plug-in lut ... · first edition instruction manual...
TRANSCRIPT

First Edition
INSTRUCTION MANUAL
PICTROGRAPHY SERIES
Internal LUT Version Upgrading Procedure/
Plug-in LUT Operating Procedure
PP3-B601E

INTRODUCTION
• This instruction manual explains the operating procedures and precautions for the newLUTs for the PICTROGRAPHY 3500 / 4000Ⅱ / 4500 / 4500N and the new plug-in LUTsfor the PICTROGRAPHY 3000 / 4000 and PICTROSTAT Digital 400.
• To correctly use and obtain optimum performance from the PICTROGRAPHY / PIC-TROSTAT, it is essential that you read this manual thoroughly before using themachine.
• Store this manual at a predetermined place near the PICTROGRAPHY / PICTROSTATso that you can readily refer to it regarding specific operating or handling procedures.
* Windows is a registered trademark of Microsoft Corporation.* MacOS, MacOSX, Mac and Macintosh are registered trademarks of Apple Computer Inc.
1. 本書の内容の一部または全部を,無断で複写または転載することは固くお断りします.
2. 本書の内容は,改良のため予告なく変更することがありますので,ご了承ください.
1. Reproduction of this manual in whole or in part is expressly prohibited without writtenpermission from Fuji Photo Film Co., Ltd.
2. The contents of this manual are subject to change without notice.

3
Contents
1 Purpose of LUT Improvement and Types of New LUT ............................................ 41.1 Internal LUT ................................................................................................................ 4
1.2 Plug-in LUT ................................................................................................................. 5
2 Internal LUT Version Upgrading Procedure (PICTROGRAPHY 3500 / 4000ⅡⅡⅡⅡ / 4500 / 4500N) ......... 6
2.1 Preparation for Version Upgrade .............................................................................. 6
2.1.1 Confirmation of Current LUT Version ........................................................................... 62.1.2 Confirmation of Folder Configuration in CD-ROM and Selection of File ...................... 8
2.2 Internal LUT Version Upgrading Procedure............................................................. 18
2.2.1 Windows + SCSI Connection (PICTROGRAPHY 3500 / 4000Ⅱ / 4500) ................... 182.2.2 Windows + PNA Connection (PICTROGRAPHY 3500 / 4000Ⅱ / 4500) .................... 222.2.3 MacOS + SCSI Connection (PICTROGRAPHY 3500 / 4000Ⅱ / 4500) ..................... 262.2.4 MacOS + PNA Connection (PICTROGRAPHY 3500 / 4000Ⅱ / 4500)....................... 302.2.5 MacOSX + SCSI Connection (PICTROGRAPHY 3500 / 4000Ⅱ / 4500) ................... 342.2.6 MacOSX + PNA Connection (PICTROGRAPHY 3500 / 4000Ⅱ / 4500) .................... 382.2.7 Windows + PICTROGRAPHY 4500N.......................................................................... 432.2.8 MacOS + PICTROGRAPHY 4500N............................................................................. 472.2.9 MacOSX + PICTROGRAPHY 4500N .......................................................................... 51
2.3 Operation After Version Upgrade.............................................................................. 56
3
Plug-in LUT Operating Procedure
(PICTROGRAPHY 3000 / 4000 / PICTROSTAT DIGITAL 400)
......................
57
3.1 Selection of Plug-in LUT............................................................................................ 57
3.1.1 Windows ..................................................................................................................... 573.1.2 MacOSX ...................................................................................................................... 59
3.2 Functions on the “LUT Settings” Screen ................................................................. 61
3.2.1 Windows ...................................................................................................................... 613.2.2 MacOSX....................................................................................................................... 63

4
1はめ込み、フレ┃ム―文字入れプリント

1 Purpose of LUT Improvement and Types of New LUT
The LUT for the PICTROGRAPHY 3500 / 4000Ⅱ / 4500 / 4500N has been improved to sup- port a new-type donor. By installing the new LUT into these models, the user can makeprints with improved color balance and gray gradation. Consequently, almost no retouchingis required for making prints from DSC and sRGB image data.However, the new LUT does not ensure the compatibility with the prints made by usingolder versions of LUTs. Accordingly, even after installing the new LUT, returning to the pre-vious (old) LUT might be necessary due to a color balance problem, etc. For this reason,before installing the new LUT, confirm and write down the version of the old LUT currentlyinstalled into the PICTROGRAPHY. If returning to the old LUT is required after installing thenew LUT, install the previously-installed LUT. The following versions of LUTs are provided.1.1 Internal LUT
Model New LUT Old LUT
PICTROGRAPHY 3500 2.00 1.02, 1.04, 1.05
PICTROGRAPHY 4000Ⅱ 3.00 2.20, 2.30, 2.50, 2.55
PICTROGRAPHY 4500 2.00 1.00
PICTROGRAPHY 4500N 2.00 1.00
4

The plug-in LUT for the PICTROGRAPHY 3000 / PICTROGRAPHY 4000 / PICTROSTATDigital 400 has been improved to support a new-type donor. This new LUT is used forobtaining print results (gradation, color balance and gray balance) similar to conventionalER prints even when using the new donor. The user can also adjust the setting of the newplug-in LUT. The following types of plug-in LUTs are provided.
1.2 Plug-in LUT
Model New LUT Old LUT
PICTROGRAPHY 3000 PG3000For PICTROGRAPHY 3000 Color Matching ON and OFF
PICTROGRAPHY 4000
PG4000ON1For PICTROGRAPHY 4000 Color Matching ON1 and OFF
PG4000ON2For PICTROGRAPHY 4000 Color Matching ON2
PG4000ON3For PICTROGRAPHY 4000 Color Matching ON3
PICTROSTAT DIGITAL 400
PSD400ON1For PICTROSTAT DIGITAL 400 Color Matching ON1
PSD400ON2For PICTROSTAT DIGITAL 400 Color Matching ON2 and OFF
5

2 Internal LUT Version Upgrading Procedure (PICTROGRAPHY 3500 / 4000ⅡⅡⅡⅡ / 4500 / 4500N)
2.1.1 Confirmation of Current LUT Version
Before installing the new LUT, confirm and write down the version of the LUT currently installed intothe PICTROGRAPHY.
Press the [ON LINE] key on the opera-tion panel to switch the machine to theOFF LINE condition.
• The message changes to “Utility”.
Press the [SEL] key.
• The message changes to “Counter Display”
(PICTROGRAPHY 3500 / 4500) or “Print Count”
(PICTROGRAPHY 4000Ⅱ / 4500N) .
PICTROGRAPHY 3500 / 4500:Press the [NEXT] key twice.PICTROGRAPHY 4000ⅡⅡⅡⅡ / 4500N:Press the [NEXT] key once.
• The message changes to “Version Check”.
2.1 Preparation for Version Upgrade
ON LINE
OFF LINE Condition
Utility
11
2
Counter Display
<PICTROGRAPHY 3500/4500>
ESC
PREV
SEL
NEXT
Print Count 123
<PICTROGRAPHY 4000ⅡⅡⅡⅡ /4500N>
3ESC
PREV
SEL
NEXT
Version Check
6

Press the [SEL] key.
• The message changes to “PRD Ver.X.XX” (PIC-
TROGRAPHY 3500) or “PIC Ver.X.XX” (PIC-
TROGRAPHY 4000Ⅱ / 4500 / 4500N).
Press the [NEXT] key.
• The message changes to “LUT 3D-LUT”.
Press the [SEL] key.
• The message changes to “1 Ver.X.XX”. This ver-
sion number “X.XX” is used for selecting the
appropriate folder when installing the new LUT
or returning to the previous LUT. Write down this
version.
Press the [ON LINE] key on the opera-tion panel to switch the machine to theON LINE condition.
4ESC
PREV
SEL
NEXT
PRD Ver.X.XX
PIC Ver.X.XX
<PICTROGRAPHY 3500>
<PICTROGRAPHY 4000ⅡⅡⅡⅡ /4500/4500N>
5ESC
PREV
SEL
NEXT
[ ]
[ ]LUT - 3D-LUT +
6
7
1 + Ver.X.XX
[ ]ESC
PREV
SEL
NEXT
ON LINE
ON LINE Condition
7

2.1.2 Confirmation of Folder Configuration in CD-ROM and Selection of File
The program file necessary for installing a LUT varies depending on the purpose of operation, oper-ating system of the host computer, model of the PICTROGRAPHY and connection method. Selectan appropriate file in the CD-ROM referring to the following:
Windows
Purpose of Installation and Selection of Corresponding File (PICTROGRAPHY 3500)
Purpose of Installation
PICTROGRAPHY Connection Method
File Selection Method (“XXX” represents folder name.)
Upgrading to New LUT Ver.2.00
SCSI Connection
“PG3500” → “LUT V200” → “English” → PGUP.exe
PNA Connection
“PG3500” → “LUT V200” → “English” → PGVU_TCP.exe
Returning to Old LUT Ver.1.02
SCSI Connection
“PG3500” → “Firmware” → “LUT V102” → “English” → PGUP.exe
PNA Connection
“PG3500” → “Firmware” → “LUT V102” → “English” → PGVU_TCP.exe
Returning to Old LUT Ver.1.04
SCSI Connection
“PG3500” → “Firmware” → “LUT V104” → “English” → PGUP.exe
PNA Connection
“PG3500” → “Firmware” → “LUT V104” → “English” → PGVU_TCP.exe
Returning to Old LUT Ver.1.05
SCSI Connection
“PG3500” → “Firmware” → “LUT V105” → “English” → PGUP.exe
PNA Connection
“PG3500” → “Firmware” → “LUT V105” → “English” → PGVU_TCP.exe
Upgrading system software
SCSI Connection
“PG3500” → “Firmware” → “Program” → “English” → PGUP.exe
PNA Connection
“PG3500” → “Firmware” → “Program” → “English” → PGVU_TCP.exe
PICTROGRAPHY 3500
PG3500 LUT V200 EnglishPGUP.exe
Firmware LUT V102
PGVU_TCP.exe
EnglishPGUP.exe
PGVU_TCP.exe
LUT V104 EnglishPGUP.exe
PGVU_TCP.exe
LUT V105 EnglishPGUP.exe
PGVU_TCP.exe
Program EnglishPGUP.exe
PGVU_TCP.exe
Folder Configuration related to PICTROGRAPHY 3500
8

PICTROGRAPHY 4000Ⅱ
PG4000Ⅱ LUT V300_220 EnglishPGUP.exe
Firmware LUT V220_220
PGVU_TCP.exe
LUT V300_230 EnglishPGUP.exe
PGVU_TCP.exe
LUT V300_250 EnglishPGUP.exe
PGVU_TCP.exe
LUT V300_255 EnglishPGUP.exe
PGVU_TCP.exe
EnglishPGUP.exe
PGVU_TCP.exe
LUT V220_230 EnglishPGUP.exe
PGVU_TCP.exe
LUT V250_255 EnglishPGUP.exe
PGVU_TCP.exe
Program EnglishPGUP.exe
PGVU_TCP.exe
Folder Configuration related to PICTROGRAPHY 4000Ⅱ
9

Purpose of Installation and Selection of Corresponding File (PICTROGRAPHY 4000Ⅱ )
Purpose of Installation
PICTROGRAPHY Connection Method
File Selection Method (“XXX” represents folder name.)
Upgrading from OldLUT Ver.2.20 to NewLUT Ver.3.00
SCSI Connection
“PG4000Ⅱ ” → “LUT V300_220” → “English” → PGUP.exe
PNA Connection
“PG4000Ⅱ ” → “LUT V300_220” → “English” → PGVU_TCP.exe
Upgrading from OldLUT Ver.2.30 to NewLUT Ver.3.00
SCSI Connection
“PG4000Ⅱ ” → “LUT V300_230” → “English” → PGUP.exe
PNA Connection
“PG4000Ⅱ ” → “LUT V300_230” → “English” → PGVU_TCP.exe
Upgrading from OldLUT Ver.2.50 to NewLUT Ver.3.00
SCSI Connection
“PG4000Ⅱ ” → “LUT V300_250” → “English” → PGUP.exe
PNA Connection
“PG4000Ⅱ ” → “LUT V300_250” → “English” → PGVU_TCP.exe
Upgrading from OldLUT Ver.2.55 to NewLUT Ver.3.00
SCSI Connection
“PG4000Ⅱ ” → “LUT V300_255” → “English” → PGUP.exe
PNA Connection
“PG4000Ⅱ ” → “LUT V300_255” → “English” → PGVU_TCP.exe
Returning to Old LUT Ver.2.20
SCSI Connection
“PG4000Ⅱ ” → “Firmware” → “LUT V220_220” → “English” → PGUP.exe
PNA Connection
“PG4000Ⅱ ” → “Firmware” → “LUT V220_220” → “English” → PGVU_TCP.exe
Returning to Old LUT Ver.2.30
SCSI Connection
“PG4000Ⅱ ” → “Firmware” → “LUT V220_230” → “English” → PGUP.exe
PNA Connection
“PG4000Ⅱ ” → “Firmware” → “LUT V220_230” → “English” → PGVU_TCP.exe
Returning to Old LUT Ver.2.50 or Ver.2.55
SCSI Connection
“PG4000Ⅱ ” → “Firmware” → “LUT V250_255” → “English” → PGUP.exe
PNA Connection
“PG4000Ⅱ ” → “Firmware” → “LUT V250_255” → “English” → PGVU_TCP.exe
Upgrading system software
SCSI Connection
“PG4000Ⅱ ” → “Firmware” → “Program” → “English” → PGUP.exe
PNA Connection
“PG4000Ⅱ ” → “Firmware” → “Program” → “English” → PGVU_TCP.exe
10

Purpose of Installation and Selection of Corresponding File (PICTROGRAPHY 4500)
Purpose of Installation and Selection of Corresponding File (PICTROGRAPHY 4500N)
Purpose of InstallationI
PICTROGRAPHY Connection Method
File Selection Method (“XXX” represents folder name.)
Upgrading to New LUT Ver.2.00
SCSI Connection
“PG4500” → “LUT V200” → “English” → PGUP.exe
PNA Connection
“PG4500” → “LUT V200” → “English” → PGVU_TCP.exe
Returning to Old LUT Ver.1.00
SCSI Connection
“PG4500” → “Firmware” → “LUT V100” → “English” → PGUP.exe
PNA Connection
“PG4500” → “Firmware” → “LUT V100” → “English” → PGVU_TCP.exe
Upgrading system software
SCSI Connection
“PG4500” → “Firmware” → “Program” → “English” → PGUP.exe
PNA Connection
“PG4500” → “Firmware” → “Program” → “English” → PGVU_TCP.exe
Purpose of Installation File Selection Method (“XXX” represents folder name.)
Upgrading to New LUT Ver.2.00
“PG4500N” → “LUT V200” → “English” → PGVUEN.exe
Returning to Old LUT Ver.1.00
“PG4500N” → “Firmware” → “LUT V100” → “English” → PVUEN.exe
Upgrading system software
“PG4500N” → “Firmware” → “Program” → “English” → PGVUEN.exe
PICTROGRAPHY 4500
PG4500 LUT V200 EnglishPGUP.exe
Firmware LUT V100
PGVU_TCP.exe
EnglishPGUP.exe
PGVU_TCP.exe
Program EnglishPGUP.exe
PGVU_TCP.exe
Folder Configuration related to PICTROGRAPHY 4500
PICTROGRAPHY 4500N
PG4500N LUT V200 EnglishPGVUEN.exe
Firmware LUT V100 EnglishPGVUEN.exe
Program EnglishPGVUEN.exe
Folder Configuration related to PICTROGRAPHY 4500N
11

Macintosh
PICTROGRAPHY 3500
PG3500 LUT V200 EnglishPGUP
Firmware LUT V102
PICTRO Upgrade (AT)
MacOSXPICTRO Upgrade (SCSI)
PICTRO Upgrade (AT)
EnglishPGUP
PICTRO Upgrade (AT)
MacOSXPICTRO Upgrade (SCSI)
PICTRO Upgrade (AT)
LUT V104 EnglishPGUP
PICTRO Upgrade (AT)
MacOSXPICTRO Upgrade (SCSI)
PICTRO Upgrade (AT)
LUT V105 EnglishPGUP
PICTRO Upgrade (AT)
MacOSXPICTRO Upgrade (SCSI)
PICTRO Upgrade (AT)
Program EnglishPGUP
PICTRO Upgrade (AT)
MacOSXPICTRO Upgrade (SCSI)
PICTRO Upgrade (AT)
Folder Configuration related to PICTROGRAPHY 3500
12

Purpose of Installation and Selection of Corresponding File (PICTROGRAPHY 3500)
Purpose of Installation
OS for Host
Computer
PICTROGRAPHY Connection
MethodFile Selection Method (“XXX” represents folder name.)
Upgrading to New LUT Ver.2.00
Mac OS SCSI Connection “PG3500” → “LUT V200” → “English” → PGUP
PNA Connection “PG3500” → “LUT V200” → “English” → PICTRO Upgrade(AT)
Mac OSX SCSI Connection “PG3500” → “LUT V200” → “MacOSX” → PICTRO Upgrade(SCSI)
PNA Connection “PG3500” → “LUT V200” → “MacOSX” → PICTRO Upgrade(AT)
Returning to Old LUT Ver.1.02
Mac OS SCSI Connection “PG3500” → “Firmware” → “LUT V102” → “English” → PGUP
PNA Connection “PG3500” → “Firmware” → “LUT V102” → “English” → PICTRO Upgrade(AT)
Mac OSX SCSI Connection “PG3500” → “Firmware” → “LUT V102” → “MacOSX” → PICTRO Upgrade(SCSI)
PNA Connection “PG3500” → “Firmware” → “LUT V102” → “MacOSX” → PICTRO Upgrade(AT)
Returning to Old LUT Ver.1.04
Mac OS SCSI Connection “PG3500” → “Firmware” → “LUT V104” → “English” → PGUP
PNA Connection “PG3500” → “Firmware” → “LUT V104” → “English” → PICTRO Upgrade(AT)
Mac OSX SCSI Connection “PG3500” → “Firmware” → “LUT V104” → “MacOSX” → PICTRO Upgrade(SCSI)
PNA Connection “PG3500” → “Firmware” → “LUT V104” → “MacOSX” → PICTRO Upgrade(AT)
Returning to Old LUT Ver.1.05
Mac OS SCSI Connection “PG3500” → “Firmware” → “LUT V105” → “English” → PGUP
PNA Connection “PG3500” → “Firmware” → “LUT V105” → “English” → PICTRO Upgrade(AT)
Mac OSX SCSI Connection “PG3500” → “Firmware” → “LUT V105” → “MacOSX” → PICTRO Upgrade(SCSI)
PNA Connection “PG3500” → “Firmware” → “LUT V105” → “MacOSX” → PICTRO Upgrade(AT)
Upgrading system software
Mac OS SCSI Connection “PG3500” → “Firmware” → “Program” → “English” → PGUP
PNA Connection “PG3500” → “Firmware” → “Program” → “English” → PICTRO Upgrade(AT)
Mac OSX SCSI Connection “PG3500” → “Firmware” → “Program” → “MacOSX” → PICTRO Upgrade(SCSI)
PNA Connection “PG3500” → “Firmware” → “Program” → “MacOSX” → PICTRO Upgrade(AT)
13

PICTROGRAPHY 4000Ⅱ
PG4000Ⅱ LUT V300_220 English
Firmware LUT V220_220
PGUP
PICTRO Upgrade (AT)
PGUP
PICTRO Upgrade (AT)
PGUP
PICTRO Upgrade (AT)
PGUP
PICTRO Upgrade (AT)
PGUP
PICTRO Upgrade (AT)
PGUP
PICTRO Upgrade (AT)
PGUP
PICTRO Upgrade (AT)
PGUP
PICTRO Upgrade (AT)
MacOSXPICTRO Upgrade (SCSI)
PICTRO Upgrade (AT)
PICTRO Upgrade (SCSI)
PICTRO Upgrade (AT)
PICTRO Upgrade (SCSI)
PICTRO Upgrade (AT)
PICTRO Upgrade (SCSI)
PICTRO Upgrade (AT)
PICTRO Upgrade (SCSI)
PICTRO Upgrade (AT)
PICTRO Upgrade (SCSI)
PICTRO Upgrade (AT)
PICTRO Upgrade (SCSI)
PICTRO Upgrade (AT)
PICTRO Upgrade (SCSI)
PICTRO Upgrade (AT)
LUT V300_230 English
MacOSX
LUT V300_250 English
MacOSX
LUT V300_255 English
MacOSX
English
Mac OSX
LUT V220_230 English
MacOSX
LUT V250_255 English
MacOSX
Program English
MacOSX
Folder Configuration related to PICTROGRAPHYⅡ
1
4
Purpose of Installation and Selection of Corresponding File (PICTROGRAPHY 4000Ⅱ )
Purpose of Installation
OS for Host
Computer
PICTROGRAPHY Connection
Method
File Selection Method (“XXX” represents folder name.)
Upgrading from Old LUTVer.2.20 to New LUTVer.3.00
Mac OS SCSI Connection “PG4000Ⅱ ” → “LUT V300_200” → “English” → PGUP
PNA Connection “PG4000Ⅱ ” → “LUT V300_200” → “English” → PICTRO Upgrade(AT)
Mac OSX SCSI Connection “PG4000Ⅱ ” → “LUT V300_200” → “MacOSX” → PICTRO Upgrade(SCSI)
PNA Connection “PG4000Ⅱ ” → “LUT V300_200” → “MacOSX” → PICTRO Upgrade(AT)
Upgrading from Old LUTVer.2.30 to New LUTVer.3.00
Mac OS SCSI Connection “PG4000Ⅱ ” → “LUT V300_230” → “English” → PGUP
PNA Connection “PG4000Ⅱ ” → “LUT V300_230” → “English” → PICTRO Upgrade(AT)
Mac OSX SCSI Connection “PG4000Ⅱ ” → “LUT V300_230” → “MacOSX” → PICTRO Upgrade(SCSI)
PNA Connection “PG4000Ⅱ ” → “LUT V300_230” → “MacOSX” → PICTRO Upgrade(AT)
Upgrading from Old LUTVer.2.50 to New LUTVer.3.00
Mac OS SCSI Connection “PG4000Ⅱ ” → “LUT V300_250” → “English” → PGUP
PNA Connection “PG4000Ⅱ ” → “LUT V300_250” → “English” → PICTRO Upgrade(AT)
Mac OSX SCSI Connection “PG4000Ⅱ ” → “LUT V300_250” → “MacOSX” → PICTRO Upgrade(SCSI)
PNA Connection “PG4000Ⅱ ” → “LUT V300_250” → “MacOSX” → PICTRO Upgrade(AT)
Upgrading from Old LUTVer.2.55 to New LUTVer.3.00
Mac OS SCSI Connection “PG4000Ⅱ ” → “LUT V300_255” → “English” → PGUP
PNA Connection “PG4000Ⅱ ” → “LUT V300_255” → “English” → PICTRO Upgrade(AT)
Mac OSX SCSI Connection “PG4000Ⅱ ” → “LUT V300_255” → “MacOSX” → PICTRO Upgrade(SCSI)
PNA Connection “PG4000Ⅱ ” → “LUT V300_255” → “MacOSX” → PICTRO Upgrade(AT)
Returning to Old LUT Ver.2.20
Mac OS SCSI Connection “PG4000Ⅱ ” → “Firmware” → “LUT V220_220” → “English” → PGUP
PNA Connection “PG4000Ⅱ ” → “Firmware” → “LUT V220_220” → “English” → PICTRO Upgrade(AT)
Mac OSX SCSI Connection “PG4000Ⅱ ” → “Firmware” → “LUT V220_220” → “MacOSX” → PICTRO Upgrade(SCSI)
PNA Connection “PG4000Ⅱ ” → “Firmwar” → “LUT V220_220” → “MacOSX” → PICTRO Upgrade(AT)
Returning to Old LUT Ver.2.30
Mac OS SCSI Connection “PG4000Ⅱ ” → “Firmware” → “LUT V220_230” → “English” → PGUP
PNA Connection “PG4000Ⅱ ” → “Firmware” → “LUT V220_230” → “English” → PICTRO Upgrade(AT)
Mac OSX SCSI Connection “PG4000Ⅱ ” → “Firmware” → “LUT V220_230” → “MacOSX” → PICTRO Upgrade(SCSI)
PNA Connection “PG4000Ⅱ ” → “Firmware” → “LUT V220_230” → “MacOSX” → PICTRO Upgrade(AT)
Returning to Old LUT Ver.2.50 or Ver.2.55
Mac OS SCSI Connection “PG4000Ⅱ ” → “Firmware” → “LUT V250_255” → “English” → PGUP
PNA Connection “PG4000Ⅱ ” → “Firmware” → “LUT V250_255” → “English” → PICTRO Upgrade(AT)
Mac OSX SCSI Connection “PG4000Ⅱ ” → “Firmware” → “LUT V250_255” → “MacOSX” → PICTRO Upgrade(SCSI)
PNA Connection “PG4000Ⅱ ” → “Firmware” → “LUT V250_255” → “MacOSX” → PICTRO Upgrade(AT)
Upgrading system software
Mac OS SCSI Connection “PG4000Ⅱ ” → “Firmware” → “Program” → “English” → PGUP
PNA Connection “PG4000Ⅱ ” → “Firmware” → “Program” → “English” → PICTRO Upgrade(AT)
Mac OSX SCSI Connection “PG4000Ⅱ ” → “Firmware” → “Program” → “MacOSX” → PICTRO Upgrade(SCSI)
PNA Connection “PG4000Ⅱ ” → “Firmware” → “Program” → “MacOSX” → PICTRO Upgrade(AT)
15

Purpose of Installation and Selection of Corresponding File (PICTROGRAPHY 4500)
Purpose of Installation
OS for Host
Computer
PICTROGRAPHY Connection
MethodFile Selection Method (“XXX” represents folder name.)
Upgrading to NewLUT Ver.2.00
Mac OS SCSI Connection “PG4500” → “LUT V200” → “English” → PGUP
PNA Connection “PG4500” → “LUT V200” → “English” → PICTRO Upgrade(AT)
Mac OSX SCSI Connection “PG4500” → “LUT V200” → “MacOSX” → PICTRO Upgrade(SCSI)
PNA Connection “PG4500” → “LUT V200” → “MacOSX” → PICTRO Upgrade(AT)
Returning to OldLUT Ver.1.00
Mac OS SCSI Connection “PG4500” → “Firmware” → “LUT V100” → “English” → PGUP
PNA Connection “PG4500” → “Firmware” → “LUT V100” → “English” → PICTRO Upgrade(AT)
Mac OSX SCSI Connection “PG4500” → “Firmware” → “LUT V100” → “MacOSX” → PICTRO Upgrade(SCSI)
PNA Connection “PG4500” → “Firmware” → “LUT V100” → “MacOSX” → PICTRO Upgrade(AT)
Upgrading system software
Mac OS SCSI Connection “PG4500” → “Firmware” → “Program” → “English” → PGUP
PNA Connection “PG4500” → “Firmware” → “Program” → “English” → PICTRO Upgrade(AT)
Mac OSX SCSI Connection “PG4500” → “Firmware” → “Program” → “MacOSX” → PICTRO Upgrade(SCSI)
PNA Connection “PG4500” → “Firmware” → “Program” → “MacOSX” → PICTRO Upgrade(AT)
PICTROGRAPHY 4500
PG4500 LUT V200 EnglishPGUP
Firmware LUT V100
PICTRO Upgrade (AT)
MacOSXPICTRO Upgrade (SCSI)
PICTRO Upgrade (AT)
EnglishPGUP
PICTRO Upgrade (AT)
MacOSXPICTRO Upgrade (SCSI)
PICTRO Upgrade (AT)
Program EnglishPGUP
PICTRO Upgrade (AT)
MacOSXPICTRO Upgrade (SCSI)
PICTRO Upgrade (AT)
Folder Configuration related to PICTROGRAPHY 4500
16

Purpose of Installation and Selection of Corresponding File (PICTROGRAPHY 4500N)
Purpose
of Installation
OS for Host Computer
File Selection Method (“XXX” represents folder name.)
Upgrading to New LUTVer.2.00
Mac OS “PG4500N” → “LUT V200” → “English” → PICTRO Upgrade(AT)
Mac OSX “PG4500N” → “LUT V200” → “MacOSX” → PICTRO Upgrade(AT)
Returning to Old LUTVer.1.00
Mac OS “PG4500N” → “Firmware” → “LUT V100” → “English” → PICTRO Upgrade(AT)
Mac OSX “PG4500N” → “Firmware” → “LUT V100” → “MacOSX” → PICTRO Upgrade(AT)
Upgrading system soft-ware
Mac OS “PG4500N” → “Firmware” → “Program” → “English” → PICTRO Upgrade(AT)
Mac OSX “PG4500N” → “Firmware” → “Program” → “MacOSX” → PICTRO Upgrade(AT)
PICTROGRAPHY 4500N
PG4500N LUT V200 EnglishPICTRO Upgrade (AT)
Firmware LUT V100
MacOSXPICTRO Upgrade (AT)
EnglishPICTRO Upgrade (AT)
MacOSXPICTRO Upgrade (AT)
Program EnglishPICTRO Upgrade (AT)
MacOSXPICTRO Upgrade (AT)
Folder Configuration related to PICTROGRAPHY 4500N
17

The internal LUT can be upgraded using the version upgrading utility on the host computer(Windows or Macintosh) connected to the PICTROGRAPHY 3500 / 4000Ⅱ / 4500 / 4500N.
2.2.1 Windows + SCSI Connection
(PICTROGRAPHY 3500 / 4000Ⅱ / 4500)
•
Examples of PICTROGRAPHY 4500 are used
in the procedure below.
Turn ON the power for the PICTROGRA-PHY 3500 / 4000Ⅱ / 4500.
Note : If an error occurs during start-up, takethe following steps.
• If an error appears on the LCD, press the
[ ] key.
• The [Version Up?] message appears on the
LCD. Press the [ ] key again, and then con-
firm that the [Version Up] message appears on
the LCD.
Turn ON the power for the host computerconnected to the PICTROGRAPHY 3500 /4000Ⅱ / 4500.
Insert the CD-ROM in the host computer.
• The CD-ROM named “PGSys” is recognized.
Check that the PICTROGRAPHY 3500 /4000Ⅱ / 4500 is in the [Data Ready (exceptduring print ejection)] state.
2.2 Internal LUT Version Upgrading Procedure
1
2
3
4
18

Double-click the CD-ROM icon to openthe CD-ROM.
• All folders stored on the CD-ROM appear.
By referring to Subsection 2.1.2, double-click the “PGUP.exe” file appropriate forthe purpose of installation.
• A dialog box to start the program appears.
Click the [OK] button.
• A dialog box listing the available versions
appears.
5
6
7Current Version
VersionAfter Installation
19

Click the [OK] button.
• Version upgrade starts and the dialog box
shown at the left appears.
• The LCD screen of the PICTROGRAPHY 3500 /
4000Ⅱ / 4500 becomes as shown at the left.
•
If you click the [Cancel] button, a dialog box appears, asking if you really want to stop version
upgrading.Click the [OK] button to stop or click the [Cancel] button to continue upgrading.
•
If an error occurs, an error message dialog box appears. Confirm the error cause and perform ver-
sion upgrade again.
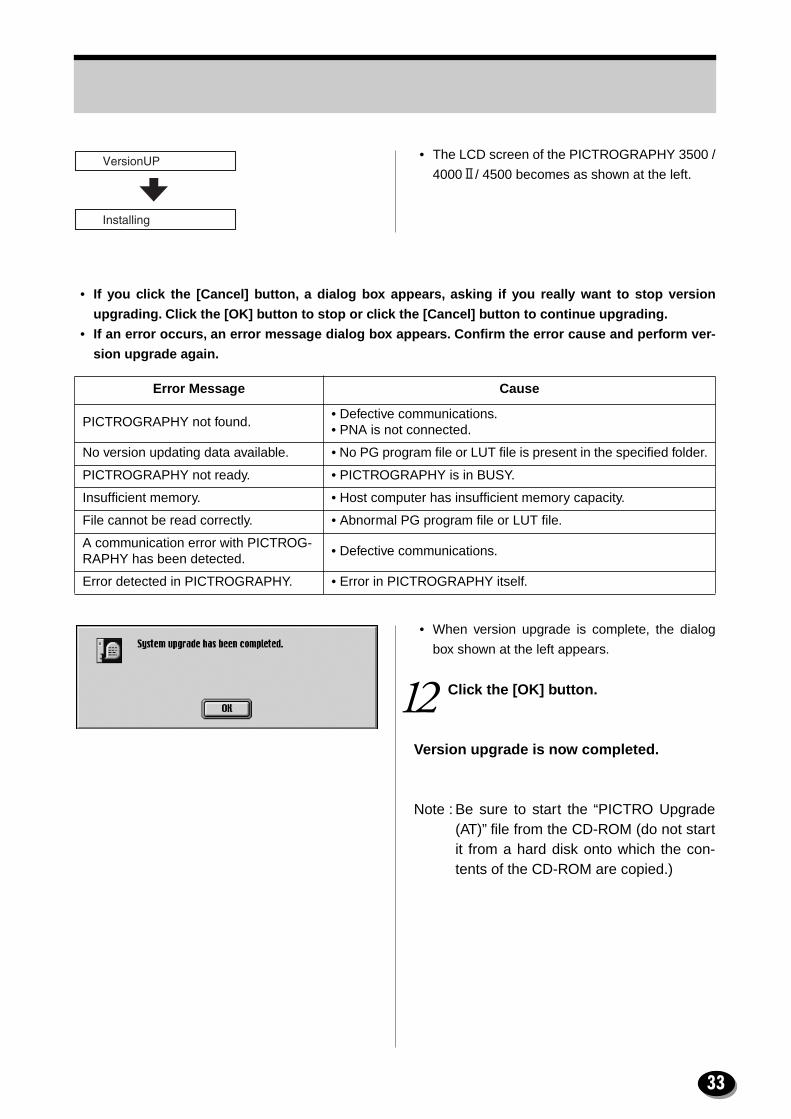
• When version upgrade is complete, the dialog
box shown at the left appears.
Error Message Cause
PICTROGRAPHY not found.• ASPI Manager is not installed.• Defective SCSI communications.• PICTROGRAPHY is not connected.
No version updating data available. • No PG program file or LUT file is present in the specified folder.
PICTROGRAPHY not ready. • PICTROGRAPHY is in BUSY.
Insufficient memory. • Host computer has insufficient memory capacity.
File cannot be read correctly. • Abnormal PG program file or LUT file.
A communication error with PICTROG-RAPHY has been detected.
• Defective SCSI communications.
Error detected in PICTROGRAPHY. • Error in PICTROGRAPHY itself.
8
VersionUP
Installing
20

Click the [OK] button.
Version upgrade is now completed.
Note :
•
Do not execute multiple [PGUP.exe] filesat the same time.
•
Do not drag a dialog during versionupgrade.
9
21
2.2.2 Windows + PNA Connection
(PICTROGRAPHY 3500 / 4000Ⅱ / 4500)
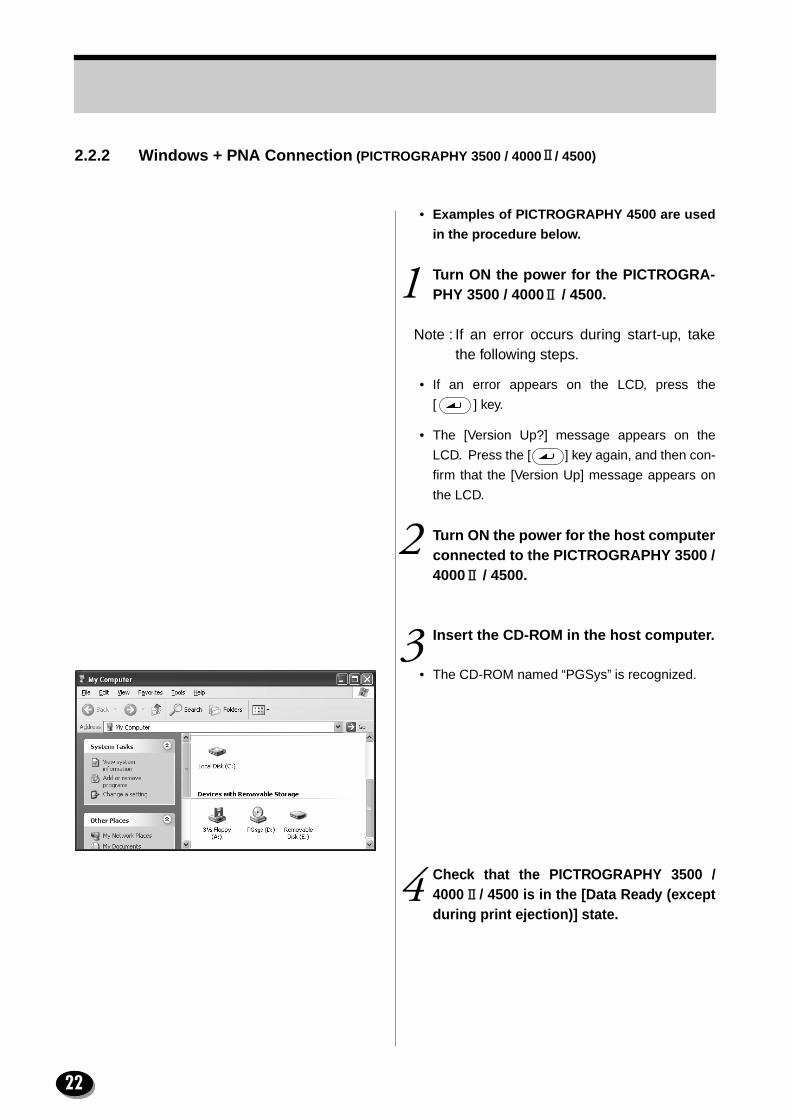
•
Examples of PICTROGRAPHY 4500 are used
in the procedure below.
Turn ON the power for the PICTROGRA-PHY 3500 / 4000Ⅱ / 4500.
Note : If an error occurs during start-up, takethe following steps.
• If an error appears on the LCD, press the
[ ] key.
• The [Version Up?] message appears on the
LCD. Press the [ ] key again, and then con-
firm that the [Version Up] message appears on
the LCD.
Turn ON the power for the host computerconnected to the PICTROGRAPHY 3500 /4000Ⅱ / 4500.
Insert the CD-ROM in the host computer.
• The CD-ROM named “PGSys” is recognized.
Check that the PICTROGRAPHY 3500 /4000Ⅱ / 4500 is in the [Data Ready (exceptduring print ejection)] state.
1
2
3
4
22

Double-click the CD-ROM icon to openthe CD-ROM.
• All folders stored on the CD-ROM appear.
By referring to Subsection 2.1.2, double-click the “PGVU_TCP.exe” file appropriatefor the purpose of installation.
• A dialog box to start the program appears.
Click the [OK] button.
• A dialog box for entering PNA’s IP address
appears.
5
6
7
(When the IP address of the PNA is 192.168.1.100)
23

Enter the IP address of the PNA and thenclick the [OK] button.
• A dialog box listing the available versions
appears.
Click the [OK] button.
• Version upgrade starts and the dialog box
shown at the left appears.
• The LCD screen of the PICTROGRAPHY 3500 /
4000Ⅱ / 4500 becomes as shown at the left.
•
If you click the [Cancel] button, a dialog box appears, asking if you really want to stop version
upgrading. Click the [OK] button to stop or click the [Cancel] button to continue upgrading.
•
If an error occurs, an error message dialog box appears. Confirm the error cause and perform ver-
sion upgrade again.
8Current Version
VersionAfter Installation
9
VersionUP
Installing
24

• When version upgrade is complete, the dialog
box shown at the left appears.
Click the [OK] button.
Version upgrade is now completed.
Note :
•
Do not execute multiple [PGVU_TCP.exe]files at the same time.
•
Do not drag a dialog during versionupgrade.
Error Message Cause
PICTROGRAPHY not found.• Defective communications.• PNA is not connected.• Incorrect IP address is entered.
No version updating data available. • No PG program file or LUT file is present in the specified folder.
PICTROGRAPHY not ready. • PICTROGRAPHY is in BUSY.
Insufficient memory. • Host computer has insufficient memory capacity.
File cannot be read correctly. • Abnormal PG program file or LUT file.
A communication error with PICTROG-RAPHY has been detected.
• Defective communications.
Error detected in PICTROGRAPHY. • Error in PICTROGRAPHY itself.
10
25

2.2.3 MacOS + SCSI Connection
(PICTROGRAPHY 3500 / 4000Ⅱ / 4500)
•
Examples of PICTROGRAPHY 4500 are used
in the procedure below.
Turn ON the power for the PICTROGRA-PHY 3500 / 4000Ⅱ / 4500.
Note : If an error occurs during start-up, takethe following steps.
• If an error appears on the LCD, press the
[ ] key.
• The [Version Up?] message appears on the
LCD. Press the [ ] key again, and then con-
firm that the [Version Up] message appears on
the LCD.
Turn ON the power for the host computerconnected to the PICTROGRAPHY 3500 /4000Ⅱ / 4500.
Insert the CD-ROM in the host computer.
• The CD-ROM named “PGSys” is mounted.
Check that the PICTROGRAPHY 3500 /4000Ⅱ / 4500 is in the [Data Ready (exceptduring print ejection)] state.
1
2
3
4
26

Double-click the CD-ROM icon to openthe CD-ROM.
• All folders stored on the CD-ROM appear.
By referring to Subsection 2.1.2, double-click the “PGUP” file appropriate for thepurpose of installation.
• A dialog box to start the program appears.
Click the [OK] button.
• A dialog box listing the available versions
appears.
5
6
7Current Version Version After Installation
27

Click the [OK] button.
• Version upgrade starts and the dialog box
shown at the left appears.
• The LCD screen of the PICTROGRAPHY 3500 /
4000Ⅱ / 4500 becomes as shown at the left.
•
If you click the [Cancel] button, a dialog box appears, asking if you really want to stop version
upgrading. Click the [OK] button to stop or click the [Cancel] button to continue upgrading.
•
If an error occurs, an error message dialog box appears. Confirm the error cause and perform ver-
sion upgrade again.
• When version upgrade is complete, the dialog
box shown at the left appears.
Error Message Cause
PICTROGRAPHY not found.• Defective SCSI communications.• PICTROGRAPHY is not connected.
No version updating data available. • No PG program file or LUT file is present in the specified folder.
PICTROGRAPHY not ready. • PICTROGRAPHY is in BUSY.
Insufficient memory. • Host computer has insufficient memory capacity.
File cannot be read correctly. • Abnormal PG program file or LUT file.
A communication error with PICTROG-RAPHY has been detected.
• Defective SCSI communications.
Error detected in PICTROGRAPHY. • Error in PICTROGRAPHY itself.
8
VersionUP
Installing
28

Click the [OK] button.
Version upgrade is now completed.
Note : Be sure to start the “PGUP” file from theCD-ROM (do not start it from a hard diskonto which the contents of the CD-ROMare copied.)
9
29

2.2.4 MacOS + PNA Connection
(PICTROGRAPHY 3500 / 4000Ⅱ / 4500)
•
Examples of PICTROGRAPHY 4500 are used
in the procedure below.
Turn ON the power for the PICTROGRA-PHY 3500 / 4000Ⅱ / 4500.
Note : If an error occurs during start-up, takethe following steps.
• If an error appears on the LCD, press the
[ ] key.
• The [Version Up?] message appears on the
LCD. Press the [ ] key again, and then con-
firm that the [Version Up] message appears on
the LCD.
Turn ON the power for the host computerconnected to the PICTROGRAPHY 3500 /4000Ⅱ / 4500.
Select [Control Panel] →→→→ [AppleTalk]from the Apple menu.
• The “AppleTalk” dialog box appears.
Select “Ethernet” from “Connect via:”and then close the dialog box.
Insert the CD-ROM in the host computer.
1
2
3
4
5
30
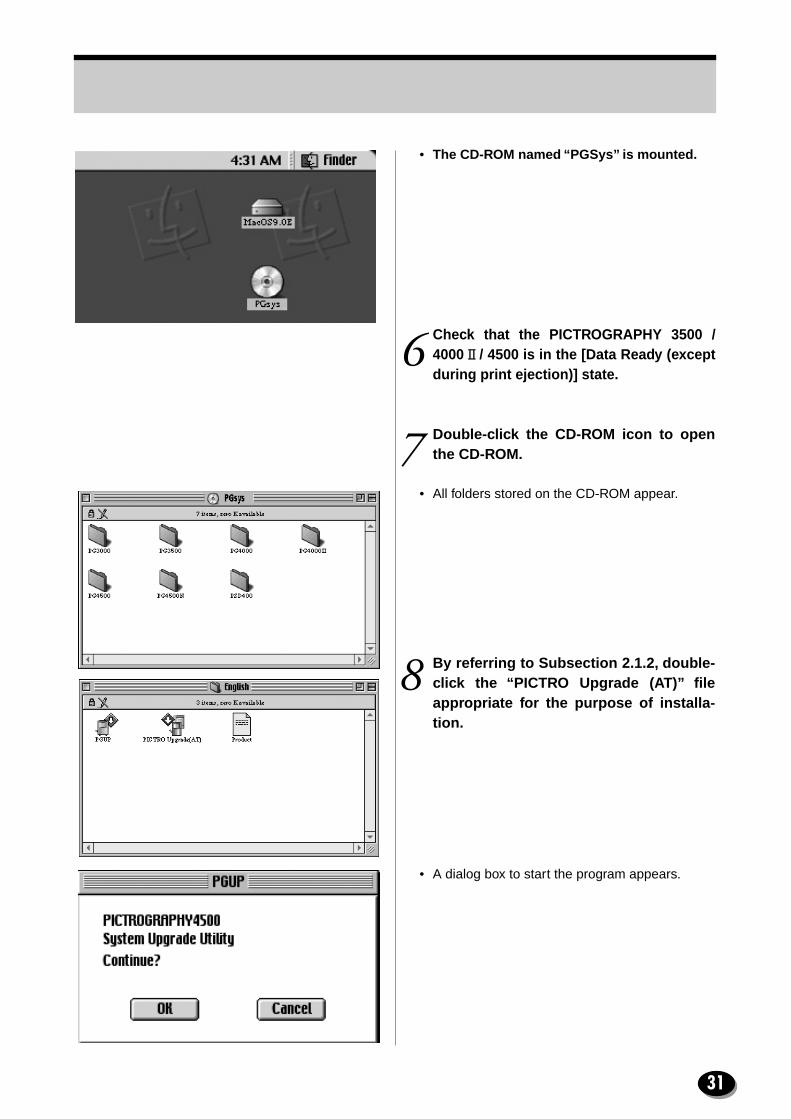
•
The CD-ROM named “PGSys” is mounted.
Check that the PICTROGRAPHY 3500 /4000Ⅱ / 4500 is in the [Data Ready (exceptduring print ejection)] state.
Double-click the CD-ROM icon to openthe CD-ROM.
• All folders stored on the CD-ROM appear.
By referring to Subsection 2.1.2, double-click the “PICTRO Upgrade (AT)” fileappropriate for the purpose of installa-tion.
• A dialog box to start the program appears.
6
7
8
31

Click the [OK] button.
• A dialog box for printer selection appears.
Note : The name displayed in the “Printer” col-umn varies depending on the PNAbecause it is the AppleTalk printer nameset to the PNA.
Click the displayed PNA and then clickthe [Next] button.
• A dialog box listing the available versions
appears.
Click the [Next] button.
• Version upgrade starts and the dialog box
shown at the left appears.
9
10Current VersionVersion After Installation
11
32
• The LCD screen of the PICTROGRAPHY 3500 /
4000Ⅱ / 4500 becomes as shown at the left.
•
If you click the [Cancel] button, a dialog box appears, asking if you really want to stop version
upgrading. Click the [OK] button to stop or click the [Cancel] button to continue upgrading.
•
If an error occurs, an error message dialog box appears. Confirm the error cause and perform ver-
sion upgrade again.
• When version upgrade is complete, the dialog
box shown at the left appears.
Click the [OK] button.
Version upgrade is now completed.
Note : Be sure to start the “PICTRO Upgrade(AT)” file from the CD-ROM (do not startit from a hard disk onto which the con-tents of the CD-ROM are copied.)
Error Message Cause
PICTROGRAPHY not found.• Defective communications.• PNA is not connected.
No version updating data available. • No PG program file or LUT file is present in the specified folder.
PICTROGRAPHY not ready. • PICTROGRAPHY is in BUSY.
Insufficient memory. • Host computer has insufficient memory capacity.
File cannot be read correctly. • Abnormal PG program file or LUT file.
A communication error with PICTROG-RAPHY has been detected.
• Defective communications.
Error detected in PICTROGRAPHY. • Error in PICTROGRAPHY itself.
12
VersionUP
Installing
33

2.2.5 MacOSX + SCSI Connection
(PICTROGRAPHY 3500 / 4000Ⅱ / 4500)
•
Examples of PICTROGRAPHY 4500 are used
in the procedure below.
Turn ON the power for the PICTROGRA-PHY 3500 / 4000Ⅱ / 4500.
Note : If an error occurs during start-up, takethe following steps.
• If an error appears on the LCD, press the
[ ] key.
• The [Version Up?] message appears on the
LCD. Press the [ ] key again, and then con-
firm that the [Version Up] message appears on
the LCD.
Turn ON the power for the host computerconnected to the PICTROGRAPHY 3500 /4000Ⅱ / 4500.
Insert the CD-ROM in the host computer.
• The CD-ROM named “PGSys” is mounted.
Check that the PICTROGRAPHY 3500 /4000Ⅱ / 4500 is in the [Data Ready (exceptduring print ejection)] state.
1
23
4
34

Double-click the CD-ROM icon to openthe CD-ROM.
• All folders stored on the CD-ROM appear.
By referring to Subsection 2.1.2, double-click the “PICTRO Upgrade (SCSI)” fileappropriate for the purpose of installa-tion.
• A dialog box to start the program appears.
Click the [Next] button.
• A dialog box listing the available versions
appears.
7
5
6
Current VersionVersion After Installation
35

Click the [Next] button.
• Version upgrade starts and the dialog box
shown at the left appears.
• The LCD screen of the PICTROGRAPHY 3500 /
4000Ⅱ / 4500 becomes as shown at the left.
•
If you click the [Cancel] button, a dialog box appears, asking if you really want to stop version
upgrading. Click the [OK] button to stop or click the [Cancel] button to continue upgrading.
•
If an error occurs, an error message dialog box appears. Confirm the error cause and perform ver-
sion upgrade again.
• When version upgrade is complete, the dialog
box shown at the left appears.
Error Message Cause
PICTROGRAPHY not found.• Defective SCSI communications.• PICTROGRAPHY is not connected.
No version updating data available. • No PG program file or LUT file is present in the specified folder.
PICTROGRAPHY not ready. • PICTROGRAPHY is in BUSY.
Insufficient memory. • Host computer has insufficient memory capacity.
File cannot be read correctly. • Abnormal PG program file or LUT file.
A communication error with PICTROG-RAPHY has been detected.
• Defective SCSI communications.
Error detected in PICTROGRAPHY. • Error in PICTROGRAPHY itself.
8
VersionUP
Installing
36

Click the [OK] button.
Version upgrade is now completed.
Note : Be sure to start the “PICTRO Upgrade(SCSI)” file from the CD-ROM (do notstart it from a hard disk onto which thecontents of the CD-ROM are copied.)
9
37

2.2.6 MacOSX + PNA Connection
(PICTROGRAPHY 3500 / 4000Ⅱ / 4500)
•
Examples of PICTROGRAPHY 4500 are used
in the procedure below.
Turn ON the power for the PICTROGRA-PHY 3500 / 4000Ⅱ / 4500.
Note : If an error occurs during start-up, takethe following steps.
• If an error appears on the LCD, press the
[ ] key.
• The [Version Up?] message appears on the
LCD. Press the [ ] key again, and then con-
firm that the [Version Up] message appears on
the LCD.
Turn ON the power for the host computerconnected to the PICTROGRAPHY 3500 /4000Ⅱ / 4500.
Select “System Preferences” from theApple menu.
1
2
3
38

• The “System Preferences” dialog box appears.
Click the [Network] icon.
• The “Network” dialog box appears.
Click the [AppleTalk] tab.
• The dialog box changes as shown at the left.
Check the [Make AppleTalk Active]checkbox and then close the [Network]dialog box.
Insert the CD-ROM in the host computer.
• The CD-ROM named “PGSys” is mounted.
Check that the PICTROGRAPHY 3500 /4000Ⅱ / 4500 is in the [Data Ready (exceptduring print ejection)] state.
5
4
6
7
8
39

Double-click the CD-ROM icon to openthe CD-ROM.
• All folders stored on the CD-ROM appear.
By referring to Subsection 2.1.2, dou-ble-click the “PICTRO Upgrade (AT)”file appropriate for the purpose ofinstallation.
• A dialog box to start the program appears.
Click the [Next] button.
• A dialog box for printer selection appears.
Note : The name displayed in the “Printer” col-umn varies depending on the PNAbecause it is the AppleTalk printer nameset to the PNA.
11
9
10
40

Click the displayed PNA and then clickthe [Next] button.
• A dialog box listing the available versions
appears.
Click the [Next] button.
• Version upgrade starts and the dialog box
shown at the left appears.
• The LCD screen of the PICTROGRAPHY 3500 /
4000Ⅱ / 4500 becomes as shown at the left.
12Current Version
Version After Installation
13
VersionUP
Installing
41

•
If you click the [Cancel] button, a dialog box appears, asking if you really want to stop version
upgrading. Click the [OK] button to stop or click the [Cancel] button to continue upgrading.
•
If an error occurs, an error message dialog box appears. Confirm the error cause and perform ver-
sion upgrade again.
• When version upgrade is complete, the dialog
box shown at the left appears.
Click the [OK] button.
Version upgrade is now completed.
Note : Be sure to start the “PICTRO Upgrade(AT)” file from the CD-ROM (do not startit from a hard disk onto which the con-tents of the CD-ROM are copied.)
Error Message Cause
PICTROGRAPHY not found.• Defective communications.• PNA is not connected.
No version updating data available. • No PG program file or LUT file is present in the specified folder.
PICTROGRAPHY not ready. • PICTROGRAPHY is in BUSY.
Insufficient memory. • Host computer has insufficient memory capacity.
File cannot be read correctly. • Abnormal PG program file or LUT file.
A communication error with PICTROG-RAPHY has been detected.
• Defective communications.
Error detected in PICTROGRAPHY. • Error in PICTROGRAPHY itself.
14
42

2.2.7 Windows + PICTROGRAPHY 4500N
Turn ON the power for the PICTROGRA-PHY 4500N.
Note : If an error occurs during start-up, takethe following steps.
• If an error appears on the LCD, press the
[ ] key.
• The [Version Up?] message appears on the
LCD. Press the [ ] key again, and then con-
firm that the [Version Up] message appears on
the LCD.
Turn ON the power for the host computerconnected to the PICTROGRAPHY 4500N.
Insert the CD-ROM in the host computer.
• The CD-ROM named “PGSys” is recognized.
Check that the PICTROGRAPHY 4500Nis in the [Data Ready (except during printejection)] state.
Double-click the CD-ROM icon to openthe CD-ROM.
• All folders stored on the CD-ROM appear.
1
2
3
4
5
43

7
By referring to Subsection 2.1.2, double-click the “PGVUEN.exe” file appropriatefor the purpose of installation.
• A dialog box to start the program appears.
Click the [OK] button.
• A dialog box for entering the IP address
appears.
Enter the IP address of the PICTROGRA-PHY 4500N and then click the [OK] button.
• A dialog box listing the available versions
appears.
6
(When the IP address of the PNA is 192.168.1.80)
Current Version
Version After Installation
8
4
4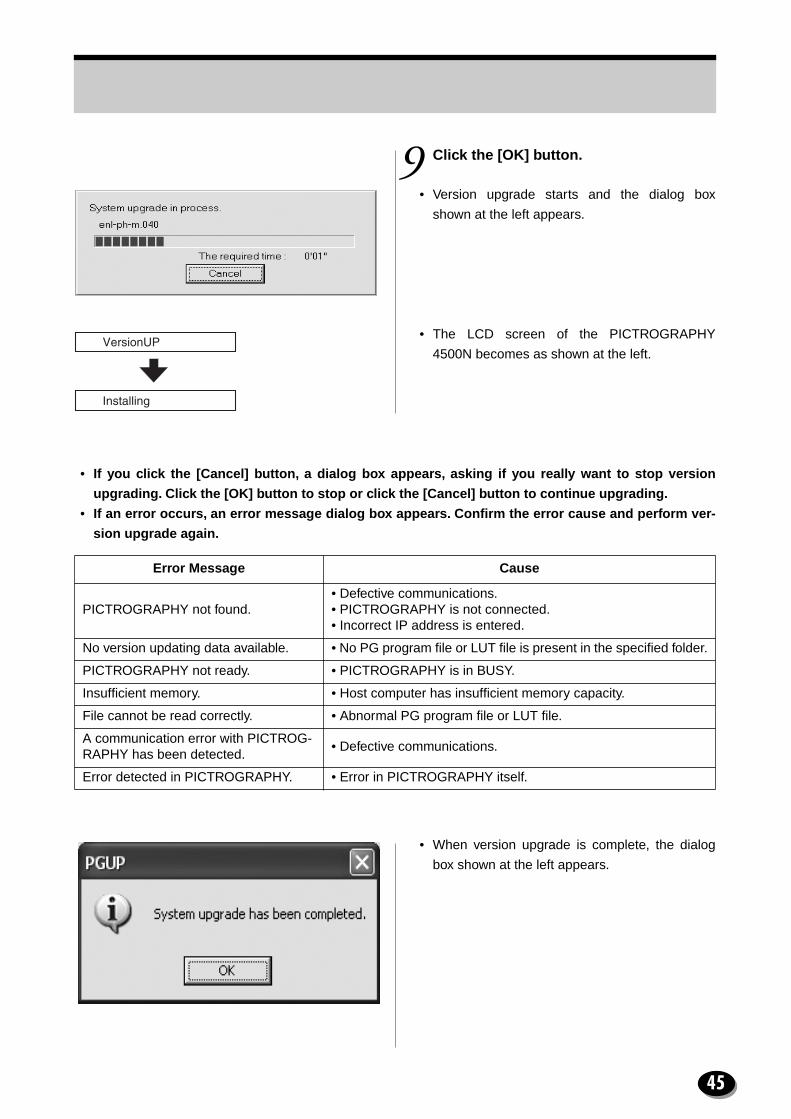
Click the [OK] button.
• Version upgrade starts and the dialog box
shown at the left appears.
• The LCD screen of the PICTROGRAPHY
4500N becomes as shown at the left.
• If you click the [Cancel] button, a dialog box appears, asking if you really want to stop version
upgrading. Click the [OK] button to stop or click the [Cancel] button to continue upgrading.
• If an error occurs, an error message dialog box appears. Confirm the error cause and perform ver-
sion upgrade again.
• When version upgrade is complete, the dialog
box shown at the left appears.
Error Message Cause
PICTROGRAPHY not found.• Defective communications.• PICTROGRAPHY is not connected.• Incorrect IP address is entered.
No version updating data available. • No PG program file or LUT file is present in the specified folder.
PICTROGRAPHY not ready. • PICTROGRAPHY is in BUSY.
Insufficient memory. • Host computer has insufficient memory capacity.
File cannot be read correctly. • Abnormal PG program file or LUT file.
A communication error with PICTROG-RAPHY has been detected.
• Defective communications.
Error detected in PICTROGRAPHY. • Error in PICTROGRAPHY itself.
9
VersionUP
Installing
45

Click the [OK] button.
Version upgrade is now completed.
Note :• Do not execute multiple [PGVUEN.exe]
files at the same time.• Do not drag a dialog during version
upgrade.
10
46

2.2.8 MacOS + PICTROGRAPHY 4500N
Turn ON the power for the PICTROGRA-PHY 4500N.
Note : If an error occurs during start-up, takethe following steps.
• If an error appears on the LCD, press the
[ ] key.
• The [Version Up?] message appears on the
LCD. Press the [ ] key again, and then con-
firm that the [Version Up] message appears on
the LCD.
Turn ON the power for the host computerconnected to the PICTROGRAPHY 4500N.
Select [Control Panel] →→→→ [AppleTalk]from the Apple menu.
• The “AppleTalk” dialog box appears.
Select “Ethernet” from “Connect via:”and then close the dialog box.
Insert the CD-ROM in the host computer.
• The CD-ROM named “PGSys” is mounted.
1
2
3
4
5
47

Check that the PICTROGRAPHY 4500Nis in the [Data Ready (except during printejection)] state.
Double-click the CD-ROM icon to openthe CD-ROM.
• All folders stored on the CD-ROM appear.
By referring to Subsection 2.1.2, double-click the “PICTRO Upgrade (AT)” fileappropriate for the purpose of installa-tion.
• A dialog box to start the program appears.
Click the [Next] button.
6
7
8
9
48

• A dialog box for printer selection appears.
Note : The name displayed in the “Printer” col-umn varies depending on the PNAbecause it is the AppleTalk printer nameset to the PICTROGRAPHY 4500N.
Click the displayed PICTROGRAPHY4500N and then click the [Next] button.
• A dialog box listing the available versions
appears.
Click the [Next] button.
• Version upgrade starts and the dialog box
shown at the left appears.
10Current VersionVersion After Installation
11
49

• The LCD screen of the PICTROGRAPHY
4500N becomes as shown at the left.
• If you click the [Cancel] button, a dialog box appears, asking if you really want to stop version
upgrading. Click the [OK] button to stop or click the [Cancel] button to continue upgrading.
• If an error occurs, an error message dialog box appears. Confirm the error cause and perform ver-
sion upgrade again.
• When version upgrade is complete, the dialog
box shown at the left appears.
Click the [OK] button.
Version upgrade is now completed.
Note : Be sure to start the “PICTRO Upgrade(AT)” file from the CD-ROM (do not startit from a hard disk onto which the con-tents of the CD-ROM are copied.)
Error Message Cause
PICTROGRAPHY not found.• Defective communications.• PICTROGRAPHY is not connected.
No version updating data available. • No PG program file or LUT file is present in the specified folder.
PICTROGRAPHY not ready. • PICTROGRAPHY is in BUSY.
Insufficient memory. • Host computer has insufficient memory capacity.
File cannot be read correctly. • Abnormal PG program file or LUT file.
A communication error with PICTROG-RAPHY has been detected.
• Defective communications.
Error detected in PICTROGRAPHY. • Error in PICTROGRAPHY itself.
12
VersionUP
Installing
50

2.2.9 MacOSX + PICTROGRAPHY 4500N
Turn ON the power for the PICTROGRA-PHY 4500N.
Note : If an error occurs during start-up, takethe following steps.
• If an error appears on the LCD, press the
[ ] key.
• The [Version Up?] message appears on the
LCD. Press the [ ] key again, and then con-
firm that the [Version Up] message appears on
the LCD.
Turn ON the power for the host computerconnected to the PICTROGRAPHY 4500N.
Select “System Preferences” from theApple menu.
• The “System Preferences” dialog box appears.
1
2
3
51

Click the [Network] icon.
• The “Network” dialog box appears.
Click the [AppleTalk] tab.
• The dialog box changes as shown at the left.
Check the [Make AppleTalk Active]checkbox and then close the [Network]dialog box.
Insert the CD-ROM in the host computer.
• The CD-ROM named “PGSys” is mounted.
Check that the PICTROGRAPHY 4500Nis in the [Data Ready (except during printejection)] state.
Double-click the CD-ROM icon to openthe CD-ROM
• All folders stored on the CD-ROM appear.
4
5
6
7
8
9
52

By referring to Subsection 2.1.2, dou-ble-click the “PICTRO Upgrade (AT)”file appropriate for the purpose ofinstallation.
• A dialog box to start the program appears.
Click the [Next] button.
• A dialog box for printer selection appears.
Note : The name displayed in the “Printer” col-umn varies depending on the PNAbecause it is the AppleTalk printer nameset to the PICTROGRAPHY 4500N.
10
11
53

Click the displayed PICTROGRAPHY4500N and then click the [Next] button
• A dialog box listing the available versions
appears.
Click the [Next] button.
• Version upgrade starts and the dialog box
shown at the left appears.
• The LCD screen of the PICTROGRAPHY
4500N becomes as shown at the left.
Current VersionVersion After Installation
12
13
VersionUP
Installing
54

• If you click the [Cancel] button, a dialog box appears, asking if you really want to stop version
upgrading. Click the [OK] button to stop or click the [Cancel] button to continue upgrading.
• If an error occurs, an error message dialog box appears. Confirm the error cause and perform ver-
sion upgrade again.
• When version upgrade is complete, the dialog
box shown at the left appears.
Click the [OK] button.
Version upgrade is now completed.
Note : Be sure to start the “PICTRO Upgrade(AT)” file from the CD-ROM (do not startit from a hard disk onto which the con-tents of the CD-ROM are copied.)
Error Message Cause
PICTROGRAPHY not found.• Defective communications.• PICTROGRAPHY is not connected.
No version updating data available. • No PG program file or LUT file is present in the specified folder.
PICTROGRAPHY not ready. • PICTROGRAPHY is in BUSY.
Insufficient memory. • Host computer has insufficient memory capacity.
File cannot be read correctly. • Abnormal PG program file or LUT file.
A communication error with PICTROG-RAPHY has been detected.
• Defective communications.
Error detected in PICTROGRAPHY. • Error in PICTROGRAPHY itself.
14
55

When the LUT or program installation is completed, turn the power switch OFF and ON.After installing the LUT, perform calibration referring to Chapter 4 (PICTROGRAPHY 4000Ⅱ / 4500 /4500N) or Chapter 5 (PICTROGRAPHY 3500) of the Instruction Manual.After program installation, a “Service” error may appear on the LCD. If this happens, turn the powerswitch OFF and ON again, and then perform calibration.
2.3 Operation After Version Upgrade
56

3 Plug-in LUT Operating Procedure (PICTROGRAPHY 3000 / 4000 / PICTROSTAT DIGITAL 400)
•
The LUT setting function is available for the following versions of Photoshop Plug-in.
Note : PSD400 Plug-in cannot be used for MacOSX.
3.1.1 Windows
•
Examples of PICTROGRAPHY 4000 are used
in the procedure below.
Check the “LUT” checkbox and thenclick the [LUT Settings] button.
• The dialog box shown at the left appears.
MacOS MacOSX Windows
PICTROGRAPHY 4000 2.2.0 1.0.1 2.20
PICTROGRAPHY 3000 1.2.0 1.0.2 1.20
PICTROSTAT DIGITAL 400(Print) 1.2.0 x 1.20
3.1 Selection of Plug-in LUT
1
57

Click the [Load] button to specify theLUT for new donor.
Select the appropriate LUT referring tothe figure shown at the left.
• The selected LUT is loaded.
Click the [OK] button.
Selection of Plug-in LUT is now completed.
2
PG3000 Plug-inLUT PG3000.PGLut
PG3000.PGLut
PSD400 Plug-inLUT PSD400ON1.PGLut
PSD400ON2.PGLut
PG4000 Plug-inLUT PG4000ON1.PGLut
PG4000ON2.PGLut
PG4000ON3.PGLut
<LUT Locations in the CD-ROM>
3
58

3.1.2 MacOSX
• Examples of PICTROGRAPHY 4000 are used
in the procedure below.
Check the “LUT” checkbox and thenclick the [LUT Settings] button.
• The dialog box shown at the left appears.
Click the [Load] button to specify theLUT for new donor.
1
2
59

Select the appropriate LUT referring tothe figure shown at the left.
• The selected LUT is loaded.
Click the [OK] button.
Selection of Plug-in LUT is now completed.
PG3000 Plug-inLUT PG3000
PG3000
MacOS
MacOSX
PSD400 Plug-inLUT PSD400ON1
MacOS
PG4000 Plug-inLUT PG4000ON1
PG4000ON2
PSD400ON2
PG4000ON2
PG4000ON3
PG4000ON1
MacOS
MacOSX
<LUT Locations in the CD-ROM>
3
60

3.2.1 Windows
• Examples of PICTROGRAPHY 4000 are used
in the procedure below.
The Y-axis of dialog box’s graphic area willbe the input data and the X-axis will be theoutput data, 0% for black color and 100% forwhite color. There are 13 fiducial pointswithin the graphic area. By clicking a fidu-cial point, the desired value can be selected.The color will be brighter when increasingthe value of a fiducial point, and the colorwill be darker when decreasing the value ofa fiducial point. The value of fiducial pointswill be displayed beside the graphic area, itis also possible to input the value directly.
If the “RGB Separated” option is unchecked,RGB will be linked to form a one tone curve.This function is used for making the outputimage brighter or darker. If this option ischecked, each RGB tone curve can beadjusted individually.
• Gray ScaleIf the “RGB Separated” option is unchecked,the gray scale displayed above the graphicarea will show the result of the RGB inputvalue from 0% to 100%. If the “RGB Sepa-rated” option is checked, the gray scale willonly show as the selected RGB tone curve.For example, an increase in the value of anR fiducial point will result in more red color.
3.2 Functions on the “LUT Settings” Screen
61

• [Reset] ButtonBy clicking on the [Reset] button, the tonecurve will be reset to the default value. Ifthe “RGB Separated” option is checked,only the selected tone curve will be reset tothe default value.
• [Save] ButtonBy clicking on the “Save” button, currentLUT settings can be saved as a file.
Enter a new file name and click on the[Save] button, the tone curve that showedin the graphic area will be saved as a file.
Note : The extension “.PGLut” will automati-cally be appended to the file name. Thisextension is necessary for reading theLUT settings file, so it should not bede-leted or modified.
• [Load] ButtonBy clicking on the [Load] button, thedesired Plug-in LUT settings file can beloaded.
Select the file name and click on the [Open]button, the value of tone curve will be readand shown in the graphic area.
Note : If the extension “.PGLut” is not part ofthe Plug-in LUT settings file name, thefile name will not appear in the file opendialog box.
62
3.2.2 MacOSX
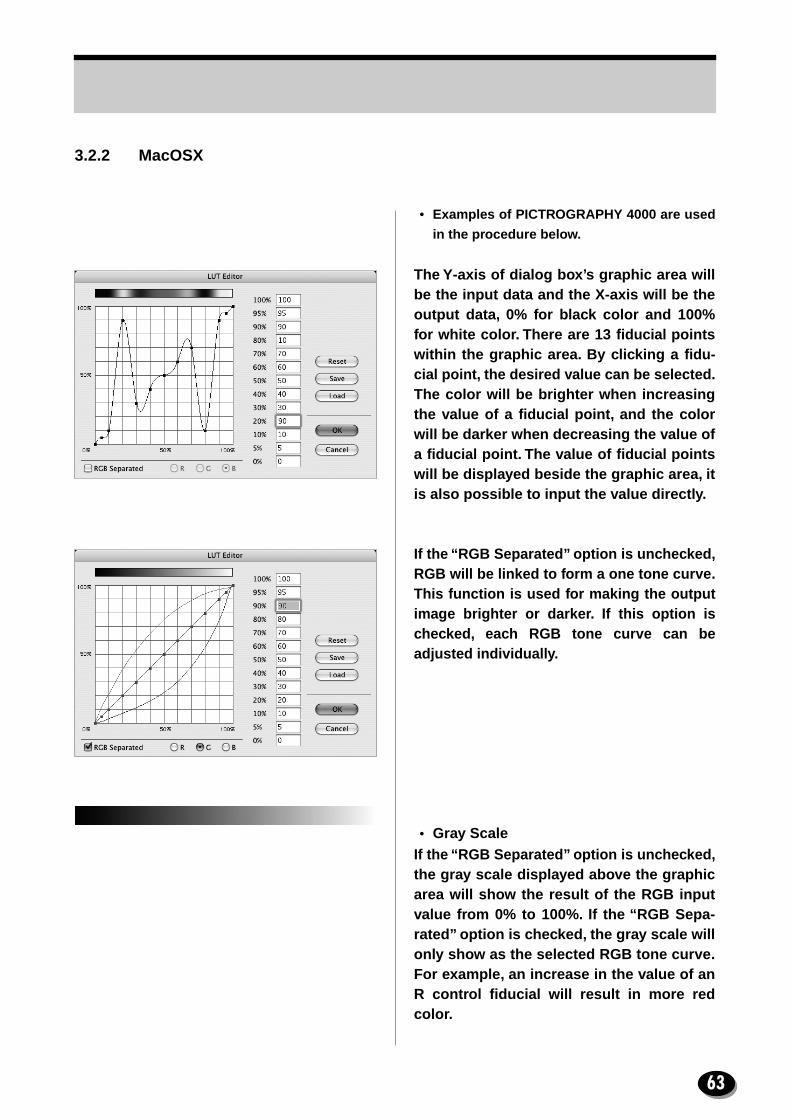
• Examples of PICTROGRAPHY 4000 are used
in the procedure below.
The Y-axis of dialog box’s graphic area willbe the input data and the X-axis will be theoutput data, 0% for black color and 100%for white color. There are 13 fiducial pointswithin the graphic area. By clicking a fidu-cial point, the desired value can be selected.The color will be brighter when increasingthe value of a fiducial point, and the colorwill be darker when decreasing the value ofa fiducial point. The value of fiducial pointswill be displayed beside the graphic area, itis also possible to input the value directly.
If the “RGB Separated” option is unchecked,RGB will be linked to form a one tone curve.This function is used for making the outputimage brighter or darker. If this option ischecked, each RGB tone curve can beadjusted individually.
• Gray ScaleIf the “RGB Separated” option is unchecked,the gray scale displayed above the graphicarea will show the result of the RGB inputvalue from 0% to 100%. If the “RGB Sepa-rated” option is checked, the gray scale willonly show as the selected RGB tone curve.For example, an increase in the value of anR control fiducial will result in more redcolor.
63

• [Reset] ButtonBy clicking on the [Reset] button, the tonecurve will be reset to the default value. Ifthe “RGB Separated” option is checked,only the selected tone curve will be reset tothe default value.
• [Save] ButtonBy clicking on the “Save” button, currentLUT settings can be saved as a file.
Enter a new file name and click on the[Save] button, the tone curve that showedin the graphic area will be saved as a file.
• [Load] ButtonBy clicking on the [Load] button, thedesired Plug-in LUT settings file can beloaded.
Select the file name and click on the [Open]button, the value of tone curve will be readand shown in the graphic area.
64

Questionaire concerning This Manual
Fujifilm’s Technical Division Photo Products Marketing would be most grateful if you would take copies of thisform, one for each manual being used, then complete and send them to us by FAX.Your opinions will contribute greatly to an accurate assessment of the overall quality of each manual.All questions can be answered by ticking [
✓
] the appropriate box(es), but in addition to these answers, pleaseprovide us with your written comments in the lined spaces following each block of questions.
Manual Title and Reference Number
Title :
Reference Number :
Your Name and Company
Name :
Company :
Your E-mail Address and FAX Number
E-mail Address :
FAX Number :
Question 1
• How would you rate this equipment-related manual overall?
(1) Very easy to use and understand (2) Fairly easy to use and understand
(3) Slightly difficult to use and understand
(4) Very difficult to use and understand
• Please provide us with your reasons and comments.
Question 2
• Have you found any technical errors, errors in spelling, or missing words in this manual?
Yes No
• If you have ticked (Yes), please let us know what these errors and missing words are.
Question 3
• How would you rate the writing (language, choice of words/phrases, etc.) and the illustrations/
diagrams, etc.?
(1) Clear and easy to follow (2) Should be simplified
(3) Difficult to follow
(1)’ [Illustrations, etc.] Of adequate size
(2)’ [Illustrations, etc.] Too small
(3)’ [Illustrations, etc.] Difficult to follow
• If you have ticked (2), (3) or (3)’, please give us your reasons.
Additional Comments/Requests
concerning This Manual
FAX ; 81-3-5484-0454
Please return this questionnaire to :
FAX No. : Tokyo 81-3-5484-0454
PICTROGRAPHY SeriesInternal LUT Version Upgrading Procedure/Plug-in LUT Operating Procedure
PP3-B601E

FUJI PHOTO FILM CO., LTD.
26-30, Nishiazabu 2-chome, Minato-ku, Tokyo 106-8620, Japan.
Printed on Recycled Paper
Ref.No.PP3-B601E TD-04.09-FG Printed in Japan