intralinks platform: transitioning from il5 quick … select new workspace from the list of commands...
TRANSCRIPT
I
IntraLinks Platform: Transitioning from IL5
Quick Guide for Deal Managers
Accessing IntraLinks PlatformThe IntraLinks login page, along with your email address and password, gives you access to all of your deals.When you use IntraLinks DealspaceSM to manage your deals, the Intra-Links Platform Hub will automatically become your default hub. Your new hub enables you to:
• Quickly find your exchange with “type-ahead” search using the Hub search field (A).
• Open and work with five IntraLinks Platform exchanges simultaneously. Simply open exchanges as you need access and toggle between them using the left side navigator (B).
• In the People directory (C), you can search for deal participants (who are visible to you) to find contact information, download vCards or recommend users to one or multiple exchanges.
• Use the Documents tab (D) to search for specific documents across all deals. Easily access new/unread documents across all your deals using the My Documents filter (E). Select one or many documents for bulk download or print.
Creating an exchange1 Click the IntraLinks 5 Hub button on the left side of the screen. The
IL5 Hub is displayed. (If you are viewing an exchange, roll your mouse over the exchange name in the upper left corner of the screen and choose IntraLinks 5 Hub.)
2 Select new workspace from the list of commands on the left side of the screen. The new workspace settings screen is displayed.
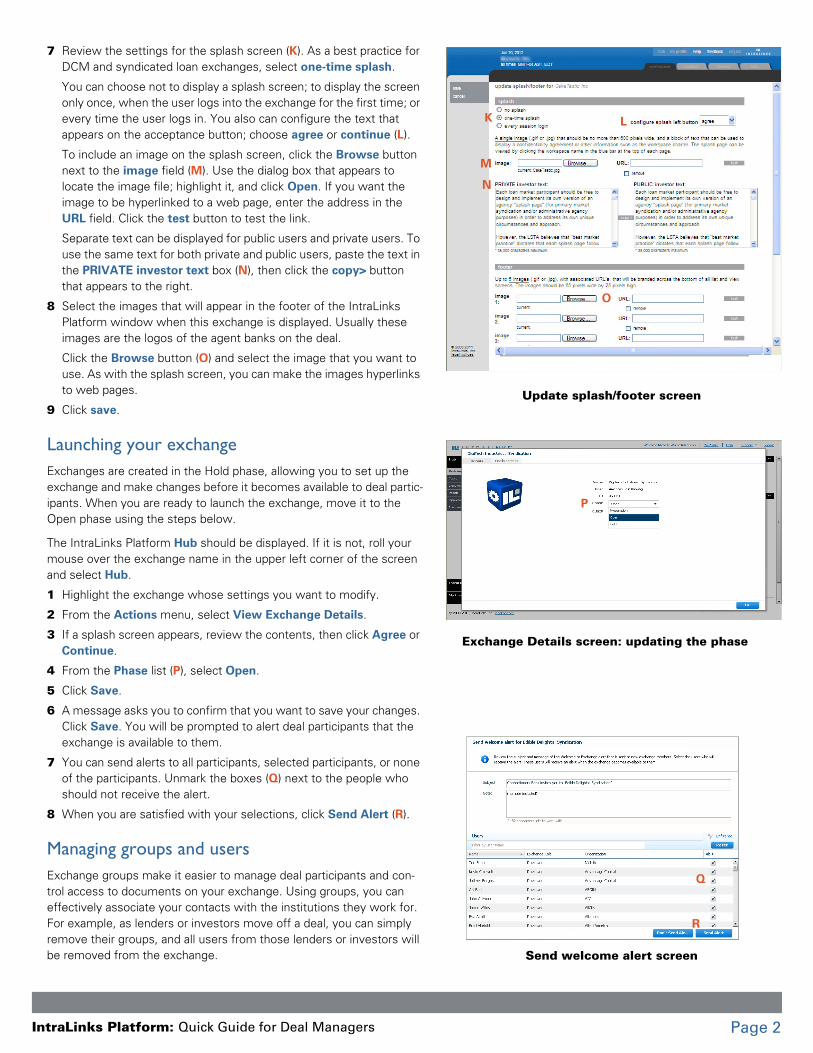
3 From the template list (F), select the template you want to use.
4 Review the name that appears in the host field (G), and make any needed changes. This field typically displays the name of the agent bank(s) on the deal.
5 In the CUSIP/ISIN field (H), enter the CUSIP or ISIN number associated with the deal.
6 In the workspace name field (I), enter the name of the deal.
7 Select save (J) from the list of commands at the left.
Modifying an exchange splash screen and footer1 Roll your mouse over the exchange name in the upper left corner of
the screen and choose Hub.
2 Highlight the exchange whose settings you want to modify.
3 From the Actions menu, select View Exchange Properties.
4 If a default splash screen appears, review the information that appears on the screen, then select continue or accept. The view workspace settings screen for the selected exchange appears.
5 To change the default splash screen and footer, select footer/splash from the list of commands on the left side of the screen.
6 Select update from the list of commands on the left side of the screen. The update splash/footer screen appears.
FOR MORE INFO: Consult the IntraLinks Platform User Guide for DCM Managers and Publishers if you need more detailed information.
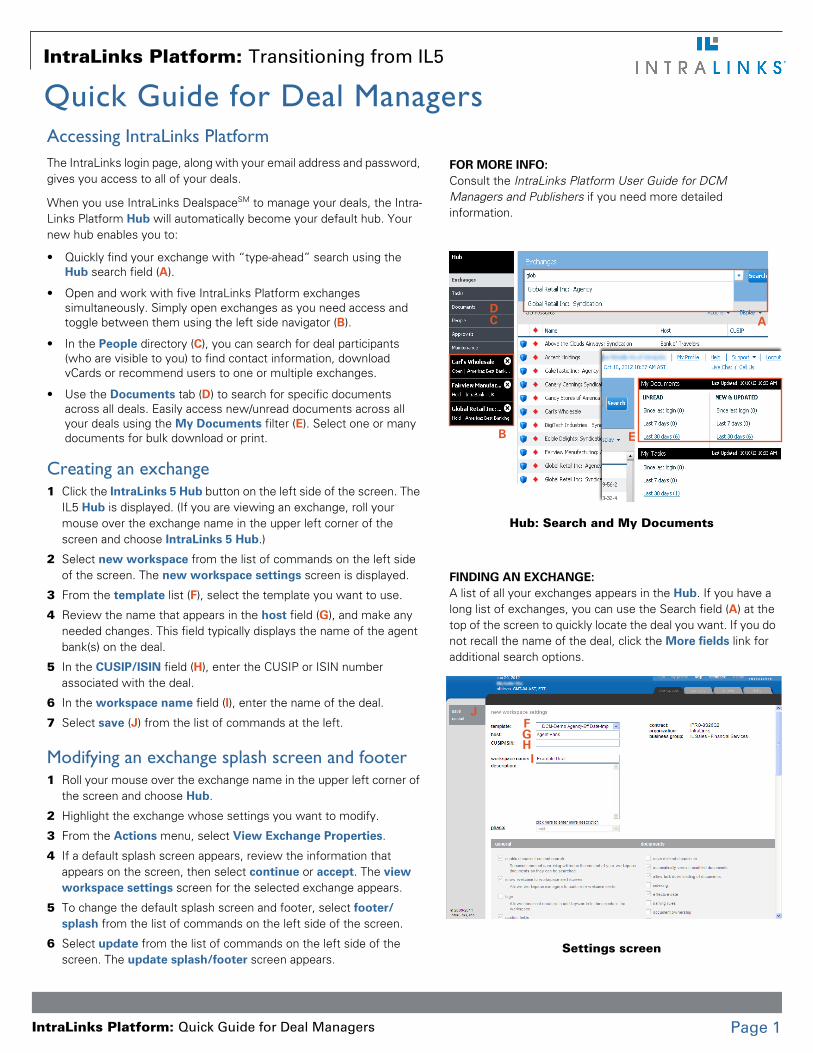
Hub: Search and My Documents
A
B
CD
E
FINDING AN EXCHANGE: A list of all your exchanges appears in the Hub. If you have a long list of exchanges, you can use the Search field (A) at the top of the screen to quickly locate the deal you want. If you do not recall the name of the deal, click the More fields link for additional search options.
Settings screen
FGH
I
J
ntraLinks Platform: Quick Guide for Deal Managers Page 1
I
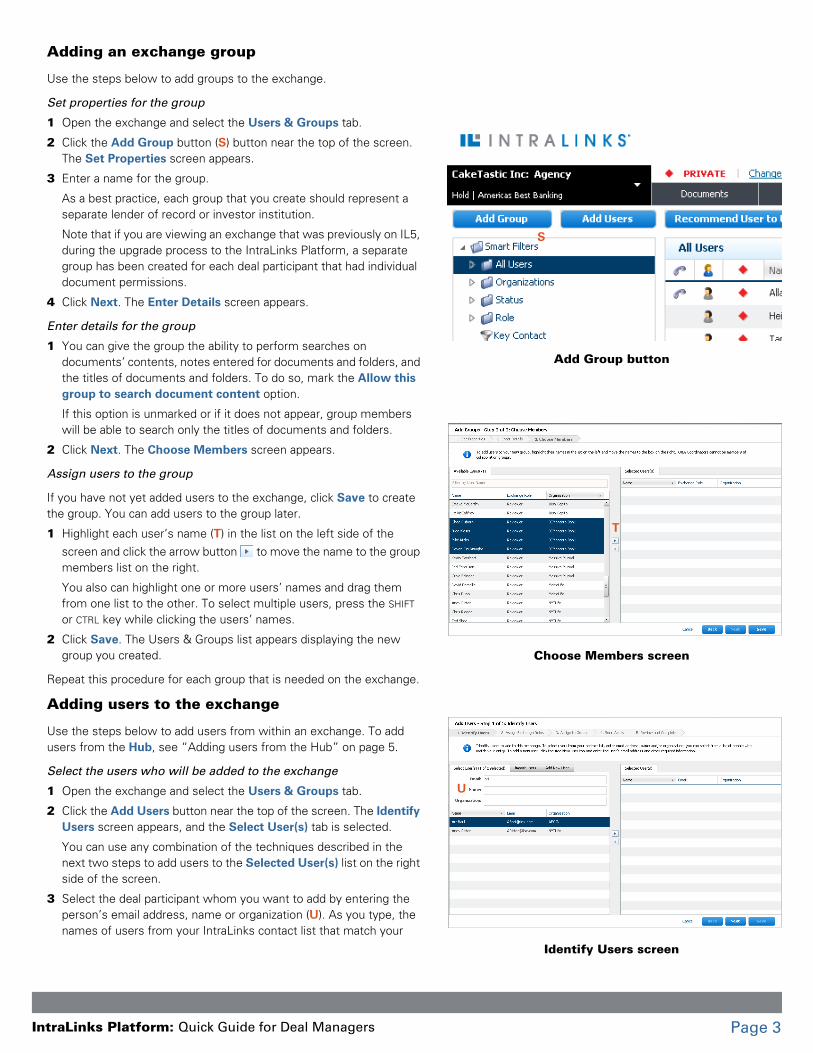
7 Review the settings for the splash screen (K). As a best practice for DCM and syndicated loan exchanges, select one-time splash.
You can choose not to display a splash screen; to display the screen only once, when the user logs into the exchange for the first time; or every time the user logs in. You also can configure the text that appears on the acceptance button; choose agree or continue (L).
To include an image on the splash screen, click the Browse button next to the image field (M). Use the dialog box that appears to locate the image file; highlight it, and click Open. If you want the image to be hyperlinked to a web page, enter the address in the URL field. Click the test button to test the link.
Separate text can be displayed for public users and private users. To use the same text for both private and public users, paste the text in the PRIVATE investor text box (N), then click the copy> button that appears to the right.
8 Select the images that will appear in the footer of the IntraLinks Platform window when this exchange is displayed. Usually these images are the logos of the agent banks on the deal.
Click the Browse button (O) and select the image that you want to use. As with the splash screen, you can make the images hyperlinks to web pages.
9 Click save.
Launching your exchangeExchanges are created in the Hold phase, allowing you to set up the exchange and make changes before it becomes available to deal partic-ipants. When you are ready to launch the exchange, move it to the Open phase using the steps below.
The IntraLinks Platform Hub should be displayed. If it is not, roll your mouse over the exchange name in the upper left corner of the screen and select Hub.
1 Highlight the exchange whose settings you want to modify.
2 From the Actions menu, select View Exchange Details.
3 If a splash screen appears, review the contents, then click Agree or Continue.
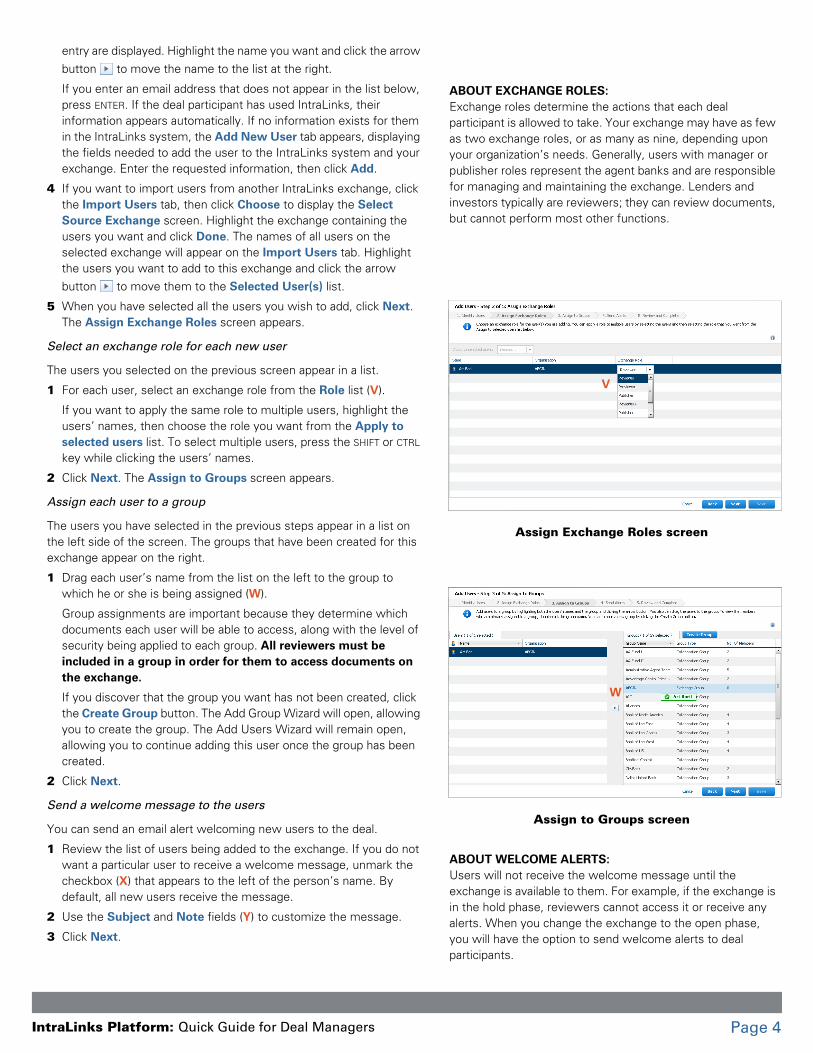
4 From the Phase list (P), select Open.
5 Click Save.
6 A message asks you to confirm that you want to save your changes. Click Save. You will be prompted to alert deal participants that the exchange is available to them.
7 You can send alerts to all participants, selected participants, or none of the participants. Unmark the boxes (Q) next to the people who should not receive the alert.
8 When you are satisfied with your selections, click Send Alert (R).
Managing groups and usersExchange groups make it easier to manage deal participants and con-trol access to documents on your exchange. Using groups, you can effectively associate your contacts with the institutions they work for. For example, as lenders or investors move off a deal, you can simply remove their groups, and all users from those lenders or investors will be removed from the exchange.
Update splash/footer screen
K
M
N
L
O
Exchange Details screen: updating the phase
P
Send welcome alert screen
Q
R
ntraLinks Platform: Quick Guide for Deal Managers Page 2
I
Adding an exchange group
Use the steps below to add groups to the exchange.
Set properties for the group
1 Open the exchange and select the Users & Groups tab.
2 Click the Add Group button (S) button near the top of the screen. The Set Properties screen appears.
3 Enter a name for the group.
As a best practice, each group that you create should represent a separate lender of record or investor institution.
Note that if you are viewing an exchange that was previously on IL5, during the upgrade process to the IntraLinks Platform, a separate group has been created for each deal participant that had individual document permissions.
4 Click Next. The Enter Details screen appears.
Enter details for the group
1 You can give the group the ability to perform searches on documents’ contents, notes entered for documents and folders, and the titles of documents and folders. To do so, mark the Allow this group to search document content option.
If this option is unmarked or if it does not appear, group members will be able to search only the titles of documents and folders.
2 Click Next. The Choose Members screen appears.
Assign users to the group
If you have not yet added users to the exchange, click Save to create the group. You can add users to the group later.
1 Highlight each user’s name (T) in the list on the left side of the screen and click the arrow button to move the name to the group members list on the right.
You also can highlight one or more users’ names and drag them from one list to the other. To select multiple users, press the SHIFT or CTRL key while clicking the users’ names.
2 Click Save. The Users & Groups list appears displaying the new group you created.
Repeat this procedure for each group that is needed on the exchange.
Adding users to the exchange
Use the steps below to add users from within an exchange. To add users from the Hub, see “Adding users from the Hub” on page 5.
Select the users who will be added to the exchange
1 Open the exchange and select the Users & Groups tab.
2 Click the Add Users button near the top of the screen. The Identify Users screen appears, and the Select User(s) tab is selected.
You can use any combination of the techniques described in the next two steps to add users to the Selected User(s) list on the right side of the screen.
3 Select the deal participant whom you want to add by entering the person’s email address, name or organization (U). As you type, the names of users from your IntraLinks contact list that match your
Add Group button
S
Choose Members screen
T
Identify Users screen
U
ntraLinks Platform: Quick Guide for Deal Managers Page 3
I
entry are displayed. Highlight the name you want and click the arrow button to move the name to the list at the right.
If you enter an email address that does not appear in the list below, press ENTER. If the deal participant has used IntraLinks, their information appears automatically. If no information exists for them in the IntraLinks system, the Add New User tab appears, displaying the fields needed to add the user to the IntraLinks system and your exchange. Enter the requested information, then click Add.
4 If you want to import users from another IntraLinks exchange, click the Import Users tab, then click Choose to display the Select Source Exchange screen. Highlight the exchange containing the users you want and click Done. The names of all users on the selected exchange will appear on the Import Users tab. Highlight the users you want to add to this exchange and click the arrow button to move them to the Selected User(s) list.
5 When you have selected all the users you wish to add, click Next. The Assign Exchange Roles screen appears.
Select an exchange role for each new user
The users you selected on the previous screen appear in a list.
1 For each user, select an exchange role from the Role list (V).
If you want to apply the same role to multiple users, highlight the users’ names, then choose the role you want from the Apply to selected users list. To select multiple users, press the SHIFT or CTRL key while clicking the users’ names.
2 Click Next. The Assign to Groups screen appears.
Assign each user to a group
The users you have selected in the previous steps appear in a list on the left side of the screen. The groups that have been created for this exchange appear on the right.
1 Drag each user’s name from the list on the left to the group to which he or she is being assigned (W).
Group assignments are important because they determine which documents each user will be able to access, along with the level of security being applied to each group. All reviewers must be included in a group in order for them to access documents on the exchange.
If you discover that the group you want has not been created, click the Create Group button. The Add Group Wizard will open, allowing you to create the group. The Add Users Wizard will remain open, allowing you to continue adding this user once the group has been created.
2 Click Next.
Send a welcome message to the users
You can send an email alert welcoming new users to the deal.
1 Review the list of users being added to the exchange. If you do not want a particular user to receive a welcome message, unmark the checkbox (X) that appears to the left of the person’s name. By default, all new users receive the message.
2 Use the Subject and Note fields (Y) to customize the message.
3 Click Next.
ABOUT EXCHANGE ROLES:Exchange roles determine the actions that each deal participant is allowed to take. Your exchange may have as few as two exchange roles, or as many as nine, depending upon your organization’s needs. Generally, users with manager or publisher roles represent the agent banks and are responsible for managing and maintaining the exchange. Lenders and investors typically are reviewers; they can review documents, but cannot perform most other functions.
Assign Exchange Roles screen
V
Assign to Groups screen
W
ABOUT WELCOME ALERTS: Users will not receive the welcome message until the exchange is available to them. For example, if the exchange is in the hold phase, reviewers cannot access it or receive any alerts. When you change the exchange to the open phase, you will have the option to send welcome alerts to deal participants.
ntraLinks Platform: Quick Guide for Deal Managers Page 4

I
Review and save your changes
1 Review the information displayed on the screen. If you need to make changes, click the Back button.
2 When you are satisfied with your entries, click Save. The users will be added to the exchange, and welcome alerts will be sent to them if the exchange is in the open phase.
Adding users from the Hub
You can use IntraLinks’ powerful search tools to locate people and add them to the exchange. Using the following procedure, you can add either a single person or many people to the exchange.
The IntraLinks Platform Hub should be displayed. If it is not, roll your mouse over the exchange name in the upper left corner of the screen and select Hub.
1 Click the People button (Z) on the left side of the screen to display a list of all the people you have worked with in IntraLinks.
2 Use the search and filtering tools to the right of the Hub button (AA) to find the person or people you want to add.
If you plan to add many people to your exchange, you can filter the list using the Advanced Search link (BB) below the search box.
3 Highlight the names of the person or people you want to add. To select multiple users, press the SHIFT or CTRL key while clicking the users’ names.
4 From the Actions menu, select Add Users To An Exchange (CC). A list of the exchanges to which you can add users appears.
5 Highlight the exchange you want to add the selected users to, and click Continue. The first step of the Add Users wizard appears.
6 The steps in this wizard are the same as those used to add users from within an exchange, described in “Adding users to the exchange” on page 3. Complete each step of the wizard and save your changes when you are finished.
Resending welcome alerts to users
Occasionally you may be asked to resend the email message that wel-comes a new user to your exchange. This also is a great way to send an ad hoc message to deal participants.
1 Locate the exchange member to whom the alert will be sent. To learn how to locate users, see “Finding users and groups” on page 7.
2 Right-click on the name. A menu of options appears.
3 Select Resend Welcome Alert. The Resend Welcome Alert screen appears.
4 If you want to make changes to the subject line of the alert or add a note to it, click Show Custom Note. Subject and Note fields appear, allowing you to make the necessary changes.
5 When you are ready to send the alert, click Send.
Send Alerts screen
Y
X
Adding users from the Hub
Z
AA
BB
CC
ntraLinks Platform: Quick Guide for Deal Managers Page 5
I
Responding to requests that users be added to the exchange
As an exchange manager, you may receive requests to add users to your exchanges. Use the steps below to respond.
The IntraLinks Platform Hub should be displayed. If it is not, roll your mouse over the exchange name in the upper left corner of the screen and select Hub.
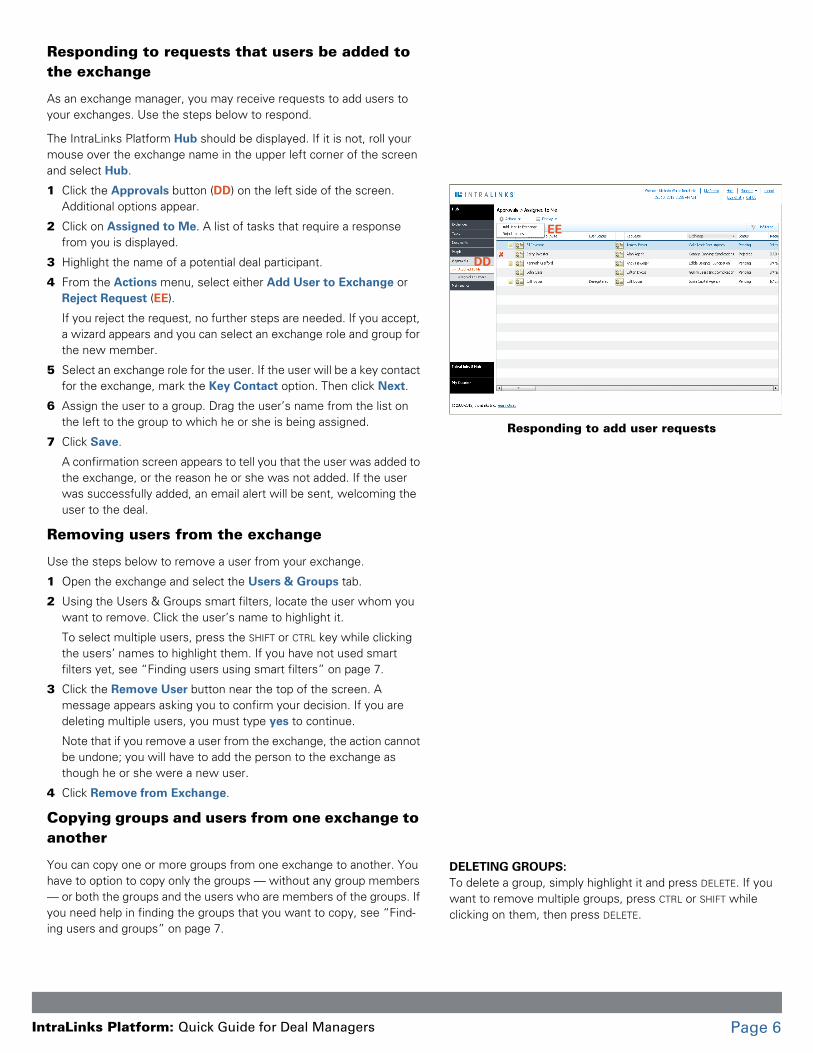
1 Click the Approvals button (DD) on the left side of the screen. Additional options appear.
2 Click on Assigned to Me. A list of tasks that require a response from you is displayed.
3 Highlight the name of a potential deal participant.
4 From the Actions menu, select either Add User to Exchange or Reject Request (EE).
If you reject the request, no further steps are needed. If you accept, a wizard appears and you can select an exchange role and group for the new member.
5 Select an exchange role for the user. If the user will be a key contact for the exchange, mark the Key Contact option. Then click Next.
6 Assign the user to a group. Drag the user’s name from the list on the left to the group to which he or she is being assigned.
7 Click Save.
A confirmation screen appears to tell you that the user was added to the exchange, or the reason he or she was not added. If the user was successfully added, an email alert will be sent, welcoming the user to the deal.
Removing users from the exchange
Use the steps below to remove a user from your exchange.
1 Open the exchange and select the Users & Groups tab.
2 Using the Users & Groups smart filters, locate the user whom you want to remove. Click the user’s name to highlight it.
To select multiple users, press the SHIFT or CTRL key while clicking the users’ names to highlight them. If you have not used smart filters yet, see “Finding users using smart filters” on page 7.
3 Click the Remove User button near the top of the screen. A message appears asking you to confirm your decision. If you are deleting multiple users, you must type yes to continue.
Note that if you remove a user from the exchange, the action cannot be undone; you will have to add the person to the exchange as though he or she were a new user.
4 Click Remove from Exchange.
Copying groups and users from one exchange to another
You can copy one or more groups from one exchange to another. You have to option to copy only the groups — without any group members — or both the groups and the users who are members of the groups. If you need help in finding the groups that you want to copy, see “Find-ing users and groups” on page 7.
Responding to add user requests
DD
EE
DELETING GROUPS: To delete a group, simply highlight it and press DELETE. If you want to remove multiple groups, press CTRL or SHIFT while clicking on them, then press DELETE.
ntraLinks Platform: Quick Guide for Deal Managers Page 6
I
The IntraLinks Platform Hub should be displayed. If it is not, roll your mouse over the exchange name in the upper left corner of the screen and select Hub.
1 Open the exchange that contains the group you want to copy.
2 Locate the group that you want to copy and highlight it.
3 Click the Copy Group button near the top of the screen.
4 Read the informational message, then click Close.
5 Return to the Hub and open the exchange where you want the copied group to appear, then select the Users & Groups tab.
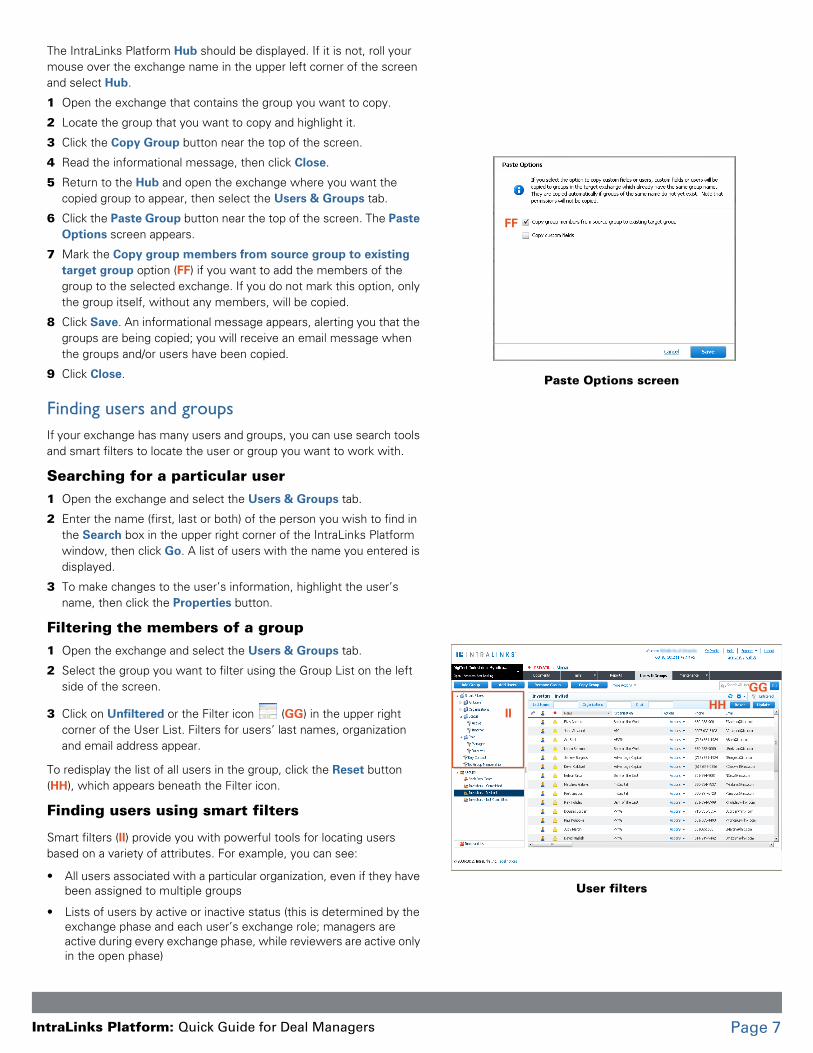
6 Click the Paste Group button near the top of the screen. The Paste Options screen appears.
7 Mark the Copy group members from source group to existing target group option (FF) if you want to add the members of the group to the selected exchange. If you do not mark this option, only the group itself, without any members, will be copied.
8 Click Save. An informational message appears, alerting you that the groups are being copied; you will receive an email message when the groups and/or users have been copied.
9 Click Close.
Finding users and groupsIf your exchange has many users and groups, you can use search tools and smart filters to locate the user or group you want to work with.
Searching for a particular user1 Open the exchange and select the Users & Groups tab.
2 Enter the name (first, last or both) of the person you wish to find in the Search box in the upper right corner of the IntraLinks Platform window, then click Go. A list of users with the name you entered is displayed.
3 To make changes to the user’s information, highlight the user’s name, then click the Properties button.
Filtering the members of a group1 Open the exchange and select the Users & Groups tab.
2 Select the group you want to filter using the Group List on the left side of the screen.
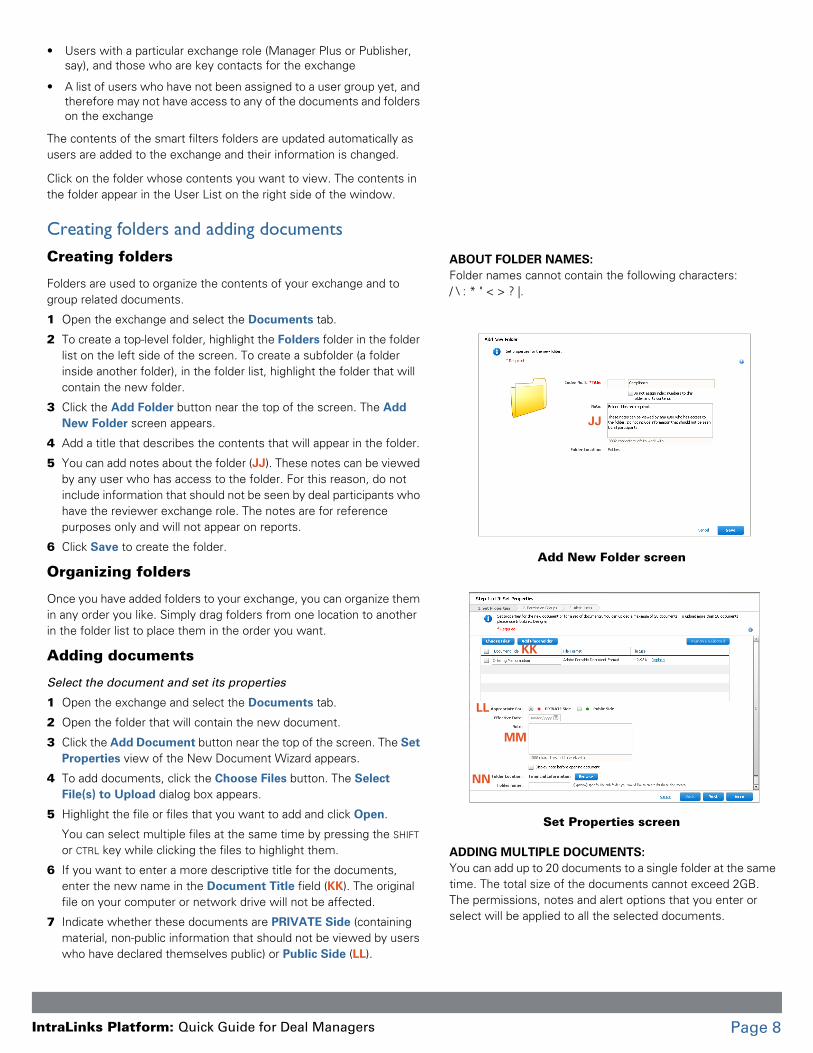
3 Click on Unfiltered or the Filter icon (GG) in the upper right corner of the User List. Filters for users’ last names, organization and email address appear.
To redisplay the list of all users in the group, click the Reset button (HH), which appears beneath the Filter icon.
Finding users using smart filters
Smart filters (II) provide you with powerful tools for locating users based on a variety of attributes. For example, you can see:
• All users associated with a particular organization, even if they have been assigned to multiple groups
• Lists of users by active or inactive status (this is determined by the exchange phase and each user’s exchange role; managers are active during every exchange phase, while reviewers are active only in the open phase)
Paste Options screen
FF
User filters
GGHH
II
ntraLinks Platform: Quick Guide for Deal Managers Page 7
I
• Users with a particular exchange role (Manager Plus or Publisher, say), and those who are key contacts for the exchange
• A list of users who have not been assigned to a user group yet, and therefore may not have access to any of the documents and folders on the exchange
The contents of the smart filters folders are updated automatically as users are added to the exchange and their information is changed.
Click on the folder whose contents you want to view. The contents in the folder appear in the User List on the right side of the window.
Creating folders and adding documentsCreating folders
Folders are used to organize the contents of your exchange and to group related documents.
1 Open the exchange and select the Documents tab.
2 To create a top-level folder, highlight the Folders folder in the folder list on the left side of the screen. To create a subfolder (a folder inside another folder), in the folder list, highlight the folder that will contain the new folder.
3 Click the Add Folder button near the top of the screen. The Add New Folder screen appears.
4 Add a title that describes the contents that will appear in the folder.
5 You can add notes about the folder (JJ). These notes can be viewed by any user who has access to the folder. For this reason, do not include information that should not be seen by deal participants who have the reviewer exchange role. The notes are for reference purposes only and will not appear on reports.
6 Click Save to create the folder.
Organizing folders
Once you have added folders to your exchange, you can organize them in any order you like. Simply drag folders from one location to another in the folder list to place them in the order you want.
Adding documents
Select the document and set its properties
1 Open the exchange and select the Documents tab.
2 Open the folder that will contain the new document.
3 Click the Add Document button near the top of the screen. The Set Properties view of the New Document Wizard appears.
4 To add documents, click the Choose Files button. The Select File(s) to Upload dialog box appears.
5 Highlight the file or files that you want to add and click Open.
You can select multiple files at the same time by pressing the SHIFT or CTRL key while clicking the files to highlight them.
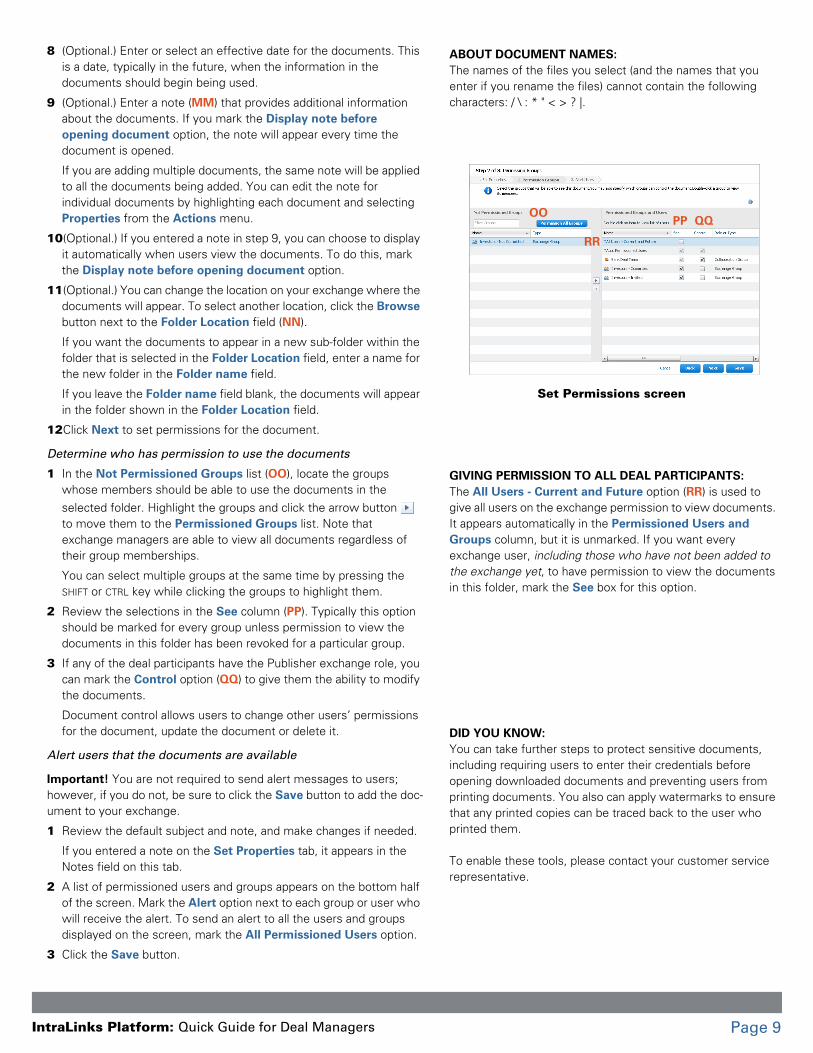
6 If you want to enter a more descriptive title for the documents, enter the new name in the Document Title field (KK). The original file on your computer or network drive will not be affected.
7 Indicate whether these documents are PRIVATE Side (containing material, non-public information that should not be viewed by users who have declared themselves public) or Public Side (LL).
ABOUT FOLDER NAMES:Folder names cannot contain the following characters: / \ : * " < > ? |.
Add New Folder screen
JJ
Set Properties screen
KK
LL
MM
NN
ADDING MULTIPLE DOCUMENTS:You can add up to 20 documents to a single folder at the same time. The total size of the documents cannot exceed 2GB. The permissions, notes and alert options that you enter or select will be applied to all the selected documents.
ntraLinks Platform: Quick Guide for Deal Managers Page 8
I
8 (Optional.) Enter or select an effective date for the documents. This is a date, typically in the future, when the information in the documents should begin being used.
9 (Optional.) Enter a note (MM) that provides additional information about the documents. If you mark the Display note before opening document option, the note will appear every time the document is opened.
If you are adding multiple documents, the same note will be applied to all the documents being added. You can edit the note for individual documents by highlighting each document and selecting Properties from the Actions menu.
10(Optional.) If you entered a note in step 9, you can choose to display it automatically when users view the documents. To do this, mark the Display note before opening document option.
11(Optional.) You can change the location on your exchange where the documents will appear. To select another location, click the Browse button next to the Folder Location field (NN).
If you want the documents to appear in a new sub-folder within the folder that is selected in the Folder Location field, enter a name for the new folder in the Folder name field.
If you leave the Folder name field blank, the documents will appear in the folder shown in the Folder Location field.
12Click Next to set permissions for the document.
Determine who has permission to use the documents
1 In the Not Permissioned Groups list (OO), locate the groups whose members should be able to use the documents in the selected folder. Highlight the groups and click the arrow button to move them to the Permissioned Groups list. Note that exchange managers are able to view all documents regardless of their group memberships.
You can select multiple groups at the same time by pressing the SHIFT or CTRL key while clicking the groups to highlight them.
2 Review the selections in the See column (PP). Typically this option should be marked for every group unless permission to view the documents in this folder has been revoked for a particular group.
3 If any of the deal participants have the Publisher exchange role, you can mark the Control option (QQ) to give them the ability to modify the documents.
Document control allows users to change other users’ permissions for the document, update the document or delete it.
Alert users that the documents are available
Important! You are not required to send alert messages to users; however, if you do not, be sure to click the Save button to add the doc-ument to your exchange.
1 Review the default subject and note, and make changes if needed.
If you entered a note on the Set Properties tab, it appears in the Notes field on this tab.
2 A list of permissioned users and groups appears on the bottom half of the screen. Mark the Alert option next to each group or user who will receive the alert. To send an alert to all the users and groups displayed on the screen, mark the All Permissioned Users option.
3 Click the Save button.
ABOUT DOCUMENT NAMES:The names of the files you select (and the names that you enter if you rename the files) cannot contain the following characters: / \ : * " < > ? |.
Set Permissions screen
OOPP QQ
RR
GIVING PERMISSION TO ALL DEAL PARTICIPANTS:The All Users - Current and Future option (RR) is used to give all users on the exchange permission to view documents. It appears automatically in the Permissioned Users and Groups column, but it is unmarked. If you want every exchange user, including those who have not been added to the exchange yet, to have permission to view the documents in this folder, mark the See box for this option.
DID YOU KNOW:You can take further steps to protect sensitive documents, including requiring users to enter their credentials before opening downloaded documents and preventing users from printing documents. You also can apply watermarks to ensure that any printed copies can be traced back to the user who printed them.
To enable these tools, please contact your customer service representative.
ntraLinks Platform: Quick Guide for Deal Managers Page 9

I
Changing documents’ public/private designation
Use the steps below to change the public or private designation for documents that were added to the exchange previously.
1 Open the exchange and select the Documents tab.
2 Using the Documents smart filters, locate the document whose designation you want to change and highlight it.
To select multiple documents, press the SHIFT or CTRL key while clicking the documents to highlight them.
3 From the More Actions menu, select Set PRIVATE/Public. The Set PRIVATE/Public screen appears.
4 Select either PRIVATE or Public for the documents.
5 Click Save.
Moving documentsMoving documents is as easy as dragging them from their original loca-tion and dropping in the location where you want for them to appear.
• You can select several documents and move them at the same time. Press the SHIFT or CTRL key while clicking on each document; continuing to press the SHIFT or CTRL key, drag the documents to their new location.
• When you drag and drop documents in IntraLinks, the documents are moved; they are not copied.
• If you want to undo a move action, select the Undo Move command (SS) from the More Actions menu.
Downloading multiple documents1 In the Documents List, highlight the documents and/or the folders
whose contents you want to download. You can select multiple documents and folders at the same time by pressing the SHIFT or CTRL key while clicking the items to highlight them.
2 Click the Download button near the top of the screen. The Download Wizard appears.
3 Follow the instructions that appear on your screen.
Deleting documentsTo delete one or more documents, follow the procedure below or sim-ply highlight the document(s) and press the DELETE key. Use care when deleting documents; once a document has been deleted, the action cannot be undone.
1 Open the exchange and select the Documents tab.
2 Using the Documents smart filters, locate the document that you want to delete and highlight it.
To select multiple documents, press the SHIFT or CTRL key while clicking the documents to highlight them.
3 From the More Actions menu, select Delete Documents. A message appears asking you to confirm your decision.
4 Click Delete.
Undo Move command
SS
BEFORE YOU DOWNLOAD:In order for you to use Download Wizard, Microsoft .NET Framework 2.0 or a later version must be installed on your computer.
Download Wizard
ntraLinks Platform: Quick Guide for Deal Managers Page 10
I
Copying and pasting documentsYou can copy any document or folder and paste it into another location on the exchange or into another exchange if you have the rights to add folders and documents in the new location. (That is, if you are a man-ager or publisher on the exchange where you want to paste the items.)
Protected Microsoft Office and PDF documents can be pasted only in the exchange where they originated.
To copy and paste documents, use the Copy and Paste commands on the Actions menu.
Finding documents within an exchangeDepending upon how your exchange has been set up, you can perform either basic searches or full-text searches. Basic searches find terms only if they appear in document or folder titles or notes. Full-text searches also find terms within the contents of the documents.
Searching for a document
1 Open the exchange and select the Documents tab.
2 Enter your search term in the Search box in the upper right corner of the IntraLinks Platform window, then click Go. A list of documents that contain your search term is displayed.
The search results you see are based on basic document information (the documents’ titles and notes). If the exchange manager has chosen to enable full-text search, all the content of documents is searched, as well.
3 To open the document you wish to review, double-click it.
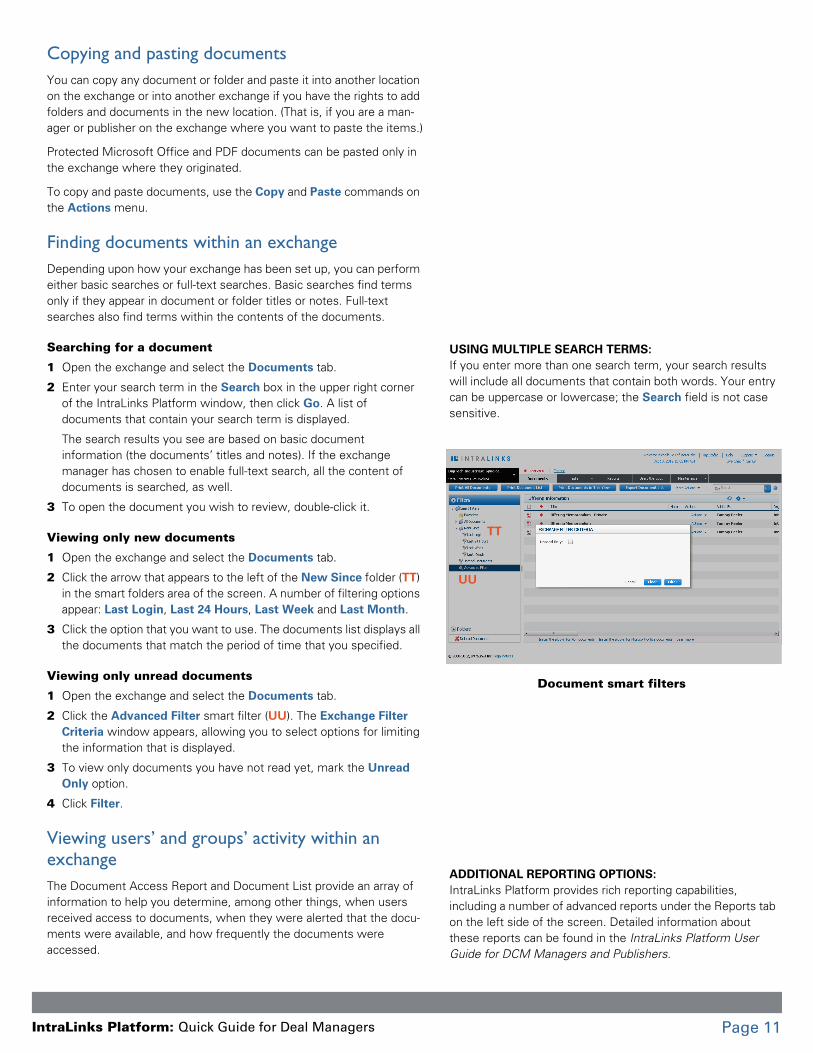
Viewing only new documents
1 Open the exchange and select the Documents tab.
2 Click the arrow that appears to the left of the New Since folder (TT) in the smart folders area of the screen. A number of filtering options appear: Last Login, Last 24 Hours, Last Week and Last Month.
3 Click the option that you want to use. The documents list displays all the documents that match the period of time that you specified.
Viewing only unread documents
1 Open the exchange and select the Documents tab.
2 Click the Advanced Filter smart filter (UU). The Exchange Filter Criteria window appears, allowing you to select options for limiting the information that is displayed.
3 To view only documents you have not read yet, mark the Unread Only option.
4 Click Filter.
Viewing users’ and groups’ activity within an exchangeThe Document Access Report and Document List provide an array of information to help you determine, among other things, when users received access to documents, when they were alerted that the docu-ments were available, and how frequently the documents were accessed.
USING MULTIPLE SEARCH TERMS:If you enter more than one search term, your search results will include all documents that contain both words. Your entry can be uppercase or lowercase; the Search field is not case sensitive.
Document smart filters
TT
UU
ADDITIONAL REPORTING OPTIONS:IntraLinks Platform provides rich reporting capabilities, including a number of advanced reports under the Reports tab on the left side of the screen. Detailed information about these reports can be found in the IntraLinks Platform User Guide for DCM Managers and Publishers.
ntraLinks Platform: Quick Guide for Deal Managers Page 11
I
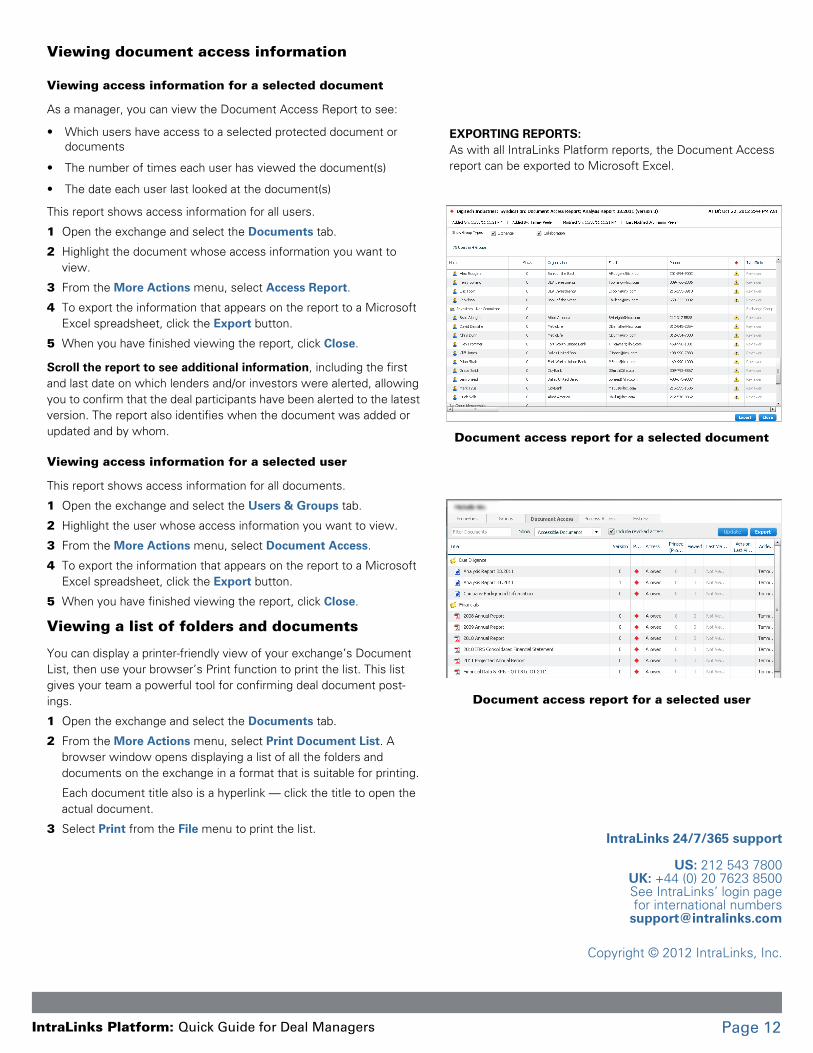
Viewing document access information
Viewing access information for a selected document
As a manager, you can view the Document Access Report to see:
• Which users have access to a selected protected document or documents
• The number of times each user has viewed the document(s)
• The date each user last looked at the document(s)
This report shows access information for all users.
1 Open the exchange and select the Documents tab.
2 Highlight the document whose access information you want to view.
3 From the More Actions menu, select Access Report.
4 To export the information that appears on the report to a Microsoft Excel spreadsheet, click the Export button.
5 When you have finished viewing the report, click Close.
Scroll the report to see additional information, including the first and last date on which lenders and/or investors were alerted, allowing you to confirm that the deal participants have been alerted to the latest version. The report also identifies when the document was added or updated and by whom.
Viewing access information for a selected user
This report shows access information for all documents.
1 Open the exchange and select the Users & Groups tab.
2 Highlight the user whose access information you want to view.
3 From the More Actions menu, select Document Access.
4 To export the information that appears on the report to a Microsoft Excel spreadsheet, click the Export button.
5 When you have finished viewing the report, click Close.
Viewing a list of folders and documents
You can display a printer-friendly view of your exchange’s Document List, then use your browser’s Print function to print the list. This list gives your team a powerful tool for confirming deal document post-ings.
1 Open the exchange and select the Documents tab.
2 From the More Actions menu, select Print Document List. A browser window opens displaying a list of all the folders and documents on the exchange in a format that is suitable for printing.
Each document title also is a hyperlink — click the title to open the actual document.
3 Select Print from the File menu to print the list.
EXPORTING REPORTS:As with all IntraLinks Platform reports, the Document Access report can be exported to Microsoft Excel.
Document access report for a selected document
Document access report for a selected user
IntraLinks 24/7/365 support
US: 212 543 7800UK: +44 (0) 20 7623 8500See IntraLinks’ login pagefor international numbers
Copyright © 2012 IntraLinks, Inc.
ntraLinks Platform: Quick Guide for Deal Managers Page 12