intraoral scanners: what they could mean for your oral and
TRANSCRIPT
1
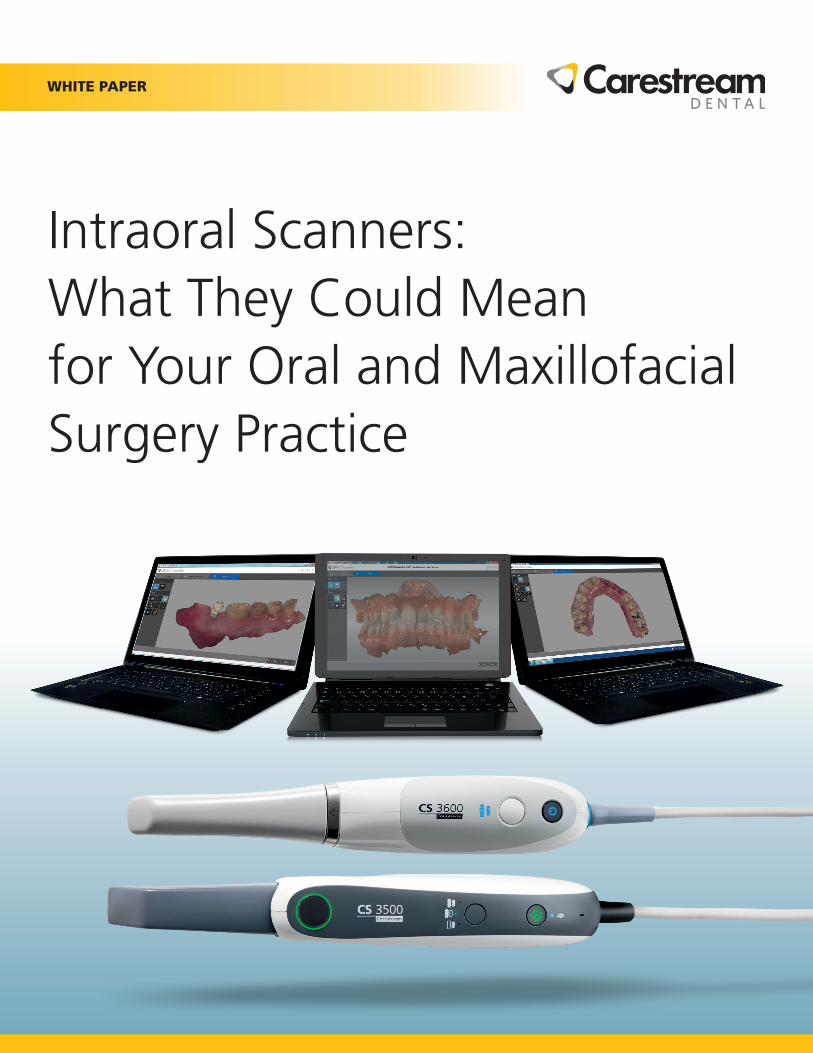
Intraoral Scanners:What They Could Mean for Your Oral and Maxillofacial Surgery Practice
WHITE PAPER
2
Table of Contents
Introduction 3
Surgical Uses of the Intraoral Scanner 4
Implant Dentistry: Conventional versus Digital Impressions 6
Standard Abutment versus a Scan Body 8
How to Scan a Standard Abutment or a Scan Body 9
Workflows for Standard Abutment or a Scan Body 10
Digital Workflow for the Lab 12
Scanning For Guided Surgery 12
Intraoral Scanner Advantages 13
Return on Investment 14
About Carestream Dental 15
WHITE PAPER
3
Introduction
By now you’ve undoubtedly heard a lot about 3D intraoral scanners and how they’re revolutionizing dentistry. Most of the attention has focused on the restorative aspects of this exciting technology. What you may not realize is that these advancements in digital impressions have a tremendous impact on the field of oral surgery, too.
When you incorporate a 3D intraoral scanner into your workflow, you can create your treatment plan virtually and execute it with more proficiency. Intraoral scanning allows labs to fabricate surgical guides, which eliminate any guesswork, enabling you to place implants with greater precision. Once the implants are in place, the digital workflow continues: you can place and scan standard abutments or perform digital fixture level impressions and fabricate custom abutments. You can collaborate with your referring dentist on a comprehensive treatment plan, from the placement of the implant to the final restoration.
This white paper examines the various ways intraoral scanning facilitates oral surgery procedures. It also explores the benefits to be gained: enhanced communication with your referrals, better outcomes for your patients, greater patient loyalty to you and a healthier bottom line for your practice.
“Intraoral scanning can mean enhanced referral communication, better outcomes, and greater patient loyalty.”
WHITE PAPER

4
Surgical Uses of the Intraoral Scanner
Intraoral scanning offers many advantages: it can minimize workups, reduce treatment times, and maximize the overall efficiency of your surgical procedures.
There are four surgical uses for the scanner. See Figure 1: Four Surgical Uses of an Intraoral Scanner
Treatment planning and acceptance
• Facilitates communication with referring dentist who will be responsible for performing the final restoration, which allows both doctors to work together to optimize surgical and restorative outcomes• Improves patient understanding of the need for treatment and treatment plan• Increases treatment acceptance rates• Provides the patient with a better estimation of both the length and cost of the procedure
Orthognathic surgery
• Enables you to plan virtual orthognathic surgical cases from digital intraoral scans and CBCT DICOM files• Allows lab to fabricate exact and provisional final appliances directly from the digital workup
Oral appliances and mouth guards
• Facilitates creation of non-invasive oral appliances for treating sleep apnea and custom mouth guards for athletes
Basic surgical guides (when used in conjunction with CBCT)
• Prevents malposition• Removes the potential for errors associated with the conventional, multi-step impression-creation process• Helps to minimize the need for custom abutments during the restorative phase.
WHITE PAPER
basic surgical guides
treatment planning & acceptance orthognathic surgery
oral appliances & mouth guards
Figure 1: Four Surgical Uses of an Intraoral Scanner
5
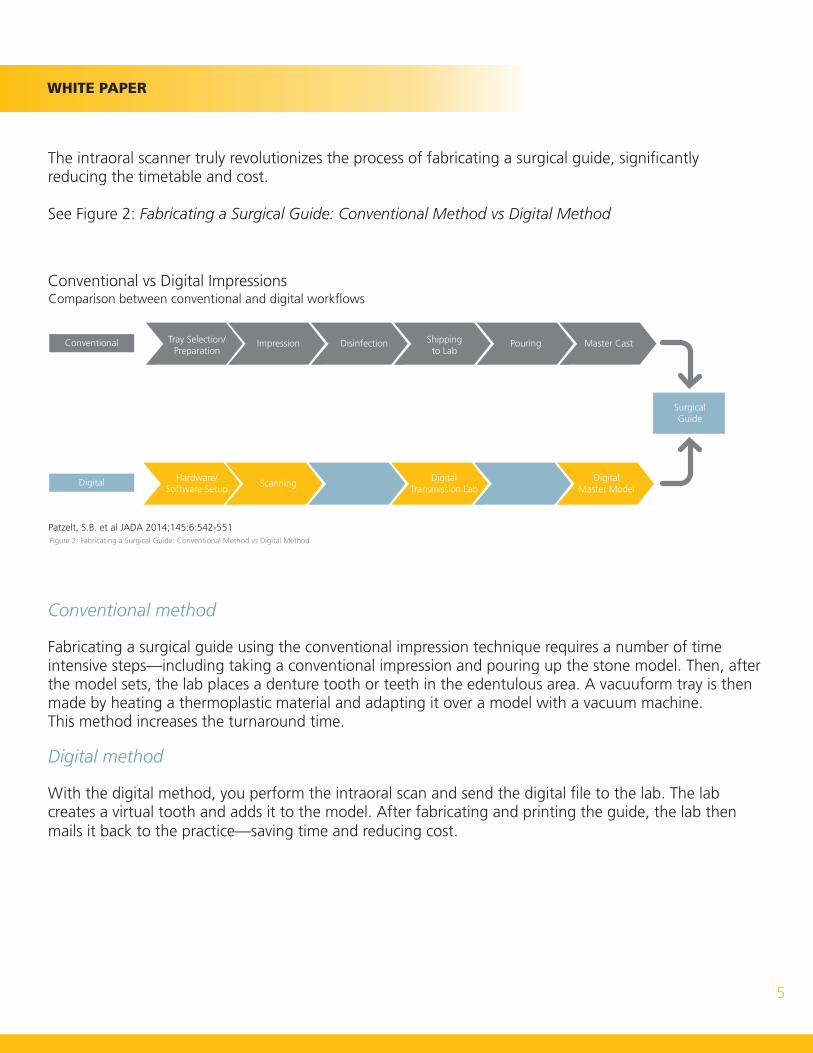
The intraoral scanner truly revolutionizes the process of fabricating a surgical guide, significantly reducing the timetable and cost.
See Figure 2: Fabricating a Surgical Guide: Conventional Method vs Digital Method
Conventional method
Fabricating a surgical guide using the conventional impression technique requires a number of time intensive steps—including taking a conventional impression and pouring up the stone model. Then, after the model sets, the lab places a denture tooth or teeth in the edentulous area. A vacuuform tray is then made by heating a thermoplastic material and adapting it over a model with a vacuum machine. This method increases the turnaround time.
Digital method
With the digital method, you perform the intraoral scan and send the digital file to the lab. The lab creates a virtual tooth and adds it to the model. After fabricating and printing the guide, the lab then mails it back to the practice—saving time and reducing cost.
WHITE PAPER
Tray Selection/Preparation
Shippingto Lab
Pouring Master CastImpression DisinfectionConventional
Hardware/Software Setup
Digital Transmission Lab
Digital Master Model
ScanningDigital
Surgical Guide
Patzelt, S.B. et al JADA 2014;145:6:542-551Figure 2: Fabricating a Surgical Guide: Conventional Method vs Digital Method
Conventional vs Digital Impressions

6
Implant Dentistry: Conventional versus Digital Impressions
Once the implant is in place and osseointegration occurs, it’s time to decide what type of abutment to use: a standard abutment or a custom abutment.
The criteria for choosing a standard or custom abutment remains the same when using either a conventional or digital impression. What does change, however, is the process: potentially cumbersome and timely or streamlined and accurate—depending on which option you choose.
Conventional Impression Process
Conventional impression for a standard abutmentIn this scenario, an impression coping is placed on top of the abutment and a conventional paste impression is taken. Once it sets, the tray is removed that contains with the impression material and the coping. An implant analog is placed into the coping and sent to the lab, who then pours the stone model.
Conventional impression for a custom abutmentIn this scenario, a conventional impression is taken of the top of the implant fixture, which allows for the fabrication of a connector specific for each patient. A fixture-level impression coping is placed inside the implant and then another conventional paste impression is taken. The lab uses the impression to pour up a stone model and wax up a custom abutment, which is then invested, casted and polished.
The conventional impression technique has a number of steps that allow for the introduction of errors.
“The technique for creating conventional impressions allows for the introduction of errors, resulting in inconsistent outcomes and lost income.”
This has a direct impact on patient care: you can’t accurately predict the length of a crown insertion appointment, and the outcomes can be inconsistent. The result? Unknown chair time.
Digital Impression Process
Digital impression for a standard abutment In this scenario, standard abutments are torqued into position and then the area is scanned to create the digital impression. It is not necessary to scan the entire mouth, which saves valuable chair time. The digital impression file is then sent to the referring dentist or the lab for the fabrication of the final restoration.
WHITE PAPER

7
Digital impression for a custom abutment In this scenario, a custom abutment requires a fixture-level impression. With analog dentistry you would have to place a fixture-level impression coping. With digital dentistry, you can place a scan body, which is the digital equivalent of a fixture-level impression coping. You can remove the scanned data where the scan bodies are placed, and simply rescan. The final files can be viewed side-by-side for a comparison of before and after, and can be sent to the referring dentist or the lab for the fabrication of the final restoration.
Scan bodies are implant- and digital-lab specific; you have to request these from the digital lab for the specific implant.
WHITE PAPER
8
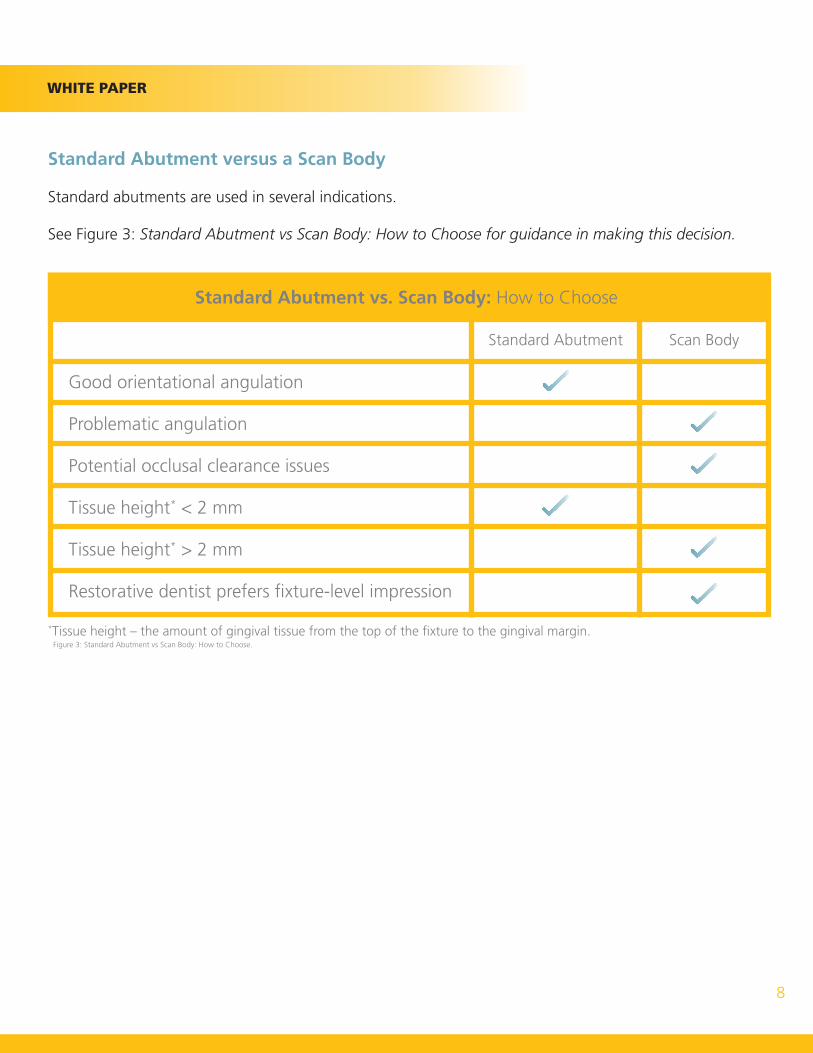
Standard Abutment versus a Scan Body
Standard abutments are used in several indications.
See Figure 3: Standard Abutment vs Scan Body: How to Choose for guidance in making this decision.
WHITE PAPER
Standard Abutment vs. Scan Body: How to Choose
Good orientational angulation
Standard Abutment Scan Body
Problematic angulation
Potential occlusal clearance issues
Tissue height* < 2 mm
Tissue height* > 2 mm
Restorative dentist prefers fixture-level impression
*Tissue height – the amount of gingival tissue from the top of the fixture to the gingival margin.Figure 3: Standard Abutment vs Scan Body: How to Choose.

9
How to Scan a Standard Abutment or a Scan Body
Scanning basics
It’s important to know the proper technique for using an intraoral scanner with a scan body. If a tooth is located behind the cuspid, you should scan the sextant up to—and including—the cuspid. If the implant is an anterior tooth, located from cuspid to cuspid, you should scan that sextant. When scanning a scan body, it is important to do a tissue scan as well.
For the majority of the scanning, use the large tip of the scanner. It can also function as a retractor to retract the cheek or tongue. As you are scanning, it’s important to overlap each capture by about 30 percent.
The best scans are typically achieved by following a consistent scanning protocol, and it is recommended to scan as follows, i.e. for the mandibular arch:
The best scans are typically achieved by following a consistent scanning protocol, and it is recommended to scan as follows:
WHITE PAPER
Start with the occlusal from the patient’s left all the way around the anterior on the patient’s right.
Drop the scanner 45 degrees to the patient’s buccal and work the scanner across the patient’s right to the anterior to the lower left.
Tilt the scanner 45 degrees on to the lingual and scan from the patient’s mandibular left to the anterior lingual and keep going to the patient’s mandibular right.
Start with the occlusal from the patient’s left all the way around the anterior on the patient’s right.
Please note: The scanner needs to see the margin of the standard abutment. If the sulcus around the abutment is deeper than 2mm, it will be difficult for the scanner to pick up the margin. To help the scanner see the margin you must follow good impression taking techniques to ensure proper tissue retraction and hemostasis. Remember, if you cannot see the margin the scanner cannot see the margin.
Please note: If you selected a custom hole-filling color in the scanner’s Preferences section, then you would identify any holes in your impression by your custom color instead of the default blue color.
10
Workflows for Standard Abutment or a Scan Body
There are two separate scanning workflows: one for a standard abutment, and one for a scan body.
Workflow for standard abutments scanning
With a standard abutment, the dentist determines the size according to the interocclusal dimension and gingival height.
Workflow for scan bodies scanning
For a custom abutment treatment, the workflow is slightly different, and it’s necessary to use a scan body. Scan bodies are implant-type specific (i.e., type and width) and milling or digital-lab specific. These must be requested from the laboratory: “I am going to be scanning a [name of implant and width of implant]” and the lab will send the proper scan body.
WHITE PAPER
Insert the abutment to the appropriate torque.
Verify its seating by taking a radiograph.
Click on the restorative icon.
Place a protective cap or temporary restoration and send the patient home.
Take scans of:
Export the .STL digital file to the digital lab.
Remember: you must see the margin or the finish line of the abutment placed in your scan. After the scan is refined, check for missing data. If you see any blue areas that the computer automatically filled in, you must rescan before your patient’s appointment is finished.
• Standard abutment with two adjacent teeth.• Corresponding teeth on the opposing arch.• Patient’s normal closed bite (maximum intercuspation)
11
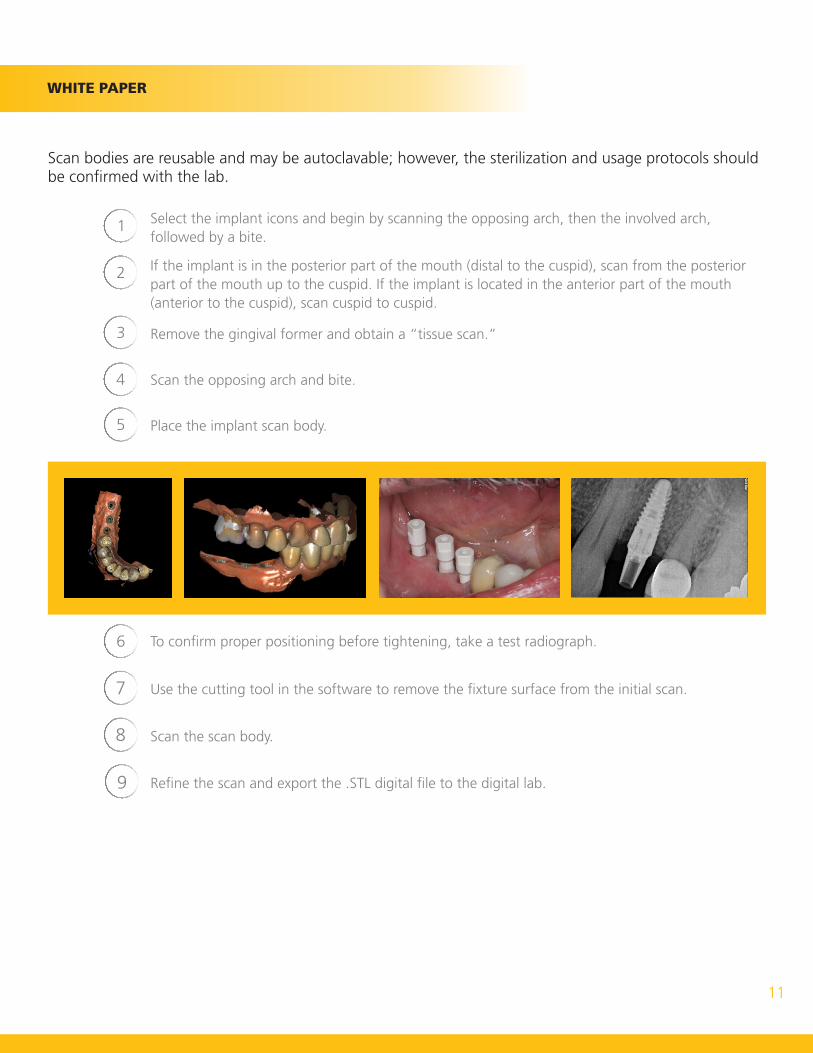
Scan bodies are reusable and may be autoclavable; however, the sterilization and usage protocols should be confirmed with the lab.
WHITE PAPER
Select the implant icons and begin by scanning the opposing arch, then the involved arch, followed by a bite.
If the implant is in the posterior part of the mouth (distal to the cuspid), scan from the posterior part of the mouth up to the cuspid. If the implant is located in the anterior part of the mouth (anterior to the cuspid), scan cuspid to cuspid.
Remove the gingival former and obtain a “tissue scan.”
Place the implant scan body.
Use the cutting tool in the software to remove the fixture surface from the initial scan.
Scan the opposing arch and bite.
To confirm proper positioning before tightening, take a test radiograph.
Scan the scan body.
Refine the scan and export the .STL digital file to the digital lab.
12
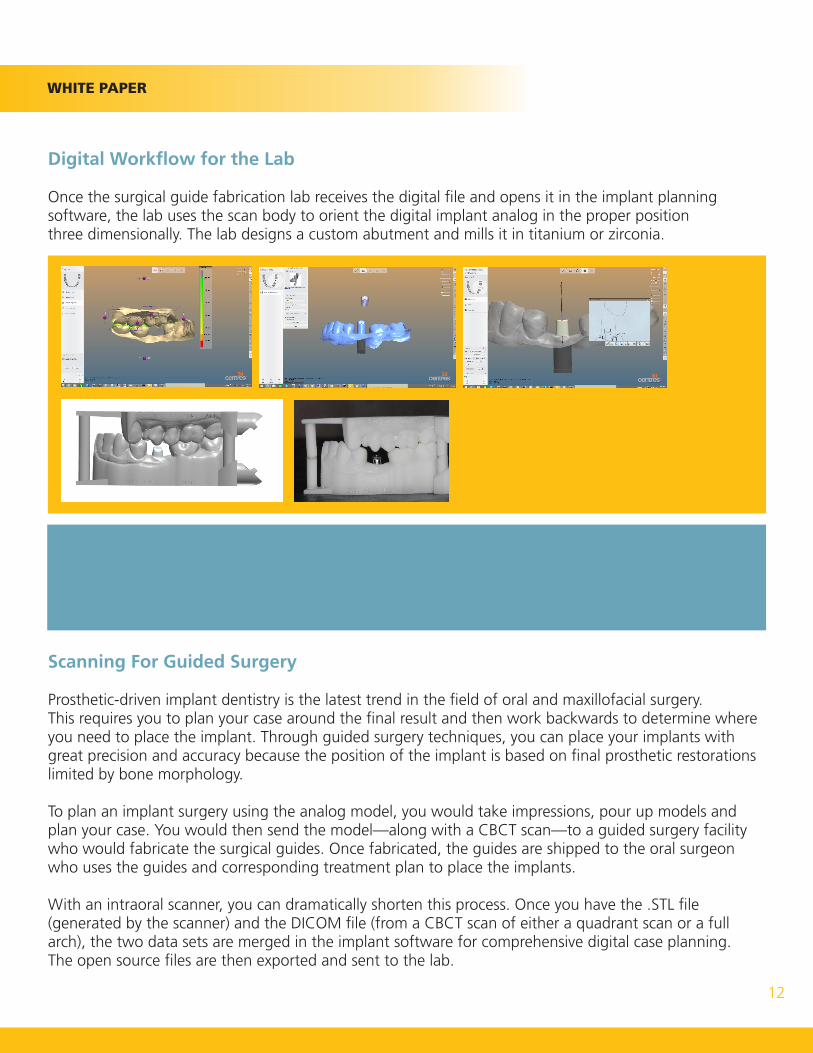
Digital Workflow for the Lab
Once the surgical guide fabrication lab receives the digital file and opens it in the implant planning software, the lab uses the scan body to orient the digital implant analog in the proper position three dimensionally. The lab designs a custom abutment and mills it in titanium or zirconia.
Scanning For Guided Surgery
Prosthetic-driven implant dentistry is the latest trend in the field of oral and maxillofacial surgery. This requires you to plan your case around the final result and then work backwards to determine where you need to place the implant. Through guided surgery techniques, you can place your implants with great precision and accuracy because the position of the implant is based on final prosthetic restorations limited by bone morphology.
To plan an implant surgery using the analog model, you would take impressions, pour up models and plan your case. You would then send the model—along with a CBCT scan—to a guided surgery facility who would fabricate the surgical guides. Once fabricated, the guides are shipped to the oral surgeon who uses the guides and corresponding treatment plan to place the implants.
With an intraoral scanner, you can dramatically shorten this process. Once you have the .STL file (generated by the scanner) and the DICOM file (from a CBCT scan of either a quadrant scan or a full arch), the two data sets are merged in the implant software for comprehensive digital case planning. The open source files are then exported and sent to the lab.
WHITE PAPER
Please note: If the digital lab has the capability to mill the crown, the lab sends back the printed or milled model with an implant analog, custom-milled abutment and a milled crown. Other labs send back the milled model with the custom-milled abutment and an implant analog in place so that your lab can do the porcelain.
13
Intraoral Scanner Advantages
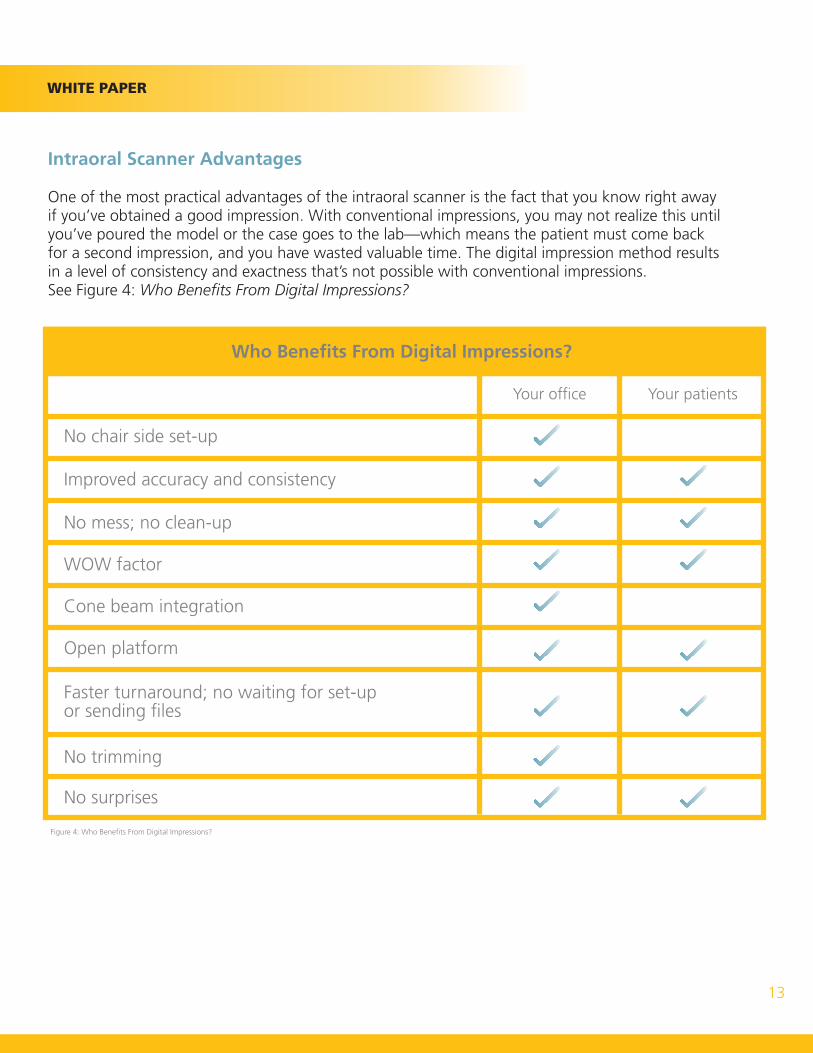
One of the most practical advantages of the intraoral scanner is the fact that you know right away if you’ve obtained a good impression. With conventional impressions, you may not realize this until you’ve poured the model or the case goes to the lab—which means the patient must come back for a second impression, and you have wasted valuable time. The digital impression method results in a level of consistency and exactness that’s not possible with conventional impressions. See Figure 4: Who Benefits From Digital Impressions?
WHITE PAPER
Who Benefits From Digital Impressions?
No chair side set-up
Your office Your patients
Improved accuracy and consistency
No mess; no clean-up
WOW factor
Cone beam integration
Open platform
Faster turnaround; no waiting for set-up or sending files
No surprises
No trimming
Figure 4: Who Benefits From Digital Impressions?
14
Return on Investment
One of the biggest uses for an intraoral scanner is in guided surgery: you can take a scan and use the .STL file in place of the model. You then merge this file with the DICOM file of the CBCT and use implant planning software to plan the case and fabricate the guide.
Another way to increase ROI is with your referral base. When a case calls for a standard abutment, you can place it and scan the patient’s mouth. You can then send the digital file to the lab of the referring dentist’s choice, where the lab fabricates the crown, according to the specifications of the referring dentist. The lab then sends the crown to the dentist for placement. With this workflow, you save valuable chair time for the referring dentist by eliminating the visit for scanning for the restoration.
When a case calls for a custom abutment, place a scan body and scan it. Send the file to a digital lab, who will design the custom abutment. Once approved, the lab fabricates the custom abutment and sends it to the referring dentist.
After the dentist selects a shade, the lab fabricates the crown. When this workflow is chosen, the dentist generally receives both the bill for the custom abutment and the restoration, and invoices the patient for both services.
All of these examples result in making the implant process easier and more controllable, which means you can improve referral collaboration and communication.
There are several ways that the referring dentist benefits from intraoral scanning. First, the specialist handles the impression visit—instead of the dentist—which saves the dentist chair time for a previously non-chargeable procedure. This translates into reduced costs for impression supplies and materials. The referring dentist also saves chair time during crown adjustment at the insertion appointment because the process requires less time.
WHITE PAPER
15
ABOUT CARESTREAM DENTAL
From the first dental radiographic film and the world’s first digital intraoral sensors to cutting-edge low dose 3D imaging technology, Carestream Dental consistently invests in research and development to continue innovations in the field of oral surgery and to better address and anticipate the needs of dental professionals in general.
Helping oral surgery practices succeed through the use of technology is Carestream Dental’s primary goal. Devoted to delivering diagnostic excellence, humanized technology, and streamlined workflows, Carestream Dental’s product portfolio includes oral surgical-specific practice management software; oral surgical imaging software; intraoral digital impression systems; panoramic and cephalometric imaging; and 3D imaging systems, as well as other intraoral and extraoral imaging equipment.
For over 100 years, Carestream Dental has provided dental professionals across the globe with the imaging tools and information they need to work more efficiently and to better serve their patients. Currently, Carestream Dental products can be found in 7 out of 10 dental practices worldwide and are sold in over 108 countries. Find out why they’ve chosen Carestream Dental: visit carestreamdental.com.
© Carestream Health, 2016. 13892 AL CS Solutions White Paper 0516
WHITE PAPER