intro to portal - university of memphis
TRANSCRIPT

Intro to the Portal Page 1 of 20
Updated: 10/08/2014
Introduction to the Portal

Intro to the Portal Page 2 of 20
Updated: 10/08/2014
Table of Contents
General Information .................................................................
3
Chapter 1: What is the myMemphis Portal .............................
4
Chapter 2: Content Layout ...................................................... Introduction to Tabs, Channels, and Controls .............................
Customizing Tabs .......................................................................... Working with Columns and Channels ……………………………………
5 5
7 11
Chapter 3: Additional Portal Functionality .............................. Announcements .............................................................................
Other Portal Functions ...................................................................
17 17
18
Appendix A: myMemphis Portal Quick Tips ............................
20
Intro to the Portal Page 3 of 20
Updated: 10/08/2014
General Information
Purpose This course introduces the University staff to the myMemphis portal and highlights some of
its key features.
Audience This course is designed for all University staff since all will be utilizing the myMemphis portal
functions in some respect. Participants do not need to have an understanding of Banner for
this training.
Learning Outcomes On completion of this course, you will be able to:
Understand what the Portal is and log into it
Identify key features within the Portal, such as Tabs and Channels
Customize your Portal pages
Intro to the Portal Page 4 of 20
Updated: 10/08/2014
Chapter 1: What is the myMemphis Portal? MyMemphis is the University initiative to integrate administrative and educational functions
campus-wide.
The myMemphis Portal
The myMemphis portal is an online tool that allows users to access many University systems
from one location. In addition, the portal offers personalized content and individual
customization.
The official myMemphis portal web site is http://my.memphis.edu. Users may access the
Portal anytime from any computer with an Internet connection.
You will log in to the portal with your University of Memphis Universal User Identification
(UUID) and password. The UUID and password are required to enter the portal and are the
same one used to login to the University e-mail and UMdrive accounts.
NOTE: The portal has a time out of one hour. This means that after being inactive for
one hour the portal will prompt you with a message if you would like to continue. If
you do not choose to continue you will be logged out. This is a security feature.
Logging in to the myMemphis Portal
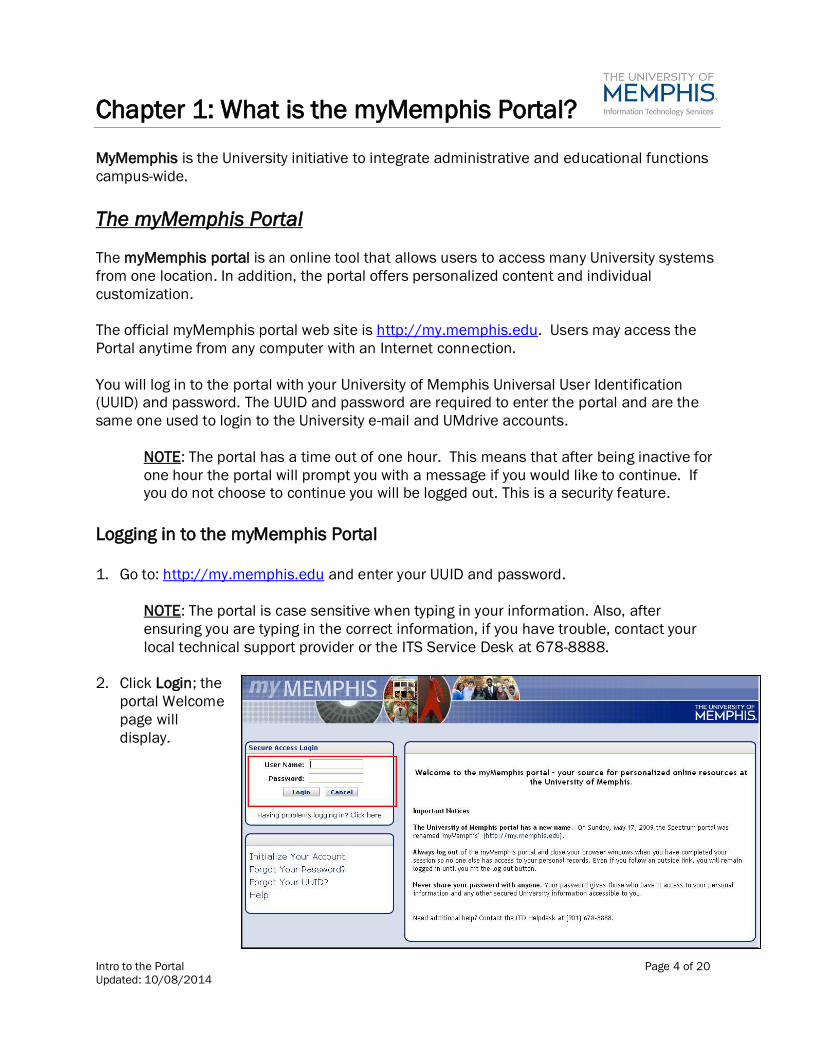
1. Go to: http://my.memphis.edu and enter your UUID and password.
NOTE: The portal is case sensitive when typing in your information. Also, after
ensuring you are typing in the correct information, if you have trouble, contact your
local technical support provider or the ITS Service Desk at 678-8888.
2. Click Login; the
portal Welcome
page will
display.

Intro to the Portal Page 5 of 20
Updated: 10/08/2014
Chapter 2: Content Layout
Section 1 – Introduction to Tabs, Channels, and Controls
Within the Welcome page you will see a series of “tabs” directly under your name. These
tabs are generated based on the roles you hold at the University. For example, if you are a
University faculty member, you have a Faculty tab, if you are an employee of the University,
you have an Employee tab; students have a series of student tabs, etc...
Tabs
Below are all of the current roles and default tabs for each of the established roles within
the myMemphis portal.
Role Default Tabs
Advisor Home, eCampus Resources, Advising*
Employee Home, eCampus Resources, Employee, Finance
Faculty
Home, eCampus Resources, Faculty, eCampus
Faculty
Former Employee Home, eCampus Resources, Employee, Finance
Prospective Student
Home, eCampus Resources, Student, Account$,
eCampus Student
Student
Home, eCampus Resources, Student, Account$,
eCampus Student
Other manually-assigned roles Specialized tabs as needed and assigned
*only visible if the user has Advisor role but NOT Faculty role

Intro to the Portal Page 6 of 20
Updated: 10/08/2014
Upon entering the portal, if you discover that not all of your appropriate
tabs are there contact the umTech Service Desk at 678-8888.
Remember, tabs displayed are based on role so not all tabs will appear for everyone.
Channels
Each tab is comprised of a series of “channels.” Channels contain information and often
feature clickable hyperlinks to additional content. Each of the default tabs described above
contains a predetermined set of channels appropriate to the employee role identified with
that tab.
Below are all of the default channels for each tab*.
Tab Default Channel
Bursar – Fees, Payments, Disbursements & Refunds; Tuition
Estimator; Financial Aid Requirements; Financial Aid Awards;
Financial Bookmarks; On-Campus Student Employment;
Financial Aid Office; View My Financial Aid; Scholarship Office
Advising Forms; Advisor Dashboard; Course Catalog/Schedule;
Banner Self-Service; Banner INB; My Banner
eCourseware, UM Online, RODP, Campus Connections,
Emerging Technology, Tools to Enhance Teaching, Learning
Object/Open Courseware Repositories; eCampus; Best
Practices; Intellectual Property
UMDrive; eCourseware; eLearn; Ask TOM; Library Links
Prepare to Learn; Academic Integrity; eCourseware; eTools;
Explore; Succeed; Help; eCampus Contacts
Time/Leave Reporting; Time Approval; Employment Details;
Personal Information; Banner INB; Banner Reference
Information; e~Print; Campus Work Requests; Safety
Information; Bursar – Fees, Payments, Disbursements &
Refunds; Faculty and Staff Giving Program; Staff Links; Job
Announcements
Finance – Banner Self Service; Banner INB; Banner Reference
Information; e~Print; Requistions & POs; Approval Alerts; My
Banner; Financial Advisor
Group Announcements; Campus Announcements; myMemphis
Channel Information; Sticky Note; UMSearch; Ask TOM; Carpool
Information; Bookmarks
Registration; Important Dates; Schedule Planning; Registrar;
Banner Self-Service; Registration Tools; SIRS Course
Evaluations; SIRS Reports
*Due to the evolutionary nature of the portal, these defaults may be altered in the future.

Intro to the Portal Page 7 of 20
Updated: 10/08/2014
Controls
Each channel contains controls in the upper-right corner. However, not all channels have the
same controls.
Control Description
Denotes that the channel has editing controls.
Represents viewing in Full Screen.
Represents minimizing the channel.
Indicates that you may remove the channel from
the tab.
Indicates a permanent channel that you may not
close or move around on the tab.
Section 2 – Customizing Tabs
1. Under the myMemphis logo, click the Content Layout link.
The Manage Content/Layout page will appear.
Intro to the Portal Page 8 of 20
Updated: 10/08/2014
Adding Tabs
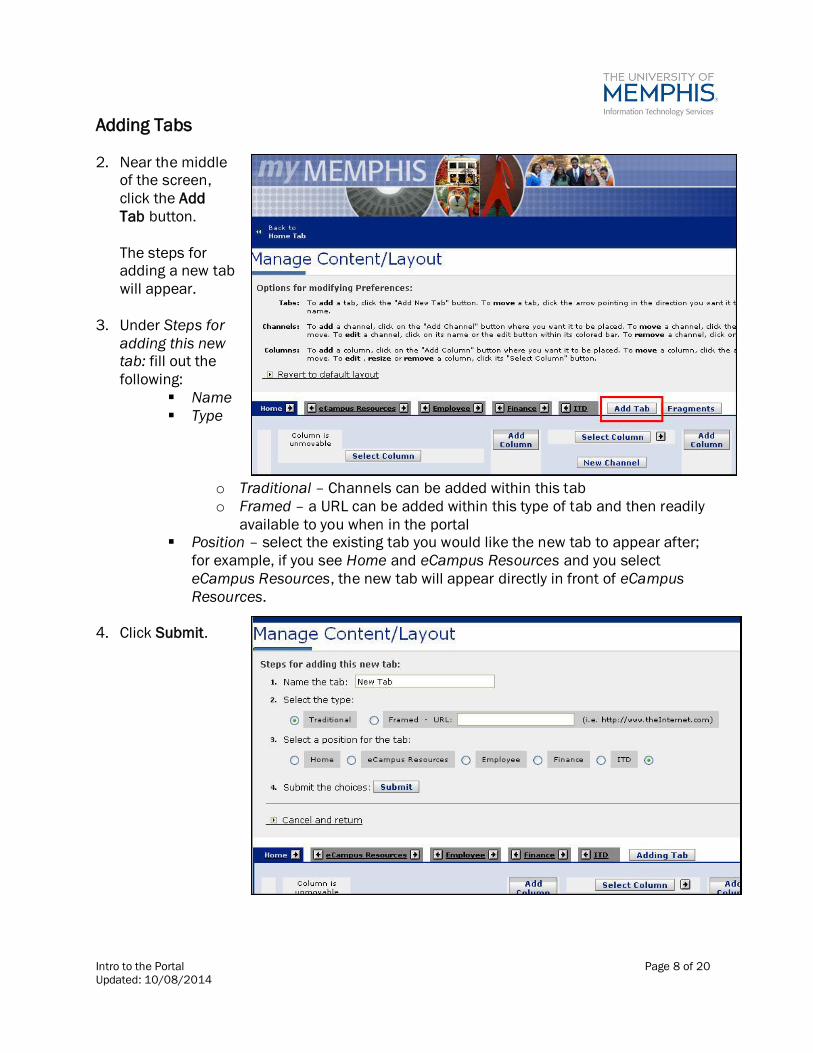
2. Near the middle
of the screen,
click the Add
Tab button.
The steps for
adding a new tab
will appear.
3. Under Steps for
adding this new
tab: fill out the
following:
Name
Type
o Traditional – Channels can be added within this tab
o Framed – a URL can be added within this type of tab and then readily
available to you when in the portal
Position – select the existing tab you would like the new tab to appear after;
for example, if you see Home and eCampus Resources and you select
eCampus Resources, the new tab will appear directly in front of eCampus
Resources.
4. Click Submit.

Intro to the Portal Page 9 of 20
Updated: 10/08/2014
Editing and Removing Tabs
5. Within the Manage Content/Layout page, click on the name of the tab you want to edit.
The Options for modifying this tab: screen will appear.
For example, if you would like to edit the New tab …
6. On this screen, your options are:
Make this the default “Active Tab” (A)
o If you select this for a tab, this will be the tab that displays when
you first log into the portal each time.
Rename the tab (B)
o Type the new name and click the Rename button.
Change the tab type (C)
o Choose the new radio button and click the Change button.
Delete (D)
o Click the Delete this tab link.
Intro to the Portal Page 10 of 20
Updated: 10/08/2014
Moving Tabs
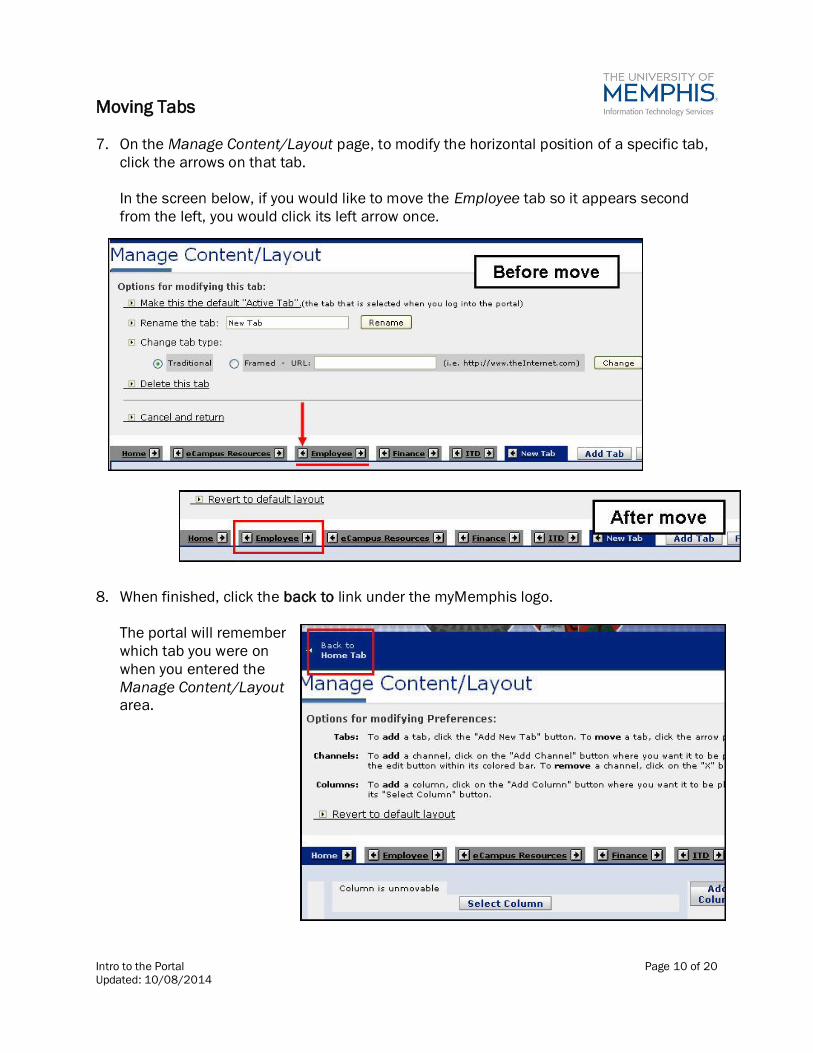
7. On the Manage Content/Layout page, to modify the horizontal position of a specific tab,
click the arrows on that tab.
In the screen below, if you would like to move the Employee tab so it appears second
from the left, you would click its left arrow once.
8. When finished, click the back to link under the myMemphis logo.
The portal will remember
which tab you were on
when you entered the
Manage Content/Layout
area.
Intro to the Portal Page 11 of 20
Updated: 10/08/2014
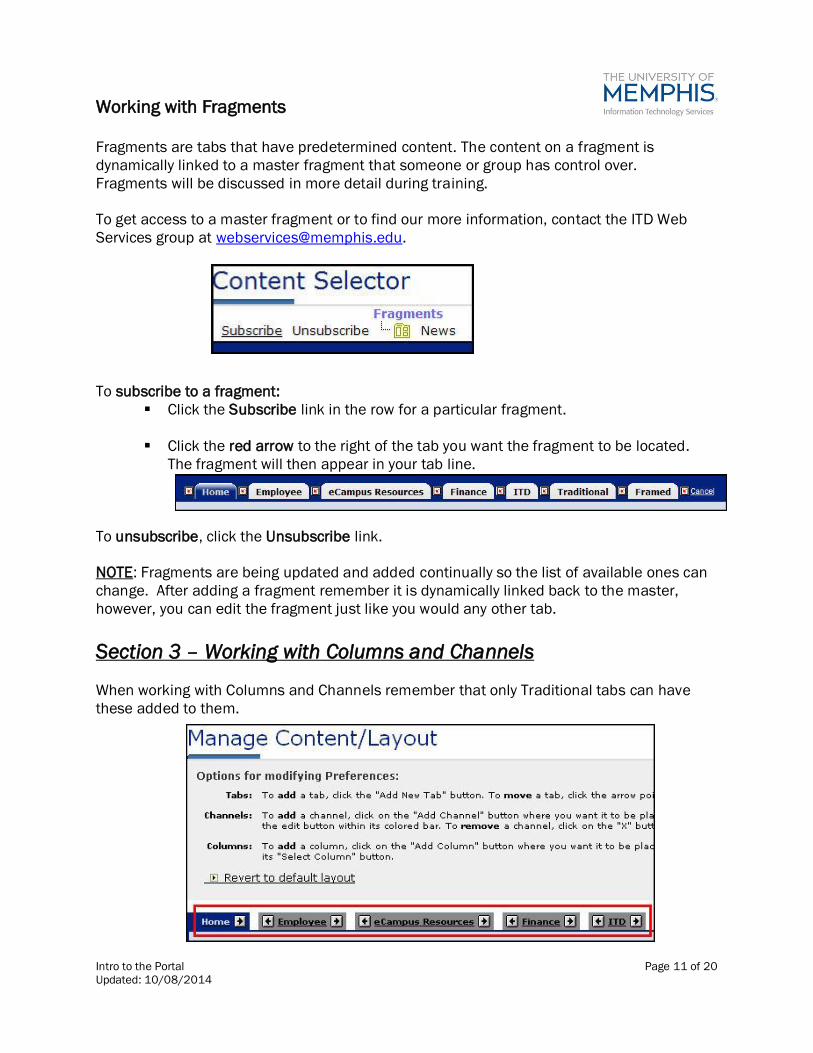
Working with Fragments
Fragments are tabs that have predetermined content. The content on a fragment is
dynamically linked to a master fragment that someone or group has control over.
Fragments will be discussed in more detail during training.
To get access to a master fragment or to find our more information, contact the ITD Web
Services group at [email protected].
To subscribe to a fragment:
Click the Subscribe link in the row for a particular fragment.
Click the red arrow to the right of the tab you want the fragment to be located.
The fragment will then appear in your tab line.
To unsubscribe, click the Unsubscribe link.
NOTE: Fragments are being updated and added continually so the list of available ones can
change. After adding a fragment remember it is dynamically linked back to the master,
however, you can edit the fragment just like you would any other tab.
Section 3 – Working with Columns and Channels
When working with Columns and Channels remember that only Traditional tabs can have
these added to them.
Intro to the Portal Page 12 of 20
Updated: 10/08/2014
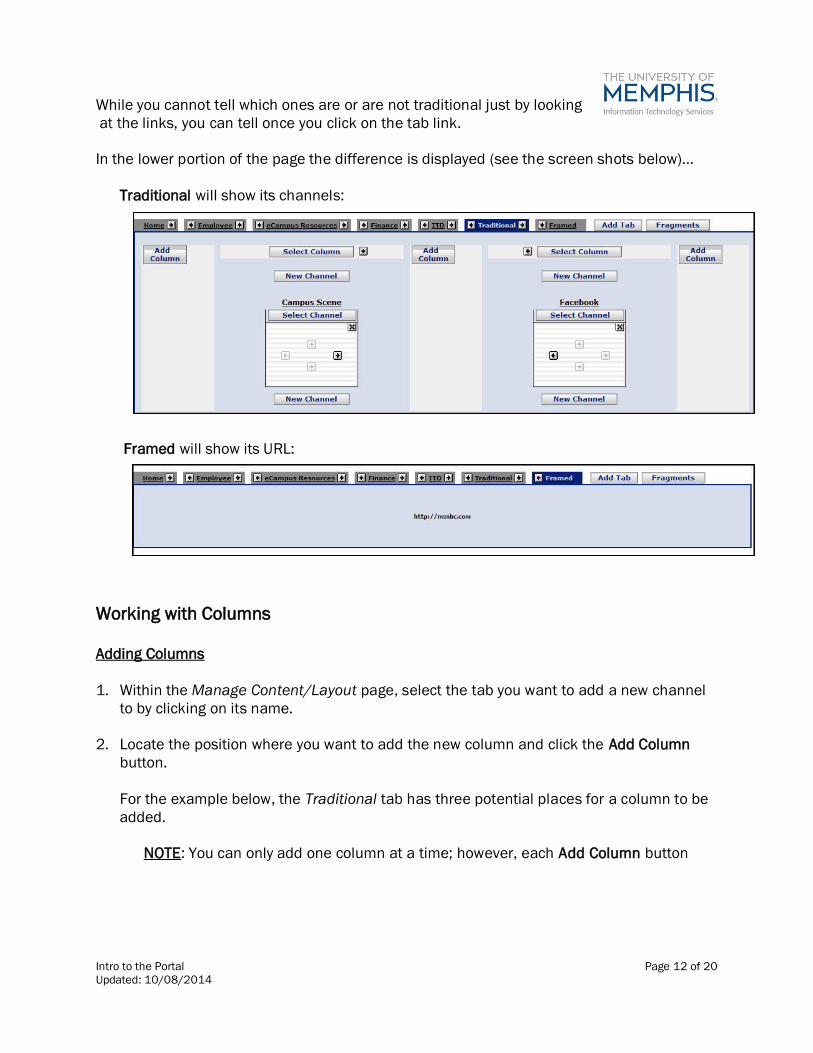
While you cannot tell which ones are or are not traditional just by looking
at the links, you can tell once you click on the tab link.
In the lower portion of the page the difference is displayed (see the screen shots below)…
Traditional will show its channels:
Framed will show its URL:
Working with Columns
Adding Columns
1. Within the Manage Content/Layout page, select the tab you want to add a new channel
to by clicking on its name.
2. Locate the position where you want to add the new column and click the Add Column
button.
For the example below, the Traditional tab has three potential places for a column to be
added.
NOTE: You can only add one column at a time; however, each Add Column button

Intro to the Portal Page 13 of 20
Updated: 10/08/2014
below has been marked to show where it could be found.
The new column will be added to the right of the button you clicked.
Editing and Removing Columns
3. Within the column, click the Select Column button.
The Options for modifying this column: screen will
appear.
4. On this screen, your options are:
Set Column Widths (A)
o Enter column width information and click the Save Widths button
Delete (B)
o Click the Delete this column link.

Intro to the Portal Page 14 of 20
Updated: 10/08/2014
Moving Columns
5. To move a column horizontally in the display, click the left or right arrows next to the
Select Column button.
Working with Channels
Adding Channels
6. Locate the column and position where you want to add the channel, click the New
Channel button. The Steps for adding a new channel: screen will appear.
For the example below, the Traditional tab has five potential places for a channel to be
added.
NOTE: You can only add one channel at a time; however, each New Channel button
below has been marked to show where it could be found.

Intro to the Portal Page 15 of 20
Updated: 10/08/2014
7. Next to step 1, using the dropdown, select a category and click Go.
Steps 1a, 2, and 3 will appear.
8. Next to 1a (A), using the dropdown, select a subcategory if you would
like, and then click Go and continue to step 2.
OR
Go directly to step 2 and highlight a channel (B), and then click the Add Channel button
(C).

Intro to the Portal Page 16 of 20
Updated: 10/08/2014
Editing and Removing Channels
All adjustments to channels, with the exception to moving them, can
be done via the Controls.
Descriptions of the controls and the icons
for them can be found on page 7.
Individual controls for each channel are
found by going to the specific channel on
the Manage Content/Layout page.
To the right, the controls for the NPR-
Morning Edition channel are marked. Or
you may find the controls by clicking
Select Channel directly beneath the
channel title.
Moving Channels
9. To move a channel horizontally or vertically in the display,
click the arrows within the channel icon.
NOTE: At times, arrows will appear grayed out and you
will not be able to move a channel in a particular
direction due to column restrictions.
Intro to the Portal Page 17 of 20
Updated: 10/08/2014
Chapter 3: Additional Portal Functionality
Section 1 – Announcements
On the Home tab all users will find two types of announcement channels: Personal and
Campus.
Neither of these channels can be deleted and are important resources. One example for the
use of these channels would be in case of issues with the campus email system.
Personal announcements are sent out based on organizational groups. An example of this
type of announcement would be your supervisor using it to communicate important memos
to your work group.
Campus announcements are those sent to all university faculty, staff, and students. An
example of this would be information on how to sign up for the new TigerText emergency
alert messaging.
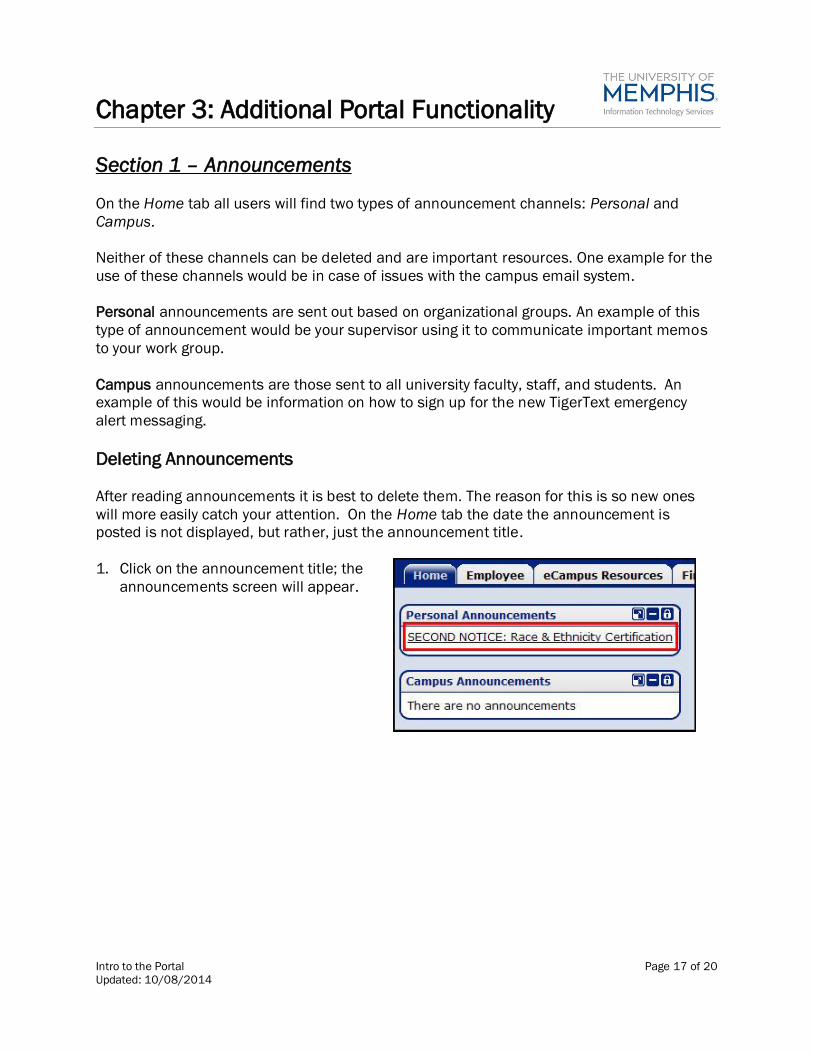
Deleting Announcements
After reading announcements it is best to delete them. The reason for this is so new ones
will more easily catch your attention. On the Home tab the date the announcement is
posted is not displayed, but rather, just the announcement title.
1. Click on the announcement title; the
announcements screen will appear.
Intro to the Portal Page 18 of 20
Updated: 10/08/2014
2. In the top portion of your screen the announcements will be listed with
their delivery date and expiration date. Next to each announcement
title you will have a checkbox.
In the bottom portion of the screen the announcement text will be displayed.
To delete an announcement place a check in the appropriate box next to the title of the
announcement you want to delete; click Delete.
A confirmation message will pop up, click OK. The announcement will have been
deleted.
3. Click back to Home tab in upper left corner to get back to the Home tab.
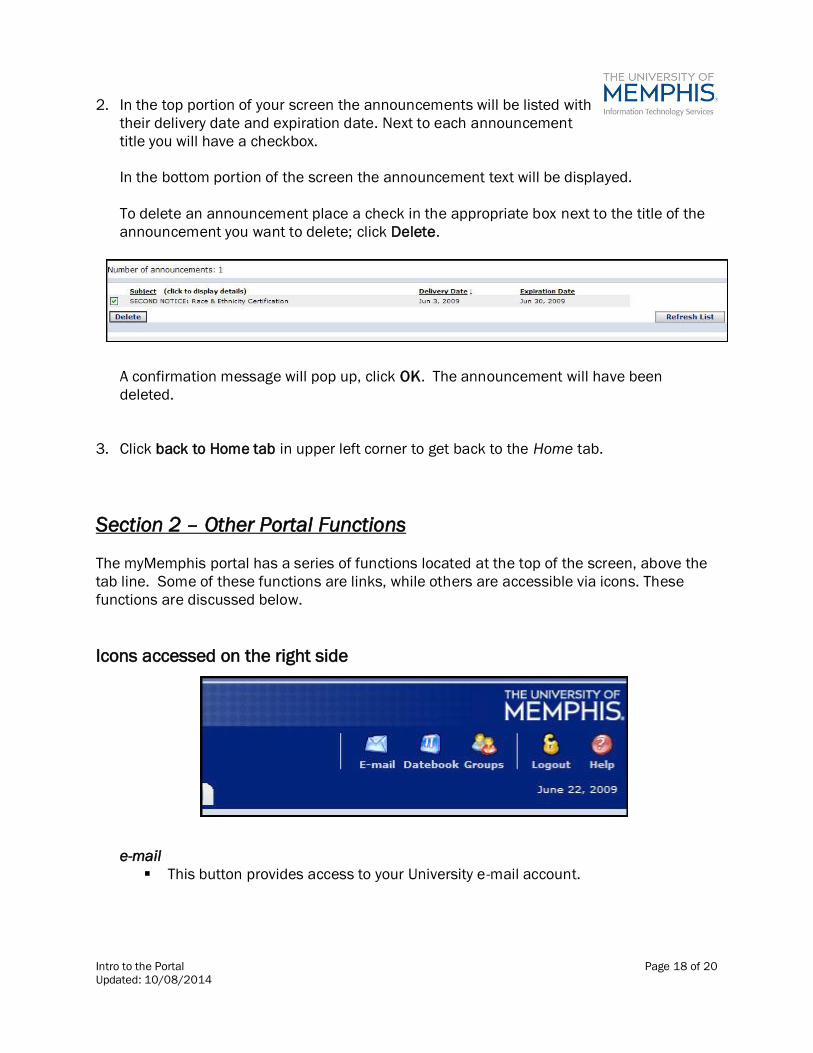
Section 2 – Other Portal Functions
The myMemphis portal has a series of functions located at the top of the screen, above the
tab line. Some of these functions are links, while others are accessible via icons. These
functions are discussed below.
Icons accessed on the right side
This button provides access to your University e-mail account.

Intro to the Portal Page 19 of 20
Updated: 10/08/2014
Datebook
The Datebook feature is a personal calendaring program
which allows you to log personal events and appointments. Events which have
been assigned to datebooks within the Group Studio (see next item) will be
included on this datebook.
The portal’s Datebook feature is not to be confused with the calendar offered via
Microsoft Outlook or with the University’s Resource 25 software.
Groups
Group Studio allows for the creation of academic, administrative, athletic,
cultural, intramural, political, service, social, and technology-related groups. Portal
users may request either public or private groups fitting any of these criteria
(within University usage guidelines).
o Public groups that are of general interest to students and faculty will
be approved. These groups must not promote activities that are illegal
or that violate the rights of others.
o Restricted groups may be created only if they are associated with a
sanctioned group or if the group leader has obtained permission.
Logout
This allows you to securely end your portal session. Always use this function
rather than just closing out of your browser window. It is best to click the Logout
button then close your browser; in this order.
Help
The Help button links to a comprehensive guide to using and customizing your
University portal.
Links access on the left side
My Account
Disregard this option and leave these settings at their defaults
Content Layout
This is the link used throughout this manual to access the editing settings for the
portal.
Portal Admin
Users with administrative privileges within the portal may access them through
this link.

Intro to the Portal Page 20 of 20
Updated: 10/08/2014
Appendix A: myMemphis Portal Quick Tips
While using a campus computer, you can enter into the address line “my” and it will go
directly to http://my.memphis.edu
When logging in to the Portal, be careful; it is case sensitive and using an uppercase
letter when it should have been lowercase and vice versa will cause an error and it will
not allow you to enter.
The Portal has a time out of one hour. This means that after being inactive for one hour
the portal will prompt you with a message if you would like to continue. If you do not
choose to continue you will be logged out. This is a security feature.
Only Traditional tabs can have Channels added to them. If you enter a Framed tab you
will not have the tools to add any features to that tab.
When adding Channels and Columns, you can only add one at a time even though more
than one Add Channel or Add Column button will appear on the page.
When moving Channels, at times, arrows will appear grayed out and you will not be able
to move a channel in a particular direction due to column restrictions.
On the Employee tab, when editing your addresses, be sure to always have one mailing
address listed. The system will not check this for you. One mailing address MUST be
included in your record at all times to ensure your pay check gets to you; even if you have
direct deposit.