iol master & network setup instructions
TRANSCRIPT

IOL.3435 Page 1 of 32
==Transfer of IOLMaster patient measurements to the Holladay IOL Consultant Professional Edition program (HIC – PRO) The IOLMaster® performs biometric measurements for the purpose of intraocular lens power calculation in preparation for cataract surgery. It also provides on-board lens power calculation capability as well as patient data management and lens constant personalization (also called optimization.) The Holladay IOL Consultant Professional Edition (HIC – PRO) is a third-party software program developed, distributed and supported by Jack Holladay MD that runs on a separate computer and provides intraocular lens power calculation, lens constant personalization and surgical outcomes analysis. It also contains a proprietary lens power calculation formula called the Holladay 2 formula, which is not available on the IOLMaster. The HIC – PRO program cannot be loaded or run directly on the IOLMaster instrument at this time. IOLMaster users wishing to use the HIC – PRO program for IOL power calculation must transfer IOLMaster patient measurement data into the HIC – PRO program. This document identifies several methods for this data transfer and provides setup and data transfer guidelines. These methods were developed from a collaborative effort between Carl Zeiss Meditec and Jack Holladay MD for the benefit of our mutual customers. Disclaimer: Please Read
Carl Zeiss Meditec, Inc. (CZM) is not responsible for the results provided by the HIC-PRO Program. The HIC-PRO is a third-party application; users are advised to contact Jack Holladay MD at ([email protected]) for technical and clinical support.
This document does not represent or imply any commitment for sales, installation and setup, technical or clinical support of the HIC-PRO program. Our tech support team has very limited knowledge of the HIC-PRO program’s operation. CZM does not provide sales, installation, setup, configuration, training or troubleshooting support for a customer’s network. This document provides guidance to assist an IT professional when configuring the Holladay IOL Consultant Professional Edition to access patient data from an IOLMaster 500 via Ethernet. CZM may provide guidance on a best-effort basis but is not responsible for the setup and administration of a user’s office network.

IOL.3435 Page 2 of 32
NOTE: Before you attempt to set up your IOLMaster it might be helpful to know what version of software your instrument is using. Below you will find the process for finding your software version for older IOLMaster systems (IOL’s 1,2,3, XP systems running 4.X or 5.X software, and for the newer 5.5 system) as well as the IOLMaster 500.
For all IOLMaster instruments except the IOLMaster 500, find the question mark (?) on the “New Patient” screen, and click on it:
IOL.3435 Page 3 of 32
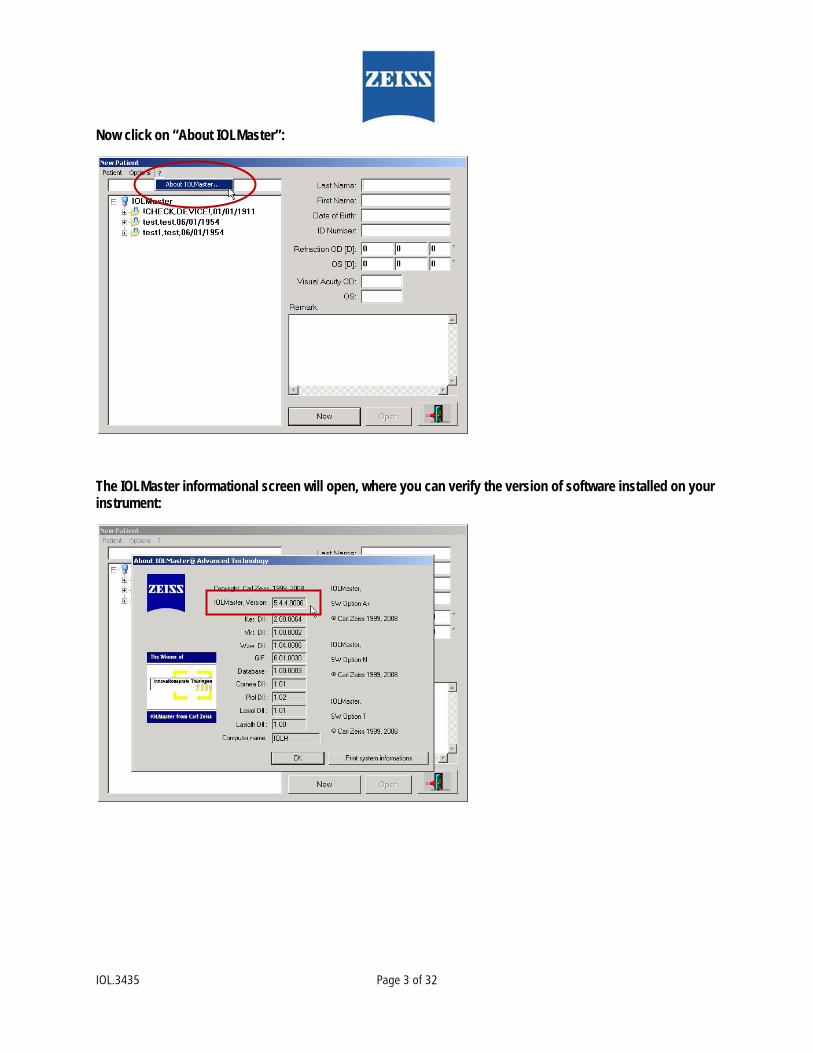
Now click on “About IOLMaster”:
The IOLMaster informational screen will open, where you can verify the version of software installed on your instrument:
IOL.3435 Page 4 of 32
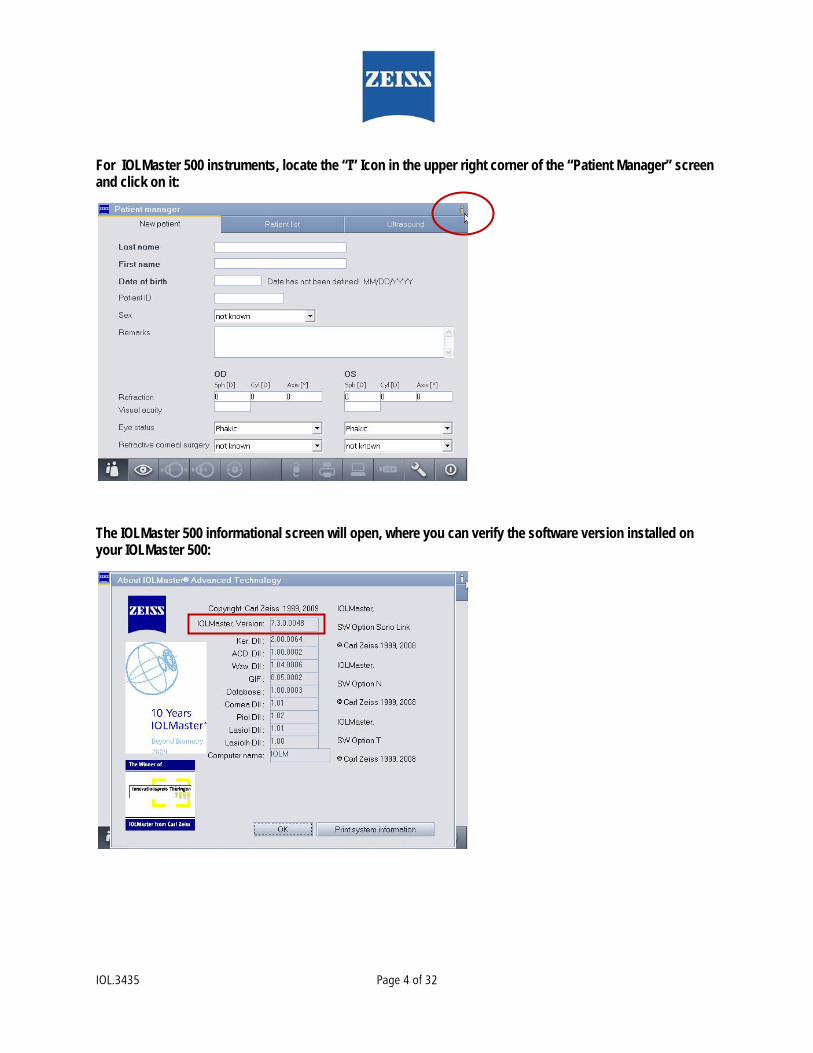
For IOLMaster 500 instruments, locate the “I” Icon in the upper right corner of the “Patient Manager” screen and click on it:
The IOLMaster 500 informational screen will open, where you can verify the software version installed on your IOLMaster 500:

IOL.3435 Page 5 of 32
Methods for data transfer from the IOLMaster to the HIC – PRO program
A. Export/Import Via Removable Media
B. Export/Import Via Network (Ethernet) connection
^K==bñéçêíLfãéçêí=sá~=oÉãçî~ÄäÉ=jÉÇá~=Ekçå=Ó=kÉíïçêâÉÇ=póëíÉãëF==The IOLMaster can export via 3 forms of removable media, depending on the model of the IOLMaster. Floppy Diskette – Limited to older IOLMaster version 1, 2 & 3 (Windows 95/98) that are equipped with a Floppy Disk drive. CD – RW Disc – Available on IOLMaster version 4 & 5 (Windows XP) that are equipped with a CD – RW drive. USB Memory Stick – Available on newer IOLMaster systems (Windows XP) that are equipped with USB ports.
flij~ëíÉê=pÉíìé=Eflij~ëíÉê=sÉêëáçåë=NIOIPIQKuI=RKuI=RKRF==Prior to performing the Export function of the IOLMaster, you must ensure that the instrument is configured properly. If the instrument is running Windows 95 or Windows 98, you must have the Option A software installed on the IOLMaster. If the instrument is running Windows XP, you must have the Option A+ software installed on the IOLMaster. In addition, the type of data and the path for the export must be defined. On IOLMaster systems running Windows 95 or Windows 98, the path is predetermined to be the Floppy Disk Drive. No other selection is possible. For systems running Windows XP, the path may be selected to be either the CD – RW drive, or a USB memory stick. To define the data and path, follow the procedure below: 1. From the New Patient Menu, Click on “Options”, then point to “Setup”, and finally click on “Program Settings”:

IOL.3435
2. The Prog
3. The Expmeasuremevalues. Lea
gram Settings w
port tab screen ents and patienave the values
window will op
will now be disnt demographic as show for pr
P
en. Click on th
splayed. The upcs are to be incloper file format
Page 6 of 32
he “Export” tab
pper portion of luded in the exptting of the exp
:
the screen hasported file. The
ported values:
s selectable opte picture below
tions as to whicw shows the def
ch fault
IOL.3435
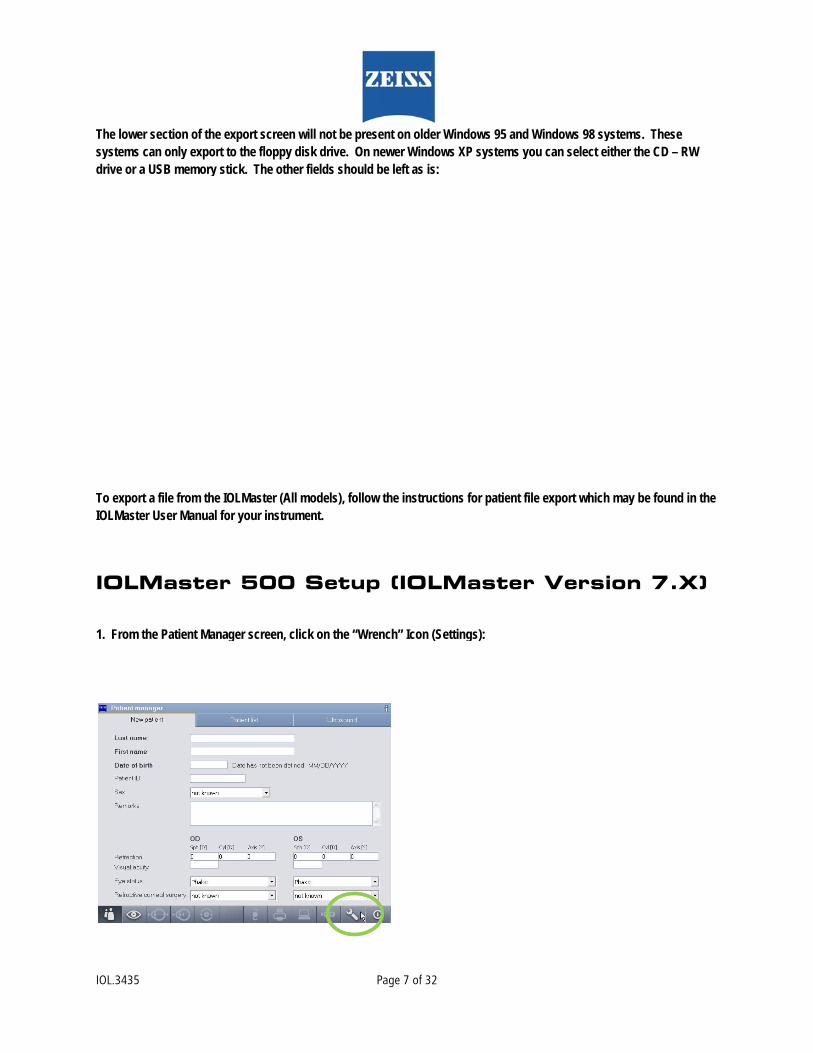
The lower ssystems cadrive or a U
To export aIOLMaster
flij
1. From the
section of the ean only export tUSB memory st
a file from the IOUser Manual fo
j~ëíÉê
e Patient Mana
export screen wto the floppy ditick. The other
OLMaster (All mor your instrum
ê=RMM=
ger screen, clic
P
will not be presesk drive. On ne fields should b
models), follow ent.
pÉíìé
ck on the “Wren
Page 7 of 32
ent on older Wiewer Windows be left as is:
the instruction
=Eflij
nch” Icon (Sett
ndows 95 and W XP systems yo
ns for patient fil
j~ëíÉê
ings):
Windows 98 sy
ou can select ei
le export which
ê=sÉêëá
ystems. These ither the CD – R
h may be found
áçå=TKu
RW
in the
uF=
IOL.3435 Page 8 of 32
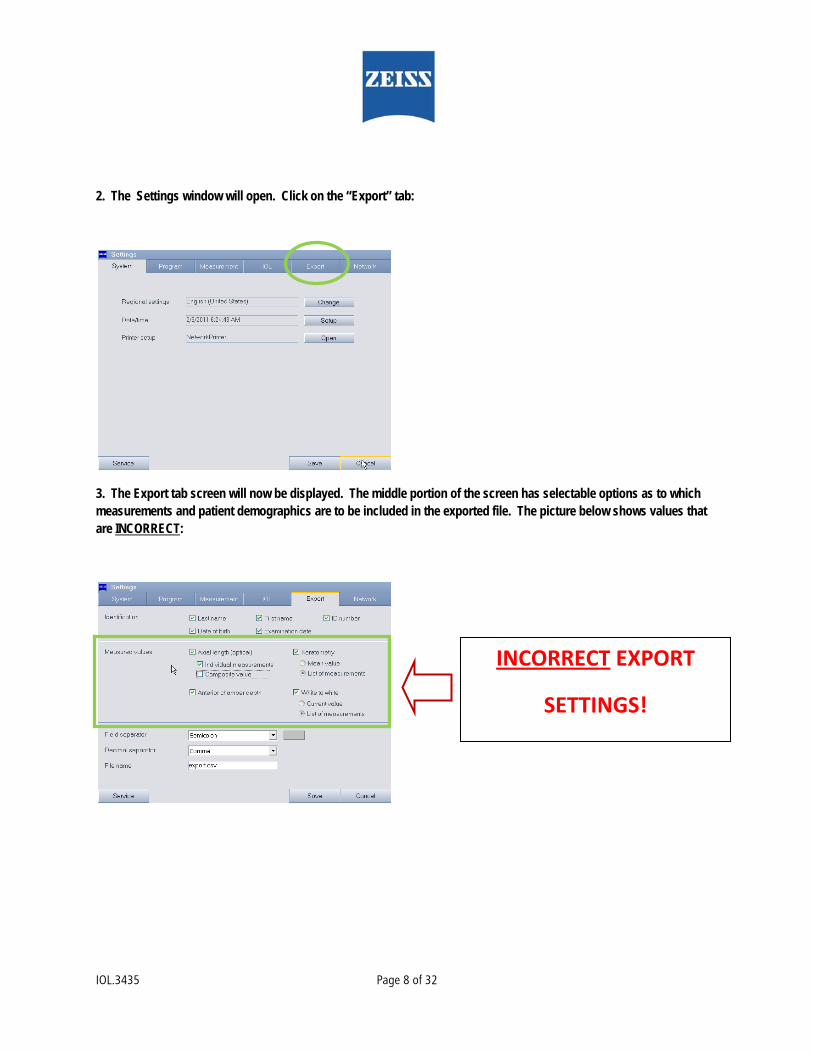
2. The Settings window will open. Click on the “Export” tab:
3. The Export tab screen will now be displayed. The middle portion of the screen has selectable options as to which measurements and patient demographics are to be included in the exported file. The picture below shows values that are INCORRECT:
INCORRECT EXPORT
SETTINGS!
IOL.3435 Page 9 of 32
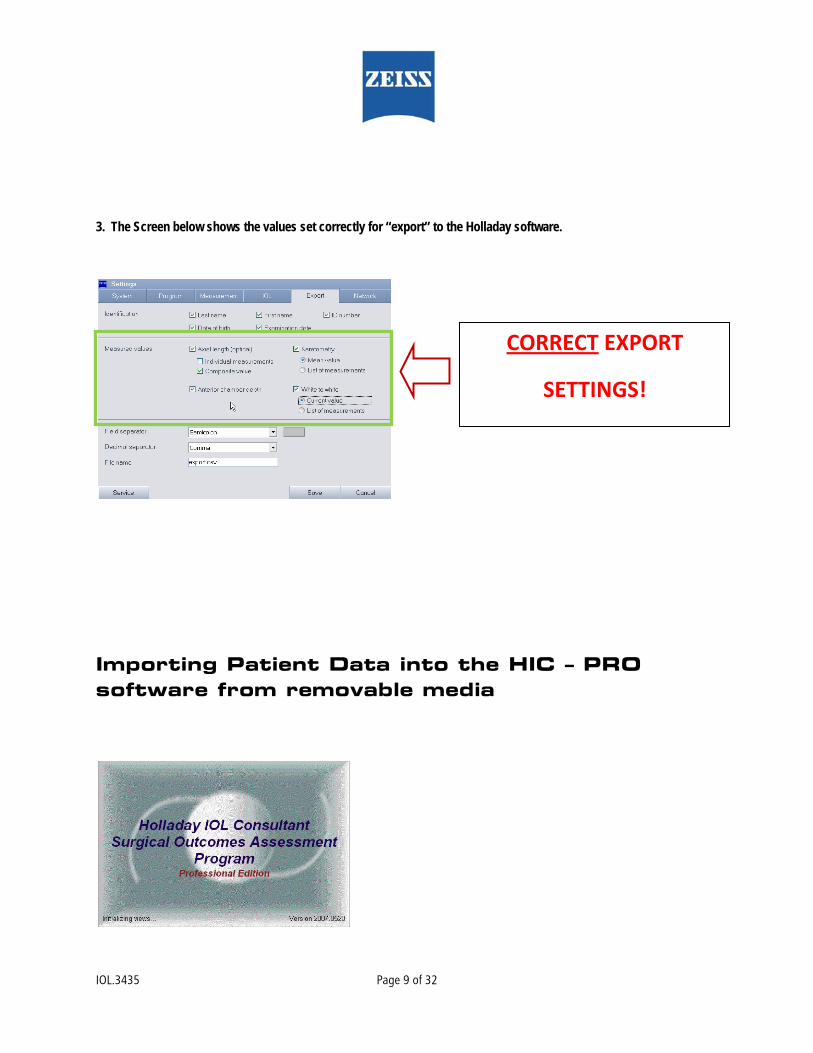
3. The Screen below shows the values set correctly for “export” to the Holladay software.
=
======fãéçêíáåÖ=m~íáÉåí=a~í~=áåíç=íÜÉ=ef`=Ó=mol=ëçÑíï~êÉ=Ñêçã=êÉãçî~ÄäÉ=ãÉÇá~====================================================
CORRECT EXPORT
SETTINGS!

IOL.3435 Page 10 of 32
1. From the “Patient Locator Screen”, click on the “Import Patients from IOLMaster…” button:
2. The program will display the “IOLMaster Import…….” selection screen. Click on the “IOLMaster Data from Floppy, USB key or CD – ROM radio button, the click on the “OK” button:
3. The HIC – PRO software will now check the various locations (Floppy drive, CD – Rom drive, USB ports) for a file entitled “export.csv”:
In the example pictured below, we have exported the file onto a Floppy Diskette:
IOL.3435 Page 11 of 32
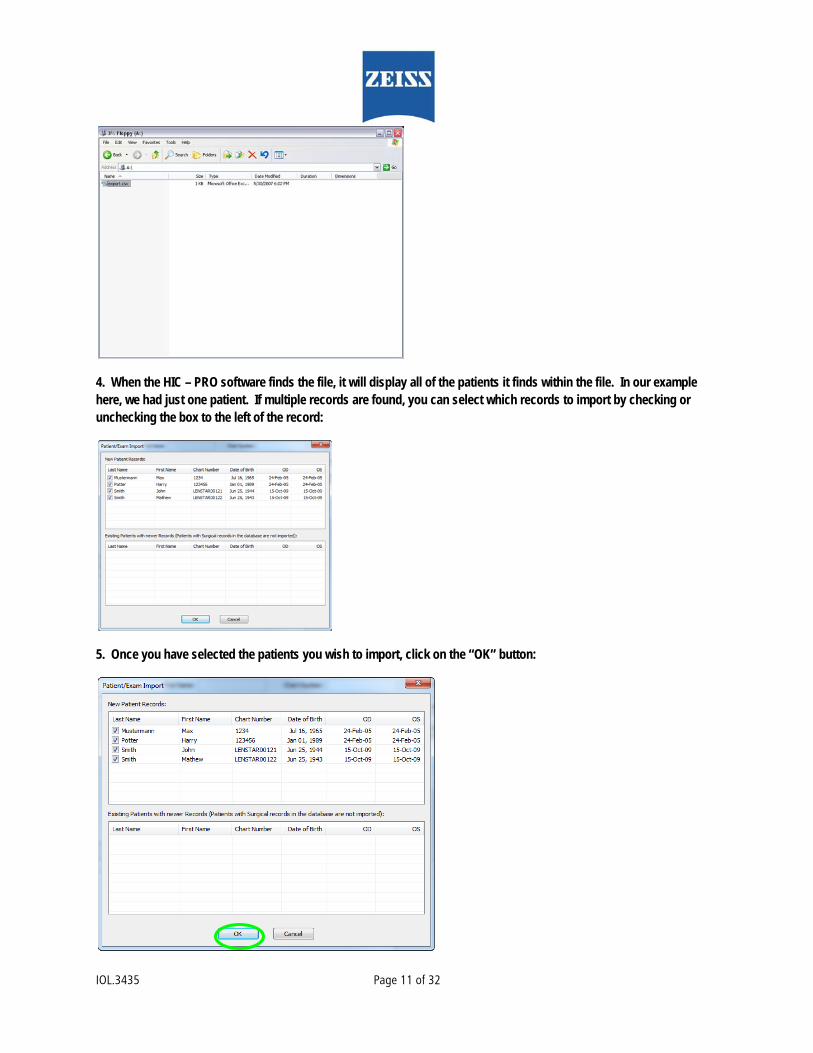
4. When the HIC – PRO software finds the file, it will display all of the patients it finds within the file. In our example here, we had just one patient. If multiple records are found, you can select which records to import by checking or unchecking the box to the left of the record:
5. Once you have selected the patients you wish to import, click on the “OK” button:
IOL.3435 Page 12 of 32
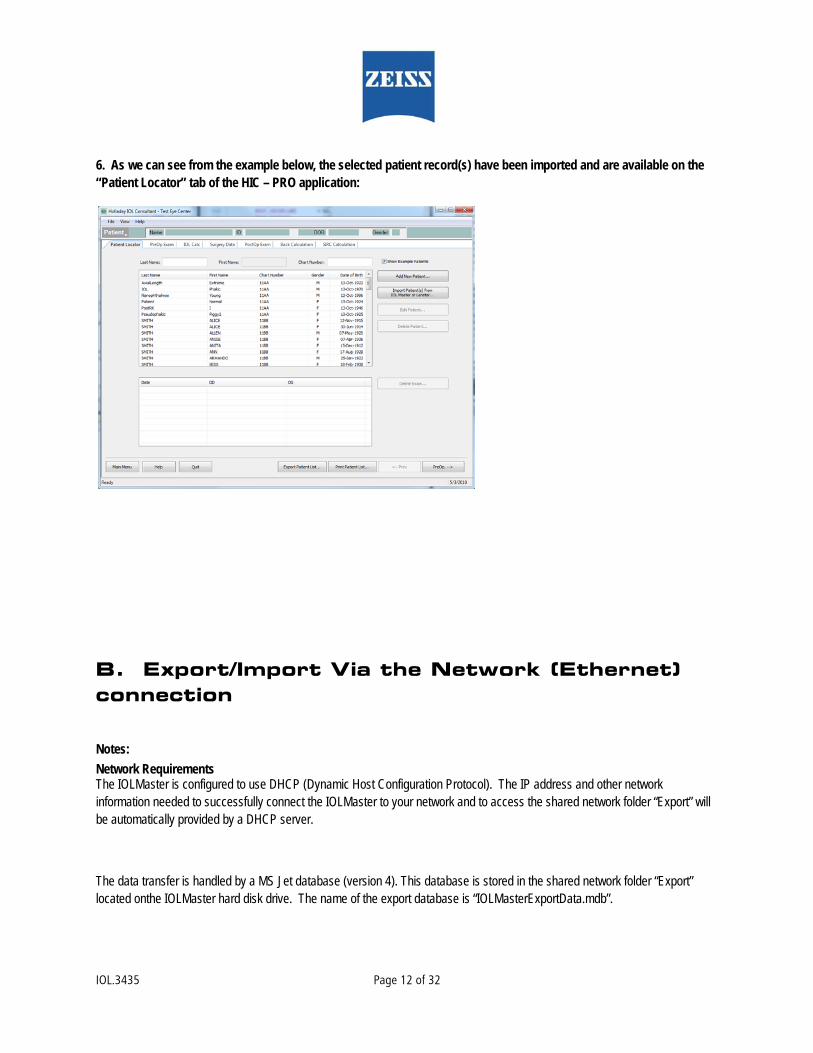
6. As we can see from the example below, the selected patient record(s) have been imported and are available on the “Patient Locator” tab of the HIC – PRO application:
==_K==bñéçêíLfãéçêí=sá~=íÜÉ=kÉíïçêâ=EbíÜÉêåÉíF=ÅçååÉÅíáçå==Notes: Network Requirements The IOLMaster is configured to use DHCP (Dynamic Host Configuration Protocol). The IP address and other network information needed to successfully connect the IOLMaster to your network and to access the shared network folder “Export” will be automatically provided by a DHCP server.
The data transfer is handled by a MS Jet database (version 4). This database is stored in the shared network folder “Export” located onthe IOLMaster hard disk drive. The name of the export database is “IOLMasterExportData.mdb”.

IOL.3435
The IOLMasconforming to connect tnetwork isolAttention sh
flijRKuI=Import of Psystems, atype netwofactory traithe network
Provided thaIOLMaster c
1. In order “find” the I
2. From the
3. The “IOLradio buttothe “Add IO
ster shall only beto the latest tech
the IOLMaster wlator (part numb
hould be paid to
j~ëíÉê=RKRI=~
Patient records nd which have
orks. If the IOLMned Zeiss Fieldk setup of the I
at both the IOLMcan be located o
for the HIC – POLMaster on th
e “Patient Loca
L Master/Lenstaon to select it. AOL Master”butto
e connected to phnical standards
with the network. er 000000- 0448the specific safe
ê=pÉíìé~åÇ=TK
via Ethernet is Option A+ instMaster is conned Engineer to beOLMaster.
Master and the hon the customer’
PRO software aphe network.
ator Screen” cli
ar Import selecAlso select the on:
Pa
private networkss! A standard pa A network isola8-931) can be orety regulations (E
é=Efli=KuF=
only possible otalled on the IOected to a netwe present durin
ost PC running s network using
pplication to im
ick on the “Imp
ction” window w date range of t
age 13 of 32
, which are protetch network cabtor must be placrdered from CarlEN 60601-1-1 / I
pçÑíï
on IOLMaster sLMaster. The I
work with other tng the setup tim
the HIC – PRO s the following ins
mport patient fil
port Patients fro
will open. Clickthe exams you w
ected from publile, Cat 5, with tw
ced inbetween IOl Zeiss for conneIEC 60601-1 (se
ï~êÉ=îÉ
systems which OLMaster comethan DHCP pro
me to grant a ne
software are constructions:
es across the E
om IOL Master…
k on the “IOL Mwish to import
c networks (Inte
wo RJ-45 connecOLMaster (NET)ection to the exteee IOLMaster Ins
Éêëáçåë
are running Wies factory conf
otocols, it will betworking profe
nnected to a DH
Ethernet conne
…” button:
aster….. Netwo from the drop m
ernet) by firewallsctors should be and network caernal network (Nstruction Manua
ë=QKuI
ndows XP operfigured for DHCe necessary fo
essional to acce
CP network, the
ction, it must fi
ork Connectionmenu, then clic
s used
able. A NET). l).
=
rating CP r a ess
e
irst
” ck on
IOL.3435
4. A Micros
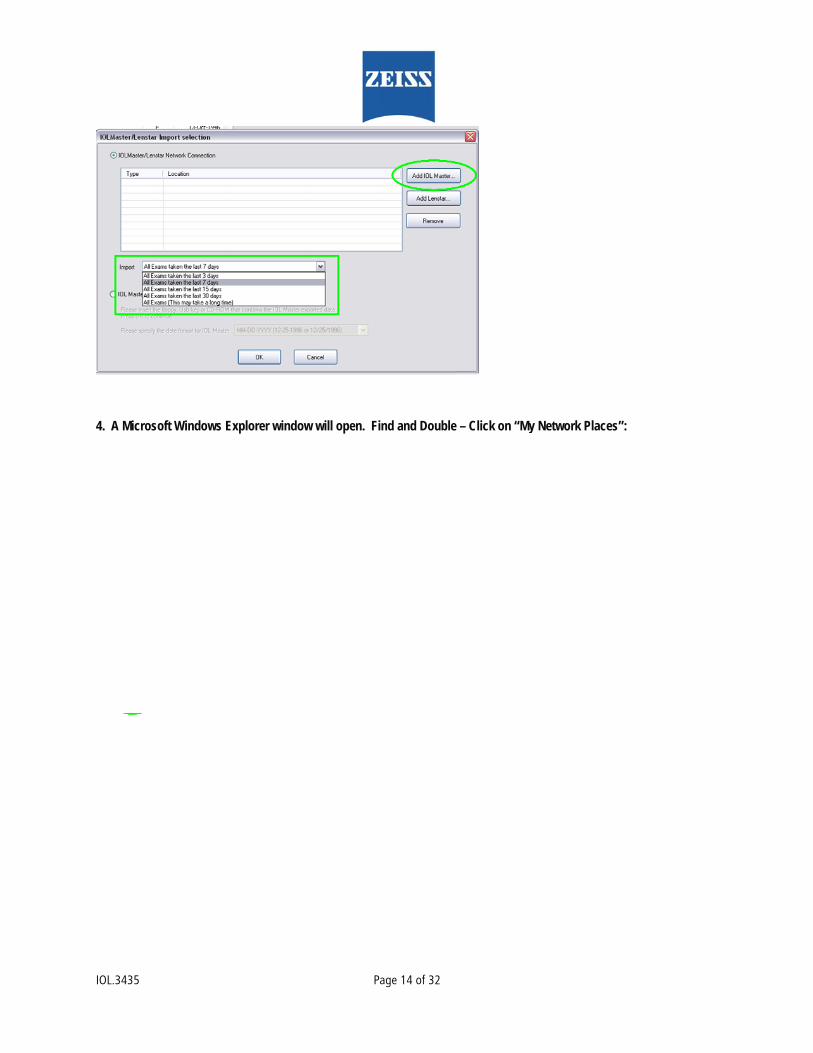
soft Windows E
Explorer window
Pa
w will open. Fi
age 14 of 32
nd and Double
– Click on “My
y Network Place
es”:

IOL.3435
5. When th
6. All of theWindows N
he “My Network
e various netwoNetwork”:
k Places” windo
orks that your s
Pa
ow opens, locat
system may co
age 15 of 32
te and Double –
onnect to are dis
– Click on “Enti
splayed. Find a
ire Network”:
and Double – C
Click on “Micros
soft

IOL.3435
7. All of theworkgroup
8. All of thedifferent IOIOLMaster
e “workgroups entitled “Zeiss
e computers wOLMaster’s, and
that you wish t
” which are par
s_workgroup”.
hich are part ofd the computer to connect to an
Pa
rt of your Micro Double – Click
f the “Zeiss_wo that we have thnd import from
age 16 of 32
osoft Windows k on this workg
orkgroup” will nhe HIC – PRO s:
Network will noroup:
now be displaysoftware loaded
ow be displayed
ed. In our examd on. Double –
d. Locate the
mple, we have tClick on the
two

IOL.3435 Page 17 of 32
9. If this is the first time you have connected to this IOLMaster, you will be prompted for a User name and Password:
10. Type in the following, EXACTLY as shown:
User Name --- IOLMaster
Password --- Iolm_XP
NOTE: You will not see what you are typing as a password, as it will only display dots, so be very careful when typing the password.

IOL.3435
11. If you hsearches fo
12. The so
have correctly eor “shared” fold
ftware should f
entered the proders on the IOL
find the default
Pa
oper User NameLMaster:
shared “Expor
age 18 of 32
e and Password
rt” folder. Doub
d, the software
ble – Click on t
will display this
his folder:
s screen while
it
IOL.3435
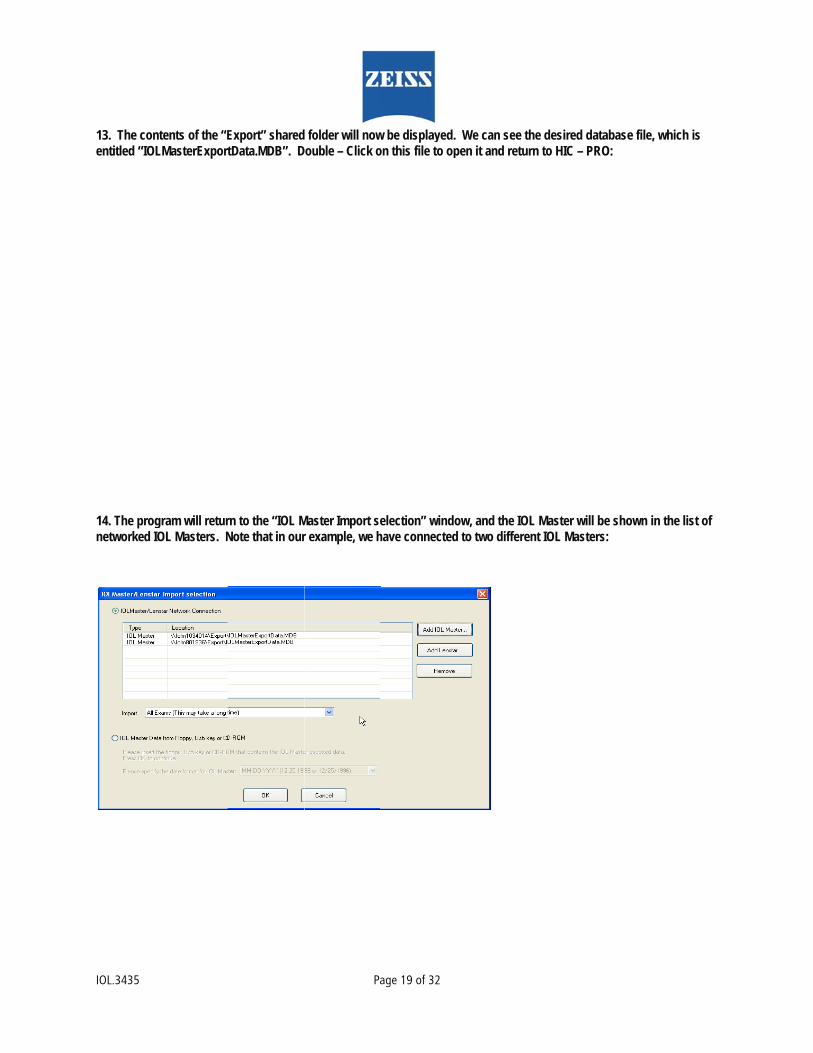
13. The coentitled “IO
14. The pronetworked
ntents of the “E
OLMasterExport
ogram will retur IOL Masters. N
Export” sharedtData.MDB”. D
rn to the “IOL MNote that in our
Pa
folder will nowDouble – Click o
Master Import ser example, we h
age 19 of 32
w be displayed. on this file to op
election” windohave connected
We can see th
pen it and retur
ow, and the IOLd to two differen
he desired datan to HIC – PRO
L Master will bent IOL Masters:
base file, which
O:
e shown in the l
h is
list of

IOL.3435 Page 20 of 32
15. Highlight the IOLMaster that you wish to import patient files from. If necessary, also select the desired date range from the drop menu, then click “OK”:
16. Depending on the number of patients that the system has to import, several minutes might go by while the patients are being imported from the selected IOL Master. After the import has been completed, the system will return to the patient selection menu:
IOL.3435 Page 21 of 32
The above procedure assumes that the customer has connected both the computer with the Holladay IOL Consultant software (HIC – PRO) AND the IOL Master XP to their network, and that the network is a DHCP configured network.
If the network settings are different, a CZMI Field Engineer will have to grant access to the configuration of the IOLMaster network connection.
This procedure has been presented for informational purposes only. CZMI does not provide technical support for the Holladay IOL Consultant software. For support of this product, please contact Dr. Holladay at www.docholladay.com
IOLMaster 500
NOTE:
The IOLMaster 500 is pre-configured for a DHCP network.
If a Static IP address is needed for the IOLMaster XP, it will require a visit by a CZMI Field Engineer to obtain access to the network configuration files in Control Panel.
The Professional Edition of the IOL Consultant program is required for the import feature to work. For details on obtaining the IOL Consultant program, contact www.docholladay.com
NOTE:
This presentation addresses only a NETWORK type connection between the IOLMaster XP system and a remote PC that has the Holladay Consultant software installed. Older IOLMasters, or IOLMasters which are NOT connected to a network, utilize the export features of the IOLMaster to export patient data to either a floppy diskette, a CD-RW disc, or a USB memory stick, and the import features of the Holladay Consultant software.
The IOLMaster shall only be connected to private networks, which are protected from public networks (Internet) by
IOL.3435 Page 22 of 32
firewalls conforming to the latest technical standards! A standard patch network cable, Cat 5, with two RJ-45 connectors should be used to connect the IOLMaster with the network. A network isolator must be placed between IOLMaster (NET) and network cable. A network isolator (part number 000000-0448-931) can be ordered from Carl Zeiss for connection to the external network (NET). Attention should be paid to the specific safety regulations (EN 60601-1-1 / IEC 60601-1 (see IOLMaster Instruction Manual).
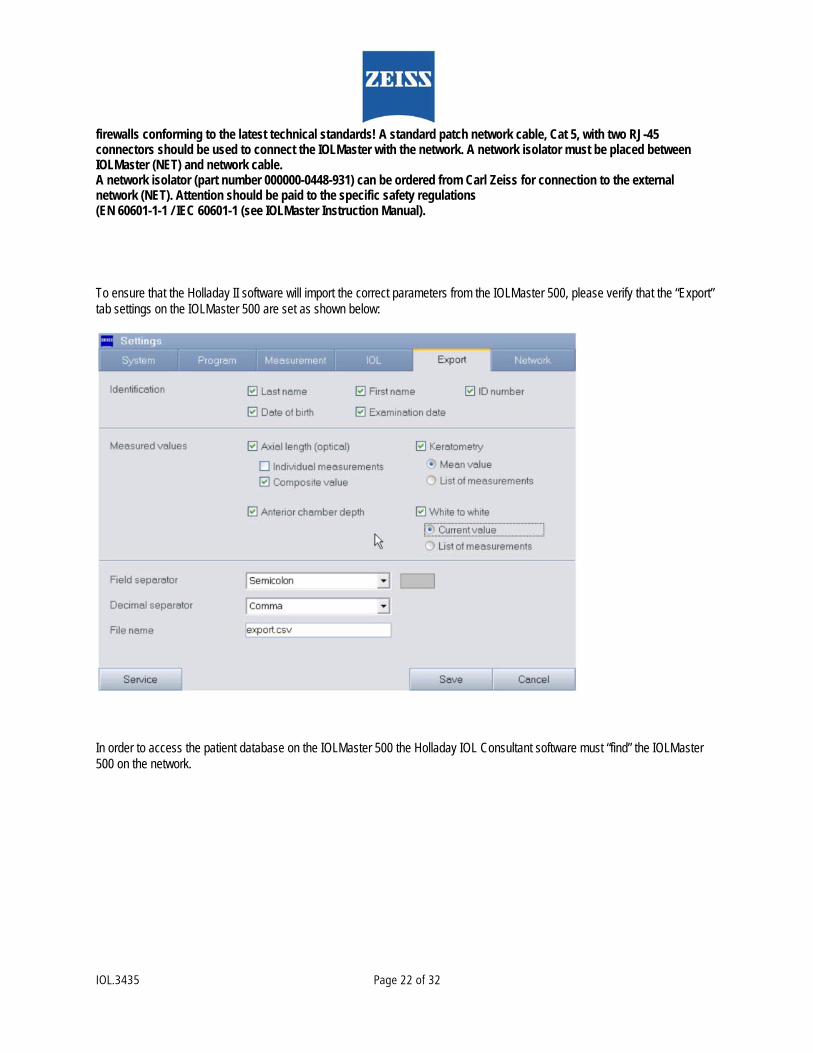
To ensure that the Holladay II software will import the correct parameters from the IOLMaster 500, please verify that the “Export” tab settings on the IOLMaster 500 are set as shown below:
In order to access the patient database on the IOLMaster 500 the Holladay IOL Consultant software must “find” the IOLMaster 500 on the network.
IOL.3435 Page 23 of 32
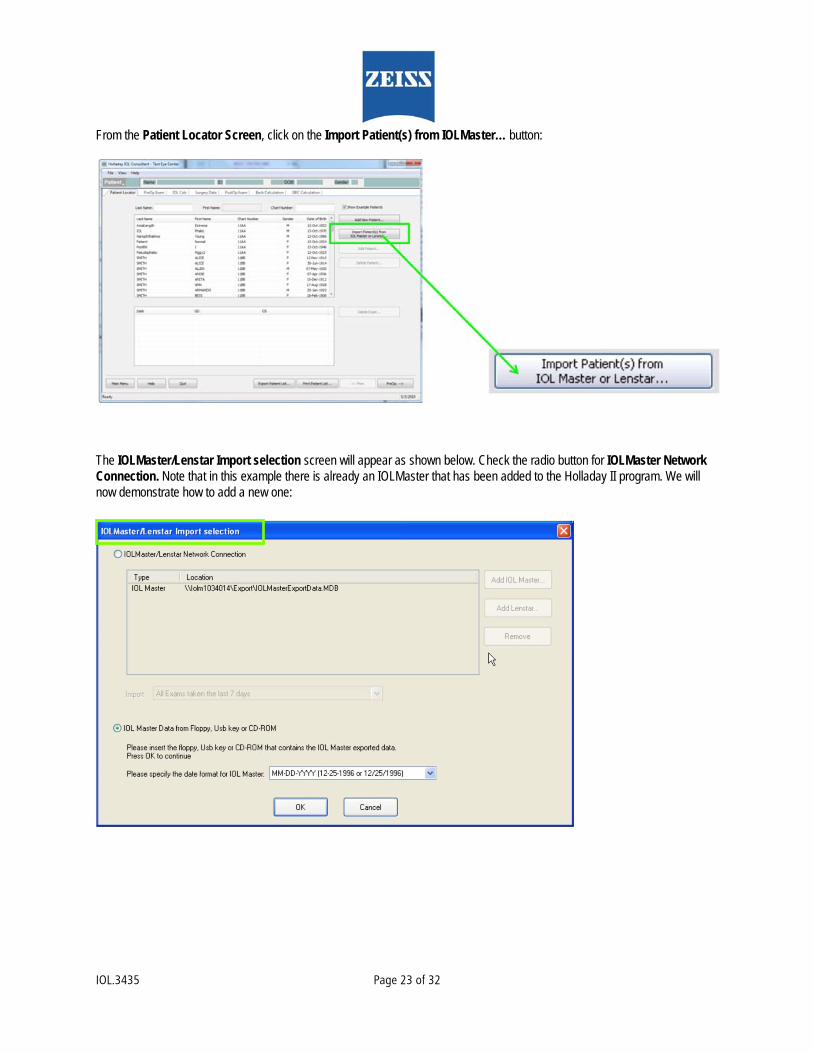
From the Patient Locator Screen, click on the Import Patient(s) from IOLMaster… button:
The IOLMaster/Lenstar Import selection screen will appear as shown below. Check the radio button for IOLMaster Network Connection. Note that in this example there is already an IOLMaster that has been added to the Holladay II program. We will now demonstrate how to add a new one:
IOL.3435 Page 24 of 32
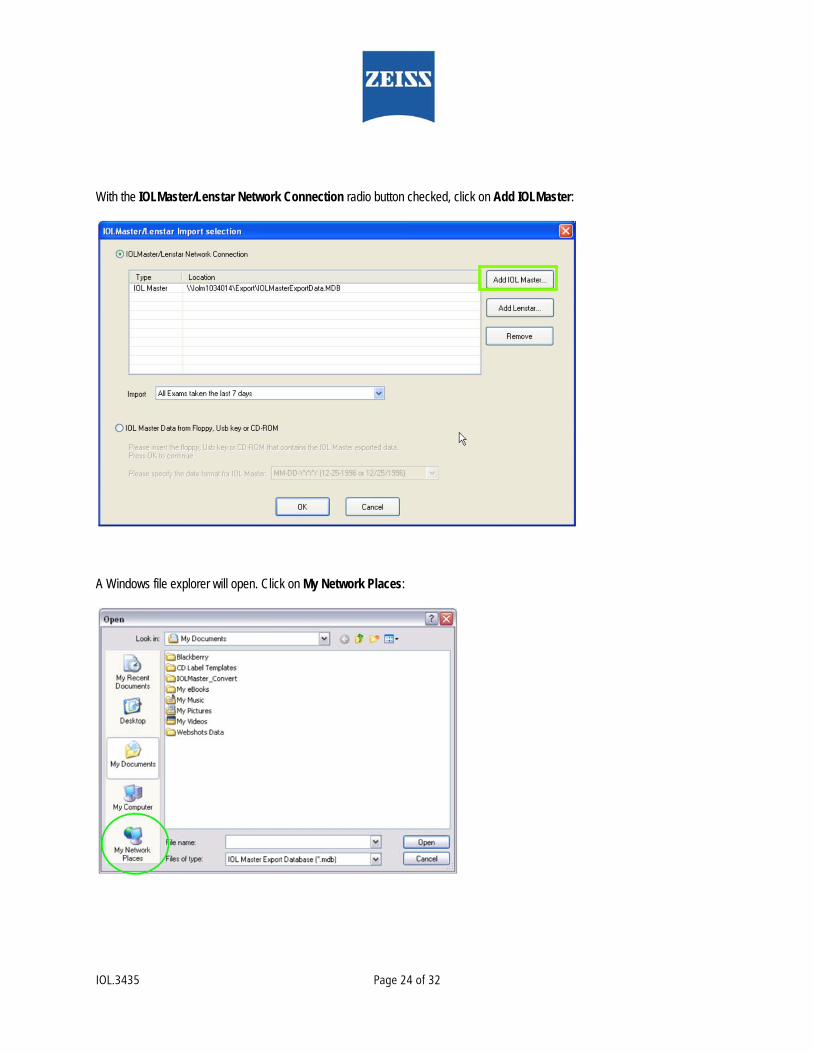
With the IOLMaster/Lenstar Network Connection radio button checked, click on Add IOLMaster:
A Windows file explorer will open. Click on My Network Places:

IOL.3435 Page 25 of 32
Double click on Entire Network:
Double click on Microsoft Windows Network:

IOL.3435 Page 26 of 32
Double Click on Zeiss_workgroup:
Any and all computers which are attached to the “Zeiss_Workgroup” will be displayed. Double click on the IOLMaster where the desired database is located:
IOL.3435 Page 27 of 32
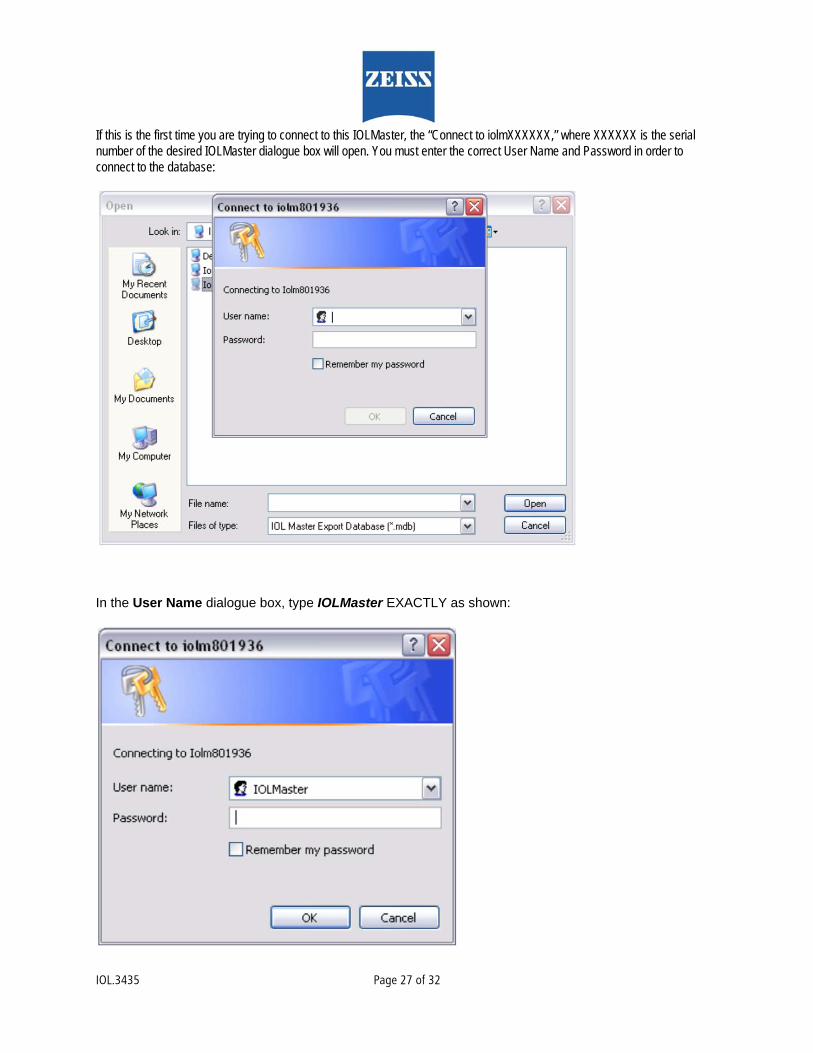
If this is the first time you are trying to connect to this IOLMaster, the “Connect to iolmXXXXXX,” where XXXXXX is the serial number of the desired IOLMaster dialogue box will open. You must enter the correct User Name and Password in order to connect to the database:
In the User Name dialogue box, type IOLMaster EXACTLY as shown:
IOL.3435 Page 28 of 32
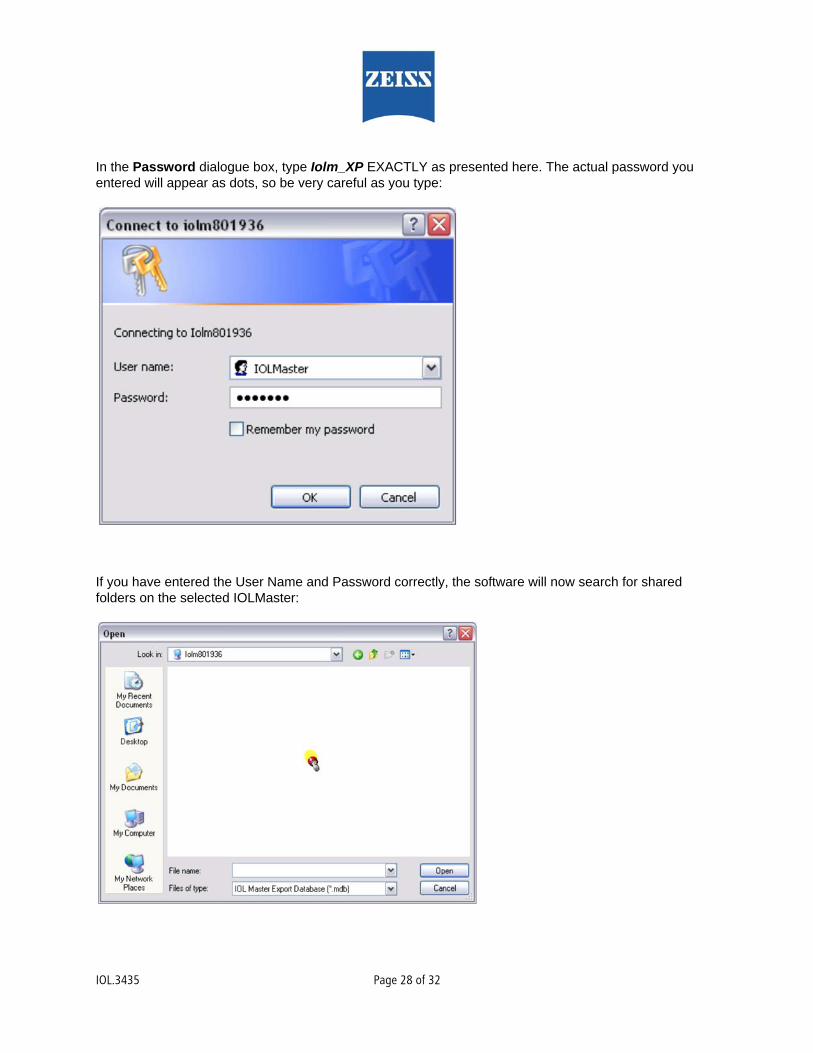
In the Password dialogue box, type Iolm_XP EXACTLY as presented here. The actual password you entered will appear as dots, so be very careful as you type:
If you have entered the User Name and Password correctly, the software will now search for shared folders on the selected IOLMaster:

IOL.3435 Page 29 of 32
Here we see that the program found a shared folder called “Export.” This is the default folder for the IOLMaster export database. Double click on the Export folder:
The IOLMasterExportData.MDB is the export database that we wish to import the patient files from. Double click on this file:

IOL.3435 Page 30 of 32
The program will return to the IOLMaster/Lenstar Import selection window, and the added IOLMaster will appear in the listing:
Highlight the IOLMaster you wish to import patients from, and also select which exams you wish to import from the drop-down menu:

IOL.3435 Page 31 of 32
Click on OK:
Depending on the number of patients the system has to import, several minutes might go by while the patients are being imported from the selected IOLMaster. After the import has been completed, the system will return to the patient selection menu:
IOL.3435 Page 32 of 32
This process assumes that the customer has connected both the computer with the Holladay IOL Consultant software AND the IOLMaster 500 to their network, and that the network is a DHCP configured network.
If the network settings are different, a CZMI Field Engineer will have to grant access to the configuration of the IOLMaster 500 network connection.
This procedure has been presented for informational purposes only. CZMI does not provide technical support for the Holladay IOL Consultant software. For support of this product, please contact Dr. Holladay at www.docholladay.com