lavatory design work sheet double bowl lavatory · 2016-11-18 · lavatory design work sheet - the...
TRANSCRIPT

LAVATORY DESIGN WORK SHEET
Double Bowl Lavatory
LEFT SIDE: RIGHT SIDE:
Answers to common questions:
- The dimensions of your vanity cabinet will tell you the correct dimensions andbowl layout of your Lavatory.
- The center of each bowl should line up with the center between the cabinetdoors.
- The Lavatory should overhang the cabinet in the front. The correct Lavatorydepth should be 1" greater than the cabinet depth.
- The Lavatory should overhang the cabinet on any ends that are not againstwalls. The correct Lavatory width should be greater than the cabinet widthby 1/2" for each open end.
- A raised edge can be put on the front and both ends of a standard size, or onthe front and only one end of a custom size.
- If a wall-side of the Lavatory is actually against a linen cabinet that is not asdeep as the Lavatory, the corner that will stick out past the cabinet will alsoneed to be finished.
Measure cabinet depth from wallto front of face frame.
FINISHED EDGES: Raised Flat Ogee
Dimension should include 1/2" overhang for each finished end
FILL IN THE DIMENSIONS AND FAX THIS TO US WITH YOUR ORDER FORM001LavatoryDesignTools-03-0212
FinishWallSidesplashShort Linen
FinishWallSidesplashShort Linen

LAVATORY DESIGN WORK SHEET
Single Bowl Centered Lavatory
LEFT SIDE: RIGHT SIDE:
Answers to common questions:
- The dimensions of your vanity cabinet will tell you the correct dimensions andbowl layout of your Lavatory.
- The center of the bowl should line up with the center between the cabinetdoors.
- The Lavatory should overhang the cabinet in the front. The correct Lavatorydepth should be 1" greater than the cabinet depth.
- The Lavatory should overhang the cabinet on any ends that are not againstwalls. The correct Lavatory width should be greater than the cabinet widthby 1/2" for each open end.
- A raised edge can be put on the front and both ends of a standard size, or onthe front and only one end of a custom size.
- If a wall-side of the Lavatory is actually against a linen cabinet that is not asdeep as the Lavatory, the corner that will stick out past the cabinet will alsoneed to be finished.
Measure cabinet depth from wallto front of face frame.
FINISHED EDGES: Raised Flat Ogee
Dimension should include 1/2" overhang for each finished end
FILL IN THE DIMENSIONS AND FAX THIS TO US WITH YOUR ORDER FORM002LavatoryDesignTools-03-0212
FinishWallSidesplashShort Linen
FinishWallSidesplashShort Linen

LAVATORY DESIGN WORK SHEET
- The dimensions of your vanity cabinet will tell you the correct dimensions andbowl layout of your Lavatory.
- The center of the bowl should line up with the center between the cabinetdoors.
- The Lavatory should overhang the cabinet in the front. The correct Lavatorydepth should be 1" greater than the cabinet depth.
- The Lavatory should overhang the cabinet on any ends that are not againstwalls. The correct Lavatory width should be greater than the cabinet widthby 1/2" for each open end.
- A raised edge can be put on the front and both ends of a standard size, or onthe front and only one end of a custom size.
- If a wall-side of the Lavatory is actually against a linen cabinet that is not asdeep as the Lavatory, the corner that will stick out past the cabinet will also
Measure cabinet depth from wallto front of face frame.
Include 1/2" overhang for each finished end
FINISHED EDGES: Raised Flat Ogee
Single Bowl Offset Lavatory
Include 1/2" overhang for each finished end
LEFT SIDE: RIGHT SIDE:
LEFT offset RIGHT offset
FILL IN THE DIMENSIONS AND FAX THIS TO US WITH YOUR ORDER FORM003LavatoryDesignTools-03-0212
FinishWallSidesplashShort Linen
FinishWallSidesplashShort Linen
Answers to common questions:

Copy this page, write your dimensions on the copy, and fax to us for a quote.
Circled numbers indicate assembly order.Always give stud-to-stud measurements
We will figure clearances etc., and distance to top of wall panels from the floor.
Rectangular Shower- Right Side Offset Curb -
001ShowerDesignTools-03-0826
Rectangular Shower- Left Side Offset Curb -
SHOWER DESIGN WORK SHEET

Rectangular Shower
Using STANDARD Shower Basewith Bench Seat on Right Side
Rectangular Shower
Using STANDARD Shower Basewith Bench Seat on Left Side
002
SHOWER DESIGN WORK SHEET
ShowerDesignTools-03-0826
Copy this page, write your dimensions on the copy, and fax to us for a quote.
We will figure clearances etc.Circled numbers indicate assembly order.
Always give stud-to-stud measurements for base, framing height of bench seat supportstructure, and distance to top of wall panels from the floor.

Rectangular Shower- Far End Offset Curb -
with Bench Seat on Right Side
Rectangular Shower- Far End Offset Curb -
with Bench Seat on Left Side
003
SHOWER DESIGN WORK SHEET
ShowerDesignTools-03-0826
Copy this page, write your dimensions on the copy, and fax to us for a quote.
We will figure clearances etc.Circled numbers indicate assembly order.
Always give stud-to-stud measurements for base, framing height of bench seat supportstructure, and distance to top of wall panels from the floor.

Rectangular Shower- Near End Offset Curb -
with Bench Seat on Right Side
Rectangular Shower- Near End Offset Curb -
with Bench Seat on Left Side
004
SHOWER DESIGN WORK SHEET
ShowerDesignTools-03-0826
Copy this page, write your dimensions on the copy, and fax to us for a quote.
We will figure clearances etc.Circled numbers indicate assembly order.
Always give stud-to-stud measurements for base, framing height of bench seat supportstructure, and distance to top of wall panels from the floor.
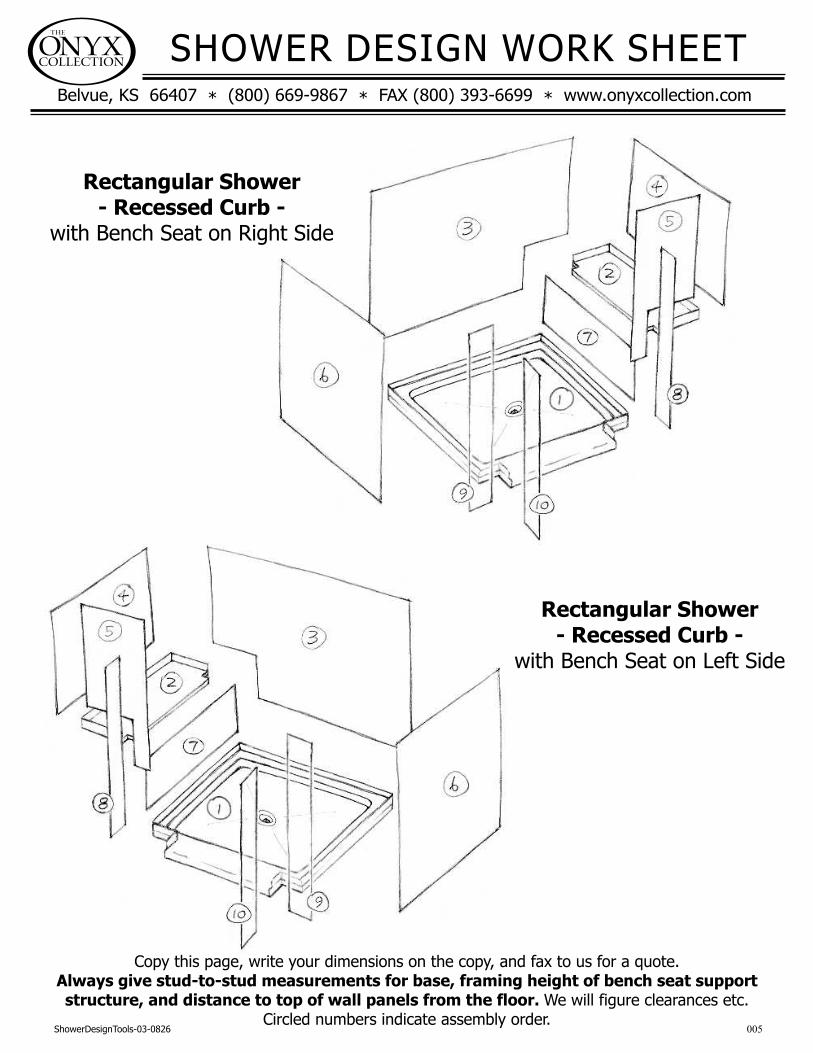
Rectangular Shower- Recessed Curb -
with Bench Seat on Right Side
Rectangular Shower- Recessed Curb -
with Bench Seat on Left Side
005
SHOWER DESIGN WORK SHEET
ShowerDesignTools-03-0826
Copy this page, write your dimensions on the copy, and fax to us for a quote.
We will figure clearances etc.Circled numbers indicate assembly order.
Always give stud-to-stud measurements for base, framing height of bench seat supportstructure, and distance to top of wall panels from the floor.

Rectangular Showerwith Bench Seat on Back Wall
(view from left side)
006
Rectangular Showerwith Bench Seat on Back Wall
(view from right side)
SHOWER DESIGN WORK SHEET
ShowerDesignTools-03-0826
Copy this page, write your dimensions on the copy, and fax to us for a quote.
We will figure clearances etc.Circled numbers indicate assembly order.
Always give stud-to-stud measurements for base, framing height of bench seat supportstructure, and distance to top of wall panels from the floor.

Rectangular Attic Shower- Angled Ceiling Panels -
with Bench Seat on Back Wall(view from left side)
007
Rectangular Attic Shower- Angled Ceiling Panels -
with Bench Seat on Back Wall(view from right side)
SHOWER DESIGN WORK SHEET
ShowerDesignTools-03-0826
Copy this page, write your dimensions on the copy, and fax to us for a quote.
We will figure clearances etc.Circled numbers indicate assembly order.
Always give stud-to-stud measurements for base, framing height of bench seat supportstructure, and distance to top of wall panels from the floor.

Neo-Angle Basewith Bench Seat on Right Side
008
Neo-Angle Basewith Bench Seat on Left Side
SHOWER DESIGN WORK SHEET
ShowerDesignTools-03-0826
Copy this page, write your dimensions on the copy, and fax to us for a quote.
We will figure clearances etc.Circled numbers indicate assembly order.
Always give stud-to-stud measurements for base, framing height of bench seat supportstructure, and distance to top of wall panels from the floor.

Neo-Angle Base- Recessed Curb on Diagonal -
with Bench Seat on Right Side
009
Neo-Angle Base- Recessed Curb on Diagonal -
with Bench Seat on Left Side
SHOWER DESIGN WORK SHEET
ShowerDesignTools-03-0826
Copy this page, write your dimensions on the copy, and fax to us for a quote.
We will figure clearances etc.Circled numbers indicate assembly order.
Always give stud-to-stud measurements for base, framing height of bench seat supportstructure, and distance to top of wall panels from the floor.

010ShowerDesignTools-03-0826
SHOWER DESIGN WORK SHEET
Neo-Angle Base- Recessed Curb on Diagonal -with Bench Seat on Back Wall Left
Neo-Angle Base- Recessed Curb on Diagonal -with Bench Seat on Back Wall Right
Copy this page, write your dimensions on the copy, and fax to us for a quote.
We will figure clearances etc.Circled numbers indicate assembly order.
Always give stud-to-stud measurements for base, framing height of bench seat supportstructure, and distance to top of wall panels from the floor.

011ShowerDesignTools-03-0826
SHOWER DESIGN WORK SHEET
Neo-Angle Base- Curb on Diagonal -
with Bench Seatson Back and Right Side
Neo-Angle Base- Curb on Diagonal -
with Bench Seatson Back and Left Side
Copy this page, write your dimensions on the copy, and fax to us for a quote.
We will figure clearances etc.Circled numbers indicate assembly order.
Always give stud-to-stud measurements for base, framing height of bench seat supportstructure, and distance to top of wall panels from the floor.

012ShowerDesignTools-03-0826
SHOWER DESIGN WORK SHEET
Rectangular Shower- with ALL GLASS FRONT -
Using STANDARD Shower Baseand Bench Seat on Right Side
Rectangular Shower
Using STANDARD Shower Base
with ALL GLASS FRONTand Bench Seat on Left Side
Copy this page, write your dimensions on the copy, and fax to us for a quote.
We will figure clearances etc.Circled numbers indicate assembly order.
Always give stud-to-stud measurements for base, framing height of bench seat supportstructure, and distance to top of wall panels from the floor.

013ShowerDesignTools-03-0826
SHOWER DESIGN WORK SHEET
JACK & JILL Shower Designwith Bench Seat on Right Side
JACK & JILL Shower Designwith Bench Seat on Left Side
Copy this page, write your dimensions on the copy, and fax to us for a quote.
We will figure clearances etc.Circled numbers indicate assembly order.
Always give stud-to-stud measurements for base, framing height of bench seat supportstructure, and distance to top of wall panels from the floor.

014ShowerDesignTools-03-0826
SHOWER DESIGN WORK SHEET
STEAM SHOWER- with Sloped Ceiling -
Using STANDARD Shower Baseand Bench Seat on Right Side
STEAM SHOWER- with Sloped Ceiling -
Using STANDARD Shower Baseand Bench Seat on Left Side
Copy this page, write your dimensions on the copy, and fax to us for a quote.
We will figure clearances etc.Circled numbers indicate assembly order.
Always give stud-to-stud measurements for base, framing height of bench seat supportstructure, and distance to top of wall panels from the floor.