lifestyle – owners’ notes august 2021 lifestyle
TRANSCRIPT

Lifestyle – Owners’ Notes August 2021
1
Lifestyle
Owners’ Notes
2018 Beneteau Oceanis 45
Lifestyle – Owners’ Notes August 2021
2
Welcome aboard Lifestyle! Our family has chartered from San Juan Sailing for many years, but after experiencing Lifestyle, we knew we had found our perfect boat and must share it with other San Juan Sailing guests. We are excited for the adventures she will bring your crew. For many years we have found life-long joy sailing through the islands, hanging on the hook, and sitting at the dock. We know the Lifestyle will bring the best of all three of these forms of boating adventure to you as well. Here is a list of some her great features:
◦ 3 Cabins – The cabins are large, have great headroom and include memory foam mattress toppers ◦ 2 Heads- The heads are light, airy and roomy, with separate enclosed showers and electric toilets ◦ Fast – Lifestyle cruises at 8 knots under power and sails like a dream ◦ Ease of handling – The two of us can easily handle her; in-mast furling, electric winch on the main,
and everything is led aft ◦ Roomy Cockpit – 8 people can sit in the cockpit and not feel crowded ◦ Ample Storage, a separate refrigerator and freezer as well as an inverter
We believe Lifestyle will be an excellent choice for your vacation adventures: First, she is in like-new condition. All her systems are tested, but she has had very limited use. You will find no dents, dings or scratches. She looks and feels like a perfectly appointed retreat. Second, Lifestyle is presented with an eye to providing everything we would want for ourselves on a cruise. She has a new dinghy, new outboard motor, state of the art electronics and beautiful lighting. See her inventory list on the web page for more details. Our only request is no smoking while aboard Lifestyle. Come explore with her and enjoy the islands! Listed below are some tips on how to get the most out of Lifestyle during your adventures. We hope you enjoy your trip and your experiences will become stories you tell for years to come. Joyous days and fair winds.
Lifestyle – Owners’ Notes August 2021
3
Table of Contents:
Welcome aboard Lifestyle! ................................................................................................................................... 2 1. Specifications: .................................................................................................. 4 2. Emergencies/Safety Equipment........................................................................ 4 3. Lifestyle’s Nuances .......................................................................................... 5 4. Anchors and Windlass ...................................................................................... 6 5. Barbecue ........................................................................................................... 7 6. Batteries, Charging & Inverter ......................................................................... 7 7. Berths ................................................................................................................ 9 8. Bow Thruster .................................................................................................... 9 9. Cabin Heat ........................................................................................................ 9 10. Dinghy and Outboard .....................................................................................10 11. Docking ..........................................................................................................11 12. Dodger ............................................................................................................11 13. Electrical Panels .............................................................................................11 14. Electronics & Instruments ..............................................................................13 15. Engine and Operating Under Power ...............................................................16 16. Fuel Tanks and System ...................................................................................18 17. Galley and Dinette ..........................................................................................18 18. Heads and Holding Tanks ..............................................................................19 19. Refrigerator/Freezer........................................................................................20 20. Repairs (Tools & Spares) ...............................................................................20 21. Sails and Rigging ............................................................................................20 22. Sailing Characteristics ....................................................................................22 23. Showers ..........................................................................................................22 24. Stove, Oven & Propane ..................................................................................22 25. Swim Step .......................................................................................................23 26. Water...............................................................................................................23 Key to Markings: Throughout these notes we have use the following convention: • Italics – used for headings. • Underlining – indicates the location of things. • Bold – indicates important knowledge or data.
Lifestyle – Owners’ Notes August 2021
4
1. Specifications:
Year: 2018 Other useful measurements: LOA: 45' 5" LWL: 42' 10" Refrigerator Beam: 14' 9" Draft: 7' 1" - Main compartment 23” x 31.5” x 22” Displacement: 23,250 lbs (dry) - Freezer/Frig comp. 18” x 19” x 31” Mast height above WL: 69’ (with
antenna) Berth mattress sizes
Fuel: 53 gal. - V-Berth 6’ 9” x 4’ 11” Water: 140 gal. (2 tanks) Hot water: 10
gal. - Quarter Berths 6’ 9” x 4’ 11”
Holding: 16 gal. Fwd, 22 gal. Aft Headroom: V-Berth 6’ 4”, Salon 6’ 4’, Engine: 54 hp. Yanmar (4JH5E) Shower 5’ 11”, Quarter Berths - 6’ 4” 2. Emergencies/Safety Equipment
Fire – There are three ABC rated fire extinguishers onboard. They are located (a) forward cabin stbd side (b) in the galley, by your head if you are standing at the sink and (c) aft cabin stbd side. All are ABC fire extinguishers. If you have a fire at the stove turn off the gas solenoid switch at the electrical panel. Hitting a Log or Running Aground – In case of a log hit or running aground, immediately check for leaks in the bilge and then check for cracks in the fore and aft sections of the bilge where the keel attaches to the hull. Also check all keel bolts. Once you are sure no water is entering the hull contact San Juan Sailing at 360-671-4300 and proceed to the nearest harbor and have a professional diver check the hull, keel, prop, and rudder before proceeding. Leaks – Make sure the bilge pumps are running. Then determine the source of the water, check the prop shaft first and then the through-hulls. There is a diagram showing the location of the through hulls in the notebook. Get the crew on deck and into life jackets. There are wood plugs wired to each of the through hulls. Also check the back of the engine to if the seals on the saildrive might be the cause. There are two bilge pumps. The manual bilge pump is located on the starboard side of the cockpit, just in front of the steering pedestal. The handle is in the starboard aft cockpit locker, aft end, mounted on the wood bulkhead. The electric bilge pump has automatic float switches but the switch on the electrical panel can be used to power the main pump manually (this breaker is normally in Auto). The electric pump is located under the salon sole about 2 feet aft of the mast compression post. Steering Failure – If the steering system fails there is an emergency tiller in the starboard lazarette (behind the helm) mounted up high on the forward bulkhead. It fits on rudder post which is accessed through the cap in the floor between the helms. You will want to reduce sail or power when using this tiller since the rudder is large and the tiller is small.
Lifestyle – Owners’ Notes August 2021
5
Emergency Equipment – Flares, air horn and tapered foam StaPlug located in a white mesh bag in the port cockpit locker. Crew Overboard – Throw a Type IV PFD (located in the port cockpit locker) or cockpit cushion to the person in the water first. Second, hit the mob button on the chart plotter so you will know where they are. Then use one of the procedures discussed in the skipper’s meeting to get back to the person. We keep the LifeSling mounted on the stern rail, starboard side.
3. Lifestyle’s Nuances In many ways she is similar to other charter boats. Therefore, you are likely to find most of her systems will be familiar and easy to operate. There are a few things about her that are not ‘typical’. These are the things that may require special attention or where it may be best to deviate from customary operating procedures. And, some are listed here because we believe they will help you plan your charter. Shore Power Cords - Lifestyle has two cords – a primary 30Amp, 50’ cord with a 50Amp female connection on one end and a 30Amp male connection on the other end. The 50Amp end needs to be plugged into the boat. The 30Amp male connector end can be plugged into the dock outlet or the 30Amp, 25’ extension cord. Both cords are stored in the starboard cockpit floor lazarette behind the helm when not in use. Fuel gauge- Unlike an automotive gauge, the boat’s gauge moves in larger increments. It may look like you have not used any fuel after hours of travel, and then it will jump by an 1/8th of a tank. Be mindful of hours of use. Filling the fuel tank- Be sure to listen closely as you fuel the boat. A spill can be both embarrassing and costly. We use the gauge to estimate how much fuel to take on (each ⅛ bar represents about 6 gallons). Shower pumps- The pumps are on a factory set (and not adjustable) cycle. They will run for about 30 seconds and will not empty the shower pan with a single push. Be sure to press the black button multiple times to empty the shower. Moving the dinette bench seat- The dinette bench seat can be moved away from the table to allow for seating. It is fastened to the floor with lateral hinges and bolts. Please carefully follow the procedure in the Galley and Dinette section of this document to safely move the bench seat. Forward Stateroom overhead hatches- The hatches are frameless and are more susceptible to damage than framed hatches. Prior to closing a hatch, the locking device in the support arm must be released, then gently pull the hatch closed. Please ensure that all hatches are closed prior to getting underway to prevent damage from getting caught by jib sheets. In addition, please do not step on the hatches while on deck. As a reminder, the hatches all have “NO STEP” stickers on them. Humming lines at night- We found the topping lift or the outhaul on the mainsail can cause some thrumming noises at night. Relaxing both will give you a restful evening.
Lifestyle – Owners’ Notes August 2021
6
4. Anchors and Windlass Lifestyle is equipped with two anchors: The primary anchor is forward and is a 44# Delta with 300’ of chain and a short tail of nylon rope. The chain is marked with the SJS standard: 2’ of yellow poly line every 25 feet and 2 such lines at 100’ and 200’. The secondary anchor is a Fortress located in the starboard lazarette behind the wheel. The rode is 50’ of chain and 200’ of nylon rope. The scope normally used in the islands is 4 to 1, definitely not 7 to 1 (unless conditions call for it, i.e. sustained winds over 25 knots). Most of the anchorages are well protected and popular, so you will likely have someone anchored nearby. After you have paid out the suitable amount of chain, 1-2 minutes of IDLE reverse sets the anchor (no more than 1000 RPM). Here is an easy formula for how much chain you need out; add the water depth on sounder, plus any tide increase expected during the night, plus 5’ (to account for the distance from sounder to roller on bow) and take that total and multiply by 4 (typical example would be 25’ of water + 6’ of tide increase + 5’ = 36’ x 4 = 144’). The electric anchor windlass receives power from the start battery. The circuit breaker for the windlass is located under the starboard quarter berth. The up-down controller for the windlass is secured inside the forward locker. Be sure to take the tension off of the windlass by attaching the snubber to the chain and a cleat (not the windlass), and then running out more chain until the chain on the drum is slack. Detailed operating instructions are listed below:
Lowering the anchor: a. Turn on the circuit breaker for the windlass (stbd aft berth, under the bunk). b. Untie the line holding the anchor in place (this line doubles as the snubber). c. Lower the anchor until the needed chain is paid out while backing slowly. d. Secure the chain with the snubber and run out enough chain to take the load off of the
windlass. DO NOT LEAVE THE LOAD ON THE DRUM. If you are expecting wind during the night it is a good idea to run the snubber over port roller and secure it to the port cleat. The reason is this, if the snubber line stays on the starboard side along with the chain it slides from side to side as the boat swings and bangs the chain into the roller brackets. It can be quite noisy for anyone sleeping in the V-berth.
e. Set the anchor by reversing at 800 RPM for 1-2 minutes, DO NOT go above 1000 RMP.
f. Turn off the circuit breaker and, if appropriate, turn on the anchor light.
Raising the anchor: a. Start the engine. b. Turn on the circuit breaker for the windlass and, if needed, turn off the anchor light. c. Turn on the raw water wash-down pump – switch in cupboard above main panel (aft
of the Fusion stereo). Hose is in sail locker behind anchor locker, turns into fitting to right of anchor locker.
d. Take in enough chain to retrieve the snubber. e. When retrieving the anchor, never use the windlass to pull the boat; instead, slowly
power toward the anchor while using the windlass (up button on the remote control) to take up the slack. Also, if the anchor is really stuck in the mud you will hear the

Lifestyle – Owners’ Notes August 2021
7
windlass slow under the load. Immediately stop the windlass and drive the boat forward to free the anchor.
f. The incoming chain will pile up against the aft end of the chain locker so the operator needs to reach in and push the pile of chain forward every 20-30 feet of chain. Also be aware the lines used to mark the chain length can catch in the outlet of the windlass and may cause a jam. Just run the windlass back out for a second to clear.
g. Once the anchor is out of the water please bring onto the boat by hand. Please do not pull the anchor up onto the rollers using the power of the windlass; doing so will likely chip the fiberglass as the anchor swings into the bow.
h. Secure the anchor by hooking the snubber onto the chain and tying it to the windlass drum (the chain over the drum should not be the only thing keeping the anchor onboard).
i. Switch the windlass breaker “off” to prevent draining the start battery. j. Turn off wash-down pump.
Stern Ties: There are times when adding a stern tie to shore will be handy, especially in Desolation Sound and north. Lifestyle has 300’ of line on a spool for this purpose. It is stored in the port cockpit locker. The recovered line is usually very wet so we leave the spool sitting under the transom seat for a couple hours to dry before we put it away.
5. Barbecue The stainless steel propane barbecue is mounted on the starboard stern pulpit. There is a line in inside the propane locker with a connector for the regulator on the BBQ. The propane locker is just port of mid-ship under the aft cockpit seat and there is a hose for the BBQ coiled up inside. Note the solenoid needs to be on to run the BBQ. 6. Batteries, Charging & Inverter Lifestyle has 6 batteries onboard, one for starting the engine, one for the bow thruster and four in the house bank. We have her wired for maximum convenience. These three battery systems are separated from each other by an isolator so it should be impossible to drain the start battery. The batteries are locations are:
• House bank – under forward end of aft berths, two on each side. • Start battery – under forward end of aft berth, inside battery on port side. • Bow thruster battery – under V-berth, forward end.
Battery/Levels Monitor – Lifestyle has a display on the main panel to monitor the batteries (and other levels). The voltage normally shows >13V while charging. When not charging (shore power off and engine not running) the voltage will show <13V. It is time to recharge when the voltage gets to 12.2 volts – PLEASE DO NOT RUN THE VOLTAGE BELOW 12.0 – DOING SO DAMAGES THE BATTERIES. Fresh water and fuel levels can also be checked using this same display by pressing the appropriate buttons (see picture to right).
Battery Voltage Fresh Water
Tank Levels
Fuel Tank Level
Lifestyle – Owners’ Notes August 2021
8
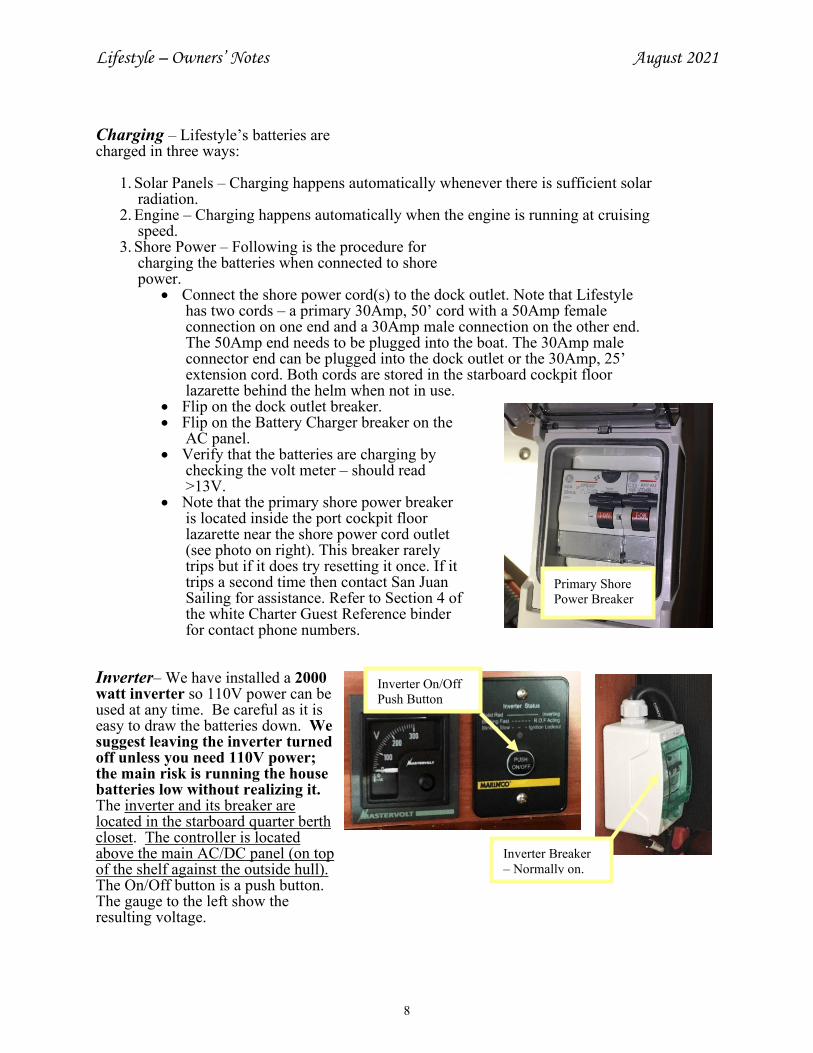
Charging – Lifestyle’s batteries are charged in three ways:
1. Solar Panels – Charging happens automatically whenever there is sufficient solar radiation.
2. Engine – Charging happens automatically when the engine is running at cruising speed.
3. Shore Power – Following is the procedure for charging the batteries when connected to shore power.
• Connect the shore power cord(s) to the dock outlet. Note that Lifestyle has two cords – a primary 30Amp, 50’ cord with a 50Amp female connection on one end and a 30Amp male connection on the other end. The 50Amp end needs to be plugged into the boat. The 30Amp male connector end can be plugged into the dock outlet or the 30Amp, 25’ extension cord. Both cords are stored in the starboard cockpit floor lazarette behind the helm when not in use.
• Flip on the dock outlet breaker. • Flip on the Battery Charger breaker on the
AC panel. • Verify that the batteries are charging by
checking the volt meter – should read >13V.
• Note that the primary shore power breaker is located inside the port cockpit floor lazarette near the shore power cord outlet (see photo on right). This breaker rarely trips but if it does try resetting it once. If it trips a second time then contact San Juan Sailing for assistance. Refer to Section 4 of the white Charter Guest Reference binder for contact phone numbers.
Inverter– We have installed a 2000 watt inverter so 110V power can be used at any time. Be careful as it is easy to draw the batteries down. We suggest leaving the inverter turned off unless you need 110V power; the main risk is running the house batteries low without realizing it. The inverter and its breaker are located in the starboard quarter berth closet. The controller is located above the main AC/DC panel (on top of the shelf against the outside hull). The On/Off button is a push button. The gauge to the left show the resulting voltage.
Inverter Breaker – Normally on.
Inverter On/Off Push Button
Primary Shore Power Breaker
Lifestyle – Owners’ Notes August 2021
9
Solar Panel – Lifestyle has a 280 watt solar panel which will help keep the batteries charged. There is nothing to do, this system is automatic.
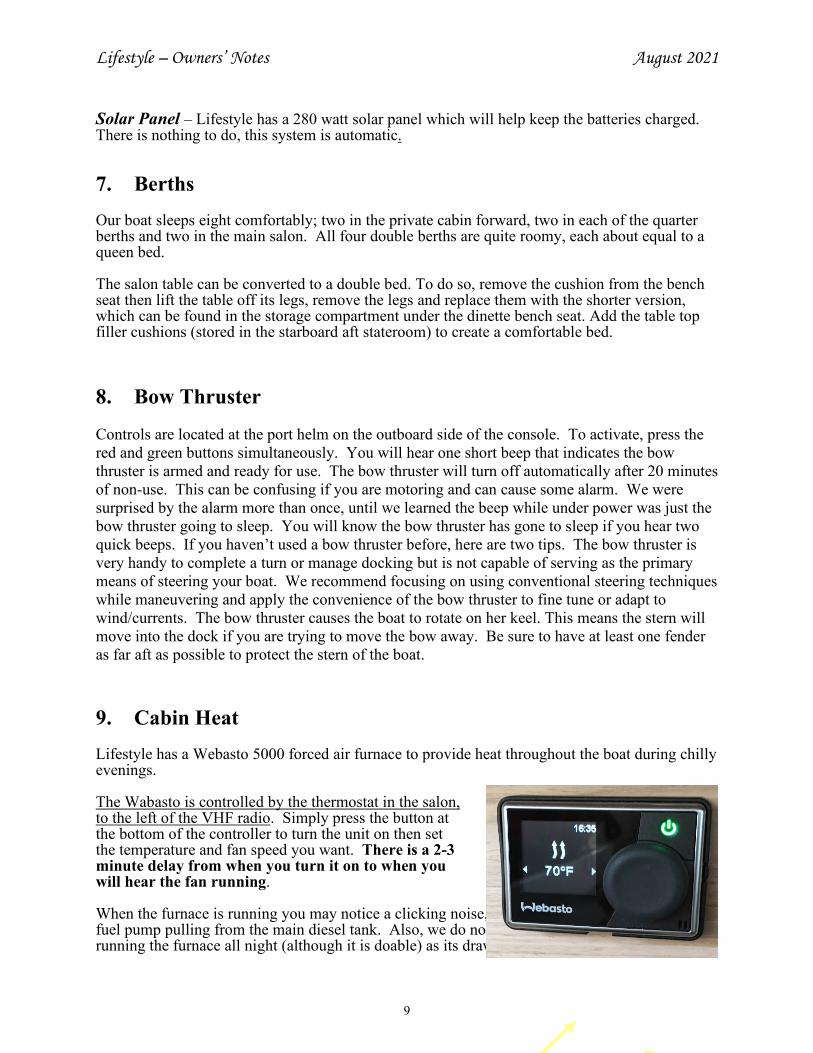
7. Berths Our boat sleeps eight comfortably; two in the private cabin forward, two in each of the quarter berths and two in the main salon. All four double berths are quite roomy, each about equal to a queen bed. The salon table can be converted to a double bed. To do so, remove the cushion from the bench seat then lift the table off its legs, remove the legs and replace them with the shorter version, which can be found in the storage compartment under the dinette bench seat. Add the table top filler cushions (stored in the starboard aft stateroom) to create a comfortable bed. 8. Bow Thruster Controls are located at the port helm on the outboard side of the console. To activate, press the red and green buttons simultaneously. You will hear one short beep that indicates the bow thruster is armed and ready for use. The bow thruster will turn off automatically after 20 minutes of non-use. This can be confusing if you are motoring and can cause some alarm. We were surprised by the alarm more than once, until we learned the beep while under power was just the bow thruster going to sleep. You will know the bow thruster has gone to sleep if you hear two quick beeps. If you haven’t used a bow thruster before, here are two tips. The bow thruster is very handy to complete a turn or manage docking but is not capable of serving as the primary means of steering your boat. We recommend focusing on using conventional steering techniques while maneuvering and apply the convenience of the bow thruster to fine tune or adapt to wind/currents. The bow thruster causes the boat to rotate on her keel. This means the stern will move into the dock if you are trying to move the bow away. Be sure to have at least one fender as far aft as possible to protect the stern of the boat. 9. Cabin Heat Lifestyle has a Webasto 5000 forced air furnace to provide heat throughout the boat during chilly evenings. The Wabasto is controlled by the thermostat in the salon, to the left of the VHF radio. Simply press the button at the bottom of the controller to turn the unit on then set the temperature and fan speed you want. There is a 2-3 minute delay from when you turn it on to when you will hear the fan running. When the furnace is running you may notice a clicking noise, this is the electric fuel pump pulling from the main diesel tank. Also, we do not recommend running the furnace all night (although it is doable) as its draw on the batteries is

Lifestyle – Owners’ Notes August 2021
10
sizable. It is also fairly noisy, especially from outside the boat and in the starboard quarter berth. The heat is dry, comfortable, and on those occasional rainy days or cool evenings, makes a huge difference in cruising comfort! 10. Dinghy and Outboard Lifestyle has a dinghy carried on davits which is equipped with a 9.9hp Honda. The dinghy is roomy (easily holds 4 adults) and the outboard are easy to operate.
As owners, we would very much appreciate your special care when beaching the dinghy. Beaches in the San Juans are seldom gentle, sandy beaches; often they are rocky and covered by barnacles equipped with extra sharp rubber cutters. So any extra care will be appreciated. The outboard has a four stroke engines, so do not add oil to the gasoline mixture – it uses straight gasoline. To deploy the dinghy untie the anti-swing lines from both sides, open the clutches and lower. Then remove the flat fender used to keep the dinghy from rubbing against the swim ladder. Operation of the outboard is pretty straightforward, the choke is automatic. Here are the basics:
• Open the vent valve on the gas can • Pump the bulb until hard • Turn throttle to start • Pull the cord • If it is ‘on’ you may want swing the ‘wheel-lock’ lever so steering will be easier.
Line to prevent swinging
Lift line clutch
Gear-shift
“Wheel-lock” lever
Fuel filter and squeeze bulb
Lifestyle – Owners’ Notes August 2021
11
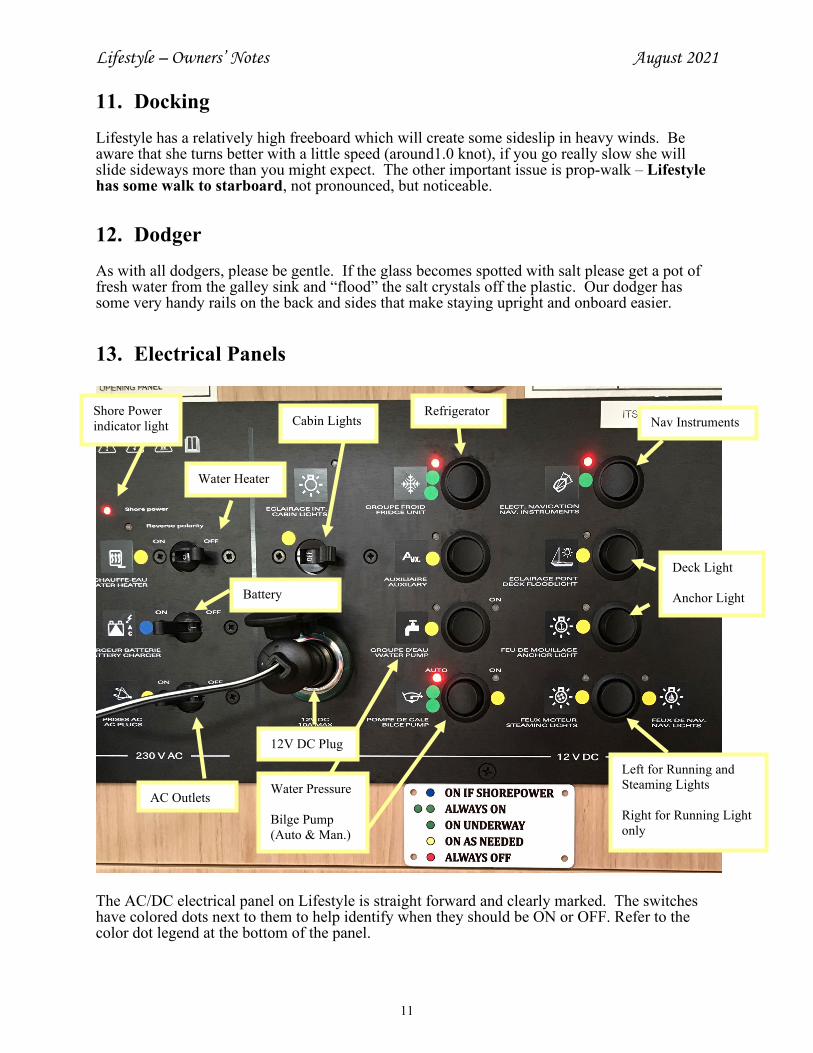
11. Docking Lifestyle has a relatively high freeboard which will create some sideslip in heavy winds. Be aware that she turns better with a little speed (around1.0 knot), if you go really slow she will slide sideways more than you might expect. The other important issue is prop-walk – Lifestyle has some walk to starboard, not pronounced, but noticeable. 12. Dodger As with all dodgers, please be gentle. If the glass becomes spotted with salt please get a pot of fresh water from the galley sink and “flood” the salt crystals off the plastic. Our dodger has some very handy rails on the back and sides that make staying upright and onboard easier. 13. Electrical Panels The AC/DC electrical panel on Lifestyle is straight forward and clearly marked. The switches have colored dots next to them to help identify when they should be ON or OFF. Refer to the color dot legend at the bottom of the panel.
Cabin Lights
12V DC Plug
Water Heater
Battery
Left for Running and Steaming Lights Right for Running Light only
Water Pressure Bilge Pump (Auto & Man.)
Deck Light Anchor Light
Refrigerator Shore Power indicator light
AC Outlets
Nav Instruments
Lifestyle – Owners’ Notes August 2021
12
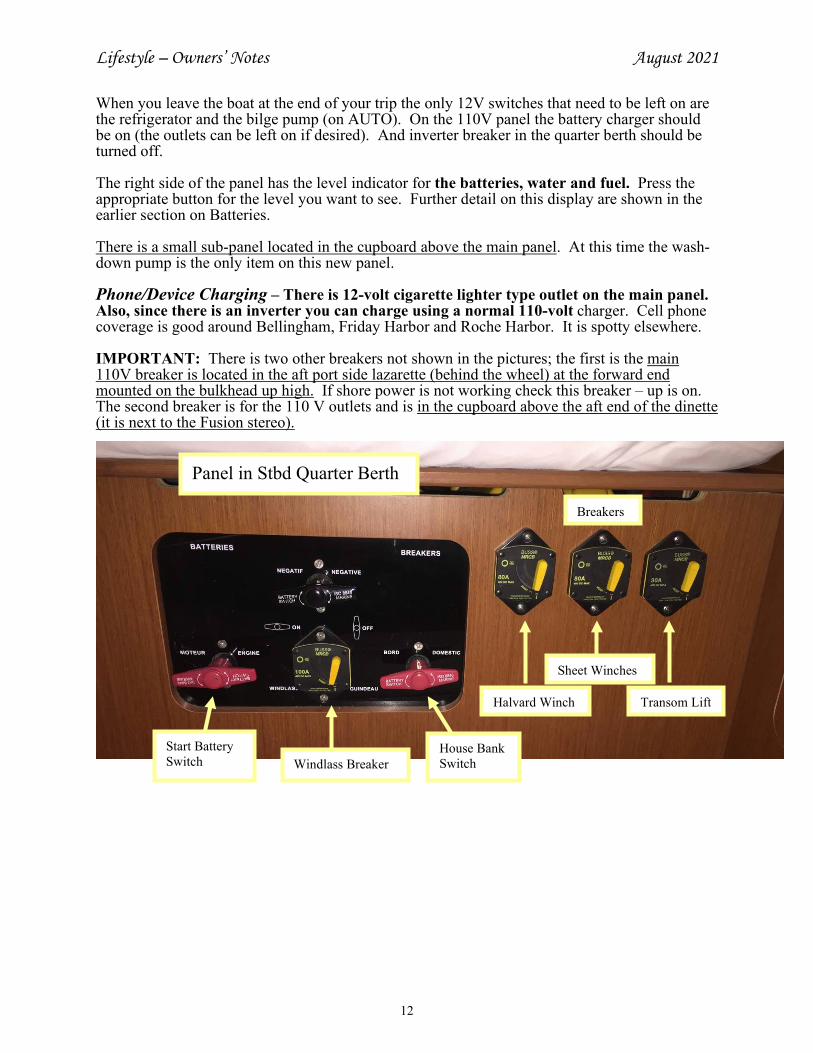
When you leave the boat at the end of your trip the only 12V switches that need to be left on are the refrigerator and the bilge pump (on AUTO). On the 110V panel the battery charger should be on (the outlets can be left on if desired). And inverter breaker in the quarter berth should be turned off. The right side of the panel has the level indicator for the batteries, water and fuel. Press the appropriate button for the level you want to see. Further detail on this display are shown in the earlier section on Batteries. There is a small sub-panel located in the cupboard above the main panel. At this time the wash-down pump is the only item on this new panel. Phone/Device Charging – There is 12-volt cigarette lighter type outlet on the main panel. Also, since there is an inverter you can charge using a normal 110-volt charger. Cell phone coverage is good around Bellingham, Friday Harbor and Roche Harbor. It is spotty elsewhere. IMPORTANT: There is two other breakers not shown in the pictures; the first is the main 110V breaker is located in the aft port side lazarette (behind the wheel) at the forward end mounted on the bulkhead up high. If shore power is not working check this breaker – up is on. The second breaker is for the 110 V outlets and is in the cupboard above the aft end of the dinette (it is next to the Fusion stereo).
Panel in Stbd Quarter Berth
Halyard Winch
Windlass Breaker House Bank Switch
Start Battery Switch
Sheet Winches
Transom Lift
Breakers

Lifestyle – Owners’ Notes August 2021
13
14. Electronics & Instruments Lifestyle has a full set of B&G instrumentation, including chart plotters, radar, AIS, depth sounder, knot meter and wind gauge.
Chart Plotter/Radar – We have three color chart plotters installed, one at each helm and a larger on in the center. All are integrated with the radar. The “Nav Instruments” breaker must be on at the electrical panel to power the units. Then press the power button (lower right corners) at the units. The manuals for the chart plotter and radar are located in the cabinets behind the chart table.
Auto-pilot Control
Chart Plotter (includes other displays, such as depth and
d)
Bow Thruster Control
Control to raise and lower swim step
Port Helm
Page Selection
Engine Panel

Lifestyle – Owners’ Notes August 2021
14
These displays are tough screens so size can be controlled like an iPad. What they display can be changed using the Page selection button (upper right corner). The picture to the right shows the page with depth, speed, etc. We recommend that your PRIMARY navigation tool be the Maptech waterproof chart book or paper charts (both have the most active “killer rocks” marked in red). The best way to stay off the rocks is by knowing where you are at all times. The primary role of the chart plotter is to verify that you are where you think you are. And, when in a tight place it will allow you to zoom in for a better view than the real charts provide. Radar – You should have little need of the radar except for the highly unlikely event that you are suddenly enveloped by fog. Fog in the islands usually forms in the wee hours of the morning and burns off by mid-day. So, if it’s a little soupy after breakfast, we put on an extra pot of coffee until it lifts. Please remember that SJS contracts do not permit night or restricted visibility sailing. However, for practice you can watch the radar screen and what is actually happening during a clear day to develop a familiarity with what it looks like. Depth Sounder – The depth sounder will not give accurate readings beyond 400’. In deeper water, the sensitivity on the unit increases as the transducer tries to get some reading back. Consequently, when you are in deep water false readings caused by currents, changes in water temperature, fish, etc. are common. These false reading often report very shallow water so knowing you are in deep water will prevent momentary heart attacks. The depth showing on the sounder is being measured from the transducer (about 18” under true water level) so the water under the boat is really a bit deeper than the reading. But, we strongly recommend leaving 10-12 feet of water under the boat. We suggest using the depth sounder mainly as an aid to navigation in shallow water. However, the key to avoiding rocks is not the depth sounder – but knowing where you are on the chart at all times. ROCKS ARE THE SINGLE BIGGEST NAVIGATIONAL AND SAFETY HAZARD IN THE ISLANDS – BUT THEY ARE ALL MARKED ON THE CHARTS. We do not recommend using the alarm. Experience in the islands tells us that it goes off at the wrong time – usually the middle of the night as a seal or fish passes underneath.
Knot Meter – If the digital knot meter shows a reading of “0.00” while underway, the impeller is most likely clogged. Sometimes it will clear its self; wakes from big powerboats are good for this. You can also try clearing it by traveling in reverse. The instrument transponders are under the forward end of the salon just port of the mast. You can remove the impeller to clear it but only if you are experienced in such things. If needed, the SOG (speed over ground) reading on the chart plotter will work as a standby knot meter.
A.I.S. – Lifestyle is equipped with an Automatic Identification System receiver. This system will show most commercial vessels on chart plotter screen as triangles. The triangle points in the direction that vessel is moving and if you move the cursor over the triangle the

Lifestyle – Owners’ Notes August 2021
15
system will give you addition information (such as name, size, speed, etc.) about the vessel. Note that the VHF base unit must be turned on to receive A.I.S. signals.
VHF Radio – The VHF base unit is mounted in the salon on the port side at the nav station. There is a handheld VHF (see photo on right) which is wirelessly linked to the base unit for use in the cockpit. It is stored in its charging cradle on the starboard side of the salon in the cabinet above the electrical panel. The master VHF must be turned on prior to turning on the handheld VHF. Please return the handheld to its charging cradle when not underway.
Stereo – We have installed a good quality car stereo is in the cupboard above the main panel and with speakers in the cabin and cockpit. Please be aware of other boats when you are in harbor and adjust the Fader so that the cockpit speakers are turned off when not in use. We recommend that you monitor Channel 16 during your cruise. It is reserved for emergencies and boat-to-boat initial contact. After contact, move to channels 68, 69, 72, 74 or 78. We listen to weather channels 1, 2, 3, 4 or 8 (whichever gives the best reception) before we sail in the morning and prior to anchoring for the evening. Listen for the reports identified as “Northern Inland Waters”. San Juan Sailing monitors channel 80 during office hours (closed Sundays). Wind Instruments – Wind speed and direction can be displayed by selecting the appropriate page.
Handheld VHF in charging

Lifestyle – Owners’ Notes August 2021
16
15. Engine and Operating Under Power
Operation – We have found the 54 HP Yanmar engine to be very reliable. Cruising should be done at engine RPMs of 1800 to 2200. The following table gives approximate cruising information:
RPM’s Boat Speed Fuel Consumption Range
1800 7.0 Knots Approx. .7 gal/hr 300 Naut. Mi. 2000 7.3 Knots Approx. 1.0 gal/hr 290 Naut. Mi. 2200 7.6 Knots Approx. 1.2 gal/hr 250 Naut. Mi.
The ranges listed assume a 25% reserve in the 53 gal fuel tank. Also, there is a blower in the engine compartment which is vented in the transom. This blower is temperature controlled so do not be surprised when it comes on automatically.
Starting: a. Visually check the engine, look for fluid or oil under the engine or eelgrass in the
strainer. There should be no need to check the oil level unless you are out for more than a week (it is checked every turn-around by our maintenance pro). If you do want to check the oil level the dipstick is easily accessed via the hatch opposite the stove.
b. Make sure the gearshift is in neutral (approx. vertical). c. Push the On/Off button (bottom right of panel). It only takes a quick
push – if you push it in and hold it too long it will turn on the then right back off again. Then, once panel has booted up (takes 3-4 sec.), push the Start button (upper right).
Check coolant level here. Do not fill unless empty and then only ¼ full.
Check sea water strainer here
Check oil level by coming in via side door – dip sick is down low.
Add oil here
Lifestyle – Owners’ Notes August 2021
17
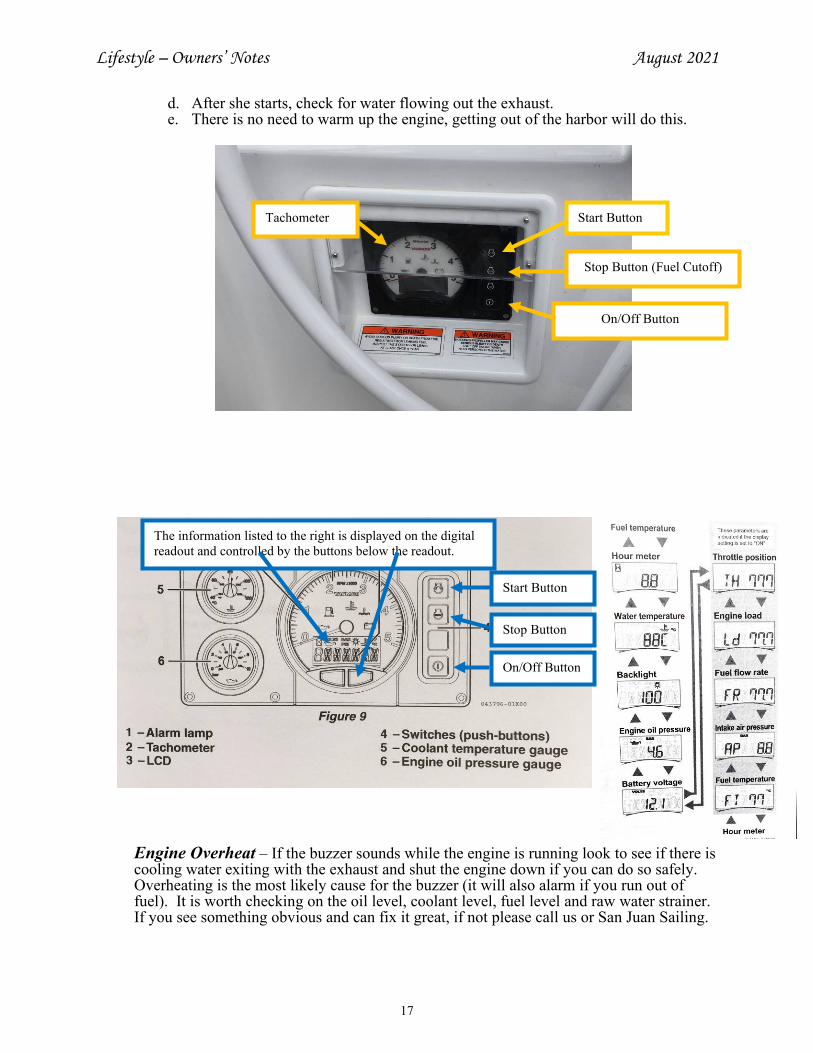
d. After she starts, check for water flowing out the exhaust. e. There is no need to warm up the engine, getting out of the harbor will do this.
Engine Overheat – If the buzzer sounds while the engine is running look to see if there is cooling water exiting with the exhaust and shut the engine down if you can do so safely. Overheating is the most likely cause for the buzzer (it will also alarm if you run out of fuel). It is worth checking on the oil level, coolant level, fuel level and raw water strainer. If you see something obvious and can fix it great, if not please call us or San Juan Sailing.
Tachometer
Stop Button (Fuel Cutoff)
Start Button
On/Off Button
The information listed to the right is displayed on the digital readout and controlled by the buttons below the readout.
On/Off Button
Start Button
Stop Button
Lifestyle – Owners’ Notes August 2021
18
Engine Shutdown – First make sure the engine is at idle and the gearshift in neutral. Then push the Stop button for about 2 seconds. You can also use the On/Off button, doing so will kill the engine and turn off the panel. If you are sailing when you turn off the engine you may need to put the gearshift into reverse just for a second; this helps feather the Maxprop. If the prop needs feathering you will likely hear the shaft turning when you go below.
16. Fuel Tanks and System The fuel tank holds 53-gallons and sits under the port quarter berth. The fuel shut-off valve is located on top of the tank. The fuel gauge is located on the main panel and can be activated by pressing the right hand side of the level gauge control (see panel section). However, do not believe this gauge, it has a tendency to stick and show more fuel than may actually be there. Instead, note the hours when you leave and fill the tank if have run 35-40 hours. The engine hours can be viewed using the digital readout on the engine panel, see diagram above. When filling the tank listen closely and stop as soon as you hear fuel coming up the fill pipe. It will foam out the vent if you go further. The deck fitting for the fuel tank is on the port side aft. 17. Galley and Dinette For those of you who are interested in fine dining while on vacation, we have done our best to setup Lifestyle with a well-equipped galley. We have place settings for eight onboard and most of the pots, pans and utensils needed for food preparation. There is also an assortment of cleaning supplies should you need them, some under the sink and more in the cabinet in the shower.
Microwave – We have installed a microwave in the galley for convenience. You will need to be sure the inverter is on before using unless you are on shore power. Also, the AC Outlets switch on the 110V Panel will need to be on. Be aware the microwave can run batteries down quickly!
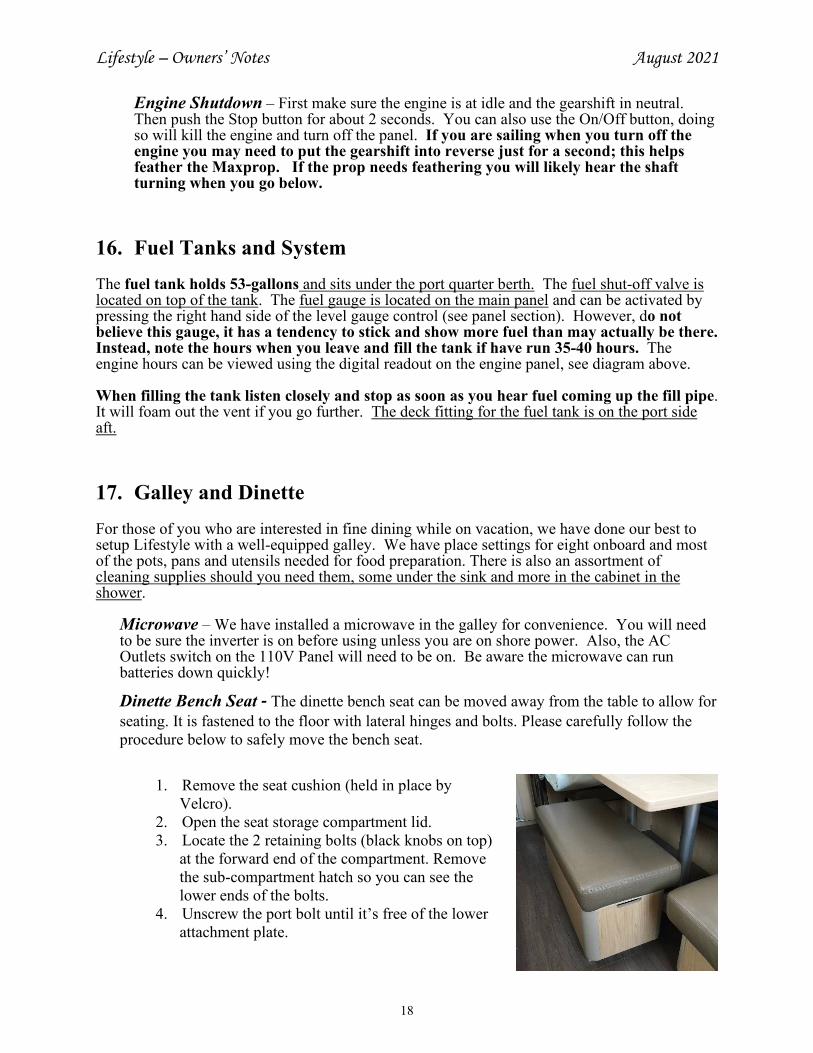
Dinette Bench Seat - The dinette bench seat can be moved away from the table to allow for seating. It is fastened to the floor with lateral hinges and bolts. Please carefully follow the procedure below to safely move the bench seat.
1. Remove the seat cushion (held in place by Velcro).
2. Open the seat storage compartment lid. 3. Locate the 2 retaining bolts (black knobs on top)
at the forward end of the compartment. Remove the sub-compartment hatch so you can see the lower ends of the bolts.
4. Unscrew the port bolt until it’s free of the lower attachment plate.
Lifestyle – Owners’ Notes August 2021
19
5. The seat is also attached to the floor with lateral moving hinges which allow the seat to be swung 8” to the port. Grab the slot handles at the forward and aft ends of the seat. Lift up and to port to swing the seat on the hinges.
6. Screw in the starboard bolt to secure the seat in place.
7. Close lid and replace cushion. Ready for dining!
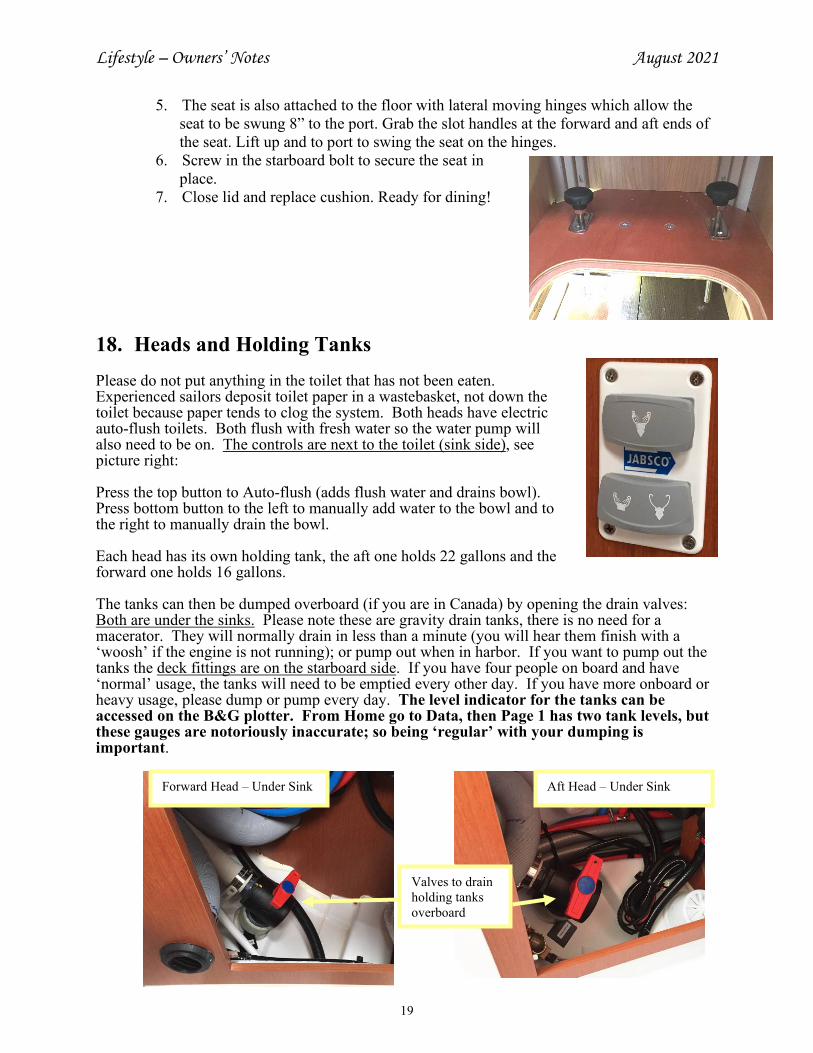
18. Heads and Holding Tanks Please do not put anything in the toilet that has not been eaten. Experienced sailors deposit toilet paper in a wastebasket, not down the toilet because paper tends to clog the system. Both heads have electric auto-flush toilets. Both flush with fresh water so the water pump will also need to be on. The controls are next to the toilet (sink side), see picture right: Press the top button to Auto-flush (adds flush water and drains bowl). Press bottom button to the left to manually add water to the bowl and to the right to manually drain the bowl. Each head has its own holding tank, the aft one holds 22 gallons and the forward one holds 16 gallons. The tanks can then be dumped overboard (if you are in Canada) by opening the drain valves: Both are under the sinks. Please note these are gravity drain tanks, there is no need for a macerator. They will normally drain in less than a minute (you will hear them finish with a ‘woosh’ if the engine is not running); or pump out when in harbor. If you want to pump out the tanks the deck fittings are on the starboard side. If you have four people on board and have ‘normal’ usage, the tanks will need to be emptied every other day. If you have more onboard or heavy usage, please dump or pump every day. The level indicator for the tanks can be accessed on the B&G plotter. From Home go to Data, then Page 1 has two tank levels, but these gauges are notoriously inaccurate; so being ‘regular’ with your dumping is important.
Forward Head – Under Sink
Valves to drain holding tanks overboard
Aft Head – Under Sink

Lifestyle – Owners’ Notes August 2021
20
19. Refrigerator/Freezer The on/off switch is on the panel and each compartment has its own thermostat (see pictures). The top loading section can be used as a freezer or frig by adjusting the thermostat. Also, we normally leave the unit running 24 hrs a day without battery issues. 20. Repairs (Tools & Spares) It is our goal and hope that you will not need to make repairs during your trip. That being said, we have also provided a good selection of tools and spares in case you need them. The tools are stored under the forward nav station seat. The spares include engine filters and belts along with a replacement head pump. If you have problems that you are not comfortable handling please call us or San Juan Sailing (see numbers on page 1). 21. Sails and Rigging
Mainsail – Unlike a standard main, it is best to have wind in a furling main when deploying, similar to deploying a furling jib. The wind adds even pressure all the way up the mast and helps the sail deploy. This even works going down wind (in moderate winds, up to about 15 knots). The new main is made of laminate, which is slippery and helps the sail deploy. Since we put on this new sail there have been no issues with unfurling. Here are the procedures we use for furling and unfurling:
Unfurling: f. Un-cleat the boom vang, furling line, outhaul and main sheet.
Top-load Freezer/Frig Section
Front-load Refrigerator Section
Temperature controls
Small Freezer

Lifestyle – Owners’ Notes August 2021
21
g. Usually we wrap the main sheet 2 turns on the port winch but do not cleat it. The idea being to not have it tight but also to keep it from running out freely.
h. Remember to fall off so there is wind in the sail. i. Take a couple wraps on the starboard winch with the outhaul line. Start pulling the
sail out of the mast by hand. If you do use the winch, DO NOT force the sail out. At the first sign that the sail is not coming out freely, stop and loosen the outhaul. Then, go forward to the mast, grab the foot of the sail and give it a hard yank out of the mast (aft). This method works 100% of the time for us with very little fanfare.
j. Once the sail if fully deployed putting the outhaul on the winch is reasonable and necessary.
k. Tighten boom vang and sheet in as needed. It is okay to use the electric winch on the sheet.
Furling:
a. Travel over or loosen the sheet (don’t need it flapping unless in stronger winds as it is best to keep a little wind in the main as it helps tension it for a tight wrap on the furling drum.
b. Un-cleat the outhaul and take all but one wrap off the winch. Use this to keep tension on the sail so it wraps tightly around the furler.
c. Take a couple wraps on the port winch with the furling line. Pull by hand. You may need to use a winch handle, lightly, just to get it started. Do not use the electric motor!
d. The entire sail does not go into the mast, please leave the last foot or so exposed (it is covered with UV protection and designed to be out).
e. Tighten boom vang and sheet to keep boom from swinging too much but not so tight that the boom comes down to the dodger.
IMPORTANT: Be sure to keep a bit of tension on the outhaul in order to get a nice tight wrap of the mainsail inside the mast. A little wind (it does not take much) in the sail will accomplish the same thing. Remember, if you furl the main without any wind pressure on it (if you’re becalmed), tension on the outhaul line is the ONLY force that will get you a nice tight wrap inside the mast. A loosely furled main inside the mast could mean a tough next deployment or, in the worst case, a jammed main. Also, be aware that too much halyard tension will cause the furler to bind. So, please do not add halyard tension. If the main is repeatedly arguing with you try loosening the halyard – it does not take much, just an inch makes a big difference. Headsail - Our genoa is a 110 and takes a good sail shape at the full out position. During periods of heavier winds you may furl the headsail as desired. Please keep moderate tension on the roller furling line when deploying the headsail to prevent a rat's nest on the drum. Similar tension on the sheets should be used when furling to prevent ‘candy striping’ of the furled sail. Electric Winches – The electric winch should be used only for sheeting in the main, the jib or running a person up the mast on the boson’s chair. IT SHOULD NOT BE USED TO ADJUST FURLING OR OTHER LINES. It is too powerful and can easily break sails, lines or fittings, all of which will break before the winch does. The winch circuit breakers are under in the starboard quarter berth.
Lifestyle – Owners’ Notes August 2021
22
22. Sailing Characteristics Lifestyle is a very solid vessel with surprisingly well balance handling characteristics. This being said, as with most modern cruising boats, Lifestyle has a beamy stern. This causes her have excessive weather helm if she heels over too far. Therefore, it is necessary to trim for less heel when the wind hits 15-20 knots. Here are the basics: Move the jib cars back and sheet in to flatten the lower part of the jib, this will also twist off the top. On the main, tighten the outhaul to flatten the sail and loosen the sheet some to twist off the top. Then use the traveler to trim for the amount of heel you want. These steps seem to work well up to about 20 knots, beyond that reefing the main becomes necessary. 23. Showers Experienced cruisers know the sailor's shower: get wet, turn it off, soap up, rinse off. CAUTION: THE ENGINE CAN HEAT THE WATER TO SCALDING TEMPERATURES! Each shower has a sump pump with a button located in the shower area. Each time you press the button the pump will run for a few seconds, so either hold it in or press it often, or you may be swimming in your shower. There is also a shower fixture back at the swim platform. This is useful for washing off shoes after returning from the beach. This fixture is located on the starboard side under the captain’s seat. 24. Stove, Oven & Propane The gimbaled propane stove has three burners and an oven. Propane is heavier than air and requires caution. For your safety, please follow these procedures:
a. Make sure all stove controls are in the “off” position. As with the BBQ, having the stove valves open when the solenoid is opened will cause the safety system to kick in. This will severely limit the flow to the stove. If this happens close all the valves, including the one on top of the tank. Then open the tank valve, then the solenoid and final open the valves at the stove.
b. Turn on propane solenoid valve switch located in the galley top drawer in front of the larger sink basin.
c. Light a match or the butane lighter and push in the stove knob and turn to high. The burners will take a while to light on the first use. When the flame lights, hold in the knob for about 3 seconds to allow the thermocouple to sense the flame.
d. When you are finished with the stove turn the solenoid switch at the off. To light the oven you will need to push in and turn the “oven” control knob on the front of the stove. Then put your butane lighter through one of the two holes in the bottom metal “floor” of the oven. You should hear the burner ignite (and see through the hole). If you have trouble lighting it, remove the metal floor/bottom of the oven, exposing the U-shape oven burner. You’ll easily be able to light it when exposed. Replace the metal floor/bottom after it is lit.
Please note that both propane valves are located in the propane locker under the aft cockpit seat just port of mid-ship. This locker is vented and isolated from the rest of the boat. That way, any leaks will be vented away from the boat. San Juan Sailing’s staff fills the propane tank every 3 weeks (a tank normally lasts 4-6 weeks).
Lifestyle – Owners’ Notes August 2021
23
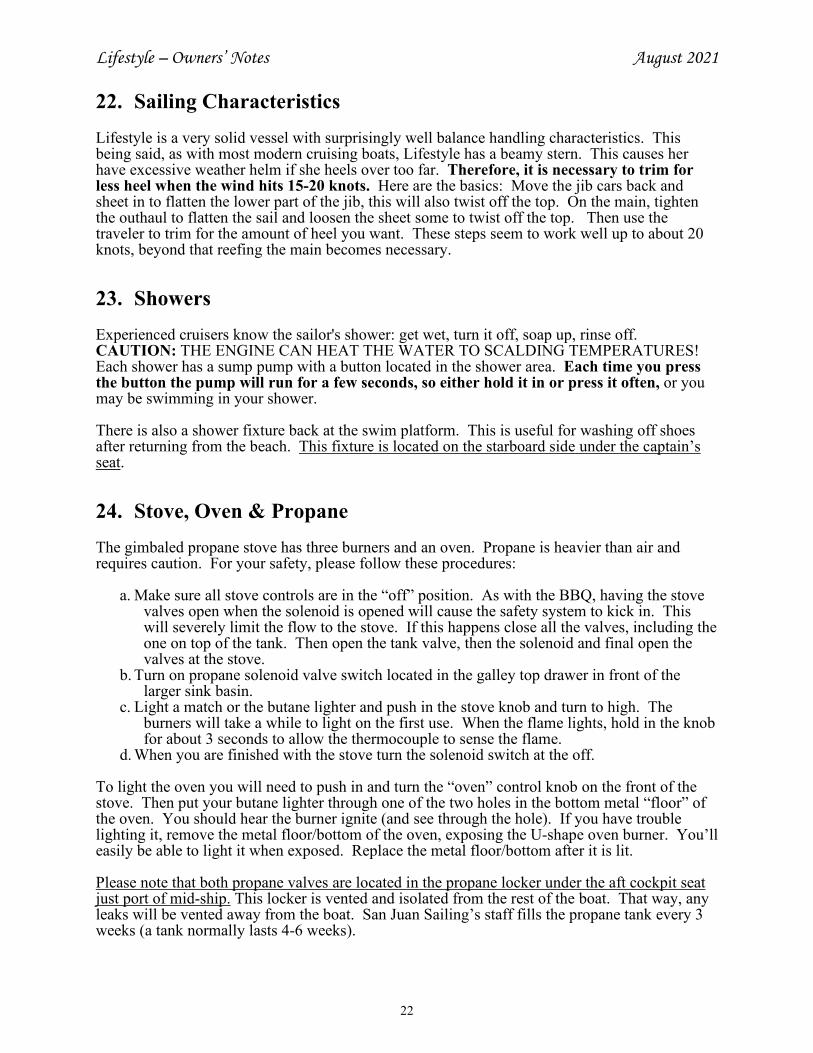
25. Swim Step The swim step on Lifestyle is one of her best features. Follow the procedure below to deploy the swim step and do the reverse to retrieve:
a. Lower dinghy and tie out of the way. b. Release the aft life lines. c. Pull the rope located under
the aft cockpit seat to release the lock on each side. (see pictures to right).
d. Use the hydraulic system to open the swim step – the control switch in by the pot steering wheel. You will need to hold the red part of the switch down and then rock the control down to deploy and up to retrieve the step.
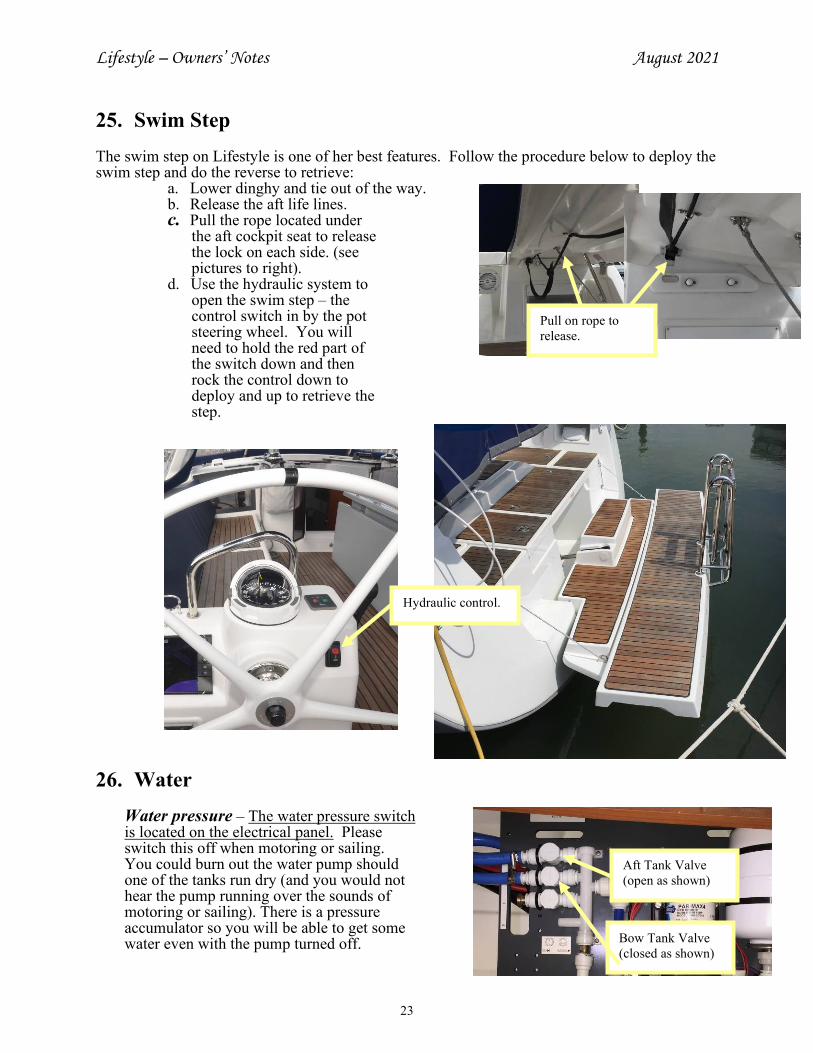
26. Water
Water pressure – The water pressure switch is located on the electrical panel. Please switch this off when motoring or sailing. You could burn out the water pump should one of the tanks run dry (and you would not hear the pump running over the sounds of motoring or sailing). There is a pressure accumulator so you will be able to get some water even with the pump turned off.
Aft Tank Valve (open as shown)
Bow Tank Valve (closed as shown)
Pull on rope to release.
Hydraulic control.

Lifestyle – Owners’ Notes August 2021
24
Water tanks – Lifestyle has two water tanks totaling 140 gals. Selection valves are under the outboard settee seat. Only one valve should be open at a time, otherwise water flows from tank to tank and the meter readings become useless.
Water Heater – The water is heated automatically when the engine runs under load (it takes about 45 minutes), running it at idle in the morning doesn’t work, sorry. CAUTION: THE ENGINE CAN HEAT THE WATER TO SCALDING TEMPERATURES! The hot water is stored in a 10-gallon tank located under the dinette seat just in front of the galley. It can also be heated electrically when shore power is available. The switch is located on the 110 V panel. The deck fitting for the bow tank is on the port side a bit aft of the anchor locker. The fitting for the aft tank is on starboard side aft of the steering wheel.
We hope this information helps you have an amazing charter experience. We wish you the very best on your adventure and trust you will have a great time