machine starters kit - océ · machine starters kit ... ink starter set ... install mild solvent...
TRANSCRIPT
AP-76553 Rev 1.1 Page 1/11
Machine Starters Kit Spitfire 65/90 Extreme
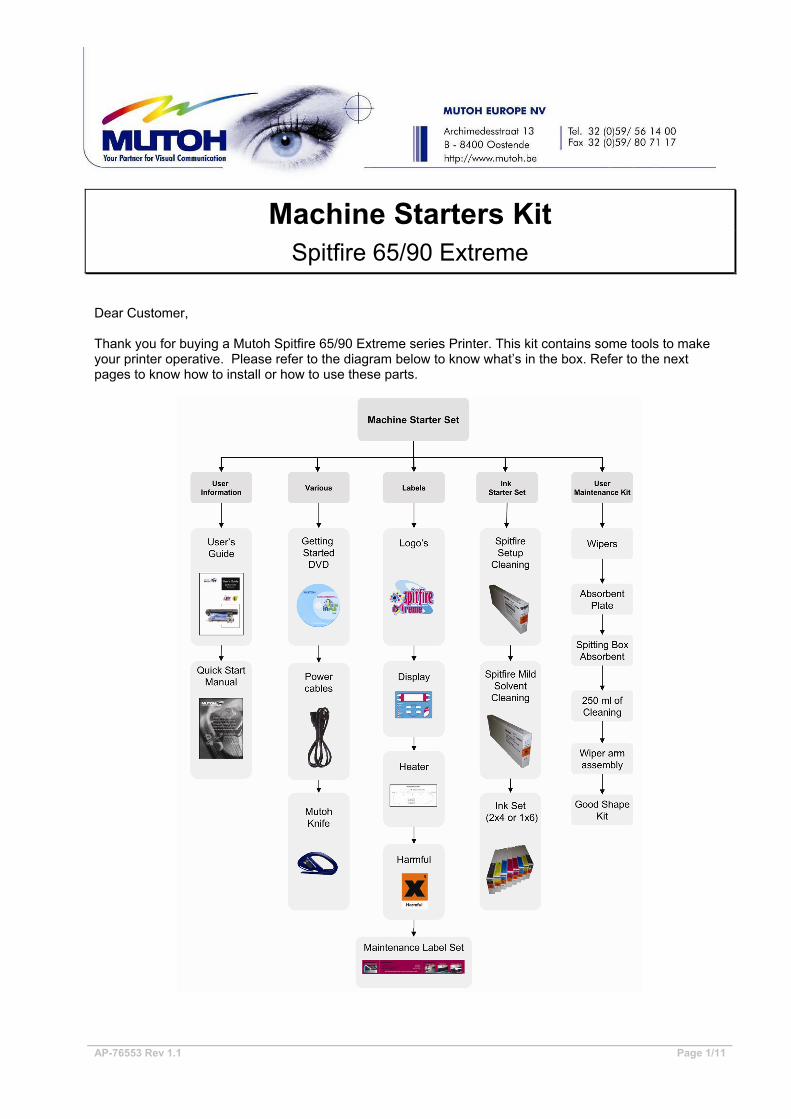
Dear Customer, Thank you for buying a Mutoh Spitfire 65/90 Extreme series Printer. This kit contains some tools to make your printer operative. Please refer to the diagram below to know what’s in the box. Refer to the next pages to know how to install or how to use these parts.

AP-76553 Rev 1.1 Page 2/11
CONTENTS TABLE
1. USER INFORMATION ....................................................................................... 3 1.1. User’s Guide......................................................................................... 3 1.2. Quick Start Manual ............................................................................... 3
2. DVD ............................................................................................................ 3
2.1. Get started DVD ................................................................................... 3
3. LABELS......................................................................................................... 4 4. INK STARTER SET.......................................................................................... 6 5. USER’S MAINTENANCE KIT (KY-80229) ........................................................ 10
5.1. Maintenance Overview....................................................................... 11
AP-76553 Rev 1.1 Page 3/11
1. USER INFORMATION
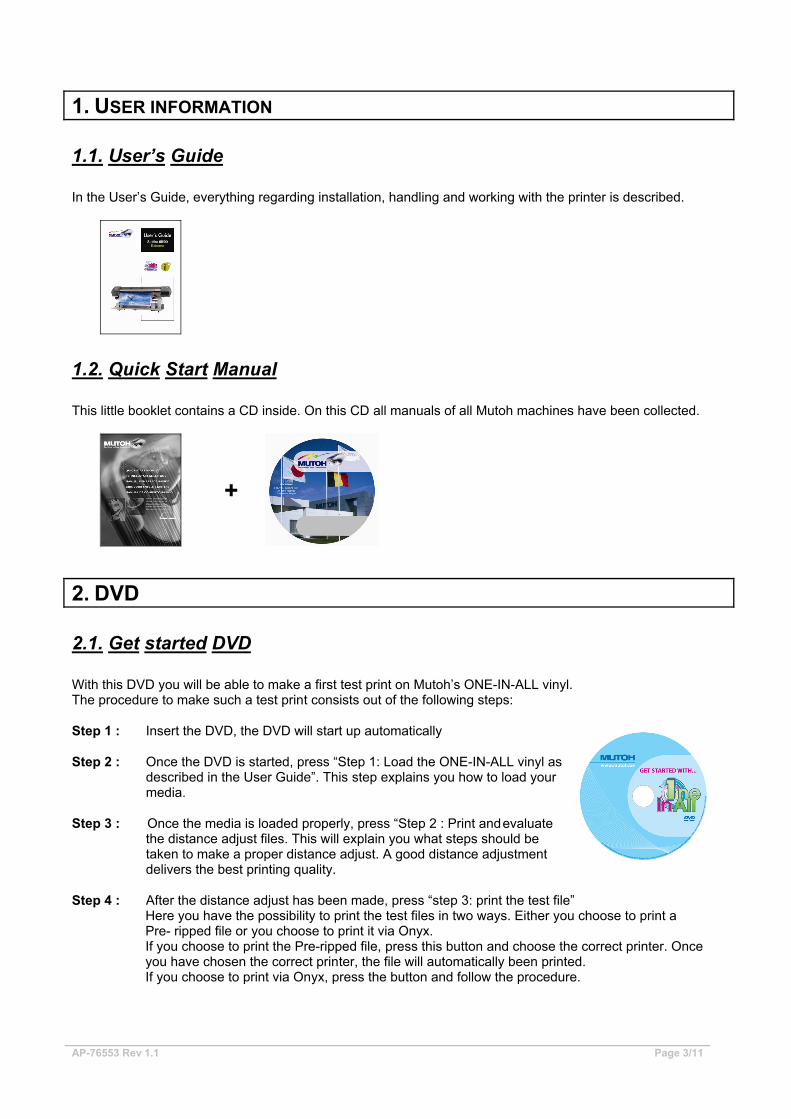
1.1. User’s Guide In the User’s Guide, everything regarding installation, handling and working with the printer is described.
1.2. Quick Start Manual This little booklet contains a CD inside. On this CD all manuals of all Mutoh machines have been collected.
+
2. DVD
2.1. Get started DVD With this DVD you will be able to make a first test print on Mutoh’s ONE-IN-ALL vinyl. The procedure to make such a test print consists out of the following steps: Step 1 : Insert the DVD, the DVD will start up automatically Step 2 : Once the DVD is started, press “Step 1: Load the ONE-IN-ALL vinyl as
described in the User Guide”. This step explains you how to load your media.
Step 3 : Once the media is loaded properly, press “Step 2 : Print and evaluate
the distance adjust files. This will explain you what steps should be taken to make a proper distance adjust. A good distance adjustment delivers the best printing quality.
Step 4 : After the distance adjust has been made, press “step 3: print the test file” Here you have the possibility to print the test files in two ways. Either you choose to print a Pre- ripped file or you choose to print it via Onyx. If you choose to print the Pre-ripped file, press this button and choose the correct printer. Once you have chosen the correct printer, the file will automatically been printed. If you choose to print via Onyx, press the button and follow the procedure.
AP-76553 Rev 1.1 Page 4/11
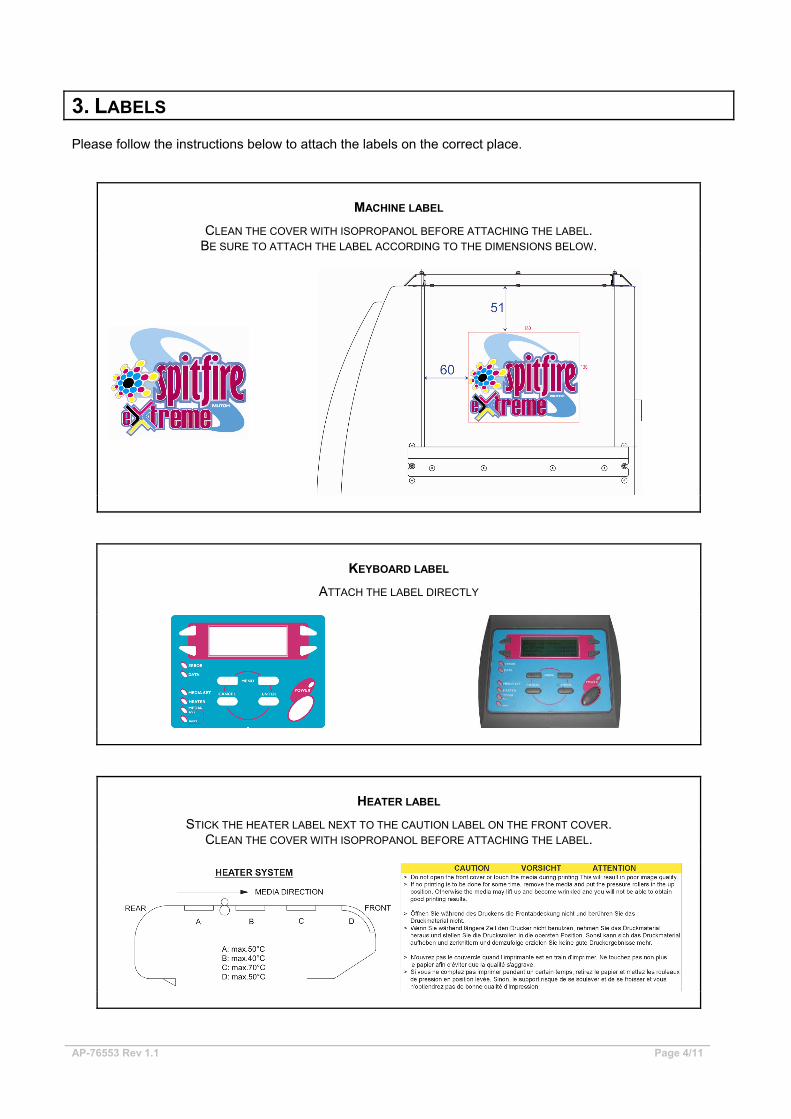
3. LABELS Please follow the instructions below to attach the labels on the correct place.
MACHINE LABEL
CLEAN THE COVER WITH ISOPROPANOL BEFORE ATTACHING THE LABEL. BE SURE TO ATTACH THE LABEL ACCORDING TO THE DIMENSIONS BELOW.
KEYBOARD LABEL
ATTACH THE LABEL DIRECTLY
HEATER LABEL
STICK THE HEATER LABEL NEXT TO THE CAUTION LABEL ON THE FRONT COVER. CLEAN THE COVER WITH ISOPROPANOL BEFORE ATTACHING THE LABEL.
AP-76553 Rev 1.1 Page 5/11
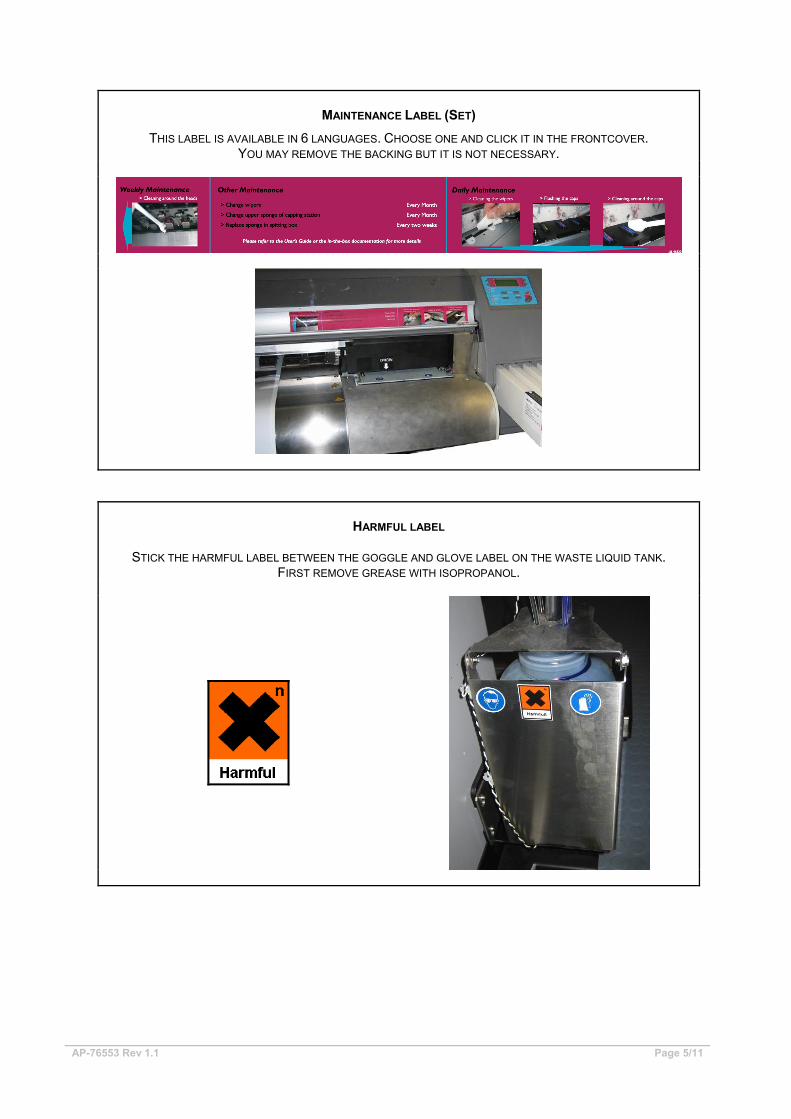
MAINTENANCE LABEL (SET)
THIS LABEL IS AVAILABLE IN 6 LANGUAGES. CHOOSE ONE AND CLICK IT IN THE FRONTCOVER. YOU MAY REMOVE THE BACKING BUT IT IS NOT NECESSARY.
HARMFUL LABEL
STICK THE HARMFUL LABEL BETWEEN THE GOGGLE AND GLOVE LABEL ON THE WASTE LIQUID TANK.
FIRST REMOVE GREASE WITH ISOPROPANOL.
AP-76553 Rev 1.1 Page 6/11
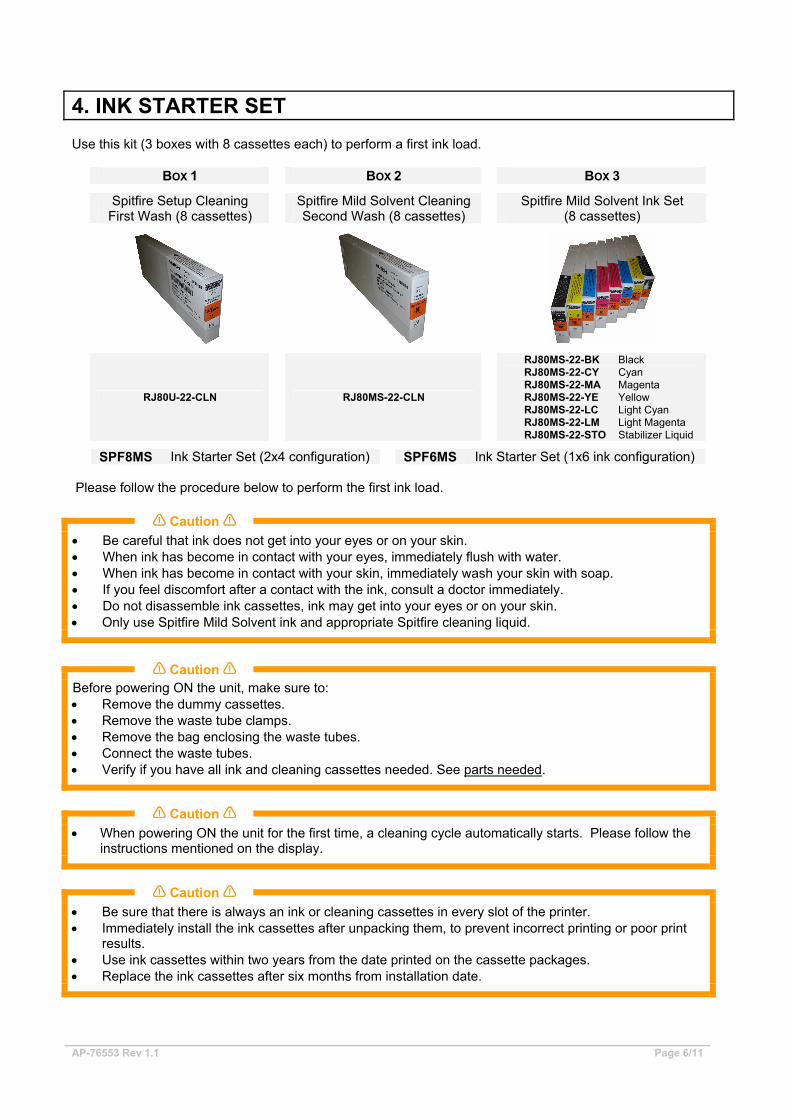
4. INK STARTER SET Use this kit (3 boxes with 8 cassettes each) to perform a first ink load.
BOX 1 BOX 2 BOX 3
Spitfire Setup Cleaning First Wash (8 cassettes) Spitfire Mild Solvent Cleaning
Second Wash (8 cassettes) Spitfire Mild Solvent Ink Set (8 cassettes)
RJ80U-22-CLN RJ80MS-22-CLN
RJ80MS-22-BK Black RJ80MS-22-CY Cyan RJ80MS-22-MA Magenta RJ80MS-22-YE Yellow RJ80MS-22-LC Light Cyan RJ80MS-22-LM Light Magenta RJ80MS-22-STO Stabilizer Liquid
SPF8MS Ink Starter Set (2x4 configuration) SPF6MS Ink Starter Set (1x6 ink configuration) Please follow the procedure below to perform the first ink load.
Caution
• Be careful that ink does not get into your eyes or on your skin. • When ink has become in contact with your eyes, immediately flush with water. • When ink has become in contact with your skin, immediately wash your skin with soap. • If you feel discomfort after a contact with the ink, consult a doctor immediately. • Do not disassemble ink cassettes, ink may get into your eyes or on your skin. • Only use Spitfire Mild Solvent ink and appropriate Spitfire cleaning liquid.
Caution
Before powering ON the unit, make sure to: • Remove the dummy cassettes. • Remove the waste tube clamps. • Remove the bag enclosing the waste tubes. • Connect the waste tubes. • Verify if you have all ink and cleaning cassettes needed. See parts needed.
Caution
• When powering ON the unit for the first time, a cleaning cycle automatically starts. Please follow the instructions mentioned on the display.
Caution
• Be sure that there is always an ink or cleaning cassettes in every slot of the printer. • Immediately install the ink cassettes after unpacking them, to prevent incorrect printing or poor print
results. • Use ink cassettes within two years from the date printed on the cassette packages. • Replace the ink cassettes after six months from installation date.

AP-76553 Rev 1.1 Page 7/11
Parts needed: Before powering ON the unit for the first time, please be sure to have: • 8 Spitfire Setup Cleaning cassettes • 8 Spitfire Cleaning liquid cassettes • 8 Spitfire Mild Solvent ink cassettes (2 x CMYK) When using a 2x4 colour configuration
• 8 Spitfire Setup Cleaning cassettes • 8 Spitfire Cleaning liquid cassettes • 6 Spitfire Mild Solvent ink cassettes (CMYKLcLm) • 2 Mild Solvent Stabilizer liquid cassettes When using a 1x6 colour configuration
First ink load procedure: Step 1 : Power ON the unit.
Step 2 : Remove dummy cassettes when following message is displayed:
Step 3 : Please wait while printer is sucking air
Step 4 : Insert 8 NEW cassettes with Mutoh Setup
Cleaning when following message is displayed.
Step 5 : Please wait
Step 6 : Moisten CAPS with Mutoh Cleaning Liquid for a good suction when asked. The carriage will automatically move to the left side of the machine.
AP-76553 Rev 1.1 Page 8/11
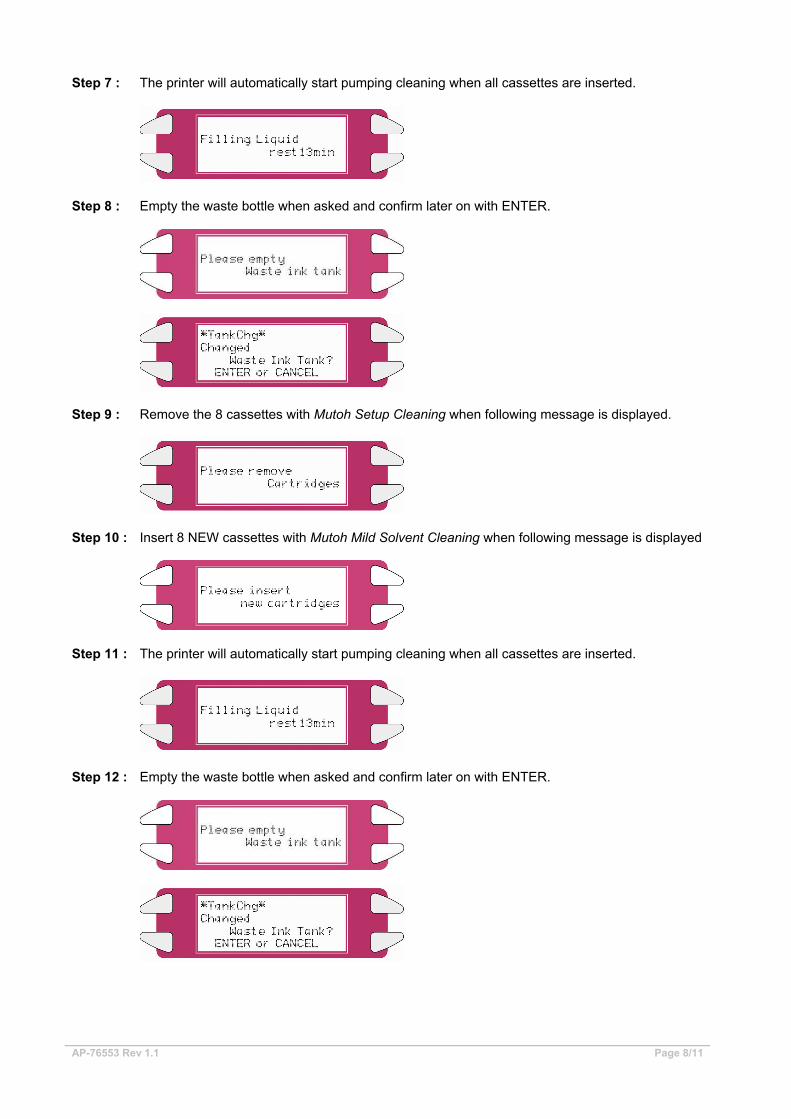
Step 7 : The printer will automatically start pumping cleaning when all cassettes are inserted.
Step 8 : Empty the waste bottle when asked and confirm later on with ENTER.
Step 9 : Remove the 8 cassettes with Mutoh Setup Cleaning when following message is displayed.
Step 10 : Insert 8 NEW cassettes with Mutoh Mild Solvent Cleaning when following message is displayed
Step 11 : The printer will automatically start pumping cleaning when all cassettes are inserted.
Step 12 : Empty the waste bottle when asked and confirm later on with ENTER.
AP-76553 Rev 1.1 Page 9/11
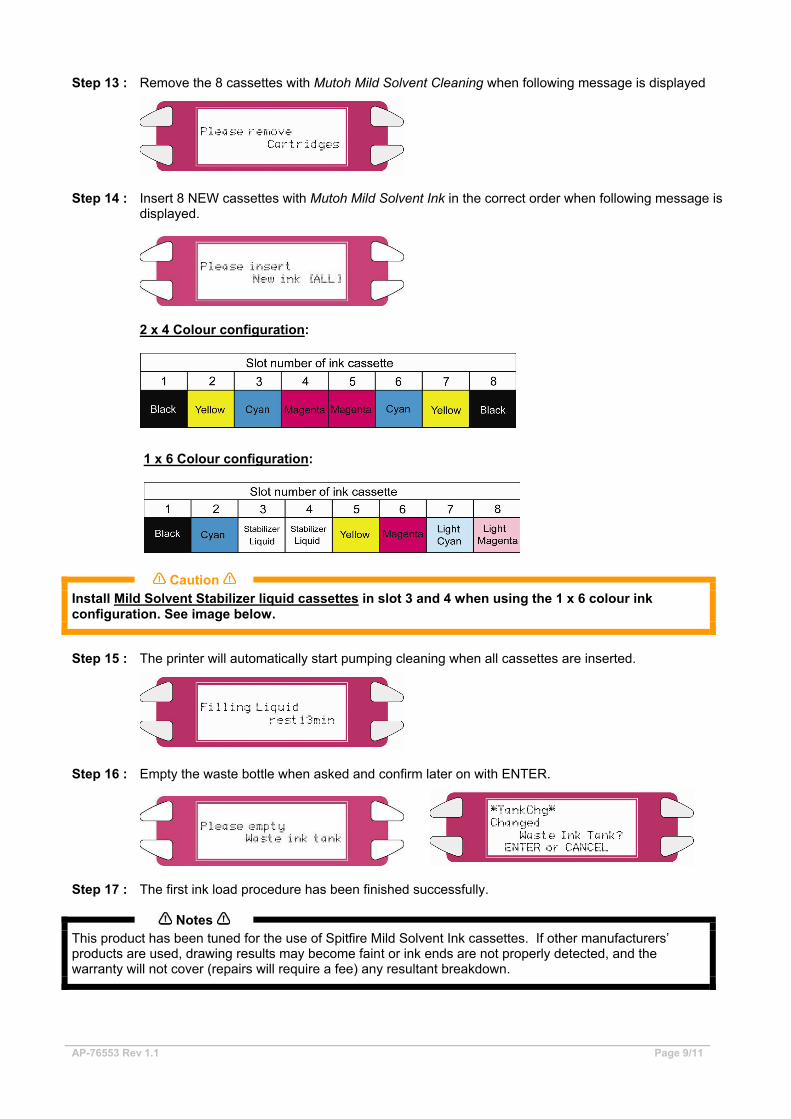
Step 13 : Remove the 8 cassettes with Mutoh Mild Solvent Cleaning when following message is displayed
Step 14 : Insert 8 NEW cassettes with Mutoh Mild Solvent Ink in the correct order when following message is
displayed.
2 x 4 Colour configuration:
1 x 6 Colour configuration:
Caution
Install Mild Solvent Stabilizer liquid cassettes in slot 3 and 4 when using the 1 x 6 colour ink configuration. See image below.
Step 15 : The printer will automatically start pumping cleaning when all cassettes are inserted.
Step 16 : Empty the waste bottle when asked and confirm later on with ENTER.
Step 17 : The first ink load procedure has been finished successfully.
Notes
This product has been tuned for the use of Spitfire Mild Solvent Ink cassettes. If other manufacturers’ products are used, drawing results may become faint or ink ends are not properly detected, and the warranty will not cover (repairs will require a fee) any resultant breakdown.
AP-76553 Rev 1.1 Page 10/11
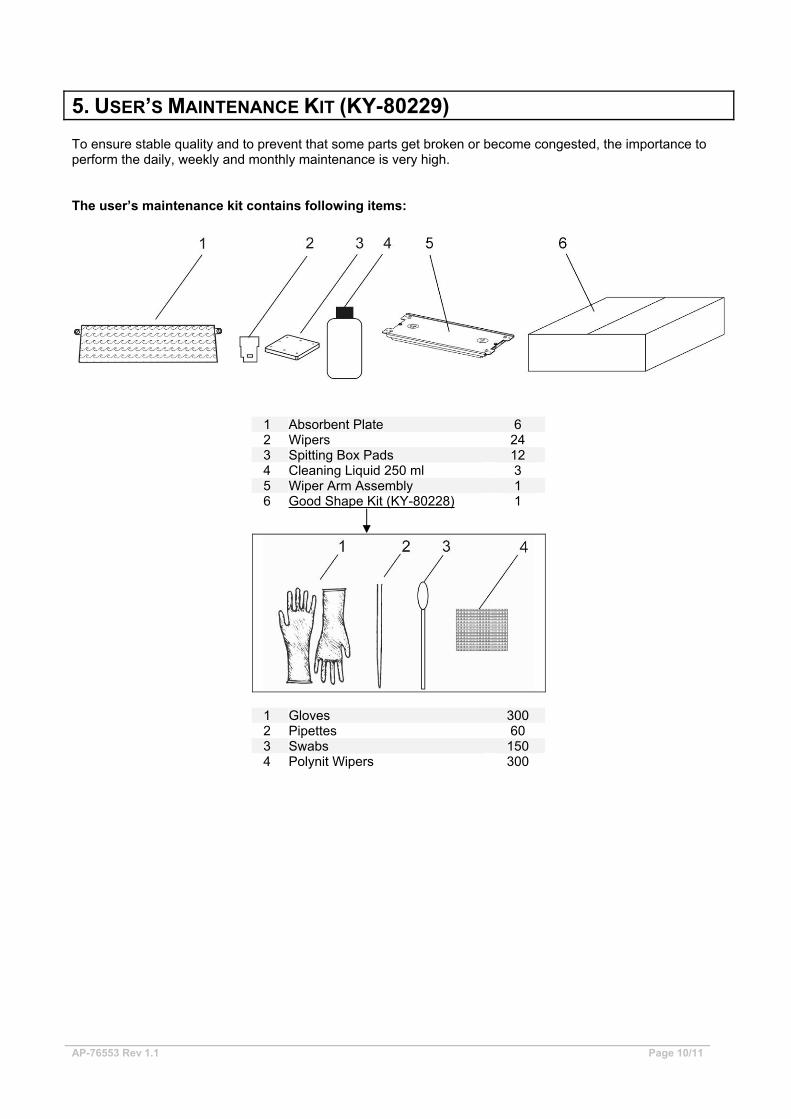
5. USER’S MAINTENANCE KIT (KY-80229) To ensure stable quality and to prevent that some parts get broken or become congested, the importance to perform the daily, weekly and monthly maintenance is very high. The user’s maintenance kit contains following items:
1 Absorbent Plate 6 2 Wipers 24 3 Spitting Box Pads 12 4 Cleaning Liquid 250 ml 3 5 Wiper Arm Assembly 1 6 Good Shape Kit (KY-80228) 1
1 Gloves 300 2 Pipettes 60 3 Swabs 150 4 Polynit Wipers 300
AP-76553 Rev 1.1 Page 11/11
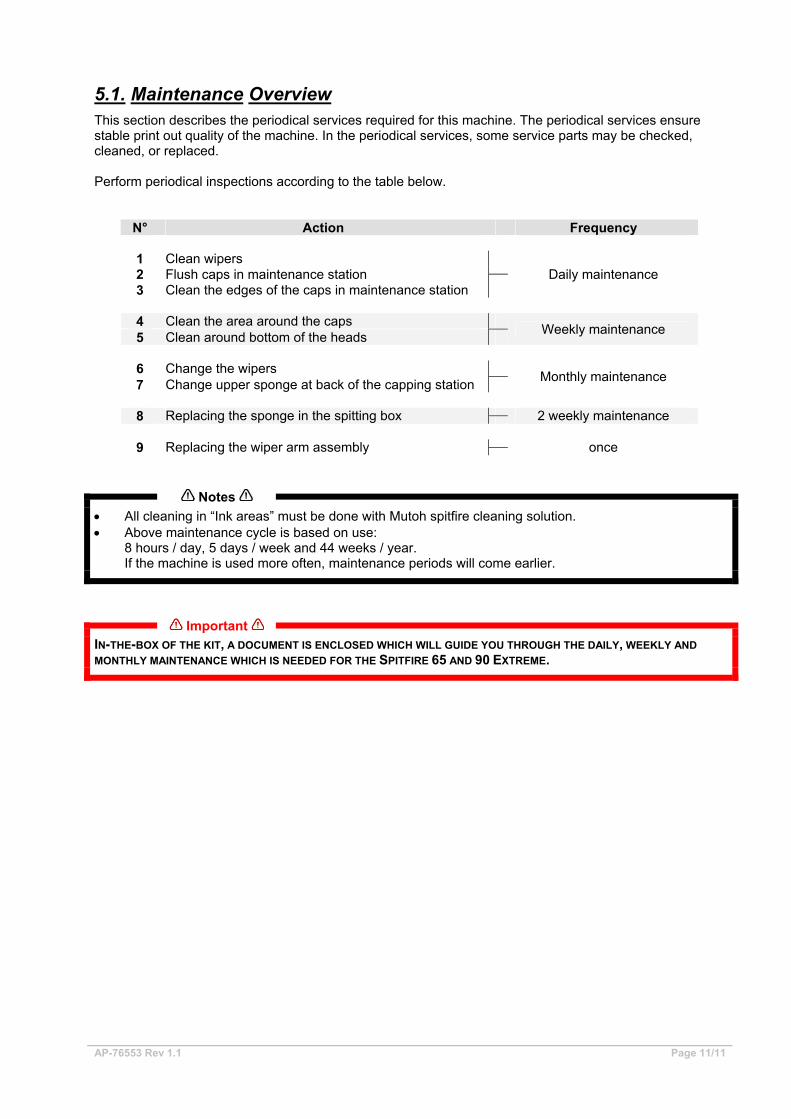
5.1. Maintenance Overview This section describes the periodical services required for this machine. The periodical services ensure stable print out quality of the machine. In the periodical services, some service parts may be checked, cleaned, or replaced. Perform periodical inspections according to the table below.
N° Action Frequency
1 Clean wipers 2 Flush caps in maintenance station
3 Clean the edges of the caps in maintenance station Daily maintenance
4 Clean the area around the caps 5 Clean around bottom of the heads Weekly maintenance
6 Change the wipers 7 Change upper sponge at back of the capping station Monthly maintenance
8 Replacing the sponge in the spitting box 2 weekly maintenance
9 Replacing the wiper arm assembly once
Notes
• All cleaning in “Ink areas” must be done with Mutoh spitfire cleaning solution. • Above maintenance cycle is based on use:
8 hours / day, 5 days / week and 44 weeks / year. If the machine is used more often, maintenance periods will come earlier.
Important
IN-THE-BOX OF THE KIT, A DOCUMENT IS ENCLOSED WHICH WILL GUIDE YOU THROUGH THE DAILY, WEEKLY AND MONTHLY MAINTENANCE WHICH IS NEEDED FOR THE SPITFIRE 65 AND 90 EXTREME.