mapinfo proreference1.mapinfo.com/software/mapinfo_pro/english/17.0.1/mapinfo... · mapinfo pro...
TRANSCRIPT

MapInfo ProVersion 17.0.1
Release Notes
Contents:
Introduction 2System Requirements 2Dependencies and Prerequisites 2MapInfo Pro Database Connectivity and Support 6Microsoft Office Support 7MapInfo Pro Web Server Support 7Installing from a DVD Requires a Drive Letter 7Installing / Upgrading MapInfo Pro 8Repairing MapInfo Pro from the .MSI file 13Support Notices 15Downloading Tools and Applications 15Locating Your Documentation 16Sample Data Enhancements 17Open Source Attribution 17Notes about this Release 17

Introduction
This document gives you a list of the new and enhanced features introduced in this release. Fordetails on these features, see What’s New in MapInfo Pro chapter in the MapInfo Pro Help System.It also provides information about resolved issues and known issues that are important to MapInfo®
Pro users.
Starting with MapInfo Pro version 17.0.1, we are changing the way we deliver new versions ofMapInfo Pro. MapInfo Pro used to deliver patches for update releases, which required them to beapplied on a base install. Now update releases of MapInfo Pro are being delivered as upgradeinstallers. The upgrade installer, while bigger in size than a patch, allows us to be more flexible indelivering new features. In addition, you no longer need to apply cumulative patches and can justuse the latest upgrade installer for a new install or an upgrade over any previous version of version17.0.
For more details, see Installing / Upgrading MapInfo Pro on page 8
System Requirements
This product is tested on the following Microsoft Windows Desktop Operating Systems:
• Windows 10 64-bit• Windows 8.1 64-bit• Windows 7 Ultimate 64-bit SP1• Windows 2016 Server 64-bit• Windows 2012 Server R2 64-bit SP1• Windows 2012 Server R2 64-bit with XenApp 7.5• Windows 2008 Server R2 64-bit SP1• Windows 2008 Server R2 64-bit SP1 with XenApp 6.0
Dependencies and Prerequisites
We recommend ensuring that your machine has the latest updates before installing Pro.
2MapInfo Pro 17.0.1 Release Notes
MapInfo Pro 17.0.1 Release Notes

The install wizard checks for the following and prompts you if not already on your system; you canchoose to have the install wizard install these requirements, or cancel the installation if you do notwant to proceed.
• Microsoft Office Access database engine 2010 (x64)
This does not install when the 32-bit office 2010 driver is installed.
• Microsoft Office Access database engine 2007 (x64)
This installs only on a 64-bit operating System that has the 64-bit 2010 driver installed.
• Microsoft .NET Framework 4.6.1
Windows 8.1 and Windows Server 2012 R2 must have KB2919355 installed before installingMicrosoft .NET Framework 4.6.1.
• Microsoft Visual C++ 2015 Update 3 redistributable (x64)• Windows fixes and updates:
Required UpdateOperating System
Hotfix KB3154529Windows 7 and Server 2008R2
Hotfix KB3154527Windows 8 and Server 2012
Hotfix KB3154528Windows 8.1 and Server 2012R2
Cumulative Update KB3156387Windows 10 *
* On Windows 10, the install wizard does not install the Cumulative Update. Ensure this updateis installed before installing this release.
If installing to an unsupported operating system, check the Microsoft website for the minimumrequirements for these redistributables and updates.
Note:
Windows 8.1 and Server 2012 R2
A Windows 8, 8.1, Server 2012, or Server 2012 R2 system must have Microsoft Update 1(KB2919355) installed before installing MapInfo Pro. To obtain this update, go tohttps://support.microsoft.com/en-us/kb/2919355. This update may require that you restart themachine.
3MapInfo Pro 17.0.1 Release Notes
MapInfo Pro 17.0.1 Release Notes

Installing 32-bit and 64-bit Microsoft Office Drivers
MapInfo Pro is a 64-bit application that can access spreadsheets and tables from 64-bit editions ofMicrosoft Excel and Access. To use data from Excel and Access in MapInfo Pro, you must use theMicrosoft Office 64-bit edition.
As part of the MapInfo Pro installation process, the 64-bit Microsoft Access Database Engine 2010Redistributable for Office is installed.
If you require the 32-bit edition of Microsoft Office on the same system with MapInfo Pro, the followingprocedure shows you how to install both versions of Office drivers.
Microsoft does not support both drivers installed on the same computer citing incompatibilitybetween the product editions or their components, seehttp://support.microsoft.com/kb/2269468.
Note:
To install Microsoft Office 32- and 64-bit drivers on the same system:1. Download the Microsoft Office drivers from
http://www.microsoft.com/en-ca/download/details.aspx?id=13255.The 32-bit version is AccessDatabaseEngine.exe. The 64-bit version isAccessDatabaseEngine_x64.exe.
2. Uninstall the 64-bit Office driver, if installed, and reboot the system. You will already have itinstalled if you have installed MapInfo Pro 64-bit.
3. Install the 32-bit Office 2010 driver.4. In the System folder (for example C:\Windows\System32), right-click on cmd.exe and select Run
as administrator.5. At the command prompt navigate to the folder where the 64-bit Office 2010 driver is located.6. Type the command and press enter: AccessDatabaseEngine_x64.exe /passive7. If you have a 32-bit version of Microsoft Office 2007, 2010, 2013, or 2016 installed, then delete
or rename its mso.dll registry key.a) Open the Registry Editor window. On the Microsoft Start menu, type regedit in the Search
field, and then click regedit.exe.b) In the Registry Editor window, navigate to
HKEY_LOCAL_MACHINE\SOFTWARE\Microsoft\Office\14.0\Common\FilesPaths.c) If there is a mso.dll value, either delete it or rename it.
If you do not delete or rename the file, then may see a reconfigure message when you opena Microsoft Office application.
Both drivers are now installed on your system.
4MapInfo Pro 17.0.1 Release Notes
MapInfo Pro 17.0.1 Release Notes

Opening Office 2013 32-bit Excel and Access Files
There is a potential issue when both 32-bit and 64-bit versions of MapInfo Pro are installed on thesame machine along with the 32-bit version of Microsoft Office 2013. The 32-bit version of MapInfoPro can close unexpectedly when opening tables generated in the 32-bit version of Excel 2013 orAccess 2013.
The section Installing 32-bit and 64-bit Microsoft Office Drivers in the MapInfo Pro Install Guidedescribes how to install the Microsoft Office 32- and 64-bit drivers on the same system. If afterfollowing these steps your 32-bit version of MapInfo Pro closes unexpectedly when opening Excel2013 and Access 2013 tables, then follow the steps outlined below.
1. Uninstall both of the Microsoft Access database engine 2010 drivers.a) From the Start menu, select Control Panel.b) On the Control Panel, select Programs and Features.c) Scroll through the list to locate and select Microsoft Access database engine 2010. There will
be two instances of this application in the list.d) Select Uninstall and follow the instructions that the uninstall procedure provides.e) Select the second Microsoft Access database engine 2010 and uninstall it.
2. Download and install the 32-bit version of Microsoft Access Runtime 2013 (calledAccessRuntime_x86_en-us.exe) fromhttps://www.microsoft.com/en-us/download/details.aspx?id=39358.
3. Download the 64-bit version of Microsoft Access Database Engine 2010 (calledAccessDatabaseEngine_x64.exe) fromhttps://www.microsoft.com/en-us/download/details.aspx?id=13255. Make note of thedownload location, such as C:\Users\myname\Downloads.
Do not run (install) from your internet browser window, download it first.CAUTION:
4. Install the 64-bit version of Microsoft Access Database Engine 2010 (calledAccessDatabaseEngine_x64.exe).a) Open a command prompt window with Administrator privileges. In the system folder
C:\Windows\System32, right-click on cmd.exe and select Run as Administrator.b) At the command prompt, change directories to the AccessDatabaseEngine_x64.exe file (type
cd C:\Users\myname\Downloads and press Enter).c) At the command prompt, type AccessDatabaseEngine_x64.exe /passive and press Enter.
5. If you have a 32-bit version of Microsoft Office 2007, 2010, 2013, or 2016 installed, then deleteor rename its mso.dll registry key.a) Open the Registry Editor window. On the Microsoft Start menu, type regedit in the Search
field, and then click regedit.exe.b) In the Registry Editor window, navigate to
HKEY_LOCAL_MACHINE\SOFTWARE\Microsoft\Office\14.0\Common\FilesPaths.
5MapInfo Pro 17.0.1 Release Notes
MapInfo Pro 17.0.1 Release Notes

c) If there is a mso.dll value, either delete it or rename it.If you do not delete or rename the file, then may see a reconfigure message when you opena Microsoft Office application.
Both 32-bit and 64-bit drivers are now installed on your system, and you can open Access 2013and Excel 2013 files in both 32-bit and 64-bit versions of MapInfo Pro.
MapInfo Pro Database Connectivity and Support
MapInfo Pro supports the following spatial database servers:
• Microsoft SQL Server 2016 (also called SQL Server Spatial)• Microsoft SQL Server 2014 (also called SQL Server Spatial)• Microsoft SQL Server 2012 (also called SQL Server Spatial)• PostgreSQL 9.5.3 with PostGIS 2.2.2• PostgreSQL 9.4.2 with PostGIS 2.1.7• PostgreSQL 9.2.2 with PostGIS 2.0.1• SQLite 3.8• Oracle Spatial 12c R1• Oracle Spatial 11g R2
In order for MapInfo Pro to access a remote database, you must install a client or driver. The followingare ODBC drivers that MapInfo Pro supports:
• Microsoft Access ODBC• Microsoft SQL Server Native Client 11.0• PostgreSQL Unicode ODBC driver 9.05.03• FDO toolkit 3.8 (used by SQLite and installed with MapInfo Pro)• Oracle Instant Client 12.1.0.2.0
You can also open tables of data from the following and make them mappable, but only for pointdata:
• Microsoft Access 2010, 2013, and 2016
For more about working with remote database information, see Accessing Remote Data and Settingyour Database Connection Preferences in the Help System.
6MapInfo Pro 17.0.1 Release Notes
MapInfo Pro 17.0.1 Release Notes

Microsoft Office Support
MapInfo Pro supports Microsoft Excel ( *.xls , *.xlsx) and Microsoft Access (*.mdb, *.accdb) formatsfor versions 1997 to 2016.
MapInfo Pro Web Server Support
MapInfo Pro supports the following web servers:
• GML (Geospatial data in XML format) 2.1.2. The Universal Translator (FME Quick Translator)supports versions up to 3.2.
• Web Feature Service (WFS) 1.0, 1.1, and 2.0• Web Feature Service with transactions (WFS-T) using WFS 1.0• Web Map Service (WMS) 1.3• Web Map Tile Service (WMTS) 1.0
MapInfo Pro also supports the mapping tile servers:
• Google Enterprise tile server• MapXtreme.NET 8.0 tile server• Microsoft Bing tile server• OpenStreetMap tile server• Spectrum Spatial Server 11.x
Installing from a DVD Requires a Drive Letter
The Installer must be run from a drive with a letter such as "G" and not from an explicit uniformnaming convention (UNC) path. For example, you might have the MapInfo Pro DVD in your computeras USERSPC. Other users may share this device as USERSPC; however, it would not contain adrive letter. The MapInfo Pro Installation program requires a drive letter. To remedy this situation,map your network drive to a specific drive letter:
1. In Windows Explorer, right-click the shared directory or DVD drive that contains the MapInfo ProSETUP.EXE and select Map Network Drive.
2. Choose a drive letter to map.3. Run the Installation Program again from the newly mapped drive letter.
7MapInfo Pro 17.0.1 Release Notes
MapInfo Pro 17.0.1 Release Notes

Installing / Upgrading MapInfo Pro
We recommend you to make sure of the following before starting the process to install / upgrade:
• You must have Administrator rights to run the Installer.• The Installer requires that your TEMP variable be set to a valid directory.• You must exit from all Windows programs before beginning the installation process.
The installer for MapInfo Pro will install all the files necessary to run Pro in multiple languages.During the installation process the first question will be what language would you like to run Pro in.This will be the default language of the Pro Application. The list of available languages to choosefrom will depend on what is available in the installer. Eventually all languages will be available asthe localization process finishes up.
Advanced users may wish to run Pro in a different language than was chosen at installation time.This will now be possible by copying the MapInfoPro.exe.config from a language sub-folder (suchas fr, de, ja, zh-CN) under the MapInfo Pro installation location on top of the MapInfoPro.exe.configin the MapInfo Pro installation location. Most users will never need to do this, but if you do try it, besure to make a copy of the file first! Be aware that many Pro settings such as ribbon customizationare locale-specific.
These are the language versions of Pro and the sub folders used (Changing AppLocale or SystemCharset via .config file is for advanced users only).
SystemCharsetName
CodePageLanguageCountry/Region
AppLocalecode
AppLocaleName
UI Locale and SubFolder Name
WindowsSimpChinese936Chinese (Simplified)2052zh-cNzh-CN
WindowsLatin21250Czech - Czech Republic1029cs-CZcs
WindowsLatin11252Danish - Denmark1030da-DKda
WindowsLatin11252Dutch - The Netherlands1043nl-NLnl
WindowsLatin11252English - United States1033en-USen
WindowsLatin11252Finnish - Finland1035fi-FIfi
WindowsLatin11252French - France1036fr-FRfr
8MapInfo Pro 17.0.1 Release Notes
MapInfo Pro 17.0.1 Release Notes

SystemCharsetName
CodePageLanguageCountry/Region
AppLocalecode
AppLocaleName
UI Locale and SubFolder Name
WindowsLatin11252German - Germany1031de-DEde
WindowsHebrew1252Hebrew - Israel1037he-ILhe
WindowsLatin11252Italian - Italy1040it-ITit
WindowsJapanese932Japanese - Japan1041ja-JPja
WindowsLatin21250Polish - Poland1045pl-PLpl
WindowsLatin11252Portuguese - Brazil1046pt-BRpt
WindowsCyrillic1251Russian - Russia1049ru-RUru
WindowsLatin11252Spanish - Spain1034es-ESes
WindowsLatin11252Swedish - Sweden1053sv-SEsv
WindowsTurkish1254Turkish - Turkey1055tr-TRtr
You can install or upgrade MapInfo Pro using the Interactive Installation Wizard or silently throughthe command line.
For detailed instructions on installing MapInfo Pro, see the MapInfo Pro Install Guide. Toaccess the MapInfo Pro Install Guide and other documents, launch the MapInfo Pro DVD
Note:
auto-start presentation by double clicking the autostart.exe in the root folder of the DVD andthen clicking Online Reference and MapInfo Pro Install Guide.
Upgrading from MapInfo Pro version 17.0
You can install and run two or more different versions of MapInfo Pro together. In previous versions,you were not required to uninstall the already installed versions before installing the latest version.This holds true for version 17.0.1 as well, except if you have installed version 17.0. If you haveMapInfo Pro version 17.0 installed, you must first uninstall it before installing version 17.0.
When installing version 17.0.1 using the Interactive Installation process, the installer takes care ofuninstalling version 17.0, if installed. For details, see Installing MapInfo Pro Interactively.
9MapInfo Pro 17.0.1 Release Notes
MapInfo Pro 17.0.1 Release Notes

But if you are attempting to install MapInfo Pro version 17.0.1 silently, you must explicitly uninstallversion 17.0, either from the Windows Add or Remove Programs settings or silently from thecommand-line. For details, see Installing MapInfo Pro Silently
Installing MapInfo Pro Interactively
You must have Administrator rights to run the Installer, and the Installer requires that your TEMPvariable be set to a valid directory.
We strongly recommend that you exit from all Windows programs before beginning theinstallation process. If you are upgrading from an earlier version of MapInfo Pro, werecommend that you uninstall before upgrading.
CAUTION:
MapInfo Pro provides its application data files to each user. Called a Per-User install, this functionalityruns the first time you run MapInfo Pro or MapInfo Pro client on a machine, and each time theMapInfo Pro Installer is run thereafter. The application data files include, among others, the PenStyles file, Custom Symbols files, and Thematic Legend templates. These files allow different usersto have custom settings.
To install MapInfo Pro:1. If installing from a DVD, the Installer automatically launches. If the Installer does not automatically
launch, then go to the DVD drive and click on autostart.exe. If installing from a download, go tothe directory into which you downloaded MapInfo Pro and right-click the setup.exe file, selectRun as Administrator from the pop-up menu to install using elevated privileges.
If you see a prompt for permission to continue. Click Allow or Yes to proceed.
The wizard begins to lead you through the installation process.
2. On the Launcher menu, choose Install Products.3. Choose MapInfo Pro and then choose MapInfo Pro Installer.
You may see a prompt for permission to continue. Click Allow or Yes to proceed (if you do notrespond and the message times-out, the install is unsuccessful).
4. Select the language in which you want to install MapInfo Pro.In version 17.0.1, you have the option of installing MapInfo Pro in three different languages otherthan English. You can choose between French (Standard), German and Japanese.
5. If any of the prerequisites listed underDependencies and Prerequisites are not already installedon your system, a display will prompt users to install the missing prerequisites. Click Install.Installing the prerequisites takes several minutes—the status of each prerequisite updates as itinstalls.
6. If you see a message that MapInfo Pro requires a reboot, click Yes. You must reboot to continuewith the installation.
7. Click Next to continue the process.
10MapInfo Pro 17.0.1 Release Notes
MapInfo Pro 17.0.1 Release Notes

8. On the License Information dialog box, review the license. Click Next to continue.9. On the Customer Information dialog box, type your name, organization name, serial number,
and access code in the corresponding fields and click Next to continue.
Do not select the check box. Doing so installs an evaluation copy of MapInfo Pro. If youselect to install an evaluation copy, then you may activate your copy after installation withyour serial number and activation code.
Note:
The serial number and access code are listed on the Product Activation Information Card oremailed with your license details, and are used to activate your product.
10. Do one of the following:
• If your organization purchased node-locked licenses, the third character of your serial numberis "N". Skip this step and go to step 12.
• If your organization purchased concurrent licenses, the third character of your serial numberis "S" or a distributable license, the third character of your serial number is "D". In this case,the License Server Name and License Server Port Number fields display on the dialog box.
For more information about node-locked, concurrent and distributable licenses, seeStarting and Activating MapInfo Pro under Chapter 3 of the MapInfo Pro Install Guide.
Note:
If you know the license server name and port number, type them here. If you do not, you cancontinue with the installation without filling in the license server name and port number. Youwill have another opportunity to supply this information when you start MapInfo Pro.
11. Click Next to continue.12. Select one of the following options and then click Next to continue:
• Typical – Choose this option if you will be using MapInfo Pro as a desktop application includingremote database access and connectivity.
• Custom – Choose this option to restrict the components that are installed by the installationprogram. For example, you can prevent the installer from adding the documentation and tools.
13. Select the destination folder where you want to install MapInfo Pro and click Next.14. Click Install to finish the installation process.
For detailed instructions on installing MapInfo Pro interactively, see Chapter 2: Installing MapInfoPro from the MapInfo Pro Install Guide.
Installing MapInfo Pro Silently
You can only perform a completely silent install of MapInfo Pro when your install process has elevatedadministrative privileges.
11MapInfo Pro 17.0.1 Release Notes
MapInfo Pro 17.0.1 Release Notes

The command-line options /q and /qn do not work when the User Access Control (UAC) is turnedon and your install process does not run with elevated administrative privileges. These options turnoff the user interface during the installation, which suppresses the Windows UAC. Users mustinteract with the UAC to provide the necessary credentials to run the installation as an administrator.If the user interface is turned off, the installation is terminated without warning because the UACcannot gather the appropriate credentials.
To work around the problem, use the /qb option in the command line when you run the silent install.This option gives the installation a basic user interface and allows the UAC to display on the dialogbox.
If you have MapInfo Pro version 17.0 installed, you must first uninstall it before installing version17.0.1
To silently uninstall version 17.0:
1. Type the following command,
start /wait MsiExec.exe /X{76BBDCCA-97EA-435B-8334-C1E2320200C9} /qnRETLIC=FALSE SDRLYN=FALSE
2. Followed by,
CD "%~dp0"
To perform a silent install using the /qb option:3. From the command prompt, go to the MapInfo Pro setup directory. The MapInfo Pro installation
setup.exe indicated in the steps below can be found on the installation DVD (D:\) in this directory:\Install\MI_PRO\DISK1.
4. Type the following command:
setup.exe /L#### /s /v"/qb USERNAME=\"MyUser\"COMPANYNAME=\"MyCompanyName\" PIDKEY=M############### ACCD=######"
where:
/L#### is the 4 digit language code identifier. For example, for English type setup.exe/L1033, for French type setup.exe /L1036, for German type setup.exe /L1031. andfor Japanese type setup.exe /L1041. DO NOT leave a space between the /L and the 4digit language code.PIDKEY=M############### is the product serial numberACCD=###### is the access code
5. When User Access Control displays on the dialog box, click Allow or Yes.
For concurrent licenses, the license server name and port number parameters must be included:
SNAME="LicenseServerName"LSPN="LicenseServerPortNumber"
12MapInfo Pro 17.0.1 Release Notes
MapInfo Pro 17.0.1 Release Notes

Substitute the appropriate license server name and port number when you perform the silentinstall.
For detailed instructions on installing MapInfo Pro silently, see Chapter 5: Silent InstallationProcedures from the MapInfo Pro Install Guide.
License Server Utility
If you have a previous version of the License Server Utility (LSU) installed to manage distributablelicenses, then you must upgrade to the latest License Server Utility version 4.9. Using a previousversion of the License Server Utility with MapInfo Pro 17.0.1 will cause MapInfo Pro to becomeunresponsive.
Using an incompatible version of the License Server Utility might result in the following issues whilefetching licenses for MapInfo Pro:
• MapInfo Pro is unable to borrow a license.• MapInfo Pro is unable to activate a distributed license from the License Server.
If this occurs, contact your License Server administrator and have them upgrade the latest LicenseServer version.
After successfully borrowing or activating a license, if you again roll back to an older version ofLicense Server Utility, you cannot transfer the borrowed/activated license back to License ServerUtility. You will not see an error message as the operation simply hangs.
Repairing MapInfo Pro from the .MSI file
The repair process fails using the .msi file when the Microsoft User Account Control (UAC) is turnedon. Depending on the installation conditions the repair stops with the following error message:
You have MapInfo Pro running, please close it and run setup again.
To work around this issue, do one of the following three things:Shut off the UAC (User Account Control), this requires System Administrative privileges, rebootthe machine, and rerun the repair.
•
• Run the original setup.exe file and then run the repair from maintenance mode.• Run the installed copy of the MapInfo Pro 17.0.1 .msi file as an administrator. Go toC:\Windows\Installer and search for the MapInfo Pro 17.0.1 .msi file. It will have a name similarto 8e95f1.msi, where the name is different for each machine. Go to C:\Windows\System32 andfind the cmd.exe file. Right click this file and select Run as Administrator (this may require an
13MapInfo Pro 17.0.1 Release Notes
MapInfo Pro 17.0.1 Release Notes

administrator password). Run the command C:\Windows\Installer\nameofMiPro17.0.1.msi andselect Repair from maintenance mode.
Disabling User Account Control (UAC) on Windows 7 or Server 2008 R2
To disable UAC on Windows 7 or Server 2008 R2:1. Launch MSCONFIG by from the Run menu.2. In the System Configuration dialog box, click the Tools tab.3. Click Change UAC Settings.4. Click Launch.5. Move the slider to Never Notify.6. Click OK to close the dialog box.7. Reboot the machine to have this change take effect.
Disabling User Account Control (UAC) on Windows 8.1 or Windows Server2012 R2
To disable UAC on Windows 8.1 or Windows Server 2012 R2:1. On Windows 8.1, go to the Search Charm and type Change User Account Control settings.•
• On Windows 2012 R2, on the Control Panel, select User Accounts, and click on Change UserAccount Control Settings.
2. In the User Account Control Settings console, move the slider to Never Notify.3. Click OK.
You may see a prompt to confirm your selection or to enter an administrator password.
4. Reboot the machine to have this change take effect.
If the .NET Framework 4.6.1 or the Update for the .NET Framework 4.6.1 fails to install, then seeCorrecting a MapInfo Pro Startup Issue on Windows 8.1 and Server 2012 R2.
Disabling User Account Control (UAC) on Windows 10
To disable UAC on Windows 10:1. On the Control Panel, select User Accounts, and click on Change User Account Control Settings.2. In the User Account Control Settings console, move the slider to Never Notify.3. Click OK.
14MapInfo Pro 17.0.1 Release Notes
MapInfo Pro 17.0.1 Release Notes

Support Notices
SQL Server 2012
If connecting to a SQL 2012 server with Windows 7 or higher, use the SQL Server Native Client2012 (also known as SQL Server Native Client 11.0).
Bing Maps Expiration Date
Bing Maps has a limited license period, which is specific to each version of MapInfo Pro. Bing Mapsand the Add Bing Roads to Map and the Move Map to features cease working after this date:
• MapInfo Pro 17.0 on January 1st 2020• MapInfo Pro 16.0 on January 1st 2018• MapInfo Pro 15.0 and 15.2 on January 1st 2017
Customers with a current maintenance package who would like to continue to use earlier versionof MapInfo Pro (11.0.x, 11.5.x, 12.0.x, or 12.5.x), are entitled to use Bing services. For details,contact your account representative.
Downloading Tools and Applications
The following web sites give access to MapInfo Pro documents, trials, and supporting materials:
• The MapInfo Pro page:www.pitneybowes.com/us/location-intelligence/geographic-information-systems/mapinfo-pro.html
• The MapInfo Pro support page:www.pitneybowes.com/us/support/products/mapinfo-pro-support.html
The following are applications that support working with MapInfo Pro:
www.pitneybowes.com/us/support/products/mapbasic-support.htmlMapInfo MapBasic
The MapBasic development environment is a complete, BASIC-like programming languageused to create custom applications for use with MapInfo Pro or special MapInfo runtimes.MapBasic allows you to customize the geographic functionality of MapInfo Pro, automate repetitiveoperations and integrate MapInfo Pro with other applications.
www.mapinfo.com/easyloaderMapInfo EasyLoader
15MapInfo Pro 17.0.1 Release Notes
MapInfo Pro 17.0.1 Release Notes

EasyLoader lets you to upload MapInfo .tab files to a remote database, such as Oracle, SQLServer, Microsoft Access, and PostgreSQL / PostGIS.
www.pbinsight.com/support/product-downloads/item/mapinfo-license-server-utility-v4.9MapInfo LicenseServer
The License Server handles requests for Pitney Bowes product licenses for MapInfo Pro. Thisis for distributable, concurrent, or borrowed licenses.
To install these downloads, unzip the download file to a temporary folder, navigate to the folder andthen launch the setup.exe. An install wizard guides you through the installation process.
Locating Your Documentation
MapInfo Pro documentation, in the form of PDF files, installs with MapInfo Pro in to the Documentationsub folder (for example, C:\Program Files\MapInfo\Professional\Documentation). You must havethe Adobe Acrobat reader installed to view PDF files. To download a free copy of the Adobe AcrobatReader, go to http://www.adobe.com.
For instructions on installing MapInfo Pro, see theMapInfo Pro Install Guide. To access theMapInfoPro Install Guide and other documents, launch the MapInfo Pro DVD autostart presentation bydouble clicking the autostart.exe in the root folder of the DVD and clicking Online Reference andMapInfo Pro Install Guide.
Documentation is also available on our website fromwww.pitneybowes.com/us/support/products/mapinfo-pro-support.html.
Installation Instructions are Available in the Install Guide
For system requirements, installation instructions, and System Administrator notes for performinga work group installation, see theMapInfo Pro Install Guide. From the software installer, click OnlineReference and then MapInfo Pro Install Guide.
Instructions for Activating your License are in the Install Guide
Instructions for activating your MapInfo Pro license are in the MapInfo Pro Install Guide. The sameinformation is also in the Activating Your Product. From the software installer, click Online Referenceand then MapInfo Pro Install Guide or Activating Your Product.
The MapInfo Pro Data Directory Document
MapInfo Pro’s sample data comes with the MapInfo Pro Data Directory document, which describesthe sample data. From the software installer, click Online Reference and then MapInfo Pro DataDirectory.
16MapInfo Pro 17.0.1 Release Notes
MapInfo Pro 17.0.1 Release Notes

Sample Data Enhancements
To help you get started, Pitney Bowes Software Inc. provides you with some United States-basedand world-wide maps you can use as a background to your data. To install the free data providedwith MapInfo Pro see the section titled Installing Data in the MapInfo Pro Install Guide. For adescription of the sample data supplied with this product, see the MapInfo Pro Data Directorydocument.
Open Source Attribution
This product contains GeoJSON.NET, which is licensed under the MIT license. The license can bedownloaded from https://github.comGeoJSON-NET/GeoJSON.NET/blob/master/LICENSE.md.The source code for this software is available from https://github.com/GeoJSON-Net/GeoJSON.Net.
Notes about this Release
MapInfo Pro
What's New in MapInfo Pro
Thank you for upgrading to the most advanced computer mapping product in the Pitney Bowes Inc.software family! As the field of computer mapping continues to expand, Pitney Bowes Inc. leads theway with new products that are designed to fulfil your computer mapping needs from the most basicto the most specialized. This is a list of the most important features and enhancements scheduledto be released with MapInfo Pro 17.0.1.
Customer Experience Improvement Program
We have created a Customer Experience Improvement Program (the “EIP”) in order to collectinformation about how our users and customers use our products, problems they may encounterwhile using the products, and features and functions most often used by our customers. This allows
17MapInfo Pro 17.0.1 Release Notes
MapInfo Pro 17.0.1 Release Notes

us to provide thoughtful, continuous improvement to ensure that we offer our customers the bestuser experience available.
Participation in the EIP is voluntary. During the installation process you will be prompted to participatein EIP. You may or may not elect to participate upon installation of the product, and at any timethereafter. Go to the options, settings, or help menu for your product and change your settings toend your participation.
You can update your EIP participation by adding a DWORD entry to the following registry key:
\HKEY_LOCAL_MACHINE\SOFTWARE\MapInfo\MapInfo\Professional\1700\
Add a new DWORD entry Optin with the following values depending on your selection:
• 0 = EIP Turned off• 1 = EIP Turned on
You can also manage your EIP participation using the following switch when installing MapInfo Prousing the command-line:
• CUSTEXPPRG=\"True\" will tell the installer to add the Optin registry entry with the value 1• CustExpProg=\"False\" will tell the installer to add the Optin registry entry with the value 0
For details on command-line installation, see Installing MapInfo Pro Silently
The Welcome Window
The Welcome Window is an informative and functional page that appears when you start MapInfoPro. It provides you a quick access to recently used tables and workspaces and the possibility toopen new ones.
New Sample Workspace
A sample workspace containing StreetPro, POI, Parcel and Elevation data for Washington DC areais now available by default when you install MapInfo Pro at the following locartion:
<MapInfo Pro InstallationDirectory>\Professional\SampleWorkspace\WashingtonDCSample.WOR
You can also access this workspace from the Welcome Page. Click Sample Workspaces... underWorkspaces on the Welcome Page.
Other sample datasets will also be available for download in the future.
Quick Search Tool
You can use Quick Search to quickly search and execute commands on the MapInfo Pro ribbon.These commands might be grouped or nested under different tabs, sub-menus or backstage itemsbut the Quick Search tool displays a list of all relevant commands as you type your query in thesearch box.
18MapInfo Pro 17.0.1 Release Notes
MapInfo Pro 17.0.1 Release Notes

Geocode Tool
Geocode is a MapInfo Pro tool that is loaded by default when you install MapInfo Pro. This toolreplaces the older Geocode using Server Utility. Using this tool, you can assign geographiccoordinates to your data, which can be street addresses. Point values assigned to each addressturn each record into a geographic object that MapInfo Pro can display on a map. Visualizing yourrecords on a map can make the relationships among your data clearer. You can display yourgeocoded records against a street map, a postal code centroid map, a county map, or whatever ismost appropriate to your needs. You can then use the wide variety of functions available in MapInfoPro mapping software to perform querying, create thematic maps, create territories, and performmany other types of geographic analysis.
MapInfo Pro accomplishes this by connecting to:
• Spectrum Spatial Server.• Pitney Bowes LI APIs.
You can load or unload the Geocode tool from the Tool Extensions drop-down list under the Toolsgroup on the HOME tab.
The older Geocode using Server utility is visible only when the Geocode Tool is not loaded.When loaded, the Geocode tool takes precedence and replaces the older version.
Note:
How do I access the Geocode Tool?
1. There must be an open table for this command to work.2. On the SPATIAL tab, in the Create group, on the Geocode list, click Geocode using Server from
the list.
Layout Templates
A Layout Template is as a user defined format that contains a Layout window with requiredplaceholders for maps/browsers/etc. in a specific arrangement for presentation. You can choosefrom a list of pre-built templates provided as part of MapInfo Pro or create and define your own andautomate the filling on contents within it. Layout Templates are made up of empty frames that getfilled in with contents of other windows such as maps or browsers, static content (text, shapes,images, etc) and dynamic text such as date, path, etc. They are portable and can be used in anyenvironment in which MapInfo Pro operates and with any MapInfo products.
Drivetime Regions Tool
Drivetime Regions is a MapInfo Pro tool that is loaded by default when you install MapInfo Pro. Thistool replaces the older Drivetime Regions (Table) Utility that used an Envinsa 4.0 server. Using thistool, you can access a Driving Regions server to create time-based and distance-based buffers forthe selected table entries. MapInfo Pro accomplishes this by connecting to:
• Spectrum Spatial Server.• Pitney Bowes LI APIs.
19MapInfo Pro 17.0.1 Release Notes
MapInfo Pro 17.0.1 Release Notes

You can load or unload the Drivetime Regions tool from the Tool Extensions drop-down list underthe Tools group on the HOME tab.
The older Drivetime Regions (Table) utility is visible only when the Drivetime Regions Toolis not loaded. When loaded, the Drivetime Regions tool takes precedence and replaces theolder version.
Note:
How do I access the Drive Regions command?
1. On the SPATIAL tab, in the Create group, on the Regions list, click Drive Regions from the list.
Layout Smart Text
Layout Smart Text is an enhancement to text frames in the Layout Designer. Previously you couldonly add static text to text frames in the Layout Designer. Smart Text provides the ability to embeddynamic values that can change based on the context. For example, you may wish to include thecurrent date or the layout page number as text in a Layout. Smart Text uses MapBasic expressionsto accomplish this.
MapInfo Data Access Library
The MapInfo Data Access Library (MDAL) is a set of classes and interfaces that allows .NETdevelopers to create MapInfo Pro Addins that can easily Create, Search, and Update MapInfo Tablesand other supported database formats such as Oracle, SQL Server, GeoPackage. The Library isbased on a subset of the MapInfo MapXtreme™ SDK product, mainly the Data Access functionality.Currently the MapInfo Data Access Library is only available for use with MapInfo Pro Add-ins.
• Fully capable Data Access Object Model – Create MapInfo Tables, Insert, Update, Delete, Select,Join multiple tables, Search using a well thought out API.
• Full MISql Support – Note that there are differences from MapBasic Syntax.• Complete Geometry Object Model – Supports efficient reading, creation and editing of all MapInfoGeometry types, including text objects. Also supports conversion to and from Well Known Binary,Well Known Text and GeoJson formats.
• Full Coordinate System Support.• Thread-Safe – Can be used to create background tasks in MapInfo Pro or run processing onsecondary threads.
• Supports most MapInfo Pro Data formats.
Not all formats are supported. For example, no spatial support for postgis.Note:
• MapInfo Pro style transactions on MapInfo and MapInfo Extended tables - This allows forbackground threads to edit tables open in MapInfo Pro and let the end user decide to commit orrevert the changes.
• Documentation – API Reference Guide, User Guide, MISql reference.
For more details, open your MapBasic installation, click Help, then click Extensibility Reference andrefer to the MapInfo Data Access Library section of the MapInfo Pro Extensibility Reference Guide.
20MapInfo Pro 17.0.1 Release Notes
MapInfo Pro 17.0.1 Release Notes

Mini Toolbar for Layout Window
You can use the Mini Toolbar on the Layout window for quick access to often used actions. Taskslike Select, Pan, Zoom In / ZoomOut, Alignment and many more are directly available on the Layoutwindow when you right-click inside (above or below the context menu depending on where you clickin the window).
Layout and Mapper Mini Toolbar Customization
The Layout and Mapper Mini Toolbars can be customized to suit your needs and work style.Commands can be added to and removed from the toolbars.
To customize a toolbar:
1. Right-click on the ribbon and choose Customize Quick Access Toolbar to open the CustomizeRibbon dialog box.
This dialog is also available from the Customize Quick Access Toolbar menu, in the upper leftcorner of the desktop, by choosing More Commands.
2. Highlight Map Toolbar or Layout Toolbar in the left pane to access the customizable settings.3. In the left pane, highlight a command and click the Add button.4. To remove a command from a custom tab or group, click the Remove button.5. To organize the commands within a tab or group, use as the Up and Down arrows. You can also
reorder any of the tabs, including the standard ones.6. Click OK to save your changes.
You can also create toolbar customizations for added ease of use. This would allow you to have adifferent selection of commands on the toolbar for every customization.
To create a new customization:
1. Customize a toolbar as per your requirement.2. Enter a Name in the Customization Name text box.3. Click on the "+" icon above the Customization Name text box to add and save the customization.4. Use the Save and Delete icons to save updates to or delete a customization.
The Map mini toolbar name is visible in the Status Bar when a map window is active. It will eitherbe default or the name of a customized mini-toolbar, whichever is active.
In addition, you can switch between your map mini toolbars by pressing the Space key. It will switchto the next mini toolbar and change the name on the Status Bar to reflect that. If you click on themini toolbar name text or the arrow next to it, a menu of the available map mini toolbars is shownwith the current one highlighted. You can make one of the mini toolbars current by clicking on itsname.
21MapInfo Pro 17.0.1 Release Notes
MapInfo Pro 17.0.1 Release Notes

Ribbon Customization
The MapInfo Pro ribbon can be customized to suit your needs and work style. For example, createcustom tabs and custom groups to hold frequently used commands. Re-arrange tabs and groupsto put commands where you want them. Minimize the ribbon to enlarge your work area.
MapInfo MapCAD Update
New version 10.0 of MapCAD.
The MapInfo MapCAD tool is registered and autoloaded when MapInfo Pro starts up. To loadMapCAD, go to the Tool Extensions on Home Tab, click on Registered tab, then double-click onMapCAD entry in list of tools to launch.
MapCAD provides tools that work with MapInfo Pro to create maps that are appropriate for landdevelopment and surveying tasks. This update was for continued compatibility with MapInfo Proand includes no new functionality.
The MapInfo MapCAD is a tool that installs under a subfolder called MapCAD. You can turn offMapCAD if you do not want to see these commands. To do this, on the HOME tab, in the ToolWindows group, click Tool Extensions. On the Running tab, click the arrow beside the nameMapCADto display an option to unregister this tool.
The manufacturer provides a full help system to assist you in using this product. You can accessthis help from MapInfo MapCAD or on MapInfo Pro’s backstage by selecting the PRO tab, clickingAdd Ins, and then clicking Help under MapInfo MapCAD. For support, contact MapInfo MapCADincorporated directly. Their web site is: http://www.geoas.de.
Feature Manipulation Engine (FME) Upgraded to Version 2018
MapInfo Pro installs with the Feature Manipulation Engine (FME) 2018, which lets you open datadirectly to avoid having to translate it separately and work with copies of the data in .TAB format.To see what is new in FME 2018, see http://www.safe.com/fme/new.
The FME from within MapInfo Pro opens following Universal Data formats:
• Autodesk AutoCAD (*.DWG, *.DXF)
• Bentley MicroStation Design (V7) (*.FC1, *.DGN, *.POS)
• Bentley MicroStation Design (V8) (*.FC1, *.DGN, *.POS)
• ESRI ArcInfo Export (*.E00)
• ESRI Legacy ArcSDE
• ESRI Geodatabase (File Geodatabase API) (*.GDB)
• ESRI Geodatabase (Personal Geodatabase) (*.MDB)
• ESRI Shapefile (*.SHZ, *.SHP)
• GML (Geography Markup Language) (*.GML, *.GZ, *.XML)
• Google KML (*KML, *KMZ)
22MapInfo Pro 17.0.1 Release Notes
MapInfo Pro 17.0.1 Release Notes

• OS MasterMap Database
• OS VectorMap District
• OS VectorMap Local
• Spatial Data Transfer Standard (SDTS) (*.CATD, *.DDF)
• Vector Product Format (VPF) Coverage (*.FT)
MapInfo Pro installs with a subset of FME that supports a limited number of formats. You can install thecomplete FME Suite from Safe Software for additional formats, and use it with mapInfo Pro. See Working
Note:
with the Note: Suite for details. For the list of formats supported by the FME suit, see:http://docs.safe.com/fme/html/FME_Desktop_Documentation/FME_ReadersWriters/Format-List-All
For details about these formats, see Feature Manipulation Engine (FME) Format Support in theMapInfo Pro install Guide.
To access the FME and open universal data directly in MapInfo Pro; on the HOME tab, in the Filegroup, on the Open list, click Universal Data. For details, see Using Universal Data Directly inMapInfo Pro Help
New Coordinate Systems and Projections
There are new datums in this version:
• Geocentric Datum of Australia (GDA 2020 Datum) #1028
For a detailed list of enhancements, see Coordinate System Enhancements by Version in MapInfoPro Help.
Enhancements and Updates
ThematicsIndividual Value Theme Bins in Layer Control
Individual Value Theme items are now supported in the Layer Control for a thematic layer. Individualbins visibility can be controlled through the Layer Control. Labels also respect bin visibility.
Graduated Symbol Themes Support in Layer Control
Graduated Symbol Theme items are now supported in the Layer Control for a thematic layer.
LayoutsImprovements to Snap in Layouts
The following are improvements to how snap to grid and guides work in Layout windows.
• We changed the way the grid displays on a layout page. It now draws using dots instead of linesto visually reduce detail. The grid does not display on your printout or output.
• Snap now happens when dragging items with the mouse. This gives instant visual feedback forwhere the item will position after letting go of the mouse. When dragging an item, it's top, leftcorner snaps to the closest grid intersection. If any edge of the item being dragged is moved withina few pixels of a guideline, that edge snaps to the guideline. When you are dragging a selection
23MapInfo Pro 17.0.1 Release Notes
MapInfo Pro 17.0.1 Release Notes

of more than one item, the item you are dragging snaps and the remaining items move theequivalent distance.
• Snap now happens when resizing items using the mouse. As you resize any edge, it snaps to theclosest horizontal or vertical line of the grid, or to the closest guideline if you resize the edge withina few pixels of the guideline. When resizing a selection of more than one item, the edge of theitem snaps and the remaining items resize by the equivalent amount.
• We've added Smart Guide support to help snap and align items with each other more easily. Anew menu item for Smart Guides has been added to the Alignment menu on the LAYOUT tab.Smart Guides are turned on by default. When you move or resize an item using the mouse whileSmart Guides are turned on, you can align any edge of the item you are moving to any edge ofother non-selected items on the current page. Smart Guides are not visible, but as you drag orresize an edge of an item near another item on the page, you will be able to feel it snap when italigns with the other item.
• We have fixed the issue when snapping rotated items, so that MapInfo Pro uses the minimumbounding rectangle (MBR) of the rotating item to snap against.
• To temporarily override the snap behavior when Snap To Grid is enabled and the frame movesthe number of pixels equal to the current grid increment, hold down Ctrl key while you use anarrow key; this will move the frame a single pixel each key press.
• Snap To Grid or Guidelines will only be active when performing direct manipulation of frameseither using the mouse or the keyboard.
Layout Alignment
Use Smart Guides and improved snapping to align objects or snap them together quickly. SmartGuides work by snapping objects on the layout together as they move close together. You can usesmart guides to align the edge of the item you are moving to the edge of other items on the currentlayout. This is turned on by default for a new Layout window.
To turn on smart guides for a Layout window:
1. On the LAYOUT tab, in the Edit group, from the Alignment list, select Smart Guides.
When using this option, we recommend disabling Snap To Grid.
2. Select one or more layout frames (frame borders display to indicate your selections) and movethem to their new position. The edges of the frame or item will align with the edges of any otherframes nearby.
Smart guides display a visual cue (an orange vertical or horizontal guideline) when a Smart Guideis actively being used to snap items together.. The item automatically aligns (snaps) to the edge ofnearby items as if there is a guide line. Smart guides include the border of an item, so that itemsvisually align.
While using the left mouse to drag or resize an item, pressing and holding the Alt key temporarilydisables all Snap to Grid and snap to guide behaviour. Releasing the Alt key enables thesebehaviours.
24MapInfo Pro 17.0.1 Release Notes
MapInfo Pro 17.0.1 Release Notes

Zooming / Panning
• When zooming in/out using the zoom tool or mouse, the zoom operation is now centred on mouselocation.
• Added Fit Layout in Window option in the Layout context menu to quickly zoom out to see theentire Layout.
• Hold down the middle mouse button to pan around the Layout.
Paper Margins
• Paper Margins now shown on the Layout so that you are aware of non-printable space.• With Smart Guides on, you will be able to snap objects to the Paper Margins.
Frame Deactivation
• Map and browser frames can now be activated to edit live content directly from within a Layout.• Deactivation of these frames can be done with either Alt-Click of the mouse or by clicking outsideof the frame on the Layout.
• New Preference added to disable frame deactivation clicking somewhere on the Layout. On theBackstage, click Layout Window in the Window group to display the Layout Preferences dialog.
Raster Image Changes32 BPP Raster Image Support
MapInfo Pro raster image support now includes the ability to load images using 32-bits per pixel(bpp) and honor per pixel transparency or translucency. This is also referred to as alpha-blending.This improves the appearance of image layers and maps. It is especially noticeable for WMS andWMTS servers that produce images with transparent backgrounds. Previously, the image wasconverted to 24 bpp on the fly and sometimes this resulted in the transparent pixels being displayedas black.
Raster Transparency Improvements
The raster transparency support has been extended to automatically detect transparency of animage background and still allow the user to select one more colors to make transparent in theimage. This means that the Adjust Image Styles dialog will no longer disable the transparent colorcontrols and the user can choose a color to make transparent in the image layer.
New MapBasic Tools
The following MapBasic tools have been ported or added to the 64-bit version of MapInfo Pro:
1. Ring Buffer Tool2. Quick Search Tool3. Layout Template Tool4. Drivetime Regions Tool5. Geocode Tool6. RDBMS Set MBR Tool7. Rotate Map Window Tool
25MapInfo Pro 17.0.1 Release Notes
MapInfo Pro 17.0.1 Release Notes

8. Disperse Tool9. Transfer Labels Tool10. Rotate Labels Tool11. Symbol Maker Tool12. Table Manager Tool13.Window Manager Tool
Layout Designer Undo Redo
You can now undo and redo actions in the layout window.
Press Ctrl+Z , or on the HOME tab, in the Clipboard group, click Undo to undo a previous action.
Press Ctrl+Y , or on the HOME tab, in the Clipboard group, click Redo to revert.
Create Points Improvement
When a Create Points operation is completed, use the Add to Map option to open the result in anew map window or add it to an existing map window. This saves time and clicks as compared togoing to Layer control and adding the layer. Available options are:
• Current Mapper - Open the table in the current Map window. This is selected by default.• New Mapper - Open the table in a new Map window.• No View - Open the table without viewing it (adds the table to the Table list in the Explorer window).
Data Editing - Reshape
While using the Reshape tool, if you click on something on a different layer or leave the Reshapemode accidentally and then return to the layer you are editing, Reshape mode persists. The layerwill stay in Reshape mode until you turn it off.
Table Operations
Browsing results after updating columns
When using the Update Column command, the Browse Results check box will remember its settingfor the duration of the session.
Open a table after saving a copy of it
• The Save Copy As dialog box now offers an option to open the table being saved.• You can choose the Preferred view as well.
New Topmost property for Floating Windows
A floating window can now have a Topmost property in which it stays on top of other floating windows(and over any non topmost window including other apps). This property is available when floatingin the title bar context menu along with Dockable, Tabbed, Auto Hide etc. This property is availablefor the following windows:
26MapInfo Pro 17.0.1 Release Notes
MapInfo Pro 17.0.1 Release Notes

• Info (selected by default, would be Topmost when opened)• MoveMapTo• Statistics• Ruler
Shortcut Keys
Snap
• Snap to grid using arrow keys has changed. When using the Up arrow, the top edge of the minimumbounding rectangle (MBR) for the selection of items snaps to the closest horizontal line of the gridabove the selection. When using the Right arrow, the right edge of the selection MBR snaps tothe closest vertical line of the grid to the right of the selection.
• To temporarily override snap while dragging or resizing items with the mouse, hold down the ALTkey.
• To temporarily override snap while moving items with arrow keys, hold down the CTRL key. TheCTRL moves selected items by one (1) pixel instead of snapping them to the grid.
Info
Press Ctrl + Shift + I to use the Info tool
Map
In a map window, pressing the Esc key changes the currently selected tool to the Select tool.
The following key mappings were updated.
CommentsKeyAction
Lowercase s used to free uppercaseS for use with other commands.
sToggle Snap mode
Lowercase c used to free uppercaseC for use with other commands.
cChange cross-hair cursor
Lowercase n used to free uppercaseN for use with other commands.
nToggle Auto-Node
Lowercase t used to free uppercaseT for use with other commands.
tToggle Trace
The following new key mappings were added.
27MapInfo Pro 17.0.1 Release Notes
MapInfo Pro 17.0.1 Release Notes

KeyAction
Ctrl+ASelect All from selection Layer
MView Entire Map
VChange View Dialog
zZoom In Tool
ZZoom Out Tool
IInfo Tool
OMap Options Dialog
PPan Tool
SSelect Tool
LLabel Tool
ICreate Legend Dialog
TCreate Theme Dialog
UUnselect All
SpaceChange to next customized mini toolbar
1Insert Point Tool
2Insert Text Tool
3Insert Line Tool
4Insert Polyline Tool
5Insert Arc Tool
6Insert Polygon Tool
28MapInfo Pro 17.0.1 Release Notes
MapInfo Pro 17.0.1 Release Notes

KeyAction
7Insert Ellipse Tool
8Insert Rectangle Tool
9Insert Rounded Rectangle Tool
Changes to the Startup Preferences and Quick Start
All functionalities in the Quick Start dialog are now available in theWelcomeWindow. So, the QuickStart dialog has been removed from MapInfo Pro.
As a result of this change, the Startup Preferences dialog has been updated. The checkbox controllingdisplay of the Quick Start dialog has been replaced with a checkbox to control the display of theWelcome Window.
Also, if you turn ON theWelcomeWindow, theMapInfoPro.wor workspace would not be automaticallyloaded and the checkbox to turn it ON in Startup preferences is also disabled.
Calculate Statistics Command
A new command Calculate Statistics has been added to the TABLE tab under the Calculategroup. This command allows you to perform statistical calculations for a column in a table orquery/selection.
Improvements to Legend Swatches
Multiple changes have been made to improve legends swatches. This includes various types ofswatches (custom symbol, rectangular fills, etc.). Changes also include appearance on-screen, aswell as when printing or exporting.
Custom Symbol Legend Swatches
Many of the raster images that are used as custom symbols (in the CUSTSYMB directory) are nowdrawn in a different way that improves the appearance of the images. This is especially noticeablewhen an image is drawn at a smaller size than the original image. This should look better on-screen(in Layout or Legend windows), as well as when printed or exported.
Extra Border around Rectangle Fill Swatches when Printed
Previously, printing a Layout containing Legend swatches for fills and lines frequently resulted inblurry edge. Now the edges will be crisp.
29MapInfo Pro 17.0.1 Release Notes
MapInfo Pro 17.0.1 Release Notes

Wrong Colors In Legend Swatches when Printed
Previously, sometimes the color of the legend sample did not look correct. This was due to smoothing.Now the smoothing has been turned off so the sample should look crisp and have the correct colorwhen printed.
Viewing PDF Files containing Legend Frames in Adobe Acrobat
If you print a layout with legend frames, to PDF, you may need to adjust your Acrobat settings. Thisis especially relevant when using a custom symbol with Show Background turned on, or a fill swatch.
If you see a thin gray line around the edge of the legend swatch, you may need to turn off ImageSmoothing in Acrobat. To do that, in Acrobat go to Edit > Preferences > Page Display >Rendering > Smooth Images (uncheck).
Layout Scalebar Unit Customization
You can now customize the units string shown in the layout scalebar. This helps in the case whenyou may want to produce a layout and show a unit name with an alternate spelling, such as"kilometers" vs. "kilometres".
The default unit naming convention has not changed. But if you wish to alter the units string, youcan do so in the Layout Scale properties dialog during creation or you canmodify an existing scalebar.
You can either click on the unit name shown below the scalebar sample, or click on the pencil iconto begin editing.
If a scalebar has a customized unit name, the scalebar will not open in older versions ofMapInfo Pro (version 16.0 or earlier).
Note:
Storing TAB, MAP, and ID files in same location as SHP files
When opening a SHP file in MapInfo Pro, you can now store the resultant TAB, MAP, and ID filesin the same folder as input SHP file. In previous versions, this location used to be the SHP filedirectory preference (typically user's Documents folder) by default. Now this location automaticallydefaults to the same folder as the input SHP file.
However, there is a new folder icon in the location sidebar you can use to select the SHP file directorypreference location instead. If folder location where SHP files reside is read-only, an error is displayedasking you to select another location.
Updates to Task Manager Preferences
The Task Manager Preferences dialog box has been updated to include the following options:
1. A new check-box to automatically show the task window when a background task is started,selected by default.
2. A new check-box to display an optional task ID in the task window list to help find the most recentlyrun task in Task window; selected by default.
30MapInfo Pro 17.0.1 Release Notes
MapInfo Pro 17.0.1 Release Notes

Changes and updates to the MapInfo Pro Ribbon
TABLE , MAP , and SPATIAL Tabs
1. In the Selection group, changed SQL Select button to a split button containing SQL Select andSimple Select.
2. In the Selection group, removed the Quick Launch button that previously opened the Selectdialog.
3. Added shortcut Ctrl+Shift+Q for SQL Select dialog command.4. Added shortcut Ctrl+Shift+P for Simple Select dialog command.
Map Tab
1. In the Navigate group, added a new Change View button to replace the quick launch control thatopened the Change View dialog.
2. In the Navigate group, changed Previous View, Move To, and Change View to small buttoncontrols.
3. Added shortcut Shift+V shortcut to open Change View dialog4. In the Content group, changed Cosmetic drop-down buttons to large button controls.5. In the Content group, changed Zoom To drop-down buttons to large button controls.
Home Tab
1. In the File group, changedWorkspace, Save, and Close split buttons to have large button controls.2. In the File group, the Save Copy As button under the Save split button is now the first control in
list instead of Save button which is not always enabled.
Quick Access Toolbar
1. In the Quick Access Toolbar, Save Table command is added as checked.
Known Issues
Custom Projections file Overwritten
If you modified your mapinfow.proj file to add customized projection in MapInfo Pro version 17.0(English), installing version 17.0.1 would overwrite your old mapinfow.prj file resulting in loss of data.
Workaround: You are advised to backup your custom projections file before upgrading to MapInfoPro version 17.0.1 from version 17.0.
TAB is now a Keyword and not available for a Define name
You can no longer create a Define using the symbol TAB. TAB is now a keyword for MapBasicstatements and compiling an MBX containing TAB in Define would result in a compilation error.
Workaround: Define TAB as TABe but existing applications that have this type of define might failto compile now.
31MapInfo Pro 17.0.1 Release Notes
MapInfo Pro 17.0.1 Release Notes

Spectrum Spatial Server error
When using a Spectrum Spatial server to geocode, you are not prompted to enter a User Id andPassword. After setting http://ssmipro-win16:8080/rest/GlobalGeocode as default and clicking OKon the Geocoding Server Information dialog, the following error message appears:
Error occurred at geocoding server: Could not find country informationto geocode.
Workaround: Enter random strings as User Id and Password even though they are not validated.
Certain Custom Installations not working correctly
MapInfo Pro does not delete any files installed in your %appdata% location. Also, we do not deleteany registry entries created under the Current User while uninstalling MapInfo Pro or while doingcustom installations.
Because of this certain custom installation scenarios involving the MapInfo Pro Tools does not workas they should, since the Tools files are copied to the user's %aapdata% location.
Issues with Non-Native TAB Files
If you use non-native TAB files (for example, DBF/TAB) as input files in the new Geocode tool, theCreate Points option under the Advanced Matching Options is not selected by default. Also, theProcess button on the Geocode dialog is disabled.
Workaround: In order to write the geocoding results to a table, export your data as a CSV file andnot DBF. You must use an editable table in order to output the geocoding results and enableprocessing.
Unable to Return License on Windows 10 version 10.0.17134
If your Windows 10 installation updates to version 10.0.17134 or beyond, you might not be able toreturn your MapInfo Pro licences. Trying to return your license via the automatic method displaysthe following error:
Unable to successfully reach the server" and user will not be able toreturn license.
Workaround: If that occurs, we recommend you utilize the email method to transfer the license.
Issues with Location Intelligence Services and Proxy Servers
If your organization connects to the internet via a Proxy Server requiring authentication, MapInfoPro's connectivity to Pitney Bowes' Location Intelligence services such as Geocoding and DrivetimePolygons may not work. There are known problems logging in and using those services. If youencounter an error which includes the error code 407 (Proxy Authentication Required) when loggingin, you are experiencing this issue.
32MapInfo Pro 17.0.1 Release Notes
MapInfo Pro 17.0.1 Release Notes

If you are already authenticated and on the Proxy server (set on the Control Panel/InternetOptions), you might not encounter this issue as you are already connected. There is noknown workaround for this issue as of now.
Note:
Enabling GDA2020 datum transformation with NTv2
NTv2 conversion is available for use as a preferred method but the NTv2 Transformations are turnedOFF by default. The use of the seven-parameter datum for GDA2020 (Datum #1028) is functionallyequivalent, however if you require processing GDA2020 through NTv2 grid files then NTv2 can beenabled by editing the NTv2.xml file in the MapInfo Pro program directory.
<install directory>\NTv2.xml
1. Open this file in a Text or XML file editor and search for all occurrences of the following tag:
<NTv2 Conversion for Australia>
2. For each of these entries change the <Enabled> tag from false to true and save the file.3. Launch MapInfo Pro and when doing datum conversions with Australian GDA94, AGD84, and
GDA2020 datum tables, the conversions will be processed using the NTv2 grid shift files listedabove.
Correcting a Microsoft .NET Framework 4.6.1 Installation Failure
MapInfo Pro installs .NET Framework 4.6.1. It displays the following error message when the .NETFramework is in a pending install state that requires an action before MapInfo Pro can finish installing.
The installation of Microsoft .NET Framework 4.6.1 Full has failed.Setup will now exit.
This issue may be due to one or more of the following, all of which require a computer restart:
• The .NET Framework install may include an update, such as KB3102467, that requires you restartthe computer and then rerun the MapInfo Pro install.
• On Windows 8.1 and Server 2012 R2, Microsoft .NET Framework 4.6.1 has a dependency onKB2919355 (April 2014). Install KB2919355 by downloading and installing it, or use WindowsUpdate. Restart the computer and then rerun the MapInfo Pro install.
• A pending reboot on the computer blocks the .Net Framework 4.6.1 install. Restart the computerand then rerun the MapInfo Pro install.
Correcting a Hotfix KB3154527/KB3154528/KB3154529 Installation Failure
MapInfo Pro installs the hotfix KB3154527, KB3154528, and/or KB3154529. If a pending reboot onthe computer blocks the hotfix installation, then MapInfo Pro displays the following message. Restartthe computer and then rerun the MapInfo Pro install.
The installation of ... Hotfix for Microsoft .NET Framework 4.6.1appears to have failed. Do you want to continue the installation?
33MapInfo Pro 17.0.1 Release Notes
MapInfo Pro 17.0.1 Release Notes

Correcting a MapInfo Pro Startup Issue
Installing the Microsoft Visual C++ 2015 Update 2 redistributable also installs KB2999226. IfKB2999226 is not installed, then MapInfo Pro may close unexpectedly when you start it. To correctthis, uninstall Microsoft Visual C++ 2015 Update 2, reboot the computer, and the reinstall MicrosoftVisual C++ 2015 Update 2 redistributable.
Before taking action, Windows 8.1 or Server 2012 R2 users should also read the next section todetermine which update is missing.
Correcting a MapInfo Pro Startup Issue on Windows 8.1 and Server 2012 R2
If MapInfo pro has difficulty starting on Windows 8.1 or Server 2012 R2, then you may be missingone or more of these updates:
• KB2919355 (required to install .Net Framework 4.6.1)• KB2999266 (installs with Visual C++ 2015 Update 2)• KB3012467 (installs with .Net Framework 4.6.1)
To check your machine for an update, on the Start menu select Control Panel. In the Control Panelwindow, select Programs and Features and then View Installed Updates. Search the list for theupdate, such as KB2919355.
If you do not have an update, then either use Windows Update to install it or search for it athttps://support.microsoft.com/en-us and download it. Restart the computer and then rerun theMapInfo Pro install.
Use the Enhanced Explorer Window
We have enhanced the Explorer Window while adding support for Individual Value and GraduatedSymbol thematic bins in the Layers list. During these changes, we have removed support for theseparate Layers window. The recommendation is to use the Explorer Window instead of Layers.The Explorer includes the Maps (Layers) plus lists of the open Tables, Windows and Connections.If you only want to see the Layers, you can hide the visibility of the other items in the Pro > Options> Explorer.
Progress and Resolution of Outstanding Issues
MapInfo Pro 17.0.1
Description and ResolutionIssue Number
When doing a postal code level geocode or find address, the values for the fields returned in theresponse were not being populated which resulted in no records being geocoded.
Resolution: Fixed.
MIPRO-101097
34MapInfo Pro 17.0.1 Release Notes
MapInfo Pro 17.0.1 Release Notes

Description and ResolutionIssue Number
Data is lost while editing in browser when .NET version 4.7 is installed.
Resolution: Fixed.
MIPRO-100358
The All Others category in the thematic bins shown in the Layers list of the Explorer window isvisible even if the bin has no items. This category will now automatically show/hide depending if
MIPRO-99941
the bin has any items. If All Others has any items, it will be shown in the Explorer. If All Othersdoes not have any items, it will not be shown in the Explorer. Other bin categories will always beshown in the regardless of whether they contain any items or if they are shown in the legend.
Resolution: Fixed.
Custom Symbols with no background are no longer drawing correctly.
Resolution: Fixed.
MIPRO-99937
Degradation of WMS image quality in Layout Designer.
Resolution: Fixed.
MIPRO-99774
Loading a MapBasic tool for the first time adds a menu into the LEGACY tab. Closing the toolremoves this menu but reloading the tool fails to add the menu again in the LEGACY tab.
Resolution: Fixed.
MIPRO-99688
Custom thematic templates from previous versions copied in thematic templates directory are notloading.
Resolution: Fixed.
MIPRO-99653
LargeInt columns uploaded to RDBMS are treated as Float when opened in MapInfo Pro.
Resolution: Fixed.
MIPRO-99338
MapInfo Easyloader is converting blank strings to NULL.
Resolution: Fixed.
MIPRO-96181
When a layer global style override is using stacked styles and you use MapBasic to remove oneor more of the style passes, the stacked style dialog launched from the layer in the Explorer isshowing the removed styles although the map is rendering the correct stacked style.
Resolution: Fixed.
MIPRO-94509
35MapInfo Pro 17.0.1 Release Notes
MapInfo Pro 17.0.1 Release Notes

Description and ResolutionIssue Number
While editing range labels for raster legends; when changing a range label so that it no longerrepresents a valid range with a begin and end value, the label would still show the "to" string.
Resolution: Fixed.
MIPRO-89896
Unsupported data type uniqueidentifier from SQL Spatial DB.
Resolution: Fixed.
MIPRO-84177
MapInfo Pro 17.0
Description and ResolutionIssue Number
Orientation of objects drawn on a map changes while Zooming-In.
Resolution: Fixed.
MIPRO-51961
On the Browser window, the Clear Filter context menu is disabled on a filtered column.
Resolution: Fixed.
MIPRO-55490
Zooming into the map with Image Reprojection enabled results in the raster and vectorimages being unsynchronized.
Resolution: Fixed.
MIPRO-59789
Text boxes in a Layout Designer window include an extra line that cannot be removed.
Resolution: Fixed.
MIPRO-63952
Text boxes in the Layout Designer window have an extra line that you cannot get rid of.
Resolution: Fixed. The default size of a text frame is now smaller.
MIPRO-63952
Geocoding a large table using Mapmarker Geocoder results in a memory leak.
Resolution: Fixed.
MIPRO-66119
SHP files are being created with UTF char-set.
Resolution: Fixed.
MIPRO-68621
36MapInfo Pro 17.0.1 Release Notes
MapInfo Pro 17.0.1 Release Notes

Description and ResolutionIssue Number
On the Browser window, the Clear Filter context menu is disabled on a filtered column.
Resolution: Fixed.
MIPRO-71386
Floating Info Tool window loses visibility behind a floating Map or Browser window.
Resolution: Fixed. Now you can set it to be Topmost window and always visible.
MIPRO-74493
If a map in layout is activated and a scalebar is added to it, selecting Remove from Scalebar contextmenu is not removing it.
Resolution: Fixed.
MIPRO-75354
When working with the Feature Manipulation Engine (FME) an "Invalid Input" error displays whenconverting DWG with the Explode Blocks into Entities option turned off.
Resolution: Fixed.
MIPRO-79274
MapCAD does not correctly create Orthogonal Polygons using an MBX.
There is an issue creating to only right angles when using the Ctrl key.
MIPRO-79932
Resolution: Fixed.
Auto labels remain visible even when the ranged theme bin has visibility turned off.
Earlier version of MapInfo Pro would display range theme bins in the Layer Controlwindow. Whenauto labels was on for the reference layer and a theme bin was not displayed, because its bin is
MIPRO-84152
unchecked and the reference layer is not visible and/or the theme has Replace layer Style turnedon, then the labels for the non-visible objects would still display.
Resolution: Fixed. If the map feature is not drawn then its auto label is also not drawn.
Legend Swatches: Legend colors not matching map when printing to PDF
Resolution: Fixed.
MIPRO-84527
Oracle spatial views are not allowing polyline inserts.
The following error displays when attempting to insert a polyline into an Oracle View.
MIPRO-87158
"Oracle Error: ORA-32575: Explicit column default is not supported for modifying views. Operationcanceled."
Resolution: Fixed.
MapInfo crash when executing the polyline split at node operation.
This happens after selecting the polyline from a query table that has less fields than the base table.
MIPRO-87647
37MapInfo Pro 17.0.1 Release Notes
MapInfo Pro 17.0.1 Release Notes

Description and ResolutionIssue Number
Resolution: Fixed.
Layout Scalebar button is disabled when a map window is changed between Floating and Tabbedwindow states.
Resolution: Fixed.
MIPRO-88188
Affine projection is lost when saved to the Geopackage format.
Resolution: Fixed. Tables that use an Affine CoordSys can now be saved to Geopackage format.
MIPRO-88282
Browsing tables is slow in the 64-bit version of MapInfo Pro 16.0 compared to the 32-bit version.It may take a few seconds on Windows 7 and much longer on Windows 8.1 and 10.
Resolution: Fixed.
MIPRO-88640
MapInfo Pro closes unexpectedly while opening a new workspace and attempting to create a newlayout.
Resolution: Fixed.
MIPRO-88947
While using WMTS server, changing a Tile Set from WMTS Table Properties results in a 403Forbidden error.
Resolution: Fixed.
MIPRO-88979
Rounded rectangles are not converting correctly from workspaces (WOR files) that include anolder legacy layout.
Resolution: Fixed.
MIPRO-89032
Floating Ruler Window Should be on Top when Map(s) set to Floating
Resolution: Fixed. Floating Ruler Window now shows on the top once set to front window
MIPRO-89312
TheWebMap Service (WMS) and Envinsa Geocoding service are not working when using a proxyserver to connect to them.
Resolution: Fixed.
MIPRO-90283
WMS and Envinsa Geocoding not working when connecting via proxy server.
Resolution: Fixed.
MIPRO-90283
38MapInfo Pro 17.0.1 Release Notes
MapInfo Pro 17.0.1 Release Notes

Description and ResolutionIssue Number
An error occurs when making an Oracle tables mappable that has mixed case coordinate fieldnames.
Resolution: Fixed.
MIPRO-90560
When using different regional settings, MapInfo Pro displays the error, "Layout Designer Grid Sizemust be greater than zero".
Resolution: Fixed.
MIPRO-91351
When using different regional settings, MapInfo Pro displays the error, "Layout Designer Grid Sizemust be greater than zero".
Resolution: Fixed.
MIPRO-91351
Customize Ranges window does not adjust Columns to fit all digits.
Resolution: Fixed.
MIPRO-91505
Text object value is incorrect using Map File Application Language (MFAL) 16.0 or higher. Thestring in the text objects that MFAL returns is not correctly null terminating.
Resolution: Fixed.
MIPRO-91584
The Layout Designer window closes unexpectedly when adding a map frame. This occurs whenrunning a MapBasic application (MBX) and then adding a map frame.
Resolution: Fixed.
MIPRO-91993
Issues using CTRL + shortcuts after closing a table using the Close All option with Explorerwindow open.
Resolution: Fixed.
MIPRO-92406
Incorrect tooltip is displayed for the Pan Tool in the Edit group on the LAYOUT tab.
Resolution: Fixed.
MIPRO-92506
The Ruler tool, on the custom AddIn tool bar, does not display the Ruler window.
Resolution: Fixed.
MIPRO-92648
The Ruler tool, on the custom AddIn tool bar, does not display the Ruler window.
Resolution: Fixed.
MIPRO-92648
39MapInfo Pro 17.0.1 Release Notes
MapInfo Pro 17.0.1 Release Notes

Description and ResolutionIssue Number
The following error occurs while loading a Tile Server Table:
Error parsing a Tile Server URL in WMTS Table.xml. Unableto open table Untitled.
MIPRO-93241
Resolution: The URL for fetching the tiles was not being correctly formed. This is Fixed now.
MapInfo Pro closes unexpectedly if you add a large number of ribbon items.
Resolution: Fixed.
MIPRO-93544
Legend Swatches: Grey box in PDF around legend symbols.
Resolution: Fixed.
MIPRO-93853
While committing data with macrons to SQL Server 2012, themacrons are discarded after refreshingthe tables.
Resolution: Fixed.
MIPRO-93897
Bing Roads and Hybrid base maps are missing certain roads.
Resolution: Fixed.
MIPRO-94038
MapInfo Pro closes unexpectedly while executing an SQL query with missing double quotes inthe WHERE clause.
Resolution: Fixed.
MIPRO-94191
While using the MapBasic command Create Text, the text appears truncated if the (X2/Y2)coordinates are not provided.
MIPRO-94716
Resolution: The Create Text statement has slightly different behavior now (as of version16.0.3) if it is created into a legacy Layout.
If a legacy Layout is created in an MBX or WOR, the X2/Y2 parameters will be ignored and thetext frame will be auto-sized when the Layout is converted to a Layout Designer.
If a Layout Designer is created in an MBX or WOR, the X2/Y2 parameters will be honored and thetext frame will be sized based on those values when created in a Layout Designer. As of version16.0.3, the X2/Y2 parameters are optional, and if left out, the text frame will be auto-sized whencreated in a Layout Designer.
ForegroundTaskSwitchHandler procedure is not working.
Resolution: Fixed.
MIPRO-94719
40MapInfo Pro 17.0.1 Release Notes
MapInfo Pro 17.0.1 Release Notes

Description and ResolutionIssue Number
Using CreateObject from a VBS or VBA script to connect to MapInfo Pro resulted inunexpected behaviour.
Resolution: Fixed.
MIPRO-94767
ECW image files having Cyrillic characters in the filename could not be opened.
Resolution: Fixed.
MIPRO-94817
MIPRO-95915
Custom Ribbon Tool Buttons are not highlighted when selected.
Resolution: Fixed.
MIPRO-94990
An error occurs when executing Polyline Split at Node operation.
Resolution: Fixed.
MIPRO-95351
Opening a new workspace and then trying to create new a layout results in MapInfo Pro closingunexpectedly.
Resolution: Fixed.
MIPRO-95558
Duplicate record are created in the DBMS table when edited using the Info tool and saved.
Resolution: Fixed.
MIPRO-95752
In the Browserwindow, after sorting upon a column, browser focus returns to the left most columninstead of the column that was sorted.
Resolution: Fixed.
MIPRO-95791
Ribbon tab switching set to None in the Preferences window is not working as expected for Customtabs.
Resolution: Fixed.
MIPRO-95804
Labels are displayed even with visibility and bin turned OFF for a layer.
Resolution: Fixed.
MIPRO-95912
Not able to Show/Hide Layout page thumbnail pane.
Resolution: Fixed.
MIPRO-96056
Single page layouts will now open with the thumbnail pane collapsed. Multi-page layouts will openwith the thumbnail pane visible. As long as the thumbnail pane is not resized by dragging the gridsplitter, the layout will auto hide thumbnails when the layout has only a single page, and will auto
41MapInfo Pro 17.0.1 Release Notes
MapInfo Pro 17.0.1 Release Notes

Description and ResolutionIssue Number
show thumbnails when the layout has more than one page. Once the thumbnail pane is resized(even if it is completely collapsed) the layout will honor that and no longer auto show/hide thumbnailsas pages are added or removed.
Layout Scalebar button is disabled if a map is added to an empty frame in a layout.
Resolution: Fixed.
MIPRO-96057
In Layout Designer frames, content once removed using theRemove Content option cannotbe restored.
Resolution: Fixed.
MIPRO-96101
Layout frames now support undo/redo when Removing Frame Content or Adding Content to anempty layout frame. If the operation cannot be undone, a confirmation message will be shown.Legend frames and Custom frames are do not support undo/redo when removing or adding framecontent.
Map Objects are lost after if you delete the corresponding records and save the Access table. TheMap Objects are not available when you reopen the Access Table.
Resolution: Fixed.
MIPRO-96149
LayoutCommandID : existing command IDs changed from previous release
Resolution: Fixed. Restored command IDs for Layout commands to previous values.
MIPRO-96163
Samples for solid fill patterns in Legend in Layout frame do not print well
Resolution: Fixed.
MIPRO-96164
Bing server gave an error when below a certain zoom level instead of showing the "no imagery"tile background
Resolution: Fixed.
MIPRO-96182
While using WFS 2.0.0, the DescribeFeatureType request is failing.
Resolution: Fixed.
MIPRO-96194
Opening workspaces is taking longer with Addins loaded in MapInfo Pro.
Resolution: Fixed.
MIPRO-96202
Selected Nodes should remain the same color (yellow) whether layer is enhanced or not.
Resolution: Fixed.
MIPRO-96203
42MapInfo Pro 17.0.1 Release Notes
MapInfo Pro 17.0.1 Release Notes

Description and ResolutionIssue Number
Clicking the Layout button in the Windows group, under the HOME tab does not open theLayout Templates gallery.
MIPRO-96378
Resolution: Fixed.
Tools are being installed to user roaming profile location.
Resolution: Fixed. Tools are now installed to the user local profile location.
MIPRO-96382
Inserting records into a table with Fastedit enabled takes a long time.
Resolution: Fixed.
MIPRO-96461
Menu + Keyboard Shortcuts are not working.
Resolution: Fixed.
MIPRO-96487
Unable to export Theme Legend Window.
Resolution: Fixed.
MIPRO-96593
In MapInfo Pro Runtime, add buttons for new preference dialogs to the old preferences dialog
Resolution: Fixed.
MIPRO-96628
List view of the Info Tool window truncates the displayed value of the column data to 31 chars.
Resolution: Fixed.
MIPRO-96664
Cannot copy a single cell from Browser when table is Read-only.
Resolution: Fixed.
MIPRO-96900
There is no way to distinguish between a stand-alone window or a map frame in the layout in theExplorer window.
Resolution: Fixed. Now each map node in the Explorer window will show an icon to identify if themap window is a stand-alone window or a map frame in the layout.
MIPRO-96973
In Layout Designer, it is difficult to center text frames with respect to other frames.
Resolution: Fixed.
MIPRO-98023
43MapInfo Pro 17.0.1 Release Notes
MapInfo Pro 17.0.1 Release Notes

Description and ResolutionIssue Number
In Layout Designer, working with the Selection Frame is difficult when Zoomed-in.
Resolution: Fixed.
MIPRO-98091
The Quick Access Toolbar customization was missing commands.
Resolution: Fixed.
MIPRO-98327
Close All button on then Quick Access Toolbar does not prompt to save data changes.
Resolution: Fixed.
MIPRO-98361
MapInfo Pro Advanced
What's New in MapInfo Pro Advanced
This section provides a brief description of important features and enhancements made to MapInfoPro Advanced 17.0.
Align - Matching the geometry of one raster with another raster
In this release of MapInfo Pro Advanced, we have added the Align tool to snap one raster withanother raster so that the geometry of both rasters become same.
On the RASTER tab, in the Operations group, click Operations and then click Align button toopen the Align dialog box.
To align, we need two raster files - the input raster and the primary raster. The input file is the rasterthat you want to align and the primary raster is the raster to be used as reference. When we aligntwo rasters, we match the geometry of one raster with another raster.
Warp Image - Georeferencing a Scanned Map
The scanned maps do not contain spatial reference information. MapInfo Pro Advanced allows youto georeference a scanned map using the Warp Image tool. Image warping is a process ofgeoreferencing a scanned map by applying a transformation to the image. This tool can be usedfor georeferencing raw image data, old scanned images or maps.
On the RASTER tab, in the Operations group, click Raster Operations and then click Warp Imagebutton to open theWarp Image dialog box.
The Warp Image can also be used to register two different images taken of the same geography atdifferent times.
44MapInfo Pro 17.0.1 Release Notes
MapInfo Pro 17.0.1 Release Notes

Polygonise - Converting a Raster into Polygon features
The Polygonise tool added in this release takes a raster as an input and joins adjacent cells havingsame cell value to form vector features and outputs into a MapInfo TAB file. The output TAB file willcontain the polygon information.
On the RASTER tab, in the Operations group, click Raster Operations and then click Polygonisebutton to open the Polygonise dialog box.
The polygonise tool provides various methods to create polygons from a raster. Polygons are createdby joining input raster cells with certain properties such as Same Value Cells, Valid\invalid Cells,Raster Extent and User Defined.
It discards all null cells. If there are scattered cells in the input raster individual polygons are created.
Export a Map as Raster Image
There may be instances when you want to save a rendered raster at a particular zoom level as animage. The Export Image tool allows you to export a map that you have created, as an image file.This image file will not be a static image, it will be a georeferenced image. You can use this imagein other graphics programs or platforms.
On the RASTER tab, in the Operations group, click Raster Operations and then click Export Imagebutton to open the Export Image dialog box. You can set the following properties.
Resolution Ratio - You can choose either High or Low resolution image in the output.
Convert To - When saving the raster as an image, you can choose a format such as .tiff, .mrr, .bil,.bip. or .bsq from the list.
Enhancements and Updates
This section summarizes enhancements made to the existing raster features.
Improvements in the Create Raster tool (gridding)
Input Data Grouping for Interpolation
In addition to filtering data, now you can group input data for interpolation. This is very useful if youhave a huge dataset and want to perform gridding on selected data only.
In this release we have added the ability to filter/group input data using an attribute column. Thisallows you to create multiple output rasters from single input dataset by using an input column asa grouping variable. It works for numeric, and text data types. For LIDAR dataset it allows you togrid certain classes of data such as elevation, intensity and point classification.
45MapInfo Pro 17.0.1 Release Notes
MapInfo Pro 17.0.1 Release Notes

Support for Smoothing in Interpolation Methods
You can now apply smoothing on the gridded data to produce smoother surface. Smoothing is usedto enhance the sharpness of an image or improve the appearance of the edges. Select a suitableSmoothing method and level for your data.
To set the smoothing level for the output raster, move the smoothing slider. You can set a valuebetween 0 to 6. A value of zero applies no smoothing. A value of 6 applies maximum smoothing.
Ability to Specify Spline Tension for Minimum Curvature Interpolation
You can now specify a value between 0 and 1 to apply tension to the splines. The default value is0. A smaller setting will result in lower overall curvature, or smoother surfaces. However, this canresult in undershoots and overshoots in regions where there is no data and the interpolator isunconstrained. A higher setting will result in less smooth surfaces but tends to reduce the amountof undershoot and overshoot. When gridding terrain or bathymetry data it is beneficial to use amoderate level of spline tension (0.25).
Support for Polygon clipping in Interpolation Methods
Support for Polygon clipping gives you better control over the finished appearance and shape ofthe output grid.
• Polygon - You can provide a TAB file of polygon(s) to clip the output raster to the polygonboundaries. You can specify whether to clip a region outside or inside the raster bounds. However,it does not support polygons with holes.
Per Band Data Conditioning
Added the ability to control input data conditioning on a per band basis. To apply per band dataconditioning, click the button on the Create Raster dialog.
You can now apply data conditioning either for all bands or individually for the selected band.
46MapInfo Pro 17.0.1 Release Notes
MapInfo Pro 17.0.1 Release Notes

Coordinate (spatial) Data Conditioning
Added the ability to perform spatial data conditioning on input data. You can now filter data basedon the rectangle or polygon drawn on the map. The gridding will be performed on the selected dataonly.
Enhancements to the Existing Raster Tools
DescriptionsRasterOperations
Set advanced properties for the output rasterConvert
When converting your raster dataset, you can set some advanced properties for the output raster suchas Raster Name, Field Name, Band Name, Band Data Units and Band Data Type.
Edit Primary RasterMerge
In the Merge operation, now you can stamp multiple raster's data into the primary raster. We haveadded the Edit Primary Raster checkbox that enables you to stamp data from one or more rasters intothe primary raster, instead of creating an output raster file. This is useful when you want to edit/updateexisting raster file.
Relaxed input raster's combine limitationsCombine
MapInfo Pro Advanced now allows you to combine input raster files even if they have different projection,origin or cell size. Previously, Combine operation required that raster’s origin, cell size and projectionshould be same.
Added Support for Save/ Load class intervals for classified rasterClassify
When reclassifying a classified raster into numeric or classified raster, you can use Load and Save Asbuttons to load/create class intervals/mapping into .class text file. Now you can also load vertical mapper.pfr files into MapInfo Pro Advanced.
Complex Calculation SupportViewshed
We have added Use Complex Calculations checkbox in the Viewshed tool. Now, MapInfo Pro Advancedcalculates the value by which the height of the target point should be raised or lowered to make thepoint visible from the viewing point (source).
Perform Rasterization on specified boundsRasterize
In the Rasterize dialog box, click Output Geometry to limit the output data points according to specifiedregion (bounds) and ignore all points that lie outside of the specified region. Only the data within thespecified bounds will be written in the output file.
47MapInfo Pro 17.0.1 Release Notes
MapInfo Pro 17.0.1 Release Notes

DescriptionsRasterOperations
Added Support for Editing/updating input TAB filePoint Inspection
In the Point Inspection dialog, you can either create a new TAB file or update the existing column(s)of the input TAB file. You can also specify a value for the null-cell and no-cell.
We have improved the support for compatible data types in the output TAB columns. Now the outputcolumn follows the input raster's band data type and creates/updates compatible data type of outputTAB columns.
Navigation Controls for Cell InformationCell Value
Added navigation controls to the Neighboring Cells tab. In the Cell Value dialog, you can inspect valuesof cells around the selected cell without a mouse-click on the map. Now you can click the navigationbutton around the cell matrix to see values of neighboring cells.
Open the Cell Value tool in Full mode. Click on the map, when the Cell Value window opens, clickOptions and then click on the Neighboring Cells tab.
Batch Mode Processing
You can run some of the raster processing operations in an automated batch process. Running anoperation in Batch Mode allows you to process multiple inputs with the same set of input parametersin a single go. Batch Mode is very useful to process multiple files with the same input settings. Forexample, reprojecting a number of raster files to a specific projection.
The input raster's properties, for example field type, coordinate system and geometry shouldbe same.
Note:
Following raster tools support the batch mode processing.
• Convert• Resample• Reproject
Currently, if you want to process multiple files with Convert, Resample and Reproject operations,you need to work with each file one by one and then execute them individually. In batch mode youcan select a number of files together and execute the operation in one go.
Multi-threading
If your computer has multiple CPUs or multiple cores, the batch processing functionality can makeuse of multi-core processor and execute multiple files concurrently. This can be configured throughthe Raster Preferences dialog by selecting the Run Tasks Parallelly in Batch Mode option from theProcessing and Analysis tab.
Output File Name Extension
48MapInfo Pro 17.0.1 Release Notes
MapInfo Pro 17.0.1 Release Notes

Output file name in batch mode is auto-generated, however, you can choose a prefix and suffix forthe output files. The default output file name is same as the input file name. You can also choosethe output file directory and select the desired file extension.
Log Summary
You can view a summary of the tasks processed.
Improvement in Raster Info tool
The Raster Info tool has been improved for ease of use. The Raster Info tool now allows you to viewthe contents of a classification table in a classified or image palette raster.
To view the additional information about a raster dataset:
1. Open a classified or image palette raster in the map window. You can click the button tobrowse and select a classified or image palette raster.
2. On the Raster tab, in the Properties group, click Raster Info to display the Raster Info window.TheRaster Info dialog box displays showing information about the input raster dataset as shownin the figure below:
49MapInfo Pro 17.0.1 Release Notes
MapInfo Pro 17.0.1 Release Notes

3. Click the Ellipse button to display Classified Table Content.The Classified Table Content dialog box displays as shown below:
50MapInfo Pro 17.0.1 Release Notes
MapInfo Pro 17.0.1 Release Notes

Support for Alpha Channel
Support for Alpha Channel
MapInfo Pro Advanced now supports images with Alpha Channel transparency. Alpha channelsare masks through which you can display images. The alpha channel is an 8-bit channel, whichmeans it has 256 levels of gray from 0 (black) to 255 (white). The resulting image is called RGBA(RGB+A, A means alpha channel).
All supported imagery files will now support Alpha channel for rendering.
You can control the rendering of alpha channel in your raster data from the Display tab of RasterPreferences dialog box. By default, the rendering of alpha channel is enabled in MapInfo ProAdvanced.
Export Histogram Data to ASCII
MapInfo Pro Advanced now supports exporting histogram data to an ASCII file in the CSV format.Now, from the Statistics dialog box you can export the statistical information to a CSV.
1. Select an input raster whose statistics you want to view or calculate.
If you open a file for which statistics are not available, the Calculate Statistics button getsenabled and MapInfo Pro Advanced prompts you to calculate statistics.
Note:
2. Select one of the modes for calculating the raster statistics.3. Click Calculate Statistics to calculate the statistics.4. Scroll down and click Export.
In the CSV file the header line string order is Value, Count, Percentage and Percentile.
51MapInfo Pro 17.0.1 Release Notes
MapInfo Pro 17.0.1 Release Notes

Export to ESRI ASCII Grid
The ESRI ASCII Grid option in the Export tool enables you to export a raster data into an ESRIASCII format raster. You can then use this format for analysis with other software applications. Theoutput raster file will contain header information that defines the properties of the raster such as thecell size, the number of rows and columns, and the coordinates of the origin of the raster. The headerinformation is followed by cell value information delimited by spaces, with each row separated by acarriage return.
When you export a raster into an ESRI ASCII format raster, the file will begin with header informationthat defines the properties of the raster such as the cell size, the number of rows and columns, andthe coordinates of the origin of the raster. The header information is followed by the cell value data.
Sequential Processing
In this release, MapInfo Pro Advanced has enabled the Sequential Processing, in addition to ParallelProcessing.
Earlier, all the operations used to start in parallel processing mode using the entire CPU resources.Now, you can run the tasks in sequential processing mode. This can be configured through theRaster Preferences dialog in the backstage.
When sequential processing is enabled, the Raster engine concentrates fully on one operation andrest of the operations are placed in a queue and automatically started one after another as soon asthe current operation gets completed. However, if you still want to run a particular task in parallel,
you can click the button against the task in the Task Manager. For example, if Create RasterMultifile operation is running on a huge dataset and Convert operation is waiting in the queue, youcan manually start the Convert operation from Task Manager by clicking the Play button. This wayboth the operations can be run in parallel. There is no limitation on the number of operations thatcan be manually started in the parallel mode.
52MapInfo Pro 17.0.1 Release Notes
MapInfo Pro 17.0.1 Release Notes

If you want to run all the operations in parallel as was the case earlier, you can disable sequentialprocessing option by clearing the Run Tasks in Sequential Mode checkbox in the Raster Preferencesdialog under Memory and Performance tab.
When you click Process to start the raster operation process. The task is added to the Task Managerwhere you can monitor the progress. On completion of the operation, if you have selected Displayoutput file check-box in Output Settings, the raster displays in the map window.
Support for Auxiliary File Formats
We have added support for the following auxiliary files:
• PAMDataset - Added support to read classification table information from PAMDataset XMLmetadata. Now you can load and render PAMDataset files as classified fields.
• *.wcf - Warp Control File - Read only support. It means you can perform analysis on the input file,however, you can not save the output in a file.
• .pfr - Added support to read classification information from .pfr files.
Known Issues
• MIRCS-189 - TIFF file (one-bit data) not rendered correctly
The raster is loaded correctly and when viewed at a suitable small scale, displays correctly.However, when viewed at larger scales the raster may not render as expected. At larger scales,the raster data is being acquired from the overview pyramid.
The issue arises because the data type used to store data in the overview pyramid is the sameas the original source data type. In this case that data type is a single bit. Because of the lack ofresolution in this data type, the overview levels lack the expected data fidelity.
53MapInfo Pro 17.0.1 Release Notes
MapInfo Pro 17.0.1 Release Notes

Usually these type of images tend to fade to background as you zoom out because backgroundpixels outnumber foreground pixels in the base level and so the foreground tends to progressivelydrop out. So it can appear that there is no data in the file until you zoom in.
These TIFF images contain 1-bit imagery (0 = white, 1 = black). They mount as "Image" field typein MapInfo Pro 17.0 and the data is loaded properly. If you have PPRC files created by previousversions, you are advised to delete them. One possible workaround is to convert the source rasterto an 8-bit MRR image.
• Temp Folder Size - When performing an operation on a large raster dataset, if the memory in yourtemp folder is not sufficient, the raster operation may not be successful. We recommend you toensure that the MapInfo temp folder has sufficient memory to create large raster.
• Warp Image - The Warp Image feature is still a work in progress and at times it may not producethe desired output.
Progress and Resolution of Outstanding Issues
MapInfo Pro Advanced 17.0
Description and ResolutionIssue Number
Region inspection tool is not giving correct output.
Resolution: Fixed.
MIRCS-89
The Contour tool always creates a TAB file in a non-earth projection ignoring the surface fileprojection present in the input TAB file.
Resolution: Fixed.
MIRCS-92/MIRCS-85
Creating raster using multi-file gridding gets stuck.
Resolution: Fixed.
MIRCS-93
Incorrect values in Rasterize for classes more than 65535.
Resolution: Fixed.
MIRCS-94
If a projection is set for a GeoSoft GRD file and the Contour operation is run, the set projectionis not retained in the output.
Resolution: Fixed.
MIRCS-100
Custom Interval Loading, add ability to use percentile steps in the contour tool.
Resolution: Fixed.
MIRCS-103
54MapInfo Pro 17.0.1 Release Notes
MapInfo Pro 17.0.1 Release Notes

Description and ResolutionIssue Number
Provide an option to specify a value to be used for Null values found during point inspection.
Resolution: Fixed.
MIRCS-108
Export ASCII - Improve the Import tool to parse and accept Unicode characters.
Resolution: Fixed.
MIRCS-111
Cross Section: Export option. The output TAB displays unnecessary underscores in columnnames.
Resolution: Fixed.
MIRCS-110/MIRCS-112
MapInfo Pro stops responding when selecting Cell Value > All and clicking on a cell.
Resolution: Fixed.
MIRCS-116
MapInfo Pro stops responding if Insert Row button is clicked twice in Advanced Color.
Resolution: Fixed.
MIRCS-120
When using Merge or Resample tool, Multi-band raster data do not get the correct band values.
Resolution: Fixed.
MIRCS-121
Create output raster band in same data type as input column’s data type for operations.
Resolution: Fixed.
MIRCS-125
The Create Raster tool has double tooltips for Select Columns.
Resolution: Fixed.
MIRCS-126
Create Raster function is only able to use the default PRJ file and not a Workgroup PRJ file.
Resolution: Fixed.
MIRCS-145
Add more details to documentation for User defined breaks in the Advanced color in MapInfoPro Advanced.
Resolution: Fixed.
MIRCS-146
Advanced color break option table should allow values lesser than statistics.
Resolution: Fixed.
MIRCS-147
55MapInfo Pro 17.0.1 Release Notes
MapInfo Pro 17.0.1 Release Notes
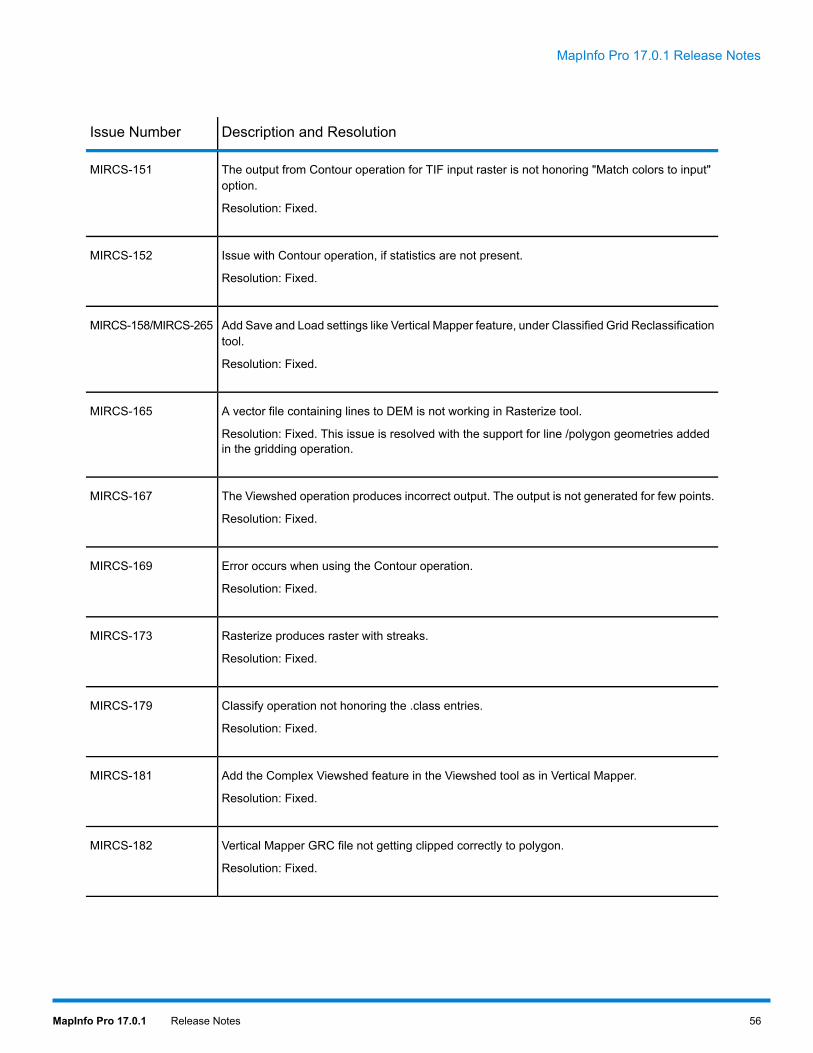
Description and ResolutionIssue Number
The output from Contour operation for TIF input raster is not honoring "Match colors to input"option.
Resolution: Fixed.
MIRCS-151
Issue with Contour operation, if statistics are not present.
Resolution: Fixed.
MIRCS-152
Add Save and Load settings like Vertical Mapper feature, under Classified Grid Reclassificationtool.
Resolution: Fixed.
MIRCS-158/MIRCS-265
A vector file containing lines to DEM is not working in Rasterize tool.
Resolution: Fixed. This issue is resolved with the support for line /polygon geometries addedin the gridding operation.
MIRCS-165
The Viewshed operation produces incorrect output. The output is not generated for few points.
Resolution: Fixed.
MIRCS-167
Error occurs when using the Contour operation.
Resolution: Fixed.
MIRCS-169
Rasterize produces raster with streaks.
Resolution: Fixed.
MIRCS-173
Classify operation not honoring the .class entries.
Resolution: Fixed.
MIRCS-179
Add the Complex Viewshed feature in the Viewshed tool as in Vertical Mapper.
Resolution: Fixed.
MIRCS-181
Vertical Mapper GRC file not getting clipped correctly to polygon.
Resolution: Fixed.
MIRCS-182
56MapInfo Pro 17.0.1 Release Notes
MapInfo Pro 17.0.1 Release Notes

Description and ResolutionIssue Number
When Parameter Unit is set as "Distance", the exact distance value of Maximum Triangle Sizeis not being used in the Create Raster tool.
Resolution: Fixed.
MIRCS-191
Needed a function to Convert a numeric or classified raster to an RGB colour image (e.g. TIF,JPEG, PNG).
Resolution: Fixed. Added a new Export Image tool to address this request.
MIRCS-194
MRR clipping memory error.
Resolution: Fixed.
MIRCS-195
Point Inspection enhancements cater this customer issue.
Resolution: Fixed.
MIRCS-206/MIRCS-129
Advanced Color and color stretch is enabled for non supported file.
Resolution: Fixed.
MIRCS-213
Cross Section browser does not respect restricted decimal precision.
Resolution: Fixed.
MIRCS-249
The Viewshed tool gives incorrect results when “View Point Height” is set to “Constant” in themultipoint TAB file.
Resolution: Fixed.
MIRCS-262
Cross Section profile view resets after export.
Resolution: Fixed.
LI360
MapInfo Pro Advanced 17.0.1
Description and ResolutionIssue Number
Exporting data to CSV - Not picking list separator from locale. The decimal values are exportedwith commas instead of points.
Resolution: Fixed.
MIRCS-246
57MapInfo Pro 17.0.1 Release Notes
MapInfo Pro 17.0.1 Release Notes

Description and ResolutionIssue Number
The Rasterize tool - Incorrect output contents. The issue was due to incorrect polygon reading.
Resolution: Fixed.
MIRCS-255
Raster image opened in MapInfo version 17.0 looked washed out with faded colors.
Resolution: Fixed.
MIRCS-271
Issue with drawing profile using the Interactive Cross Section tool.
Resolution: Fixed. This issue occurred while using MapInfo 17.0 (English) build on non-EnglishMachine. Change the system locale from non-English to English.
MIRCS-284
58MapInfo Pro 17.0.1 Release Notes
MapInfo Pro 17.0.1 Release Notes

3001 Summer Street
Stamford CT 06926-0700
USA
www.pitneybowes.com
© 2018 Pitney Bowes Software Inc.
All rights reserved