mim ctp test lab guide for privileged access management
DESCRIPTION
MIM Lab Guide for PAM featureTRANSCRIPT

Prerelease documentation subject to change
Test Lab Guide: Demonstrating Privileged Access Management using Microsoft Identity ManagerDocument version 3.0 – Last updated April 20, 2015
This material is prerelease documentation and subject to change.
In This GuideThis guide contains instructions for demonstrating Microsoft Identity Manager and Active Directory Domain Services features for privileged access management for administration across forests.
In This Guide................................................................................................................................................1Background..................................................................................................................................................1Principles of Operation................................................................................................................................2Test Lab Overview.......................................................................................................................................3Hardware and Software Requirements.......................................................................................................4Configuring the MIM CTP Test Lab for Privileged Access Management......................................................6Step 1 – Prepare CORP domain controller and member workstation.........................................................7Step 2 – Prepare PRIV domain controller..................................................................................................12Step 3 – Prepare a PAM server..................................................................................................................16Step 4 – Install MIM components on PAM server and workstation..........................................................20Step 5 – Establish trust between PRIV and CORP forests..........................................................................26Step 6 – Transition a group to Privileged Access Management.................................................................28Step 7 – Elevate a user’s access.................................................................................................................30Summary...................................................................................................................................................32Appendix – Diagnosing Issues....................................................................................................................32Document Revision History.......................................................................................................................33
BackgroundIn many sophisticated cyber-attacks against various enterprises worldwide, the attackers often focus their attention on gaining administrative privileges. In particular, they may use “Pass-the-Hash”, spear-phishing, or other techniques to gain the access rights of a user who has administrative privileges across a domain or forest. These attacks are exacerbated because many users have permanent administrative privileges associated with their Active Directory account. If an attacker compromises any one of those user’s accounts and then can log in or run a program as that user, the attacker then has administrative privileges. Organizations concerned about the possibility for insider attack and constraining access with IT outsourcing are also motivated for improving controls or users with highly privileged access. The document Best Practices for Securing Active Directory highlights the need to “Eliminate permanent membership in highly privileged groups” and “Implement controls to grant temporary membership in privileged groups when needed”, and this guide demonstrates how these controls can be achieved using prerelease versions of Active Directory and Microsoft Identity Manager.
1

Prerelease documentation subject to change
The solution architecture for privileged access management (PAM) is based on two concepts:
Control by managing a user’s access, not their credential, and leverage Active Directory groups to provide that access
Extract and isolate administrative accounts from existing Active Directory forests
This solution is primarily focused on domain accounts in which an end user will be authenticating and authorized to act as a role or application administrator of a particular collection of systems or across multiple services which rely upon Kerberos (or ADFS) with Active Directory-hosted security groups. This test lab guide is not intended to cover scenarios for service accounts, local administrator accounts, shared accounts, or non-AD environments.
Principles of OperationThe solution for externalizing administrative accounts is composed of parallel forests. In this guide, there are two forests:
“CORP”: A general-purpose corporate forest that includes one or more domains. Organizations may have multiple “CORP” forests, however this test lab guide for simplicity assumes a single forest with a single domain.
“PRIV”: A dedicated forest for privileged account management, created especially for this PAM scenario. This forest includes one domain. This domain will accommodate privileged groups and accounts which are shadowed from one or more CORP domains.
The Active Directory domain controller for the “PRIV” forest provides privileged user authentication and authorization. Furthermore, MIM enforces access through time-limited memberships of user accounts in security and foreign principal groups. Note that in the versions of the Windows Server referenced in this Test Lab Guide, foreign principal groups are not yet available; this will be provided in future updates to this Guide for the next version of Windows Server.
Microsoft Identity Manager adds new workflow activities and related resources for privileged access “just in time” elevation requests, which communicate directly to the Active Directory domain controller for the “PRIV” forest. It also provides new PowerShell cmdlets for elevation requests.
The MIM solution as configured for PAM includes the following components:
MIM Service – implements business logic for performing identity and access management operations, including privileged account management and elevation request handling.
MIM Portal – a SharePoint-based Portal, hosted by SharePoint 2013, which provides an administrator management and configuration UI.
MIM Service Database – stored in SQL Server 2012 or 2014 – holds identity data and meta-data required for MIM Service.
PAM Monitoring Service and PAM Component Service– two services that manages the lifecycle of privileged accounts and assists the PRIV AD in group membership lifecycle
PowerShell cmdlets– for populating in MIM Service and PRIV AD users and groups corresponding to users and groups in the CORP forest for PAM administrators, and for end users requesting Just-in-time (JIT) use of privileges on an administrative account
2
Prerelease documentation subject to change
PAM REST API and sample portal– for developers integrating MIM in the PAM scenario with custom clients for elevation, without needing to use PowerShell or SOAP. The use of the REST API is demonstrated with a sample web application.
Once installed and configured, each group created by the migration procedure in the PRIV forest is a shadow SIDHistory-based security group (or in a later update with Windows Server vNext, a foreign principal group) mirroring the SID a group in the original CORP forest. Furthermore, when the MIM Service adds members to these groups in the PRIV forest, those memberships will be time limited.
As a result, when a user requests elevation using the PowerShell cmdlets, and their request is approved, the MIM Service will add their account in the PRIV forest to a group in the PRIV forest. When the user logs in with their privileged account, their Kerberos token will contain a Security Identifier (SID) identical to the SID of the group in the CORP forest. Since the CORP forest is configured to trust the PRIV forest, the elevated account being used to access a resource in the CORP forest appears, to a resource checking the Kerberos group memberships, be a member of that resource’s security groups. This is provided via Kerberos cross-forest authentication.
Furthermore, these memberships are time limited so that after a preconfigured interval of time, the user’s administrative account will no longer be part of the group in the PRIV forest. As a result, that account will no longer be usable for accessing additional resources.
For example, assume the CORP forest CONTOSO contains a group “CONTOSO\CorpAdmins” with a member “CONTOSO\Jen”. There is a sensitive resource, for instance a file share, whose access control list refers to that group. Because Jen is a member of that group, when Jen tries to access the file share, then she will have access.
After installing and configuring MIM, a new user is created in the PRIV forest: PRIV.Jen. This user account will not have any privileges by default. Also, a new group will be created in the PRIV forest: PRIV\CONTOSO.CorpAdmins. That group will not have any members by default. Furthermore, that group PRIV\CONTOSO.CorpAdmins has the same SID as CONTOSO\CorpAdmins.
At this point, CONTOSO\Jen can be removed (manually) from the CONTOSO\CorpAdmins group. When Jen requests access from MIM, and is authorized, then the MIM Service adds PRIV.Jen to PRIV\CONTOSO.CorpAdmins. Jen can then gain access to resources such as the file share using her new PRIV.Jen account. Later, that account’s membership in PRIV\CONTOSO.CorpAdmins is automatically terminated. If she is still needing access, Jen must re-request elevation.
Test Lab OverviewThis test lab comprises software which can be installed on four physical or virtual machines, as illustrated in Figure 1. The remainder of these instructions assume the installation is performed on virtual machines which share a common private network (e.g., a virtual LAN with IP addresses numbered 10.0.x.x or 192.168.x.x).
Important: This CTP is not compatible with the database or directory contents from the previous CTP. If you have been previously evaluating MIM for PAM or other scenarios, please back up and archive the virtual machines used for
3
Prerelease documentation subject to change
that test, and start the deployment with new virtual machine images that have not previously be used for MIM scenarios.
Figure 1. MIM Preview PAM Test Lab Architecture
Hardware and Software RequirementsNo hardware requirements beyond those of the underlying software platforms, sufficient memory or disk space and network connectivity is required. This test lab is not intended to demonstrate performance, scalability or high availability, and does not represent a recommended deployment topology for large enterprises or production environments.
Installing from Software Packages
The following software can be downloaded from Connect:
Microsoft Identity Manager vNext prerelease preview for PAM scenarioo Service and Portal: contains the installer for MIM Service and MIM Portal and for
the PAM Scenarioo Add-ins and Extensions: contains the installer for the requestor PowerShell
cmdletso PAMSamplePortal: contains sample web application for the REST API
The following software is required and can be downloaded as Evaluation software:
Windows Server 2012 R2 Windows 8.1 Enterprise SQL Server 2012 Service Pack 1 or SQL Server 2014 (specific installation steps are listed in step 4)
If you do not have licenses for Windows or SQL Server, Windows Server 2012 R2 evaluations can be downloaded from the TechNet Evaluation Center for Windows Server:, Windows 8.1 evaluations can be downloaded from the TechNet Evaluation Center for Windows: http://www.microsoft.com/en-us/evalcenter/evaluate-windows-8-1-enterprise and SQL Server evaluations can be downloaded from the Microsoft Download Center: http://www.microsoft.com/en-us/download/details.aspx?id=29066 .
The following software is required and can be downloaded from Microsoft Download Center:
SharePoint Foundation 2013 with SP1 and its prerequisites (Available as a download from http://www.microsoft.com/en-us/download/details.aspx?id=42039 )
The following links provide more information on the hardware requirements:
4
domain join Windows 8.1
CORPWKSTN:
AD DS (CORP DC)WS 2012 R2 or earlier
CORPDC:
forest trustdomain
join
AD DS (PRIV DC)WS 2012 R2 or later
MIM PAM REST APIMIM Service and PortalSharePoint SQL Server 2014WS 2012 R2
PAMSRV: PRIVDC:

Prerelease documentation subject to change
For CORPDC, prepared in step 1 o Windows Server 2012 R2 requirements:
http://technet.microsoft.com/en-us/library/dn303418.aspx o (Earlier versions of Windows Server can be used for CORPDC if desired)
For CORPWKSTN, prepared in step 1o Windows 8.1 requirements:
http://windows.microsoft.com/en-us/windows-8/system-requirements For PRIVDC, prepared in step 2
o Windows Server 2012 R2 requirements:http://technet.microsoft.com/en-us/library/dn303418.aspx
For PAMSRV, prepared in step 3o Windows Server 2012 R2 requirements:
http://technet.microsoft.com/en-us/library/dn303418.aspxo SQL Server 2012 and SQL Server 2014 requirements:
http://msdn.microsoft.com/en-us/library/ms143506(SQL.110).aspx http://msdn.microsoft.com/en-us/library/ms143506.aspx
o SharePoint 2013 requirements:http://technet.microsoft.com/en-us/library/cc262485(v=office.15).aspx
Using preconfigured Virtual Machines
If you are using preconfigured virtual machines, the following steps will guide you through importing the VMs into a Hyper-V host and create a virtual switch to be used for the PAM environment. If you are installing software onto new virtual machines, then skip this section.
1. Download the PAM VMs from connect.microsoft.com to the Hyper-V Server where you would like to test Privileged Access Management.
2. Create a folder in the root directory called MIM. The drive where this folder will be located must have a minimum of 100 GB free disk space.
3. Copy all zip files to this folder.4. Unpack CORPDC.zip, CORPWKSTN.zip, PRIVDC.zip and PAMSRV.ZIP to the folder created above,
e.g. D:\MIM (not to C:\MIM\CORPDC).5. Ensure that you now have 4 folders under the MIM folder: CORPDC, CORPWKSTN, PRIVDC and
PAMSRV. The folder structure looks like this:
5

Prerelease documentation subject to change
6. (optional) Delete the 5 zip files to free up space.7. Open Hyper-V Management Console.8. Click Virtual Switch Manager.9. Select “Private” and click “Create Virtual Switch.10. Name the Virtual Switch “Private”, Click Ok.11. Click “Import Virtual Machine...”12. Go to the location where the PAMVMs files were unpacked.13. Select CORPDC and select this folder.14. Click Next and select CORPDC and Click Next.15. Select Default and select Next.16. Click Finish to Import the VM.17. Repeat step 11 and 16 and import the other VMs (CORPWKSTN, PRIVDC, and PAMSRV)18. In the Hyper-v Management Console, Start the VMs in the following order with 2 minutes
between starting the VMs.a. CORPDCb. CORPWKSTNc. PRIVDCd. PAMSRV
19. Then continue the configuration with the test lab guide documentation included with those virtual machines. Note that in these environments, two domain user accounts have already been established, in the CORP CONTOSO and PRIV forests. The administrator passwords are “Pass@word1”.
Configuring the MIM CTP Test Lab for Privileged Access ManagementThere are seven steps to complete when setting up the environment for cross-forest access, installing and configuring Active Directory and Microsoft Identity Manager, and demonstrating a just-in-time access request.
If you are using preconfigured virtual machines, you can skip to step 6 of this guide.
6

Prerelease documentation subject to change
1. Prepare CORPDC server as a domain controller and CORPWKSTN as a member workstation.2. Prepare PRIVDC server as a domain controller.3. Prepare PAMSRV server in the PRIV forest.4. Install MIM components on PAMSRV and the cmdlets on a CONTOSO forest member
workstation, and prepare them for Privileged Access Management.5. Establish trust between PRIV and CONTOSO forests. 6. Preparing privileged security groups with access to protected resources and member accounts
for Just-in-time Privileged Access Management.7. Demonstrate requesting, receiving, and making use of privileged elevated access to a protected
resource.
The following sections provide details about how to perform these tasks.
Step 1 – Prepare CORP domain controller and member workstationIn this step, you will create a domain controller and a member workstation in a new domain in a new forest. This forest will simulate an existing forest that has resources to be managed. The resource to be protected for this scenario will be represented by a file share.
1. Prepare four virtual machines with separate drives that are connected to each other on a shared virtual network. These virtual machines can be hosted by Windows 8, Windows Server 2012 R2 or other operating system platforms. The drive where the virtual machine disk images will be stored must have a minimum of 100 GB of free disk space to hold all the virtual machines.
2. On one virtual machine, install Windows Server 2012 R2 to create a computer “CORPDC”.a. Specify Windows Server 2012 R2 Standard (Server with a GUI) x64.
Figure 2. Windows Server 2012 R2 Installation Options
b. Review and accept the license terms.
7
Prerelease documentation subject to change
c. Since the disk will be empty, select Custom: Install Windows only and use the uninitialized disk space.
3. Log into that new computer as its administrator. Using Control Panel, set its name to CORPDC, and give it a static IP address on the virtual network. This will require a server restart.
4. After the server has restarted, login as an administrator. Using Control Panel, configure the computer to check for updates, and install any updates needed. This may require a server restart.
5. After the server has restarted, login as an administrator. Using PowerShell, add the Active Directory Domain Services (AD DS), DNS Server and File Server (part of the File and Storage Services section) roles, and promote this server to a domain controller of a new forest “contoso.local”, as described below:
a. While logged in as Administrator, launch PowerShell.b. Type the following commands.
import-module ServerManager
Add-WindowsFeature AD-Domain-Services,DNS,FS-FileServer –restart –IncludeAllSubFeature -IncludeManagementTools
Install-ADDSForest –DomainMode Win2008R2 –ForestMode Win2008R2 –DomainName contoso.local –DomainNetbiosName contoso –Force -NoDnsOnNetwork
This will prompt for a Safe Mode Administrator Password to use. Note that warning messages for DNS delegation and cryptography settings will appear. These are normal.
c. After the forest creation is complete, sign out and the server will restart automatically.
6. After the server restarts, login to CORPDC as an administrator of the domain, typically the user CONTOSO\Administrator, which will have the same password as specified when installing Windows on CORPDC.
7. Create new users and groups, including a group named “CorpAdmins”, a user named “Jen”, as well as a group needed for auditing purposes by AD itself. The name of the group must be is the NetBIOS domain name followed by three dollar signs: “CONTOSO$$$”. The group scope must be “Domain local”, and the group type “Security”. This is necessary to enable groups to be created in the PRIV forest in a later step.
a. Launch PowerShell.b. Type the following commands.
import-module activedirectory
New-ADGroup –name CorpAdmins –GroupCategory Security –GroupScope Global –SamAccountName CorpAdmins
New-ADUser –SamAccountName Jen –name Jen
Add-ADGroupMember –identity CorpAdmins –Members Jen
8

Prerelease documentation subject to change
$jp = ConvertTo-SecureString "Pass@word1" –asplaintext –force
Set-ADAccountPassword –identity Jen –NewPassword $jp
Set-ADUser –identity Jen –Enabled 1 -DisplayName "Jen"
New-ADGroup –name 'CONTOSO$$$' –GroupCategory Security –GroupScope DomainLocal –SamAccountName 'CONTOSO$$$'
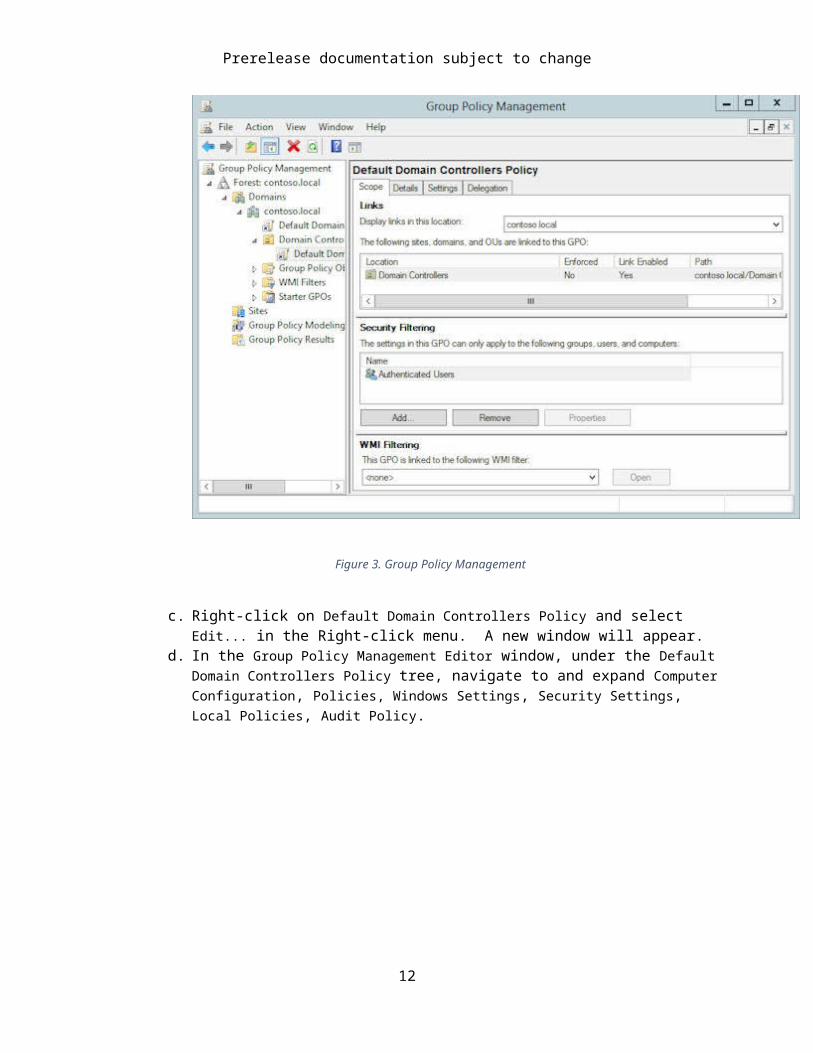
8. Configure auditing. a. Go to Start, Administrative Tools, and launch Group Policy Management.b. Navigate to Forest: contoso.local, Domains, contoso.local, Domain
Controllers, Default Domain Controllers Policy. An informational message will appear.
Figure 3. Group Policy Management
9

Prerelease documentation subject to change
c. Right-click on Default Domain Controllers Policy and select Edit... in the Right-click menu. A new window will appear.
d. In the Group Policy Management Editor window, under the Default Domain Controllers Policy tree, navigate to and expand Computer Configuration, Policies, Windows Settings, Security Settings, Local Policies, Audit Policy.
Figure 4. Group Policy Management Editor
e. In the details pane, right click on Audit account management and select Properties in the right-click menu. Click Define these policy settings, put a checkbox on Success, put a checkbox on Failure, click Apply and OK.
f. In the details pane, right click on Audit directory service access and select Properties in the right-click menu. Click Define these policy settings, put a checkbox on Success, put a checkbox on Failure, click Apply and OK.
10

Prerelease documentation subject to change
Figure 5. Group Policy Management Editor – Policy Settings
9. Close the Group Policy Management Editor window, the Group Policy Management window. Then apply the audit settings by launching a PowerShell window and typing:
gpupdate /force /target:computer
The message “Computer Policy update has completed successfully.” should appear after a few minutes.
10. Configure registry settings that will be needed for SID History migration, which will be used for privileged access management group creation, and restart the domain controller.
a. Launch PowerShell.b. Type the following commands that will configure the source domain to permit remote
procedure call (RPC) access to the security accounts manager (SAM) database.
New-ItemProperty –Path HKLM:SYSTEM\CurrentControlSet\Control\Lsa –Name TcpipClientSupport –PropertyType DWORD –Value 1
Restart-Computer
This will restart CORPDC. For further information on this registry setting, see: http://support.microsoft.com/kb/322970
11. On another new virtual machine with no software installed, install Windows 8.1 Enterprise to make a computer “CORPWKSTN”.
a. Use Express settings during installation.b. Note that the installation may not be able to connect to the Internet. Click to Create a
local account. Specify a different username; do not use “Administrator” or “Jen”.12. Using the Control Panel, give this computer a static IP address on the virtual network, and set
the interface’s preferred DNS server to be that of the CORPDC server.13. Using the Control Panel, domain join the CORPWKSTN computer to the contoso.local
domain. This will require providing the Contoso domain administrator credentials. Then when this completes, restart the computer CORPWKSTN.
14. After the computer restarts, click the “Switch user” icon, click on “Other user”. Ensure that the user CONTOSO\Jen can log into CORPWKSTN.
15. On CORPWKSTN, create and share a new folder named “CorpFS” with the “CorpAdmins” group.a. On the Start menu, type PowerShell and select to Run as Administrator.b. When the window opens, type the following commands.
mkdir c:\corpfs
New-SMBShare –Name corpfs –Path c:\corpfs –ChangeAccess CorpAdmins
$acl = Get-Acl c:\corpfs
$car = New-Object System.Security.AccessControl.FileSystemAccessRule( "CONTOSO\CorpAdmins", "FullControl", "Allow")
11
Prerelease documentation subject to change
$acl.SetAccessRule($car)
Set-Acl c:\corpfs $acl
Step 2 – Prepare PRIV domain controller In this step you will create a new domain for a new privileged access management forest.
1. On another new virtual machine with no software installed, install Windows Server 2012 R2 to make a computer “PRIVDC”.
a. Select to perform a custom (not upgrade) install of Windows Server.b. When installing, specify Windows Server 2012 R2 Standard (Server with a GUI) x64; do
not select Data Center or Server Core.
Figure 6. Windows Server 2012 R2 Installation Options
c. Review and accept the license terms.d. Since the disk will be empty, select Custom: Install Windows only and use the
uninitialized disk space.
2. After installing the operating system version, log in to this new computer as the new administrator. Use Control Panel to set the computer name to “PRIVDC”, give it a static IP address on the virtual network, and configure the DNS server to be that of the domain controller installed in the previous step. This will require a server restart.
3. After the server has restarted, login as the administrator. Using Control Panel, configure the computer to check for updates, and install any updates needed. This may require a server restart.
4. Add the Active Directory Domain Services (AD DS) and DNS Server roles, and promote the server to a domain controller of a new forest.
12

Prerelease documentation subject to change
a. While logged in as Administrator, launch PowerShell.b. Type the following commands.
import-module ServerManager
Install-WindowsFeature AD-Domain-Services,DNS –restart –IncludeAllSubFeature -IncludeManagementTools
$ca= get-credential
Install-ADDSForest –DomainMode 6 –ForestMode 6 –DomainName priv.contoso.local –DomainNetbiosName priv –Force –CreateDNSDelegation –DNSDelegationCredential $ca
When the popup appears, provide the credentials for the CORP forest administrator (e.g., the username CONTOSO\Administrator and the corresponding password from step 1). Then this will prompt within the PowerShell window for a Safe Mode Administrator Password to use: enter a new password twice. Note that warning messages for DNS delegation and cryptography settings will appear; these are normal.
c. After the forest creation is complete, the server will restart automatically.
5. Create the user and service accounts, which will be needed during MIM Service and Portal setup, in Users container of the priv.contoso.local domain.
a. After restarting, log on to PRIVDC as the domain administrator (PRIV\Administrator).
b. Type the following command to update the DC from the group policy settings.
import-module activedirectory
$sp = ConvertTo-SecureString "Pass@word1" –asplaintext –force
New-ADUser –SamAccountName MIMMA –name MIMMA
Set-ADAccountPassword –identity MIMMA –NewPassword $sp
Set-ADUser –identity MIMMA –Enabled 1 –PasswordNeverExpires 1
New-ADUser –SamAccountName MIMMonitor –name MIMMonitor -DisplayName MIMMonitor
Set-ADAccountPassword –identity MIMMonitor –NewPassword $sp
Set-ADUser –identity MIMMonitor –Enabled 1 –PasswordNeverExpires 1
New-ADUser –SamAccountName MIMComponent –name MIMComponent -DisplayName MIMComponent
Set-ADAccountPassword –identity MIMComponent –NewPassword $sp
Set-ADUser –identity MIMComponent –Enabled 1 –PasswordNeverExpires 1
New-ADUser –SamAccountName MIMSync –name MIMSync
13

Prerelease documentation subject to change
Set-ADAccountPassword –identity MIMSync –NewPassword $sp
Set-ADUser –identity MIMSync –Enabled 1 –PasswordNeverExpires 1
New-ADUser –SamAccountName MIMService –name MIMService
Set-ADAccountPassword –identity MIMService –NewPassword $sp
Set-ADUser –identity MIMService –Enabled 1 –PasswordNeverExpires 1
New-ADUser –SamAccountName SharePoint –name SharePoint
Set-ADAccountPassword –identity SharePoint –NewPassword $sp
Set-ADUser –identity SharePoint –Enabled 1 –PasswordNeverExpires 1
New-ADUser –SamAccountName SqlServer –name SqlServer
Set-ADAccountPassword –identity SqlServer –NewPassword $sp
Set-ADUser –identity SqlServer –Enabled 1 –PasswordNeverExpires 1
New-ADUser –SamAccountName BackupAdmin –name BackupAdmin
Set-ADAccountPassword –identity BackupAdmin –NewPassword $sp
Set-ADUser –identity BackupAdmin –Enabled 1
Add-ADGroupMember "Domain Admins" SharePoint
Add-ADGroupMember "Domain Admins" MIMService
6. Configure auditing and logon rights.a. Ensure you are logged on as the domain administrator (such as PRIV\
Administrator).b. Go to Start, Administrative Tools, Group Policy Management.c. Navigate to Forest: priv.contoso.local, Domains, priv.contoso.local,
Domain Controllers, Default Domain Controllers Policy. Note that a warning message will appear.
d. Right-click on Default Domain Controllers Policy and select Edit in the right-click menu.
e. In the Group Policy Management Editor console tree, navigate to Computer Configuration, Policies, Windows Settings, Security Settings, Local Policies, Audit Policy.
f. In the details pane, right click on Audit account management and select Properties in the right-click menu. Click Define these policy settings, put a checkbox on Success, put a checkbox on Failure, click Apply and OK.
14
Prerelease documentation subject to change
g. In the details pane, right click on Audit directory service access and select Properties in the right-click menu. Click Define these policy settings, put a checkbox on Success, put a checkbox on Failure, click Apply and OK.
h. Close the Group Policy Management Editor window.i. In the Group Policy Management window, select Default Domain Policy, right click
and select Edit. The Group Policy Management Editor window will appear.j. Expand Computer Configuration, Policies, Windows Settings, Security
Settings, Local Policies and select User Rights Assignment.k. On the details pane, right click on Deny log on as a batch job, and select
Properties.l. Click the Define these Policies Settings checkbox, click Add User or Group, and in the
User and group names, type priv\mimmonitor; priv\MIMService; priv\mimcomponent and click OK.
m. Click OK to close the Deny log on as a batch job Properties window.n. On the details pane, right click on Deny log on through Remote Desktop
Services, and select Properties.o. Click the Define these Policies Settings checkbox, click Add User or Group, and in the
User and group names, type priv\mimmonitor; priv\MIMService; priv\mimcomponent and click OK.
p. Click OK to close the Deny log on through Remote Desktop Services Properties window.
q. Close the Group Policy Management Editor window and the Group Policy Management window.
7. Launch a PowerShell window as administrator and type the following command to update the DC from the group policy settings.
gpupdate /force /target:computer
After a minute, it will complete with the message “Computer Policy update has completed successfully.”
8. Configure registry settings needed for SID History migration. Launch PowerShell and type the following commands that will configure the source domain to permit remote procedure call (RPC) access to the security accounts manager (SAM) database.
New-ItemProperty –Path HKLM:SYSTEM\CurrentControlSet\Control\Lsa –Name TcpipClientSupport –PropertyType DWORD –Value 1
9. Using PowerShell on PRIVDC, configure DNS name forwarding. Specify contoso.local for the DNS domain, and the CORPDC computer’s virtual network IP address as an IP address of the master server. Launch PowerShell and type the following command, changing the IP address from "10.1.1.31" to that of the CORPDC computer’s virtual network IP address.
Add-DnsServerConditionalForwarderZone –name "contoso.local" –masterservers
15

Prerelease documentation subject to change
10.1.1.31
10. Using PowerShell, add SPNs to enable Kerberos authentication to be used by SharePoint and PAM REST API and the MIM Service (SharePoint will be configured in Step 3 below).
setspn -S http/pamsrv.priv.contoso.local PRIV\SharePoint
setspn -S http/pamsrv PRIV\SharePoint
setspn -S FIMService/pamsrv.priv.contoso.local PRIV\MIMService
11. Configure delegation. a. Launch Active Directory Users and Computers.b. Right click on the domain priv.contoso.local and select Delegate Control.c. On the Selected users and groups tab, click Add.d. On the Select Users, Computers, or Groups popup, type mimcomponent; mimmonitor
and click Check Names. After the names are underlined, click OK, then click Next.e. In the list of common tasks, select "Create, delete, and manage user accounts" and
"Modify the membership of a group", then click Next and click Finish.f. Close Active Directory Users and Computers.
12. Restart the PRIVDC server so that these changes take effect.
Step 3 – Prepare a PAM server 1. On a third virtual machine, install Windows Server 2012 R2, specifically Windows Server 2012 R2
Standard (Server with a GUI) x64, to make a new computer “PAMSRV”. Note that since SQL Server and SharePoint 2013 will be installed on this computer, it requires a minimum of 8GB of RAM.
a. Specify Windows Server 2012 R2 Standard (Server with a GUI) x64.
16

Prerelease documentation subject to change
Figure 7. Windows Server 2012 R2 Installation Options
b. Review and accept the license terms.c. Since the disk will be empty, select Custom: Install Windows only and use the
uninitialized disk space.
2. Log into that new computer as its administrator. Using Control Panel, give it a static IP address on the virtual network, configure that network interface to send DNS queries to the IP address of PRIVDC and set the computer name to PAMSRV. This will require a server restart.
3. If the virtual network does not provide Internet connectivity, add an additional network interface to the computer that provides a connection to the Internet. This will be needed for SharePoint installation, and can be disabled after this step is completed.
4. After the server has restarted, login as the administrator. Using Control Panel, configure the computer to check for updates, and install any updates needed. This may require a server restart.
5. After the server restarts, login as Administrator, open the Control Panel and join PAMSRV to the PRIV domain (priv.contoso.local). This will require providing the username and credentials of a PRIV domain administrator such as PRIV\Administrator. After the welcome message appears, close the dialog box and restart this server.
6. Start the computer PAMSRV and login to it as a PRIV domain administrator such as PRIV\Administrator.
7. Add the Web Server (IIS) and Application Server roles, the .NET Framework 3.5 Features, the Active Directory module for Windows PowerShell, and other features required by SharePoint.
a. While logged in as Administrator, launch PowerShell.b. Type the following commands. Note that it may be necessary to specify a different
location for the source files for .NET Framework 3.5 features. These features are typically not present when Windows Server installs, but are available in the side-by-side (SxS) folder on the OS install disk sources folder, e.g., “d:\Sources\SxS\”.
import-module ServerManager
17

Prerelease documentation subject to change
Install-WindowsFeature Web-WebServer, Net-Framework-Features,rsat-ad-powershell,Web-Mgmt-Tools,Application-Server,Windows-Identity-Foundation,Server-Media-Foundation,Xps-Viewer –includeallsubfeature -restart -source d:\sources\SxS
8. Configure the server security policy to allow the newly-created accounts to run as services.a. Launch the Local Security Policy program.b. Navigate to Local Policies, User Rights Assignment.c. On the details pane, right click on Log on as a service, and select Properties.d. Click Add User or Group, and in the User and group names, type priv\mimmonitor;
priv\MIMService; priv\SharePoint; priv\mimcomponent; priv\SqlServer, click Check Names, and click OK.
e. Click OK to close the Log on as a service Properties window.f. On the details pane, right click on Deny access to this computer from the
network, and select Properties.g. Click Add User or Group, and in the User and group names, type priv\mimmonitor;
priv\MIMService; priv\mimcomponent and click OK.h. Click OK to close the Deny access to this computer from the network
Properties window.i. On the details pane, right click on Deny log on locally, and select Properties.j. Click Add User or Group, and in the User and group names, type priv\mimmonitor;
priv\MIMService; priv\mimcomponent and click OK.k. Click OK to close the Deny log on locally Properties window.l. Close the Local Security Policy window.
9. Change the IIS configuration to allow applications to use Windows Authentication mode.a. Open a PowerShell window.b. Stop IIS and unlock the application host settings using these commands
iisreset /STOP
C:\Windows\System32\inetsrv\appcmd.exe unlock config /section:windowsAuthentication -commit:apphost
iisreset /START
c. Alternatively, using a text editor such as Notepad, open this file:C:\Windows\System32\inetsrv\config\applicationHost.config and on line 82 of that file, replace the tag value of overrideModeDefault:
<section name="windowsAuthentication" overrideModeDefault="Deny" />
with
<section name="windowsAuthentication" overrideModeDefault="Allow" />
Then save the file, and restart IIS with the command iisreset /START10. Install SQL Server 2012 Service Pack 1 or later, or SQL Server 2014. The following steps assume
SQL 2014.a. Launch PowerShell as a domain administrator.b. Change to the directory where the SQL Server setup program is located.
18

Prerelease documentation subject to change
c. Type the following commands.
.\setup.exe /Q /IACCEPTSQLSERVERLICENSETERMS /ACTION=install /FEATURES=SQL,SSMS /INSTANCENAME=MSSQLSERVER /SQLSVCACCOUNT="PRIV\SqlServer" /SQLSVCPASSWORD="Pass@word1" /AGTSVCSTARTUPTYPE=Automatic /AGTSVCACCOUNT="NT AUTHORITY\Network Service" /SQLSYSADMINACCOUNTS="PRIV\Administrator"
11. Using the SharePoint Foundation 2013 with SP1 installer, install SharePoint’s software prerequisites on PAMSRV. Note that this will cause the server to restart, and will also require Internet connectivity for this computer for the installer to download its prerequisites.
a. Launch PowerShell as a domain administrator.b. Change to the directory where SharePoint was unpacked.c. Type the following command.
.\prerequisiteinstaller.exe
12. After the SharePoint prerequisites are installed, install SharePoint Foundation 2013 with SP1. a. Launch PowerShell as a domain administrator.b. Change to the directory where SharePoint was unpacked.c. Type the following command.
.\setup.exe
d. Select the complete server type.e. After the install completes, select to run the wizard.
13. Run the SharePoint Products Configuration Wizard to configure SharePoint.a. On the "Connect to a server farm" tab, change to create a new server farm.b. Specify PAMSRV as the database server for the configuration database, and PRIV\
SharePoint as the database access account for SharePoint to use. c. Specify a password as the farm security passphrase (it will not be used later in this lab
environment).d. For this test lab environment, accept the rest of the SharePoint configuration wizard
default settings.e. When the configuration wizard completes configuration task 10 of 10, click Finish and a
web browser will open. f. In the Internet Explorer popup, authenticate as PRIV\Administrator (or the
equivalent domain administrator account) to proceed. g. Start the wizard (within the web app) to configure the SharePoint farm. h. Select to use the existing managed account (PRIV\SharePoint), and click Next.i. Once the creating a site collection window appears, click Skip. Then click Finish.
14. After the wizards complete, use PowerShell to create a SharePoint Foundation 2013 Web Application to host the MIM Portal. Note that as this is a test lab environment, SSL will not be enabled.
a. Launch SharePoint 2013 Management Shell and run the following PowerShell script:
19

Prerelease documentation subject to change
$dbManagedAccount = Get-SPManagedAccount -Identity PRIV\SharePoint
New-SpWebApplication -Name "MIM Portal" -ApplicationPool "MIMAppPool" -ApplicationPoolAccount $dbManagedAccount -AuthenticationMethod "Kerberos" -Port 82 -URL http://PAMSRV.priv.contoso.local
Note that a warning message will appear that Windows Classic authentication method is being used, and it may take several minutes for the final command to return. When completed, the output will indicate the URL of the new portal. Keep the SharePoint 2013 Management Shell window open as it will be needed in a subsequent task.
15. Next, create a SharePoint Site Collection associated with that web application to host the MIM Portal.
a. Launch SharePoint 2013 Management Shell, if not already open, and run the following PowerShell script:
$t = Get-SPWebTemplate -compatibilityLevel 14 -Identity "STS#1"
$w = Get-SPWebApplication http://pamsrv.priv.contoso.local:82
New-SPSite -Url $w.Url -Template $t -OwnerAlias PRIV\Administrator -CompatibilityLevel 14 -Name "MIM Portal" -SecondaryOwnerAlias PRIV\BackupAdmin
$s = SpSite($w.Url)
$s.AllowSelfServiceUpgrade = $false
$s.CompatibilityLevel
Verify that the result of the CompatibilityLevel variable is “14”. (See http://technet.microsoft.com/en-us/library/jj863242(v=ws.10).aspx for more information). If the result is “15”, then the site collection was not created for the 2010 experience version; delete the site collection and recreate it.
16. Disable SharePoint server-side viewstate, and the SharePoint task "Health Analysis Job (Hourly, Microsoft SharePoint Foundation Timer, All Servers)", by running the following PowerShell commands in the SharePoint 2013 Management Shell:
$contentService = [Microsoft.SharePoint.Administration.SPWebService]::ContentService;
$contentService.ViewStateOnServer = $false;
$contentService.Update();
Get-SPTimerJob hourly-all-sptimerservice-health-analysis-job | disable-SPTimerJob
20

Prerelease documentation subject to change
17. Open a new web browser tab, navigate to http://pamsrv.priv.contoso.local:82/ and login as PRIV\Administrator. An empty SharePoint site named “MIM Portal” will be shown. Then in Internet Explorer, open Internet Options, change to the Security tab, select Local intranet, and add the web site. (Note that if sign in fails, the Kerberos SPNs created earlier in step 2 might need to be updated.)
18. Using Services (located in Administrative Tools), start the SharePoint Administration service, if not already running.
Step 4 – Install MIM components on PAM server and workstation
1. On PAMSRV, log in as PRIV\Administrator to be able to install MIM Service and Portal and the sample portal web application. (Note that you must be a domain administrator; if you are not running the following commands as a domain administrator, the subsequent trust validation checks in the next step will not be completed.)
2. Download the Service and Portal archive from the connect site and unpack from the archive the folder Service and Portal and its sub-folders to a new folder.
3. Run the Service and Portal install program. Follow the guidelines of the installer and complete the installation.
a. When selecting component features, it is necessary to include the following: MIM Service (including Privileged Access Management, not including MIM
Reporting) MIM Portal
b. When configuring common services and the MIM database connection, specify “Create a new database”.
c. When configuring a mail server connection, set the mail server to “corpdc.contoso.local” and uncheck the “Use SSL” and “Mail Server is Exchange Server 2007 or Exchange Server 2010” checkboxes.
21

Prerelease documentation subject to change
d. Specify to generate a new self-signed certificate.e. Specify the Service Account Name as “MIMService”, and the Service Account Password
as “Pass@word1” (the password specified in step 2 above), Service Account Domain as “PRIV” and the Service Email Account as “[email protected]”.
f. Accept the defaults for the synchronization server hostname and specify the MIM Management Agent account as “PRIV\mimma”. Note that a warning message will appear that the MIM synchronization service does not exist. This is OK, since the MIM synchronization service is not used in this TLG scenario.
g. Specify “pamsrv” as MIM Service server address.h. Specify "http://pamsrv.priv.contoso.local:82" as the SharePoint site
collection URL. i. Leave the registration portal URL blank.j. Select the checkbox to Open ports 5725 and 5726 in the firewall, and the checkbox to
grant all authenticated users access to the MIM portal site.k. Leave the PAM REST API hostname empty , and specify 8086 as the port number (as
described in the screenshot below):
l. Configure the MIM PAM REST API account to use the same account as SharePoint (as the MIM Portal is co-located on this server). Specify the account name as “SharePoint”, and the Application Pool Account Password as “Pass@word1” (the password specified in step 2 above), and the Application Pool Account Domain as “PRIV”.
22

Prerelease documentation subject to change
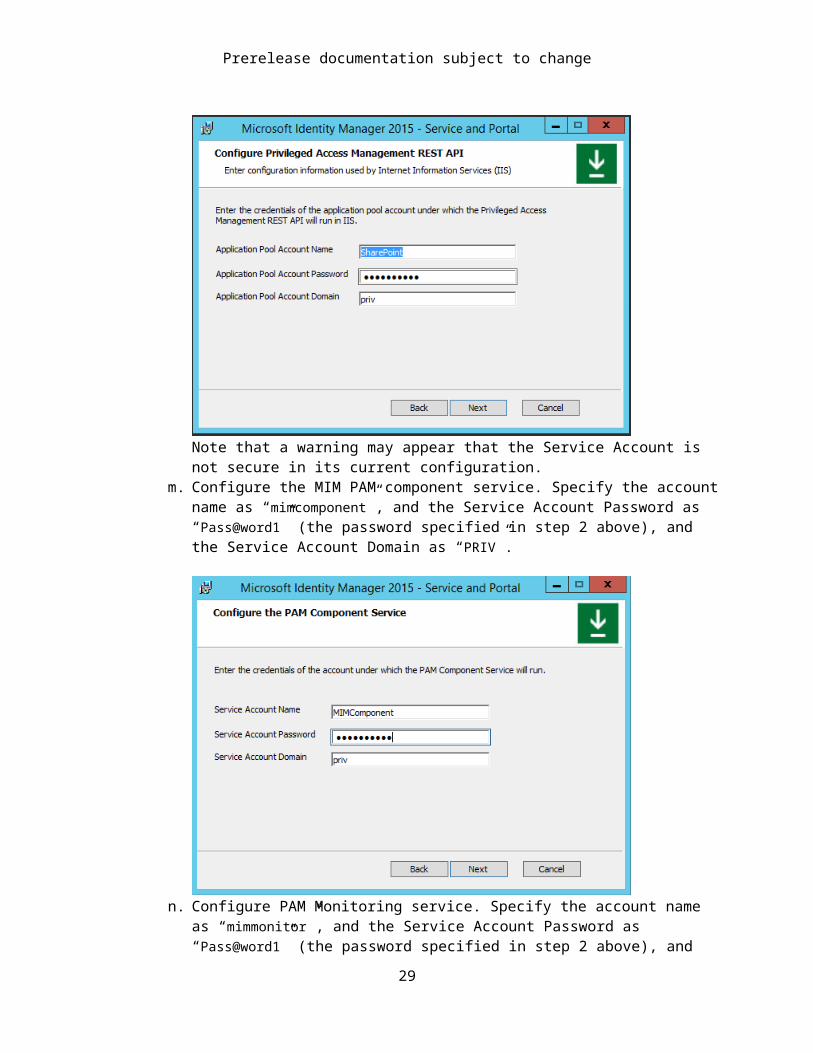
Note that a warning may appear that the Service Account is not secure in its current configuration.
m. Configure the MIM PAM component service. Specify the account name as “mimcomponent”, and the Service Account Password as “Pass@word1” (the password specified in step 2 above), and the Service Account Domain as “PRIV”.
n. Configure PAM Monitoring service. Specify the account name as “mimmonitor”, and the Service Account Password as “Pass@word1” (the password specified in step 2 above), and the Service Account Domain as “PRIV”.
23
Prerelease documentation subject to change
o. On the page Enter Information for MIM Password Portals, leave checkboxes empty and continue. Then click Next to continue the installation.
4. After installation completes, the server will reboot, then verify that the MIM Portal is active and enable users to view their own object resource in MIM.
a. After PAMSRV reboots, log on as PRIV\Administrator.b. Launch Internet Explorer and connect to the MIM Portal on
“http://pamsrv.priv.contoso.local:82/identitymanagement”. Note there may be a short delay the first time this page is located.
If necessary, authenticate as PRIV\Administrator to Internet Explorer.
c. In Internet Explorer, open the Internet Options, change to the security tab, and add the site to the “Local intranet” zone if it is not already there. Close the Internet Options dialog.
d. Using Internet Explorer to view MIM Portal, click on “Management Policy Rules”. a. Search for the management policy rule User management: Users can read
attributes of their own. b. Select this management policy rule, uncheck “Policy is disabled”, click OK and
then click Submit.e.
5. Verify that the firewall allows incoming connections to TCP port 5725, 5726, 8086 and 8090.a. Launch Windows Firewall with Advanced Security (located in Administrative Tools)b. Click on Inbound Rules.c. Verify that two rules “Forefront Identity Manager Service (STS)” and
“Forefront Identity Manager Service (Webservice)” are listed.d. Click New rule, select Port, select TCP, and type the specific local ports 8086, 8090.
Click through the wizard accepting the defaults, give the rule a name and click Finish. e. After completing the wizard and close the Windows Firewall application.
24

Prerelease documentation subject to change
f. Launch Control Panel.g. Click on "View network status and tasks", located under "Network and Internet".h. Verify that there is an active Network which is listed as being “priv.contoso.local”
as a “Domain network”.i. Close Control Panel.
6. Configure the PAM monitoring and component service accounts to integrate with the FIM service database. This can be done using the following PowerShell commands:
[System.Reflection.Assembly]::LoadWithPartialName( 'Microsoft.SqlServer.SMO')
$uc = New-Object -TypeName Microsoft.SqlServer.Management.Smo.Login -ArgumentList "localhost","priv\mimcomponent"
$uc.LoginType = 'WindowsUser'
$uc.Create()
$um = New-Object -TypeName Microsoft.SqlServer.Management.Smo.Login -ArgumentList "localhost","priv\mimmonitor"
$um.LoginType = 'WindowsUser'
$um.Create()
$s = New-Object ('Microsoft.SqlServer.Management.Smo.Server') "localhost"
$d = $s.Databases['FIMService']
$uc2 = New-Object ('Microsoft.SqlServer.Management.Smo.User') ($d, "priv\mimcomponent")
$uc2.Login = "priv\mimcomponent"
$uc2.Create()
$um2 = New-Object ('Microsoft.SqlServer.Management.Smo.User') ($d, "priv\mimmonitor")
$um2.Login = "priv\mimmonitor"
$um2.Create()
$d.Roles['db_datareader'].AddMember("priv\mimcomponent")
$d.Roles['db_datareader'].AddMember("priv\mimmonitor")
7. Download the sample web application archive from the connect site, and unpack from the archive the contents of the folder PAMsamplePortal into a new folder Privileged Access Management Portal within the folder C:\Program Files\Microsoft Forefront Identity Manager\2010.
8. Install and configure the sample web application for the MIM PAM REST API.
25
Prerelease documentation subject to change
a. Create new web site in IIS with a site name of "MIM Privileged Access Management Example Portal", physical path "C:\Program Files\Microsoft Forefront Identity Manager\2010\Privileged Access Management Portal" and port 8090. This can be done using the following PowerShell command:
New-WebSite -Name "MIM Privileged Access Management Example Portal" -Port 8090 -PhysicalPath "C:\Program Files\Microsoft Forefront Identity Manager\2010\Privileged Access Management Portal\"
b. Enable the sample web application to be able to redirect users to the MIM PAM REST API. Using a text editor such as Notepad, edit the file “C:\Program Files\Microsoft Forefront Identity Manager\2010\Privileged Access Management REST API\web.config”. In the <system.webServer> section, add the following lines:
<httpProtocol>
<customHeaders> <add name="Access-Control-Allow-Credentials" value="true" />
<add name="Access-Control-Allow-Headers" value="content-type" />
<add name="Access-Control-Allow-Origin" value="http://pamsrv:8090" />
</customHeaders> </httpProtocol>
c. Configure the sample web application. Using a text editor such as Notepad, edit the file "C:\Program Files\Microsoft Forefront Identity Manager\2010\Privileged Access Management Portal\js\utils.js". In that file, set the value of pamRespApiUrl to "http://pamsrv.priv.contoso.local:8086/api/pamresources/".
d. Restart IIS so these changes take effect.
iisreset
e. (Optional) verify that the user can authenticate to the REST API. Open a web browser, as the administrator on pamsrv. Navigate to the web site URL http://pamsrv.priv.contoso.local:8086/api/pamresources/pamroles/ authenticate (if needed), and ensure that a download occurs.
9. Install the MIM PAM requestor cmdlets on the workstation.a. Log into CORPWKSTN as an administrator.b. Download the Add-ins and extensions to the CORPWKSTN computer, if not
already present.
26

Prerelease documentation subject to change
c. Unpack from the archive the folder Add-ins and extensions to a new folder.d. Run the installer setup.exe.e. On the custom setup, specify the PAM Client is to be installed, but not the MIM Add-in
for Outlook or the MIM Password and Authentication Extensions.f. On the PAM Server address, specify as the hostname of the PRIV MIM server
pamsrv.priv.contoso.local.
10. After the installation completes, restart CORPWKSTN to complete the registration of the new PowerShell module.
Step 5 – Establish trust between PRIV and CORP forestsThe PRIV and CONTOSO domain controllers are bound by a trust which allows for users in the PRIV domain to access resources on the CORP domain.
1. Prior to establishing trust, each domain controller must be configured for DNS name resolution for its counterpart, based on the other domain controller/DNS server’s IP address.
a. Ensure that there are no other DNS servers which are providing domain naming services to computers in either domain. If the virtual machines have network interfaces connected to public networks, it may be necessary to override the Windows network interface settings to ensure a DHCP-supplied DNS server address is not used by any virtual machines.
b. (Optional) On CORPDC, launch PowerShell, and type the following command.
nslookup -qt=ns priv.contoso.local.
Ensure that the output indicates a nameserver record for this domain.
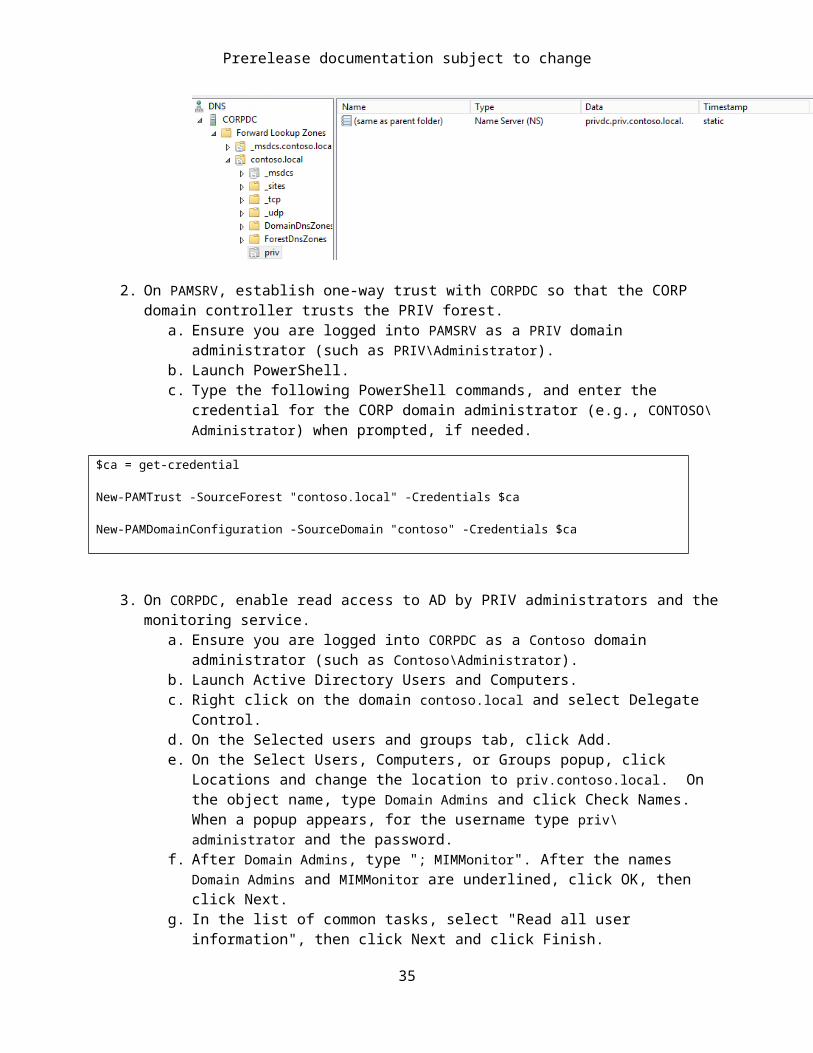
c. (Optional) Alternatively, use DNS Manager (located in Start, Application Tools, DNS) to confirm DNS name forwarding for the PRIV domain to PRIVDC’s IP address. Using this program, expand the nodes CORPDC, Forward Lookup Zones, contoso.local, and ensure a key named priv is present as a Name Server (NS) type.
2. On PAMSRV, establish one-way trust with CORPDC so that the CORP domain controller trusts the PRIV forest.
27

Prerelease documentation subject to change
a. Ensure you are logged into PAMSRV as a PRIV domain administrator (such as PRIV\Administrator).
b. Launch PowerShell.c. Type the following PowerShell commands, and enter the credential for the CORP
domain administrator (e.g., CONTOSO\Administrator) when prompted, if needed.
$ca = get-credential
New-PAMTrust -SourceForest "contoso.local" -Credentials $ca
New-PAMDomainConfiguration -SourceDomain "contoso" -Credentials $ca
3. On CORPDC, enable read access to AD by PRIV administrators and the monitoring service.a. Ensure you are logged into CORPDC as a Contoso domain administrator (such as
Contoso\Administrator). b. Launch Active Directory Users and Computers.c. Right click on the domain contoso.local and select Delegate Control.d. On the Selected users and groups tab, click Add.e. On the Select Users, Computers, or Groups popup, click Locations and change the
location to priv.contoso.local. On the object name, type Domain Admins and click Check Names. When a popup appears, for the username type priv\administrator and the password.
f. After Domain Admins, type "; MIMMonitor". After the names Domain Admins and MIMMonitor are underlined, click OK, then click Next.
g. In the list of common tasks, select "Read all user information", then click Next and click Finish.
h. Close Active Directory Users and Computers.4. On PAMSRV, start the monitoring and component services.
a. Ensure you are logged into PAMSRV as a PRIV domain administrator (such as PRIV\Administrator).
b. Launch PowerShell.c. Type the following PowerShell commands.
net start "PAM Component service"
net start "PAM Monitoring service"
5. (optional) Verify that SID history is enabled and SID filtering is disabled on the trust from the CORP domain to the PRIV domain.
a. Ensure you are logged into CORPDC as a domain administrator (such as CONTOSO\Administrator).
b. Open a PowerShell window.c. Use netdom to ensure SID history is enabled and SID filtering is disabled. Type:
netdom trust contoso.local /quarantine /enablesidhistory:yes /domain priv.contoso.local
28
Prerelease documentation subject to change
The output should indicate either “Enabling SID history for this trust” or “SID history is already enabled for this trust”.
The output should also indicate that “SID filtering is not enabled for this trust”. See http://technet.microsoft.com/en-us/library/cc772816(v=WS.10).aspx for more information.
Step 6 – Transition a group to Privileged Access ManagementThe privileged account creation in the PRIV forest is done using several new PowerShell cmdlets. These cmdlets perform the following functions:
Creates a new group in the PRIV forest with the same SID (Security Identifier) as a group in the CORP forest and as an object in the MIM Service database corresponding to the group in the PRIV forest.
For each user account, the cmdlets creates two objects in the MIM Service database, corresponding to the user in the CORP forest and the new user account in the PRIV forest.
Creates a PAM Role object in the MIM Service database.
In this prerelease preview, the cmdlets needs to be run once for each group, and once for each member of a group. (Note that the migration cmdlets do not change or modify any user or groups in the CORP forest: that is to be done manually by the PAM administrator subsequently.)
1. Log into PAMSRV as a domain administrator and verify the services are running. a. Ensure you are logged into PAMSRV as PRIV\Administrator.b. Open Services.c. Verify that the Forefront Identity Manager service is running. If the service is not
running, right-click on the service and select start to start the service.2. Run the MIM PAM group and user management cmdlets to copy the CorpAdmins group and its
member, Jen, from CONTOSO to PRIV domain.a. If you are using the preconfigured VMs, launch PowerShell and run the following
commands. If you are not using the preconfigured VMs, continue to 2b.
Import-Module MIMPAM
$pg = Get-PAMGroup
$sj = Get-PAMUser -SourceDisplayName "Jen"
$pr = New-PAMRole –DisplayName "CorpAdmins" –Privileges $pg –Candidates $sj
29

Prerelease documentation subject to change
b. If you have reached this from step 5 and are not using the preconfigured VMs, launch PowerShell and run the following commands, specifying the CORP domain admin (CONTOSO\Administrator) password where prompted:
Import-Module MIMPAM
Import-Module ActiveDirectory
$ca = get-credential –UserName CONTOSO\Administrator –Message "CORP forest domain admin credentials"
$pg = New-PAMGroup –SourceGroupName "CorpAdmins" –SourceDomain CONTOSO.local –SourceDC CORPDC.contoso.local –Credentials $ca
$sj = New-PAMUser –SourceDomain CONTOSO.local –SourceAccountName Jen
$jp = ConvertTo-SecureString "Pass@word1" –asplaintext –force
Set-ADAccountPassword –identity priv.Jen –NewPassword $jp
Set-ADUser –identity priv.Jen –Enabled 1
Add-ADGroupMember "Protected Users" priv.Jen
$pr = New-PAMRole –DisplayName "CorpAdmins" –Privileges $pg –Candidates $sj
For reference, the New-PAMGroup command takes the following parameters:
The CORP forest domain name in NetBIOS form the name of the group to copy from that domain The CORP forest Domain Controller NetBIOS name the credentials of an domain admin user in the CORP forest
Next, you will transition a user who is currently group member to JIT elevation, and then verify that cross-forest access rights are effective or the user's administrator account.
3. On CORPDC, remove Jen’s account from the CONTOSO CorpAdmins group, if it is still present.a. Log into CORPDC as CONTOSO\Administrator.b. Launch PowerShell, run the following command and confirm the change.
Remove-ADGroupMember -identity "CorpAdmins" -Members "Jen"
Step 7 – Elevate a user’s accessThis step will demonstrate that a user can request access to a role via MIM.
1. Verify that Jen cannot access the privileged resource in the CORP forest using her account CONTOSO\Jen.
30
Prerelease documentation subject to change
a. On CORPWKSTN, sign out. (This will remove any cached open connections)b. Sign into CORPWKSTN as CONTOSO\Jen and switch to the Desktop view.c. Open a DOS command prompt.d. Type the command “dir \\corpwkstn\corpfs”, and the error message “Access
is denied.” should appear.e. Leave the command prompt window open.
2. Request privileged access from MIM.a. On CORPWKSTN, ensure that you are logged in as CONTOSO\Jen and a DOS command
window is open. b. Type the following command.
runas /user:[email protected] powershell
c. When prompted, type the password for the PRIV.Jen account. A new command prompt window will appear.
d. When the PowerShell window appears, change to that window and type the following commands (note that all subsequent interactions are time-sensitive).
Import-module MIMPAM
$r = Get-PAMRoleForRequest | ? { $_.DisplayName –eq "CorpAdmins" }
New-PAMRequest –role $r
klist purge
e. After that completes, close the newly-opened PowerShell window.f. In the DOS command window, type the following command
runas /user:[email protected] powershell
g. Type the password for the PRIV.Jen account. A new command prompt window will appear.
3. Validate the elevated access.a. In the newly opened window, type the following commands.
whoami /groups
dir \\corpwkstn\corpfs
If the dir command fails with the error message Access is denied, then re-check the trust relationship.
4. (Optional) Elevate by requesting privileged access via the PAM sample portal.a. On CORPWKSTN, ensure that you are logged in as CORP\Jen and a DOS command
window is open.
31
Prerelease documentation subject to change
b. Type the following command.
runas /user:[email protected] "c:\program files\Internet Explorer\iexplore.exe"
c. When prompted, type the password for the PRIV.Jen account. A new web browser window will appear.
d. Navigate to http://pamsrv.priv.contoso.local:8090 and ensure that a web page from the sample portal is visible.
e. In Internet Explorer, select Tools, Internet Options and change to the Security tab.f. Click on the Local intranet zone, click Sites, click Advanced, and add the website to the
zone. Close the Internet Options dialogs.g. On the left tab, click “Elevate”. Select the PAM role and Click Elevate.
In this environment you can also learn how to develop applications which use the PAM REST API to elevate. For more information, download the MIM PAM REST API reference document from the connect site.
SummaryOnce you have completed the steps in this test lab guide, you have demonstrated a privileged access management scenario, in which user privileges are elevated for a limited amount of time, allowing the user to access protected resources with a separate privileged account. As soon as the elevation session expires, the privileged account can no longer access the protected resource. The decision which security groups represent privileged roles is coordinated by the PAM administrator. Once access rights are migrated to the privileged access management system, access that was previously made possible with the original user account is now made possible only by logging in with a special privileged account, and made available upon request. As a result, group memberships for highly privileged groups are effective for a limited amount of time.
32

Prerelease documentation subject to change
Appendix – Diagnosing Issues Events generated by MIM for this scenario are logged to the event log, and are visible in Event Viewer under Application and Services logs->Privileged Access Management.
When a PAM request is successful, the following events will be logged (not necessarily in this order): 89, 90, 85, 86, 82, 84, and 83. (Event 84 will be logged for each group associated with a PAM role).
Event Type ID Event DetailsInformation 82 Add User to AD Group Activity Started.
Request ID: <Request ID>PAM Request: <Request Display Name>
Information 83 Add User to AD Group Activity Ended Successfully.Request ID: <Request ID>PAM Request: <Request Display Name>PAM Role: <Role’s Display Name>, ID: <Role’s ID>User: <User’s Display Name>, Linked User: <Linked User's Account Name (or user’s account name if user doesn’t have a linked user>Duration of Activity (in milliseconds): <PC’s Duration>
Information 84 Add User to AD Group Activity Added User to Security Group:Request ID: <Request ID>PAM Request: <Request Display Name>Security Group: <SG’s Display Name>, Account Name: <SG’s Account Name>TTL: < TTL>Added User: <User’s Account Name>
Information 85 Request Handler Activity Started.Request ID: <Request ID>PAM Request: <Request Display Name>
Information 86 Request Handler Activity Ended Successfully.Request ID: <Request ID>PAM Request: <Request Display Name>PAM Role: <Role’s Display Name>, ID: <Role’s ID>Expiration Date: <Request’s Expiration Date> (TTL: <Role’s TTL>)Duration of Activity (in milliseconds): <PC’s Duration>
Information 89 PAM Request Authorization Started.Request ID: <Request ID>
Information 90 PAM Request Authorization Activity Ended Successfully, Request is Authorized.Request ID: <Request ID>PAM Role: <Role’s Display Name>, ID: <Role’s ID>User: <User’s Display Name>Duration of Activity (in milliseconds): <PC’s Duration>
Document Revision HistoryRevision Date Applied ChangesApril 20, 2015 Update instructions for configuring MIM monitoring and component
services
March 30, 2015 Update to next CTP
March 12, 2015 Update PowerShell in step 6 for preconfigured VMs
33

Prerelease documentation subject to change
Revision Date Applied ChangesMarch 11, 2015 Clarified instructions for item 8 in step 3
March 4, 2015 Update commands for PRIV DC preparation in step 2
February 26, 2015 Update VM sizing, service logon accounts and group policy settings in step 2
February 25, 2015 Update to next CTP with revised trust model
November 18, 2014 Add missing quote characters
November 12, 2014 Update account name
November 7, 2014 Updated URL
October 27, 2014 Update content for review
34
Prerelease documentation subject to change
The information contained in this document represents the current view of Microsoft Corporation on the issues discussed as of the date of publication. Because Microsoft must respond to changing market conditions, it should not be interpreted to be a commitment on the part of Microsoft, and Microsoft cannot guarantee the accuracy of any information presented after the date of publication.The Test Lab Guide is for informational purposes only. MICROSOFT MAKES NO WARRANTIES, EXPRESS, IMPLIED OR STATUTORY, AS TO THE INFORMATION IN THIS DOCUMENT.
Complying with all applicable copyright laws is the responsibility of the user. Without limiting the rights under copyright, no part of this document may be reproduced, stored in or introduced into a retrieval system, or transmitted in any form or by any means (electronic, mechanical, photocopying, recording, or otherwise), or for any purpose, without the express written permission of Microsoft Corporation.
Microsoft may have patents, patent applications, trademarks, copyrights, or other intellectual property rights covering subject matter in this document. Except as expressly provided in any written license agreement from Microsoft, the furnishing of this document does not give you any license to these patents, trademarks, copyrights, or other intellectual property.
Unless otherwise noted, the companies, organizations, products, domain names, e-mail addresses, logos, people, places, and events depicted in examples herein are fictitious. No association with any real company, organization, product, domain name, e-mail address, logo, person, place, or event is intended or should be inferred.
© 2015 Microsoft Corporation. All rights reserved.
Microsoft, Windows, Active Directory, Internet Explorer, and Windows Server are either registered trademarks or trademarks of Microsoft Corporation in the United States and/or other countries.
The names of actual companies and products mentioned herein may be the trademarks of their respective owners.
35