moodle manual for teachers and trainers - epos...
TRANSCRIPT

Moodle manual for Teachers And Trainers
Revised March 2007
GNU GENERAL PUBLIC LICENSE Version 2, June 1991
Copyright (C) 1989, 1991 Free Software Foundation, Inc. 59 Temple Place, Suite 330, Boston, MA 02111-1307 USA Everyone is permitted to copy and distribute verbatim copies of this license document, but changing it is not allowed.
Preamble only (see for complete license)
The licenses for most software are designed to take away your freedom to share and change it. By contrast, the GNU General Public License is intended to guarantee your freedom to share and change free software--to make sure the software is free for all its users. This General Public License applies to most of the Free Software Foundation's software and to any other program whose authors commit to using it. (Some other Free Software Foundation software is covered by the GNU Library General Public License instead.) You can apply it to your programs, too.
When we speak of free software, we are referring to freedom, not price. Our General Public Licenses are designed to make sure that you have the freedom to distribute copies of free software (and charge for this service if you wish), that you receive source code or can get it if you want it, that you can change the software or use pieces of it in new free programs; and that you know you can do these things.
To protect your rights, we need to make restrictions that forbid anyone to deny you these rights or to ask you to surrender the rights. These restrictions translate to certain responsibilities for you if you distribute copies of the software, or if you modify it.
For example, if you distribute copies of such a program, whether gratis or for a fee, you must give the recipients all the rights that you have. You must make sure that they, too, receive or can get the source code. And you must show them these terms so they know their rights.
We protect your rights with two steps: (1) copyright the software, and (2) offer you this license which gives you legal permission to copy, distribute and/or modify the software.
Also, for each author's protection and ours, we want to make certain that everyone understands that there is no warranty for this free software. If the software is modified by someone else and passed on, we want its recipients to know that what they have is not the original, so that any problems introduced by others will not reflect on the original authors' reputations.
Finally, any free program is threatened constantly by software patents. We wish to avoid the danger that redistributors of a free program will individually obtain patent licenses, in effect making the program proprietary. To prevent this, we have made it clear that any patent must be licensed for everyone's free use or not licensed at all.
The precise terms and conditions for copying, distribution and modification are outlined in the GNU General Public License found online.
ABOUT THIS DOCUMENT This manual is an edition reduced respect to the original document that was created for the Moodle.org community by Bryan C. Williams of remote-Learner.net, and is available under the Creative Commons Noncommercial copyright. You may copy, distribute, and create derivative works based upon it — but for noncommercial purposes only. Any alteration of the original work must credit the author, and members of the Moodle community that contributed to this document (Bryan C. Williams, Matt Riordan and Martin Dougiamas).

Table of Contents
Introduction 3-4
Getting Started 5-6
Course Management 7-26
Learner Management 27-33

Introduction:
Moodle
If you were a computer programmer the term “Modular Object-Oriented Dynamic Learning Environment” (Moodle) might make your heart skip a beat. If you were a teacher you might recognize the word as a verb that describes the process of lazily meandering through something, doing things as it occurs to you to do them, an enjoyable tinkering that often leads to insight and creativity.
As such it applies both to the way Moodle was developed, and to the way a student or teacher might approach studying or teaching an online course. Anyone who uses Moodle is a Moodler. The Australian developer of Moodle (Martin Dougiamas), is both an educator and computer scientist. This combination brings unique qualifications to the art and science of using technology to reach learners in the 21
st
century.
Open Source e-Learning Software
Moodle is a course management system (CMS) - a software package designed to help educators create quality online courses and manage learner outcomes. Such e-learning systems are sometimes also cal led Learning Management Systems (LMS), Virtual Learning Environments (VLE) and Learning Content Management Systems (LCMS). Students need only a browser (e.g., IE, Firefox, Safari) to participate in a Moodle course.
Moodle is Open Source software, which means you are free to download it, use it, modify it and even distribute it (under the terms of the GNU General Public License). Moodle runs without modification on Unix, Linux, Windows, Mac OS X, Netware and any other system that supports PHP, including most web host providers. Data is stored in a single database: MySQL and PostgreSQL are best supported, but it can also be used with Oracle, Access, Interbase, ODBC and others.
Language Support
Moodle has 50 language packs, including: Arabic , Catalan, Chinese (simplified and traditional), Czech, Danish, Dutch, English (UK and US versions), Finnish, French (France and Canada versions), German, Greek, Hungarian, Indonesian, Italian, Japanese, Maori, Norwegian, Polish, Portuguese (Portugal and Brazil), Romanian, Russian, Slovak, Spanish, Swedish, Thai and Turkish.
Design Philosophy
The design and development of Moodle is guided by a particular philosophy of learning, a way of thinking that you may see referred to in shorthand as a "social constructionist pedagogy". This page tries to explain in simple terms what that phrase means by unpacking four main concepts behind it. Note that each of these is summarizing one view of an immense amount of diverse research so these definitions may seem thin if you have read about these before.
If these concepts are completely new to you then it is likely that these ideas will be hard to understand at first. We recommend that you read this carefully, while thinking about your own experiences of trying to learn something.
1. Constructivism This point of view maintains that people actively construct new knowledge as they interact with their environment.
Everything you read, see, hear, feel, and touch is tested against your prior knowledge and if it is viable within your mental world, may form new knowledge you carry with you. Knowledge is strengthened if you can use it successfully in your wider environment. You are not just a memory bank passively absorbing information, nor can knowledge be "transmitted" to you just by reading something or listening to someone. This is not to say you can't learn anything from reading a web page or watching a lecture, obviously you can, it's just pointing out that there is more interpretation going on than a transfer of information from one brain to another.
2. Constructionism Constructionism asserts that learning is particularly effective when constructing something for others to experience. This can be anything from a spoken sentence or an internet posting, to more complex artifacts like a painting, a house or a software package.
For example, you might read this page several times and still forget it by tomorrow - but if you were to try and explain these ideas to someone else in your own words, or produce a slideshow that explained these concepts, then I can guarantee you'd have a better understanding that is more integrated into your own ideas. This is why people take notes during lectures, even if they never read the notes again.
3. Social Constructivism This extends the above ideas into a social group constructing things for one another, collabora-tively creating a small culture of shared artifacts with shared meanings. When one is immersed within a culture like this, one is learning all the time about how to be a part of that culture, on many levels.

A very simple example is an object like a cup. The object can be used for many things, but its shape does suggest some "knowledge" about carrying liquids. A more complex example is an online course - not only do the "shapes" of the software tools indicate certain
things about the way online courses should work, but the activities and texts produced within the group as a whole will help shape how each person behaves within that group.
4. Connected and Separate This idea looks deeper into the motivations of individuals within a discussion. Separate behavior is when someone tries to remain 'objective' and 'factual', and tends to defend their own ideas using logic to find holes in their opponent's ideas. Connected behavior is a more empathic approach that accepts subjectivity, trying to listen and ask questions in an effort to understand the other point of view. Constructed behavior is when a person is sensitive to both of these approaches and is able to choose either of them as appropriate to the current situation.
In general, a healthy amount of connected behavior within a learning community is a very powerful stimulant for learning, not only bringing people closer together but promoting deeper reflection and re-examination of their existing beliefs.
Once you are thinking about all these issues, it helps you to focus on the experiences that would be best for learning from the learner's point of view, rather than just publishing and assessing the information you think they need to know. It can also help you realize how each participant in a course can be a teacher as well as a learner. Your job as a 'teacher' can change from being 'the source of knowledge' to being an influencer and role model of class culture, connecting with students in a personal way that addresses their own learning needs, and moderating discussions and activities in a way that collectively leads students towards the learning goals of the class.
Obviously Moodle doesn't force this style of behavior, but this is what it is best at supporting. In future, as the technical infrastructure of Moodle stabilizes, further improvements in pedagogical support will be a major direction for Moodle development. You are invited to be a part of this future by contributing your ideas and experiences using Moodle with your students.
Join the online community of teachers and business trainers at http://moodle.org

Creating a New User Account
Before you can do anything in Moodle you must create a New Account. By default this is done via e-mai l confirmation. A message is sent from Moodle after completing the New Account registration form (Fig. 2), accessible from the main Login screen (Fig. 1). Other forms of user authentication are supported in Moodle (e.g. manual accounts only, external database, POP3, LDAP etc.), and these are explained in the Administration section of this manual.
Once a user account is established the primary Moodle administrator can change an accounts login permissions. Following are types of user accounts that can be assigned to a Moodle user:
• Student (default - can interact with course content only) • Teacher with Editing Permissions (can populate a course with activities and provide learner
feedback - e.g. grades, assignment comments etc.) • Teacher without Editing Permissions (can provide learner feedback only - e.g. grades, assignment
comments etc.) • Course Creator (can create new courses, teach within them and assign teachers)
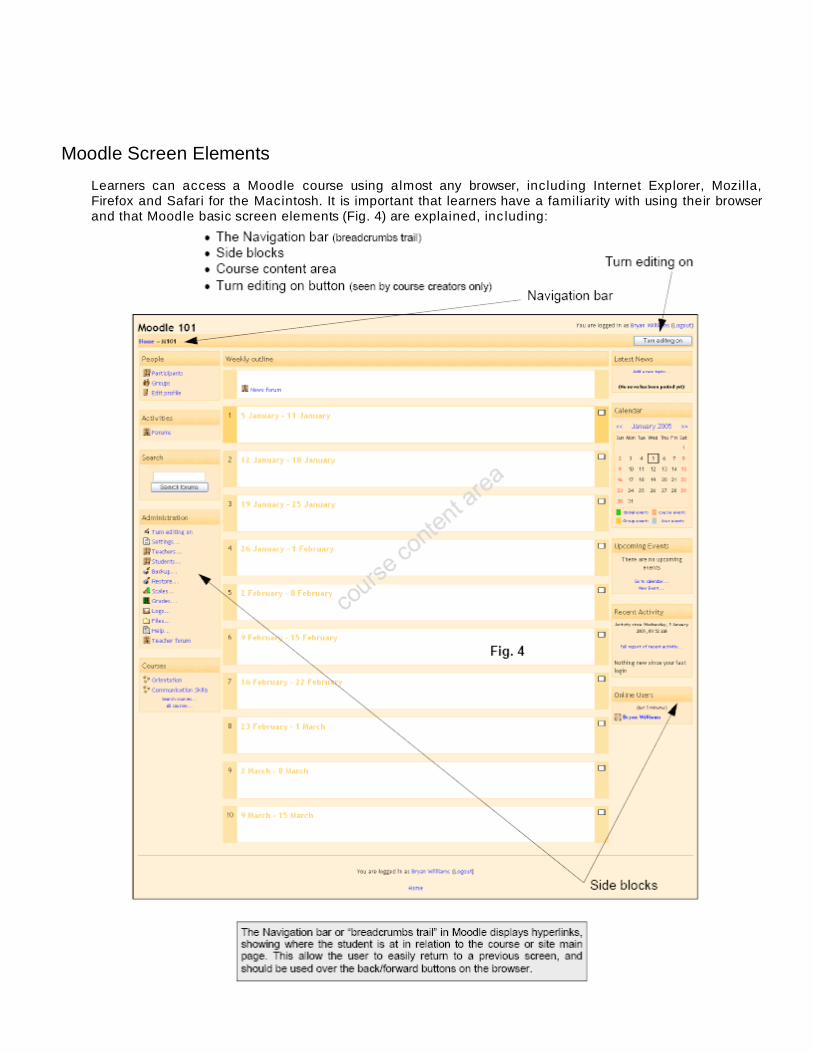
Moodle Screen Elements
Learners can access a Moodle course using almost any browser, including Internet Explorer, Mozilla, Firefox and Safari for the Macintosh. It is important that learners have a familiarity with using their browser and that Moodle basic screen elements (Fig. 4) are explained, inc luding:

Course Setup - Side Blocks
If this is the first time you are entering a new course created for you by an administrator, it will be mostly blank (see Fig. 4). Course templates have block areas on the left and right sides, with course content activities being added in the middle of the screen. Side blocks can be added, removed and moved around on the course homepage to fit your needs.
To reveal Moodle's features for adding content and arranging side blocks in your course, click the “Turn editing on” button located in the top right corner of the screen(Fig. 5).
This action will reveal features for adding activities and resources in the content area of the course, and allow you to work with side blocks. The following is a description of Moodle side blocks included during installation, and their functions.
People This block has three selections, including: Participants (shows list view of everyone enrolled in course) Groups (see Learner Management section in manual) Edit profile (allows a user to add personal information to their profile - Fig. 6)
Activities Whenever you add a different activity or resource to your course, an icon will appear in this block
representing the specific Moodle “module” (e.g. Forum, Journal, Assignment etc.) These icons will l ink to a list of all instances of that modules activity that appear throughout the course. For students this provides a quick way to access a specific learning activity, teacher feedback or grade. For teachers they can access Learner Management features covered in that section of the manual.
Calendar This block allows a user to post significant events, relative to their account permissions: • Site (event viewable in all courses - created by admin users) • Course (event viewable only to course members - created by teachers) • Groups (event viewable only by members of a group - created by teachers) • User (personal event a student user can create - viewable only by the user)
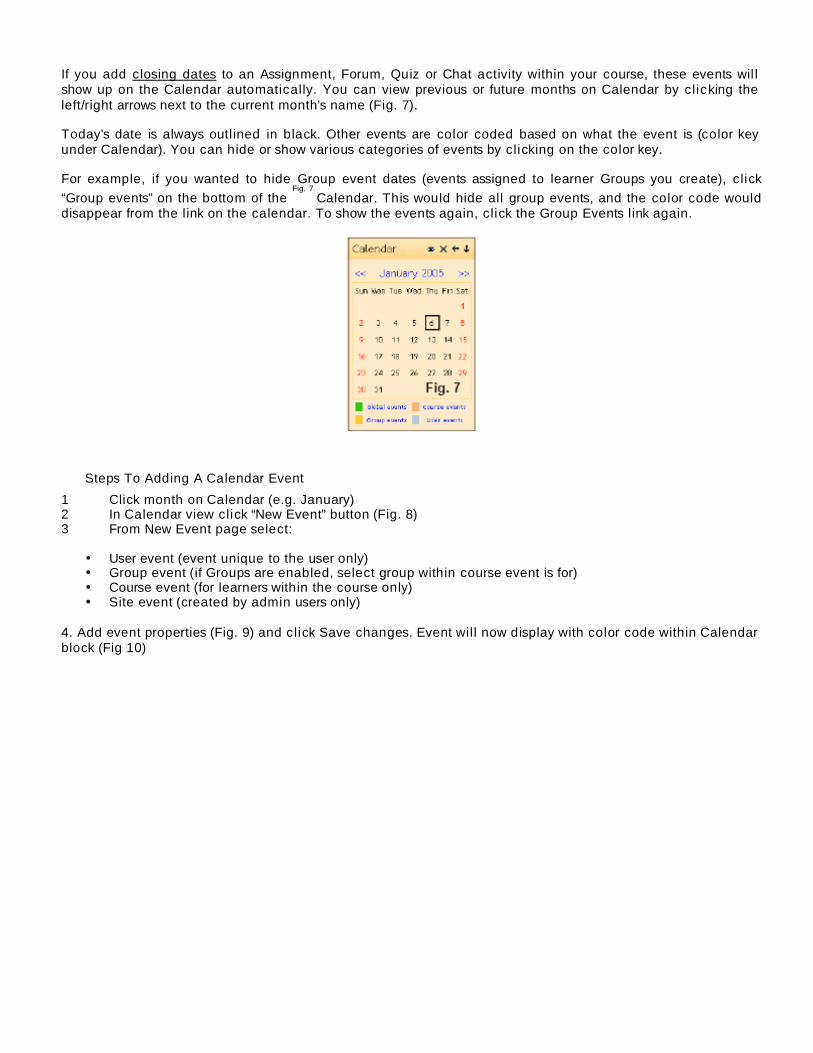
If you add closing dates to an Assignment, Forum, Quiz or Chat activity within your course, these events wil l show up on the Calendar automatically. You can view previous or future months on Calendar by clicking the left/right arrows next to the current month’s name (Fig. 7).
Today’s date is always outlined in black. Other events are color coded based on what the event is (color key under Calendar). You can hide or show various categories of events by clicking on the color key.
For example, if you wanted to hide Group event dates (events assigned to learner Groups you create), click
“Group events” on the bottom of the Fig. 7
Calendar. This would hide all group events, and the color code would disappear from the link on the calendar. To show the events again, click the Group Events link again.
Steps To Adding A Calendar Event
1 Click month on Calendar (e.g. January) 2 In Calendar view click “New Event” button (Fig. 8) 3 From New Event page select:
• User event (event unique to the user only) • Group event (if Groups are enabled, select group within course event is for) • Course event (for learners within the course only) • Site event (created by admin users only)
4. Add event properties (Fig. 9) and click Save changes. Event will now display with color code within Calendar block (Fig 10)

Upcoming Events This block displays upcoming Calendar events in an abbreviated list, with links to the actual event so all details can be viewed. If this event is an Assignment, Forum, Quiz or Chat closing date the participant can link directly to this activity.
Search Allows participants to do a Google like search of all Forums, for the occurrence of their search value.
Administration These features are discussed in the Learner Management section of the manual.
Courses This block will display a list of all courses (only) that a participant is enrolled in, allowing one-click
access to another course home page.
Latest News The News forum (default) within your course provides a why in which you can post course news you want participants to receive. Any posting made in this forum will display as a listed item in the Latest News block.
Recent Activity This block displays two types of information for a participant; an abbreviated list of what they have done since their last login (displayed within the block), and a more detailed “Full report of recent activity”. This latter features provides the participant with a Normal view displaying a list of recent activity by module, or an Advanced view where report criteria can be set.
Recent Activity is a great way to quickly spot check course participation of aspecific learner, using the Advanced search feature.
Online User Displays name and image of everyone logged in to the course within the past 5 minutes.

Customizing Block Placement Blocks can be added, removed and moved around on the course home
page to meet the needs of your classroom. When you click “Turn editing on” the Block block appears (Fig. 11), allowing you to easily perform these actions on any of the blocks we have discussed in this section of the manual.
When editing is turned on, symbols for manipulating a block appear in the header (Fig. 12), including:
• Eye - Hides or shows the block to students • X - Removes block and adds it back to Block drop-down list • -Moves block up or down in position • -Moves block to left or right side of screen Fig. 12
Course Setup - Settings
In the simpliest of terms, a Moodle course is comprised of learning activities presented to participants within a specific format. This format can be open-ended consisting of a number of topics, or it can be more formal such as structured around a beginning and ending date (like Fig. 1), or it can be formatted to encourage informal learning. Moodle allows you to select one of these three formats while setting up your course:
• Topic (for open-ended or ongoing enrollment - self paced learning) • Weekly (structured, with a beginning and ending time period - e.g. school environments) • Social (Forums that encourage informal modes of learning - peer interaction)
All features available from the Administration block will be covered in the Learner Management section of the manual, except for the Settings selection. This selection is central to course management in that this is where you will structure the online learning experience for your participants. When you you click the Settings link in the Administration block the “Edit course settings screen (Fig. 13) appears, allowing you to make the following selections:

Category: It is likely that your course may be one of several selections available at the Moodle site front page. Courses are typically assigned to a category (e.g. Language Arts, Workplace Safety etc.), and your Moodle administrator may have done this when the course template was created. If not, make a selection from the Category value list that places your course in the correct category for your organization.
Full name: Give your course a full name, as it will appear in the header area of the home page (e.g. Moodle 101), and in the site front page category.

Short name: This is the name that will appear in the Navigation bar “breadcrumbs” are (e.g. M101)
ID Number: If you have an official code name for this course then use it here. Otherwise, leave blank.
Summary: Enter a brief desciption for your course; about a paragraph of information that describes it to
someone visiting the site front page.
Format: Select a display format for the course (Topic, Weekly or Social), as discussed on page 11. Course start date: If you selected Weekly format, assign a date for when the course will go live.
Enrollment period: If you would like to set a time limit for how long a participant can be enrolled in your
course, make a selection here. If you do not wish to set an enrollment period limit, select Unlimited. When you set enrollment period limits, a participant will be automatically unenrolled from the course on the specified number of days after they have first entered the course.
Number of weeks/topics: If you chose either Topic or Weekly format, select the number of topics or weeks you course will be comprised of.
Group mode: Group mode allows you to segment participants into either Separate or Visible groups. Groups are discussed in the Learner Management section of the manual.
Force (Group mode): If the group mode is "forced" at a course-level, then the course group mode is applied to every activity in that course. Individual group settings in each activity are then ignored. This is useful when, for example, one wants to set up a course for a number of completely separate cohorts.
Availability: This option allows you to "hide" your course completely. It will not appear on any course listings, except to teachers of the course and administrators. Even if students try to access the course URL directly, they will not be allowed to enter.
Enrollment key: A course enrolment key is what keeps unwanted people out of your course. If you leave this blank, then anyone who has created a Moodle username on this site will be able to enrol in your course simply by going in to it. If you put something here, then students who are trying to get in for the FIRST TIME ONLY will be asked to supply this word or phrase.
The idea is that you will supply the key to authorized people using another means like private email, snail mail, on the phone or even verbally in a face to face class. If this password "gets out" and you have unwanted people enrolling, you can unenrol them (see their user profile page) and change this key. Any legitimate students who have already enrolled will not be affected, but the unwanted people won't be able to get back in.
Guest access: You have the choice of allowing "guests" into your course. People can log in as guests using
the "Login as a guest" button on the login screen. Guests ALWAYS have "read-only" access - meaning they can't leave posts or otherwise mess up the course for real students. This can be useful when you want to let a colleague in to look around at your work, or to let students see a course before they have decided to enroll. You have a choice between two types of guest access: with the enrolment key or without. If you choose to allow guests who have the key, then the guest will need to provide the current enrolment key EVERY TIME they log in (unlike students who only need to do it once). This lets you restrict your guests. If you choose to allow guests without a key, then anyone can enter into your course.
Hidden sections: This option allows you to decide how the hidden sections in your course are displayed to students. By default, a small area is shown (in collapsed form, usually gray) to indicate where the hidden section is, though they still can not actually see the hidden activities and texts. This is particularly useful in the Weekly format, so that non-class weeks are clear. If you choose, these can be completely hidden, so that students don't even know sections of the course are hidden.
News items to show: A special forum called "News" appears in the "Weekly" and "Topics" course formats. It's a good place to post notices for all students to see. (By default, all students are subscribed to this forum, and will receive your notices by email.) This setting determines how many recent items appear on your course home page, in the Latest News block or News forum. If you set it to "0 news items" then the Latest News block won't appear on the home page.
Show grades: Many Moodle activities allow grades to be set. By default, the results of all grades within the course can be seen in the Grades page, available to students from the course home page "Administration" block. If a teacher is not interested in using grades in a course, or just wants to hide grades from students, then they can disable the display of grades using this setting. This does not prevent individual activities from using or setting grades, it just disables the results being displayed to students.

Show activity reports: Activity reports are available for each participant that show their activity in the current course. As well as listings of their contributions, these reports include detailed access logs. Teachers always have access to these reports, using the “Activity” link visible on each partic ipants profile page. Student access to their own reports is controlled by the teacher via this course setting. For some courses these reports can be a useful tool for a student to reflect on their involvement and appearance within the online environment, but for some courses this may not be necessary. Another reason for turning it off is that the report can place a bit of load on the server while being generated. For large or long classes it may be more effic ient to keep it off (default).
Maximum upload size: This setting defines the largest size of file that can be uploaded by students in this course, limited by the site wide setting created by the administrator. It is possible to further restrict this size through settings within each Moodle activity module.
Your word for….: These four fields allow you define what names will appear within the course for teachers and students.
Force language: Allows you to set course language setting to a default, which will override a students settings. Moodle has language packs for over 50 languages, which change all screen information and help files to the language selected. Course content which is added is in the language in which it was created, Moodle does not automatically interpret such content.
Course Setup - Design Tools
This section will discuss Moodle design tools (editing symbols and the HTML editor), used during course creation. A good way to become famil iar with these basic features is to add a summary description in the Top section of the course home page for your participants (Fig. 16). Begin by clicking the “Turn editing on” button. This action will reveal:

Course Home Page Summary Description To add comments in the Top section of the course home page that describes your course to participants, click the Edit icon link for the Top section area. This action will bring up the sections Summary of week/topic property screen (Fig. 15). You can add an image with your description, and when complete simply cl ick “Save Changes” to see your summary appear on the course home page (Fig. 16). Each topic/week in your course can have a Summary description.
HTML Editor: When you are creating your course you will frequently use Moodle’s built in HTML editor (Fig. 17). Your students will use this tool when responding to Forum posts, making Journal entries, creating a Dialogue response and when they use a Wiki. The HTML editor can be disabled by the Moodle administrator, but is a useful tool for enriching course content.

Course Setup - Adding Activities and Resources
A Moodle course is populated with activities in one of two ways; by adding a “module” instance from the Activities drop-down menu (Fig. 18), or by adding an internal or external Resouce (Fig. 19). An internal resouce is defined as a file you create within Moodle using say the HTML editor, and an external resource is typically a file stored elsewhere on the Internet, on another server or elsewhere within Moodle.
This section of the manual will explain both activity modules and resources. The following activity modules are discussed:
Assignment Module
In a bricks & mortar classroom an instructor may provide learners with an assignment that typically gets assessed (or graded) for completion. Adding an instance of an Assignment module activity allows you to do this. An assessment can be made from either a participants online submission of an electronic file (Word, PowerPoint etc.), or from an offline submission of the project in an actual classroom.

In either case the instructor can provide an assessment/grade or written feedback to the participant on their assignment, using Moodle’s Learner Management features (see that section of the manual). When you select Assignment from the drop-down menu a property screen appears with the following values to be completed:
Assignment name: Give your assignment a name (e.g. “Report on Topic Content)
Description: You can be as brief or expanded as you want when adding details of the assignment. If your are adding rich content, tables etc. to your description, expand the HTML editor into full screen mode so you can make your webpage document look nice when participants view it.
Assignment type: Select whether participants will complete the assignment as an Offline activity, or Upload a single file. If the latter, participants will have an option at the bottom of the screen to upload a file (not viewable during teacher login).
Allow resubmitting: Select whether course participants can submit the assignment more than once.
Grade: If this assignment is graded, select a value for the grade or select a scale that is being used. In the Learner Management section of the manual you will learn how to create custom grade scales and assessment of your own.
Maximum size: If you selected Upload a single file for Assignment type, set this value for the maximum size file (Word, Excel PowerPoint etc.) a participant can upload. This is typically only a few megabytes in size, unless the assignment is a multimedia file submission.
Due date: When the course is running in a “Weekly” format there is an option to set a date for when this assignment is due by. This date will appear in the course Calendar as a reminder for participants. If you are using Topic format, set this date for say a few years in advance so the assignment activity will never become unavailable to students.
Chat Module The Chat module allows participants to have a real-time synchronous discussion via the web. This is a useful way to get a different understanding of each other and the topic being discussed - the mode of using a chat room is quite different from the asynchronous Forums. The Chat module contains a number of features for managing and reviewing chat discussions.
Setup properties include the ability to establish a Chat session date/time (displayed on course calendar), schedule repeating chat sessions, a period for saving past chat sessions for students to review and whether or not these past sessions can be viewed.
Choice Module A choice activity is very simple - the teacher asks a question and specifies a choice of
multiple responses. It can be useful as a quick poll to stimulate thinking about a topic; to allow the class to vote on a direction for the course; or to gather research feedback. The Choice properties window allows you to select whether results from the actitivy are published for participants to view (anonymously or known) and whether a participant can modify their original selection. You can also set whether the results page will display a column showing unanswered participants.
Dialogue Module (non-standard) This module provides a simple communication method between pairs of users. A teacher can open an dialogue with a student, a student can open a dialogue with a teacher, and (optionally) a student can open a dialogue with another student. A teacher or student can be involved in many on-going dialogues at any time. If you were a teacher, you might think of this as an after school personal meeting. If you were a mentor, this could be a one-to-one session. Students can use a dialogue to help each other in a private manner.
Setup properties allow you to select whether a dialogue is deleted a certain number of days after it has been closed, the type of dialogue instance being created (i.e., teacher to student, student to student or everybody) whether more than one dialogue per person is permitted and whether Moodle will automatically send out an e-mail notifying each party that a comment has been added to the dialogue.
Forum Module This activity can be most important in terms of helping learners construct new knowledge - it is here that discussion among partic ipants and teachers takes place. Forums can be structured in different

ways, and can inc lude peer rating of each posting. The postings can be viewed in a variety for formats, and can inc lude attachments. By subscribing to a forum, participants will receive copies of each new posting in their email. A teacher can impose subscription on everyone if they want to.
Forum setup properties include:
• How students are allowed to post to a forum • Whether subscription is forced • Maximum size of attachment upload • Whether posts can be rated and by whom, the type of rating scale used and how students can view these
ratings, and a time period in which ratings can be applied.
Participants can choose how they wish to receive forum posts and other e-mail that Moodle sends out, by changing their “Edit profile” preferences (e.g. single message for each post made, daily digest of all messages etc.)
Lesson Module A lesson delivers content in an interesting and flexible way. It consists of a number of pages.
Each page normally ends with a question and a number of possible answers (Fig. 22). Depending on the student's choice of answer they either progress to the next page or are taken back to a previous page. Navigation through the lesson can be straight forward or complex, depending largely on the structure of the material being presented. Lessons are a great way to assess practical knowledge of a subject, and with creative use of Moodle’s HTML editor very effective simulations can be built.
Lesson module allows you to add entire lessons that guide the student based on the student’s answers. It might be helpful to think of a Lesson activity as a kind of flowchart. The student reads some content. After the content, you ask the student some questions. Based on the answers the student gives, the system sends the student to another page in the Lesson. For example, if a student chooses question one, then the system might go to page 3. If the student chooses answer two, the system goes to page 1. If the student answers question 3, the system goes to page 5 etc. Lessons are very flexible, but do require some set-up.
To add a Lesson, select Lesson from the Add an activity menu on the course homepage. This action will take you to the Lesson editing properties page (Fig. 22a). Fill in the Name of the lesson. Next, select the maximum grade to be given for the whole lesson (a number from 0-100).
How grading works: If the system sends the student ahead to any later page, the question is marked correct. If the system sends the student back to any page, the question is marked incorrect. The “Maximum number of answers”
sets how many questions can be asked on each page. If you leave the number at say 4, you can still ask 2 questions on one page if you wish. You can even have a page where you do not ask a question – in those cases the student automatically continues on to the next page.
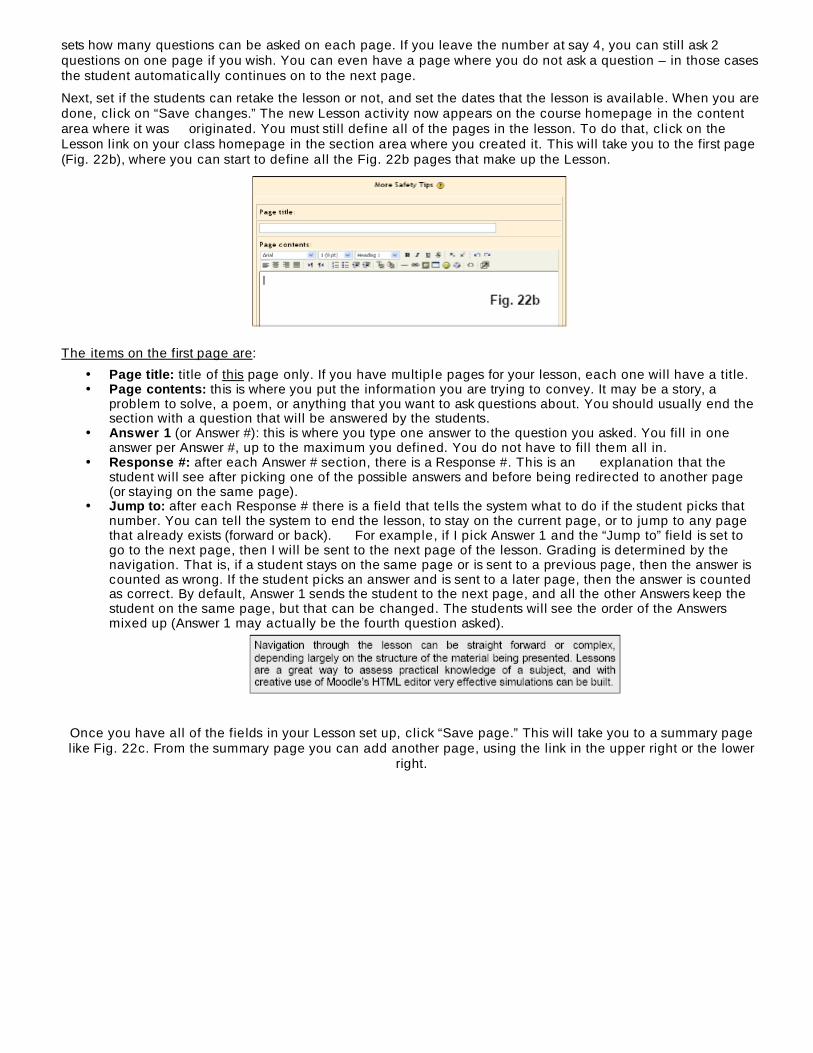
Next, set if the students can retake the lesson or not, and set the dates that the lesson is available. When you are done, click on “Save changes.” The new Lesson activity now appears on the course homepage in the content area where it was originated. You must still define all of the pages in the lesson. To do that, click on the Lesson link on your class homepage in the section area where you created it. This will take you to the first page (Fig. 22b), where you can start to define all the Fig. 22b pages that make up the Lesson.
The items on the first page are:
• Page title: title of this page only. If you have multiple pages for your lesson, each one will have a title. • Page contents: this is where you put the information you are trying to convey. It may be a story, a
problem to solve, a poem, or anything that you want to ask questions about. You should usually end the section with a question that will be answered by the students.
• Answer 1 (or Answer #): this is where you type one answer to the question you asked. You fill in one answer per Answer #, up to the maximum you defined. You do not have to fill them all in.
• Response #: after each Answer # section, there is a Response #. This is an explanation that the student will see after picking one of the possible answers and before being redirected to another page (or staying on the same page).
• Jump to: after each Response # there is a field that tells the system what to do if the student picks that number. You can tell the system to end the lesson, to stay on the current page, or to jump to any page that already exists (forward or back). For example, if I pick Answer 1 and the “Jump to” field is set to go to the next page, then I will be sent to the next page of the lesson. Grading is determined by the navigation. That is, if a student stays on the same page or is sent to a previous page, then the answer is counted as wrong. If the student picks an answer and is sent to a later page, then the answer is counted as correct. By default, Answer 1 sends the student to the next page, and all the other Answers keep the student on the same page, but that can be changed. The students will see the order of the Answers mixed up (Answer 1 may actually be the fourth question asked).
Once you have all of the fields in your Lesson set up, click “Save page.” This will take you to a summary page like Fig. 22c. From the summary page you can add another page, using the link in the upper right or the lower
right.


Quiz Module Quiz module allows the teacher to design and set quiz tests, consisting of multiple choice,
true-false, short answer questions etc. (Fig. 24). These questions are kept in a categorized database, and can be re-used within courses and even between courses. Quizzes can allow multiple attempts. Each attempt is automatically marked, and the teacher can choose whether to give feedback or to show correct answers. Quiz module includes grading facilities.
Working with Quiz module involves a simple step-by-step process, which includes:
• Step 1 - Create a quiz activity on the course home page using the “Add an activity” drop- o down list, and set all properties for the Quiz. Properties can include: o a.) an opening and close date for the quiz o b.) a time limit o c.) whether answers and questions are shuf fled when a new attempt is made o d.) whether more than one attempt is allowed o e.) whether attempts build on previous attempt o f .) a grading method or curve o g.) how quiz gives feedback o h.) whether students can view past attempts o i.) a maximum grade given for the quiz o j.) an optional password to access the quiz
• Step 2 -Select a category to create your quiz questions in. I f no categories exist, click the “Edit categories” button
and add a new category (Fig. 25). • Step 3 - From the Create new questions list select a type of question to create (Fig. 24). Moodle allows you to import
questions from a file or other learning management system such as Blackboard, WebCT and IMS QTI formats. • Step 4 - Once you have added questions to the category (Fig. 26), you will publish these question to the Quiz
activity . Select each one and click the “<<Add selected to quiz” button. A fter placing each question in the proper order (Fig. 27) and optionally assigning a grade value, you are ready to complete the Quiz activity. Simply click the “Save this whole quiz” button and the Quiz activity will now be available from the course home page.
To start building a category of questions, either select an existing category or create a new one as indicated. Once you have made your selection from the Category drop-down list, the screen will refresh and display any existing questions that have been created under the category you have selected (Fig. 25). Moodle gives you options at this point as to how questions are created and added to the category:
• Import questions from file: this imports existing questions from file systems Moodle recognizes (AON, Blackboard, Course Test Management, GIFT, IMS/QTI, Missing word format and WebCT).
• Create multiple questions: this feature creates a specified number of random questions. These questions are drawn randomly from your database of pre-existing questions. You specify the category the

questions come from, so Moodle will not acc identally ask questions about Othello when you are teaching Hamlet!
• Create new question: (most common selection) When you create a new question, it is stored in the category you select. It is then always available to add to any quiz at any time. To create a new question, select the type of question you want from the pull-down menu. You have the option of adding:
1 Multiple choice questions 2 True/False questions 3 A short answer question 4 A numerical question 5 Matching question 6 Description question 7 Random set 8 Random short answer 9 A special embedded question (Cloze) Multiple Choice – To add a multiple choice question, select Multiple Choice in the “Create new question” drop-down menu. This will take you to the multiple choice question screen. Type in the name of the question (something to help you identify the question in the list), and type in the question. You do not have to type the answers in the “Question” box – the program will l ist the answers you type in the various “Choice # ” boxes.
You may select an image to display, if you have any loaded resources in the course Files area (see Learner Management section of manual). You may then select if students are allowed to select more than one answer, or if there is only one answer allowed. Next, fil l in your answers for the multiple choice question, and include feedback text if you wish.
In Moodle, you have an option to apply a weight to multiple choice questions. The positive answers must add up to 100%, or the system will ask if that is what you want to do. You do have the option to assign negative weight to an answer, such that a wrong answer might actually count against the student, instead of being no credit. This might be true where multiple answers are possible, such that A) is worth 50%, B) is worth -50% and C) is worth 50%. A student selecting A) and C) would get full credit, but a student selecting A) and B) would get no credit at all. You do have the option to make a wrong answer not count either way as well.
When you are done fill ing in your questions, answers, feedback and grade, click on “Save changes.” This action will return you to the quiz edit screen (Fig. 26), with the new question listed. You are now ready to add another question.
True/False – the questions are just that – true/false. To add a true/false question, select True/ False from the “Create new question” drop-down menu. This will take you through a process similar to that of creating multiple choice questions discussed above.
Short Answer – To create a short answer question, select Short Answer from the “Create new question” drop-down menu. This will take you through a process similar to that of creating multiple choice questions discussed above. Fill in the question name (something that will tell you what the question is) and the question itself. The question can have up to 5 short answer “answers.” This can be very flexible. You can make a fill-in-the-blank (e.g. President Bush is ___ years old), or just ask for answers (Name the first 3 presidents).
Note: One big caution to pass on to students: a misspelled answer is WRONG (unless you put in the right answer and the 2 or 3 most common misspellings – that would work).
Next to each answer is the “Grade” field. The total points of the question must equal 100%. In the case of the presidents question above, you would make each answer worth 33% of the question. In the case of the fill-in-the-blank question, one answer would be worth 100%. You can have multiple answers be worth 100% (in the case of listing common misspellings, or in the case of “Name 1 of the first 3 Presidents” – where 3 answers would be worth 100% each).
You may also fill in feedback for each answer. Feedback generally comes up if you type an answer that the quiz has, so on short answer questions, the feedback is limited to telling you why your answer is correct (on short answer questions only). The feedback can show the student the correct answer if the student guesses wrong, even if the wrong answer is not in the list of answers. Once you are finished, click on “Save changes” to return to the quiz edit creation screen (Fig. 26).
Numerical Question – To add a numerical question, make sure “Numerical” is selected in the “Create new question” drop-down menu. This will take you through a process similar to that of creating multiple choice questions discussed above. A numerical question is a question that expects a number for the answer. It has the added flexibility to accept a range of answers (10 +- 3 would accept anything from 7 to 13).

Fill in the “Question name” with anything that will help you identify the question. In the “Question” box, fil l out the question you wish to ask (“How fast can Matt run?”). If you have loaded any picture images to the system (from Files area), you will have the option to display the image as part of the question. Next, fil l in the correct answer, and the accepted error (2 in the example would allow a correct answer of 8-12). You may then fill in feedback if you wish to use that feature. When everything is fil led out the way you want it, click on “Save changes.” The question will then appear in the list of questions on the main quiz screen.
Matching – To add a matching question, select “Matching” from the drop-down menu. This will take you through a process similar to that of creating multiple choice questions discussed above. Fill out a question name that you will recognize, and then write the “big” question – this is the introduction the student sees. This could be “Match the following questions with the correct answers,” or “Match the name of the president with the year he was elected,” or anything else you like.
Next, fil l in at least 3 questions that will be matched to the answers you provide. The “questions” can be one word to be matched to the answer. Each matching part is worth an equal amount (if you have four matches, each is worth 25% of the whole question. The whole question then can be weighted on the quiz – more on weighting later). When you are finished fill ing in the whole question (remember the program treats all the matches – even if there are eight – as one question), click on “Save changes.” You will then be taken back to the quiz edit-ing screen where you will see your new question added to the list.
Description – To add a description, select “Description” from the drop-down menu. A description is not actually a question. It allows you to add text to a quiz (such as a story or an article) that you can then ask other questions about. Fill in the “Question name” with a name that will help you remember the description. Then, in the “Question” box, fil l in your description (story, article, etc.). If you have uploaded pictures in the Files area, you can choose to display them with the description (so your description can describe a picture). When everything is fil led out the way you want it, click on “Save changes.” Your description should now appear in the list of questions on the main quiz screen.
Random question – To select a random question, select “Random question” from the drop-down menu. A random question will select a question that already exists randomly from all the questions in any category you specify. If you have 10 questions in say an Othello category, this feature will pick one of those questions at random. Select the category you wish to draw the question from (“Default” in example). You may name the question if you wish (you might want to add the category to the name – i.e. “random Default #1”). Note that you can mix random questions with “normal” questions on a quiz. When you are done, select “Save changes,” and you should see the main quiz screen with the new random question added (“Random Default #1” in my example):
Random Short-Answer Matching – This question makes a matching question by drawing random questions and answers from among the short-answer questions you have created. You must have at least two short-answer questions in a category for this feature to work.
A category is whatever category you were in when you selected the random short answer matching question. The question name can be anything you like, but it is suggest adding a number to the end (#1, #2, etc.). You may leave the existing default introduction, or you may change it if you wish. You then select the number of questions you would like to have. When you are finished, click on “Save changes.” You should see the quiz editing screen with the new question listed (“Random Short-Answer Matching #1” in example):
Embedded Answers (Cloze) – This question type embeds the answers into the question. This allows you to have questions that look like Fig. 27a. These are great questions, but do require some formatting.
The “Question name” names the question for the list. The “Image to display” lists any pictures you have uploaded to your “Files” section. The “Question” part is where you type your question, but this MUST inc lude the formatting. This can take some getting used to. To create a question like the example in Fig 27a, the following would be entered in the Question area:
This sample question consists of some text with an answer embedded right here {1:MULTICHOICE:Wrong answer#Feedback for this wrong answer~Another wrong answer#Feedback for the other wrong answer~=Correct answer#Feedback for correct answer~%50%Answer that gives half the credit#Feedback for half credit answer} and right after that you will have to deal with this short answer {1:SHORTANSWER:Wrong answer#Feedback for this wrong answer~=Correct answer#Feedback for correct answer~%50%Answer that gives half the credit#Feedback for half credit answer} and finally we have a floating point number {2:NUMERICAL:=23.8:0.1#Feedback for correct answer 23.8~%50%N/ A#Feedback for halfcredit answer in the nearby region of the correct answer}.
This entry will display a question like Fig. 27a. The formatting works like this:
• Normal text is just typed (like “This question consists of some text with an answer embedded right here” from above).
• To open a field in the embedded question, use the left bracket { and close the field with the right

bracket }. • To insert a pull-down menu, type the number of points the field (menu) is worth (1,2,3, etc.). The entire
question is worth the total of all the points of each part (menus and short answer parts). Follow the number by a colon, followed by the word MULTICHOICE followed by another colon (1:MULTICHOICE:). Then type your possible answers followed by tildes (~). The correct answer must start with an equals sign (=). An answer that counts for partial credit starts with the percent sign followed by the credit followed by a percent sign (%50% for 50 % credit). A full example would be: {2:MULTICHOICE:Washington~Jefferson~Lincoln~=Franklin~%50%Adams} This entry would make a pull-down menu of 5 items. This menu would be worth 2 points. In this ex-ample, Washington, Jefferson and Lincoln are wrong, Franklin is right, and Adams is worth half-credit.
• To insert a short answer (fil l-in-the-blank), put in the points the short answer is worth, followed by a colon followed by SHORTANSWER followed by a colon (2:SHORTANSWER:). Then put an equals sign (=) followed by the right answer inside the brackets. An example would be {2:SHORTANSWER:=Maine}. This would make a blank worth 2 points where the answer is Maine (and spelling does count!). You may list other correct answers by separating them by a tilde sign (~) – like this (don’t forget the = sign): {2:SHORTANSWER:=Maine~=Ohio}. When you have everything the way you want it, cl ick on “Save changes.” Your Embedded Answers question will now display on Editing quiz screen list (Fig. 27b) of questions for your category.
Course Setup - Adding Audio & Video
Moodle allows you to embed rich media into an activity you create within your course when using the HTML editor. Your Moodle administrator should enable the Multimedia plug-in “Filter” setting (see Administration section of manual) in advance. Examples of media player files supported within Moodle include:
• Flash • Windows Media • QuickTime • MP3
How to add a media resource:
Step 1: Create an instance of an activity on the course home page. As an example we will create an “Assignment” called The Interview (Fig. 40). Complete all properties for this activity. In the example we have selected that this will be an assignment requiring the student to upload their work online (see page 16), entered a Grade value and Due date.
Step 2: We have described theassignment and added a link to aWindows Media video file, entering the text“Review this video” for our link. Linking to a resource stored in the Files area of thecourse is easy. Select the URL link button on the HTML editor and locate a file byusing the Browse button (Fig. 41) on theInsert a Link screen. Our resource(interview.wmv) is stored within the courseFiles area (Fig. 42).
Step 3: Click “Save changes” when youhave completed creating the activity. Theresults (Fig. 43) wil l display in the browser as your students will the assignment.

Course Setup - Adding Math Equations
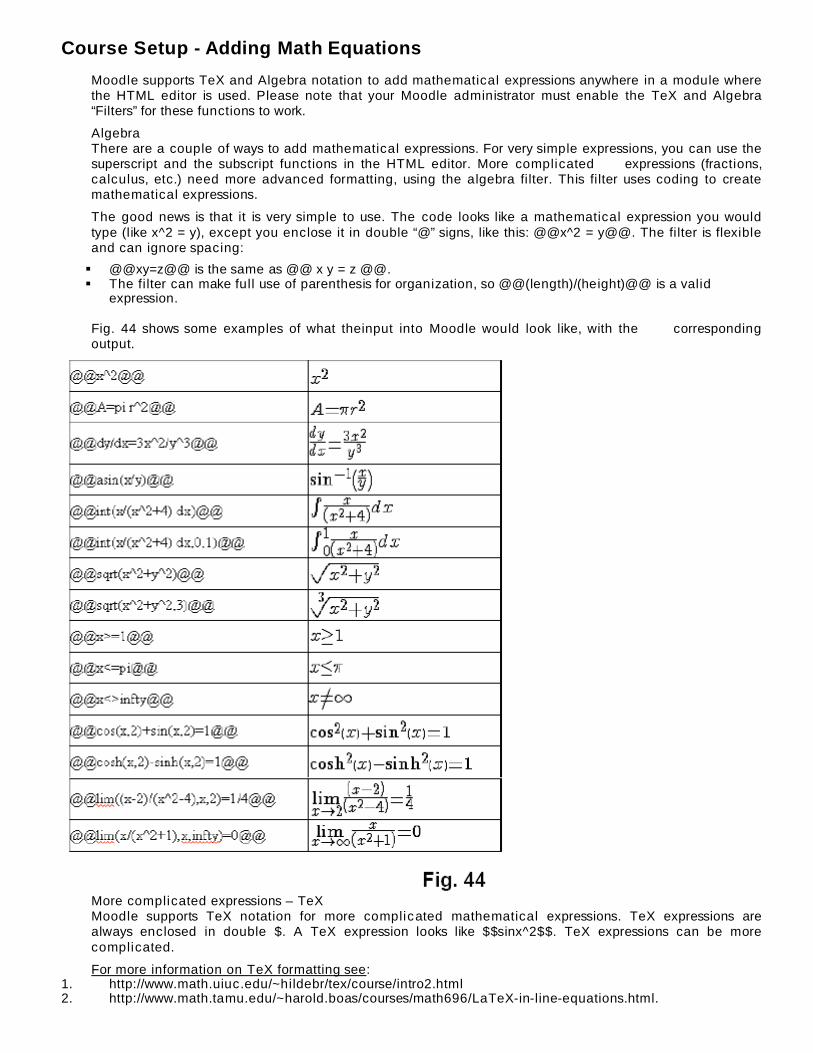
Moodle supports TeX and Algebra notation to add mathematical expressions anywhere in a module where the HTML editor is used. Please note that your Moodle administrator must enable the TeX and Algebra “Filters” for these functions to work.
Algebra There are a couple of ways to add mathematical expressions. For very simple expressions, you can use the superscript and the subscript functions in the HTML editor. More complicated expressions (fractions, calculus, etc.) need more advanced formatting, using the algebra filter. This filter uses coding to create mathematical expressions.
The good news is that it is very simple to use. The code looks like a mathematical expression you would type (like x^2 = y), except you enclose it in double “@” signs, like this: @@x^2 = y@@. The filter is flexible and can ignore spacing:
@@xy=z@@ is the same as @@ x y = z @@. The filter can make full use of parenthesis for organization, so @@(length)/(height)@@ is a valid
expression.
Fig. 44 shows some examples of what theinput into Moodle would look like, with the corresponding output.
More complicated expressions – TeX Moodle supports TeX notation for more complicated mathematical expressions. TeX expressions are always enclosed in double $. A TeX expression looks like $$sinx^2$$. TeX expressions can be more complicated.
For more information on TeX formatting see: 1. http://www.math.uiuc.edu/~hildebr/tex/course/intro2.html 2. http://www.math.tamu.edu/~harold.boas/courses/math696/LaTeX-in-line-equations.html.

3. http://abel.math.harvard.edu/computing/ 4. latex/manual/node21.html

Learner Management Features
In this section of the manual you will be introduced to Moodle’s features for managing learner activity, inc luding:
• Groups • Activities block • Administration block
Groups Moodle allows you to separate students into groups, when for example you assign projects to course participants that will work together. You must have either “Separate” or “Visible” groups enabled in the course Settings properties (see Fig. 13) to use the Groups feature. If you click on “Groups” in the People block (Fig. 51), a screen like Fig 52 appears (you must first click the “Turn editing on” button).
If your course has no students in ityet you will see only your name. Fig 52 has two students and ateacher (#). There are no groups yet. To add a group type the nameof the group in the box next to“Add new group,” and then click on button. In Fig 53 we have added agroup called “Group1:”
Students can now be added to thegroup. To add a student, simply click the student’s name and cl ick “Add selected to group.” To addmultiple students to a group at thesame time, hold down the Shift key on your keyboard while clicking oneach name. If you prefer, you may add all of the students to a group using the “Randomly assign all togroups” button. After addingstudents to Group1, the screen will now look like Fig. 53. If you now click “Turn editing off” you will see the newly created group (Fig. 54).

Groups and Activities Moodle’s Groups feature allows you to create distinct activities for members of a group. When you create an activity, as explained earlier in the manual, editing tools appear in the topic/weekly area (Fig. 55) allowing you to select a Group relationship for this activity.
Each time you click the Group icon image connected with an activity, it will change to reflect a different Group status for that activity (e.g., Visible, Separate or No Groups)
Activities Block Activities block (Fig. 56) lists all Moodle modules added during course creation (e.g., Forums, Quizzes, Assignments, etc.). The first time you enter your course the only module that is listed is “Forums.” This is because one forum (News) exists by default. The Activities block list will grow as you add different activities to your course.
As a teacher in the course you can access each activity within a module category that appears in the Activities block. Simply click the modules icon to see a list of activities within this category. For example, Fig. 57 shows

a list of all “Assignment” activities with a link that allows you to view each students submission for an individual Fig. 56 course assignment.
Let’s look at the learner management function for “Assignment #1: PowerPoint example. Notice there are 5 submitted assignments. If we click the “View 5 submitted assignments” link on the right, this action will reveal a screen (Fig. 58) that allows the teacher to access each students uploaded assignment, grade this assignment and add feedback comments for the student to review.
If this were an “Offline” assignment (see page 16), submitted in class, the teacher would simply add the grade and feedback comments. In either case, once learner management functions are completed simply click the “Save all my feedback” button. Students will be e-mailed a message indicating the teacher has commented/graded their assignment. Journal module has the same learner management properties for giving students feedback on their journal entries (Fig. 59), and the is notified via e-mail when the teacher has
commented on their entry.

Finally, when Quizzes is selected from the Activities block, a list of al l course quizzes appears (Filg.60), allowing the teacher to select a specifi c quiz and view student results (Fig. 61). Simply click the link on the right side of a quiz in the list to see student results. Results can be view in different ways, including:
• Overview (shown) • Regrade attempts • Detail statistics • Simple statistics
Fig. 59
Administration Block One of the selections in this block has already been discussed in the Course Management section of the manual The remainder of the selections in this block are discussed here, inc luding:
• Turn editing on allows you to make changes to the course (e.g. add activities). • Settings allows you to change the look of your class (see page 11). • Teachers lists all the teachers for the course (typical ly just you, but could be more than that if the class
were team-taught). • Students lists all of the students in the class. You can manually enroll or unenroll a student from here. • Backup allows your class data to be backed up. • Restore allows you to restore old class data (that was backed up). • Scales allows you to define special scales for evaluation. These are made up of word evaluations (i.e.,
Excellent, Good, Average, etc.) • Grades lists the grades of the tests and quizzes of each enrolled student. • Logs shows you all of the activity in your class for a set amount of time. • Files allows you to upload files (e.g. graphics, Word, PP, Excel doc’s etc.) into your course, for inclusion
in an activity or layout. • Help brings up the Moodle abbreviated manual pages. • Teacher forum” is a teacher-only discussion board.
Teachers This feature lists all teachers (Fig. 62) in a course (typically just you). From here you can add a co-teacher if you wish. To add another teacher to your class, cl ick on the “Add teacher” button next to the name of the teacher you wish to add (or type in the teacher’s name if there are too many users to show).

Once you have added a teacher, you can set the “Order” of the teachers (for listing purposes – 1 is at the top, lower numbers are in numerical order on the list). If you wish, you can select “Hide” from the “Order” menu. This hides that teacher from the students (unless the teacher posts something in the class). This is useful if you want another teacher to audit the class with you.
The last setting is the “Edit” menu. If this is set to “Yes,” the teacher can do anything a normal teacher can do (create assignments, grade, etc.). If this is set to “no,” the teacher has the access rights of a teacher (the teacher can go anywhere and see everything in a class), but the new teacher will not be able to change anything (no editing permissions).
Students You can add or unenroll a student from your class manually from the Students property screen (Fig. 63). On the left are the students currently enrolled in the class, and on the right are the students that could be added to the class.
To add a new student, click on the left-facing arrow next to the student’s name (or type in the student’s name in the “Search” field if there are too many students to list). The student should move from the “Potential student” column to the “Enrolled students” column. To unenroll a student from a class, click on the right-facing arrow next to the student’s name. The student should move from the “Enrolled students” column to the “Potential students” column. Please note that students may enroll themselves by clicking on the class listing of your class (they will need the enrollment key if you supply one).

Backup Generally, you will not have to worry about backup as the primary Moodle administrator has set a schedule of site wide backups. However, it is a best management practice to perform a course backup at regular intervals, and to store this backup locally on your computer. After clicking the Backup link you will see options for specific activities you wish to backup. Simply follow the on-screen instructions to complete a backup.
Restore If you have backup files you wish to restore to the system, click on this button.
Scales The Scales feature (Fig. 64) allows you to create a word-based custom evaluation scale (like “fair,” “excellent,” etc.) that is used as the grading instrument within an activity. Default scales include 1-100 and Separate and Connected ways of knowing. Here’s how to create a custom grading scale:
• Click Add a new scale button from within the Scales property window • Name – This is the name of the scale. • Scale – This is where you input your scale words. You can have as many as you like, but they need to
be separated by commas, and they should be from the lowest level comment (like “Poor”) to the highest level comment (like “Excellent”).
• Description – This is an optional field. You may type anything you like here that describes your custom scale.
When you are done typing in the information, click on “Save changes” button The new scale will now be
available within all resources where scales can be applied (Forums, Assignments, Quizzes, Lessons, Fig. 63
Journals, Workshops).
Grades Grades feature (Fig. 64) displays the grades and scales applied for Forums, Quizzes, Assignments, Lessons, Journals, Workshops and SCORM activities that students have completed, submitted or posted. You can easily download grades in Excel or text format for inclusion in a grade book, and you can select which course on the site you are enrolled in as a teacher to view grades.
Logs Logs show you the activity in your class for different days or times. This can be useful to check to see if everyone has done a certain task, or spent a required amount of time online within certain activities. When you select Logs from the Administration block, a report screen (Fig. 65) is revealed that allows you to set filter criteria for

the type of logs (Fig. 66) you wish to view, including: • Course you want to view • If “Groups” are enable, which group you want to view • A specific participant (or All participants) whose logs you want to view • A date (or all dates) for logs you want to view • Which course activity (or All activities) logs you want to view •
Files The Files feature (Fig. 67) allows you to upload files to the server within your course. These files are stored in a special place on the server, outside of the public directory (cannot be access by web surfers). Students do not have access to these files unless you link them to an activity within the course, using the HTML editor (see page 15). A file can be text documents, sound, graphic or video, spreadsheet, PowerPoint or any executable file. Moodle will either open it for the student within their browser, or download.
You can create a folder within the Files area for storing all course resources you want to allow students to have access to on the course homepage. One option from the Add a resource… menu is “Display a directory”, which allows you to select only the directory for display you created in the Files area.
Help Moodle’s internal help file, an abbreviated reference like this manual.
Teacher Forum This is a forum that is accessible by teachers only. It can be used to discuss anything you like, but may be especially useful if face-to-face meetings are difficult (if schedules conflict). It may also be useful for departmental discussions and course creation ideas.
