network computing devices, inc. ncbridge installation
TRANSCRIPT
Network Computing Devices, Inc.
NCBridge Installation Manual for UNIX EnvironmentsVersion 3.2
May 1999
Printed in USA
Network Computing Devices, Inc.350 North Bernardo AvenueMountain View, CA 94043 USA
1-800-800-9599 (USA and Canada)1-503-641-2200
http://www.ncd.com

Copyright 1999 Network Computing Devices, Inc., 350 North Bernardo Avenue, Mountain View, California 94043.
Copyright 1990, 1992, 1993, 1994, 1995, 1996 Tektronix, Inc. Wilsonville, Oregon.
Printed in the United States of America or the United Kingdom. All rights reserved. This document may not be copiedin whole or in part, or otherwise reproduced except as specifically permitted under U.S. copyright law, without theprior written consent of Network Computing Devices, Inc., 350 North Bernardo Avenue, Mountain View, CA 94043USA.
WinDD and NCBridge are trademarks of Network Computing Devices, Inc.
TEKTRONIX, TEK, UTek, Profile, TekColor, Serial Xpress, SXp, and ErgoCable are trademarks or registeredtrademarks of Tektronix, Inc.
Portions of the network computer source code are copyrighted 1989 by Sun Microsystems, Inc. Sun design patentspending in the U.S. and foreign countries. OPEN LOOK is a trademark of AT&T. Used by written permission of theowners.
Portions of this NCBridge software 1984-95 Adobe Systems Incorporated. All rights reserved.
Some fonts are copyrighted 1986, 1985 by Bigelow & Holmes. Lucida is a registered trademark of Bigelow &Holmes.
Ethernet is a trademark of Xerox Corporation; UNIX is a registered trademark of AT&T; DEC, DECnet, DECwindows,ULTRIX, SCAMP, VMS, and VT are trademarks of Digital Equipment Corporation; SPARCstation is a registeredtrademark of SPARC International, licensed exclusively to Sun Microsystems, Inc.; Sun Microsystems, SunOS, NFS,Sun, Sun-3, Sun-4, and OpenWindows are trademarks of Sun Microsystems, Inc.; OSF, OSF/Motif, and Motif aretrademarks of Open Software Foundation, Inc.; X and X Window System are trademarks of the MassachusettsInstitute of Technology. Hewlett-Packard, HP, and vue are trademarks of the Hewlett-Packard company. IBM andSMIT are trademarks of International Business Machines. Silicon Graphics and IRIS are registered trademarks andIRIX is a trademark of Silicon Graphics, Inc. OpenConnect is a registered trademark of OpenConnect Systems, Inc.Other trade names used in this document are trademarks or registered trademarks of the manufacturers or vendorsof the associated products.
Microsoft, Windows NT and Windows95 are registered trademarks of the Microsoft Corporation.
Adobe, Acrobat, Display PostScript, and ShowPS are trademarks of Adobe Systems Incorporated which may beregistered in certain jurisdictions.

Manual Revision Status
UNIX Installation
Rev Date Description
July 1997 Original Issue.
May 1999 Document new features included in NCBridge ver. 3.2.
UNIX Installation

Revision Status
UNIX Installation

Contents
Related Documentation ........................................................................ ixPieces of the Puzzle .............................................................................x
Chapter 1 Installing the SoftwareQuick Start ............................................................................................1-2
NCBridge installation .......................................................................1-2Font Setup .......................................................................................1-2NC terminal installation ....................................................................1-3
Media Contents ....................................................................................1-5Installing NCBridge...............................................................................1-8Sun Installation .....................................................................................1-9
Installation Considerations...............................................................1-9Preparing for Installation ..................................................................1-11Installing from a CD-ROM Drive ......................................................1-12Installing from a Remote Tape Drive ...............................................1-13Extracting the INSTALL Script .........................................................1-14
IBM Installation .....................................................................................1-15Installation Considerations...............................................................1-15Preparing for Installation ..................................................................1-15Installing from a CD-ROM Drive ......................................................1-17Installing from a Remote Tape Drive ...............................................1-18Extracting the INSTALL Script .........................................................1-19
Hewlett-Packard Installation .................................................................1-20Installation Considerations...............................................................1-20Preparing for Installation ..................................................................1-20Installing from a CD-ROM Drive ......................................................1-22Installing from a Remote Tape Drive ...............................................1-23Extracting the INSTALL Script .........................................................1-24
Silicon Graphics Installation .................................................................1-25Installation Considerations...............................................................1-25Preparing for Installation ..................................................................1-26Installing from a CD-ROM Drive ......................................................1-27Installing from a Remote Tape Drive ...............................................1-28Extracting the INSTALL Script .........................................................1-29
Alpha_OSF Installation .........................................................................1-30Installation Considerations...............................................................1-30Preparing for Installation ..................................................................1-31Installing from a CD-ROM Drive ......................................................1-32Installing from a Remote Tape Drive ...............................................1-33Extracting the INSTALL Script .........................................................1-34
Generic UNIX Installation .....................................................................1-35Installation Considerations...............................................................1-35Preparing for Installation ..................................................................1-37
UNIX Installation i
Contents
ii
Installing from a Remote CD-ROM Drive ........................................ 1-38Installing from a Remote Tape Drive ............................................... 1-39Extracting the Files .......................................................................... 1-39
Using the INSTALL Script .................................................................... 1-43Making the Utilities ............................................................................... 1-47Getting Acquainted............................................................................... 1-49
Basic Installation Example .............................................................. 1-50Network Computer Worksheet ........................................................ 1-51
Powering on the Network Computer .................................................... 1-53Booting the Network Computer ............................................................ 1-54Starting a Session with Launcher......................................................... 1-57
Opening a Telnet Session ............................................................... 1-58Closing a Telnet Window................................................................. 1-59Using Setup..................................................................................... 1-60Exiting Setup ................................................................................... 1-64
Chapter 2 Making ChoicesConfiguration Strategies....................................................................... 2-3
Booting Strategies ........................................................................... 2-5File Access Strategies..................................................................... 2-9Host Connection Strategies............................................................. 2-11ROM and Flash Memory Strategies ................................................ 2-15Boot Host Check List ....................................................................... 2-16File Host Check List ........................................................................ 2-16Network Computer Check List......................................................... 2-17
What Next? .......................................................................................... 2-17Configuration Workbook....................................................................... 2-18
Chapter 3 Supporting a Centralized System - SunEnabling NFS on SunOS 4 .................................................................. 3-3Enabling NFS on SunOS 5 .................................................................. 3-4Enabling TFTP ..................................................................................... 3-5
Using Secure TFTP......................................................................... 3-7Enabling BOOTP.................................................................................. 3-8
Setting Up the bootptab File ............................................................ 3-9Running BOOTP ............................................................................. 3-11
Enabling RARP on SunOS 4................................................................ 3-14Enabling RARP on SunOS 5................................................................ 3-15Enabling XDM ...................................................................................... 3-16Enabling the XDM from the Media ....................................................... 3-18Adding DNS Entries ............................................................................. 3-20
UNIX Installation

Contents
Chapter 4 Supporting a Centralized System - IBMEnabling NFS Access ...........................................................................4-2Enabling TFTP......................................................................................4-4Enabling BOOTP ..................................................................................4-5
Setting Up the bootptab File ............................................................4-6Running BOOTP..............................................................................4-7
Enabling XDM.......................................................................................4-9Adding DNS Entries..............................................................................4-11
Chapter 5 Supporting a Centralized System - HPEnabling NFS Access ...........................................................................5-3Enabling TFTP......................................................................................5-4Enabling bootp......................................................................................5-6
Ensuring that bootp is Running........................................................5-8
Chapter 6 Supporting a Centralized System - Silicon GraphicsEnabling NFS Access ...........................................................................6-3Enabling TFTP......................................................................................6-4
Using Secure TFTP .........................................................................6-5Enabling BOOTP ..................................................................................6-6
Setting Up the Silicon Graphics bootptab File .................................6-7Setting Up the bootptab File from the Installation Media .................6-8Running BOOTP..............................................................................6-10
Enabling XDM.......................................................................................6-11Adding DNS Entries..............................................................................6-13
Chapter 7 Supporting a Centralized System - Alpha_OSFEnabling NFS Access ...........................................................................7-3Enabling TFTP......................................................................................7-4Enabling BOOTP ..................................................................................7-5
Using the DEC Bootptab File...........................................................7-5Using the Bootptab File from the Installation Media ........................7-7Running BOOTP..............................................................................7-9
Enabling RARP.....................................................................................7-12Enabling Xprompter ..............................................................................7-13Adding DNS Entries..............................................................................7-14
Chapter 8 Supporting a Centralized System - Generic UNIXEnabling NFS Access ...........................................................................8-3Enabling TFTP......................................................................................8-5
Using Secure TFTP .........................................................................8-7Enabling BOOTP ..................................................................................8-8
Setting Up the bootptab File ............................................................8-9Running BOOTP..............................................................................8-10
Enabling RARP.....................................................................................8-13Adding DNS Entries..............................................................................8-15
UNIX Installation iii

Contents
iv
Chapter 9 Local ClientsStarting Local Clients With xpsh...................................................... 9-2Starting Local Clients In The xp.cnf File .......................................... 9-12
Starting Local Clients with rsh .............................................................. 9-13Enabling rsh .................................................................................... 9-13Editing the .rhosts File ..................................................................... 9-13Starting Local Clients with rsh ......................................................... 9-14
Client Launcher .................................................................................... 9-15Configuring the Client Launcher...................................................... 9-15Downloading the Client Launcher ................................................... 9-18Using the Client Launcher ............................................................... 9-20
Authorization Key Manager .................................................................. 9-21Setting Up SNMP ............................................................................ 9-21The authkey.dat File........................................................................ 9-22Starting the Authorization Key Manager.......................................... 9-22Using the Authorization Key Manager Client................................... 9-23
Setting up XIE ...................................................................................... 9-28XIE Authorization............................................................................. 9-28Enabling XIE.................................................................................... 9-28
Setting up XBlink .................................................................................. 9-29XBlink Authorization ........................................................................ 9-29Enabling XBlink ............................................................................... 9-29Using XBlink .................................................................................... 9-29
Setting Up the XPT/A Graphics Tablet................................................. 9-30Touchscreen Calibration Client ............................................................ 9-31Common Desktop Environment ........................................................... 9-33
Starting the Local TED/CDE Client ................................................. 9-34
Chapter 10 Window ManagersSetting Up Local MWM ........................................................................ 10-1
Starting Local MWM ........................................................................ 10-2Accessing MWM Configuration Files............................................... 10-2Accessing the MWM Resource Description File.............................. 10-2Accessing the MWM Defaults File................................................... 10-5Accessing Bitmap Files ................................................................... 10-7Specifying Virtual Key Bindings....................................................... 10-7Setting up Virtual Desktop Panning................................................. 10-7Troubleshooting MWM .................................................................... 10-9
Setting Up XP Window Manager.......................................................... 10-11Accessing the XPWM Defaults File ................................................. 10-11Starting the XP Window Manager ................................................... 10-11Using XPWM ................................................................................... 10-12Customizing XPWM ........................................................................ 10-14
UNIX Installation
Contents
Chapter 11 Using Additional FontsHow the X Server Builds the Font Database ........................................11-3Resident and Boot Directory Fonts.......................................................11-5Installing Fonts .....................................................................................11-7
Adding IBM Fonts to fonts.tbl...........................................................11-7Using xset to Add or Delete Font Paths...........................................11-8Converting Sun Fonts ......................................................................11-9SCF Font Issues ..............................................................................11-10
Chapter 12 Troubleshooting
Appendix A Installing and Configuring PSXpressInstalling PSXpress ..............................................................................A-2
Running the adobe.install Script .....................................................A-3Manual Installation ...........................................................................A-7
Accessing Example Files and Applications ..........................................A-8Administering PSXpress .......................................................................A-9
Adding Fonts and UPR Files ...........................................................A-10Configuring the Services Port ..........................................................A-12Allocating Display PostScript Agents...............................................A-13Exclusive Authorization for NCD Network Computers .....................A-14Limit of 16 Agents per Host .............................................................A-15Starting an Agent with execnx .........................................................A-16Using PSXpress with Other Display PostScript Applications...........A-19Updating XKeysymDB .....................................................................A-20
Understanding Display PostScript NX ..................................................A-21The Display PostScript Extension....................................................A-22Display PostScript NX Network Software ........................................A-23
UNIX Installation v

Contents
vi
UNIX Installation
UNIX Installation vii
Preface
This manual presents installation and configuration information for the network computers. This manual is written for system and network administrators responsible for installing network computers in a distributed-computing environment. The procedures in this manual assume you are familiar with:
• the operating system and administration of the intended host computer
• the network protocols and concepts related to your local-area network (LAN)
• the X environment, including window managers and display managers
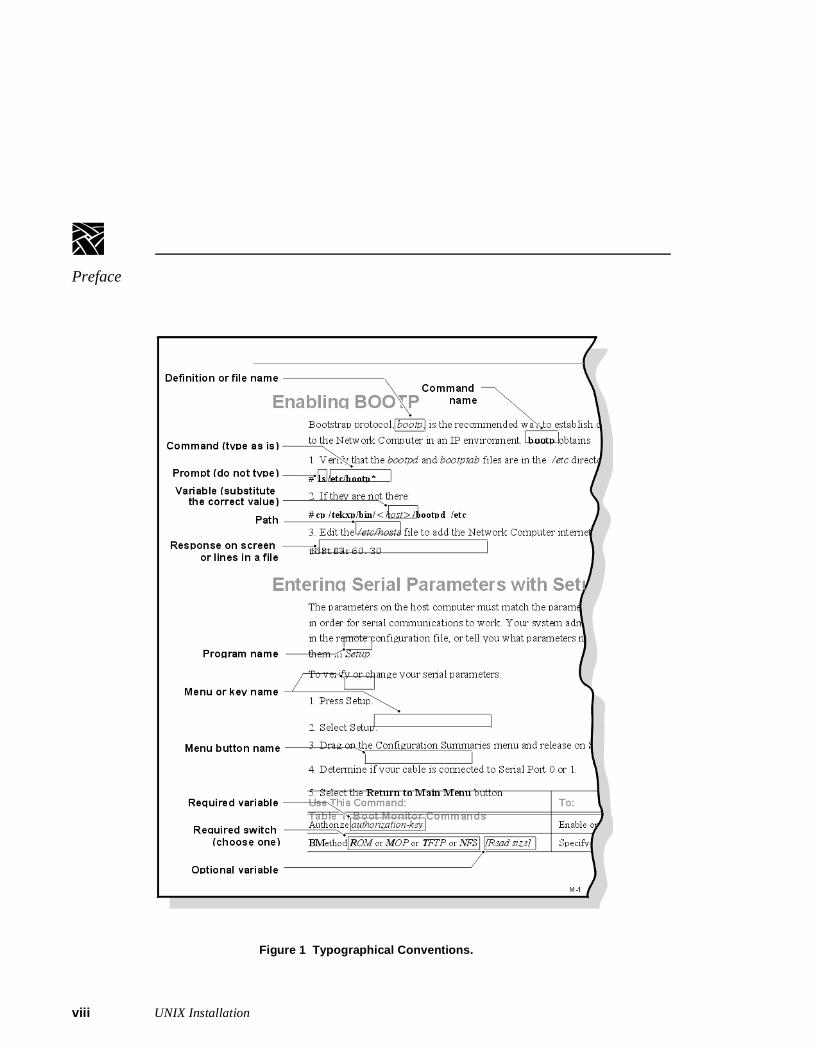
The following conventions and terminology is used in this manual.
• Pointing: use the mouse to position the pointer on an object on the display
• Moving: use the mouse to change the location of the pointer on the display
• Clicking: press and release a mouse button without moving the pointer
• Dragging: press and hold down a mouse button while moving the pointer
• Releasing: release the mouse button to complete a dragging action
Preface
vii
Figure 1 Typographical Conventions.
i UNIX Installation
Related Documentation
t.
es:
Related DocumentationThe following user manuals are included in the Documentation CD-ROM:
• Network Computer User
Provides operating information for the novice user.• Network Computer Reference
Provides detailed reference information for system administrators.
• 3270/3179G User
Provides operating information for the 3270/3179G terminal emulators.• 3270E/5250 User
Provides operating information for the 3270E/5250 terminal emulators.
The following manuals are available in paper:
• Network Computer Installation for UNIX — 9300845Network Computer Installation for VMS — 9300846Network Computer Installation for Windows NT — 9300847
Explains how to install and configure network computers on a specific hos
• Serial Xpress User —9300834
Provides information about using Serial Xpress which enables a network computer to connect to a remote host over an RS-232 serial connection.
The following document is available in local bookstores:
• X Window System User’s Guide — O’Reilly & Associates, Inc.
Presents window system concepts and includes tutorials for many client programs.
The following documentation from your computer manufacturer would be helpful to look up additional options, subnet masking, and broadcast address
• System Administrator’s Manual
• Network Administrator’s Manual
UNIX Installation ix
Preface
x
o ce
e ou u ur is r
r g
s
r.
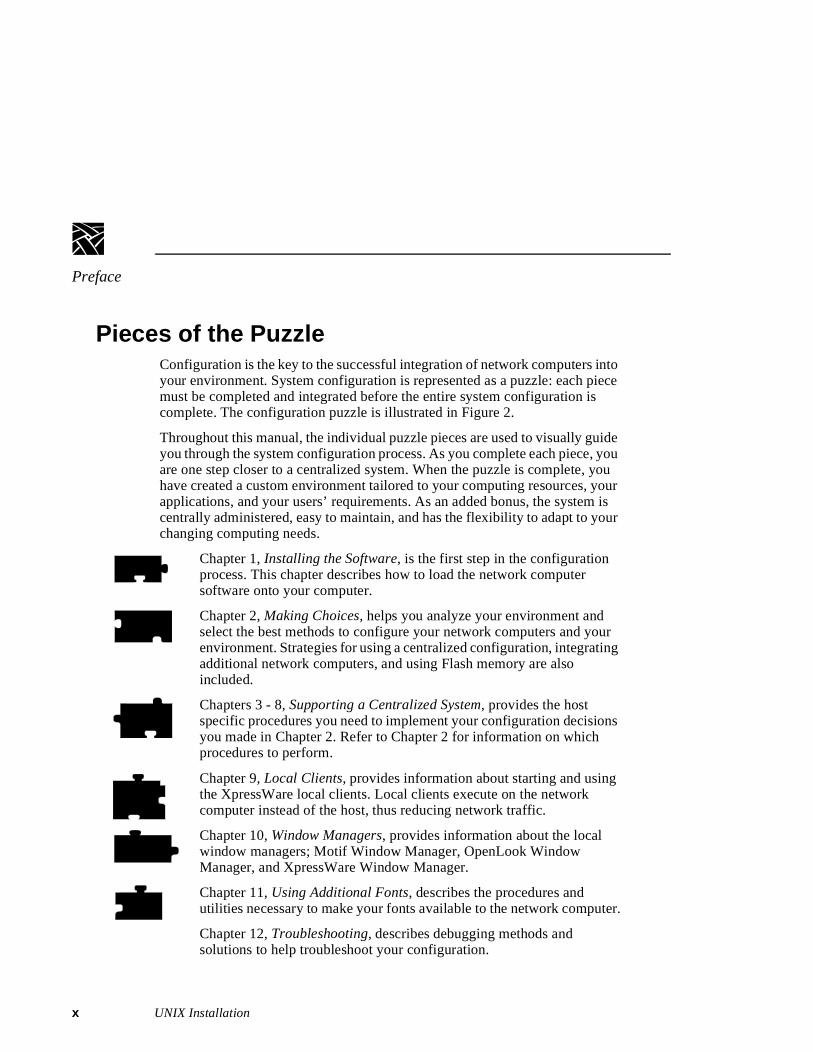
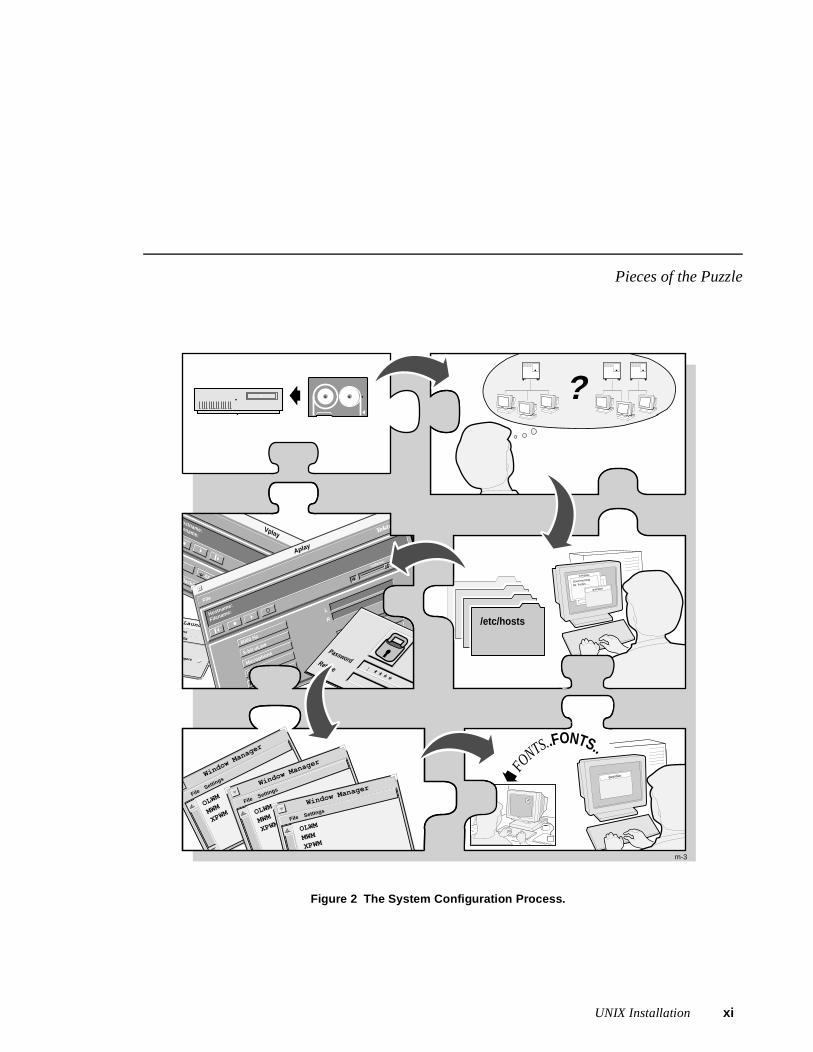
Pieces of the PuzzleConfiguration is the key to the successful integration of network computers intyour environment. System configuration is represented as a puzzle: each piemust be completed and integrated before the entire system configuration is complete. The configuration puzzle is illustrated in Figure 2.
Throughout this manual, the individual puzzle pieces are used to visually guidyou through the system configuration process. As you complete each piece, yare one step closer to a centralized system. When the puzzle is complete, yohave created a custom environment tailored to your computing resources, yoapplications, and your users’ requirements. As an added bonus, the system centrally administered, easy to maintain, and has the flexibility to adapt to youchanging computing needs.
Chapter 1, Installing the Software, is the first step in the configuration process. This chapter describes how to load the network computer software onto your computer.
Chapter 2, Making Choices, helps you analyze your environment and select the best methods to configure your network computers and youenvironment. Strategies for using a centralized configuration, integratinadditional network computers, and using Flash memory are also included.
Chapters 3 - 8, Supporting a Centralized System, provides the host specific procedures you need to implement your configuration decisionyou made in Chapter 2. Refer to Chapter 2 for information on which procedures to perform.
Chapter 9, Local Clients, provides information about starting and using the XpressWare local clients. Local clients execute on the network computer instead of the host, thus reducing network traffic.
Chapter 10, Window Managers, provides information about the local window managers; Motif Window Manager, OpenLook Window Manager, and XpressWare Window Manager.
Chapter 11, Using Additional Fonts, describes the procedures and utilities necessary to make your fonts available to the network compute
Chapter 12, Troubleshooting, describes debugging methods and solutions to help troubleshoot your configuration.
UNIX Installation
Pieces of the Puzzle
Figure 2 The System Configuration Process.
Vplay
0
Contrast: Volume: 50
X
Black/White
Hostname:ilename:
0
Brightness:
4X
Launcherons
edia
agers
Audio PlayerDigital Video
XIE ViewerAudio Mixer
Aplay
L
R
Volume: 50
8000 Hz
8-bit uLaw
Microphone
Stereo
Mic Boost
File
Hostname:
Filename:
Rec. Level:
0 dB
60
Rec. Length (secs)
Password: * * * *
Retype
Window Manager
FileSettin
gs
OLWM
MWM
XPWM
Window Manager
FileSettings
OLWM
MWM
XPWM
Window Manager
File Settings
OLWM
MWM
XPWM
?
FO
NTS..FONTS..
guardian
m-3
colossus
Good morning
Mr. Forbin.....
guardian
/etc/hosts
UNIX Installation xi

Preface
xii
UNIX Installation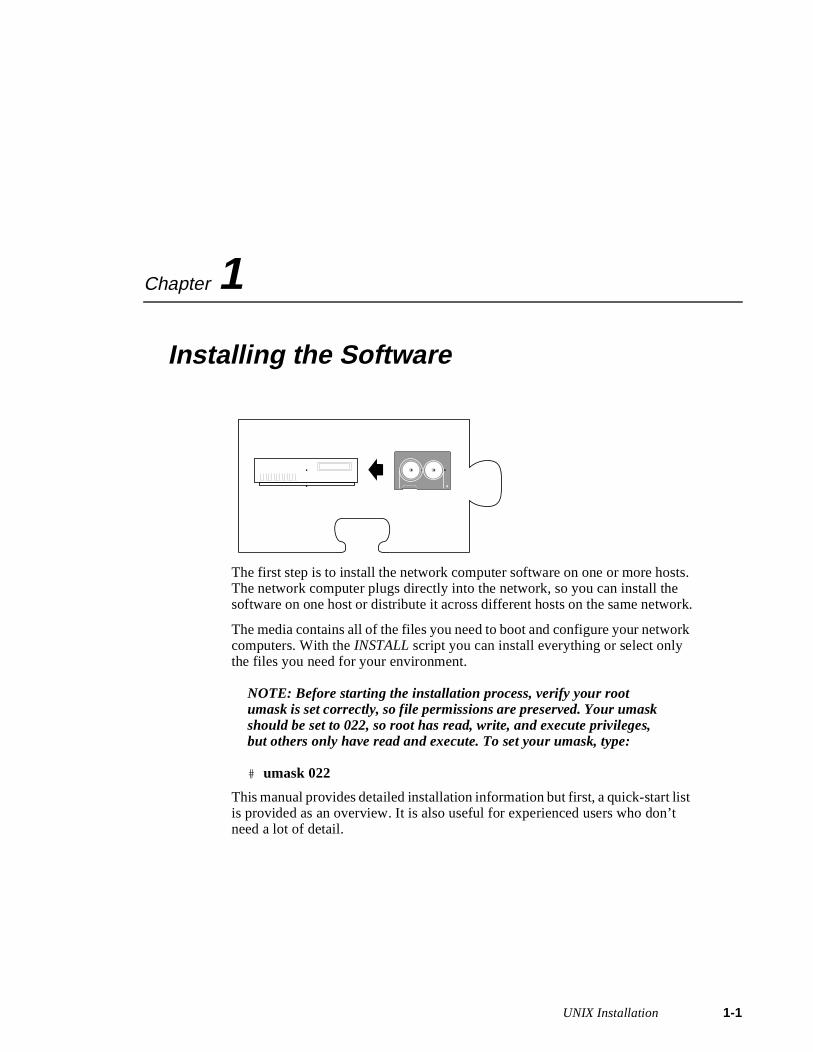
Chapter
1s.
rk.
k
t
Installing the Software
The first step is to install the network computer software on one or more hostThe network computer plugs directly into the network, so you can install the software on one host or distribute it across different hosts on the same netwo
The media contains all of the files you need to boot and configure your networcomputers. With the INSTALL script you can install everything or select only the files you need for your environment.
NOTE: Before starting the installation process, verify your root umask is set correctly, so file permissions are preserved. Your umask should be set to 022, so root has read, write, and execute privileges, but others only have read and execute. To set your umask, type:
# umask 022
This manual provides detailed installation information but first, a quick-start lisis provided as an overview. It is also useful for experienced users who don’t need a lot of detail.
UNIX Installation 1-1
Chapter 1 Installing the Software
1-2
on
t
f
f e
ed
Quick StartThe following steps provide an overview describing how to install NCBridge the host and to configure an NC for operation. Details can be found in the remainder of this manual and in the Network Computer Reference Manual.
NCBridge installation1. Log on to installation host.
2. Insert the installation CD-ROM into the host CD-ROM drive. Set the mounpoint and path (for details, see Installing from a CD-ROM Drive on page 1-12).
3. Extract the INSTALL script (see Extracting the INSTALL Script on page 1-14 for details).
4. Run the install script. Choose the options you wish to install as you are prompted. Choose options as they apply to your system. The remainder othis chapter covers many different UNIX platforms (i.e. Sun, IBM, HP, etc.).
5. Configure the fonts for your workstation. This is a common source of installation problems. One of the following two methods may be used.
Font SetupProviding access to the correct fonts is key to the function and appearance owindows on the NC’s display. Font access is most easily done by matching thNC fonts to the fonts used by other X window workstations. For example, if younormally run an application on a Solaris workstation, then ensure the fonts usby the NC match the Solaris workstation’s fonts.
Method 1 (for Solaris workstations with font servers):1. Point to the font server using the format TCP:/<ipaddr>:7100 (<ipaddr> is
the ip address of the font server). Add this command to the fonts.tbl file in the /tekxp/boot/config directory.
UNIX Installation
NC terminal installation
Method 2 (other systems):1. Determine the fonts used by the workstation you’re trying to simulate by
entering the command xset -q. A list of fonts and paths similar to the following will appear:
/usr/openwin/lib/X11/fonts/F3bitmaps/usr/openwin/lib/X11/fonts/Type1/usr/openwin/lib/X11/fonts/Speedo/usr/openwin/lib/X11/fonts/misc/usr/openwin/lib/X11/fonts/75dpi/usr/openwin/lib/X11/fonts/100dpi
2. Enter the path information obtained in the previous step into the fonts.tbl file in the /tekxp/boot/config directory.
3. Using nfs boot, the boot and font directories need to be exported for file sharing. See Chapters 3 - 8 for details regarding your specific system.
4. Set up the terminal for nfs file sharing. File sharing allows the terminal to have nfs access to font files listed in the fonts.tbl file. Do this by adding thefollowing to the nfs_table entry in the xp.cnf file for the terminal: nfs_table "<file_system_name>" "<local_directory>" "<transfer_size>". <file_system_name> is the remote host path specified by either name or ipaddress and path, <local_directory> is the local path specification and <transfer_size> is the byte size for transfers. The following is a typical example:
nfs_table "oregon:/usr" "/usr" "8192"
See the Network Computer Reference Manual for more details.
NOTE: With newer versions of UNIX on our supported workstations, it is recommended to configure NCBridge to use the fonts provided by the UNIX vendor.
NC terminal installation1. Unpack the NC hardware and assemble according to Installation Guide
provided.
2. Turn on the NC.
3. When the boot screen appears, press the spacebar.
UNIX Installation 1-3
Chapter 1 Installing the Software
1-4
es
4. Set the following items:IA <ip address of NC> IH <ip address of boot host>IM <subnet mask>BP </installation_directory/tekxp/boot/os.500>IGate <ip address of gateway host>NVS (to save settings in NVRAM)B (to start boot process)
The network computer should boot for basic operation. Make custom changto the installation, as desired.
After booting, a TekHostMenu window should appear, showing a list of available hosts.
UNIX Installation
Media Contents
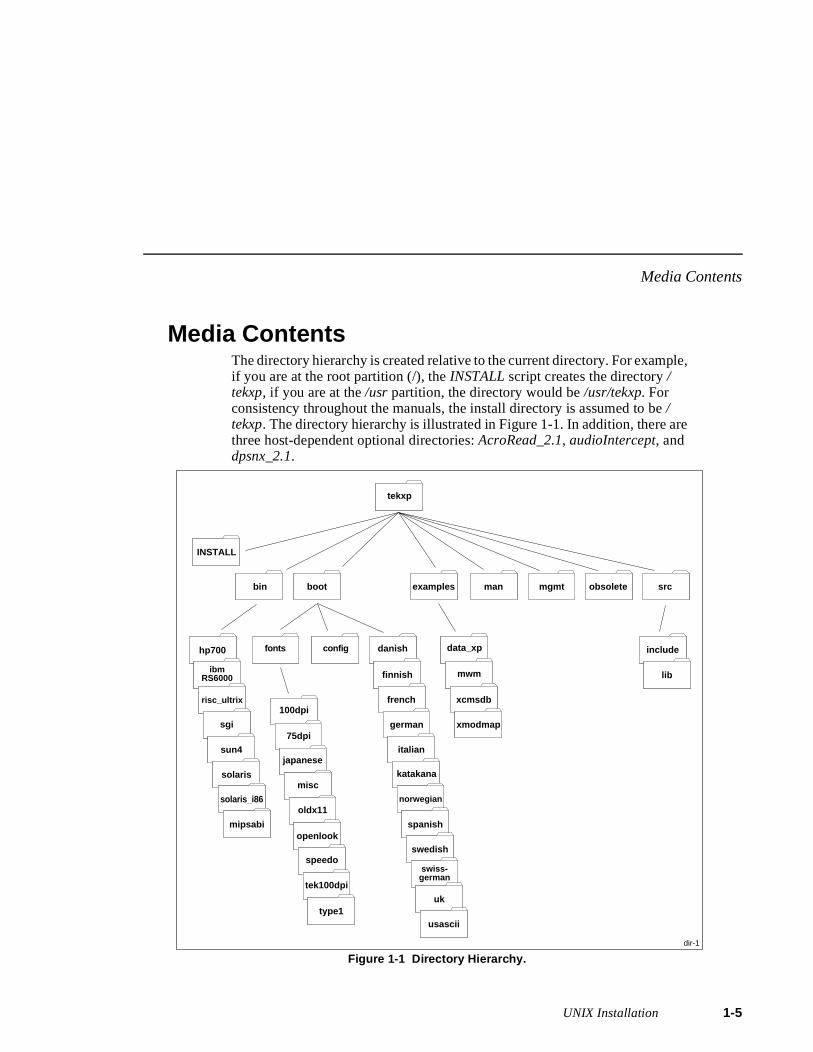
Media ContentsThe directory hierarchy is created relative to the current directory. For example, if you are at the root partition (/), the INSTALL script creates the directory /tekxp, if you are at the /usr partition, the directory would be /usr/tekxp. For consistency throughout the manuals, the install directory is assumed to be /tekxp. The directory hierarchy is illustrated in Figure 1-1. In addition, there are three host-dependent optional directories: AcroRead_2.1, audioIntercept, and dpsnx_2.1.
Figure 1-1 Directory Hierarchy.dir-1
finnish
french
german
italian
katakana
norwegian
spanish
swedish
swiss-german
uk
usascii
data_xp
mwm
hp700 include
libibm
RS6000
risc_ultrix
sgi
sun4
100dpi
75dpi
japanese
misc
oldx11
openlook
speedo
tek100dpi
type1
xcmsdb
bin boot
INSTALL
examples man mgmt obsolete src
tekxp
configfonts danish
xmodmap
solaris
solaris_i86
mipsabi
UNIX Installation 1-5
Chapter 1 Installing the Software
1-6
t
Here are the standard installed directories:
• /tekxp/INSTALL
Contains the installation scripts and the installation log files.
• /tekxp/bin/<host>
Contains one or more host subdirectories containing network computer-specific executables for font conversion, hardcopy, and communications.
• /tekxp/boot
Contains the boot files, boot fonts, local clients, and input files. For files thadiffer between network computer models, the format file.model is used. Refer to Table 1-8 for model information.
• /tekxp/boot/config
Contains the network computer configuration files (xp.cnf and.tbl files).
• /tekxp/boot/fonts
Contains subdirectories for the supplied non-resident fonts.
• /tekxp/boot/<language_directory>/app-defaults
Contains translated text for network computer clients.
• /tekxp/examples
Contains examples of resource files, such as Xsession and Xresources. There are subdirectories containing sample files for data_xp, mwm, and xcmsdb and keyboard mapping files for use with 7 bit national character sets.
• /tekxp/man
Contains on-line manual pages for many of the binaries in /tekxp/bin/<host>
• /tekxp/mgmt
Contains a sample SNMP MIB file.
• /tekxp/src
Contains source files for various utilities.
UNIX Installation
Media Contents
Here are the optional directories:
• /tekxp/AcroRead_2.1
Contains the Adobe Acrobat programs available with the PSXpress option.
• /tekxp/audioIntercept
Contains files that allow host based audio applications to redirect audio output to the network computer.
• /tekxp/dpsnx_2.1
Contains the Adobe Display PostScript files available with the PSXpress option on selected hosts
UNIX Installation 1-7

Chapter 1 Installing the Software
1-8
Installing NCBridgeThe following sections explain installation considerations, preparations, and script extraction for the different hosts on which you can install NCBridge:
• Sun (page 1-9)
• IBM (page 1-15)
• Hewlett Packard (page 1-20)
• Silicon Graphics (page 1-25)
• Alpha_OSF (page 1-30)
• Generic UNIX (page 1-35)
UNIX Installation

Sun Installation
n
e
d
Sun InstallationThis section describes installing NCBridge on Sun hosts. It includes installatioconsiderations, preparing for the installation, installing NCBridge, and extracting the INSTALL script.
Installation ConsiderationsThe binary files in the directory /tekxp/bin/sun4 support Sun hosts running SunOS versions 4.1.3 or greater (referred to as SunOS 4 in this manual). The binary files in the directory /tekxp/bin/solaris support Sun Sparc hosts running Solaris 2.3 or greater, (referred to as SunOS 5 in this manual), and the binary files in the directory /tekxp/bin/solaris_i86 supports Intel solaris version 2.4.
Before you install the tape, there are two topics you need to consider:
• NFS boot security
• Secure tftp
The following sections describe the general considerations. If you need morin-depth or introductory information, refer to your Sun documentation.
NFS Boot Security
If you are planning to boot via NFS, the installation directory must be exporteso the network computer can access the boot files. Select an installation directory tree that does not contain secured or proprietary information. For example, you may wish to install files under the directory /usr/tekxp instead of /tekxp. Thereby exporting the /usr partition instead of the root partition (/).
UNIX Installation 1-9
Chapter 1 Installing the Software
1-1
if
se
, r
,
Secure tftp
There are considerations if the boot or font host use secure tftp. To determineyou use secure tftp, check the file /etc/inetd.conf for a line similar to:
tftp dgram udp wait root /usr/etc/in.tftpd in.tftpd -s /tftpboot
The -s indicates the host is using secure tftp. The partial path name followingthe -s is the secure path (the only path searched for files used in tftp transfers).
If you are using secure tftp, note the secure directory at the end of the line. Uthis directory as the parent directory for /tekxp.
Secure tftp does not follow symbolic links to files outside the secure directoryso all boot and configuration files must share a common parent directory. Foexample, you cannot link the file /tftpboot/tekxp/boot/config/xp.cnf to /usr/tekxp/xp.cnf. However, it is possible to symbolically link the secure directory toanother partition if disk space is limited in the secure directory. For example/tftpboot/tekxp could be linked to /usr/tftpboot/tekxp. Refer to your host documentation.
0 UNIX Installation

Preparing for Installation
Preparing for Installation1. Log in to the host system as root:
# su
NOTE: If you are not logged in as root, you are not be able to overwrite files from a previous installation.
2. Use Table 1-1 to calculate the approximate size of the files you need to install. Use df to make sure you have enough disk space in the partition where you want to install the files. If not, select another partition that has enough space, like /usr, or increase the size of the logical volume.
# df
Table 1-1 Approximate File Package Sizes for Sun Installations.
Package NameSize
(kilobytes)Package Name
Size (kilobytes)
tekxp/boot 2256 tekxp/man 512
tekxp/boot (all binaries)XP10 onlyXP100/XP200/XP350/XP400 onlyNC200XP330 only
4499694167064
~70644516
tekxp/mgmt 92
tekxp/obsolete 468
tekxp/examples 212
tekxp/bin 8390
tekxp/boot/fonts (all)misc100dpi75dpijapaneseoldx11openlooktek100dpiSpeedoType1
1288424962396209225321056104564568
1072
tekxp/src 192
tekxp/audioIntercept 756
tekxp/DpsNx_2.1 24412
UNIX Installation 1-11
Chapter 1 Installing the Software
1-1
Installing from a CD-ROM DriveExtracting the script is only required for the initial installation. The script can be reused to extract additional files or to re-install the software.
1. Insert the CD-ROM into the drive. Use cd to change to the parent directory (must have world read and execute privilege). This is where the INSTALL script builds the tekxp directory tree. A typical installation requires about 80 MB of free space.
For this example, we are using the root partition:
# cd /
2. You need to know the mount point and path for your CD-ROM drive. If a mount point does not exist, create a directory named cdrom to be used as the mount point for the CD-ROM by entering the following command:
# mkdir /cdrom
3. Enter the command to mount the CD-ROM to the /cdrom directory: If you are running an automounter, this step is not necessary.
For Sun4:
mount -t hsfs -r /dev/sr0 /cdrom
The -t indicates the file system type (hsfs), the -r indicates the contents are read-only, and /dev/sr0 is the device name.
For Sun5:
mount -F hsfs -r /dev/sd6c /cdrom
The -F indicates the file system type (hsfs), the -r indicates the contents are read-only, and /dev/sd6c is the device name.
4. You need to know the mount point and path for your CD-ROM drive. Defaults are shown in the extraction examples. Extract the INSTALL script with the command:
tar -xvpf /cdrom/sun/install.tar
NOTE: For Sun5, the Solaris 2.3 automounter mounts the CD-ROM as /cdrom/NCBridge_version_X_X/common, where X_X is the version number (for example, 8_0).
2 UNIX Installation
Installing from a Remote Tape Drive
ve
e
Installing from a Remote Tape DriveIf you are installing the files from a remote tape drive:
1. Establish remote shell privileges between the remote host with the tape driand the local host where you want to install the files. Each host needs an .rhosts file in the root directory. The file contains the other host name followed by root as the user name. For security reasons, you may want to delete this file when you the installation is complete. As an example, assumyou have two hosts: oregon and montana. The.rhosts file on oregon contains:
montana root
The .rhosts file on montana contains:
oregon root
2. Use the remote shell command to extract the INSTALL script from the tape:
# rsh -n <remote_host> dd if=<device> bs=20b | tar xvBfb - 20
where <remote_host> is the name of the host with the tape drive, and <device> is the no-rewind device type. The default no-rewind <device> for Sun tape drives is /dev/nrst0
Continue on with Using the INSTALL Script on page 1-40. Be sure to use the -host and -user switches with the INSTALL script.
UNIX Installation 1-13
Chapter 1 Installing the Software
1-1
Extracting the INSTALL ScriptYou only need to extract the INSTALL script for your initial installation, as the script can be reused for subsequent installations. To extract the script:
1. Use cd to change to the parent directory. This is where the INSTALL script builds the tekxp directory tree. The parent directory should have world readand execute privileges. For this example, we are using the root partition:
# cd /
2. Insert the media into the drive.
3. You need to know the path and name of your no-rewind tape device. The default no-rewind <device> for Sun tape drives is /dev/nrst0. Extract the INSTALL script with the command:
# tar -xvpf <device>
For example:
# tar -xvpf /dev/nrst0
After extracting the INSTALL script, continue to Using the INSTALL Script on page 1-40.
4 UNIX Installation
IBM Installation
d
IBM InstallationThis section describes installing NCBridge on IBM hosts. It includes installation considerations, preparing for the installation, installing NCBridge,and extracting the INSTALL script.
Installation Considerations
NFS Boot Security
If you are planning to boot via NFS, the installation directory must be exporteso the network computer can access the boot files. Select an installation directory tree that does not contain secured or proprietary information. For example, you may wish to install files under the directory /usr/tekxp instead of /tekxp. Thereby exporting the /usr partition instead of the root partition (/).
If you need more in-depth or introductory information, refer to your IBM host documentation.
Preparing for Installation1. Log in to the host system as root:
# su
NOTE: If you are not logged in as root, you are not be able to overwrite files from a previous installation.
2. Use Table 1-2 to calculate the approximate size of the files you need to install. Use df to make sure you have enough disk space in the partition where you want to install the files. If not, select another partition that has enough space, like /usr, or increase the size of the logical volume.
# df
UNIX Installation 1-15
Chapter 1 Installing the Software
1-1
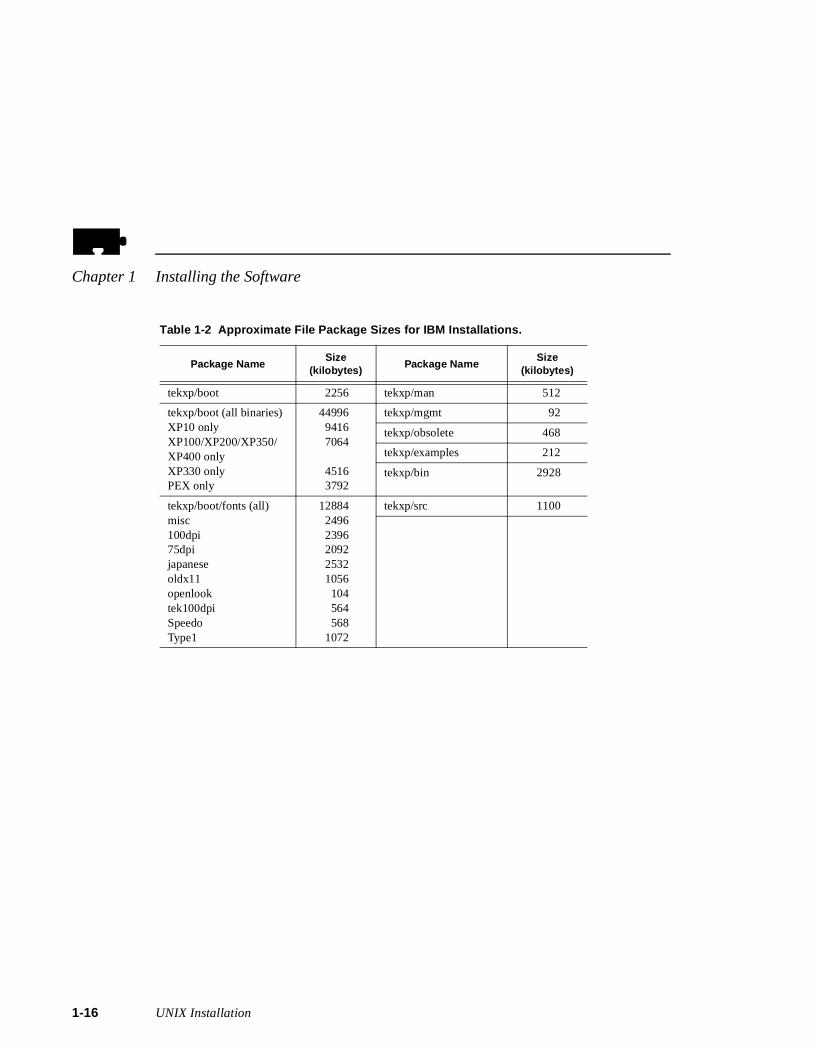
Table 1-2 Approximate File Package Sizes for IBM Installations.
Package NameSize
(kilobytes)Package Name
Size (kilobytes)
tekxp/boot 2256 tekxp/man 512
tekxp/boot (all binaries)XP10 onlyXP100/XP200/XP350/XP400 onlyXP330 onlyPEX only
4499694167064
45163792
tekxp/mgmt 92
tekxp/obsolete 468
tekxp/examples 212
tekxp/bin 2928
tekxp/boot/fonts (all)misc100dpi75dpijapaneseoldx11openlooktek100dpiSpeedoType1
1288424962396209225321056104564568
1072
tekxp/src 1100
6 UNIX Installation
Installing from a CD-ROM Drive
Installing from a CD-ROM DriveExtracting the script is only required for the initial installation. The script can be reused to extract additional files or to re-install the software.
1. Insert the CD-ROM into the drive. Use cd to change to the parent directory (must have world read and execute privilege). This is where the INSTALL script builds the tekxp directory tree. A typical installation requires about 80 MB of free space.
For this example, we are using the root partition:
# cd /
2. You need to know the mount point and path for your CD-ROM drive. If a mount point does not exist, create a directory named cdrom to be used as the mount point for the CD-ROM. Create the mount point with SMIT. To add access to a local drive:
System Management ⇒Physical & Logical Storage ⇒File Systems ⇒Add/Change/Show/Delete File Systems ⇒
3. Enter the command to mount the CD-ROM to the /cdrom directory: If you are running an automounter, this step is not necessary.
mount -v cdrfs -r /dev/cd0 /cdrom
where -v is the virtual file system type (cdrfs), -r indicates read-only, and /dev/cd0 is the device name.
4. You need to know the mount point and path for your CD-ROM drive. Extract the INSTALL script with the command:
tar -xvpf /cdrom/ibm/install.tar
UNIX Installation 1-17
Chapter 1 Installing the Software
1-1
ve
e
Installing from a Remote Tape DriveIf you are installing the files from a remote tape drive:
1. Establish remote shell privileges between the remote host with the tape driand the local host where you want to install the files. Each host needs an .rhosts file in the root directory. The file contains the other host name followed by root as the user name. For security reasons, you may want to delete this file when you the installation is complete. As an example, assumyou have two hosts: oregon and montana. The.rhosts file on oregon contains:
montana root
The .rhosts file on montana contains:
oregon root
2. Use the remote shell command to extract the INSTALL script from the tape:
# rsh -n <remote_host> dd if=<device> bs=20b | tar xvBfb - 20
where <remote_host> is the name of the host with the tape drive, and <device> is the no-rewind device type. The default no-rewind <device> for IBM tape drives is /dev/rmt0.1
Continue on with Using the INSTALL Script on page 1-40. Be sure to use the -host and -user switches with the INSTALL script.
8 UNIX Installation
Extracting the INSTALL Script
ur
Extracting the INSTALL ScriptYou must extract the script from the media. This only needs to be done for yoinitial installation, as the script can be reused for subsequent installations.
1. Use cd to change to the parent directory. This is where the INSTALL script builds the tekxp directory tree. The parent directory should have world read and execute privileges. For this example, we are using the root partition:
# cd /
2. Insert the media into the drive.
3. You need to know the path and name of your no-rewind tape device. The default no-rewind <device> for IBM RS/6000 tape drives is /dev/rmt0.1. Extract the INSTALL script with the command:
# tar -xvpf <device>
For example:
# tar -xvpf /dev/rmt0.1
After extracting the INSTALL script, continue to Using the INSTALL Script on page 1-40.
UNIX Installation 1-19
Chapter 1 Installing the Software
1-2
a ed
Hewlett-Packard InstallationThis section describes installing NCBridge on Hewlett-Packard hosts. It includes installation considerations, preparing for the installation, installing NCBridge, and extracting the INSTALL script.
The binary files in the directory /tekxp/bin/hp700 support Series 700 and 800 hosts.
Installation Considerations
NFS Boot Security
If you plan to boot via NFS, you must export the directories that contain the network computer software before you load the installation media. Use SAM to export and create the selected boot and install directories. When selectingboot and install directory, create a tree structure that does not contain securor proprietary information. For example, you may wish to install files under thedirectory /usr/tekxp instead of /tekxp. Thereby exporting the /usr partition instead of the root partition (/).
Preparing for Installation1. Log in to the host system as root:
# su
NOTE: If you are not logged in as root, you are not be able to overwrite files from a previous installation.
0 UNIX Installation
Preparing for Installation
2. Use Table 1-3 to calculate the approximate size of the files you need toinstall. Use df to make sure you have at enough disk space in the partitionwhere you want to install the files. If not, select another partition that has enough space, like /usr, or increase the size of the logical volume.
# df
or from the SAM menu:
File Systems->Status Operations->View Disk Space Information
Table 1-3 Approximate File Package Sizes for Hewlett-Packard Installations.
Package NameSize
(kilobytes)Package Name
Size (kilobytes)
tekxp/boot 2088 tekxp/man 504
tekxp/boot (all binaries)XP10 onlyXP100/XP200/XP350/XP400 onlyXP330 onlyPEX only
386761035617560145563792
tekxp/mgmt 92
tekxp/obsolete 236
tekxp/examples 212
tekxp/bin 5839
tekxp/boot/fonts (all)misc100dpi75dpijapaneseoldx11openlooktek100dpiSpeedoType1
1288024962396209225321056104564568
1072
UNIX Installation 1-21
Chapter 1 Installing the Software
1-2
Installing from a CD-ROM DriveExtracting the script is only required for the initial installation. The script can be reused to extract additional files or to re-install the software.
1. Insert the CD-ROM into the drive. Use cd to change to the parent directory (must have world read and execute privilege). This is where the INSTALL script builds the tekxp directory tree. A typical installation requires about 80 MB of free space.
For this example, we are using the root partition:
# cd /
2. You need to know the mount point and path for your CD-ROM drive. If a mount point does not exist, create a directory named cdrom to be used as the mount point for the CD-ROM by entering the following command:
# mkdir /cdrom
3. Enter the command to mount the CD-ROM to the /cdrom directory: If you are running an automounter, this step is not necessary.
mount -t cdfs -r /dev/dsk/4s0 /cdrom
where -t is the file system type (cdfs), -r indicates read-only, and /dev/dsk/4s0 is the device name.
4. You need to know the mount point and path for your CD-ROM drive. Defaults are shown in the extraction examples. Extract the INSTALL script with the command:
tar -xvpf /cdrom/HP/INSTALL.TAR\;1
NOTE: To use NFS as a file access method, use SAM to export the boot_directory (/tekxp/boot) before running the script.
2 UNIX Installation
Installing from a Remote Tape Drive
ve
e
Installing from a Remote Tape DriveIf you are installing the files from a remote tape drive:
1. Establish remote shell privileges between the remote host with the tape driand the local host where you want to install the files. Each host needs an .rhosts file in the root directory. The file contains the other host name followed by root as the user name. For security reasons, you may want to delete this file when you the installation is complete. As an example, assumyou have two hosts: oregon and montana. The.rhosts file on oregon contains:
montana root
The .rhosts file on montana contains:
oregon root
2. Use the remote shell command to extract the INSTALL script from the tape:
# remsh -n <remote_host> dd if=<device> bs=20b | tar xvfb - 20
where <remote_host> is the name of the host with the tape drive, and <device> is the no-rewind device type. The default no-rewind <device> for Hewlett-Packard tape drives is /dev/update.src.
Continue on with Using the INSTALL Script on page 1-40. Be sure to use the -host and -user switches with the INSTALL script.
UNIX Installation 1-23
Chapter 1 Installing the Software
1-2
ur
Extracting the INSTALL ScriptYou must extract the script from the media. This only needs to be done for yoinitial installation, as the script can be reused for subsequent installations.
1. Use cd to change to the parent directory. This is where the INSTALL script builds the tekxp directory tree. The parent directory should have world readand execute privileges. For this example, we are using the root partition:
# cd /
2. Insert the media into the drive.
3. You need to know the path and name of your no-rewind tape device. The default no-rewind <device> for Hewlett-Packard tape drives is /dev/update.src. Extract the INSTALL script with the command:
# tar -xvpf <device>
For example:
# tar -xvpf /dev/update.src
NOTE: If you intend to use NFS as a file access method, use SAM to export the boot_directory before loading the software.
After extracting the INSTALL script, continue to Using the INSTALL Script on page 1-40.
4 UNIX Installation
Silicon Graphics Installation
re
d on
if
, r
Silicon Graphics InstallationThis section describes installing NCBridge on Silicon Graphics hosts. It includes installation considerations, preparing for the installation, installing NCBridge, and extracting the INSTALL script.
Installation ConsiderationsThe following sections describe the general considerations. Your Silicon Graphics operating system version should be 4.0.5 or higher. If you need moin-depth or introductory information, refer to your Silicon Graphics IRIS System Administration Guide.
NFS Boot Security
If you are planning to boot via NFS, the installation directory must be exporteso the network computer users can access the boot files. Select an installatidirectory tree that does not contain secured or proprietary information. For example, you may wish to install files under the directory /usr/tekxp instead of /tekxp. Thereby exporting the /usr partition instead of the root partition (/).
Secure tftp
There are considerations if the boot or font host use secure tftp. To determineyou use secure tftp, check the file /etc/inetd.conf for a line similar to:
tftp dgram udp wait guest /usr/etc/tftpd tftpd -s /usr/local/boot
The -s indicates the host is using secure tftp. The partial path name followingthe -s is the secure path.
Secure tftp does not follow symbolic links to files outside the secure directoryso all boot and configuration files must share a common parent directory. Foexample, you cannot link the file /tekxp/boot/config/xp.cnf to /usr/tekxp/boot/config/xp.cnf. However, it is possible to symbolically link the secure directory to another partition if disk space is limited in the secure directory. For example, /tekxp could be linked to /usr/tekxp. Refer to your host documentation.
UNIX Installation 1-25
Chapter 1 Installing the Software
1-2
Preparing for Installation1. Log in to the host system as root:
# su
NOTE: If you are not logged in as root, you are not be able to overwrite files from a previous installation.
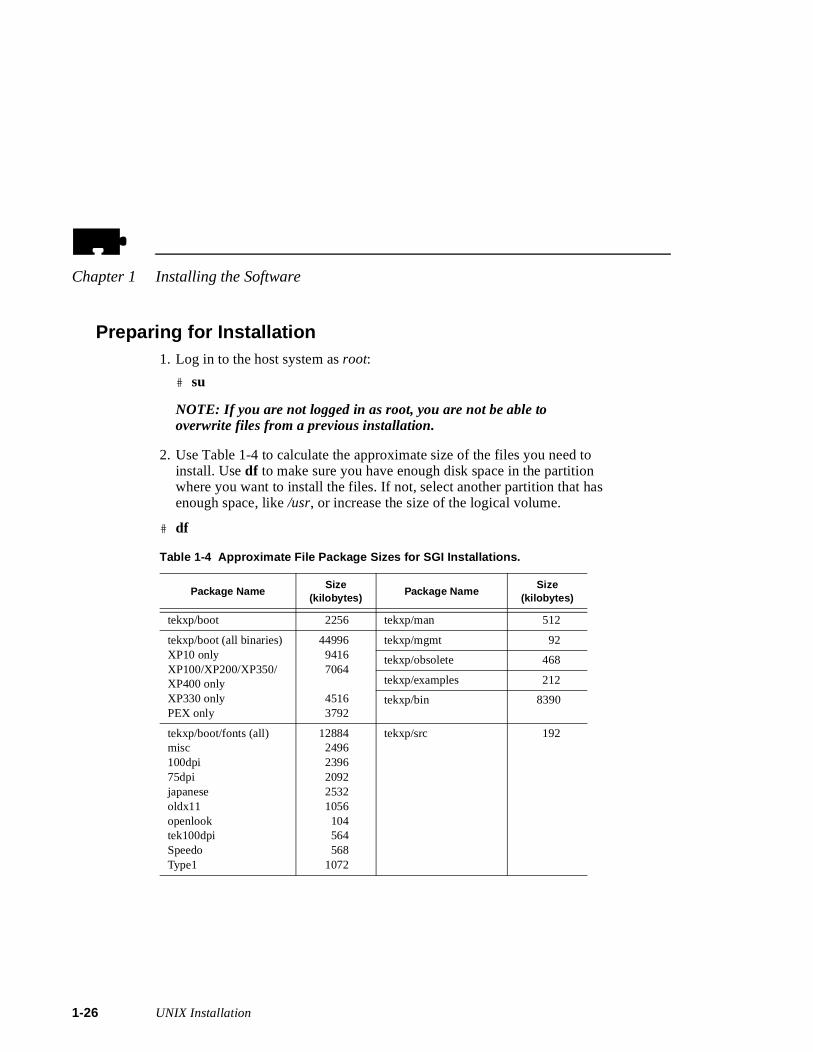
2. Use Table 1-4 to calculate the approximate size of the files you need to install. Use df to make sure you have enough disk space in the partition where you want to install the files. If not, select another partition that has enough space, like /usr, or increase the size of the logical volume.
# df
Table 1-4 Approximate File Package Sizes for SGI Installations.
Package NameSize
(kilobytes)Package Name
Size (kilobytes)
tekxp/boot 2256 tekxp/man 512
tekxp/boot (all binaries)XP10 onlyXP100/XP200/XP350/XP400 onlyXP330 onlyPEX only
4499694167064
45163792
tekxp/mgmt 92
tekxp/obsolete 468
tekxp/examples 212
tekxp/bin 8390
tekxp/boot/fonts (all)misc100dpi75dpijapaneseoldx11openlooktek100dpiSpeedoType1
1288424962396209225321056104564568
1072
tekxp/src 192
6 UNIX Installation

Installing from a CD-ROM Drive
Installing from a CD-ROM DriveExtracting the script is only required for the initial installation. The script can be reused to extract additional files or to re-install the software.
1. Insert the CD-ROM into the drive. Use cd to change to the parent directory (must have world read and execute privilege). This is where the INSTALL script builds the tekxp directory tree. A typical installation requires about 80 MB of free space.
For this example, we are using the root partition:
# cd /
2. You need to know the mount point and path for your CD-ROM drive. If a mount point does not exist, create a directory named cdrom to be used as the mount point for the CD-ROM by entering the following command:
# mkdir /cdrom
3. Enter the command to mount the CD-ROM to the /cdrom directory: If you are running an automounter, this step is not necessary.
mount -t iso9660 -r /dev/scsi/<device> /cdrom
the -t indicates the file system type (iso9660), the -r indicates the contents are read-only, and /dev/scsi/<device> is the device name.
4. You need to know the mount point and path for your CD-ROM drive. Defaults are shown in the extraction examples. Extract the INSTALL script with the command:
tar -xvpf /cdrom/sgi/install.tar
UNIX Installation 1-27
Chapter 1 Installing the Software
1-2
ve
:
Installing from a Remote Tape DriveIf you are installing the files from a remote tape drive:
1. Establish remote shell privileges between the remote host with the tape driand the local host where you want to install the files. Each host needs an .rhosts file in the root directory. The file contains the other host name followed by root as the user name. For security reasons, you may want to delete this file after installing. As an example, assume you have two hostsoregon and montana. The.rhosts file on oregon contains:
montana root
The .rhosts file on montana contains:
oregon root
2. Use the remote shell command to extract the INSTALL script from the tape:
# rsh -n <remote_host> dd if=<device> bs=20b | tar xvBfb - 20
where <remote_host> is the name of the host with the tape drive, and <device> is the no-rewind device type. The default no-rewind <device> for Silicon Graphics tape drives is /dev/nrtape
Continue on with Using the INSTALL Script on page 1-40. Be sure to use the -host and -user switches with the INSTALL script.
8 UNIX Installation
Extracting the INSTALL Script
Extracting the INSTALL ScriptYou only need to extract the INSTALL script for your initial installation, as the script can be reused for subsequent installations. To extract the script:
1. Use cd to change to the parent directory. This is where the INSTALL script builds the tekxp directory tree. The parent directory should have world read and execute privileges. For this example, we are using the root partition:
# cd /
2. Insert the media into the drive.
3. You need to know the path and name of your no-rewind tape device. The default no-rewind <device> for Silicon Graphics tape drives is /dev/nrtape. Extract the INSTALL script with the command:
# tar -xvpf <device>
For example:
# tar -xvpf /dev/nrtape
After extracting the INSTALL script, continue to Using the INSTALL Script on page 1-40.
UNIX Installation 1-29
Chapter 1 Installing the Software
1-3
ain
if
s).
se
, r
,
Alpha_OSF InstallationThis section describes installing NCBridge on Alpha_OSF hosts. It includes installation considerations, preparing for the installation, installing NCBridge,and extracting the INSTALL script.
The files for Alpha AXP running OSF/1 are in the directory /tekxp/bin/AlphAXP_OSF1.
Installation Considerations
NFS Boot Security
If you plan to boot via NFS, you must export the directories that contain the network computer software before you load the installation media. When selecting a boot and install directory, create a tree structure that does not contsecured or proprietary information. For example, you may wish to install filesunder the directory /usr/tekxp instead of /tekxp. Thereby exporting the /usr partition instead of the root partition (/).
Secure tftp
There are considerations if the boot or font host use secure tftp. To determineyou use secure tftp, check the file /etc/inetd.conf for a line similar to:
tftp dgram udp wait /usr/etc/tftpd tftpd -r /tftpboot
The -r indicates the host is using secure tftp. The partial path name followingthe -r is the secure path (the only path searched for files used in tftp transfer
If you are using secure tftp, note the secure directory at the end of the line. Uthis directory as the parent directory for /tekxp.
Secure tftp does not follow symbolic links to files outside the secure directoryso all boot and configuration files must share a common parent directory. Foexample, you cannot link the file /tftpboot/tekxp/boot/config/xp.cnf to /usr/tekxp/xp.cnf. However, it is possible to symbolically link the secure directory toanother partition if disk space is limited in the secure directory. For example/tftpboot/tekxp could be linked to /usr/tftpboot/tekxp. Refer to your host documentation.
0 UNIX Installation

Preparing for Installation
Preparing for Installation1. Log in to the host system as root:
# su
NOTE: If you are not logged in as root, you are not be able to overwrite files from a previous installation.
2. Use Table 1-5 to calculate the approximate size of the files you need to install. Use df to make sure you have at enough disk space in the partitionwhere you want to install the files. If not, select another partition that has enough space, like /usr, or increase the size of the logical volume.
# df
Table 1-5 Approximate File Package Sizes for Alpha_OSF Installations.
Package NameSize
(kilobytes)Package Name
Size (kilobytes)
tekxp/boot 2256 tekxp/man 512
tekxp/boot (all binaries)XP10 onlyXP100/XP200/XP350/XP400 onlyXP330 onlyPEX only
4499694167064
45163792
tekxp/mgmt 92
tekxp/obsolete 468
tekxp/examples 212
tekxp/bin 6536
tekxp/boot/fonts (all)misc100dpi75dpijapaneseoldx11openlooktek100dpiSpeedoType1
1288424962396209225321056104564568
1072
tekxp/src 192
UNIX Installation 1-31
Chapter 1 Installing the Software
1-3
Installing from a CD-ROM DriveExtracting the script is only required for the initial installation. The script can be reused to extract additional files or to re-install the software.
1. Insert the CD-ROM into the drive. Use cd to change to the parent directory (must have world read and execute privilege). This is where the INSTALL script builds the tekxp directory tree. A typical installation requires about 80 MB of free space.
For this example, we are using the root partition:
# cd /
2. You need to know the mount point and path for your CD-ROM drive. If a mount point does not exist, create a directory named cdrom to be used as the mount point for the CD-ROM by entering the following command:
# mkdir /cdrom
3. Enter the command to mount the CD-ROM to the /cdrom directory: If you are running an automounter, this step is not necessary.
mount -t cdfs -o noversion /dev/rzNc /cdrom
where -t is the file system type (cdfs), -o noversion strips version numbers and does not convert file names to uppercase. /dev/rzNc is the device name where N is the logical unit number of the CD-ROM.
4. You need to know the mount point and path for your CD-ROM drive. Defaults are shown in the extraction examples. Extract the INSTALL script with the command:
tar -xvpf /cdrom/ultrix/install.tar
2 UNIX Installation

Installing from a Remote Tape Drive
ve
u
Installing from a Remote Tape DriveIf you are installing the files from a remote tape drive:
1. Establish remote shell privileges between the remote host with the tape driand the local host where you want to install the files. Each host needs an .rhosts file in the root directory. The file contains the other host name followed by root as the user name. For security reasons, you may want to delete this file when the installation is complete. As an example, assume yohave two hosts: oregon and montana. The.rhosts file on oregon contains:
montana root
The .rhosts file on montana contains:
oregon root
2. Use the remote shell command to extract the INSTALL script from the tape:
# rsh -n <remote_host> dd if=<device> bs=20b | tar xvBfb - 20
where <remote_host> is the name of the host with the tape drive, and <device> is the no-rewind device type. The default no-rewind <device> for ULTRIX tape drives is /dev/nrmt0h
Continue on with Using the INSTALL Script on page 1-40. Be sure to use the -host and -user switches with the INSTALL script.
UNIX Installation 1-33
Chapter 1 Installing the Software
1-3
ur
Extracting the INSTALL ScriptYou must extract the script from the media. This only needs to be done for yoinitial installation, as the script can be reused for subsequent installations.
1. Use cd to change to the parent directory. This is where the INSTALL script builds the tekxp directory tree. The parent directory should have world readand execute privileges. For this example, we are using the root partition:
# cd /
2. Insert the media into the drive.
3. You need to know the path and name of your no-rewind tape device. The default no-rewind <device> for ULTRIX tape drives is /dev/nrmt0h. Extract the INSTALL script with the command:
# tar -xvpf <device>
For example:
# tar -xvpf /dev/nrmt0h
After extracting the INSTALL script, continue to Using the INSTALL Script on page 1-40.
4 UNIX Installation
Generic UNIX Installation
k
d
e
d
Generic UNIX InstallationThis section describes installing NCBridge on Generic UNIX hosts. It includesinstallation considerations, preparing for the installation, installing NCBridgesoftware, and extracting the INSTALL script.
The media contains all of the files you need to boot and configure your networcomputers. With the INSTALL script you can install everything or select only the files you need for your environment The generic files can also be installewithout using the INSTALL script.
NOTE: Examples in this chapter are based on a Sun Sparcstation2 running SunOS.
Installation ConsiderationsBefore you install the tape, there are two topics you need to consider:
• NFS boot security
• Secure tftp
The following sections describe the general considerations. If you need morin-depth or introductory information, refer to your host documentation.
NFS Boot Security
If you are planning to boot via NFS, the installation directory must be exporteso the network computer can access the boot files. Select an installation directory tree that does not contain secured or proprietary information. For example, you may wish to install files under the directory /usr/tekxp instead of /tekxp. Thereby exporting the /usr partition instead of the root partition (/).
UNIX Installation 1-35

Chapter 1 Installing the Software
1-3
if
se
, r
,
Secure tftp
There are considerations if the boot or font host use secure tftp. To determineyou use secure tftp, check the file /etc/inetd.conf for a line similar to:
tftp dgram udp wait root /usr/etc/in.tftpd in.tftpd -s /tftpboot
The -s indicates the host is using secure tftp. The partial path name followingthe -s is the secure path (the only path searched for files used in tftp transfers).
If you are using secure tftp, note the secure directory at the end of the line. Uthis directory as the parent directory for /tekxp.
Secure tftp does not follow symbolic links to files outside the secure directoryso all boot and configuration files must share a common parent directory. Foexample, you cannot link the file /tftpboot/tekxp/boot/config/xp.cnf to /usr/tekxp/xp.cnf. However, it is possible to symbolically link the secure directory toanother partition if disk space is limited in the secure directory. For example/tftpboot/tekxp could be linked to /usr/tftpboot/tekxp. Refer to your host documentation.
6 UNIX Installation
Preparing for Installation
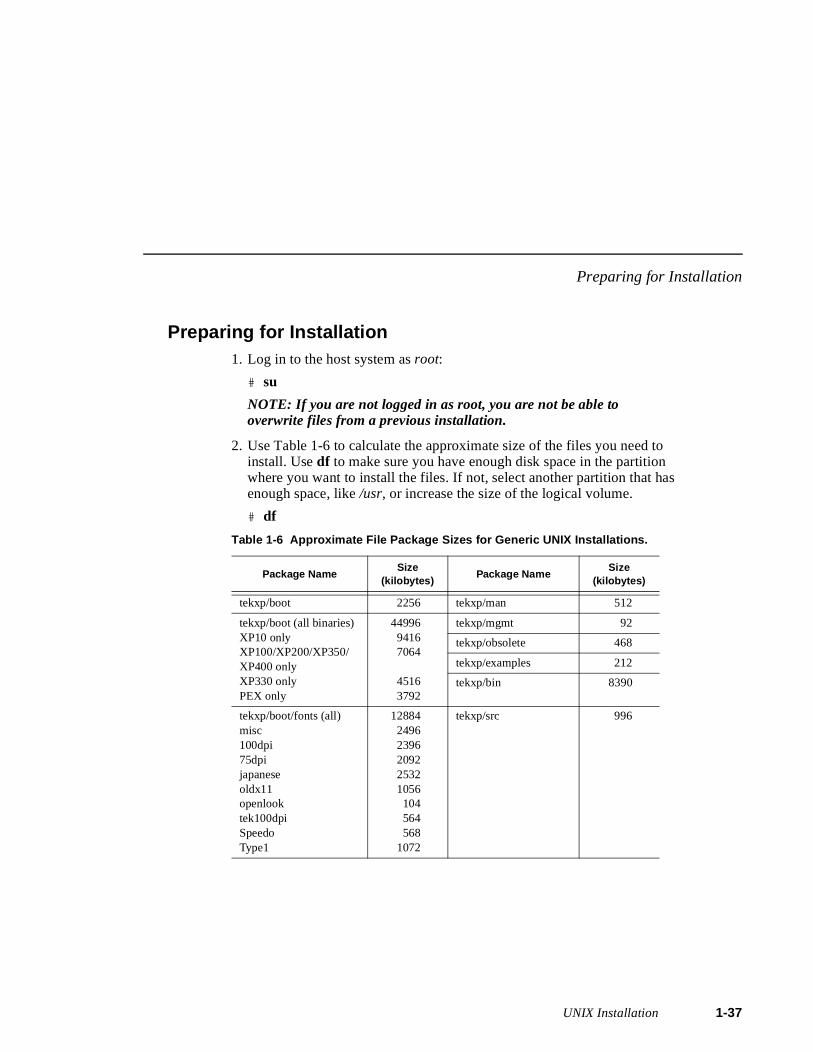
Preparing for Installation1. Log in to the host system as root:
# su
NOTE: If you are not logged in as root, you are not be able to overwrite files from a previous installation.
2. Use Table 1-6 to calculate the approximate size of the files you need to install. Use df to make sure you have enough disk space in the partition where you want to install the files. If not, select another partition that has enough space, like /usr, or increase the size of the logical volume.
# df
Table 1-6 Approximate File Package Sizes for Generic UNIX Installations.
Package NameSize
(kilobytes)Package Name
Size (kilobytes)
tekxp/boot 2256 tekxp/man 512
tekxp/boot (all binaries)XP10 onlyXP100/XP200/XP350/XP400 onlyXP330 onlyPEX only
4499694167064
45163792
tekxp/mgmt 92
tekxp/obsolete 468
tekxp/examples 212
tekxp/bin 8390
tekxp/boot/fonts (all)misc100dpi75dpijapaneseoldx11openlooktek100dpiSpeedoType1
1288424962396209225321056104564568
1072
tekxp/src 996
UNIX Installation 1-37
Chapter 1 Installing the Software
1-3
Installing from a Remote CD-ROM DriveYou may need to establish access to the drive.
On the host with the CD-ROM drive
1. Edit the /etc/exports file to export the CD-ROM drive. Add the line:
/cdrom -ro
2. To enable the export:
# /usr/etc/exportfs -a
3. To verify the export:
# /usr/etc/exportfs
8 UNIX Installation
Installing from a Remote Tape Drive
ve
u
int
Installing from a Remote Tape DriveIf you are installing the files from a remote tape drive:
1. Establish remote shell privileges between the remote host with the tape driand the local host where you want to install the files. Each host needs an .rhosts file in the root directory. The file contains the other host name followed by root as the user name. For security reasons, you may want to delete this file when the installation is complete. As an example, assume yohave two hosts: oregon and montana. The.rhosts file on oregon contains:
montana root
The .rhosts file on montana contains:
oregon root
2. Use the remote shell command to extract the files from the tape:
# rsh -n <remote_host> dd if=<device> bs=20b | tar xvBfb - 20
where <remote_host> is the name of the host with the tape drive, and <device> is the device type. Refer to Table 1-7 for the default <device>. If the tar command fails, skip to the section titled Making the Utilities on page 1-36
If the tar command executes properly, continue on with Using the INSTALL Script on page 1-40. Be sure to use the -host and -user switches with the INSTALL script.
Extracting the Files1. Use cd to change to the parent directory. This is where the INSTALL script
builds the tekxp directory tree. The parent directory should have world read and execute privileges. For this example, we are going to use the root partition:
# cd /2. Insert the media into the drive.
3. You need to know the path and name of your tape device or the mount poand path for your CD-ROM drive. Table 1-7 shows some typical no-rewindtape device types, such as /dev/nrst0. A rewind device can also be used. The default CD-ROM mount point is /cdrom/unix/install.tar
UNIX Installation 1-39
Chapter 1 Installing the Software
1-4
.
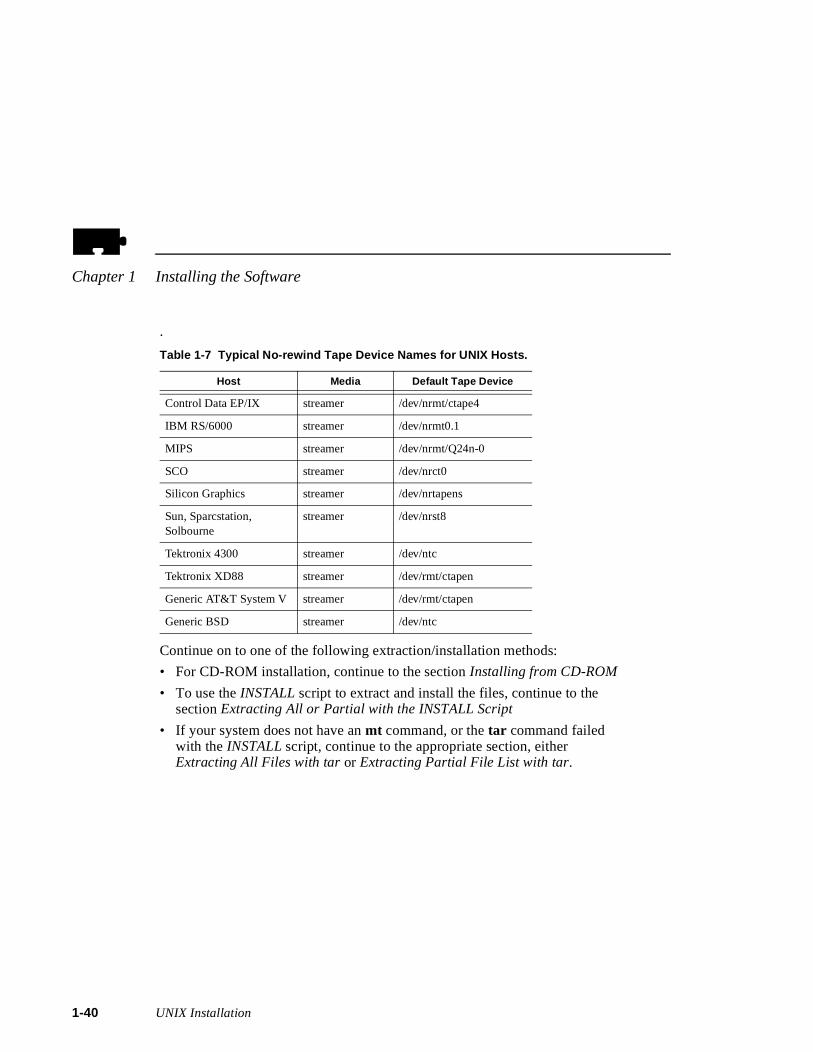
Continue on to one of the following extraction/installation methods:
• For CD-ROM installation, continue to the section Installing from CD-ROM
• To use the INSTALL script to extract and install the files, continue to the section Extracting All or Partial with the INSTALL Script
• If your system does not have an mt command, or the tar command failed with the INSTALL script, continue to the appropriate section, either Extracting All Files with tar or Extracting Partial File List with tar.
Table 1-7 Typical No-rewind Tape Device Names for UNIX Hosts.
Host Media Default Tape Device
Control Data EP/IX streamer /dev/nrmt/ctape4
IBM RS/6000 streamer /dev/nrmt0.1
MIPS streamer /dev/nrmt/Q24n-0
SCO streamer /dev/nrct0
Silicon Graphics streamer /dev/nrtapens
Sun, Sparcstation, Solbourne
streamer /dev/nrst8
Tektronix 4300 streamer /dev/ntc
Tektronix XD88 streamer /dev/rmt/ctapen
Generic AT&T System V streamer /dev/rmt/ctapen
Generic BSD streamer /dev/ntc
0 UNIX Installation
Extracting the Files
Installing from CD-ROM
If you are installing via CD-ROM, you need to perform these steps:
1. If a CD-ROM mount point does not exist, create a directory named cdrom to be used as the mount point for the CD-ROM:
# mkdir /cdrom
2. Enter the mount command appropriate for your host to mount the CD-ROM to the /cdrom directory. This is an example for a Sun host:
# mount -t hsfs -r /dev/sr0 /cdrom
The -t switch indicates the file system type (hsfs), the -r switch indicates the CD-ROM contents are read-only, and /dev/sr0 is the device name.
NOTE: If there is another CD-ROM in the drive you must unmount (umount command) and remove the disc before you can insert and mount (mount command) the TekXpress CD-ROM.
3. Extract the files from the CD-ROM:
# tar -xvpf /cdrom/unix/install.tar
4. Continue to the section Using the INSTALL Script on page 1-40 to install the files.
Extracting All or Partial with the INSTALL Script
This procedure unloads the INSTALL script and then uses the script to select, extract and install the other files. The script automatically preserves existingconfiguration files when extracting the new files.
1. Unload the INSTALL directory, then abort the tar command with Ctrl-C or whatever sequence you would normally use to stop a command.
# tar -xvpf <device> tekxp/INSTALL
2. Continue to the section Using the INSTALL Script on page 1-40 to extract and install all or part of the files.
UNIX Installation 1-41
Chapter 1 Installing the Software
1-4
Extracting All Files with tar
If your system does not support the mt command, or if you have a non-standard tar command, use this procedure to extract and install the files:
1. Extract the media contents (Table 1-7 lists <device> names):
# tar -xvpf <device>
2. Connect to the tekxp/INSTALL directory:
# cd tekxp/INSTALL
3. Run the INSTALL script to ensure the /tekxp directory tree is correctly built, and to modify applicable configuration files:
# ./INSTALL -move
After extracting the INSTALL script, continue to the Using the INSTALL Script section on page 1-40.
Extracting Partial File List with tar
If your system does not support the mt command, or if you have a non-standard tar command, use this procedure to extract and install a subset of the files:
1. Extract the media contents, specifying only the directories ([ opt_dir ]) you want. Figure 1-1 illustrates the available directories. Table 1-7 lists <device> names:
# tar -xvpf <device> tekxp/INSTALL [ opt_dir] [ opt_dir ]
2. Connect to the tekxp/INSTALL directory:
# cd tekxp/INSTALL
3. Run the INSTALL script to ensure the /tekxp directory tree is correctly built, and to modify applicable configuration files:
# ./INSTALL -move
After extracting the INSTALL script, continue to the Using the INSTALL Script section on page 1-40.
2 UNIX Installation
Using the INSTALL Script
t l d.
y
p
Using the INSTALL ScriptFiles are installed from the media using the provided INSTALL script. With the script, you can install everything or select only the files you need.
Refer to the Installation section for your host type earlier in this chapter.
When you run INSTALL, it creates a log file (/tekxp/INSTALL/install.log) to track installation activities. If you have multiple log files, the installation date and time are appended to the file. An example of why you might run the scripmultiple times, is if you do a partial installation now, and as you add additionamodels or require additional support, you can install the other files as neede
If you have a current installation, your configuration files are saved for you. Besure to check the new configuration files for any new commands, and add anapplicable commands to your saved configuration files.
• If there is a previous installation in the current directory, the configuration files (.cnf and.tbl files) are automatically preserved. The new configuration files unloaded from the media are stored in the file /tekxp/config_date where date is the installation date and time.
• If you have a current installation in another directory location, you can invoke the INSTALL script with the -oldq and -oldu switches to preserve your existing configuration files. New configuration files unloaded from themedia are then saved as file.date, where date is the installation date and time.
• Use the -host and -user switches to install the files from a remote host.
• For Generic UNIX hosts, use the -move command to have the INSTALL script move files that have already been extracted. This ensures the /tekxdirectory structure is correctly built.
UNIX Installation 1-43

Chapter 1 Installing the Software
1-4
To run the installation script:
1. Use cd to change to the INSTALL directory, tekxp/INSTALL.
# cd tekxp/INSTALL
2. Make sure the media is in the drive, then run the script:
# ./INSTALL -f device [-move] [-oldq dir] [ -oldu dir] [ -host host] [-user user]
-f device specifies the no-rewind tape device or the CD-ROM device (for example: /dev/nrst0 or /cdrom/common/tekxp.tar).-move is used to skip the extraction portion of the script and only run the portion that relocates unloaded files to their correct location.-oldq and -oldu options are used to save the configuration files from a previous installation using the TekXpress Quick Install and TekXpress Utility tapes. The dir variable specifies the location of those configuration files. Forexample, the default path for the xp.cnf file would be: -oldq /tftpboot/XP, and for the.tbl files: -oldu /usr/lib/X11/XP/site.-host and -user options are used to install the files from a remote host. You must specify a valid user name (user) for the remote host.
3. The INSTALL script displays:
Installation file selection is done by answering one or more yes/no questions. The default answer is ’y’ or yes. The first question will ask if you want to do a full install. If you answer ’y’ to this question, no more questions will be asked.
Size of the entire installation is 54557 kilobytes.Do you wish to do a full install (y/n)?
4. If you select y, the installation begins. If you answer n, then prompts are displayed so you can select the groups to install. The xpbinaries and font groups are further subdivided for your selection.
4 UNIX Installation
Using the INSTALL Script
The following groups are available:
- tekxp/boot files
- tekxp/boot/(XP binaries) files (Select y for yes, n for no, or p for partial)
xp10xp330xp100, xp200, xp350 and xp400nc200
- tekxp/boot/fonts files (Select y for all, n for none, or p to select sub-groups)
misc100dpi75dpijapaneseoldx11openlooktek100dpiSpeedoType1
- tekxp/man files (Select y for all, n for none)
- tekxp/mgmt files (Select y for all, n for none)
- tekxp/obsolete files (Select y for all, n for none)
- tekxp/examples files (Select y for all, n for none)
- tekxp/bin files (Select y for all, n for none)
- tekxp/src (Select y for all, n for none)
- tekxp/AcroRead_2.1 files (Select y for all, n for none)
- tekxp/audioIntercept files (Select y for all, n for none)
- tekxp/dpsnx_2.1 files (Select y for all, n for none)
NOTE: The AcroRead, and DpsNx files are available for Sun and Hewlett-Packard hosts only, and the Audio Intercept files are available for Sun hosts only.
UNIX Installation 1-45
Chapter 1 Installing the Software
1-4
.
d
5. A confirmation prompt is displayed, showing the groups you have selectedEnter y to confirm the installation, or n to abort.
NOTE: For Silicon Graphics hosts, if you installed NCBridge from a tape, rewind the media:
# mt rew
6. When complete, remove the media from the drive.
If you installed NCBridge from a CD-ROM, you need to unmount the disc:
# umount cdrom
After you complete the installation process, continue through this chapter anmanual to configure the network computers for your environment.
6 UNIX Installation
Making the Utilities
re
an
Making the UtilitiesFor generic UNIX hosts, the media contains source for clients in case they anot on your host.
NOTE: You may need to modify the source code or Makefiles to build these utilities in your environment.
Create these libraries only if you need to make one or more utilities. In addition, utilities such as xpsh also require the system to have a libX11 and libXext (-lX11, -lXext on the link command line). The libXext library may be integrated into libX11 on some systems. If so, only the -lX11 switch would be needed.
1. Create the libXp.a library:
# cd /tekxp/src/lib/Xp# make
2. The cc command line define requirements are as follows:
TEKXP Do not define-DTEKX11 Always define-DX11R5 Only define if system is using X11R5
3. Host specific cc and linker options may be found if X has been built somewhere else on the system. Look in the X tree’s config directory for an xxx.cf file, where xxx is the system abbreviation, for example, hp.cf or cray.cf. Check the -D defines to see how they are used on your system forbuilding other X clients. Other system defines may be needed, such as:
-DSVR4 System V Release 4 UNIX compatible system-DSYSV System V pre-release 4 UNIX compatible system
4. Trial and error may be necessary. When a compile error occurs, it is often incompatibility in an include file. Check the include files for other -D definesor for other files being included. Another common possibility is if an included file is actually located in a different directory. Consult the appropriate man pages for more information.
UNIX Installation 1-47
Chapter 1 Installing the Software
1-4
o
5. The user may want to #ifdef any changes with a system specific label which the compiler automatically defines, such as #ifdef sun for Sun systems. The user can usually find this with man cc or man cpp or sometimes by running cc -v.
#ifdef __xyz /* Xyz's compiler defines __xyz automatically */#include "sys/xxx.h"#else#include "xxx.h"#endif /* __xyz */
These utilities are only necessary if they are not already on your system:
• /tekxp/src/bootp -- bootp (Bootstrap Protocol) establishes network communications. Refer to the Supporting a Centralized System chapter for your host type for bootp instructions.
• /tekxp/src/killall -- killall may be used by the other utilities.
• /tekxp/src/tftp -- tftp (Trivial File Transfer Protocol) is a file transfer protocol that can be used to download the boot file and other files. Refer tthe Supporting a Centralized System chapter for your host type for tftp instructions.
• /tekxp/src/xev -- xev prints the contents of X events.
• /tekxp/src/xlock -- xlock locks the local X display until a password is entered
• /tekxp/src/xlsfonts -- xlsfonts is a server font list displayer for X.
• /tekxp/src/xmodmap -- xmodmap modifies keymaps.
• /tekxp/src/xpsh -- xpsh downloads and executes local clients on a network computer.
• /tekxp/src/xrdb -- xrdb is used to read X resource files.
• /tekxp/src/xsetprop -- xsetprop is used to print hardcopies. Refer to Appendix C of the Network Computer Reference Manual.
8 UNIX Installation
Getting Acquainted
Getting AcquaintedThis section describes adding the first network computer to your system. It contains an example step-by-step procedure for performing a basic networkcomputer installation. By following the instructions in this section, you becomefamiliar with the network computer’s network configuration parameters, Boot Monitor, and Setup utility. In addition to learning about the network computer, the procedure presented in this section leads you through the basic host configuration procedures for supporting network computers.
These steps are performed during the basic network computer installation:
• Configure host files to support the network computer
• Collect information about your environment which is needed to boot the network computer
• Use the Boot Monitor to enter network computer communication parameters and establish a host connection
• Log in through a Telnet session from Client Launcher
• Use Setup to enter the network computer configuration parameters
After the basic network computer installation is complete, the network computer can:
• Locate the host on the network
• Download the operating system, configuration, and font files
• Apply configuration files residing on the host
UNIX Installation 1-49
Chapter 1 Installing the Software
1-5
Basic Installation ExampleHere is an example of the information needed for a sample Sun host environment:
Boot Host: SPARCstation SunOS 4.1.2 and OpenWindows 3.0
Boot Host Name: oregon IP Address: 128.07.60.01Network Computer model: XP17Network Computer Name: portland IP Address: 128.07.60.30Netmask: 255.255.255.0Gateway Address: 128.07.60.100Broadcast Address: 128.07.60.255Boot Method: nfsFont Host Name: oregon IP Address: 128.07.60.01File Access Method: tftp
Configuring Host Files
Modify the host configuration files and utilities to support the network computer:
• nfs (Network File Service) to provide booting service
• tftp (Trivial File Transfer Protocol) to provide backup booting service
• xdm (X Display Manager) to provide a host log in interface
• Set up HP VUE to manage network computer accounts (Hewlett-Packardhosts only)
• Export the boot and install directories (IBM hosts only)
For details about these configuration files and utilities, refer to the Supporting a Centralized System chapter for your host type.
0 UNIX Installation

Network Computer Worksheet
rk
Network Computer WorksheetComplete this worksheet prior to powering on the network computer. When completed, the information on this worksheet assists you in booting the netwocomputer and performing other procedures.
1. Network computer model: XP_____
Find this information on the network computer’s serial number tag.
2. Network computer hardware address: ____:____:____:____:____:____
Find this information on the network computer’s serial number tag.
3. Network computer name: _____________________
4. Network computer IP address: ____._____._____._____
5. Boot Path: _________________________________boot_directory
(/<boot_directory>/boot/<boot file> For example, /tekxp/boot/os.330)
Use Table 1-8 to determine your boot file.
NOTE: Once booted, to see the OS file version currently in use, use the UNIX what command. For example what os.350.
6. Boot Method: nfs 8192
Table 1-8 Boot Files.
Boot File Supported Network Computer Series
os.10 XP10 Series (example: XP18)
os-tr.10 XP10 Token Ring Series (example: XP18T)
os.330 XP100D, XP330 Series (example: XP338)
ospex.330 XP338P
os.350 XP100 Series, XP200 Series, XP300 Series, XP350 Series, and XP400 Series (examples: XP117C, XP219, XP358, XP317CVJ)
os.500 NC200
UNIX Installation 1-51
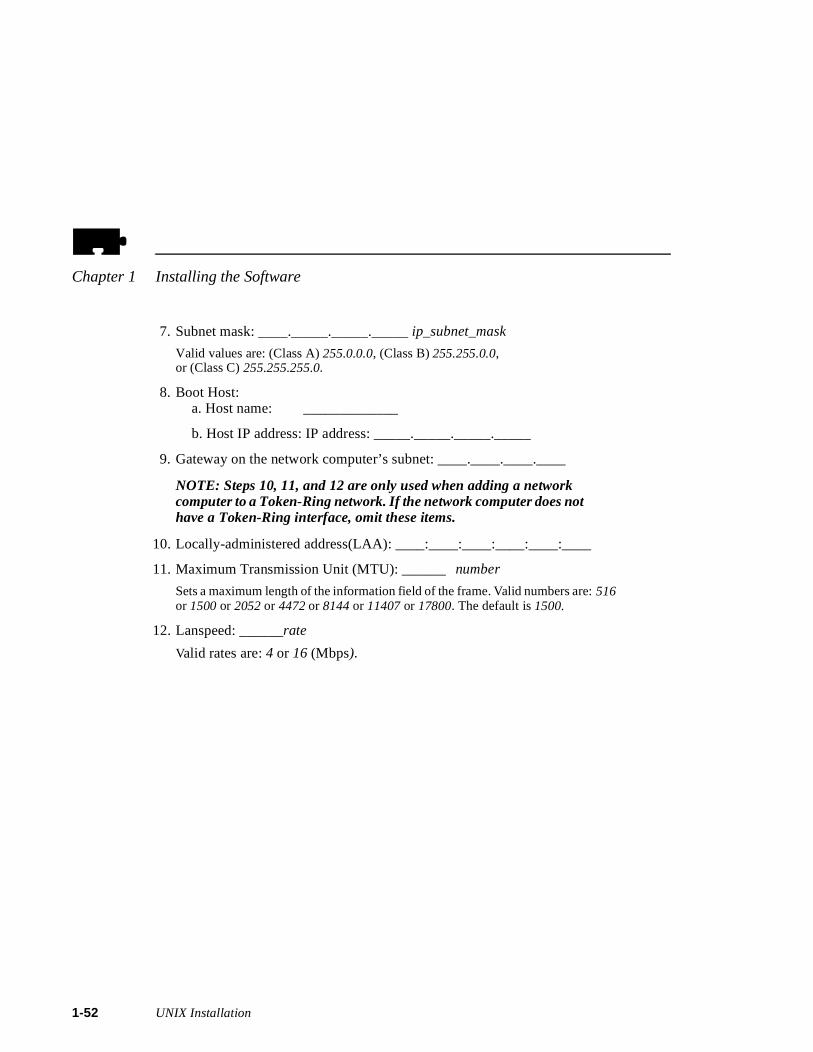
Chapter 1 Installing the Software
1-5
7. Subnet mask: ____._____._____._____ ip_subnet_mask
Valid values are: (Class A) 255.0.0.0, (Class B) 255.255.0.0,or (Class C) 255.255.255.0.
8. Boot Host:a. Host name: _____________
b. Host IP address: IP address: _____._____._____._____
9. Gateway on the network computer’s subnet: ____.____.____.____
NOTE: Steps 10, 11, and 12 are only used when adding a network computer to a Token-Ring network. If the network computer does not have a Token-Ring interface, omit these items.
10. Locally-administered address(LAA): ____:____:____:____:____:____
11. Maximum Transmission Unit (MTU): ______ number
Sets a maximum length of the information field of the frame. Valid numbers are: 516 or 1500 or 2052 or 4472 or 8144 or 11407 or 17800. The default is 1500.
12. Lanspeed: ______rate
Valid rates are: 4 or 16 (Mbps).
2 UNIX Installation
Powering on the Network Computer
, t
t r
s
the
Powering on the Network ComputerVerify the physical installation of the network computer’s cables, power cordskeyboard, mouse, and network connection with the pictorial installation sheeincluded in the packing box.
Turn on the network computer’s power switch. On the first power-up, you musspecify the keyboard you’re using. By default, the North American 101/102 oVT200 is selected (depending on the connected keyboard). Press Enter or Return to accept this keyboard. If using a different keyboard or nationality, press the Spacebar to scroll through the list of available keyboards and presEnter or Return to select the appropriate keyboard.
After specifying the keyboard, press the Return or Enter key again to displaythe BOOT> prompt.
The BOOT> prompt indicates that you are in the Boot Monitor. The Boot Monitor is a simple, command-line utility that provides an easy way to input boot commands. These boot commands set the parameters which describe network computer in your network environment.
The scoreboard is an area in the upper right-hand corner of the boot screen. At this time, the scoreboard shows only default values. Use the scoreboard to verify the entries you make in the steps that follow.
UNIX Installation 1-53
Chapter 1 Installing the Software
1-5
fter ot
et
n
Booting the Network ComputerTo enter a boot command, type the command plus its associated parameter athe BOOT> prompt. To complete an entry, press Enter. To see a list of the BoMonitor commands, type help and press Enter.
NOTE: An “unrecognized command” error message and description appears on the screen if an invalid command is entered.
The line numbers in the steps refer to lines on the network computer Workshe(page 1-40) where you filled in the appropriate information. If you have not completed the Worksheet, do so now.
Using the Boot Monitor, perform the following steps:
NOTE: The lanspeed, mtu, and localaddr commands are only used when adding a network computer equipped with a Token-Ring interface. Skip to Step 4 if you are installing an Ethernet network computer.
1. Enter the lanspeed command. (See Line 12.)
A Lanspeed setting is required if you are installing the network computer oa Token-Ring network. There is no automatic default for lanspeed. Lanspeed can only be entered with the lanspeed command in the Boot Monitor.
>>> CAUTION: Disruption to the Token-Ring LAN may occur if you attempt to open communications with the wrong lanspeed setting.
BOOT> lanspeedrate
2. Enter the mtu command. (See Line 11.)
If the mtu command is not entered, the default setting of 1500 is used. MTUcan also be set in Setup.
BOOT> mtu number
3. Enter the localaddr command. (See Line 10.)
It is not essential that a locally-administered address be set. The localaddr command is optional.
BOOT> localaddr address
4 UNIX Installation
Booting the Network Computer
oot r
4. Use the iaddr command to enter the network computer’s ip address. (See Line 4.)
BOOT> iaddr ip_address
5. Use the bpath command to enter the boot path. (See Line 5.)
BOOT> bpath /<boot_directory>/boot/os.<model>
6. Use the imask command to enter the subnet mask. (See Line 7.)
BOOT> imask ip_subnet_mask
7. Use the ihost command to enter the boot host’s ip address. (See Line 8b.)
BOOT> ihost ip_address
8. Use the igate command to enter the ip address for a gateway host if the network computer is booting through a gateway. (See Line 9.)
BOOT> igate ip_address
9. Use the bmethod command to specify NFS as the boot method. The 8192 parameter represents an NFS read size.
BOOT> bmethod nfs 8192
NOTE: Check the scoreboard to verify your entries. If there is an error, re-enter the command using the correct value.
10. Use the nvsave command to save the values in nonvolatile memory.
BOOT> nvsave
11. Use the boot command to initiate the boot process.
BOOT> boot
If the network computer locates the host and boot files, a bar appears on the bscreen showing the percent of download complete. Once the network computedownloads all of the files required, a gray screen with an X-shaped cursor appears. If the boot process fails without error messages, you probably entered an incorrect parameter. Enter the appropriate command and parameter to correct the error. After correcting the error, execute the nvsave and boot commands. If booting fails again, refer to Chapter 12: Troubleshooting.
UNIX Installation 1-55
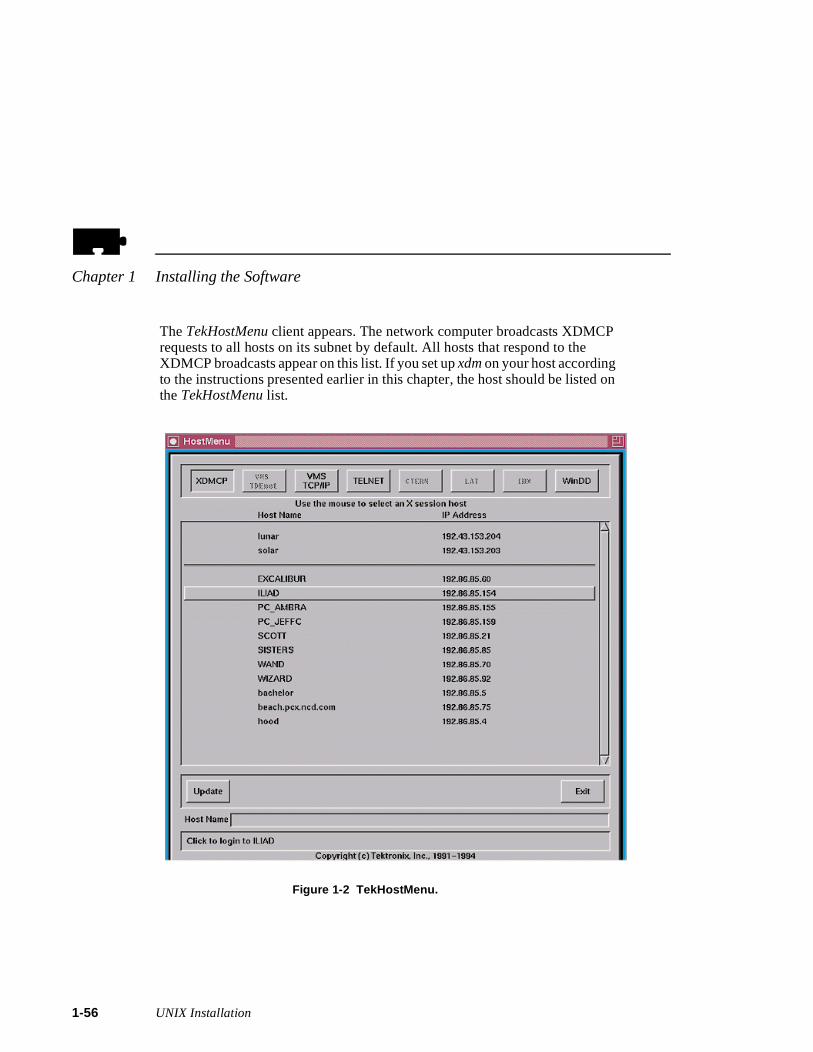
Chapter 1 Installing the Software
1-5
on
The TekHostMenu client appears. The network computer broadcasts XDMCPrequests to all hosts on its subnet by default. All hosts that respond to the XDMCP broadcasts appear on this list. If you set up xdm on your host according to the instructions presented earlier in this chapter, the host should be listed the TekHostMenu list.
Figure 1-2 TekHostMenu.
6 UNIX Installation
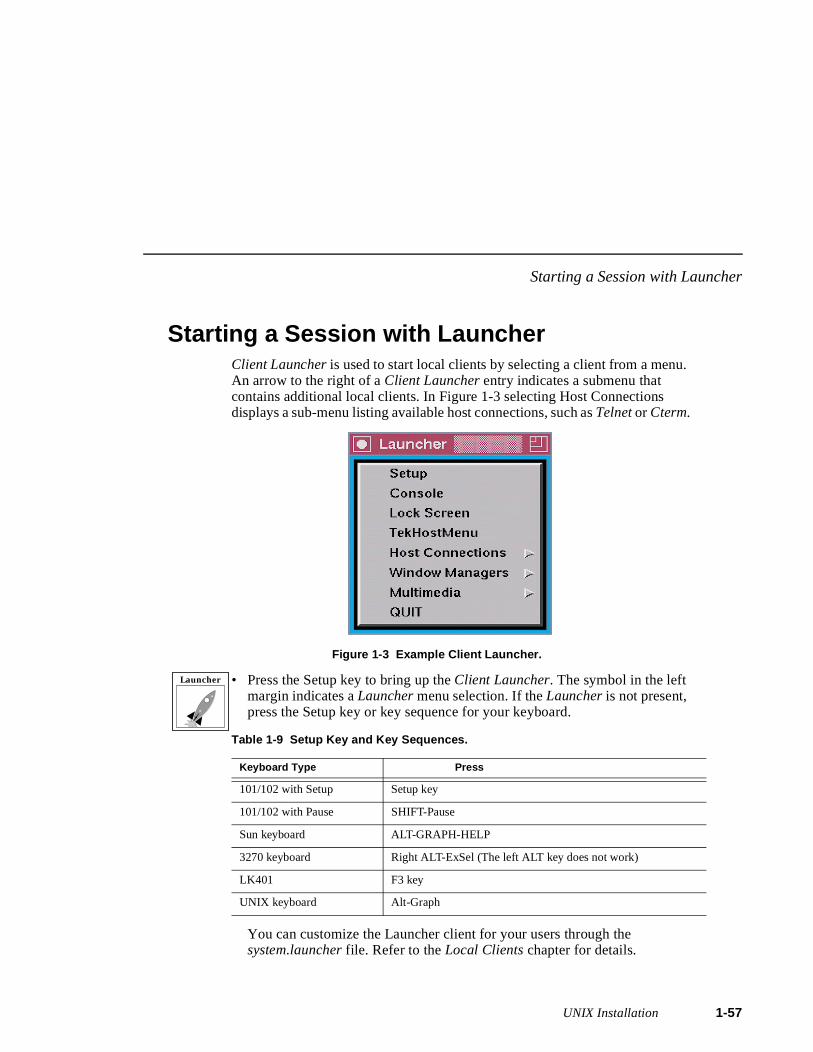
Starting a Session with Launcher
.
Starting a Session with LauncherClient Launcher is used to start local clients by selecting a client from a menuAn arrow to the right of a Client Launcher entry indicates a submenu that contains additional local clients. In Figure 1-3 selecting Host Connections displays a sub-menu listing available host connections, such as Telnet or Cterm.
Figure 1-3 Example Client Launcher.
• Press the Setup key to bring up the Client Launcher. The symbol in the left margin indicates a Launcher menu selection. If the Launcher is not present, press the Setup key or key sequence for your keyboard.
Table 1-9 Setup Key and Key Sequences.
You can customize the Launcher client for your users through the system.launcher file. Refer to the Local Clients chapter for details.
Keyboard Type Press
101/102 with Setup Setup key
101/102 with Pause SHIFT-Pause
Sun keyboard ALT-GRAPH-HELP
3270 keyboard Right ALT-ExSel (The left ALT key does not work)
LK401 F3 key
UNIX keyboard Alt-Graph
Launcher
UNIX Installation 1-57
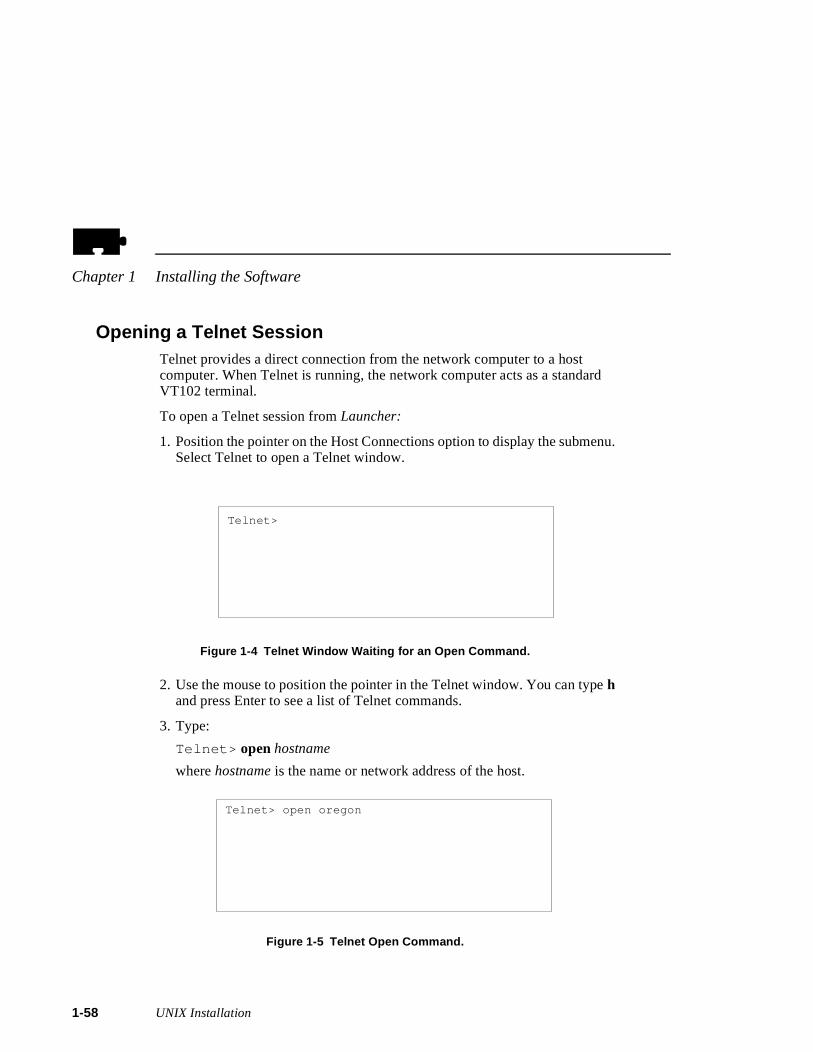
Chapter 1 Installing the Software
1-5
u.
Opening a Telnet SessionTelnet provides a direct connection from the network computer to a host computer. When Telnet is running, the network computer acts as a standardVT102 terminal.
To open a Telnet session from Launcher:
1. Position the pointer on the Host Connections option to display the submenSelect Telnet to open a Telnet window.
Figure 1-4 Telnet Window Waiting for an Open Command.
2. Use the mouse to position the pointer in the Telnet window. You can type h and press Enter to see a list of Telnet commands.
3. Type:
Telnet> open hostname
where hostname is the name or network address of the host.
Figure 1-5 Telnet Open Command.
Telnet>
Telnet> open oregon
8 UNIX Installation
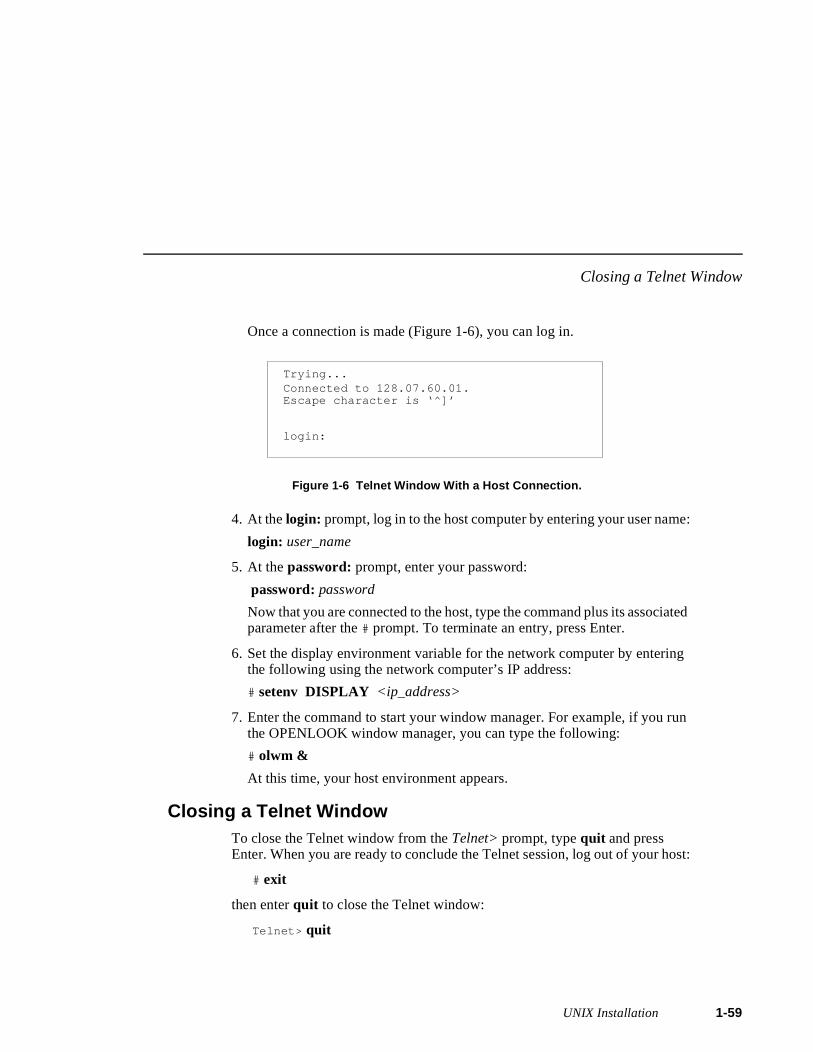
Closing a Telnet Window
:
ted
n
st:
Once a connection is made (Figure 1-6), you can log in.
Figure 1-6 Telnet Window With a Host Connection.
4. At the login: prompt, log in to the host computer by entering your user name
login: user_name
5. At the password: prompt, enter your password:
password: password
Now that you are connected to the host, type the command plus its associaparameter after the # prompt. To terminate an entry, press Enter.
6. Set the display environment variable for the network computer by enteringthe following using the network computer’s IP address:
# setenv DISPLAY <ip_address>
7. Enter the command to start your window manager. For example, if you ruthe OPENLOOK window manager, you can type the following:
# olwm &
At this time, your host environment appears.
Closing a Telnet WindowTo close the Telnet window from the Telnet> prompt, type quit and press Enter. When you are ready to conclude the Telnet session, log out of your ho
# exit
then enter quit to close the Telnet window:
Telnet> quit
Connected to 128.07.60.01.Escape character is ‘^]’
login:
Trying...
UNIX Installation 1-59
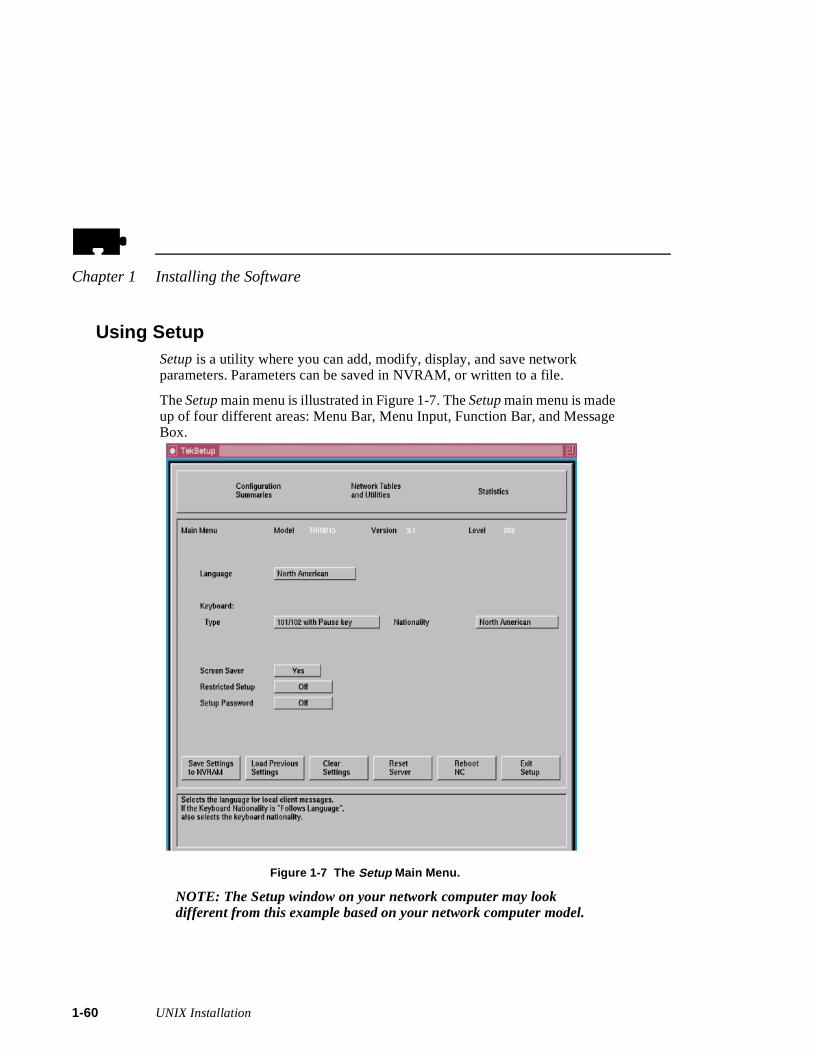
Chapter 1 Installing the Software
1-6
Using SetupSetup is a utility where you can add, modify, display, and save network parameters. Parameters can be saved in NVRAM, or written to a file.
The Setup main menu is illustrated in Figure 1-7. The Setup main menu is made up of four different areas: Menu Bar, Menu Input, Function Bar, and Message Box.
Figure 1-7 The Setup Main Menu.
NOTE: The Setup window on your network computer may look different from this example based on your network computer model.
0 UNIX Installation
Using Setup
Use the following procedures to enter configuration parameters using Setup. After each typed entry, press Enter.
1. Drag in the Configuration Summaries menu and release on TCP/IP.
- Enter the following:
Network Computer Name network_computer_nameDefault Telnet Host host_ nameName Server 1 ip_address of name server
- Click on Return to Main Menu .
2. Drag in the Configuration Summaries menu and release on X Environment.
- Select the following:
Host Connect Method TekHostMenuDefault Host List XDMCP
- Click on the following:
XDMCP Query Method Broadcast
- Click on Return to Main Menu .
3. Drag in the Network Tables and Utilities menu and release on NFS Mount. Click on Add Table Entry .
- Add an entry for each directory exported in the /etc/exports file:
File System Name exported directoryLocal Directory local_directory Transfer Size read size for transferring files
- Click on Return to Main Menu .
UNIX Installation 1-61
Chapter 1 Installing the Software
1-6
4. Drag in the Configuration Summaries menu and release on Host File Access.
- Select the following:
Primary File Access NFSPrimary Mount Path local_directory (from previous step)
- Click on Return to Main Menu .
5. Drag in the Network Tables and Utilities menu and release on Internet Host. Click on Add Table Entry .
- Add your boot host and login host as follows:
Host IP Address ip_addressHost Name host_name
- Click on Return to Main Menu .
6. Click on Save Current Settings to store the current settings in NVRAM.
2 UNIX Installation
Using Setup
ure e
e
Saving Setup Settings to a File
Setup entries can be saved to a host-based file which is then used to configone or more network computers. This is a good utility to create an initial remotconfiguration file, or for users to create an individual, customized file.
• If the specified file already exists, Setup overwrites it. Unless you are sure you wish to overwrite the file, you may want to specify a temporary file name or create a backup of your previous file.
NOTE: If using TFTP as the access method, the new file must exist before performing the Save Settings to File.
• Only settings available in Setup are saved to the file. Features that are only available in the remote configuration file (xp.cnf) must be manually added to the file written by Setup.
To save the current Setup settings to a sample remote configuration file:
1. Drag on Configuration Summaries and release on Save Settings to File.
2. Enter your host name or address:
Save Settings File Host host_name
3. Click on NFS for the Save Setting Access Method.
4. Enter the NFS local directory you defined earlier in this chapter along withthe file name. You can look up the local directory name by dragging on Network Tables and Utilities and releasing on NFS Mount. An example filename is /tekxp/boot/config/xp_cnf_new. You can then compare the saved file with your existing xp.cnf file.
Save Settings File Name local_directory/file_name
5. Click on Save Settings to File. A message appears to confirm the settings were written to the file.
6. Click on Return to Main Menu .
You can edit or view the created file with a text editor. Since we have only mada few changes in this chapter, the created file probably does not have all theinformation your site requires, but can serve as an example of a remote configuration file.
UNIX Installation 1-63
Chapter 1 Installing the Software
1-6
n,
Exiting Setup When you are ready to exit Setup, click on the Exit Setup button.
Once you have successfully completed a basic network computer installatiogo on to the Supporting a Centralized System chapter for your host type.
4 UNIX Installation
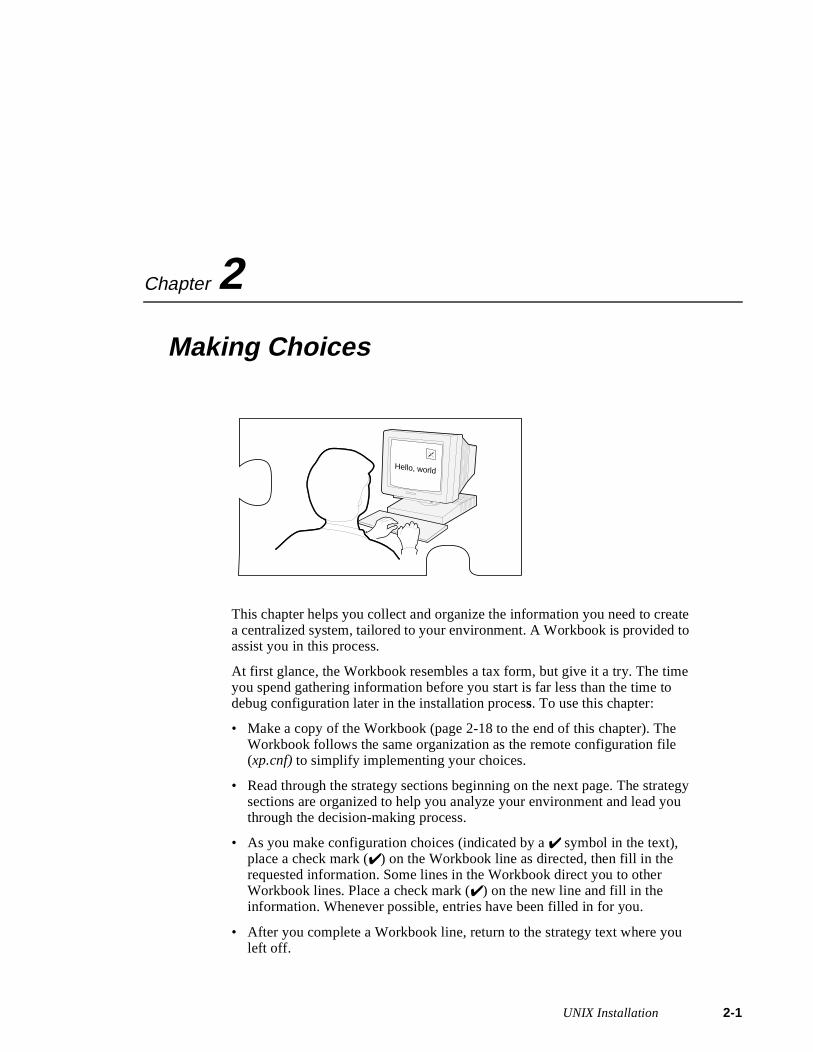
Chapter
2te
gy
Making Choices
This chapter helps you collect and organize the information you need to creaa centralized system, tailored to your environment. A Workbook is provided toassist you in this process.
At first glance, the Workbook resembles a tax form, but give it a try. The timeyou spend gathering information before you start is far less than the time to debug configuration later in the installation process. To use this chapter:
• Make a copy of the Workbook (page 2-18 to the end of this chapter). The Workbook follows the same organization as the remote configuration file (xp.cnf) to simplify implementing your choices.
• Read through the strategy sections beginning on the next page. The stratesections are organized to help you analyze your environment and lead youthrough the decision-making process.
• As you make configuration choices (indicated by a ✔ symbol in the text), place a check mark (✔) on the Workbook line as directed, then fill in the requested information. Some lines in the Workbook direct you to other Workbook lines. Place a check mark (✔) on the new line and fill in the information. Whenever possible, entries have been filled in for you.
• After you complete a Workbook line, return to the strategy text where you left off.
Hello, world
UNIX Installation 2-1
Chapter 2 Making Choices
2-2
• When the Workbook is complete, continue on to the chapter Supporting a Centralized System for your host type. Edit the files as needed to incorporateyour configuration choices from the completed Workbook. When you edit aline in the xp.cnf file, it matches the line in your Workbook.
UNIX Installation
Configuration Strategies
a
ed
es.
r
n
ity
e
y g
Configuration StrategiesSystem configuration is the key to successfully integrate network computersinto your environment. With proper configuration, you can ensure your userssmooth transition to network computers with little or no disruption of their work.
Network computers run efficiently in a distributed-computing environment, where processing is shared by a number of networked host computers. Thismeans applications competing for resources at any given time can be distributacross the system to maximize performance. Files can also be stored and transferred among the accessible computers to share mass storage resourc
The network computer typically connects directly to the network, so it can effectively communicate with any host on the network. The network computereceives files and display information over the network and manages communications between processes running on the network computer and othe host.
In a distributed computer environment, host computers perform a variety of functions. The strategy sections refer to three types of hosts, although in realthe functions can be as distributed or consolidated as you choose.
A boot host contains the files necessary to boot the network computers. Thisincludes the model-specific operating system files and xp.cnf file. These files are downloaded to the network computer via the specified boot method.
A file host contains additional configuration files, fonts, and optional host-specific utilities for the network computer. The network computer may frequently access this host during a user session. Files are downloaded to thnetwork computer via the specified file access method.
A login host is the host where the user’s login account is found. You can specifa host for each user, or allow the user to select from a list of hosts, dependinon your host connection method. The login host supplies a login window to the network computer, using a utility that provides login services.
UNIX Installation 2-3
Chapter 2 Making Choices
2-4
s
The strategy sections discuss the basics required to configure and support acentralized system. To simplify this task, all of the network computer featureare not covered. Once your initial configuration is working, you can enable additional features as needed.
NOTE: When you add a feature, perform the necessary host configuration to support the feature. Refer to Chapter 2 of the Network Computer Reference manual for more information.
These topics are discussed:
• Booting Strategies
- Boot Methods
- Automatic or Manual First Boot
- Subsequent Boots
• File Access Strategies
- File Access Methods
• Host Connection Strategies
• ROM and Flash Memory Strategies
• Boot Host Check List
• Network Computer Check List
• File Host Check List
• What Next?
UNIX Installation
Booting Strategies
t
y
r.
Booting StrategiesOn a system with many network computers, you might want to install the boosoftware on more than one host. Then you can either set up different network computers to boot and download files from different hosts, or set up all the network computers to boot from the first available host.
Boot Methods
The network computer uses the boot method to download the X server. Manof the other booting decisions in this section depend on the boot method youselect. The boot methods are TFTP , NFS, MOP , and ROM .
NOTE: NT systems only support NFS or ROM booting.
• TFTP (Trivial File Transfer Protocol) can be used on TCP/IP networks. It isnot as efficient as NFS, but can be made more secure. TFTP is the default method to boot network computers not equipped with TDEnet or the FlashMemory or ROM options.
• NFS (Network File Service) can be used on hosts supporting NFS (typically in a TCP/IP network). The advantage to NFS is faster booting and increased efficiency.
• ROM (Read-Only Memory) can be used with network computers equippedwith Flash Memory or a ROM board. ROM is the default method to boot all network computers equipped with the Flash Memory or the ROM options.Refer to ROM and Flash Memory Strategies later in this chapter for more information.
• MOP (Maintenance Operation Protocol) is used on DECnet networks to download the boot files to the network computers. This is the default bootmethod if the network computer is not equipped with Flash Memory or theROM options, and if the TDEnet option is enabled on the network compute
Decide which boot method to use. Continue to the next pages to see how toimplement the method you selected.
UNIX Installation 2-5

Chapter 2 Making Choices
2-6
m
n
re
m
k,
s .
Automatic or Manual First Boot
For a first time boot, the network computers can boot automatically or manually, depending on how you configure your environment. This decisiondoes not relate to ROM-based network computers.
Automatic means that the network computer determines boot parameters frothe network and boots without operator intervention. In addition, with automatic booting you can implement a strategy where network computers caboot from the first available host.
Manual means that an operator would have to enter the boot parameters befothe network computer could boot.
Implement the manual method if you are installing a single network computer. Use the Boot Monitor to enter the boot parameters. Implement your other Workbook selections with the Setup commands. Remember that Setup commands only affect the individual network computer.
Implement the automatic method if you are installing or planning to install more than one network computer, or want the network computers to boot frothe first available host. Implement your other Workbook selections with the xp.cnf commands so they apply to each network computer.
For automatic booting:
✔ If you are going to use TFTP or NFS as the boot method:Check Workbook line 58 to use bootp (BOOTstrap Protocol) or check Workbook line 59 to use DHCP for automatic booting. A host that recognizes the network computer’s hardware address responds with the following information: the network computer’s Internet address, the boot server’s Internet address, the name of the file to download, the subnet masand the primary gateway.
✔ As an additional method for TFTP or NFS:Check Workbook line 60 to use rarp (Reverse Address Resolution Protocol) for automatic booting. A host responds with the Internet addresof the network computer and the Internet address of the responding hostThe boot directory must be located (or linked) in the default (/tekxp/boot) directory on the host that replies. rarp and bootp can run simultaneously. The network computer alternates between bootp and rarp broadcasts.
✔ If you are going to use MOP as the boot method:Check Workbook line 65 and Workbook line 66 for automatic booting.
UNIX Installation
Booting Strategies
ree
Subsequent Boots
The next boot decision determines how subsequent boots occur. There are thmain strategies:
• Booting from a specific host, using parameters stored in NVRAM:
- Controls which host is used. In the case of different workgroups on different hosts, each workgroup can have their own configuration.
- Easier to provide a fixed environment.
- Provides a specific backup (secondary) boot.
• Booting from the first available host, using parameters obtained from the network:
- The least-busy host responds to the boot requests.
- Provides backup booting. Booting occurs as long as any host is responding.
• Booting from a specific host, using parameters obtained from the network:
- Controls which host is used. In the case of different workgroups on different hosts, each workgroup can have their own configuration.
- Easier to administer in a dynamic environment, where network computers, workgroups, and network addresses tend to migrate.
- Easier to provide a consistent environment.
Decide which strategy to use. Continue to the next page to see how to implement the strategy you selected.
UNIX Installation 2-7

Chapter 2 Making Choices
2-8
.
rs
.
k
Booting from a specific host, using parameters stored in NVRAM. For this method, specify all of the required information, change booting to NVRAM, and save it. You can specify a secondary boot in case the primary boot fails
The network computer has already booted once. If the current boot parameteare acceptable, do not change the primary boot information. The network computer saves the current method, host, and path as the primary.
To change the primary booting information:
✔ Choose the primary boot method to use, either TFTP, NFS, or MOP:For TFTP, check Workbook line 28.For NFS, check Workbook line 29.For MOP, check Workbook line 30.
✔ Check Workbook line 37 to boot from NVRAM instead of NETWORK.
✔ Check Workbook line 42 to save the new method.
To optionally set secondary booting information:
✔ Choose the secondary boot method to use, either TFTP, NFS, or MOP:For TFTP, check Workbook line 32.For NFS, check Workbook line 33.For MOP, check Workbook line 34.
Booting from the first available host, using parameters obtained from the network. Set up automatic booting (from the previous section) on every boot host. Add the information for every network computer to every boot host.
- You can explicitly set the boot method but obtain the remainder of the boot parameters from the network. For example, if you want to boot withNFS instead of TFTP. To change the default boot method:
✔ Choose the primary boot method to use, either TFTP, NFS, or MOP:For TFTP, check Workbook line 28. Ignore boot host and path settingsFor NFS, check Workbook line 29. Ignore boot path setting.For MOP, check Workbook line 30. Ignore boot path setting.
✔ Check Workbook line 42 to save the new method.
Booting from a specified host, using parameters obtained from the network. Set up automatic booting (from the previous section) on every boot host. Add theinformation for the specific network computer to the specific boot host.
- You can change only the boot method. Follow the preceding check marparagraphs for the booting from the first available host section.
UNIX Installation
File Access Strategies
ut
s
he
File Access StrategiesFile access determines how the network computer locates and downloads configuration and font files. As discussed in the Configuration Strategies section, you can have one or more file hosts.
The file access path you specify is actually the path to the configuration (.tbl) files. For fonts, the fonts.tbl file contains the actual paths to the files, not the actual fonts. This may be confusing at first, but makes sense if you think aboit. Font files take up a lot of disk space. By having the configuration file pointto the various locations, you can distribute fonts across disks, partitions, or different hosts, depending on your disk space.
Here are some considerations for a file host:
• The host may be frequently accessed during a user session.
• Font files use a lot of disk space, so make sure you only have the ones you need. Many of the fonts on the installation media are probably duplicates of your host computer’s native fonts. If the X server can read your computer’native fonts, use them and only keep the unique fonts from the installationmedia.
• Place the files on a machine with enough room. This does not have to be tboot host; the files can be installed in any directory on any machine on thenetwork accessible to the network computers.
• The entries in the fonts.tbl file use network computer memory, so only add the font directories your applications require.
UNIX Installation 2-9
Chapter 2 Making Choices
2-1
ile
t
File Access Methods
The file access method choices are similar to the boot method choices. The faccess methods are: TFTP, NFS, DAP, and SXP. The method you select is dependent on your network type and how your users connect.
NOTE: When a file_path is requested, provide the path to the .tbl files. The default path is .
If you do not enable any file access hosts or methods, the boot host and boomethod are used by the network computer.
• NFS can be used on hosts supporting NFS (typically on a TCP/IP network). The advantage to NFS is downloading speed and efficiency.
• TFTP can be used on TCP/IP networks. It is not as efficient as NFS.
• DAP is used on DECnet networks to download files to the network computers.
• SXP is used to download files for a Serial Xpress connection.
✔ Select a primary file access method:Check Workbook line 10 to use NFS as the primary file access method.Check Workbook line 11 to use TFTP as the primary file access method.Check Workbook line 12 to use DAP as the primary file access method.Check Workbook line 13 to use SXP as the primary file access method.
In addition, a secondary (backup) method can be enabled. The secondary information is only used if the primary method fails.
✔ Select a secondary file access method:Check Workbook line 14 to use NFS as the secondary method.Check Workbook line 15 to use TFTP as the secondary method.Check Workbook line 16 to use DAP as the secondary method.Check Workbook line 17 to use SXP as the secondary method.
NOTE: If the last method tried is NFS, the network computer automatically tries TFTP using the last file path specified. TO take advantage of this feature, make sure TFTP is enabled.
✔ Check Workbook line 56 to enable TFTP.
0 UNIX Installation

Host Connection Strategies
a e
Host Connection StrategiesHost connection specifies how a user connects to their login host. There areseveral possibilities:
• TekHostMenu presents a list of hosts. The user uses the mouse to select session type and login host (this is the default method). This is easy to usand provides flexibility for users who need access to multiple hosts.
• Login Window to a Specific Host. Displays a host login box where the user simply logs in to the host.
• Session Window to a Specific Host. Opens a session window and connects to the specific host. The user simply logs in.
• Session Window with no Specified Host. Opens a session window. The user would have to specify a host connection and then log in.
• No connection method. The user would have to start a session from the Client Launcher and then log in.
Pick the method that best fits your users and your environment.
UNIX Installation 2-11

Chapter 2 Making Choices
2-1
rk
se
TekHostMenu
TekHostMenu is the default connection method. Within the TekHostMenu interface, there are multiple lists of hosts available: XDMCP , VMS (both TDEnet and TCP/IP connections), TELNET , CTERM , LAT, IBM and WinDD . A user can pick the list to view, and then pick a host from that list. Youcan support as many of the lists as apply to your environment.
• XDMCP - this is a generated list based on hosts that respond to the netwocomputer’s xdm broadcast. xdm must be enabled on the host. Responding hosts can be optionally prioritized to appear at the top of the list.✔ Check Workbook line 61 to enable xdm on the host.✔ Check Workbook line 43 to optionally prioritize hosts on the list.
• VMS TDEnet - this is a list of entries you specify in the xp.cnf file. Use this list if you connect to DEC hosts running DECnet.✔ Check Workbook line 44 to add VMS TDEnet host entries.
• VMS TCP/IP - this is a list of entries you specify in the xp.cnf file. Use this list if your users connect to DEC hosts running TCP/IP.✔ Check Workbook line 45 to add VMS TCP/IP host entries.
• TELNET - this is a list of entries you specify in the xp.cnf file. In addition, the boot host and the default Telnet host (if defined) appears on the list. Uthis list if your users connect to TCP/IP hosts via Telnet.✔ Check Workbook line 46 to add TELNET host entries.✔ Check Workbook line 38 to define a default TELNET host.
• CTERM - this is a list of entries you specify in the xp.cnf file. In addition, the boot host and the default CTERM host (if defined) appears on the list. Use this list if your users connect to DECnet hosts via CTERM.✔ Check Workbook line 47 to add CTERM host entries.✔ Check Workbook line 39 to define a default CTERM host.
• LAT - this is a generated list based on available LAT services.✔ Check Workbook line 9 to start LAT services on the host
• IBM - this is a list of IBM host entries you specify in the xp.cnf file.✔ Check Workbook line 47 to add IBM host entries.
• WinDD - this is a list of WinDD servers you specify in the xp.cnf file.✔ Check Workbook line 49 to add WinDD server entries.
2 UNIX Installation
Host Connection Strategies
t
st
Login Window to a Specific Host
This option uses a utility on the specified host to display a login box on the network computer. The method you select for this option is network and hosconnection dependent.
If your user logs in to a TCP/IP host on a TCP/IP network:
✔ Check Workbook line 18 to specify a direct host connection.
✔ Check Workbook line 61 to enable xdm on the host.
If your user logs in to a DECnet node in a DEC environment:
✔ Check Workbook line 19 to specify a direct host connection.
✔ Check Workbook line 67 to enable DECwindows on the host.
If your user logs in to a TCP/IP host in a DEC environment:
✔ Check Workbook line 20 to specify a direct host connection.
✔ Check Workbook line 61 to enable xdm on the host.
If your user logs in to a Windows NT server:
✔ Check Workbook line 20 to specify a direct WinDD host connection.
✔ Check Workbook line 68 to install WinDD on the Windows NT server.
Session Window to a Specific Host
This option can be used to display either a TELNET or CTERM session window on a defined host or node. The session you select for this option is hodependent.
If your user logs in to a TCP/IP host, specify the connect method to be TELNET, and define the default Telnet host:
✔ Check Workbook line 21 to specify TELNET .
✔ Check Workbook line 38 to define a default Telnet host.
If your user logs in to a DECnet node, specify the connect method to be CTERM, and define the default CTERM host:
✔ Check Workbook line 22 to specify CTERM .
✔ Check Workbook line 39 to define a default CTERM host.
UNIX Installation 2-13
Chapter 2 Making Choices
2-1
or
Session Window with No Specific Host
This option opens a session window. The user would have to open a host connection or service. Several sessions are available: TELNET , CTERM , LAT , SERIAL0 , and SERIAL1 . The session type you select is network and host connection dependent.
If your user logs in to a TCP/IP host:
✔ Check Workbook line 21 to specify a Telnet session.
If your user logs in to a DECnet node:
✔ Check Workbook line 22 to specify a CTERM session.
If your user logs in to a LAT service:
✔ Check Workbook line 23 to specify a LAT session.
If your user logs in via a serial connection on their network computer serial port 0:
✔ Check Workbook line 24 to specify a Serial0 session.
If your user logs in via a serial connection on their network computer serial port 1:
✔ Check Workbook line 25 to specify a Serial1 session.
No Connection Method
You can have the network computer simply display the root weave and X cursby disabling host connections. A user would have to start a session from the Client Launcher.
To disable host connections:
✔ Check Workbook line 27.
4 UNIX Installation
ROM and Flash Memory Strategies
to
k
r.
ROM and Flash Memory Strategies
Reading Host-Based Remote Configuration Files
Network computers with Flash Memory can be set up to read an xp.cnf file on the host. Another strategy if you have space in Flash Memory, is to flash a version of xp.cnf, to free the network computer from trying to find a host during the boot process.
✔ Check Workbook line 35 to read a host-based xp.cnf file with a network computer equipped with Flash Memory.
XP10 models equipped with the ROM (Read Only Memory) options can alsoread an xp.cnf file.
✔ Check Workbook line 31 to read an xp.cnf file with an XP10 ROM model.
Saving your Configuration in Flash MemoryAs you have worked through this chapter, you have selected the commandsimplement in the configuration file. For RAM-based network computers, this configuration can either be saved in NVRAM, or loaded each time the networcomputer boots and reads the xp.cnf file. To take advantage of the Flash Memory option, you can flash all or part of your configuration.
This section provides the basic flash procedure. Refer to Chapter 2 of the Network Computer Reference manual for the specific flash commands.
• Create a remote configuration file with the do_flash and appropriate flash_feature enabled. Change the boot_method to ROM (for subsequent boots). If you are not going to flash the remote configuration file, you maywish to set the network computer to read a host-based xp.cnf file.
• Boot only the network computers that you want to flash. Use TFTP, NFS, or MOP as the boot method. You cannot flash a network computer that booted from Flash Memory (boot method ROM ).
• Once flashing is complete, comment out the flash information in the xp.cnf file. Restore the boot_method settings as needed for your other network computers.
Enabling a Master Network ComputerA network computer equipped with Flash memory can be used as a master network computer to boot other network computers.
✔ Check Workbook line 36 to enable or boot from a master network compute
UNIX Installation 2-15
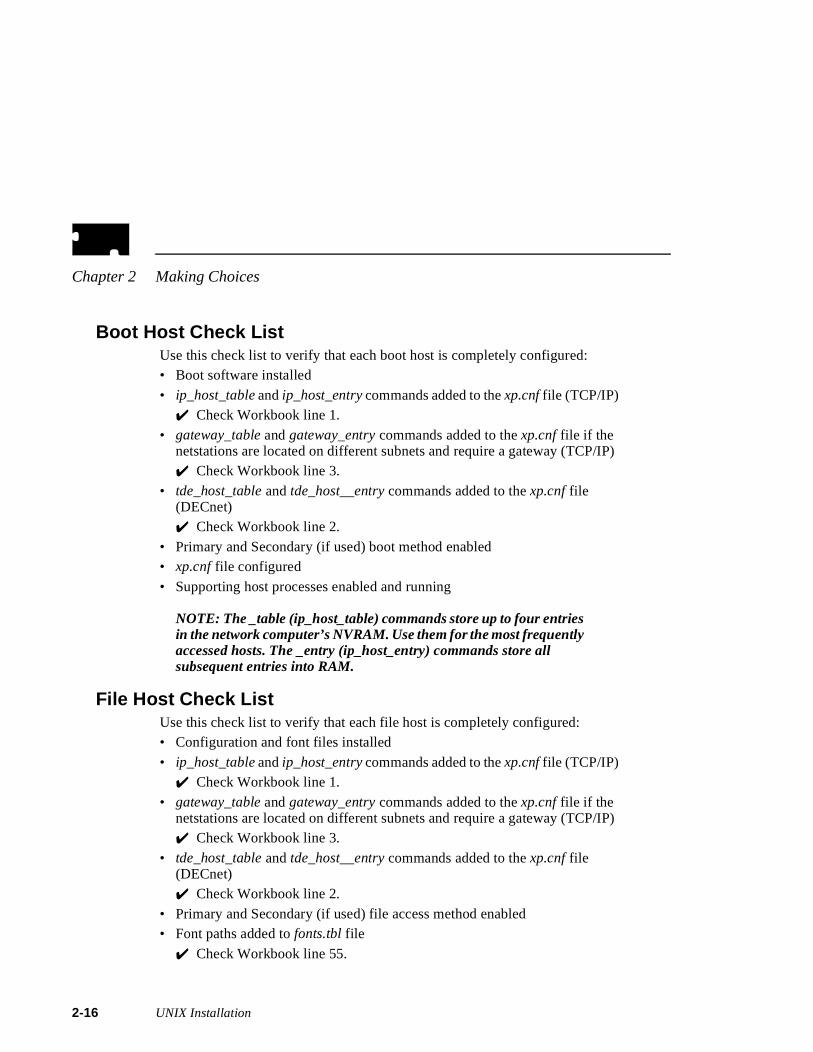
Chapter 2 Making Choices
2-1
P)
P)
Boot Host Check ListUse this check list to verify that each boot host is completely configured:• Boot software installed
• ip_host_table and ip_host_entry commands added to the xp.cnf file (TCP/IP)✔ Check Workbook line 1.
• gateway_table and gateway_entry commands added to the xp.cnf file if the netstations are located on different subnets and require a gateway (TCP/I✔ Check Workbook line 3.
• tde_host_table and tde_host__entry commands added to the xp.cnf file (DECnet)✔ Check Workbook line 2.
• Primary and Secondary (if used) boot method enabled• xp.cnf file configured
• Supporting host processes enabled and running
NOTE: The _table (ip_host_table) commands store up to four entries in the network computer’s NVRAM. Use them for the most frequently accessed hosts. The _entry (ip_host_entry) commands store all subsequent entries into RAM.
File Host Check ListUse this check list to verify that each file host is completely configured:• Configuration and font files installed
• ip_host_table and ip_host_entry commands added to the xp.cnf file (TCP/IP)✔ Check Workbook line 1.
• gateway_table and gateway_entry commands added to the xp.cnf file if the netstations are located on different subnets and require a gateway (TCP/I✔ Check Workbook line 3.
• tde_host_table and tde_host__entry commands added to the xp.cnf file (DECnet)✔ Check Workbook line 2.
• Primary and Secondary (if used) file access method enabled• Font paths added to fonts.tbl file
✔ Check Workbook line 55.
6 UNIX Installation
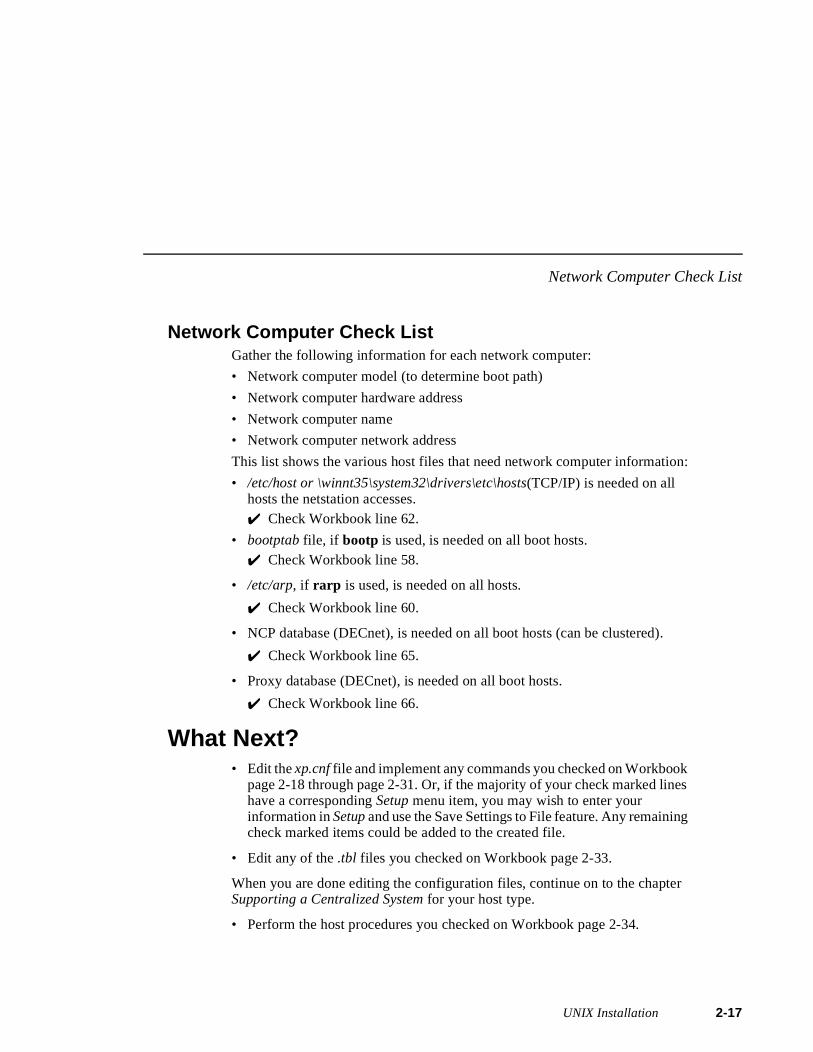
Network Computer Check List
:
s
r
Network Computer Check ListGather the following information for each network computer:
• Network computer model (to determine boot path)
• Network computer hardware address
• Network computer name
• Network computer network address
This list shows the various host files that need network computer information
• /etc/host or \winnt35\system32\drivers\etc\hosts(TCP/IP) is needed on all hosts the netstation accesses.✔ Check Workbook line 62.
• bootptab file, if bootp is used, is needed on all boot hosts.✔ Check Workbook line 58.
• /etc/arp, if rarp is used, is needed on all hosts.
✔ Check Workbook line 60.
• NCP database (DECnet), is needed on all boot hosts (can be clustered).
✔ Check Workbook line 65.
• Proxy database (DECnet), is needed on all boot hosts.
✔ Check Workbook line 66.
What Next?• Edit the xp.cnf file and implement any commands you checked on Workbook
page 2-18 through page 2-31. Or, if the majority of your check marked linehave a corresponding Setup menu item, you may wish to enter your information in Setup and use the Save Settings to File feature. Any remainingcheck marked items could be added to the created file.
• Edit any of the.tbl files you checked on Workbook page 2-33.
When you are done editing the configuration files, continue on to the chapteSupporting a Centralized System for your host type.
• Perform the host procedures you checked on Workbook page 2-34.
UNIX Installation 2-17
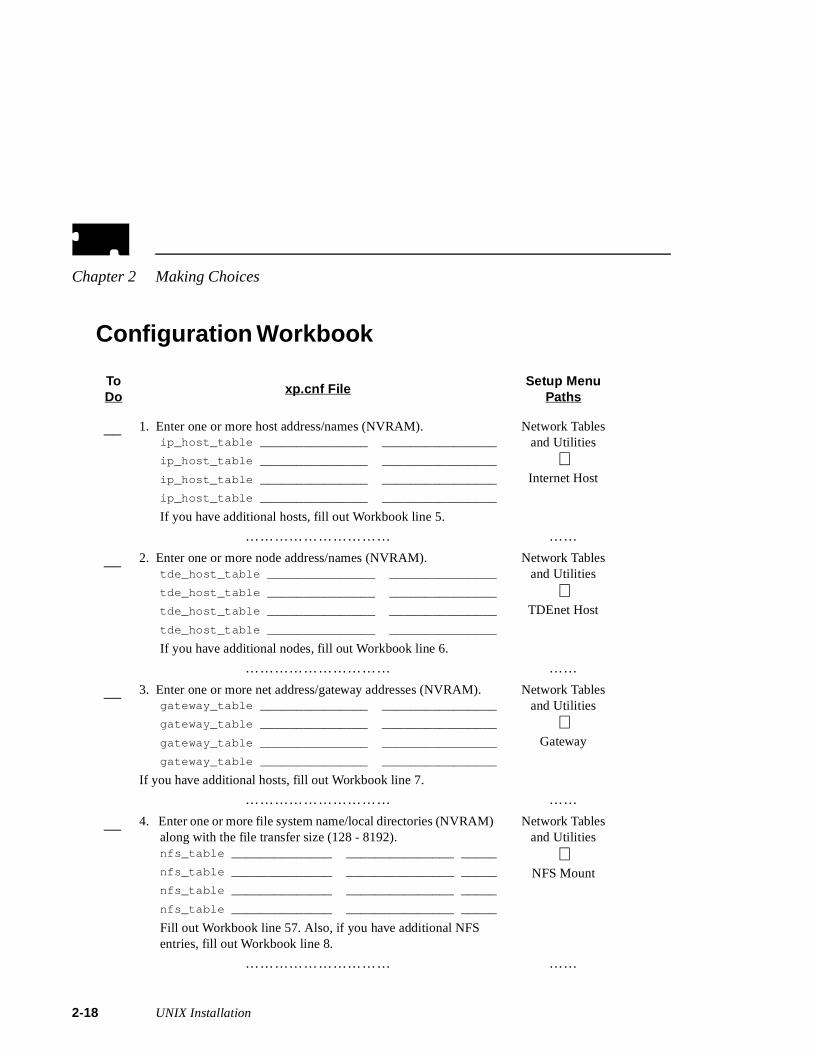
Chapter 2 Making Choices
2-1
Configuration Workbook
ToDo
xp.cnf FileSetup Menu
Paths
__ 1. Enter one or more host address/names (NVRAM).ip_host_table _______________ ________________
ip_host_table _______________ ________________
ip_host_table _______________ ________________
ip_host_table _______________ ________________
If you have additional hosts, fill out Workbook line 5.
Network Tablesand Utilities
⇓Internet Host
………………………… ……
__ 2. Enter one or more node address/names (NVRAM).tde_host_table _______________ _______________
tde_host_table _______________ _______________
tde_host_table _______________ _______________
tde_host_table _______________ _______________
If you have additional nodes, fill out Workbook line 6.
Network Tablesand Utilities
⇓TDEnet Host
………………………… ……
__ 3. Enter one or more net address/gateway addresses (NVRAM).gateway_table _______________ ________________
gateway_table _______________ ________________
gateway_table _______________ ________________
gateway_table _______________ ________________
If you have additional hosts, fill out Workbook line 7.
Network Tablesand Utilities
⇓Gateway
………………………… ……
__ 4. Enter one or more file system name/local directories (NVRAM) along with the file transfer size (128 - 8192).nfs_table ______________ _______________ _____
nfs_table ______________ _______________ _____
nfs_table ______________ _______________ _____
nfs_table ______________ _______________ _____
Fill out Workbook line 57. Also, if you have additional NFS entries, fill out Workbook line 8.
Network Tables and Utilities
⇓NFS Mount
………………………… ……
8 UNIX Installation

Configuration Workbook
__ 5. Enter one or more host address/names (RAM).ip_host_entry _______________ ________________
ip_host_entry _______________ ________________
ip_host_entry _______________ ________________
ip_host_entry _______________ ________________
Continue adding entries as needed.
Not available
………………………… ……
__ 6. Enter one or more node address/names (RAM).tde_host_entry _______________ _______________
tde_host_entry _______________ _______________
tde_host_entry _______________ _______________
tde_host_entry _______________ _______________
Continue adding entries as needed.
Not available
………………………… ……
__ 7. Enter one or more net address/gateway addresses (RAM).gateway_entry _______________ ________________
gateway_entry _______________ ________________
gateway_entry _______________ ________________
gateway_entry _______________ ________________
Continue adding entries as needed.
Not available
………………………… ……
__ 8. Enter one or more file system name/local directories (RAM) along with the file transfer size (128 - 8192).nfs_entry ______________ _______________ _____
nfs_entry ______________ _______________ _____
nfs_entry ______________ _______________ _____
nfs_entry ______________ _______________ _____
Continue adding entries as needed.Fill out Workbook line 57.
Not available
………………………… ……
ToDo
xp.cnf FileSetup Menu
Paths
UNIX Installation 2-19
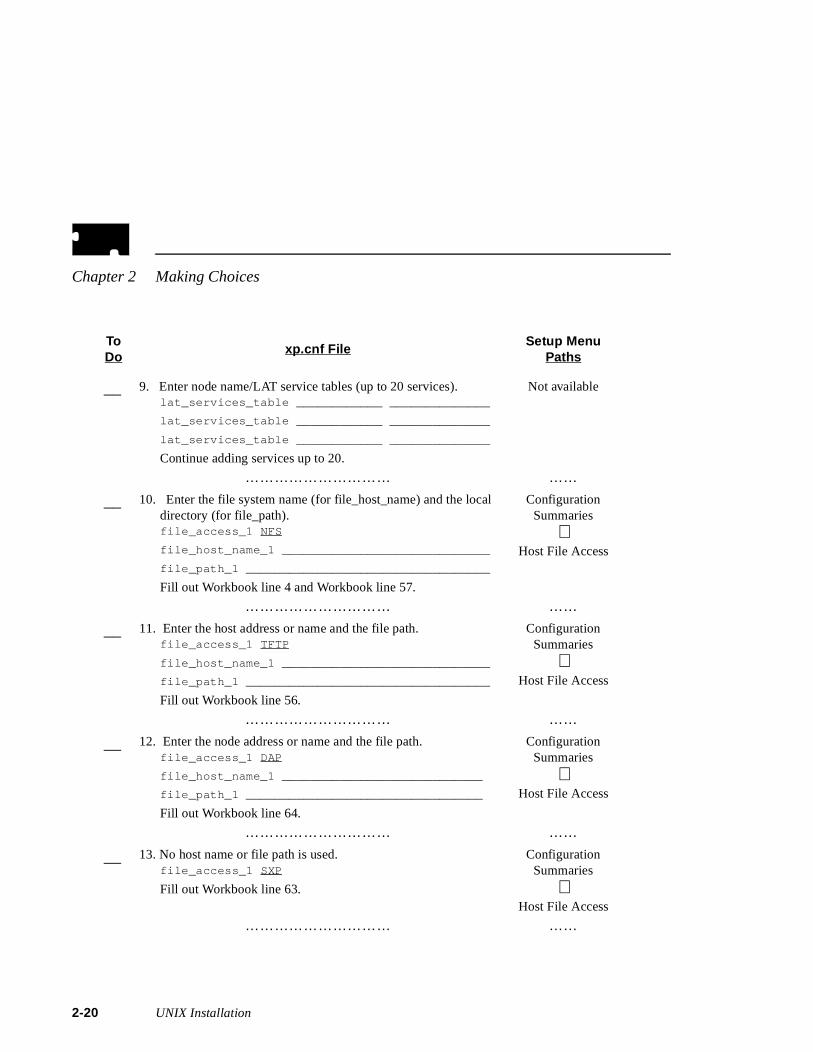
Chapter 2 Making Choices
2-2
__ 9. Enter node name/LAT service tables (up to 20 services).lat_services_table ____________ ______________
lat_services_table ____________ ______________
lat_services_table ____________ ______________
Continue adding services up to 20.
Not available
………………………… ……
__ 10. Enter the file system name (for file_host_name) and the local directory (for file_path).file_access_1 NFS
file_host_name_1 _____________________________
file_path_1 __________________________________
Fill out Workbook line 4 and Workbook line 57.
Configuration Summaries
⇓Host File Access
………………………… ……
__ 11. Enter the host address or name and the file path.file_access_1 TFTP
file_host_name_1 _____________________________
file_path_1 __________________________________
Fill out Workbook line 56.
Configuration Summaries
⇓Host File Access
………………………… ……
__ 12. Enter the node address or name and the file path.file_access_1 DAP
file_host_name_1 ____________________________
file_path_1 _________________________________
Fill out Workbook line 64.
Configuration Summaries
⇓Host File Access
………………………… ……
__ 13. No host name or file path is used.file_access_1 SXP
Fill out Workbook line 63.
Configuration Summaries
⇓Host File Access
………………………… ……
ToDo
xp.cnf FileSetup Menu
Paths
0 UNIX Installation

Configuration Workbook
__ 14. Enter the file system name (for file_host_name) and the local directory (for file_path).file_access_2 NFS
file_host_name_2 ____________________________
file_path_2 _________________________________
Fill out Workbook line 4 and Workbook line 57.
Configuration Summaries
⇓Host File Access
………………………… ……
__ 15. Enter the host address or name and the file path.file_access_2 TFTP
file_host_name_2 ____________________________
file_path_2 _________________________________
Fill out Workbook line 56.
Configuration Summaries
⇓Host File Access
………………………… ……
__ 16. Enter the node address or name and the file path.file_access_2 DAP
file_host_name_2 ____________________________
file_path_2 _________________________________
Fill out Workbook line 64.
Configuration Summaries
⇓Host File Access
………………………… ……
__ 17. No host name or file path is used.file_access_1 SXP
Fill out Workbook line 63.
Configuration Summaries
⇓Host File Access
………………………… ……
__ 18. Enter the address or name of the XDMCP host.host_connect_method XDMCP
xdmcp_connect DIRECT
xdmcp_server ___________________________
Fill out Workbook line 61.
Configuration Summaries
⇓X Environment
………………………… ……
ToDo
xp.cnf FileSetup Menu
Paths
UNIX Installation 2-21
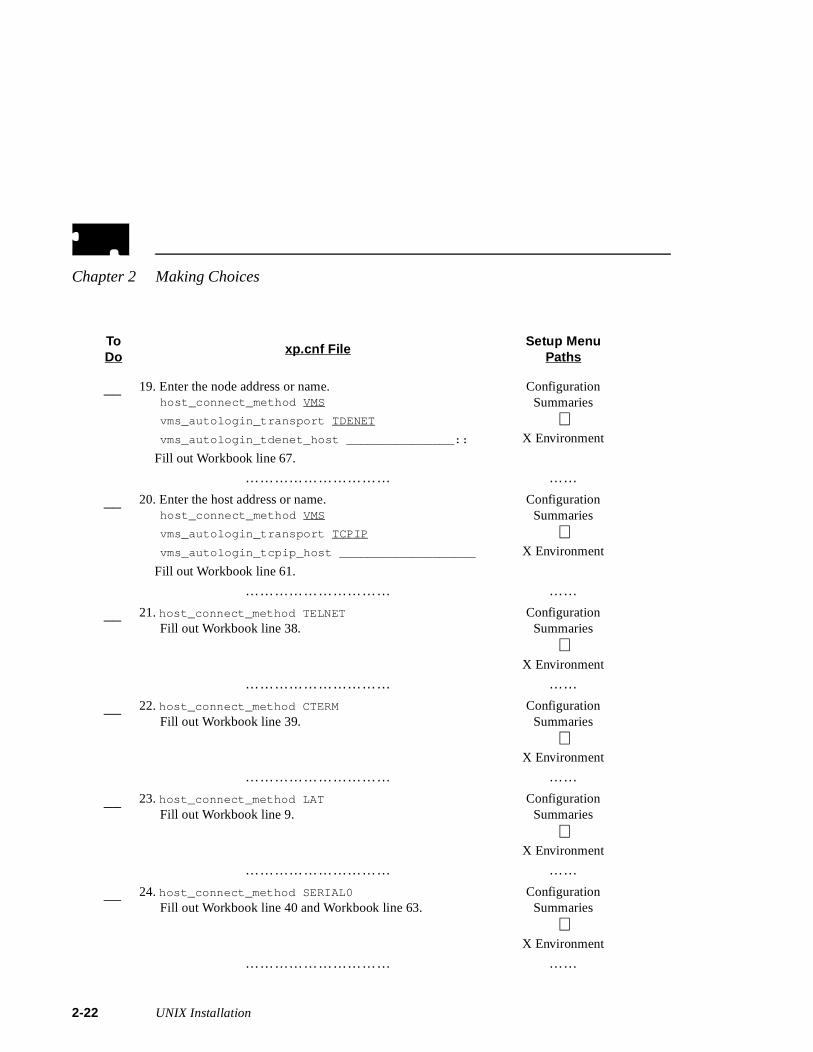
Chapter 2 Making Choices
2-2
__ 19. Enter the node address or name.host_connect_method VMS
vms_autologin_transport TDENET
vms_autologin_tdenet_host _______________::
Fill out Workbook line 67.
Configuration Summaries
⇓X Environment
………………………… ……
__ 20. Enter the host address or name.host_connect_method VMS
vms_autologin_transport TCPIP
vms_autologin_tcpip_host ___________________
Fill out Workbook line 61.
Configuration Summaries
⇓X Environment
………………………… ……
__ 21. host_connect_method TELNET
Fill out Workbook line 38.Configuration
Summaries
⇓X Environment
………………………… ……
__ 22. host_connect_method CTERM
Fill out Workbook line 39.Configuration
Summaries
⇓X Environment
………………………… ……
__ 23. host_connect_method LAT
Fill out Workbook line 9.Configuration
Summaries
⇓X Environment
………………………… ……
__ 24. host_connect_method SERIAL0
Fill out Workbook line 40 and Workbook line 63.Configuration
Summaries
⇓X Environment
………………………… ……
ToDo
xp.cnf FileSetup Menu
Paths
2 UNIX Installation
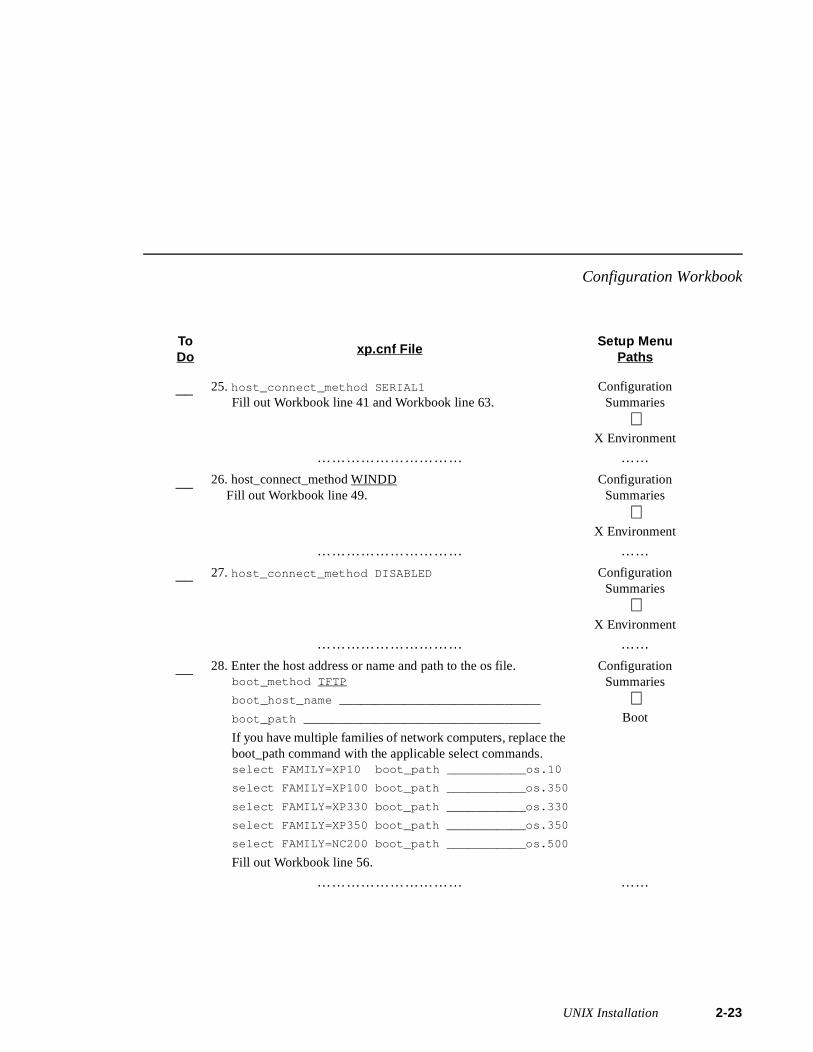
Configuration Workbook
__ 25. host_connect_method SERIAL1
Fill out Workbook line 41 and Workbook line 63.Configuration
Summaries
⇓X Environment
………………………… ……
__ 26. host_connect_method WINDDFill out Workbook line 49.
Configuration Summaries
⇓X Environment
………………………… ……
__ 27. host_connect_method DISABLED Configuration Summaries
⇓X Environment
………………………… ……
__ 28. Enter the host address or name and path to the os file.boot_method TFTP
boot_host_name ____________________________
boot_path _________________________________
If you have multiple families of network computers, replace the boot_path command with the applicable select commands.select FAMILY=XP10 boot_path ___________os.10
select FAMILY=XP100 boot_path ___________os.350
select FAMILY=XP330 boot_path ___________os.330
select FAMILY=XP350 boot_path ___________os.350
select FAMILY=NC200 boot_path ___________os.500
Fill out Workbook line 56.
Configuration Summaries
⇓Boot
………………………… ……
ToDo
xp.cnf FileSetup Menu
Paths
UNIX Installation 2-23

Chapter 2 Making Choices
2-2
__ 29. Enter the NFS read size and the path to the os file.boot_method NFS ___________________________
boot_path _________________________________
If you have multiple families of network computers, replace the boot_path command with the applicable select commands.select FAMILY=XP10 boot_path ___________os.10
select FAMILY=XP100 boot_path ___________os.350
select FAMILY=XP330 boot_path ___________os.330
select FAMILY=XP350 boot_path ___________os.350
select FAMILY=NC200 boot_path ___________os.500
Fill out Workbook line 57.
Configuration Summaries
⇓Boot
………………………… ……
__ 30. Enter the path to the OS file.boot_method MOP
boot_path _________________________________
If you have multiple families of network computers, replace the boot_path command with the applicable select commands.select FAMILY=XP10 boot_path _________XP10_OS
select FAMILY=XP100 boot_path _________XP350_OS
select FAMILY=XP330 boot_path _________XP330_OS
select FAMILY=XP350 boot_path _________XP350_OS
select FAMILY=NC200 boot_path _________NC200_OS
Fill out Workbook line 64.
Configuration Summaries
⇓Boot
………………………… ……
ToDo
xp.cnf FileSetup Menu
Paths
4 UNIX Installation
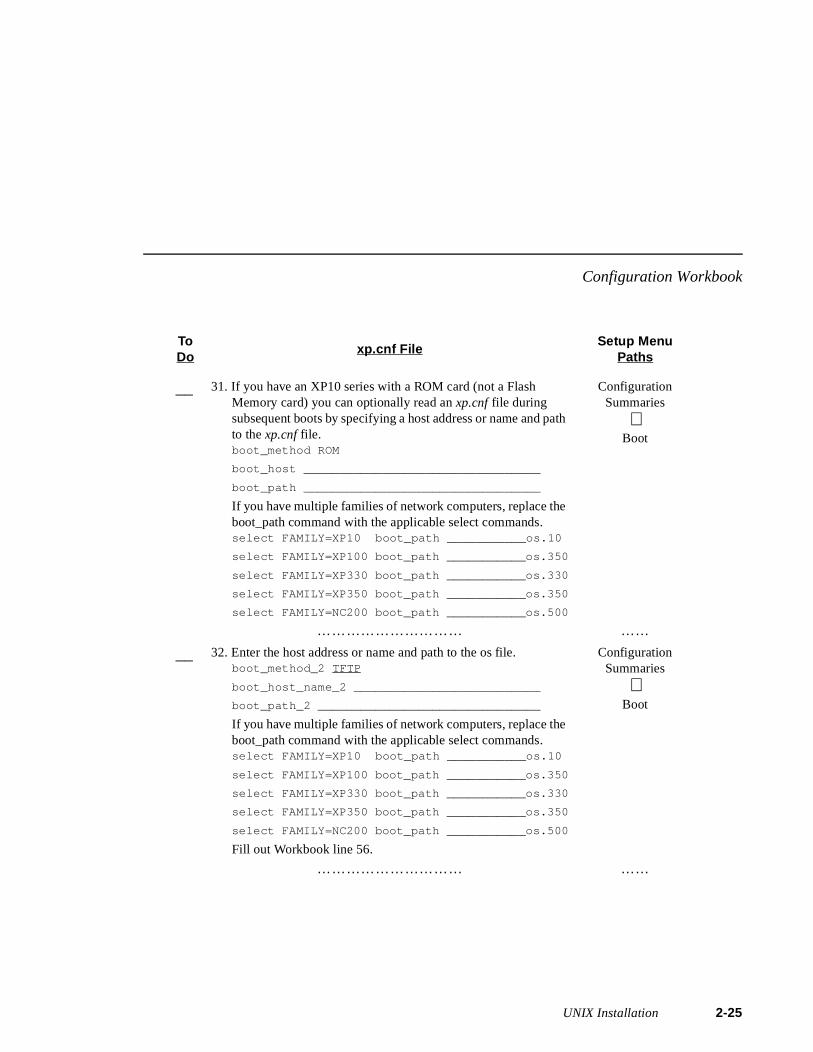
Configuration Workbook
__ 31. If you have an XP10 series with a ROM card (not a Flash Memory card) you can optionally read an xp.cnf file during subsequent boots by specifying a host address or name and path to the xp.cnf file.boot_method ROM
boot_host _________________________________
boot_path _________________________________
If you have multiple families of network computers, replace the boot_path command with the applicable select commands.select FAMILY=XP10 boot_path ___________os.10
select FAMILY=XP100 boot_path ___________os.350
select FAMILY=XP330 boot_path ___________os.330
select FAMILY=XP350 boot_path ___________os.350
select FAMILY=NC200 boot_path ___________os.500
Configuration Summaries
⇓Boot
………………………… ……
__ 32. Enter the host address or name and path to the os file.boot_method_2 TFTP
boot_host_name_2 __________________________
boot_path_2 _______________________________
If you have multiple families of network computers, replace the boot_path command with the applicable select commands.select FAMILY=XP10 boot_path ___________os.10
select FAMILY=XP100 boot_path ___________os.350
select FAMILY=XP330 boot_path ___________os.330
select FAMILY=XP350 boot_path ___________os.350
select FAMILY=NC200 boot_path ___________os.500
Fill out Workbook line 56.
Configuration Summaries
⇓Boot
………………………… ……
ToDo
xp.cnf FileSetup Menu
Paths
UNIX Installation 2-25
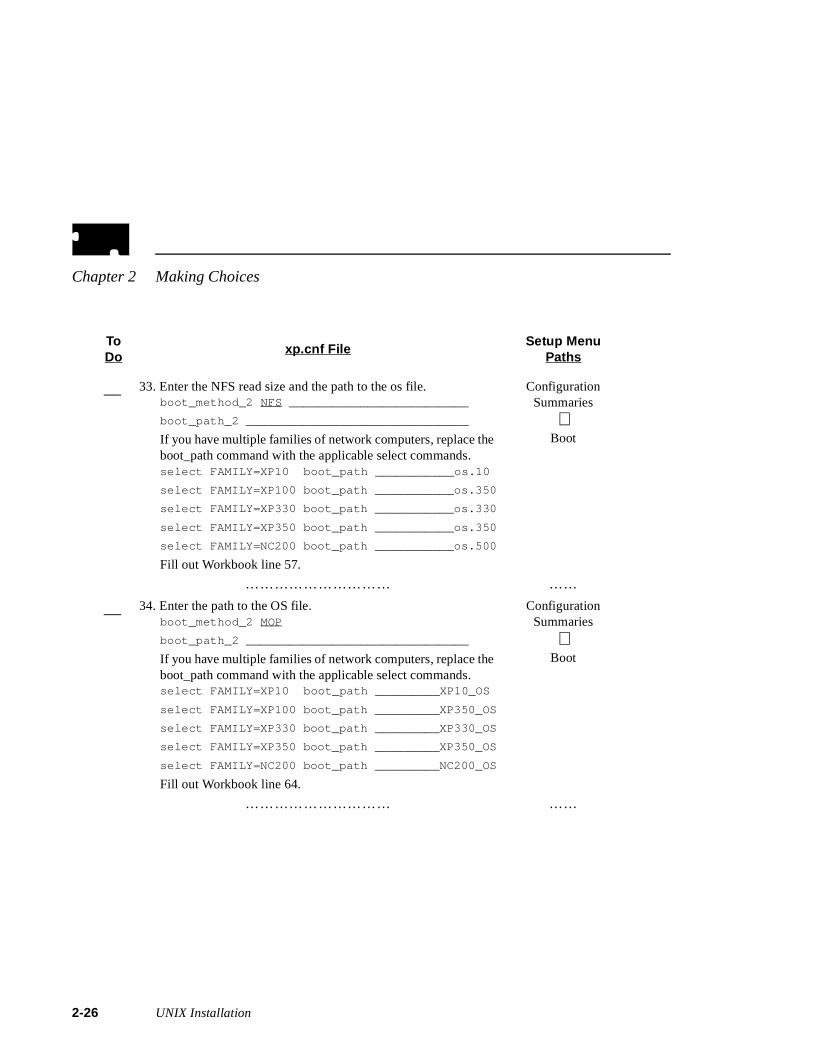
Chapter 2 Making Choices
2-2
__ 33. Enter the NFS read size and the path to the os file.boot_method_2 NFS _________________________
boot_path_2 _______________________________
If you have multiple families of network computers, replace the boot_path command with the applicable select commands.select FAMILY=XP10 boot_path ___________os.10
select FAMILY=XP100 boot_path ___________os.350
select FAMILY=XP330 boot_path ___________os.330
select FAMILY=XP350 boot_path ___________os.350
select FAMILY=NC200 boot_path ___________os.500
Fill out Workbook line 57.
Configuration Summaries
⇓Boot
………………………… ……
__ 34. Enter the path to the OS file.boot_method_2 MOP
boot_path_2 _______________________________
If you have multiple families of network computers, replace the boot_path command with the applicable select commands.select FAMILY=XP10 boot_path _________XP10_OS
select FAMILY=XP100 boot_path _________XP350_OS
select FAMILY=XP330 boot_path _________XP330_OS
select FAMILY=XP350 boot_path _________XP350_OS
select FAMILY=NC200 boot_path _________NC200_OS
Fill out Workbook line 64.
Configuration Summaries
⇓Boot
………………………… ……
ToDo
xp.cnf FileSetup Menu
Paths
6 UNIX Installation
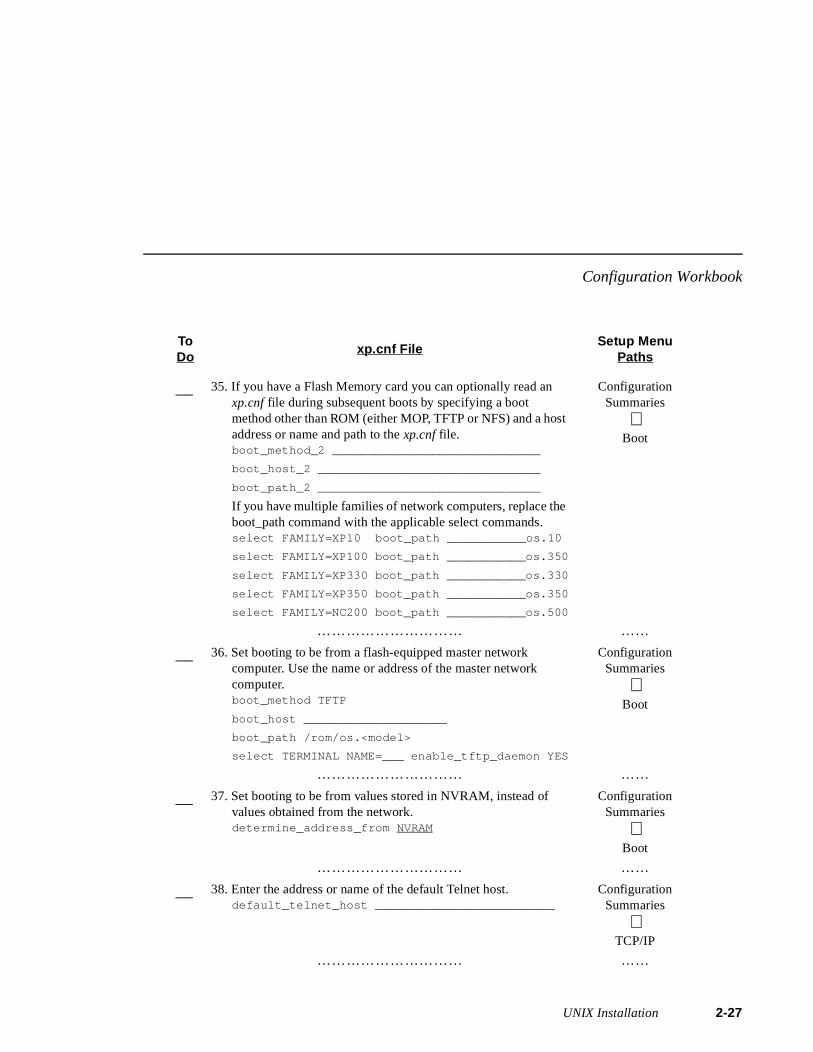
Configuration Workbook
__ 35. If you have a Flash Memory card you can optionally read an xp.cnf file during subsequent boots by specifying a boot method other than ROM (either MOP, TFTP or NFS) and a host address or name and path to the xp.cnf file.boot_method_2 _____________________________
boot_host_2 _______________________________
boot_path_2 _______________________________
If you have multiple families of network computers, replace the boot_path command with the applicable select commands.select FAMILY=XP10 boot_path ___________os.10
select FAMILY=XP100 boot_path ___________os.350
select FAMILY=XP330 boot_path ___________os.330
select FAMILY=XP350 boot_path ___________os.350
select FAMILY=NC200 boot_path ___________os.500
Configuration Summaries
⇓Boot
………………………… ……
__ 36. Set booting to be from a flash-equipped master network computer. Use the name or address of the master network computer.boot_method TFTP
boot_host ____________________
boot_path /rom/os.<model>
select TERMINAL NAME=___ enable_tftp_daemon YES
Configuration Summaries
⇓Boot
………………………… ……
__ 37. Set booting to be from values stored in NVRAM, instead of values obtained from the network.determine_address_from NVRAM
Configuration Summaries
⇓Boot
………………………… ……
__ 38. Enter the address or name of the default Telnet host.default_telnet_host _________________________
Configuration Summaries
⇓TCP/IP
………………………… ……
ToDo
xp.cnf FileSetup Menu
Paths
UNIX Installation 2-27
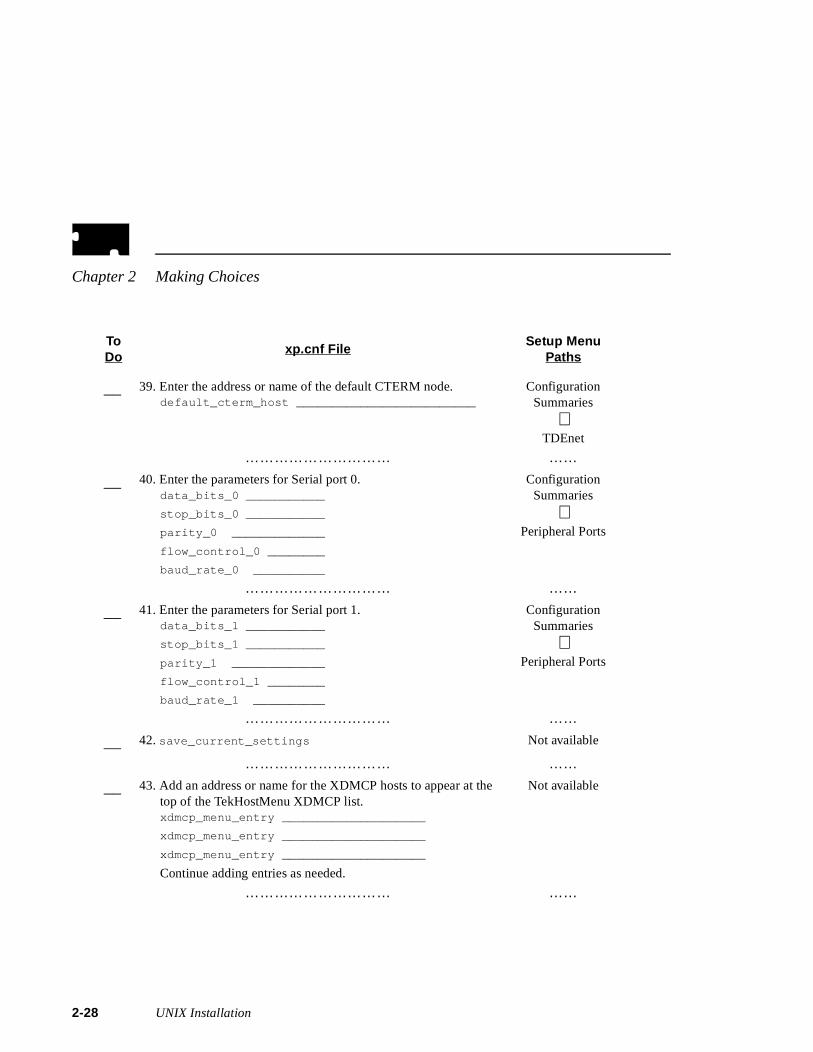
Chapter 2 Making Choices
2-2
__ 39. Enter the address or name of the default CTERM node.default_cterm_host _________________________
Configuration Summaries
⇓TDEnet
………………………… ……
__ 40. Enter the parameters for Serial port 0.data_bits_0 ___________
stop_bits_0 ___________
parity_0 _____________
flow_control_0 ________
baud_rate_0 __________
Configuration Summaries
⇓Peripheral Ports
………………………… ……
__ 41. Enter the parameters for Serial port 1.data_bits_1 ___________
stop_bits_1 ___________
parity_1 _____________
flow_control_1 ________
baud_rate_1 __________
Configuration Summaries
⇓Peripheral Ports
………………………… ……
__ 42. save_current_settings Not available
………………………… ……
__ 43. Add an address or name for the XDMCP hosts to appear at the top of the TekHostMenu XDMCP list.xdmcp_menu_entry ____________________
xdmcp_menu_entry ____________________
xdmcp_menu_entry ____________________
Continue adding entries as needed.
Not available
………………………… ……
ToDo
xp.cnf FileSetup Menu
Paths
8 UNIX Installation
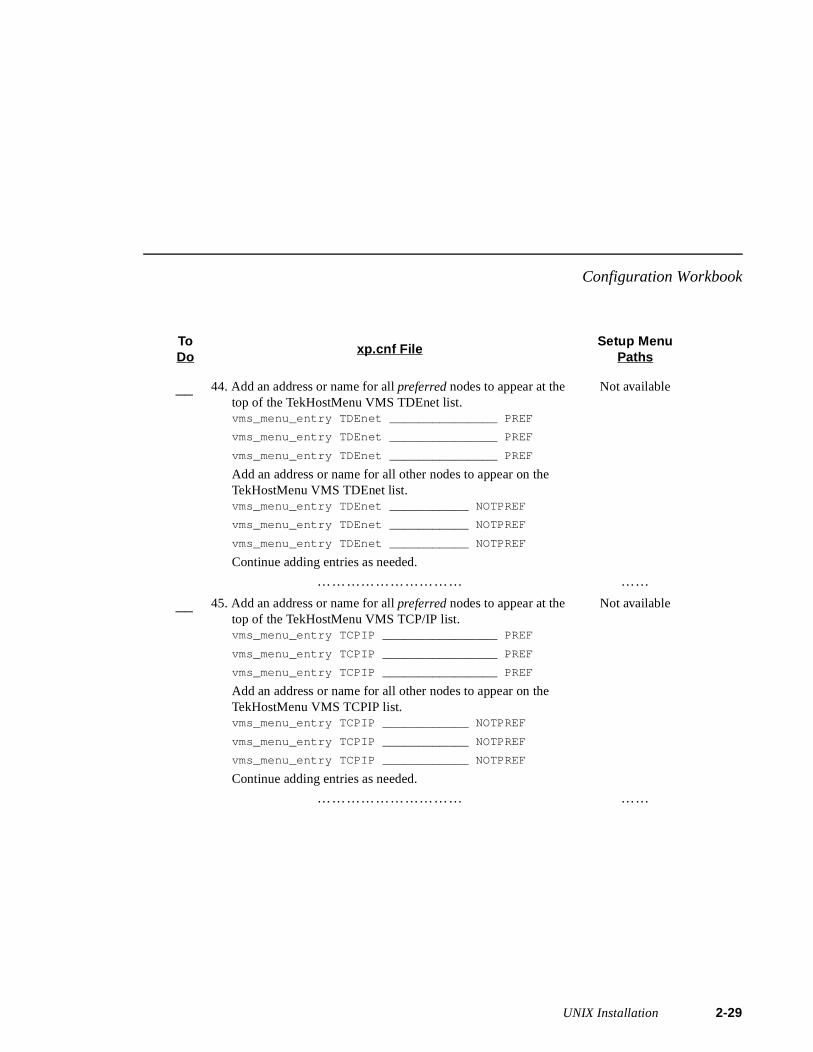
Configuration Workbook
__ 44. Add an address or name for all preferred nodes to appear at the top of the TekHostMenu VMS TDEnet list.vms_menu_entry TDEnet _______________ PREF
vms_menu_entry TDEnet _______________ PREF
vms_menu_entry TDEnet _______________ PREF
Add an address or name for all other nodes to appear on the TekHostMenu VMS TDEnet list.vms_menu_entry TDEnet ___________ NOTPREF
vms_menu_entry TDEnet ___________ NOTPREF
vms_menu_entry TDEnet ___________ NOTPREF
Continue adding entries as needed.
Not available
………………………… ……
__ 45. Add an address or name for all preferred nodes to appear at the top of the TekHostMenu VMS TCP/IP list.vms_menu_entry TCPIP ________________ PREF
vms_menu_entry TCPIP ________________ PREF
vms_menu_entry TCPIP ________________ PREF
Add an address or name for all other nodes to appear on the TekHostMenu VMS TCPIP list.vms_menu_entry TCPIP ____________ NOTPREF
vms_menu_entry TCPIP ____________ NOTPREF
vms_menu_entry TCPIP ____________ NOTPREF
Continue adding entries as needed.
Not available
………………………… ……
ToDo
xp.cnf FileSetup Menu
Paths
UNIX Installation 2-29
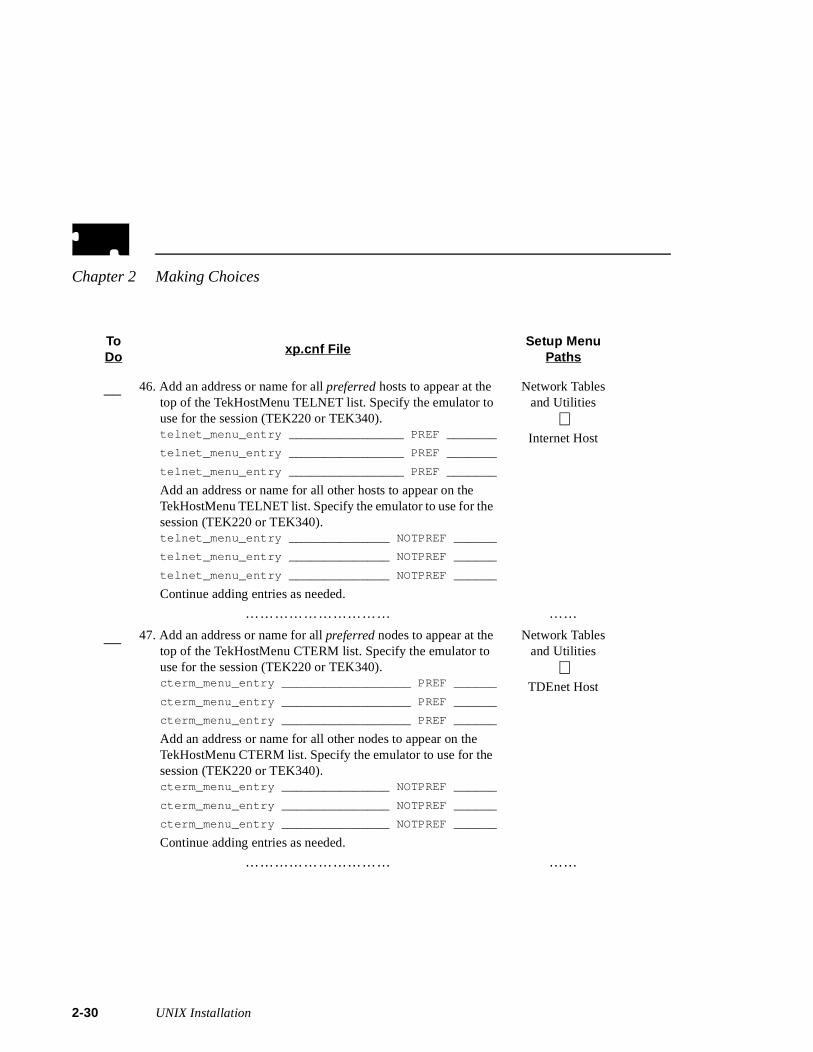
Chapter 2 Making Choices
2-3
__ 46. Add an address or name for all preferred hosts to appear at the top of the TekHostMenu TELNET list. Specify the emulator to use for the session (TEK220 or TEK340).telnet_menu_entry ________________ PREF _______
telnet_menu_entry ________________ PREF _______
telnet_menu_entry ________________ PREF _______
Add an address or name for all other hosts to appear on the TekHostMenu TELNET list. Specify the emulator to use for the session (TEK220 or TEK340).telnet_menu_entry ______________ NOTPREF ______
telnet_menu_entry ______________ NOTPREF ______
telnet_menu_entry ______________ NOTPREF ______
Continue adding entries as needed.
Network Tables and Utilities
⇓Internet Host
………………………… ……
__ 47. Add an address or name for all preferred nodes to appear at the top of the TekHostMenu CTERM list. Specify the emulator to use for the session (TEK220 or TEK340).cterm_menu_entry __________________ PREF ______
cterm_menu_entry __________________ PREF ______
cterm_menu_entry __________________ PREF ______
Add an address or name for all other nodes to appear on the TekHostMenu CTERM list. Specify the emulator to use for the session (TEK220 or TEK340).cterm_menu_entry _______________ NOTPREF ______
cterm_menu_entry _______________ NOTPREF ______
cterm_menu_entry _______________ NOTPREF ______
Continue adding entries as needed.
Network Tables and Utilities
⇓TDEnet Host
………………………… ……
ToDo
xp.cnf FileSetup Menu
Paths
0 UNIX Installation
Configuration Workbook
__ 48. Add an address or name for all preferred IBM hosts to appear at the top of the TekHostMenu IBM list. Specify the emulator to use for the session (TEK220 or TEK340), the model (2, 3, 4, 5), and the protocol (TN or OCS).ibm_menu_entry ____________ PREF ______ __ ____
ibm_menu_entry ____________ PREF ______ __ ____
ibm_menu_entry ____________ PREF ______ __ ____
Add an address or name for all other IBM hosts to appear on the TekHostMenu IBM list.cterm_menu_entry ________ NOTPREF _____ __ ____
cterm_menu_entry ________ NOTPREF _____ __ ____
cterm_menu_entry ________ NOTPREF _____ __ ____
Continue adding entries as needed.
Not available
………………………… ……
__ 49. Add an address or name for all preferred WinDD servers to appear at the top of the TekHostMenu WinDD list. Specify the window size to use for the session (640, 800, 1024, 1280), whether to reconnect after a session log off (NORECONNECT, RECONNECT), and whether to display the menubar (MENUBAR, NOMENUBAR).windd_menu_entry ________ PREF __ _______ _____
windd_menu_entry ________ PREF __ _______ _____
windd_menu_entry ________ PREF __ _______ _____
Add an address or name for all other WinDD servers to appear on the TekHostMenu WinDD list.windd_menu_entry _______ NOTPREF __ ______ ____
windd_menu_entry _______ NOTPREF __ ______ ____
windd_menu_entry _______ NOTPREF __ ______ ____
Continue adding entries as needed.
Not available
………………………… ……
ToDo
xp.cnf FileSetup Menu
Paths
UNIX Installation 2-31
Chapter 2 Making Choices
2-3
__ 50. Add the name or address and configuration information for the WinDD server when the host_connect_method is set to WINDD. windd_size can be 640, 800, 1024, 1280). windd_auto_connect, windd_auto_reconnect, and windd_entrybox can be set as ENABLED or DISABLED. windd_menubar can be set as YES or NO.windd_host_name _____________________
windd_size ___________________________
windd_auto_connect ___________________
windd_auto_reconnect _________________
windd_menubar ________________________
windd_entrybox _______________________
Not available
………………………… ……
ToDo
xp.cnf FileSetup Menu
Paths
2 UNIX Installation
Configuration Workbook
To Do
*.tbl FilesSetup Menu
Paths
__ 51. Edit the gateway.tbl file and enter as many additional gateways as needed.
Network Tables and Utilities
⇓Gateway
………………………… ……
__ 52. Edit the hosts.tbl file and enter as many additional hosts as needed.
Network Tables and Utilities
⇓Internet Host
………………………… ……
__ 53. Edit the file nodes.tbl and enter as many additional nodes as needed.
Network Tablesand Utilities
⇓TDEnet Host
………………………… ……
__ 54. Edit the nfs.tbl file and enter as many additional NFS mounts as needed.
Network Tablesand Utilities
⇓NFS Mount
………………………… ……
__ 55. Edit the fonts.tbl file and enter the directory paths (Example: ).______________________________________________
______________________________________________
______________________________________________
______________________________________________
Network Tablesand Utilities
⇓Font Directory
………………………… ……
UNIX Installation 2-33

Chapter 2 Making Choices
2-3
To Do
Host Configuration Procedures
__ 56. Enable tftp on the host
…………………………
__ 57. Enable NFS on the host
…………………………
__ 58. Enable bootp on the host
…………………………
__ 59. Enable DHCP on the host
…………………………
__ 60. Enable rarp on the host
…………………………
__ 61. Enable XDM on the host
…………………………
__ 62. Add network computer entries to /etc/host file
…………………………
__ 63. Set up Serial Xpress (see the Serial Xpress User manual)
…………………………
__ 64. Enable MOP on the host
…………………………
__ 65. Add the nodes to the NCP database
…………………………
__ 66. Create Proxy accounts on the host
…………………………
__ 67. Enable DECwindows on the host
…………………………
__ 68. Install WinDD on the Windows NT server.
…………………………
4 UNIX Installation
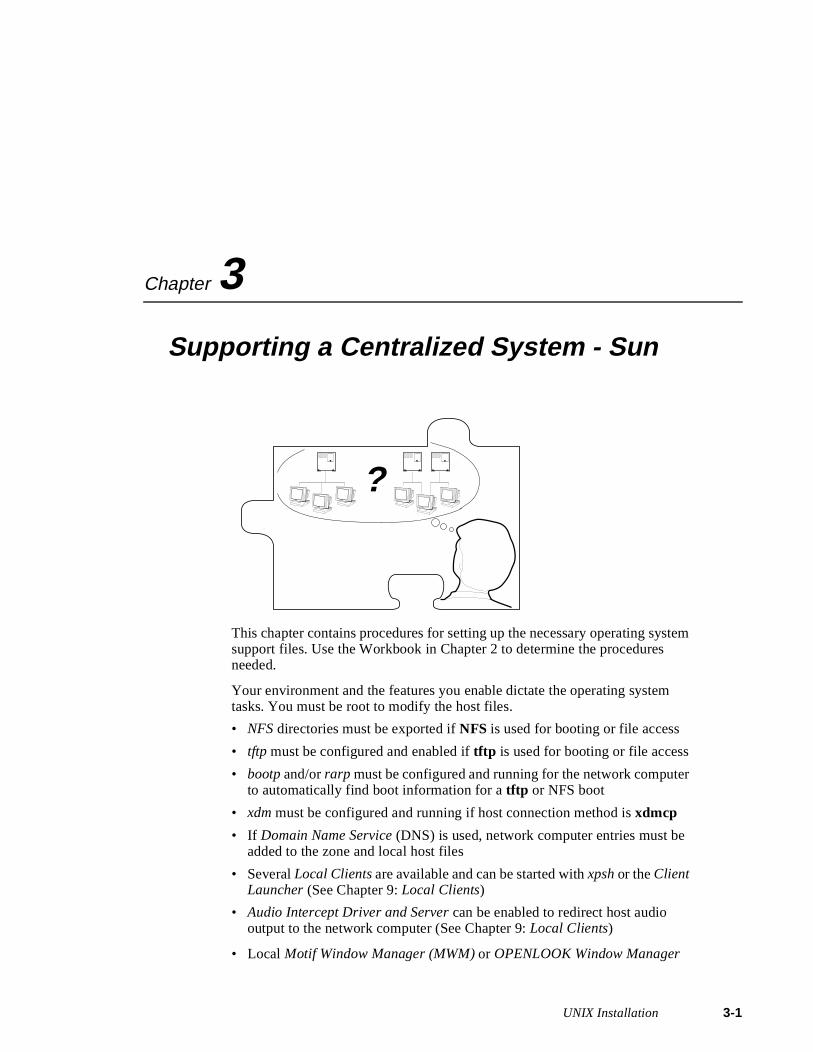
Chapter
3em
Supporting a Centralized System - Sun
This chapter contains procedures for setting up the necessary operating systsupport files. Use the Workbook in Chapter 2 to determine the procedures needed.
Your environment and the features you enable dictate the operating system tasks. You must be root to modify the host files.
• NFS directories must be exported if NFS is used for booting or file access
• tftp must be configured and enabled if tftp is used for booting or file access
• bootp and/or rarp must be configured and running for the network computerto automatically find boot information for a tftp or NFS boot
• xdm must be configured and running if host connection method is xdmcp
• If Domain Name Service (DNS) is used, network computer entries must be added to the zone and local host files
• Several Local Clients are available and can be started with xpsh or the Client Launcher (See Chapter 9: Local Clients)
• Audio Intercept Driver and Server can be enabled to redirect host audio output to the network computer (See Chapter 9: Local Clients)
• Local Motif Window Manager (MWM) or OPENLOOK Window Manager
?
UNIX Installation 3-1
Chapter 3 Supporting a Centralized System - Sun
3-2
(OLWM) must be started to use local MWM or OLWM (See Chapter 10: Window Managers)
• XIE must be enabled to run XIE applications (See Chapter 9: Local Clients)
• XPT/A graphics tablet must be configured on the host if it is used for input. (See Chapter 9: Local Clients)
UNIX Installation

Enabling NFS on SunOS 4
as
er.
r
Enabling NFS on SunOS 4This section describes the steps necessary to set up the host if NFS is usedthe boot_method or file_access_method.
1. Edit the /etc/exports file. Add each of the file systems to be exported at boottime, along with any options.
The file systems must be exported to be accessible to the network computThe exported systems are specified with an nfs_table command in the xp.cnf file, or in the nfs.tbl file. An example xp.cnf file entry:
nfs_table "montana:/tekxp" "/tekxp" "8192"
An example nfs.tbl entry:
montana:/tekxp /tekxp 8192
/etc/exports entry, shown with the read only option (-ro):
/tekxp -ro
2. To enable the mount point immediately, without booting, run:
# /usr/etc/exportfs -a [-o options]
3. Use /usr/etc/exportfs without any parameters to verify the exports.
4. Edit the /etc/hosts file and add the network computer name and address. Foexample:
128.07.60.30 portland128.07.60.31 corvallis
5. Use the ps command to see if nfsd is running:
# ps -aux | grep nfsd | sed /grep/droot 88 1 0 Jul 27 ? 0:01 nfsd
a. If nfsd is not running, type:
# /usr/etc/nfsd 8 &
b. If nfsd is running, use the kill command with the PID to restart the daemon (the PID is 88 in the preceding ps example):
# kill -HUP PID
UNIX Installation 3-3
Chapter 3 Supporting a Centralized System - Sun
3-4
as
er.
Enabling NFS on SunOS 5This section describes the steps necessary to set up the host if NFS is usedthe boot_method or file_access_method.
1. Edit the /etc/dfs/dfstab file. Add each of the file systems to be exported at boot time, along with any options.
The file systems must be exported to be accessible to the network computThe exported systems are specified with an nfs_table or nfs_entry commands in the xp.cnf file, or in the nfs.tbl file. An example xp.cnf file entry:
nfs_table "montana:/tekxp" "/tekxp" "8192"
An example nfs.tbl entry:
montana:/tekxp /tekxp 8192
/etc/dfs/dfstab entry, shown with the read only option (ro):
share -F nfs -o ro -d "network computer files" /tekxp
2. To enable the mount point immediately, without booting, run:
# shareall
3. Edit the /etc/hosts file and add the network computer name and address.
128.07.60.30 portland
4. Use the ps command to see if nfsd is running:
# ps -edf | grep nfsd | sed /grep/droot 88 1 22 Jul 27 ? 0:00 /usr/lib/nfs/nfsd -a 8
a. If nfsd is not running, type:
# /usr/lib/nfs/nfsd 8 &
b. If nfsd is running, use the kill command with the PID to restart the daemon (the PID is 88 in the preceding ps example):
# kill -HUP PID
5. Use the ps command to see if mountd is running:
# ps -edf | grep mountd | sed /grep/droot 88 1 74 Jul 27 ? 0:01 /usr/lib/nfs/mountd
If mountd is not running, type:
# /usr/lib/nfs/mountd &
UNIX Installation
Enabling TFTP
.
Enabling TFTPThis section describes the steps necessary to set up tftp if it is used as the boot_method or file_access_method. This is the default boot method for network computers not equipped with TDEnet, Flash Memory or ROM optionsFor details, see the tftp man page on your host, or in /tekxp/man.
1. Verify that the tftp startup command is in the /etc/inetd.conf file. Add the line if it does not exist in your inetd.conf file. For SunOS 4, the path is /usr/etc/in.tftpd, for SunOS 5, the path is /usr/sbin. To verify the command:
# grep tftp /etc/inetd.conf
tftp dgram udp wait root /usr/etc/in.tftpd in.tftpdortftp dgram udp wait root /usr/sbin/in.tftpd in.tftpd
2. If /etc/inetd.conf contains a tftp entry with the -s (secure tftp) option:
tftp dgram udp wait root /usr/etc/in.tftpd in.tftpd -s /tekxportftp dgram udp wait root /usr/sbin/in.tftpd in.tftpd -s /tekxp
both the boot_directory and install_directory used during the tape installation would have to be within the secure path, in this case, /tftpboot. Refer to the following section for information on secure tftp.
3. Verify that in.tftpd, the tftp binary, resides where it is specified in /etc/inetd.conf. For the preceding examples, tftp would be located in /usr/etc (SunOS 4) or /usr/sbin (SunOS 5). If there is a mismatch between the actuallocation and the specified location, either move the binary or change the /etc/inetd.conf file.
UNIX Installation 3-5

Chapter 3 Supporting a Centralized System - Sun
3-6
4. If you edited inetd.conf, restart the inetd daemon. Use the ps command to find the process ID number (PID) for inetd. In this example the PID is 112.
a. For SunOS 4:
# ps -aux | grep inetd | sed /grep/d
root 112 1 0 Jul 27 ? 0:01 /usr/etc/inet/inetd
b. For SunOS 5:
# ps -edf | grep inetd | sed /grep/d
root 112 1143 Jul 27 ? 0:06 /usr/sbin/inetd -s
The -s indicates standalone. The process is running outside the Service Access Facility (SAF).
5. If inetd is running, use the kill command with the PID to restart the inetd daemon.
# kill -HUP PID
6. If inetd is not running, either reboot the host or start inetd:
a. For SunOS 4:
# inetd
b. For SunOS 5:
# inetd -s
NOTE: The /tekxp/bin/sun4/tftp binary from the installation media requires a /usr/tmp directory to perform the file transfers. If this directory does not exist, it must be created.
UNIX Installation

Using Secure TFTP
f
Using Secure TFTPIf you use secure tftp, there are various things to consider before you begin:
• Do not use the secure directory (usually /tekxp) as part of the path when you specify file paths in xp.cnf, fonts.tbl, nfs.tbl, bootptab, or at the network computer’s Boot Monitor. The secure option adds the secure directory.
Actual path to the boot file: /tekxp/boot/os.350Path you specify: /boot/os.350
NOTE: You must supply the initial slash (/) in the path that you specify (e.g. you cannot use boot/os.350 in the previous example).
• Secure tftp only allows access to files within the secure directory (usually /tekxp), so all boot and configuration files must share a common parent directory. For example, place the network computer files as follows:
Boot files: /tekxp/bootConfiguration files: /tekxp/boot/configFont files: /tekxp/boot/fonts
• Secure tftp does not follow symbolic links outside of the secure directory. Ithere is not enough room on the /tekxp partition, use NFS to access fonts and files on other disks. It is also possible to symbolically link the secure directory to another partition. For example, /tekxp could be linked to /usr/tekxp. Refer to your host documentation.
• To allow the network computer to configure itself from the network the firsttime it boots, you must use bootpd to establish communications, and enter the boot file name (without the secure directory in the path) in the bootptab file. Both bootp and a bootptab file are included on the installation media.
If the boot file in the following example is /tekxp/boot/os.350, the boot file (bf) command line changes if secure tftp is used. For example:
- network computer entry in the bootptab file for non-secure tftp:corvallis: tc=subnet60: ht=ethernet: ha=080011010046:\
ip=128.07.60.31: bf=/tekxp/boot/os.350:
- network computer entry in the bootptab file for secure tftp:eugene: tc=subnet60: ht=ethernet: ha=080011010048:\
ip=128.07.60.33: bf=/boot/os.350:
Refer to Setting Up the bootptab File on page 3-9 for command details.
UNIX Installation 3-7

Chapter 3 Supporting a Centralized System - Sun
3-8
l
Enabling BOOTPBootstrap protocol, bootp, is the recommended way to establish communications from the host to the network computer in an internet protocoenvironment. Bootp obtains booting data from the bootptab file. With the proper information stored in the bootptab file, the network computer can find its own name and IP address and boot from the network without any intervention, even for a first time boot.
1. Verify that the bootpd and bootptab files are in the /etc directory:
# ls /etc/bootp*
2. If they are not there:
# cp /tekxp/bin/sun4/bootpd /etcor# cp /tekxp/bin/solaris/bootpd /etc
# cp /tekxp/examples/bootptab /etc
3. Edit the /etc/hosts file to add the network computer internet addresses and names:
128.07.60.30 portland128.07.60.31 corvallis
4. Set up the bootptab file.
5. Start or restart the inetd or bootpd daemon.
UNIX Installation
Setting Up the bootptab File
r
Setting Up the bootptab FileThe bootptab file contains the data used by bootp. A sample bootptab file is located in /tekxp/examples. Refer to the bootp man page in /tekxp/man for more information. The file contains three sections:
• Global template entries define general information about the host. They are used as part of the subnet template entries. Examples include:
- Setting the subnet mask (sm)
- Specifying the address for one or more Domain Name Servers (ds) if your site uses Domain Name Service (DNS) as an option
- Sets the network computer name (hn).
- Sets the home directory for the files (hd), typically used for secure tftp.
• Subnet template entries define information specific to each subnet. They are used for each network computer entry. Subnet template entries generally include:
- Using the template command (tc) to point to the global entry
- Specifying the gateway or router to be used for each subnet (gw)
• Network computer entries are used to set information for a specific network computer. network computer entries are specified by the network computename and generally include:
- Using the template command (tc) to point to the appropriate subnet entry
- Specifying the hardware type (ht), use ethernet for network computers
- Specifying the network computer’s hardware (ethernet) address (ha)
- Specifying the network computer’s internet protocol address (ip)
- Specifying the network computer’s boot file (bf)
- Specifying the location and name of the remote configuration file (T134)
NOTE: T134 is a user-defined variable to the bootptab file. It is intended for use with the bootp and bootptab file included on the media.
UNIX Installation 3-9
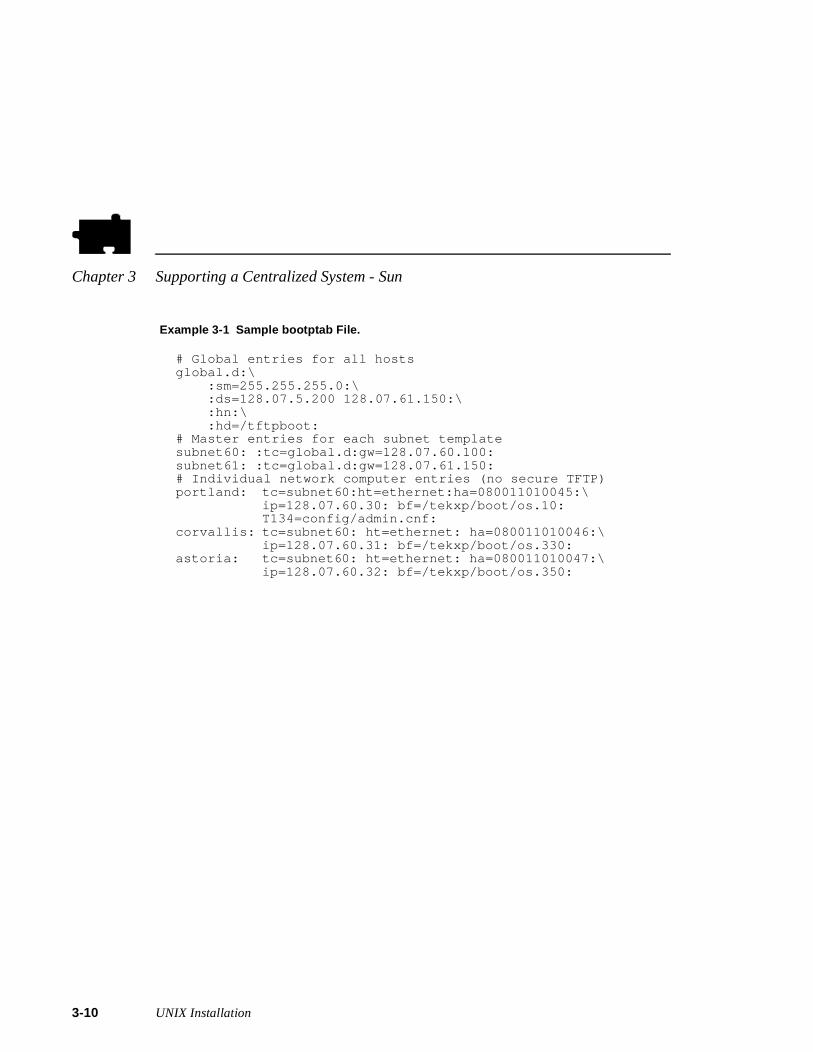
Chapter 3 Supporting a Centralized System - Sun
3-1
Example 3-1 Sample bootptab File.
# Global entries for all hostsglobal.d:\
:sm=255.255.255.0:\:ds=128.07.5.200 128.07.61.150:\:hn:\:hd=/tftpboot:
# Master entries for each subnet templatesubnet60: :tc=global.d:gw=128.07.60.100:subnet61: :tc=global.d:gw=128.07.61.150:# Individual network computer entries (no secure TFTP)portland: tc=subnet60:ht=ethernet:ha=080011010045:\
ip=128.07.60.30: bf=/tekxp/boot/os.10:T134=config/admin.cnf:
corvallis: tc=subnet60: ht=ethernet: ha=080011010046:\ip=128.07.60.31: bf=/tekxp/boot/os.330:
astoria: tc=subnet60: ht=ethernet: ha=080011010047:\ip=128.07.60.32: bf=/tekxp/boot/os.350:
0 UNIX Installation
Running BOOTP
Running BOOTPThere are two methods for using bootp:
• Only running the bootpd daemon when a process sends a bootp request
• Always running the bootpd daemon so it is waiting for bootp requests (SunOS 4 only)
Select the method that best fits your environment.
Only Running BOOTP on Request
1. If the bootpd daemon is started within the inetd.conf file, it is only run when bootp requests are sent to the host. If necessary, add the bootpd command to the inetd.conf file. To verify the bootps command in the file:
# grep bootp /etc/inetd.confbootps dgram udp wait root /etc/bootpd bootpd
2. Verify that bootpd resides where it is specified in /etc/inetd.conf. For the preceding examples, bootpd is in /etc. If there is a mismatch between the actual location and the specified location, either move the bootpd binary or change the /etc/inetd.conf file.
3. The port numbers for bootp listening and replying must be set in the /etc/services file. If they are not set, edit the file and add them. To verify thatthe ports are set in the file:
# grep bootp /etc/services
bootps 67/udpbootpc 68/udp
UNIX Installation 3-11

Chapter 3 Supporting a Centralized System - Sun
3-1
4. If you edited inetd.conf, restart the inetd daemon. Use the ps command to find the process ID number (PID) for inetd. In this example the PID is 112.
a. For SunOS 4:
# ps -aux | grep inetd | sed /grep/d
root 112 1 0 Jul 27 ? 0:01 /usr/etc/inet/inetd
b. For SunOS 5:
# ps -edf | grep inetd | sed /grep/d
root 112 1143 Jul 27 ? 0:06 /usr/sbin/inetd -s
The -s indicates standalone. The process is running outside the Service Access Facility (SAF).
5. If inetd is running, use the kill command with the PID to restart the inetd daemon.
# kill -HUP PID
6. If inetd is not running, either reboot the host or start inetd:
a. For SunOS 4:
# inetd
b. For SunOS 5:
# inetd -s
2 UNIX Installation
Running BOOTP
Always Running BOOTP (SunOS 4 Only)
1. If the bootpd daemon is started within the /etc/rc.local file or a similar startup file, it is always running and waiting for bootp requests. If the bootp command line does not exist in your /etc/rc.local file, you need to add it. To verify that the bootp startup command is in the file:
# grep bootp /etc/rc.local
/etc/bootpd -s ; echo -n ’ bootpd’
The -s option specifies continuous execution.
2. Verify that bootpd resides where it is specified in /etc/rc.local. For the preceding examples, bootpd would be located in /etc. If there is a mismatch between the actual location and the specified location, either move the bootpd binary or change the /etc/rc.local file.
3. The port numbers for bootp listening and replying must be set in the /etc/services file. If they are not set, edit the file and add them. To verify thatthe ports are set in the file:
# grep bootp /etc/services
bootps 67/udpbootpc 68/udp
4. To start the bootpd daemon without rebooting the system:
# /etc/bootpd -s &
UNIX Installation 3-13

Chapter 3 Supporting a Centralized System - Sun
3-1
st
ve
d
n:
Enabling RARP on SunOS 4In addition to bootp the network computer can use rarp (TCP/IP Reverse Address Resolution Protocol) to establish communications. With rarp , the network computer broadcasts its ethernet address across the network, and receives its internet address back from the first host to respond. Whichever horesponds first becomes the boot host.
NOTE: rarp is not supported for Token-Ring networks.
1. If the rarpd daemon is started within the /etc/rc.local file or a similar startup file, it is always running and waiting for rarp broadcasts. If the rarp command line does not exist in your /etc/rc.local file, you need to add it. To verify that the rarp startup command is in the file:# grep rarp /etc/rc.local/usr/etc/rarpd -a ; echo -n ’ rarpd’
2. Verify that rarpd resides where it is specified in /etc/rc.local. For the preceding examples, rarpd would be located in /usr/etc. If there is a mismatch between the actual location and the specified location, either mothe rarpd binary or change the /etc/rc.local file.
3. Edit the /etc/hosts file to add the network computer internet addresses and names:
128.07.60.30 portland128.07.60.31 corvallis
4. Edit the /etc/ethers file to add the network computer ethernet addresses annames:
08.00.11.01.00.45 portland08.00.11.01.00.46 corvallis
5. Use the ps command to see if the rarpd daemon is running:
# ps -aux | grep rarp | sed /grep/droot 69 1 0 Jul 27 ? 0:01 /etc/rarpd
a. If rarp is running, use the kill command with the PID to restart the daemo
# kill -HUP PID
b. If rarp is not running, type:
# /usr/etc/rarpd -a &
4 UNIX Installation
Enabling RARP on SunOS 5
st
Enabling RARP on SunOS 5In addition to bootp the network computer can use rarp (TCP/IP Reverse Address Resolution Protocol) to establish communications. With rarp , the network computer broadcasts its ethernet address across the network, and receives its internet address back from the first host to respond. Whichever horesponds first becomes the boot host.
NOTE: rarp is not supported for Token-Ring networks.
1. The rarpd daemon is automatically enabled by default in the K60nfs.server file if you have a /tftpboot directory. Refer to your documentation for more information. To verify that the rarp startup command is in the file:
# grep rarp /etc/rc2.d/K60nfs.server
/usr/sbin/in.rarpd -a
2. Edit the /etc/hosts file to add the network computer internet addresses and names:
128.07.60.30 portland128.07.60.31 corvallis
3. Edit the /etc/ethers file to add the network computer ethernet addresses andnames:
08.00.11.01.00.45 portland08.00.11.01.00.46 corvallis
4. Use the ps command to see if the rarpd daemon is running:
# ps -edf | grep rarp | sed /grep/droot 69 1 19 Jul 27 ? 0:00 /usr/sbin/in.rarpd -a
a. If rarp is running, use the kill command with the PID to restart the daemon:
# kill -HUP PID
b. If rarp is not running, type:
# /usr/sbin/in.rarpd -a &
UNIX Installation 3-15
Chapter 3 Supporting a Centralized System - Sun
3-1
Enabling XDMThe X Display Manager (xdm) provides services similar to a character terminal session, where a login window is displayed, error messages logged, and theoperator’s environment can easily be provided. The interface is customized through the use of several resource files
This section enables the xdm supplied with OpenWindows 3.0. If you do not run OpenWindows 3.0, follow the Enabling the XDM from the Media procedure next in this section.
1. Verify that the xdm binary (/usr/openwin/bin/xdm) and the configuration files (/usr/openwin/lib/xdm) exist on the host.
NOTE: If you are running OpenWindows 3.0 and the files are not on the host, they may not have been loaded from the CDROM. Install the files from the CDROM (SunView_Users, OpenWindows_Users, and OpenWindows_Fonts modules).
2. Create a system startup script to enable xdm to restart each time the host is booted. For SunOS 4, the script is /etc/rc.xdm. For SunOS 5 the script would be named /etc/rc2.d/SXXxdm, where XX is a user-assigned number (such as 93) for startup files. The script should contain these lines:
#!/bin/shOPENWINHOME=${OPENWINHOME:=/usr/openwin}
## Note: if OPENWINHOME isn't set, it gets set to## /usr/openwin; otherwise it is left alone.
LD_LIBRARY_PATH=$OPENWINHOME/lib:/usr/libPATH=$OPENWINHOME/bin:$PATHexport OPENWINHOME LD_LIBRARY_PATH PATH$OPENWINHOME/bin/xdm -config $OPENWINHOME/lib/xdm/xdm-config
3. Change the protections on the appropriate start-up file:
# chmod 755 /etc/rc.xdmor# chmod 755 /etc/rc2.d/S93xdm
4. For SunOS 4, add the following lines to the end of the /etc/rc.local file:
if [ -f /etc/rc.xdm ]; then/etc/rc.xdm; echo 'starting XDM.'
fi
6 UNIX Installation

Enabling XDM
e:
s e.
5. Modify the file /usr/openwin/lib/xdm/Xservers so xdm does not try to open a session window on the system console. To do this, comment out the lin
:0 Local local $OPENWINHOME/lib/xdm/StartOW :0
The new line should look like this:
##:0 Local local $OPENWINHOME/lib/xdm/StartOW :0
6. If you have monochrome network computers, you may have color conflictand end up with both background and foreground colors interpreted as whitEdit the /usr/openwin/lib/xdm/Xresources file and add or modify the following entries:
#ifdef COLORxlogin*greetColor: #f63xlogin*failColor: redxlogin*Foreground: whitexlogin*Background: grey#elsexlogin*Foreground: blackxlogin*Background: white#endif
7. Start the rc.xdm script manually so you do not have to reboot:
# /etc/rc.xdm
8. Use the appropriate ps command to verify the xdm process started:
a. For SunOS 4:
# ps -auxw | grep xdm | sed /grep/droot 113 0.0 0.0 108 0 ? IW Nov 15 0:09
/usr/openwin/bin/xdm -config /usr/openwin/lib/xdm/xdm-config
b. For SunOS 5:
# ps -edf | grep xdm | sed /grep/droot 3472 1 80 Sep 30 ? 15:54
/usr/openwin/bin/xdm -config /usr/openwin/lib/xdm/xdm-config
UNIX Installation 3-17
Chapter 3 Supporting a Centralized System - Sun
3-1
n
Enabling the XDM from the MediaIf you do not have OpenWindows 3.0, you can use the xdm from the installatiomedia. Refer to Chapter 1: Installing the Software for information.
NOTE: The paths and the two Xsession and Xresources files described in this section apply to the version of xdm included on the installation media. If you are installing xdm from the installation media and have an xdm session running, be sure to kill it before installing the new xdm file. The new file cannot be installed over the existing file.
You must edit the xdm-config script and change the paths from /usr/lib/X11/XP/bin/sun4 to the complete path where you installed the media, such as /tekxp/bin/sun4 or /tekxp/bin/solaris.
1. To manually start xdm (where <os> is either sun4 or solaris):
# /tekxp/bin/<os>/xdm -config \ /tekxp/bin/<os>/xdmconfig/xdm-config
2. For SunOS 4, edit the /etc/rc.local startup file to include the xdm command, so xdm is started as part of the host boot process. For SunOS 5, create a system startup script to enable xdm to start each time the host is booted. The script would be named /etc/rc2.d/SXXxdm, where XX is a user-assigned number (such as 93) for startup files. Add lines similar to:
# Start xdmif [ -f /tekxp/bin/ <os> /xdmconfig/xdm-config ]; then
/tekxp/bin/ <os> /xdm -config \ /tekxp/bin/ <os> /xdmconfig/xdm-config; echo "Starting xdm"
fi
where <os> is either sun4 or solaris.
3. The /tekxp/bin/<os>/Xresources and Xsession system files (where <os> is either sun4 or solaris) can be modified to set system wide information, including starting the user’s environment.
8 UNIX Installation
Enabling the XDM from the Media
he
4. Be sure that the fonts you select are in the network computer’s font path. Topenlook and misc font directories must be in the fonts.tbl file, otherwise olwm fails.5. To use xdm with OpenWindows, edit the file /tekxp/bin/<os>/xdmconfig/Xsession (where <os> is either sun4 or solaris) and add these lines after the "Let user/system scripts know" comments:
OPENWINHOME=/usr/openwinLD_LIBRARY_PATH=$OPENWINHOME/lib:/usr/libXDM_INITIATED=TRUEexport OPENWINHOME LD_LIBRARY_PATH XDM_INITIATED TEKXP_ROOT
Boot the network computer. If host_connect_method is TekHostMenu or XDMCP with xdmcp_connect set to BROADCAST, TekHostMenu displays the hosts that responded to the xdmcp broadcast when the XDMCP list is shown. If xdmcp_connect is DIRECT , the host login window is displayed. You can modify the appearance of the login window by modifying the file /tekxp/bin/<os>/xdmconfig/Xresources, where <os> is either sun4 or solaris.
NOTE: If the host list is incomplete, verify that the broadcast addresses and subnet masks are compatible on the host (see the ifconfig command) and on the network computer (can be set in the bootptab file, the remote configuration file, in Setup, or with the boot monitor). If they are not compatible, change the masks and reboot the host or network computer.
UNIX Installation 3-19
Chapter 3 Supporting a Centralized System - Sun
3-2
the
rs
r.
e e
Adding DNS EntriesThis section assumes that your site is currently running Domain Name Service (DNS). The instructions in this section deal strictly with adding network computer names and addresses to your existing zone and local host files on name server. The following structure is used for the examples:
DOC 128.07.50.1 is the primary name server for the DOC company, oregon 128.07.60.1 is the secondary name server, serving the site’s network computeportland 128.07.60.30 and corvallis 128.07.60.31 are network computers.
1. Add the network computer entries to the local host file for the name serveThe typical file name is named.local. Depending on your system, the path for this example could be /var/named/oregon.DOC.COM/named.local.
; named.local for server oregonIN NS oregon.DOC.COM
30 IN PTR portland.oregon.DOC.COM31 IN PTR corvallis.oregon.DOC.COM
IN indicates Internet Protocol, NS is the name server, and PTR sets up reverse pointers for the network computers.
2. Add the network computer entries to the zone file for the name server. Thtypical file name is the name of your server. Depending on your system, thfull path name for this example could be /var/named/hosts/oregon.DOC.COM.
; zone hosts file for server oregonoregon A 128.07.60.1
HINFO Sparc2portland A 128.07.60.30
HINFO network computercorvallis A 128.07.60.31
HINFO network computer
A indicates an IP address record, HINFO is an information entry.
3. Use ps -aux (SunOS 4) or ps -edf (SunOS 5) to see if named is running:
# ps -aux | grep named | sed /grep/droot 88 1 0 Jul 27 ? 0:01 named
a. If named is not running, type:
# named
b. If named is running, use kill and the PID to restart the daemon:
# kill -HUP PID
0 UNIX Installation

Chapter
4em
m
Supporting a Centralized System - IBM
This chapter contains procedures for setting up the necessary operating systsupport files. Use the Workbook in Chapter 2 to determine the procedures needed.
The values selected in the remote configuration file dictate the operating systefiles that must be enabled, created, or modified.
• NFS directories must be exported if NFS is used for booting or file access
• tftp must be configured and enabled if tftp is used for booting or file access
• bootp must be configured and running for the network computer to automatically find boot information for a tftp or NFS boot
• xdm must be configured and running if host connection method is xdmcp
• If Domain Name Service (DNS) is used, the network computer entries must be added to the zone and local host files
• Several Local Clients are available and can be started with xpsh or the Client Launcher (See Chapter 9: Local Clients)
• Local Motif Window Manager (MWM) or OPENLOOK Window Manager (OLWM) must be started to use local MWM or OLWM (See Chapter 10:
?
UNIX Installation 4-1
Chapter 4 Supporting a Centralized System - IBM
4-2
ork
od
er.
Window Managers)
• XIE must be enabled to run XIE applications (See Chapter 9: Local Clients)
• XPT/A graphics tablet must be configured on the host if it is used for input (See Chapter 9: Local Clients)
NOTE: You must log in as root to perform the tasks in this chapter.
Enabling NFS AccessThis section describes the steps necessary to set up the NFS host so the netwcomputer can search the host for fonts and configuration files. You need to enable access if the primary or secondary file access method or the boot methis set to NFS.
If you have the SMIT interface, use the following menu path to access NFS information. In addition, export entries with the read-mostly option.
Communication Applications and Services —> NFS —> Network File System (NFS) —>Configure NFS on This System —>Start NFS
Respond to the following by accepting both, the system default.
Start NFS now, on system restart or both both
Press Enter or, if using the window interface, click DO.
Follow any additional instructions provided by the Command Status screen. When the status is displayed as OK, the command is complete.
Use this procedure if you do not use SMIT:
1. Edit the /etc/exports file. Add each of the file systems to be exported at boottime, along with any options.
The file systems must be exported to be accessible to the network computThe exported systems are specified with an nfs_table command in the xp.cnf file, or in the nfs.tbl file. An example xp.cnf file entry:
nfs_table "montana:/tekxp" "/tekxp" "8192"
An example nfs.tbl entry:
montana:/tekxp /tekxp 8192
UNIX Installation
Enabling NFS Access
r
e
/etc/exports entry, shown with the read only option (-ro):
/tekxp -ro
2. To enable the mount point immediately, without booting, run:
# /usr/etc/exportfs -a[ -o options]
3. Use /usr/etc/exportfs without any parameters to verify the exports.
4. Edit the /etc/hosts file and add the network computer name and address. Foexample:
128.07.60.30 portland128.07.60.31 corvallis
5. Update the arp table to add the new entries:
# arp -s ether portland 08:00:11:01:00:45# arp -s ether corvallis 08:00:11:01:00:46
The ether switch indicates you are providing an hardware address. If you arinstalling a large quantity of network computers, you might want to take advantage of the -f filename option to the arp command. Where filename is a file of all the network computer entries to set.
6. Use the ps command to see if nfsd is running:
# ps aux | grep nfsd | sed /grep/droot 88 1 0 Jul 27 ? 0:01 nfsd
7. If nfsd is not running, type:
# /usr/etc/nfsd 8 &
8. If nfsd is running, use the kill command with the PID to restart the daemon:
# kill -HUP PID
UNIX Installation 4-3
Chapter 4 Supporting a Centralized System - IBM
4-4
th
d
Enabling TFTPtftp is one boot and file access method for network computers not equipped wiDECnet or the ROM option. To use tftp to download the boot files from a host, or for font or any other file access, tftp service must be enabled on the host. For further information see the tftp man page for your host, or the supplied man page from /tekxp/man.
Use this procedure if you do not use SMIT:
1. The tftpd daemon should be started each time the host boots. The /etc/inetd.conf file is read at startup, and should contain the tftp command line. If the line does not exist in your inetd.conf file, you need to add it. To verify that the tftp startup command is in the file:
# grep tftp /etc/inetd.conf
tftp dgram udp wait nobody /usr/etc/tftp -n tftp
2. Verify that in.tftpd, the tftp binary, resides where it is specified in /etc/inetd.conf. For the preceding examples, tftp would be located in /usr/etc. If there is a mismatch between the actual location and the specifielocation, either move the binary or change the /etc/inetd.conf file.
3. If you have edited inetd.conf, restart the inetd daemon for your changes to take effect:
- Restart the inet subsystem:
# inetimp
- Restart inetd and read the inetd.conf file:
# refresh -s inetd
UNIX Installation
Enabling BOOTP
e
:
s:
Enabling BOOTPBootstrap protocol, bootp, is a method of ensuring that a particular network computer will always boot from the correct host using the proper configurationfiles. The bootpd daemon provides a name, IP address, boot path, and boot filname based on the hardware address of the network computer. Bootpd obtains booting data from the bootptab file. With the proper bootptab file and the network computer configured to boot from NETWORK, the network computer will boot from the network without any intervention, even for a first time boot.
1. Verify that the bootpd and bootptab files are in the /etc directory:
# ls /etc/bootp*
2. If they are not there, copy the versions provided on the installation media
# cp /tekxp/bin/ibmRS6000/bootpd /etc# cp /tekxp/examples/bootptab /etc
3. Edit the /etc/hosts file to add the network computer IP addresses and name
128.07.60.30 portland128.07.60.31 corvallis
4. Update the arp table to add the new entries:
# arp -s ether portland 08:00:11:01:00:45# arp -s ether corvallis 08:00:11:01:00:46
The ether switch indicates you are providing a hardware address. The arp command also runs with a -f filename option, where filename is a file of all network computer entries to set.
5. Set up the bootptab file with the instructions presented in the next section.
6. Add the bootpd daemon start up to rc.tcpip:
/etc/bootpd -s
7. Use the ps command to find the process ID number (PID) for bootpd. In this example the PID is 112.
# ps aux | grep bootpd | sed /grep/d
root 112 0.0 1.0 116 180 -S 10:0:01 0:00 /usr/etc/bootpd -s
8. Use the kill command with the PID to restart the bootpd daemon.
# kill -9 PID
9. If bootpd is not running, type:
# /etc/bootpd -s
UNIX Installation 4-5
Chapter 4 Supporting a Centralized System - IBM
4-6
r
Setting Up the bootptab FileThe bootptab file contains the data used by bootpd. A sample bootptab file is located in /tekxp/examples. Refer to the bootpd man page in /tekxp/man for more information on the bootpd daemon provided on the installation media. The bootptab file contains three sections:
• Global template entries define general information about the host. They are used as part of the subnet template entries. Examples of global entries include:
- Setting the subnet mask (sm)
- Specifying the address for one or more Domain Name Servers (ds) if your site uses Domain Name Service (DNS) as an option
- Sets the network computer name (hn)
- Sets the home directory (boot_directory) for the files (hd)
• Subnet template entries define information specific to each subnet. They are used for each network computer entry. Subnet template entries generally include:
- Using the template command (tc) to point to the global entry
- Specifying the gateway or router to be used for each subnet (gw)
• Network computer entries are used to set information for a specific network computer. Network computer entries are specified by the network computename and generally include:
- Using the template command (tc) to point to the appropriate subnet entry
- Specifying the hardware type (ht), use ethernet for network computers
- Specifying the network computer’s hardware (ethernet) address (ha)
- Specifying the network computer’s internet protocol address (ip)
- Specifying the network computer’s boot file (bf)
- Specifying the location and name of the remote configuration file (T134)
NOTE: T134 is a user-defined variable to the bootptab file. It is intended for use with the bootp and bootptab file included on the media.
UNIX Installation
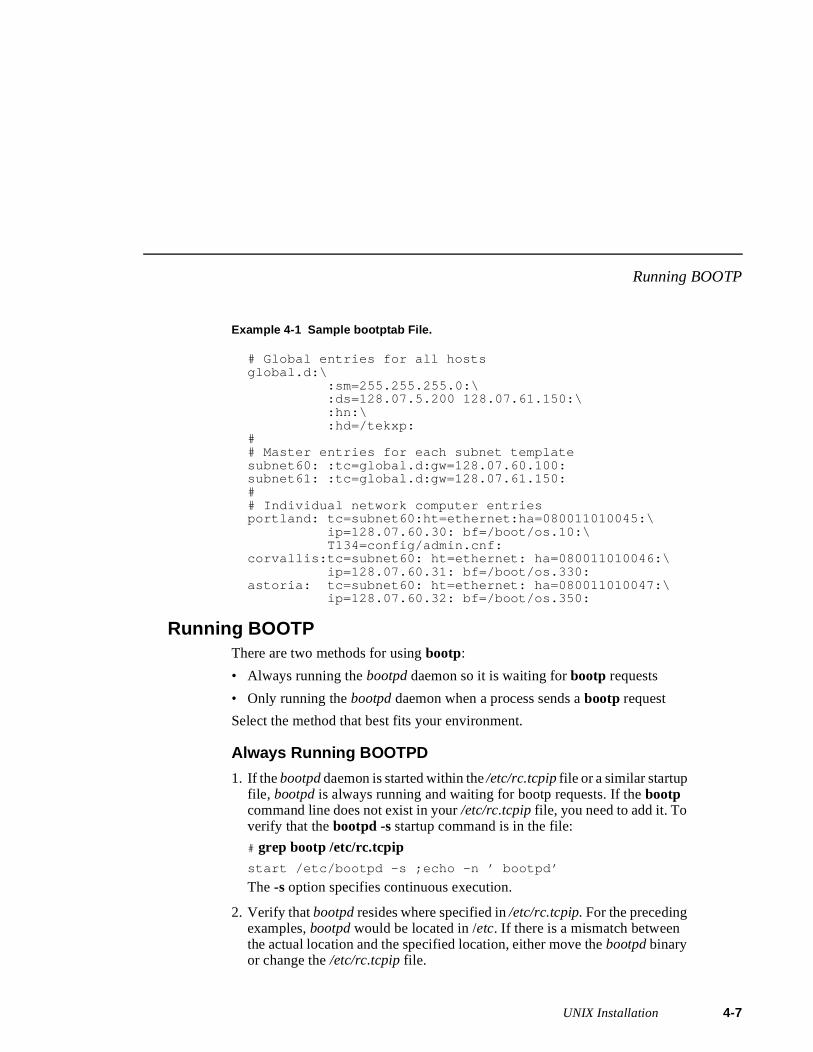
Running BOOTP
Example 4-1 Sample bootptab File.
# Global entries for all hostsglobal.d:\
:sm=255.255.255.0:\:ds=128.07.5.200 128.07.61.150:\:hn:\:hd=/tekxp:
## Master entries for each subnet templatesubnet60: :tc=global.d:gw=128.07.60.100:subnet61: :tc=global.d:gw=128.07.61.150:## Individual network computer entriesportland: tc=subnet60:ht=ethernet:ha=080011010045:\
ip=128.07.60.30: bf=/boot/os.10:\T134=config/admin.cnf:
corvallis:tc=subnet60: ht=ethernet: ha=080011010046:\ip=128.07.60.31: bf=/boot/os.330:
astoria: tc=subnet60: ht=ethernet: ha=080011010047:\ip=128.07.60.32: bf=/boot/os.350:
Running BOOTPThere are two methods for using bootp:
• Always running the bootpd daemon so it is waiting for bootp requests
• Only running the bootpd daemon when a process sends a bootp request
Select the method that best fits your environment.
Always Running BOOTPD
1. If the bootpd daemon is started within the /etc/rc.tcpip file or a similar startup file, bootpd is always running and waiting for bootp requests. If the bootp command line does not exist in your /etc/rc.tcpip file, you need to add it. To verify that the bootpd -s startup command is in the file:
# grep bootp /etc/rc.tcpipstart /etc/bootpd -s ;echo -n ’ bootpd’
The -s option specifies continuous execution.
2. Verify that bootpd resides where specified in /etc/rc.tcpip. For the preceding examples, bootpd would be located in /etc. If there is a mismatch between the actual location and the specified location, either move the bootpd binary or change the /etc/rc.tcpip file.
UNIX Installation 4-7
Chapter 4 Supporting a Centralized System - IBM
4-8
3. The port numbers for bootp listening and replying must be set in the /etc/services file. If they are not set, edit the file and add them. To verify thatthe ports are set in the file:
# grep bootp /etc/servicesbootps 67/udpbootpc 68/udp
4. To start the bootpd daemon without rebooting the system:
# /etc/bootpd -s &
Only Running BOOTPD on Request
1. If the bootpd daemon is started without the -s option, it is only run when bootp requests are sent to the host. If the bootpd command line does not exist in your inetd.conf file, you need to add it. To verify that the bootpd - s startup command is in the file:
# grep bootp /etc/inetd.conf
bootps dgram udp wait nobody /etc/bootpd bootpd
2. Verify that bootpd resides where it is specified in /etc/inetd.conf. For the preceding examples, bootpd would be located in /etc. If there is a mismatch between the actual location and the specified location, either move the bootpd binary or change the /etc/inetd.conf file.
3. The port numbers for bootp listening and replying must be set in the /etc/services file. If they are not set, edit the file and add them. To verify thatthe ports are set in the file:
# grep bootp /etc/servicesbootps 67/udpbootpc 68/udp
4. If you have edited inetd.conf, restart the inetd daemon for your changes to take effect:
NOTE: In some installations, you may have to reboot the workstation to force a re-read of inetd.conf.
- Restart the Inet subsystem:# inetimp
- Restart inetd and read the inetd.conf file:
# refresh -s inetd
UNIX Installation

Enabling XDM
Enabling XDM The X Display Manager (xdm) provides services similar to a character terminal session, where a login window is displayed, error messages logged, and theoperator’s environment can easily be provided. The interface is customized through the use of several resource files.
This procedure enables the xdm program provided with the AIX 3.2 or later operating system. The procedure assumes that you have already built the Makefiles for the Xamples directory. If you have not, see /usr/lpp/X11/README for instructions. If the host is running xdm already, skip this section.
As root, do the following.
1. If you do not have a /usr/bin/X11 directory, make one.
# mkdir /usr/bin/X11
2. Copy the xdm program to the /usr/bin/X11 directory.
# cp /usr/lpp/X11/Xamples/bin/xdm /usr/bin/X11
3. Set permissions for the new file.
# chmod 755 /usr/bin/X11/xdm
4. If you do not have a /usr/lib/X11/xdm directory, make one.
# mkdir /usr/lib/X11/xdm
5. Copy the xdm configuration files to the /usr/lib/X11/xdm directory.
# cp /usr/lpp/X11/Xamples/clients/xdm/config/* /usr/lib/X11/xdm
6. Set permissions for the new directory.
# chmod 755 /usr/lib/X11/xdm/*
UNIX Installation 4-9

Chapter 4 Supporting a Centralized System - IBM
4-1
7. Using a text editor, open the /usr/lib/X11/xdm/Xsession file. The file should look similar to Example 4-2.
Example 4-2 Sample Xsession File.
#!/bin/sh## Xsession#case $# in1)
case $1 infailsafe)
exec xterm -geometry 80x24-0-0 -ls
;;
esacesac
startup=$HOME/.xsessionresources+$HOME/.Xresources
if [ -f $startup ]; thenexec $startupexec /bin/sh $startup
elseif [ -f $resources ]; then
xrdb -load $resourcesfimwm &exec xterm -geometry 80x24+10-10 -lsfi
8. Edit the last four lines of the file to look like the example below. This changedirects xdm to look at the system’s xinitrc file to provide the user with the same environment as running xinit from the workstation console HFT.
fi#mwm &#exec xterm -geometry 80x24+10-10 -ls/usr/lpp/X11/defaults/xinitrcfi
9. Save and exit the file.
10. Run the xdm daemon:
# /usr/bin/X11/xdm -config /usr/lib/X11/xdm/xdm-config
0 UNIX Installation
Adding DNS Entries
the
s,
f e
Adding DNS EntriesThis section assumes that your site is currently running Domain Name Service (DNS). The instructions in this section deal strictly with adding network computer names and addresses to your existing zone and local host files on name server. The following structure is used for the examples:
DOC 128.07.50.1 is the primary name server for the DOC company, oregon 128.07.60.1 is the secondary name server, serving the site’s network computerand portland 128.07.60.30 and corvallis 128.07.60.31 are network computers.
1. Edit the local host file for the name server. The typical file name is named.local. Depending on how you set up your system, the full path namefor this example could be /var/named/oregon.DOC.COM/named.local. Add the network computer entries to the file. For example:
; named.local for server oregonIN NS oregon.DOC.COM
30 IN PTR portland.oregon.DOC.COM31 IN PTR corvallis.oregon.DOC.COM
IN indicates Internet Protocol, NS designates the name server, and PTR sets up reverse pointers for the network computers.
2. Edit the zone file for the name server. The typical file name is the name oyour server. Depending on how you set up your system, the full path namfor this example could be /var/named/hosts/oregon.DOC.COM. Add the network computer entries to the file. For example:
; zone hosts file for server oregonoregon A 128.07.60.1
HINFO Sparc2portland A 128.07.60.30
HINFO network computercorvallis A 128.07.60.31
HINFO network computer
A indicates an IP address record, HINFO is an information entry.
UNIX Installation 4-11

Chapter 4 Supporting a Centralized System - IBM
4-1
3. Use the ps command to see if named is running:
# ps aux | grep named | sed /grep/droot 88 1 0 Jul 27 ? 0:01 named
4. If named is not running, type:
# named
5. If named is running, use the kill command with the PID to restart the daemon:
# kill -HUP PID
2 UNIX Installation
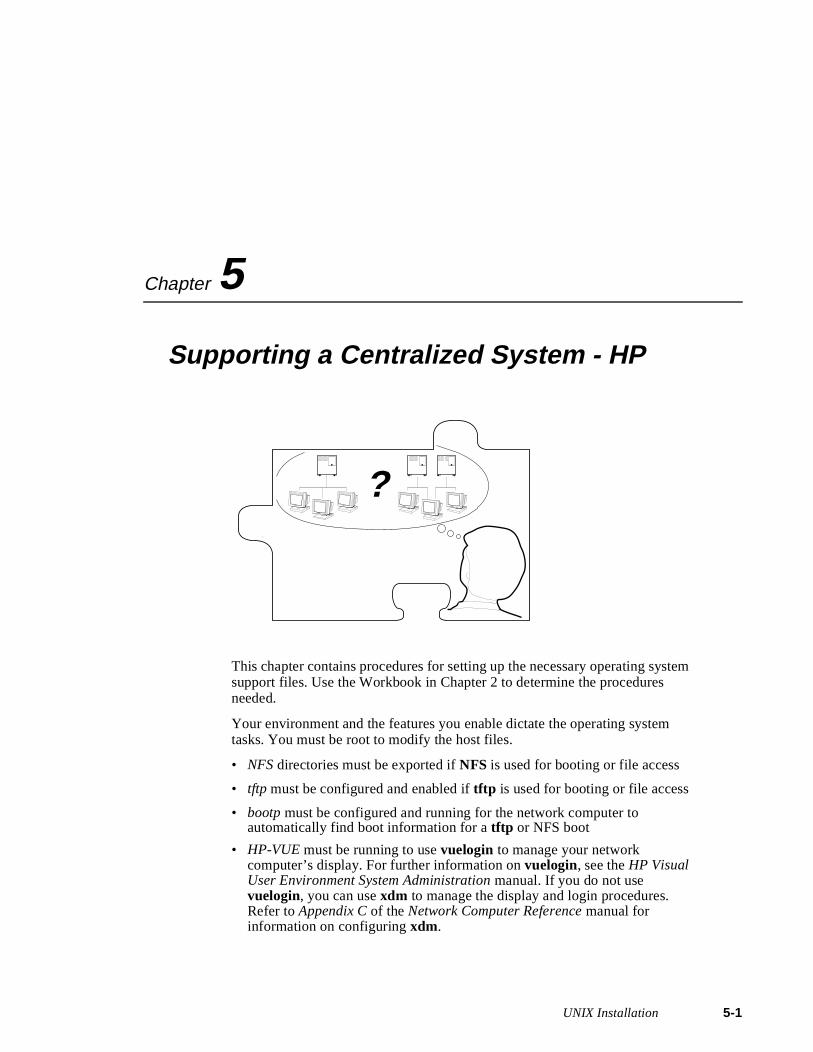
Chapter
5em
Supporting a Centralized System - HP
This chapter contains procedures for setting up the necessary operating systsupport files. Use the Workbook in Chapter 2 to determine the procedures needed.
Your environment and the features you enable dictate the operating system tasks. You must be root to modify the host files.
• NFS directories must be exported if NFS is used for booting or file access
• tftp must be configured and enabled if tftp is used for booting or file access
• bootp must be configured and running for the network computer to automatically find boot information for a tftp or NFS boot
• HP-VUE must be running to use vuelogin to manage your network computer’s display. For further information on vuelogin, see the HP Visual User Environment System Administration manual. If you do not use vuelogin, you can use xdm to manage the display and login procedures. Refer to Appendix C of the Network Computer Reference manual for information on configuring xdm.
?
UNIX Installation 5-1
Chapter 5 Supporting a Centralized System - HP
5-2
NOTE: To enable vuelogin to read the user’s $HOME/.xsession file, modify the /usr/vue/config/Xconfig file as follows:
Vuelogin*xdmMode: True
• Local Motif Window Manager (MWM) or OPENLOOK Window Manager (OLWM) must be started to use local MWM or OLWM. (See Chapter 10: Window Managers.)
• XIE must be enabled to run XIE applications. (See Chapter 9: Local Clients.)
• XPT/A graphics tablet must be configured on the host if it is used for input. (See Chapter 9: Local Clients.)
UNIX Installation
Enabling NFS Access
e se
er.
nd
be
Enabling NFS AccessNFS is included as part of the optional NFS services software package for thHewlett-Packard operating system. If the boot host does not provide NFS, utftp to download network computer files. This section describes the steps necessary to set up the host if NFS is used as the boot_method or file_access_method.
1. Edit the /etc/exports file. Add each of the file systems to be exported now andat boot, along with any options.
The file systems must be exported to be accessible to the network computThe exported systems are specified with an nfs_table command in the xp.cnf file, or in the nfs.tbl file. An example xp.cnf file entry:nfs_table "montana:/tekxp" "/tekxp" "8192"
An example nfs.tbl entry:montana:/tekxp /tekxp 8192
/etc/exports entry:/tekxp
2. Invoke SAM to edit the /etc/hosts file. Choose the menu items:Network Communication-> ARPA Services Configuration->Add Connectivity to a Remote System
Specify the host name, Internet address, and optional hostname aliases acomments in response to the SAM prompts. For example:
128.07.60.30 portland
3. Use the ps command to see if nfsd is running:
# ps -ef | grep nfsd | sed /grep/d root 75 74 0 Aug 14 ? 0:05 /etc/nfsd 4root 76 74 0 Aug 14 ? 0:04 /etc/nfsd 4root 77 74 0 Aug 14 ? 0:04 /etc/nfsd 4
4. If nfsd is running, use the kill command with the PIDs to kill the daemons:# kill -15 PID
The output from step 3 shows the PID of the nfsd process in the second column and the parent process in the third column. Several daemons canstarted by the same parent process; check the third column for a repeatednumber. If you kill this PID, you may not need to kill the others.
5. Restart the NFS daemon to enable NFS access with the command:
# /etc/nfsd 4 &
UNIX Installation 5-3
Chapter 5 Supporting a Centralized System - HP
5-4
.
Enabling TFTPThis section describes the steps necessary to set up tftp if it is used as the boot_method or file_access_method.This is the default boot method for network computers not equipped with TDEnet, Flash Memory or ROM optionsFor details, see the tftp man page on your host, or in /tekxp/man.
NOTE: The executable for the tftp daemon, tftpd, is not normally available on pre-8.0 HP-UX systems. To use tftp on pre-8.0 HP-UX systems or systems without Hewlett-Packard’s optional ARPA software, install the executable and follow the instructions below. The tftpd executable is on the installation media, and is installed in /tekxp/bin/<host>/tftpd (where <host> is either hp300 or hp700) by default. For details on Hewlett-Packard’s tftp daemon, see Volume 3 of the HP-UX Reference.
1. The tftpd daemon should be started each time the host boots. The /etc/inetd.conf file is read at startup, and should contain the tftp command line. If the line does not exist in your inetd.conf file, you need to add it. To verify that the tftp startup command is in the file:
# grep tftp /etc/inetd.conftftp dgram udp wait root /etc/tftpd tftpd
2. The boot_directory and install_directory used during the tape installation must have a common parent directory. In addition, if the /etc/inetd.conf file contains a tftp entry with the -s (secure tftp) option:
tftp dgram udp wait root /etc/tftpd tftpd -s /tekxp
both the boot_directory and install_directory used during the tape installation would have to be within the secure path, in this case, /tekxp.
3. Check the /etc/services file for a tftp entry. If a tftp entry does not exist, edit the file and add the line (maintain numeric order with other entries):
tftp 69/udp
4. Check the /etc/passwd file for a tftp entry. This entry provides secure tftp access and allows tftp operations. If it does not exist, add the line:
tftp:*user_ID:group_ID:tftp server:/tekxp:/bin/false
Use appropriate values for user_ID and group_ID.
UNIX Installation
Enabling TFTP
5. If /etc/tftpd does not exist, copy /tekxp/bin/<host>/tftpd to /etc.
6. After you edit inetd.conf to add the tftp entry, kill and restart the inetd daemon for your changes to take effect:
# /etc/inetd -k# /etc/inetd
The host starts tftpd whenever it receives an external request for tftp service.
NOTE: The tftp binary from the installation media requires a /usr/tmp directory to perform the file transfers. If this directory does not exist, it must be created.
UNIX Installation 5-5

Chapter 5 Supporting a Centralized System - HP
5-6
ork t
al
Enabling bootpThis section describes the steps necessary to set up the host so that the netwcomputer automatically boots using the Internet Boot Protocol to transfer booinformation upon power-up. The bootp daemon is included as part of Hewlett-Packard’s optional ARPA software package for HP-UX release 8.0 operatingsystem. If the bootp daemon is not available, contact Hewlett-Packard or use the boot monitor and Setup to configure each network computer. For additioninformation on the configuration of bootpd, see Volume 3 of the HP-UX Reference manual
To enable bootp, perform the following steps:
1. Edit the /etc/bootptab file:
A typical section of the /etc/bootptab file looks like the following:
# Global entry that every host uses:
global.d:\sm=255.255.255.0:\hd=/tekxp:\ds=134.62.5.17 134.62.61.219:\:to=18000:
# Subnet entry:
subnet64:\tc=global.d: gw=134.62.64.120:
# Individual entry:
portland:\c=subnet64: ht=ethernet: ha=080011010031:\ip=134.62.64.53: bf=/boot/os.350:\T134=config/admin.cnf:
A sample bootptab file is located in /tekxp/examples. Table 5-1 briefly describes the bootp fields.
UNIX Installation

Enabling bootp
NOTE: T134 is a user-defined variable to the bootptab file. It is intended for use with the bootp and bootptab file included on the media.
Table 5-1 bootp Fields.
Field Description
hostname The Internet name of the host (required)
hd The full path of the home directory (typically /tftpboot)
bf The path and name of the bootfile within the home directory (ie /XP10/os)
cs The Internet address of the cookie server(s)
ds The Internet address of the domain name server(s)
gw The Internet address of the gateway server(s)
ha The network computer’s hardware address
ht The network computer’s hardware type (typically ethernet)
im The Internet address of the impress server(s)
ip The Internet address of the host
lg The Internet address of the log server(s)
lp The Internet address of the LPR server(s)
ns The Internet address of the IEN-116 name server(s)
rl The resource location protocol servers
sm The subnet mask
tc The template entry which bootp uses
to The time offset in seconds
ts The Internet address of the time server(s)
T134 The location and name of the remote configuration file
UNIX Installation 5-7
Chapter 5 Supporting a Centralized System - HP
5-8
Ensuring that bootp is RunningThe final step is to ensure that bootp is running. To see if bootp is running:
# ps -e | grep bootpd | sed /grep/d
61 ? 0:01 bootpd
If bootp is not running:
1. Verify that bootpd and its associated data file bootptab are in /etc:
# ls /etc
2. If necessary, add the bootps command to the inetd.conf file. To verify the bootps command in the inetd.conf file:
# grep bootp /etc/inetd.confbootps dgram udp wait root /etc/bootpd bootpd
3. Verify that bootpd resides where it is specified in /etc/inetd.conf. For the preceding examples, bootpd is in /etc. If there is a mismatch between the actual location and the specified location, either move the bootpd binary or change the /etc/inetd.conf file.
4. The port numbers for bootp listening and replying must be set in the /etc/services file. If they are not set, edit the file and add them. To verify thatthe ports are set in the file:
# grep bootp /etc/servicesbootps 67/udpbootpc 68/udp
5. If you have edited inetd.conf, restart the inetd daemon:
# inetd -k# /etc/inetd
To run bootpd as a stand-alone daemon, start bootp directly from /etc using the -s option as follows:
# /etc/bootpd -s
This method of invocation often works better in environments with large numbers of network computers making bootp requests.
UNIX Installation

Chapter
6em
Supporting a Centralized System - Silicon Graphics
This chapter contains procedures for setting up the necessary operating systsupport files. Use the Workbook in Chapter 2 to determine the procedures needed.
Your environment and the features you enable dictate the operating system tasks. You must be root to modify the host files.
• NFS directories must be exported if NFS is used for booting or file access
• tftp must be configured and enabled if tftp is used for booting or file access
• bootp must be configured and running for the network computer to automatically find boot information for a tftp or NFS boot
• xdm must be configured and running if host connection method is xdmcp
• If Domain Name Service (DNS) is used, network computer entries must be added to the zone and local host files
• Several Local Clients are available and can be started with xpsh or the Client Launcher (See Chapter 9, Local Clients)
• Local Motif Window Manager (MWM) or OPENLOOK Window Manager (OLWM) must be started to use local MWM or OLWM (See Chapter 10, Window Managers)
?
UNIX Installation 6-1
Chapter 6 Supporting a Centralized System - Silicon Graphics
6-2
• XIE must be enabled to run XIE applications (See Chapter 9, Local Clients)
• XPT/A graphics tablet must be configured on the host if it is used for input (See Chapter 9, Local Clients)
UNIX Installation
Enabling NFS Access
as
ith
le:
Enabling NFS AccessThis section describes the steps necessary to set up the host if NFS is usedthe boot_method or file_access_method.
Edit the /etc/exports file. Add each of the file systems to be exported at boottime, along with any options. The file systems must be exported to be accessible to the network computer. The exported systems are specified wan nfs_table command in the xp.cnf file, or in the nfs.tbl file. An example xp.cnf file entry:nfs_table "montana:/tekxp" "/tekxp" "8192"
An example nfs.tbl entry:montana:/tekxp /tekxp 8192
/etc/exports entry, shown with the read only option (-ro):
/tekxp -ro
1. To enable the mount point immediately, without booting, run:
# /usr/etc/exportfs -a [-o options]
2. Use /usr/etc/exportfs without any parameters to verify the exports.
3. Edit /etc/hosts and add the network computer’s name and address. For examp
128.07.60.30 portland128.07.60.31 corvallis
4. Update the arp table to add new entries:
# arp -s portland 08:00:11:01:00:45# arp -s corvallis 08:00:11:01:00:46
arp can also be run with a -f filename option, where filename is a file of network computer entries to set.
5. Use the ps command to see if nfsd is running:
# ps -eafroot 88 1 0 Jul 27 ? 0:01 nfsd
a. If nfsd is not running, type:
# /usr/etc/nfsd 8 &
b. If nfsd is running, use the kill command with the PID to restart the daemon (the PID is 88 in the preceding ps example):
# kill -HUP PID
UNIX Installation 6-3
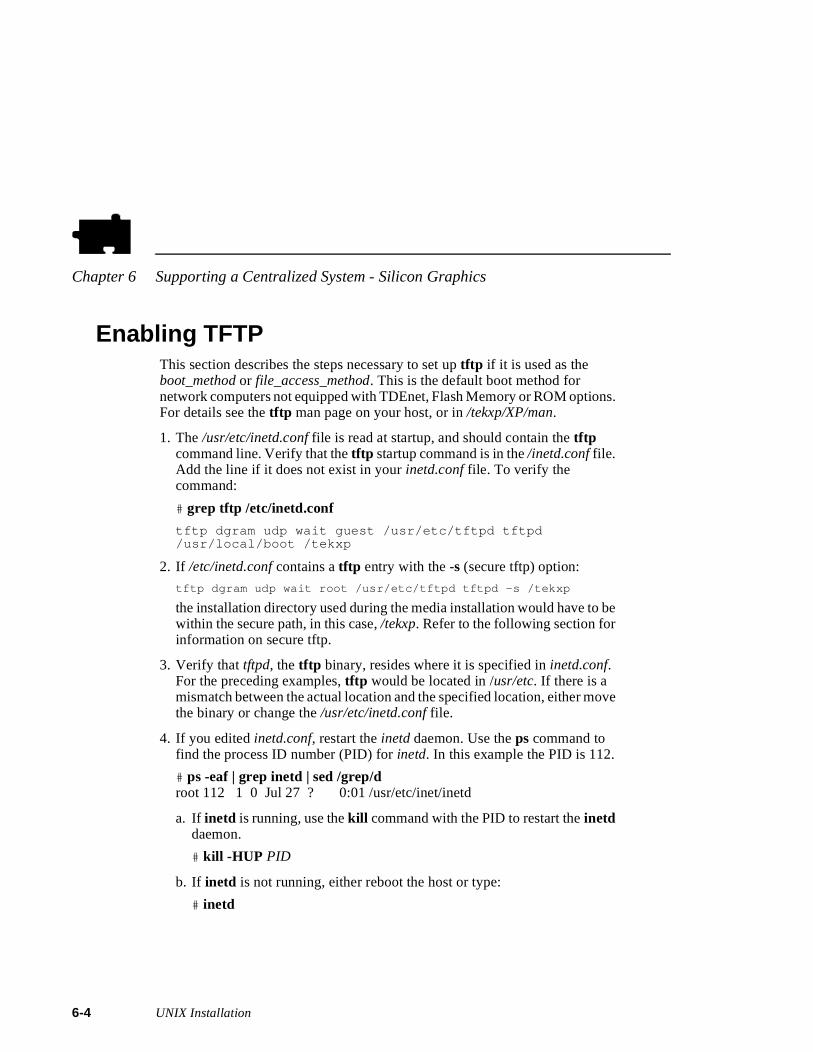
Chapter 6 Supporting a Centralized System - Silicon Graphics
6-4
.
ve
Enabling TFTPThis section describes the steps necessary to set up tftp if it is used as the boot_method or file_access_method. This is the default boot method for network computers not equipped with TDEnet, Flash Memory or ROM optionsFor details see the tftp man page on your host, or in /tekxp/XP/man.
1. The /usr/etc/inetd.conf file is read at startup, and should contain the tftp command line. Verify that the tftp startup command is in the /inetd.conf file. Add the line if it does not exist in your inetd.conf file. To verify the command:
# grep tftp /etc/inetd.conf
tftp dgram udp wait guest /usr/etc/tftpd tftpd /usr/local/boot /tekxp
2. If /etc/inetd.conf contains a tftp entry with the -s (secure tftp) option:
tftp dgram udp wait root /usr/etc/tftpd tftpd -s /tekxp
the installation directory used during the media installation would have to be within the secure path, in this case, /tekxp. Refer to the following section for information on secure tftp.
3. Verify that tftpd, the tftp binary, resides where it is specified in inetd.conf. For the preceding examples, tftp would be located in /usr/etc. If there is a mismatch between the actual location and the specified location, either mothe binary or change the /usr/etc/inetd.conf file.
4. If you edited inetd.conf, restart the inetd daemon. Use the ps command to find the process ID number (PID) for inetd. In this example the PID is 112.
# ps -eaf | grep inetd | sed /grep/droot 112 1 0 Jul 27 ? 0:01 /usr/etc/inet/inetd
a. If inetd is running, use the kill command with the PID to restart the inetd daemon.
# kill -HUP PID
b. If inetd is not running, either reboot the host or type:
# inetd
UNIX Installation

Using Secure TFTP
r
r
f
Using Secure TFTPIf you use secure tftp, there are various things to consider before you begin:
• Do not use the secure directory (usually /tekxp) as part of the path when you specify file paths in xp.cnf, fonts.tbl, nfs.tbl, bootptab, or at the network computer’s Boot Monitor. The secure option adds the secure directory. Foexample:
Actual path to the boot file: >/tekxp/boot/os.350Path you specify: boot/os.350
• Secure tftp only allows access to files within the secure directory /tekxp so all boot and configuration files must share a common parent directory. Foexample, place the network computer files as follows:
Boot files: /tekxp/boot/XP10Configuration files: /tekxp/boot/configFont files: /tekxp/boot/fonts
• Secure tftp does not follow symbolic links outside of the secure directory. Ithere is not enough room on the /tekxp partition, use NFS to access fonts and files on other disks. It is also possible to symbolically link the secure directory to another partition. For example, /tekxp could be linked to /usr2/fonts. Refer to your host documentation.
• To allow the network computer to configure itself from the network the firsttime it boots, you must use bootpd to establish communications, and enter the boot file name (without the secure directory in the path) in the bootptab file. You can use the bootp executable and bootptab file supplied with your Silicon Graphics host to boot network computers. In addition, a generic bootp and bootptab file are included on the installation media.
If the boot file is /tekxp/boot/os.350, the boot file (bf) command line changes if secure tftp is used. For example:
- Network computer entry in the bootptab file for non-secure tftp:corvallis: 1 08:00:11:01:00:46 128.07.60.31 /tekxp/boot/os.350:
- Network computer entry in the bootptab file for secure tftp:eugene: 1 08:00:11:01:00:48 128.07.60.33 boot/os.350:
Refer to Setting Up the Silicon Graphics bootptab File on page 6-7 for command details.
UNIX Installation 6-5
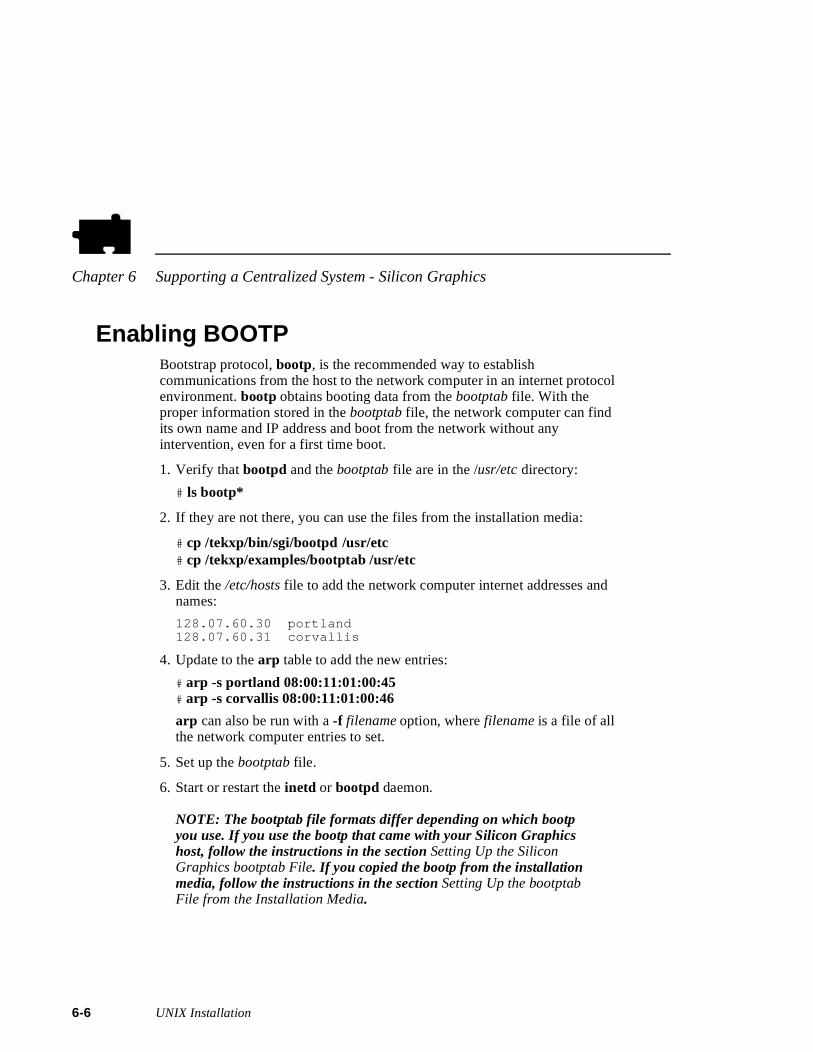
Chapter 6 Supporting a Centralized System - Silicon Graphics
6-6
l
Enabling BOOTPBootstrap protocol, bootp, is the recommended way to establish communications from the host to the network computer in an internet protocoenvironment. bootp obtains booting data from the bootptab file. With the proper information stored in the bootptab file, the network computer can find its own name and IP address and boot from the network without any intervention, even for a first time boot.
1. Verify that bootpd and the bootptab file are in the /usr/etc directory:
# ls bootp*
2. If they are not there, you can use the files from the installation media:
# cp /tekxp/bin/sgi/bootpd /usr/etc# cp /tekxp/examples/bootptab /usr/etc
3. Edit the /etc/hosts file to add the network computer internet addresses and names:
128.07.60.30 portland128.07.60.31 corvallis
4. Update to the arp table to add the new entries:
# arp -s portland 08:00:11:01:00:45# arp -s corvallis 08:00:11:01:00:46
arp can also be run with a -f filename option, where filename is a file of all the network computer entries to set.
5. Set up the bootptab file.
6. Start or restart the inetd or bootpd daemon.
NOTE: The bootptab file formats differ depending on which bootp you use. If you use the bootp that came with your Silicon Graphics host, follow the instructions in the section Setting Up the Silicon Graphics bootptab File. If you copied the bootp from the installation media, follow the instructions in the section Setting Up the bootptab File from the Installation Media.
UNIX Installation
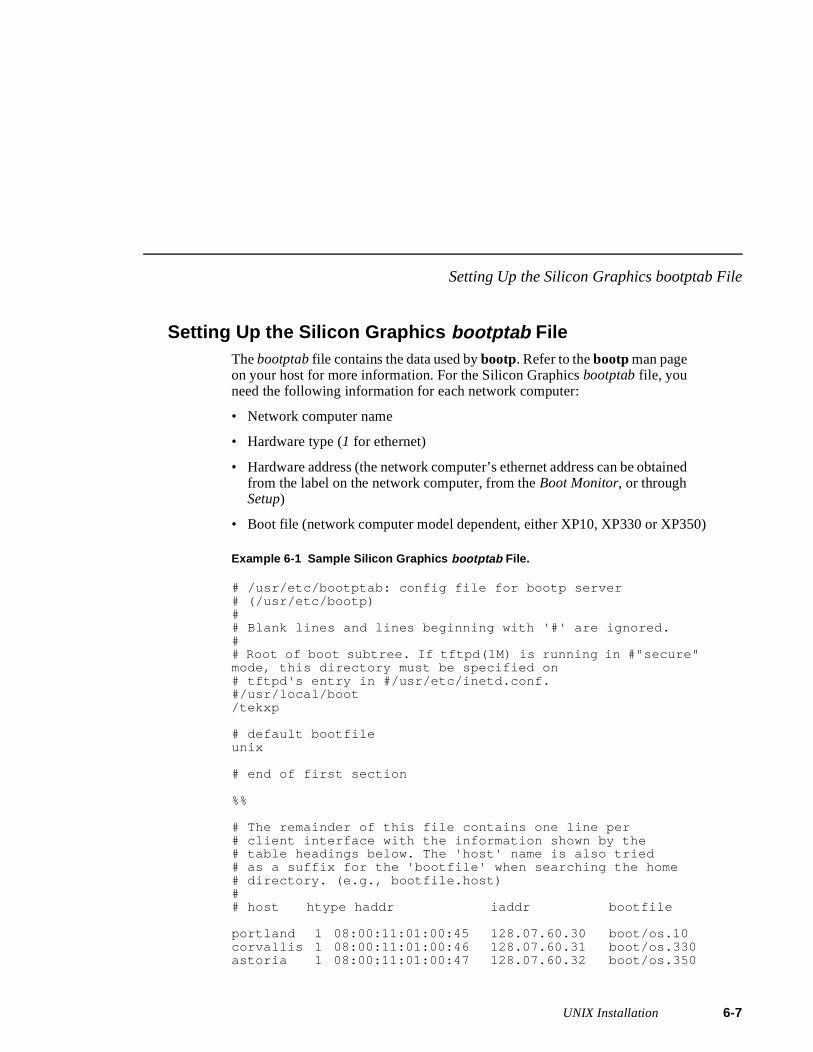
Setting Up the Silicon Graphics bootptab File
ed
50)
Setting Up the Silicon Graphics bootptab FileThe bootptab file contains the data used by bootp. Refer to the bootp man page on your host for more information. For the Silicon Graphics bootptab file, you need the following information for each network computer:
• Network computer name
• Hardware type (1 for ethernet)
• Hardware address (the network computer’s ethernet address can be obtainfrom the label on the network computer, from the Boot Monitor, or through Setup)
• Boot file (network computer model dependent, either XP10, XP330 or XP3
Example 6-1 Sample Silicon Graphics bootptab File.
# /usr/etc/bootptab: config file for bootp server # (/usr/etc/bootp)## Blank lines and lines beginning with '#' are ignored.## Root of boot subtree. If tftpd(1M) is running in #"secure" mode, this directory must be specified on # tftpd's entry in #/usr/etc/inetd.conf.#/usr/local/boot/tekxp
# default bootfileunix
# end of first section
%%
# The remainder of this file contains one line per # client interface with the information shown by the# table headings below. The 'host' name is also tried# as a suffix for the 'bootfile' when searching the home# directory. (e.g., bootfile.host)## host htype haddr iaddr bootfile
portland 1 08:00:11:01:00:45 128.07.60.30 boot/os.10corvallis 1 08:00:11:01:00:46 128.07.60.31 boot/os.330astoria 1 08:00:11:01:00:47 128.07.60.32 boot/os.350
UNIX Installation 6-7
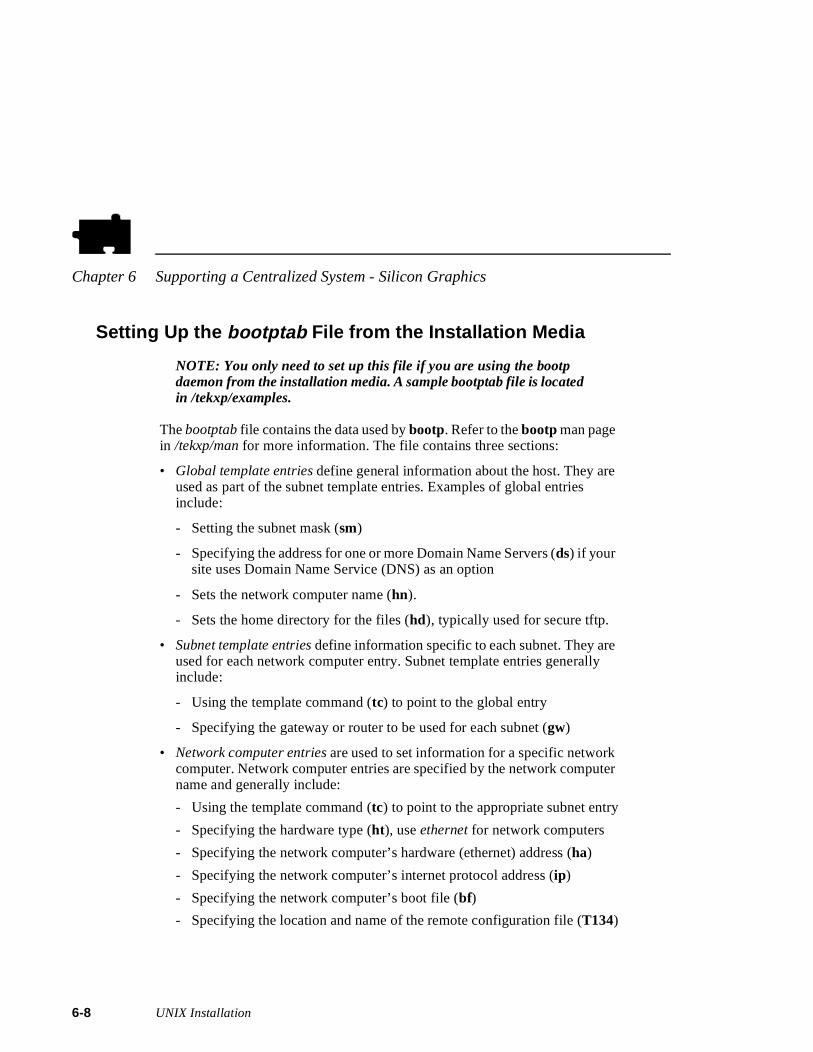
Chapter 6 Supporting a Centralized System - Silicon Graphics
6-8
r
Setting Up the bootptab File from the Installation Media
NOTE: You only need to set up this file if you are using the bootp daemon from the installation media. A sample bootptab file is located in /tekxp/examples.
The bootptab file contains the data used by bootp. Refer to the bootp man page in /tekxp/man for more information. The file contains three sections:
• Global template entries define general information about the host. They are used as part of the subnet template entries. Examples of global entries include:
- Setting the subnet mask (sm)
- Specifying the address for one or more Domain Name Servers (ds) if your site uses Domain Name Service (DNS) as an option
- Sets the network computer name (hn).
- Sets the home directory for the files (hd), typically used for secure tftp.
• Subnet template entries define information specific to each subnet. They are used for each network computer entry. Subnet template entries generally include:
- Using the template command (tc) to point to the global entry
- Specifying the gateway or router to be used for each subnet (gw)
• Network computer entries are used to set information for a specific network computer. Network computer entries are specified by the network computename and generally include:
- Using the template command (tc) to point to the appropriate subnet entry
- Specifying the hardware type (ht), use ethernet for network computers
- Specifying the network computer’s hardware (ethernet) address (ha)
- Specifying the network computer’s internet protocol address (ip)
- Specifying the network computer’s boot file (bf)
- Specifying the location and name of the remote configuration file (T134)
UNIX Installation

Setting Up the bootptab File from the Installation Media
NOTE: T134 is a user-defined variable to the bootptab file. It is intended for use with the bootp and bootptab file included on the media.
Example 6-2 Sample bootptab File from the Installation Media.
# Global entries for all hostsglobal.d:\
:sm=255.255.255.0:\:ds=128.07.5.200 128.07.61.150:\:hn:\:hd=/tekxp:
# Master entries for each subnet templatesubnet60: :tc=global.d:gw=128.07.60.100:subnet61: :tc=global.d:gw=128.07.61.150:# Individual network computer entriesportland: tc=subnet60:ht=ethernet:ha=080011010045:\
ip=128.07.60.30: bf=/boot/os.10:\T134=config/admin.cnf:
corvallis:tc=subnet60: ht=ethernet: ha=080011010046:\ip=128.07.60.31: bf=/boot/os.330:
astoria: tc=subnet60: ht=ethernet: ha=080011010047:\ip=128.07.60.32: bf=/boot/os.350:
UNIX Installation 6-9
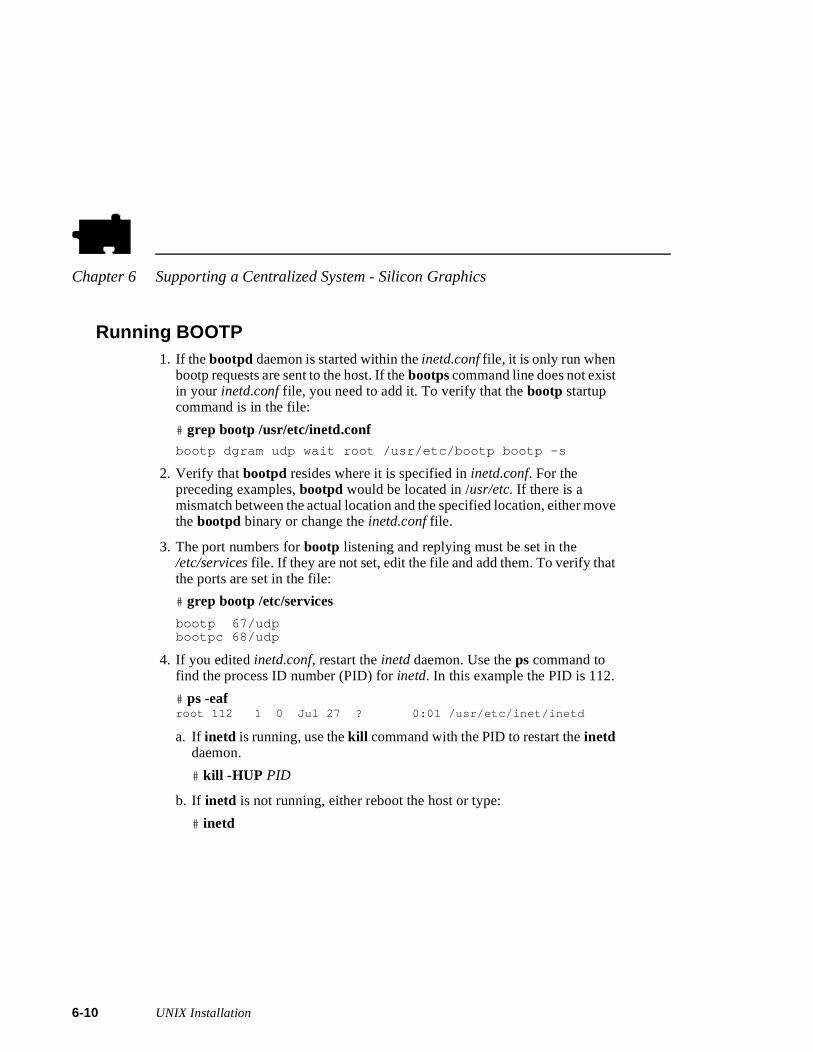
Chapter 6 Supporting a Centralized System - Silicon Graphics
6-1
ve
Running BOOTP1. If the bootpd daemon is started within the inetd.conf file, it is only run when
bootp requests are sent to the host. If the bootps command line does not exist in your inetd.conf file, you need to add it. To verify that the bootp startup command is in the file:
# grep bootp /usr/etc/inetd.confbootp dgram udp wait root /usr/etc/bootp bootp -s
2. Verify that bootpd resides where it is specified in inetd.conf. For the preceding examples, bootpd would be located in /usr/etc. If there is a mismatch between the actual location and the specified location, either mothe bootpd binary or change the inetd.conf file.
3. The port numbers for bootp listening and replying must be set in the /etc/services file. If they are not set, edit the file and add them. To verify thatthe ports are set in the file:
# grep bootp /etc/services
bootp 67/udpbootpc 68/udp
4. If you edited inetd.conf, restart the inetd daemon. Use the ps command to find the process ID number (PID) for inetd. In this example the PID is 112.
# ps -eafroot 112 1 0 Jul 27 ? 0:01 /usr/etc/inet/inetd
a. If inetd is running, use the kill command with the PID to restart the inetd daemon.
# kill -HUP PID
b. If inetd is not running, either reboot the host or type:
# inetd
0 UNIX Installation
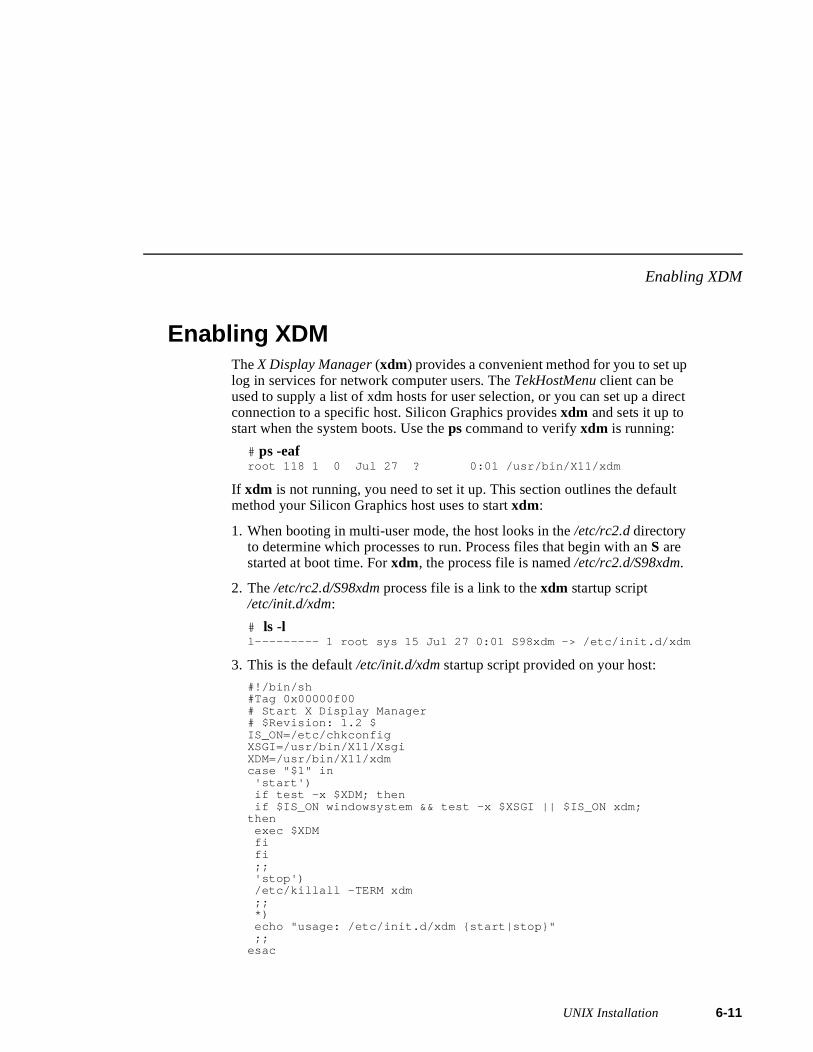
Enabling XDM
ct
Enabling XDMThe X Display Manager (xdm) provides a convenient method for you to set up log in services for network computer users. The TekHostMenu client can be used to supply a list of xdm hosts for user selection, or you can set up a direconnection to a specific host. Silicon Graphics provides xdm and sets it up to start when the system boots. Use the ps command to verify xdm is running:
# ps -eafroot 118 1 0 Jul 27 ? 0:01 /usr/bin/X11/xdm
If xdm is not running, you need to set it up. This section outlines the default method your Silicon Graphics host uses to start xdm:
1. When booting in multi-user mode, the host looks in the /etc/rc2.d directory to determine which processes to run. Process files that begin with an S are started at boot time. For xdm, the process file is named /etc/rc2.d/S98xdm.
2. The /etc/rc2.d/S98xdm process file is a link to the xdm startup script /etc/init.d/xdm:
# ls -ll--------- 1 root sys 15 Jul 27 0:01 S98xdm -> /etc/init.d/xdm
3. This is the default /etc/init.d/xdm startup script provided on your host:
#!/bin/sh#Tag 0x00000f00# Start X Display Manager# $Revision: 1.2 $IS_ON=/etc/chkconfigXSGI=/usr/bin/X11/XsgiXDM=/usr/bin/X11/xdmcase "$1" in 'start') if test -x $XDM; then if $IS_ON windowsystem && test -x $XSGI || $IS_ON xdm;then exec $XDM fi fi ;; 'stop') /etc/killall -TERM xdm ;; *) echo "usage: /etc/init.d/xdm {start|stop}" ;;esac
UNIX Installation 6-11
Chapter 6 Supporting a Centralized System - Silicon Graphics
6-1
4. Configuration commands for xdm are read by default from the file /usr/lib/X11/xdm/xdm-config. You can customize this file for your environment. Many of the commands in this configuration file use resource files for the actual settings.
5. You can customize the resource files /usr/lib/X11/xdm/Xresources and /usr/lib/X11/xdm/Xsession for your environment.
6. Be sure that the fonts you select are in the network computer’s font path.
Boot the network computer. If host_connect_method is TekHostMenu or XDMCP with xdmcp_connect set to BROADCAST, TekHostMenu displays the hosts that responded to the xdmcp broadcast when the XDMCP list is shown. If xdmcp_connect is DIRECT , the host login window is displayed. You can modify the appearance of the login window by modifying the file Xresources.
NOTE: If the host list is incomplete, verify that the broadcast addresses and subnet masks are compatible on the host (see the ifconfig command) and on the network computer (can be set in the bootptab file, the remote configuration file, in Setup, or with the boot monitor). If they are not compatible, change the masks and reboot the host or network computer.
2 UNIX Installation
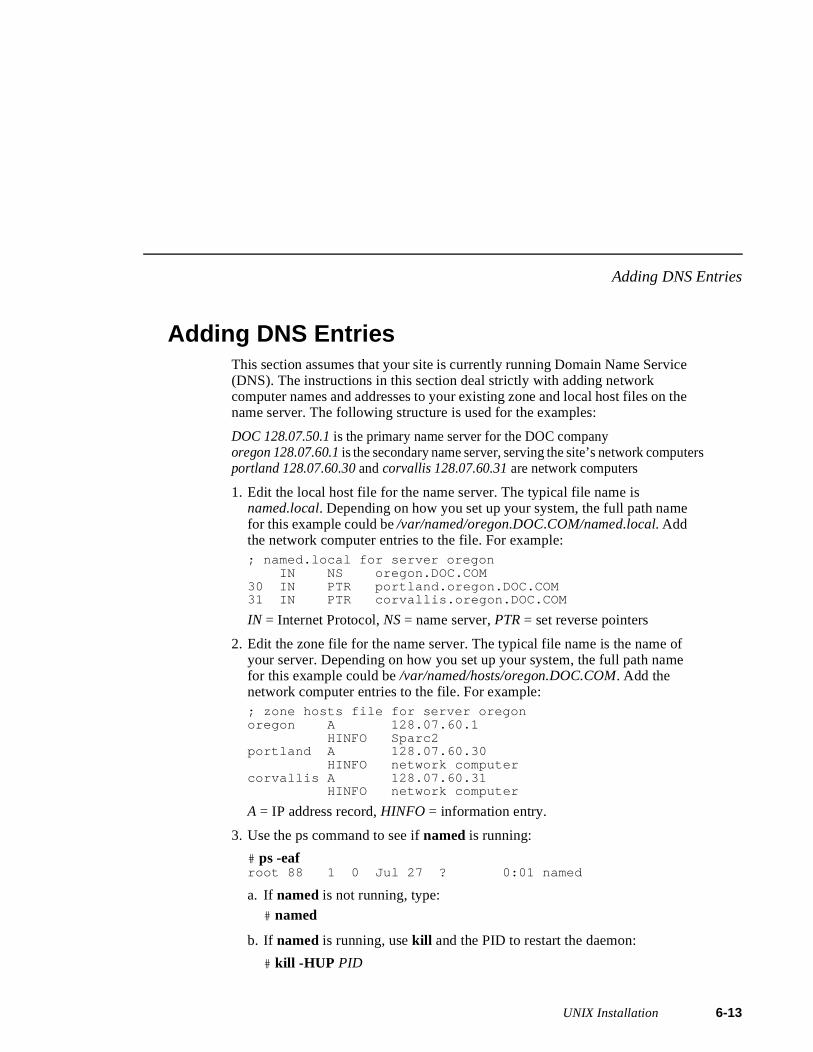
Adding DNS Entries
the
ters
f e
Adding DNS EntriesThis section assumes that your site is currently running Domain Name Service (DNS). The instructions in this section deal strictly with adding network computer names and addresses to your existing zone and local host files on name server. The following structure is used for the examples:
DOC 128.07.50.1 is the primary name server for the DOC companyoregon 128.07.60.1 is the secondary name server, serving the site’s network compuportland 128.07.60.30 and corvallis 128.07.60.31 are network computers
1. Edit the local host file for the name server. The typical file name is named.local. Depending on how you set up your system, the full path namefor this example could be /var/named/oregon.DOC.COM/named.local. Add the network computer entries to the file. For example:; named.local for server oregon
IN NS oregon.DOC.COM30 IN PTR portland.oregon.DOC.COM31 IN PTR corvallis.oregon.DOC.COM
IN = Internet Protocol, NS = name server, PTR = set reverse pointers
2. Edit the zone file for the name server. The typical file name is the name oyour server. Depending on how you set up your system, the full path namfor this example could be /var/named/hosts/oregon.DOC.COM. Add the network computer entries to the file. For example:; zone hosts file for server oregonoregon A 128.07.60.1
HINFO Sparc2portland A 128.07.60.30
HINFO network computercorvallis A 128.07.60.31
HINFO network computer
A = IP address record, HINFO = information entry.
3. Use the ps command to see if named is running:
# ps -eafroot 88 1 0 Jul 27 ? 0:01 named
a. If named is not running, type:
# named
b. If named is running, use kill and the PID to restart the daemon:
# kill -HUP PID
UNIX Installation 6-13
Chapter 6 Supporting a Centralized System - Silicon Graphics
6-1
4 UNIX Installation
Chapter
7em
m
Supporting a Centralized System - Alpha_OSF
This chapter contains procedures for setting up the necessary operating systsupport files. Use the Workbook in Chapter 2 to determine the procedures needed.
The values selected in the remote configuration file dictate the operating systefiles that must be enabled, created, or modified.
• NFS directories must be exported if NFS is used.
• tftp must be configured and enabled if tftp is used.
• bootp and/or rarp must be configured and running to automatically downloadboot files and network values for a tftp or NFS boot.
• Xprompter must be configured if it is used to start dxsession (DECwindows session manager).
• xdm must be configured and running if xdm is used. Refer to your host documentation for instructions on loading and configuring xdm.
• If Domain Name Service (DNS) is used, the network computer entries must be added to the zone and local host files
• Several Local Clients are available and can be started with xpsh or the Client Launcher (See Chapter 9: Local Clients)
?
UNIX Installation 7-1
Chapter 7 Supporting a Centralized System - Alpha_OSF
7-2
• Local Motif Window Manager (MWM) or OPENLOOK Window Manager (OLWM) must be started to use local MWM or OLWM (See Chapter 10: Window Managers)
• XIE must be enabled to run XIE applications. (See Chapter 9: Local Clients.)
• XPT/A graphics tablet must be configured on the host if it is used for input (See Chapter 9: Local Clients)NOTE: You must log in as root to perform the tasks in this chapter.
UNIX Installation
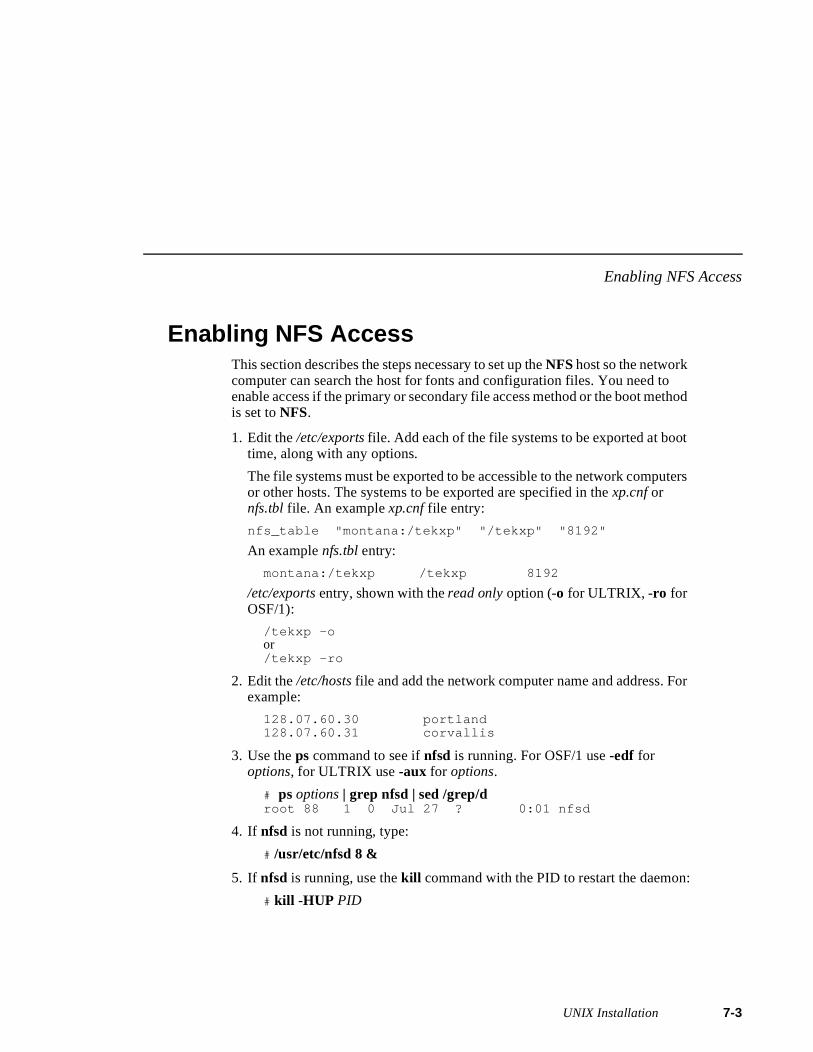
Enabling NFS Access
od
rs
r
Enabling NFS AccessThis section describes the steps necessary to set up the NFS host so the network computer can search the host for fonts and configuration files. You need to enable access if the primary or secondary file access method or the boot methis set to NFS.
1. Edit the /etc/exports file. Add each of the file systems to be exported at boottime, along with any options.
The file systems must be exported to be accessible to the network computeor other hosts. The systems to be exported are specified in the xp.cnf or nfs.tbl file. An example xp.cnf file entry:
nfs_table "montana:/tekxp" "/tekxp" "8192"
An example nfs.tbl entry:
montana:/tekxp /tekxp 8192
/etc/exports entry, shown with the read only option (-o for ULTRIX, -ro for OSF/1):
/tekxp -oor/tekxp -ro
2. Edit the /etc/hosts file and add the network computer name and address. Foexample:
128.07.60.30 portland128.07.60.31 corvallis
3. Use the ps command to see if nfsd is running. For OSF/1 use -edf for options, for ULTRIX use -aux for options.
# ps options | grep nfsd | sed /grep/droot 88 1 0 Jul 27 ? 0:01 nfsd
4. If nfsd is not running, type:
# /usr/etc/nfsd 8 &
5. If nfsd is running, use the kill command with the PID to restart the daemon:
# kill -HUP PID
UNIX Installation 7-3
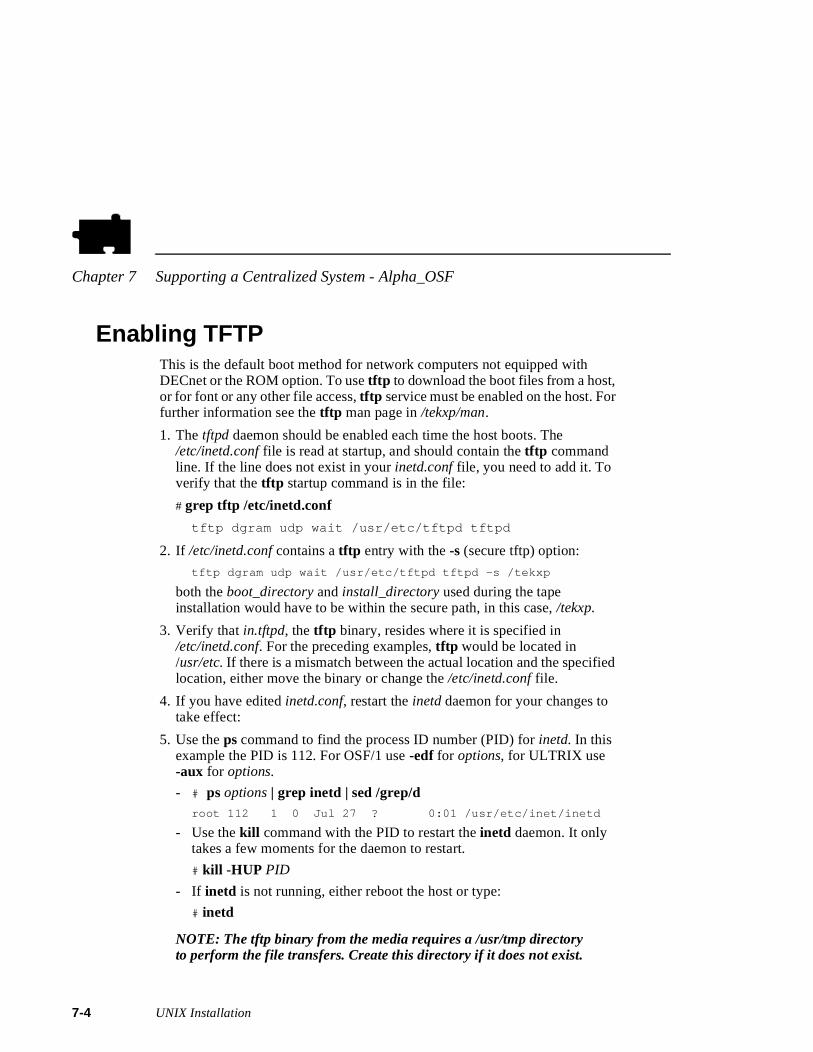
Chapter 7 Supporting a Centralized System - Alpha_OSF
7-4
d
Enabling TFTPThis is the default boot method for network computers not equipped with DECnet or the ROM option. To use tftp to download the boot files from a host, or for font or any other file access, tftp service must be enabled on the host. For further information see the tftp man page in /tekxp/man.
1. The tftpd daemon should be enabled each time the host boots. The /etc/inetd.conf file is read at startup, and should contain the tftp command line. If the line does not exist in your inetd.conf file, you need to add it. To verify that the tftp startup command is in the file:
# grep tftp /etc/inetd.conf
tftp dgram udp wait /usr/etc/tftpd tftpd
2. If /etc/inetd.conf contains a tftp entry with the -s (secure tftp) option:
tftp dgram udp wait /usr/etc/tftpd tftpd -s /tekxp
both the boot_directory and install_directory used during the tape installation would have to be within the secure path, in this case, /tekxp.
3. Verify that in.tftpd, the tftp binary, resides where it is specified in /etc/inetd.conf. For the preceding examples, tftp would be located in /usr/etc. If there is a mismatch between the actual location and the specifielocation, either move the binary or change the /etc/inetd.conf file.
4. If you have edited inetd.conf, restart the inetd daemon for your changes to take effect:
5. Use the ps command to find the process ID number (PID) for inetd. In this example the PID is 112. For OSF/1 use -edf for options, for ULTRIX use -aux for options.
- # ps options | grep inetd | sed /grep/droot 112 1 0 Jul 27 ? 0:01 /usr/etc/inet/inetd
- Use the kill command with the PID to restart the inetd daemon. It only takes a few moments for the daemon to restart.
# kill -HUP PID
- If inetd is not running, either reboot the host or type:
# inetd
NOTE: The tftp binary from the media requires a /usr/tmp directory to perform the file transfers. Create this directory if it does not exist.
UNIX Installation
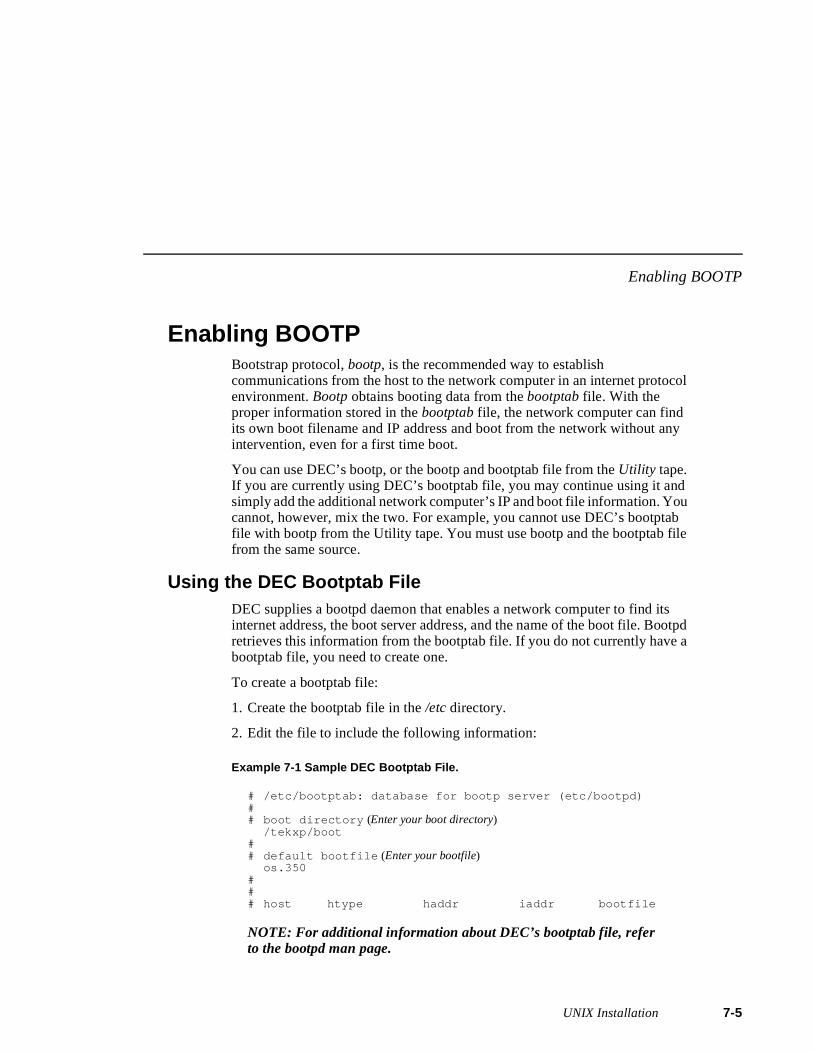
Enabling BOOTP
l
tpd
Enabling BOOTPBootstrap protocol, bootp, is the recommended way to establish communications from the host to the network computer in an internet protocoenvironment. Bootp obtains booting data from the bootptab file. With the proper information stored in the bootptab file, the network computer can find its own boot filename and IP address and boot from the network without anyintervention, even for a first time boot.
You can use DEC’s bootp, or the bootp and bootptab file from the Utility tape. If you are currently using DEC’s bootptab file, you may continue using it andsimply add the additional network computer’s IP and boot file information. Youcannot, however, mix the two. For example, you cannot use DEC’s bootptabfile with bootp from the Utility tape. You must use bootp and the bootptab filefrom the same source.
Using the DEC Bootptab FileDEC supplies a bootpd daemon that enables a network computer to find its internet address, the boot server address, and the name of the boot file. Booretrieves this information from the bootptab file. If you do not currently have a bootptab file, you need to create one.
To create a bootptab file:
1. Create the bootptab file in the /etc directory.
2. Edit the file to include the following information:
Example 7-1 Sample DEC Bootptab File.
# /etc/bootptab: database for bootp server (etc/bootpd)## boot directory (Enter your boot directory)
/tekxp/boot## default bootfile (Enter your bootfile)
os.350### host htype haddr iaddr bootfile
NOTE: For additional information about DEC’s bootptab file, refer to the bootpd man page.
UNIX Installation 7-5
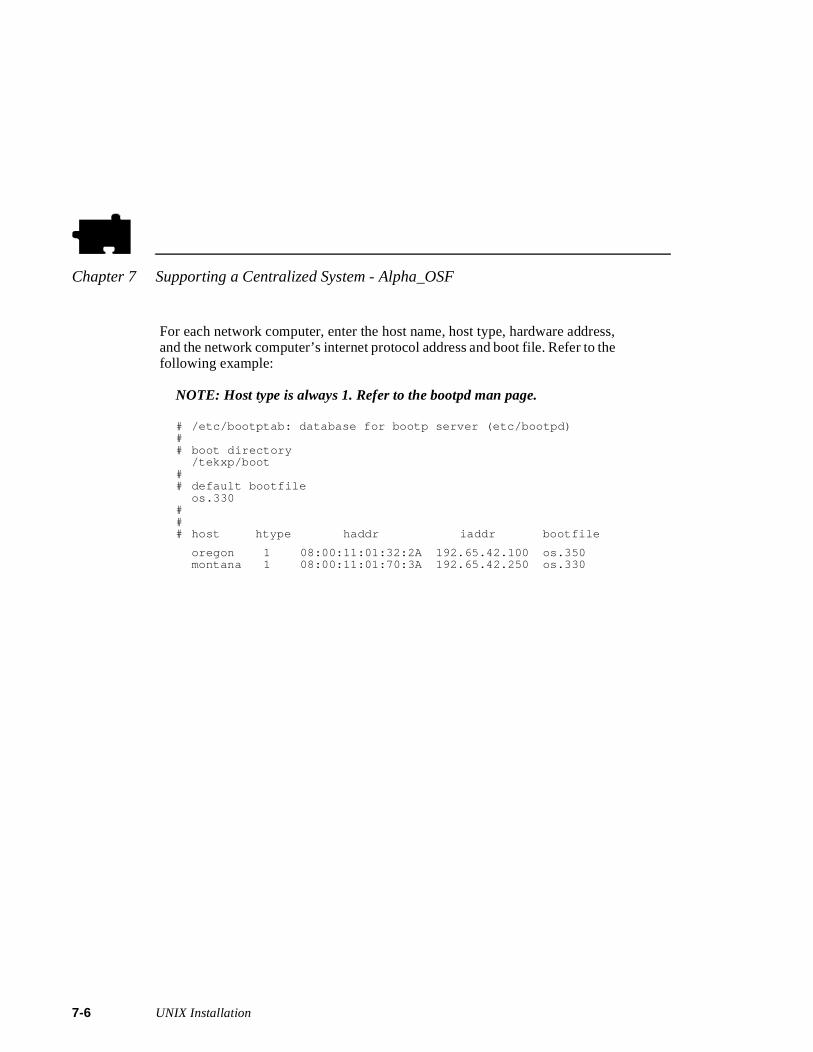
Chapter 7 Supporting a Centralized System - Alpha_OSF
7-6
ss, e
For each network computer, enter the host name, host type, hardware addreand the network computer’s internet protocol address and boot file. Refer to thfollowing example:
NOTE: Host type is always 1. Refer to the bootpd man page.
# /etc/bootptab: database for bootp server (etc/bootpd)## boot directory
/tekxp/boot## default bootfile
os.330### host htype haddr iaddr bootfile
oregon 1 08:00:11:01:32:2A 192.65.42.100 os.350montana 1 08:00:11:01:70:3A 192.65.42.250 os.330
UNIX Installation
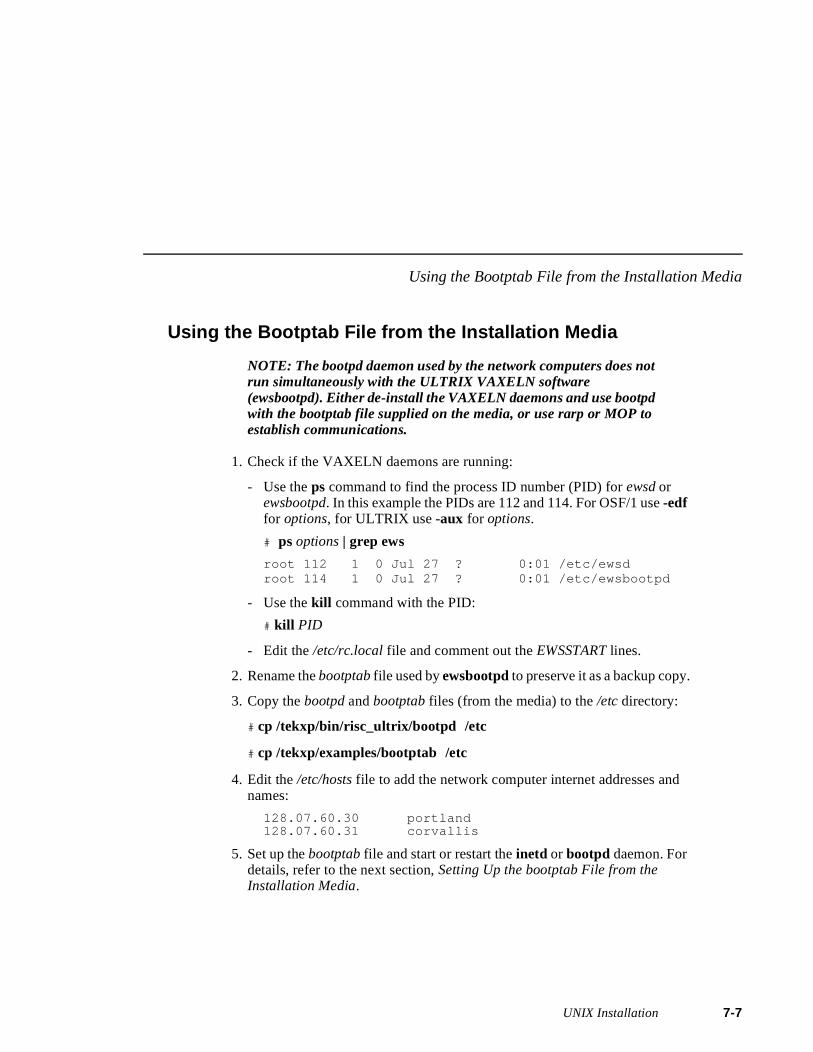
Using the Bootptab File from the Installation Media
Using the Bootptab File from the Installation Media
NOTE: The bootpd daemon used by the network computers does not run simultaneously with the ULTRIX VAXELN software (ewsbootpd). Either de-install the VAXELN daemons and use bootpd with the bootptab file supplied on the media, or use rarp or MOP to establish communications.
1. Check if the VAXELN daemons are running:
- Use the ps command to find the process ID number (PID) for ewsd or ewsbootpd. In this example the PIDs are 112 and 114. For OSF/1 use -edf for options, for ULTRIX use -aux for options.
# ps options | grep ews
root 112 1 0 Jul 27 ? 0:01 /etc/ewsdroot 114 1 0 Jul 27 ? 0:01 /etc/ewsbootpd
- Use the kill command with the PID:
# kill PID
- Edit the /etc/rc.local file and comment out the EWSSTART lines.
2. Rename the bootptab file used by ewsbootpd to preserve it as a backup copy.
3. Copy the bootpd and bootptab files (from the media) to the /etc directory:
# cp /tekxp/bin/risc_ultrix/bootpd /etc
# cp /tekxp/examples/bootptab /etc
4. Edit the /etc/hosts file to add the network computer internet addresses and names:
128.07.60.30 portland128.07.60.31 corvallis
5. Set up the bootptab file and start or restart the inetd or bootpd daemon. For details, refer to the next section, Setting Up the bootptab File from the Installation Media.
UNIX Installation 7-7

Chapter 7 Supporting a Centralized System - Alpha_OSF
7-8
es
es
r
Setting Up the bootptab File from the Installation Media
The bootptab file contains the data used by bootp. A sample bootptab file is located in /tekxp/examples. Refer to the bootp man page in /tekxp/man for more information. The file contains three sections:
• Global template entries define general information about the host. They are used as part of the subnetwork template entries. Examples of global entriinclude:
- Setting the subnet mask (sm)
- Specifying the address for one or more Domain Name Servers (ds) if your site uses Domain Name Service (DNS) as an option
- Sends the network computer host name (hn)
- Sets the home directory (boot_directory) for the files (hd)
• Subnetwork template entries define information specific to each subnet. They are used for each network computer entry. Subnetwork template entrigenerally include:
- Using the template command (tc) to point to the global entry
- Specifying the gateway or router to be used for each subnet (gw)
• Network computer entries are used to set information for a specific network computer. Network computer entries are specified by the network computename and generally include:
- Using the template command (tc) to point to the appropriate subnet entry
- Specifying the hardware type (ht), use ethernet for network computers
- Specifying the network computer’s hardware (ethernet) address (ha)
- Specifying the network computer’s internet protocol address (ip)
- Specifying the network computer’s boot file (bf)
- Specifying the location and name of the remote configuration file (T134)
NOTE: T134 is a user-defined variable to the bootptab file. It is intended for use with the bootp and bootptab file included on the media.
UNIX Installation
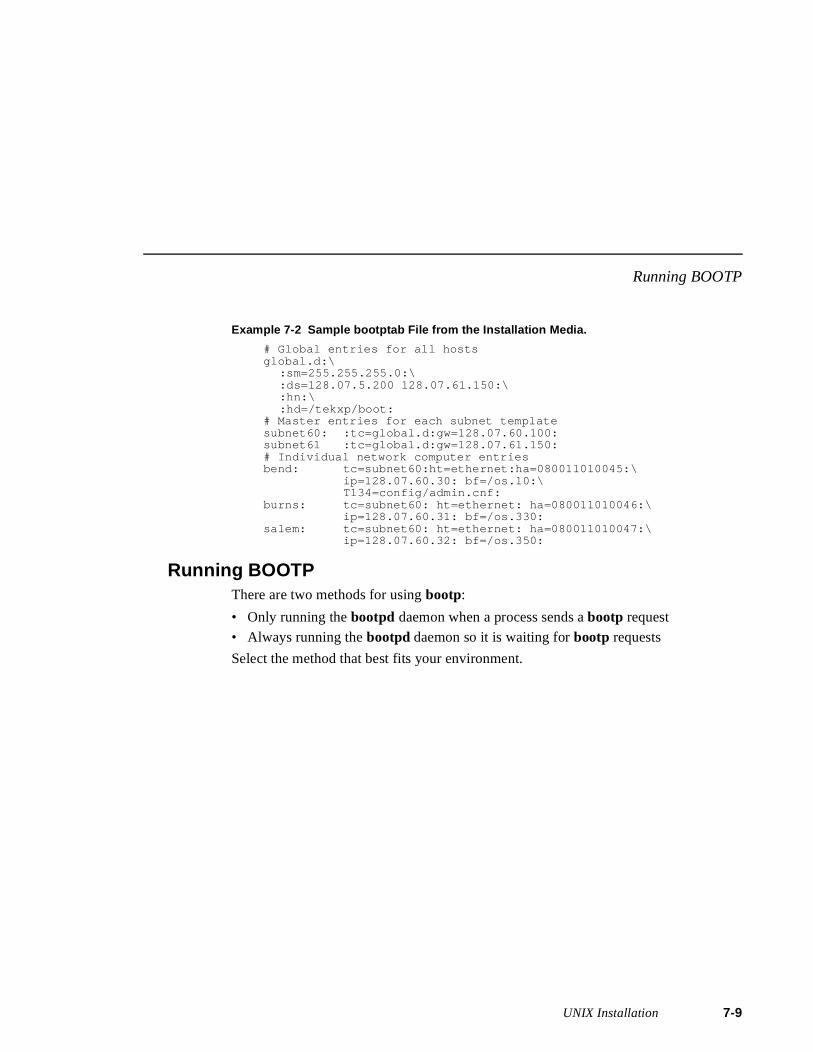
Running BOOTP
Example 7-2 Sample bootptab File from the Installation Media.
# Global entries for all hostsglobal.d:\
:sm=255.255.255.0:\:ds=128.07.5.200 128.07.61.150:\:hn:\:hd=/tekxp/boot:
# Master entries for each subnet templatesubnet60: :tc=global.d:gw=128.07.60.100:subnet61 :tc=global.d:gw=128.07.61.150:# Individual network computer entriesbend: tc=subnet60:ht=ethernet:ha=080011010045:\
ip=128.07.60.30: bf=/os.10:\T134=config/admin.cnf:
burns: tc=subnet60: ht=ethernet: ha=080011010046:\ip=128.07.60.31: bf=/os.330:
salem: tc=subnet60: ht=ethernet: ha=080011010047:\ip=128.07.60.32: bf=/os.350:
Running BOOTPThere are two methods for using bootp:
• Only running the bootpd daemon when a process sends a bootp request
• Always running the bootpd daemon so it is waiting for bootp requests
Select the method that best fits your environment.
UNIX Installation 7-9
Chapter 7 Supporting a Centralized System - Alpha_OSF
7-1
Only Running BOOTP on Request1. If the bootpd daemon is started by inetd, it is only run when bootp requests
are sent to the host. If the bootp command line does not exist in your inetd.conf file, you need to add it. To verify that the bootp startup command is in the file:
# grep bootps /etc/inetd.confbootps dgram udp wait /etc/bootpd bootpd
2. The port number for bootps must be set in the /etc/services file. The name field must match the name field set in the inetd.conf file. To verify that the port is set in the file:
# grep bootp /etc/services
bootps 67/udp
3. Verify that bootpd resides where it is specified in /etc/inetd.conf. For the preceding examples, bootpd would be located in /etc. If there is a mismatch between the actual location and the specified location, either move the bootpd binary or change the /etc/inetd.conf file.
4. If you have edited inetd.conf, restart the inetd daemon for your changes to take effect:
- Use the ps command to find the process ID number (PID) for inetd. In this example the PID is 112. For OSF/1 use -edf for options, for ULTRIX use -aux for options.
# ps options | grep inetd | sed /grep/d
root 112 1 0 Jul 27 ? 0:01 /etc/inetd
- Use the kill command with the PID to restart the inetd daemon. It only takes a few moments for the daemon to restart.
# kill -HUP PID
- If inetd is not running, either reboot the host or type:
# inetd
0 UNIX Installation
Running BOOTP
Always Running BOOTP
1. If the bootpd daemon is started within the /etc/rc.local file or a similar startup file, it is always running and waiting for bootp requests. If the bootp command line does not exist in your /etc/rc.local file, you need to add it. To verify that the bootp startup command is in the file:
# grep bootp /etc/rc.local
/etc/bootpd -s ; echo -n ’ bootpd’
The -s option specifies continuous execution.
2. Verify that bootpd resides where it is specified in /etc/rc.local. For the preceding examples, bootpd would be located in /etc. If there is a mismatch between the actual location and the specified location, either move the bootpd binary or change the /etc/rc.local file.
3. The port numbers for bootp listening and replying must be set in the /etc/services file. If they are not set, edit the file and add them. To verify thatthe ports are set in the file:
# grep bootp /etc/services
bootps 67/udpbootpc 68/udp
4. To start the bootpd daemon without rebooting the system:
# /etc/bootpd -s &
UNIX Installation 7-11

Chapter 7 Supporting a Centralized System - Alpha_OSF
7-1
st ths
ve
mes:
d
Enabling RARPIn addition to bootp the network computer can use rarp (TCP/IP Reverse Address Resolution Protocol) to establish communications. With rarp , the network computer broadcasts its ethernet address across the network, and receives its internet address back from the first host to respond. Whichever horesponds first becomes the boot host. The network computer uses the boot pastored in NVRAM or tries the default path /tekxp/boot/os.<model>.
NOTE: To use rarp, the kernel must be configured with the Ethernet Packet Filter option.
1. If the rarpd daemon is started within the /etc/rc.local file or a similar startup file, it is always running and waiting for rarp broadcasts. If the rarp command line does not exist in your /etc/rc.local file, you need to add it. To verify that the rarp startup command is in the file:
# grep rarp /etc/rc.local
/usr/etc/rarpd ; echo -n ’ rarpd’
2. Verify that rarpd resides where it is specified in /etc/rc.local. For the preceding examples, rarpd would be located in /usr/etc. If there is a mismatch between the actual location and the specified location, either mothe rarpd binary or change the /etc/rc.local file.
3. Edit the /etc/hosts file to add the network computer internet addresses and na128.07.60.30 portland128.07.60.31 corvallis
4. Edit the /etc/ethers file to add the network computer ethernet addresses annames:
08.00.11.01.00.45 portland08.00.11.01.00.46 corvallis
5. Use the ps command to see if the rarpd daemon is running. For OSF/1 use -edf for options, for ULTRIX use -aux for options.
# ps options | grep rarp | sed /grep/droot 69 1 0 Jul 27 ? 0:01 /usr/etc/rarpd
6. If rarp is running, use the kill command with PID to restart the daemon:# kill -HUP PID
7. If rarp is not running, type:
# /usr/etc/rarpd &
2 UNIX Installation
Enabling Xprompter
Enabling XprompterXprompter can be enabled and used to automatically start dxsession (DECwindows session manager). If using xprompter, the host connect method must be DISABLED.
Network computers cannot simultaneously use both xdm and Xprompter.
1. Edit the file /tekxp/bin/risc_ultrix/XP-lst and add each network computer’s name and display definition. For example:
portland 128.07.60.30:0corvallis 34.8::0
NOTE: Check the /etc/ttys file and verify there are no entries following the NCD entries. If there are, move the NCD entries to the end of the file. Any entries following the NCD entries are deleted.
2. Run the script /tekxp/bin/risc_ultrix/XP-lst-to-ttys to update the /etc/ttys file with the information in the XP-lst file. The script adds a line for each network computer entry to initialize Xprompter and properly close the session. XP-lst-to-ttys copies the original ttys file to ttys.old.
The XP-lst file is used by XP-prompter to obtain the display variable needed to display the login window. Whenever you add additional network computers to your environment, you need to repeat these steps.
3. Run the XP-set-dir script.
NOTE: If the XP-prompter, XP-start, and XP-lst-to-ttys files are located in a different path than /tekxp/bin/risc_ultrix, enter the following command to specify the path where they are located:
# XP-set-dir path
UNIX Installation 7-13
Chapter 7 Supporting a Centralized System - Alpha_OSF
7-1
the
f e
Adding DNS EntriesThis section assumes that your site is currently running Domain Name Service (DNS). The instructions in this section deal strictly with adding network computer names and addresses to your existing zone and local host files on name server. The following structure is used for the examples:
DOC 128.07.50.1 is the primary name server for the DOC companyoregon 128.07.60.1 is the secondary name server, serving the site’s network computers bend 128.07.60.30 burns 128.07.60.31 are network computers
1. Edit the local host file for the name server. The typical file name is named.local. Depending on how you set up your system, the full path namefor this example could be /var/named/oregon.DOC.COM/named.local. Add the network computer entries to the file. For example:
; named.local for server oregonIN NS oregon.DOC.COM
30 IN PTR bend.oregon.DOC.COM31 IN PTR burns.oregon.DOC.COM
IN indicates Internet Protocol, NS designates the name server, and PTR sets up reverse pointers for the network computers.
2. Edit the zone file for the name server. The typical file name is the name oyour server. Depending on how you set up your system, the full path namfor this example could be /var/named/hosts/oregon.DOC.COM. Add the network computer entries to the file. For example:
; zone hosts file for server oregonoregon A 128.07.60.1
HINFO Sparc2bend A 128.07.60.30
HINFO network computerburns A 128.07.60.31
HINFO network computer
A indicates an IP address record, HINFO is an information entry.
4 UNIX Installation

Adding DNS Entries
3. Use the ps command to see if named is running. For OSF/1 use -edf for options, for ULTRIX use -aux for options.
# ps options | grep named | sed /grep/droot 88 1 0 Jul 27 ? 0:01 named
- If named is not running, type:
# /usr/etc/named
- If named is running, use the kill command and PID to restart the daemon:
# kill -HUP PID
UNIX Installation 7-15
Chapter 7 Supporting a Centralized System - Alpha_OSF
7-1
6 UNIX Installation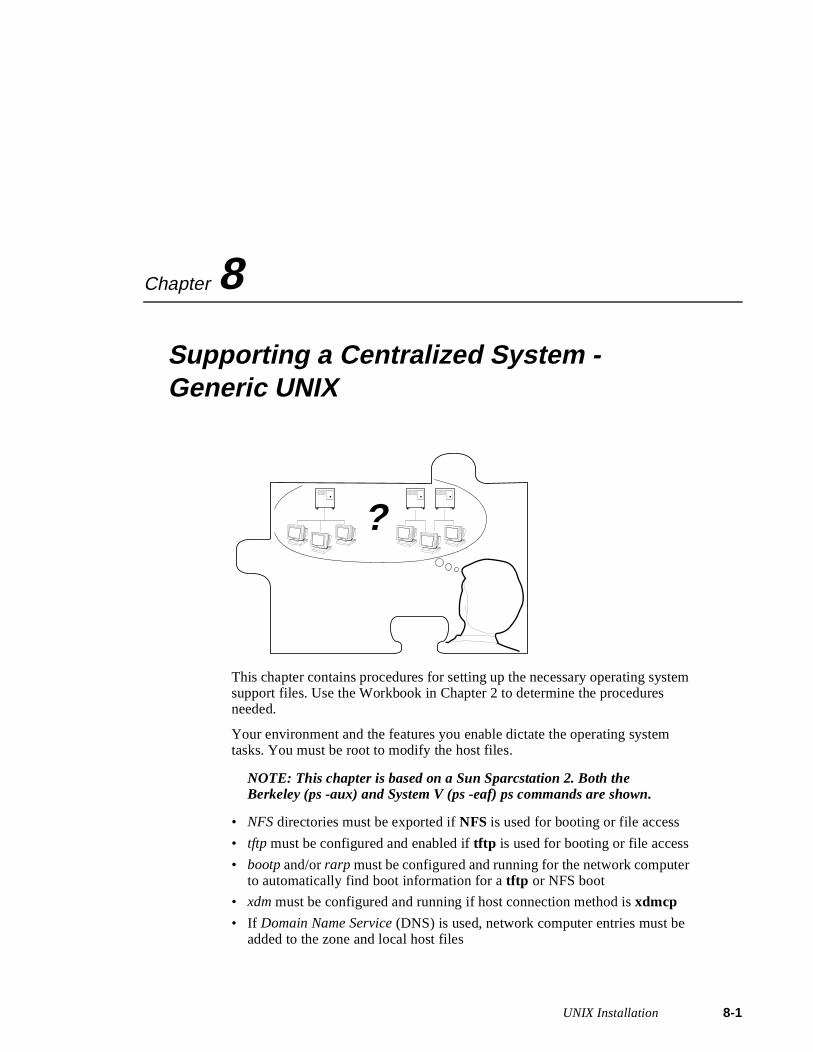
Chapter
8em
Supporting a Centralized System - Generic UNIX
This chapter contains procedures for setting up the necessary operating systsupport files. Use the Workbook in Chapter 2 to determine the procedures needed.
Your environment and the features you enable dictate the operating system tasks. You must be root to modify the host files.
NOTE: This chapter is based on a Sun Sparcstation 2. Both the Berkeley (ps -aux) and System V (ps -eaf) ps commands are shown.
• NFS directories must be exported if NFS is used for booting or file access
• tftp must be configured and enabled if tftp is used for booting or file access
• bootp and/or rarp must be configured and running for the network computerto automatically find boot information for a tftp or NFS boot
• xdm must be configured and running if host connection method is xdmcp
• If Domain Name Service (DNS) is used, network computer entries must be added to the zone and local host files
?
UNIX Installation 8-1
Chapter 8 Supporting a Centralized System - Generic UNIX
8-2
• Several Local Clients are available and can be started with xpsh or the Client Launcher (See Chapter 9, Local Clients)
• Local Motif Window Manager (MWM) must be started to use local MWM (See Chapter 10, Window Managers)
• XIE must be enabled to run XIE application (See Chapter 9, Local Clients)
• XPT/A graphics tablet must be configured on the host if it is used for input (See Chapter 9, Local Clients)
UNIX Installation
Enabling NFS Access
an
Enabling NFS AccessThis section describes the steps necessary to set up the host if NFS is used as the boot_method or file_access_method.
Edit the /etc/exports file. Add each of the file systems to be exported at boottime, along with any options. The file systems must be exported to be accessible to network computers. The exported systems are specified withnfs_table command in the xp.cnf file, or in the nfs.tbl file. An example xp.cnf file entry:nfs_table "montana:/tekxp" "/tekxp" "8192"
An example nfs.tbl entry:montana:/tekxp /tekxp 8192
/etc/exports entry, shown with the read only option (-ro):/tekxp -ro
4. To enable the mount point immediately, without booting, run:
# /usr/etc/exportfs -a [-o options]
5. Use /usr/etc/exportfs without any parameters to verify the exports.
6. Edit /etc/hosts and add the network computer name and address. For example:
128.07.60.30 portland
7. Some hosts require an explicit update to the arp table to add new entries:
# arp -s ether portland 080011010045# arp -s ether corvallis 080011010046
The ether switch indicates an ethernet address. arp can be run with a -f filename option, where filename is a file of network computer entries to set.
8. Use the appropriate ps command to see if nfsd is running:# ps -aux# ps -eafroot 88 1 0 Jul 27 ? 0:01 nfsd
a. If nfsd is not running, type:
# /usr/etc/nfsd 8 &
UNIX Installation 8-3
Chapter 8 Supporting a Centralized System - Generic UNIX
8-4
b. If nfsd is running, use the kill command with the PID to restart the daemon (the PID is 88 in the preceding ps example):
# kill -HUP PID
UNIX Installation
Enabling TFTP
.
ve
Enabling TFTPThis section describes the steps necessary to set up tftp if it is used as the boot_method or file_access_method.This is the default boot method for network computers not equipped with TDEnet, Flash Memory or ROM optionsFor details see the tftp man page on your host, or in /tekxp/man.
1. The /etc/inetd.conf or /usr/etc/inetd.conf file is read at startup, and should contain the tftp command line. Verify that the tftp startup command is in the /inetd.conf file. Add the line if it does not exist in your inetd.conf file. To verify the command:
# grep tftp /etc/inetd.conf
tftp dgram udp wait root /usr/etc/in.tftpd in.tftpd
Your startup could be different. Check the man page for specifics. Here is another example:
tftp dgram udp wait nobody /usr/etc/tftpd tftpd
2. If /etc/inetd.conf contains a tftp entry with the -s (secure tftp) option:
tftp dgram udp wait root /usr/etc/in.tftpd in.tftpd -s /tekxp
both the boot_directory and install_directory used during the media installation would have to be within the secure path, in this case, /tekxp. Refer to the following section for information on secure tftp.
3. Verify that in.tftpd, the tftp binary resides where it is specified in inetd.conf. For the preceding examples, tftp would be located in /usr/etc. If there is a mismatch between the actual location and the specified location, either mothe binary or change the /etc/inetd.conf file.
UNIX Installation 8-5
Chapter 8 Supporting a Centralized System - Generic UNIX
8-6
4. If you edited inetd.conf, restart the inetd daemon. Use the appropriate ps command to find the process ID number (PID) for inetd. In this example the PID is 112.
# ps -aux | grep inetd | sed /grep/d# ps -eafroot 112 1 0 Jul 27 ? 0:01 /usr/etc/inet/inetd
a. If inetd is running, use the kill command with the PID to restart the inetd daemon.
# kill -HUP PID
b. If inetd is not running, either reboot the host or type:
# inetd
NOTE: The tftp binary from the installation media requires a /usr/tmp directory to perform the file transfers. If this directory does not exist, it must be created.
UNIX Installation
Using Secure TFTP
f
Using Secure TFTPIf you use secure tftp, there are various things to consider before you begin:
• Do not use the secure directory (usually /tekxp) as part of the path when you specify file paths in xp.cnf, fonts.tbl, nfs.tbl, bootptab, or at the network computer’s Boot Monitor. The secure option adds the secure directory.
Actual path to the boot file: /tekxp/boot/os.350Path you specify: /boot/os.350
NOTE: You must supply the initial slash (/) in the path that you specify (e.g. you cannot use boot/os.350 in the previous example).
• Secure tftp only allows access to files within the secure directory (usually /tekxp), so all boot and configuration files must share a common parent directory. For example, place the network computer files as follows:
Boot files: /tekxp/bootConfiguration files: /tekxp/boot/configFont files: /tekxp/boot/fonts
• Secure tftp does not follow symbolic links outside of the secure directory. Ithere is not enough room on the /tekxp partition, use NFS to access fonts and files on other disks. It is also possible to symbolically link the secure directory to another partition. For example, /tekxp could be linked to /usr/tekxp. Refer to your host documentation.
• To allow the network computer to configure itself from the network the firsttime it boots, you must use bootpd to establish communications, and enter the boot file name (without the secure directory in the path) in the bootptab file. Both bootp and a bootptab file are included on the installation media.
If the boot file in the following example is /tekxp/boot/os.350, the boot file (bf) command line changes if secure tftp is used. For example:
- Network computer entry in the bootptab file for non-secure tftp:corvallis: tc=subnet60: ht=ethernet: ha=080011010046:\
ip=128.07.60.31: bf=/tekxp/boot/os.350:
- Network computer entry in the bootptab file for secure tftp:eugene: tc=subnet60: ht=ethernet: ha=080011010048:\
ip=128.07.60.33: bf=/boot/os.350:
Refer to Setting Up the bootptab File on page 8-9 for command details.
UNIX Installation 8-7
Chapter 8 Supporting a Centralized System - Generic UNIX
8-8
l
Enabling BOOTPBootstrap protocol, bootp, is the recommended way to establish communications from the host to the network computer in an internet protocoenvironment. Bootp obtains booting data from the bootptab file. With the proper information stored in the bootptab file, the network computer can find its own name and IP address and boot from the network without any intervention, even for a first time boot.
NOTE: If bootp is not already on your host, you must build it from the source included on the installation media. Refer to the Making the Utilities section in Chapter 1: Installing the Software for more information.
1. Verify that the bootpd and bootptab files are in the /etc or /usr/etc directory:
# ls bootp*
2. If they are not there, make the utility, then:
# cp /tekxp/src/bootp/bootpd /etc# cp /tekxp/examples/bootptab /etc
3. Edit the /etc/hosts file to add the network computer internet addresses and names:
128.07.60.30 portland128.07.60.31 corvallis
4. Some hosts may require an explicit update to the arp table to add the new entries:
# arp -s ether portland 08:00:11:01:00:45# arp -s ether corvallis 08:00:11:01:00:46
The ether switch indicates you are providing an ethernet address. The arpcommand can also be run with a -f filename option, where filename is a file of all the network computer entries to set.
5. Set up the bootptab file.
6. Start or restart the inetd or bootpd daemon.
UNIX Installation
Setting Up the bootptab File
r
Setting Up the bootptab FileThe bootptab file contains the data used by bootp. A sample bootptab file is located in /tekxp/examples. Refer to the bootp man page in /tekxp/man for more information. The file contains three sections:
• Global template entries define general information about the host. They are used as part of the subnet template entries. Examples of global entries include:
- Setting the subnet mask (sm)
- Specifying the address for one or more Domain Name Servers (ds) if your site uses Domain Name Service (DNS) as an option
- Sets the network computer name (hn).
- Sets the home directory for the files (hd), typically used for secure tftp.
• Subnet template entries define information specific to each subnet. They are used for each network computer entry. Subnet template entries generally include:
- Using the template command (tc) to point to the global entry
- Specifying the gateway or router to be used for each subnet (gw)
• Network computer entries are used to set information for a specific network computer. Network computer entries are specified by the network computename and generally include:
- Using the template command (tc) to point to the appropriate subnet entry
- Specifying the hardware type (ht), use ethernet for network computers
- Specifying the network computer’s hardware (ethernet) address (ha)
- Specifying the network computer’s internet protocol address (ip)
- Specifying the network computer’s boot file (bf)
- Specifying the location and name of the remote configuration file (T134)
NOTE: T134 is a user-defined variable to the bootptab file. It is intended for use with the bootp and bootptab file included on the media.
UNIX Installation 8-9
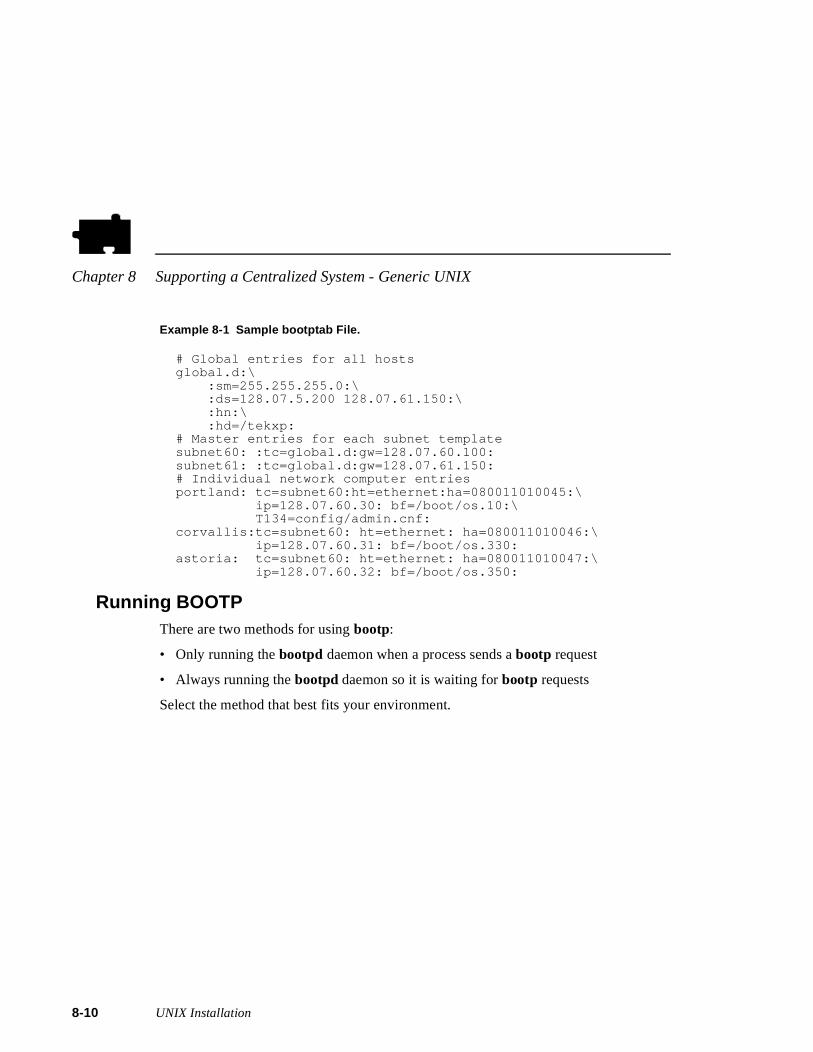
Chapter 8 Supporting a Centralized System - Generic UNIX
8-1
Example 8-1 Sample bootptab File.
# Global entries for all hostsglobal.d:\
:sm=255.255.255.0:\:ds=128.07.5.200 128.07.61.150:\:hn:\:hd=/tekxp:
# Master entries for each subnet templatesubnet60: :tc=global.d:gw=128.07.60.100:subnet61: :tc=global.d:gw=128.07.61.150:# Individual network computer entriesportland: tc=subnet60:ht=ethernet:ha=080011010045:\
ip=128.07.60.30: bf=/boot/os.10:\T134=config/admin.cnf:
corvallis:tc=subnet60: ht=ethernet: ha=080011010046:\ip=128.07.60.31: bf=/boot/os.330:
astoria: tc=subnet60: ht=ethernet: ha=080011010047:\ip=128.07.60.32: bf=/boot/os.350:
Running BOOTPThere are two methods for using bootp:
• Only running the bootpd daemon when a process sends a bootp request
• Always running the bootpd daemon so it is waiting for bootp requests
Select the method that best fits your environment.
0 UNIX Installation
Running BOOTP
ve
Only Running BOOTP on Request
1. If the bootpd daemon is started within the inetd.conf file, it is only run when bootp requests are sent to the host. If the bootps command line does not exist in your inetd.conf file, you need to add it. To verify that the bootps startup command is in the file:
# grep bootp /etc/inetd.conf
bootps dgram udp wait root /etc/bootpd bootpd
Your startup could be different, check the man page. Another example:
bootps dgram udp wait nobody /usr/etc/bootpd bootpd
2. Verify that bootpd resides where it is specified in inetd.conf. For the preceding examples, bootpd would be located in /usr/etc. If there is a mismatch between the actual location and the specified location, either mothe bootpd binary or change the inetd.conf file.
3. The port numbers for bootp listening and replying must be set in the /etc/services file. If they are not set, edit the file and add them. To verify thatthe ports are set in the file:
# grep bootp /etc/services
bootps 67/udpbootpc 68/udp
4. If you edited inetd.conf, restart the inetd daemon. Use the appropriate ps command to find the process ID number (PID) for inetd. In this example the PID is 112.
# ps -aux# ps -eafroot 112 1 0 Jul 27 ? 0:01 /usr/etc/inet/inetd
a. If inetd is running, use the kill command with the PID to restart the inetd daemon.
# kill -HUP PID
b. If inetd is not running, either reboot the host or type:
# inetd
UNIX Installation 8-11
Chapter 8 Supporting a Centralized System - Generic UNIX
8-1
Always Running BOOTP
1. If the bootpd daemon is started within the /etc/rc.local file or a similar startup file, it is always running and waiting for bootp requests. If the bootp command line does not exist in your /etc/rc.local file, you need to add it. To verify that the bootp startup command is in the file:
# grep bootp /etc/rc.local
/etc/bootpd -s ; echo -n ’ bootpd’
The -s option specifies continuous execution.
2. Verify that bootpd resides where it is specified in /etc/rc.local. For the preceding examples, bootpd would be located in /etc. If there is a mismatch between the actual location and the specified location, either move the bootpd binary or change the /etc/rc.local file.
3. The port numbers for bootp listening and replying must be set in the /etc/services file. If they are not set, edit the file and add them. To verify thatthe ports are set in the file:
# grep bootp /etc/services
bootps 67/udpbootpc 68/udp
4. To start the bootpd daemon without rebooting the system:
# /etc/bootpd -s &
2 UNIX Installation
Enabling RARP
the
ve
Enabling RARPIn addition to bootp, rarp (TCP/IP Reverse Address Resolution Protocol) can be used to establish communications. The network computer broadcasts its ethernet address across the network, and receives its internet address fromfirst host to respond. The /tekxp directory must be on the host.
NOTE: rarp is not supported for Token-Ring networks.
1. If the rarpd daemon is started within the /etc/rc.local file or a similar startup file, it is always running and waiting for rarp broadcasts. If the rarp command line does not exist in your /etc/rc.local file, you need to add it. To verify that the rarp startup command is in the file:
# grep rarp /etc/rc.local/usr/etc/rarpd -a ; echo -n ’ rarpd’
2. Verify that rarpd resides where it is specified in /etc/rc.local. For the preceding examples, rarpd would be located in /usr/etc. If there is a mismatch between the actual location and the specified location, either mothe rarpd binary or change the /etc/rc.local file.
3. Edit the /etc/hosts file to add the network computer internet addresses and names:
128.07.60.30 portland128.07.60.31 corvallis
4. Edit the /etc/ethers file to add the network computer ethernet addresses andnames:
08.00.11.01.00.45 portland08.00.11.01.00.46 corvallis
5. Some hosts require an explicit update to the arp table to add new entries:
# arp -s ether portland 08:00:11:01:00:45# arp -s ether corvallis 08:00:11:01:00:46
The ether switch indicates an ethernet address. arp can be run with a -f filename option, where filename is a file of the network computer entries to set.
UNIX Installation 8-13
Chapter 8 Supporting a Centralized System - Generic UNIX
8-1
6. Use the appropriate ps command to see if the rarpd daemon is running:
# ps -aux# ps -eafroot 69 1 0 Jul 27 ? 0:01 /etc/rarpd
a. If rarp is running, use kill with the PID to restart the daemon:
# kill -HUP PID
b. If rarp is not running, type:
# /usr/etc/rarpd -a &
4 UNIX Installation
Adding DNS Entries
the
rs
f e
Adding DNS EntriesThis section assumes that your site is currently running Domain Name Service (DNS). The instructions in this section deal strictly with adding network computer names and addresses to your existing zone and local host files on name server. The following structure is used for the examples:
DOC 128.07.50.1 is the primary name server for the DOC company, oregon 128.07.60.1 is the secondary name server, serving the site’s network computeportland 128.07.60.30 and corvallis 128.07.60.31 are network computers.
1. Edit the local host file for the name server. The typical file name is named.local. Depending on how you set up your system, the full path namefor this example could be /var/named/oregon.DOC.COM/named.local. Add the network computer entries to the file. For example:; named.local for server oregon
IN NS oregon.DOC.COM30 IN PTR portland.oregon.DOC.COM31 IN PTR corvallis.oregon.DOC.COM
IN = Internet Protocol, NS = name server, PTR = set reverse pointers
2. Edit the zone file for the name server. The typical file name is the name oyour server. Depending on how you set up your system, the full path namfor this example could be /var/named/hosts/oregon.DOC.COM. Add the network computer entries to the file. For example:; zone hosts file for server oregonoregon A 128.07.60.1
HINFO Sparc2portland A 128.07.60.30
HINFO network computercorvallis A 128.07.60.31
HINFO network computer
A = IP address record, HINFO = information entry.
3. Use the appropriate ps command to see if named is running:
# ps -aux# ps -eafroot 88 1 0 Jul 27 ? 0:01 named
a. If named is not running, type:
# namedb. If named is running, use kill and the PID to restart the daemon:
# kill -HUP PID
UNIX Installation 8-15

Chapter 8 Supporting a Centralized System - Generic UNIX
8-1
6 UNIX Installation
Chapter
9se us
Local Clients
This chapter describes various ways to start local client. Local clients are thoapplications that execute on the network computer, rather than on the host, threducing network traffic. TekHostMenu, Telnet, Cterm, and Setup are examples of local clients. Local clients can be started with xpsh, the remote configuration file (xp.cnf), with rsh, or with the Client Launcher.
This chapter also describes the Client Launcher, Audio Intercept Driver and Server, Authorization Key Manager, XIE, XBlink, XPT/A Graphics Tablet, Touchscreen Calibration, and the Common Desktop Environment.
UNIX Installation 9-1

Chapter 9 Local Clients
9-2
l
r.
The following local clients are available on the network computer:
NOTE: MWM, LAT, Cterm, XIE, the Tek340 emulator, the Digital Video player, and CDE require an authorization key.
Determining Local Client Versions
To see the version of any local client in the boot directory, use the UNIX ident command. For example, to see the version of Setup currently in use, enter ident setup.350 (where 350 is the OS level you booted with). The version and leveinformation displays. You can use this command for any of the local clients.
Starting Local Clients With xpshxpsh is a host program used to download local clients to a network computeIt is a two-way communication mechanism between the host program (xpsh) and the local daemon (xpshd). xpsh sends information to the network computer specifying which local clients to download, and xpsh receives local client error messages and exit information from the network computer. xpsh can download and start:
Starting a client using xpsh enables the client to run locally instead of from the host. The host environment, client name, and arguments are sent to the local network computer. For example, using xpsh to download MWM enables access to files in $HOME. This allows you to customize the MWM environment for an individual user.
Analog Video Player
Audio MixerAudio Player
Authorization Key ManagerCterm session
Common Desktop Environment (CDE)Digital Video Player
LAT sessionLocal Client Launcher
Motif Window Manager (MWM)
Serial session
SetupTelnet session
Touchscreen CalibrationWinDD
XBlinkXIE Viewer
Xlock clientXP Window Manager (XPWM)
UNIX Installation
Starting Local Clients With xpsh
NOTE: When starting local clients with xpsh, instead of entering the -display variable each time, you can set the environment variable DISPLAY to network_computer_name:0. Then when starting local clients with xpsh, enter xpsh and the local client only. For example:
xpsh tek220 -e ctermxpsh tek340 -e telnetxpsh mwmxpsh tek220 -e lloginxpsh tek220 -e tip tty0xpsh tek340 -e tip tty1xpsh xlock -mode 1xpsh setup
To reduce the startup time for a local client started with xpsh, you can access the client through an NFS path. (For information about NFS, refer to the Supporting a Centralized System chapter for your host.) For example, if you mount host_name:/tekxp/boot to /host_name/tekxp/boot on your network computer, you can invoke MWM with the command:
xpsh /host_name/tekxp/boot/mwm
To start a local client using xpsh, enter the appropriate command below:
Starting the Analog Video Playerxpsh -display network_computer_name:0 xpvideo
The following options can be set on the xpsh command line:-encode specifies the encoding format. Specify either NTSC (National Television System Committee) or PAL (Phase Alternation Line-rate).
-source specifies the video source to which the video device is connected.Specify either COMPOSITE_1, COMPOSITE_2 or SVIDEO1.-color specifies the color intensity of the video being played. Specify a number from -1000 to 1000. 0 is the default.
-bright specifies the color brightness intensity of the video being played. Specify a number from -1000 to 1000. 0 is the default.-contrast specifies the color contrast intensity of the video being played. Specify a number from -1000 to 1000. 0 is the default.
-tint specifies the color tint of the video being player. Specify a number from-1000 to 1000. 0 is the default.
UNIX Installation 9-3
Chapter 9 Local Clients
9-4
io
Starting the Audio Mixerxpsh -display network_computer_name:0 mixer
Starting the Audio Playerxpsh -display network_computer_name:0 aplay
The following options can be set on the xpsh command line:
-h host — specifies the host name or address on which the audio file resides. The host must be entered in the network computer’s InternetHost Table in Setup. This host displays in the Audio Player’s File Information area.
-f filename and path — specifies the audio file name and its entire path. This file displays in the Audio Player’s File Information area.
-a access method — specifies the access method used to access the audfile. Available access methods are tftp , nfs, and dap.
-v volume level — specifies the volume level to use when playing the audio file. Specify a number between 0 and 100, with 0 indicating no volume, and 100 indicating the loudest volume setting.
-p when used with the -h, -f, -a, and -v options, the specified file plays without opening the Audio Player. The entire file plays and cannot beinterrupted.
Starting the Authorization Key Managerxpsh authkey
The network computer reads the authkey.dat file when booting and updates the network computer and authorization key information. (Be sure that SNMP is available and enabled.)
Starting a Cterm sessionA Cterm session can be started with a Tek220 or Tek340 emulator.
xpsh -display network_computer_name:0 tek220 -e ctermxpsh -display network_computer_name:0 tek340 -e cterm
Resource settings can be specified for a Cterm session. Refer to the nextsection, Specifying Client Resource Settings.
UNIX Installation
Starting Local Clients With xpsh
t
o
.
Starting the Digital Video Playerxpsh -display network_computer_name:0 vplay
The following vplay options can be set on the xpsh command line:
-h host — specifies the host name or address on which the video fileresides. The host must be entered in the network computer’s InterneHost Table in Setup. This host displays in the Video Player’s File Information area. When Multicasting, -h specifies the IP address. The port number displays in the Video Player’s Addr/Port Information area.
-f filename and path — specifies the video file name and its entire path. This file displays in the Video Player’s File Information area. When Multicasting, -f specifies the port number. The address displays in theVideo Player’s Addr/Port Information area
-a access method — specifies the access method used to access the videfile. Available access methods are tftp , nfs, dap, and Multicast. NFS is the preferred file access method for faster and more accurate data transfer rates required by the player. In addition, there is a 16MB limiton files transferred with TFTP.
-v volume level — specifies the volume level to use when playing the video file. Specify a number between 0 and 100, with 0 indicating novolume, and 100 indicating the loudest volume setting.
-m (Mute) specifies that the video file plays with no sound.
-c (Color) specifies that the video file displays in color (used only if the video was recorded in color).
-nc (No Color) specifies that the video file displays in greyscale images
-brightness n — sets the brightness level of the video file. Specify a number between -50 and +50.
-contrast n — sets the contrast level of the video file. Specify a numberbetween -50 and +50.
-b (Big) specifies that the video file displays in a frame four times the size of the original file.
UNIX Installation 9-5
Chapter 9 Local Clients
9-6
n
e
,
-p (Playonly) when used with the options above, the specified file playswithout showing the Video Player. The entire file plays and cannot beinterrupted.
-all (Play All; software player only) plays all frames in a video file. Frame scheduling is ignored and the audio will not be in sync.
-title "string" — assigns a title for the vplay windows.
-propcmd — creates properties that allow other clients to send command strings to the Video Player. These properties cannot be changed or modified and are used to control the Video Player from another client that you create. For details about the properties, see the vplay man page.
-BUFSIZE n — (Hardware Player only) specifies the size of the Video Player’s memory buffer (in kilobytes). The value defaults to 1024 and can not be set lower than 1 kilobyte. If the value specified is greater thaavailable memory when trying to play a file, the Video Player reducesits buffer to the available memory.
-CHKSIZE n — (Hardware Player only) specifies that the Video Player’s memory buffer is divided into “chunks”, measured in kilobytes. The network fills the chunks, and the Video Player empties them as they araccessed. The default is 32, which divides the buffer into 32 kilobyte chunks. If the chunk size is set to a number larger than the buffer sizethe chunk size will be truncated to one half the buffer size. The chunksize cannot be set less than 1 kilobyte.
-CHKDELAY n — (Hardware Player only) specifies the time delay (in milliseconds) that the Video Player waits following each read request that fills a chunk.
-chan n — (Multicast only) specifies an index into an array of available Multicast channels. Do not use with the -h, -f, -a, or -text options.
-text "string" — (Multicast only) specifies the channel string to be displayedby the Video Player. Do not use with the -chan option.
UNIX Installation
Starting Local Clients With xpsh
0
Starting a LAT sessionA LAT session can be started with a Tek220 or Tek340 emulator.
xpsh -display network_computer_name:0 tek220 -e lloginxpsh -display network_computer_name:0 tek340 -e llogin
Resource settings can be specified for a LAT session. Refer to the next section, Specifying Client Resource Settings.
Starting the Local Client Launcherxpsh -display network_computer_name:0 launcher
The following options can be added to the xpsh command line when starting the Client Launcher:
-auto Configures the Client Launcher with the automatic default settings even if a configuration file exists.
-file filename Configures the Client Launcher using a user-defined configuration file.
Starting local MWMxpsh -display network_computer_name:0 mwm
NOTE: If both MWM version 1.1 and MWM version 2.0 are authorized, the 2.0 version will start.
Starting a Serial Session for Port 0 and Port 1A serial session can be started with a Tek220 or Tek340 emulator for portor port 1.
xpsh -display network_computer_name:0 tek220 -e tip tty0xpsh -display network_computer_name:0 tek340 -e tip tty1
Starting Setupxpsh -display network_computer_name:0 setup
A network computer’s Setup and Console window can also be started and displayed on a remote network computer or host using xpsh. Once started, you can use Setup to configure network computer settings, establish communication connections, and monitor network computer operations.
UNIX Installation 9-7
Chapter 9 Local Clients
9-8
e
To access a network computer’s Setup from a remote network computer or host using C shell, enter:
setenv TEKSETUP_DISPLAY display_device:0xpsh -display network_computer:0 setup
If using a different type of shell tool, enter:
xpsh -display network_computer:0 -xpenv “TEKSETUP_DISPLAY \= display_device:0” setup
where network computer is the remote network computer whose Setup and Console window is accessed, and display_device is the network computer or host where Setup is to display. Use IP addresses if the remote network computer does not know the host name of the display device (set up in thInternet Host Table in Setup).
If the network computer user currently has Setup started, it is not accessible remotely via xpsh. Likewise, if a remote network computer or host has Setup open via xpsh, it is not available to the network computer user.
NOTE: To prevent other users from accessing your network computer’s Setup and resetting the server, set enable_access_control to Yes (in either the xp.cnf file or in Setup).
Starting a Telnet sessionA Telnet session can be started with a Tek220 or Tek340 emulator.
xpsh -display network_computer_name:0 tek220 -e telnetxpsh -display network_computer_name:0 tek340 -e telnet
Resource settings can be specified for a Telnet session. Refer to the nextsection, Specifying Client Resource Settings.
UNIX Installation
Starting Local Clients With xpsh
.
is
,
Starting WinDDxpsh can start the WinDD client as needed. To start WinDD with xpsh, enter the following (where network_computer_name is the name or address of your network computer):
xpsh -display network_computer_name:0 windd [options]
The following options can be set on the xpsh command line:
-display network_computer:0Specifies the network_computer name or address to display the WinDD local client.
-c Auto-connect to the first application server in the application server listIf there are no application servers in the list, this option is ignored andthe client window is displayed.
-nc Do not auto-connect to an application server. (Default)
-d Displays the menu bar and the internal borders. (Default)
-nd Does not display the menu bar or the internal borders. For example, thallows a 1280x1024 WinDD window to fully display on a 1280x1024 monitor (minus windows manager decorations).
-e Enables the Application Server edit field window so that users can add application servers to the application server list. (Default)
-ne Disables the Application Server edit field window so that users are not allowed to add application servers to the application server list.
-floppyAllows supported host versions of WinDD to use its local floppy drive as a network connected drive for the Application Server. Only the firsthost client to specify this option will be allowed to use the floppy device. NOTE: For host clients (with local floppy drive) only.
-no_floppy_cacheDisables use of local floppy write cache. This is a fail-safe option to ensure the entire file has been updated in the event a user suddenly ejects a disk mechanically (when disks are ejected via the GUI buttonthat process flushes the cache so no information is lost).
-geometry <geometry>Standard X11 geometry option, <WidthxHeight+X+Y>.
UNIX Installation 9-9
Chapter 9 Local Clients
9-1
e
t
-h <application server>Adds the named application server(s) to the application server list. Multiple application servers can be added to the list by listing them separated by spaces.
-helpDisplays a brief help list on the available WinDD command line options.
-initprog <prog> [-initdir <dir> ]Specifies the application to execute upon application server login. Thlogin session is terminated when the application is terminated.
Prog specifies the application and can also specify its path (up to 259characters) and parameters. The program path and name are writtenconsecutively (and not separated by a space) when they are both specified in prog. A space separates the program name and its parameters. These parameters are program specific and can specify program settings or data files to invoke on execution. Dir specifies the path of the executable program.
-keysym_onlySpecifies that all NCD network computer keyboards are supported withkeysym translations within WinDD.
-local_numlockSpecifies that WinDD manages the state of the Num_Lock independenof any Xserver support.
-no_auto_numlockSpecifies that WinDD does not control the Num_Lock setting.
-login <username> [pass <passwd>] [-domain <domainname>]Specifies the application server user account login name, login password, and domain. These values will be used for user account verification.
When using a WinDD client and connecting to a WinDD application server, your username, password, domain, initial program, and initial directory are encrypted as they are sent across the network.
Username, password, domainname, dir, and prog are not viewable or changeable from the WinDD configuration window.
-r Reconnect to the application server after log off.
0 UNIX Installation

Starting Local Clients With xpsh
.
.
-nr Does not reconnect to the application server after log off. (Default)
-versionDisplays the WinDD version in use. (If the license is 8019, this optionalso prints For evaluation purposes only.)
-x Exits the WinDD client upon logging out of, or disconnecting from, the application server.
-nx Does not exit the WinDD client upon logging out of, or disconnecting from, the application server. (Default)
-force_xcursorSpecifies that monochrome pointers within the WinDD desktop are tobe implemented using X cursors. Some monochrome pointers are xor’d with the underlying desktop. When this switch is specified, it is no longer xor’d, as X cursors do not support that mode.
NOTE: The force_xcursor feature is intended to compensate for workstations that do not have a particularly high performance X server. Consider using this option if the pointer flashes when move, or poor performance is observed entering text in dialog boxes. Using this switch improves user interactivity. The only side effect is the pointer is displayed in a single color.
Starting the XIE Viewerxpsh -display network_computer_name:0 xieview
The following options can be set on the xpsh command line:
-ifg color specifies the color used as the foreground on bitonal imagesThe color specified must be in the network computer’s rgb.txt file.
-ibg color specifies the color used as the background on bitonal imagesThe color specified must be in the network computer’s rgb.txt file.
-cc color specifies the background color for the image window. The colorspecified must be in the network computer’s rgb.txt file.
UNIX Installation 9-11
Chapter 9 Local Clients
9-1
e ,
d
s
-fullpan True or FalseIf True, the image uses less memory when zoomed. If False, thimage uses more memory when zoomed. When set to Falsepanning the image is faster. If there is not enough memory toview the entire zoomed image, only part of the image will be available when panning. The default is True.
Starting Xlockxpsh -display network_computer_name:0 xlock -mode <mode>
where <mode> is an optional setting. If set to 1, Xlock locks the keyboard only. If set to 0, Xlock locks the keyboard and the screen. If a mode settingis not given, Xlock locks the keyboard and the screen by default.
A password is required to use the Xlock client. The same password is used throughout the entire session. If while using Xlock you forget the password, you must reboot the network computer or reset the server (in Setup) to clear the password and unlock the keyboard and screen.
Starting local XpressWare Window Managerxpsh -display network_computer_name:0 xpwm
Starting Local Clients In The xp.cnf FileUsing the start and/or preload commands in the remote configuration file (xp.cnf), you can determine which local clients are downloaded and/or starteat boot time. The specified clients are loaded into the network computer’s memory and remain there until started. Even after closing the client, it remainin RAM so that it can be restarted again. For information about starting localclients from the remote configuration file, refer to the start and preload commands in Chapter 2, Remote Configuration in the Network Computer Reference Manual.
2 UNIX Installation

Starting Local Clients with rsh
e
nt ts;
If st
nt
Starting Local Clients with rshrsh is a host program used to download local clients to a network computer. rsh sends information to the network computer specifying which local clients to download, however, unlike xpsh, rsh does not receive local client error messages and exit information from the network computer.
Security for rsh is set through the.rhosts file. If user security is not set in the .rhosts file, then users will be able to access all local clients. The rshd_security command in the remote configuration file (xp.cnf) is used to determine whether users can override the security features set by the systemadministrator.
Enabling rshBefore starting local clients with rsh, you must first enable it. To do this, use th start command with the parameter RSDH in the remote configuration file (xp.cnf):
start RSHD Yes
Editing the . rhosts FileThe .rhosts file is used to authenticate user requests to execute local clients. Entries are either positive or negative, depending on the permissions you wato give users. Positive entries enable user to access the specified local cliennegative entries deny access. The entries should include the hostname, username and client name. The order of entries within the files is important. the file contains both positive and negative entries, the entry that appears firtakes precedence.
Examples
For example, the entry below allows user judyl access to the Setup and ClieLauncher clients while logged into the host Sierra:
sierra judyl +setup +launcher
If you do not list specific clients, then all clients are available to the specifieduser:
sierra judyl
UNIX Installation 9-13
Chapter 9 Local Clients
9-1
er r
ny
her
ck
ith
A negative entry means that the client is not available to the user, but all othclients are. For example, user judyl cannot access the Digital Video Player othe Audio Player, but can access any of the other available clients:
sierra judyl -vplay -aplay
You can also use the positive and negative specification for hostname and usernames. In the following example, user paulb can access all clients from aremote host:
+ paulb
In the next example, any user from any host can access the Setup and Launcclients:
+ + +setup +launcher
In the final example, user davidb is not allowed access to the Setup and Xloclients from any host:
+ -davidb +setup +xlock
For details about the .rhosts file, refer to the rhosts man page for your host.
Starting Local Clients with rshrsh uses the same local client options as xpsh. When using rsh to start clients, you do not enter the -display environment variable, and you must use the network computer name instead of an address. For example, to start Setup wrsh:
rsh network_computer_name setup
For details about starting local clients using rsh, refer to the Starting Local Clients with xpsh section earlier in this chapter and substitute rsh for xpsh and omit the -display environment variable and the:0 in all examples.
NOTE: rsh can start all the local clients that xpsh can start, except for the Remote Setup client.
4 UNIX Installation

Client Launcher
g
,
Client LauncherThe local Client Launcher allows users to start local clients by simply selectina client from a menu using the mouse. Figure 9-1 shows a sample Client Launcher menu. The Client Launcher can be configured automatically usingdefault options, or with a customized configuration file. It can be downloadedto the network computer using the remote configuration file (xp.cnf) or using xpsh
.
Figure 9-1 Client Launcher Menu.
Configuring the Client LauncherThere are two ways to configure the Client Launcher: default automatic configuration, or with a specific configuration file. When the Client Launcheris started, if a user-defined configuration file is not specified, it first searches for a system.launcher configuration file. (A sample system.launcher file is located in /tekxp/boot/config.) If that file is not found, it configures automatically.
Automatic Configuration
If there is no configuration file present, the Client Launcher automatically configures and includes the following clients by default: Telnet, TekHostMenuLock Screen, Console, and Setup. Serial Port 0 and/or 1 are included if the network computer has serial ports. If Motif Window Manager, OPENLOOK
UNIX Installation 9-15
Chapter 9 Local Clients
9-1
re
e.
.
in
ed)
r
r
.
Window Manager, TDEnet, LAT, or Tek340 are authorized, they are includedas well. The Audio and Video players are included if authorized and if the required hardware is present.
Configuration FilesThe configuration files are accessed when the Client Launcher starts, and aused to determine which clients are available to users. There are two different types of configuration files:
• The system.launcher file configures multiple network computers so that the clients available on the Client Launcher are the same for all who use the filThis allows a system administrator to control which clients are available tousers.
• A user-defined configuration file customizes the Client Launcher for a user
To create a configuration file:
1. Create a new file, naming it either system.launcher for a system-wide configuration file, or whatever you like for a user-defined file, for example, launch. A sample system.launcher file is located in /tekxp/boot/config.
2. Move the new file to the same directory where the xp.cnf file is located. (The default location is /tekxp/boot/config.)
3. In the file, use a text editor to enter the main Client Launcher menu name uppercase letters.
4. On subsequent lines, enter each of the clients and sub-menu names (if usin double quotation marks to include on the Client Launcher followed by thef.exec or f.menu option:
f.menu specifies that a sub-menu is available with additional options. Foexample, if you have both Motif Window Manager and OPENLOOK Window Manager authorized, you could have a Window Managers entry on the Client Launcher menu that opens asecond menu containing MWM and OLWM. You can use any name or description you like with the f.menu option, however it must end with the letters menu.
f.exec specifies a local client to start immediately upon selecting it. Entethe client name exactly as you would on the xpsh command line, usually with all lower case letters and with double quotation marksFor example, “telnet”, “console”, “setup”, and “mwm”.
6 UNIX Installation

Configuring the Client Launcher
e
ase
ia a
The order in which you enter clients and sub-menus in the configuration fildetermines the order they appear on the Client Launcher.
5. On the last line of the main menu, enter ENDMENU in uppercase letters.
6. Create the submenus, if used, by entering the submenu name in all uppercletters. On subsequent lines, list the clients to include followed by f.exec option in the same manner described in Step 4.
7. On the last line of each sub-menu, enter ENDMENU in uppercase letters.
In the following example, the Client Launcher menu contains the following entries: Sessions (displays a submenu of available session clients), Multimed(displays a submenu), Console, TekHostMenu, Window Managers (displayssubmenu), and Setup.
Example 9-1 Sample Client Launcher Configuration File.
# Configuration file for Client Launcher#MAINMENU"Sessions " f.menu SESSIONS"Multimedia" f.menu MULTIMEDIA"Console " f.exec "console ""HostMenu " f.exec "HostMenu ""Window Managers " f.menu WINDOWS"Setup " f.exec "setup ""Exit " f.exec "quit "ENDMENU
SESSIONS"Serial 0 " f.exec "tip -e tip tty0 ""Telnet 220 " f.exec "xterm -e telnet ""Telnet 340 " f.exec "tek340 -e telnet "ENDMENU
MULTIMEDIA"Audio Player" f.exec "aplay -v 50""Digital Video" f.exec "vplay -v 50""XIE Viewer" f.exec "xieview""Audio Mixer" f.exec "mixer"ENDMENU
UNIX Installation 9-17

Chapter 9 Local Clients
9-1
n,
WINDOWS"MWM" f.exec "mwm""OLWM" f.exec "olwm""XPWM" f.exec "xpwm"ENDMENU
In the previous example, the f.exec option immediately starts a client or sessioand the f.menu option specifies that a submenu is to appear. The word ENDMENU specifies the end of the menu options.
The main Client Launcher menu contains the MAINMENU entries of the configuration file. When Sessions or Window Managers is selected, the appropriate submenu displays.
Downloading the Client LauncherThe Client Launcher can be downloaded using the remote configuration file (xp.cnf) or with xpsh.
Downloading Using the xp.cnf File
The start command in the xp.cnf file can be set to automatically download and start the Client Launcher when the network computer boots. For informationabout the start command and available parameters, refer to Chapter 2, Remote Configuration in the Network Computer Reference Manual.
8 UNIX Installation
Downloading the Client Launcher
Downloading With xpsh
When downloading and starting the Client Launcher using xpsh, the following options can be set:
• -auto Configures the Client Launcher with the automatic default settings even if a configuration file exists
• -file filename Configures the Client Launcher using a user-defined configuration file
• -geometry x, y Configures the position of the Client Launcher. A positive entry (+x, +y) orients from the upper left corner of the display. A negative entry (-x, -y) orients from the lower right corner of the display.
Examples
The following example downloads and starts the Client Launcher with automatic configuration on the network computer sierra:
xpsh -display sierra:0 launcher -auto
The following example downloads and starts the Client Launcher with automatic configuration on the network computer sierra and positions it 30 pixels from the lower right corner:
xpsh -display sierra:0 launcher -auto -geometry -30-30
The following example downloads and starts the Client Launcher, configuringits contents using a user-defined file named launch on the network computer sierra:
xpsh -display sierra:0 launcher -file\ /u1/user3/launch
The following example downloads and starts the Client Launcher, configuringits contents using the system.launcher file on the network computer rocky:
xpsh -display rocky:0 launcher
The following example starts the Client Launcher with the automatic configuration using the start command in the xp.cnf file:
start launcher -auto
UNIX Installation 9-19
Chapter 9 Local Clients
9-2
to
r
Using the Client LauncherOnce the Client Launcher is downloaded, press the Setup key to display theClient Launcher main menu.
NOTE: To start the Client Launcher on a UNIX keyboard, press and hold the AltGraph key (three keys to the right of the space bar) and press the Help/Setup key (at the bottom left of the keyboard).
When the Client Launcher is started, it searches for configuration information in the following order:
• In a user-defined configuration file, if specified
• The system.launcher configuration file
• If neither configuration file is found, the Client Launcher automatically configures by listing all default and authorized clients
To open a client listed on the Client Launcher, simply position the mouse pointer on the client name and click the mouse button once. To open a sub-menu, position the mouse pointer on the menu name. The sub-menu displaysthe right of the Client Launcher main menu (refer to Figure 9-1). Position themouse pointer an item in the sub-menu and click the mouse button once.
If the Client Launcher is iconified, pressing the Setup key displays it again (othe AltGraph and Help/Setup keys on a UNIX keyboard). This is especially useful if the Client Launcher icon is hidden under other open files.
0 UNIX Installation
Authorization Key Manager
ch
e
d
d
Authorization Key ManagerThe Authorization Key Manager enables a system administrator to easily update the authorization keys of several network computers. Authorization keys are used to authorize special options used on the network computer, suas window managers, XIE, TDEnet, and the video player.
Instead of entering each network computer’s authorization key one at a time, you can update and maintain them from a central file. The Manager reads thauthkey.dat file, which contains the authorization keys for those network computers you want to update with new options. When the file is read, thosenetwork computers listed in the authkey.dat file are updated with a new key.
How the Authorization Key Manager Works
The Authorization Key Manager uses SNMP to query specific broadcast addresses and network computers listed in the authkey.dat file, or in the Authorization Key Manager client. Those network computers are then assignea new authorization key, also listed in the authkey.dat file. Therefore, you must have and enable SNMP.
Setting Up SNMPIn the xp.cnf file, use the snmp_comm_list command to set the community list to public and to allow read and write permissions:
snmp_comm_list “host” public RW
where “host” is the host that performs the GET and SET operations when querying the subnet, public is the community string, and RW indicates read anwrite permissions.
UNIX Installation 9-21
Chapter 9 Local Clients
9-2
rs d
s.
)
.
The authkey.dat FileThe authkey.dat file is located in /tekxp/boot/config by default and is empty. Edit the file to contain the broadcast address to query, the network computeto update, and the new authorization keys. The following parameters are usein the authkey.dat file:
broadcast specify the broadcast address to query using SNMP.
terminal for each network computer you want to update with a newauthorization key, enter its hardware address.
authorization key For each network computer, enter the authorization key. Each network computer must have a unique authorizationkey.
The example below shows a sample authkey.dat file:
broadcast 144.67.33.255terminal 08:00:34:94:33:EJ JAB(4%>3+[=T;fjqcterminal 08:46:22:69:47:32 AK)&AMB@.?JTOR&]\terminal 08:42:90:00:31:69 Jk%3+=]klw\jvv<?!terminal 08:47:35:69:21:21 Uu$^qvuIi#=/>1GLq
Starting the Authorization Key ManagerYou can update authorization keys automatically with the xp.cnf file (and the authkey.dat file), or you can open the Authorization Key Manager client. The client provides a user interface where you can enter and delete authorization key and network computer information before updating the authorization key
Updating the Authorization Key When Booting
To automatically update authorization keys when booting, edit the xp.cnf file to uncomment the update_authkey command. The network computer reads the authkey.dat file when booting and updates the network computer and authorization key information. (Be sure that SNMP is available and enabled.
Starting the Authorization Key Manager Client With xpsh
Use xpsh to open the Authorization Key Manager client as shown in Figure 1The client’s interface allows you to add and delete information from the authkey.dat file, and to force the authkey.dat file to be read without having to reboot the network computer.
2 UNIX Installation
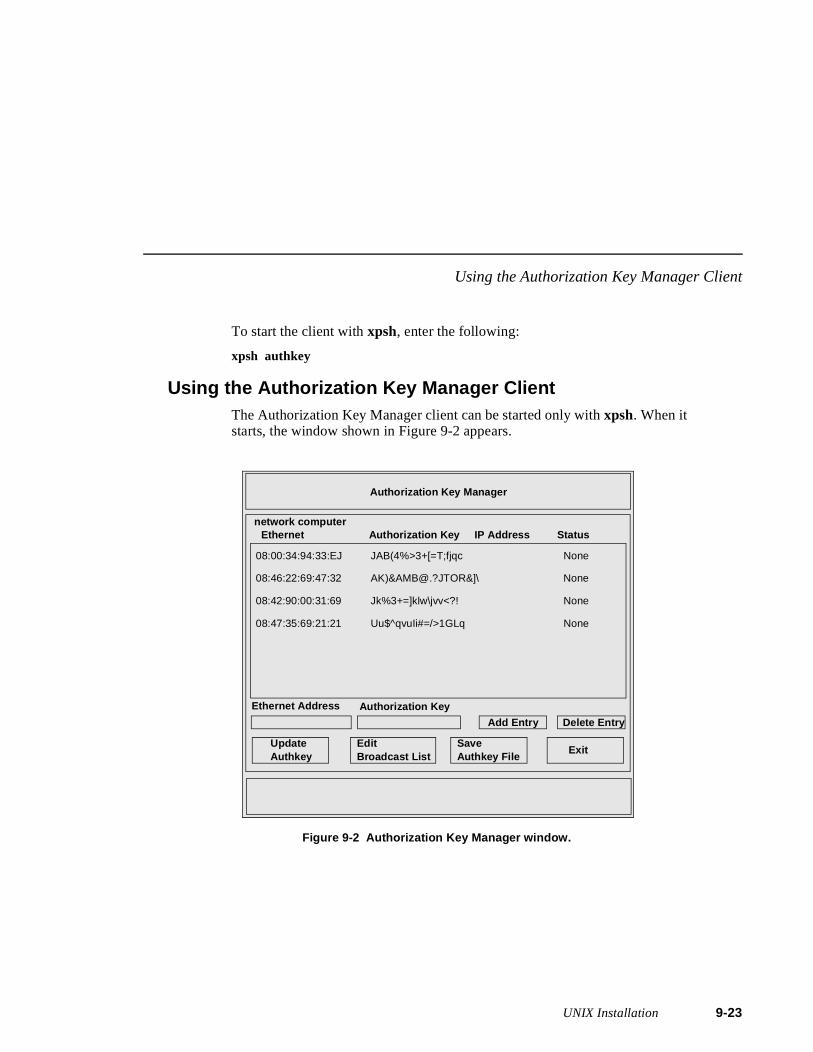
Using the Authorization Key Manager Client
To start the client with xpsh, enter the following:
xpsh authkey
Using the Authorization Key Manager ClientThe Authorization Key Manager client can be started only with xpsh. When it starts, the window shown in Figure 9-2 appears.
Figure 9-2 Authorization Key Manager window.
Authorization Key Manager
Add Entry
network computer
Delete Entry
Exit
Ethernet Authorization Key IP Address Status
Ethernet Address Authorization Key
SaveAuthkey File
EditBroadcast List
UpdateAuthkey
08:00:34:94:33:EJ JAB(4%>3+[=T;fjqc None
08:46:22:69:47:32 AK)&AMB@.?JTOR&]\ None
08:42:90:00:31:69 Jk%3+=]klw\jvv<?! None
08:47:35:69:21:21 Uu$^qvuIi#=/>1GLq None
UNIX Installation 9-23
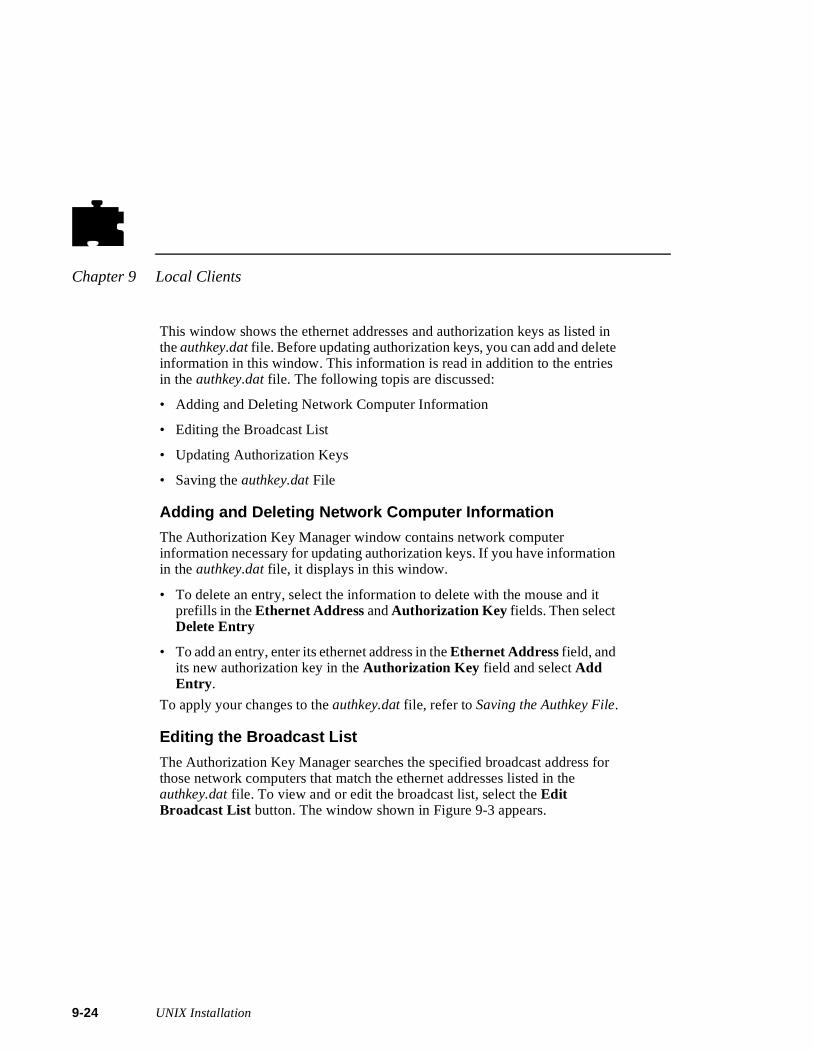
Chapter 9 Local Clients
9-2
in
r
This window shows the ethernet addresses and authorization keys as listed the authkey.dat file. Before updating authorization keys, you can add and deleteinformation in this window. This information is read in addition to the entries in the authkey.dat file. The following topis are discussed:
• Adding and Deleting Network Computer Information
• Editing the Broadcast List
• Updating Authorization Keys
• Saving the authkey.dat File
Adding and Deleting Network Computer Information
The Authorization Key Manager window contains network computer information necessary for updating authorization keys. If you have informationin the authkey.dat file, it displays in this window.
• To delete an entry, select the information to delete with the mouse and it prefills in the Ethernet Address and Authorization Key fields. Then select Delete Entry
• To add an entry, enter its ethernet address in the Ethernet Address field, and its new authorization key in the Authorization Key field and select Add Entry .
To apply your changes to the authkey.dat file, refer to Saving the Authkey File.
Editing the Broadcast List
The Authorization Key Manager searches the specified broadcast address fothose network computers that match the ethernet addresses listed in the authkey.dat file. To view and or edit the broadcast list, select the Edit Broadcast List button. The window shown in Figure 9-3 appears.
4 UNIX Installation
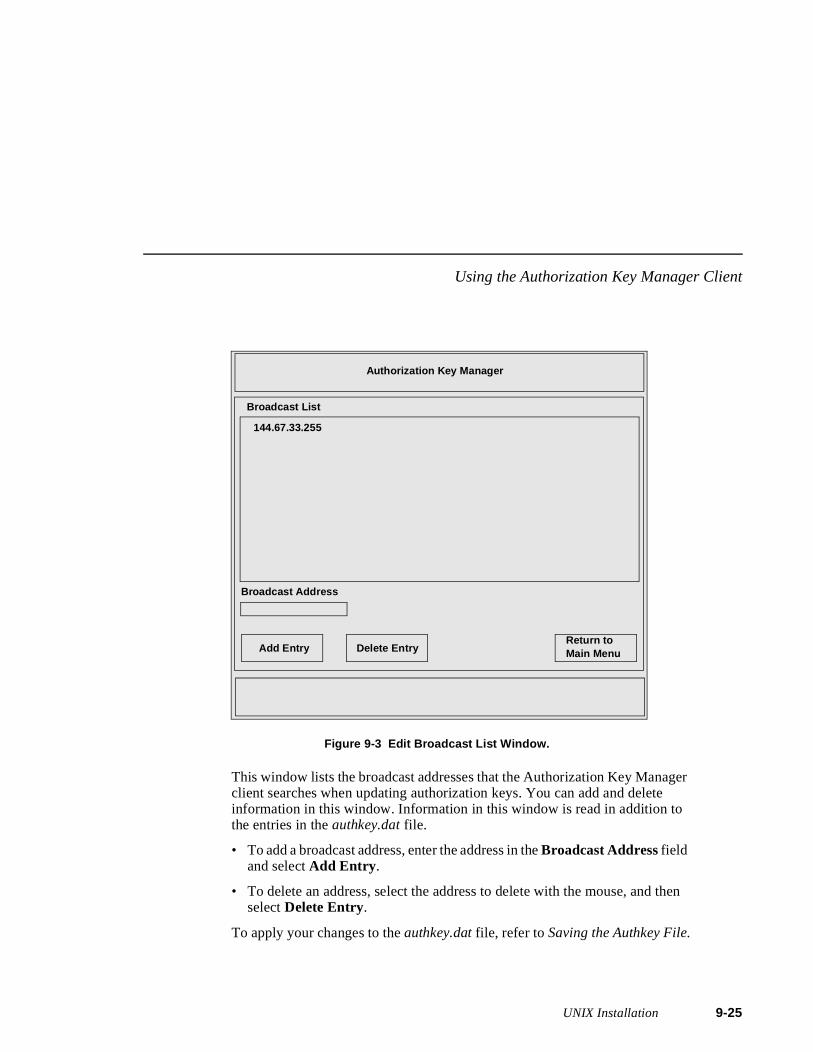
Using the Authorization Key Manager Client
er
en
Figure 9-3 Edit Broadcast List Window.
This window lists the broadcast addresses that the Authorization Key Managclient searches when updating authorization keys. You can add and delete information in this window. Information in this window is read in addition to the entries in the authkey.dat file.
• To add a broadcast address, enter the address in the Broadcast Address field and select Add Entry .
• To delete an address, select the address to delete with the mouse, and thselect Delete Entry.
To apply your changes to the authkey.dat file, refer to Saving the Authkey File.
Authorization Key Manager
Add Entry
Broadcast List
Delete EntryReturn toMain Menu
Broadcast Address
144.67.33.255
UNIX Installation 9-25

Chapter 9 Local Clients
9-2
ful ect
ast
Updating Authorization Keys
When the correct information is in the Authorization Key Manager window, select the Update Authkey button. The authorization keys are updated for those network computers listed.
The update status for each network computer is displayed as either Successor Unreachable. If the status is Unreachable, check that you entered the correthernet and authorization key information. Make sure also that you have SNMP enabled.
Saving the Authkey File
After making changes to the ethernet addresses, authorization key, or broadcinformation, you can save those changes to the authkey.dat file. To save changes, select Save Authkey File. The window shown in Figure 9-4 appears.
6 UNIX Installation
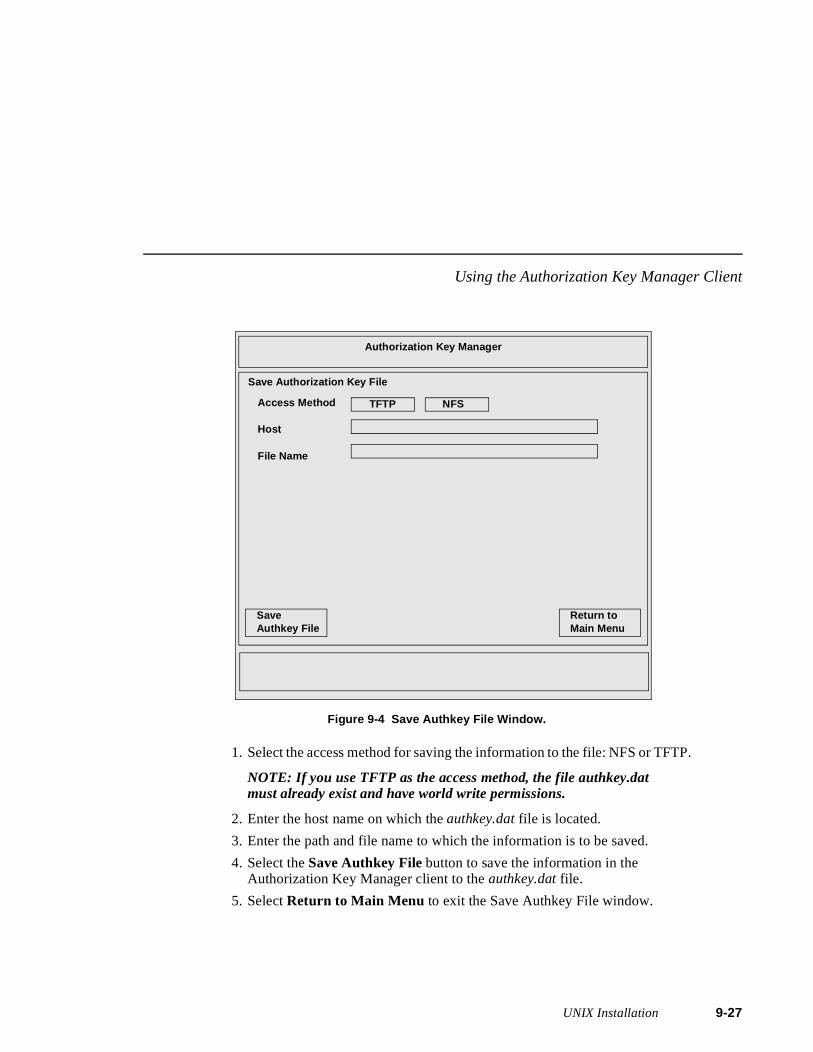
Using the Authorization Key Manager Client
P.
Figure 9-4 Save Authkey File Window.
1. Select the access method for saving the information to the file: NFS or TFT
NOTE: If you use TFTP as the access method, the file authkey.dat must already exist and have world write permissions.
2. Enter the host name on which the authkey.dat file is located.
3. Enter the path and file name to which the information is to be saved.
4. Select the Save Authkey File button to save the information in the Authorization Key Manager client to the authkey.dat file.
5. Select Return to Main Menu to exit the Save Authkey File window.
Authorization Key Manager
Save Authorization Key File
Return toMain Menu
Access Method
Host
File Name
TFTP NFS
SaveAuthkey File
UNIX Installation 9-27
Chapter 9 Local Clients
9-2
r’s
Setting up XIEX Imaging Extension (XIE) is a standard extension to the X11 Window System.XIE is a library of support routines to add image enhancements and display operations to applications. XIE programmer documentation is available fromMIT.
The XIE server is a network computer option. If the XIE option is available andenabled, the XIE server is downloaded and attached to the network computeX server. The XIE server requires approximately 400K of memory. XIE mustbe authorized for the network computer, and then enabled through Setup or the remote configuration file.
XIE AuthorizationUse Setup to verify if XIE is authorized. There are two ways to verify XIE:
• Drag on Configuration Summaries and release on X Environment. If the Enable XIE option appears on the screen, XIE is authorized.
• Drag on Statistics and release on Options. If XIE is listed, it is authorized.
If XIE was factory-loaded, the authorization key is already entered and XIE should be available. If XIE was purchased separately, the authorization key must be entered at the network computer Boot Monitor with the Authorize command. See Chapter 4 Boot Monitor of the Network Computer Reference manual.
Enabling XIEXIE can be enabled through Setup or in the remote configuration file. In Setup, drag on Configuration Summaries and release on X Environment. The Enable XIE option should be Yes. In the xp.cnf file, use enable_xie.
To automatically download XIE each time the network computer is booted, enable XIE and then use Save Current Settings. To download XIE on demand, enter Setup and enable it, but do not select Save Current Settings. As soon as it is enabled, XIE is downloaded.
To unload XIE from the server, enter Setup and disable it (use Save Current Settings if you previously saved XIE as enabled), then reboot the network computer.
8 UNIX Installation
Setting up XBlink
to
5.
Setting up XBlinkXBlink provides the ability to cause graphics primitives to blink using a set ofdynamically loadable X extension functions. By modifying applications to callthese functions, a graphic element, such as text or a line, can alternate colorscreate a blinking affect. For example, to create the blink affect, a function could be called passing in blue/yellow and 500/500 milliseconds, and return index If text is drawn with color index 5, then every 500 milliseconds the text wouldalternate between the colors blue and yellow.
The XBlink Extension is applicable only for PseudoColor, DirectColor and GrayScale visuals.
XBlink AuthorizationXBlink must be authorized for use on a network computer. To use Setup to verify if XBlink is authorized, drag on Statistics and release on Options. If XBlink is listed, it is authorized.
If XBlink was factory-loaded, the authorization key is already entered and XBlink should be available. If XBlink was purchased separately, the authorization key must be entered at the network computer Boot Monitor with the Authorize command. See Chapter 4 Boot Monitor of the Network Computer Reference manual.
Enabling XBlinkXBlink is enabled in the remote configuration file with the enable_xblink command. Uncomment the command in the xp.cnf file, set the parameter to YES, and reboot the network computer.
enable_xblink YES
To unload XBlink from the server, comment out the enable_xblink command, or set its parameter to NO. Reboot the network computer.
Using XBlinkFor details about the XBlink feature and its functions, refer to the xblink man page, documented in Appendix C of the Network Computer Reference manual.
UNIX Installation 9-29
Chapter 9 Local Clients
9-3
e ct
Setting Up the XPT/A Graphics TabletThe XPT/A graphics tablet provides a way to input graphics into your networkcomputer applications. Using the graphics tablet with an appropriate networkcomputer application, you can digitize and insert images, control cursor movements, and make menu selections.
NOTE: The network computer must have a serial port in order to connect the XPT/A Graphics Tablet
1. Install the graphics tablet using the procedure in the XPT/A Graphics Tablet manual.
2. Specify the device description file for each port that a device will be connected using either the remote configuration file or Setup:
- In the remote configuration file, use the input_ext_config_file_0 or input_ext_config_file_1 command to specify the device description file. Refer to Chapter 2: Remote Configuration in the Network Computer Reference manual.
- In Setup, drag on Configuration Summaries and release on Input Extension. Select the device connected to the appropriate port using thDevice on Serial Port 0 or Device on Serial Port 1 option, and then selethe core pointer using the Select Core Pointer Device option.
0 UNIX Installation
Touchscreen Calibration Client
ing
d
Touchscreen Calibration ClientThe Trident Touchscreen Calibration Client enables you to calibrate the touchscreen. The Calibration Client is shown in Figure 9-5.
Figure 9-5 Calibration Client.
To invoke the Calibration Client, first map it to a keysym using the keysym_action_entry command. For example, to invoke the client with the F1 key, enter the following in the xp.cnf file:
keysym_action_entry F1 TOUCH_CALIBRATE ALL
Touchscreen jitter can be controlled with the touchSc_Jitter command:
touchSc_Jitter 4 # touch screen jitter control
In this example, the 4 indicates that a change of less than 5 pixels when touchthe screen will not move the cursor.
The Calibration Client includes the following elements:
NOTE: Not all elements are available on all touchscreen devices. Only those elements needed for your touchscreen appear.
Up Threshold — controls the touch up threshold
Down Threshold — controls the touch down threshold
Jitter Control — controls the jitter and SAW touchscreen pressure threshol
OutOfBounds Data — controls the out of bounds data
Calibrate
Up Threshold: 4
Jitter Control: 4
Down Threshold: 1
OutOfBounds Data: 0
Normal Mode
UNIX Installation 9-31
Chapter 9 Local Clients
9-3
a
ase
he
is
Normal Mode — controls the different touch modes. The available modes are:
- Normal Mode: user touching the screen generates a button press; userdragging his finger generates a button press motion (like pressing the mouse button and dragging the mouse), user lifting his finger generatesbutton release event.
- Point Mode: user touching the screen generates a button press and releevent immediately.
- Tap Mode: allows the touchscreen to operate like a mouse. The user touching the screen generates a motion event allowing the user to drag tcursor around the screen (like moving the mouse). Lifting his finger fromthe screen and touching the screen again within a predefined time limit(about 1/4 second) causes a button press event (like pressing a mousebutton). The user can now move his finger around the screen causing button press motion events (like pressing the mouse button and movingthe mouse simultaneously). Removing his finger from the screen generates a button release event (like releasing the mouse button).
- Release Mode: creates motion events as the user touches the screen anddrags his finger. When the user removes his finger, a button press eventgenerated, followed immediately by a button release event.
2 UNIX Installation
Common Desktop Environment
ser
ces st
s:
r
Common Desktop EnvironmentThe Common Desktop Environment (CDE) is a collection of software standards which defines an integrated, standard, and consistent graphical uinterface desktop environment.
CDE enables the network computer user to interact with a common environment even though the network computer may be connected to a heterogeneous network. It gives the user a common way of accessing resour(printers, viewers, applications, etc.) that is independent of any particular hoon the network. In addition, CDE allows some services, such as the windowmanager, to be run locally, thus reducing the load on the host.
The window manager component of TriTeal’s CDE implementation, called TED, has been ported to NCD network computers. TED consists of two partone running on the host, the other, known as local TED/CDE, running on thenetwork computer.
Requirements
The following requirements are needed to use local TED/CDE:
• You must have an appropriately licensed version of TED 4.0 running on youhost. Contact TriTeal to acquire a copy of TED which supports local TED.
• TED requires the network computer to have at least 12 MB of RAM, although your usage of TED may require more memory
• The /usr/dt/config/xfonts/C directory must be accessible to the network computer. This directory contains a fonts.alias file used by CDE.
• A network computer authorization key is required to use local CDE
UNIX Installation 9-33
Chapter 9 Local Clients
9-3
Starting the Local TED/CDE ClientTo load the local dtwm window manager from dtlogin, each user must perform the following steps:
NOTE: Be sure that tftp is enabled on the server if you will be using it to load the fonts.
1. Change directories to the /examples directory.
cd <install_dir> /tekxp/examples
2. Execute the setup script for local TED:
# setup4localted
The setup script prompts you for the name of your host, the name of the network computer, the path to dtpeer, and the path to xpsh. For all but thenetwork computer name, the script attempts to provide defaults. You can override these defaults.
The script creates the following directory:
$HOME/.dt/bin/<host_name>/<network_computer_name>
In this directory, the script creates a link to dtpeer called dtwm, and a link to xpsh called xpsh.
3. Logout and log back in.
When dtsession is run, the session manager loads the local dtwm and connects with the peer. If this fails, the default host dtwm is run.
4. Make sure the network computer’s name is fully qualified on the host machine in the file /etc/hosts. The entry should be this format:
<IP Address> <network_computer_name> <network_computer_name>.<domain_name>
For example,
134.62.10.199 twinkle twinkle.tek.com
4 UNIX Installation
Starting the Local TED/CDE Client
e
Troubleshooting
If you experience problems, do the following:
• To determine if local TED is locating the host, look for the following message in the Console:
Peer has been initialized and we can start dtwm.
Numerous "Cannot open file:" messages appear in the Console window. Disregard these messages.
If local TED cannot locate the host, the following message appears:
No host entry for <hostname>No socket.
• The dt peer waits for up to several minutes for the local dtwm to start. To confirm that you are using the local dtwm, check the Workspace Menu to see which dtwm was loaded. (Click on the right mouse button anywhere onthe background to bring up the menu.) The Restart Workspace Manager... item should be grayed out.
• Make sure that the network computer name is defined in Setup’s TCP/IP Configuration Menu
• The host must be included in Setup’s Internet Host Table, or Domain NamService (DNS) must be enabled and configured
• Make sure that /var/dt is writable
• Look at the files $HOME/.dt/startlog and $HOME/.dt/errorlog for any suspicious messages and correct the indicated problems
• Make sure tftp is enabled on the host
• The directory /usr/dt/config/xfonts/C must be accessible
• Check the gateway and name server addresses
• Check that the network computer name and address do not conflict with others on the network
UNIX Installation 9-35
Chapter 9 Local Clients
9-3
6 UNIX Installation
Chapter
10le,
led
Window Managers
This chapter describes the local window managers available on the network computer. These window managers are: Motif Window Manager (MWM), OpenLook Window Manager (OLWM), and XP Window Manager (XPWM).
Setting Up Local MWMStarting local Motif Window Manager (MWM) from your host allows MWM to access the configuration and resource files in a standard location, for exampthe $HOME directory. It also allows you to customize the window manager menus and to define menu selections that include host commands. For detaiinformation about MWM configuration, refer to the MWM man page located in /tekxp/man by default.
colossus
Good morning
Mr. Forbin.....
guardian
/etc/hosts
10-1
Chapter 10 Window Managers
10
Starting Local MWMEnter the following command in the user’s session start up file.
xpsh -display displayname:0.0 mwm
This assumes that xpsh is in your search path. The default search path is /tekxp/bin/<host>. You need not specify -display displayname:0.0 if you have set the DISPLAY environment variable.
NOTE: You can also start local MWM using the remote configuration file or the Client Launcher. However, these methods do not allow MWM access to the system-level and user-level customization files on your host.
Starting MWM With The xp.cnf FileThe start and preload commands in the xp.cnf file can be used to start MWM. For details about these commands, refer to Chapter 2, Remote Configuration in the Network Computer Reference Manual.
Starting MWM With the Client LauncherThe Client Launcher can be customized to include those clients that you usemost often. If authorized, MWM is listed on the Client Launcher by default aspart of the Window Managers sub-menu. To start MWM, move the mouse pointer to MWM and click the mouse button. For information about the ClientLauncher, refer to the Client Launcher section in Chapter 9: Local Clients.
Accessing MWM Configuration FilesWhen starting local MWM using xpsh, using the -access xpsh command line option enables local MWM to access full resource and file access as if it was started from a host. For example, the following line starts local MWM and accesses system-level and user-level customization files on the host:
xpsh -access xpsh mwm
Accessing the MWM Resource Description FileMWM searches for a resource description file in this order:
1. The value of the MWM configFile resource
2. $HOME/$LANG/.mwmrc
-2
Accessing the MWM Resource Description File
,
ding
3. $HOME/.mwmrc
4. /usr/lib/X11/$LANG/system.mwmrc
5. /usr/lib/X11/system.mwmrc
If MWM does not find a resource description file in one of the above locationsit defaults to a language-specific defaults file under the boot directory, typically, /tekxp/boot/<language>/system.mwmrc. The <language> variable is determined by the language command in the remote configuration file, or in Setup. To see the current language setting, enter Setup and look at the Language option. A sample system.mwmrc file is located in /tekxp/examples/mwm.
Creating a Local MWM Resource Description File
You can copy the system.mwmrc file to your home directory and then modify the file to customize your Motif environment. Table 10-1 shows the functionsyou can add to the file.
Table 10-1 MWM Functions.
Function Description
f.beep Causes a beep
f.cci Controls the placement and naming of client-command interface (CCI)commands generated by applications
f.circle_down Moves the top window to the bottom of the window stack
f.circle_up Moves the bottom window to the top of the window stack
f.exec or ! Executes the following shell command
f.focus_color Sets the colormap focus to a window
f.focus_key Sets the keyboard input focus to a window
f.goto Moves the root window to a specified location
f.kill Kills an application and its window
f.lower Moves a window to the bottom of the window stack
f.maximize Maximizes a window
f.menu Activates the named menu. This function can be used to create cascaand Popup Menus
f.minimize Iconifies a window
f.move Starts an interactive move for a window
10-3
Chapter 10 Window Managers
10
ck
size
l size
ith
,
top
ny
f.next_cmap Installs the next colormap
f.next_key Moves the keyboard input focus to the next window in the window sta
f.nop Does nothing
f.normalize Causes an icon or a maximized window to be displayed at its normal
f.normalize_and_raise Causes an icon or a maximized window to be displayed at its normaand raised to the top of the window stack
f.pack_icons Reorganizes the icons according to the current icon placement policy
f.pan Moves the root window a specified amount
f.pass_keys Toggles the use of special key bindings
f.post_wmenu Posts the Window Menu
f.prev_cmap Installs the previous colormap in the list of colormaps for the window wthe colormap focus
f.prev_key Moves the keyboard input focus to the previous window in the windowstack
f.quit_mwm Exits the window manager without exiting the X Window System
f.raise Raises a window to the top of the window stack
f.raise_lower If obscured, raises a window to the top of the window stack; otherwiselowers it to the bottom of the window stack
f.refresh Redraws all the windows on the screen
f.refresh_win Redraws a single window
f.resize Starts an interactive resize for a window
f.restart Stops and restarts the window manager
f.restore Restores an iconified window to its previous state
f.restore_and_raise Restores an iconified window to its previous state and raises it to theof its stack
f.screen Moves a pointer to a specific screen
f.send_msg Sends a client message to the application
f.separator Draws a separator in a menu pane
f.set_behavior Restarts the window manager with the default behavior or reverts to acustom behavior
f.title Inserts a title in a menu pane
f.track_pan Continuously moves the root window in the direction of the mouse
Table 10-1 MWM Functions. (Continued)
Function Description
-4
Accessing the MWM Defaults File
e
ple
in
Accessing the MWM Defaults FileMWM is configured from its resource database. This database is built from thfollowing sources, listed in the order that MWM accesses them.
1. MWM command line options
2. File specified by the XENVIRONMENT environment variable, if it set;otherwise$HOME/.Xdefaults-terminal_name, if it exists
These values do not override the existing values in the database.
3. RESOURCE_MANAGER root window property, if it is set;otherwise$HOME/.Xdefaults, if it exists
The RESOURCE_MANAGER is typically set with the xrdb command. These values do not override the existing values in the database. An exam.Xdefaults file is shown in Example 10-1.
4. The user’s application specific app-defaults file;
$HOME/$LANG/Mwm, if it exists;otherwise$HOME/Mwm
The actual location of this file depends on the XUSERFILESEARCHPATHand XAPPLRESDIR environmental variables. These values do not override the existing values in the database.
5. The application’s specific app-defaults file;
/usr/lib/X11/$LANG/app-defaults/Mwm, if it exists;otherwise/usr/lib/X11/app-defaults/Mwm
The actual location of this file depends on the XFILESEARCHPATH environmental variable. These values do not override the existing values the database.
If none of the above application specific app-defaults files are found, MWM defaults to a language-specific defaults file from the boot configuration directory, typically, /tekxp/boot. The language is specified by the Language command in the remote configuration file (xp.cnf), or in Setup. To see the current language setting, enter Setup and look at the Language option.
10-5
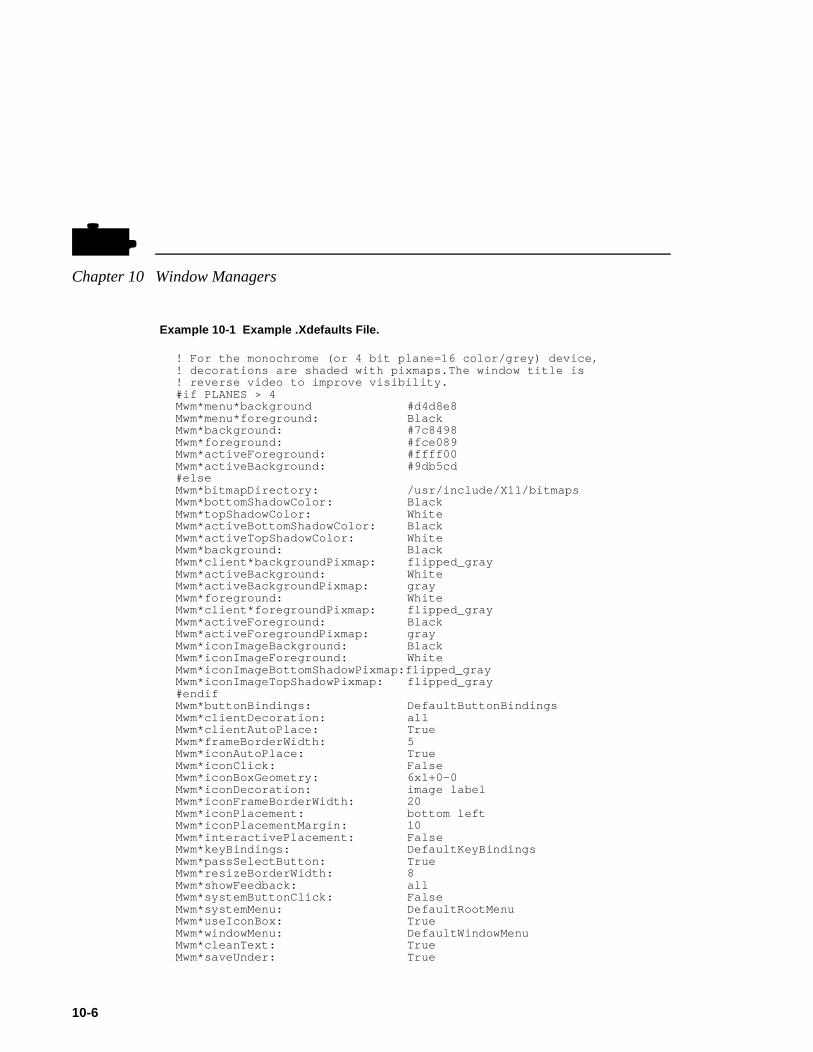
Chapter 10 Window Managers
10
Example 10-1 Example .Xdefaults File.
! For the monochrome (or 4 bit plane=16 color/grey) device,! decorations are shaded with pixmaps.The window title is ! reverse video to improve visibility.#if PLANES > 4Mwm*menu*background #d4d8e8Mwm*menu*foreground: BlackMwm*background: #7c8498Mwm*foreground: #fce089Mwm*activeForeground: #ffff00Mwm*activeBackground: #9db5cd#elseMwm*bitmapDirectory: /usr/include/X11/bitmapsMwm*bottomShadowColor: BlackMwm*topShadowColor: WhiteMwm*activeBottomShadowColor: BlackMwm*activeTopShadowColor: WhiteMwm*background: BlackMwm*client*backgroundPixmap: flipped_grayMwm*activeBackground: WhiteMwm*activeBackgroundPixmap: grayMwm*foreground: WhiteMwm*client*foregroundPixmap: flipped_grayMwm*activeForeground: BlackMwm*activeForegroundPixmap: grayMwm*iconImageBackground: BlackMwm*iconImageForeground: WhiteMwm*iconImageBottomShadowPixmap:flipped_grayMwm*iconImageTopShadowPixmap: flipped_gray#endifMwm*buttonBindings: DefaultButtonBindingsMwm*clientDecoration: allMwm*clientAutoPlace: TrueMwm*frameBorderWidth: 5Mwm*iconAutoPlace: TrueMwm*iconClick: FalseMwm*iconBoxGeometry: 6x1+0-0Mwm*iconDecoration: image labelMwm*iconFrameBorderWidth: 20Mwm*iconPlacement: bottom leftMwm*iconPlacementMargin: 10Mwm*interactivePlacement: FalseMwm*keyBindings: DefaultKeyBindingsMwm*passSelectButton: TrueMwm*resizeBorderWidth: 8Mwm*showFeedback: allMwm*systemButtonClick: FalseMwm*systemMenu: DefaultRootMenuMwm*useIconBox: TrueMwm*windowMenu: DefaultWindowMenuMwm*cleanText: TrueMwm*saveUnder: True
-6
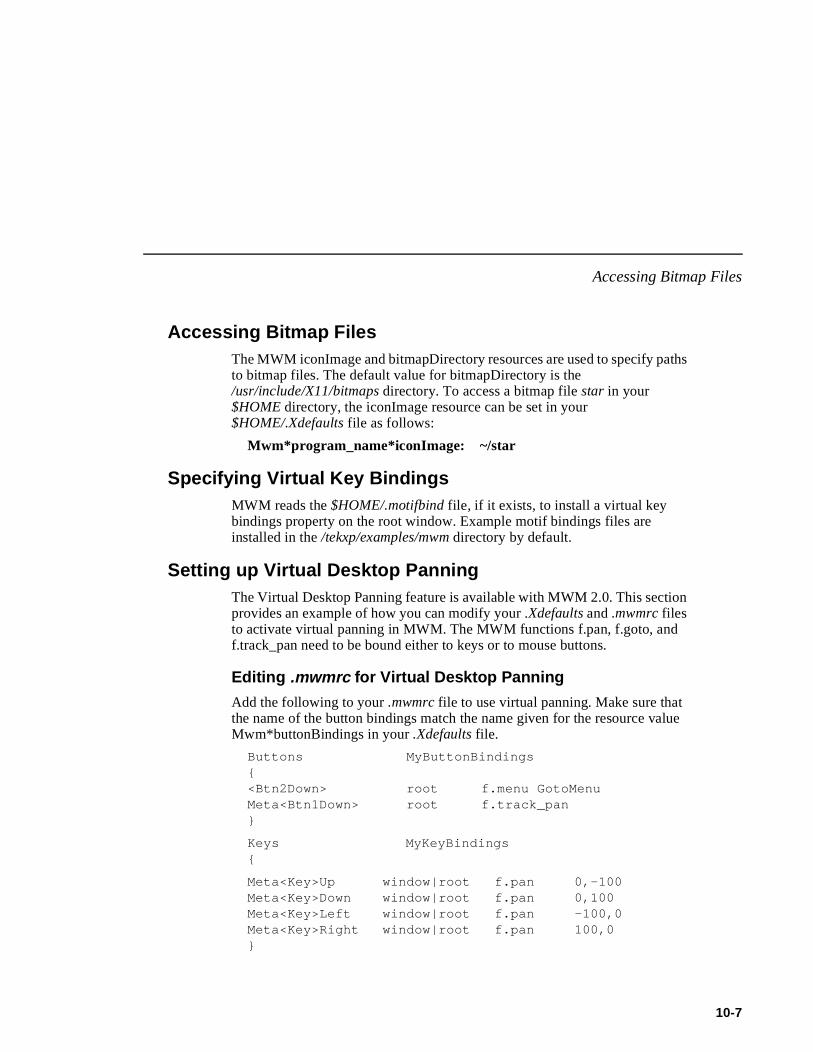
Accessing Bitmap Files
s
e
Accessing Bitmap FilesThe MWM iconImage and bitmapDirectory resources are used to specify pathto bitmap files. The default value for bitmapDirectory is the /usr/include/X11/bitmaps directory. To access a bitmap file star in your $HOME directory, the iconImage resource can be set in your $HOME/.Xdefaults file as follows:
Mwm*program_name*iconImage: ~/star
Specifying Virtual Key BindingsMWM reads the $HOME/.motifbind file, if it exists, to install a virtual key bindings property on the root window. Example motif bindings files are installed in the /tekxp/examples/mwm directory by default.
Setting up Virtual Desktop PanningThe Virtual Desktop Panning feature is available with MWM 2.0. This sectionprovides an example of how you can modify your .Xdefaults and.mwmrc files to activate virtual panning in MWM. The MWM functions f.pan, f.goto, and f.track_pan need to be bound either to keys or to mouse buttons.
Editing .mwmrc for Virtual Desktop Panning
Add the following to your.mwmrc file to use virtual panning. Make sure that the name of the button bindings match the name given for the resource valuMwm*buttonBindings in your.Xdefaults file.
Buttons MyButtonBindings{ <Btn2Down> root f.menu GotoMenuMeta<Btn1Down> root f.track_pan}
Keys MyKeyBindings{
Meta<Key>Up window|root f.pan 0,-100Meta<Key>Down window|root f.pan 0,100Meta<Key>Left window|root f.pan -100,0Meta<Key>Right window|root f.pan 100,0}
10-7
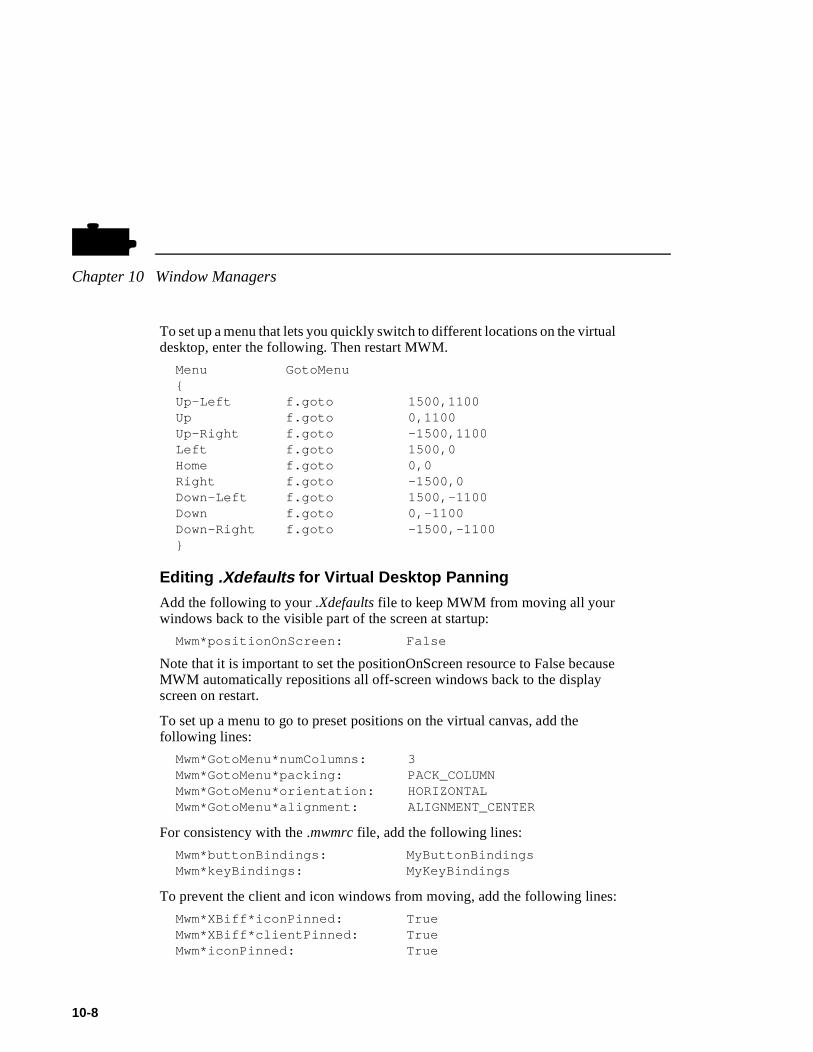
Chapter 10 Window Managers
10
l
se
:
To set up a menu that lets you quickly switch to different locations on the virtuadesktop, enter the following. Then restart MWM.
Menu GotoMenu{Up-Left f.goto 1500,1100Up f.goto 0,1100Up-Right f.goto -1500,1100Left f.goto 1500,0Home f.goto 0,0Right f.goto -1500,0Down-Left f.goto 1500,-1100Down f.goto 0,-1100Down-Right f.goto -1500,-1100}
Editing .Xdefaults for Virtual Desktop Panning
Add the following to your.Xdefaults file to keep MWM from moving all your windows back to the visible part of the screen at startup:
Mwm*positionOnScreen: False
Note that it is important to set the positionOnScreen resource to False becauMWM automatically repositions all off-screen windows back to the display screen on restart.
To set up a menu to go to preset positions on the virtual canvas, add the following lines:
Mwm*GotoMenu*numColumns: 3Mwm*GotoMenu*packing: PACK_COLUMNMwm*GotoMenu*orientation: HORIZONTALMwm*GotoMenu*alignment: ALIGNMENT_CENTER
For consistency with the .mwmrc file, add the following lines:
Mwm*buttonBindings: MyButtonBindingsMwm*keyBindings: MyKeyBindings
To prevent the client and icon windows from moving, add the following lines
Mwm*XBiff*iconPinned: TrueMwm*XBiff*clientPinned: TrueMwm*iconPinned: True
-8
Troubleshooting MWM
. If
t
of
Troubleshooting MWMThis section contains some information on possible solutions to correct some common MWM problems:
• If MWM does not come up at all:
- Your DISPLAY environment variable may not be set correctly. The DISPLAY environment variable may be set to unix:0, as in a configuration file such as $HOME/.cshrc. You may see output directed to your host display, instead of to the network computer.
- Your local MWM authorization key may not be entered. To check your enabled options, press Setup. Drag on Statistics and release on Optionsmwm is not there, enter the correct authorization key at the Boot Monitor. Refer to Chapter 4: Boot Monitor of the Network Computer Reference Manual.
- If you start MWM with xpsh and it fails to execute clients from the MWM menus, make sure that the path to the client is in the xpsh environment.
- Check the console window for a message indicating that there is not enough memory to run MWM. Increase the amount of available memory if necessary.
• If you customize a file which is read by local MWM but the changes are noreflected when you run MWM:
- Make sure the customized file has world read permissions.
- If the file is accessed using TFTP, make sure you are using the version xpsh included with the software version 6.1 or greater. If you are using anearlier version of xpsh, enter your hostname in the Internet host table.
• Do not kill an xpsh process that invoked MWM with a -9 (SIGKILL) signal. Neither MWM nor xpsh can clean up before they exit. Use kill -15 (SIGTERM) instead.
• If your keyboard has neither a Meta key nor an Alt key, use the xmodmap command to display and modify the values of mapped keys, including thekey mapped to mod1, which MWM uses for Meta or Alt.
10-9
Chapter 10 Window Managers
10
t
s
Starting OLWM With The xp.cnf File
The start and preload commands in the xp.cnf file can be used to start OLWM. For details about these commands, refer to Chapter 2, Remote Configuration in the Network Computer Reference Manual.
Starting OLWM With the Client LauncherThe Client Launcher can be customized to include those clients that you usemost often. If authorized, OLWM is listed on the Client Launcher by default as part of the Window Managers sub-menu. To start OLWM, move the mouse pointer to OLWM and click the mouse button. For information about the ClienLauncher, refer to the Client Launcher section in Chapter 9: Local Clients.
When starting local OLWM using xpsh, using the -access xpsh command line option enables OLWM to access full resource and file access as if it was started from a host. For example, the following line starts local OLWM and accessesystem-level and user-level customization files on the host:
xpsh -access xpsh olwm
-10
Setting Up XP Window Manager
e g
Setting Up XP Window ManagerXP Window Manager (XPWM) is a local window manager available with thenetwork computer. XPWM provides a basic window manager that uses a minimum amount of network computer memory.
Accessing the XPWM Defaults FileXPWM is configured from its resource database. This database is built from thfollowing sources, listed in the order that XPWM accesses them (the last settintakes precedence over the first).
1. RESOURCE_MANAGER root window property, if it is set
The RESOURCE_MANAGER is typically set with the xrdb command. These values do not override the existing values in the database.
2. The application’s specific app-defaults file;
/usr/lib/X11/<language>/app-defaults/xpwm
3. XPWM default values
Starting the XP Window ManagerXPWM can be started with xpsh, from the remote configuration file (xp.cnf), or from the Client Launcher.
Starting XPWM With xpsh
Enter the following command in the user’s session start up file.
xpsh -display displayname:0.0 xpwm
This assumes that xpsh is in your search path. The default search path is /tekxp/bin/<host>.
NOTE: You need not specify -display displayname:0.0 if you have set the DISPLAY environment variable.
Starting XPWM With the xp.cnf File
The start and preload commands in the xp.cnf file can be used to start XPWM. For details about these commands, refer to Chapter 2, Remote Configuration in the Network Computer Reference Manual.
10-11

Chapter 10 Window Managers
10
o ,
w
Starting XPWM With the Client Launcher
The Client Launcher can be customized to include those clients that you usemost often. The XPWM is listed on the Client Launcher by default as part of the Window Managers sub-menu. To start XPWM, move the mouse pointer tXPWM and click the mouse button. For information about the Client Launcherrefer to the Client Launcher section in Chapter 9: Local Clients.
Using XPWMYou use XPWM much like any other window manager. The windows have many of the same elements as Motif Window Manager and OpenLook WindoManager. Figure 5-9 shows a sample XPWM window and its elements.
Figure 10-1 Elements of an XPWM Window.
Icon
IconifyButton
Title Bar Resize ButtonWindow Name
8049-144
Scroll BarWindow withInput Focus
xterm
eagle>
xterm
TEK
TEK
-12
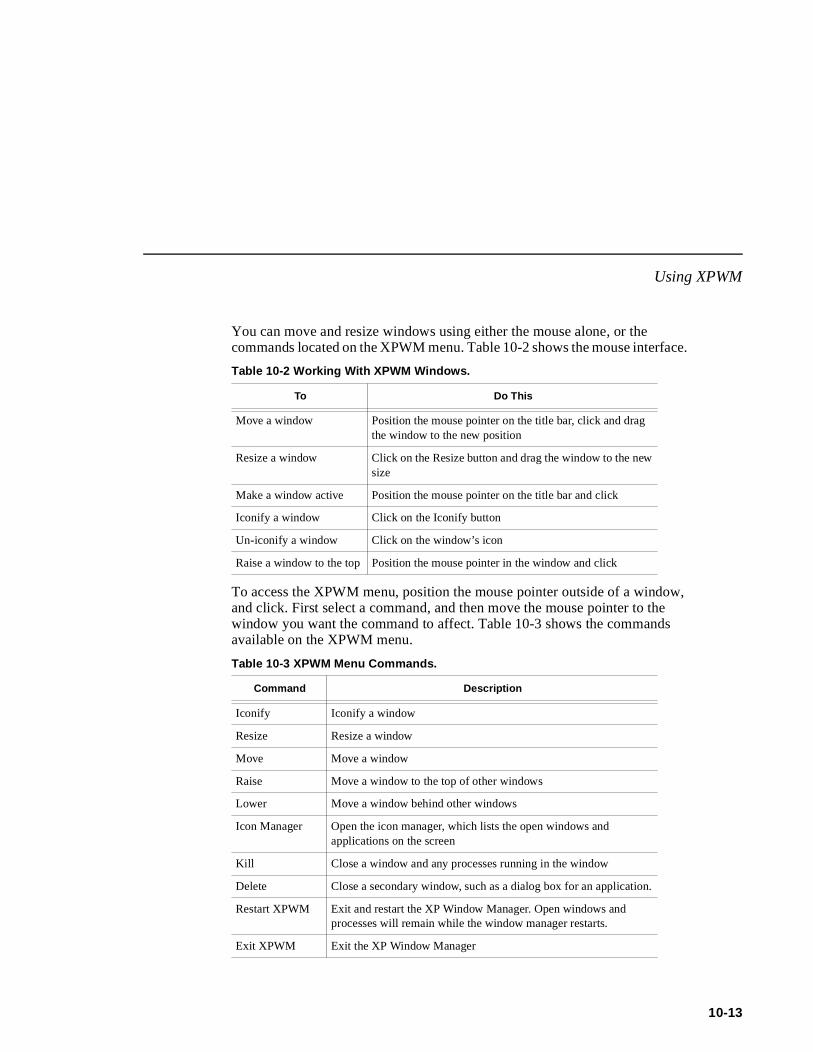
Using XPWM
,
You can move and resize windows using either the mouse alone, or the commands located on the XPWM menu. Table 10-2 shows the mouse interface.
To access the XPWM menu, position the mouse pointer outside of a windowand click. First select a command, and then move the mouse pointer to the window you want the command to affect. Table 10-3 shows the commands available on the XPWM menu.
Table 10-2 Working With XPWM Windows.
To Do This
Move a window Position the mouse pointer on the title bar, click and drag the window to the new position
Resize a window Click on the Resize button and drag the window to the new size
Make a window active Position the mouse pointer on the title bar and click
Iconify a window Click on the Iconify button
Un-iconify a window Click on the window’s icon
Raise a window to the top Position the mouse pointer in the window and click
Table 10-3 XPWM Menu Commands.
Command Description
Iconify Iconify a window
Resize Resize a window
Move Move a window
Raise Move a window to the top of other windows
Lower Move a window behind other windows
Icon Manager Open the icon manager, which lists the open windows and applications on the screen
Kill Close a window and any processes running in the window
Delete Close a secondary window, such as a dialog box for an application.
Restart XPWM Exit and restart the XP Window Manager. Open windows and processes will remain while the window manager restarts.
Exit XPWM Exit the XP Window Manager
10-13
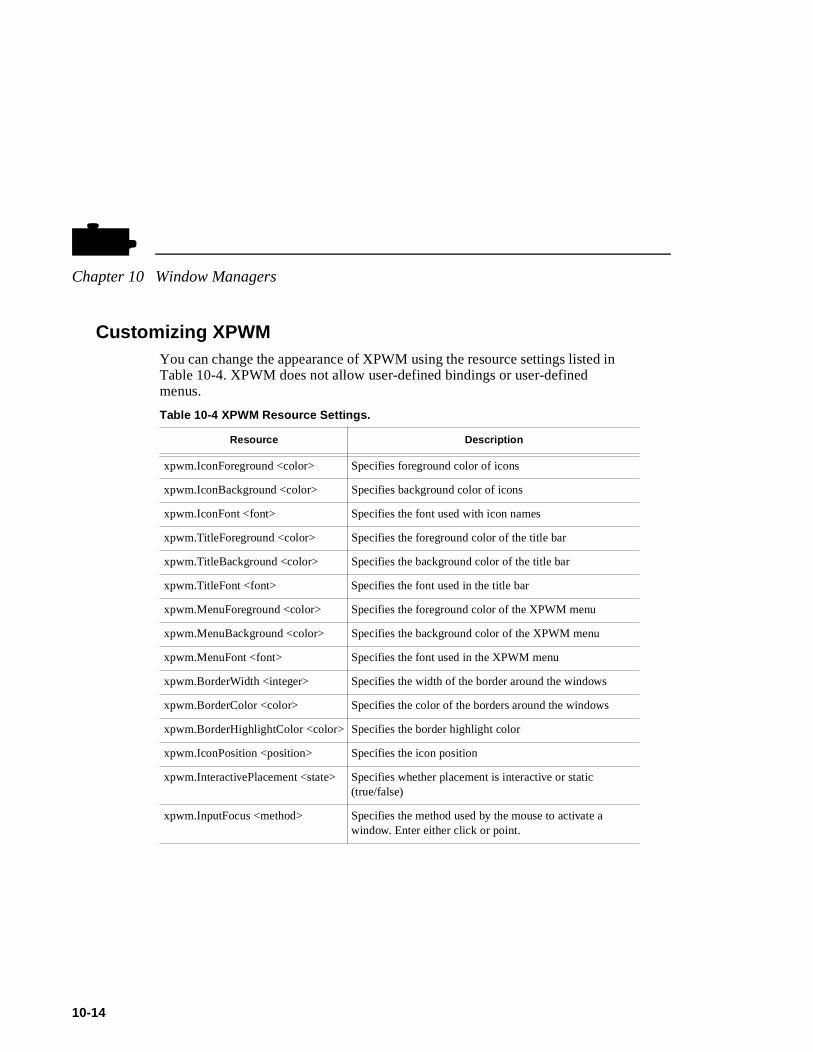
Chapter 10 Window Managers
10
in
Customizing XPWMYou can change the appearance of XPWM using the resource settings listedTable 10-4. XPWM does not allow user-defined bindings or user-defined menus.
Table 10-4 XPWM Resource Settings.
Resource Description
xpwm.IconForeground <color> Specifies foreground color of icons
xpwm.IconBackground <color> Specifies background color of icons
xpwm.IconFont <font> Specifies the font used with icon names
xpwm.TitleForeground <color> Specifies the foreground color of the title bar
xpwm.TitleBackground <color> Specifies the background color of the title bar
xpwm.TitleFont <font> Specifies the font used in the title bar
xpwm.MenuForeground <color> Specifies the foreground color of the XPWM menu
xpwm.MenuBackground <color> Specifies the background color of the XPWM menu
xpwm.MenuFont <font> Specifies the font used in the XPWM menu
xpwm.BorderWidth <integer> Specifies the width of the border around the windows
xpwm.BorderColor <color> Specifies the color of the borders around the windows
xpwm.BorderHighlightColor <color> Specifies the border highlight color
xpwm.IconPosition <position> Specifies the icon position
xpwm.InteractivePlacement <state> Specifies whether placement is interactive or static (true/false)
xpwm.InputFocus <method> Specifies the method used by the mouse to activate a window. Enter either click or point.
-14
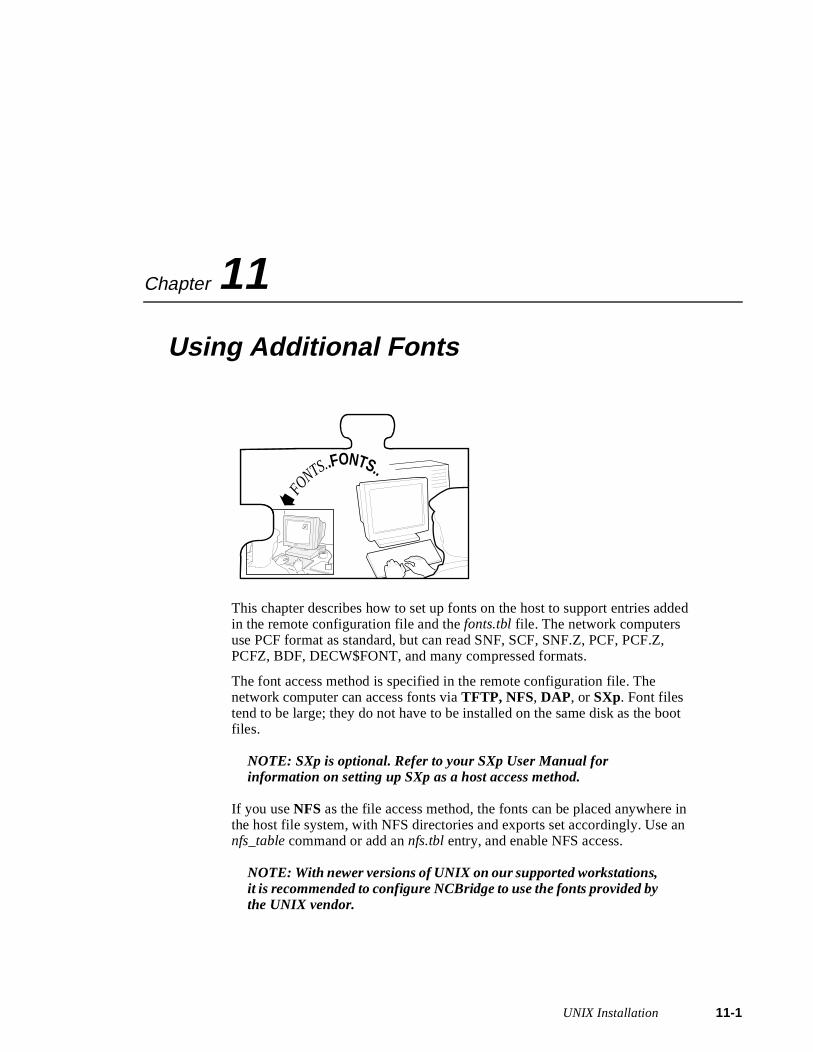
Chapter
11ed
ot
n n
Using Additional Fonts
This chapter describes how to set up fonts on the host to support entries addin the remote configuration file and the fonts.tbl file. The network computers use PCF format as standard, but can read SNF, SCF, SNF.Z, PCF, PCF.Z, PCFZ, BDF, DECW$FONT, and many compressed formats.
The font access method is specified in the remote configuration file. The network computer can access fonts via TFTP, NFS, DAP, or SXp. Font files tend to be large; they do not have to be installed on the same disk as the bofiles.
NOTE: SXp is optional. Refer to your SXp User Manual for information on setting up SXp as a host access method.
If you use NFS as the file access method, the fonts can be placed anywhere ithe host file system, with NFS directories and exports set accordingly. Use anfs_table command or add an nfs.tbl entry, and enable NFS access.
NOTE: With newer versions of UNIX on our supported workstations, it is recommended to configure NCBridge to use the fonts provided by the UNIX vendor.
FO
NTS..FONTS..
UNIX Installation 11-1
Chapter 11 Using Additional Fonts
11
re
, ont
To use secure tftp for loading fonts, the font directories must reside in the secudirectory. Secure tftp does not follow symbolic links outside the secure directory. If there is insufficient space within the secure directory for the fontsyou may install them elsewhere, and use NFS to access them. When setting fpaths, do not use the secure directory name in the path. For example:
Secure directory: /tekxpActual font directory: /tekxp/boot/fontsSpecified font path: /boot/fonts/100dpi
Refer to Chapter 1 for more information on secure tftp.
-2 UNIX Installation
How the X Server Builds the Font Database
he
oot
How the X Server Builds the Font DatabaseAt boot time, the X server builds a font database based on the following sequence of events:
1. The X server searches the primary path for a fonts.tbl file.
If a fonts.tbl file is not found with the primary path, the X server searches thesecondary path for a fonts.tbl file. The secondary path is used if the primary path is not specified. Primary and secondary paths are specified in either tremote configuration file or in Setup. If fonts are not found through the primary or secondary paths, the X server searches the boot host and the bmethod.
In this example, the primary file path for the configuration files is /tekxp/boot/fonts on the host arizona, accessed with tftp .
ip_host_table "128.07.60.12" "arizona"file_access_1 TFTPfile_host_name_1 "arizona"file_path_1 "/tekxp/boot/fonts"
In this example, the secondary file path for the configuration files is /usr/tekxp/boot/fonts, where /usr/tekxp/boot/fonts is an exported directory from the host oregon and accessed through NFS. The file_host_name is not needed for NFS, but is specified as a null string to ensure a correct path.
file_access_2 NFSfile_host_name_2 ""file_path_2 "/usr/tekxp/boot/fonts"
This example assumes that you have an entry similar to the following in the nfs.tbl file:
oregon:/usr/tekxp/boot/fonts /usr/tekxp/boot/fonts
UNIX Installation 11-3
Chapter 11 Using Additional Fonts
11
unt
2. When the X server finds a fonts.tbl file, it searches the directories listed in this file for fonts.dir and fonts.alias files. The X server uses the information in the fonts.dir and fonts.alias files to search for specific font files. The X server rejects the path unless it finds both fonts.dir and fonts.alias files.
NOTE: Once the fonts.tbl file is found, the X server ignores file_path_1 and file_path_2 when searching for specific font files.
The fonts.dir file maps file names to an X logical font descriptive name (XLFD); the fonts.alias file lists alternative names for the XLFD font names. A typical entry for fonts.dir is:
5x8.snf -misc-fixed-medium-r-normal--8-80-75-75-c-50-iso8859-1
Typical entries for fonts.alias are:
FILE_NAMES_ALIASES5x8 -misc-fixed-medium-r-normal--8-80-75-75-c-50-iso8859-1
3. The network computer resolves font paths in this order:
a. Primary access and font path
b. Secondary access and font path
c. Boot host and boot method
Access can be a host if using TFTP or DAP as the access method, or a mopoint if using NFS. If not resolved, the font path is rejected.
4. Resident fonts are always available unless explicitly removed with the xset fp- command. Refer to Table 11-1 for the list of resident fonts.
-4 UNIX Installation
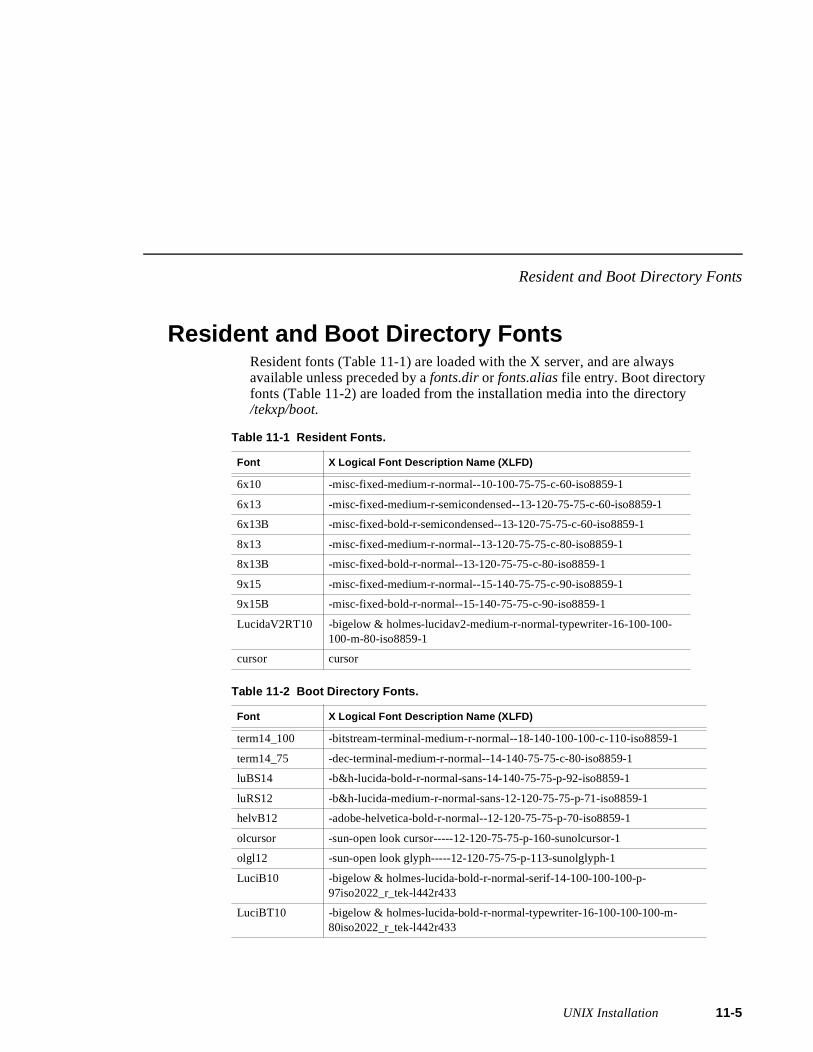
Resident and Boot Directory Fonts
Resident and Boot Directory FontsResident fonts (Table 11-1) are loaded with the X server, and are alwaysavailable unless preceded by a fonts.dir or fonts.alias file entry. Boot directory fonts (Table 11-2) are loaded from the installation media into the directory/tekxp/boot.
Table 11-1 Resident Fonts.
Font X Logical Font Description Name (XLFD)
6x10 -misc-fixed-medium-r-normal--10-100-75-75-c-60-iso8859-1
6x13 -misc-fixed-medium-r-semicondensed--13-120-75-75-c-60-iso8859-1
6x13B -misc-fixed-bold-r-semicondensed--13-120-75-75-c-60-iso8859-1
8x13 -misc-fixed-medium-r-normal--13-120-75-75-c-80-iso8859-1
8x13B -misc-fixed-bold-r-normal--13-120-75-75-c-80-iso8859-1
9x15 -misc-fixed-medium-r-normal--15-140-75-75-c-90-iso8859-1
9x15B -misc-fixed-bold-r-normal--15-140-75-75-c-90-iso8859-1
LucidaV2RT10 -bigelow & holmes-lucidav2-medium-r-normal-typewriter-16-100-100-100-m-80-iso8859-1
cursor cursor
Table 11-2 Boot Directory Fonts.
Font X Logical Font Description Name (XLFD)
term14_100 -bitstream-terminal-medium-r-normal--18-140-100-100-c-110-iso8859-1
term14_75 -dec-terminal-medium-r-normal--14-140-75-75-c-80-iso8859-1
luBS14 -b&h-lucida-bold-r-normal-sans-14-140-75-75-p-92-iso8859-1
luRS12 -b&h-lucida-medium-r-normal-sans-12-120-75-75-p-71-iso8859-1
helvB12 -adobe-helvetica-bold-r-normal--12-120-75-75-p-70-iso8859-1
olcursor -sun-open look cursor-----12-120-75-75-p-160-sunolcursor-1
olgl12 -sun-open look glyph-----12-120-75-75-p-113-sunolglyph-1
LuciB10 -bigelow & holmes-lucida-bold-r-normal-serif-14-100-100-100-p-97iso2022_r_tek-l442r433
LuciBT10 -bigelow & holmes-lucida-bold-r-normal-typewriter-16-100-100-100-m-80iso2022_r_tek-l442r433
UNIX Installation 11-5
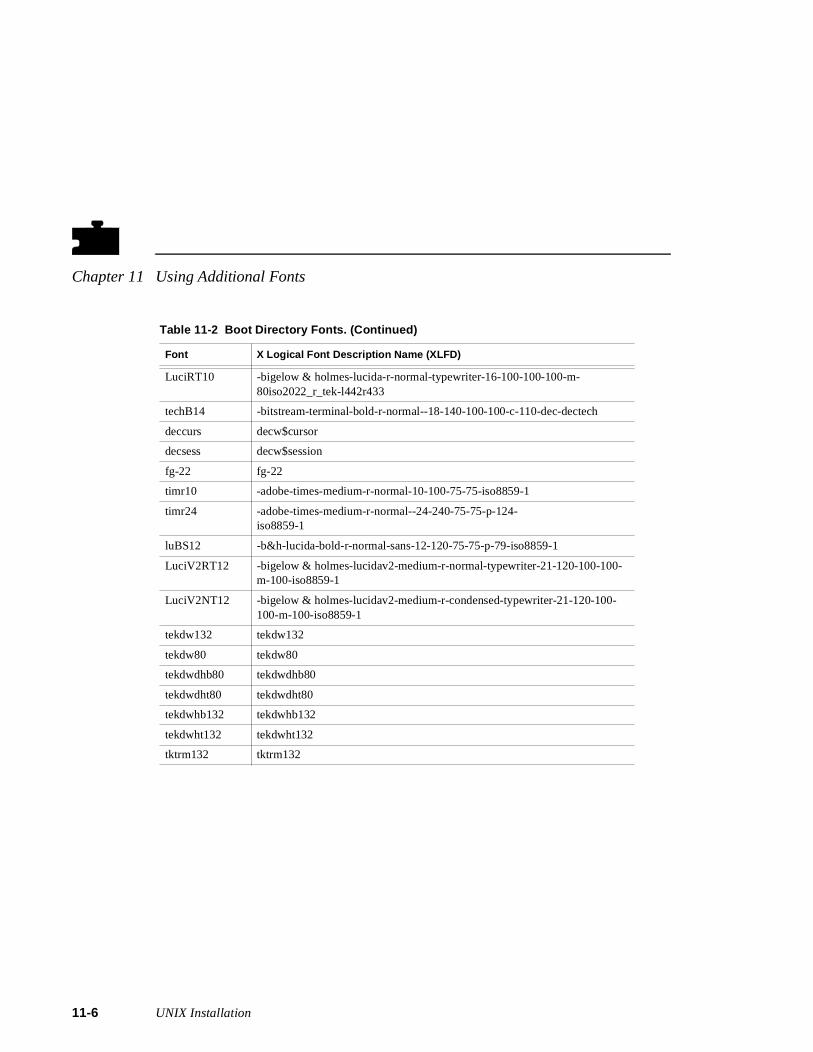
Chapter 11 Using Additional Fonts
11
LuciRT10 -bigelow & holmes-lucida-r-normal-typewriter-16-100-100-100-m-80iso2022_r_tek-l442r433
techB14 -bitstream-terminal-bold-r-normal--18-140-100-100-c-110-dec-dectech
deccurs decw$cursor
decsess decw$session
fg-22 fg-22
timr10 -adobe-times-medium-r-normal-10-100-75-75-iso8859-1
timr24 -adobe-times-medium-r-normal--24-240-75-75-p-124-iso8859-1
luBS12 -b&h-lucida-bold-r-normal-sans-12-120-75-75-p-79-iso8859-1
LuciV2RT12 -bigelow & holmes-lucidav2-medium-r-normal-typewriter-21-120-100-100-m-100-iso8859-1
LuciV2NT12 -bigelow & holmes-lucidav2-medium-r-condensed-typewriter-21-120-100-100-m-100-iso8859-1
tekdw132 tekdw132
tekdw80 tekdw80
tekdwdhb80 tekdwdhb80
tekdwdht80 tekdwdht80
tekdwhb132 tekdwhb132
tekdwht132 tekdwht132
tktrm132 tktrm132
Table 11-2 Boot Directory Fonts. (Continued)
Font X Logical Font Description Name (XLFD)
-6 UNIX Installation
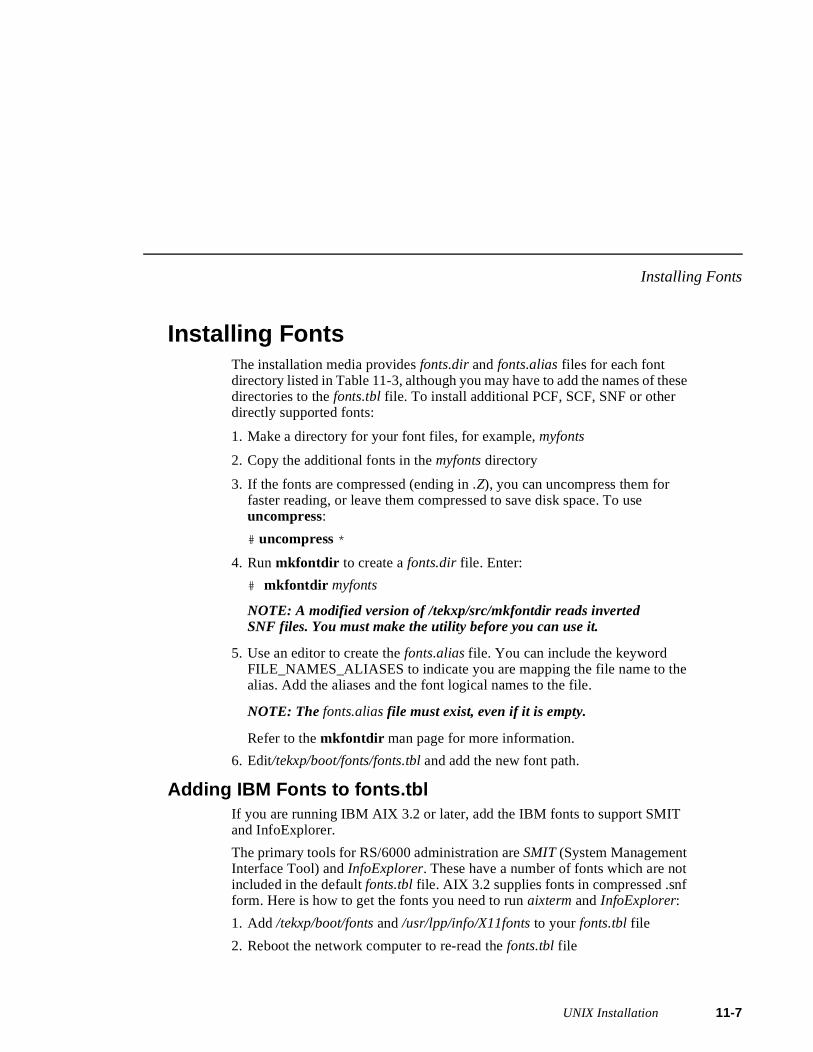
Installing Fonts
se
Installing FontsThe installation media provides fonts.dir and fonts.alias files for each font directory listed in Table 11-3, although you may have to add the names of thedirectories to the fonts.tbl file. To install additional PCF, SCF, SNF or other directly supported fonts:
1. Make a directory for your font files, for example, myfonts
2. Copy the additional fonts in the myfonts directory
3. If the fonts are compressed (ending in.Z), you can uncompress them for faster reading, or leave them compressed to save disk space. To use uncompress:
# uncompress *
4. Run mkfontdir to create a fonts.dir file. Enter:
# mkfontdir myfonts
NOTE: A modified version of /tekxp/src/mkfontdir reads inverted SNF files. You must make the utility before you can use it.
5. Use an editor to create the fonts.alias file. You can include the keyword FILE_NAMES_ALIASES to indicate you are mapping the file name to the alias. Add the aliases and the font logical names to the file.
NOTE: The fonts.alias file must exist, even if it is empty.
Refer to the mkfontdir man page for more information.
6. Edit/tekxp/boot/fonts/fonts.tbl and add the new font path.
Adding IBM Fonts to fonts.tblIf you are running IBM AIX 3.2 or later, add the IBM fonts to support SMIT and InfoExplorer.
The primary tools for RS/6000 administration are SMIT (System Management Interface Tool) and InfoExplorer. These have a number of fonts which are not included in the default fonts.tbl file. AIX 3.2 supplies fonts in compressed .snf form. Here is how to get the fonts you need to run aixterm and InfoExplorer:
1. Add /tekxp/boot/fonts and /usr/lpp/info/X11fonts to your fonts.tbl file
2. Reboot the network computer to re-read the fonts.tbl file
UNIX Installation 11-7
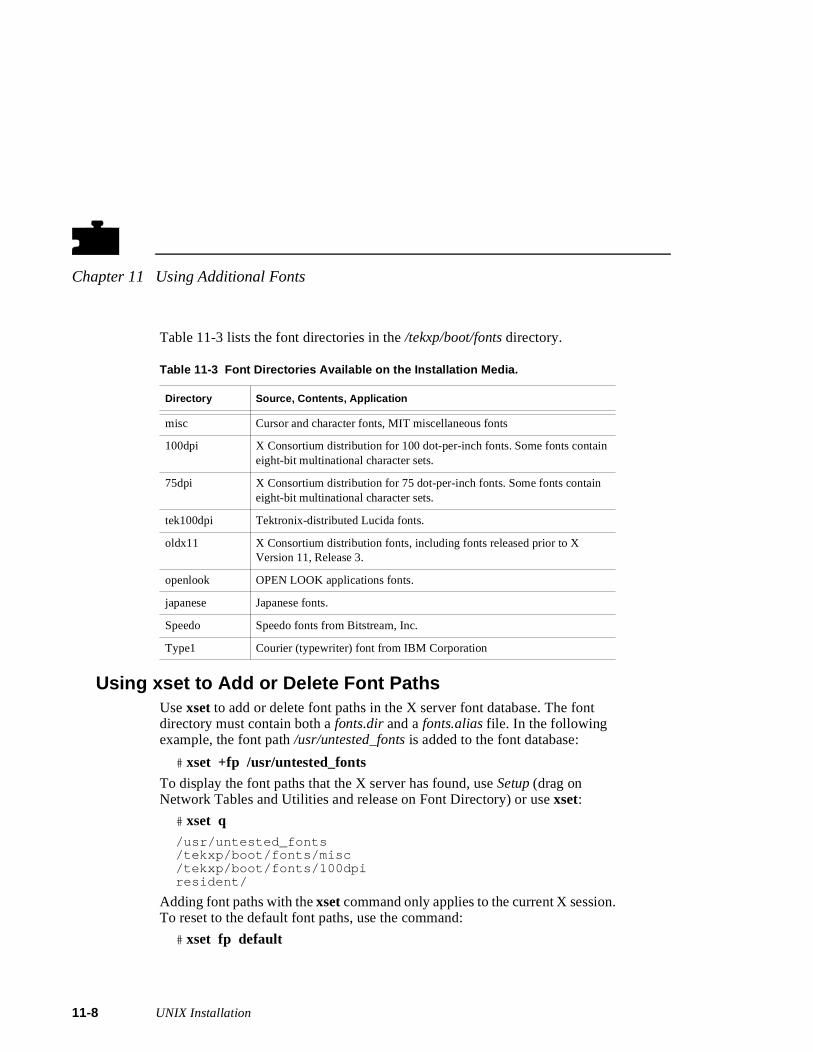
Chapter 11 Using Additional Fonts
11
Table 11-3 lists the font directories in the /tekxp/boot/fonts directory.
Using xset to Add or Delete Font PathsUse xset to add or delete font paths in the X server font database. The font directory must contain both a fonts.dir and a fonts.alias file. In the following example, the font path /usr/untested_fonts is added to the font database:
# xset +fp /usr/untested_fonts
To display the font paths that the X server has found, use Setup (drag on Network Tables and Utilities and release on Font Directory) or use xset:
# xset q/usr/untested_fonts/tekxp/boot/fonts/misc/tekxp/boot/fonts/100dpiresident/
Adding font paths with the xset command only applies to the current X session. To reset to the default font paths, use the command:
# xset fp default
Table 11-3 Font Directories Available on the Installation Media.
Directory Source, Contents, Application
misc Cursor and character fonts, MIT miscellaneous fonts
100dpi X Consortium distribution for 100 dot-per-inch fonts. Some fonts contain eight-bit multinational character sets.
75dpi X Consortium distribution for 75 dot-per-inch fonts. Some fonts contain eight-bit multinational character sets.
tek100dpi Tektronix-distributed Lucida fonts.
oldx11 X Consortium distribution fonts, including fonts released prior to XVersion 11, Release 3.
openlook OPEN LOOK applications fonts.
japanese Japanese fonts.
Speedo Speedo fonts from Bitstream, Inc.
Type1 Courier (typewriter) font from IBM Corporation
-8 UNIX Installation
Converting Sun Fonts
s
, e
Converting BDF to PCF
A utility is provided to convert BDF fonts to PCF format. The utility bdftopcf is located in /tekxp/bin/<host>/bdftopcf, where <host> is sun4, solaris, or hp700. This utility is not provided for hp300. For best results, compile the fonton the host where they are used.
1. Copy the BDF files to be converted to a separate directory.
2. Change to the new directory.
3. Convert the BDF files to PCF files:
# bdftopcf <fontname>.bdf > <fontname>.pcf
4. You can remove all of the BDF files in the directory.
# rm *.bdf
5. Follow the previous instructions under the heading Installing Fonts, to make the converted fonts available to the network computer.
Converting Sun FontsThe suntoxfont utility converts Sun fonts to PCF format that the network computer can read directly. This utility can be found in the /tekxp/bin/sun4 directory.
1. Use mkdir to create a new directory to contain the converted fonts. For example:
mkdir /tekxp/boot/fonts/new_openlook
2. Use cd to change to the new directory.
cd /tekxp/boot/fonts/new_openlook
3. In a separate ASCII file, list each font name to be converted (one font name per line). A sample file, font_list, is located in the /tekxp/bin/sun4 directory. This file contains recommended fonts for conversion.
4. Run the suntoxfont utility specifying the file list created in step 3.
suntoxfont < font_list
The utility finds the correct Sun font file, determines the point size neededand converts the fonts to .pcf.Z format. The converted fonts are added to thfonts.dir file and the fonts.alias file is updated.
UNIX Installation 11-9
Chapter 11 Using Additional Fonts
11
h
5. Use xset to add the new directory to the X server font database.
xset +fp /tekxp/boot/fonts/new_openlook
For detailed information about using xset, refer to the section Using xset to Add or Delete Font Paths earlier in this chapter.
Adding Fonts
To add additional fonts to a font directory:
1. Use cd to change to the directory containing the converted fonts.
2. Run the suntoxfont utility specifying the specific font(s) to add. For example:
suntoxfont courb12 helvetica24
The fonts are converted to .pcf.Z format, and the fonts.alias and fonts.dir files are updated.
SCF Font IssuesThe directory /usr/lib/X11/fonts contains five subdirectories of HP fonts; hp_kana8, hp_roman8/75dpi, iso_8859.1/100dpi and 75dpi, misc, and whatever. Font files in these subdirectories are in compressed SNF format wita file extensions of.scf.
The network computer can read compressed SCF fonts directly by includingany of the HP font directories listed above in a fonts.tbl file. Make sure the primary and secondary file access is properly set. Refer to the section How the X Server Builds the Font Database earlier in this chapter for detailed information.
-10 UNIX Installation
SCF Font Issues
e
Converting SCF Fonts to SNF Fonts
If you have sufficient disk space available and want to enhance the system performance, use the procedures below to convert the.scf font files to uncompressed SNF files. This is an optional step used to increase system performance only.
The utility uncompress converts these compressed fonts to standard SNF format, readable by the network computer. Use the following procedure to convert a directory of SCF files to SNF format:
1. Create the directory /tekxp/boot/fonts/<fontdir>, where <fontdir> corresponds to a directory of compressed files in /usr/lib/X11/fonts.
2. Copy the compressed font files into the new directory, and cd to the new directory.
3. Rename any font files that are more than 12 characters in length to providroom for the .Z extension. File name length is limited to 14 characters by default.
4. Invoke a C Shell (if you are not already running C Shell), and enter the following commands:
% foreach i (*.scf)? mv $i $i.Z? uncompress $i? mv $i $i:r.snf? end%
This shell program first appends a .Z extension to each font file then runs uncompress and stores the result in a file with a.snf extension. The.snf file just created is in standard SNF format, readable by a network computer.
5. Follow the procedure from the previous section, Installing Fonts, to make the converted fonts available to the network computer.
UNIX Installation 11-11
Chapter 11 Using Additional Fonts
11
-12 UNIX Installation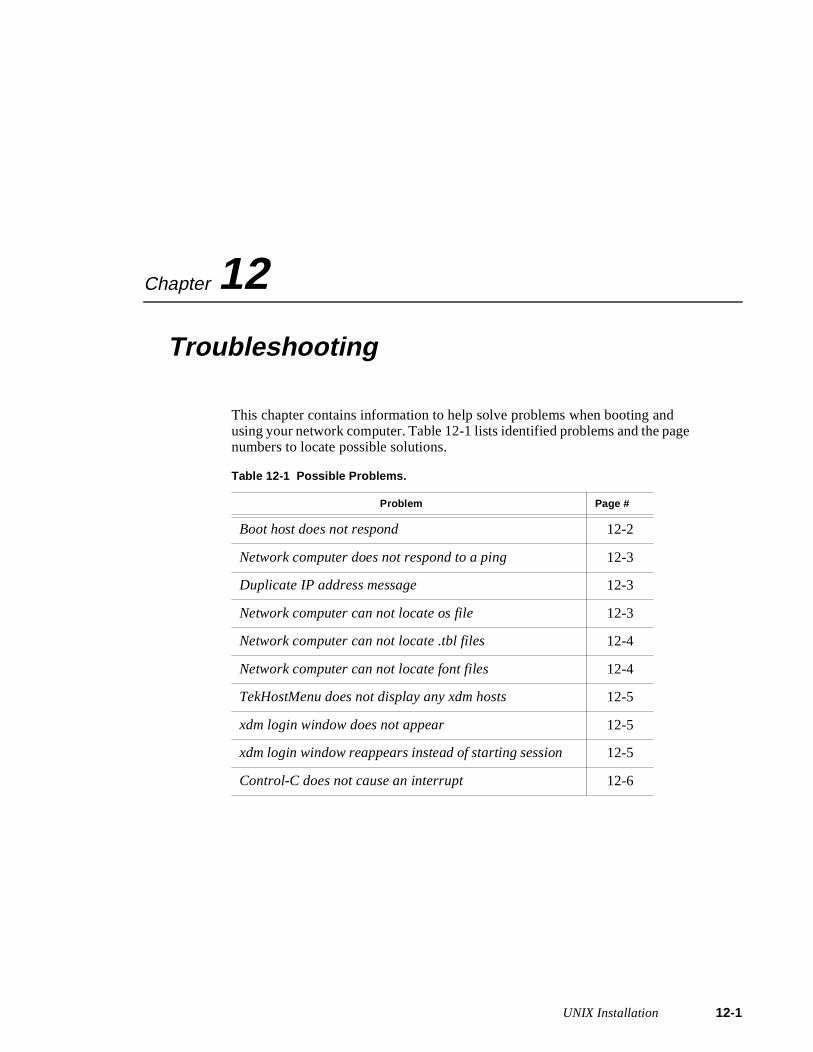
Chapter
12e
Troubleshooting
This chapter contains information to help solve problems when booting and using your network computer. Table 12-1 lists identified problems and the pagnumbers to locate possible solutions.
Table 12-1 Possible Problems.
Problem Page #
Boot host does not respond 12-2
Network computer does not respond to a ping 12-3
Duplicate IP address message 12-3
Network computer can not locate os file 12-3
Network computer can not locate .tbl files 12-4
Network computer can not locate font files 12-4
TekHostMenu does not display any xdm hosts 12-5
xdm login window does not appear 12-5
xdm login window reappears instead of starting session 12-5
Control-C does not cause an interrupt 12-6
UNIX Installation 12-1
Chapter 12 Troubleshooting
12
e
n
Boot host does not respond
• Verify that the boot host is configured to support the boot method you selected. Supporting host files may include inetd.conf, bootptab, exports, hosts, and ethers.
• Use the ps command on the boot host to verify the supporting daemon(s) arrunning. The daemons may include: inetd, nfsd, tftpd, bootpd, and rarpd.
• If you are booting from NVRAM , use the network computer Boot Monitor to verify the correct values are assigned for the following commands:
- Network computer IP address (iaddr) or node number (dnode)
- Boot host IP address (ihost)
- Subnet mask (imask)
- Gateway address (igate)
- Boot method (bmethod)
- Boot path (bpath)
- Boot from (bafrom set to NVRAM )
• If you are booting from NETWORK , use the network computer Boot Monitor to verify the correct values are assigned for the following commands:
- Boot method (bmethod)
- Boot from (bafrom set to NETWORK )
• Use the network computer Boot Monitor to ping the boot host. If the host does not respond, use the ifconfig command on the host to verify the host’s subnet mask and gateway address. The ifconfig command is also used to change the subnet mask and gateway address if necessary.
• If the host has an ethernet switch, make sure it is set to the proper positiofor thicknet or thinnet.
-2 UNIX Installation
.
sses
ew as
e h the
e ed
Network computer does not respond to a ping
• Verify that the network computer is booted.
• Use the network computer Boot Monitor report command to check the network computer’s ethernet switch or jumper setting. If it is incorrect, refer to the pictorial physical installation guide for your network computer model
Duplicate IP address message
This can indicate two different problems: either there are two devices using the same IP address, or there is a mismatch between the ethernet and IP addrein the host files or in the router ARP tables.
• To determine if there are two devices using the same IP address, go to a different device and ping the duplicate IP address. If two responses come back, change the IP address on one of the devices. Be sure to save the naddress. You may also have to change supporting files on the host, such /etc/hosts, /etc/ethers, bootptab, and change entries in the ARP table (arp command) to ensure the correct ethernet and IP addresses are used.
• If the network computer is using the same IP address as a previous devic(that has been removed from the network), then the problem is a mismatcbetween the ethernet and IP addresses. To correct this situation, change files where the ethernet and IP addresses are used, such as /etc/ethers, bootptab, and change entries in the ARP table (arp command). The network administrator should flush the ARP table in the router.
Network computer can not locate os file
• Verify that the boot path is specified correctly and matches the actual file location on boot host. If using secure tftp, the secure directory should not bspecified as part of the boot path. For Silicon Graphics hosts, the securedboot path should not have a leading slash. For other UNIX hosts, the securboot path should have a leading slash.
• Verify that you are using the correct os file (os.10, os.330, or os.350), and that it has world read permission. Use chmod command to change permission.
UNIX Installation 12-3
Chapter 12 Troubleshooting
12
t d
t, e
d
• On Hewlett-Packard hosts, verify that tftp is set up properly. On some Hewlett-Packard hosts, there must be a tftp entry in the password file. The secure directory is specified in the password file as if it were a home directory. Also, if tftp is in the inetd.sec file, make sure the network computer is listed as an authorized device.
Network computer can not locate .tbl files
Verify the primary and secondary file hosts, access methods, and paths:
• If you are debugging a centralized system, or if the network computer is nobooted, check the primary and secondary file_access, file_host_name, anfile_path entries in the xp.cnf file.
• If the network computer is booted, use the Console window to see the hosmethod, and path the network computer tried. Use the Left and Right mousbuttons to scroll through the window. You can also use Setup to view the host file access information.
• Verify that the appropriate daemon is running on the host for the specifiedaccess method.
• Verify that the.tbl files are in the proper location and have world read permission. If you are using secure tftp, ensure that the.tbl files are in the secure directory. If the.tbl files are not in the secure directory, either move them to the secure directory or use NFS to download them.
Network computer can not locate font files
• Follow the previous procedures for Network computer can not locate .tbl files to verify that the network computer is locating the fonts.tbl file.
• Verify that the fonts.tbl file specifies the correct paths to the font directories. If NFS is used, the full pathname to the NFS mount point must be specifieif NFS is used.
• Verify that the fonts.dir and fonts.alias files exist and are readable.
• Verify that the fonts.dir and fonts.alias files contain the correct paths to the actual font files.
-4 UNIX Installation

d
y
TekHostMenu does not display any xdm hosts
• Use the ps command to verify that the xdm daemon is running on the host.
• Check the Host Connect Method with Setup. Drag on Configuration Summaries and release on X Environment. Verify that the Host Connect Method is set to TekHostMenu.
• Verify that the xdm-error and xdm-pid files have world write permission in the xdm-config file.
xdm login window does not appear
• Use the ps command to verify that the xdm daemon is running on the host.
• Check the Host Connect Method with Setup. Drag on Configuration Summaries and release on X Environment. Verify that the Host Connect Method is set to XDMCP Direct, and that the log in host is specified.
• Verify that the xdm-error and xdm-pid files have world write permission in the xdm-config file.
xdm login window reappears instead of starting session
• Verify that the X startup file contains a valid session control client. Ensurethat either the system-wide Xsession (or Xinitrc on Sun hosts) or users .xsession (or .xinitrc on Sun hosts) file ends with a client that is not running in the background. Verify the path to the session control client.
To correct the problem, try using failsafe mode: When the xdm login window appears, type in user name and password and press the F1 key (instead of Enter). If nothing happens, then the failsafe feature is not enableon that host, and you must log in by another method.
• Verify that the session control client is executable. Use the chmod command, if necessary, to make the session control client executable. Try using failsafe mode to correct the problem.
• The X startup file may not be executable. Use the chmod command, if necessary, to make the X startup file executable. Try using failsafe mode to correct the problem.
• Environmental variables may not be set. Verify that the X startup file sets anenvironmental variables that are required by the session control client. Try using failsafe mode to correct the problem.
UNIX Installation 12-5
Chapter 12 Troubleshooting
12
Control-C does not cause an interrupt
• Set the interrupt variable in each user’s .cshrc (c shell) or .profile (Bourne shell) file. Use the format:
stty intr ’^C’
-6 UNIX Installation
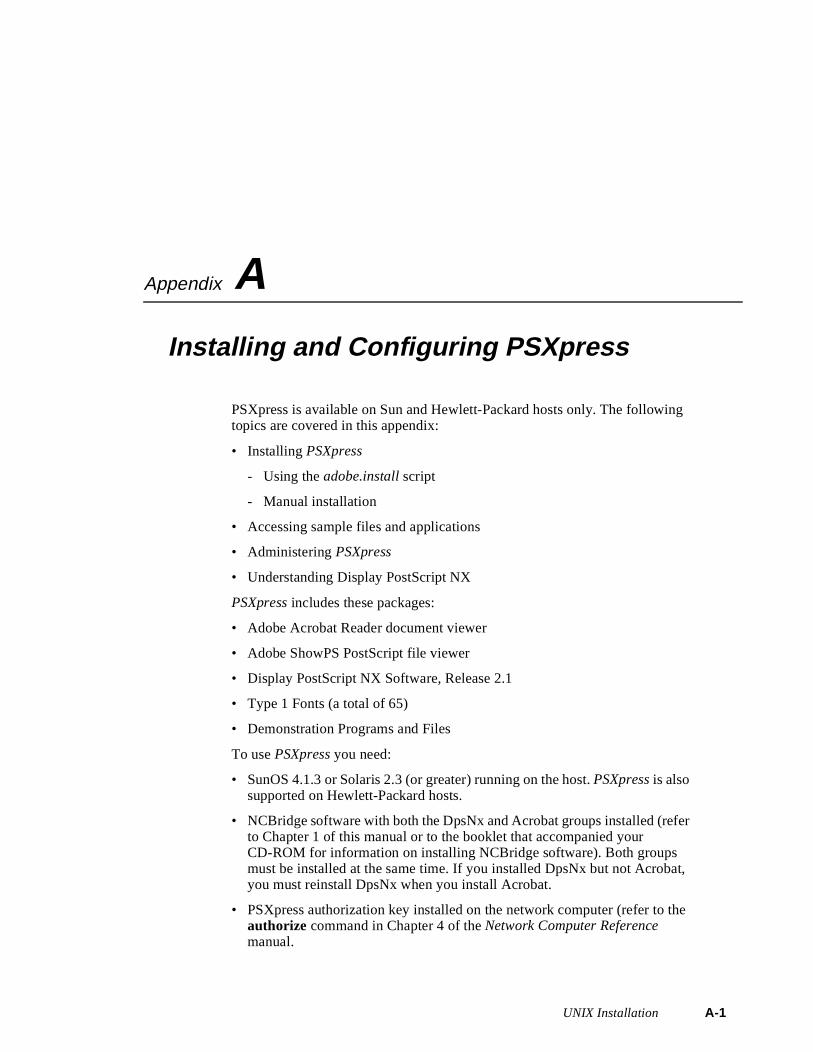
Appendix
A,
Installing and Configuring PSXpress
PSXpress is available on Sun and Hewlett-Packard hosts only. The followingtopics are covered in this appendix:
• Installing PSXpress
- Using the adobe.install script
- Manual installation
• Accessing sample files and applications
• Administering PSXpress
• Understanding Display PostScript NX
PSXpress includes these packages:
• Adobe Acrobat Reader document viewer
• Adobe ShowPS PostScript file viewer
• Display PostScript NX Software, Release 2.1
• Type 1 Fonts (a total of 65)
• Demonstration Programs and Files
To use PSXpress you need:
• SunOS 4.1.3 or Solaris 2.3 (or greater) running on the host. PSXpress is also supported on Hewlett-Packard hosts.
• NCBridge software with both the DpsNx and Acrobat groups installed (refer to Chapter 1 of this manual or to the booklet that accompanied your CD-ROM for information on installing NCBridge software). Both groups must be installed at the same time. If you installed DpsNx but not Acrobatyou must reinstall DpsNx when you install Acrobat.
• PSXpress authorization key installed on the network computer (refer to the authorize command in Chapter 4 of the Network Computer Reference manual.
UNIX Installation A-1
Appendix A
A-
t
e
Installing PSXpressMost sites can use the install script exactly as provided. If the script does nomeet your needs, you can edit the adobe.install script as required. For example, if you have performed a non-standard installation of the operating system atyour site, you may need to alter the command definitions at the beginning of thadobe.install script to suit your special requirements.
The adobe.install script has a few global configuration options, such as the definition of a temporary working directory, default file permissions for programs, and so on. For details, read the contents of the script.
Instructions for manually installing PSXpress follow the script instructions.
NOTE: You must be logged in as root to install PSXpress.
2 UNIX Installation
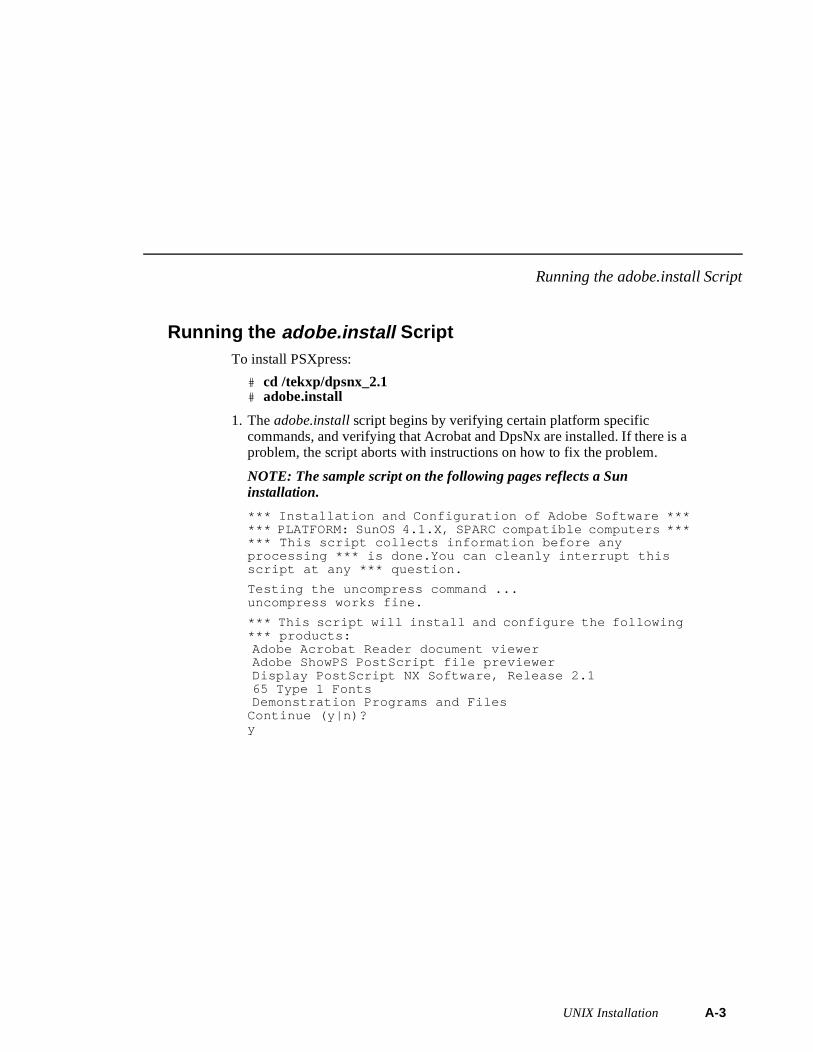
Running the adobe.install Script
a
Running the adobe.install Script
To install PSXpress:
# cd /tekxp/dpsnx_2.1# adobe.install
1. The adobe.install script begins by verifying certain platform specific commands, and verifying that Acrobat and DpsNx are installed. If there is problem, the script aborts with instructions on how to fix the problem.
NOTE: The sample script on the following pages reflects a Sun installation.
*** Installation and Configuration of Adobe Software ****** PLATFORM: SunOS 4.1.X, SPARC compatible computers ****** This script collects information before any processing *** is done.You can cleanly interrupt this script at any *** question.
Testing the uncompress command ... uncompress works fine.
*** This script will install and configure the following *** products:Adobe Acrobat Reader document viewerAdobe ShowPS PostScript file previewerDisplay PostScript NX Software, Release 2.165 Type 1 FontsDemonstration Programs and Files
Continue (y|n)? y
UNIX Installation A-3
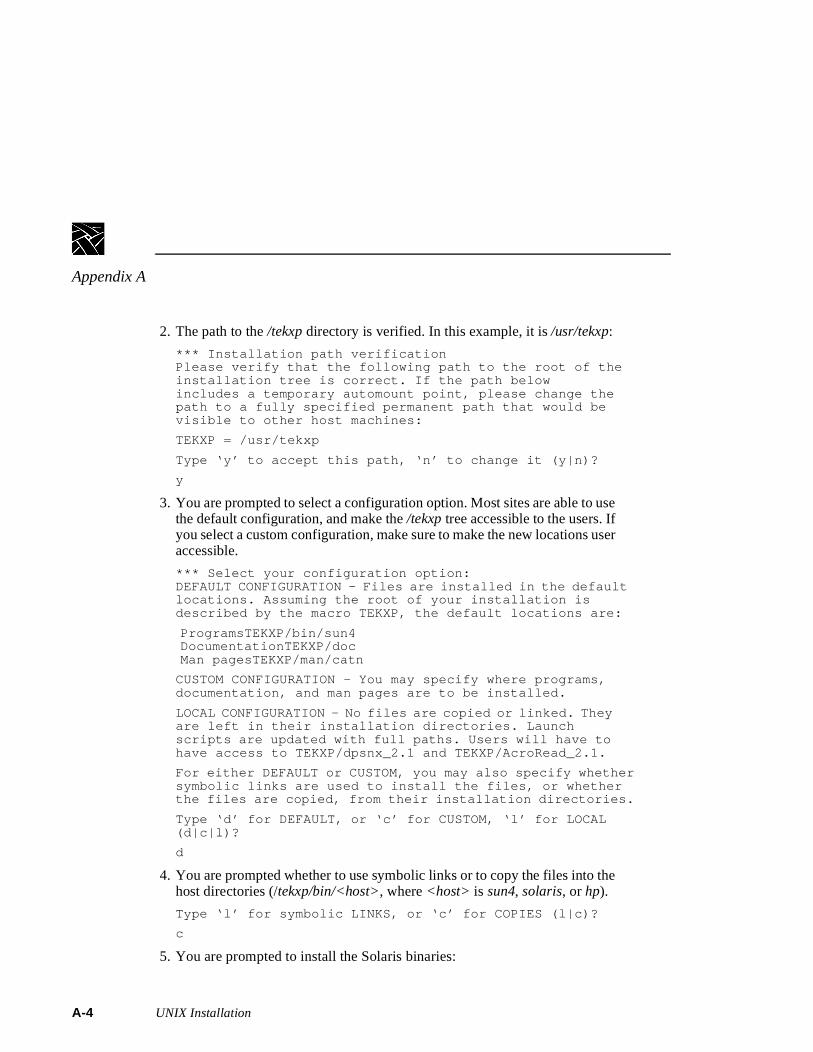
Appendix A
A-
se
er
e
2. The path to the /tekxp directory is verified. In this example, it is /usr/tekxp:
*** Installation path verificationPlease verify that the following path to the root of theinstallation tree is correct. If the path belowincludes a temporary automount point, please change the path to a fully specified permanent path that would be visible to other host machines:
TEKXP = /usr/tekxp
Type ‘y’ to accept this path, ‘n’ to change it (y|n)?
y
3. You are prompted to select a configuration option. Most sites are able to uthe default configuration, and make the /tekxp tree accessible to the users. If you select a custom configuration, make sure to make the new locations usaccessible.
*** Select your configuration option:DEFAULT CONFIGURATION - Files are installed in the default locations. Assuming the root of your installation is described by the macro TEKXP, the default locations are:
ProgramsTEKXP/bin/sun4DocumentationTEKXP/docMan pagesTEKXP/man/catn
CUSTOM CONFIGURATION - You may specify where programs, documentation, and man pages are to be installed.
LOCAL CONFIGURATION - No files are copied or linked. They are left in their installation directories. Launch scripts are updated with full paths. Users will have to have access to TEKXP/dpsnx_2.1 and TEKXP/AcroRead_2.1.
For either DEFAULT or CUSTOM, you may also specify whethersymbolic links are used to install the files, or whetherthe files are copied, from their installation directories.
Type ‘d’ for DEFAULT, or ‘c’ for CUSTOM, ‘l’ for LOCAL (d|c|l)?
d
4. You are prompted whether to use symbolic links or to copy the files into thhost directories (/tekxp/bin/<host>, where <host> is sun4, solaris, or hp).
Type ‘l’ for symbolic LINKS, or ‘c’ for COPIES (l|c)?
c
5. You are prompted to install the Solaris binaries:
4 UNIX Installation
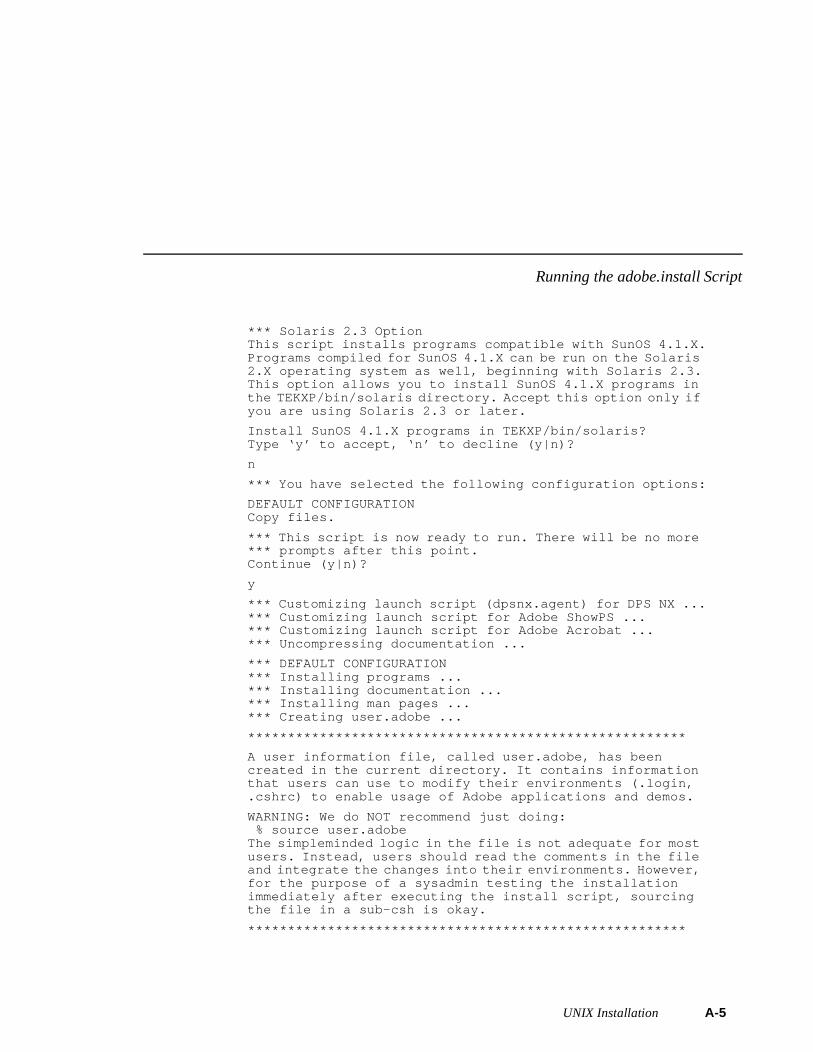
Running the adobe.install Script
*** Solaris 2.3 OptionThis script installs programs compatible with SunOS 4.1.X.Programs compiled for SunOS 4.1.X can be run on the Solaris 2.X operating system as well, beginning with Solaris 2.3.This option allows you to install SunOS 4.1.X programs in the TEKXP/bin/solaris directory. Accept this option only if you are using Solaris 2.3 or later.
Install SunOS 4.1.X programs in TEKXP/bin/solaris?Type ‘y’ to accept, ‘n’ to decline (y|n)?
n
*** You have selected the following configuration options:
DEFAULT CONFIGURATIONCopy files.
*** This script is now ready to run. There will be no more *** prompts after this point.Continue (y|n)?
y
*** Customizing launch script (dpsnx.agent) for DPS NX ...*** Customizing launch script for Adobe ShowPS ... *** Customizing launch script for Adobe Acrobat ... *** Uncompressing documentation ...
*** DEFAULT CONFIGURATION*** Installing programs ...*** Installing documentation ...*** Installing man pages ...*** Creating user.adobe ...
*******************************************************
A user information file, called user.adobe, has been created in the current directory. It contains information that users can use to modify their environments (.login, .cshrc) to enable usage of Adobe applications and demos.
WARNING: We do NOT recommend just doing: % source user.adobeThe simpleminded logic in the file is not adequate for most users. Instead, users should read the comments in the file and integrate the changes into their environments. However, for the purpose of a sysadmin testing the installation immediately after executing the install script, sourcing the file in a sub-csh is okay.
*******************************************************
UNIX Installation A-5
Appendix A
A-
s
The user.adobe File
The adobe.install script creates a file named /tekxp/dpsnx_2.1/user.adobe that can be distributed to users (by means of e-mail, for example). The file explaincustomizations that users can apply to their environments to access Adobe software.
NOTE: If you are an OpenWindows site, refer to Chapter 4 of the TekXpress User manual for information on integrating icons and using the PSXpress option with AnswerBook.
6 UNIX Installation

Manual Installation
t:
es:
Manual InstallationIf the adobe.install script fails and automated configuration cannot be completed, manual configuration is possible. First, try using the local configuration option. This option will rewrite the most important launch scriptsand customize app-defaults files as needed, without copying or linking any files. You can then selectively copy files by hand.
If local configuration does not meet your needs, use the information in the following sections to configure the software by hand.
Customizing the Launch Scripts
Adobe ShowPS and Adobe Acrobat Reader are launched with the following scripts:
Adobe ShowPS/tekxp/dpsnx_2.1/<host>/bin/showps Adobe Acrobat Reader/tekxp/AcroRead_2.1/<host>/bin/acroread
where <host> is sun, solaris, or hp. Both of these applications require the Display PostScript NX host-based software, which is also launched by a scrip
Display PostScript NX/tekxp/dpsnx_2.1/<host>/bin/dpsnx.agent
where <host> is sun, solaris, or hp. You can edit any of these scripts to conform to your installation.
To customize these three launch scripts, you must define the script variablesshown in Table A-1. Not all variables are used in every script.
Table A-1 Required Environment Variables.
Script Variable Meaning Default Value
acroread INSTALL_DIR Installation directory for Acrobat.
None (script computes path)
acroread DPSNX_DIR Location of dpsnx_2.1 installation directory.
None
dpsnx.agent LOCAL_PSRES Paths to PostScript font directories, separated by colons.
/ tekxp/dpsnx_2.1/common/psr
dpsnx.agentshowps
LOCAL_BIN Full path to program directory.
/ tekxp/dpsnx_2.1/common/bin
UNIX Installation A-7
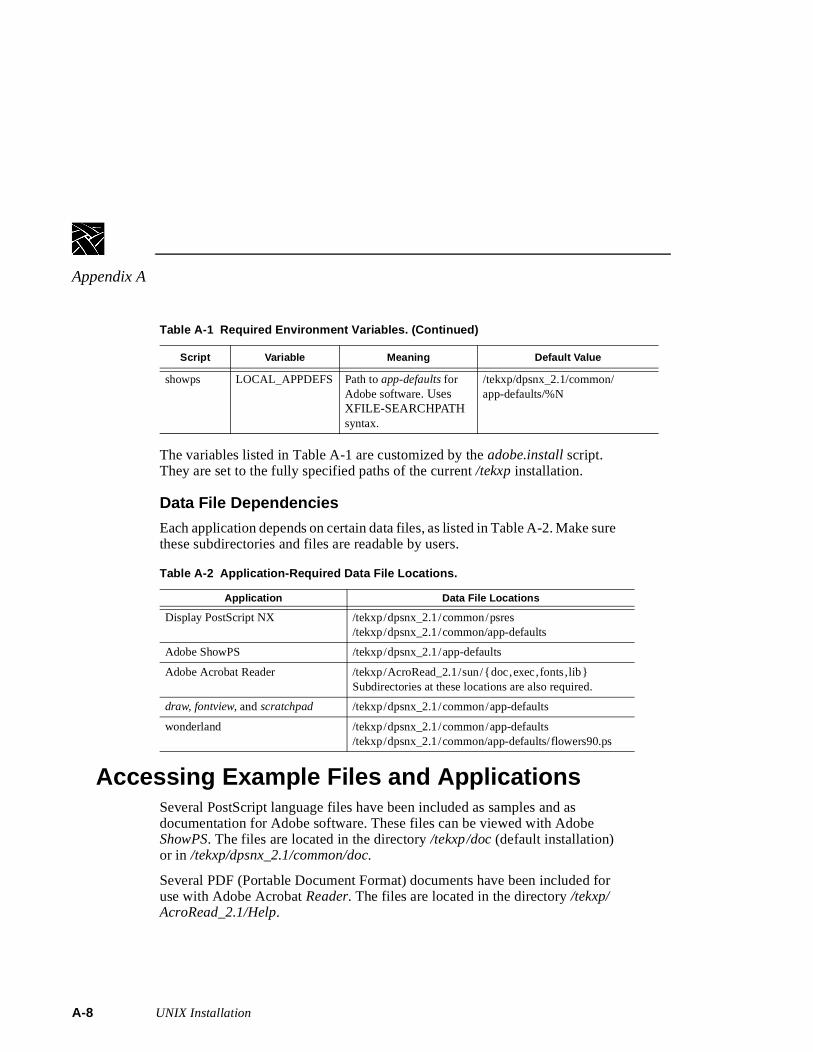
Appendix A
A-
re
r
The variables listed in Table A-1 are customized by the adobe.install script. They are set to the fully specified paths of the current /tekxp installation.
Data File Dependencies
Each application depends on certain data files, as listed in Table A-2. Make suthese subdirectories and files are readable by users.
Accessing Example Files and ApplicationsSeveral PostScript language files have been included as samples and as documentation for Adobe software. These files can be viewed with Adobe ShowPS. The files are located in the directory /tekxp/doc (default installation) or in /tekxp/dpsnx_2.1/common/doc.
Several PDF (Portable Document Format) documents have been included fouse with Adobe Acrobat Reader. The files are located in the directory /tekxp/AcroRead_2.1/Help.
showps LOCAL_APPDEFS Path to app-defaults for Adobe software. Uses XFILE-SEARCHPATH syntax.
/tekxp/dpsnx_2.1/common/app-defaults/%N
Table A-2 Application-Required Data File Locations.
Application Data File Locations
Display PostScript NX /tekxp/dpsnx_2.1/common/psres/tekxp/dpsnx_2.1/common/app-defaults
Adobe ShowPS /tekxp/dpsnx_2.1/app-defaults
Adobe Acrobat Reader /tekxp/AcroRead_2.1/sun/{doc,exec, fonts,lib}Subdirectories at these locations are also required.
draw, fontview, and scratchpad /tekxp/dpsnx_2.1/common/app-defaults
wonderland /tekxp/dpsnx_2.1/common/app-defaults/tekxp/dpsnx_2.1/common/app-defaults/ flowers90.ps
Table A-1 Required Environment Variables. (Continued)
Script Variable Meaning Default Value
8 UNIX Installation
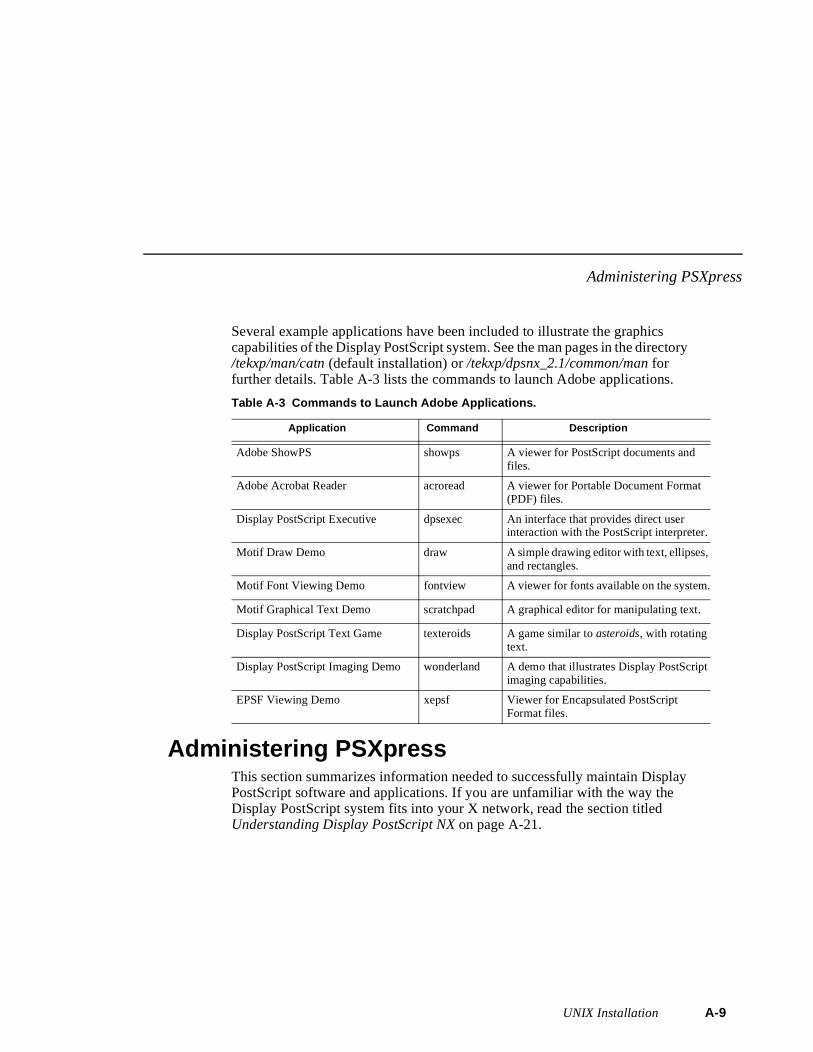
Administering PSXpress
ry
y
d
at
.
s,
m.
t.
cript
Several example applications have been included to illustrate the graphics capabilities of the Display PostScript system. See the man pages in the directo/tekxp/man/catn (default installation) or /tekxp/dpsnx_2.1/common/man for further details. Table A-3 lists the commands to launch Adobe applications.
Administering PSXpressThis section summarizes information needed to successfully maintain DisplaPostScript software and applications. If you are unfamiliar with the way the Display PostScript system fits into your X network, read the section titled Understanding Display PostScript NX on page A-21.
Table A-3 Commands to Launch Adobe Applications.
Application Command Description
Adobe ShowPS showps A viewer for PostScript documents anfiles.
Adobe Acrobat Reader acroread A viewer for Portable Document Form(PDF) files.
Display PostScript Executive dpsexec An interface that provides direct userinteraction with the PostScript interpreter
Motif Draw Demo draw A simple drawing editor with text, ellipseand rectangles.
Motif Font Viewing Demo fontview A viewer for fonts available on the syste
Motif Graphical Text Demo scratchpad A graphical editor for manipulating tex
Display PostScript Text Game texteroids A game similar to asteroids, with rotating text.
Display PostScript Imaging Demo wonderland A demo that illustrates Display PostSimaging capabilities.
EPSF Viewing Demo xepsf Viewer for Encapsulated PostScript Format files.
UNIX Installation A-9
Appendix A
A-
e
se
h
Adding Fonts and UPR FilesWhen you install Display PostScript software from other vendors, you may brequired to specify the installation location of Display PostScript resources such as Type 1 fonts and resource specification (UPR) files. Resource specification files have a .upr suffix.
The Display PostScript system searches for .upr files in the following locations, in the following order until it finds a value:
• The location specified by the user’s PSRESOURCEPATH environment variable.
• The location specified by the default value of “::”. The value of “::” for Display PostScript NX is as follows:
/usr/psres/usr/lib/DPSthe installation directory, for library data filesthe installation directory, for fonts
NOTE: The double colon (::) tells PostScript-based applications to look for resources in the standard locations in addition to the specific directories. Failure to include this symbol in the definition of PSRESOURCEPATH may cause problems.
*.upr files (for example, PSres.upr) are files that describe the PostScript resources installed on your system, such as PostScript Type 1 fonts. Becauthese files have a special syntax that must be followed in order to work properly, they are usually created using the makepsres utility (by default, located in /tekxp/dpsnx_2.1/<host>/bin). For more information on this utility, see the makepsres man page and the documentation that accompanies the software.
The directory /usr/psres is the recommended location for shared resources, sucas Type 1 fonts. The recommended procedure is to place the fonts in /usr/psres/ fonts and create a PSres.upr file in /usr/psres.
10 UNIX Installation
Adding Fonts and UPR Files
t nd
y
Installing Fonts for Acrobat Reader
One of Acrobat’s key features is font substitution. If a document requires a fonthat is not installed, Acrobat creates a substitute font that matches the size athe appearance of the original font. Although font substitution is entirely satisfactory for most situations, for optimal performance and accuracy, whenever possible, use the real font instead of a substitute font.
To achieve optimal font performance and accuracy, Acrobat Reader and the Display PostScript NX agent must be aware of all fonts installed on your system. By default, Acrobat Reader is aware of only those fonts pointed to b*.upr files in the /tekxp/AcroRead_2.1/fonts, /usr/psres, $HOME/psres, and the Display PostScript NX installation directories.
To make Acrobat Reader aware of *.upr files installed in directories different from the ones listed above, do the following:
1. If the *.upr files apply to all Acrobat Reader users, edit (as the root user) /tekxp/AcroRead_2.1/custom/SITE_PSRESOURCEPATH to add the directories to those listed in the file. (Comments in the file describe the changes you should make.)
2. Change the value of the environment variable PSRESOURCEPATH for each user. For example, to specify that directories /apps/wordtool/fonts and /projects/fonts contain *.upr files, set PSRESOURCEPATH as follows, depending on your shell:
C-shell users:# setenv PSRESOURCEPATH /apps/wordtool/fonts:/projects/fonts::
Bourne or Korn shell users:$ PSRESOURCEPATH = /apps/wordtool/fonts: /projects/fonts::
$ export PSRESOURCEPATH
It is recommended that you insert the definition of PSRESOURCEPATH intothe appropriate file (.cshrc, .login, or .profile) and then restart the window system so that the new value is in effect for all windows on the desktop.
UNIX Installation A-11
Appendix A
A-
rt.
or
at
e
Configuring the Services PortThis section describes how a port is selected for an agent that is started automatically by the Display PostScript Client Library. System administrators may need this information to change the default base port for TCP/IP transpo
The Client Library tries to start an agent on the port that was specified by theapplication when it called the XDPSNXSetClientArg procedure. If the application has not specified a port, the Client Library looks in the Internet services and aliases database for the entry
dpsnx <port>/tcp
to determine whether there is a port assigned. Depending upon your networksystem configuration, this database may be either the file /etc/services or an NIS database. port is the IP port number assigned as Display PostScript NX software’s base listening port. Its value is the base port in a range of ports ththe Client Library and the agent expect to be available for their use. The specified network protocol must be tcp. If the application has specified a port, but that port is already in use, the agent will not start. If there is no entry in thdatabase, the Client Library tries to start an agent using a default port, which is hard-coded to 6016.
12 UNIX Installation

Allocating Display PostScript Agents
e
to
n
y
t y, a
Allocating Display PostScript AgentsIn systems in which Display PostScript is implemented as an extension to thX server, there is exactly one PostScript interpreter for each X display. Similarly, for Display PostScript NX, the best results are obtained when one agent is allocated for each X display.
Display PostScript NX agents are run only when needed — you do not need configure your hosts to run agents at boot time. Do not think of agents as daemons. Rather, each Display PostScript application automatically starts aagent if one is not available. There are no facilities for remote execution: theagent runs on the same host as the Display PostScript application.
Similarly, you do not need to worry about cleaning up after agents (with the exception of “zombie” agents, as described on page A-18). When the last application in use on an X display exits, the agent associated with that X displaautomatically exits.
After an agent has been assigned to an X display, it will service all Display PostScript requests for that X display regardless of which application or hosthe requests come from. As a result, once an agent is started for an X displathe user can run clients from any host. Only one agent per host can service particular display.
For a given host, one agent is running for each user that is running a DisplayPostScript application. You can use the usual utilities (such as the ps command) to inspect the runtime state of your host. For the ps command, on System V-type OS use edf for options, for Berkeley-type OS, use aux for options.
# ps -options | grep dpsnx.agent | sed /grep/d
UNIX Installation A-13
Appendix A
A-
y
es
re
Exclusive Authorization for NCD Network ComputersThe Display PostScript NX agent included in NCBridge is authorized only to work with NCD network computers with the PSXpress option enabled. The agent cannot be used on any other type of X display.
Most Display PostScript NX agents purchased from other sources can be used on any display. For example, if you purchase Acrobat Exchange 2.1 for SPARC-compatible computers, an agent is included that can be used on andisplay. However, other forms of authorization may apply. In the case of Acrobat Exchange, the agent displays on any X display, but only communicatwith Display PostScript applications from Adobe.
When presented with a choice, use the latest revision of an agent. Agents afully backwards compatible. NCBridge software contains a Release 2.1 agent. See Using PSXpress with Other Display PostScript Applications on page A-19 for details.
14 UNIX Installation

Limit of 16 Agents per Host
t n dy. n
e s
al
Limit of 16 Agents per HostDisplay PostScript applications are configured to automatically start an agenas needed, but there is an implementation limit which prevents an applicatiofrom starting a new agent if there are 16 agents running on a single host alreaNote that this limit is imposed by the Display PostScript library linked with theapplication, not by Display PostScript NX. More than 16 agents can be run oa single host, however, but the additional agents must be started manually.
If the limit of 16 has been reached, the user will see a warning message in thcommand window when an additional Display PostScript application attemptto launch. When presented with the warning message, the user can quit a running Display PostScript application, run the new application on a different host, or start an agent on a different host and run the application on the originhost.
UNIX Installation A-15
Appendix A
A-
e
e
e
e
y
o
y.
ich ual
Starting an Agent with execnxThe execnx agent is used to start a Display PostScript NX software agent fromthe command line. execnx assigns an agent to a specific display, ensures that thDisplay PostScript system is available before starting an application, and configures an agent with any of the command-line arguments.
NOTE: Users do not need to run execnx before running showps, acroread, or any of the demo applications included in this release. These programs start their own agents if one is not already running.
To manually start an agent, invoke the execnx program from the command line. An example of the syntax is given below:
# execnx [–display display_name:num [.screen] ] [–new] [–port num][–transport { tcp|unix}] [– – [agent_name] agent_options]
See the execnx man page for the command-line syntax of execnx.
When execnx starts an agent, it also acts as the agent’s first client on the specified display. As a result, the agent places an advertising property on thgiven display and makes itself available to other applications.
By default, execnx starts an agent only for a display that is not already being serviced by either the Display PostScript extension or an existing agent. If thX server for the targeted display contains the Display PostScript extension, execnx notifies the user that the Display PostScript extension is present. If thX server does not have the extension, but there is an agent servicing it, execnx connects to the agent. If the display has an agent servicing it and the DisplaPostScript extension is present, execnx will not connect to the agent. To force execnx to start an agent, the environment variable DPSNXOVER must be set tTrue, and if an agent is present, the –new option must be used.
Starting an Agent to Service a Particular X Display
Use the following command syntax to start an agent for a particular X displa
# execnx –display display_name:num[.screen]
execnx starts an agent to service the named display, assuming the host on whexecnx is being executed has access rights to the named display. See the manpage for xhost(1) for more information. If the DISPLAY environment variable is already set to the display, you can omit the –display argument.
16 UNIX Installation
Starting an Agent with execnx
so
is
ed n
61.
Starting Multiple Agents On a Single Host
The Display PostScript NX software requires a reserved set of TCP/IP ports that multiple agents can run on a single host. execnx automatically searches for an open port in this range so that it can assign a port to an agent.
Starting Multiple Agents to Service a Single Display
Multiple agents from one or more hosts may service one display. If a display already running a service from one host, execnx does not start another agent unless the –new argument is specified. Use the following command to start anadditional agent for a display:
# execnx –display display_name:num [.screen] –new
Starting a Specific Agent
By default, execnx attempts to start the first executable named dpsnx.agent that it finds on the user’s search path. Multiple agents on the user’s path that contain locks for specific applications can lead to problems because execnx starts the first agent that it finds. This agent may be an older version than the one bundlwith the application, or it may not be the agent for which the application has aauthorization key. To specify an agent, include the name of the agent on thecommand line. If you specify an agent name without a complete file path, execnx will search the current search path for that executable. The following command line guarantees that execnx will start the agent in OurAppDir instead of any other agent executables that might be on the user’s search path.
# execnx – – /usr/new/OurAppDir/dpsnx.agent
Starting an Agent on a Specific Port
execnx uses the command-line arguments –port and –transport to start an agent on a specific port. execnx only uses the port specified; it does not use any of itsreserved set of TCP/IP ports. This example starts a new agent on tcp port 47
# execnx –port 4761 –transport tcp –new
Starting an Agent On a Different Host
execnx has no built-in functionality to remotely start agents. To start an agenton a specific host you must either remotely log on to that host and start the agent, or execute commands remotely on the host. For example, use the rsh command to run execnx.
UNIX Installation A-17
Appendix A
A-
t die
ts.
y
Avoiding Problems with Zombie Agents
There is a potential problem associated with manual launching of Display PostScript NX agents and the use of execnx. It is typical for users to use execnx in background mode, as follows:
# execnx &
Assuming that no agents are assigned to the X display, execnx starts a new agent in response to this command. It is possible for users to forget that they are running execnx in background mode. Since execnx maintains a connection to this agent, the agent remains active on the host. Because such agents do noautomatically as a user might expect (they are being kept alive by execnx), they are called zombie agents. By using up one of the 16 available agent slots, zombie agents may prevent other users from running more productive agen
To avoid zombie agents:
• If you run execnx in background mode (or leave any Display PostScript application running for a long time), do not forget to kill it when you are doneusing Display PostScript.
• Log out and reset your X server when you are done working. This is easilaccomplished if you are using XDMCP or some other form of session management. All clients, including the Display PostScript NX agent, closedown when the X server resets.
• Use the listnx utility to see if an agent is already servicing your display, and if so, whether or not you meant to launch it.
NOTE: Some users intentionally leave an agent running to reduce Display PostScript application start-up time, or for situations in which you want to run the agent on one host and Display PostScript applications on another.
18 UNIX Installation

Using PSXpress with Other Display PostScript Applications
or
ent
on .
h
e
Using PSXpress with Other Display PostScript ApplicationsThird party software packages may contain a Display PostScript NX agent. Fexample, users who purchase Adobe Acrobat Exchange 2.1 for SPARC-compatible computers will discover that it includes a Release 2.1 agent.
Display PostScript applications use whatever agent is currently running. If noagents are running when a user starts Acrobat Exchange, the Release 2.1 agthat was bundled with Acrobat Exchange is run for all Display PostScript applications that are subsequently launched. If no agents are running and the user starts Acrobat Reader (bundled with NCBridge software), the Release 2.1 agent bundled with Acrobat Reader is run for subsequent Display PostScript applications, including Acrobat Exchange.
Since it is desirable to use the latest revision whenever possible, the installatiof the third party software should be modified so that the latest agent is usedThe easiest way to modify the installation is to make sure that the directory containing the latest version of dpsnx.agent comes first on the user’s execution path. By default, Display PostScript applications search the user’s executionpath for the first instance of dpsnx.agent.
Some applications might attempt to use a fully specified path to their own bundled agent, but you can usually override this behavior by editing the launcscript used by the application or by choosing a customized installation configuration during installation.
If all else fails, you can find the agent that the application is using and replacthat dpsnx.agent with a symbolic link to the latest version. You may also needto replace the following data files with their latest versions:dpsnx.vm DPSNX.upr DPSNXFonts.upr
UNIX Installation A-19
Appendix A
A-
s
Updating XKeysymDBYou may wish to consider updating your site’s installed XKeysymDB file. Adobe Display PostScript applications are based on OSF/Motif, which requireadditional key bindings.
If your site is using an X environment that is compatible with X version 11 Release 4 (X11R4) or earlier, you probably need to update the XKeysymDB file. If your site is using an X environment that is compatible with X version 11 Release 5 (X11R5) or later, you probably do not need to update.
In any case, if your users complain of warning messages or malfunctioning Motif applications, you need to update.
A copy of the file distributed with X11R5 is included in:
/tekxp/dpsnx_2.1/common/lib/X11/XKeysymDB
You can merge it into your site’s XKeysymDB, or direct users to set the environment variable XKEYSYMDB to the specified path.
Failure to use the correct XKeysymDB results in warning messages, application malfunction, or incorrect interface appearance or behavior.
20 UNIX Installation
Understanding Display PostScript NX
Understanding Display PostScript NXThis section provides background information about Display PostScript NX software that may prove useful for system administrators.
The Display PostScript system is available both as an extension to the X Window System and as a stand-alone application in the form of Display PostScript NX.
UNIX Installation A-21
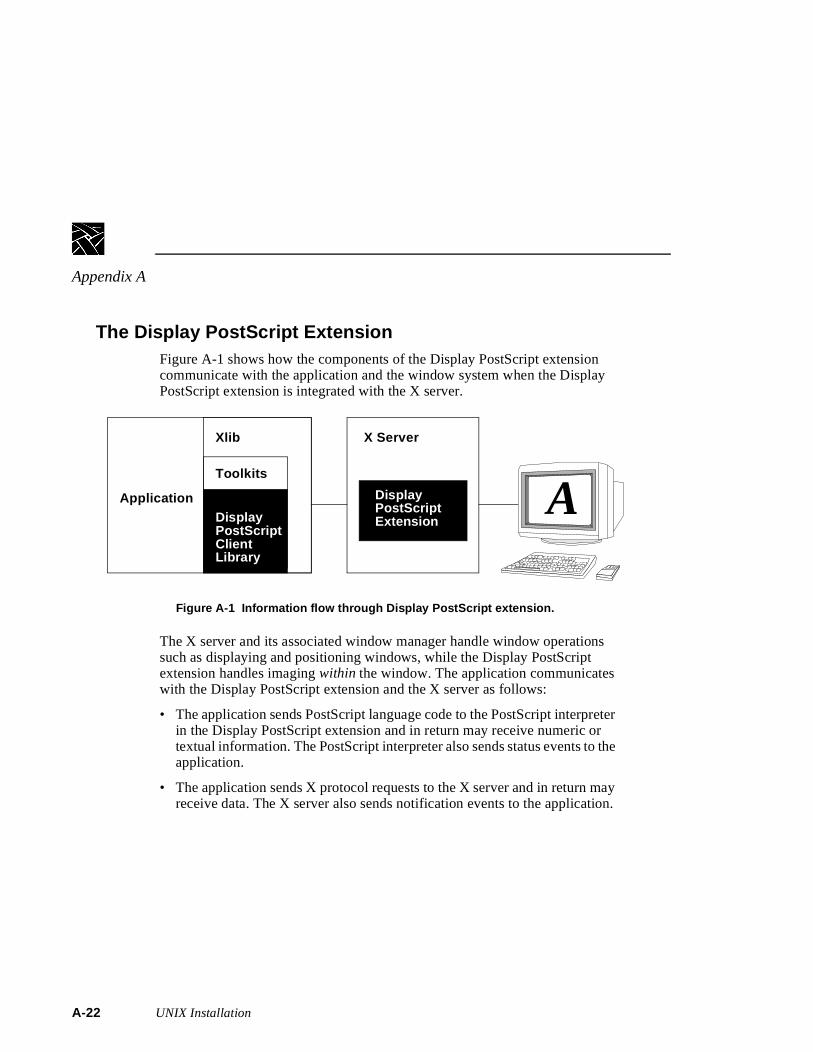
Appendix A
A-
ter
he
y n.
The Display PostScript ExtensionFigure A-1 shows how the components of the Display PostScript extension communicate with the application and the window system when the Display PostScript extension is integrated with the X server.
Figure A-1 Information flow through Display PostScript extension.
The X server and its associated window manager handle window operationssuch as displaying and positioning windows, while the Display PostScript extension handles imaging within the window. The application communicates with the Display PostScript extension and the X server as follows:
• The application sends PostScript language code to the PostScript interprein the Display PostScript extension and in return may receive numeric or textual information. The PostScript interpreter also sends status events to tapplication.
• The application sends X protocol requests to the X server and in return mareceive data. The X server also sends notification events to the applicatio
Application
Xlib
Toolkits
X Server
DisplayPostScriptExtensionDisplay
PostScriptClientLibrary
A
22 UNIX Installation
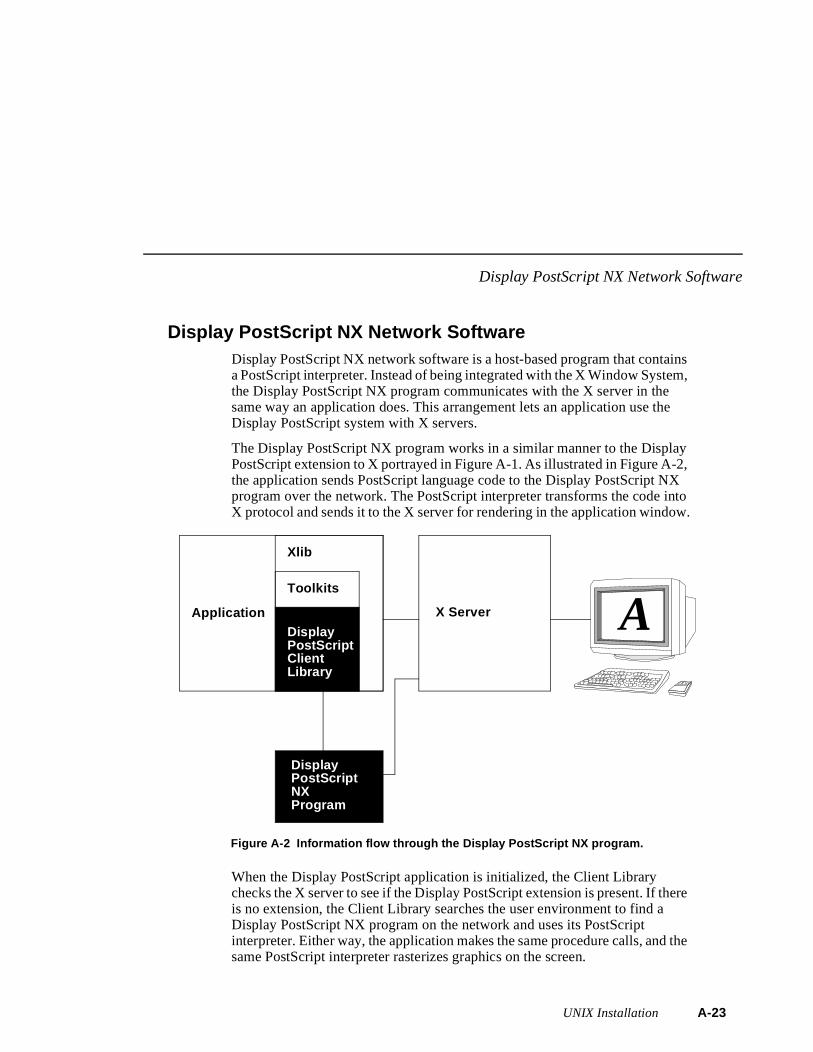
Display PostScript NX Network Software
s ,
,
to .
re
the
Display PostScript NX Network SoftwareDisplay PostScript NX network software is a host-based program that containa PostScript interpreter. Instead of being integrated with the X Window Systemthe Display PostScript NX program communicates with the X server in the same way an application does. This arrangement lets an application use the Display PostScript system with X servers.
The Display PostScript NX program works in a similar manner to the DisplayPostScript extension to X portrayed in Figure A-1. As illustrated in Figure A-2the application sends PostScript language code to the Display PostScript NXprogram over the network. The PostScript interpreter transforms the code inX protocol and sends it to the X server for rendering in the application window
Figure A-2 Information flow through the Display PostScript NX program.
When the Display PostScript application is initialized, the Client Library checks the X server to see if the Display PostScript extension is present. If theis no extension, the Client Library searches the user environment to find a Display PostScript NX program on the network and uses its PostScript interpreter. Either way, the application makes the same procedure calls, and same PostScript interpreter rasterizes graphics on the screen.
Application
Xlib
Toolkits
X Server
DisplayPostScriptNX
DisplayPostScriptClientLibrary
Program
A
UNIX Installation A-23

Appendix A
A-
24 UNIX Installation
Index
2
Symbols/etc/bootptab file 5-6/etc/exports file 5-3/etc/hosts file 5-3/etc/inetd 5-5/etc/inetd.conf file 5-4/etc/services file 5-4
AAcrobat Reader
installing fonts for A-11adobe.install script A-3Analog Video Player
starting with xpsh 9-3Audio Mixer
starting with xpsh 9-4Audio Player
starting with xpsh 9-4authkey.dat file 9-22Authorization Key Manager 9-21
setting up SNMP 9-21starting with xpsh 9-4
BBaud rate 2-28Boot
directory fonts 11-5from master Network computers 2-
15host 2-3host check list 2-16methods 2-5strategies 2-5
Boot Monitor Commands 1-54about the Boot Monitor 1-53
bmethod 1-55boot 1-54bpath 1-55iaddr 1-55igate 1-55ihost 1-55imask 1-55lanspeed 1-54localaddr 1-54mtu 1-54NVSAVE 1-54
Boot screen 1-53boot_file
which version 1-51boot_host_name 2-23boot_method 2-23boot_path 2-23, 2-24, 2-25, 2-26, 2-27Booting
automatic 2-6first boot 2-6from a specific host 2-7from first available host 2-7manual 2-6subsequent boots 2-7
bootpalways running 3-13, 4-7, 7-11, 8-1automatic booting 2-6bootptab file 3-8, 4-5, 6-6, 7-5, 8-8DEC bootp 7-5enabling 5-6, 7-5host enabling 3-8, 4-5, 6-6, 8-8making 1-48running 4-7running on request 3-11, 4-8, 7-10, 8-11
UNIX Installation IDX-1
Index
ID
,
bootptab file 3-8, 3-9, 4-5, 4-6, 6-6, 6-7,6-8, 7-5, 7-8, 8-8, 8-9
CCDE 9-33Check List
boot host 2-16file host 2-16Network computer 2-17
Client Launcher 1-57, 9-15Configuring 9-15downloading the launcher 9-18starting the Client Launcher 9-20Starting with xpsh 9-7
Common Desktop Environment 9-33starting 9-34
Configuration choices and strategies 2-1Configuration Files
font path table 11-1Console, remote 9-8Cterm 2-12, 2-13, 2-14
starting a cterm session 9-4cterm_menu_entry 2-30
DDAP
font access 11-1Data bits 2-28DEC
bootp 7-5DECwindows
session manager 7-13default_cterm_host 2-28default_telnet_host 2-27determine_address_from 2-27
Digital Video Playerstarting with xpsh 9-5
Directory heirarchy 1-5Display PostScript
allocating agents A-13Display PostScript Client Library A-12Display PostScript NX
overview A-21Display PostScript NX agent
limit on number of A-15starting manually A-16zombie A-18
Distributed computing 2-3Domain Name Service
adding entries 3-20, 4-11, 6-13, 7-148-15
bootptab file 3-9, 4-6, 6-8, 7-8, 8-9dxsession 7-13
EEmulators
Tek220 9-4Tek340 9-4
FFile Access Methods
TFTP, NFS, DAP, SXP 2-10File Access Strategies 2-9File heirarchy 1-5File Host 2-3
check list 2-16file_access_1 2-20file_host_name_1 2-20file_path_1 2-20
X-2 UNIX Installation
Index
Flash Memory 2-15strategies 2-15
Flow control 2-28Font
boot directory 11-5converting SCF to SNF 11-11DAP access 11-1database 11-3fonts.alias file 11-4fonts.dir file 11-4HP compressed format 11-10installing 11-7mkfontdir command 11-7NFS access 11-1resident 11-5SCF files 11-10setting up 11-1tftp access 11-1xset command 11-8
FontsIBM 11-7
fontsadding A-10
fonts.alias 11-4, 11-8fonts.dir 11-4, 11-8
Ggateway_entry 2-19gateway_table 2-18Generic UNIX host
Installing the software 1-35Getting acquainted 1-49Graphics Tablet 9-30
Hhardcopy
setting up 6-13Hewlett-Packard fonts 11-10Hewlett-Packard host
Installing the software 1-20Host
boot 2-3connection strategies 2-11file 2-3file host considerations 2-9login 2-3
host_connect_method 2-22HostMenu 2-12
IIBM host
Installing the software 1-15IBM host connection 2-12ibm_menu_entry 2-31INSTALL Script 1-43Installation
media contents 1-5Installation Considerations 1-8
Alpha_OSF 1-30Generic UNIX 1-35Hewlett-Packard 1-20IBM 1-15Silicon Graphics 1-25
Installation example 1-50ip_host_entry 2-19ip_host_table 2-18
UNIX Installation IDX-3
Index
ID
LLAT 2-12, 2-14
starting a LAT session 9-7lat_services_table 2-20Launcher 1-57Local clients 9-1
starting with rsh 9-13starting with xpsh 9-2
Local Window Managerstarting a local session 9-12
Locking the network computer 9-12Login
host 2-3window 2-13
MManual
mouse terminology viiterminology used viitypographical conventions vii
Master Network computer 2-15Media
about 1-1contents 1-5loading 1-8
mkfontdir 11-7MOP 2-5, 2-10Motif Window Manager
bitmap files 10-7configuration files 10-2defaults file 10-5resource description file 10-2starting a local session 9-7Starting from DECwindows 7-14starting MWM 10-2
troubleshooting 10-9virtual key bindings, specifying 10-7
Mouse Buttons vii
NName Service (DNS) 4-11, 7-14Name service (DNS) 3-20, 6-13, 8-15Network Computer
Booting 1-54Network computer
checklist 2-17Power on 1-53
Network computer Worksheet 1-51NFS
enabling 5-3, 6-3, 8-3enabling on SunOS 4 3-3enabling on SunOS 5 3-4font access 11-1host enabling 4-2, 7-3using 2-5, 2-10
NFS boot securityfor Alpha_OSF hosts 1-30for Generic UNIX hosts 1-35for Hewlett-Packard hosts 1-20for IBM hosts 1-15for Silicon Graphics hosts 1-25for Sun hosts 1-9
nfs_table 2-18, 2-19
PParity 2-28PSXpress option
documentation A-8manual installation A-7system requirements A-1
X-4 UNIX Installation
Index
QQuick Start 1-2
Rrarp
host enabling 7-12, 8-13host enabling SunOS 4 3-14host enabling SunOS 5 3-15
Remote Configurationreading from ROM or Flash Memory
2-15Remote Configuration Commands
update_authkey 9-23Resident fonts
table of resident fonts 11-5ROM 2-5, 2-15
booting 2-5strategies 2-15
RSHstarting local clients 9-13
SSave Setup Settings to File 1-63save_current_settings 2-28SCF Fonts 11-11SCF fonts 11-10Scoreboard 1-53Secure tftp 3-5, 3-7, 3-9, 5-4, 6-4, 6-5, 6-
8, 7-4, 8-5, 8-7, 8-9, 11-2for Alpha_OSF hosts 1-30for Generic UNIX hosts 1-36for Silicon Graphics hosts 1-25for Sun hosts 1-10
Serial 0, Serial 1 2-14starting a serial session 9-7
Session window 2-13Setup
exiting 1-64key 1-57main menu 1-57save settings to file 1-63starting with xpsh 9-7window 1-60
Setup key 1-57Silicon Graphics host
Installing the software 1-25Stop bits 2-28Strategies
configuration 2-3file access 2-9Flash Memory 2-15for booting 2-5host connection 2-11ROM 2-15
Subnet Maskbootptab file 4-6
Subnet maskbootptab file 6-8, 7-8, 8-9
subnet maskbootptab file 3-9
Sun hostInstalling the software 1-9
SXpfont access 11-1method 2-10
UNIX Installation IDX-5
Index
ID
TTCP/IP 2-12tde_host_entry 2-19tde_host_table 2-18TDEnet 2-12Tek220 emulator 9-4Tek340 emulator 9-4Telnet 1-58, 2-12, 2-13, 2-14
closing 1-59default host 1-61opening 1-58starting a Telnet session 9-8
telnet_menu_entry 2-30TFTP
secure 3-7tftp 5-4
enabling 3-5, 5-4, 6-4, 7-4, 8-5font access 11-1making 1-48secure 5-4, 6-5, 8-7, 11-2secure tftp 7-4using 2-5, 2-10
tftpd 5-4Token-Ring
adding a Network computer to 1-54
UUPR files and fonts A-10Using the INSTALL Script 1-43Utilities, making 1-47
Vvms_autologin_tdenet_host 2-22vms_autologin_transport 2-22vms_menu_entry 2-29
WWinDD
host connection 2-12starting a session 9-9
windd_auto_connect 2-32windd_auto_reconnect 2-32windd_entrybox 2-32windd_host_name 2-32windd_menu_entry 2-31windd_menubar 2-32windd_size 2-32
XX Display Manager (xdm)
host enabling 3-16, 4-9, 6-11X Imaging Extension (XIE) 9-28XBlink feature 9-29XDMCP 2-12xdmcp_connect 2-21xdmcp_menu_entry 2-28xdmcp_server 2-21XIE 9-28XIE Viewer
starting with xpsh 9-11XKeysymDB file
updating A-20Xlock function 9-12Xprompter 7-13XPSH
starting a LAT session 9-7starting a serial session 9-7starting Cterm 9-4starting local clients 9-2starting MWM 9-7starting Setup 9-7
X-6 UNIX Installation
Index
starting Telnet 9-8starting the Analog Video Player 9-3starting the Audio Mixer 9-4starting the Audio Player 9-4starting the authorization key manag-
er 9-4starting the client launcher 9-7starting the Digital Video Player 9-5starting the XIE Viewer 9-11starting Xlock 9-12starting XPWM 9-12
XPT/A Graphics Tablet 6-13, 9-30Xsession File 4-10xset 11-8
UNIX Installation IDX-7

Index
ID
X-8 UNIX Installation

Network Computing Devices, Inc.350 North Bernardo AvenueMountain View, CA 94043-5207
9300845
*9300845*