oracle webcenter sites
TRANSCRIPT
Oracle® Fusion MiddlewareWebCenter Sites: Installing and Configuring Supporting Software
11g Release 1 (11.1.1.8.0)
E29751-03
December 2016
Oracle Fusion Middleware WebCenter Sites: Installing and Configuring Supporting Software, 11g Release 1 (11.1.1.8.0)
E29751-03
Copyright © 2012, 2016, Oracle and/or its affiliates. All rights reserved.
Primary Author: Nirmala Suryaprakash
This software and related documentation are provided under a license agreement containing restrictions on use and disclosure and are protected by intellectual property laws. Except as expressly permitted in your license agreement or allowed by law, you may not use, copy, reproduce, translate, broadcast, modify, license, transmit, distribute, exhibit, perform, publish, or display any part, in any form, or by any means. Reverse engineering, disassembly, or decompilation of this software, unless required by law for interoperability, is prohibited.
The information contained herein is subject to change without notice and is not warranted to be error-free. If you find any errors, please report them to us in writing.
If this is software or related documentation that is delivered to the U.S. Government or anyone licensing it on behalf of the U.S. Government, then the following notice is applicable:
U.S. GOVERNMENT END USERS: Oracle programs, including any operating system, integrated software, any programs installed on the hardware, and/or documentation, delivered to U.S. Government end users are "commercial computer software" pursuant to the applicable Federal Acquisition Regulation and agency-specific supplemental regulations. As such, use, duplication, disclosure, modification, and adaptation of the programs, including any operating system, integrated software, any programs installed on the hardware, and/or documentation, shall be subject to license terms and license restrictions applicable to the programs. No other rights are granted to the U.S. Government.
This software or hardware is developed for general use in a variety of information management applications. It is not developed or intended for use in any inherently dangerous applications, including applications that may create a risk of personal injury. If you use this software or hardware in dangerous applications, then you shall be responsible to take all appropriate fail-safe, backup, redundancy, and other measures to ensure its safe use. Oracle Corporation and its affiliates disclaim any liability for any damages caused by use of this software or hardware in dangerous applications.
Oracle and Java are registered trademarks of Oracle and/or its affiliates. Other names may be trademarks of their respective owners.
Intel and Intel Xeon are trademarks or registered trademarks of Intel Corporation. All SPARC trademarks are used under license and are trademarks or registered trademarks of SPARC International, Inc. AMD, Opteron, the AMD logo, and the AMD Opteron logo are trademarks or registered trademarks of Advanced Micro Devices. UNIX is a registered trademark of The Open Group.
This software or hardware and documentation may provide access to or information about content, products, and services from third parties. Oracle Corporation and its affiliates are not responsible for and expressly disclaim all warranties of any kind with respect to third-party content, products, and services unless otherwise set forth in an applicable agreement between you and Oracle. Oracle Corporation and its affiliates will not be responsible for any loss, costs, or damages incurred due to your access to or use of third-party content, products, or services, except as set forth in an applicable agreement between you and Oracle.
iii
Contents
Preface ................................................................................................................................................................. ix
Audience....................................................................................................................................................... ixDocumentation Accessibility ..................................................................................................................... ixRelated Documents ..................................................................................................................................... ixGraphics in This Guide............................................................................................................................... ixConventions ................................................................................................................................................. x
Part I Creating and Configuring a Database
1 Creating and Configuring an Oracle 11g Database
1.1 Creating an Oracle 11g Database ...................................................................................... 1-11.2 Creating a New User for WebCenter Sites ...................................................................... 1-201.3 Next Step ........................................................................................................................ 1-26
2 Creating and Configuring an IBM DB2 Database
2.1 Installing DB2 ................................................................................................................... 2-12.2 Creating a New DB2 Database ...................................................................................... 2-172.2.1 Creating a New DB2 Database Using a SQL Script .................................................. 2-172.2.2 Creating a New DB2 Database Using the 'db2cc' Utility .......................................... 2-182.3 Configuring the Database ............................................................................................... 2-26
3 Creating and Configuring a Microsoft SQL Server Database
3.1 Creating and Configuring a SQL Server 2008 R2 or 2012 Database .................................. 3-1
Part II Installing an Application Server
4 Installing Oracle WebLogic Server
4.1 WebLogic Server Installation Steps .................................................................................. 4-1
5 Installing Apache Tomcat Application Server
5.1 Tomcat Installation Steps ................................................................................................. 5-1
iv
6 Installing IBM WebSphere Application Server
6.1 Installing IBM Installation Manager ................................................................................. 6-16.2 Installing WebSphere Application Server Using IBM IM ................................................. 6-66.3 Updating WebSphere Application Server ...................................................................... 6-22
Part III Installing a Web Server
7 Installing Oracle HTTP Server 11g
7.1 Oracle HTTP Server 11g Installation Steps ....................................................................... 7-1
8 Installing Apache Web Server
8.1 Is Apache Web Server Already Installed? ........................................................................ 8-18.2 Installation Options .......................................................................................................... 8-18.3 Documenting Your Apache Parameters ........................................................................... 8-28.4 Verifying that Apache Runs Properly .............................................................................. 8-38.5 Next Step .......................................................................................................................... 8-3
9 Installing IBM HTTP Server 8.0 and 8.5
9.1 IBM HTTP Server 8.0 and 8.5 Installation Steps ............................................................... 9-19.2 WebServer Plugin Configuration ..................................................................................... 9-8
10 Installing IBM HTTP Server 7.0
10.1 IBM HTTP Server 7.0 Installation Steps ......................................................................... 10-110.2 Installing IHS 7.0 with WebSphere Application Server on the Local Server ................ 10-11
11 Installing Microsoft Internet Information Services 8.0 on Windows 2012 Server
11.1 Installing IIS 8.0 .............................................................................................................. 11-111.2 Verifying the Installation ................................................................................................ 11-411.3 Starting and Configuring IIS 8.0 ..................................................................................... 11-511.3.1 Starting and Configuring IIS Manager ..................................................................... 11-511.3.2 Changing the IIS Port ............................................................................................... 11-711.3.3 Adding a New ISAPI Filter ...................................................................................... 11-811.4 Proxing Using IIS 8.0 ...................................................................................................... 11-9
12 Installing Microsoft Internet Information Services 7.x on Windows 2008 Server
12.1 Installing IIS 7.x .............................................................................................................. 12-112.2 Verifying the Installation .............................................................................................. 12-1012.3 Starting and Configuring IIS ........................................................................................ 12-1112.3.1 IIS Manager ........................................................................................................... 12-1112.3.2 Changing the IIS Port ............................................................................................. 12-1212.3.3 Adding a New ISAPI Filter .................................................................................... 12-1312.3.4 Proxying Using IIS ................................................................................................. 12-14
v
Part IV Installing and Configuring an LDAP Server
13 Setting Up Oracle Internet Directory
13.1 Installing Oracle Internet Directory ................................................................................ 13-113.2 Starting the Required Oracle Internet Directory Components ....................................... 13-113.3 Using the Oracle Directory Services Manager ................................................................ 13-313.4 Configuring Oracle Internet Directory ........................................................................... 13-513.5 Connecting to Oracle Internet Directory using an LDAP Browser ................................. 13-713.6 Adding Users/Roles Using an LDIF File ........................................................................ 13-8
14 Setting Up the Oracle WebLogic 10.3 Embedded LDAP Server
14.1 Enabling the WebLogic Embedded LDAP Server .......................................................... 14-114.2 Modifying User Passwords ............................................................................................ 14-3
15 Setting Up IBM Tivoli Directory Server 6.x
15.1 IBM Tivoli Directory Server Commands ........................................................................ 15-115.2 Before Installing IBM Tivoli Directory Server ................................................................ 15-115.3 Installing IBM Tivoli Directory Server ........................................................................... 15-215.4 Configuring Tivoli Directory Server ............................................................................. 15-1115.5 Connecting to IBM TDS Using the LDAP Browser ...................................................... 15-19
16 Installing Microsoft Active Directory 2012
16.1 Configuring OS System Settings ..................................................................................... 16-116.2 Configuring the Network Settings ................................................................................. 16-416.3 Installing Active Directory 2012 ..................................................................................... 16-716.4 Checking Group Policies .............................................................................................. 16-2016.5 Changing Group Policies .............................................................................................. 16-2416.6 Connecting to Active Directory Server Using an LDAP Browser ................................. 16-27
17 Installing Microsoft Active Directory 2008
17.1 Installing Active Directory 2008 ..................................................................................... 17-117.2 Configuring the Network Settings ................................................................................. 17-517.3 Installing Active Directory 2008 Services ....................................................................... 17-917.4 Installing Active Directory 2008 Installation Wizard .................................................... 17-1617.5 Checking Group Policies .............................................................................................. 17-2817.6 Changing Group Policies .............................................................................................. 17-3217.7 Connecting to ADS Using an LDAP Browser ............................................................... 17-36
18 Setting Up OpenLDAP 2.3.x
18.1 OpenLDAP Commands ................................................................................................. 18-118.1.1 Starting OpenLDAP ................................................................................................. 18-118.1.2 Searching an OpenLDAP Server .............................................................................. 18-118.1.3 Adding an LDIF File to an OpenLDAP Server ......................................................... 18-218.2 Installing OpenLDAP ..................................................................................................... 18-2

vi
18.3 Configuring OpenLDAP ................................................................................................ 18-518.4 Adding WebCenter Sites Schema to OpenLDAP ........................................................... 18-718.5 Modifying User Passwords ............................................................................................ 18-918.5.1 Modifying User Passwords Using an LDAP Browser ........................................... 18-1018.5.2 Modifying User Passwords Using the ldapmodify Command .............................. 18-12
Part V Integrating Oracle WebCenter Sites with LDAP
19 Overview of the Oracle WebCenter Sites-LDAP Integration
19.1 Introduction ................................................................................................................... 19-119.2 LDAP Integration Options ............................................................................................. 19-2
20 Integrating Oracle WebCenter Sites with Flat Schema LDAP Servers
20.1 WebCenter Sites-LDAP Integrator ................................................................................. 20-120.2 Running the WebCenter Sites-LDAP Integrator ............................................................ 20-220.2.1 Prerequisites ............................................................................................................ 20-220.2.2 Integration Steps ...................................................................................................... 20-320.3 Completing the Integration .......................................................................................... 20-1520.4 Post-Integration Steps: When CM Sites Have Not Been Created ................................. 20-1720.5 Testing the Integration ................................................................................................. 20-17
21 Integrating Oracle WebCenter Sites with Hierarchical Schema LDAP Servers
21.1 Integration Steps ............................................................................................................ 21-121.1.1 Step 1. Configure the WebCenter Sites LDAP Connection Properties ..................... 21-121.1.1.1 A. Start the Property Editor ............................................................................... 21-221.1.1.2 B. Configure Properties in futuretense.ini ......................................................... 21-221.1.1.3 C. Configure Properties in dir.ini ...................................................................... 21-221.1.1.4 D. Configure Properties in futuretense_xcel.ini ................................................ 21-421.1.2 Step 2. Configure the LDAP Server ......................................................................... 21-521.1.3 Step 3. Check the mail Attribute ............................................................................. 21-521.1.4 Step 4. Create LDAP User Groups (WebCenter Sites ACLs) ................................... 21-521.1.4.1 Default ACLs ..................................................................................................... 21-521.1.4.2 Web Services ACLs ........................................................................................... 21-621.1.4.3 Custom ACLs .................................................................................................... 21-621.1.5 Step 5. Create Required Users and Assign Them to LDAP Groups ......................... 21-621.1.5.1 WebCenter Sites Default Users .......................................................................... 21-721.1.5.2 Custom Users .................................................................................................... 21-721.1.5.3 Sample Site Users .............................................................................................. 21-721.1.6 Step 6. Create Sites and Roles in the LDAP Server .................................................. 21-821.1.7 Step 7. If You Completed Step 6 ............................................................................ 21-1021.1.8 Step 8. Post-Integration Steps When CM Sites Have Not Been Created ................ 21-1121.2 Testing the Integration ................................................................................................. 21-11
22 Reference: Sample LDIF for Hierarchical Schema LDAP
22.1 Sample ldif File ............................................................................................................... 22-1
vii
Part VI Installing and Configuring Authentication Services
23 Integrating Oracle Access Manager with Oracle WebCenter Sites
23.1 Overview ........................................................................................................................ 23-123.1.1 Integration Components .......................................................................................... 23-123.1.2 Flow for Browser Requests ...................................................................................... 23-223.1.2.1 Login Processing ............................................................................................... 23-323.1.2.2 SSO and Logoff .................................................................................................. 23-423.1.3 REST Service Flow ................................................................................................... 23-423.2 OAM Integration Prerequisites ...................................................................................... 23-523.2.1 Oracle Database 11g - Version 11.2.0 ........................................................................ 23-623.2.2 Oracle Fusion Middleware Repository Creation Utility .......................................... 23-723.2.3 Oracle WebLogic Server Generic and Coherence ..................................................... 23-723.2.4 Oracle Identity Management and Access Management ........................................... 23-723.2.5 Oracle Fusion Middleware Web Tier Utilities .......................................................... 23-923.2.6 Oracle Access Manager OHS WebGates .................................................................. 23-923.3 Integrating OAM with Oracle WebCenter Sites ........................................................... 23-1023.3.1 Before You Start ..................................................................................................... 23-1023.3.2 Integration Steps .................................................................................................... 23-1123.3.3 Allowing Anonymous Access to External Users .................................................... 23-2423.4 Integrating OAM with Oracle WebCenter Sites: Satellite Server .................................. 23-2523.4.1 Before You Start ..................................................................................................... 23-2523.4.2 Integration Steps .................................................................................................... 23-25
24 Enabling Community-Gadgets to Communicate with OAM-Integrated WebCenter Sites
24.1 Before You Start .............................................................................................................. 24-124.2 Enabling Communication with the OAM-Integrated Management WebCenter Sites .... 24-224.2.1 Updating the Management OAM-WebCenter Sites Configuration to Support
Community-Gadgets ............................................................................................... 24-224.2.1.1 Adding the Management Community-Gadgets Resource Definitions to the
OAM-WebCenter Sites Configuration ............................................................... 24-224.2.1.2 Enabling Identity Assertion for the Authorization Policy ................................. 24-324.2.1.3 Registering the WebLogic Managed Server for the Management
Community-Gadgets with Oracle HTTP Server ................................................ 24-324.2.1.4 Increasing Maximum Number of Sessions ........................................................ 24-424.2.2 Configuring Community-Gadgets to Use the OAM-Integrated Management
WebCenter Sites ....................................................................................................... 24-524.2.2.1 Configuring wem_sso_config.xml ..................................................................... 24-524.2.2.2 Adding the Oracle HTTP Server Address to Property Files .............................. 24-624.3 Enabling Communication with the OAM-Integrated Production WebCenter Sites ....... 24-724.3.1 Updating the Production OAM-WebCenter Sites Configuration to Support
Community-Gadgets ............................................................................................... 24-724.3.1.1 Adding Production Community-Gadgets Resource Definitions to the
OAM-WebCenter Sites Configuration ............................................................... 24-724.3.1.2 Enabling Identity Assertion for the Authorization Policy ................................. 24-8
viii
24.3.1.3 Registering the WebLogic Managed Server for the Production Community-Gadgets Application with Oracle HTTP Server ............................ 24-8
24.3.2 Configuring Community-Gadgets to Use OAM-Integrated Production WebCenter Sites ......................................................................................................................... 24-9
24.3.2.1 Configuring wem_sso_config.xml ..................................................................... 24-924.3.2.2 Adding the Oracle HTTP Server Address to Property Files ............................ 24-1024.4 Next Step ...................................................................................................................... 24-11
25 Integrating Oracle Access Manager with Oracle WebCenter Sites: Site Capture
25.1 Prerequisites ................................................................................................................... 25-125.2 Configuring Oracle Access Manager for Integration with Site Capture ......................... 25-125.2.1 Adding Resources to Oracle Access Manager ......................................................... 25-125.2.2 Adjusting the root-context.xml File ......................................................................... 25-2
ix
Preface
This guide contains information about installing and configuring supported databases, application servers, web servers, and other software used by the Oracle WebCenter Sites product family. This guide also contains procedures for integrating WebCenter Sites and its applications with LDAP and authentication applications.
AudienceThis guide is intended for installation engineers with experience installing and configuring enterprise-level software, including databases, database drivers, application servers, web servers, and LDAP servers.
Documentation AccessibilityFor information about Oracle's commitment to accessibility, visit the Oracle Accessibility Program website at http://www.oracle.com/pls/topic/lookup?ctx=acc&id=docacc.
Access to Oracle SupportOracle customers that have purchased support have access to electronic support through My Oracle Support. For information, visit http://www.oracle.com/pls/topic/lookup?ctx=acc&id=info or visit http://www.oracle.com/pls/topic/lookup?ctx=acc&id=trs if you are hearing impaired.
Related DocumentsFor more information, see the following documents:
■ Oracle WebCenter Sites Certification Matrix
■ Oracle WebCenter Sites Release Notes
■ Oracle Fusion Middleware WebCenter Sites Installation Guide
Graphics in This GuideGraphics in this guide are screen captures of dialog boxes and similar windows that you will interact with during the installation or configuration process. The graphics are presented to help you follow the installation and configuration processes. They are not intended to be sources of information such as parameter values, options to select, and product version numbers.
x
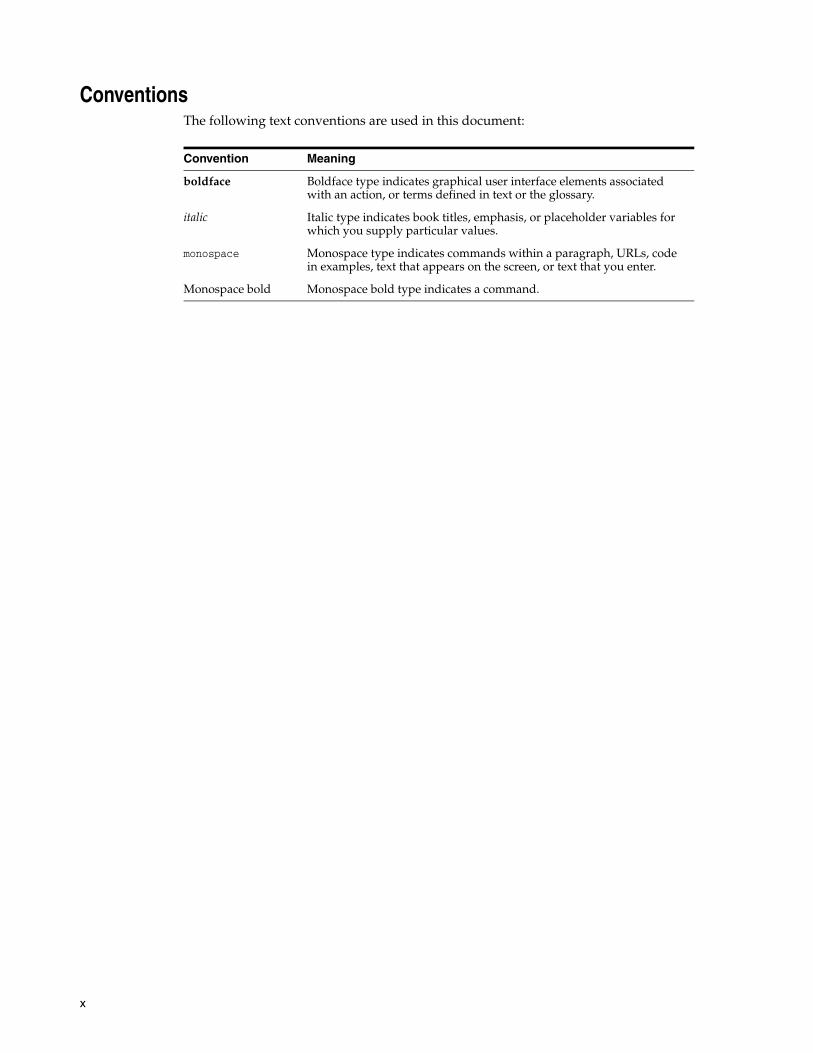
ConventionsThe following text conventions are used in this document:
Convention Meaning
boldface Boldface type indicates graphical user interface elements associated with an action, or terms defined in text or the glossary.
italic Italic type indicates book titles, emphasis, or placeholder variables for which you supply particular values.
monospace Monospace type indicates commands within a paragraph, URLs, code in examples, text that appears on the screen, or text that you enter.
Monospace bold Monospace bold type indicates a command.
Part IPart I Creating and Configuring a Database
Oracle WebCenter Sites requires access to a supported database configured specifically for WebCenter Sites. Instructions for creating and configuring supported databases are available in this part.
Part I contains the following chapters:
■ Chapter 1, "Creating and Configuring an Oracle 11g Database"
■ Chapter 2, "Creating and Configuring an IBM DB2 Database"
■ Chapter 3, "Creating and Configuring a Microsoft SQL Server Database"
In practice, permissions can be restricted for the user that WebCenter Sites will use to access a database. However, the following rights must exist: ability to create, modify, and delete tables and indexes.
If you need instructions on installing a supported database, refer to the product documentation. For instructions on creating and configuring a supported database refer to the chapters listed above. (Note that database configuration is identical across different application servers.)

1
Creating and Configuring an Oracle 11g Database 1-1
1Creating and Configuring an Oracle 11gDatabase
Use this chapter to set up an Oracle 11g database for your WebCenter Sites installation.
This chapter contains the following sections:
■ Section 1.1, "Creating an Oracle 11g Database"
■ Section 1.2, "Creating a New User for WebCenter Sites"
■ Section 1.3, "Next Step"
1.1 Creating an Oracle 11g Database1. Launch the Oracle Database Configuration Assistant by executing the following
command:
<ora_home>/bin/dbca
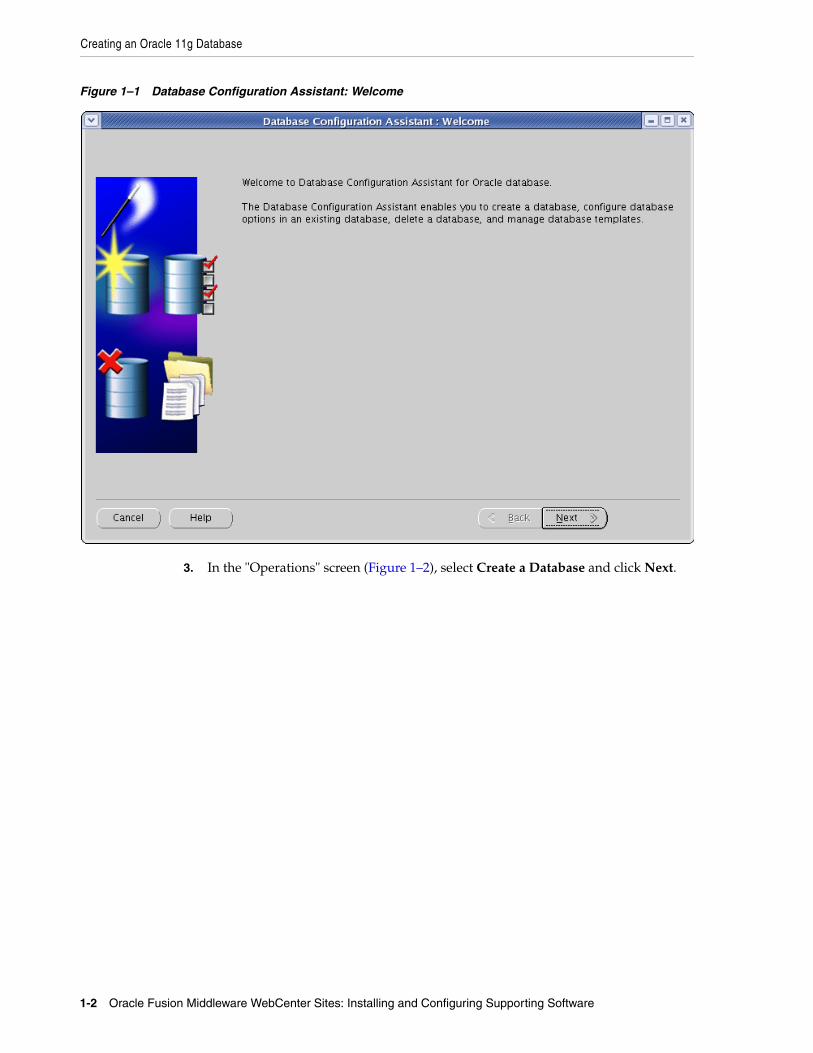
2. In the "Welcome" screen (Figure 1–1), click Next.
Creating an Oracle 11g Database
1-2 Oracle Fusion Middleware WebCenter Sites: Installing and Configuring Supporting Software
Figure 1–1 Database Configuration Assistant: Welcome
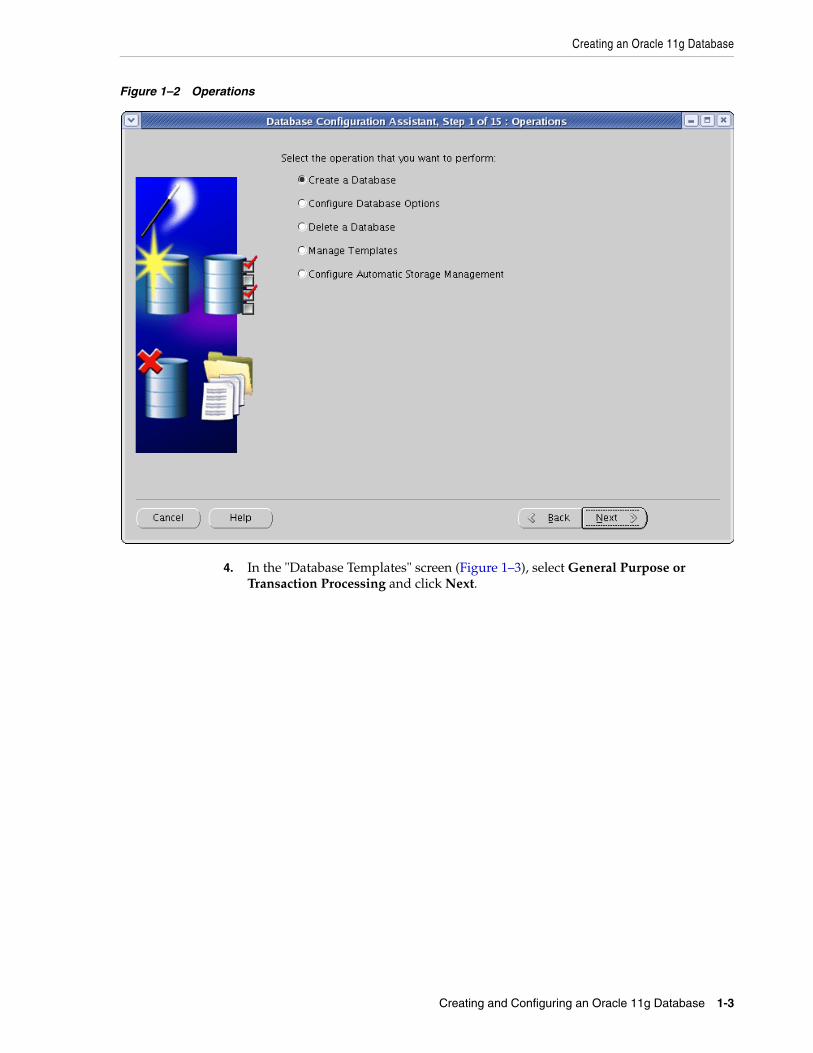
3. In the "Operations" screen (Figure 1–2), select Create a Database and click Next.
Creating an Oracle 11g Database
Creating and Configuring an Oracle 11g Database 1-3
Figure 1–2 Operations
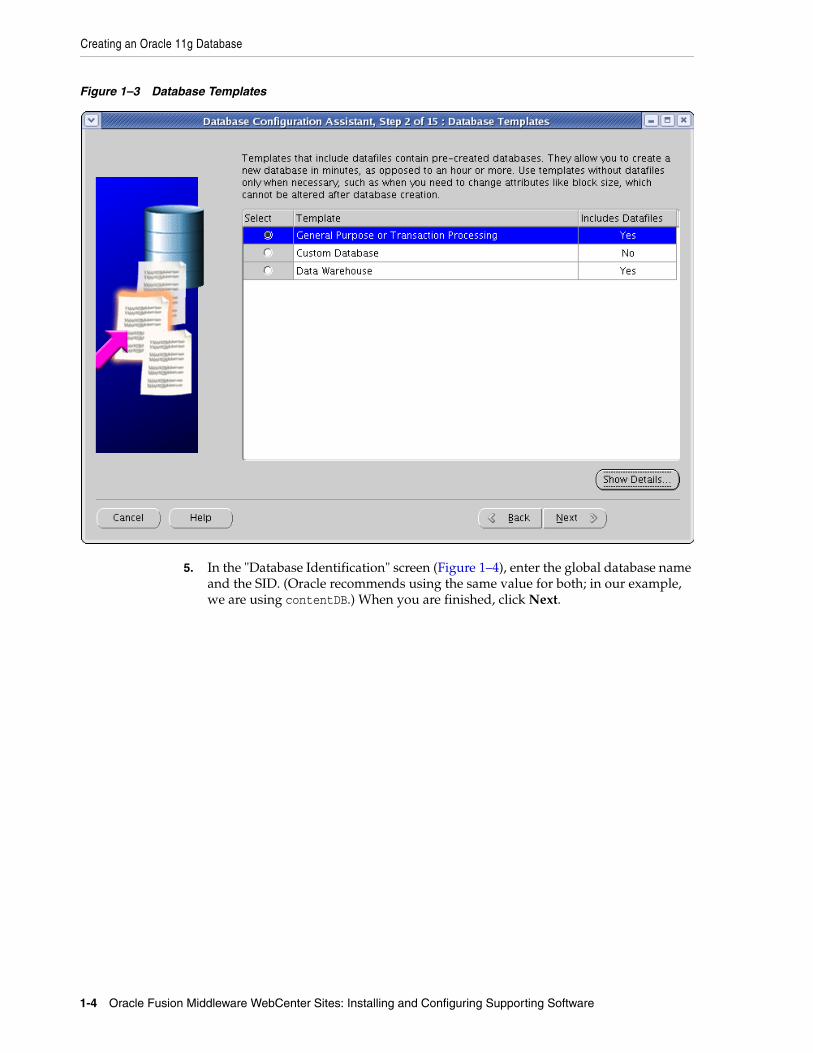
4. In the "Database Templates" screen (Figure 1–3), select General Purpose or Transaction Processing and click Next.
Creating an Oracle 11g Database
1-4 Oracle Fusion Middleware WebCenter Sites: Installing and Configuring Supporting Software
Figure 1–3 Database Templates
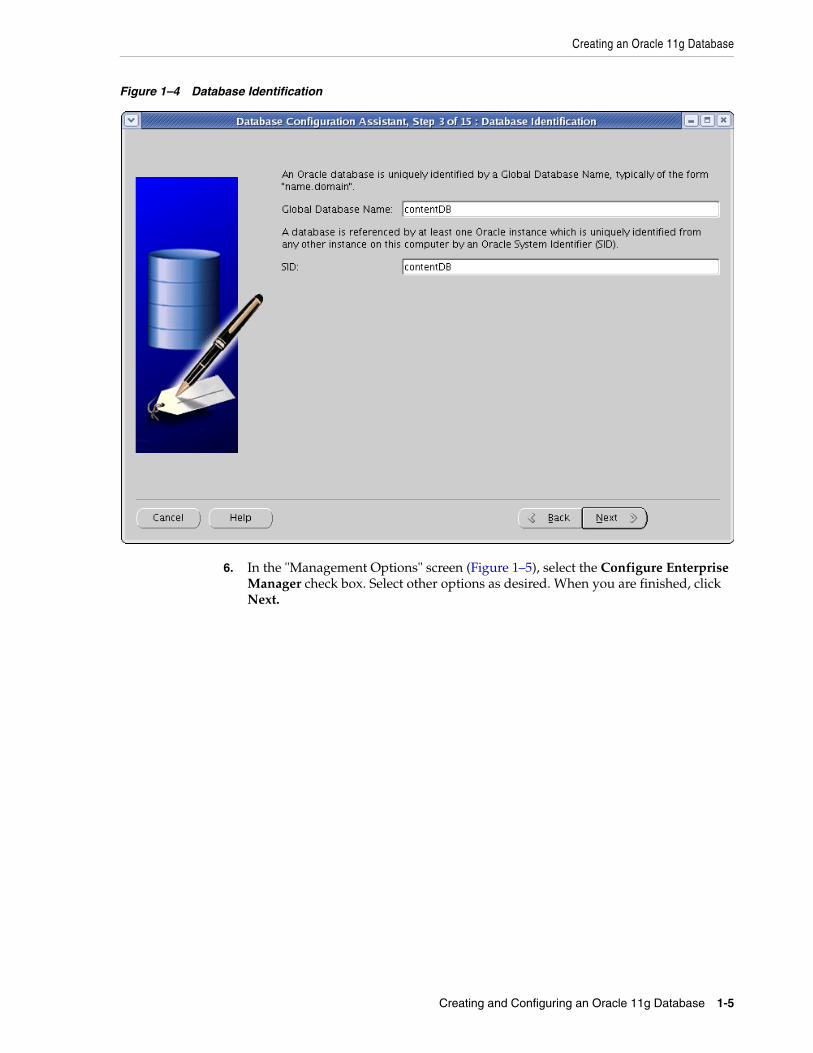
5. In the "Database Identification" screen (Figure 1–4), enter the global database name and the SID. (Oracle recommends using the same value for both; in our example, we are using contentDB.) When you are finished, click Next.
Creating an Oracle 11g Database
Creating and Configuring an Oracle 11g Database 1-5
Figure 1–4 Database Identification
6. In the "Management Options" screen (Figure 1–5), select the Configure Enterprise Manager check box. Select other options as desired. When you are finished, click Next.

Creating an Oracle 11g Database
1-6 Oracle Fusion Middleware WebCenter Sites: Installing and Configuring Supporting Software
Figure 1–5 Management Options
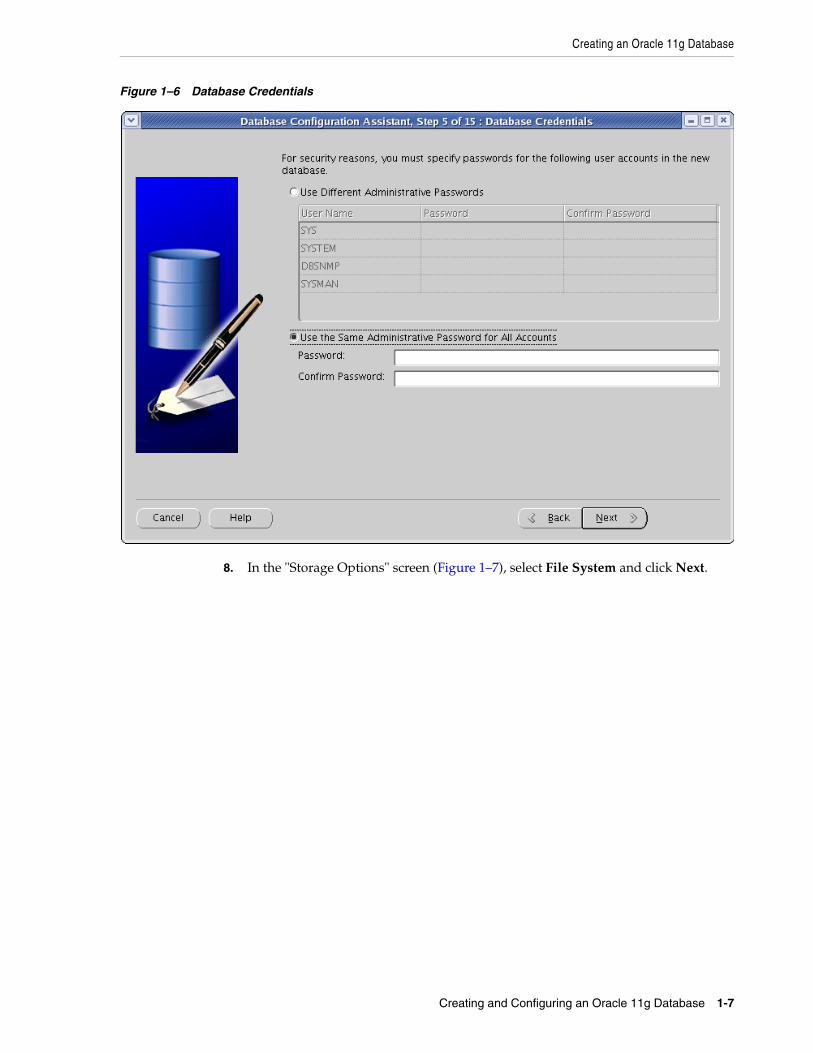
7. In the "Database Credentials" screen (Figure 1–6), do one of the following:
– If you are installing a production system, select Use Different Administrative Passwords, enter a unique password for each database user shown in the table, and click Next.
– If you are installing a non-production system, select Use the Same Administrative Password for All Accounts, enter and re-enter a password, and click Next.
Creating an Oracle 11g Database
Creating and Configuring an Oracle 11g Database 1-7
Figure 1–6 Database Credentials
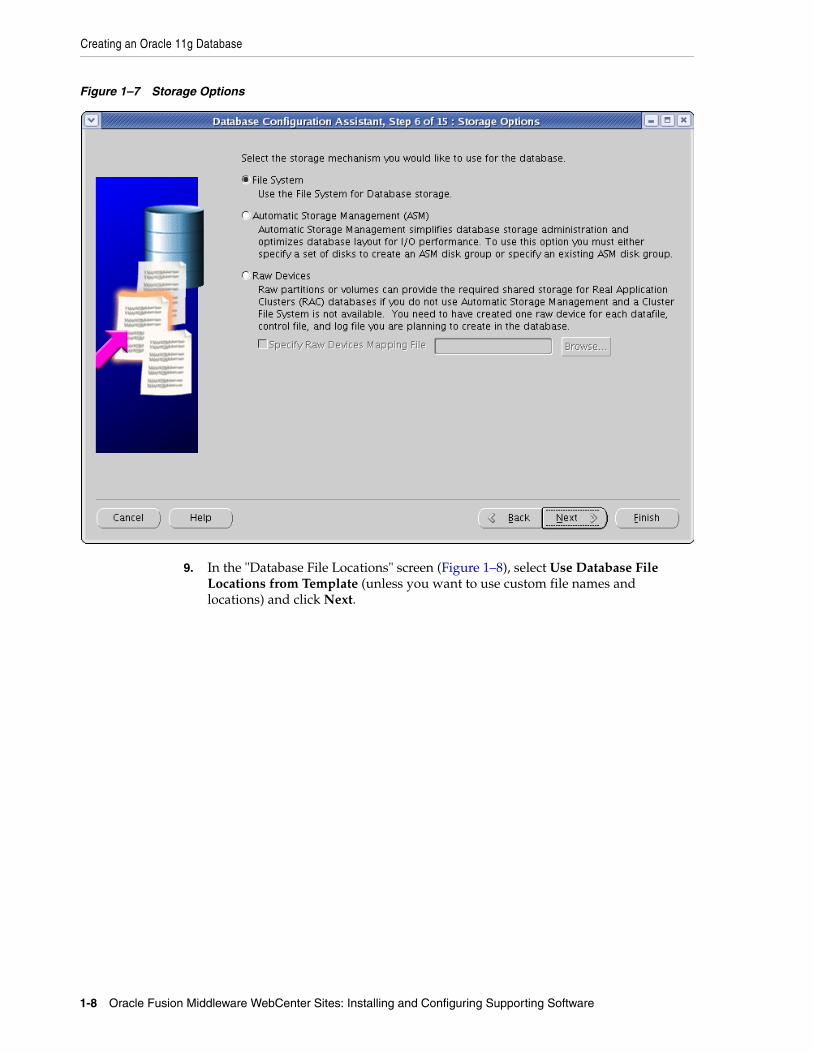
8. In the "Storage Options" screen (Figure 1–7), select File System and click Next.
Creating an Oracle 11g Database
1-8 Oracle Fusion Middleware WebCenter Sites: Installing and Configuring Supporting Software
Figure 1–7 Storage Options
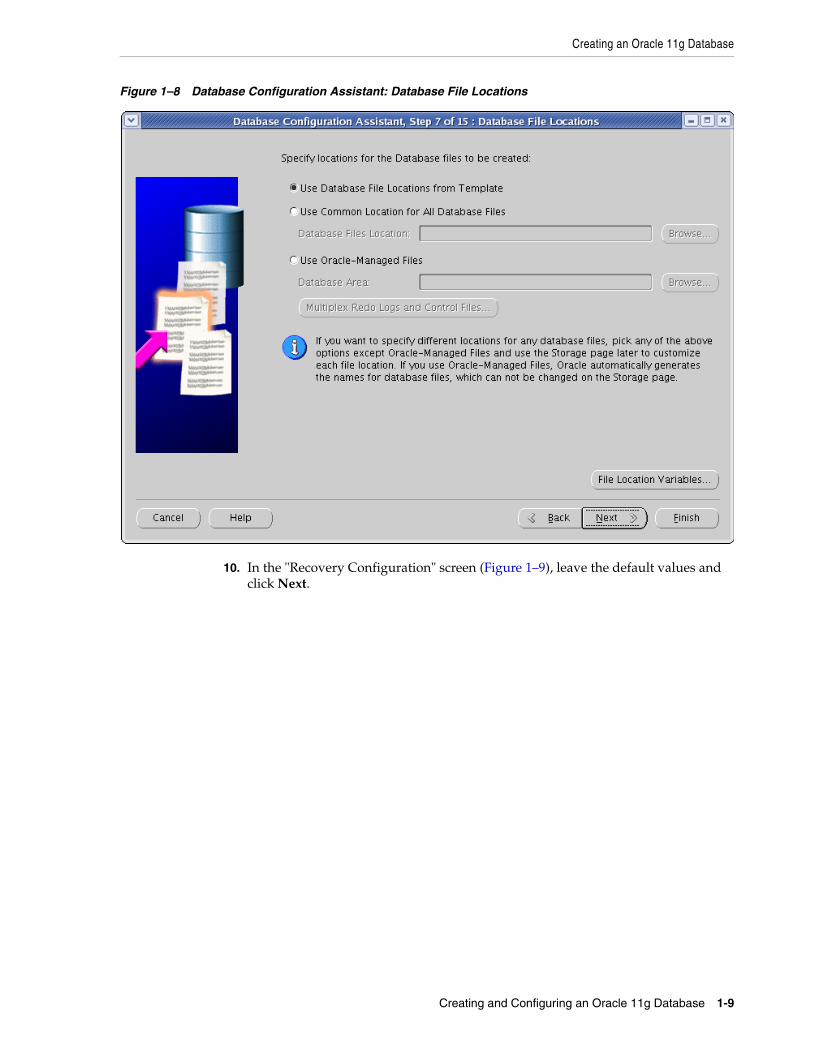
9. In the "Database File Locations" screen (Figure 1–8), select Use Database File Locations from Template (unless you want to use custom file names and locations) and click Next.
Creating an Oracle 11g Database
Creating and Configuring an Oracle 11g Database 1-9
Figure 1–8 Database Configuration Assistant: Database File Locations
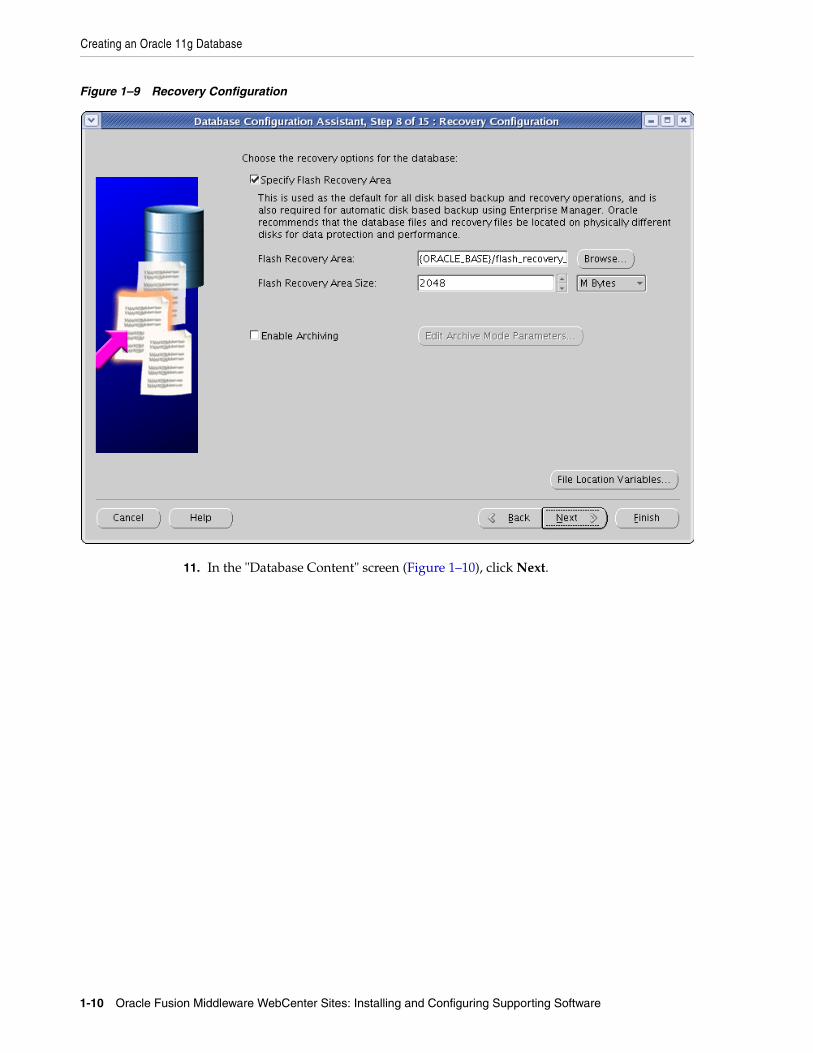
10. In the "Recovery Configuration" screen (Figure 1–9), leave the default values and click Next.
Creating an Oracle 11g Database
1-10 Oracle Fusion Middleware WebCenter Sites: Installing and Configuring Supporting Software
Figure 1–9 Recovery Configuration
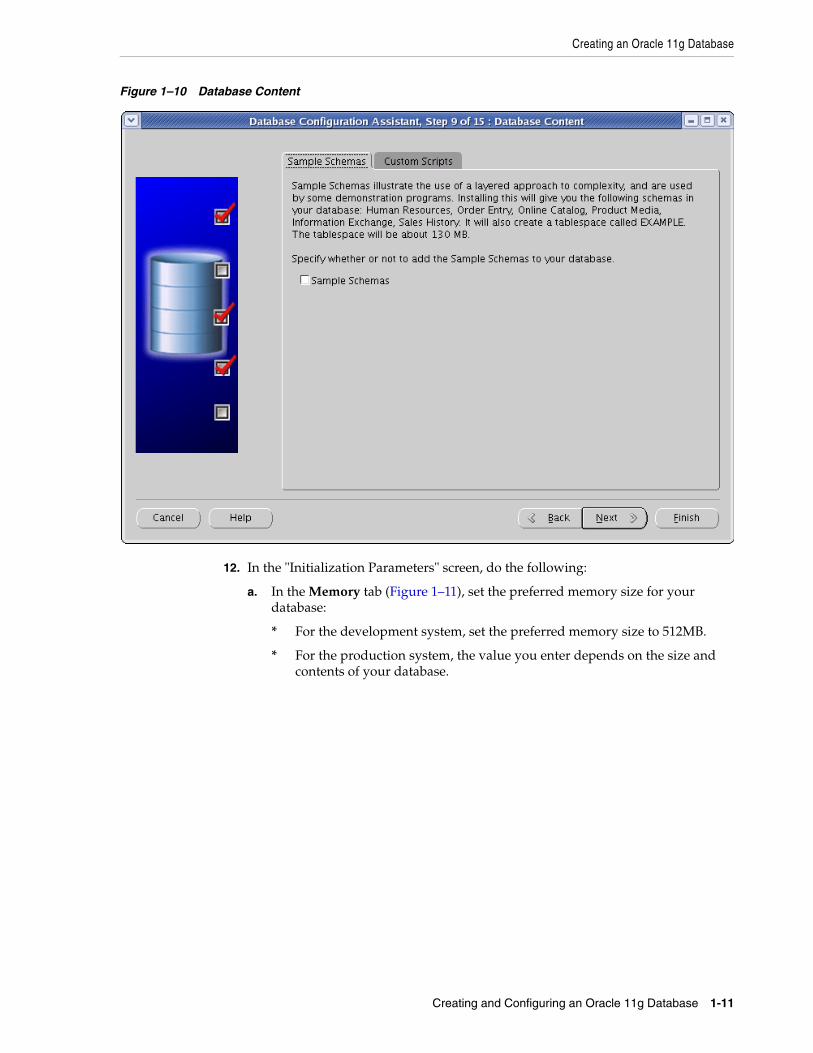
11. In the "Database Content" screen (Figure 1–10), click Next.
Creating an Oracle 11g Database
Creating and Configuring an Oracle 11g Database 1-11
Figure 1–10 Database Content
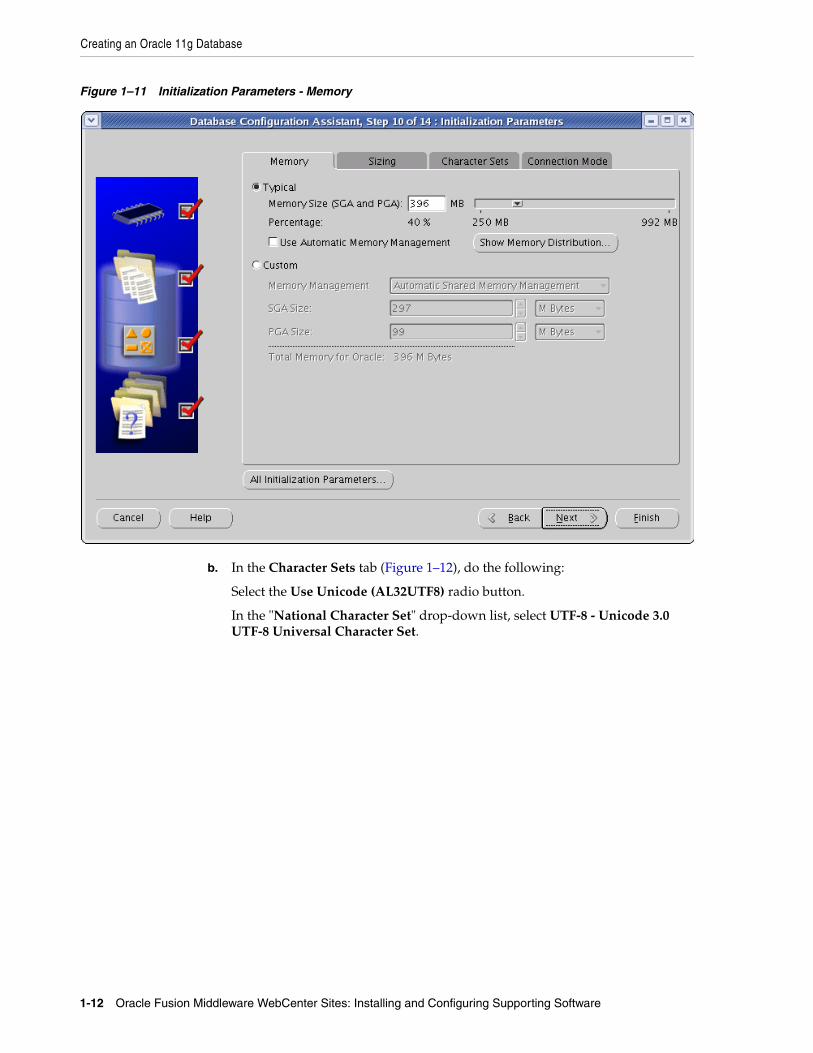
12. In the "Initialization Parameters" screen, do the following:
a. In the Memory tab (Figure 1–11), set the preferred memory size for your database:
* For the development system, set the preferred memory size to 512MB.
* For the production system, the value you enter depends on the size and contents of your database.
Creating an Oracle 11g Database
1-12 Oracle Fusion Middleware WebCenter Sites: Installing and Configuring Supporting Software
Figure 1–11 Initialization Parameters - Memory
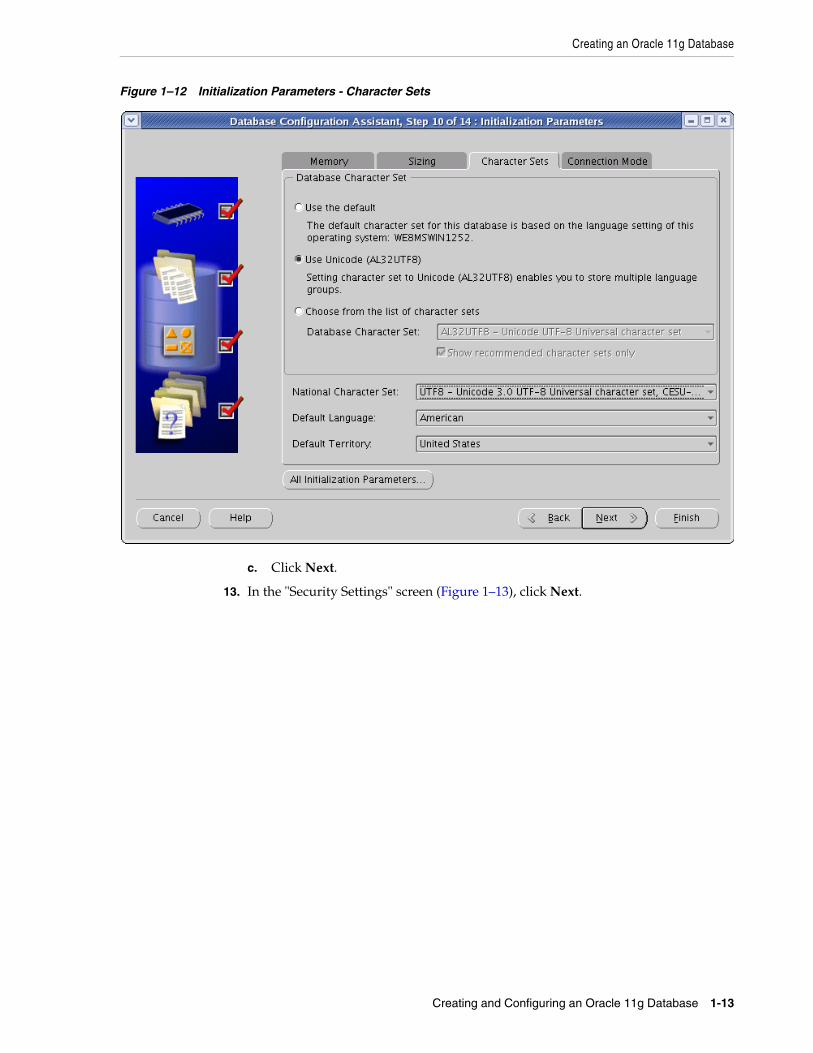
b. In the Character Sets tab (Figure 1–12), do the following:
Select the Use Unicode (AL32UTF8) radio button.
In the "National Character Set" drop-down list, select UTF-8 - Unicode 3.0 UTF-8 Universal Character Set.
Creating an Oracle 11g Database
Creating and Configuring an Oracle 11g Database 1-13
Figure 1–12 Initialization Parameters - Character Sets
c. Click Next.
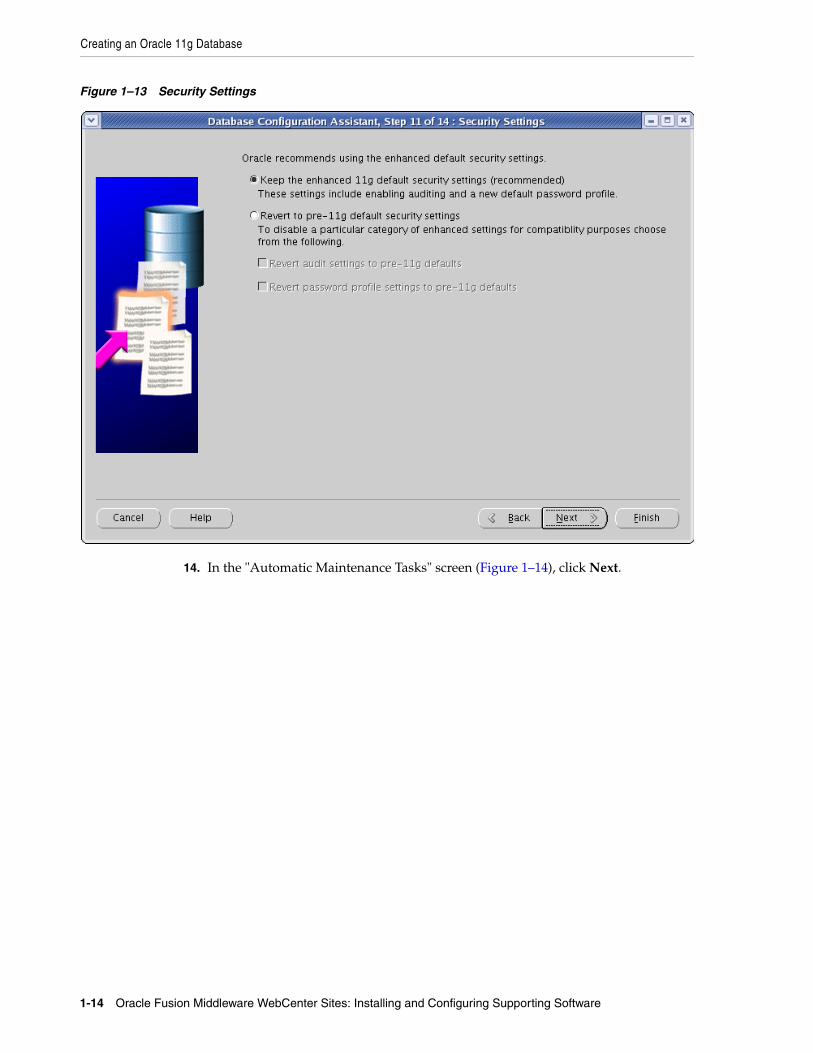
13. In the "Security Settings" screen (Figure 1–13), click Next.
Creating an Oracle 11g Database
1-14 Oracle Fusion Middleware WebCenter Sites: Installing and Configuring Supporting Software
Figure 1–13 Security Settings
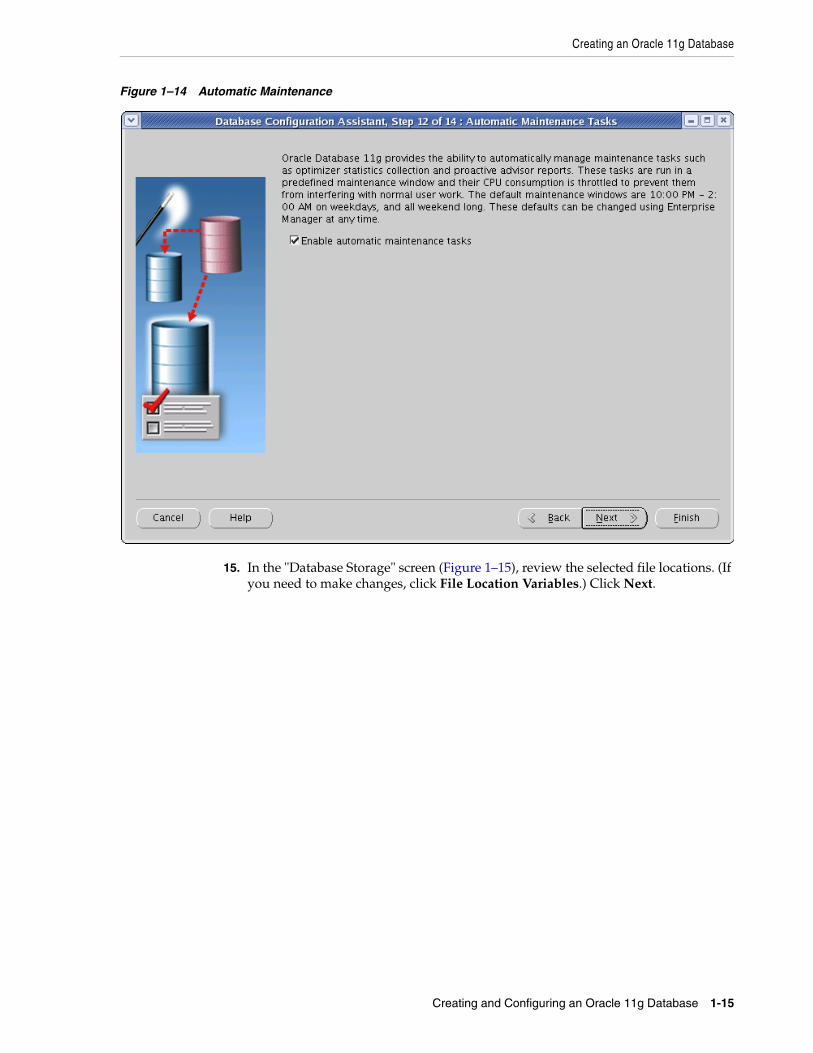
14. In the "Automatic Maintenance Tasks" screen (Figure 1–14), click Next.
Creating an Oracle 11g Database
Creating and Configuring an Oracle 11g Database 1-15
Figure 1–14 Automatic Maintenance
15. In the "Database Storage" screen (Figure 1–15), review the selected file locations. (If you need to make changes, click File Location Variables.) Click Next.
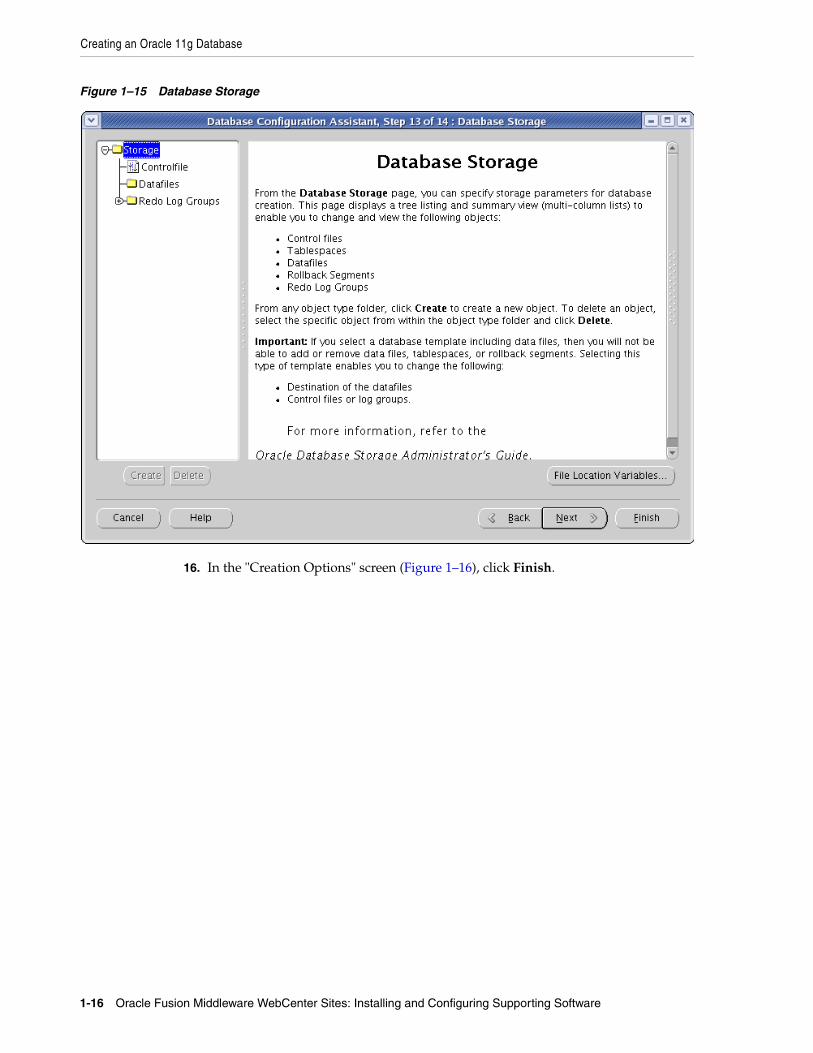
Creating an Oracle 11g Database
1-16 Oracle Fusion Middleware WebCenter Sites: Installing and Configuring Supporting Software
Figure 1–15 Database Storage
16. In the "Creation Options" screen (Figure 1–16), click Finish.
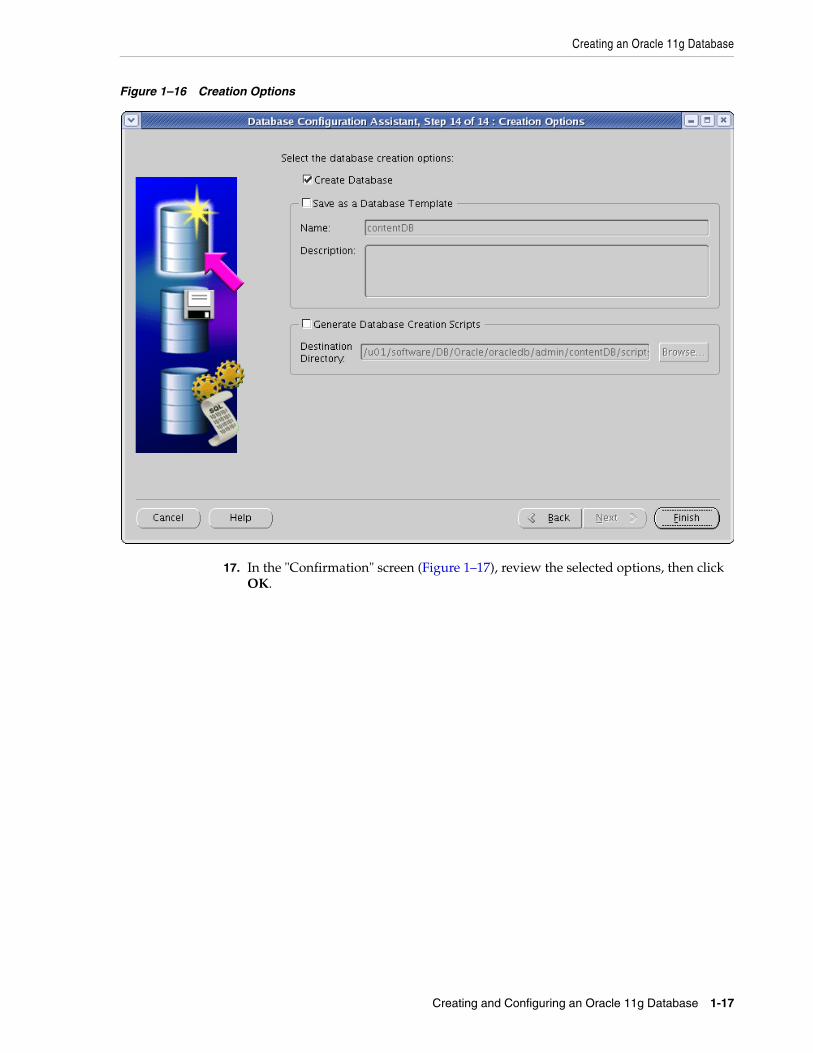
Creating an Oracle 11g Database
Creating and Configuring an Oracle 11g Database 1-17
Figure 1–16 Creation Options
17. In the "Confirmation" screen (Figure 1–17), review the selected options, then click OK.
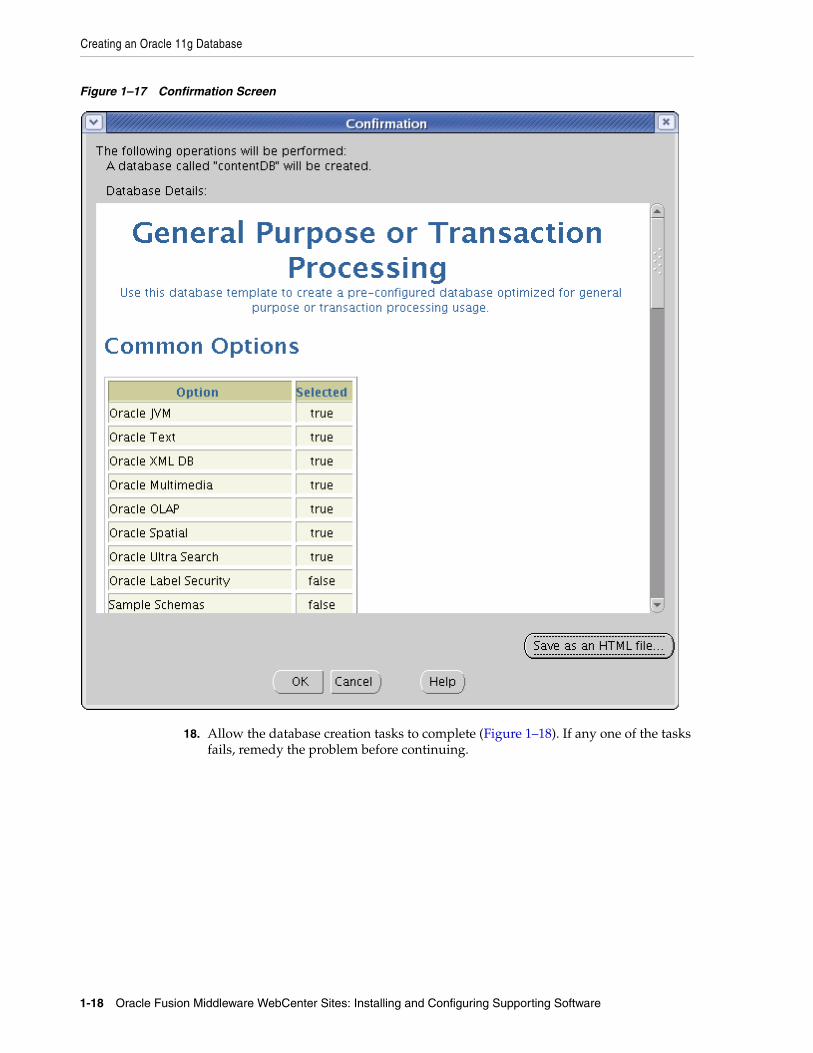
Creating an Oracle 11g Database
1-18 Oracle Fusion Middleware WebCenter Sites: Installing and Configuring Supporting Software
Figure 1–17 Confirmation Screen
18. Allow the database creation tasks to complete (Figure 1–18). If any one of the tasks fails, remedy the problem before continuing.
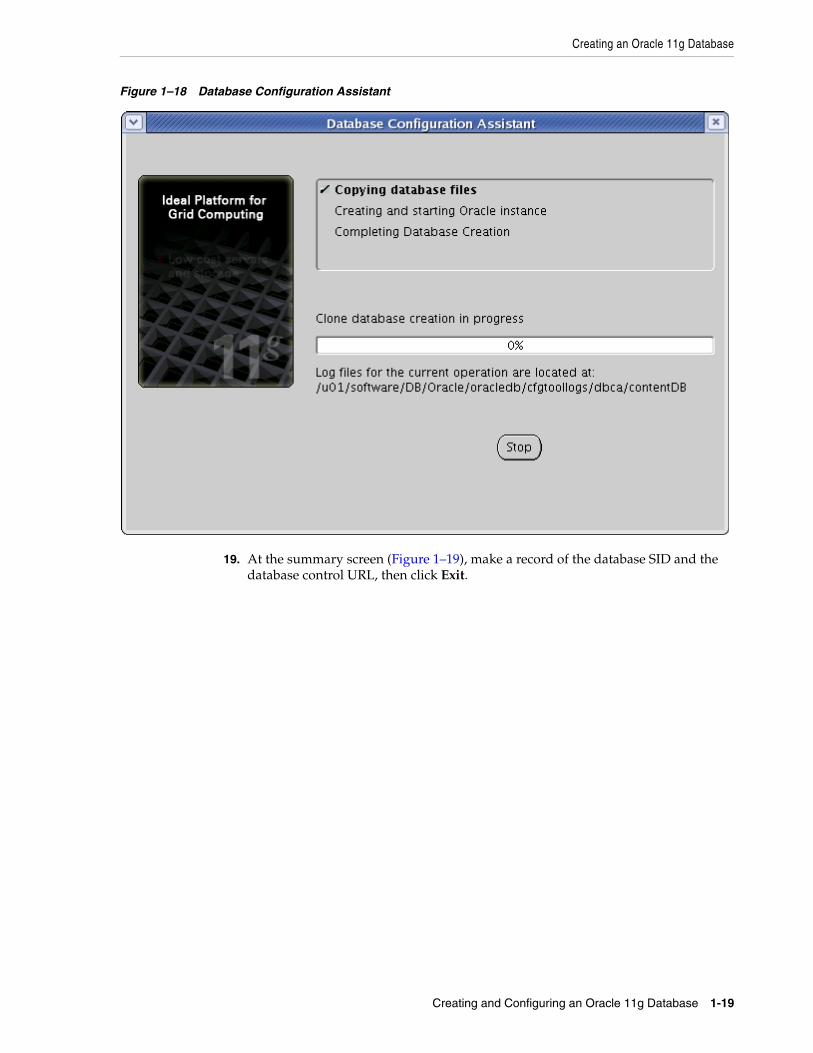
Creating an Oracle 11g Database
Creating and Configuring an Oracle 11g Database 1-19
Figure 1–18 Database Configuration Assistant
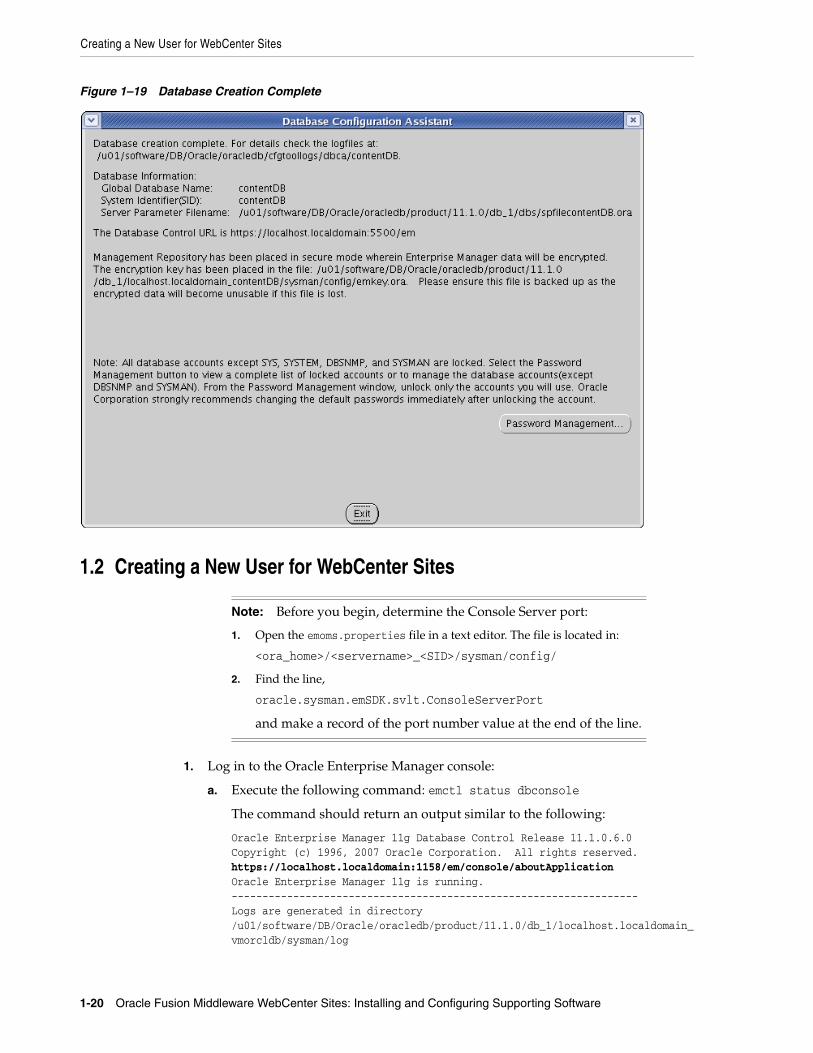
19. At the summary screen (Figure 1–19), make a record of the database SID and the database control URL, then click Exit.
Creating a New User for WebCenter Sites
1-20 Oracle Fusion Middleware WebCenter Sites: Installing and Configuring Supporting Software
Figure 1–19 Database Creation Complete
1.2 Creating a New User for WebCenter Sites
1. Log in to the Oracle Enterprise Manager console:
a. Execute the following command: emctl status dbconsole
The command should return an output similar to the following:
Oracle Enterprise Manager 11g Database Control Release 11.1.0.6.0Copyright (c) 1996, 2007 Oracle Corporation. All rights reserved.https://localhost.localdomain:1158/em/console/aboutApplicationOracle Enterprise Manager 11g is running.------------------------------------------------------------------Logs are generated in directory /u01/software/DB/Oracle/oracledb/product/11.1.0/db_1/localhost.localdomain_vmorcldb/sysman/log
Note: Before you begin, determine the Console Server port:
1. Open the emoms.properties file in a text editor. The file is located in:
<ora_home>/<servername>_<SID>/sysman/config/
2. Find the line,
oracle.sysman.emSDK.svlt.ConsoleServerPort
and make a record of the port number value at the end of the line.
Creating a New User for WebCenter Sites
Creating and Configuring an Oracle 11g Database 1-21
b. Open a browser and go to the URL highlighted in bold in step a above. If you see a "Security Mismatch" error, ignore it (the error appears if you are using a self-signed certificate).
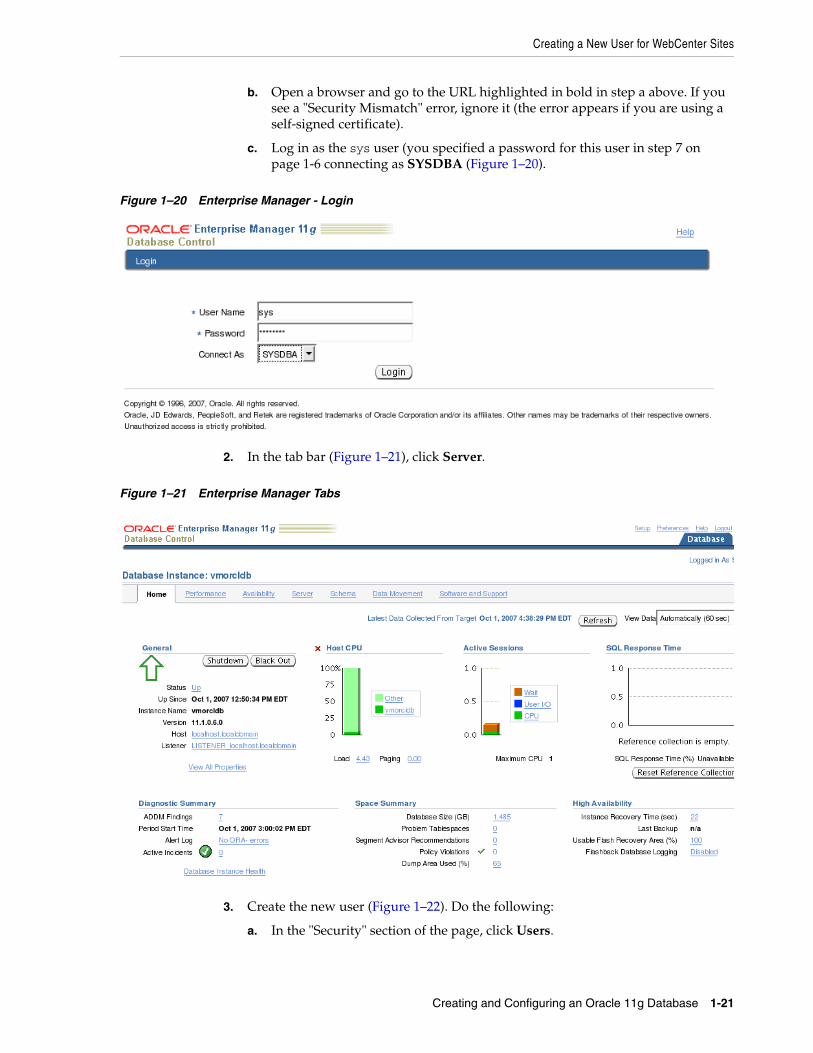
c. Log in as the sys user (you specified a password for this user in step 7 on page 1-6 connecting as SYSDBA (Figure 1–20).
Figure 1–20 Enterprise Manager - Login
2. In the tab bar (Figure 1–21), click Server.
Figure 1–21 Enterprise Manager Tabs
3. Create the new user (Figure 1–22). Do the following:
a. In the "Security" section of the page, click Users.

Creating a New User for WebCenter Sites
1-22 Oracle Fusion Middleware WebCenter Sites: Installing and Configuring Supporting Software
Figure 1–22 Server Tab
b. Click Create near the top right corner of the user list (Figure 1–23).
Figure 1–23 Users
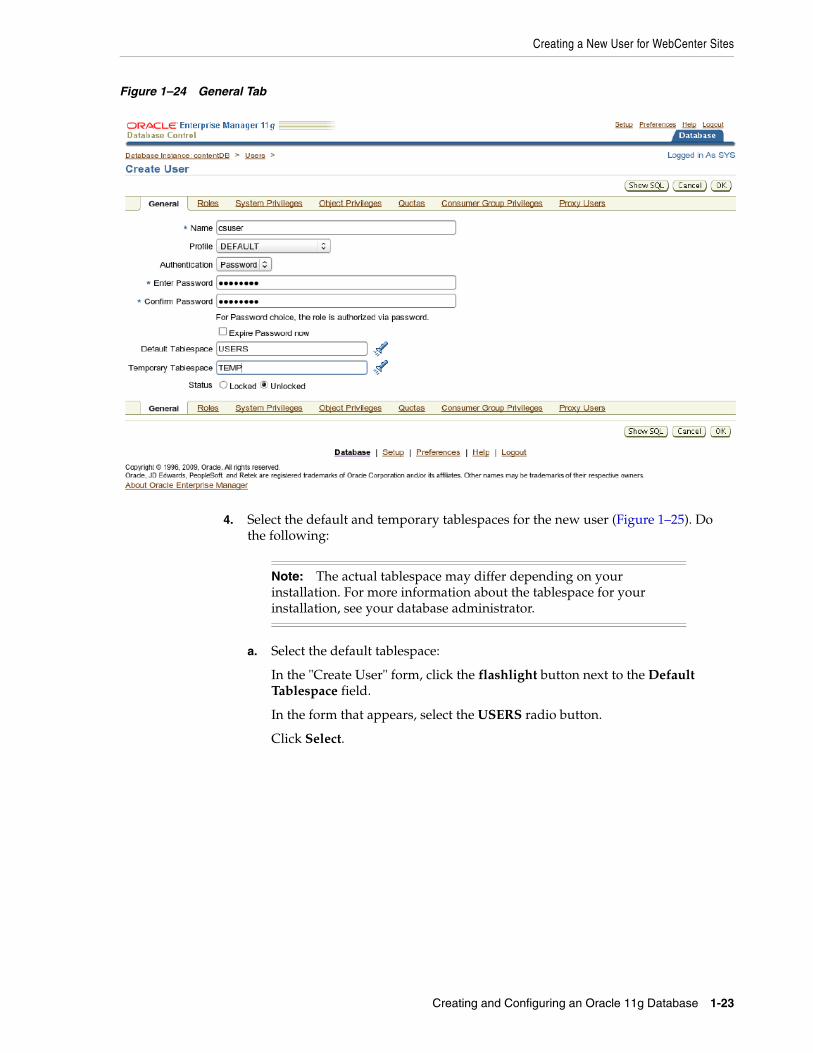
c. In the "Create User" form (Figure 1–24), fill in all required fields (marked with an asterisk). Fill in all other fields as necessary.
Creating a New User for WebCenter Sites
Creating and Configuring an Oracle 11g Database 1-23
Figure 1–24 General Tab
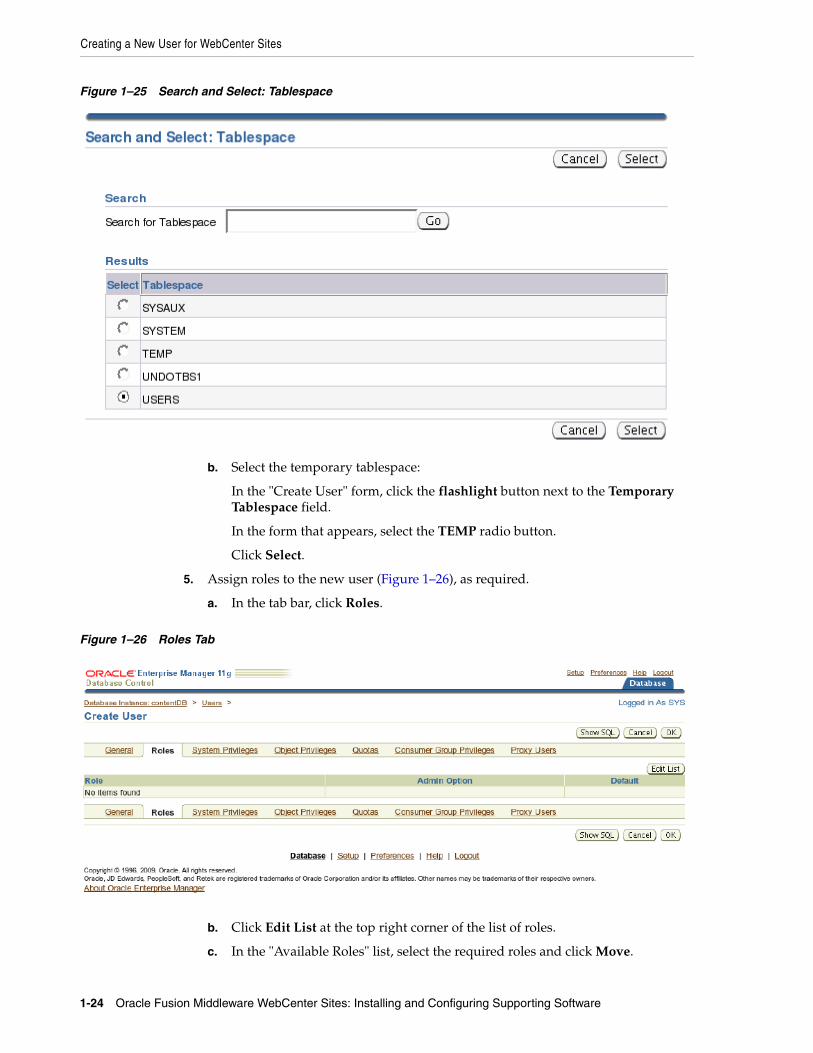
4. Select the default and temporary tablespaces for the new user (Figure 1–25). Do the following:
a. Select the default tablespace:
In the "Create User" form, click the flashlight button next to the Default Tablespace field.
In the form that appears, select the USERS radio button.
Click Select.
Note: The actual tablespace may differ depending on your installation. For more information about the tablespace for your installation, see your database administrator.
Creating a New User for WebCenter Sites
1-24 Oracle Fusion Middleware WebCenter Sites: Installing and Configuring Supporting Software
Figure 1–25 Search and Select: Tablespace
b. Select the temporary tablespace:
In the "Create User" form, click the flashlight button next to the Temporary Tablespace field.
In the form that appears, select the TEMP radio button.
Click Select.
5. Assign roles to the new user (Figure 1–26), as required.
a. In the tab bar, click Roles.
Figure 1–26 Roles Tab
b. Click Edit List at the top right corner of the list of roles.
c. In the "Available Roles" list, select the required roles and click Move.
Creating a New User for WebCenter Sites
Creating and Configuring an Oracle 11g Database 1-25
The roles appear in the "Selected Roles" list.
d. Click OK.
6. Assign system privileges to the new user. Do the following:
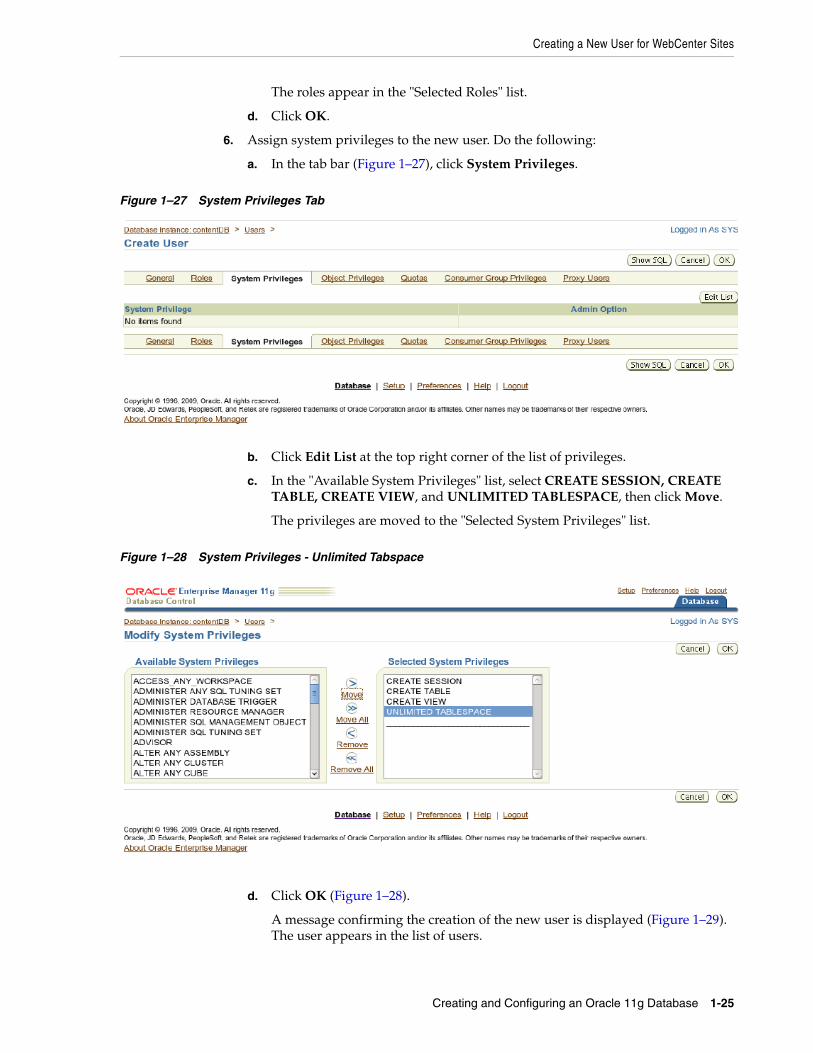
a. In the tab bar (Figure 1–27), click System Privileges.
Figure 1–27 System Privileges Tab
b. Click Edit List at the top right corner of the list of privileges.
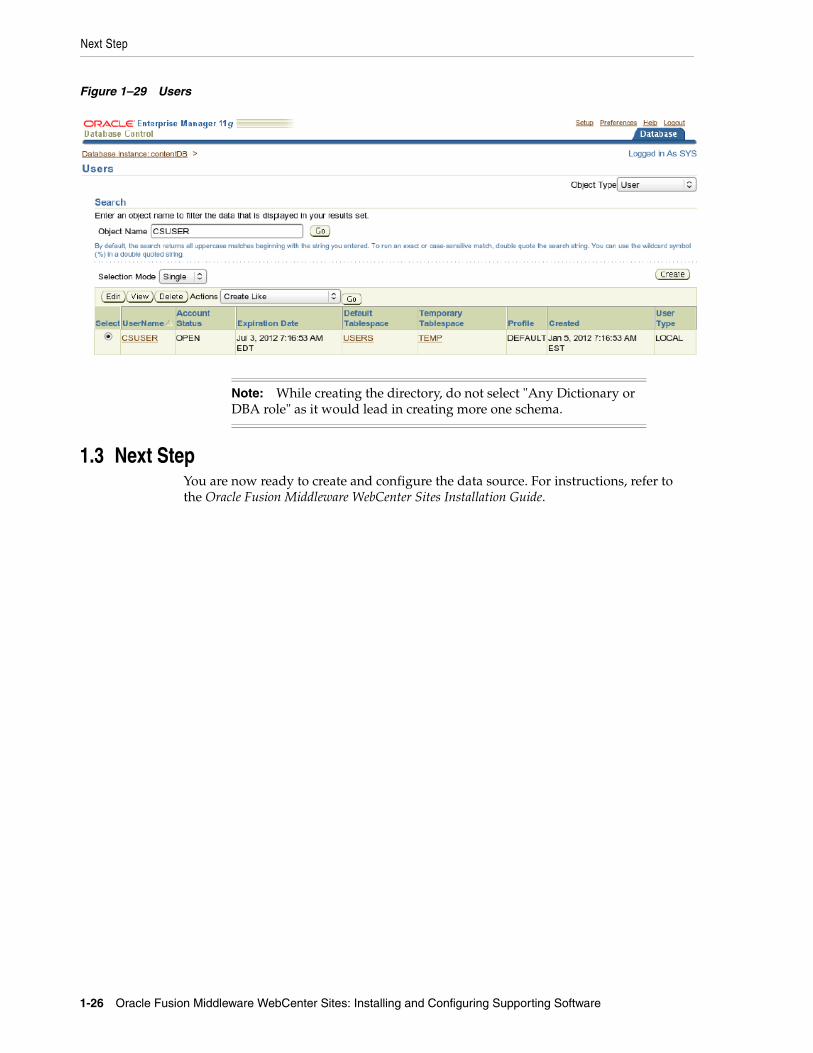
c. In the "Available System Privileges" list, select CREATE SESSION, CREATE TABLE, CREATE VIEW, and UNLIMITED TABLESPACE, then click Move.
The privileges are moved to the "Selected System Privileges" list.
Figure 1–28 System Privileges - Unlimited Tabspace
d. Click OK (Figure 1–28).
A message confirming the creation of the new user is displayed (Figure 1–29). The user appears in the list of users.
Next Step
1-26 Oracle Fusion Middleware WebCenter Sites: Installing and Configuring Supporting Software
Figure 1–29 Users
1.3 Next StepYou are now ready to create and configure the data source. For instructions, refer to the Oracle Fusion Middleware WebCenter Sites Installation Guide.
Note: While creating the directory, do not select "Any Dictionary or DBA role" as it would lead in creating more one schema.
2
Creating and Configuring an IBM DB2 Database 2-1
2Creating and Configuring an IBM DB2Database
Use this chapter to set up a supported IBM DB2 database for your WebCenter Sites installation.
This chapter contains the following sections:
■ Section 2.1, "Installing DB2"
■ Section 2.2, "Creating a New DB2 Database"
■ Section 2.3, "Configuring the Database"
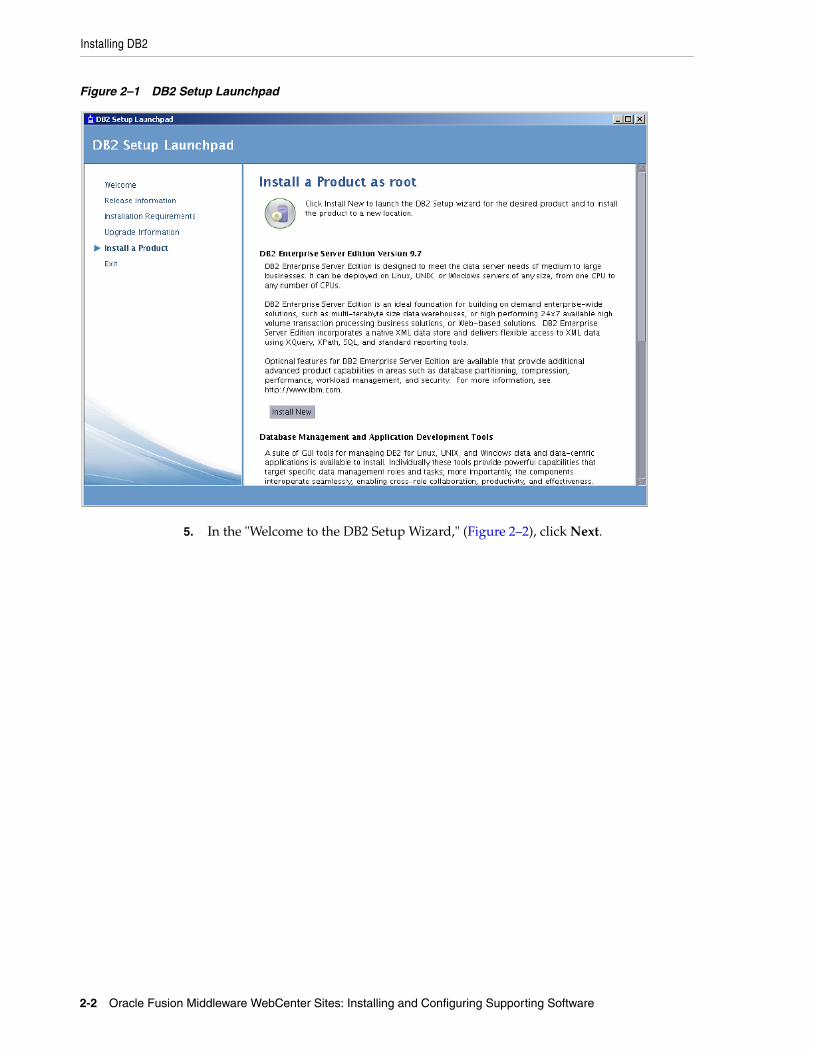
2.1 Installing DB21. Uncompress the correct installation file for your distribution.
2. Run ./db2setup
3. In the "Information Management Software" screen, select Install a Product.
4. Under "DB2 Enterprise Server Edition," (Figure 2–1) select Install New.
Installing DB2
2-2 Oracle Fusion Middleware WebCenter Sites: Installing and Configuring Supporting Software
Figure 2–1 DB2 Setup Launchpad
5. In the "Welcome to the DB2 Setup Wizard," (Figure 2–2), click Next.

Installing DB2
Creating and Configuring an IBM DB2 Database 2-3
Figure 2–2 DB2 Setup Wizard - Welcome
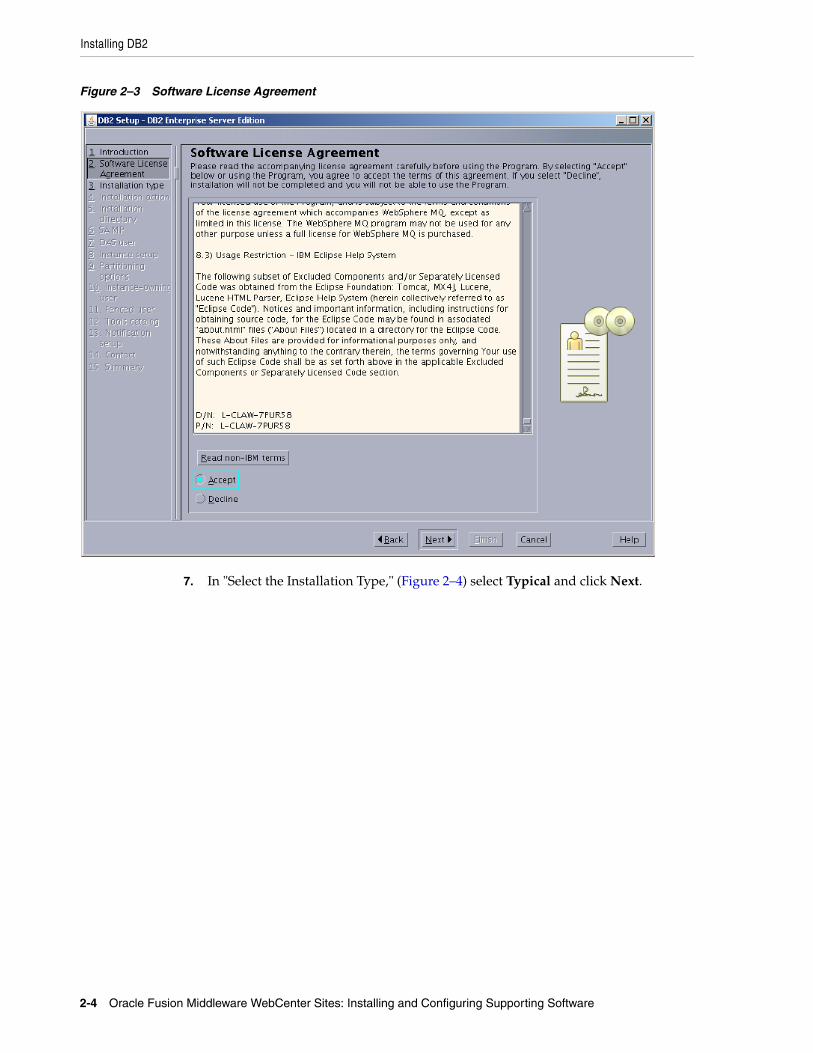
6. In the "Software License Agreement" screen (Figure 2–3), click Accept, then click Next.
Installing DB2
2-4 Oracle Fusion Middleware WebCenter Sites: Installing and Configuring Supporting Software
Figure 2–3 Software License Agreement
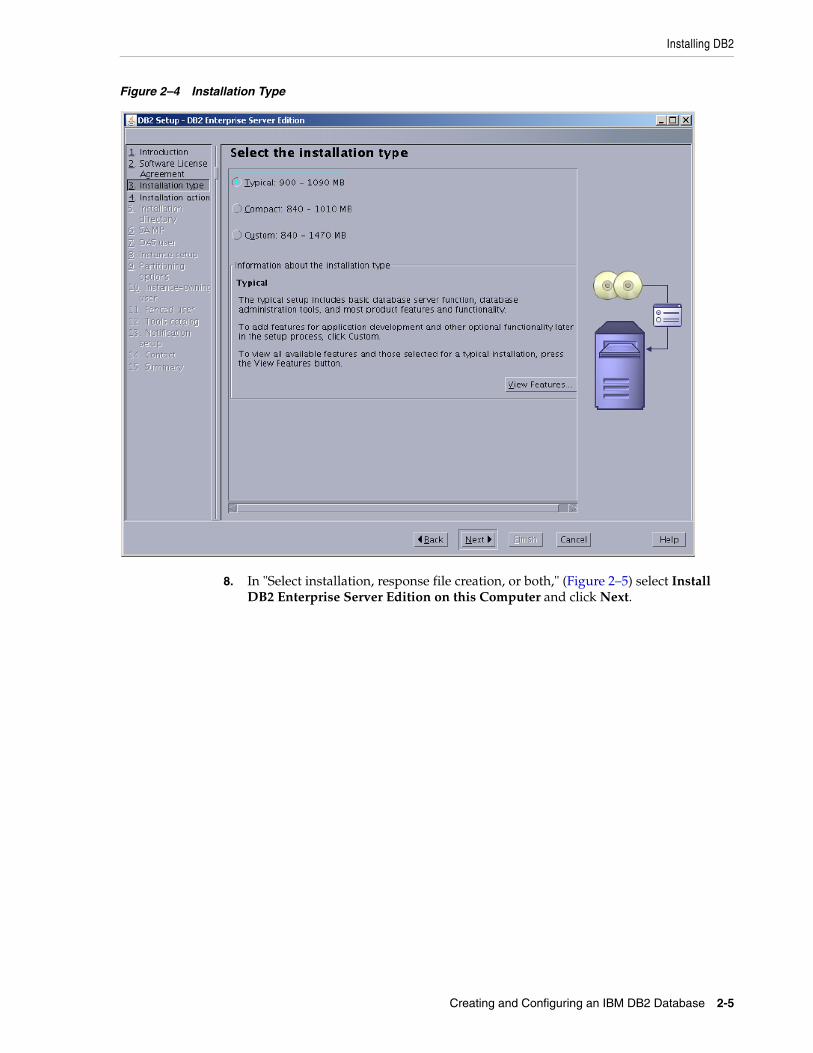
7. In "Select the Installation Type," (Figure 2–4) select Typical and click Next.
Installing DB2
Creating and Configuring an IBM DB2 Database 2-5
Figure 2–4 Installation Type
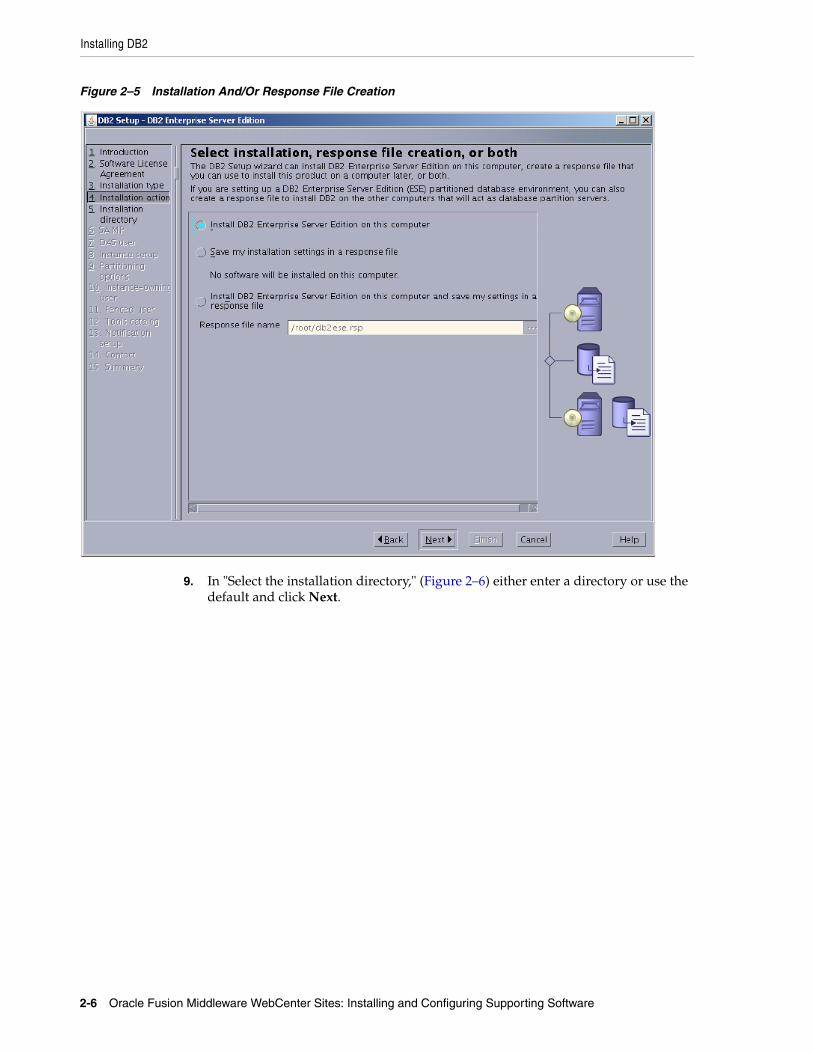
8. In "Select installation, response file creation, or both," (Figure 2–5) select Install DB2 Enterprise Server Edition on this Computer and click Next.
Installing DB2
2-6 Oracle Fusion Middleware WebCenter Sites: Installing and Configuring Supporting Software
Figure 2–5 Installation And/Or Response File Creation
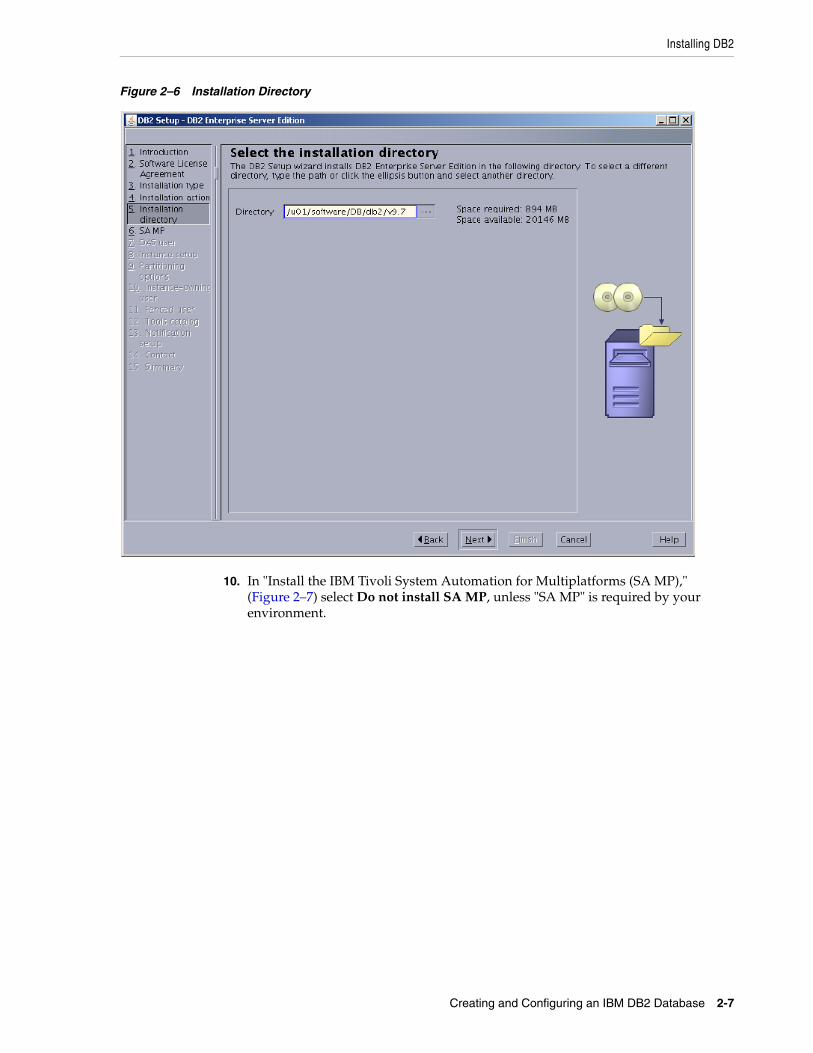
9. In "Select the installation directory," (Figure 2–6) either enter a directory or use the default and click Next.
Installing DB2
Creating and Configuring an IBM DB2 Database 2-7
Figure 2–6 Installation Directory
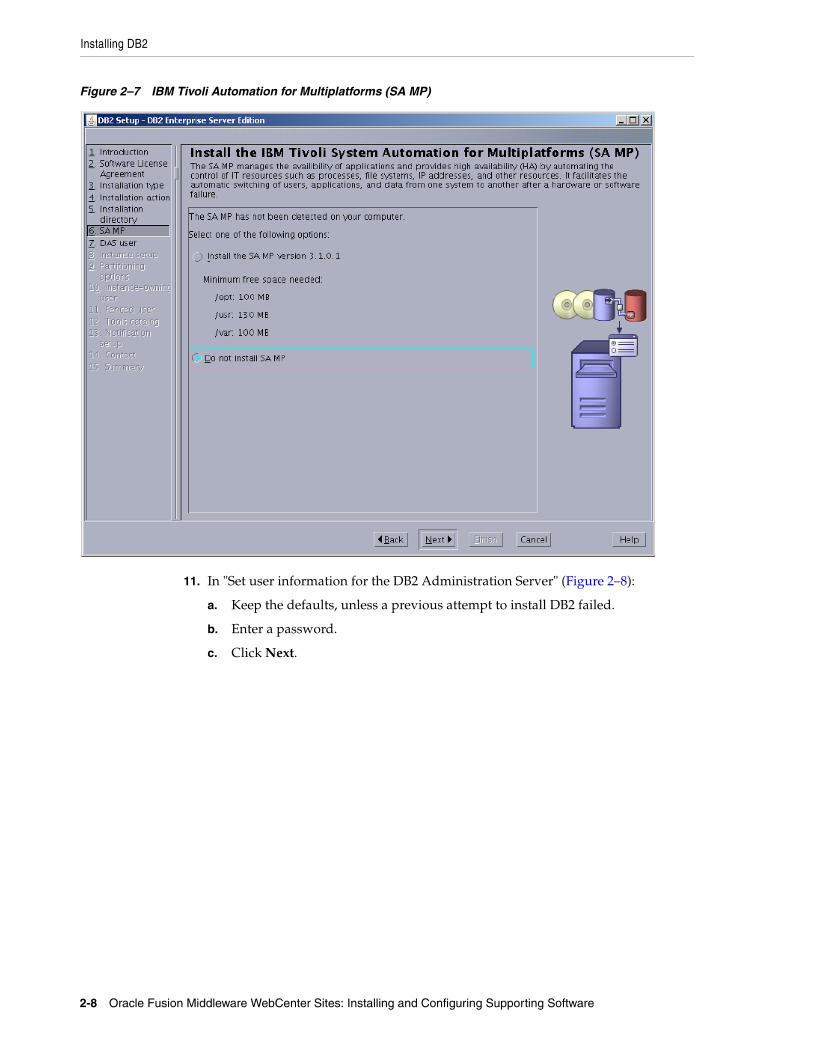
10. In "Install the IBM Tivoli System Automation for Multiplatforms (SA MP)," (Figure 2–7) select Do not install SA MP, unless "SA MP" is required by your environment.
Installing DB2
2-8 Oracle Fusion Middleware WebCenter Sites: Installing and Configuring Supporting Software
Figure 2–7 IBM Tivoli Automation for Multiplatforms (SA MP)
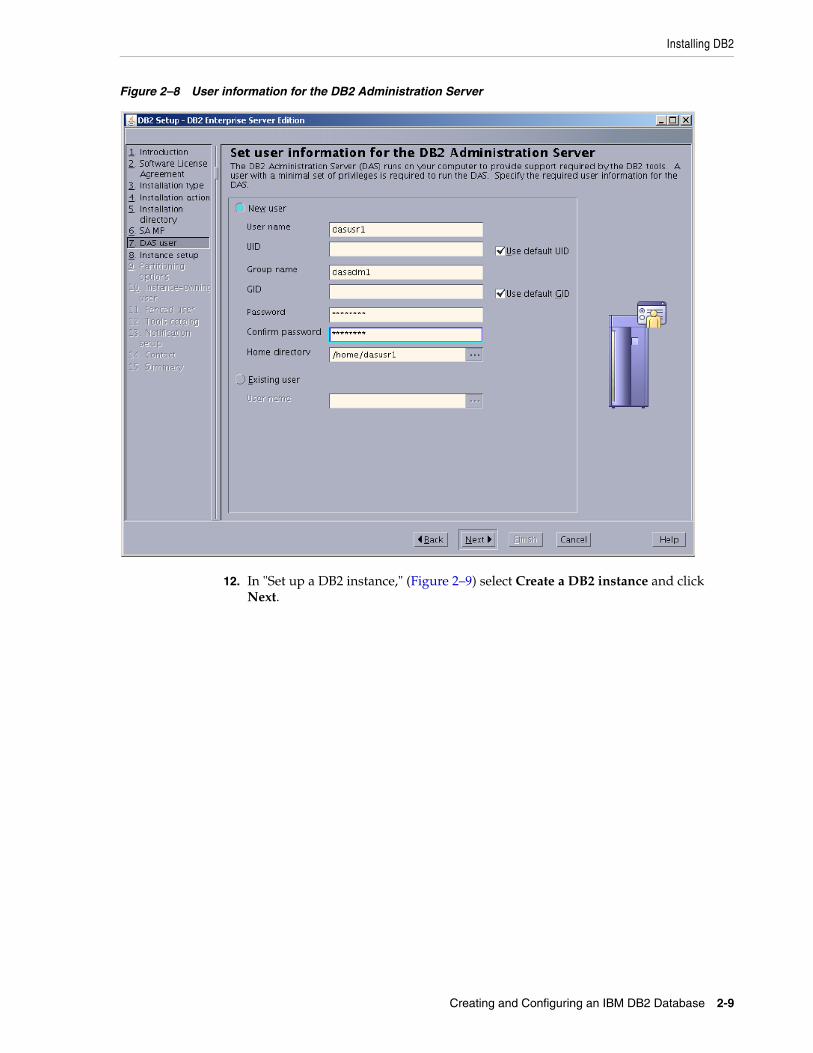
11. In "Set user information for the DB2 Administration Server" (Figure 2–8):
a. Keep the defaults, unless a previous attempt to install DB2 failed.
b. Enter a password.
c. Click Next.
Installing DB2
Creating and Configuring an IBM DB2 Database 2-9
Figure 2–8 User information for the DB2 Administration Server
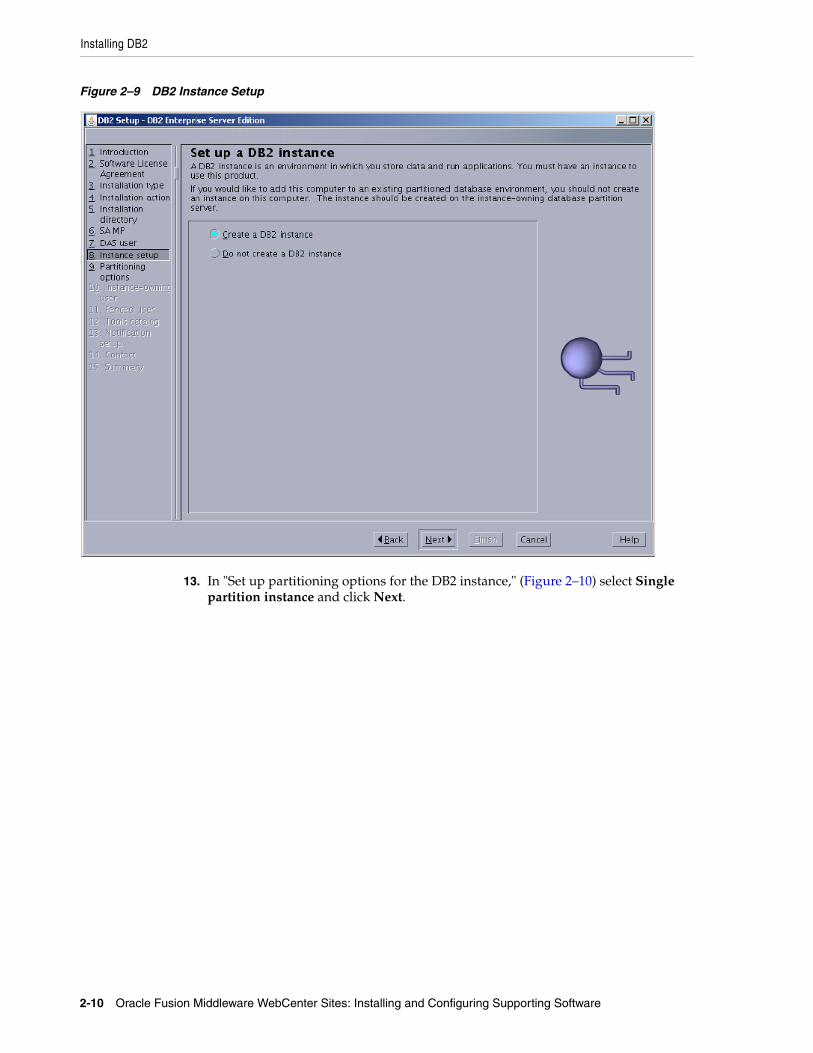
12. In "Set up a DB2 instance," (Figure 2–9) select Create a DB2 instance and click Next.
Installing DB2
2-10 Oracle Fusion Middleware WebCenter Sites: Installing and Configuring Supporting Software
Figure 2–9 DB2 Instance Setup
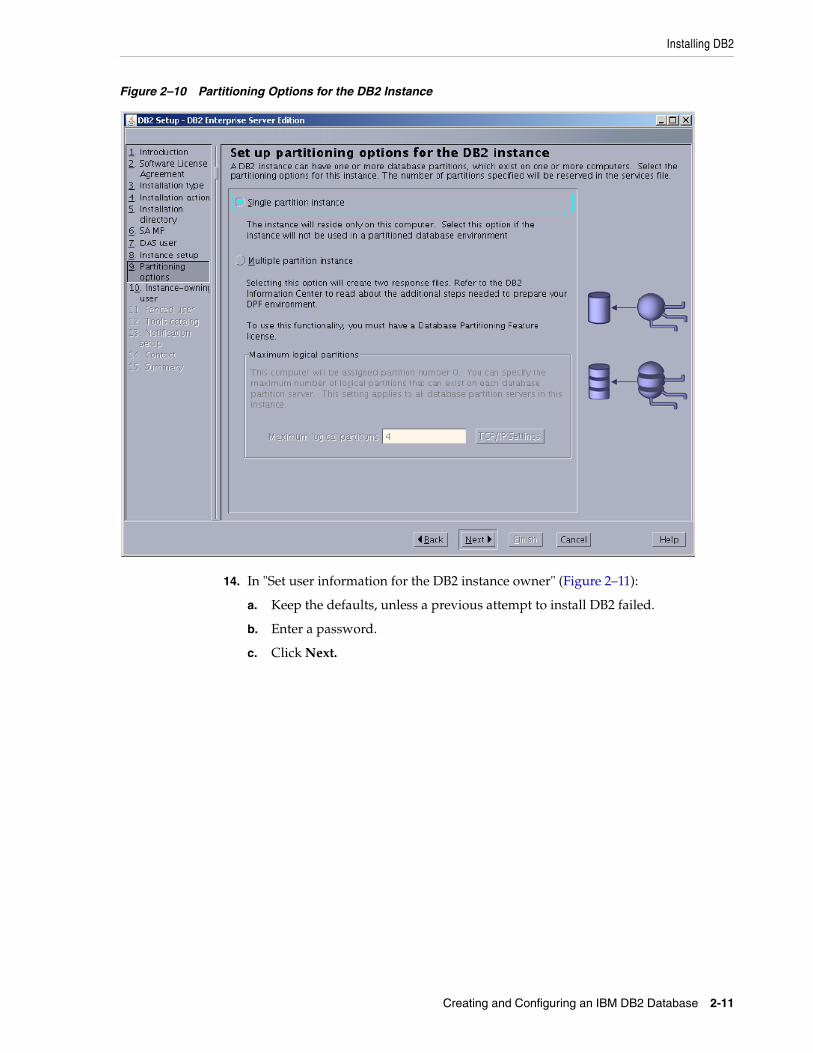
13. In "Set up partitioning options for the DB2 instance," (Figure 2–10) select Single partition instance and click Next.
Installing DB2
Creating and Configuring an IBM DB2 Database 2-11
Figure 2–10 Partitioning Options for the DB2 Instance
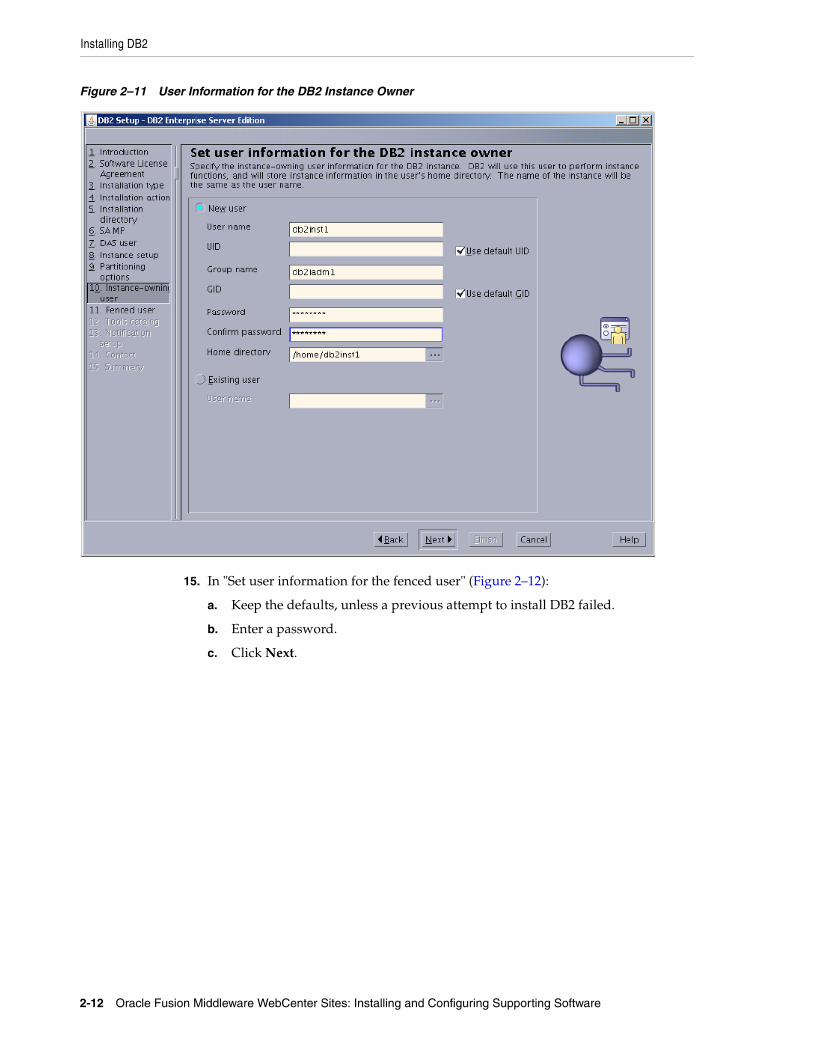
14. In "Set user information for the DB2 instance owner" (Figure 2–11):
a. Keep the defaults, unless a previous attempt to install DB2 failed.
b. Enter a password.
c. Click Next.
Installing DB2
2-12 Oracle Fusion Middleware WebCenter Sites: Installing and Configuring Supporting Software
Figure 2–11 User Information for the DB2 Instance Owner
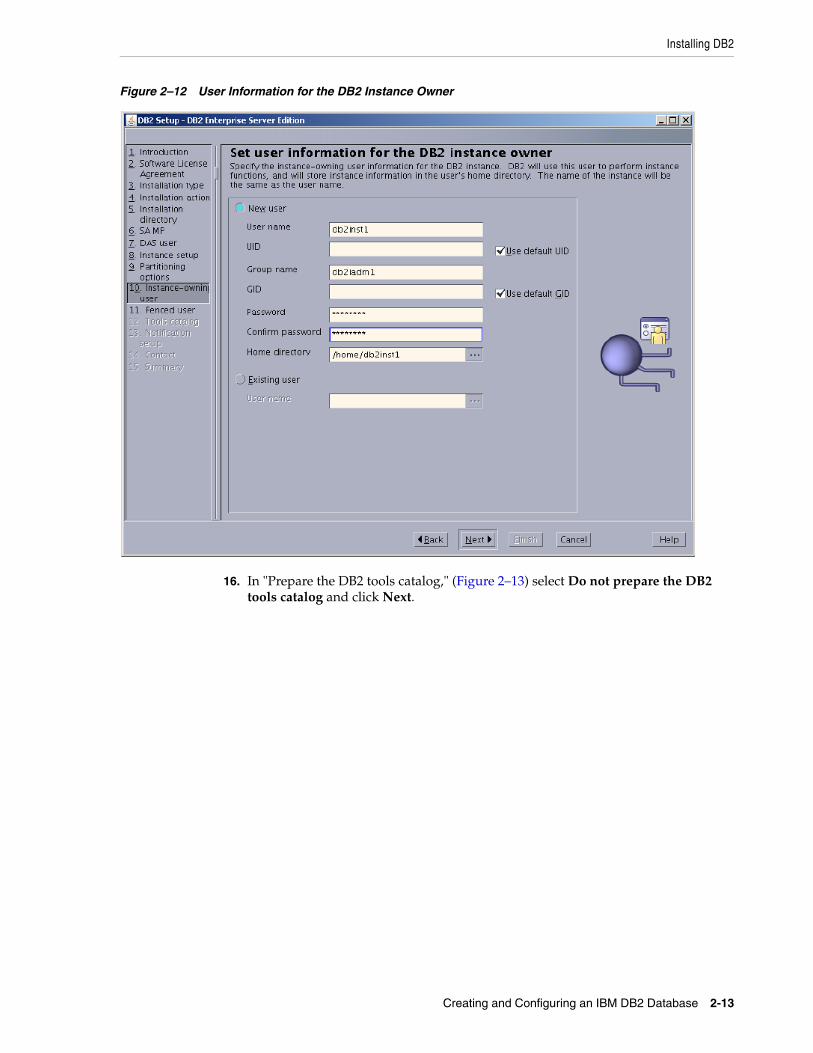
15. In "Set user information for the fenced user" (Figure 2–12):
a. Keep the defaults, unless a previous attempt to install DB2 failed.
b. Enter a password.
c. Click Next.
Installing DB2
Creating and Configuring an IBM DB2 Database 2-13
Figure 2–12 User Information for the DB2 Instance Owner
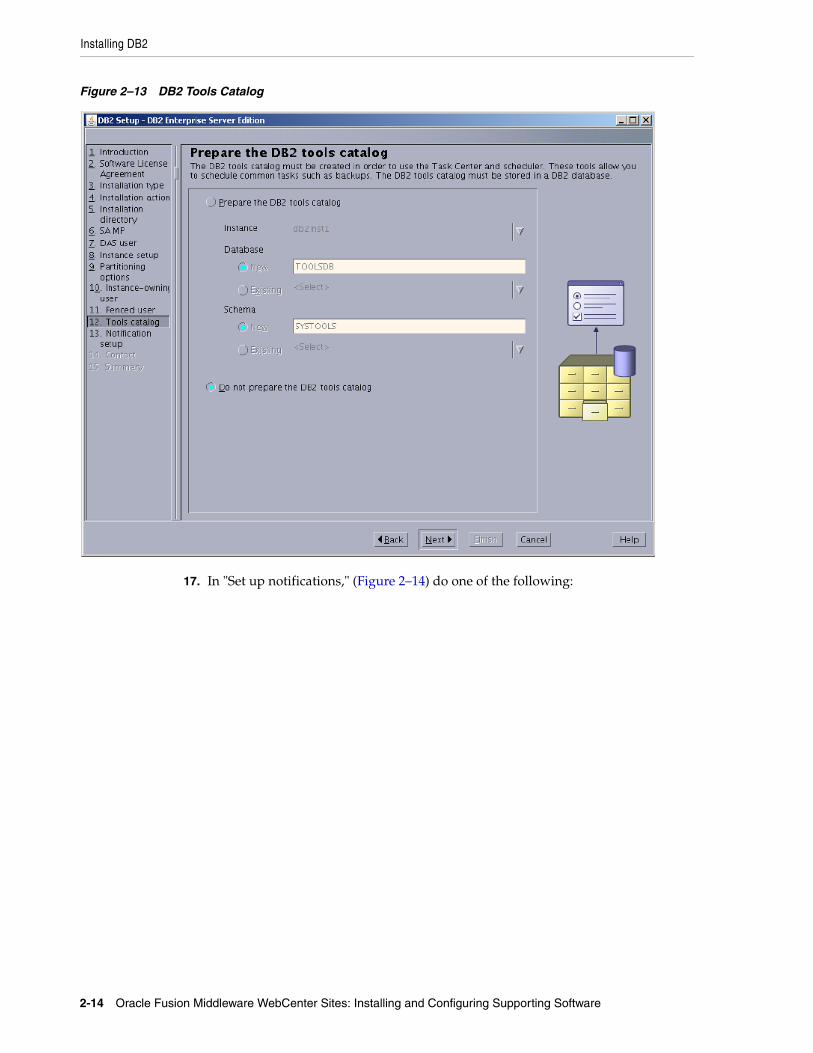
16. In "Prepare the DB2 tools catalog," (Figure 2–13) select Do not prepare the DB2 tools catalog and click Next.
Installing DB2
2-14 Oracle Fusion Middleware WebCenter Sites: Installing and Configuring Supporting Software
Figure 2–13 DB2 Tools Catalog
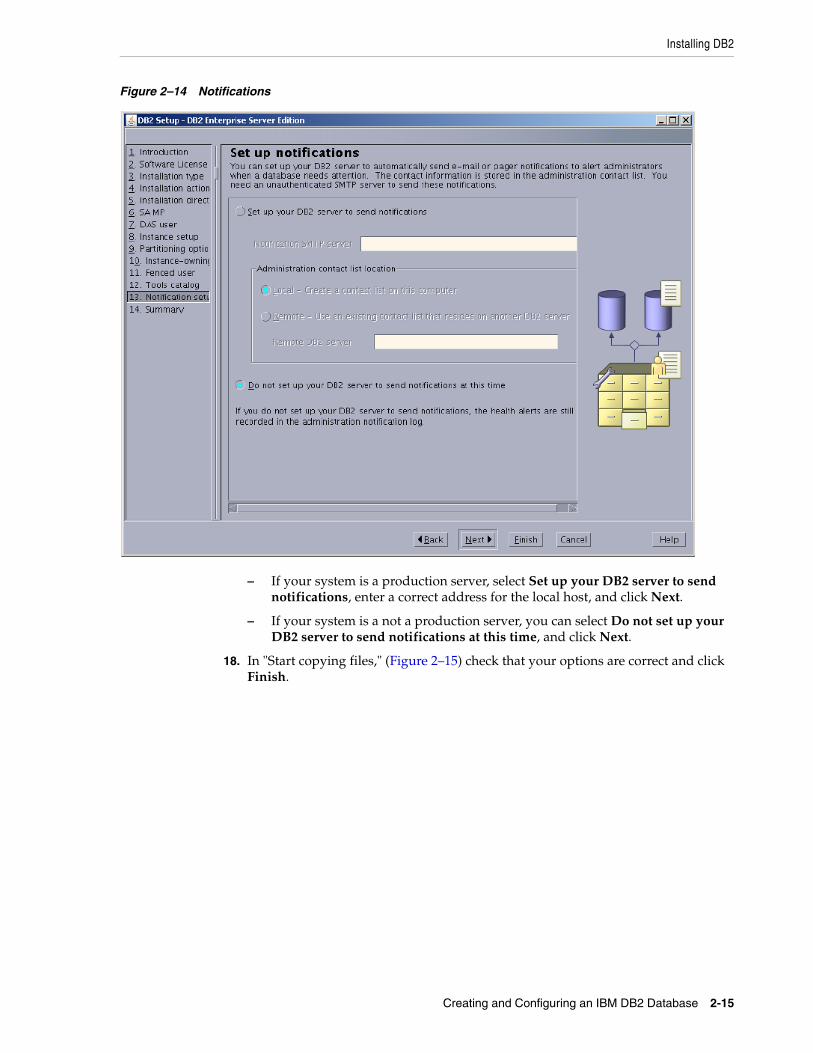
17. In "Set up notifications," (Figure 2–14) do one of the following:
Installing DB2
Creating and Configuring an IBM DB2 Database 2-15
Figure 2–14 Notifications
– If your system is a production server, select Set up your DB2 server to send notifications, enter a correct address for the local host, and click Next.
– If your system is a not a production server, you can select Do not set up your DB2 server to send notifications at this time, and click Next.
18. In "Start copying files," (Figure 2–15) check that your options are correct and click Finish.
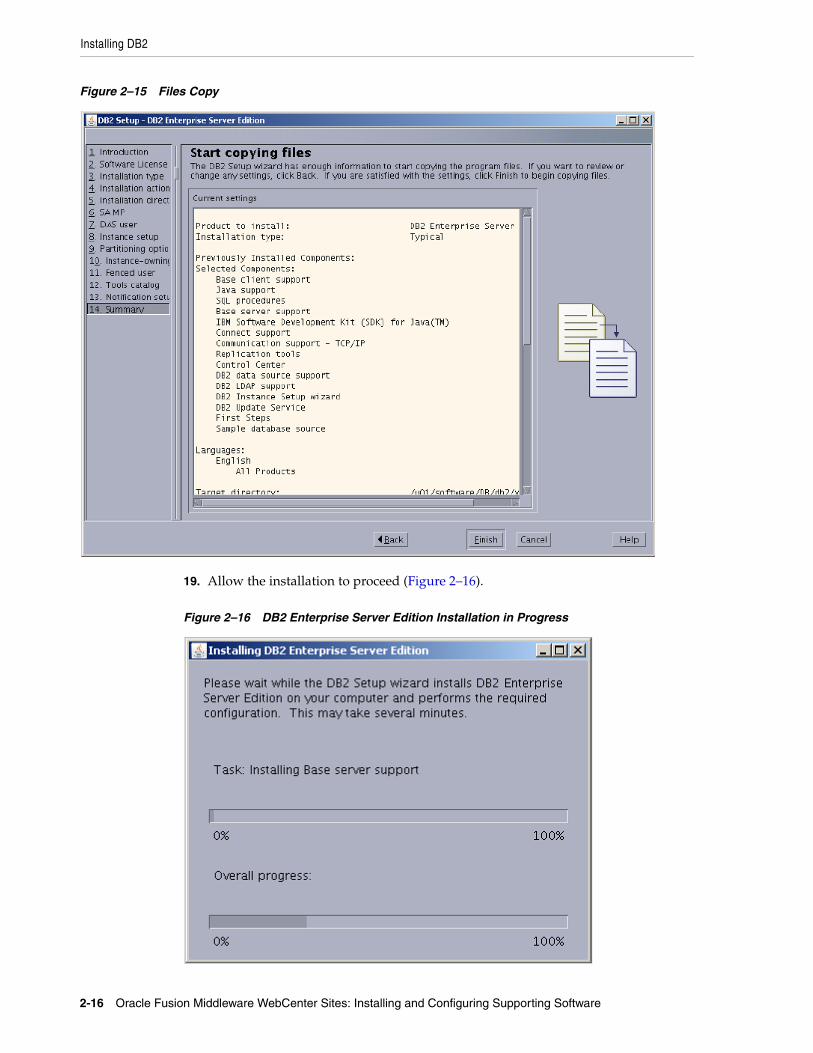
Installing DB2
2-16 Oracle Fusion Middleware WebCenter Sites: Installing and Configuring Supporting Software
Figure 2–15 Files Copy
19. Allow the installation to proceed (Figure 2–16).
Figure 2–16 DB2 Enterprise Server Edition Installation in Progress
Creating a New DB2 Database
Creating and Configuring an IBM DB2 Database 2-17
20. In "Setup has completed successfully," read the notes, check the log tab, and click Finish.
The installation of DB2 is now complete.
2.2 Creating a New DB2 Database This section provides instructions for creating a new DB2 database.
■ Section 2.2.1, "Creating a New DB2 Database Using a SQL Script"
■ Section 2.2.2, "Creating a New DB2 Database Using the 'db2cc' Utility"
2.2.1 Creating a New DB2 Database Using a SQL ScriptYou can use a SQL script to create aDB2 database (and a user for the new database) for any version of IBM DB2 that is installed on your environment, including IBM DB2 versions 9.7 and 10.1.
To create a new DB2 database using a SQL script1. Create a user for the new database. For example, to create a user named csuser on
Linux:
useradd -d /home/csuser -m -p welcome1 csuser
2. Log in with DB2 instance owner credentials. For example, db2inst1.
3. Create a file with the following DB2 commands. (For example, create db.sql and modify the database name, path, and user variables to match your installation):
CREATE DATABASE <DBNAME> AUTOMATIC STORAGE YES ON '<DB2_HOME>/Databases/<DBNAME>' DBPATH ON '<DB2_HOME>/Databases/<DBNAME>' USING CODESET UTF-8 TERRITORY US COLLATE USING SYSTEM PAGESIZE 32768;CONNECT TO <DBNAME>;GRANT DBADM,CREATETAB,BINDADD,CONNECT,CREATE_NOT_FENCED_ROUTINE,IMPLICIT_SCHEMA,LOAD,CREATE_EXTERNAL_ROUTINE,QUIESCE_CONNECT,SECADM ON DATABASE TO USER <DBUSER>;UPDATE DATABASE CONFIGURATION USING APPLHEAPSZ 1024 DEFERRED;UPDATE DATABASE CONFIGURATION USING LOCKTIMEOUT 30 DEFERRED;UPDATE DATABASE CONFIGURATION USING APP_CTL_HEAP_SZ 1024 DEFERRED;UPDATE DATABASE CONFIGURATION USING LOGFILSIZ 32768 DEFERRED;UPDATE DATABASE CONFIGURATION USING LOGSECOND 8 IMMEDIATE ;CONNECT RESET;
4. Create the directory for your database.
mkdir -p <DB2_HOME>/Databases/<DBNAME>
5. Execute the sql script. For example:
db2 -tvsf createdb.sql
Note: If you installed IBM DB2 version 9.7, you have the option of creating a new DB2 database using the db2cc utility. For instructions, see Section 2.2.2, "Creating a New DB2 Database Using the 'db2cc' Utility."
Creating a New DB2 Database
2-18 Oracle Fusion Middleware WebCenter Sites: Installing and Configuring Supporting Software
2.2.2 Creating a New DB2 Database Using the 'db2cc' UtilityIf you installed IBM DB2 version 9.7, follow the steps in this section to create a new DB2 database using the db2cc utility. This section also includes instructions for creating a new database user.
1. Log in as db2inst1 (or your instance user created during the installation, step 14 on page 2-11).
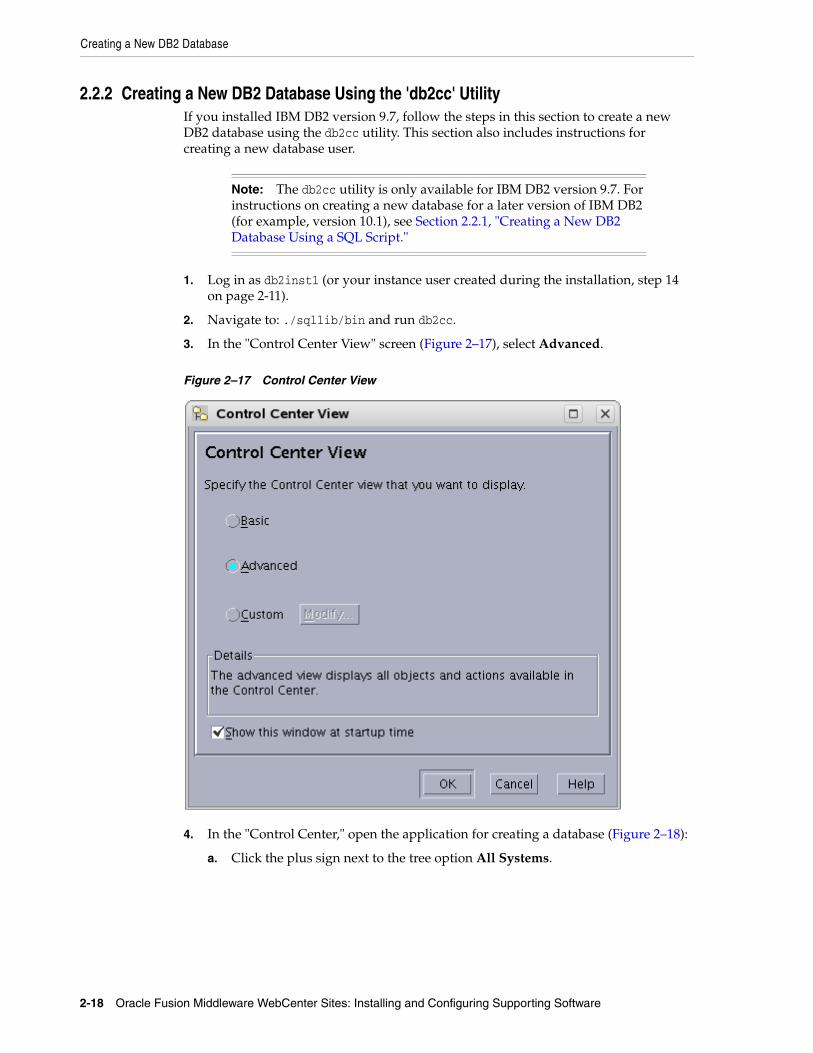
2. Navigate to: ./sqllib/bin and run db2cc.
3. In the "Control Center View" screen (Figure 2–17), select Advanced.
Figure 2–17 Control Center View
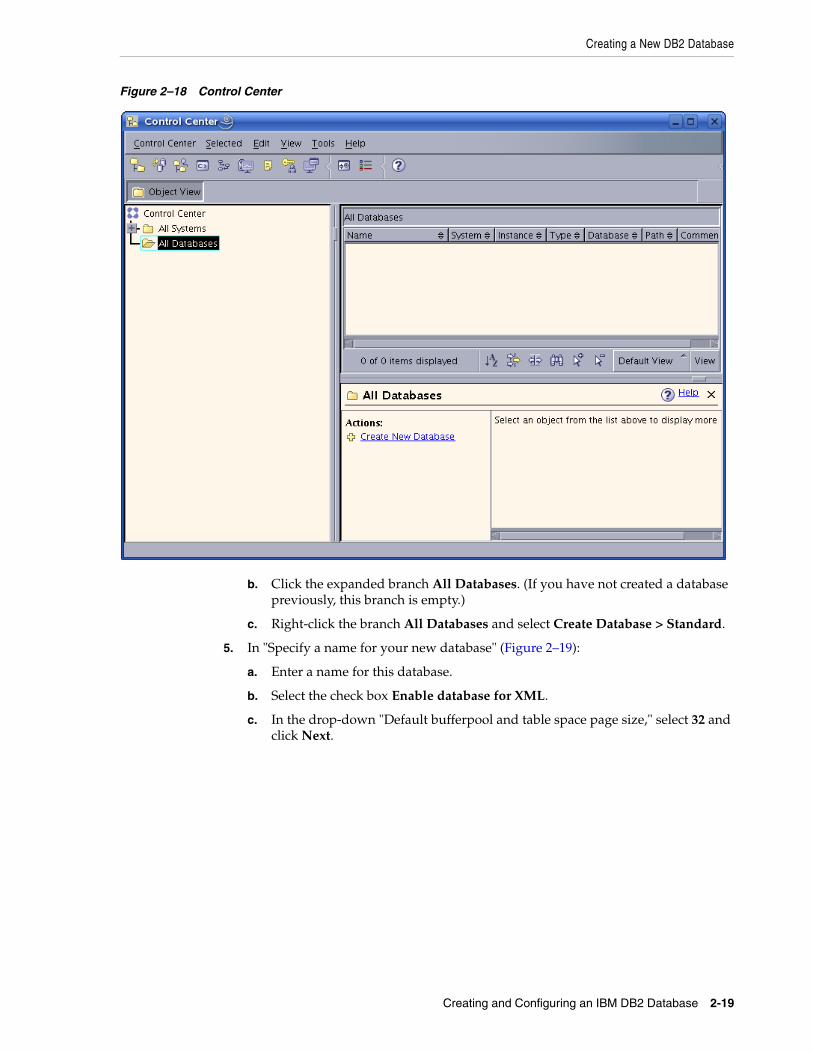
4. In the "Control Center," open the application for creating a database (Figure 2–18):
a. Click the plus sign next to the tree option All Systems.
Note: The db2cc utility is only available for IBM DB2 version 9.7. For instructions on creating a new database for a later version of IBM DB2 (for example, version 10.1), see Section 2.2.1, "Creating a New DB2 Database Using a SQL Script."
Creating a New DB2 Database
Creating and Configuring an IBM DB2 Database 2-19
Figure 2–18 Control Center
b. Click the expanded branch All Databases. (If you have not created a database previously, this branch is empty.)
c. Right-click the branch All Databases and select Create Database > Standard.
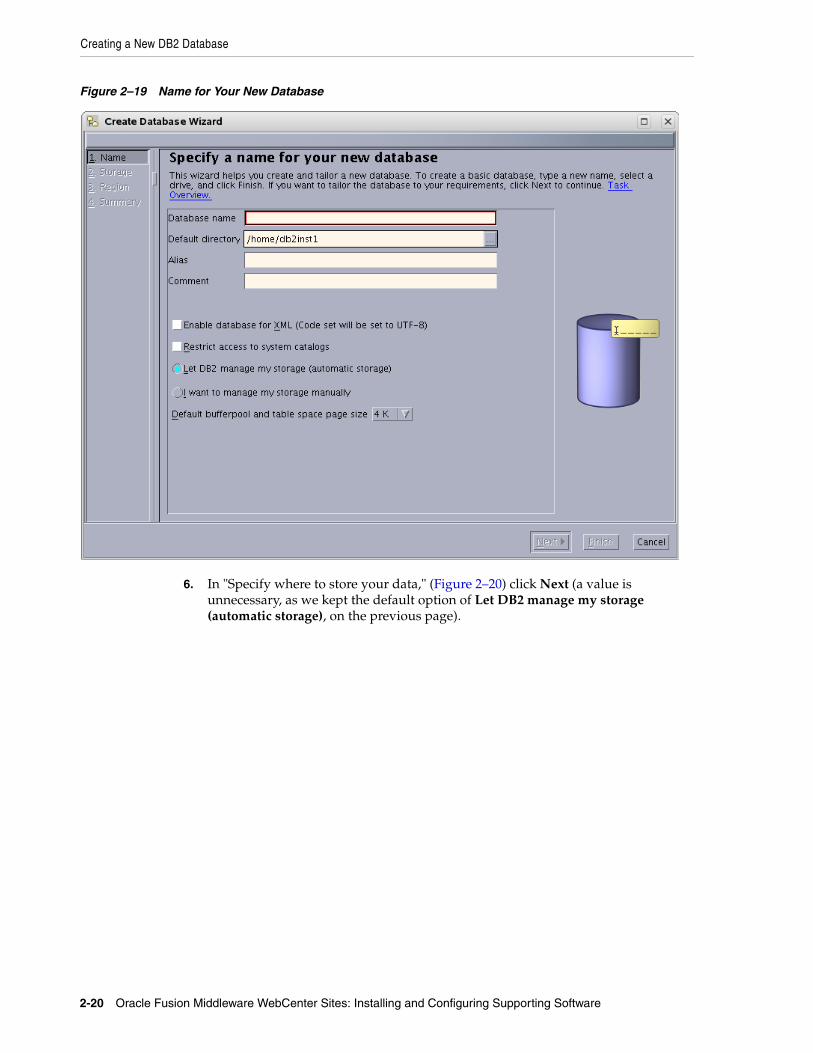
5. In "Specify a name for your new database" (Figure 2–19):
a. Enter a name for this database.
b. Select the check box Enable database for XML.
c. In the drop-down "Default bufferpool and table space page size," select 32 and click Next.
Creating a New DB2 Database
2-20 Oracle Fusion Middleware WebCenter Sites: Installing and Configuring Supporting Software
Figure 2–19 Name for Your New Database
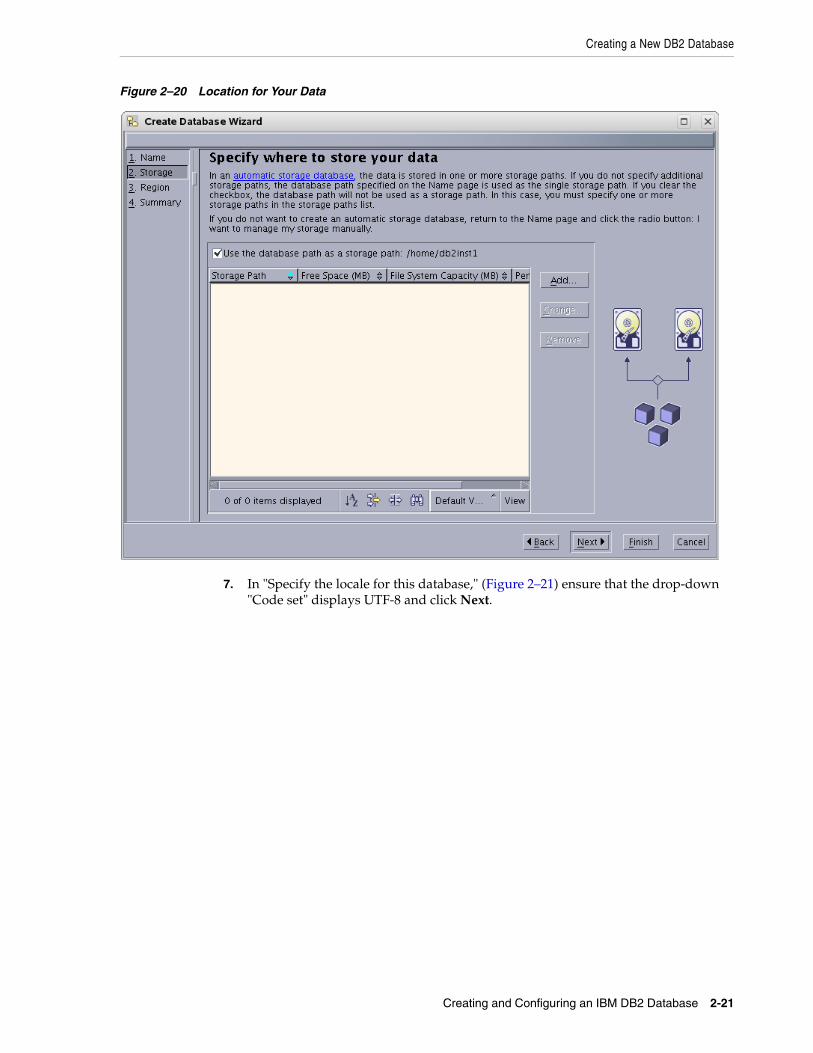
6. In "Specify where to store your data," (Figure 2–20) click Next (a value is unnecessary, as we kept the default option of Let DB2 manage my storage (automatic storage), on the previous page).
Creating a New DB2 Database
Creating and Configuring an IBM DB2 Database 2-21
Figure 2–20 Location for Your Data
7. In "Specify the locale for this database," (Figure 2–21) ensure that the drop-down "Code set" displays UTF-8 and click Next.

Creating a New DB2 Database
2-22 Oracle Fusion Middleware WebCenter Sites: Installing and Configuring Supporting Software
Figure 2–21 Database Locale
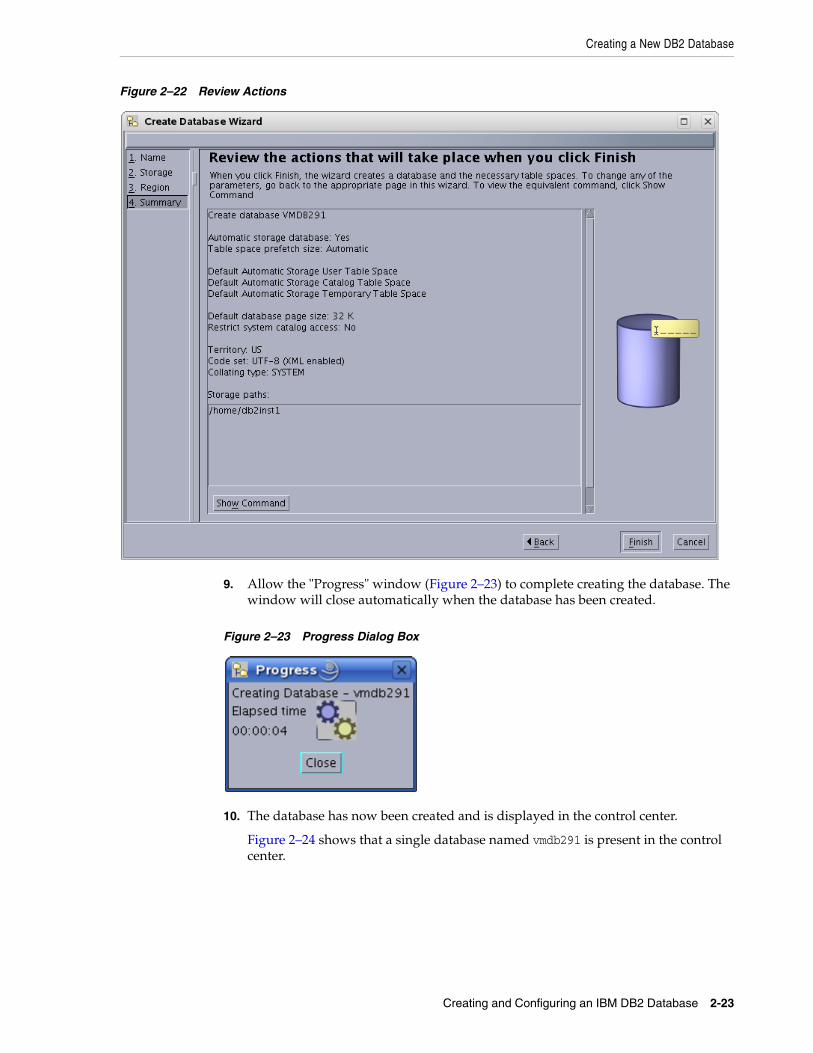
8. In "Review the actions that will take place when you click finish," (Figure 2–22) confirm that everything looks correct and click Finish.
Creating a New DB2 Database
Creating and Configuring an IBM DB2 Database 2-23
Figure 2–22 Review Actions
9. Allow the "Progress" window (Figure 2–23) to complete creating the database. The window will close automatically when the database has been created.
Figure 2–23 Progress Dialog Box
10. The database has now been created and is displayed in the control center.
Figure 2–24 shows that a single database named vmdb291 is present in the control center.

Creating a New DB2 Database
2-24 Oracle Fusion Middleware WebCenter Sites: Installing and Configuring Supporting Software
Figure 2–24 vmdb291 Database
11. Create a user for the new database
a. Go to the command line. As the system user, create a new user named csuser that will be used to access the database from your Oracle product.
For example, to create a user named csuser on Linux:
useradd -d /home/csuser -m -p demo4132 csuser
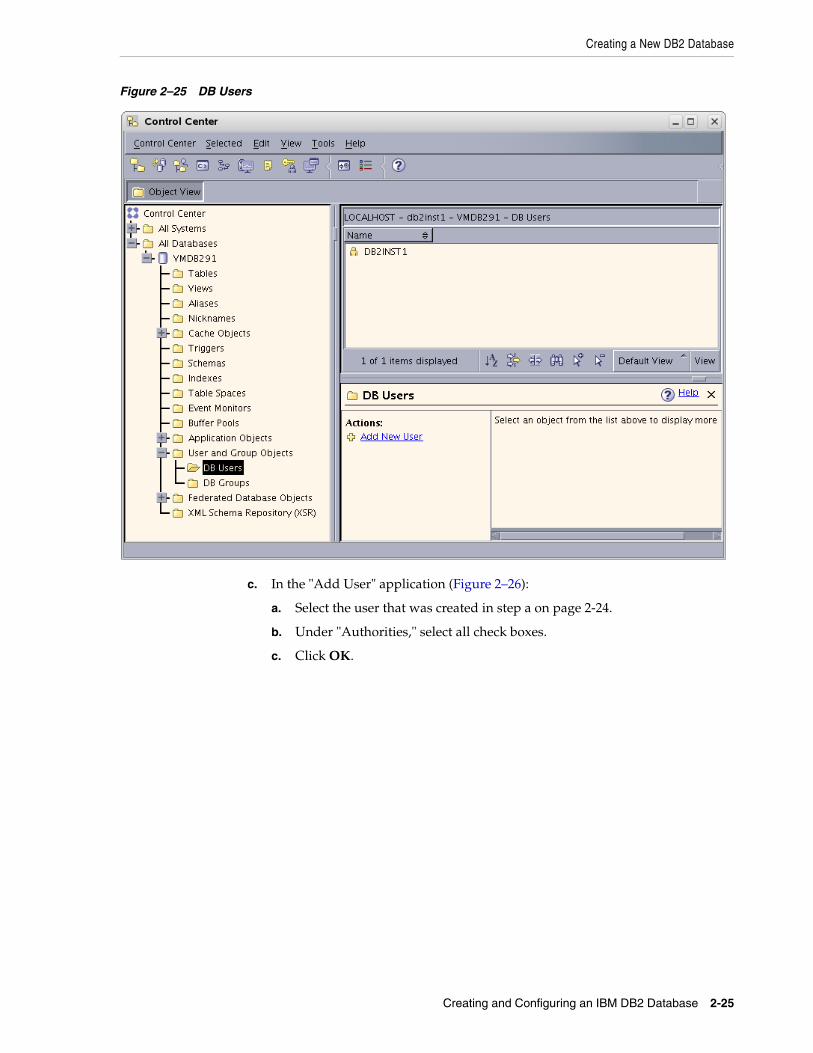
b. Go back to the "Control Center" and add the user:
a. Expand the newly created database in the tree by clicking the plus sign, then expanding the branch User and Group Objects.
b. Click DB Users to open the right-hand panel.
c. Right-click the branch DB Users (Figure 2–25) and select the Add option.
Creating a New DB2 Database
Creating and Configuring an IBM DB2 Database 2-25
Figure 2–25 DB Users
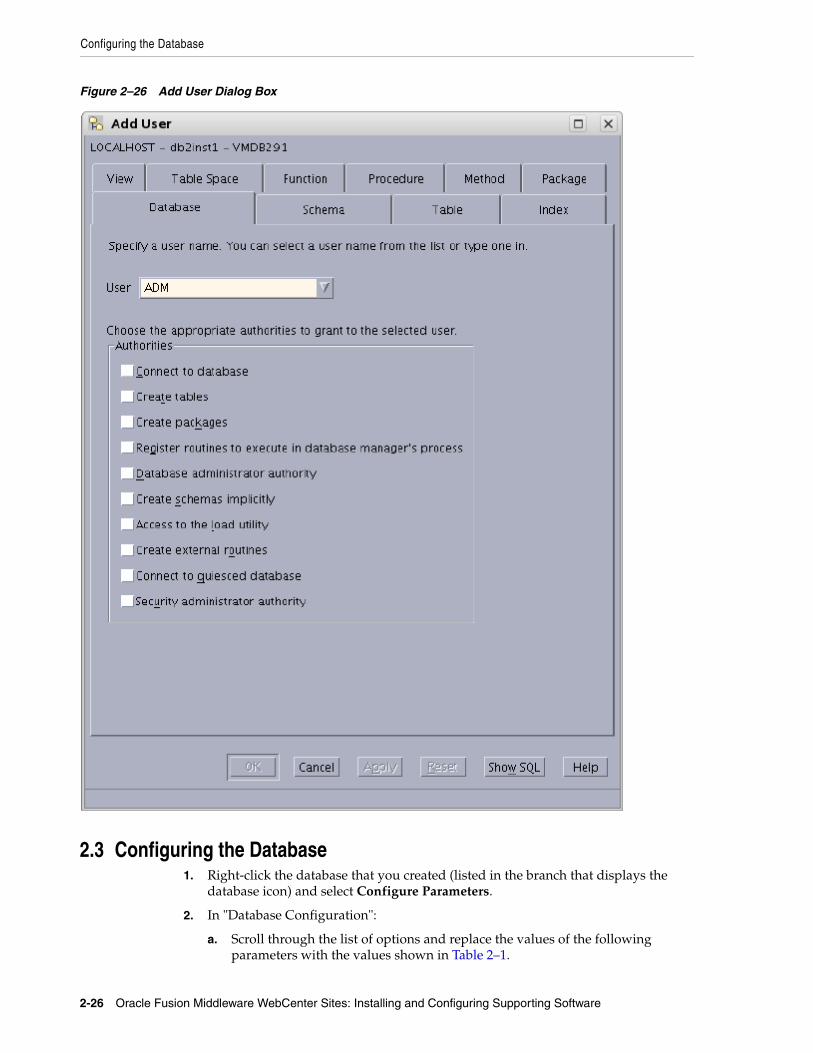
c. In the "Add User" application (Figure 2–26):
a. Select the user that was created in step a on page 2-24.
b. Under "Authorities," select all check boxes.
c. Click OK.
Configuring the Database
2-26 Oracle Fusion Middleware WebCenter Sites: Installing and Configuring Supporting Software
Figure 2–26 Add User Dialog Box
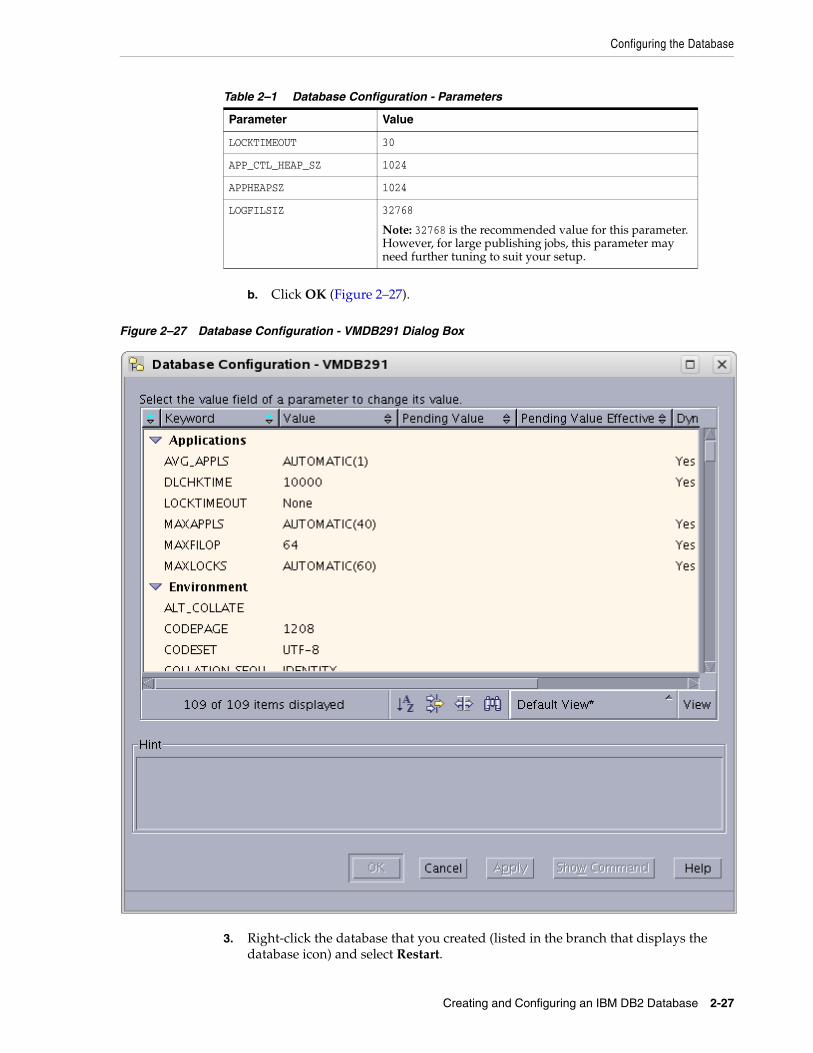
2.3 Configuring the Database1. Right-click the database that you created (listed in the branch that displays the
database icon) and select Configure Parameters.
2. In "Database Configuration":
a. Scroll through the list of options and replace the values of the following parameters with the values shown in Table 2–1.
Configuring the Database
Creating and Configuring an IBM DB2 Database 2-27
b. Click OK (Figure 2–27).
Figure 2–27 Database Configuration - VMDB291 Dialog Box
3. Right-click the database that you created (listed in the branch that displays the database icon) and select Restart.
Table 2–1 Database Configuration - Parameters
Parameter Value
LOCKTIMEOUT 30
APP_CTL_HEAP_SZ 1024
APPHEAPSZ 1024
LOGFILSIZ 32768
Note: 32768 is the recommended value for this parameter. However, for large publishing jobs, this parameter may need further tuning to suit your setup.
Configuring the Database
2-28 Oracle Fusion Middleware WebCenter Sites: Installing and Configuring Supporting Software
A status window flashes. This does not mean that the operation has been completed. Typically, you will need to wait 2 to 3 minutes for the system to restart.
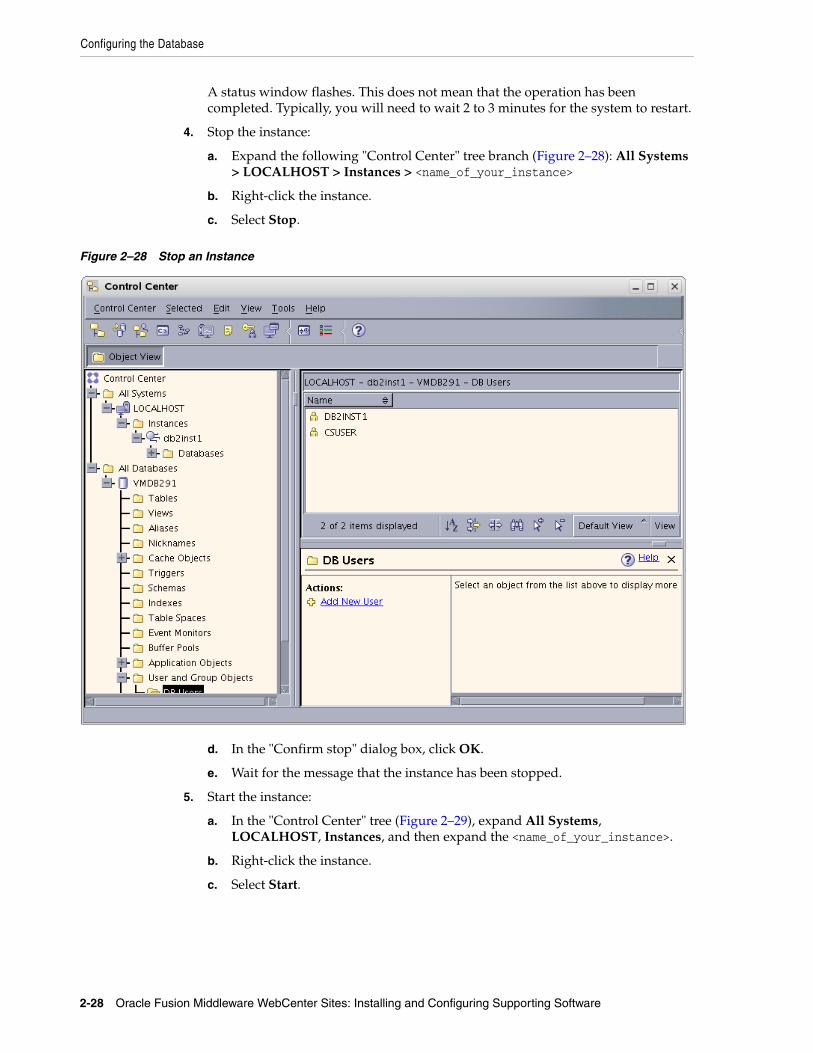
4. Stop the instance:
a. Expand the following "Control Center" tree branch (Figure 2–28): All Systems > LOCALHOST > Instances > <name_of_your_instance>
b. Right-click the instance.
c. Select Stop.
Figure 2–28 Stop an Instance
d. In the "Confirm stop" dialog box, click OK.
e. Wait for the message that the instance has been stopped.
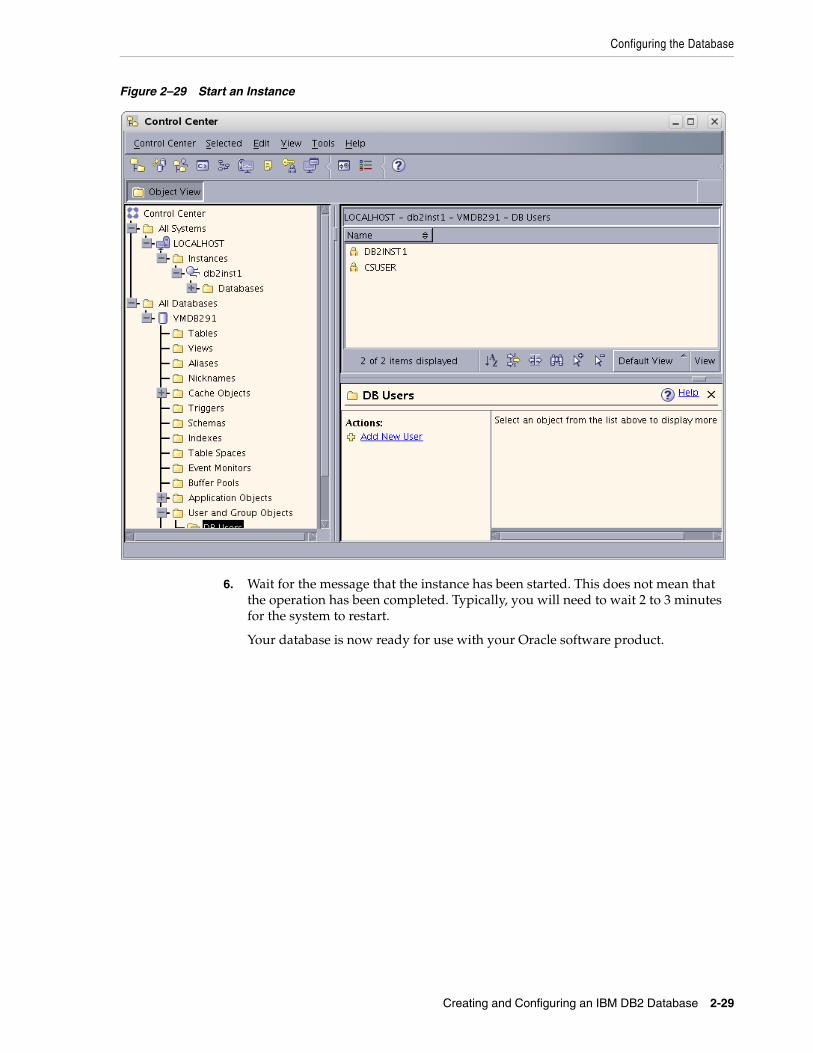
5. Start the instance:
a. In the "Control Center" tree (Figure 2–29), expand All Systems, LOCALHOST, Instances, and then expand the <name_of_your_instance>.
b. Right-click the instance.
c. Select Start.
Configuring the Database
Creating and Configuring an IBM DB2 Database 2-29
Figure 2–29 Start an Instance
6. Wait for the message that the instance has been started. This does not mean that the operation has been completed. Typically, you will need to wait 2 to 3 minutes for the system to restart.
Your database is now ready for use with your Oracle software product.
Configuring the Database
2-30 Oracle Fusion Middleware WebCenter Sites: Installing and Configuring Supporting Software
3
Creating and Configuring a Microsoft SQL Server Database 3-1
3Creating and Configuring a Microsoft SQLServer Database
Use this chapter to set up a SQL Server database for your WebCenter Sites installation.
This chapter contains the following section:
■ Section 3.1, "Creating and Configuring a SQL Server 2008 R2 or 2012 Database"
3.1 Creating and Configuring a SQL Server 2008 R2 or 2012 Database1. Use the Windows Account Manager to create a new user account for the
WebCenter Sites database user (for example, csuser), and assign a password to the account.
2. Open SQL Server Manager Studio.
3. Log in to MS SQL Server:
a. Enter your user name and password (the default user name is sa).
b. Click Connect.
4. Create the database:
a. In the left-hand tree, expand the Databases node.
b. Right-click the Databases node and select New Database from the pop-up menu.
c. In the "New Database" window, enter a name for your database and click OK.
Your newly created database appears under the Databases node in the tree.
5. In the tree, expand the node representing your newly created database, then expand the Security node underneath it.
6. Click the Users tab.
7. Right-click within the white space underneath the list of existing users and select New User from the pop-up menu.
8. In the "Database User - New" window, enter the user name of the WebCenter Sites database user (which you created in step 1 of this procedure) into the User name and Login name fields.
9. In the "Owned Schemas" and "Role Members" areas, select the db_owner check box.
10. Click OK.
Creating and Configuring a SQL Server 2008 R2 or 2012 Database
3-2 Oracle Fusion Middleware WebCenter Sites: Installing and Configuring Supporting Software
The database is created.
11. After the database has been created, turn on the READ_COMMITED_SNAPSHOT as shown below. For more information, refer to the vendor documentation.
ALTER DATABASE <your_db_name>SET ALLOW_SNAPSHOT_ISOLATION ON GOALTER DATABASE <your_db_name>SET READ_COMMITTED_SNAPSHOT ON GO
Database configuration is complete.
12. You are now ready to create and configure the data source using the user name and password of the WebCenter Sites database user you created in step 1 of this procedure. For instructions, refer to the Oracle Fusion Middleware WebCenter Sites Installation Guide.
Part IIPart II Installing an Application Server
Part II contains the following chapters:
■ Chapter 4, "Installing Oracle WebLogic Server"
■ Chapter 5, "Installing Apache Tomcat Application Server"
■ Chapter 6, "Installing IBM WebSphere Application Server"

4
Installing Oracle WebLogic Server 4-1
4Installing Oracle WebLogic Server
This chapter is not exhaustive, as it covers the installation of Oracle WebLogic Application Server so far as needed to install and run WebCenter Sites. For more extensive documentation on the installation process and best practices, see the Oracle Fusion Middleware Installation Guide for Oracle WebLogic Server.
4.1 WebLogic Server Installation Steps1. Run the WebLogic Server installer (on UNIX, make sure your DISPLAY variable is
set).
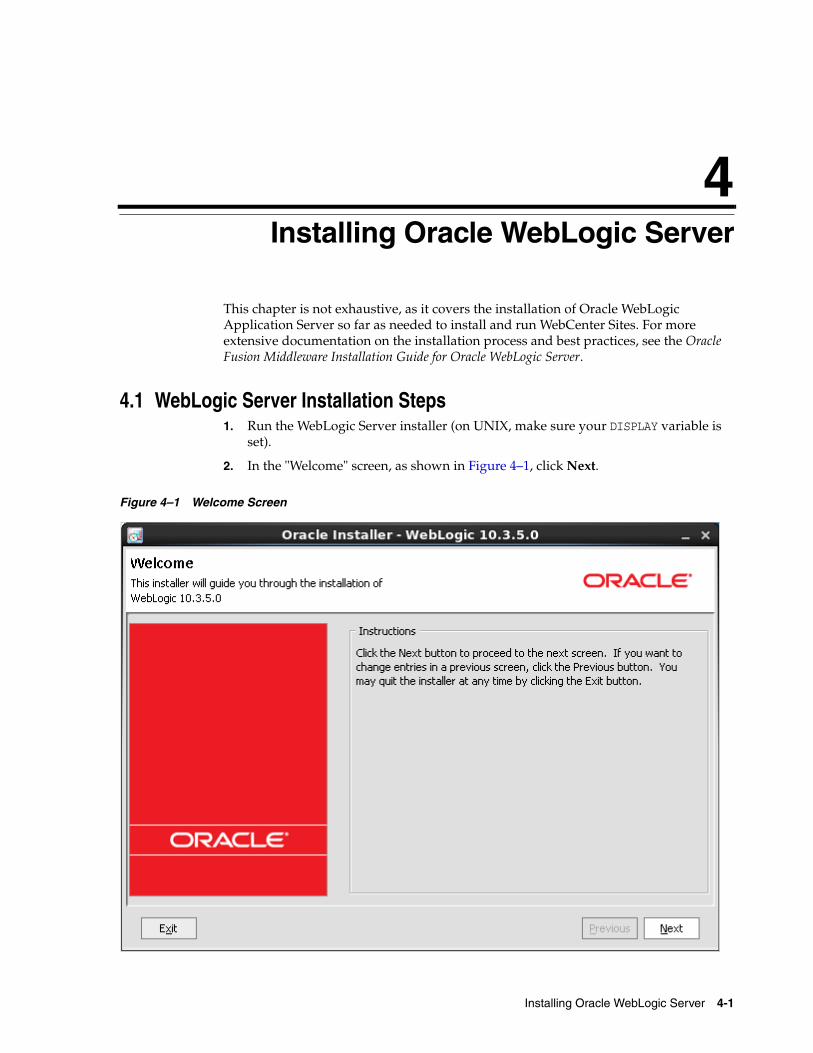
2. In the "Welcome" screen, as shown in Figure 4–1, click Next.
Figure 4–1 Welcome Screen
WebLogic Server Installation Steps
4-2 Oracle Fusion Middleware WebCenter Sites: Installing and Configuring Supporting Software
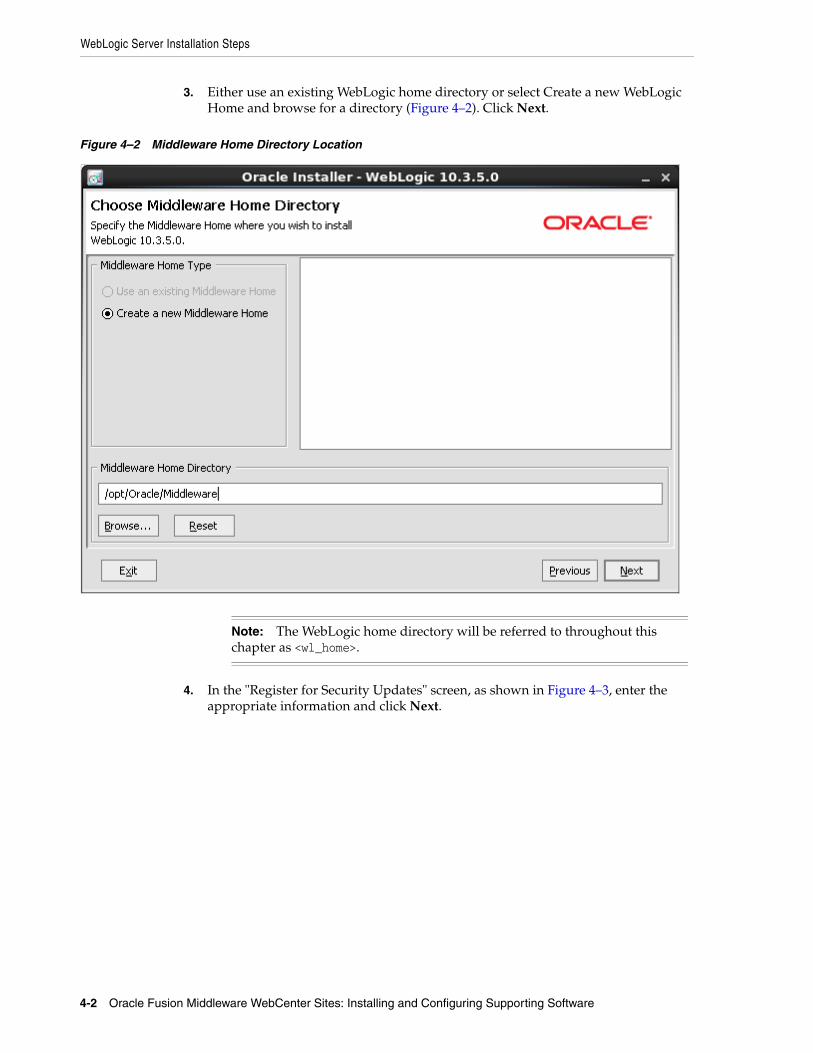
3. Either use an existing WebLogic home directory or select Create a new WebLogic Home and browse for a directory (Figure 4–2). Click Next.
Figure 4–2 Middleware Home Directory Location
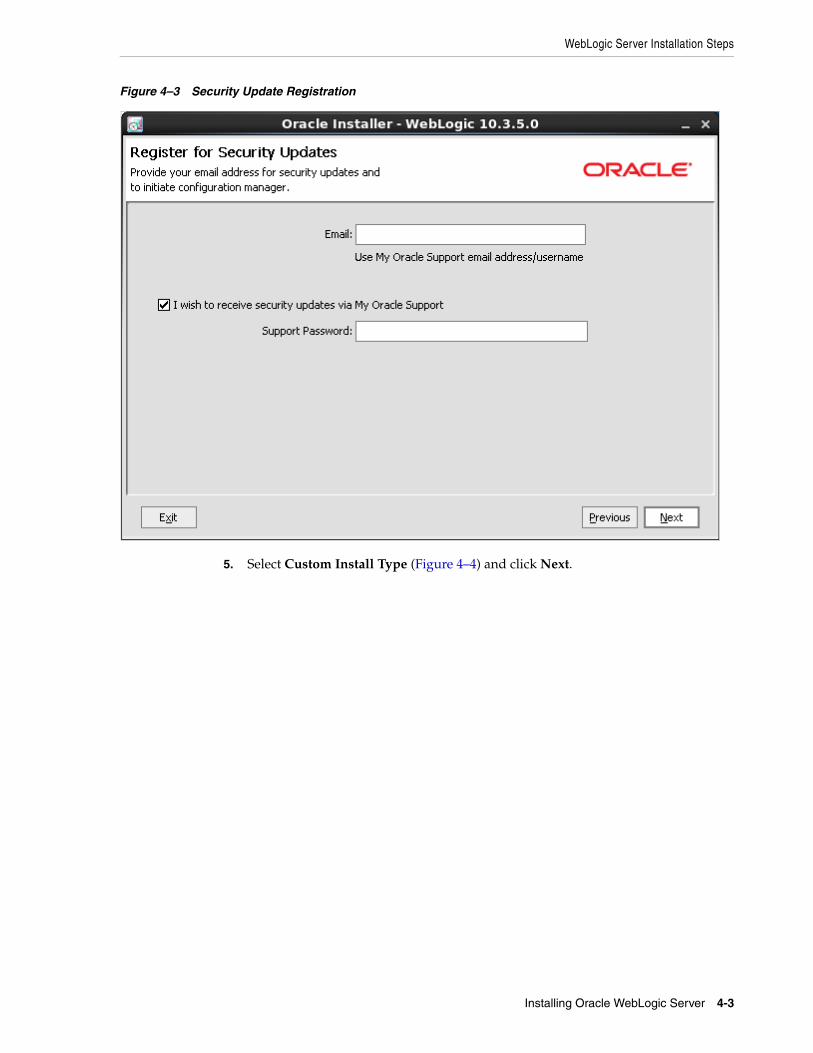
4. In the "Register for Security Updates" screen, as shown in Figure 4–3, enter the appropriate information and click Next.
Note: The WebLogic home directory will be referred to throughout this chapter as <wl_home>.
WebLogic Server Installation Steps
Installing Oracle WebLogic Server 4-3
Figure 4–3 Security Update Registration
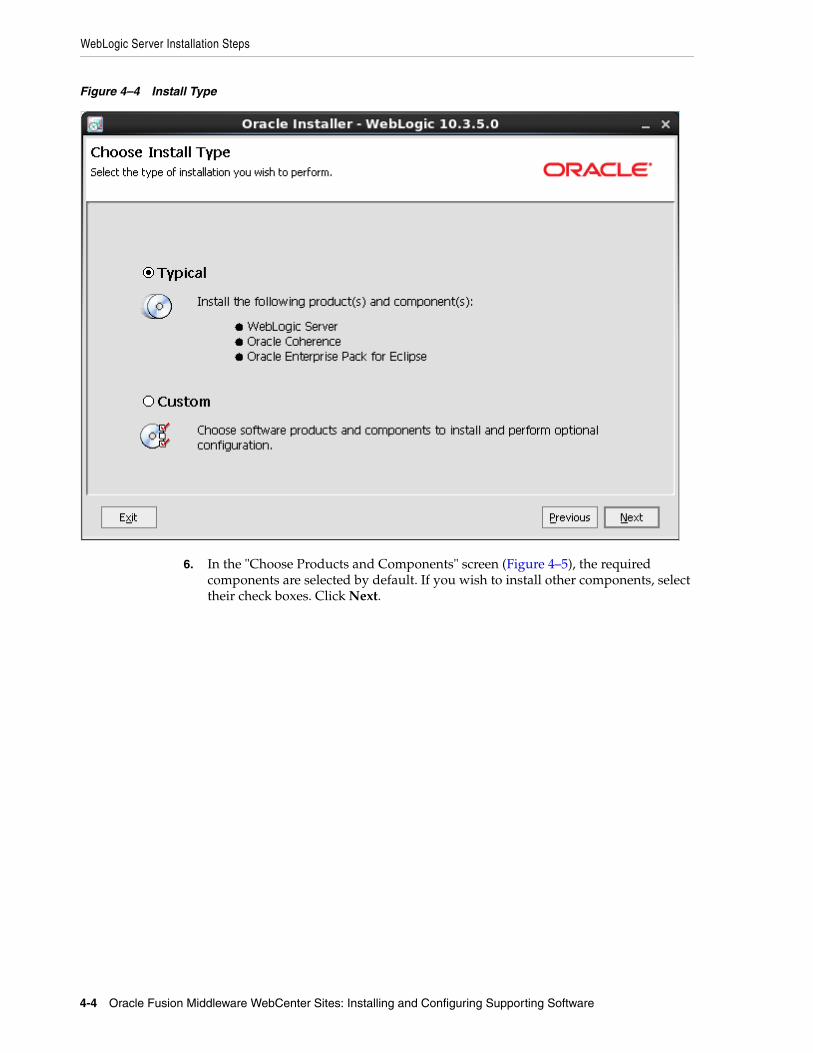
5. Select Custom Install Type (Figure 4–4) and click Next.
WebLogic Server Installation Steps
4-4 Oracle Fusion Middleware WebCenter Sites: Installing and Configuring Supporting Software
Figure 4–4 Install Type
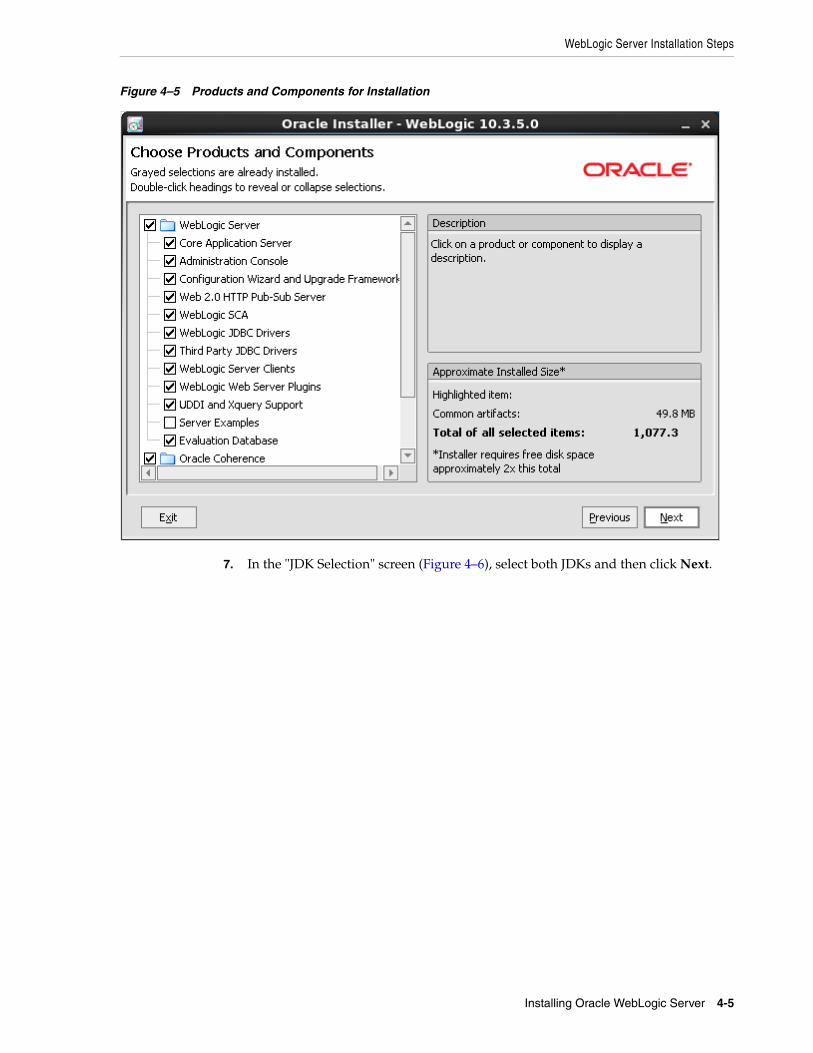
6. In the "Choose Products and Components" screen (Figure 4–5), the required components are selected by default. If you wish to install other components, select their check boxes. Click Next.
WebLogic Server Installation Steps
Installing Oracle WebLogic Server 4-5
Figure 4–5 Products and Components for Installation
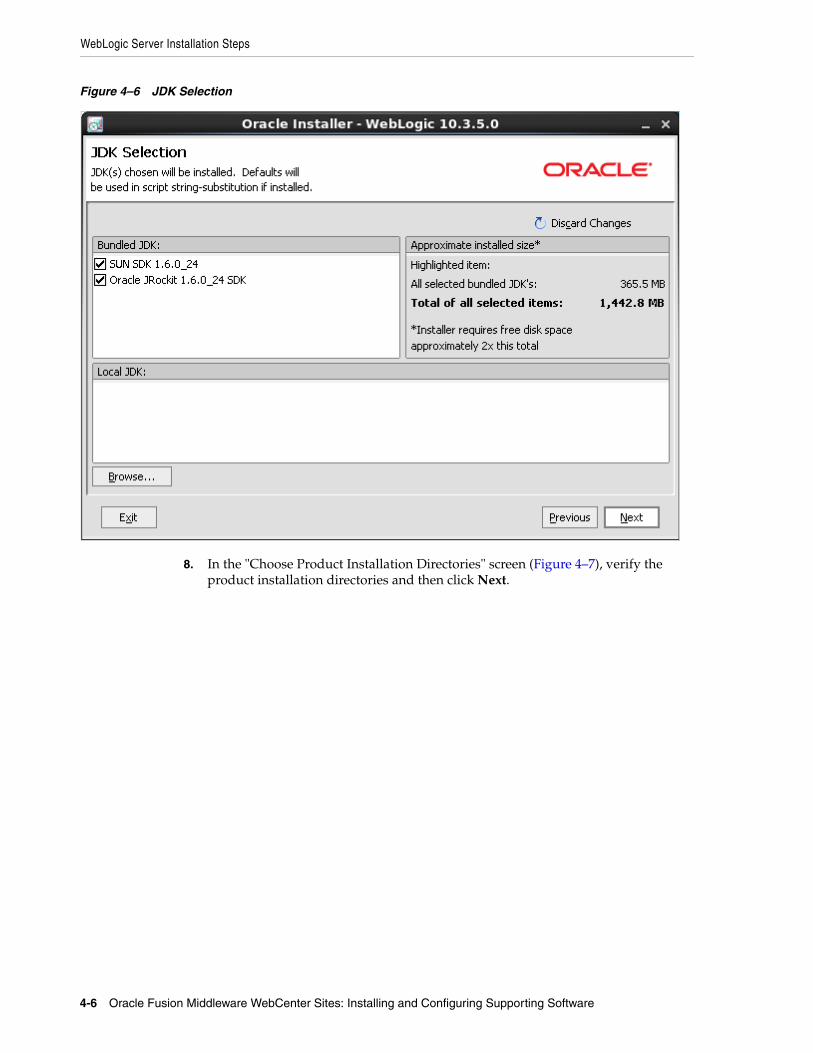
7. In the "JDK Selection" screen (Figure 4–6), select both JDKs and then click Next.
WebLogic Server Installation Steps
4-6 Oracle Fusion Middleware WebCenter Sites: Installing and Configuring Supporting Software
Figure 4–6 JDK Selection
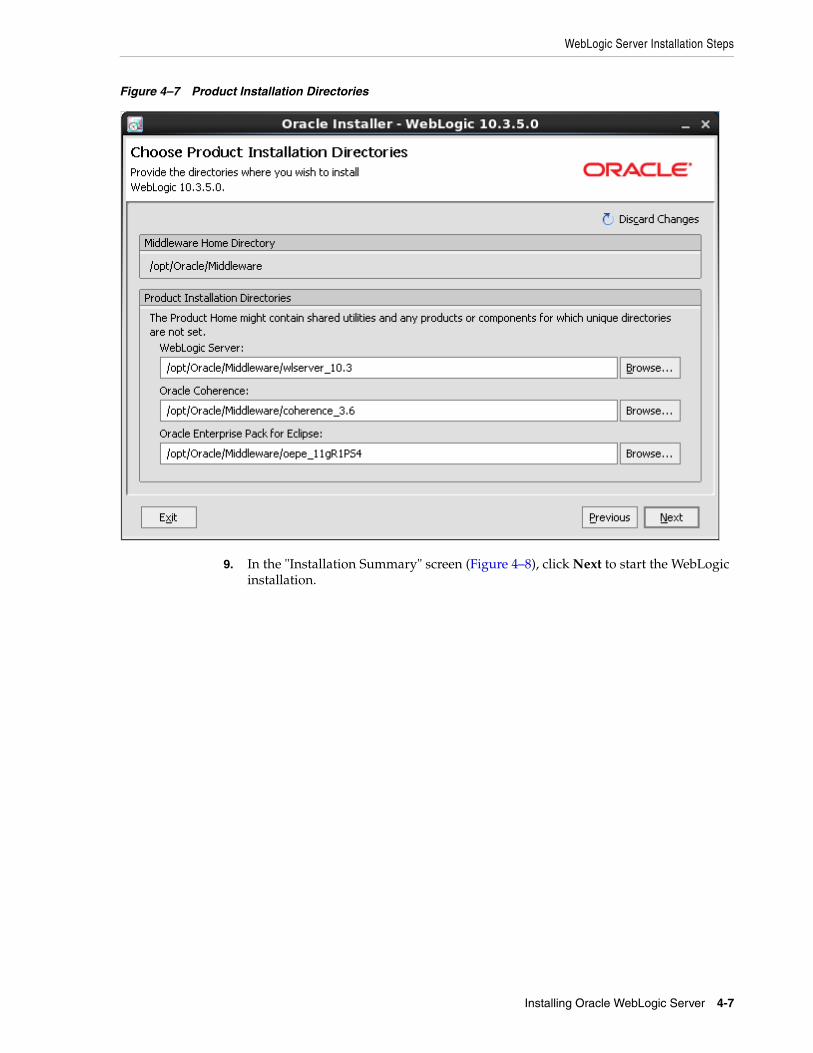
8. In the "Choose Product Installation Directories" screen (Figure 4–7), verify the product installation directories and then click Next.
WebLogic Server Installation Steps
Installing Oracle WebLogic Server 4-7
Figure 4–7 Product Installation Directories
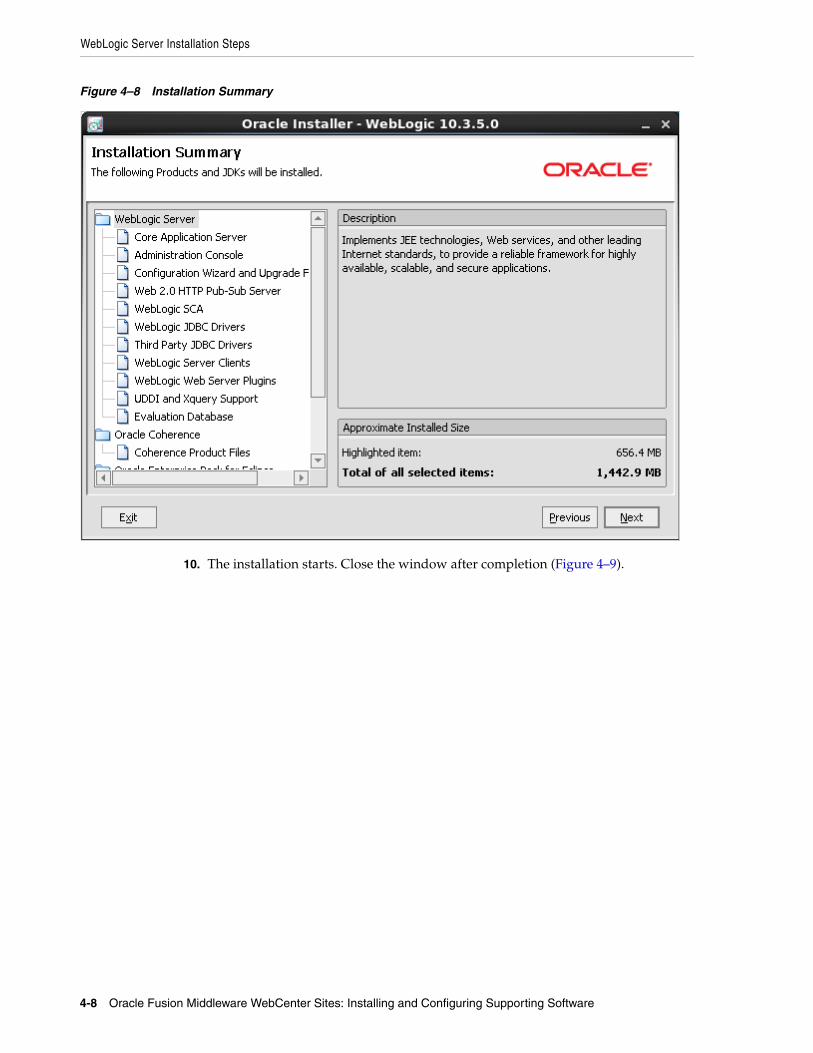
9. In the "Installation Summary" screen (Figure 4–8), click Next to start the WebLogic installation.
WebLogic Server Installation Steps
4-8 Oracle Fusion Middleware WebCenter Sites: Installing and Configuring Supporting Software
Figure 4–8 Installation Summary
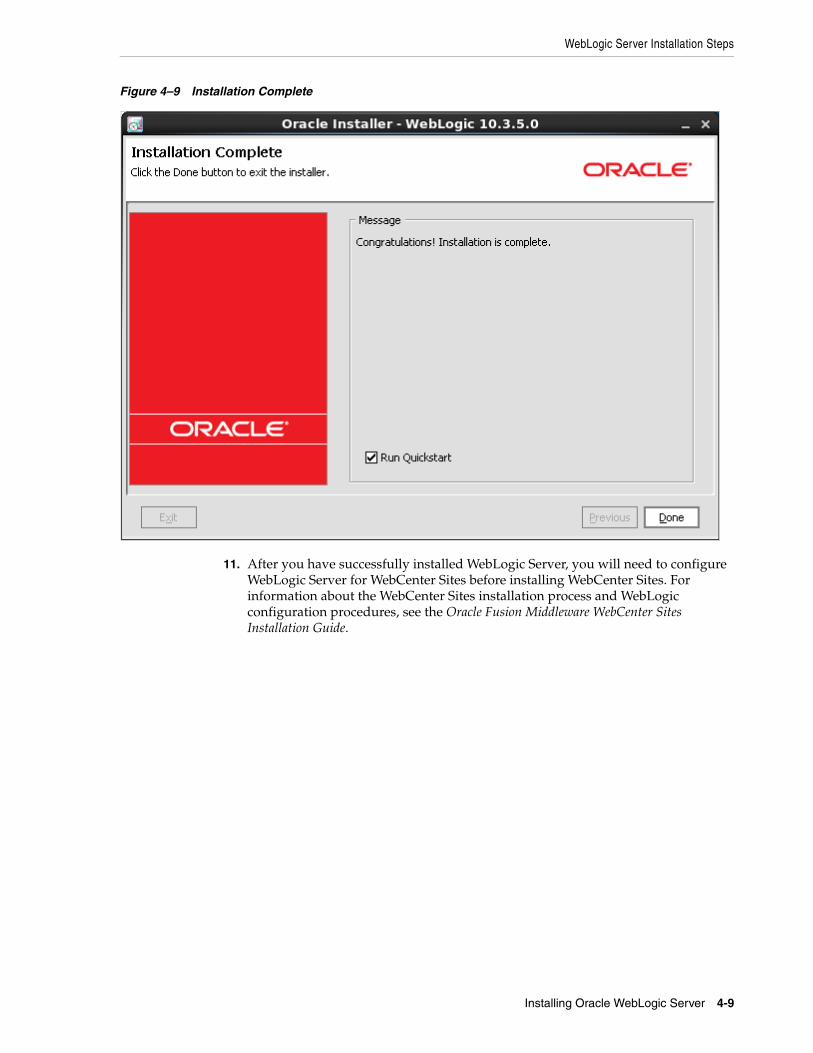
10. The installation starts. Close the window after completion (Figure 4–9).
WebLogic Server Installation Steps
Installing Oracle WebLogic Server 4-9
Figure 4–9 Installation Complete
11. After you have successfully installed WebLogic Server, you will need to configure WebLogic Server for WebCenter Sites before installing WebCenter Sites. For information about the WebCenter Sites installation process and WebLogic configuration procedures, see the Oracle Fusion Middleware WebCenter Sites Installation Guide.
WebLogic Server Installation Steps
4-10 Oracle Fusion Middleware WebCenter Sites: Installing and Configuring Supporting Software
5
Installing Apache Tomcat Application Server 5-1
5Installing Apache Tomcat Application Server
5.1 Tomcat Installation Steps
To install the Tomcat Application Server 1. Download and install a supported JDK.
2. Decompress the Tomcat archive file:
tar xvfz apache-tomcat-<version>.tar.gz
3. Rename the apache-tomcat-<version> directory and move it to a desired location. (The rest of this section refers to the new path of this directory as <tomcat_home>.)
4. Create a file named setenv.sh in the <tomcat-home>/bin directory. Add the following lines to the file:
CATALINA_HOME=<tomcat_home>CATALINA_PID="$CATALINA_HOME"/tomcat.pid
Adding tomcat.pid ensures that the Tomcat process is killed when the shutdown.sh command is executed with the -force argument.
5. Set the JAVA_HOME variable to the JDK folder of the version of Java that will be used. For example:
export JAVA_HOME=/opt/jdk1.6.0.39
6. Start the application server by running the startup command.
<tomcat_home>/bin/startup.sh
7. Access the following URL in a web browser: http://<hostname>:8080/
This brings you to Tomcat's default homepage.
8. Shut down the application server by running the shutdown command.
<tomcat_home>/bin/shutdown.sh -force
9. After you have successfully installed Tomcat, you will need to configure Tomcat for WebCenter Sites before installing WebCenter Sites. For information about the
Note: In this chapter, we assume that you are using a UNIX based system. Therefore, the commands that are provided in this chapter for your reference are only for UNIX based systems. Commands for Windows based systems may be different.
Tomcat Installation Steps
5-2 Oracle Fusion Middleware WebCenter Sites: Installing and Configuring Supporting Software
WebCenter Sites installation process and WebLogic configuration procedures, see the Oracle Fusion Middleware WebCenter Sites Installation Guide.
6
Installing IBM WebSphere Application Server 6-1
6Installing IBM WebSphere Application Server
This chapter describes how to install WebSphere Application Server version 8. It contains the following steps:
■ Section 6.1, "Installing IBM Installation Manager"
■ Section 6.2, "Installing WebSphere Application Server Using IBM IM"
■ Section 6.3, "Updating WebSphere Application Server"
6.1 Installing IBM Installation ManagerThis section describes how to install the IBM Installation Manager.
To install the IBM Installation Manager1. Unzip the IBM Installation Manager to a directory and execute the following
command:
cd <iim_directory> (need to add this to dir list)./install
This command starts the installer for the IBM Installation Manager.
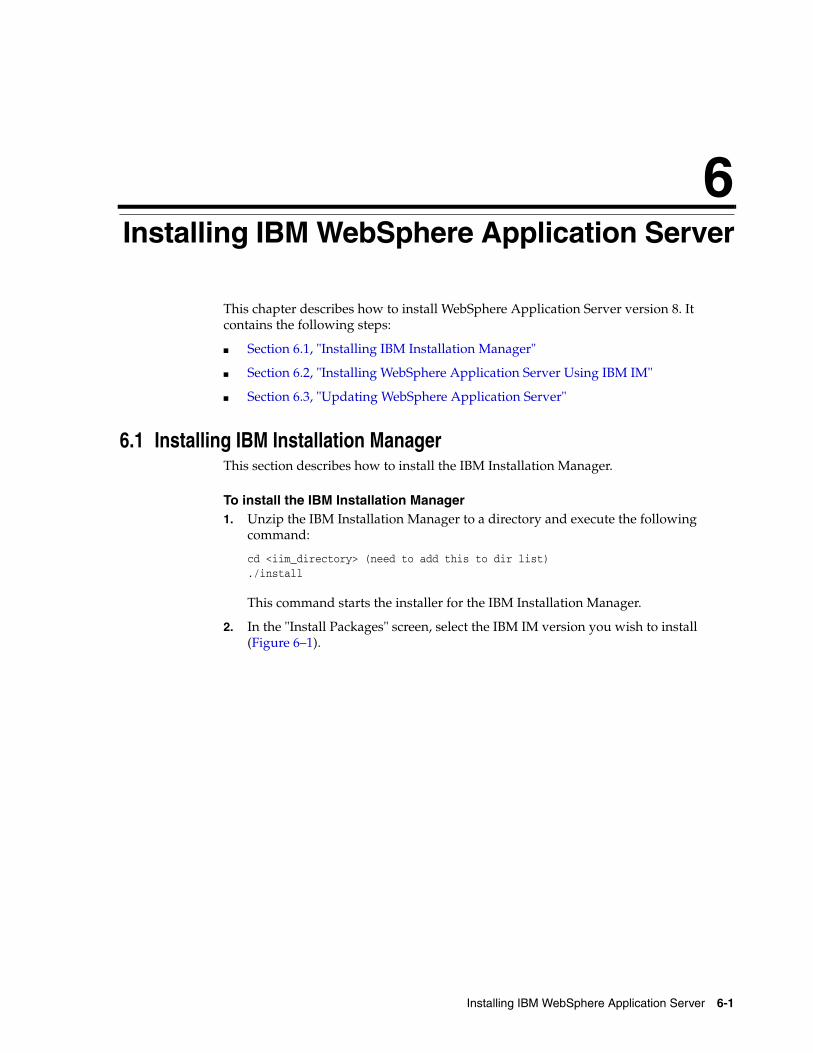
2. In the "Install Packages" screen, select the IBM IM version you wish to install (Figure 6–1).
Installing IBM Installation Manager
6-2 Oracle Fusion Middleware WebCenter Sites: Installing and Configuring Supporting Software
Figure 6–1 Installation Packages
3. Click Next.
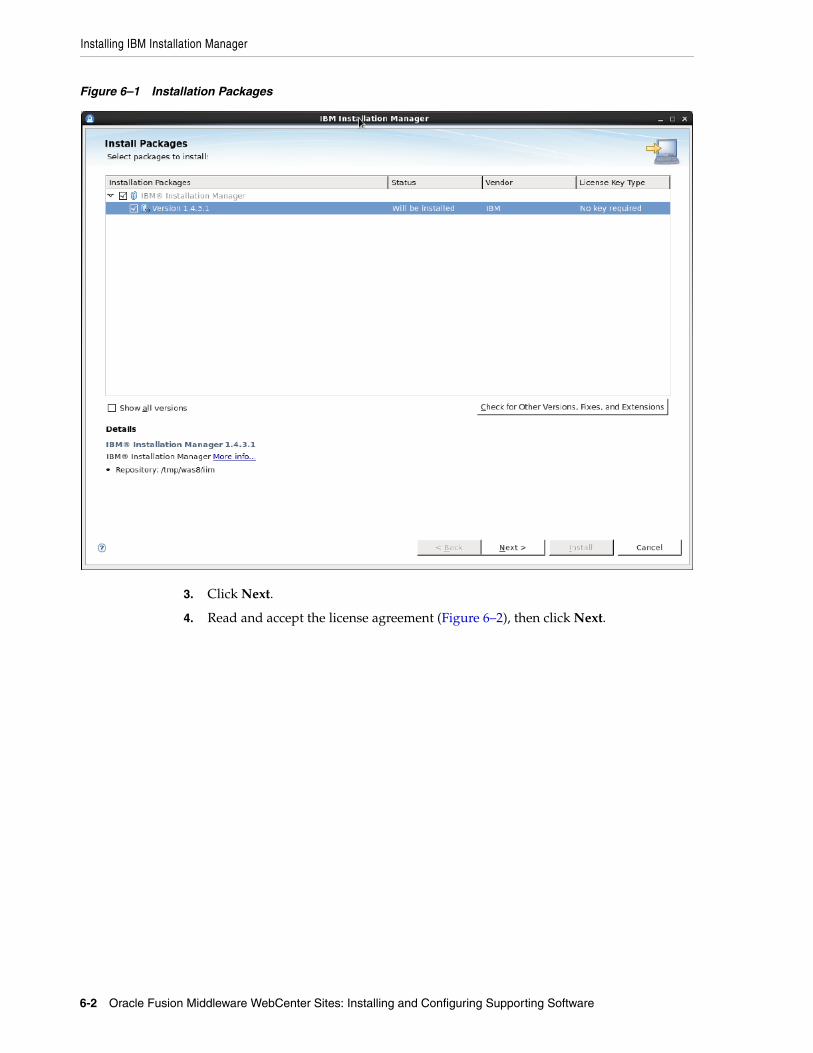
4. Read and accept the license agreement (Figure 6–2), then click Next.
Installing IBM Installation Manager
Installing IBM WebSphere Application Server 6-3
Figure 6–2 License Agreement
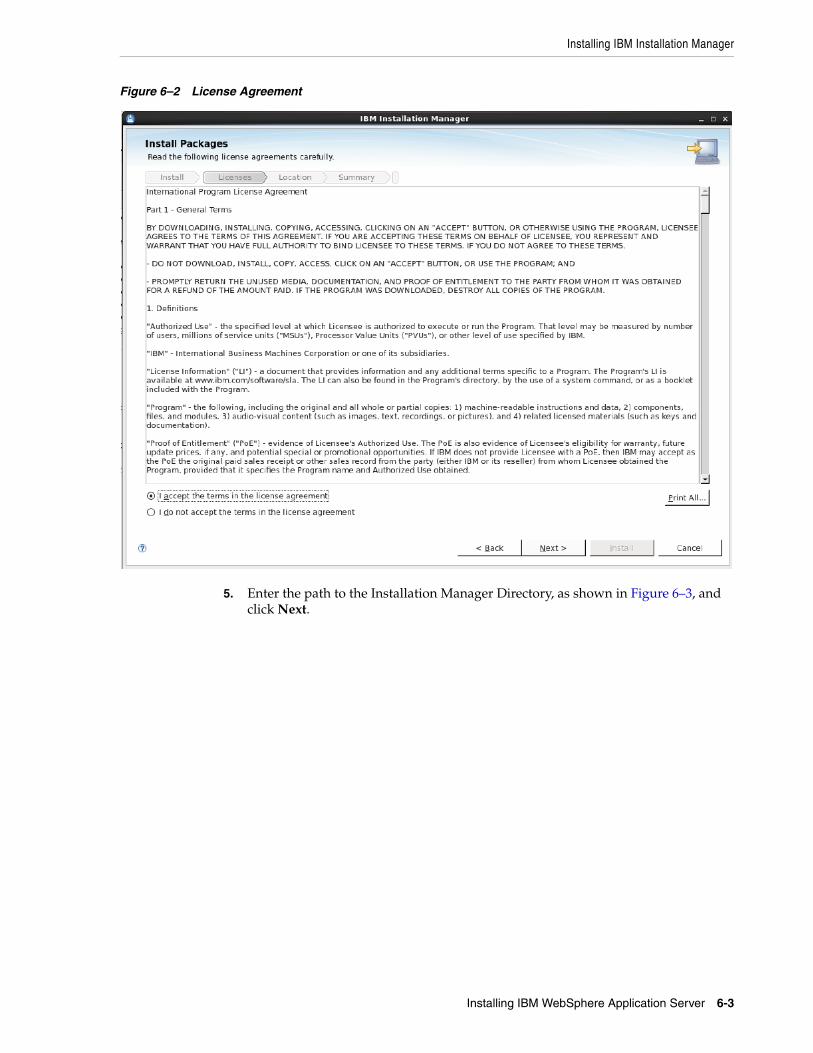
5. Enter the path to the Installation Manager Directory, as shown in Figure 6–3, and click Next.
Installing IBM Installation Manager
6-4 Oracle Fusion Middleware WebCenter Sites: Installing and Configuring Supporting Software
Figure 6–3 Installation Manager Location
6. Click Install to start the installation process (Figure 6–4).

Installing IBM Installation Manager
Installing IBM WebSphere Application Server 6-5
Figure 6–4 Target Location
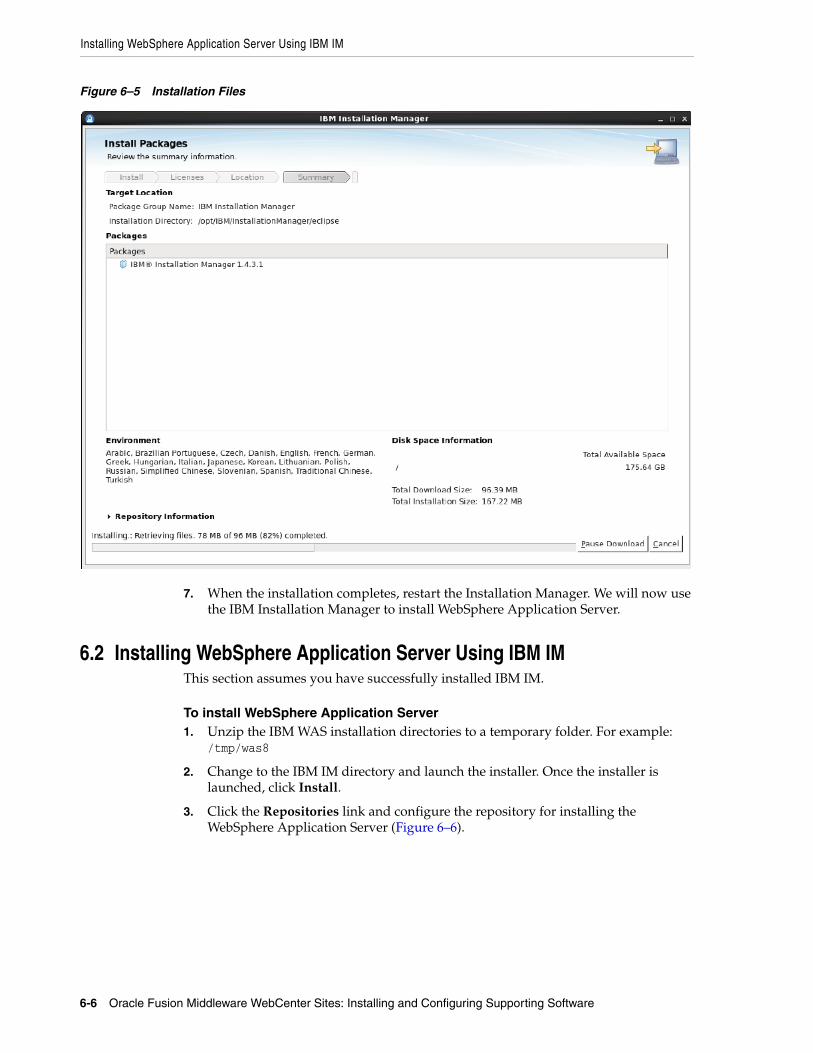
The installer retrieves the required installation files, as shown in Figure 6–5.
Installing WebSphere Application Server Using IBM IM
6-6 Oracle Fusion Middleware WebCenter Sites: Installing and Configuring Supporting Software
Figure 6–5 Installation Files
7. When the installation completes, restart the Installation Manager. We will now use the IBM Installation Manager to install WebSphere Application Server.
6.2 Installing WebSphere Application Server Using IBM IMThis section assumes you have successfully installed IBM IM.
To install WebSphere Application Server1. Unzip the IBM WAS installation directories to a temporary folder. For example:
/tmp/was8
2. Change to the IBM IM directory and launch the installer. Once the installer is launched, click Install.
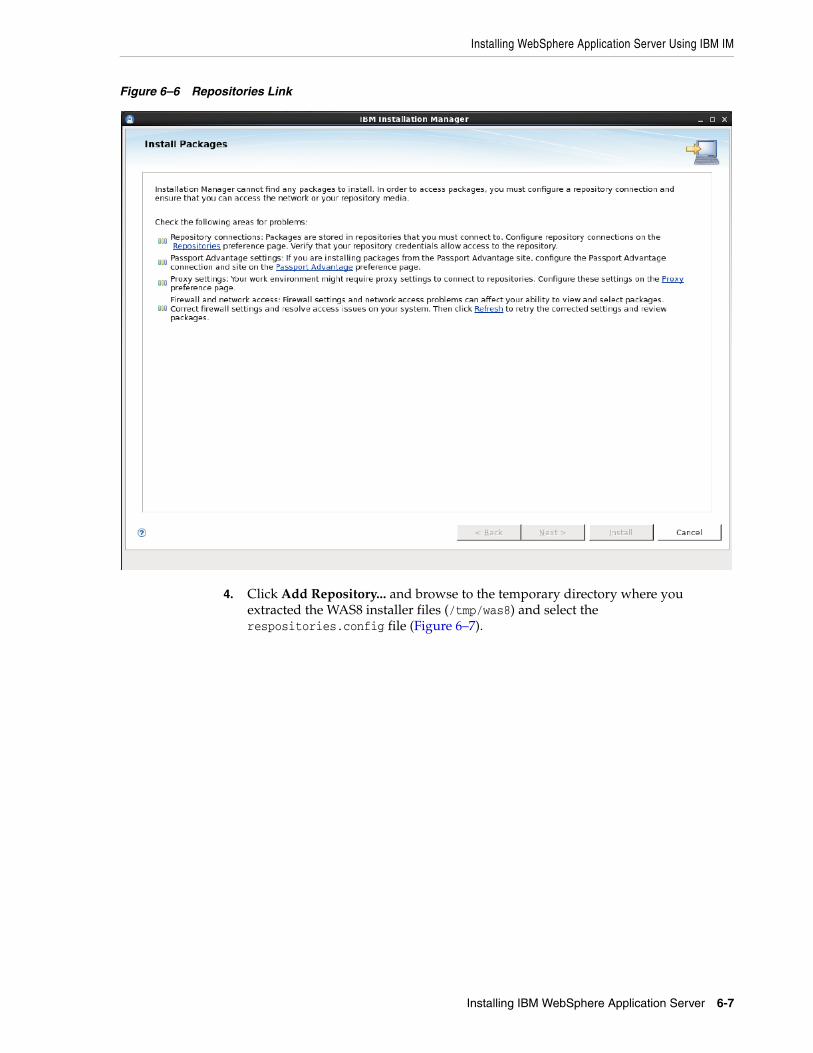
3. Click the Repositories link and configure the repository for installing the WebSphere Application Server (Figure 6–6).
Installing WebSphere Application Server Using IBM IM
Installing IBM WebSphere Application Server 6-7
Figure 6–6 Repositories Link
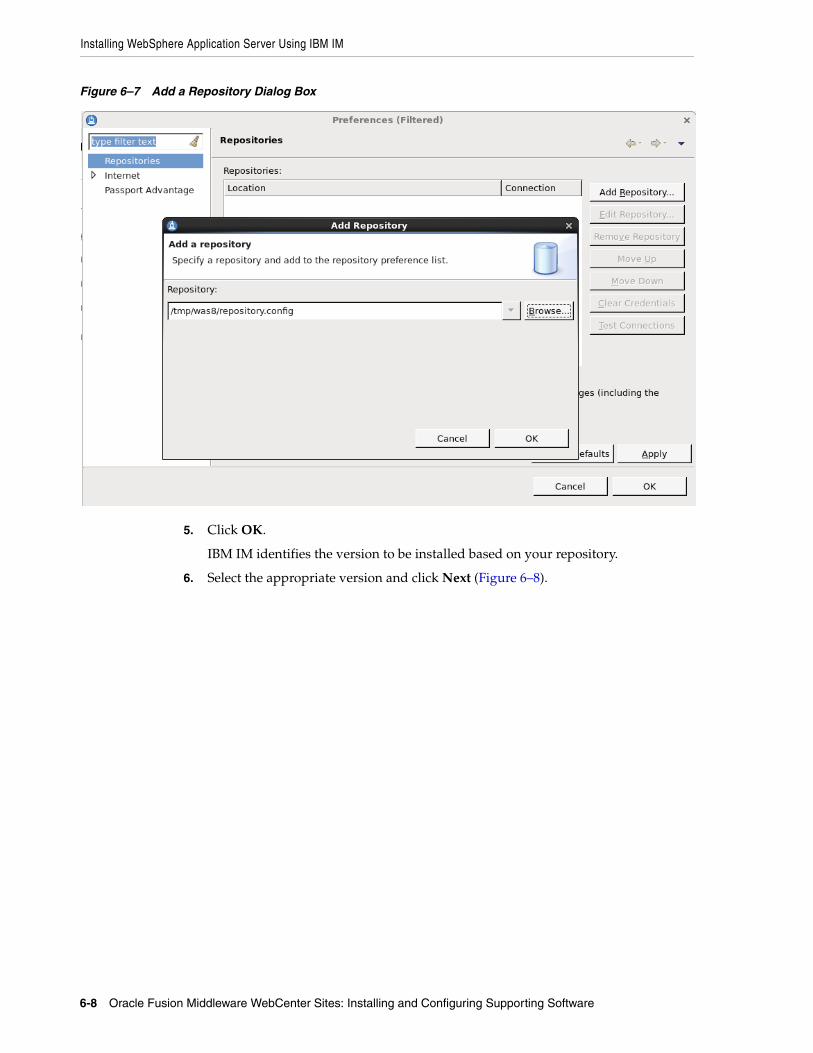
4. Click Add Repository... and browse to the temporary directory where you extracted the WAS8 installer files (/tmp/was8) and select the respositories.config file (Figure 6–7).
Installing WebSphere Application Server Using IBM IM
6-8 Oracle Fusion Middleware WebCenter Sites: Installing and Configuring Supporting Software
Figure 6–7 Add a Repository Dialog Box
5. Click OK.
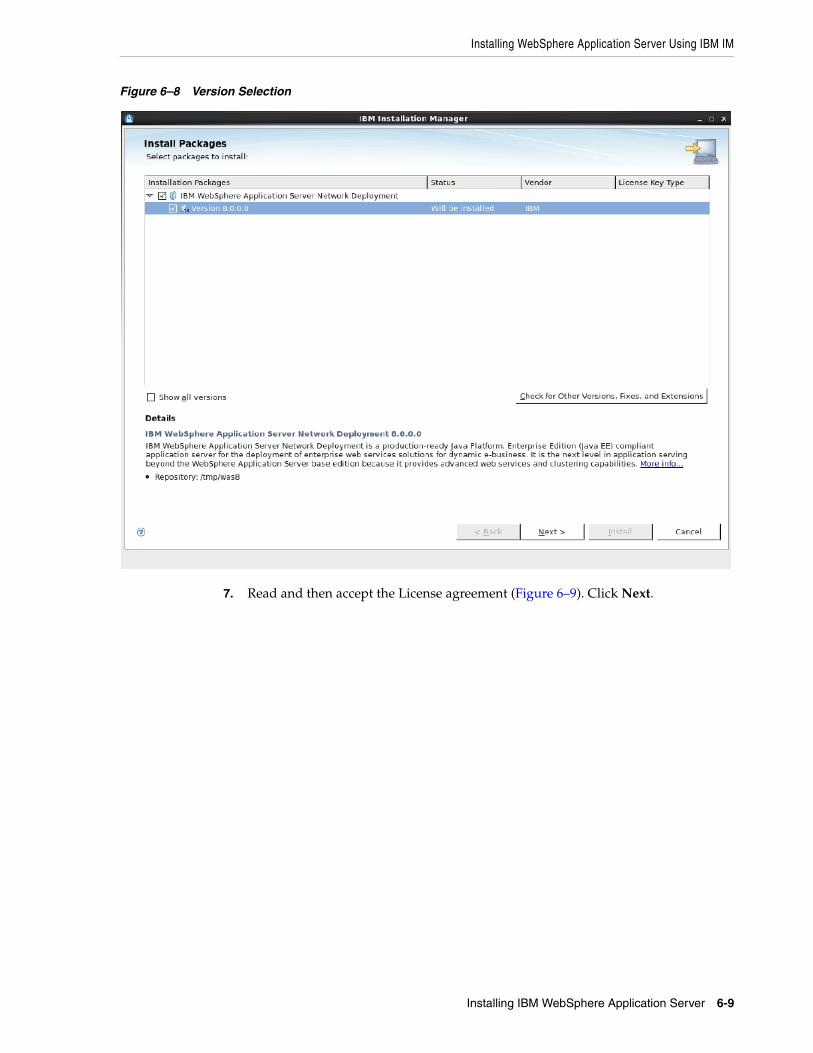
IBM IM identifies the version to be installed based on your repository.
6. Select the appropriate version and click Next (Figure 6–8).
Installing WebSphere Application Server Using IBM IM
Installing IBM WebSphere Application Server 6-9
Figure 6–8 Version Selection
7. Read and then accept the License agreement (Figure 6–9). Click Next.
Installing WebSphere Application Server Using IBM IM
6-10 Oracle Fusion Middleware WebCenter Sites: Installing and Configuring Supporting Software
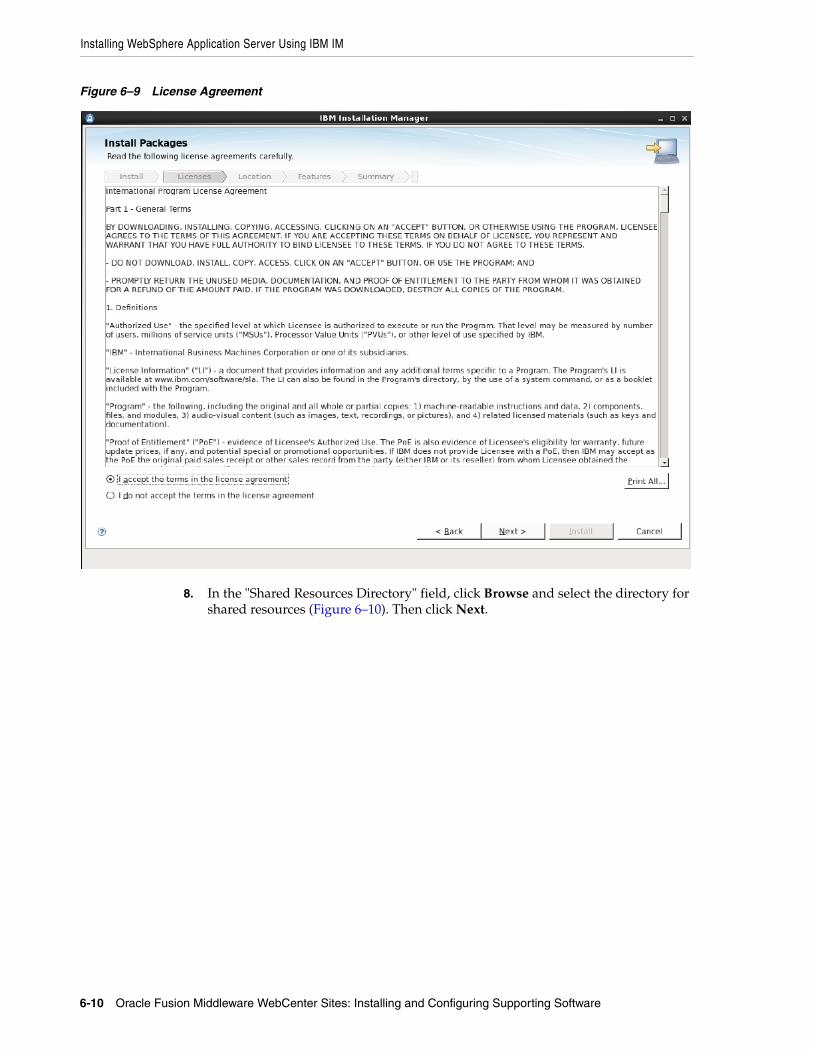
Figure 6–9 License Agreement
8. In the "Shared Resources Directory" field, click Browse and select the directory for shared resources (Figure 6–10). Then click Next.
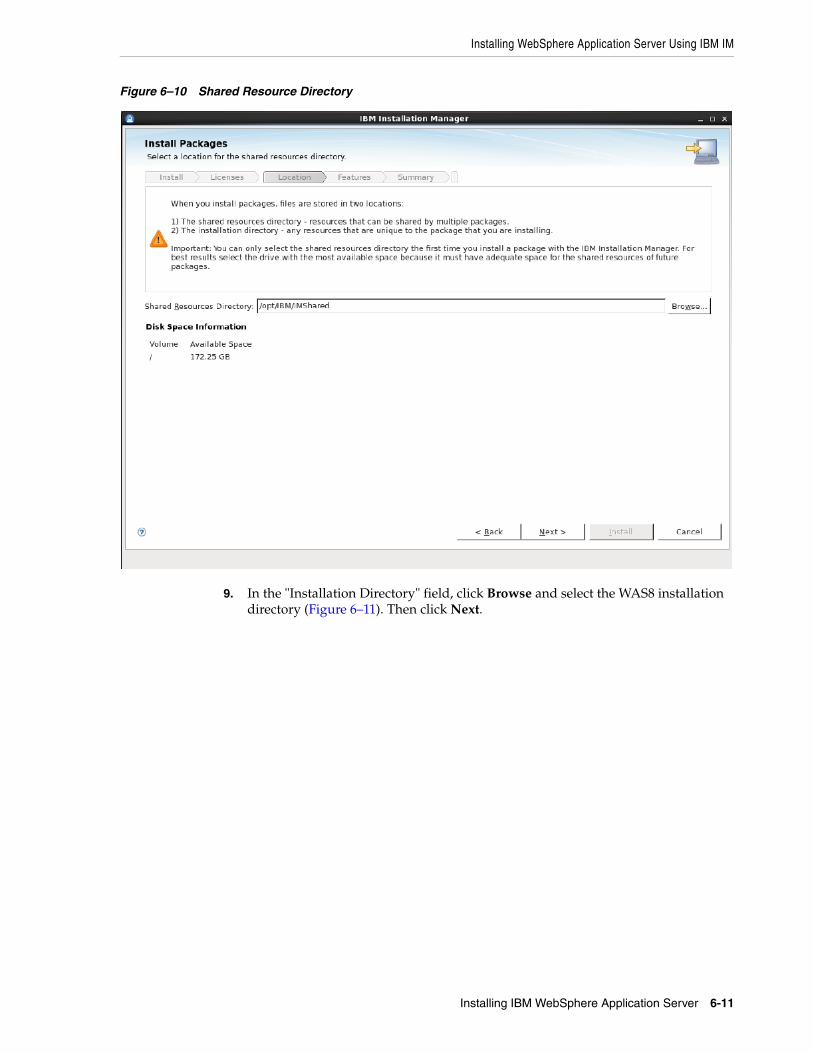
Installing WebSphere Application Server Using IBM IM
Installing IBM WebSphere Application Server 6-11
Figure 6–10 Shared Resource Directory
9. In the "Installation Directory" field, click Browse and select the WAS8 installation directory (Figure 6–11). Then click Next.
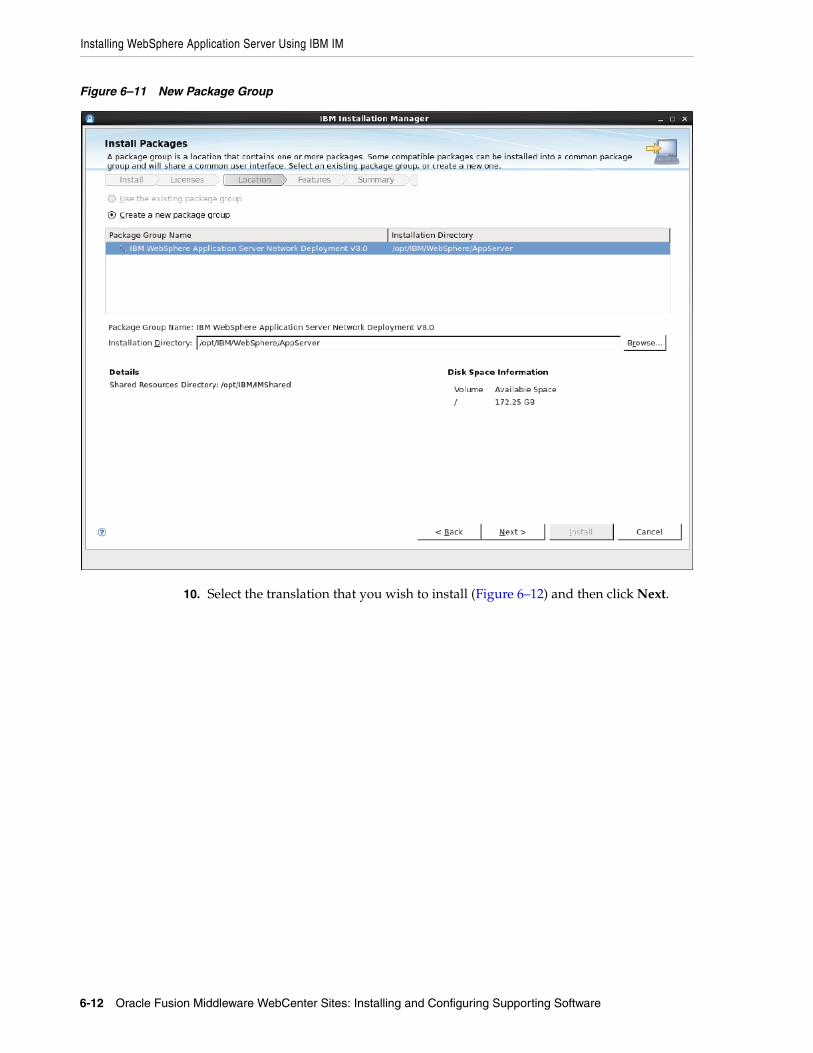
Installing WebSphere Application Server Using IBM IM
6-12 Oracle Fusion Middleware WebCenter Sites: Installing and Configuring Supporting Software
Figure 6–11 New Package Group
10. Select the translation that you wish to install (Figure 6–12) and then click Next.
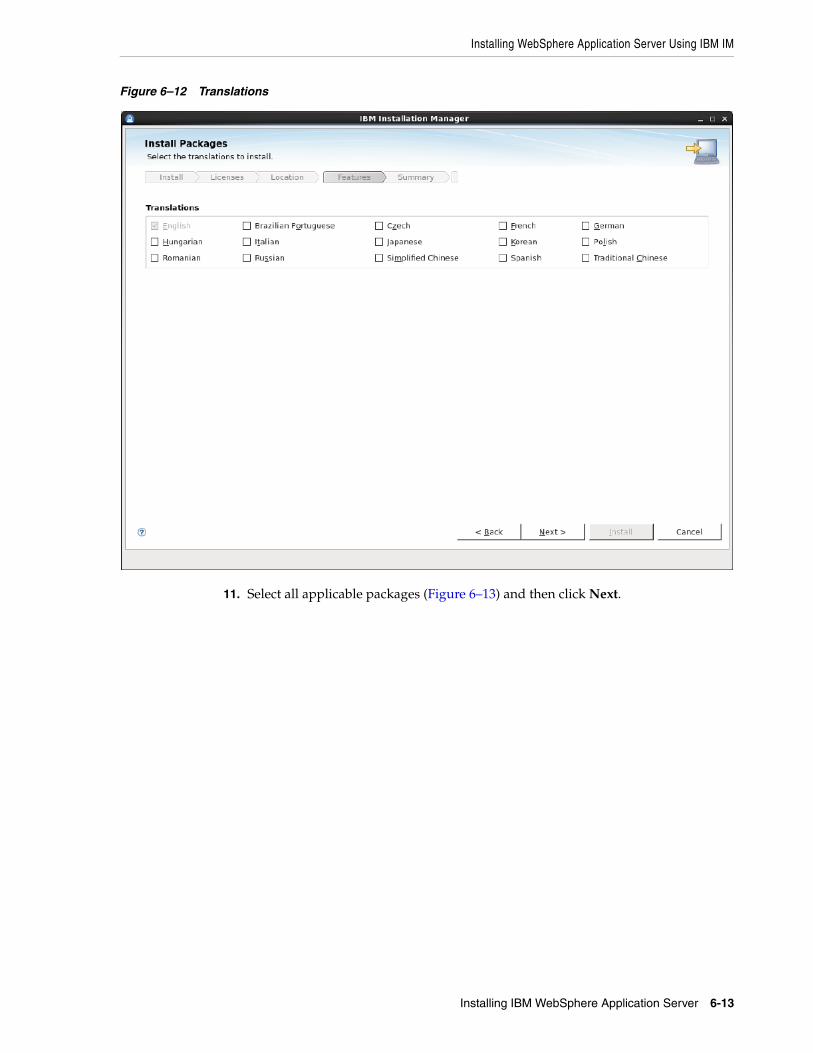
Installing WebSphere Application Server Using IBM IM
Installing IBM WebSphere Application Server 6-13
Figure 6–12 Translations
11. Select all applicable packages (Figure 6–13) and then click Next.
Installing WebSphere Application Server Using IBM IM
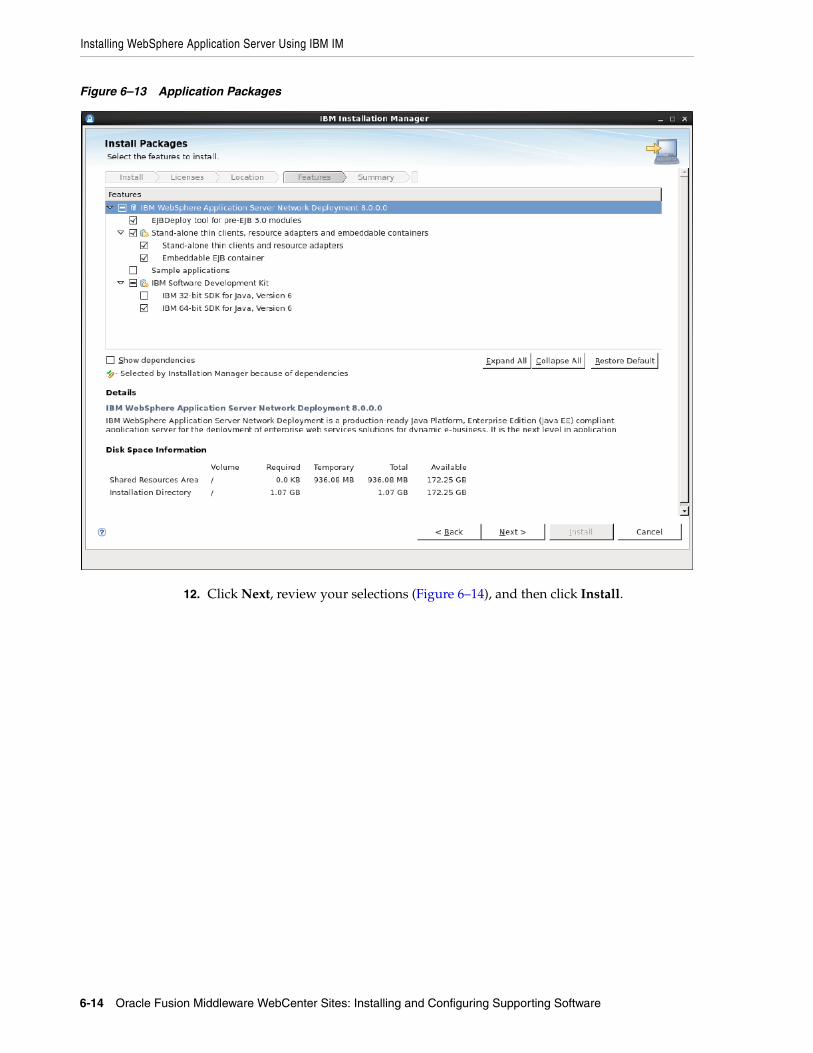
6-14 Oracle Fusion Middleware WebCenter Sites: Installing and Configuring Supporting Software
Figure 6–13 Application Packages
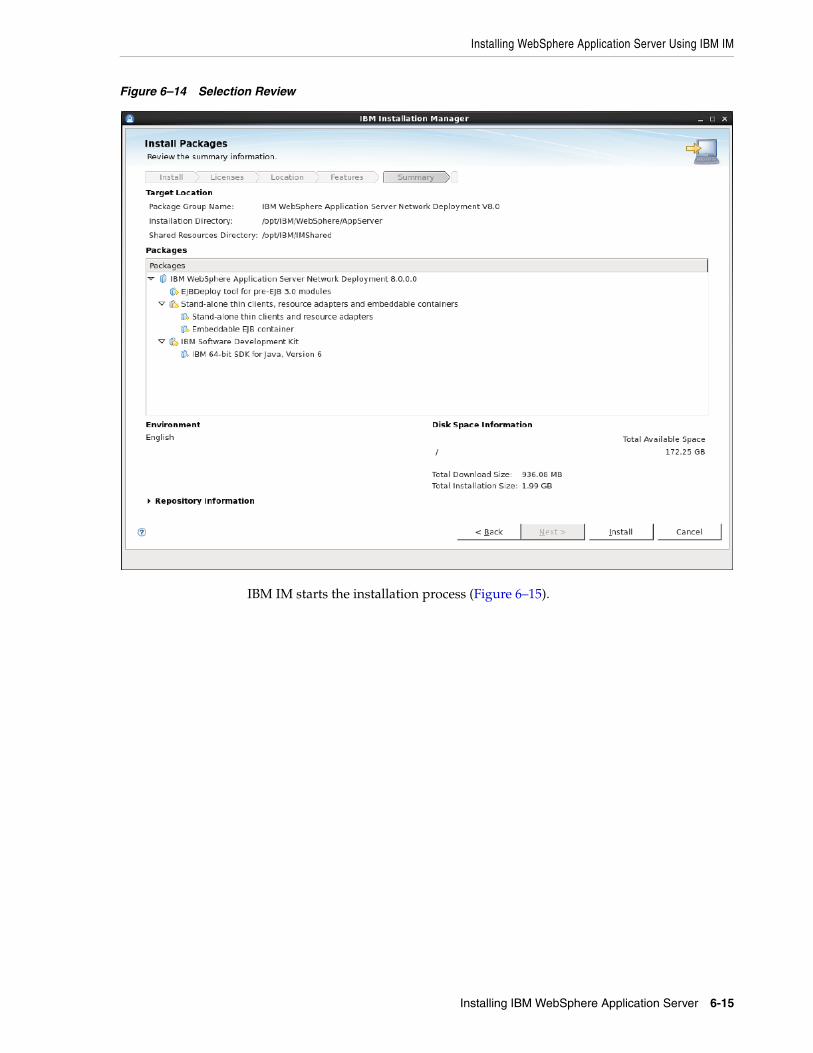
12. Click Next, review your selections (Figure 6–14), and then click Install.
Installing WebSphere Application Server Using IBM IM
Installing IBM WebSphere Application Server 6-15
Figure 6–14 Selection Review
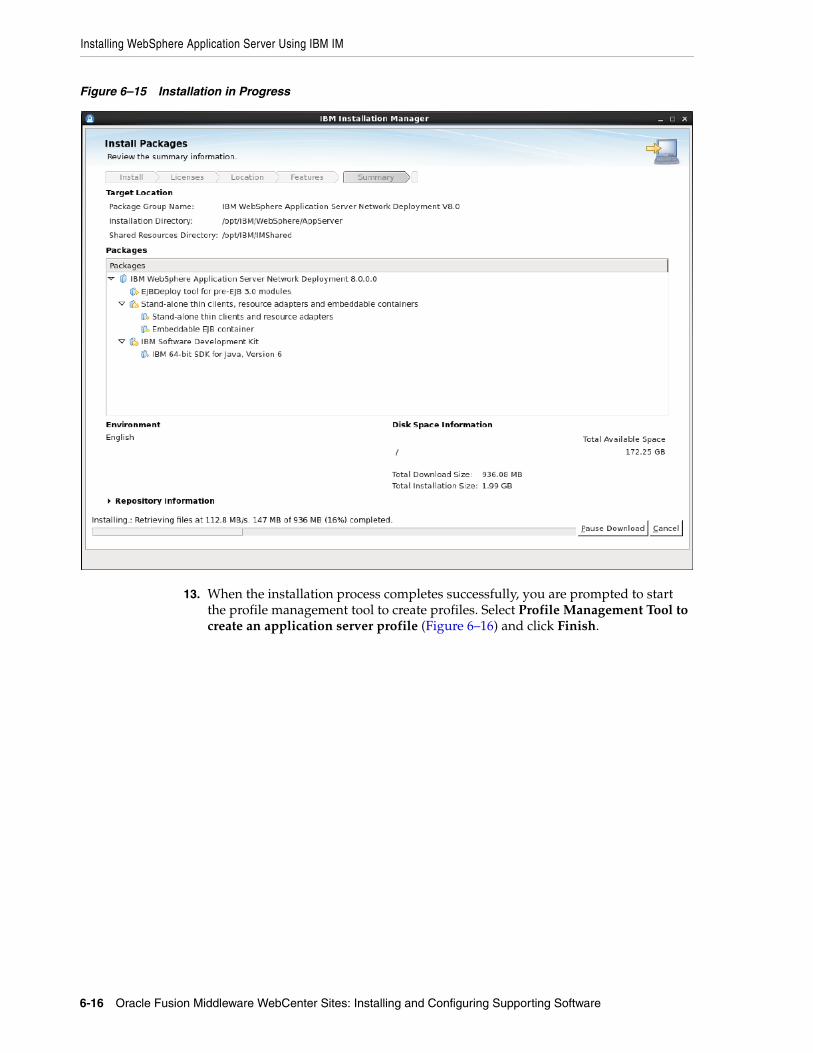
IBM IM starts the installation process (Figure 6–15).
Installing WebSphere Application Server Using IBM IM
6-16 Oracle Fusion Middleware WebCenter Sites: Installing and Configuring Supporting Software
Figure 6–15 Installation in Progress
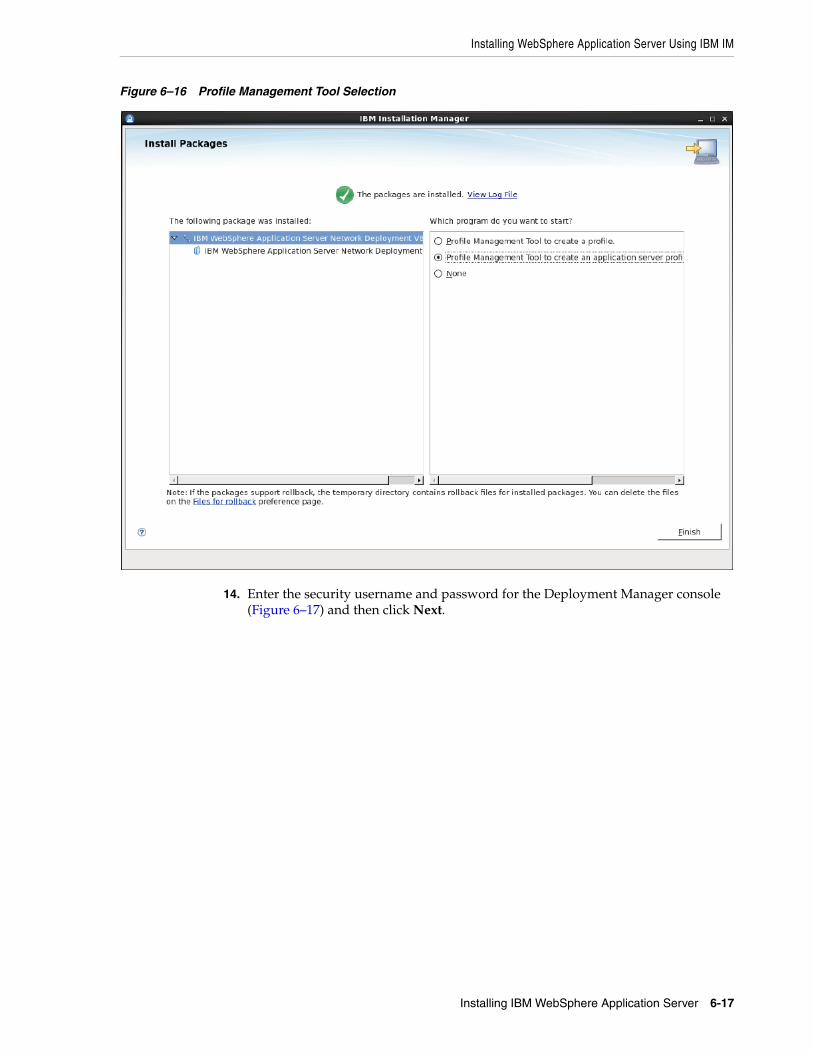
13. When the installation process completes successfully, you are prompted to start the profile management tool to create profiles. Select Profile Management Tool to create an application server profile (Figure 6–16) and click Finish.
Installing WebSphere Application Server Using IBM IM
Installing IBM WebSphere Application Server 6-17
Figure 6–16 Profile Management Tool Selection
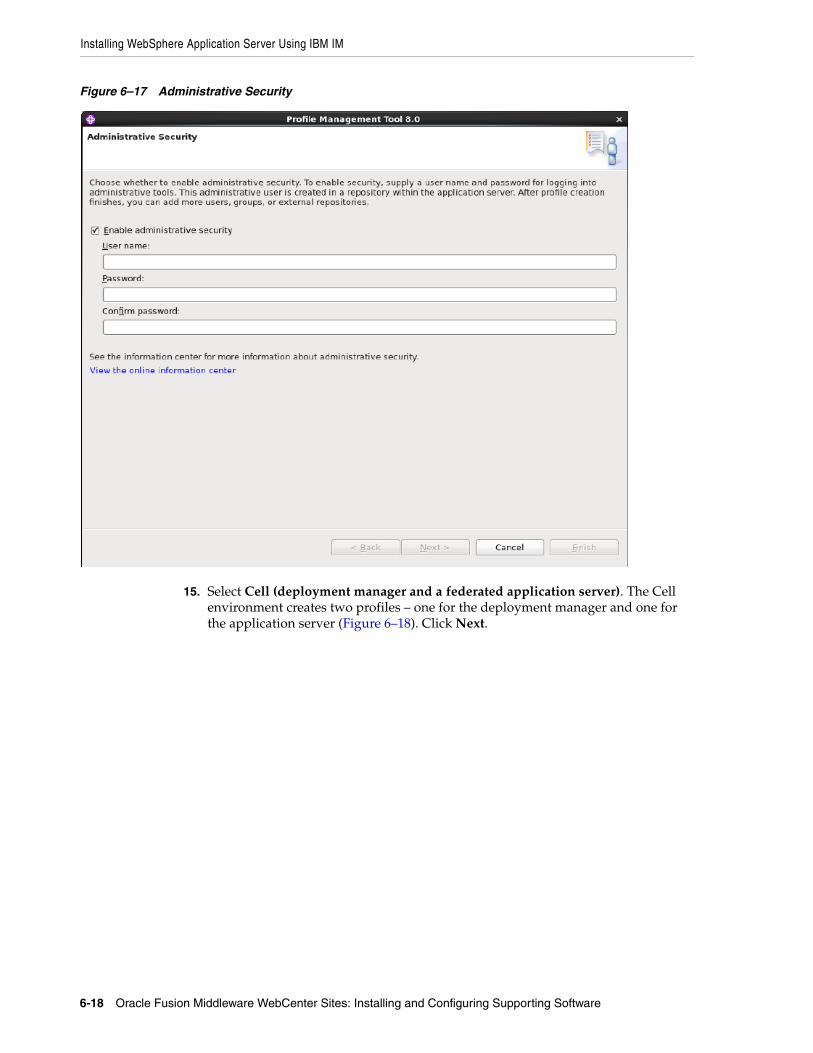
14. Enter the security username and password for the Deployment Manager console (Figure 6–17) and then click Next.
Installing WebSphere Application Server Using IBM IM
6-18 Oracle Fusion Middleware WebCenter Sites: Installing and Configuring Supporting Software
Figure 6–17 Administrative Security
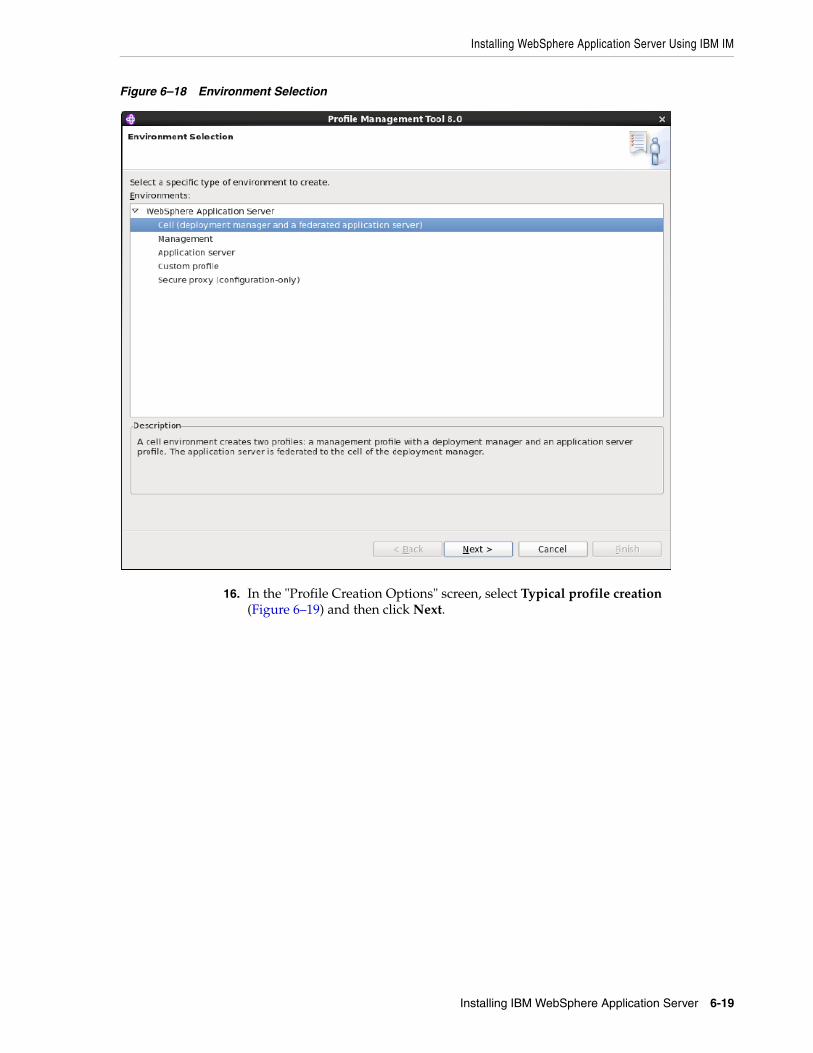
15. Select Cell (deployment manager and a federated application server). The Cell environment creates two profiles – one for the deployment manager and one for the application server (Figure 6–18). Click Next.
Installing WebSphere Application Server Using IBM IM
Installing IBM WebSphere Application Server 6-19
Figure 6–18 Environment Selection
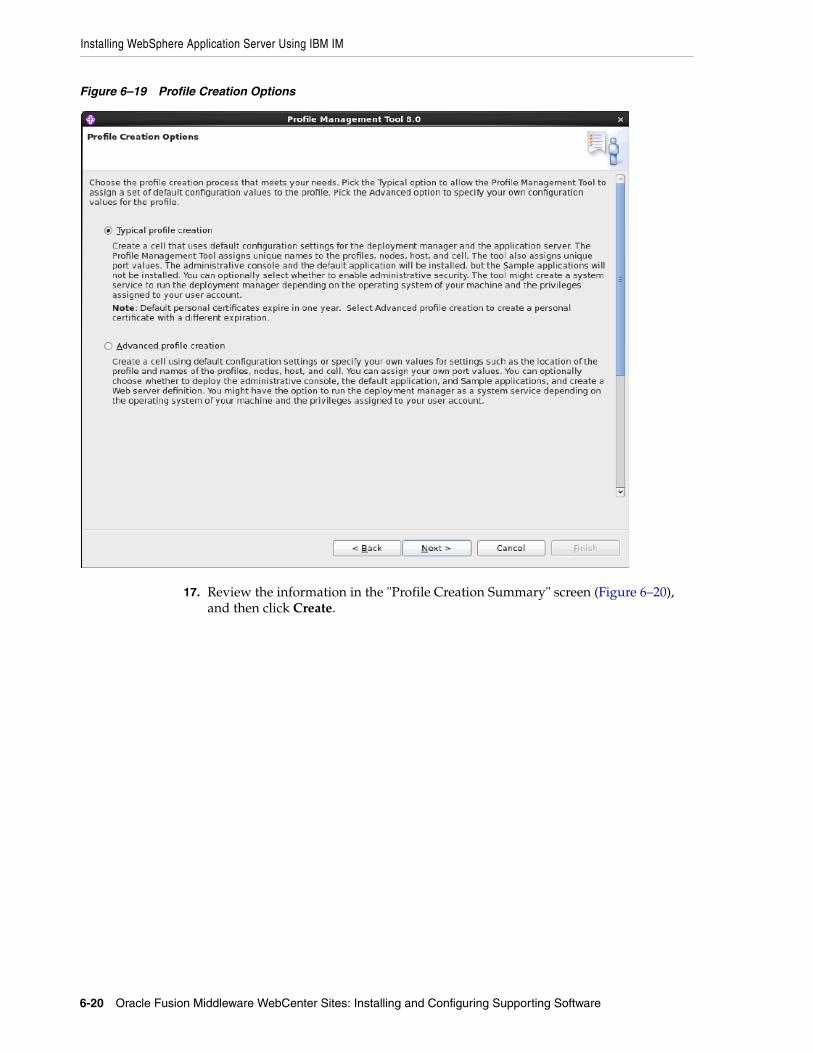
16. In the "Profile Creation Options" screen, select Typical profile creation (Figure 6–19) and then click Next.
Installing WebSphere Application Server Using IBM IM
6-20 Oracle Fusion Middleware WebCenter Sites: Installing and Configuring Supporting Software
Figure 6–19 Profile Creation Options
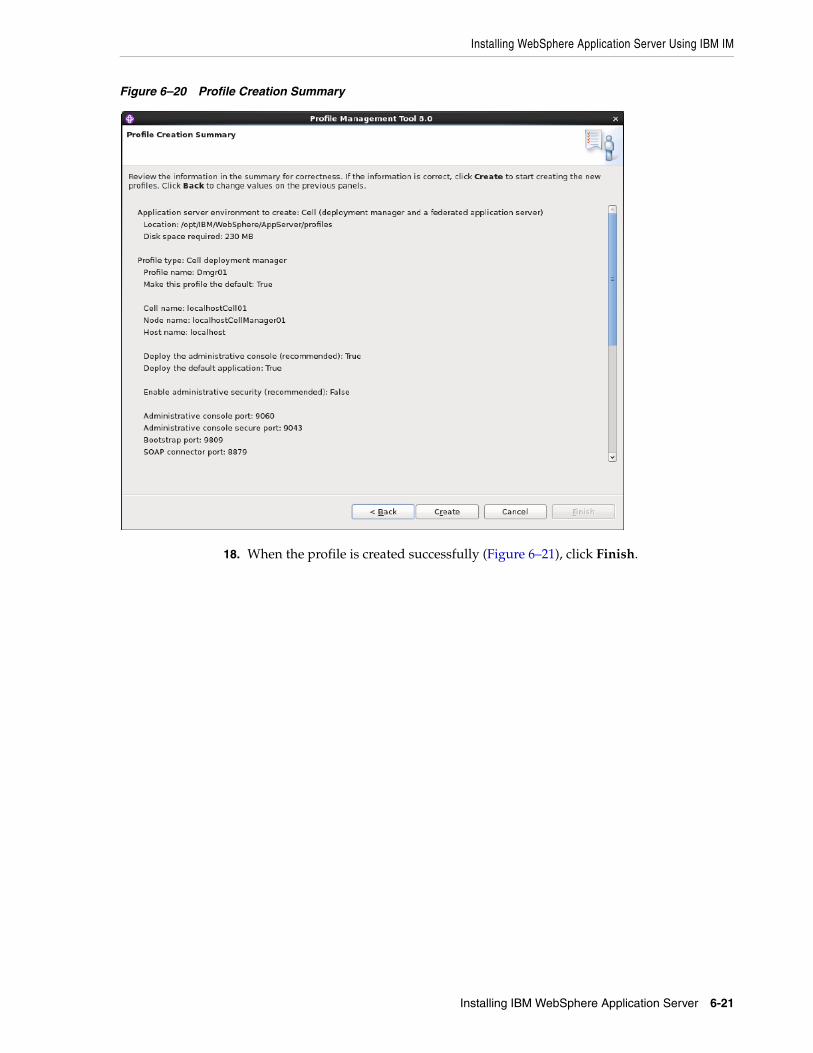
17. Review the information in the "Profile Creation Summary" screen (Figure 6–20), and then click Create.
Installing WebSphere Application Server Using IBM IM
Installing IBM WebSphere Application Server 6-21
Figure 6–20 Profile Creation Summary
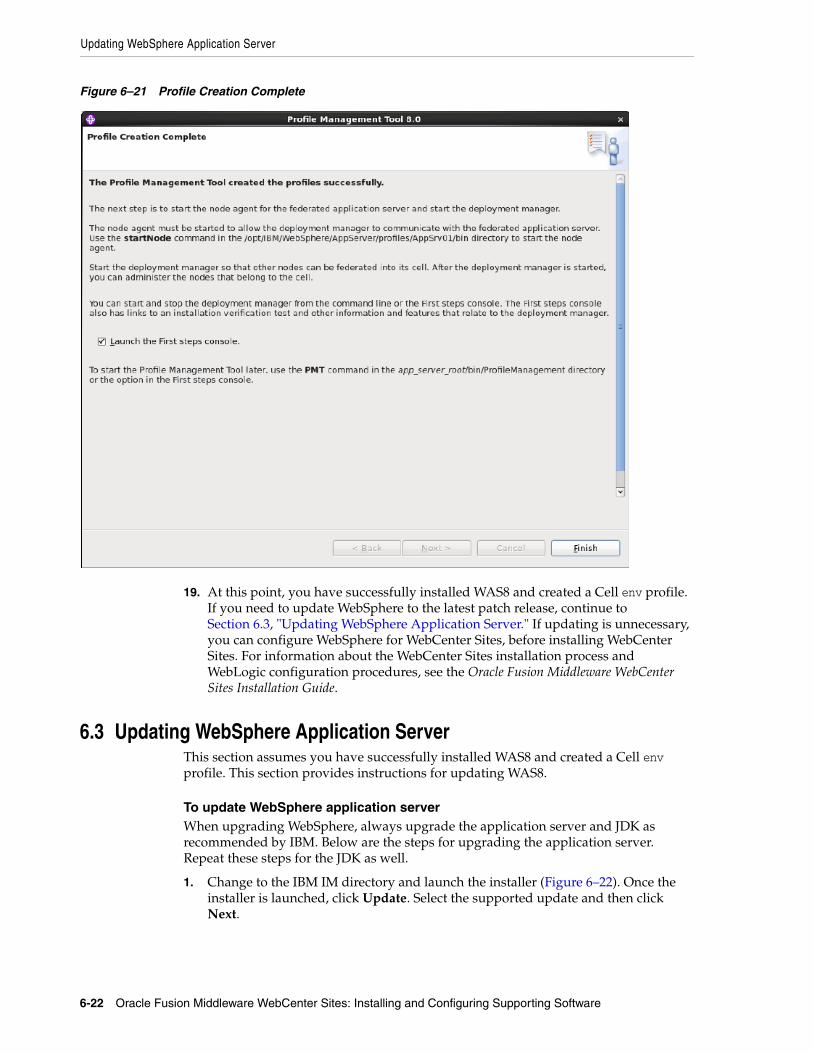
18. When the profile is created successfully (Figure 6–21), click Finish.
Updating WebSphere Application Server
6-22 Oracle Fusion Middleware WebCenter Sites: Installing and Configuring Supporting Software
Figure 6–21 Profile Creation Complete
19. At this point, you have successfully installed WAS8 and created a Cell env profile. If you need to update WebSphere to the latest patch release, continue to Section 6.3, "Updating WebSphere Application Server." If updating is unnecessary, you can configure WebSphere for WebCenter Sites, before installing WebCenter Sites. For information about the WebCenter Sites installation process and WebLogic configuration procedures, see the Oracle Fusion Middleware WebCenter Sites Installation Guide.
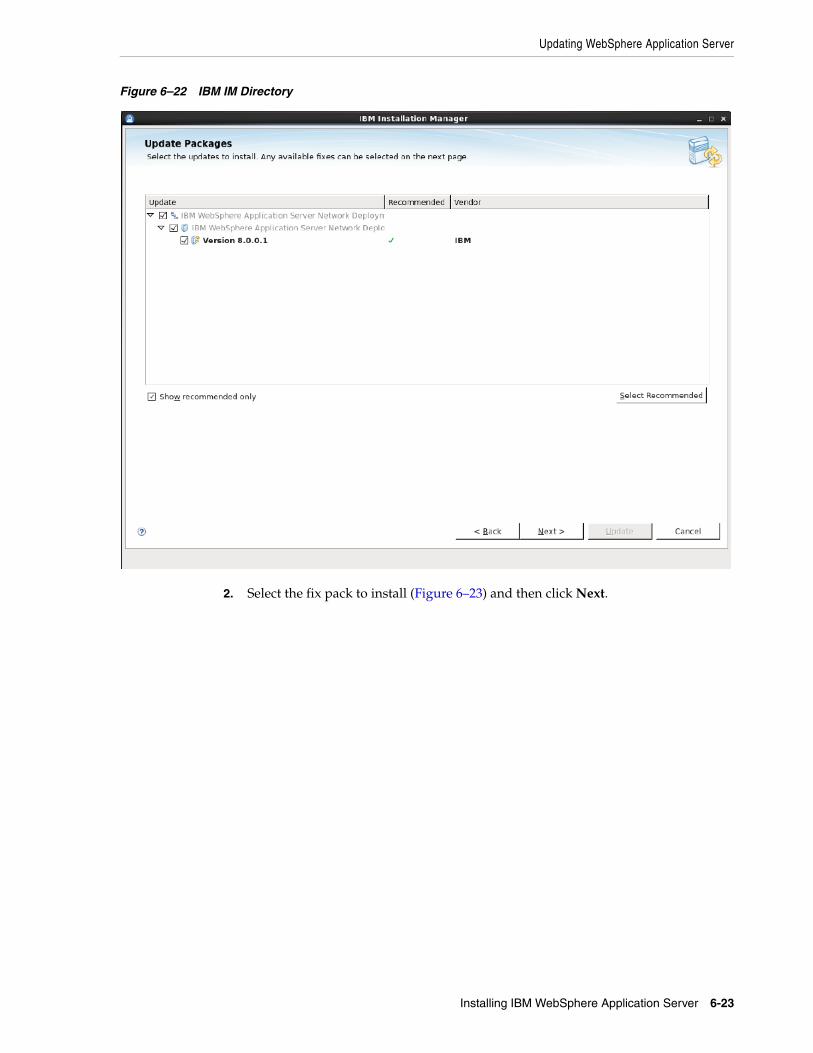
6.3 Updating WebSphere Application ServerThis section assumes you have successfully installed WAS8 and created a Cell env profile. This section provides instructions for updating WAS8.
To update WebSphere application serverWhen upgrading WebSphere, always upgrade the application server and JDK as recommended by IBM. Below are the steps for upgrading the application server. Repeat these steps for the JDK as well.
1. Change to the IBM IM directory and launch the installer (Figure 6–22). Once the installer is launched, click Update. Select the supported update and then click Next.
Updating WebSphere Application Server
Installing IBM WebSphere Application Server 6-23
Figure 6–22 IBM IM Directory
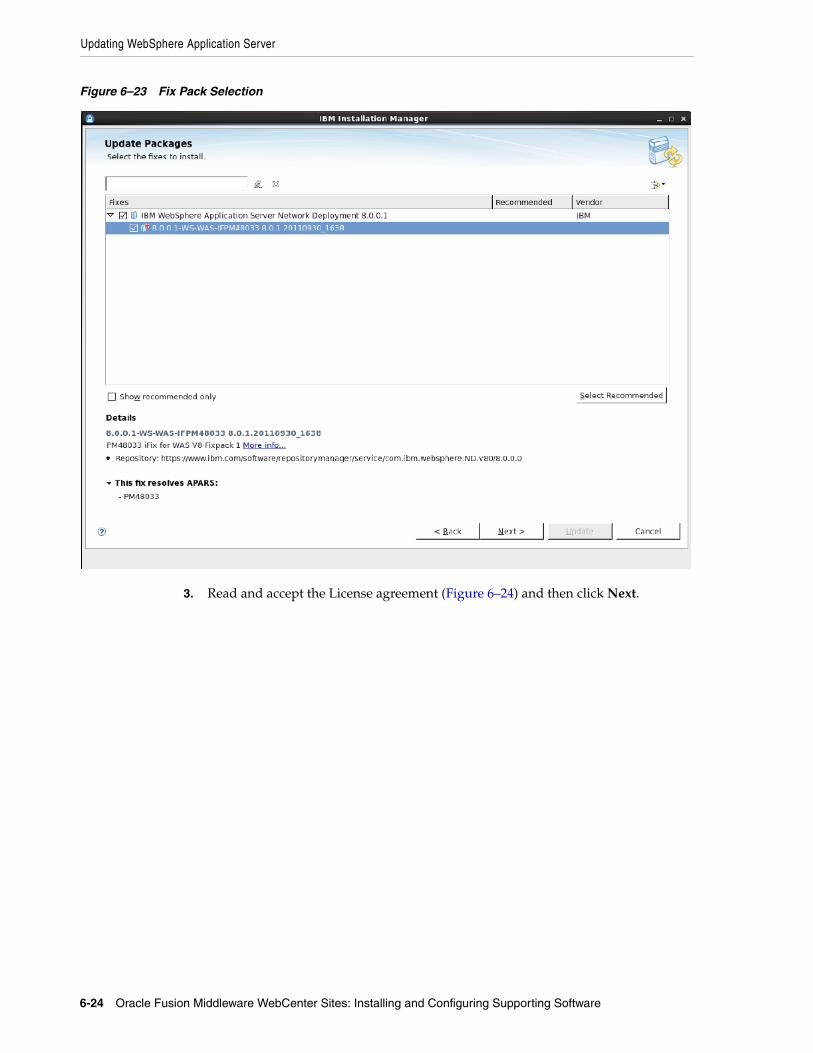
2. Select the fix pack to install (Figure 6–23) and then click Next.
Updating WebSphere Application Server
6-24 Oracle Fusion Middleware WebCenter Sites: Installing and Configuring Supporting Software
Figure 6–23 Fix Pack Selection
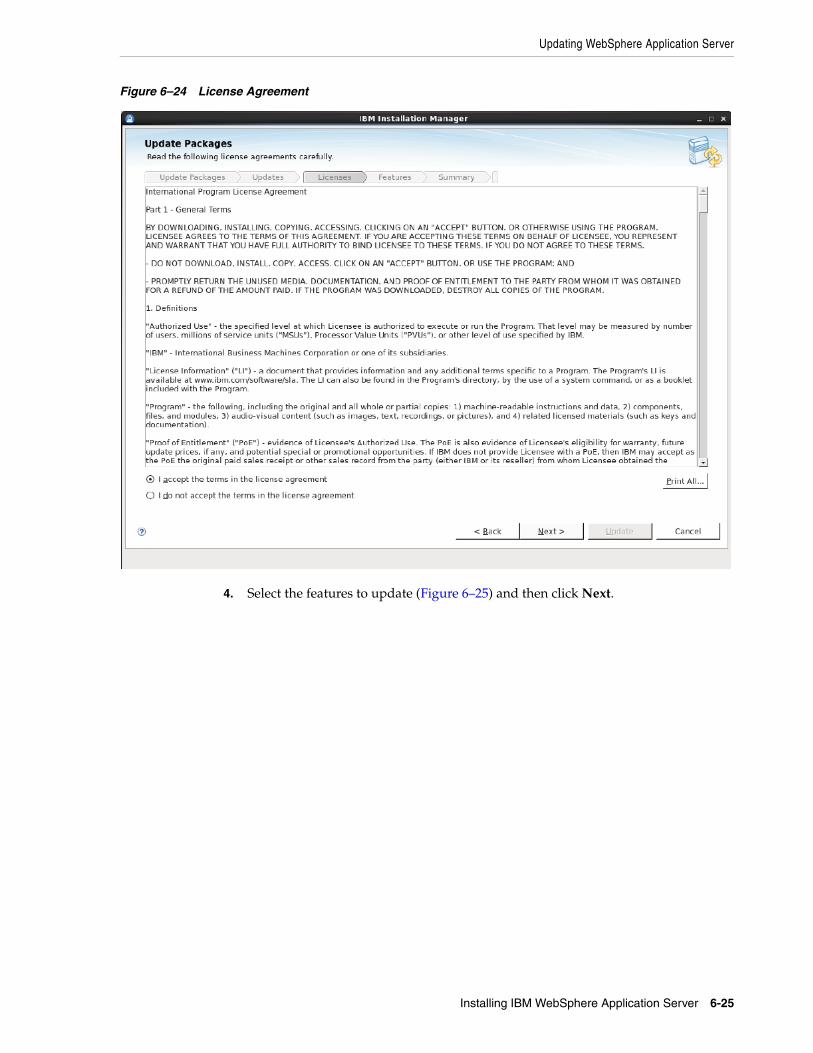
3. Read and accept the License agreement (Figure 6–24) and then click Next.
Updating WebSphere Application Server
Installing IBM WebSphere Application Server 6-25
Figure 6–24 License Agreement
4. Select the features to update (Figure 6–25) and then click Next.
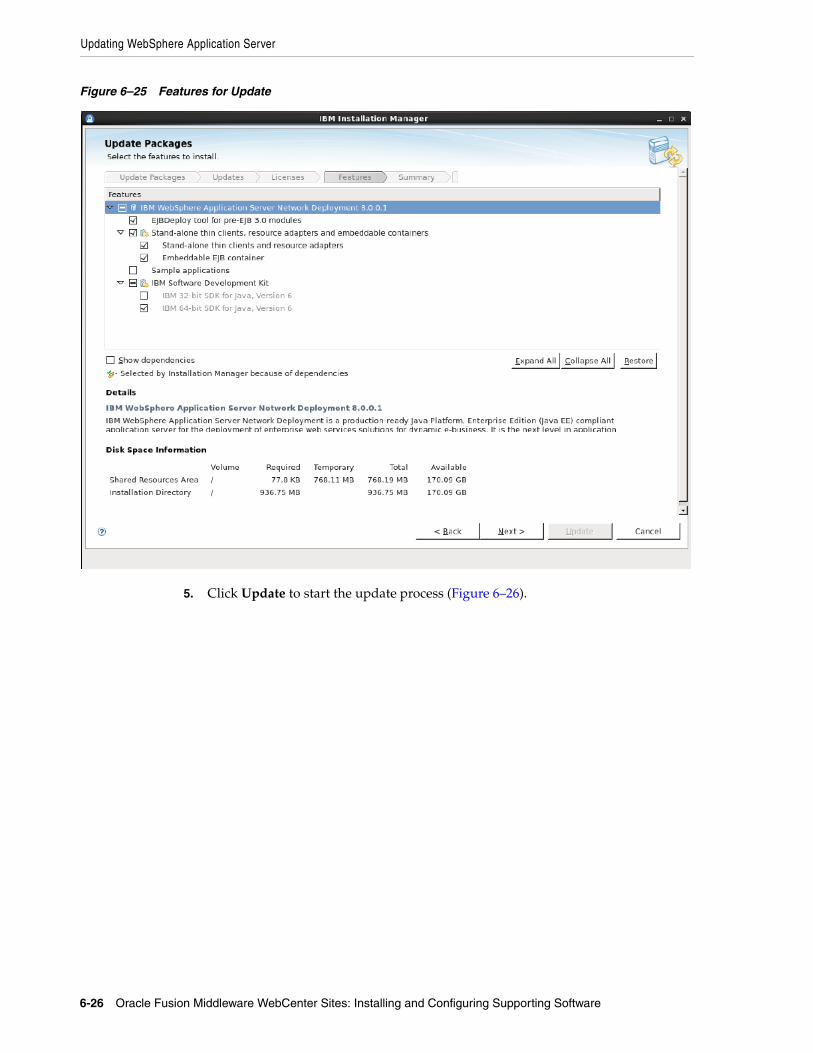
Updating WebSphere Application Server
6-26 Oracle Fusion Middleware WebCenter Sites: Installing and Configuring Supporting Software
Figure 6–25 Features for Update
5. Click Update to start the update process (Figure 6–26).
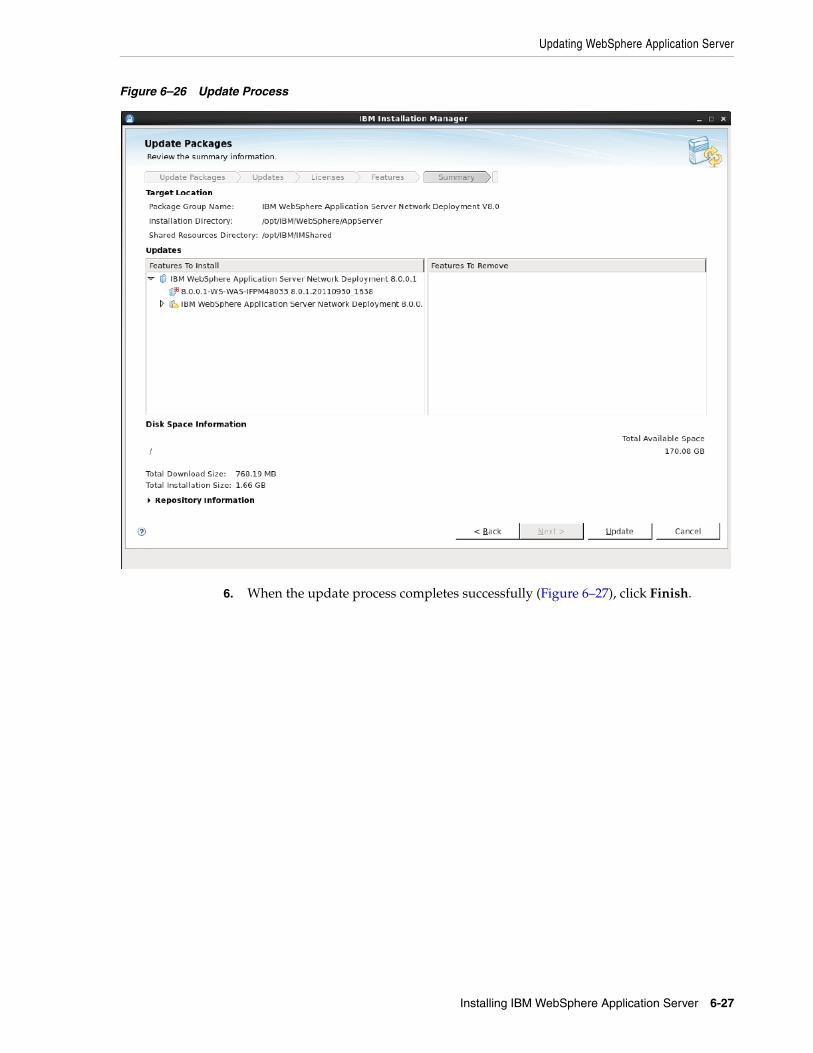
Updating WebSphere Application Server
Installing IBM WebSphere Application Server 6-27
Figure 6–26 Update Process
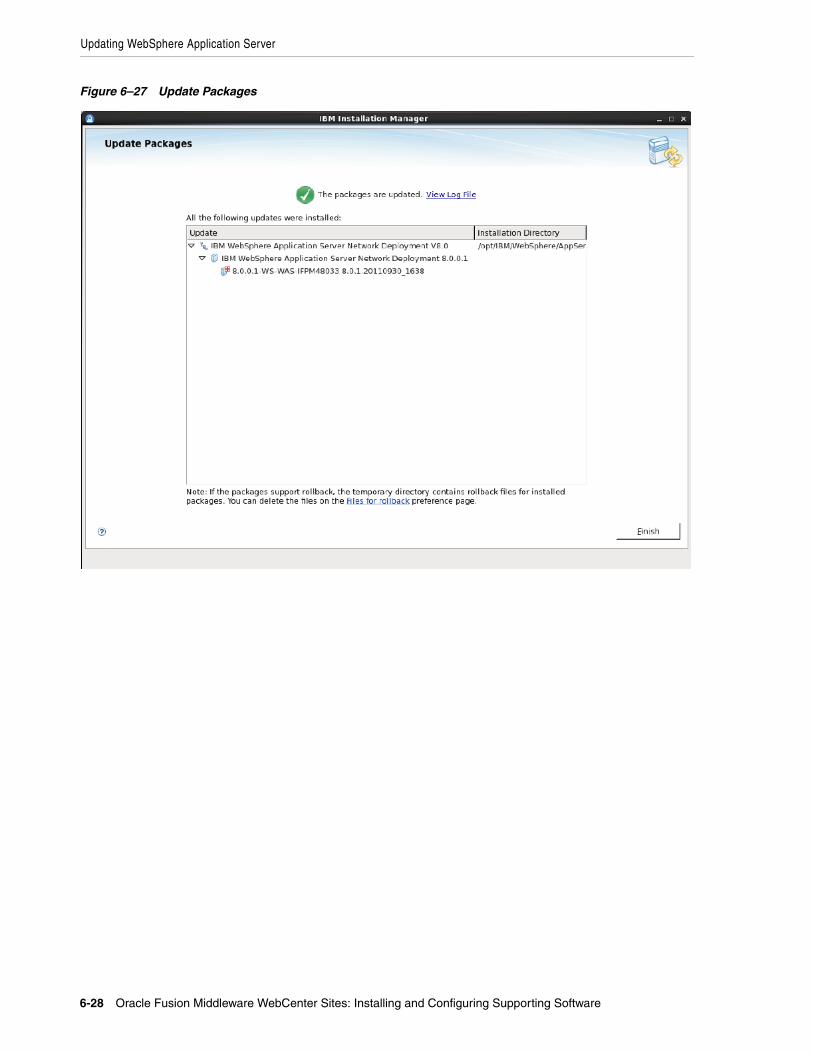
6. When the update process completes successfully (Figure 6–27), click Finish.
Updating WebSphere Application Server
6-28 Oracle Fusion Middleware WebCenter Sites: Installing and Configuring Supporting Software
Figure 6–27 Update Packages
Part IIIPart III Installing a Web Server
Part III describes how to install a supported web server. It contains the following chapters:
■ Chapter 7, "Installing Oracle HTTP Server 11g"
■ Chapter 8, "Installing Apache Web Server"
■ Chapter 9, "Installing IBM HTTP Server 8.0 and 8.5"
■ Chapter 10, "Installing IBM HTTP Server 7.0"
■ Chapter 11, "Installing Microsoft Internet Information Services 8.0 on Windows 2012 Server"
■ Chapter 12, "Installing Microsoft Internet Information Services 7.x on Windows 2008 Server"

7
Installing Oracle HTTP Server 11g 7-1
7Installing Oracle HTTP Server 11g
This chapter provides instructions for installing Oracle HTTP Server and configuring Oracle HTTP Server to use with WebLogic.
This chapter contains the following section:
■ Section 7.1, "Oracle HTTP Server 11g Installation Steps"
7.1 Oracle HTTP Server 11g Installation StepsFollow these steps to install the Oracle HTTP Server:
1. Oracle HTTP Server is available as a webserver component in Oracle Web Tier. Download Oracle Web Tier 11g from Oracle. The following steps assume you have downloaded the Oracle FMW Web Tier and installed it on a Linux system.
2. Create a non root user and extract the installer contents from the downloaded Oracle Web Tier zip file.
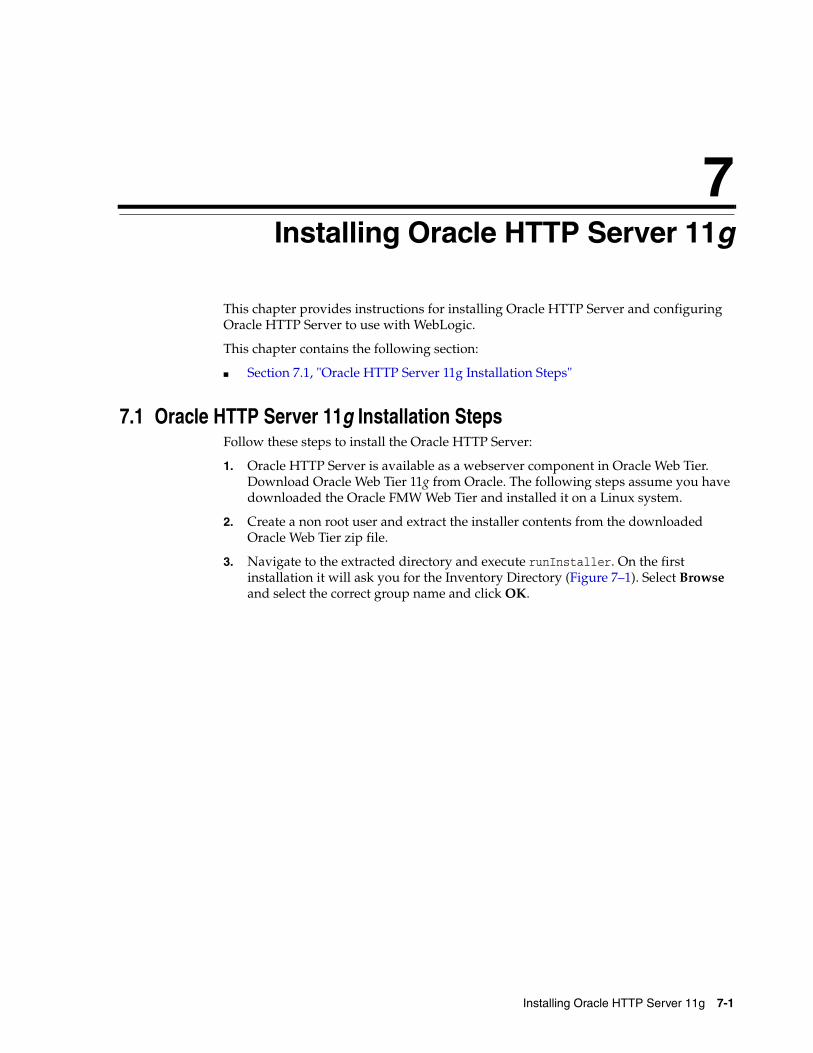
3. Navigate to the extracted directory and execute runInstaller. On the first installation it will ask you for the Inventory Directory (Figure 7–1). Select Browse and select the correct group name and click OK.
Oracle HTTP Server 11g Installation Steps
7-2 Oracle Fusion Middleware WebCenter Sites: Installing and Configuring Supporting Software
Figure 7–1 Specific Inventory Directory
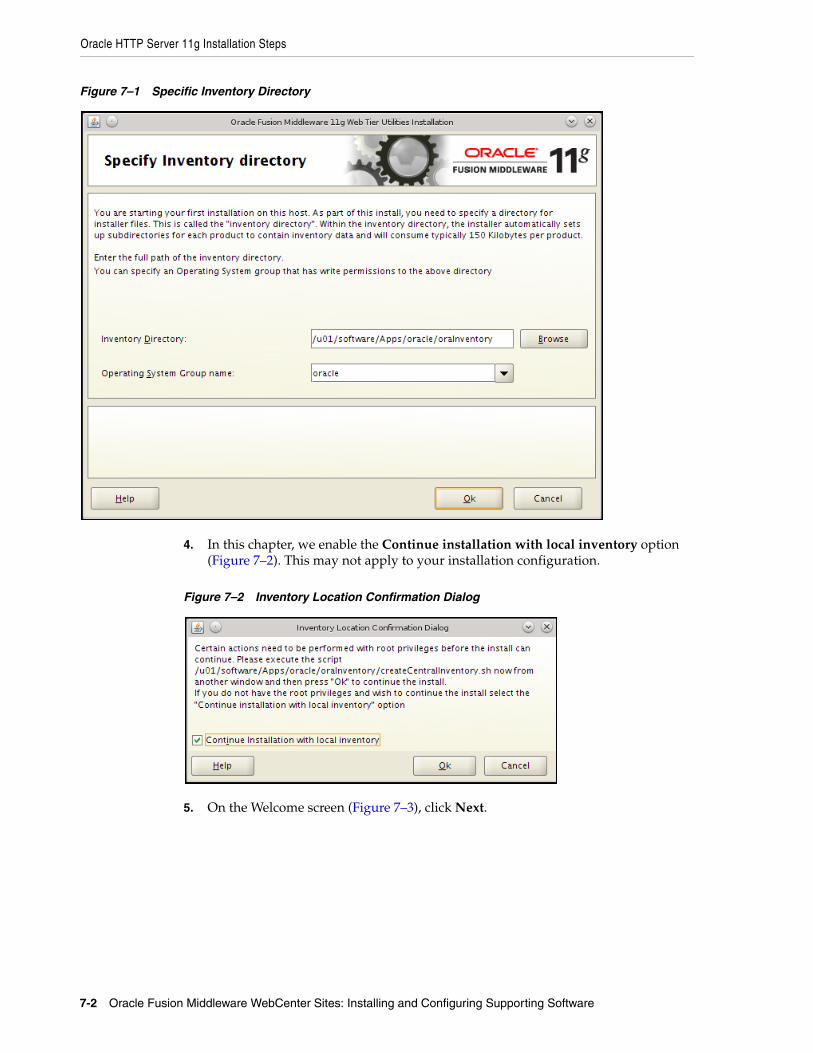
4. In this chapter, we enable the Continue installation with local inventory option (Figure 7–2). This may not apply to your installation configuration.
Figure 7–2 Inventory Location Confirmation Dialog
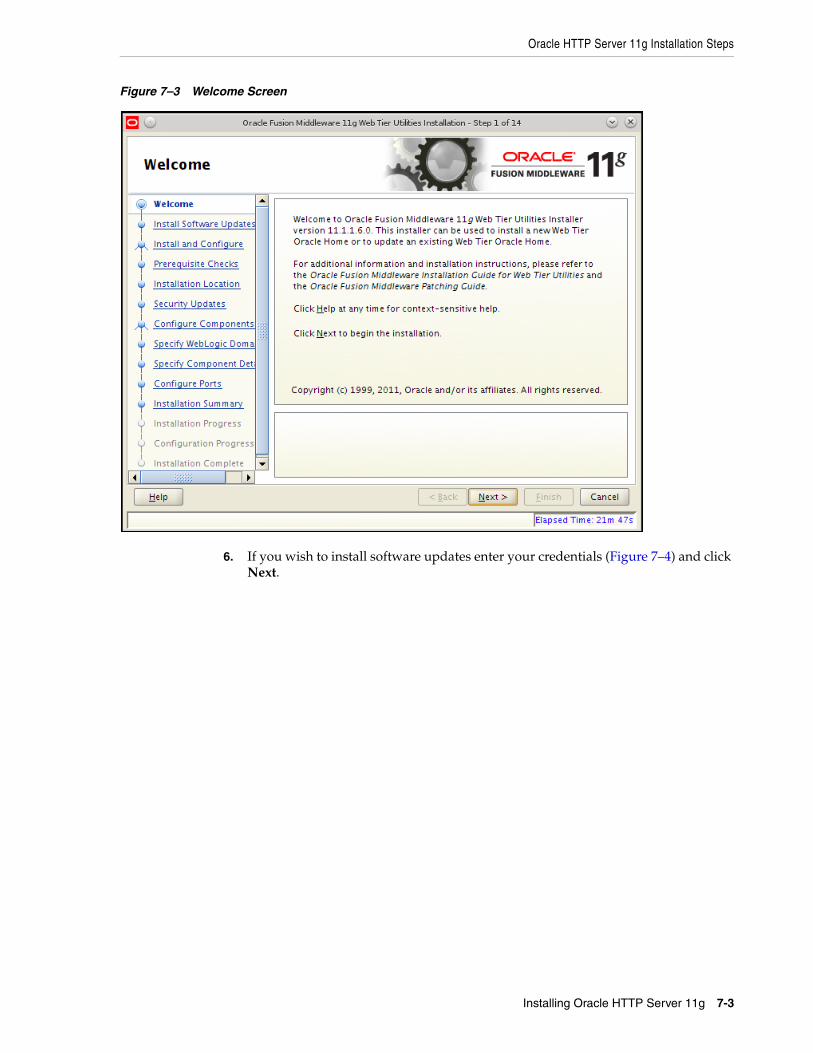
5. On the Welcome screen (Figure 7–3), click Next.
Oracle HTTP Server 11g Installation Steps
Installing Oracle HTTP Server 11g 7-3
Figure 7–3 Welcome Screen
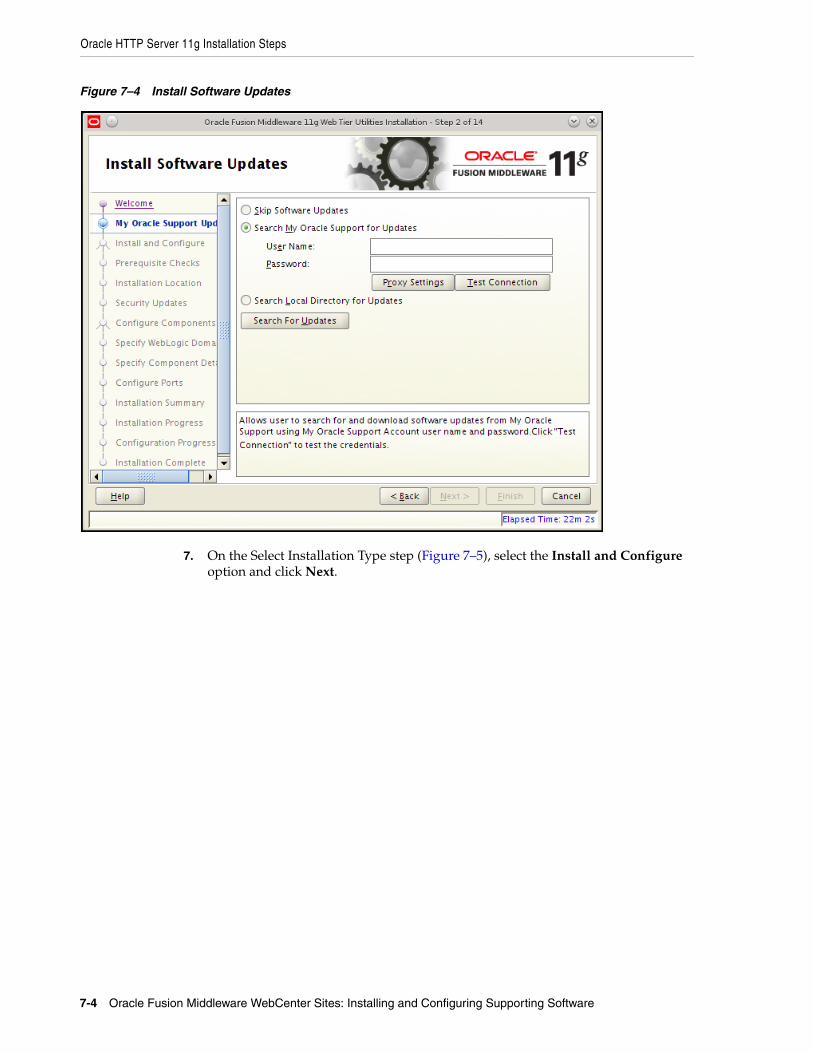
6. If you wish to install software updates enter your credentials (Figure 7–4) and click Next.
Oracle HTTP Server 11g Installation Steps
7-4 Oracle Fusion Middleware WebCenter Sites: Installing and Configuring Supporting Software
Figure 7–4 Install Software Updates
7. On the Select Installation Type step (Figure 7–5), select the Install and Configure option and click Next.
Oracle HTTP Server 11g Installation Steps
Installing Oracle HTTP Server 11g 7-5
Figure 7–5 Select Installation Type
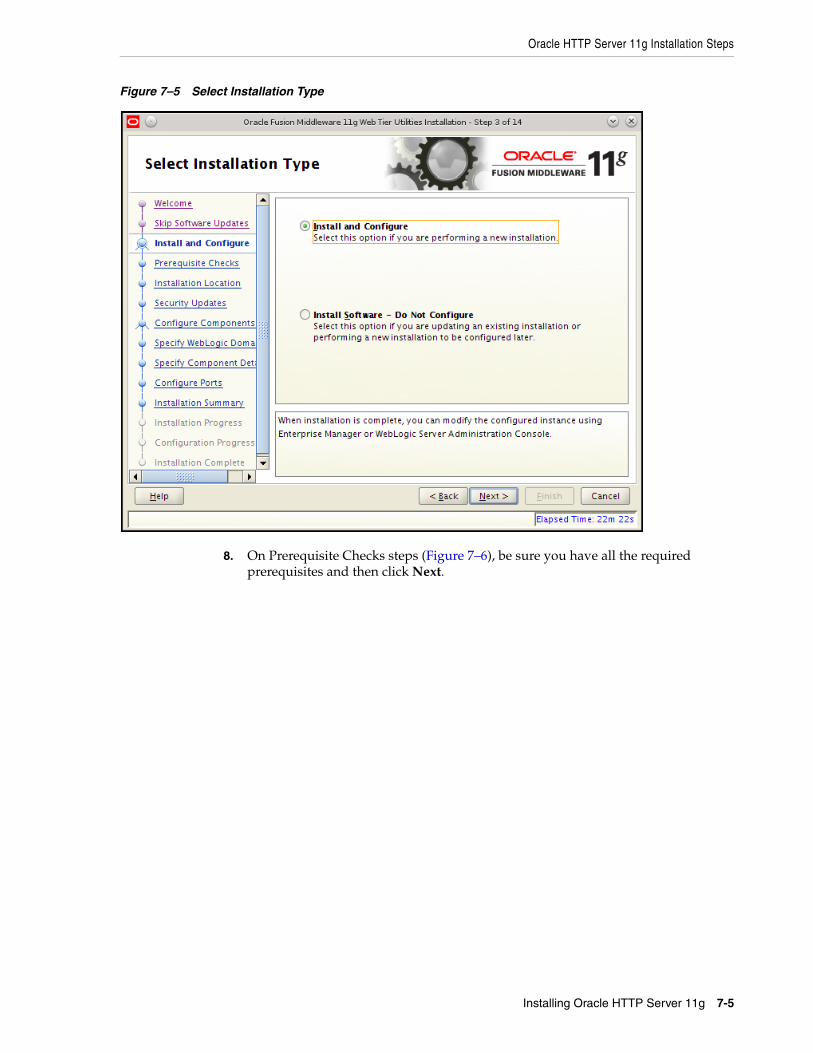
8. On Prerequisite Checks steps (Figure 7–6), be sure you have all the required prerequisites and then click Next.
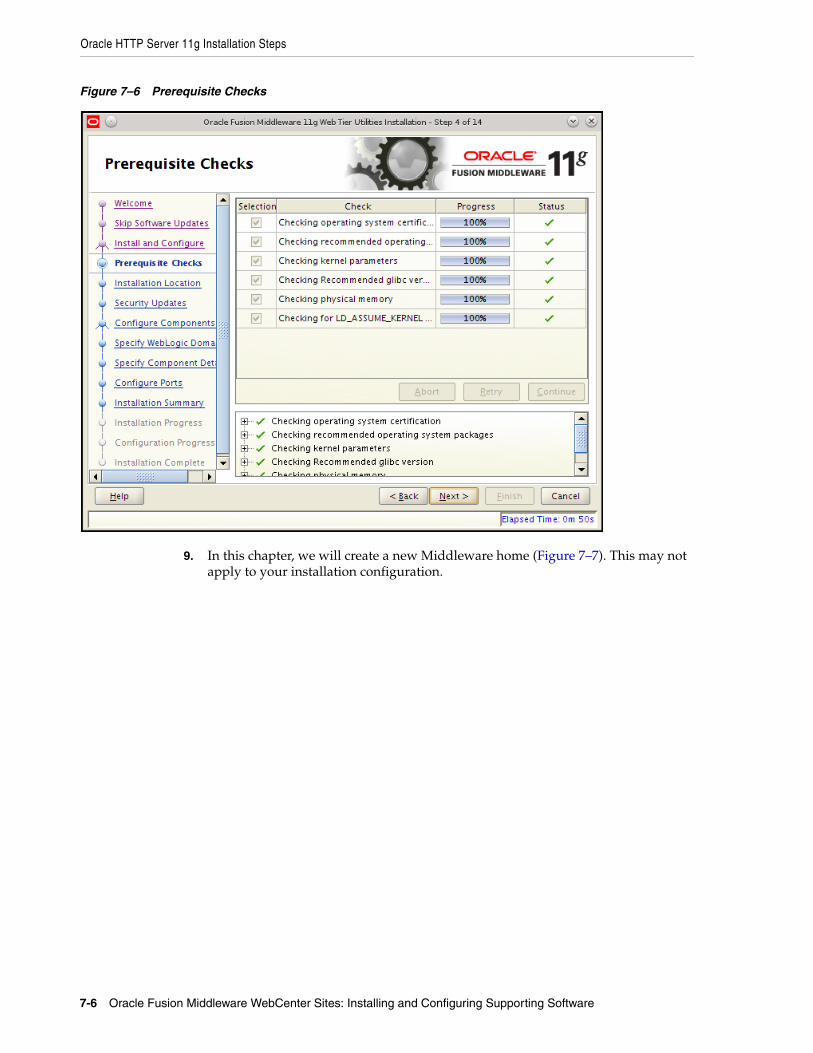
Oracle HTTP Server 11g Installation Steps
7-6 Oracle Fusion Middleware WebCenter Sites: Installing and Configuring Supporting Software
Figure 7–6 Prerequisite Checks
9. In this chapter, we will create a new Middleware home (Figure 7–7). This may not apply to your installation configuration.

Oracle HTTP Server 11g Installation Steps
Installing Oracle HTTP Server 11g 7-7
Figure 7–7 Specify Installation Location
10. On the Specify Security updates step (Figure 7–8), enter your details to receive security updates.
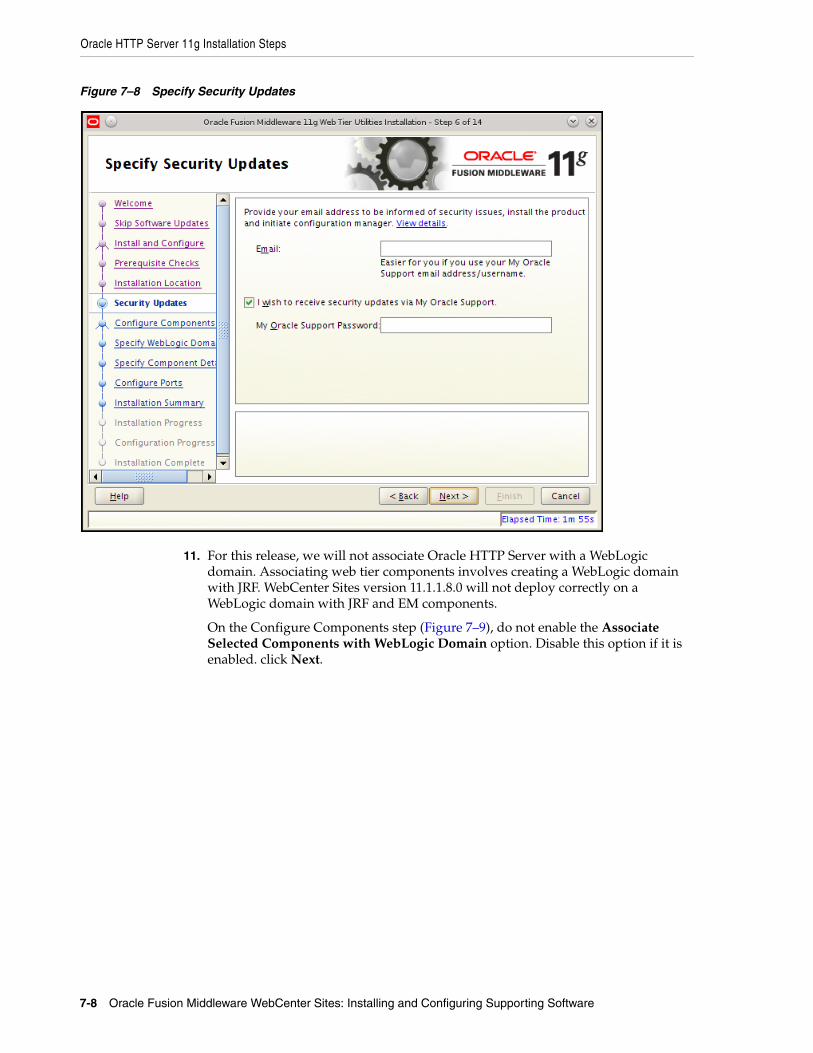
Oracle HTTP Server 11g Installation Steps
7-8 Oracle Fusion Middleware WebCenter Sites: Installing and Configuring Supporting Software
Figure 7–8 Specify Security Updates
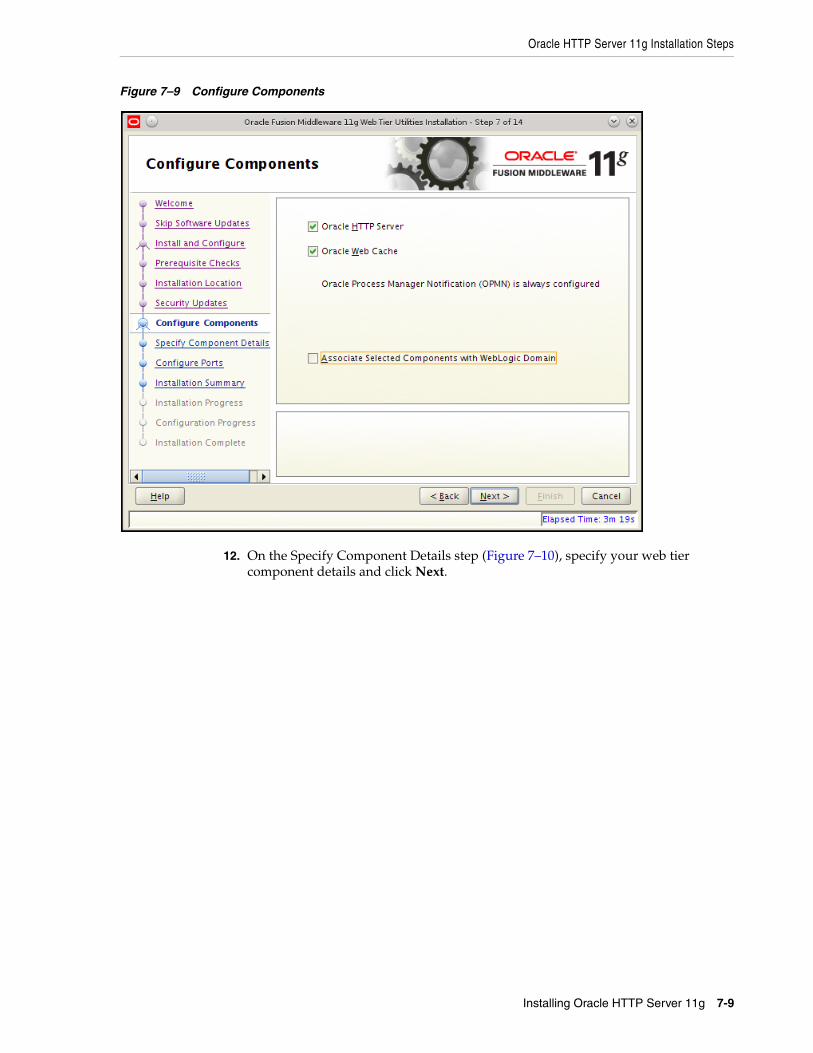
11. For this release, we will not associate Oracle HTTP Server with a WebLogic domain. Associating web tier components involves creating a WebLogic domain with JRF. WebCenter Sites version 11.1.1.8.0 will not deploy correctly on a WebLogic domain with JRF and EM components.
On the Configure Components step (Figure 7–9), do not enable the Associate Selected Components with WebLogic Domain option. Disable this option if it is enabled. click Next.
Oracle HTTP Server 11g Installation Steps
Installing Oracle HTTP Server 11g 7-9
Figure 7–9 Configure Components
12. On the Specify Component Details step (Figure 7–10), specify your web tier component details and click Next.
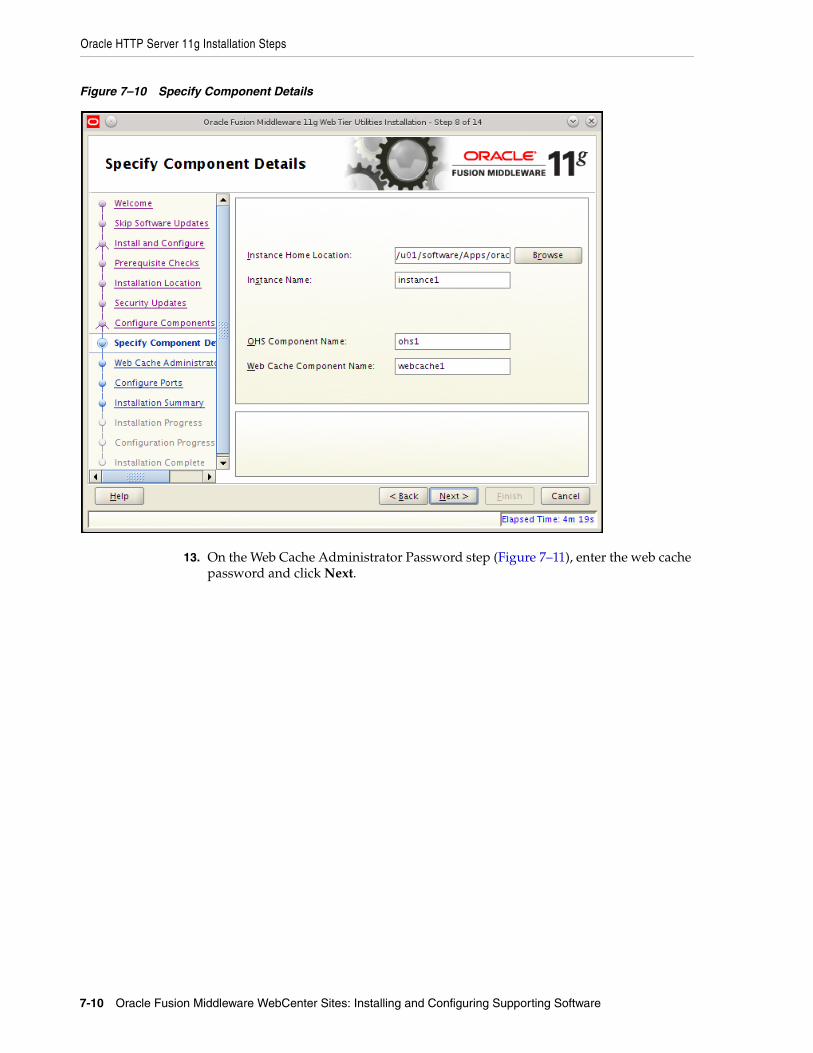
Oracle HTTP Server 11g Installation Steps
7-10 Oracle Fusion Middleware WebCenter Sites: Installing and Configuring Supporting Software
Figure 7–10 Specify Component Details
13. On the Web Cache Administrator Password step (Figure 7–11), enter the web cache password and click Next.
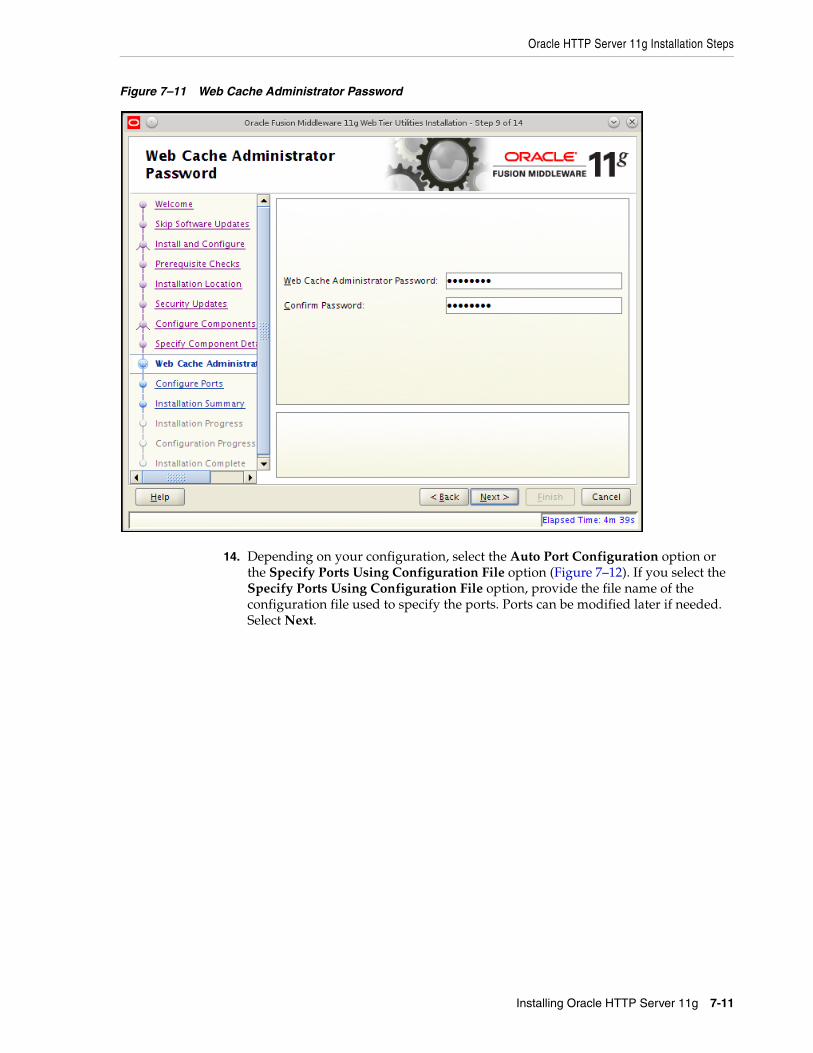
Oracle HTTP Server 11g Installation Steps
Installing Oracle HTTP Server 11g 7-11
Figure 7–11 Web Cache Administrator Password
14. Depending on your configuration, select the Auto Port Configuration option or the Specify Ports Using Configuration File option (Figure 7–12). If you select the Specify Ports Using Configuration File option, provide the file name of the configuration file used to specify the ports. Ports can be modified later if needed. Select Next.
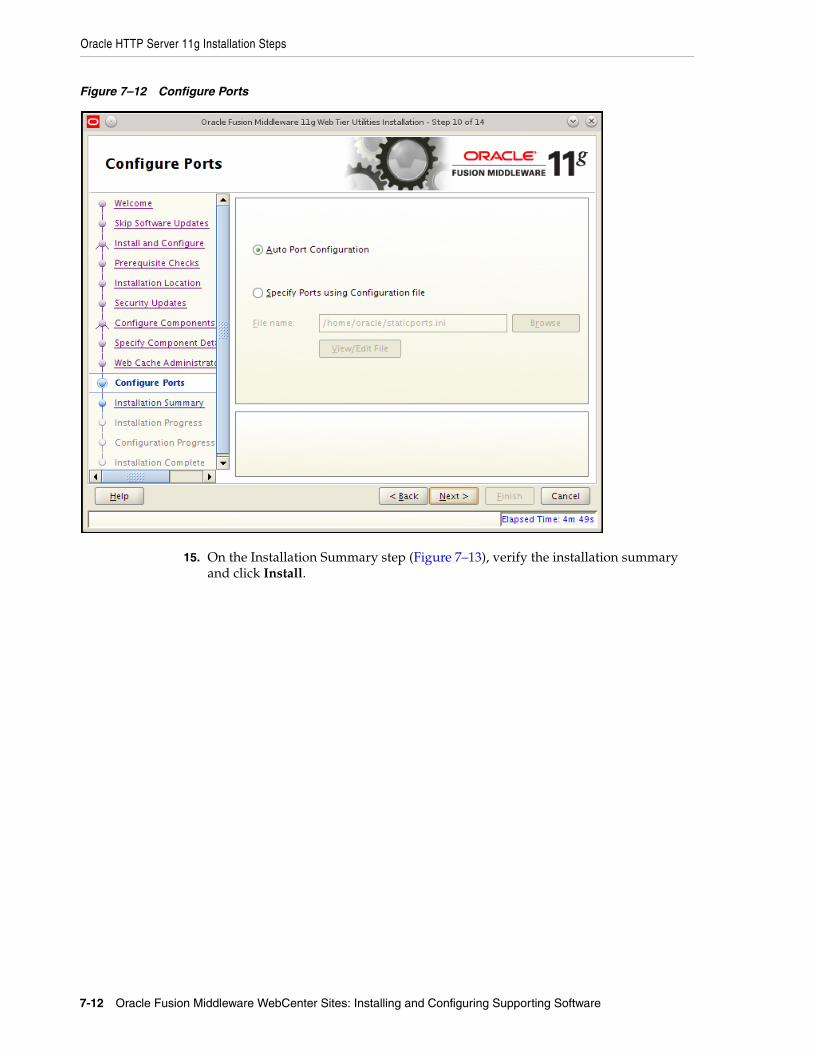
Oracle HTTP Server 11g Installation Steps
7-12 Oracle Fusion Middleware WebCenter Sites: Installing and Configuring Supporting Software
Figure 7–12 Configure Ports
15. On the Installation Summary step (Figure 7–13), verify the installation summary and click Install.
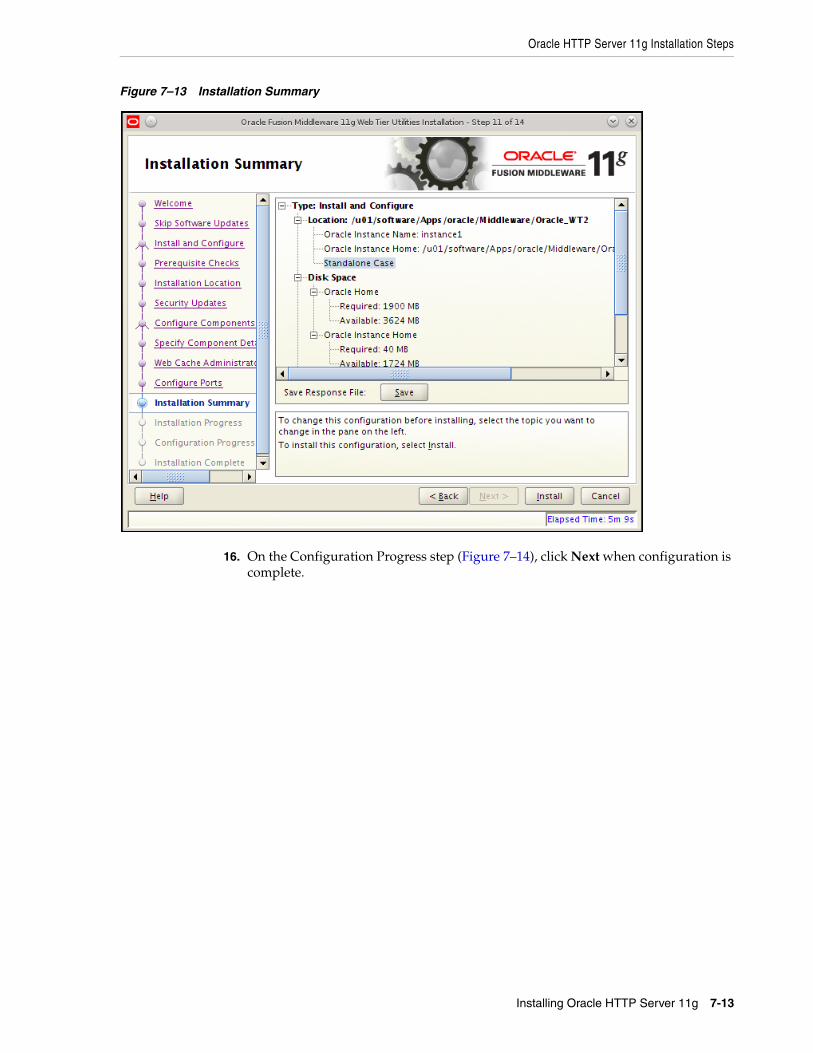
Oracle HTTP Server 11g Installation Steps
Installing Oracle HTTP Server 11g 7-13
Figure 7–13 Installation Summary
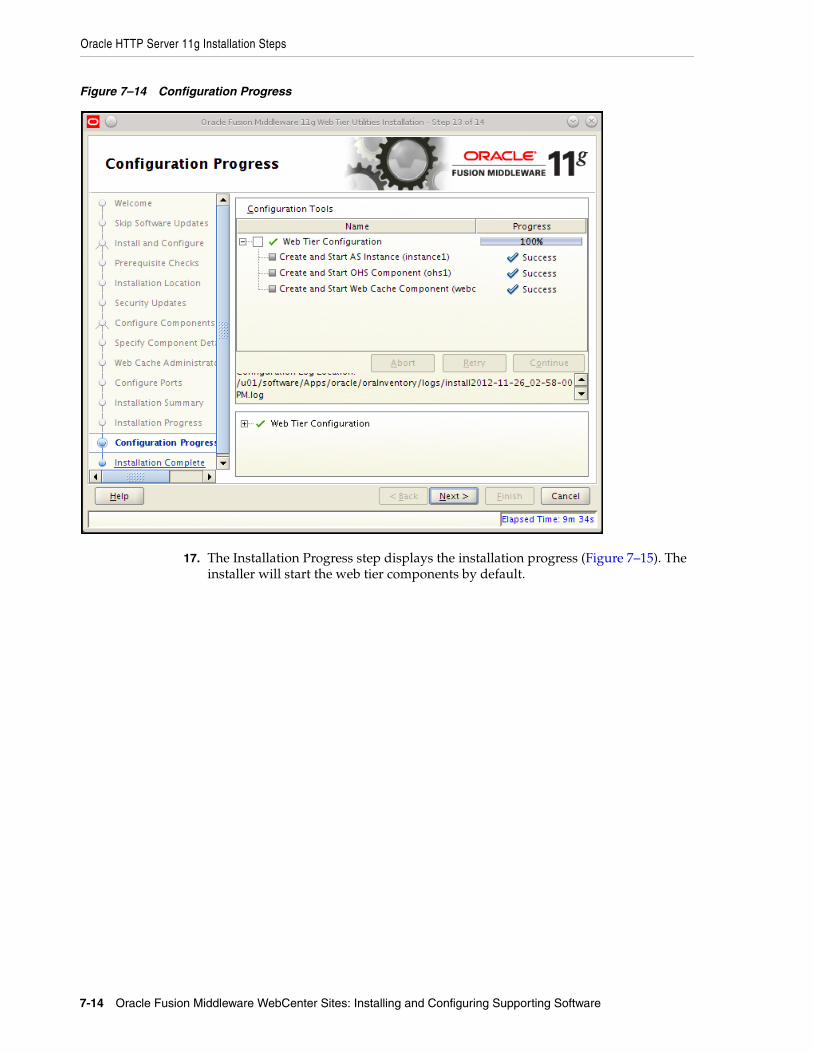
16. On the Configuration Progress step (Figure 7–14), click Next when configuration is complete.
Oracle HTTP Server 11g Installation Steps
7-14 Oracle Fusion Middleware WebCenter Sites: Installing and Configuring Supporting Software
Figure 7–14 Configuration Progress
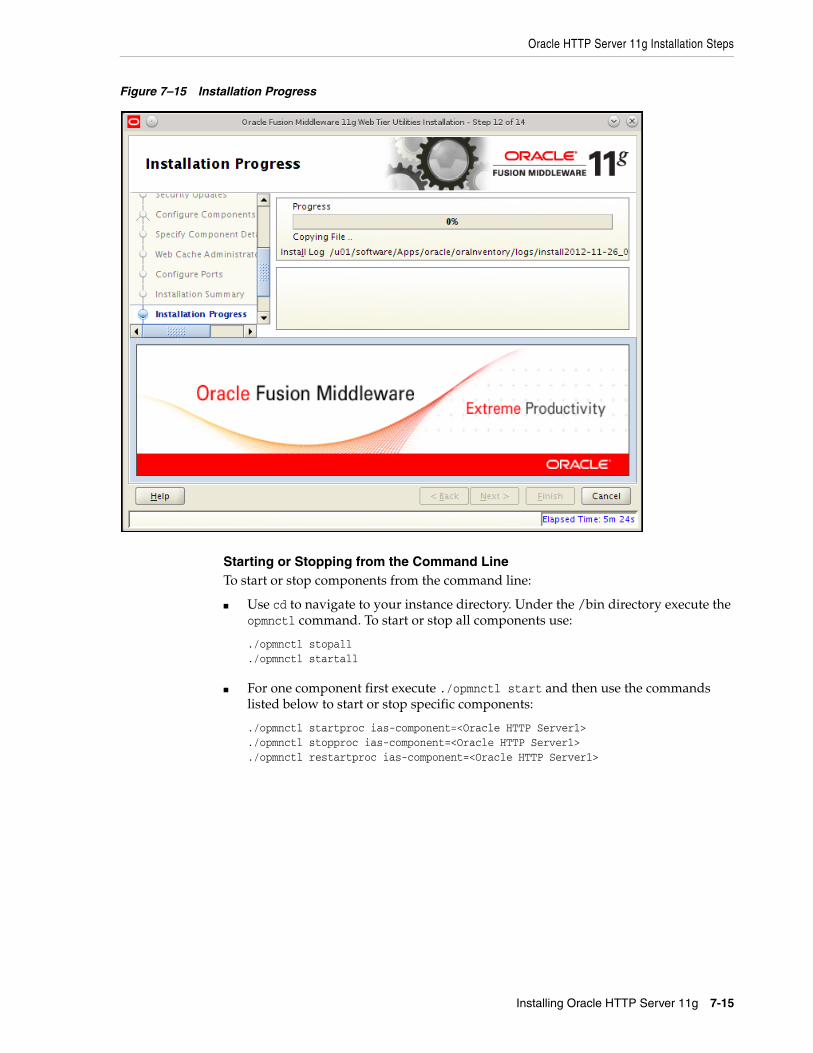
17. The Installation Progress step displays the installation progress (Figure 7–15). The installer will start the web tier components by default.
Oracle HTTP Server 11g Installation Steps
Installing Oracle HTTP Server 11g 7-15
Figure 7–15 Installation Progress
Starting or Stopping from the Command LineTo start or stop components from the command line:
■ Use cd to navigate to your instance directory. Under the /bin directory execute the opmnctl command. To start or stop all components use:
./opmnctl stopall
./opmnctl startall
■ For one component first execute ./opmnctl start and then use the commands listed below to start or stop specific components:
./opmnctl startproc ias-component=<Oracle HTTP Server1>
./opmnctl stopproc ias-component=<Oracle HTTP Server1>
./opmnctl restartproc ias-component=<Oracle HTTP Server1>
Oracle HTTP Server 11g Installation Steps
7-16 Oracle Fusion Middleware WebCenter Sites: Installing and Configuring Supporting Software
8
Installing Apache Web Server 8-1
8Installing Apache Web Server
This chapter describes how to install Apache HTTP Server systems. You can install Apache HTTP Server on the same machine that will host WebLogic and WebCenter Sites, or you can install and use it on a separate host.
This chapter contains the following sections:
■ Section 8.1, "Is Apache Web Server Already Installed?"
■ Section 8.2, "Installation Options"
■ Section 8.3, "Documenting Your Apache Parameters"
■ Section 8.4, "Verifying that Apache Runs Properly"
■ Section 8.5, "Next Step"
8.1 Is Apache Web Server Already Installed?1. Apache HTTP Server can come pre-installed on UNIX-based platforms such as
Solaris and Linux. Determine whether Apache is installed on the environment(s) on which you plan to run it.
2. If Apache is already installed, continue with Section 8.3, "Documenting Your Apache Parameters." If Apache is not installed, continue to Section 8.2, "Installation Options."
8.2 Installation OptionsTo install Apache Web Server, you can do one of the following:
■ Install it from your source medium.
■ Download it from the Internet.
■ Build it from source; that is, select the modules and compile the Apache executable yourself, as described in this section. For detailed instructions, refer to the
Note: If Apache Web Server is already installed, ensure the installed version matches the minimum version supported in the Oracle WebCenter Sites Certification Matrix. If Apache Web Server exists and is supported, then you can skip the installation of Apache Web Server. However, if the version installed on your environment is out of date, you are required to compile a new version.
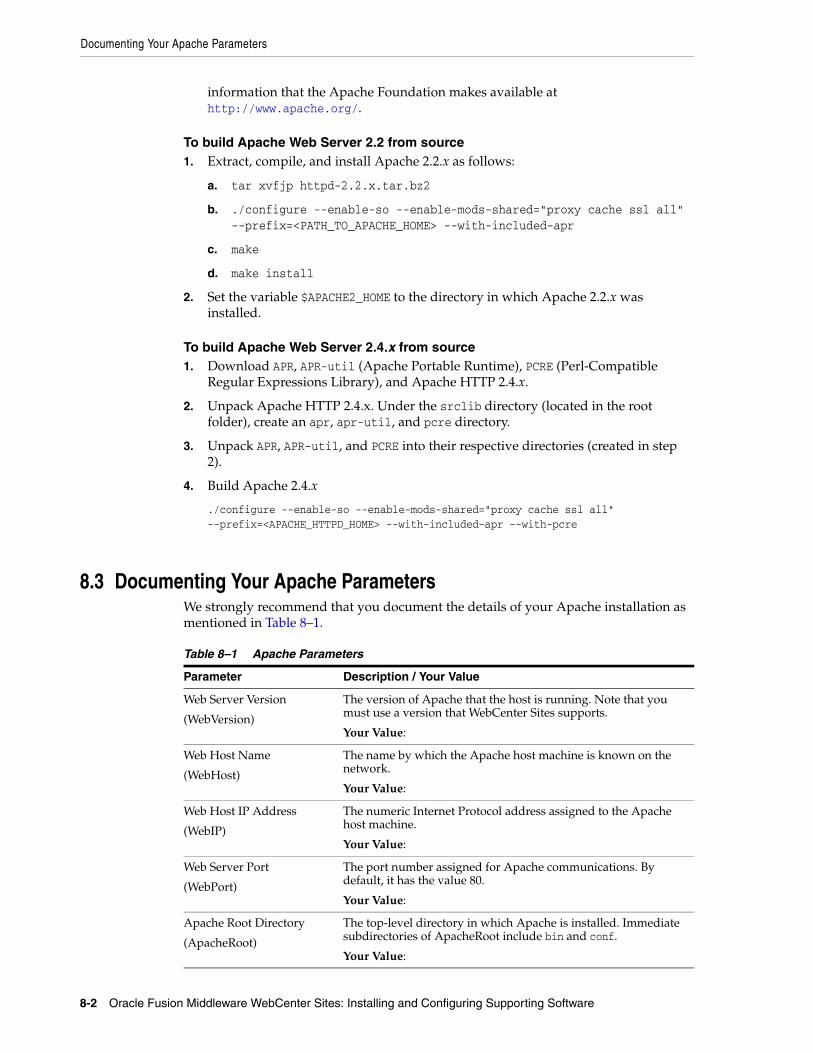
Documenting Your Apache Parameters
8-2 Oracle Fusion Middleware WebCenter Sites: Installing and Configuring Supporting Software
information that the Apache Foundation makes available at http://www.apache.org/.
To build Apache Web Server 2.2 from source 1. Extract, compile, and install Apache 2.2.x as follows:
a. tar xvfjp httpd-2.2.x.tar.bz2
b. ./configure --enable-so --enable-mods-shared="proxy cache ssl all" --prefix=<PATH_TO_APACHE_HOME> --with-included-apr
c. make
d. make install
2. Set the variable $APACHE2_HOME to the directory in which Apache 2.2.x was installed.
To build Apache Web Server 2.4.x from source1. Download APR, APR-util (Apache Portable Runtime), PCRE (Perl-Compatible
Regular Expressions Library), and Apache HTTP 2.4.x.
2. Unpack Apache HTTP 2.4.x. Under the srclib directory (located in the root folder), create an apr, apr-util, and pcre directory.
3. Unpack APR, APR-util, and PCRE into their respective directories (created in step 2).
4. Build Apache 2.4.x
./configure --enable-so --enable-mods-shared="proxy cache ssl all" --prefix=<APACHE_HTTPD_HOME> --with-included-apr --with-pcre
8.3 Documenting Your Apache ParametersWe strongly recommend that you document the details of your Apache installation as mentioned in Table 8–1.
Table 8–1 Apache Parameters
Parameter Description / Your Value
Web Server Version
(WebVersion)
The version of Apache that the host is running. Note that you must use a version that WebCenter Sites supports.
Your Value:
Web Host Name
(WebHost)
The name by which the Apache host machine is known on the network.
Your Value:
Web Host IP Address
(WebIP)
The numeric Internet Protocol address assigned to the Apache host machine.
Your Value:
Web Server Port
(WebPort)
The port number assigned for Apache communications. By default, it has the value 80.
Your Value:
Apache Root Directory
(ApacheRoot)
The top-level directory in which Apache is installed. Immediate subdirectories of ApacheRoot include bin and conf.
Your Value:
Next Step
Installing Apache Web Server 8-3
8.4 Verifying that Apache Runs ProperlyIn this step, you will start Apache and verify that it is running properly. For verification instructions, see the Apache web site (http://www.apache.org).
8.5 Next StepConfigure Apache to run with WebLogic and WebCenter Sites. For instructions, see the Oracle Fusion Middleware WebCenter Sites Installation Guide.

Next Step
8-4 Oracle Fusion Middleware WebCenter Sites: Installing and Configuring Supporting Software
9
Installing IBM HTTP Server 8.0 and 8.5 9-1
9Installing IBM HTTP Server 8.0 and 8.5
This chapter contains the following sections:
■ Section 9.1, "IBM HTTP Server 8.0 and 8.5 Installation Steps"
■ Section 9.2, "WebServer Plugin Configuration"
9.1 IBM HTTP Server 8.0 and 8.5 Installation StepsTo install the IBM HTTP Server, complete the following steps:
1. Download the IBM HTTP Server installer files from the IBM website and extract the contents to a folder of your choice. Refer to the Oracle WebCenter Sites Certification Matrix for supported versions with WebCenter Sites here: http://www.oracle.com/technetwork/middleware/webcenter/sites/downloads/index.html
2. In the IIM, select File, then select Preferences, then select Add Repository to configure an IBM HTTP Server repository.
Test the connection to the new repository.
3. Check for the latest available versions by clicking the Check for other Versions, Fixes and Extensions button.
4. From the list of available Install Package items, select IBM HTTP Server for WebSphere Application Server, Web Server Plug-ins for IBM WebSphere Application Server, and WebSphere Customization Toolbox. See Figure 9–1 for details:
Note: Keep in mind the following:
■ This chapter is for WebSphere 8.0 and 8.5. If you are installing on WebSphere 7.0, see Chapter 10, "Installing IBM HTTP Server 7.0."
■ In this chapter, IBM HTTP Server is referred to as "IHS." WebSphere Application Server is referred to as "WAS."
Note: There installation instructions assume you have installed IBM Installation Manager (IIM). If you do not have IIM installed, you must do so.
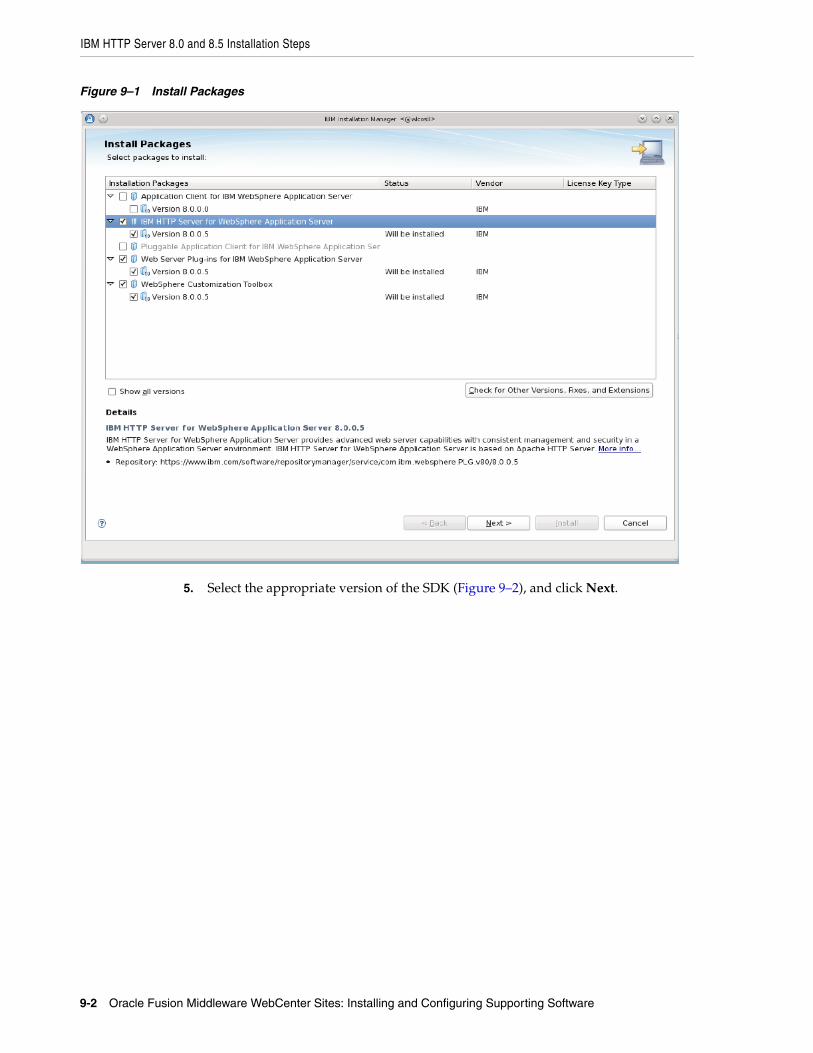
IBM HTTP Server 8.0 and 8.5 Installation Steps
9-2 Oracle Fusion Middleware WebCenter Sites: Installing and Configuring Supporting Software
Figure 9–1 Install Packages
5. Select the appropriate version of the SDK (Figure 9–2), and click Next.
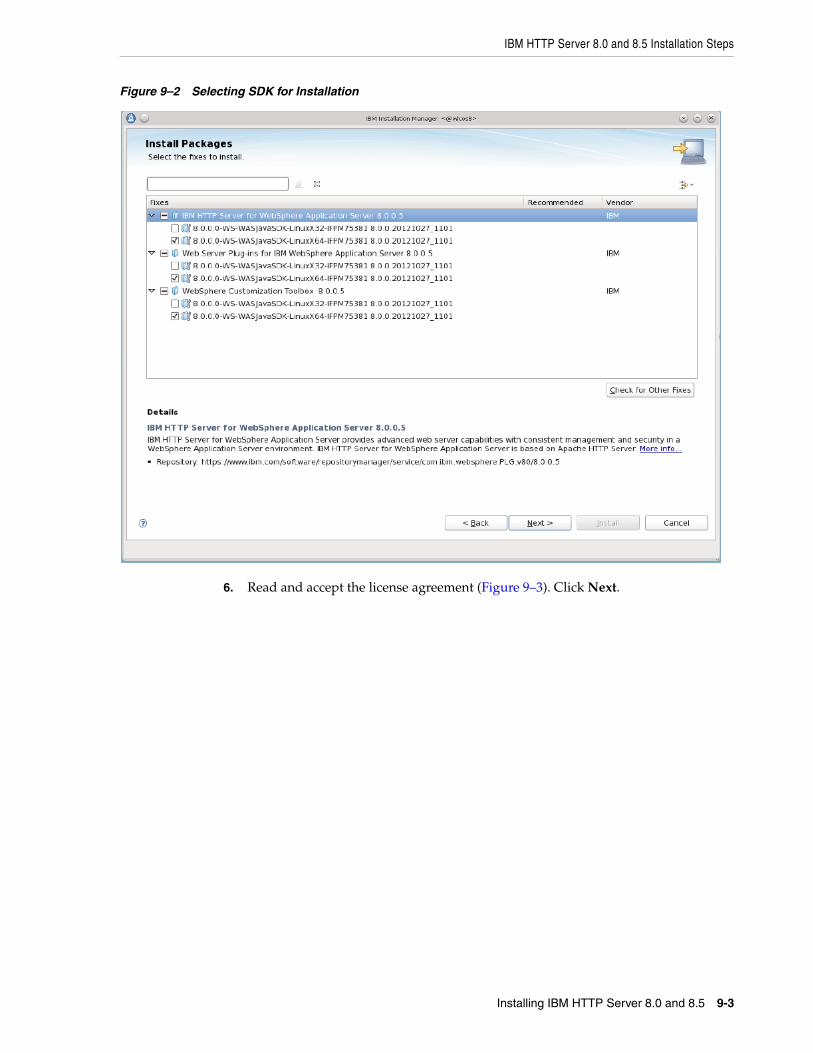
IBM HTTP Server 8.0 and 8.5 Installation Steps
Installing IBM HTTP Server 8.0 and 8.5 9-3
Figure 9–2 Selecting SDK for Installation
6. Read and accept the license agreement (Figure 9–3). Click Next.
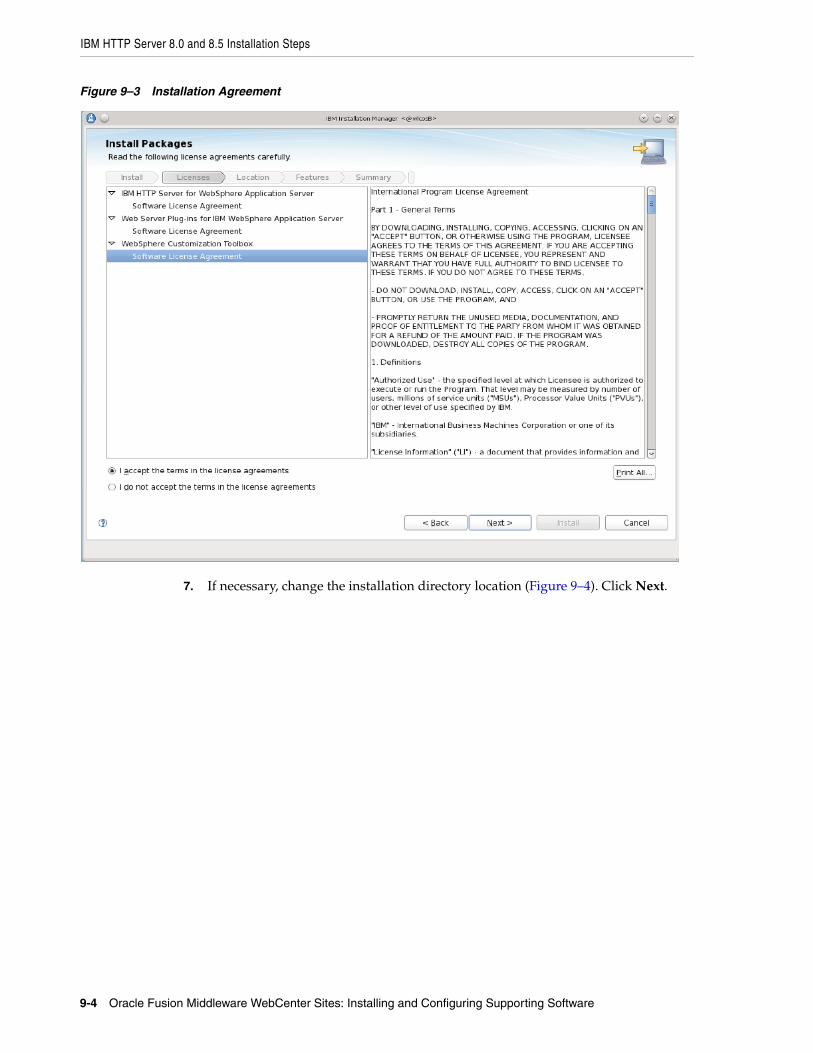
IBM HTTP Server 8.0 and 8.5 Installation Steps
9-4 Oracle Fusion Middleware WebCenter Sites: Installing and Configuring Supporting Software
Figure 9–3 Installation Agreement
7. If necessary, change the installation directory location (Figure 9–4). Click Next.
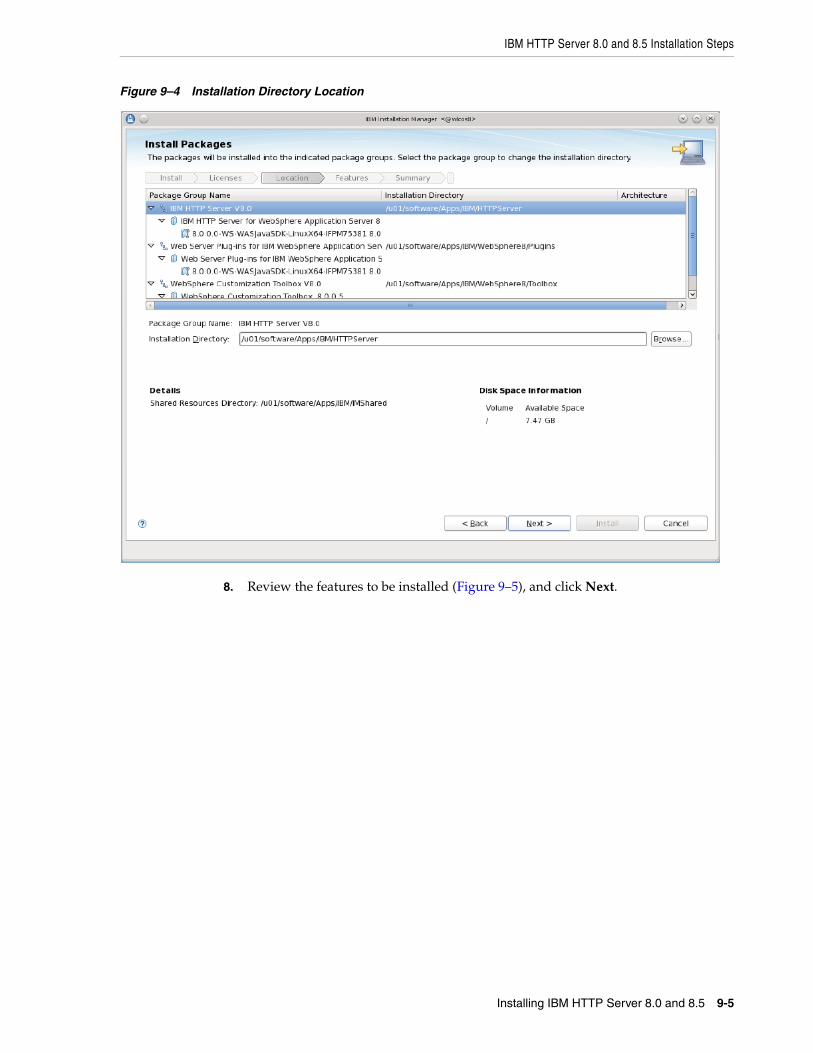
IBM HTTP Server 8.0 and 8.5 Installation Steps
Installing IBM HTTP Server 8.0 and 8.5 9-5
Figure 9–4 Installation Directory Location
8. Review the features to be installed (Figure 9–5), and click Next.
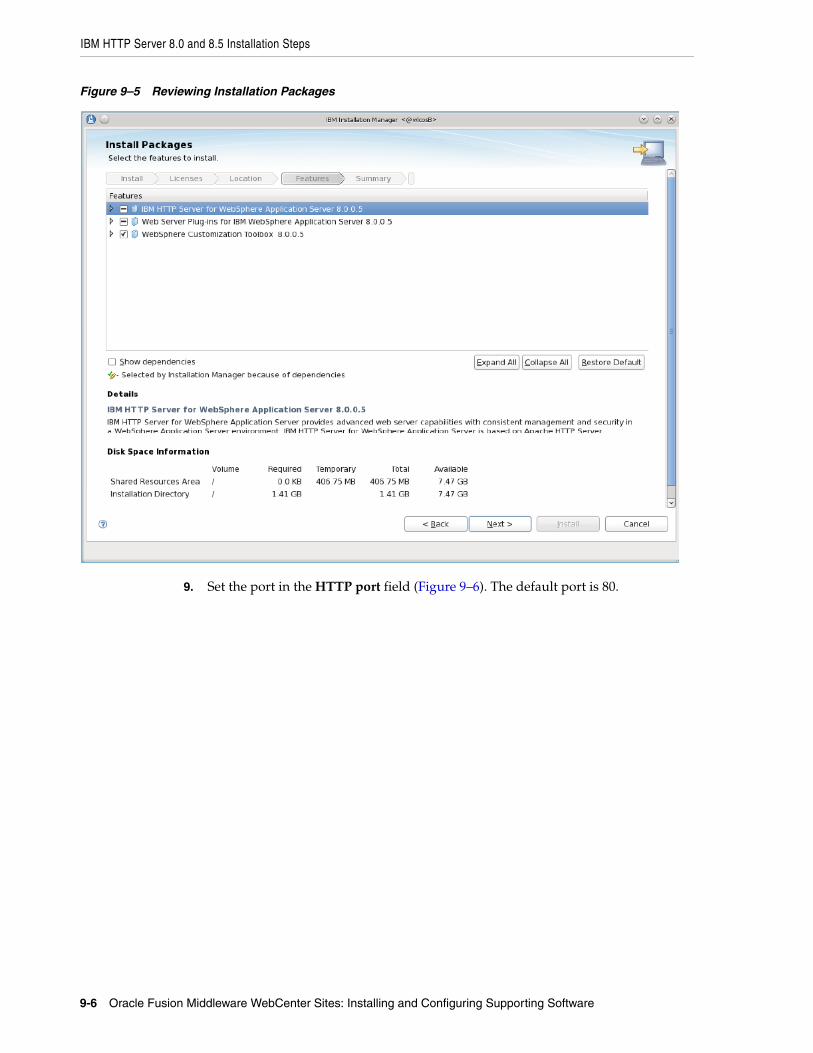
IBM HTTP Server 8.0 and 8.5 Installation Steps
9-6 Oracle Fusion Middleware WebCenter Sites: Installing and Configuring Supporting Software
Figure 9–5 Reviewing Installation Packages
9. Set the port in the HTTP port field (Figure 9–6). The default port is 80.
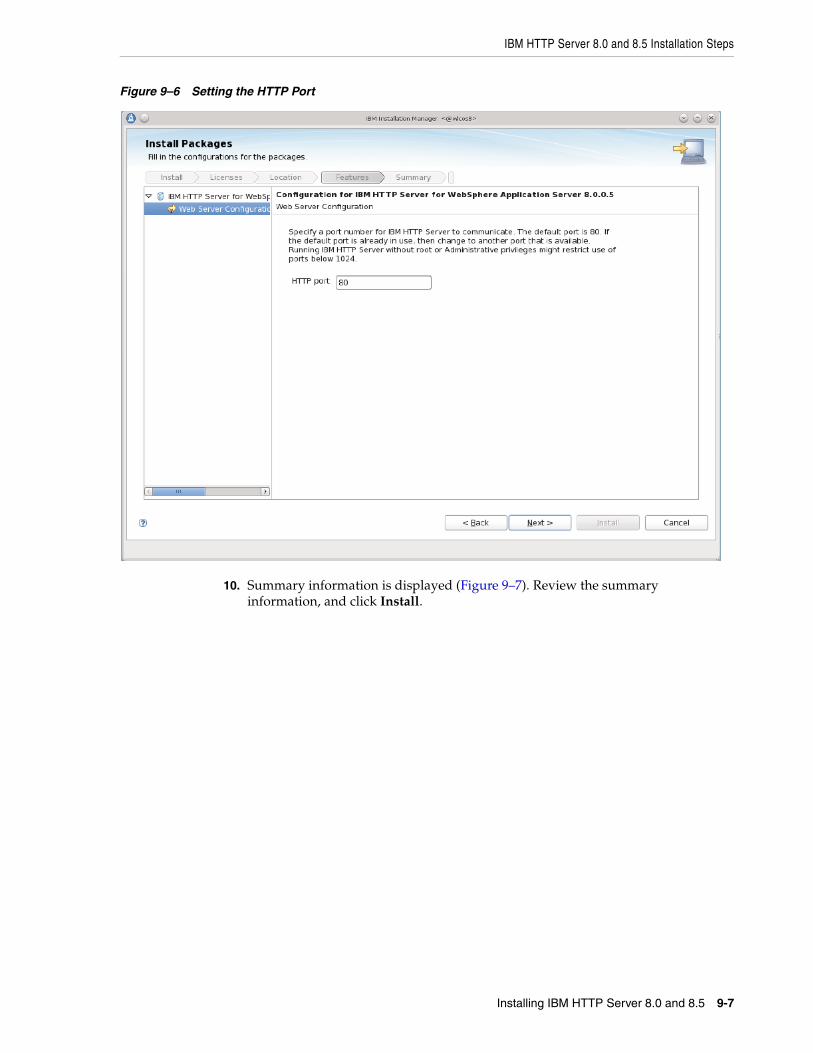
IBM HTTP Server 8.0 and 8.5 Installation Steps
Installing IBM HTTP Server 8.0 and 8.5 9-7
Figure 9–6 Setting the HTTP Port
10. Summary information is displayed (Figure 9–7). Review the summary information, and click Install.
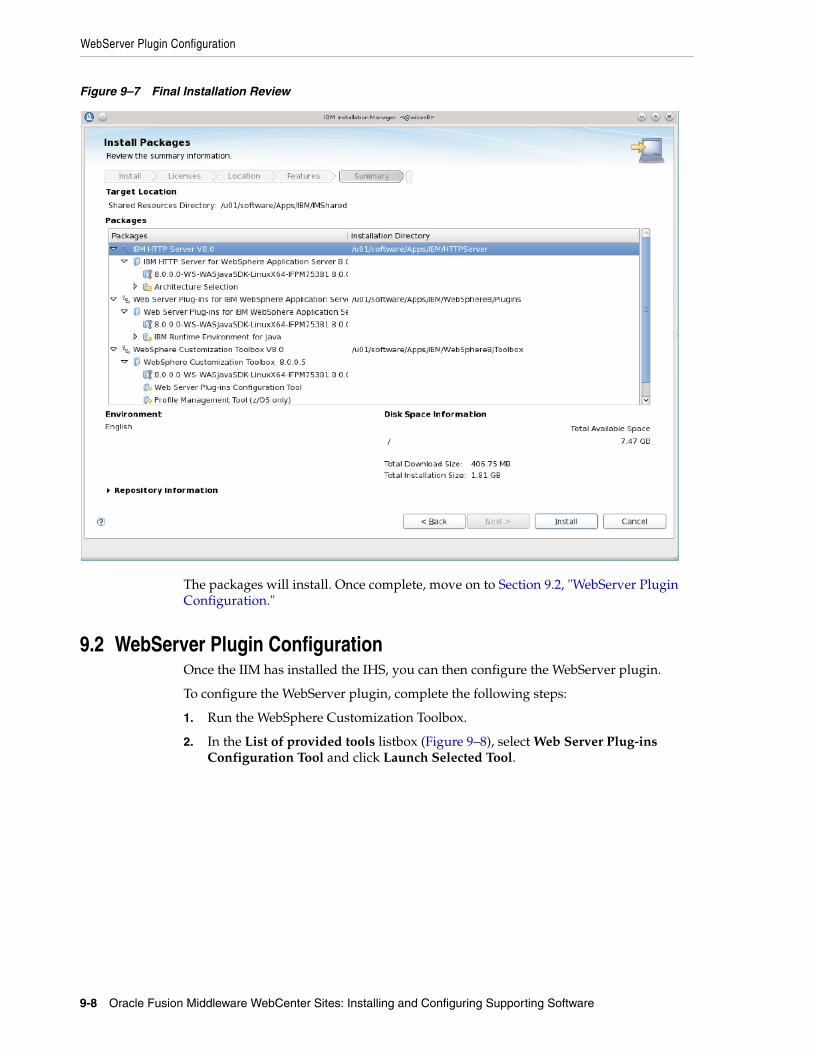
WebServer Plugin Configuration
9-8 Oracle Fusion Middleware WebCenter Sites: Installing and Configuring Supporting Software
Figure 9–7 Final Installation Review
The packages will install. Once complete, move on to Section 9.2, "WebServer Plugin Configuration."
9.2 WebServer Plugin ConfigurationOnce the IIM has installed the IHS, you can then configure the WebServer plugin.
To configure the WebServer plugin, complete the following steps:
1. Run the WebSphere Customization Toolbox.
2. In the List of provided tools listbox (Figure 9–8), select Web Server Plug-ins Configuration Tool and click Launch Selected Tool.
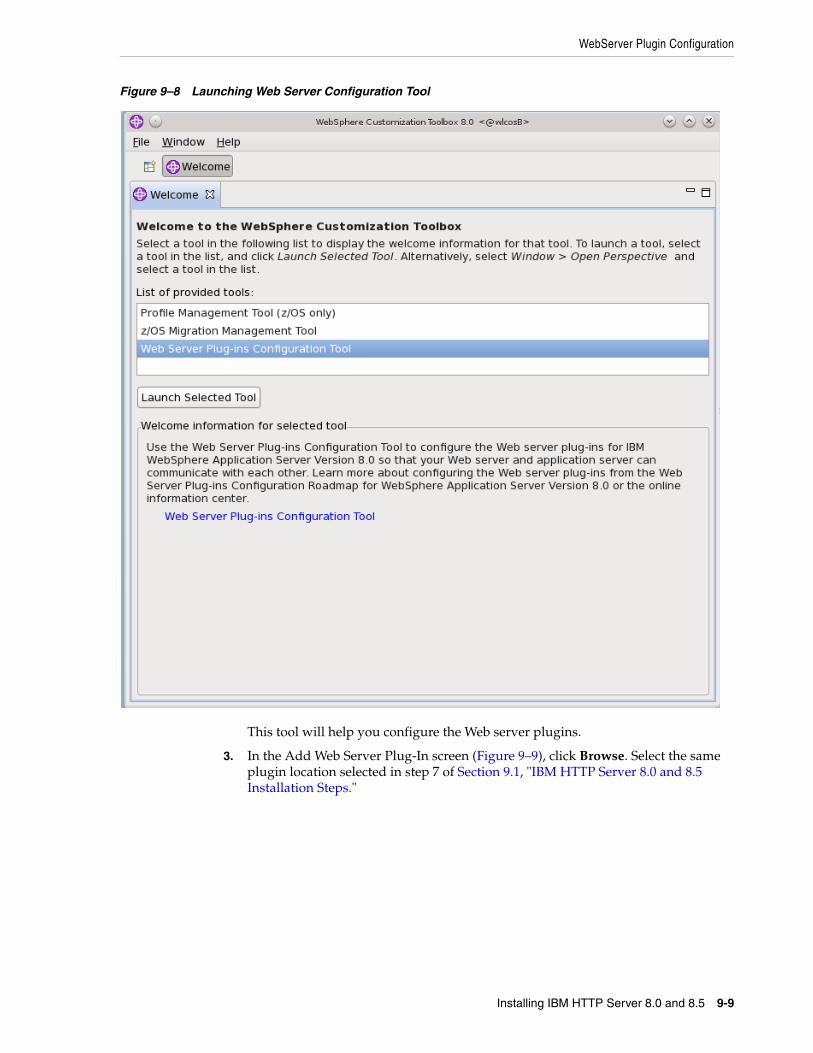
WebServer Plugin Configuration
Installing IBM HTTP Server 8.0 and 8.5 9-9
Figure 9–8 Launching Web Server Configuration Tool
This tool will help you configure the Web server plugins.
3. In the Add Web Server Plug-In screen (Figure 9–9), click Browse. Select the same plugin location selected in step 7 of Section 9.1, "IBM HTTP Server 8.0 and 8.5 Installation Steps."
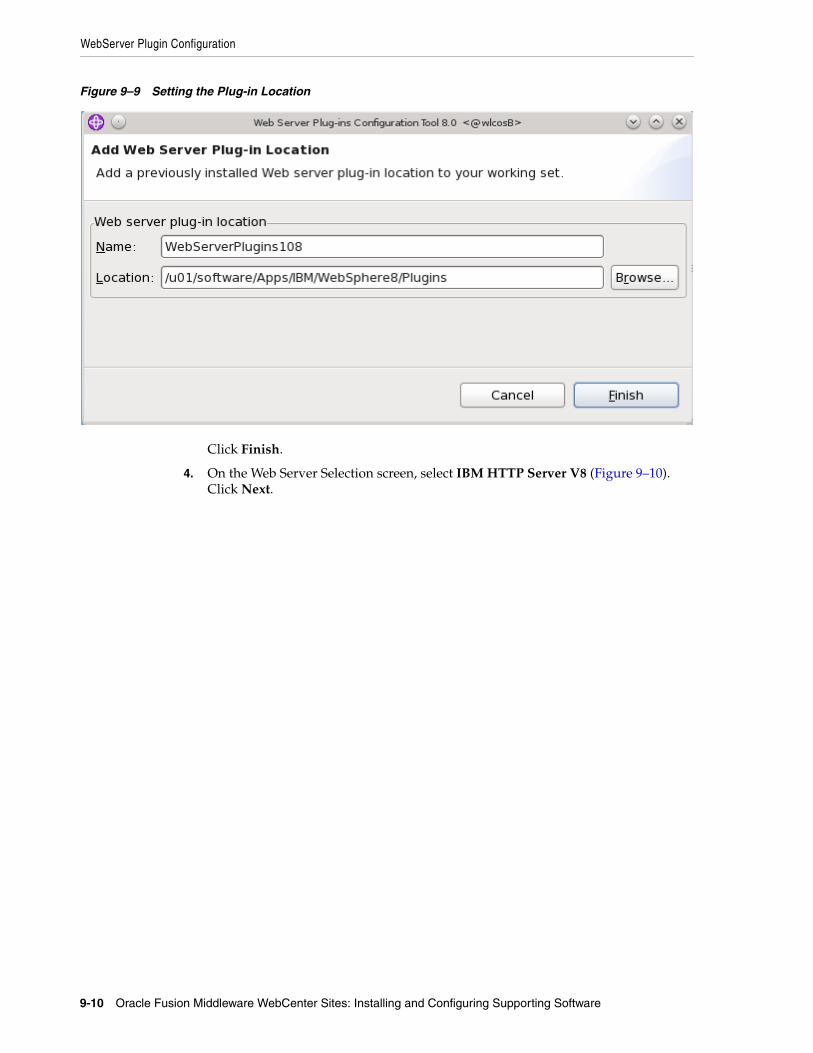
WebServer Plugin Configuration
9-10 Oracle Fusion Middleware WebCenter Sites: Installing and Configuring Supporting Software
Figure 9–9 Setting the Plug-in Location
Click Finish.
4. On the Web Server Selection screen, select IBM HTTP Server V8 (Figure 9–10). Click Next.
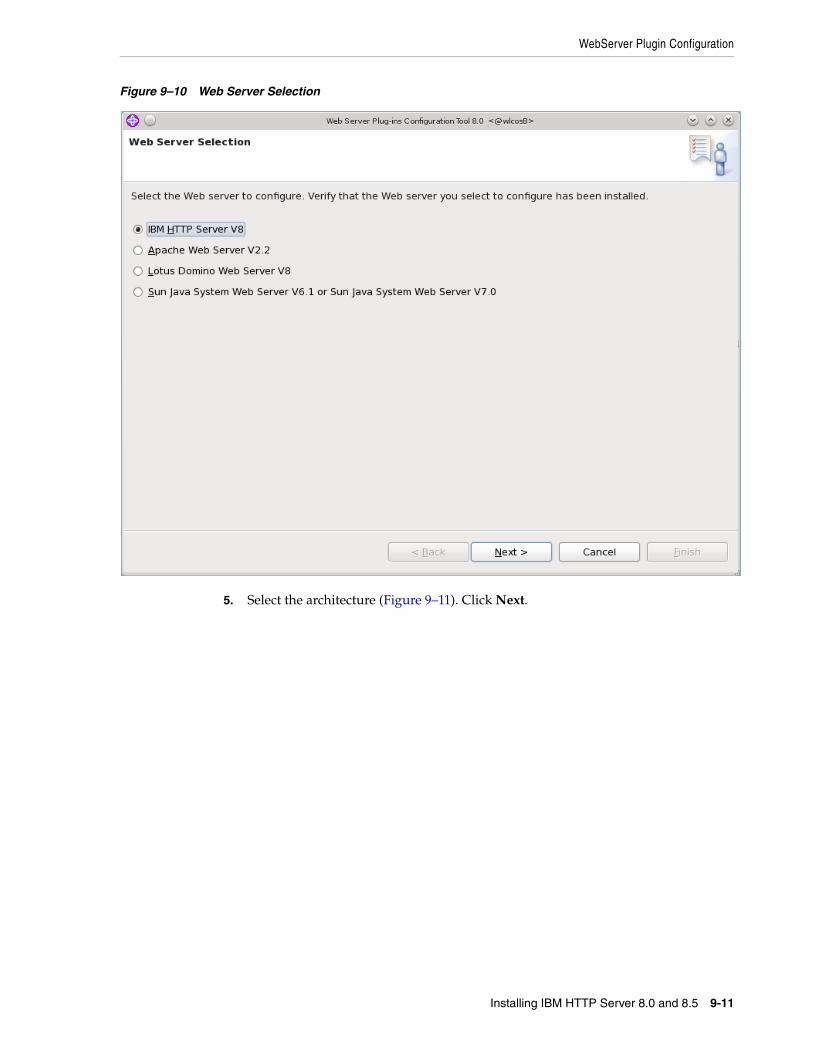
WebServer Plugin Configuration
Installing IBM HTTP Server 8.0 and 8.5 9-11
Figure 9–10 Web Server Selection
5. Select the architecture (Figure 9–11). Click Next.
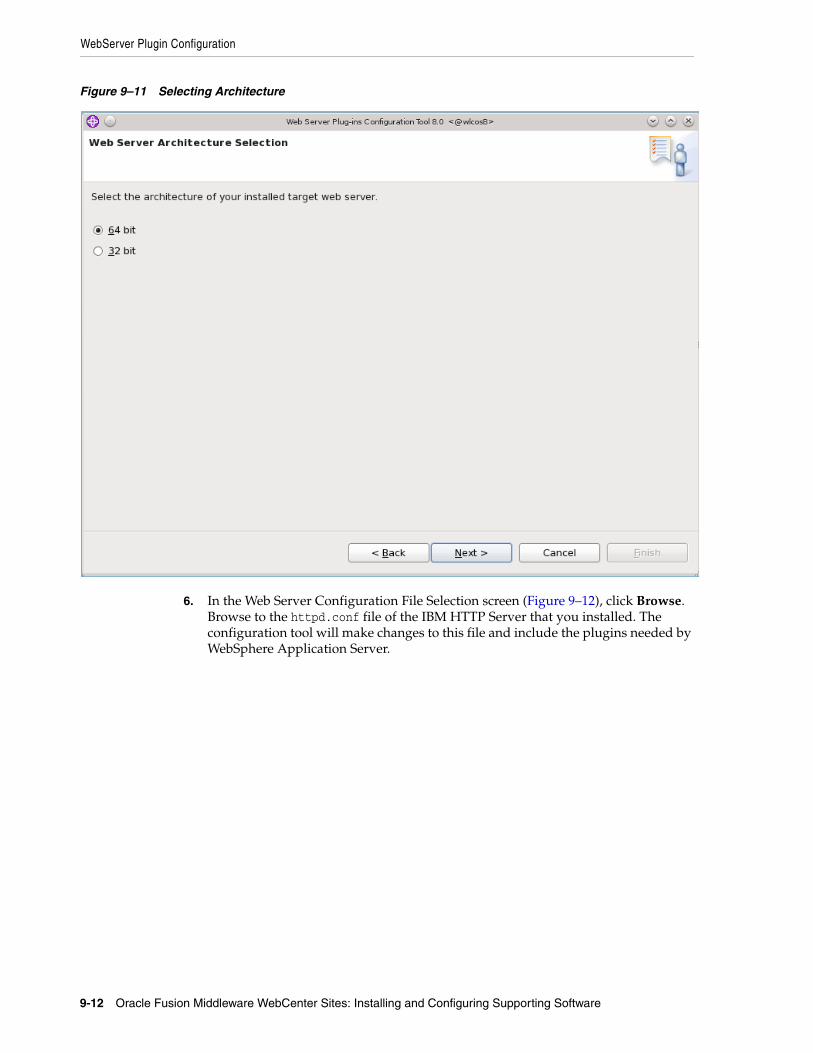
WebServer Plugin Configuration
9-12 Oracle Fusion Middleware WebCenter Sites: Installing and Configuring Supporting Software
Figure 9–11 Selecting Architecture
6. In the Web Server Configuration File Selection screen (Figure 9–12), click Browse. Browse to the httpd.conf file of the IBM HTTP Server that you installed. The configuration tool will make changes to this file and include the plugins needed by WebSphere Application Server.
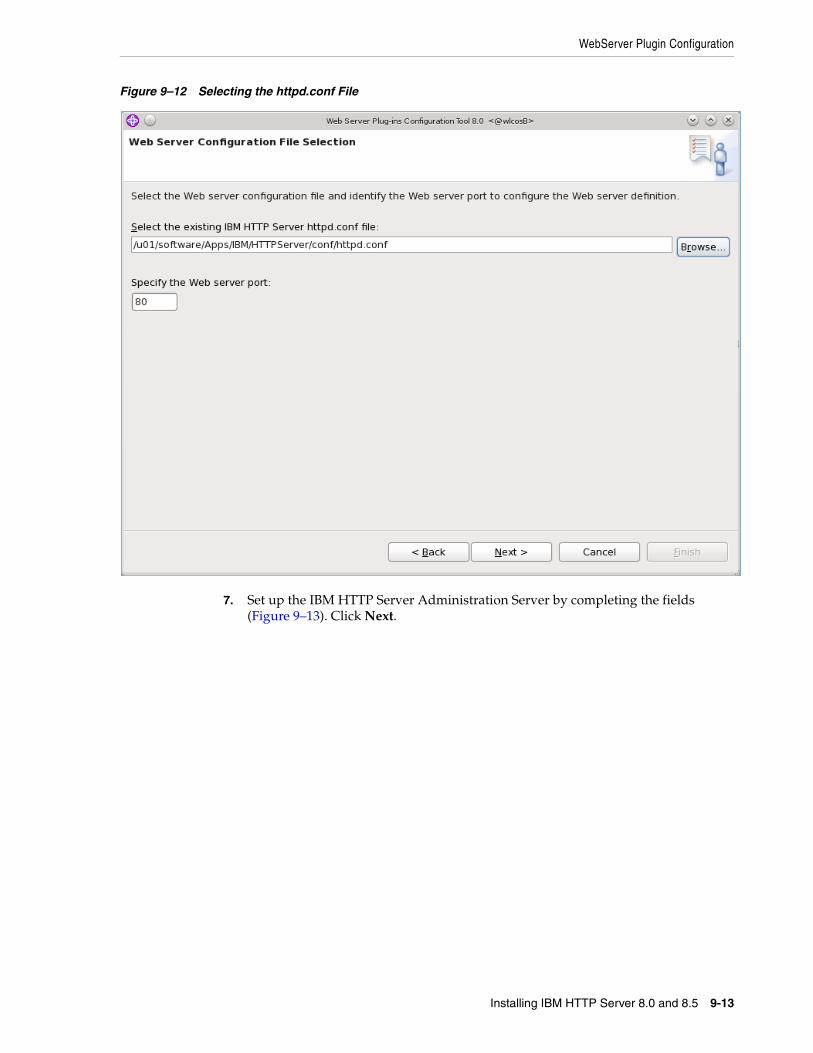
WebServer Plugin Configuration
Installing IBM HTTP Server 8.0 and 8.5 9-13
Figure 9–12 Selecting the httpd.conf File
7. Set up the IBM HTTP Server Administration Server by completing the fields (Figure 9–13). Click Next.
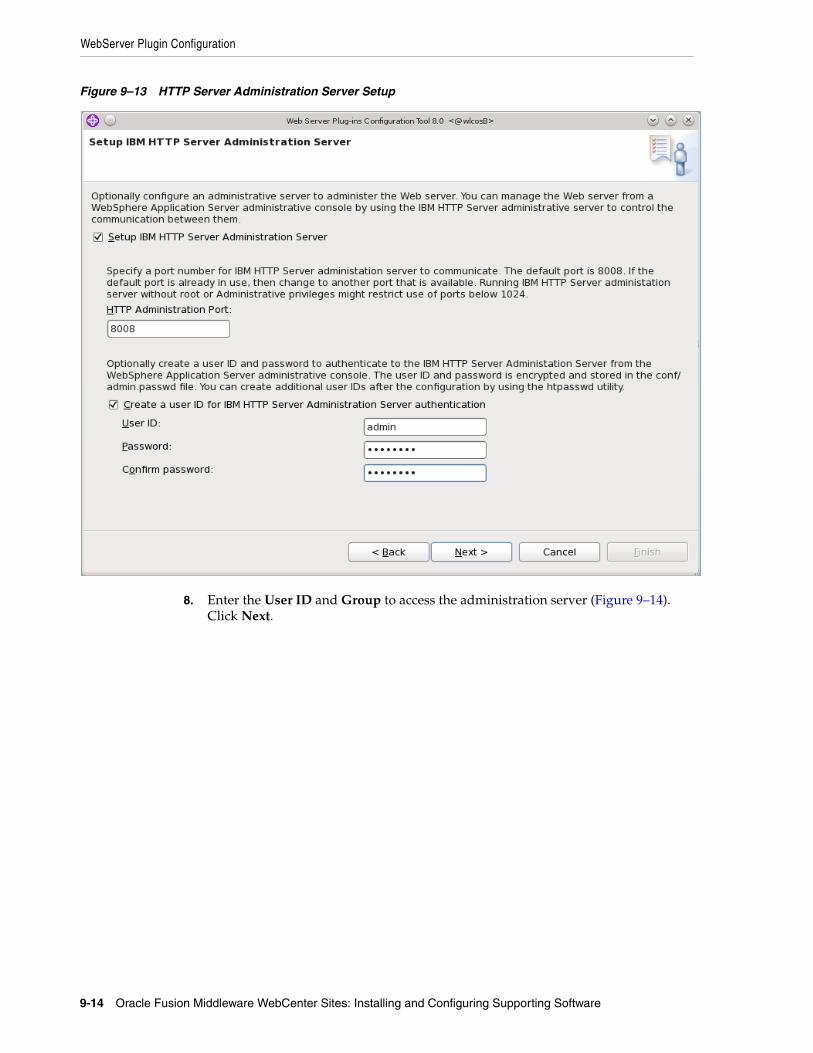
WebServer Plugin Configuration
9-14 Oracle Fusion Middleware WebCenter Sites: Installing and Configuring Supporting Software
Figure 9–13 HTTP Server Administration Server Setup
8. Enter the User ID and Group to access the administration server (Figure 9–14). Click Next.
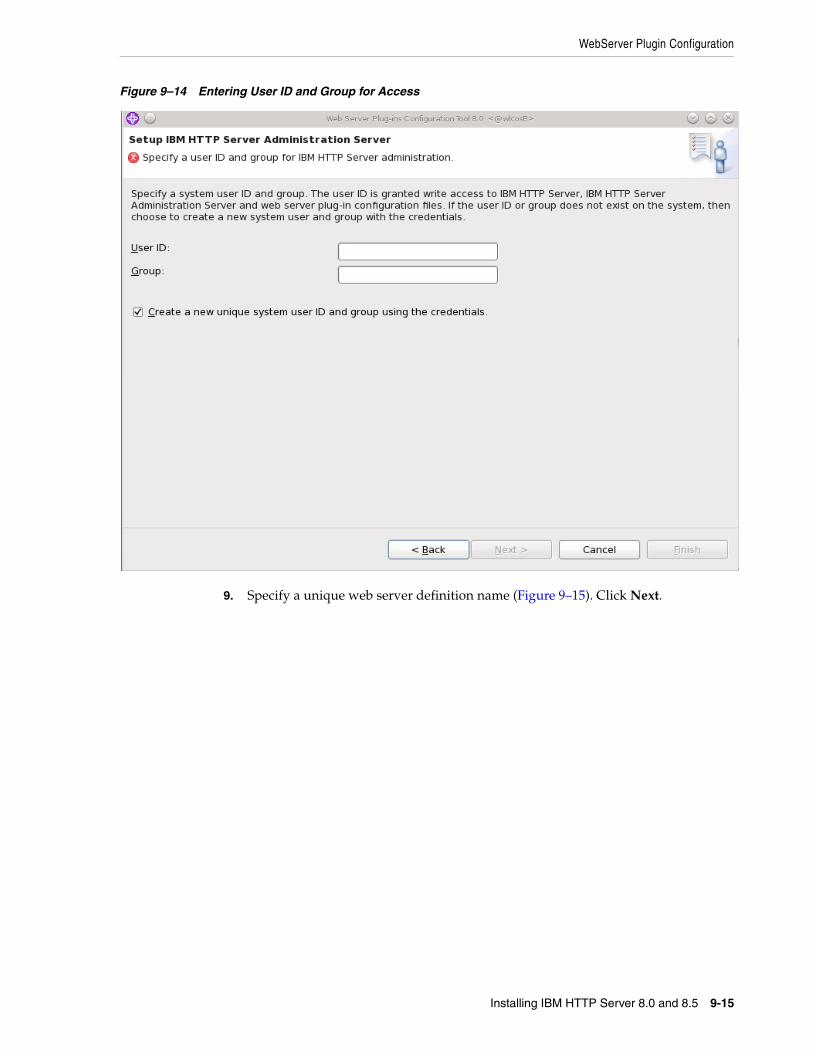
WebServer Plugin Configuration
Installing IBM HTTP Server 8.0 and 8.5 9-15
Figure 9–14 Entering User ID and Group for Access
9. Specify a unique web server definition name (Figure 9–15). Click Next.
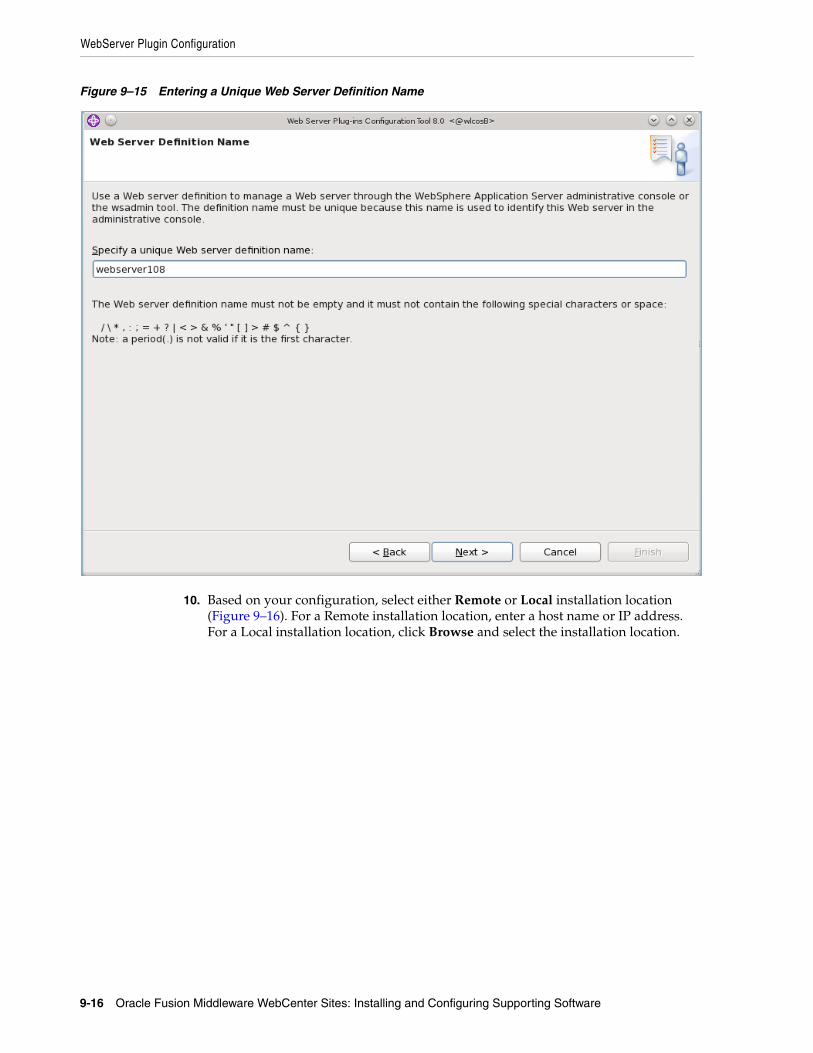
WebServer Plugin Configuration
9-16 Oracle Fusion Middleware WebCenter Sites: Installing and Configuring Supporting Software
Figure 9–15 Entering a Unique Web Server Definition Name
10. Based on your configuration, select either Remote or Local installation location (Figure 9–16). For a Remote installation location, enter a host name or IP address. For a Local installation location, click Browse and select the installation location.
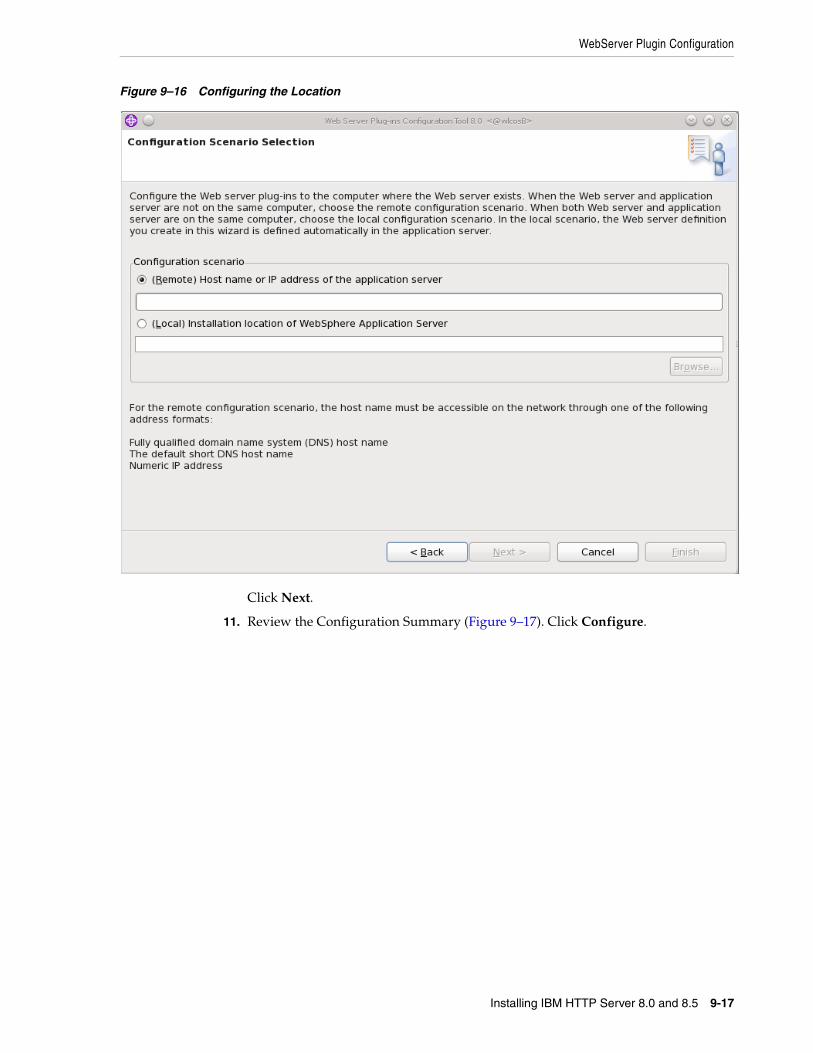
WebServer Plugin Configuration
Installing IBM HTTP Server 8.0 and 8.5 9-17
Figure 9–16 Configuring the Location
Click Next.
11. Review the Configuration Summary (Figure 9–17). Click Configure.
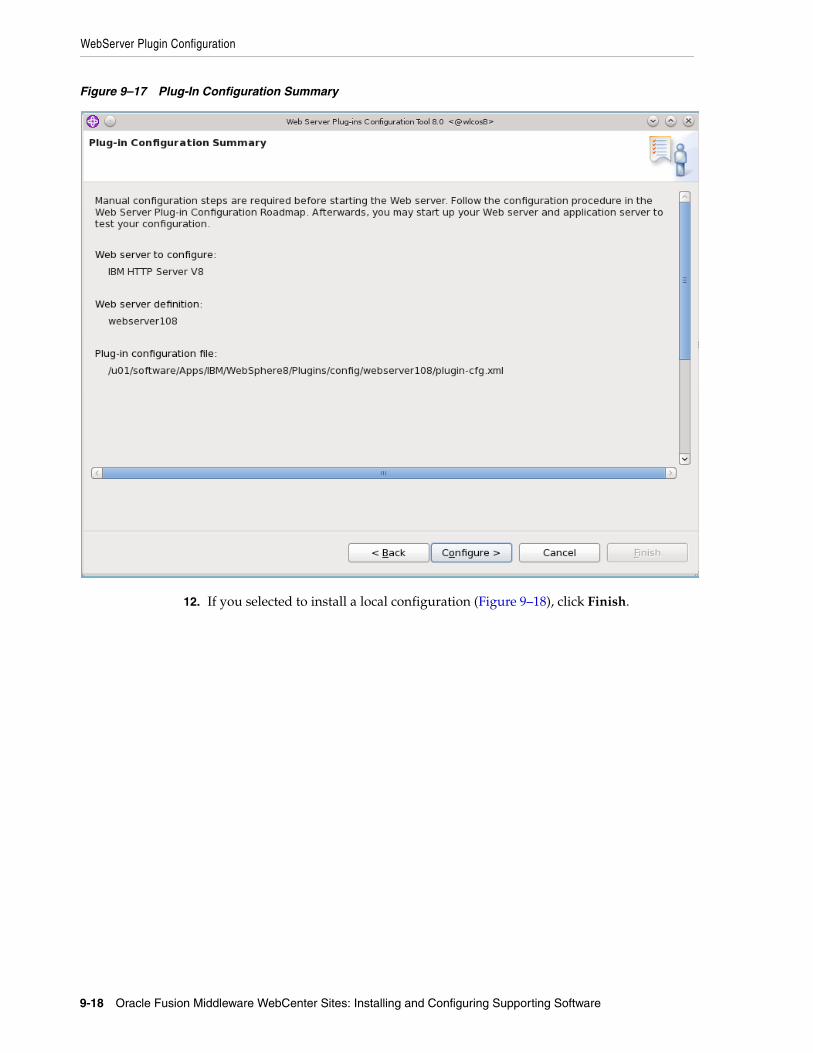
WebServer Plugin Configuration
9-18 Oracle Fusion Middleware WebCenter Sites: Installing and Configuring Supporting Software
Figure 9–17 Plug-In Configuration Summary
12. If you selected to install a local configuration (Figure 9–18), click Finish.
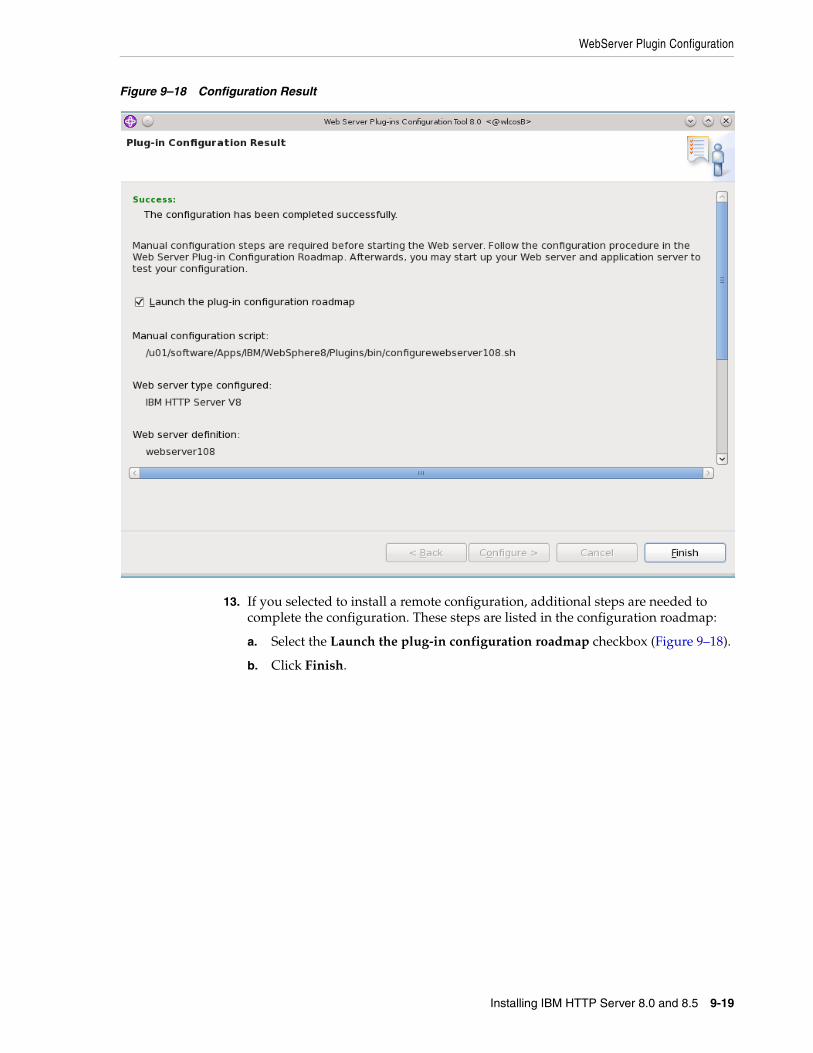
WebServer Plugin Configuration
Installing IBM HTTP Server 8.0 and 8.5 9-19
Figure 9–18 Configuration Result
13. If you selected to install a remote configuration, additional steps are needed to complete the configuration. These steps are listed in the configuration roadmap:
a. Select the Launch the plug-in configuration roadmap checkbox (Figure 9–18).
b. Click Finish.

WebServer Plugin Configuration
9-20 Oracle Fusion Middleware WebCenter Sites: Installing and Configuring Supporting Software

10
Installing IBM HTTP Server 7.0 10-1
10Installing IBM HTTP Server 7.0
This chapter contains the following sections:
■ Section 10.1, "IBM HTTP Server 7.0 Installation Steps"
■ Section 10.2, "Installing IHS 7.0 with WebSphere Application Server on the Local Server"
10.1 IBM HTTP Server 7.0 Installation Steps1. Download the correct file, WebSphere Plugins, for your IBM operating system.
2. Extract the file to a temporary directory.
– On UNIX: tar -xvf <file name>
For example:
gzip -d C87XTML_Plugins.tar.gz
tar -xvf C87XTML_Plugins.tar
– On Windows: unzip <file name>
For example:
unzip C87XTML_Plugins.zip
3. Change the directory to IHS/.
For example:
cd IHS/
4. Run the installer:
– For UNIX: ./install
– For Windows: install.exe
5. The "GUI" installer appears (Figure 10–1). Click Next.
Note: Keep in mind the following:
■ This chapter is for WebSphere 7.0. If you are installing on WebSphere 8.0 or 8.5, see Chapter 9, "Installing IBM HTTP Server 8.0 and 8.5."
■ In this chapter, IBM HTTP Server is referred to as "IHS." WebSphere Application Server is referred to as "WAS."
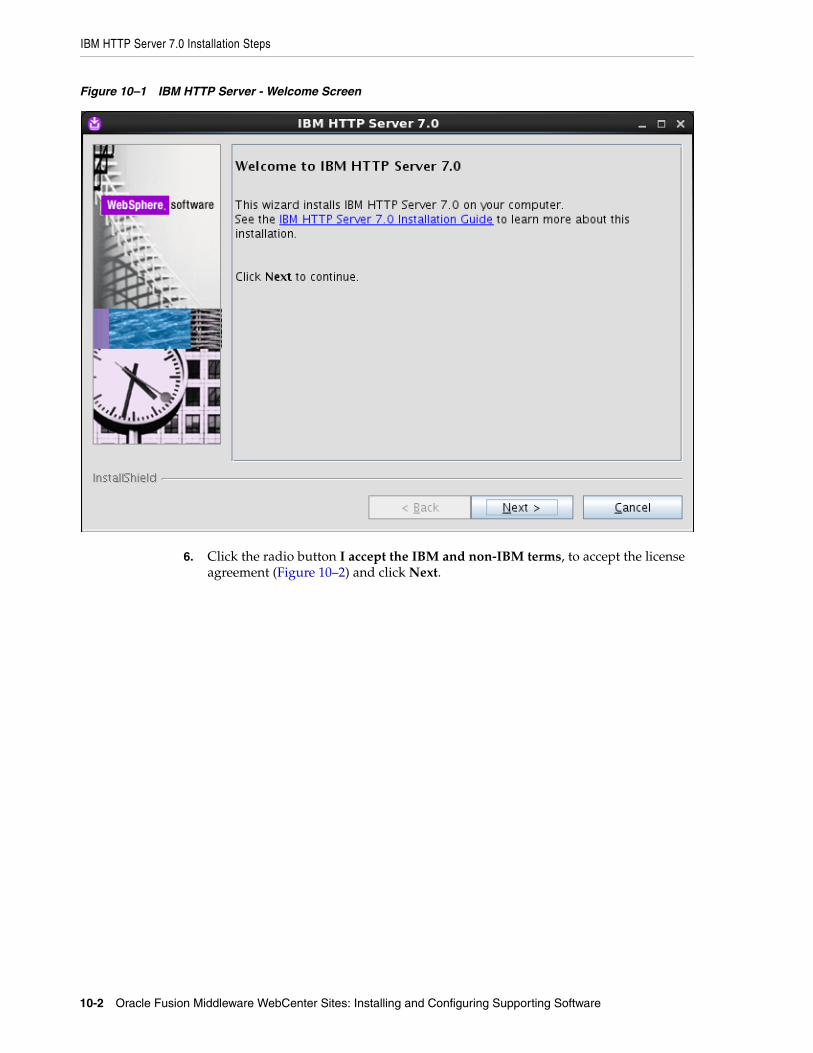
IBM HTTP Server 7.0 Installation Steps
10-2 Oracle Fusion Middleware WebCenter Sites: Installing and Configuring Supporting Software
Figure 10–1 IBM HTTP Server - Welcome Screen
6. Click the radio button I accept the IBM and non-IBM terms, to accept the license agreement (Figure 10–2) and click Next.
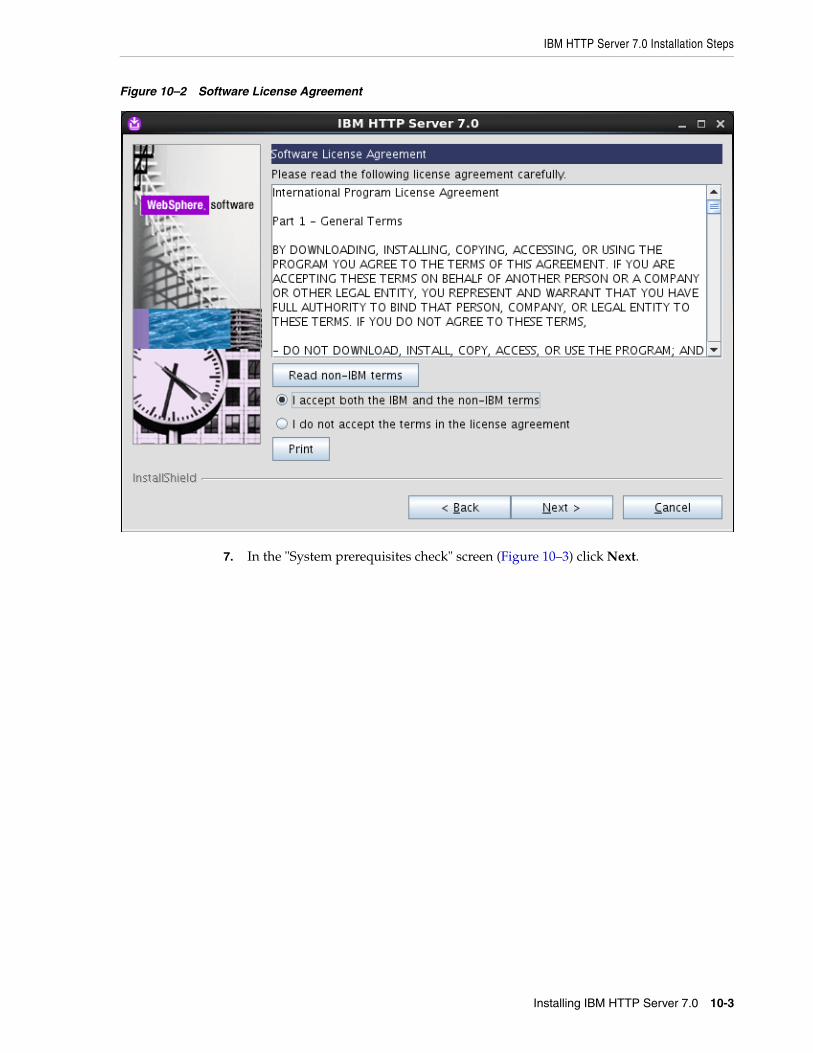
IBM HTTP Server 7.0 Installation Steps
Installing IBM HTTP Server 7.0 10-3
Figure 10–2 Software License Agreement
7. In the "System prerequisites check" screen (Figure 10–3) click Next.
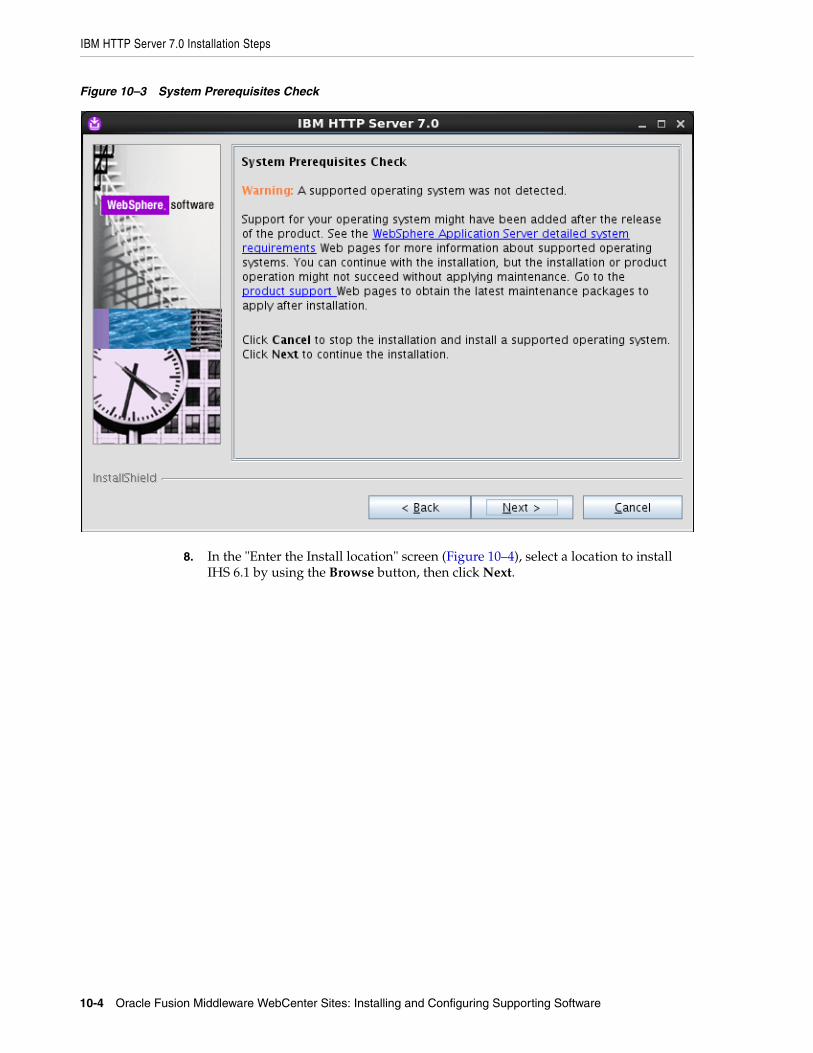
IBM HTTP Server 7.0 Installation Steps
10-4 Oracle Fusion Middleware WebCenter Sites: Installing and Configuring Supporting Software
Figure 10–3 System Prerequisites Check
8. In the "Enter the Install location" screen (Figure 10–4), select a location to install IHS 6.1 by using the Browse button, then click Next.
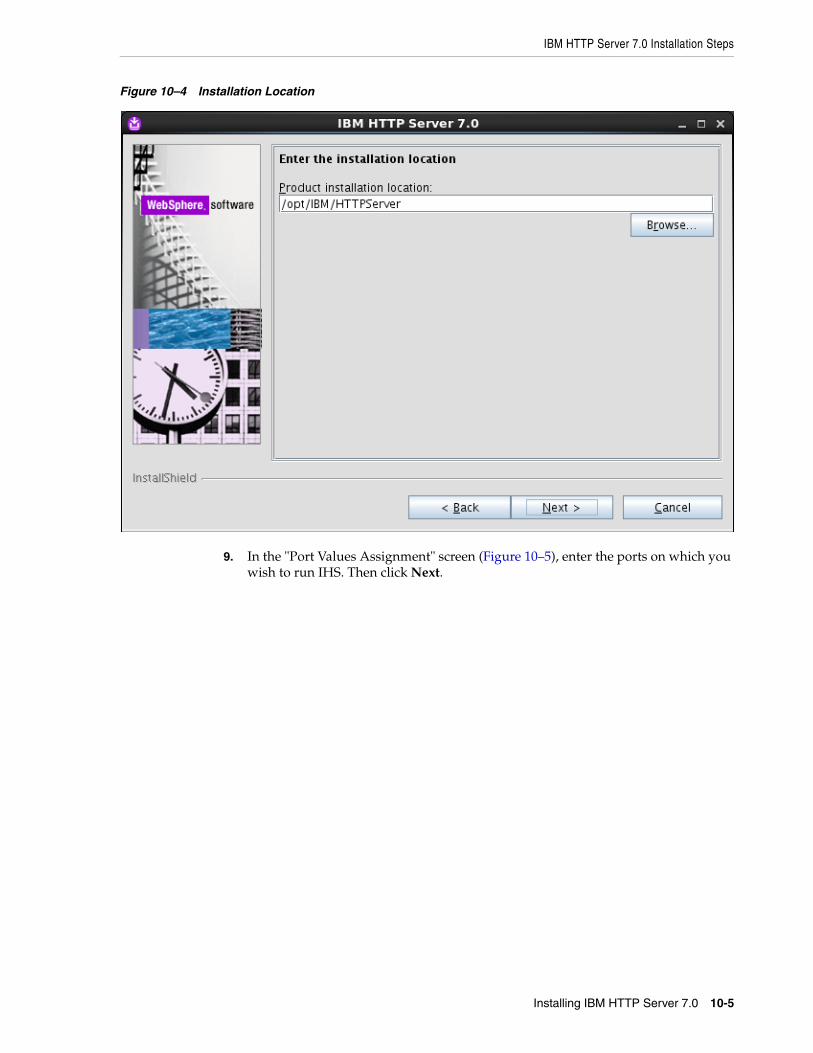
IBM HTTP Server 7.0 Installation Steps
Installing IBM HTTP Server 7.0 10-5
Figure 10–4 Installation Location
9. In the "Port Values Assignment" screen (Figure 10–5), enter the ports on which you wish to run IHS. Then click Next.
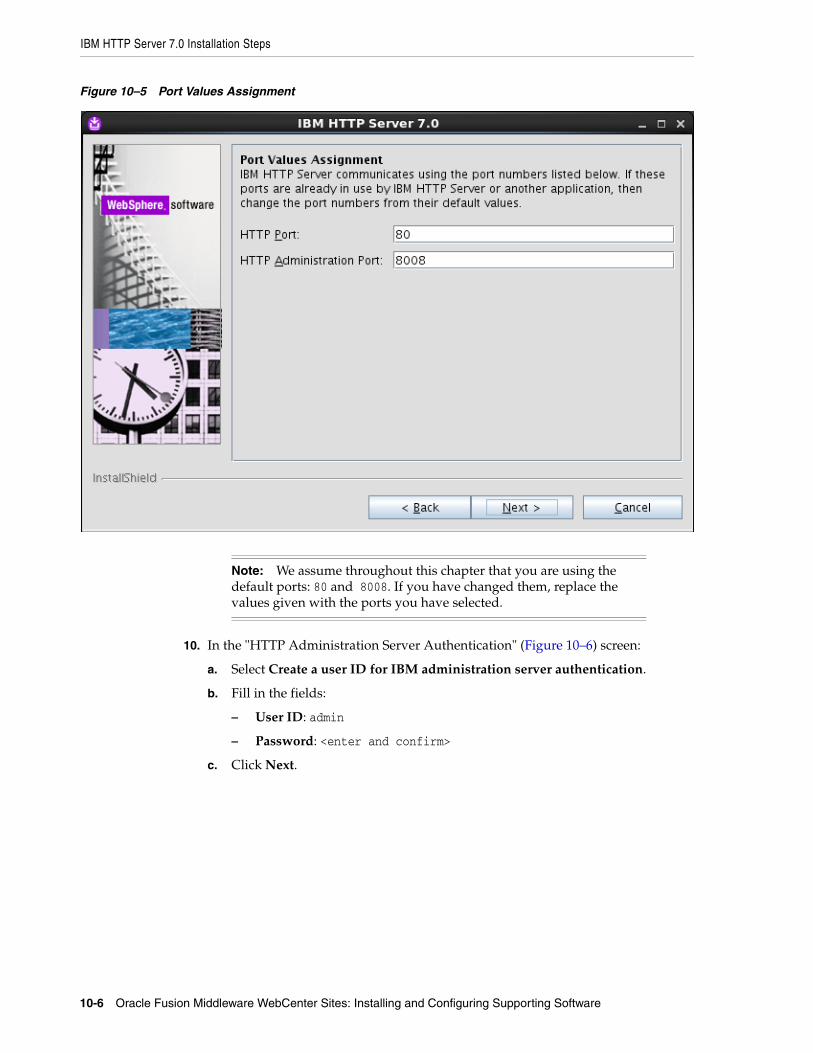
IBM HTTP Server 7.0 Installation Steps
10-6 Oracle Fusion Middleware WebCenter Sites: Installing and Configuring Supporting Software
Figure 10–5 Port Values Assignment
10. In the "HTTP Administration Server Authentication" (Figure 10–6) screen:
a. Select Create a user ID for IBM administration server authentication.
b. Fill in the fields:
– User ID: admin
– Password: <enter and confirm>
c. Click Next.
Note: We assume throughout this chapter that you are using the default ports: 80 and 8008. If you have changed them, replace the values given with the ports you have selected.
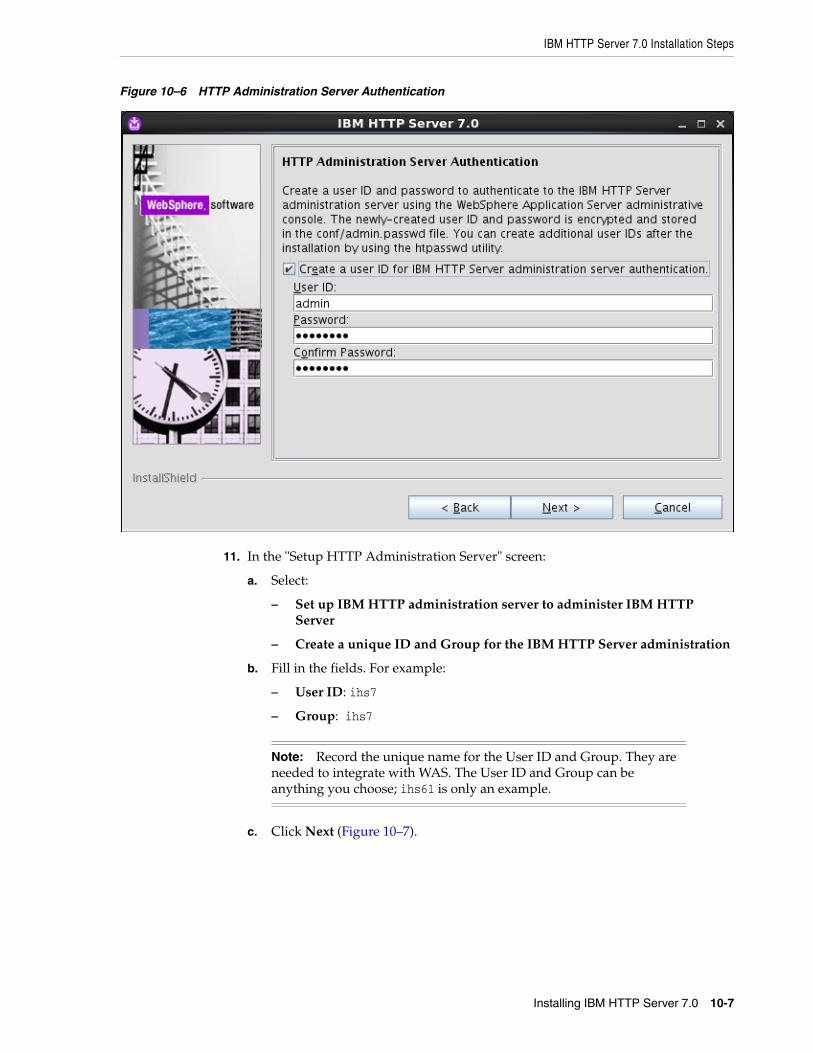
IBM HTTP Server 7.0 Installation Steps
Installing IBM HTTP Server 7.0 10-7
Figure 10–6 HTTP Administration Server Authentication
11. In the "Setup HTTP Administration Server" screen:
a. Select:
– Set up IBM HTTP administration server to administer IBM HTTP Server
– Create a unique ID and Group for the IBM HTTP Server administration
b. Fill in the fields. For example:
– User ID: ihs7
– Group: ihs7
c. Click Next (Figure 10–7).
Note: Record the unique name for the User ID and Group. They are needed to integrate with WAS. The User ID and Group can be anything you choose; ihs61 is only an example.

IBM HTTP Server 7.0 Installation Steps
10-8 Oracle Fusion Middleware WebCenter Sites: Installing and Configuring Supporting Software
Figure 10–7 Setup of IBM HTTP Server Administration Server
12. In the "IBM HTTP Server Plugin for IBM WebSphere Application Server" screen:
a. Select Install the IBM HTTP Server Plug-in for IBM WebSphere Application Server.
b. Fill in the fields:
– Web server definition: webserver1
– Host name: Enter the hostname on which the application server is found.
c. Click Next (Figure 10–8).
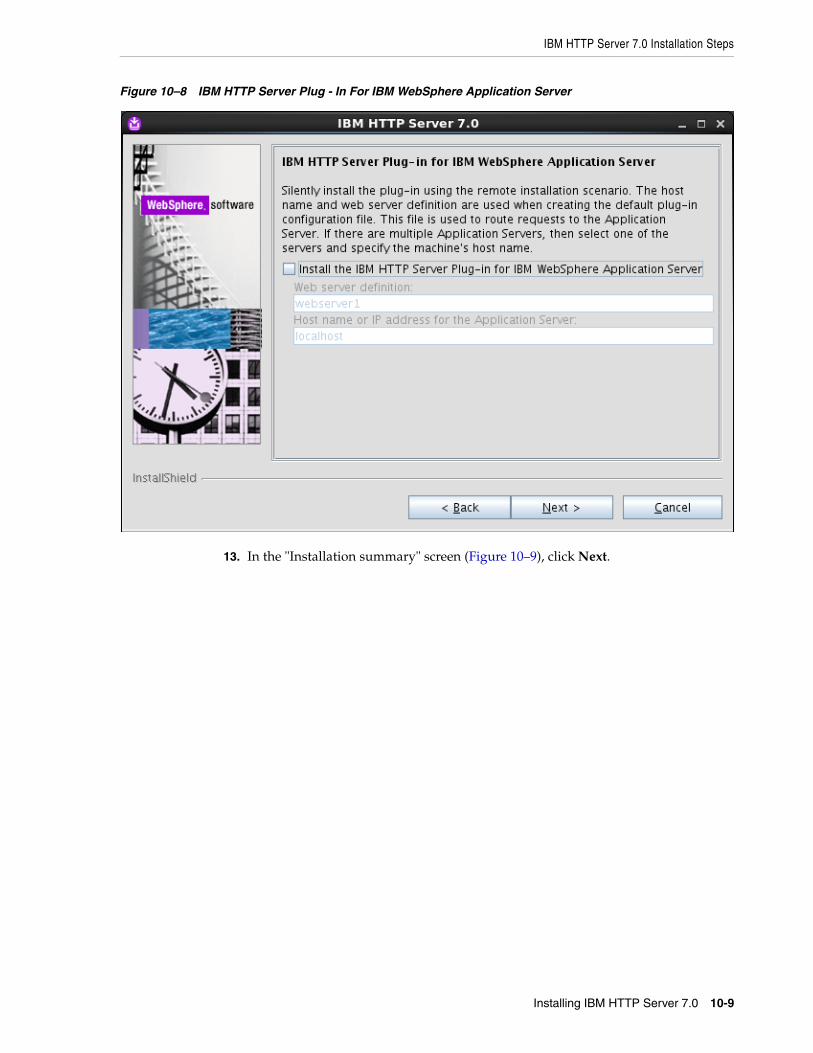
IBM HTTP Server 7.0 Installation Steps
Installing IBM HTTP Server 7.0 10-9
Figure 10–8 IBM HTTP Server Plug - In For IBM WebSphere Application Server
13. In the "Installation summary" screen (Figure 10–9), click Next.
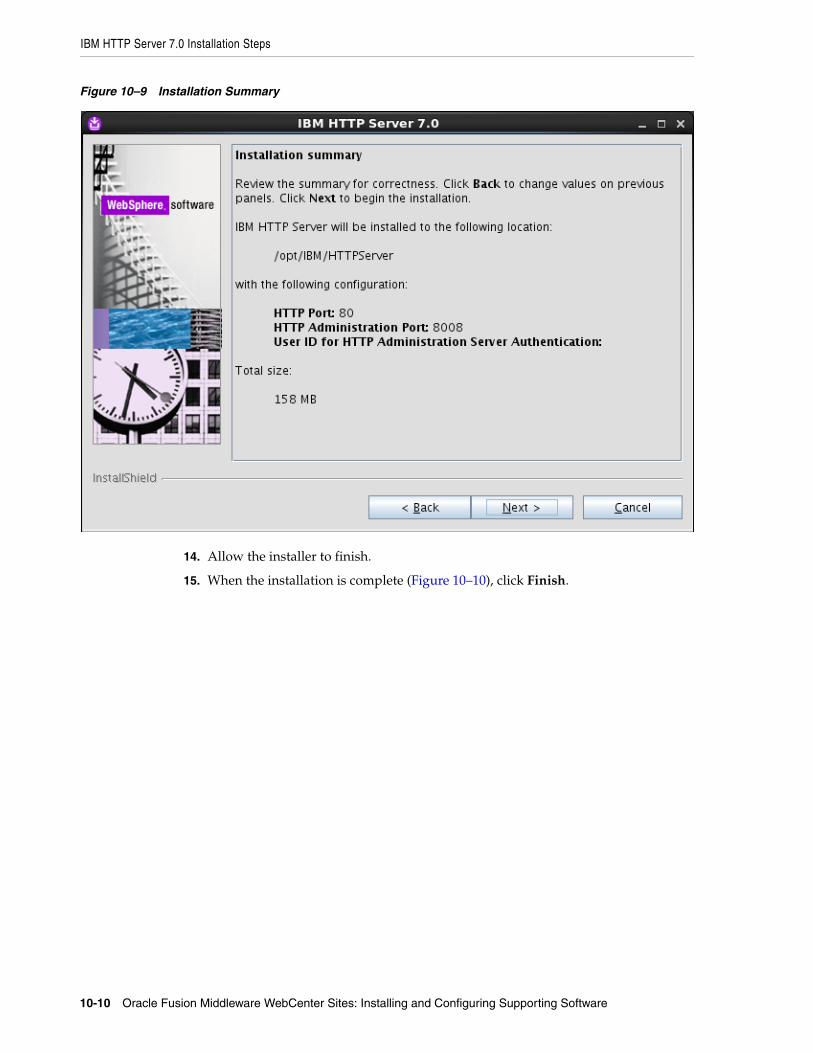
IBM HTTP Server 7.0 Installation Steps
10-10 Oracle Fusion Middleware WebCenter Sites: Installing and Configuring Supporting Software
Figure 10–9 Installation Summary
14. Allow the installer to finish.
15. When the installation is complete (Figure 10–10), click Finish.
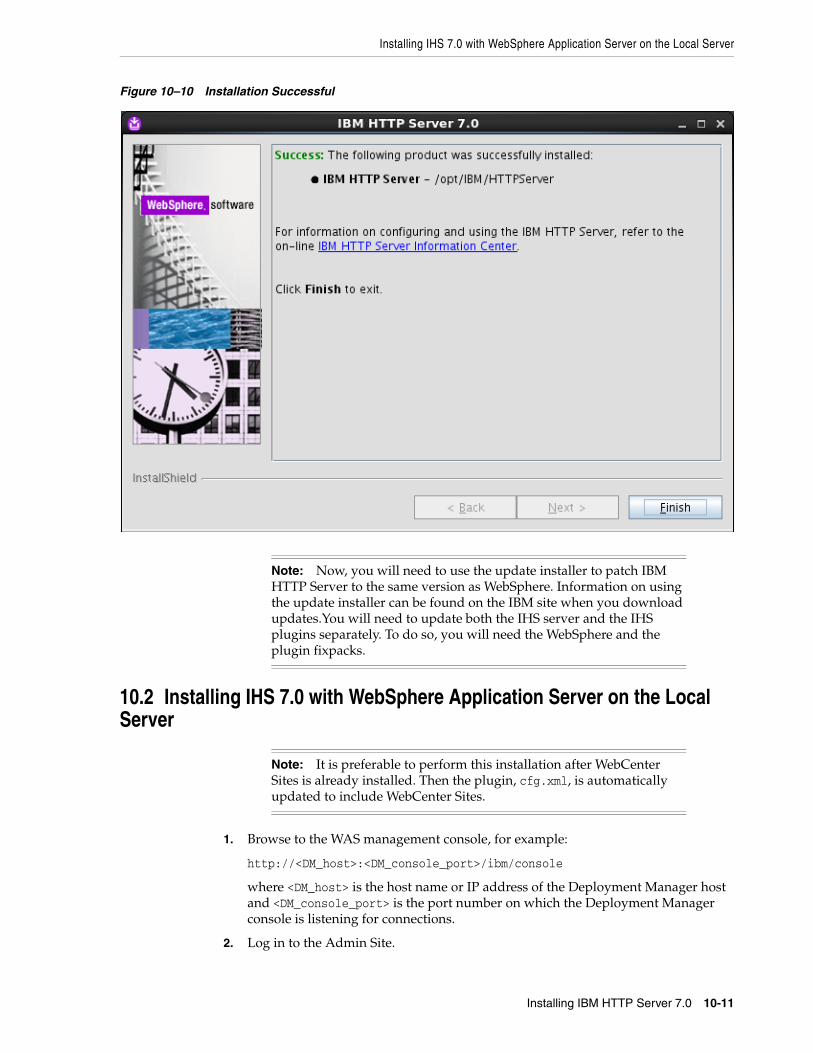
Installing IHS 7.0 with WebSphere Application Server on the Local Server
Installing IBM HTTP Server 7.0 10-11
Figure 10–10 Installation Successful
10.2 Installing IHS 7.0 with WebSphere Application Server on the Local Server
1. Browse to the WAS management console, for example:
http://<DM_host>:<DM_console_port>/ibm/console
where <DM_host> is the host name or IP address of the Deployment Manager host and <DM_console_port> is the port number on which the Deployment Manager console is listening for connections.
2. Log in to the Admin Site.
Note: Now, you will need to use the update installer to patch IBM HTTP Server to the same version as WebSphere. Information on using the update installer can be found on the IBM site when you download updates.You will need to update both the IHS server and the IHS plugins separately. To do so, you will need the WebSphere and the plugin fixpacks.
Note: It is preferable to perform this installation after WebCenter Sites is already installed. Then the plugin, cfg.xml, is automatically updated to include WebCenter Sites.
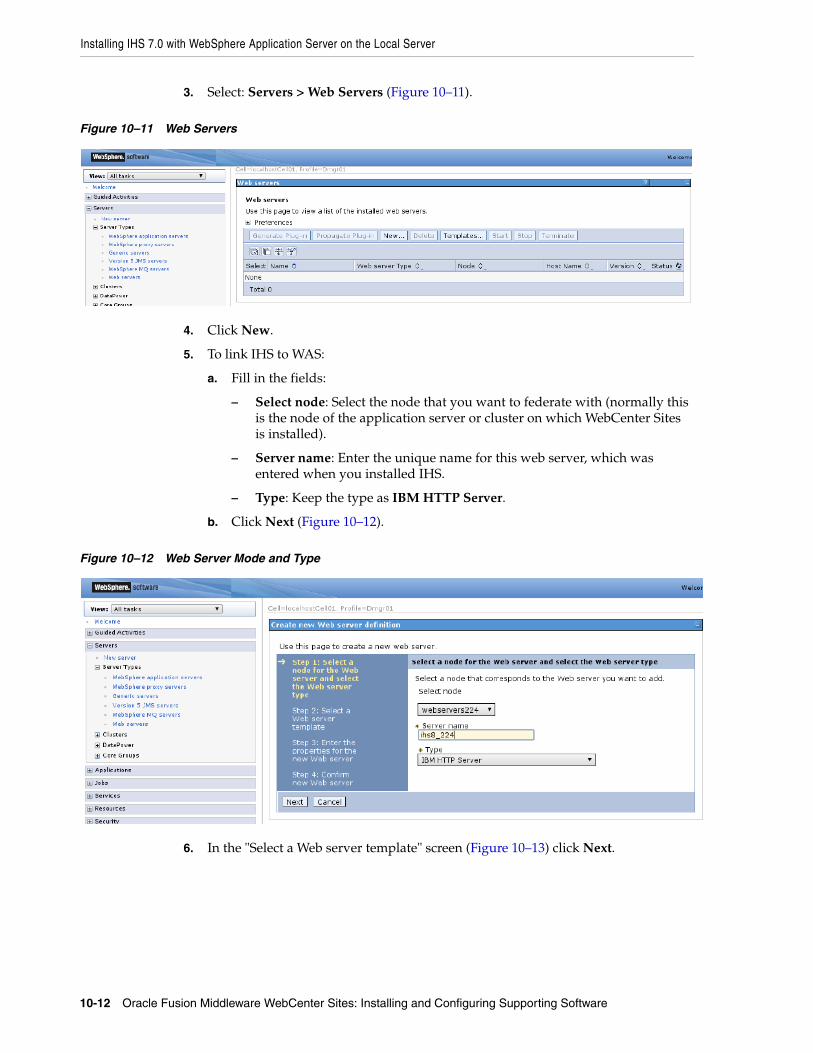
Installing IHS 7.0 with WebSphere Application Server on the Local Server
10-12 Oracle Fusion Middleware WebCenter Sites: Installing and Configuring Supporting Software
3. Select: Servers > Web Servers (Figure 10–11).
Figure 10–11 Web Servers
4. Click New.
5. To link IHS to WAS:
a. Fill in the fields:
– Select node: Select the node that you want to federate with (normally this is the node of the application server or cluster on which WebCenter Sites is installed).
– Server name: Enter the unique name for this web server, which was entered when you installed IHS.
– Type: Keep the type as IBM HTTP Server.
b. Click Next (Figure 10–12).
Figure 10–12 Web Server Mode and Type
6. In the "Select a Web server template" screen (Figure 10–13) click Next.
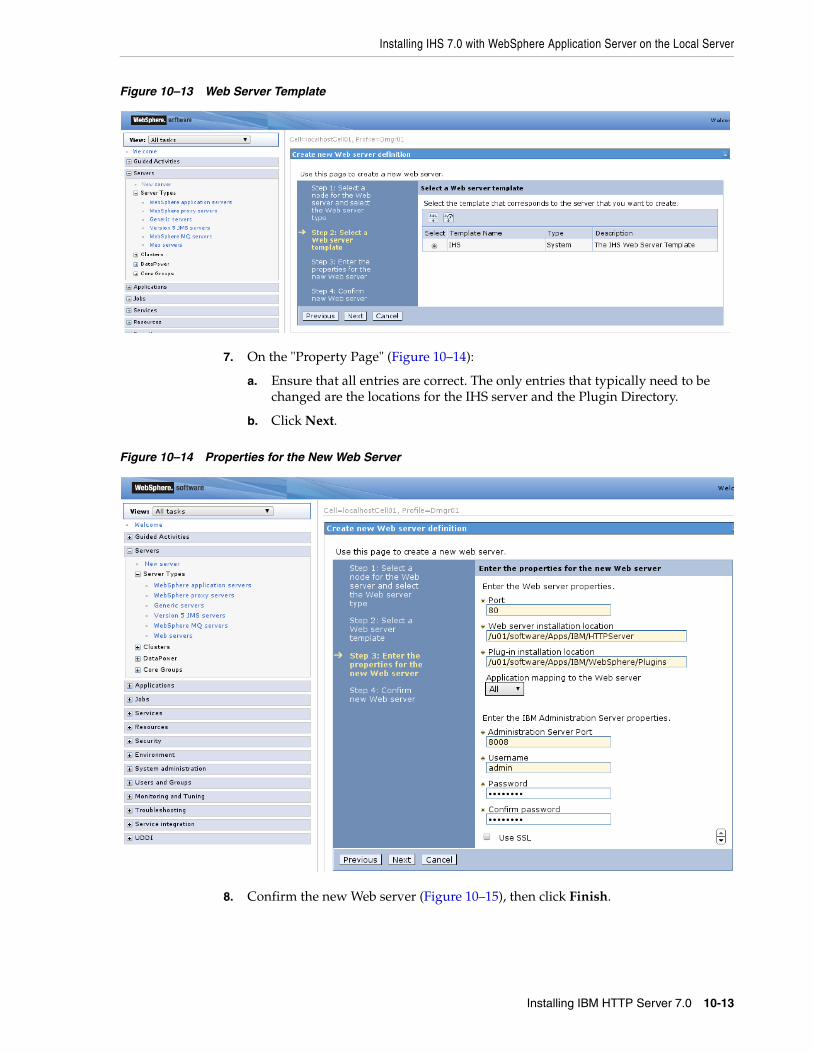
Installing IHS 7.0 with WebSphere Application Server on the Local Server
Installing IBM HTTP Server 7.0 10-13
Figure 10–13 Web Server Template
7. On the "Property Page" (Figure 10–14):
a. Ensure that all entries are correct. The only entries that typically need to be changed are the locations for the IHS server and the Plugin Directory.
b. Click Next.
Figure 10–14 Properties for the New Web Server
8. Confirm the new Web server (Figure 10–15), then click Finish.

Installing IHS 7.0 with WebSphere Application Server on the Local Server
10-14 Oracle Fusion Middleware WebCenter Sites: Installing and Configuring Supporting Software
Figure 10–15 New Web Server Confirmation
9. Save the changes as requested (Figure 10–16).
Figure 10–16 Save the Changes to the Web Server
10. You can now start and stop the web server from the WAS console, using the Web servers selection.
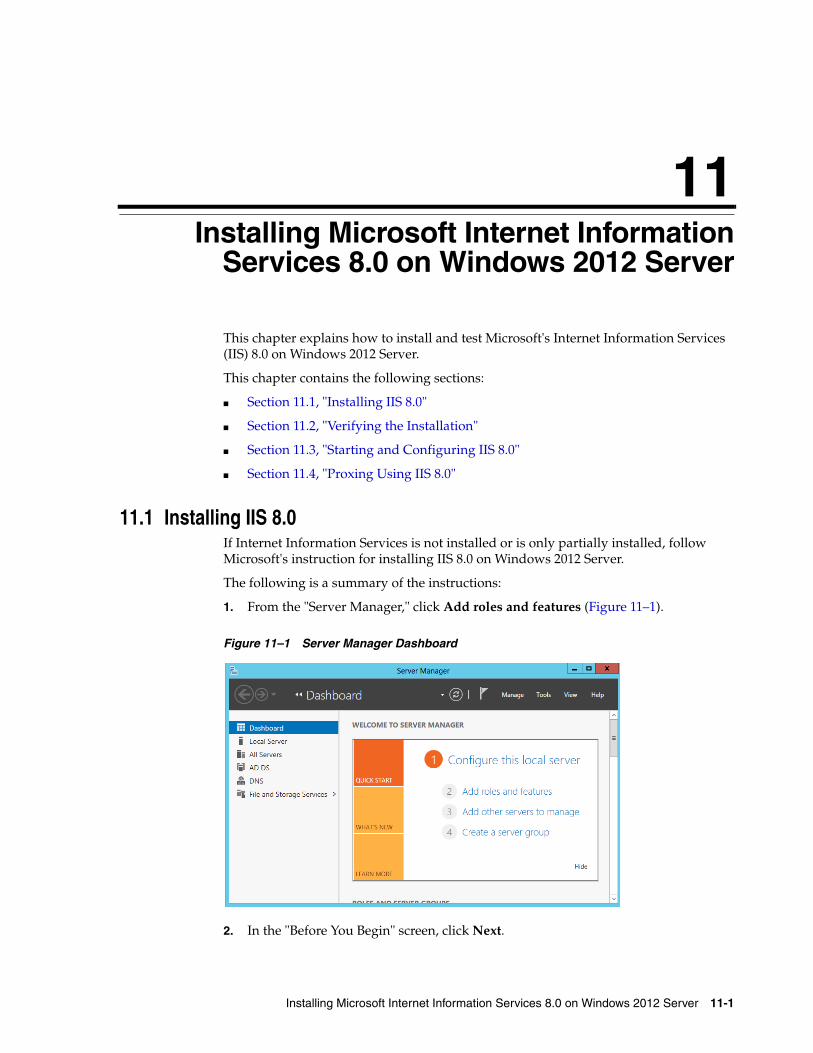
11
Installing Microsoft Internet Information Services 8.0 on Windows 2012 Server 11-1
11Installing Microsoft Internet InformationServices 8.0 on Windows 2012 Server
This chapter explains how to install and test Microsoft's Internet Information Services (IIS) 8.0 on Windows 2012 Server.
This chapter contains the following sections:
■ Section 11.1, "Installing IIS 8.0"
■ Section 11.2, "Verifying the Installation"
■ Section 11.3, "Starting and Configuring IIS 8.0"
■ Section 11.4, "Proxing Using IIS 8.0"
11.1 Installing IIS 8.0If Internet Information Services is not installed or is only partially installed, follow Microsoft's instruction for installing IIS 8.0 on Windows 2012 Server.
The following is a summary of the instructions:
1. From the "Server Manager," click Add roles and features (Figure 11–1).
Figure 11–1 Server Manager Dashboard
2. In the "Before You Begin" screen, click Next.
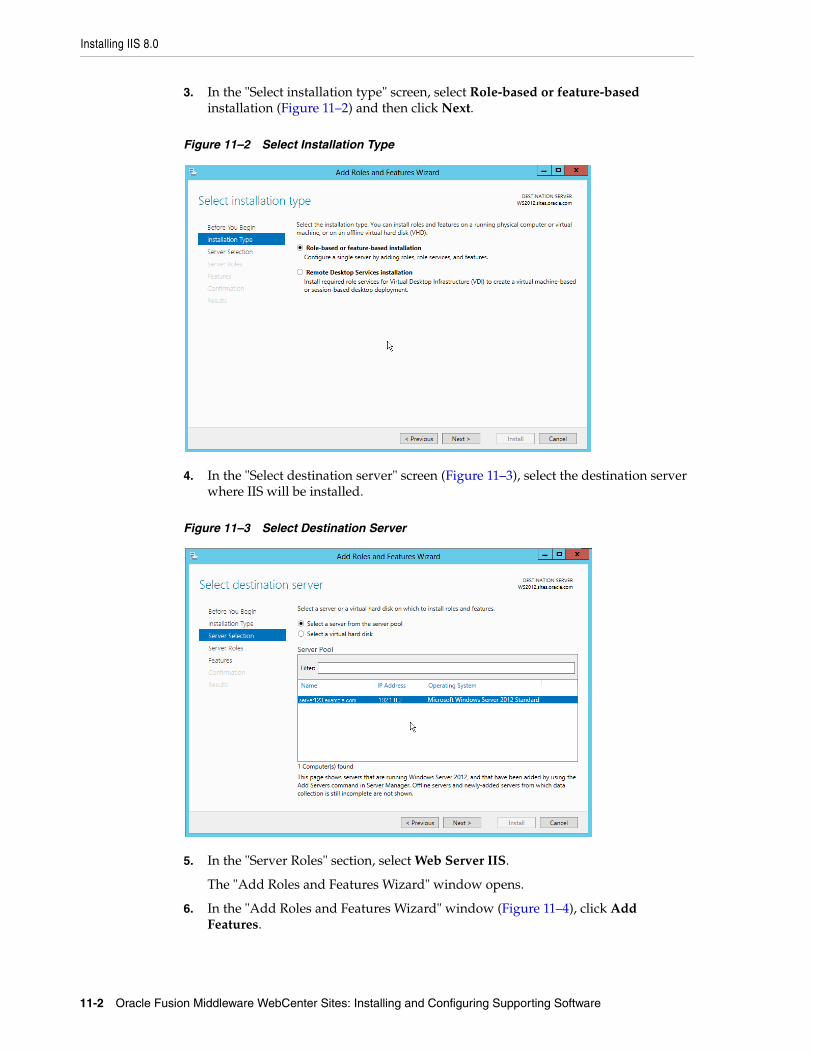
Installing IIS 8.0
11-2 Oracle Fusion Middleware WebCenter Sites: Installing and Configuring Supporting Software
3. In the "Select installation type" screen, select Role-based or feature-based installation (Figure 11–2) and then click Next.
Figure 11–2 Select Installation Type
4. In the "Select destination server" screen (Figure 11–3), select the destination server where IIS will be installed.
Figure 11–3 Select Destination Server
5. In the "Server Roles" section, select Web Server IIS.
The "Add Roles and Features Wizard" window opens.
6. In the "Add Roles and Features Wizard" window (Figure 11–4), click Add Features.
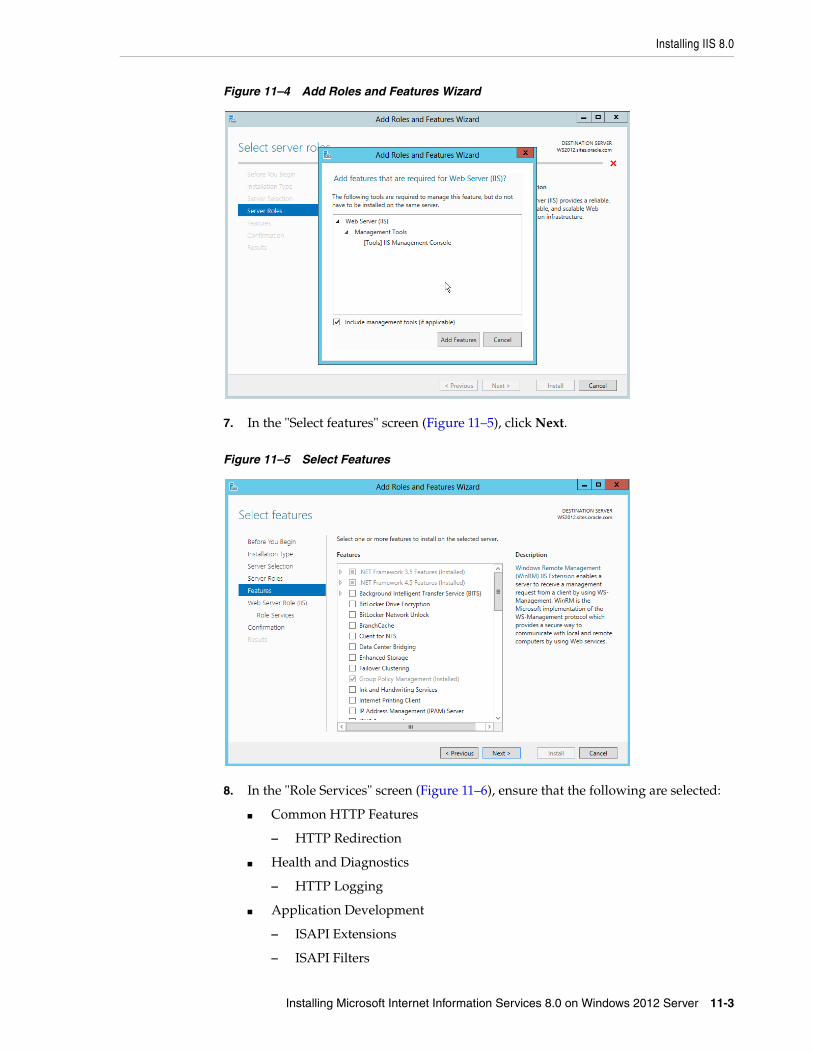
Installing IIS 8.0
Installing Microsoft Internet Information Services 8.0 on Windows 2012 Server 11-3
Figure 11–4 Add Roles and Features Wizard
7. In the "Select features" screen (Figure 11–5), click Next.
Figure 11–5 Select Features
8. In the "Role Services" screen (Figure 11–6), ensure that the following are selected:
■ Common HTTP Features
– HTTP Redirection
■ Health and Diagnostics
– HTTP Logging
■ Application Development
– ISAPI Extensions
– ISAPI Filters
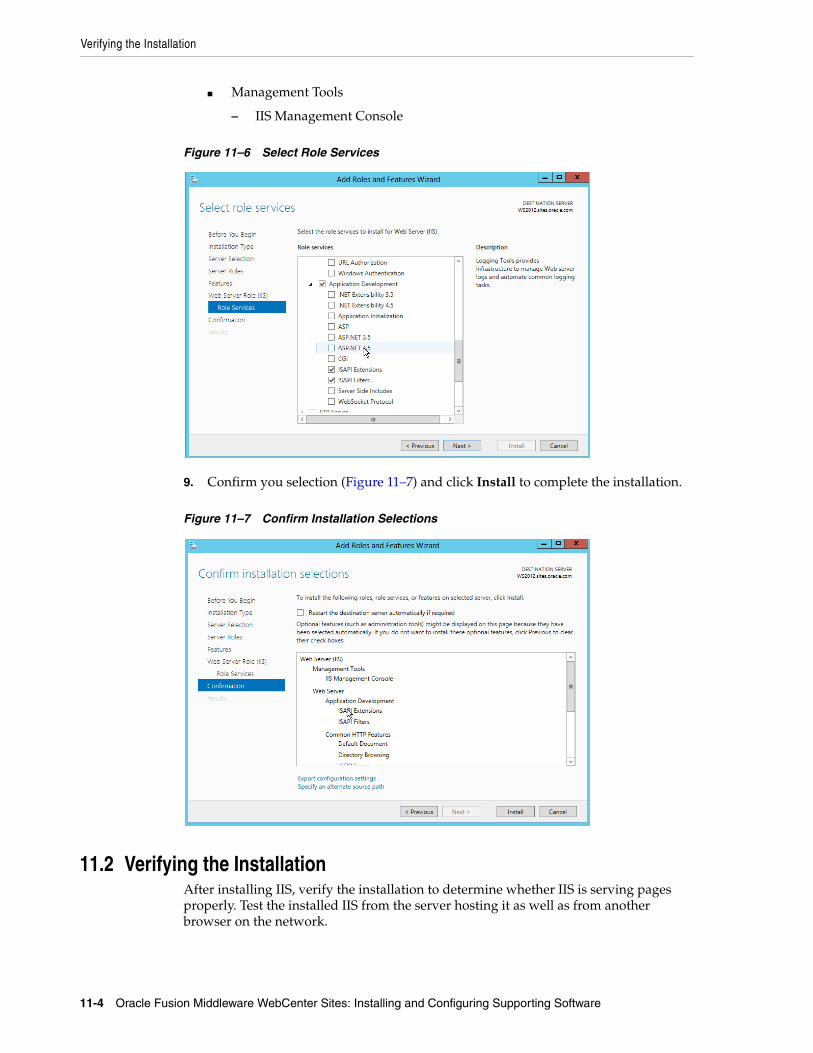
Verifying the Installation
11-4 Oracle Fusion Middleware WebCenter Sites: Installing and Configuring Supporting Software
■ Management Tools
– IIS Management Console
Figure 11–6 Select Role Services
9. Confirm you selection (Figure 11–7) and click Install to complete the installation.
Figure 11–7 Confirm Installation Selections
11.2 Verifying the InstallationAfter installing IIS, verify the installation to determine whether IIS is serving pages properly. Test the installed IIS from the server hosting it as well as from another browser on the network.
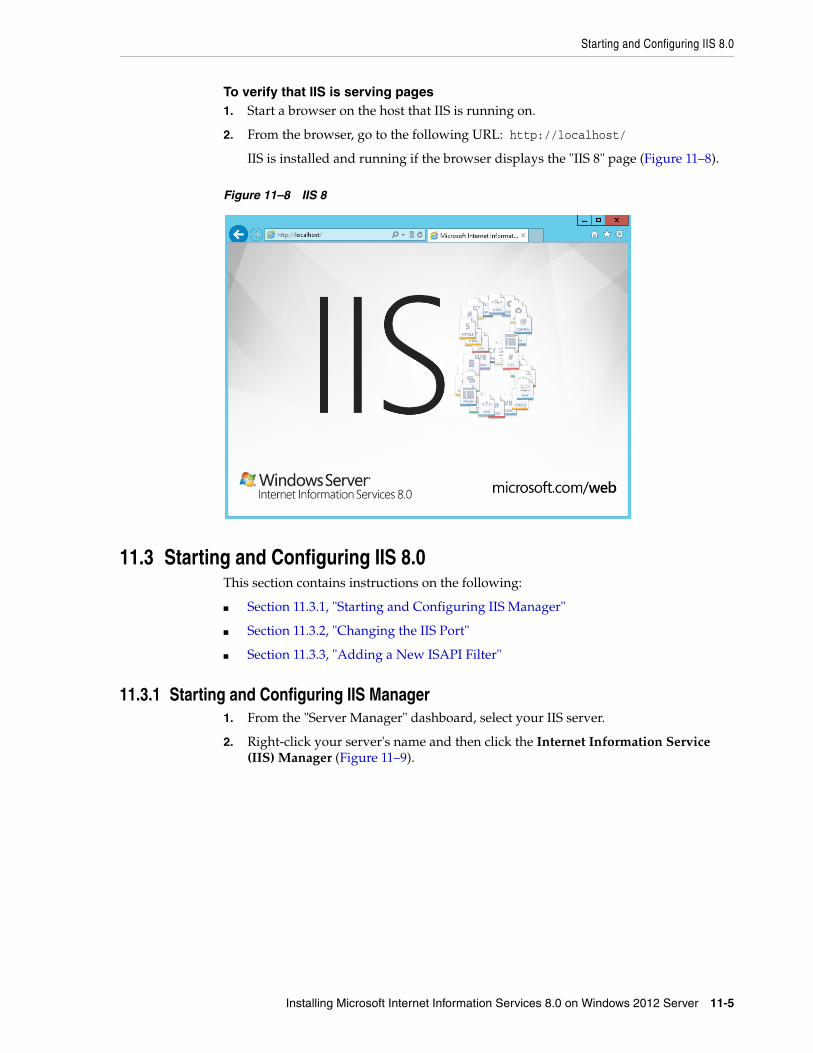
Starting and Configuring IIS 8.0
Installing Microsoft Internet Information Services 8.0 on Windows 2012 Server 11-5
To verify that IIS is serving pages1. Start a browser on the host that IIS is running on.
2. From the browser, go to the following URL: http://localhost/
IIS is installed and running if the browser displays the "IIS 8" page (Figure 11–8).
Figure 11–8 IIS 8
11.3 Starting and Configuring IIS 8.0This section contains instructions on the following:
■ Section 11.3.1, "Starting and Configuring IIS Manager"
■ Section 11.3.2, "Changing the IIS Port"
■ Section 11.3.3, "Adding a New ISAPI Filter"
11.3.1 Starting and Configuring IIS Manager1. From the "Server Manager" dashboard, select your IIS server.
2. Right-click your server's name and then click the Internet Information Service (IIS) Manager (Figure 11–9).
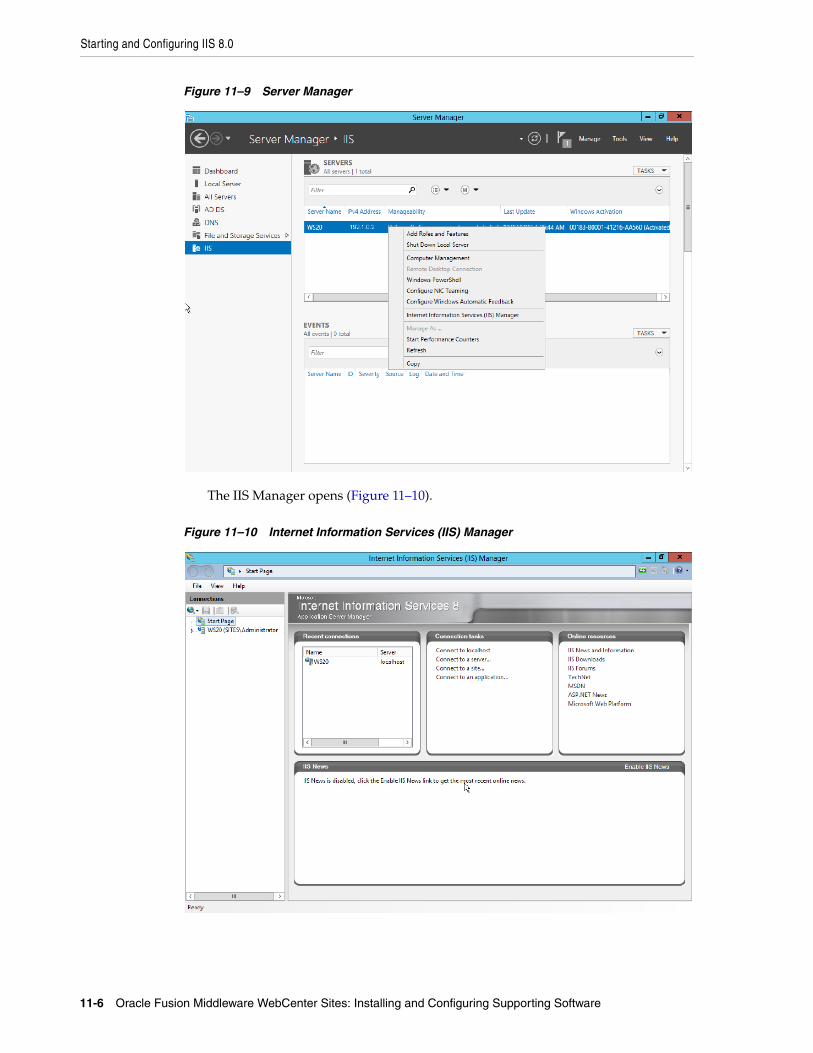
Starting and Configuring IIS 8.0
11-6 Oracle Fusion Middleware WebCenter Sites: Installing and Configuring Supporting Software
Figure 11–9 Server Manager
The IIS Manager opens (Figure 11–10).
Figure 11–10 Internet Information Services (IIS) Manager
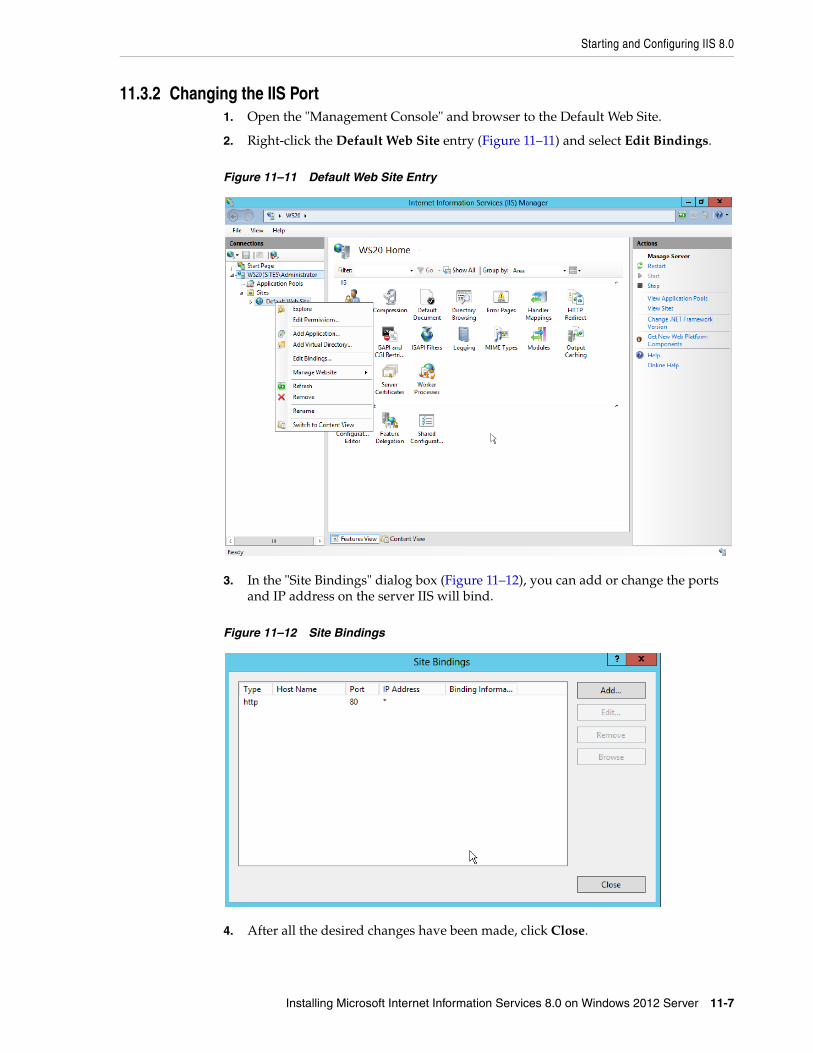
Starting and Configuring IIS 8.0
Installing Microsoft Internet Information Services 8.0 on Windows 2012 Server 11-7
11.3.2 Changing the IIS Port1. Open the "Management Console" and browser to the Default Web Site.
2. Right-click the Default Web Site entry (Figure 11–11) and select Edit Bindings.
Figure 11–11 Default Web Site Entry
3. In the "Site Bindings" dialog box (Figure 11–12), you can add or change the ports and IP address on the server IIS will bind.
Figure 11–12 Site Bindings
4. After all the desired changes have been made, click Close.
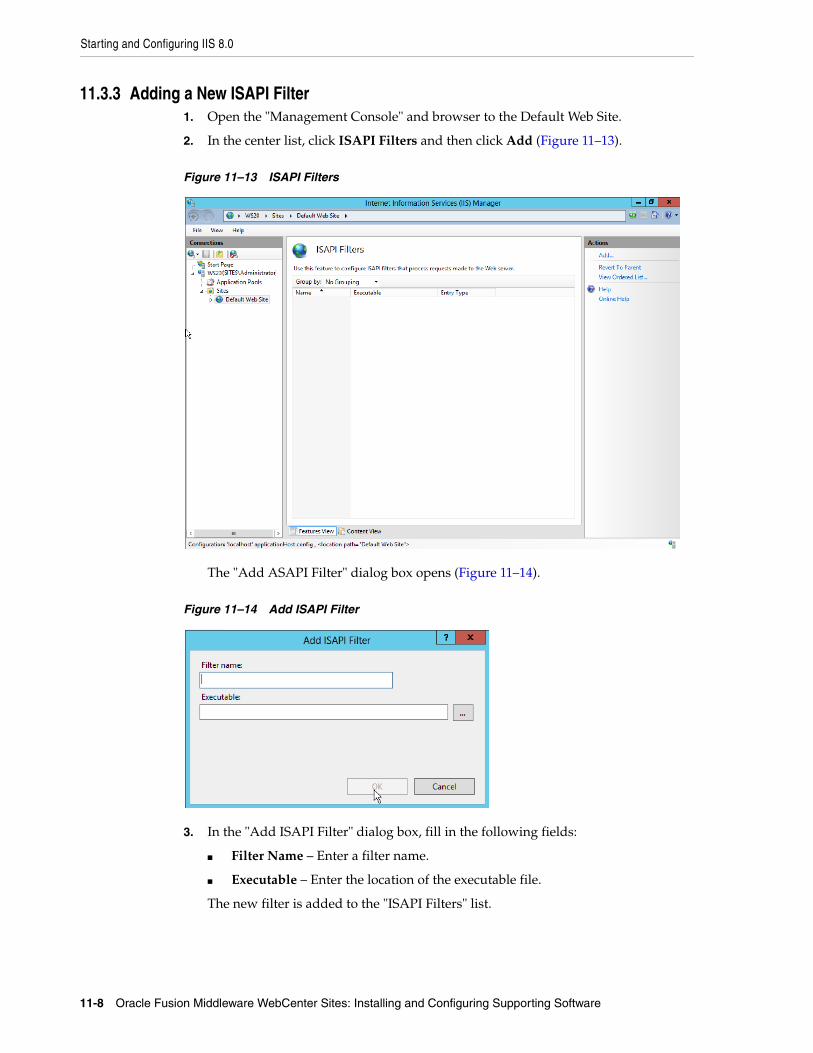
Starting and Configuring IIS 8.0
11-8 Oracle Fusion Middleware WebCenter Sites: Installing and Configuring Supporting Software
11.3.3 Adding a New ISAPI Filter1. Open the "Management Console" and browser to the Default Web Site.
2. In the center list, click ISAPI Filters and then click Add (Figure 11–13).
Figure 11–13 ISAPI Filters
The "Add ASAPI Filter" dialog box opens (Figure 11–14).
Figure 11–14 Add ISAPI Filter
3. In the "Add ISAPI Filter" dialog box, fill in the following fields:
■ Filter Name – Enter a filter name.
■ Executable – Enter the location of the executable file.
The new filter is added to the "ISAPI Filters" list.
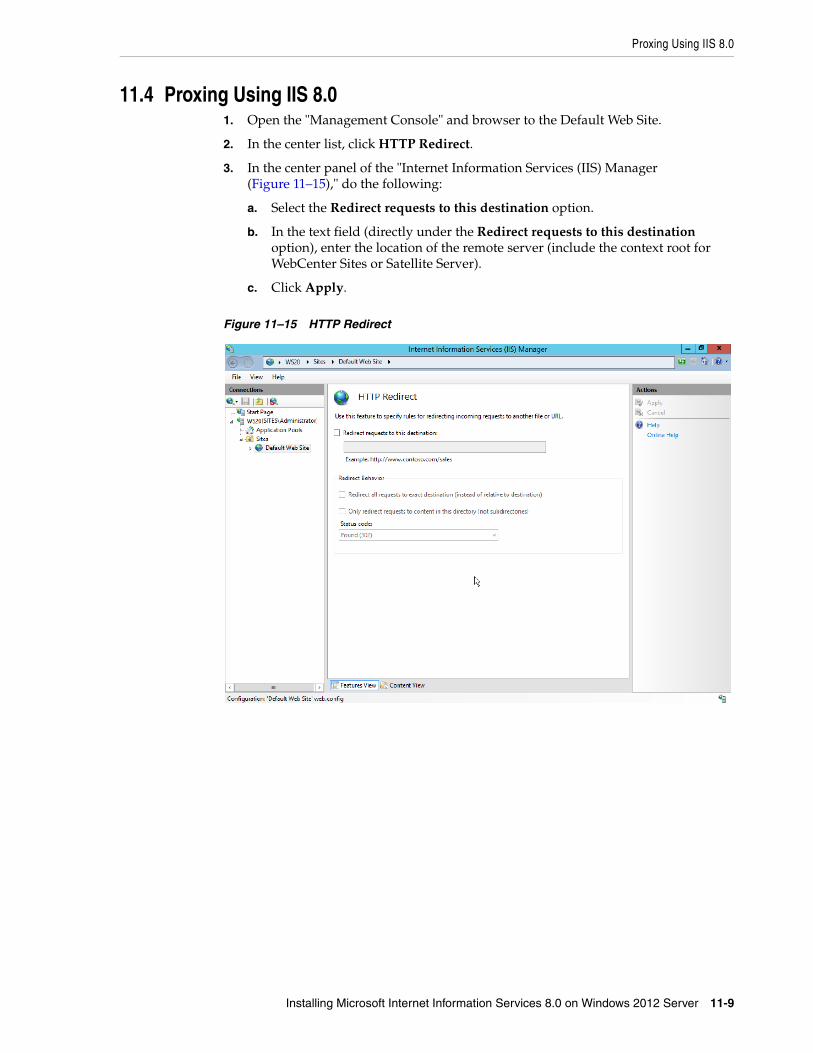
Proxing Using IIS 8.0
Installing Microsoft Internet Information Services 8.0 on Windows 2012 Server 11-9
11.4 Proxing Using IIS 8.01. Open the "Management Console" and browser to the Default Web Site.
2. In the center list, click HTTP Redirect.
3. In the center panel of the "Internet Information Services (IIS) Manager (Figure 11–15)," do the following:
a. Select the Redirect requests to this destination option.
b. In the text field (directly under the Redirect requests to this destination option), enter the location of the remote server (include the context root for WebCenter Sites or Satellite Server).
c. Click Apply.
Figure 11–15 HTTP Redirect
Proxing Using IIS 8.0
11-10 Oracle Fusion Middleware WebCenter Sites: Installing and Configuring Supporting Software
12
Installing Microsoft Internet Information Services 7.x on Windows 2008 Server 12-1
12Installing Microsoft Internet InformationServices 7.x on Windows 2008 Server
This chapter explains how to install and test Microsoft's Internet Information Services (IIS) 7.0/7.5 on Windows 2008 Server.
This chapter contains the following sections:
■ Section 12.1, "Installing IIS 7.x"
■ Section 12.2, "Verifying the Installation"
■ Section 12.3, "Starting and Configuring IIS"
12.1 Installing IIS 7.xIf IIS is not installed or is only partially installed, follow Microsoft's instruction for installing either IIS 7.0 on Windows 2008 Server or IIS 7.5 on Windows 2008 R2 Server.
Here is a summary of the instructions:
1. Select Start > Settings > Control Panel.
2. Select Programs and Features
3. Select Turn Windows features on or off (Figure 12–1).
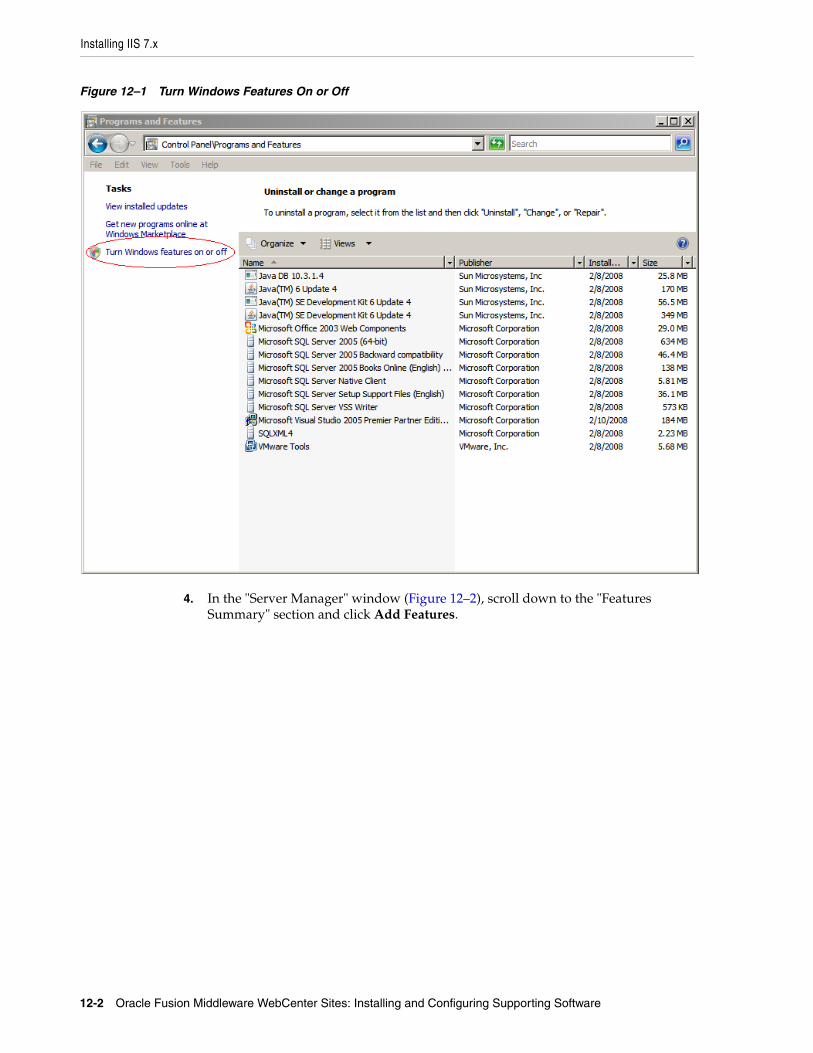
Installing IIS 7.x
12-2 Oracle Fusion Middleware WebCenter Sites: Installing and Configuring Supporting Software
Figure 12–1 Turn Windows Features On or Off
4. In the "Server Manager" window (Figure 12–2), scroll down to the "Features Summary" section and click Add Features.
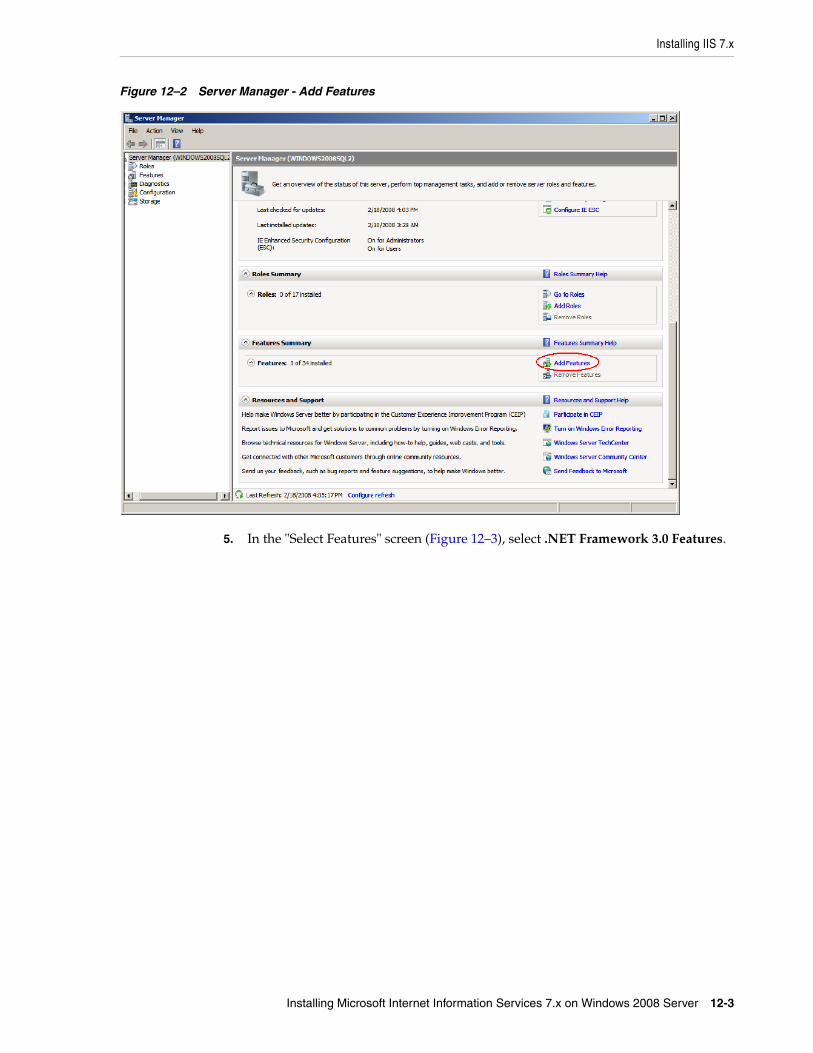
Installing IIS 7.x
Installing Microsoft Internet Information Services 7.x on Windows 2008 Server 12-3
Figure 12–2 Server Manager - Add Features
5. In the "Select Features" screen (Figure 12–3), select .NET Framework 3.0 Features.
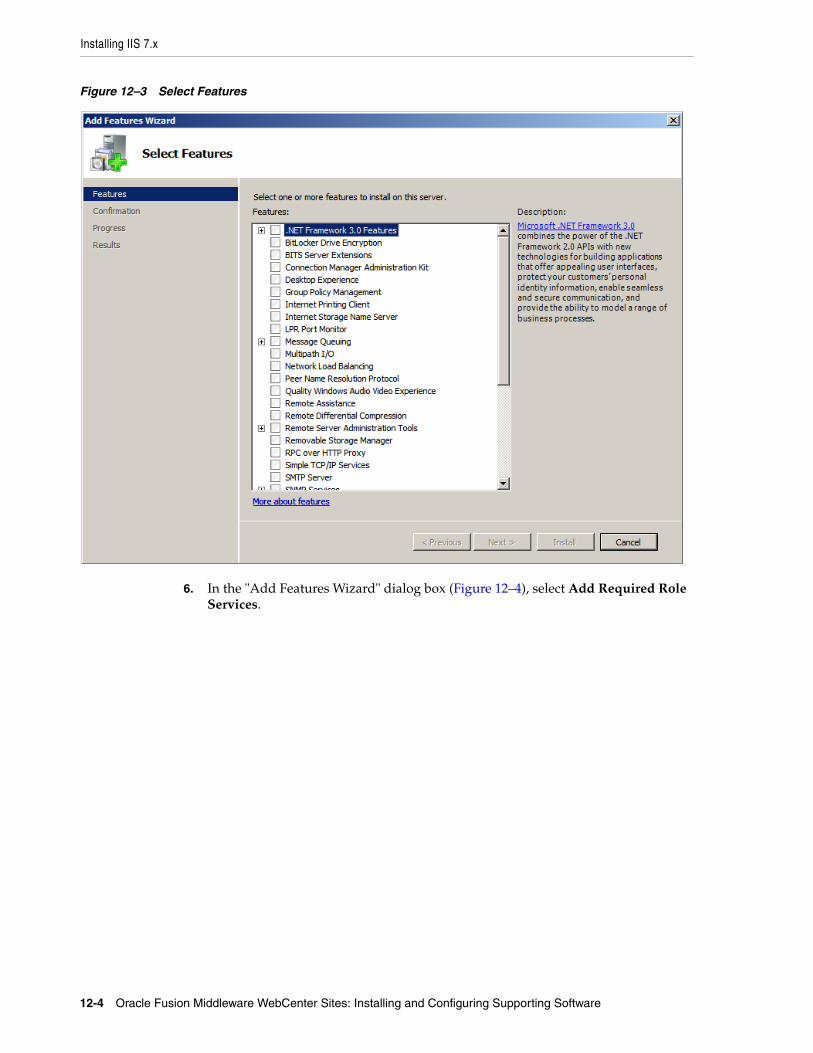
Installing IIS 7.x
12-4 Oracle Fusion Middleware WebCenter Sites: Installing and Configuring Supporting Software
Figure 12–3 Select Features
6. In the "Add Features Wizard" dialog box (Figure 12–4), select Add Required Role Services.

Installing IIS 7.x
Installing Microsoft Internet Information Services 7.x on Windows 2008 Server 12-5
Figure 12–4 Add Required Role Services Button
7. The Web Server (IIS) option (Figure 12–5) appears in the "Add Features Wizard." Click Next.
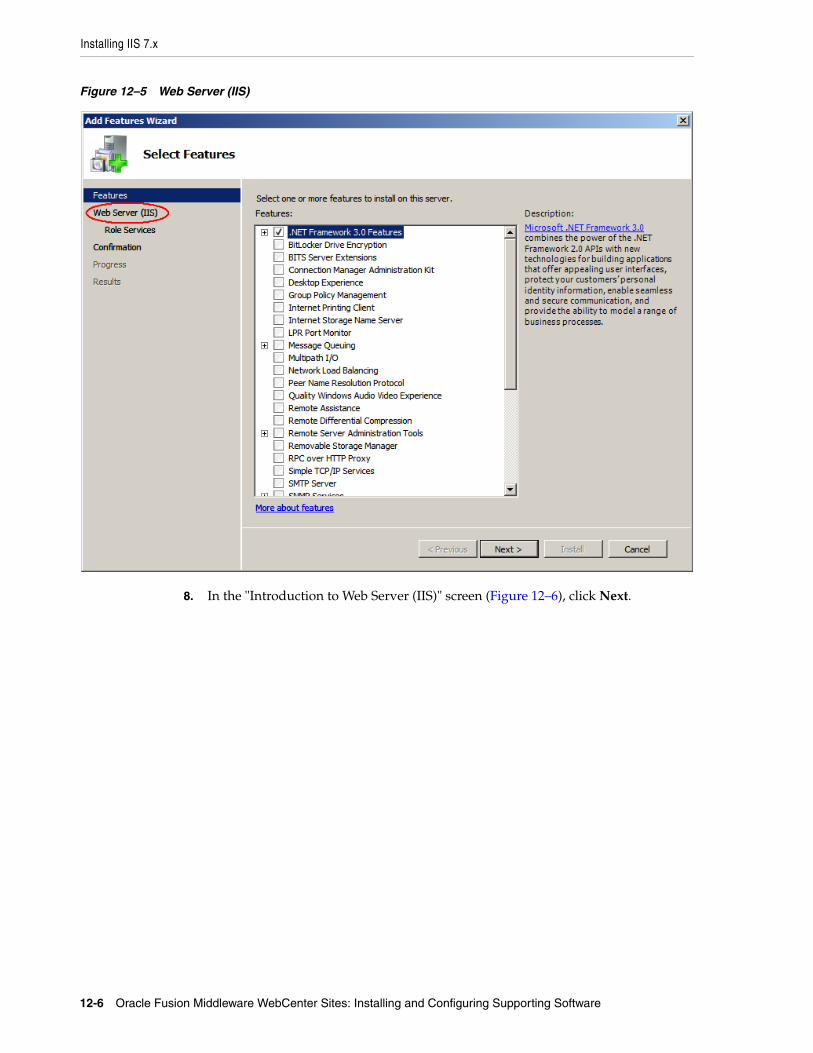
Installing IIS 7.x
12-6 Oracle Fusion Middleware WebCenter Sites: Installing and Configuring Supporting Software
Figure 12–5 Web Server (IIS)
8. In the "Introduction to Web Server (IIS)" screen (Figure 12–6), click Next.
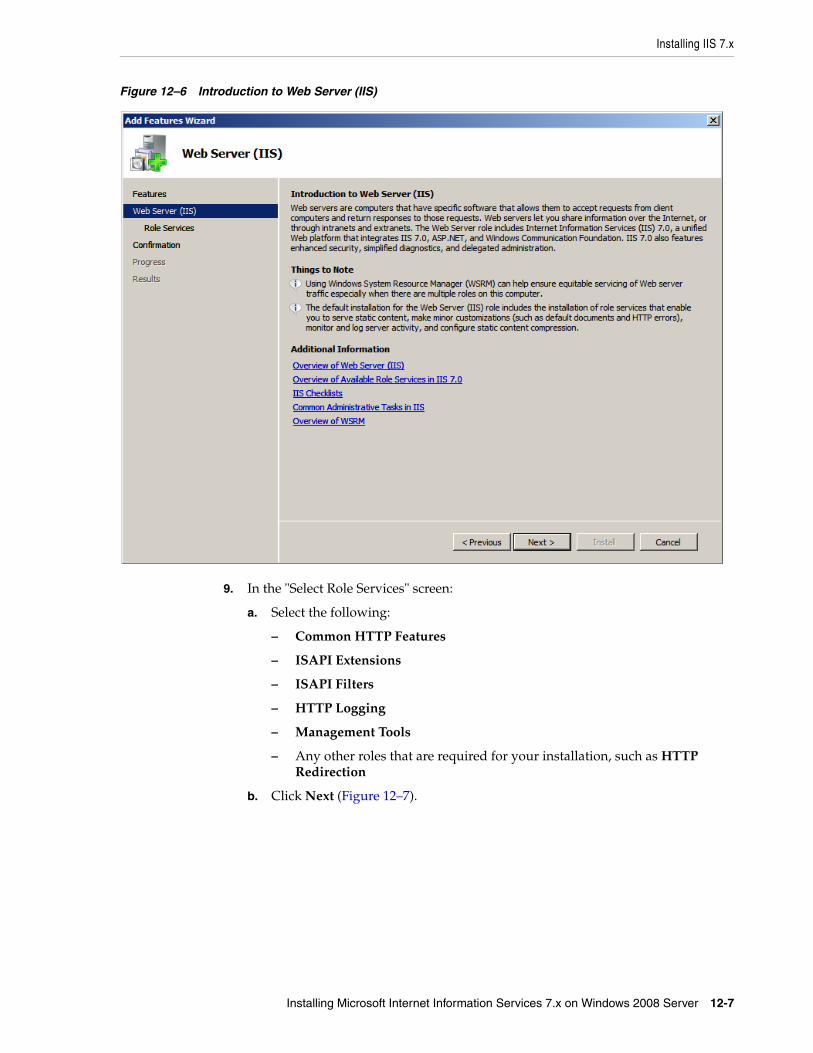
Installing IIS 7.x
Installing Microsoft Internet Information Services 7.x on Windows 2008 Server 12-7
Figure 12–6 Introduction to Web Server (IIS)
9. In the "Select Role Services" screen:
a. Select the following:
– Common HTTP Features
– ISAPI Extensions
– ISAPI Filters
– HTTP Logging
– Management Tools
– Any other roles that are required for your installation, such as HTTP Redirection
b. Click Next (Figure 12–7).
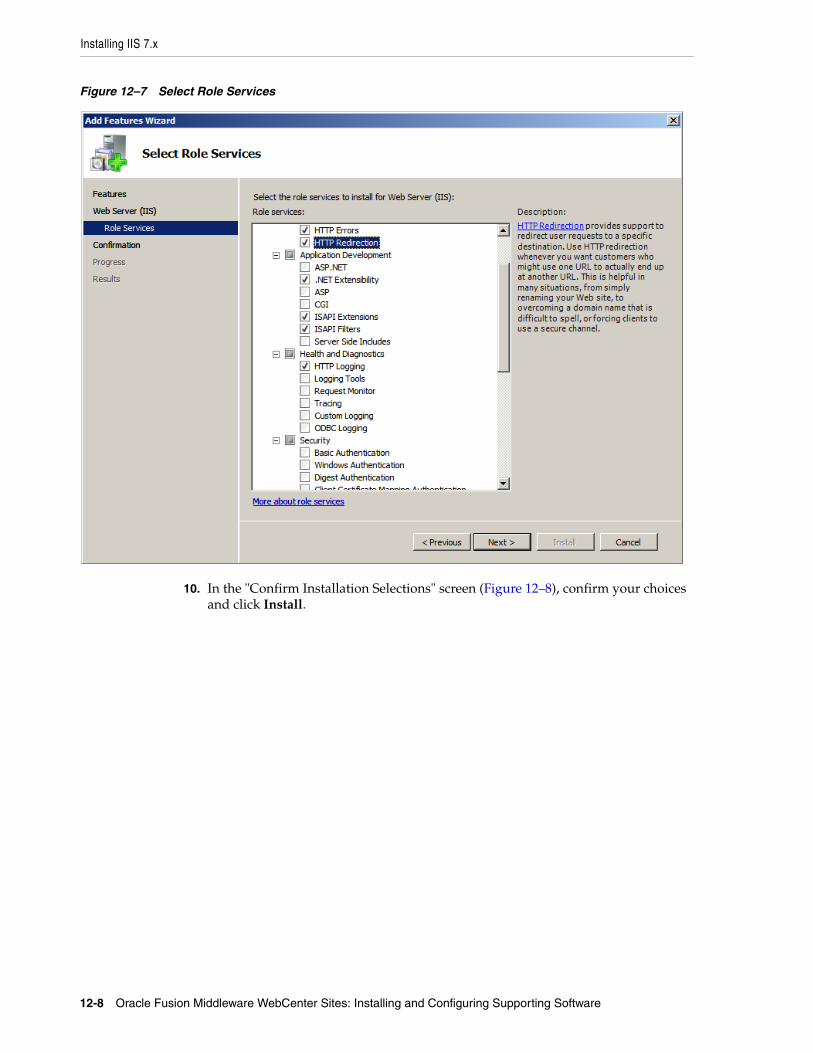
Installing IIS 7.x
12-8 Oracle Fusion Middleware WebCenter Sites: Installing and Configuring Supporting Software
Figure 12–7 Select Role Services
10. In the "Confirm Installation Selections" screen (Figure 12–8), confirm your choices and click Install.
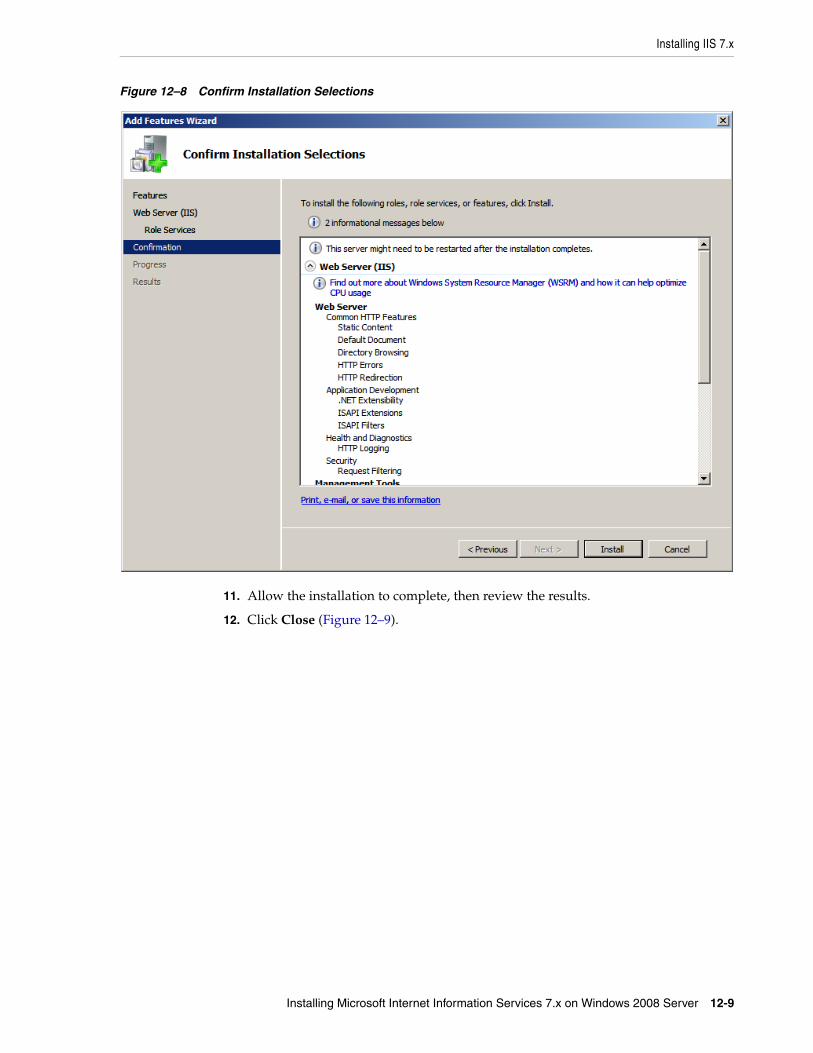
Installing IIS 7.x
Installing Microsoft Internet Information Services 7.x on Windows 2008 Server 12-9
Figure 12–8 Confirm Installation Selections
11. Allow the installation to complete, then review the results.
12. Click Close (Figure 12–9).
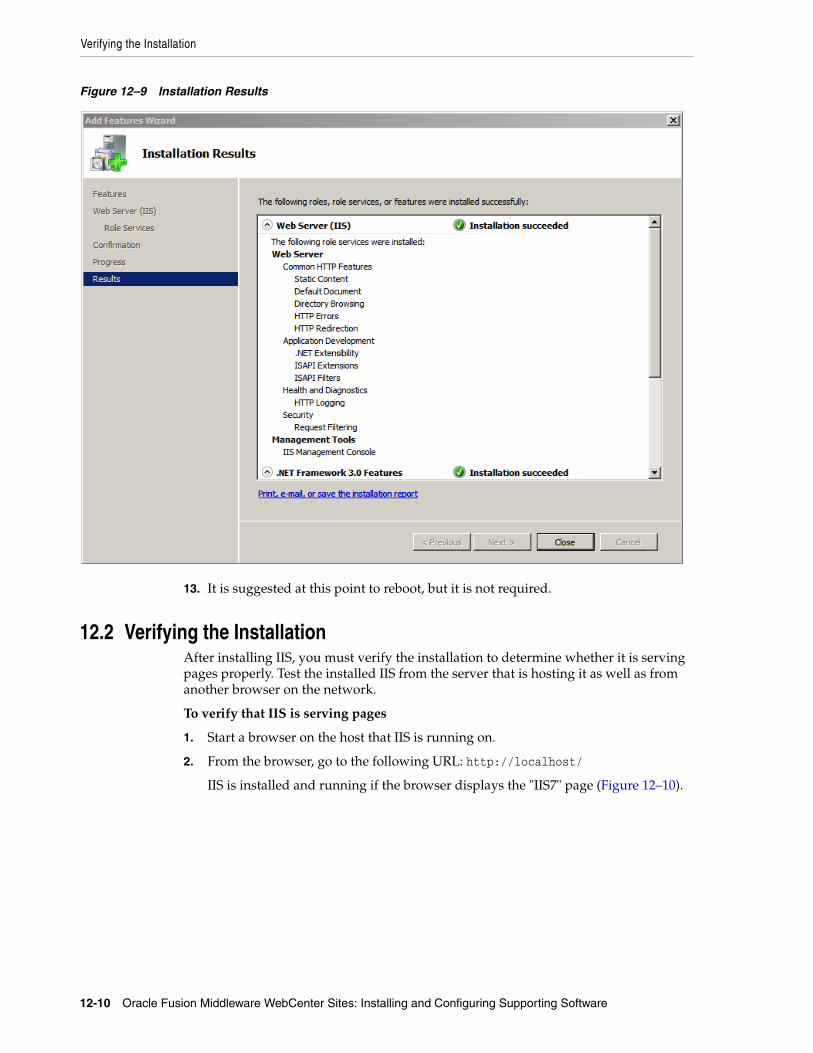
Verifying the Installation
12-10 Oracle Fusion Middleware WebCenter Sites: Installing and Configuring Supporting Software
Figure 12–9 Installation Results
13. It is suggested at this point to reboot, but it is not required.
12.2 Verifying the InstallationAfter installing IIS, you must verify the installation to determine whether it is serving pages properly. Test the installed IIS from the server that is hosting it as well as from another browser on the network.
To verify that IIS is serving pages
1. Start a browser on the host that IIS is running on.
2. From the browser, go to the following URL: http://localhost/
IIS is installed and running if the browser displays the "IIS7" page (Figure 12–10).
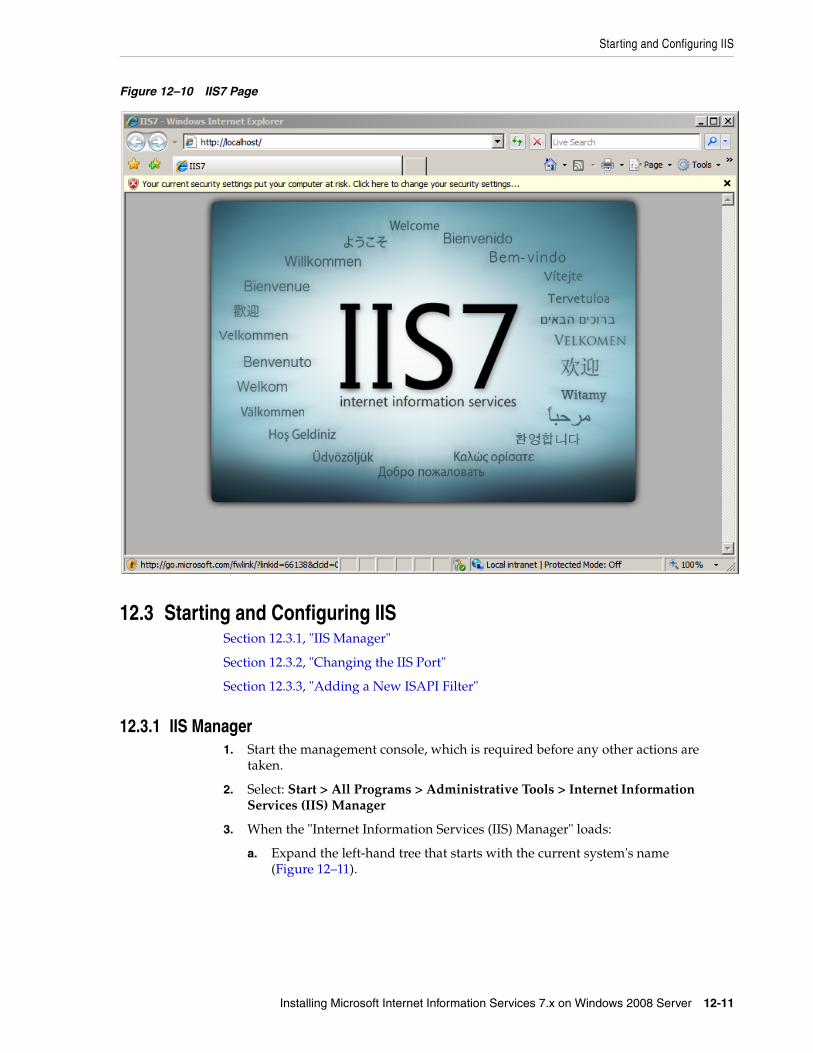
Starting and Configuring IIS
Installing Microsoft Internet Information Services 7.x on Windows 2008 Server 12-11
Figure 12–10 IIS7 Page
12.3 Starting and Configuring IISSection 12.3.1, "IIS Manager"
Section 12.3.2, "Changing the IIS Port"
Section 12.3.3, "Adding a New ISAPI Filter"
12.3.1 IIS Manager1. Start the management console, which is required before any other actions are
taken.
2. Select: Start > All Programs > Administrative Tools > Internet Information Services (IIS) Manager
3. When the "Internet Information Services (IIS) Manager" loads:
a. Expand the left-hand tree that starts with the current system's name (Figure 12–11).
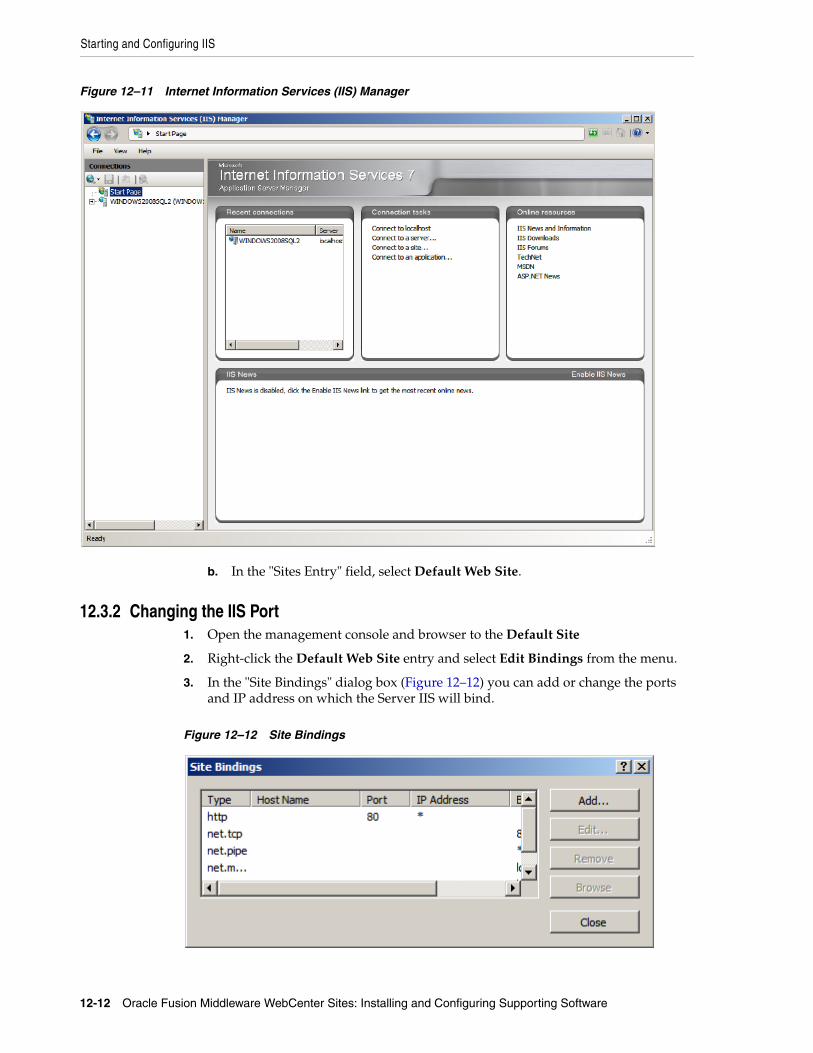
Starting and Configuring IIS
12-12 Oracle Fusion Middleware WebCenter Sites: Installing and Configuring Supporting Software
Figure 12–11 Internet Information Services (IIS) Manager
b. In the "Sites Entry" field, select Default Web Site.
12.3.2 Changing the IIS Port1. Open the management console and browser to the Default Site
2. Right-click the Default Web Site entry and select Edit Bindings from the menu.
3. In the "Site Bindings" dialog box (Figure 12–12) you can add or change the ports and IP address on which the Server IIS will bind.
Figure 12–12 Site Bindings
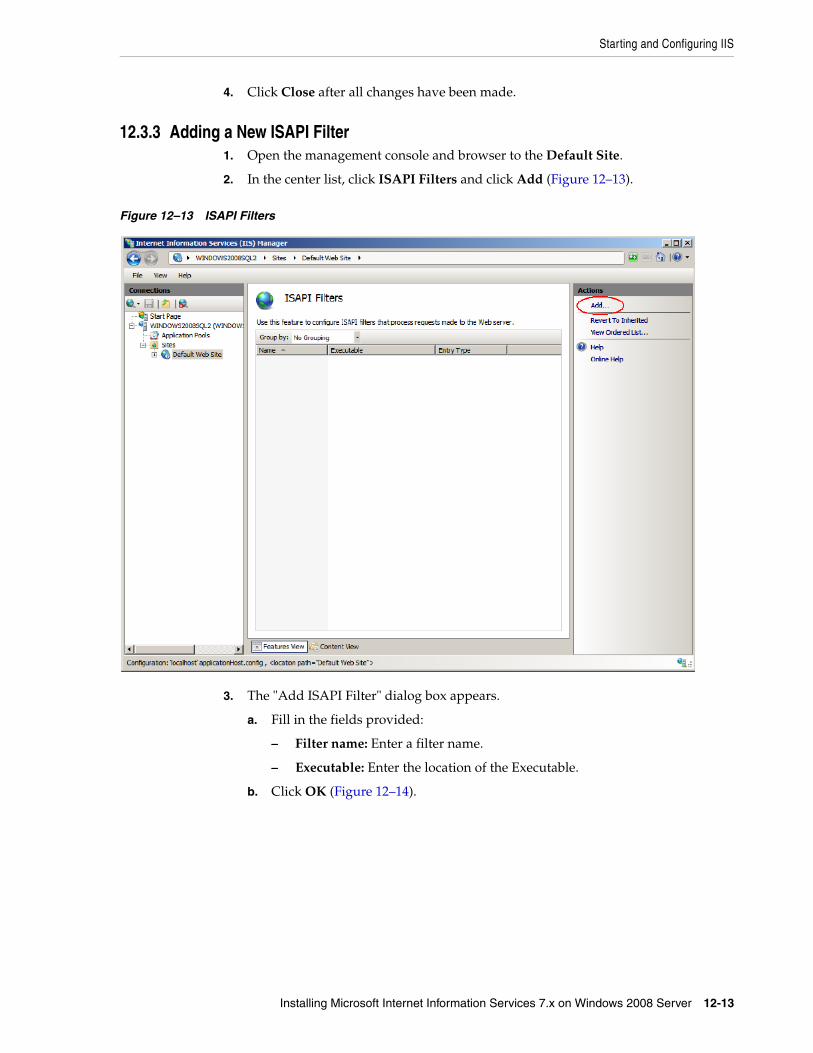
Starting and Configuring IIS
Installing Microsoft Internet Information Services 7.x on Windows 2008 Server 12-13
4. Click Close after all changes have been made.
12.3.3 Adding a New ISAPI Filter1. Open the management console and browser to the Default Site.
2. In the center list, click ISAPI Filters and click Add (Figure 12–13).
Figure 12–13 ISAPI Filters
3. The "Add ISAPI Filter" dialog box appears.
a. Fill in the fields provided:
– Filter name: Enter a filter name.
– Executable: Enter the location of the Executable.
b. Click OK (Figure 12–14).
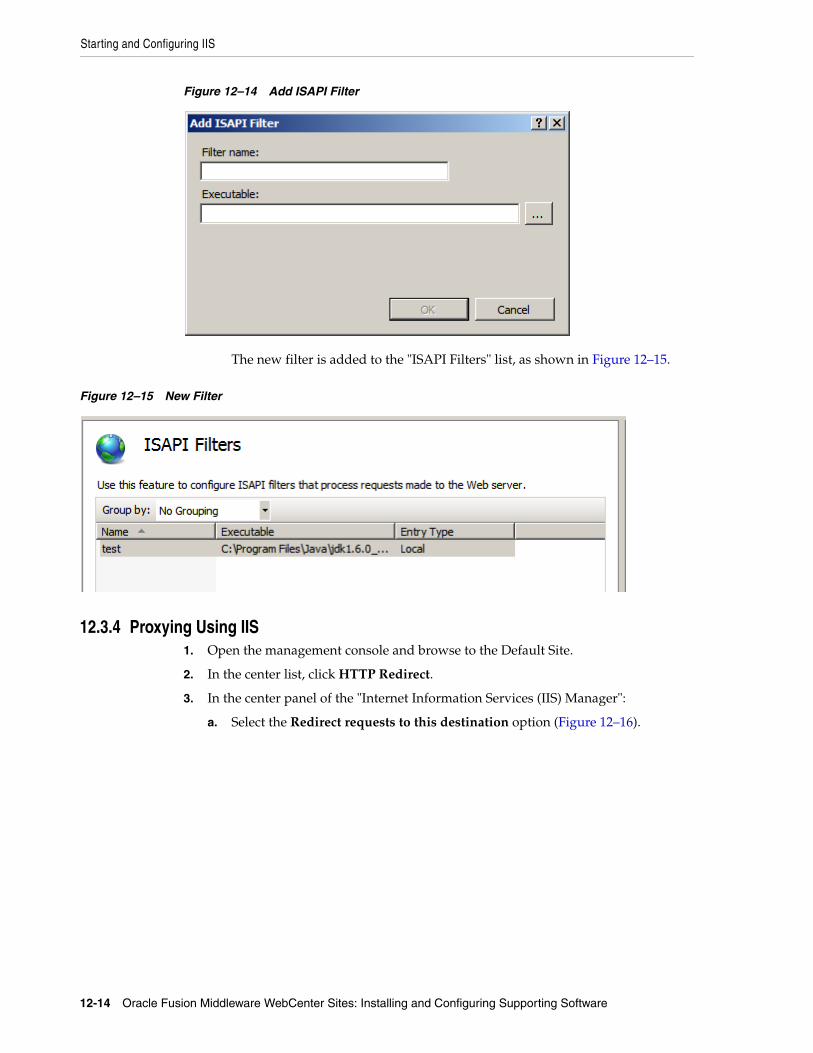
Starting and Configuring IIS
12-14 Oracle Fusion Middleware WebCenter Sites: Installing and Configuring Supporting Software
Figure 12–14 Add ISAPI Filter
The new filter is added to the "ISAPI Filters" list, as shown in Figure 12–15.
Figure 12–15 New Filter
12.3.4 Proxying Using IIS1. Open the management console and browse to the Default Site.
2. In the center list, click HTTP Redirect.
3. In the center panel of the "Internet Information Services (IIS) Manager":
a. Select the Redirect requests to this destination option (Figure 12–16).

Starting and Configuring IIS
Installing Microsoft Internet Information Services 7.x on Windows 2008 Server 12-15
Figure 12–16 HTTP Redirect
b. Enter the location of the remote server in the text field (for WebCenter Sites or Satellite Server include the context root).
c. Click Apply.

Starting and Configuring IIS
12-16 Oracle Fusion Middleware WebCenter Sites: Installing and Configuring Supporting Software
Part IVPart IV Installing and Configuring an LDAP
Server
If you choose to use LDAP, WebCenter Sites must have access to a supported LDAP server specifically configured for WebCenter Sites. This part describes how to install and configure a supported LDAP server for integration with WebCenter Sites.
Part IV contains the following chapters:
■ Chapter 13, "Setting Up Oracle Internet Directory"
■ Chapter 14, "Setting Up the Oracle WebLogic 10.3 Embedded LDAP Server"
■ Chapter 15, "Setting Up IBM Tivoli Directory Server 6.x"
■ Chapter 16, "Installing Microsoft Active Directory 2012"
■ Chapter 17, "Installing Microsoft Active Directory 2008"
■ Chapter 18, "Setting Up OpenLDAP 2.3.x"
Note: You must set up a supported LDAP server before you run the WebCenter Sites-LDAP integrator.
If you are integrating with LDAP, but no content management sites exist in WebCenter Sites, then upon completion of the LDAP integration procedure, refer to instructions in Section 20.4, "Post-Integration Steps: When CM Sites Have Not Been Created."

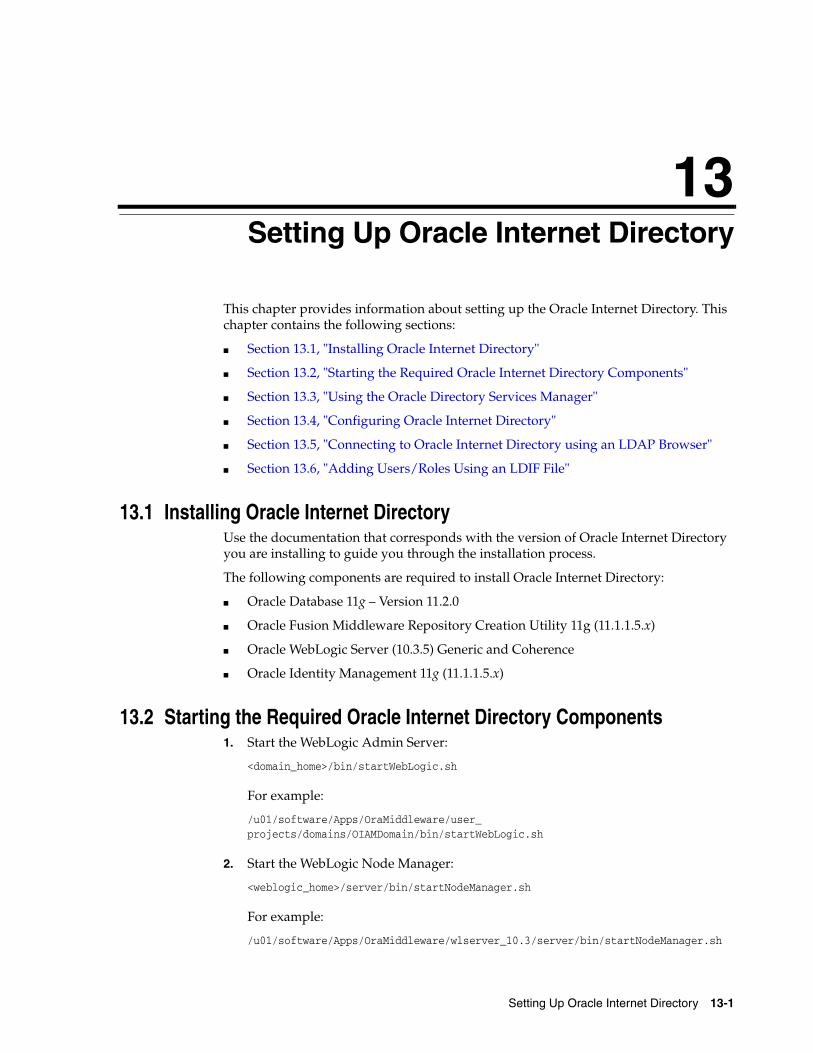
13
Setting Up Oracle Internet Directory 13-1
13Setting Up Oracle Internet Directory
This chapter provides information about setting up the Oracle Internet Directory. This chapter contains the following sections:
■ Section 13.1, "Installing Oracle Internet Directory"
■ Section 13.2, "Starting the Required Oracle Internet Directory Components"
■ Section 13.3, "Using the Oracle Directory Services Manager"
■ Section 13.4, "Configuring Oracle Internet Directory"
■ Section 13.5, "Connecting to Oracle Internet Directory using an LDAP Browser"
■ Section 13.6, "Adding Users/Roles Using an LDIF File"
13.1 Installing Oracle Internet DirectoryUse the documentation that corresponds with the version of Oracle Internet Directory you are installing to guide you through the installation process.
The following components are required to install Oracle Internet Directory:
■ Oracle Database 11g – Version 11.2.0
■ Oracle Fusion Middleware Repository Creation Utility 11g (11.1.1.5.x)
■ Oracle WebLogic Server (10.3.5) Generic and Coherence
■ Oracle Identity Management 11g (11.1.1.5.x)
13.2 Starting the Required Oracle Internet Directory Components1. Start the WebLogic Admin Server:
<domain_home>/bin/startWebLogic.sh
For example:
/u01/software/Apps/OraMiddleware/user_projects/domains/OIAMDomain/bin/startWebLogic.sh
2. Start the WebLogic Node Manager:
<weblogic_home>/server/bin/startNodeManager.sh
For example:
/u01/software/Apps/OraMiddleware/wlserver_10.3/server/bin/startNodeManager.sh
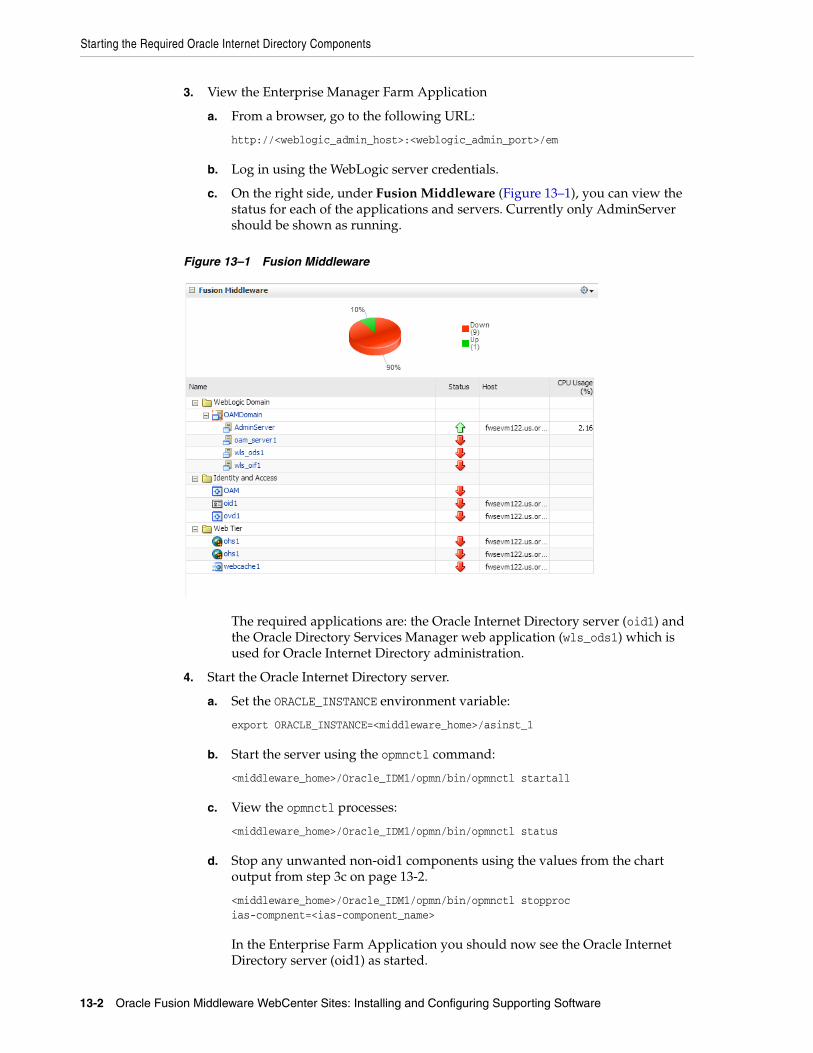
Starting the Required Oracle Internet Directory Components
13-2 Oracle Fusion Middleware WebCenter Sites: Installing and Configuring Supporting Software
3. View the Enterprise Manager Farm Application
a. From a browser, go to the following URL:
http://<weblogic_admin_host>:<weblogic_admin_port>/em
b. Log in using the WebLogic server credentials.
c. On the right side, under Fusion Middleware (Figure 13–1), you can view the status for each of the applications and servers. Currently only AdminServer should be shown as running.
Figure 13–1 Fusion Middleware
The required applications are: the Oracle Internet Directory server (oid1) and the Oracle Directory Services Manager web application (wls_ods1) which is used for Oracle Internet Directory administration.
4. Start the Oracle Internet Directory server.
a. Set the ORACLE_INSTANCE environment variable:
export ORACLE_INSTANCE=<middleware_home>/asinst_1
b. Start the server using the opmnctl command:
<middleware_home>/Oracle_IDM1/opmn/bin/opmnctl startall
c. View the opmnctl processes:
<middleware_home>/Oracle_IDM1/opmn/bin/opmnctl status
d. Stop any unwanted non-oid1 components using the values from the chart output from step 3c on page 13-2.
<middleware_home>/Oracle_IDM1/opmn/bin/opmnctl stopproc ias-compnent=<ias-component_name>
In the Enterprise Farm Application you should now see the Oracle Internet Directory server (oid1) as started.
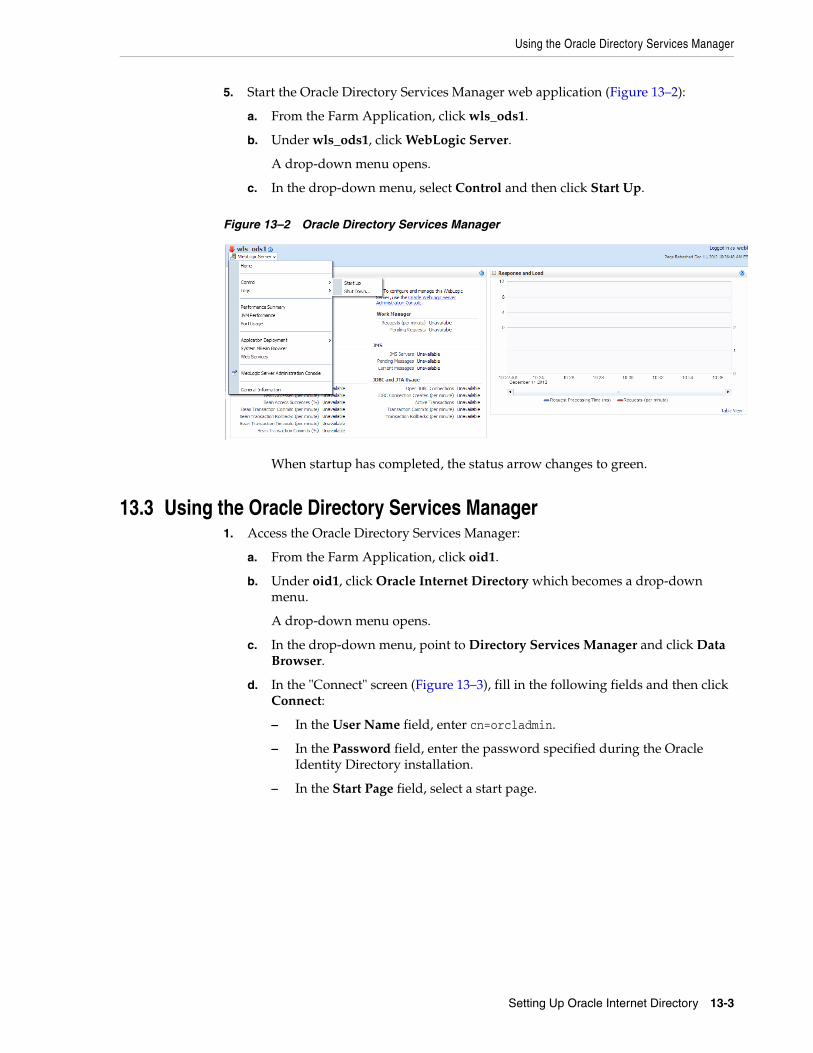
Using the Oracle Directory Services Manager
Setting Up Oracle Internet Directory 13-3
5. Start the Oracle Directory Services Manager web application (Figure 13–2):
a. From the Farm Application, click wls_ods1.
b. Under wls_ods1, click WebLogic Server.
A drop-down menu opens.
c. In the drop-down menu, select Control and then click Start Up.
Figure 13–2 Oracle Directory Services Manager
When startup has completed, the status arrow changes to green.
13.3 Using the Oracle Directory Services Manager1. Access the Oracle Directory Services Manager:
a. From the Farm Application, click oid1.
b. Under oid1, click Oracle Internet Directory which becomes a drop-down menu.
A drop-down menu opens.
c. In the drop-down menu, point to Directory Services Manager and click Data Browser.
d. In the "Connect" screen (Figure 13–3), fill in the following fields and then click Connect:
– In the User Name field, enter cn=orcladmin.
– In the Password field, enter the password specified during the Oracle Identity Directory installation.
– In the Start Page field, select a start page.
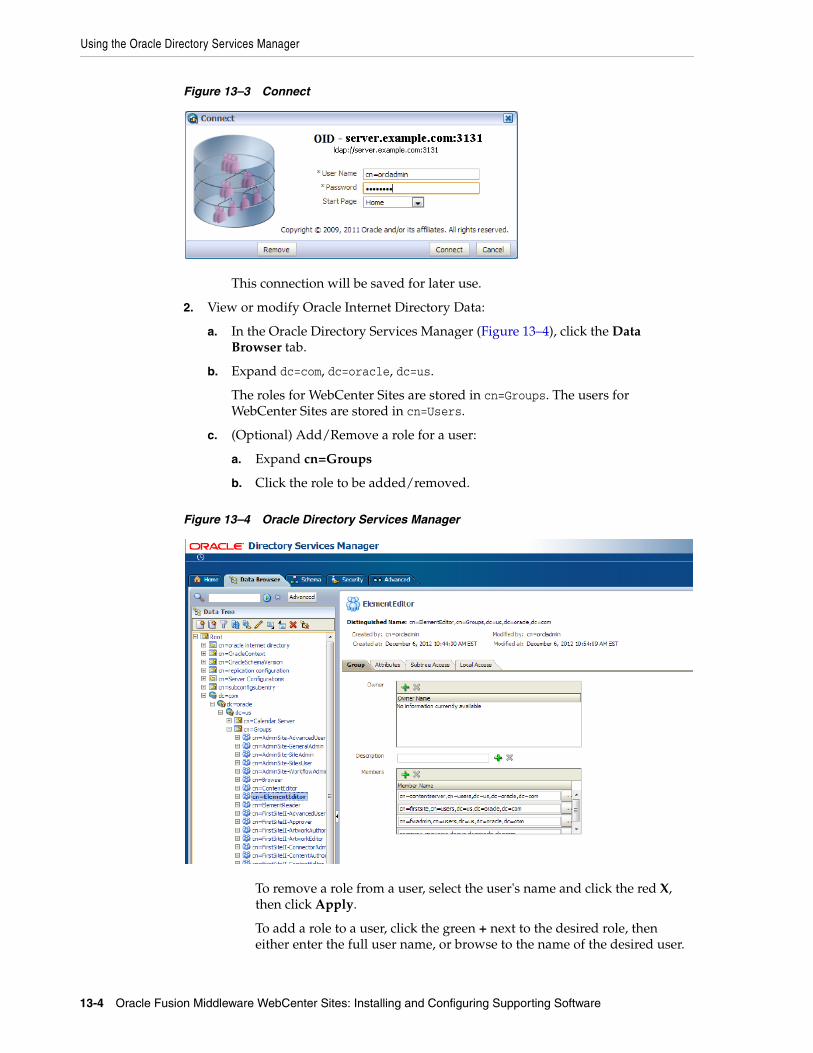
Using the Oracle Directory Services Manager
13-4 Oracle Fusion Middleware WebCenter Sites: Installing and Configuring Supporting Software
Figure 13–3 Connect
This connection will be saved for later use.
2. View or modify Oracle Internet Directory Data:
a. In the Oracle Directory Services Manager (Figure 13–4), click the Data Browser tab.
b. Expand dc=com, dc=oracle, dc=us.
The roles for WebCenter Sites are stored in cn=Groups. The users for WebCenter Sites are stored in cn=Users.
c. (Optional) Add/Remove a role for a user:
a. Expand cn=Groups
b. Click the role to be added/removed.
Figure 13–4 Oracle Directory Services Manager
To remove a role from a user, select the user's name and click the red X, then click Apply.
To add a role to a user, click the green + next to the desired role, then either enter the full user name, or browse to the name of the desired user.

Configuring Oracle Internet Directory
Setting Up Oracle Internet Directory 13-5
d. (Optional) Change a user's password (Figure 13–5):
a. Expand cn=Users
b. Click the name of the user whose password you wish to change.
c. Click the Attributes tab.
d. In the "userPassword" field, enter the new password for the user and then click Apply.
Figure 13–5 Oracle Directory Services Manager
13.4 Configuring Oracle Internet Directory1. Set the Server Mode:
a. From the Farm Application, click oid1 (Figure 13–6).
b. Under oid1, click Oracle Internet Directory.
A drop-down menu opens.
c. In the drop-down menu, select Administration and then click Server Properties.
Note: WebCenter Sites requires an LDAP server that is capable of recording data to enable User/Role modification in the WebCenter Sites Admin interface.

Configuring Oracle Internet Directory
13-6 Oracle Fusion Middleware WebCenter Sites: Installing and Configuring Supporting Software
Figure 13–6 Oracle Internet Directory: Server Properties
The "Server Properties" screen opens.
d. In the "Server Mode" field, select Read/Write (Figure 13–7) and then click Apply.
Figure 13–7 Server Properties
2. Modify the default Password Policy:
Note: WebCenter Sites requires an LDAP server to allow passwords without numeric characters.
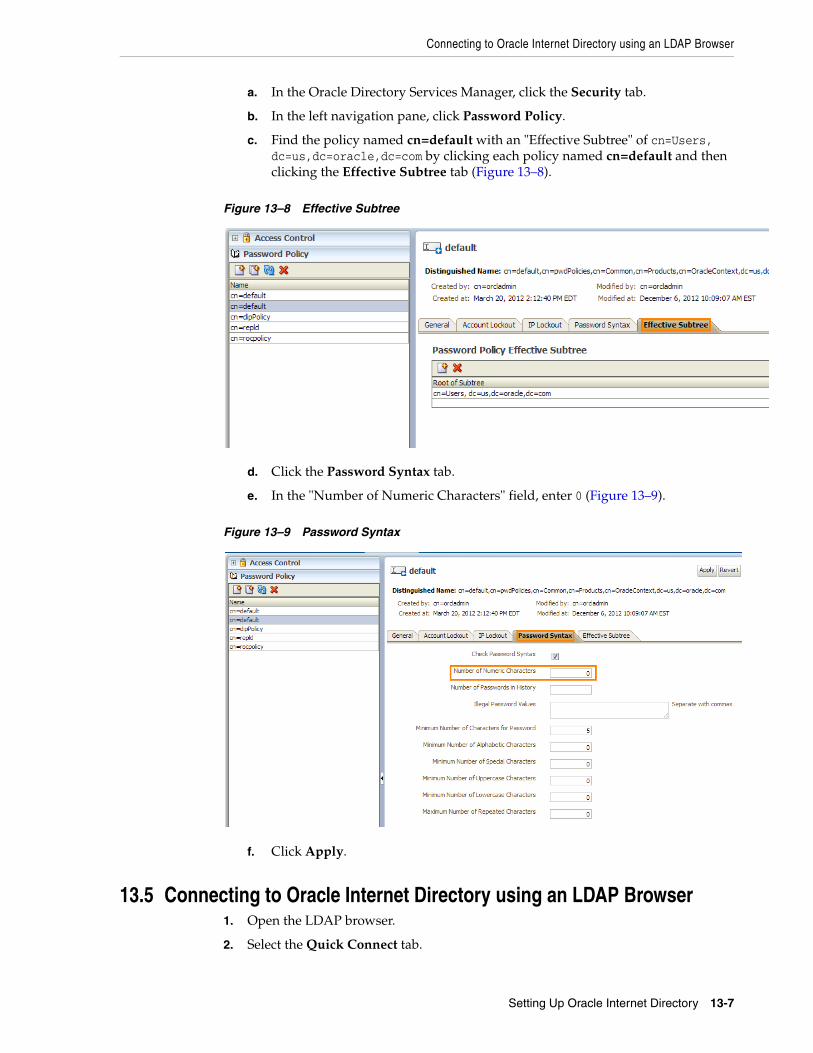
Connecting to Oracle Internet Directory using an LDAP Browser
Setting Up Oracle Internet Directory 13-7
a. In the Oracle Directory Services Manager, click the Security tab.
b. In the left navigation pane, click Password Policy.
c. Find the policy named cn=default with an "Effective Subtree" of cn=Users, dc=us,dc=oracle,dc=com by clicking each policy named cn=default and then clicking the Effective Subtree tab (Figure 13–8).
Figure 13–8 Effective Subtree
d. Click the Password Syntax tab.
e. In the "Number of Numeric Characters" field, enter 0 (Figure 13–9).
Figure 13–9 Password Syntax
f. Click Apply.
13.5 Connecting to Oracle Internet Directory using an LDAP Browser1. Open the LDAP browser.
2. Select the Quick Connect tab.
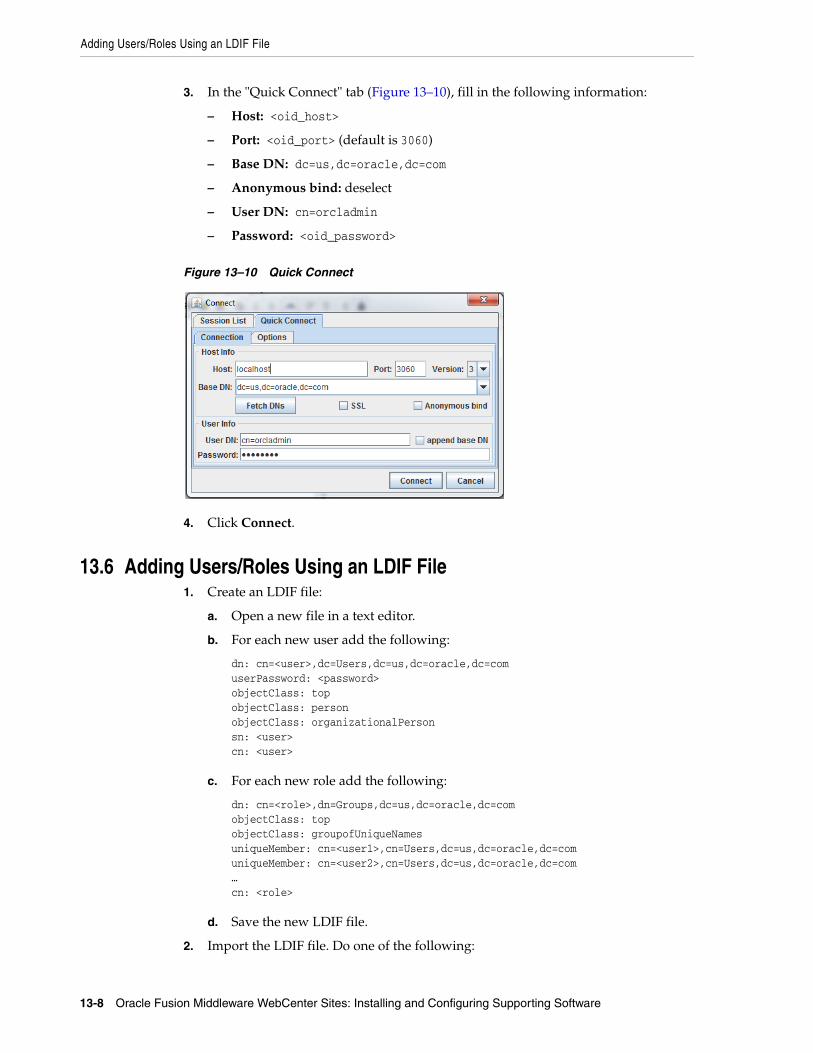
Adding Users/Roles Using an LDIF File
13-8 Oracle Fusion Middleware WebCenter Sites: Installing and Configuring Supporting Software
3. In the "Quick Connect" tab (Figure 13–10), fill in the following information:
– Host: <oid_host>
– Port: <oid_port> (default is 3060)
– Base DN: dc=us,dc=oracle,dc=com
– Anonymous bind: deselect
– User DN: cn=orcladmin
– Password: <oid_password>
Figure 13–10 Quick Connect
4. Click Connect.
13.6 Adding Users/Roles Using an LDIF File1. Create an LDIF file:
a. Open a new file in a text editor.
b. For each new user add the following:
dn: cn=<user>,dc=Users,dc=us,dc=oracle,dc=comuserPassword: <password>objectClass: topobjectClass: personobjectClass: organizationalPersonsn: <user>cn: <user>
c. For each new role add the following:
dn: cn=<role>,dn=Groups,dc=us,dc=oracle,dc=comobjectClass: topobjectClass: groupofUniqueNamesuniqueMember: cn=<user1>,cn=Users,dc=us,dc=oracle,dc=comuniqueMember: cn=<user2>,cn=Users,dc=us,dc=oracle,dc=com…cn: <role>
d. Save the new LDIF file.
2. Import the LDIF file. Do one of the following:
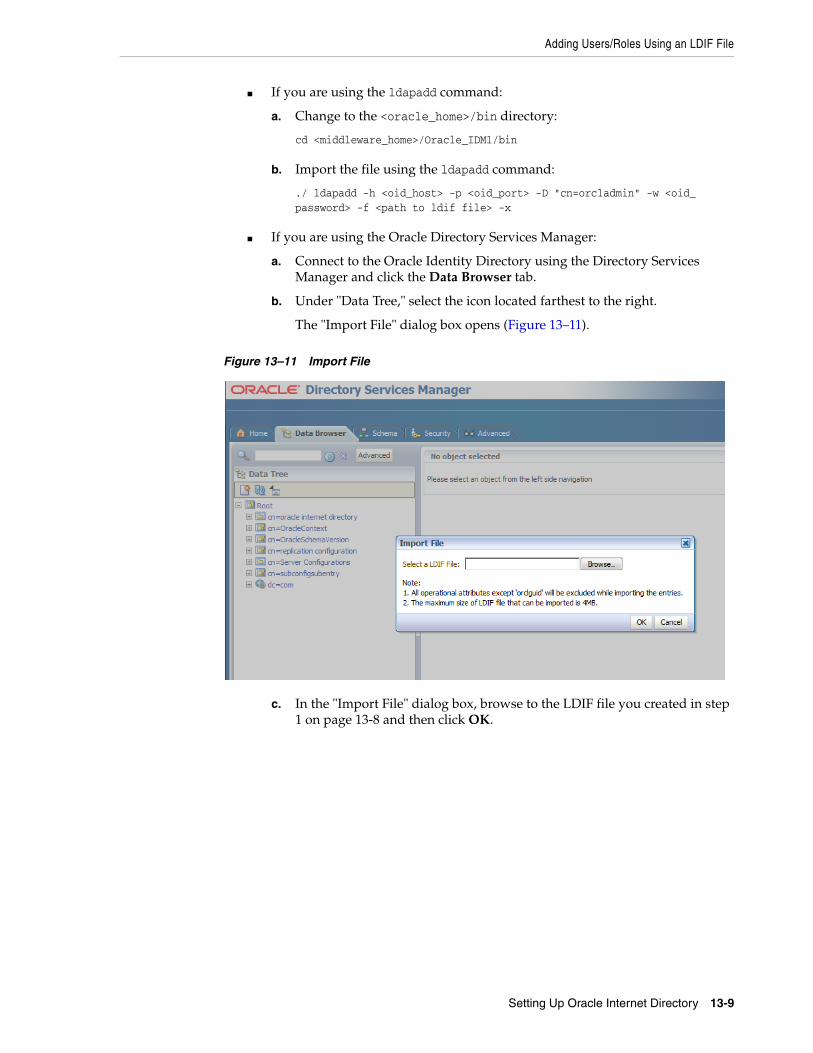
Adding Users/Roles Using an LDIF File
Setting Up Oracle Internet Directory 13-9
■ If you are using the ldapadd command:
a. Change to the <oracle_home>/bin directory:
cd <middleware_home>/Oracle_IDM1/bin
b. Import the file using the ldapadd command:
./ ldapadd -h <oid_host> -p <oid_port> -D "cn=orcladmin" -w <oid_password> -f <path to ldif file> -x
■ If you are using the Oracle Directory Services Manager:
a. Connect to the Oracle Identity Directory using the Directory Services Manager and click the Data Browser tab.
b. Under "Data Tree," select the icon located farthest to the right.
The "Import File" dialog box opens (Figure 13–11).
Figure 13–11 Import File
c. In the "Import File" dialog box, browse to the LDIF file you created in step 1 on page 13-8 and then click OK.
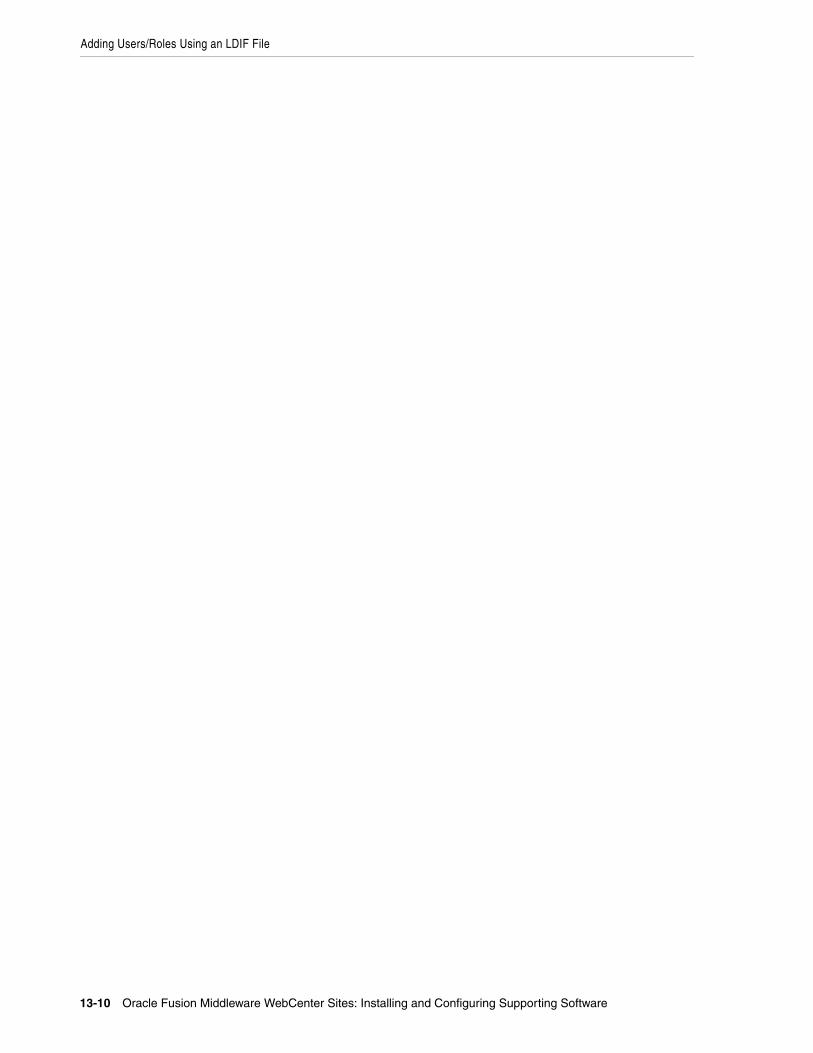
Adding Users/Roles Using an LDIF File
13-10 Oracle Fusion Middleware WebCenter Sites: Installing and Configuring Supporting Software
14
Setting Up the Oracle WebLogic 10.3 Embedded LDAP Server 14-1
14Setting Up the Oracle WebLogic 10.3Embedded LDAP Server
This chapter provides instructions on setting up the currently supported WebLogic Embedded LDAP Server for use with WebCenter Sites.
This chapter contains the following sections:
■ Section 14.1, "Enabling the WebLogic Embedded LDAP Server"
■ Section 14.2, "Modifying User Passwords"
14.1 Enabling the WebLogic Embedded LDAP ServerThis section explains how to enable the WebLogic Embedded LDAP Server.
To enable the WebLogic Embedded LDAP Server
1. Log in to the WebLogic Server Administration Console.
2. In the "Domain Structure" tree at the left, click your WebLogic portal domain.
3. Set the Embedded LDAP password (Figure 14–1):
a. In the workspace, select the Security tab, then select the Embedded LDAP sub-tab.
b. In the "Change Center" pane in the upper left, click Lock & Edit.
c. In the Credential field, enter the desired Embedded LDAP password. Re-enter the password in the Confirm Credential field for verification.
d. Click Save.
Note: You must set up WebLogic LDAP before you run the WebCenter Sites-LDAP integrator.
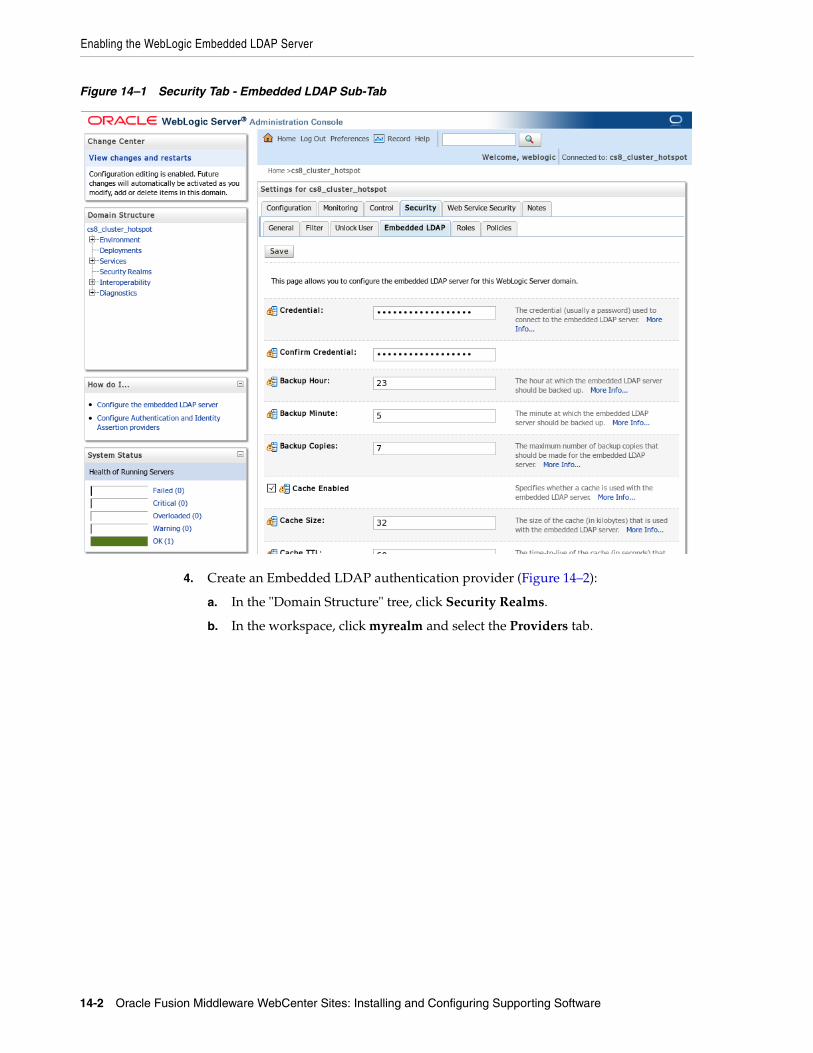
Enabling the WebLogic Embedded LDAP Server
14-2 Oracle Fusion Middleware WebCenter Sites: Installing and Configuring Supporting Software
Figure 14–1 Security Tab - Embedded LDAP Sub-Tab
4. Create an Embedded LDAP authentication provider (Figure 14–2):
a. In the "Domain Structure" tree, click Security Realms.
b. In the workspace, click myrealm and select the Providers tab.
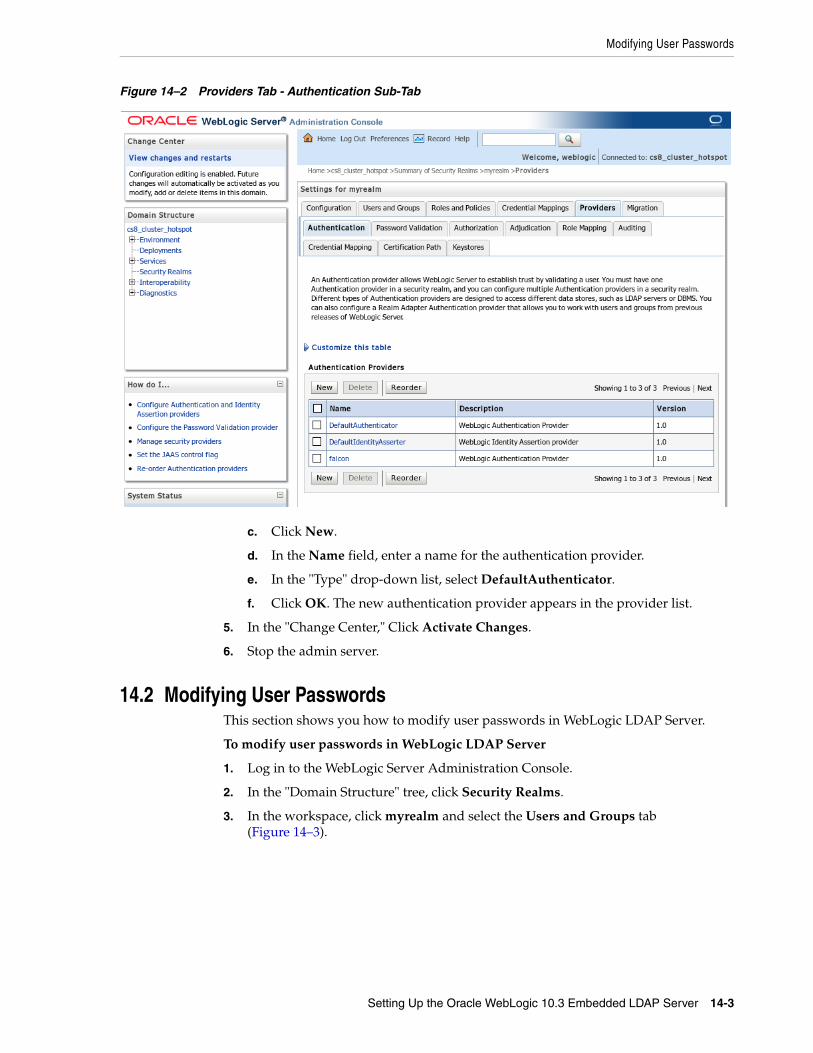
Modifying User Passwords
Setting Up the Oracle WebLogic 10.3 Embedded LDAP Server 14-3
Figure 14–2 Providers Tab - Authentication Sub-Tab
c. Click New.
d. In the Name field, enter a name for the authentication provider.
e. In the "Type" drop-down list, select DefaultAuthenticator.
f. Click OK. The new authentication provider appears in the provider list.
5. In the "Change Center," Click Activate Changes.
6. Stop the admin server.
14.2 Modifying User PasswordsThis section shows you how to modify user passwords in WebLogic LDAP Server.
To modify user passwords in WebLogic LDAP Server
1. Log in to the WebLogic Server Administration Console.
2. In the "Domain Structure" tree, click Security Realms.
3. In the workspace, click myrealm and select the Users and Groups tab (Figure 14–3).
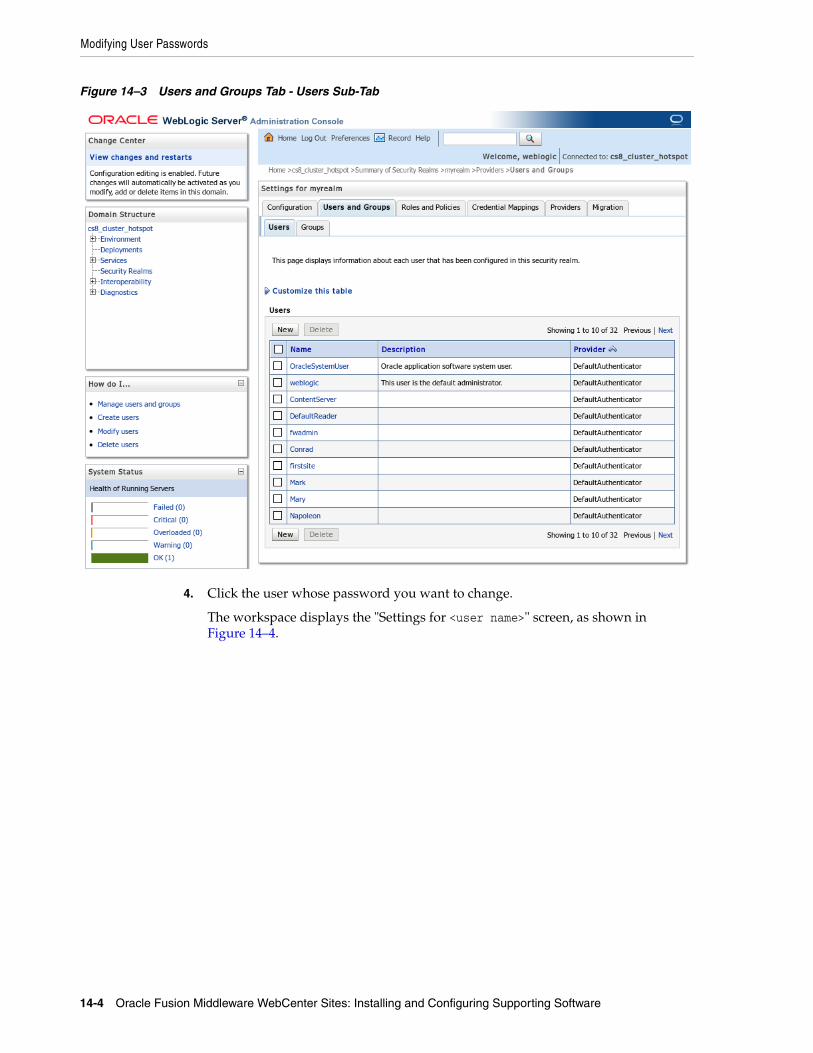
Modifying User Passwords
14-4 Oracle Fusion Middleware WebCenter Sites: Installing and Configuring Supporting Software
Figure 14–3 Users and Groups Tab - Users Sub-Tab
4. Click the user whose password you want to change.
The workspace displays the "Settings for <user name>" screen, as shown in Figure 14–4.
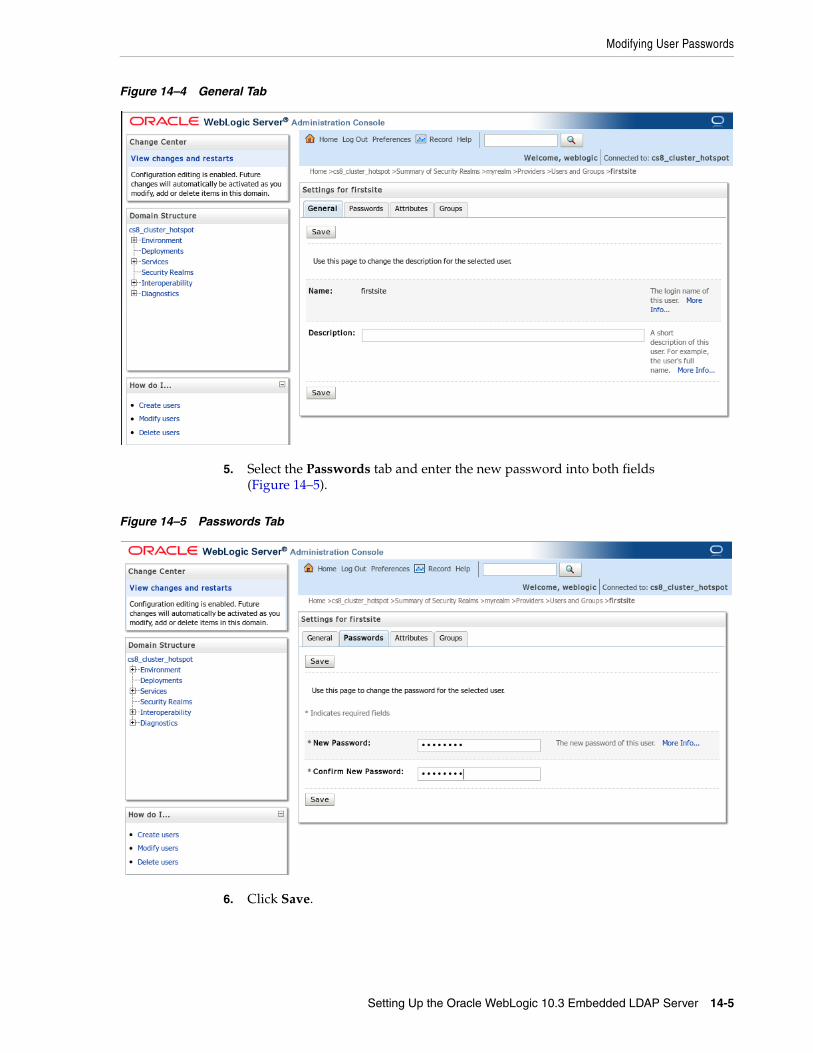
Modifying User Passwords
Setting Up the Oracle WebLogic 10.3 Embedded LDAP Server 14-5
Figure 14–4 General Tab
5. Select the Passwords tab and enter the new password into both fields (Figure 14–5).
Figure 14–5 Passwords Tab
6. Click Save.
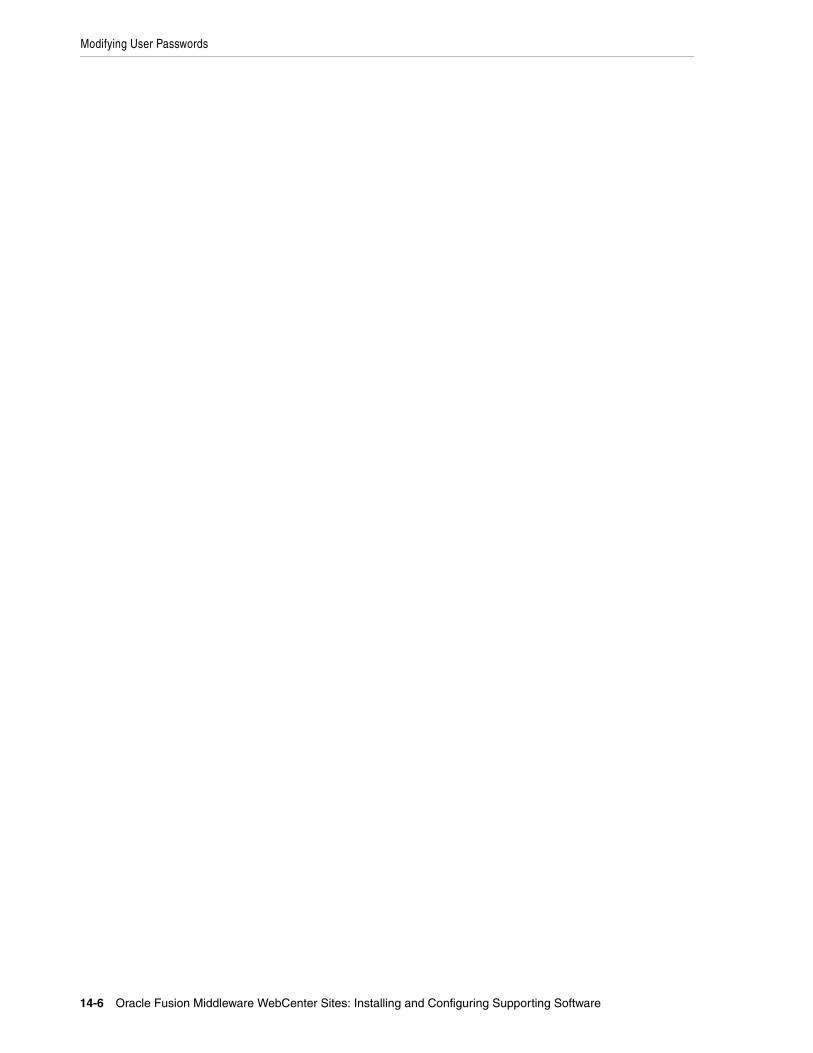
Modifying User Passwords
14-6 Oracle Fusion Middleware WebCenter Sites: Installing and Configuring Supporting Software
15
Setting Up IBM Tivoli Directory Server 6.x 15-1
15Setting Up IBM Tivoli Directory Server 6.x
This chapter contains the following sections:
■ Section 15.1, "IBM Tivoli Directory Server Commands"
■ Section 15.2, "Before Installing IBM Tivoli Directory Server"
■ Section 15.3, "Installing IBM Tivoli Directory Server"
■ Section 15.4, "Configuring Tivoli Directory Server"
■ Section 15.5, "Connecting to IBM TDS Using the LDAP Browser"
15.1 IBM Tivoli Directory Server Commands
15.2 Before Installing IBM Tivoli Directory Server1. Create the following group: idsldap
2. Create a user for the LDAP instance and write down the password, for example, ldapdb2. This password will be used in step 7 of Section 15.3, "Installing IBM Tivoli Directory Server."
3. Check that pdksh is installed.
Note: In this chapter, Tivoli Directory Server is also referred to as "TDS."
Table 15–1 IBM Tivoli Directory Server Commands
Action Command
Starting an instance <LDAP Install directory>/sbin/idsslapd -I <instance name>
Stopping an instance <LDAP Install directory>/bin/ibmdirctl stop -h localhost -D cn=root -w <password for cn=root>
Checking an instance <LDAP Install directory>/bin/ibmdirctl status -h localhost -D cn=root -w <password entered for cn=root>
Displaying list of instances <LDAP Install directory>/sbin/idsilist
Loading the instance administration tool
<LDAP Install directory>/sbin/idsxinst
Loading the configuration tool for an instance
<LDAP Install directory>/sbin/idsxcfg -I <name of instance>
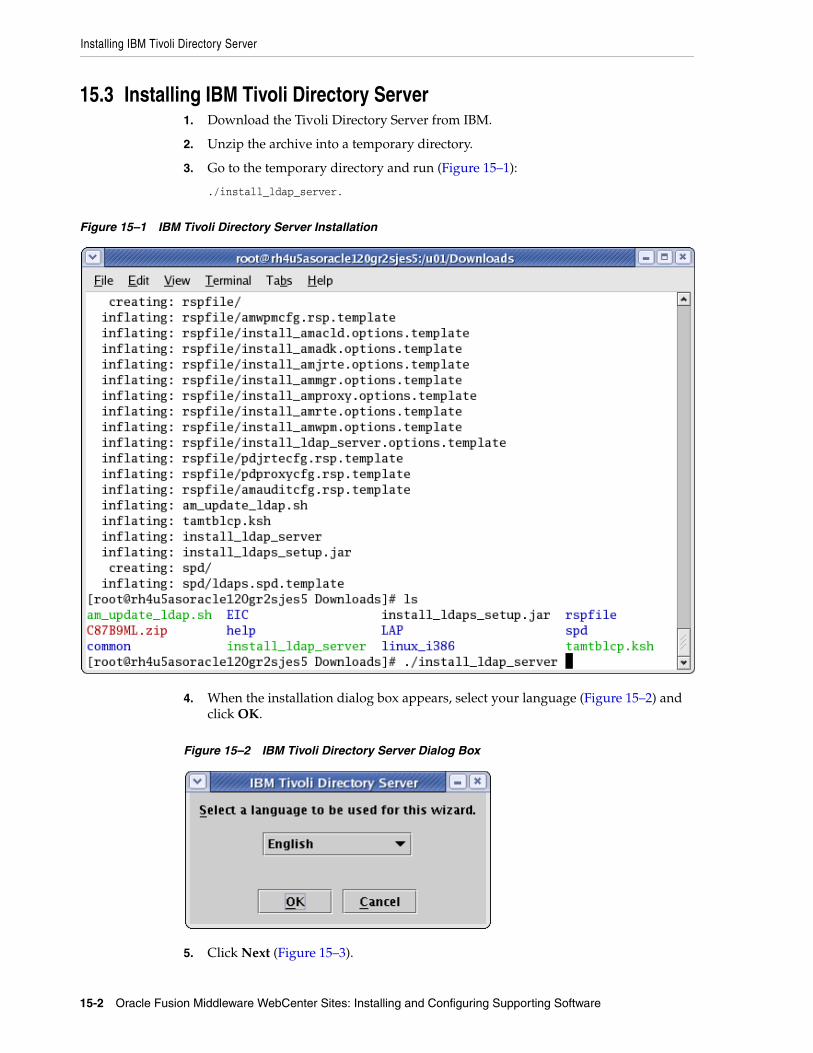
Installing IBM Tivoli Directory Server
15-2 Oracle Fusion Middleware WebCenter Sites: Installing and Configuring Supporting Software
15.3 Installing IBM Tivoli Directory Server1. Download the Tivoli Directory Server from IBM.
2. Unzip the archive into a temporary directory.
3. Go to the temporary directory and run (Figure 15–1):
./install_ldap_server.
Figure 15–1 IBM Tivoli Directory Server Installation
4. When the installation dialog box appears, select your language (Figure 15–2) and click OK.
Figure 15–2 IBM Tivoli Directory Server Dialog Box
5. Click Next (Figure 15–3).
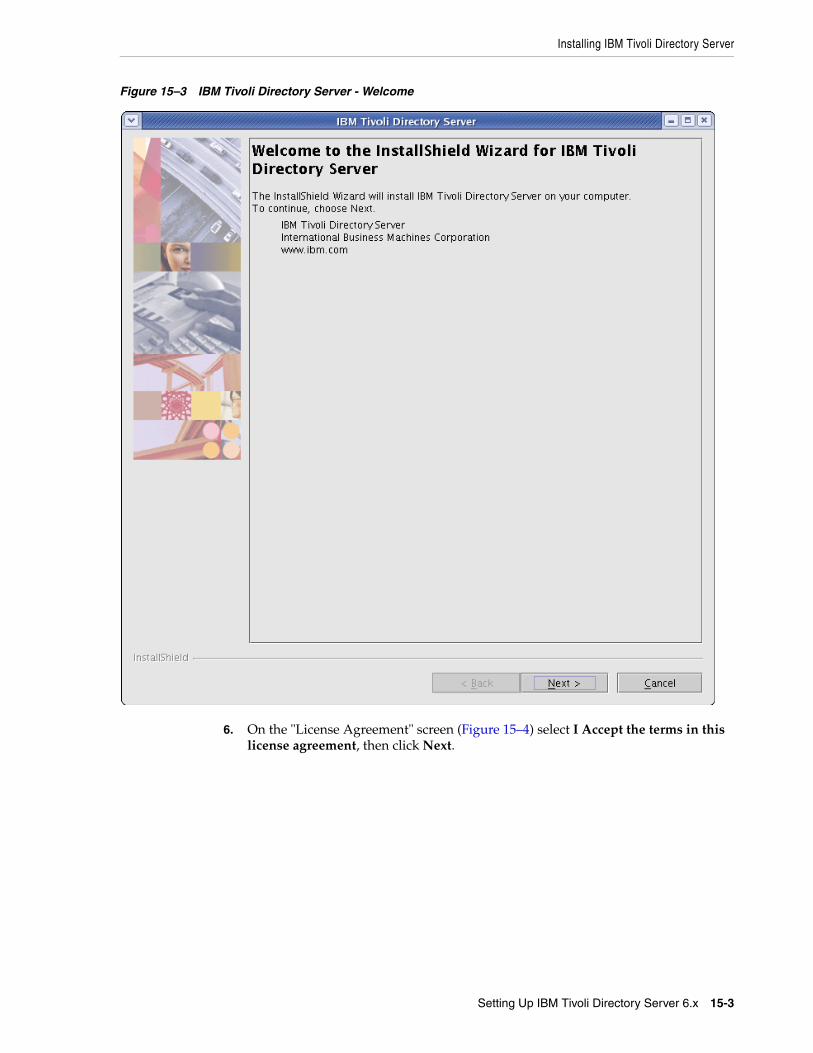
Installing IBM Tivoli Directory Server
Setting Up IBM Tivoli Directory Server 6.x 15-3
Figure 15–3 IBM Tivoli Directory Server - Welcome
6. On the "License Agreement" screen (Figure 15–4) select I Accept the terms in this license agreement, then click Next.
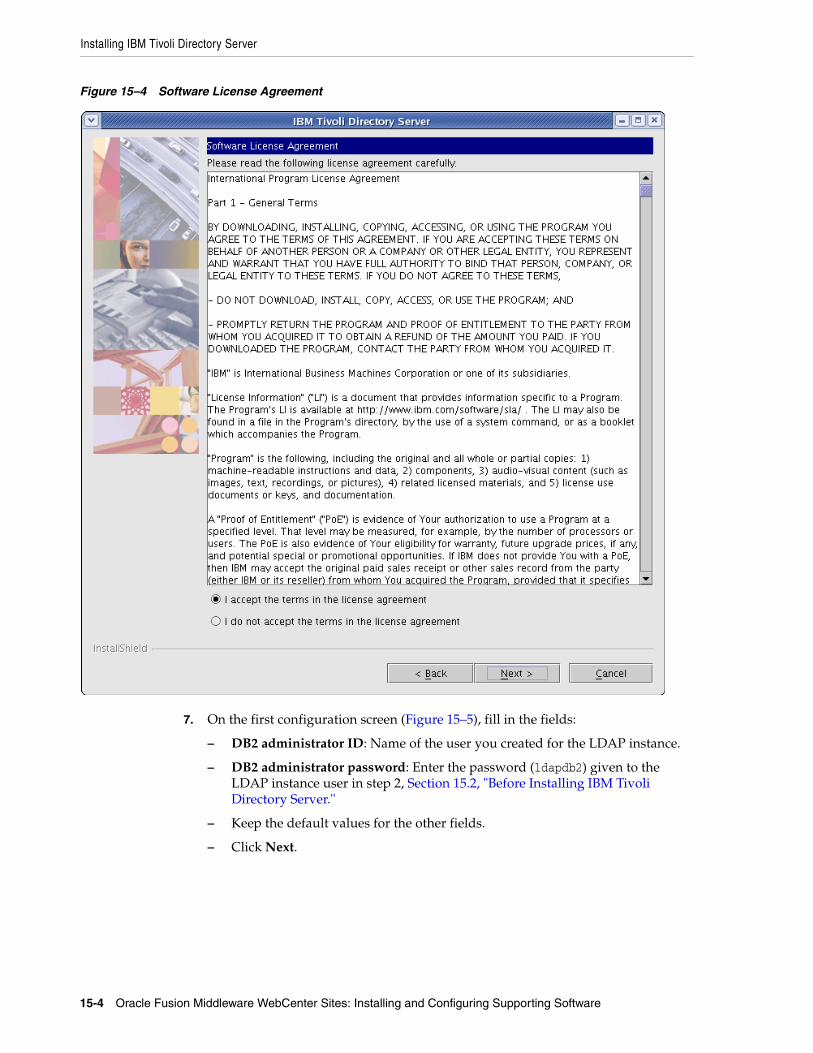
Installing IBM Tivoli Directory Server
15-4 Oracle Fusion Middleware WebCenter Sites: Installing and Configuring Supporting Software
Figure 15–4 Software License Agreement
7. On the first configuration screen (Figure 15–5), fill in the fields:
– DB2 administrator ID: Name of the user you created for the LDAP instance.
– DB2 administrator password: Enter the password (ldapdb2) given to the LDAP instance user in step 2, Section 15.2, "Before Installing IBM Tivoli Directory Server."
– Keep the default values for the other fields.
– Click Next.

Installing IBM Tivoli Directory Server
Setting Up IBM Tivoli Directory Server 6.x 15-5
Figure 15–5 Database information
8. On the second configuration screen (Figure 15–6), fill in the fields:
a. Administrator password: Enter a password and remember it. This password will re-occur throughout the configuration and will be referred to as sn=root.
b. User-defined suffix: dc=<domain>,dc=<ext> For example, if your domain is example.com, then the User-defined suffix should read: dc=example,dc=com.
c. Confirm that the Local hostname is correct.
d. Click Next.
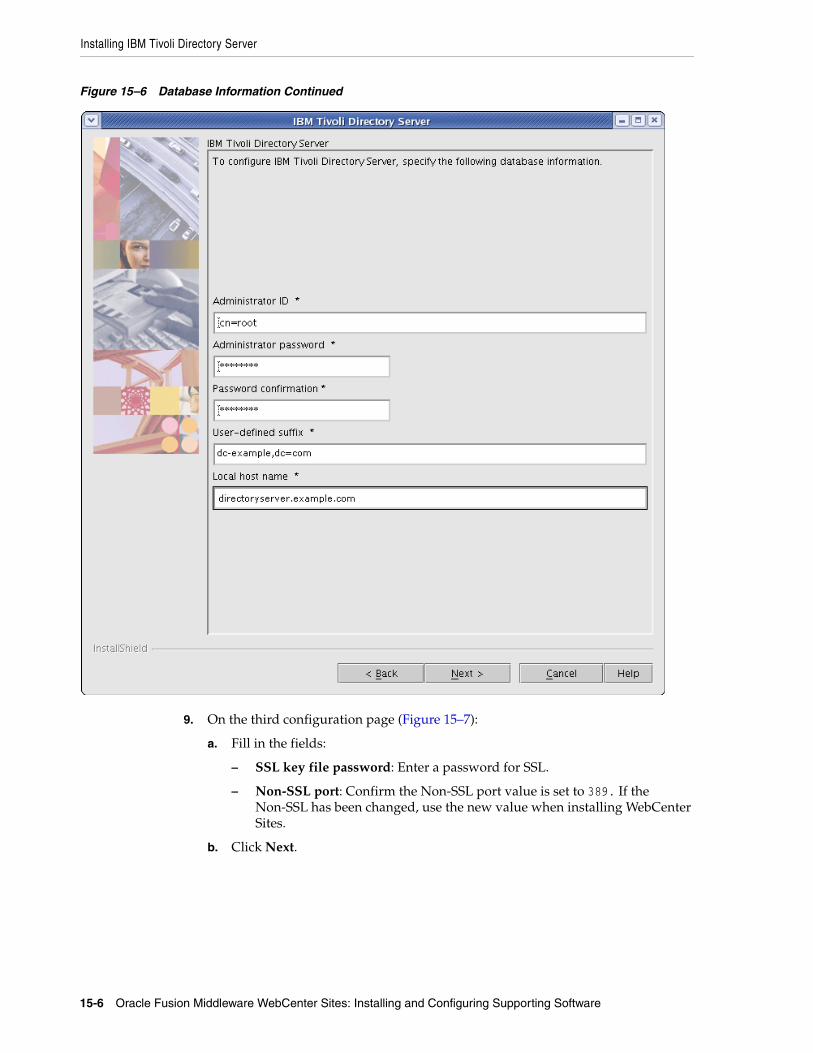
Installing IBM Tivoli Directory Server
15-6 Oracle Fusion Middleware WebCenter Sites: Installing and Configuring Supporting Software
Figure 15–6 Database Information Continued
9. On the third configuration page (Figure 15–7):
a. Fill in the fields:
– SSL key file password: Enter a password for SSL.
– Non-SSL port: Confirm the Non-SSL port value is set to 389. If the Non-SSL has been changed, use the new value when installing WebCenter Sites.
b. Click Next.
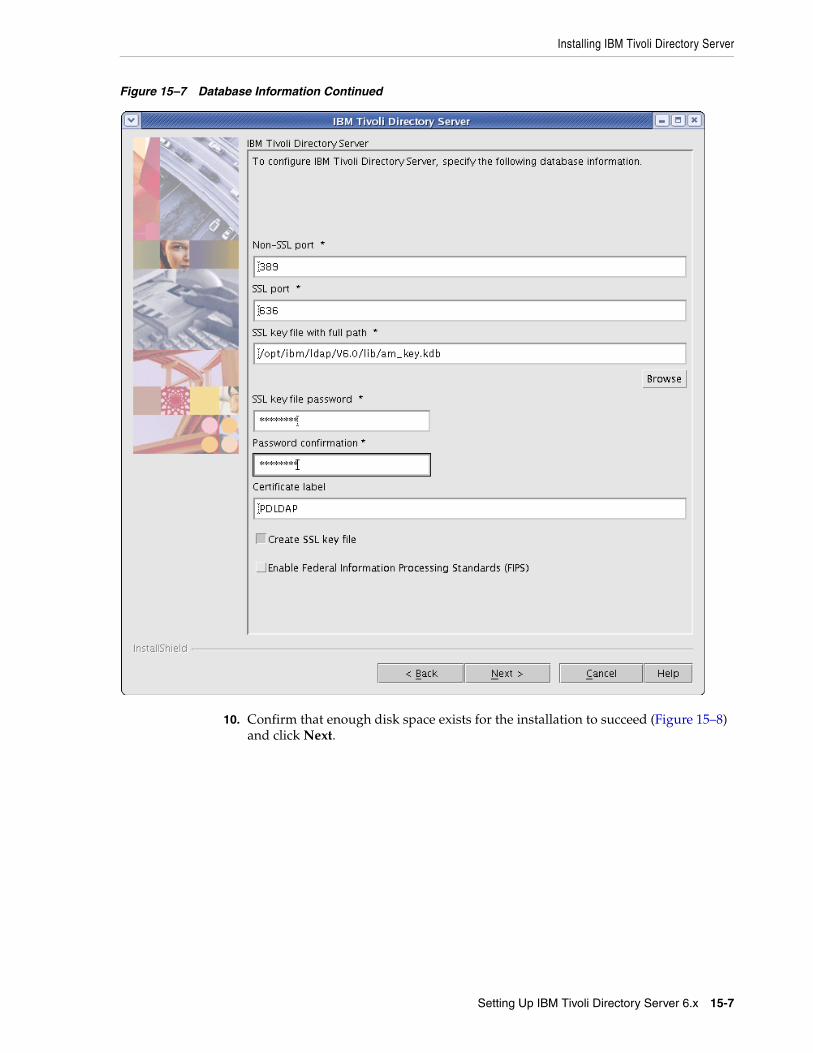
Installing IBM Tivoli Directory Server
Setting Up IBM Tivoli Directory Server 6.x 15-7
Figure 15–7 Database Information Continued
10. Confirm that enough disk space exists for the installation to succeed (Figure 15–8) and click Next.
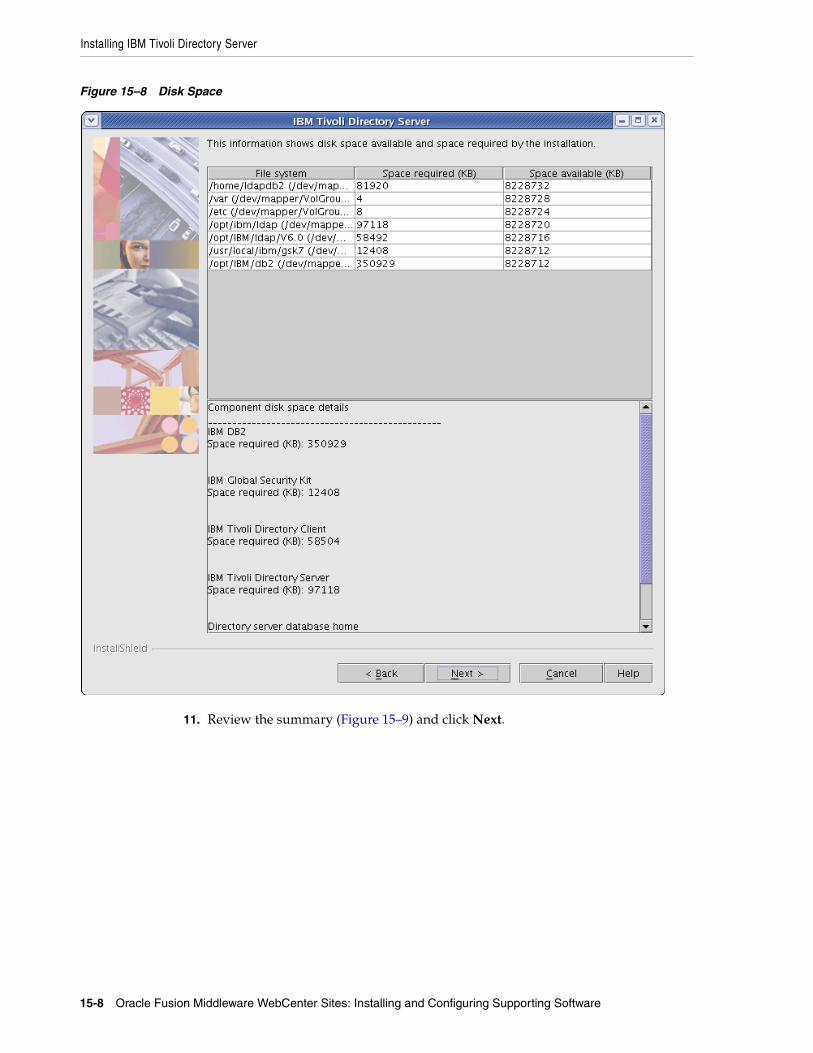
Installing IBM Tivoli Directory Server
15-8 Oracle Fusion Middleware WebCenter Sites: Installing and Configuring Supporting Software
Figure 15–8 Disk Space
11. Review the summary (Figure 15–9) and click Next.
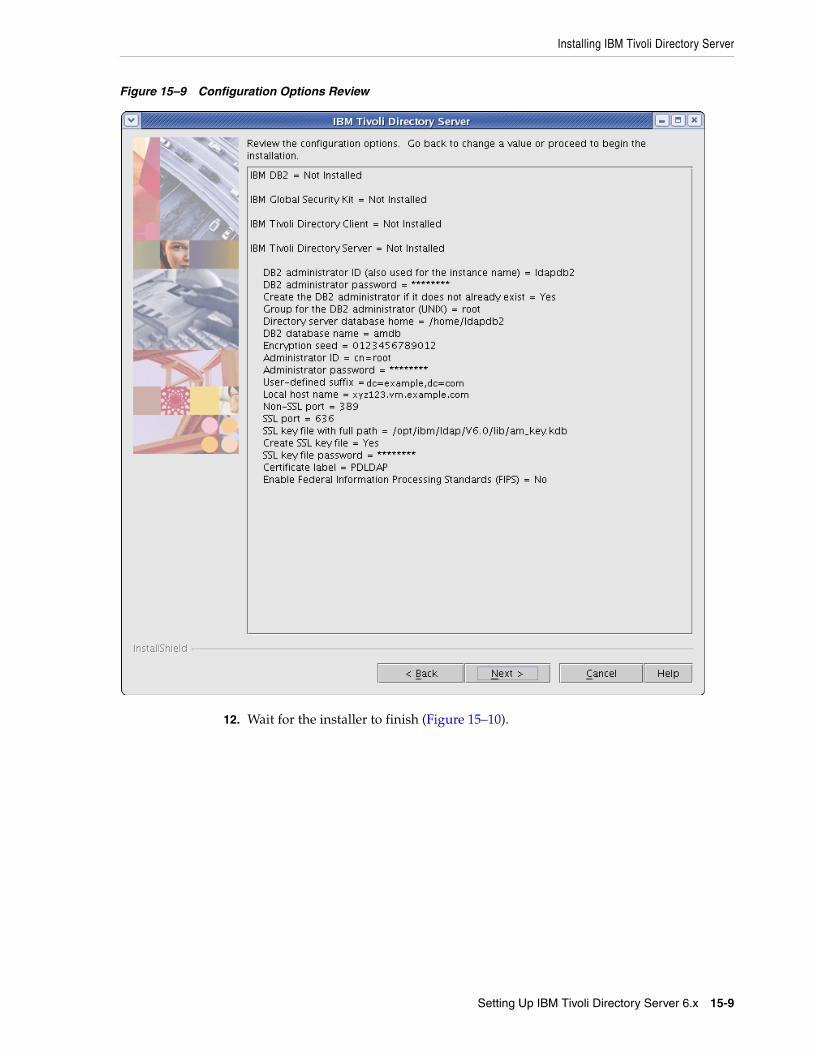
Installing IBM Tivoli Directory Server
Setting Up IBM Tivoli Directory Server 6.x 15-9
Figure 15–9 Configuration Options Review
12. Wait for the installer to finish (Figure 15–10).
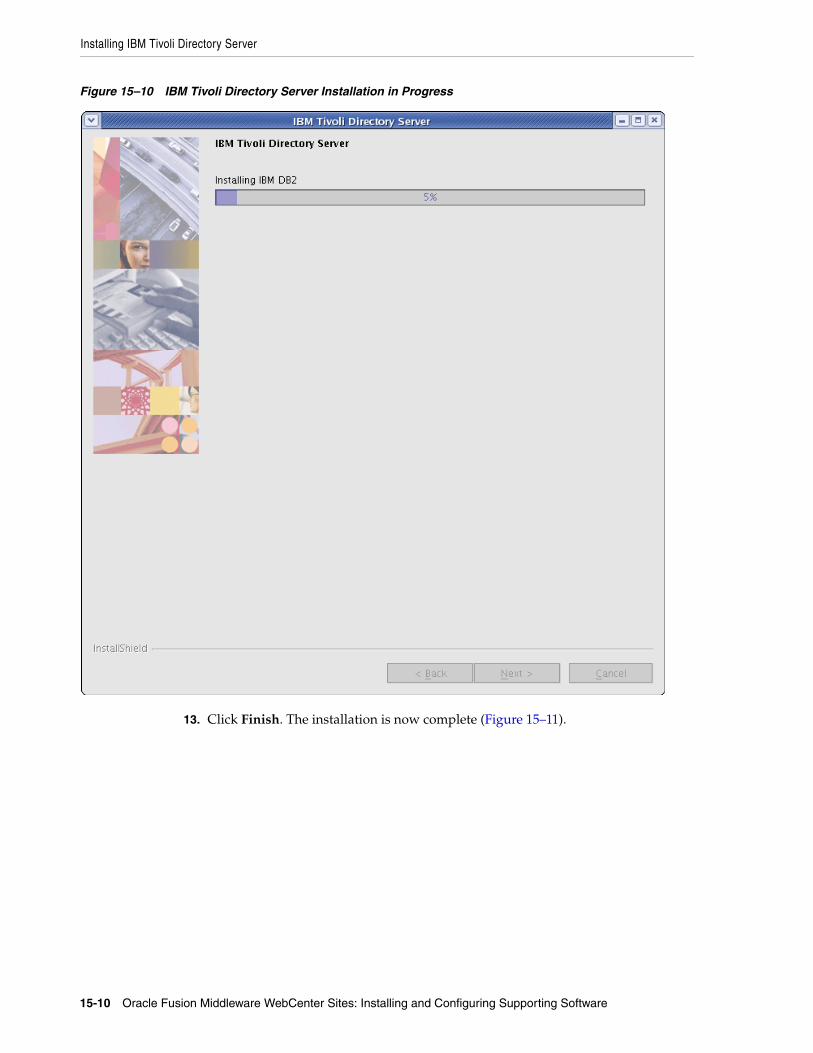
Installing IBM Tivoli Directory Server
15-10 Oracle Fusion Middleware WebCenter Sites: Installing and Configuring Supporting Software
Figure 15–10 IBM Tivoli Directory Server Installation in Progress
13. Click Finish. The installation is now complete (Figure 15–11).
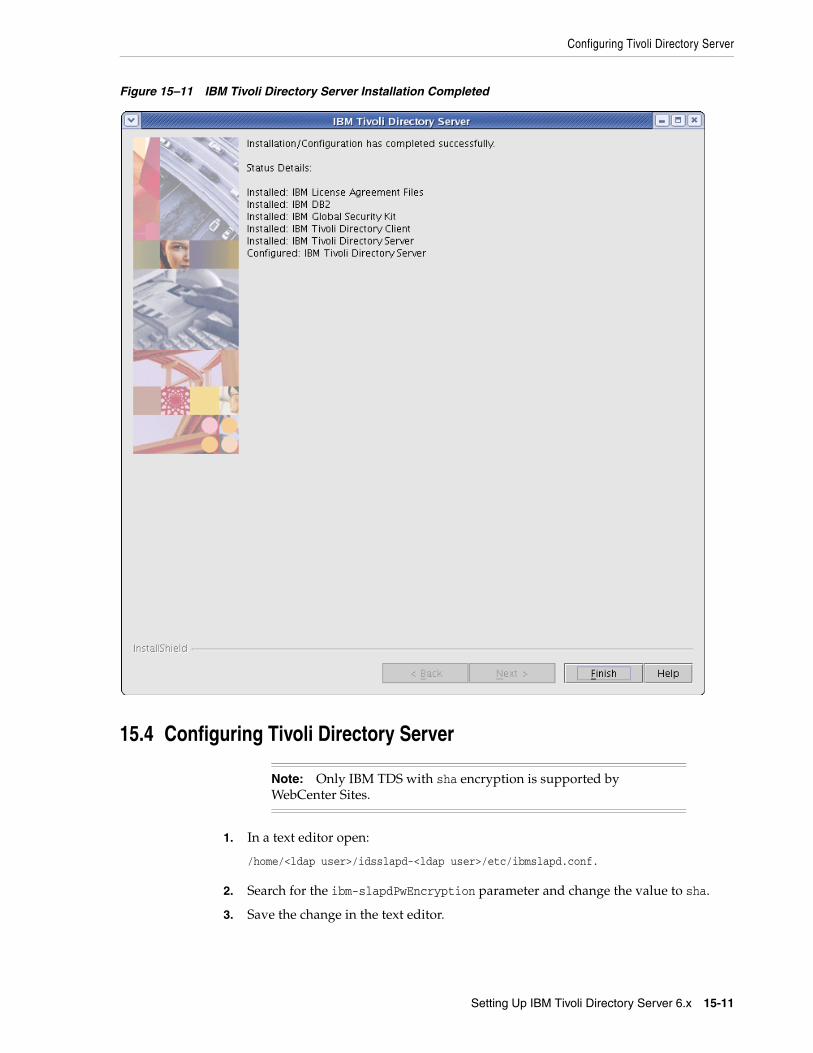
Configuring Tivoli Directory Server
Setting Up IBM Tivoli Directory Server 6.x 15-11
Figure 15–11 IBM Tivoli Directory Server Installation Completed
15.4 Configuring Tivoli Directory Server
1. In a text editor open:
/home/<ldap user>/idsslapd-<ldap user>/etc/ibmslapd.conf.
2. Search for the ibm-slapdPwEncryption parameter and change the value to sha.
3. Save the change in the text editor.
Note: Only IBM TDS with sha encryption is supported by WebCenter Sites.
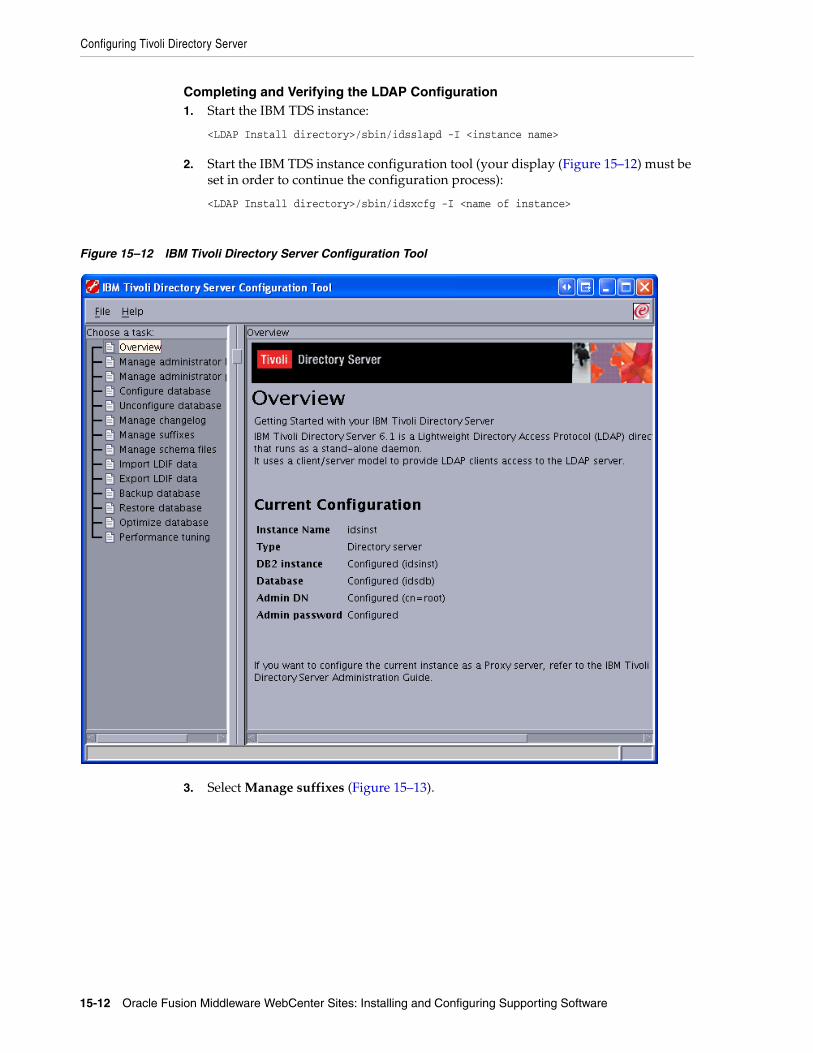
Configuring Tivoli Directory Server
15-12 Oracle Fusion Middleware WebCenter Sites: Installing and Configuring Supporting Software
Completing and Verifying the LDAP Configuration1. Start the IBM TDS instance:
<LDAP Install directory>/sbin/idsslapd -I <instance name>
2. Start the IBM TDS instance configuration tool (your display (Figure 15–12) must be set in order to continue the configuration process):
<LDAP Install directory>/sbin/idsxcfg -I <name of instance>
Figure 15–12 IBM Tivoli Directory Server Configuration Tool
3. Select Manage suffixes (Figure 15–13).
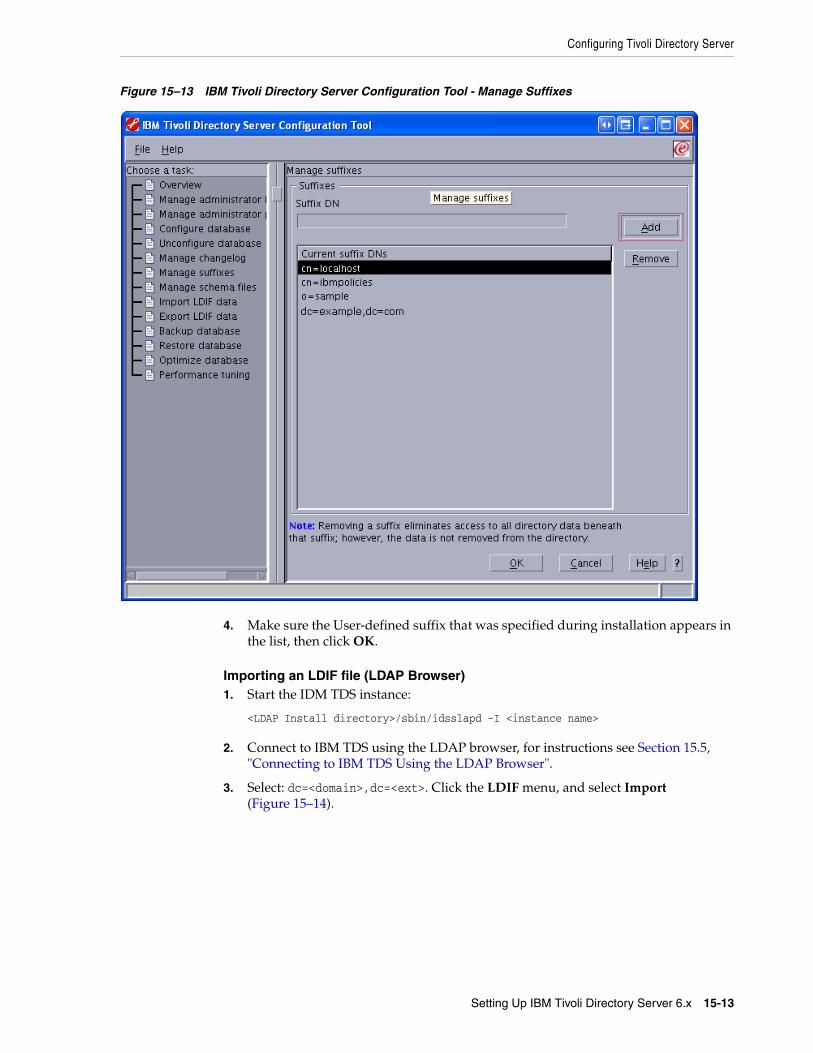
Configuring Tivoli Directory Server
Setting Up IBM Tivoli Directory Server 6.x 15-13
Figure 15–13 IBM Tivoli Directory Server Configuration Tool - Manage Suffixes
4. Make sure the User-defined suffix that was specified during installation appears in the list, then click OK.
Importing an LDIF file (LDAP Browser)1. Start the IDM TDS instance:
<LDAP Install directory>/sbin/idsslapd -I <instance name>
2. Connect to IBM TDS using the LDAP browser, for instructions see Section 15.5, "Connecting to IBM TDS Using the LDAP Browser".
3. Select: dc=<domain>,dc=<ext>. Click the LDIF menu, and select Import (Figure 15–14).
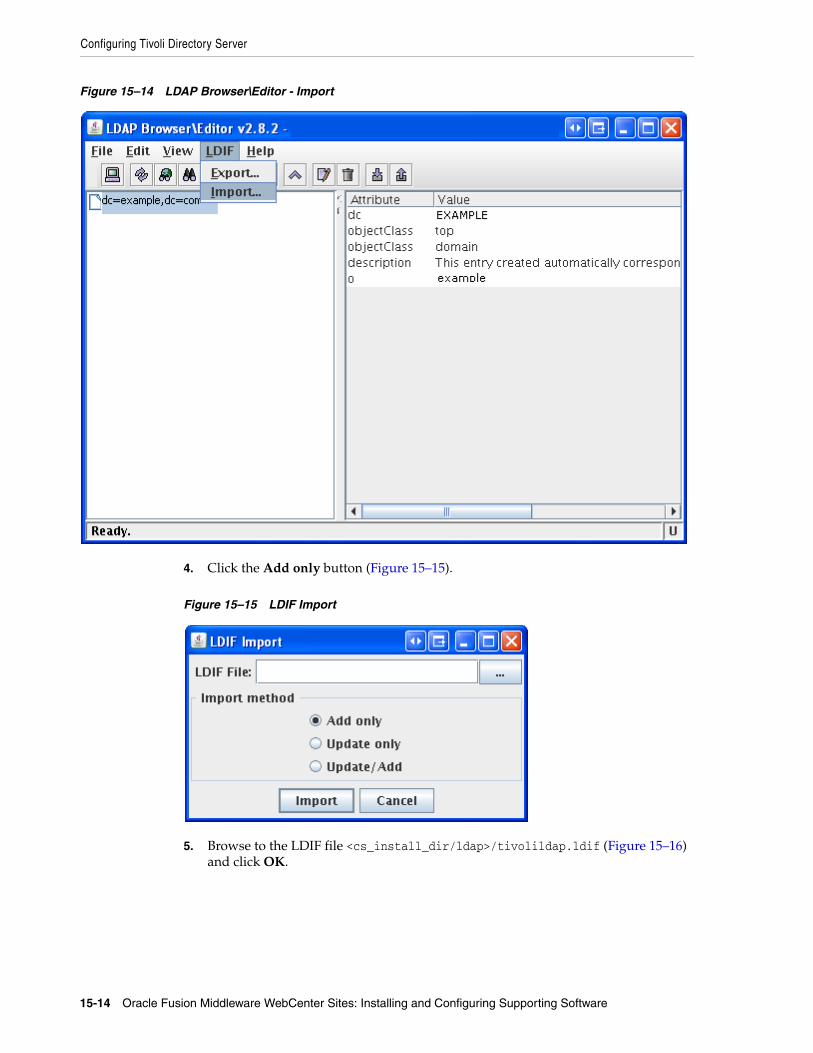
Configuring Tivoli Directory Server
15-14 Oracle Fusion Middleware WebCenter Sites: Installing and Configuring Supporting Software
Figure 15–14 LDAP Browser\Editor - Import
4. Click the Add only button (Figure 15–15).
Figure 15–15 LDIF Import
5. Browse to the LDIF file <cs_install_dir/ldap>/tivolildap.ldif (Figure 15–16) and click OK.
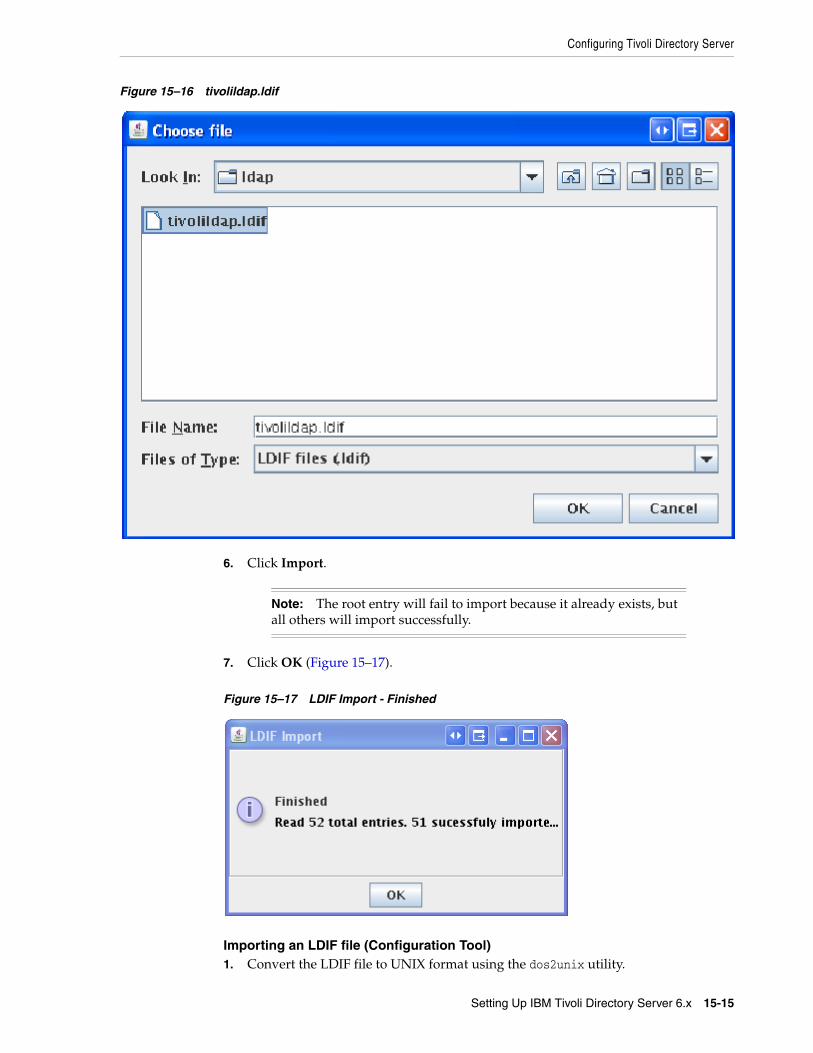
Configuring Tivoli Directory Server
Setting Up IBM Tivoli Directory Server 6.x 15-15
Figure 15–16 tivolildap.ldif
6. Click Import.
7. Click OK (Figure 15–17).
Figure 15–17 LDIF Import - Finished
Importing an LDIF file (Configuration Tool)1. Convert the LDIF file to UNIX format using the dos2unix utility.
Note: The root entry will fail to import because it already exists, but all others will import successfully.
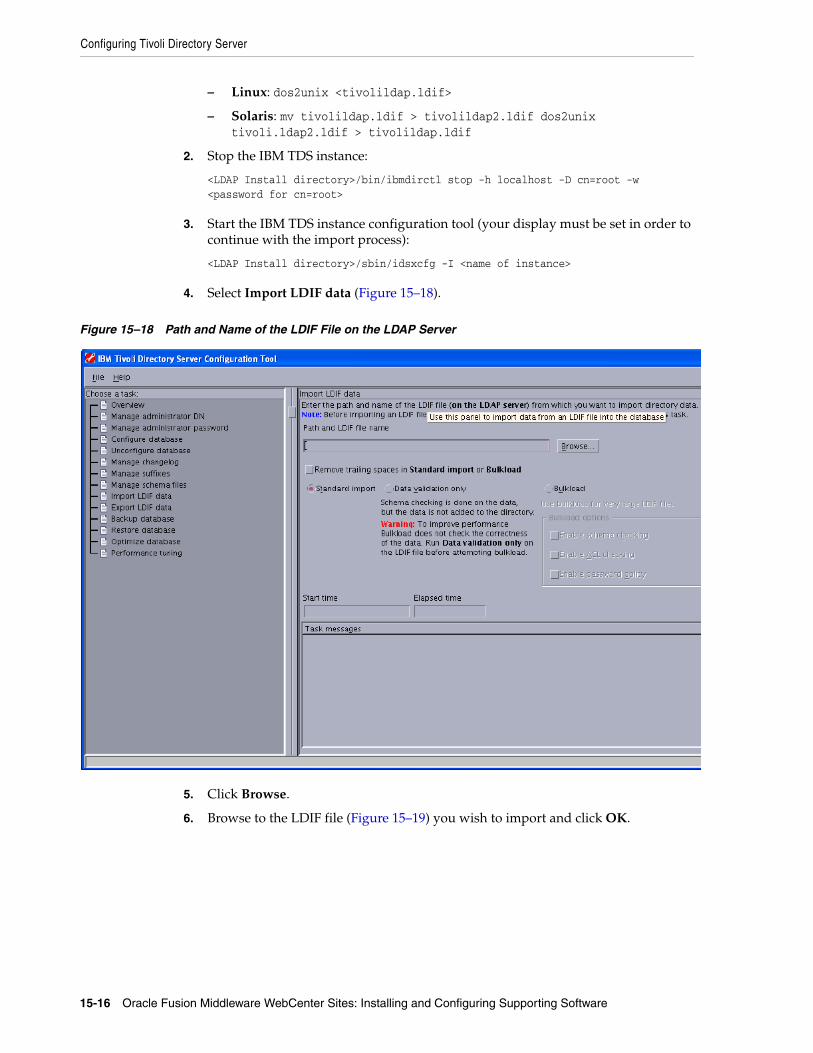
Configuring Tivoli Directory Server
15-16 Oracle Fusion Middleware WebCenter Sites: Installing and Configuring Supporting Software
– Linux: dos2unix <tivolildap.ldif>
– Solaris: mv tivolildap.ldif > tivolildap2.ldif dos2unix tivoli.ldap2.ldif > tivolildap.ldif
2. Stop the IBM TDS instance:
<LDAP Install directory>/bin/ibmdirctl stop -h localhost -D cn=root -w <password for cn=root>
3. Start the IBM TDS instance configuration tool (your display must be set in order to continue with the import process):
<LDAP Install directory>/sbin/idsxcfg -I <name of instance>
4. Select Import LDIF data (Figure 15–18).
Figure 15–18 Path and Name of the LDIF File on the LDAP Server
5. Click Browse.
6. Browse to the LDIF file (Figure 15–19) you wish to import and click OK.
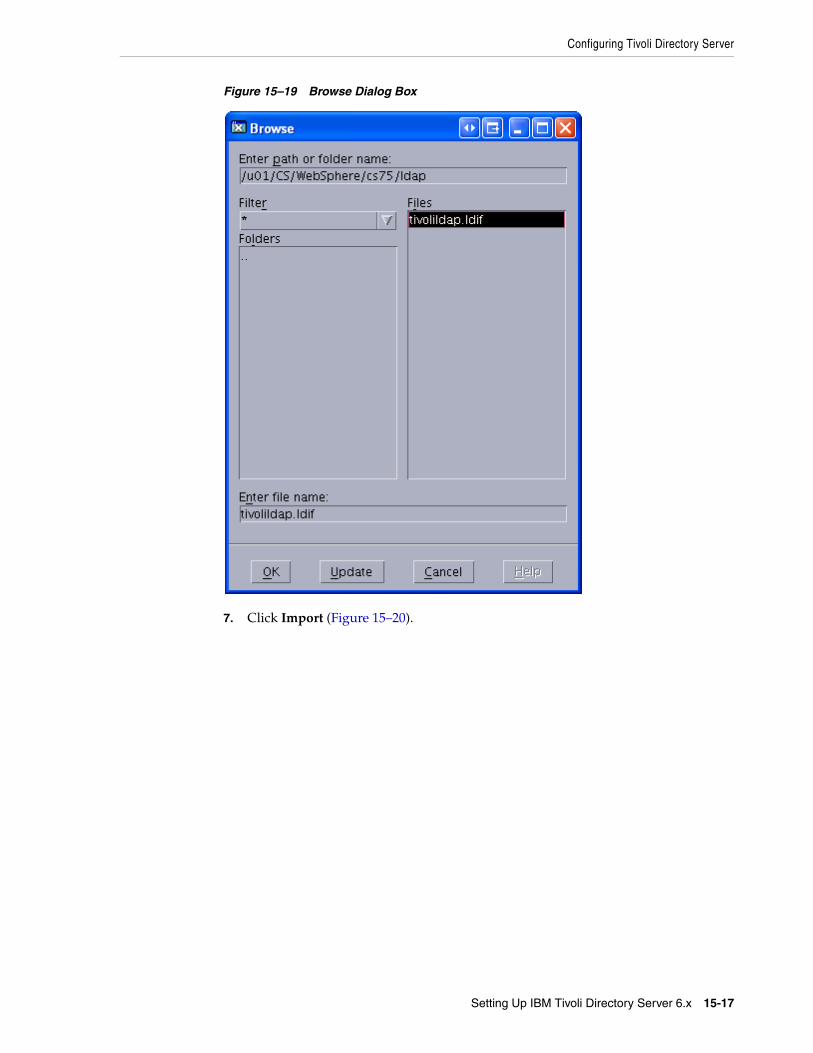
Configuring Tivoli Directory Server
Setting Up IBM Tivoli Directory Server 6.x 15-17
Figure 15–19 Browse Dialog Box
7. Click Import (Figure 15–20).
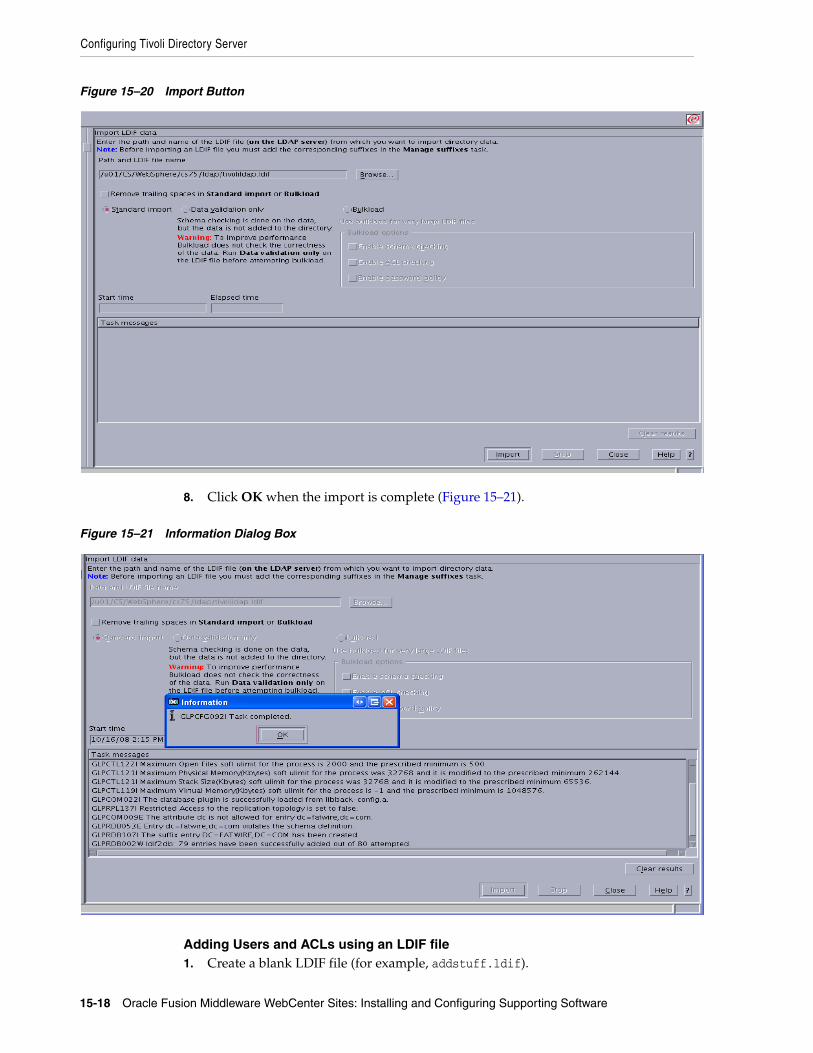
Configuring Tivoli Directory Server
15-18 Oracle Fusion Middleware WebCenter Sites: Installing and Configuring Supporting Software
Figure 15–20 Import Button
8. Click OK when the import is complete (Figure 15–21).
Figure 15–21 Information Dialog Box
Adding Users and ACLs using an LDIF file1. Create a blank LDIF file (for example, addstuff.ldif).
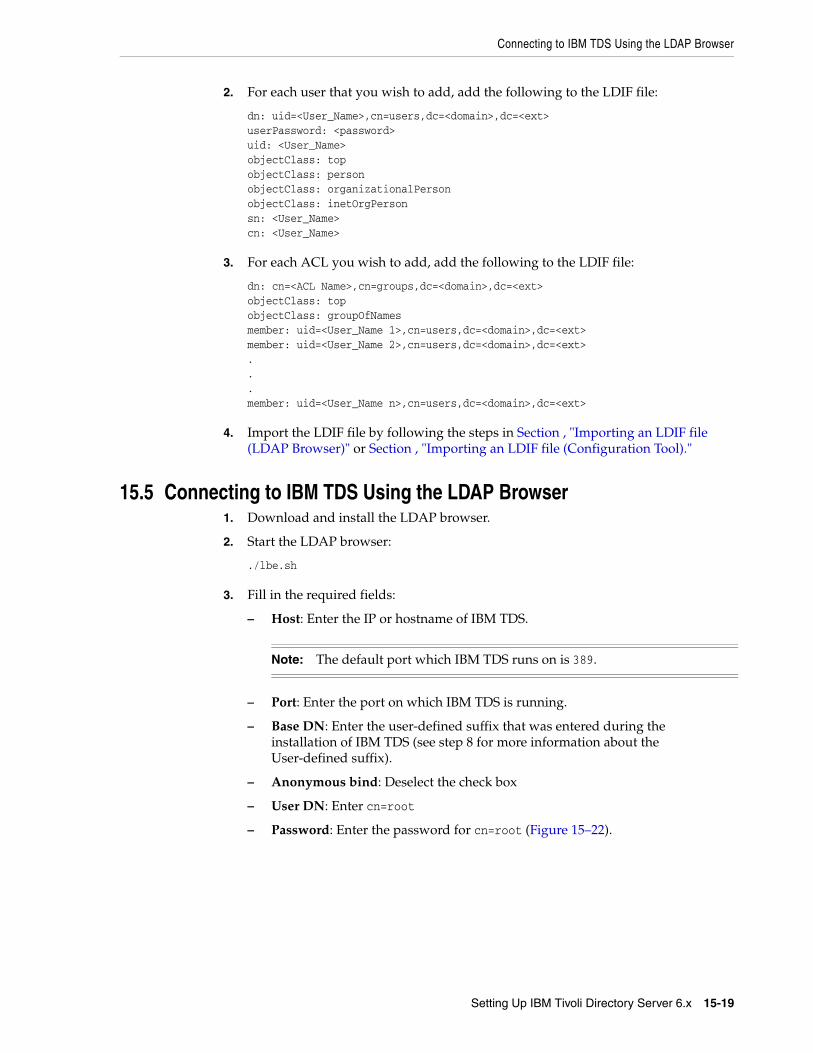
Connecting to IBM TDS Using the LDAP Browser
Setting Up IBM Tivoli Directory Server 6.x 15-19
2. For each user that you wish to add, add the following to the LDIF file:
dn: uid=<User_Name>,cn=users,dc=<domain>,dc=<ext>userPassword: <password>uid: <User_Name>objectClass: topobjectClass: personobjectClass: organizationalPersonobjectClass: inetOrgPersonsn: <User_Name>cn: <User_Name>
3. For each ACL you wish to add, add the following to the LDIF file:
dn: cn=<ACL Name>,cn=groups,dc=<domain>,dc=<ext>objectClass: topobjectClass: groupOfNamesmember: uid=<User_Name 1>,cn=users,dc=<domain>,dc=<ext>member: uid=<User_Name 2>,cn=users,dc=<domain>,dc=<ext>...member: uid=<User_Name n>,cn=users,dc=<domain>,dc=<ext>
4. Import the LDIF file by following the steps in Section , "Importing an LDIF file (LDAP Browser)" or Section , "Importing an LDIF file (Configuration Tool)."
15.5 Connecting to IBM TDS Using the LDAP Browser1. Download and install the LDAP browser.
2. Start the LDAP browser:
./lbe.sh
3. Fill in the required fields:
– Host: Enter the IP or hostname of IBM TDS.
– Port: Enter the port on which IBM TDS is running.
– Base DN: Enter the user-defined suffix that was entered during the installation of IBM TDS (see step 8 for more information about the User-defined suffix).
– Anonymous bind: Deselect the check box
– User DN: Enter cn=root
– Password: Enter the password for cn=root (Figure 15–22).
Note: The default port which IBM TDS runs on is 389.
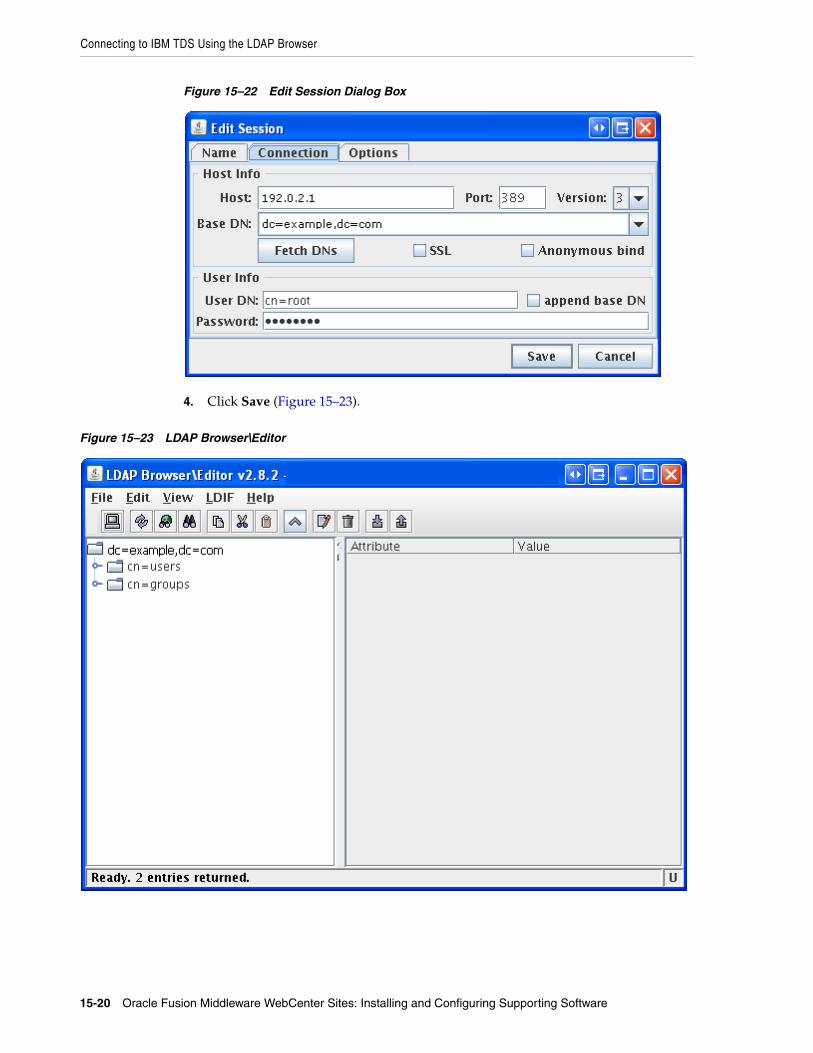
Connecting to IBM TDS Using the LDAP Browser
15-20 Oracle Fusion Middleware WebCenter Sites: Installing and Configuring Supporting Software
Figure 15–22 Edit Session Dialog Box
4. Click Save (Figure 15–23).
Figure 15–23 LDAP Browser\Editor
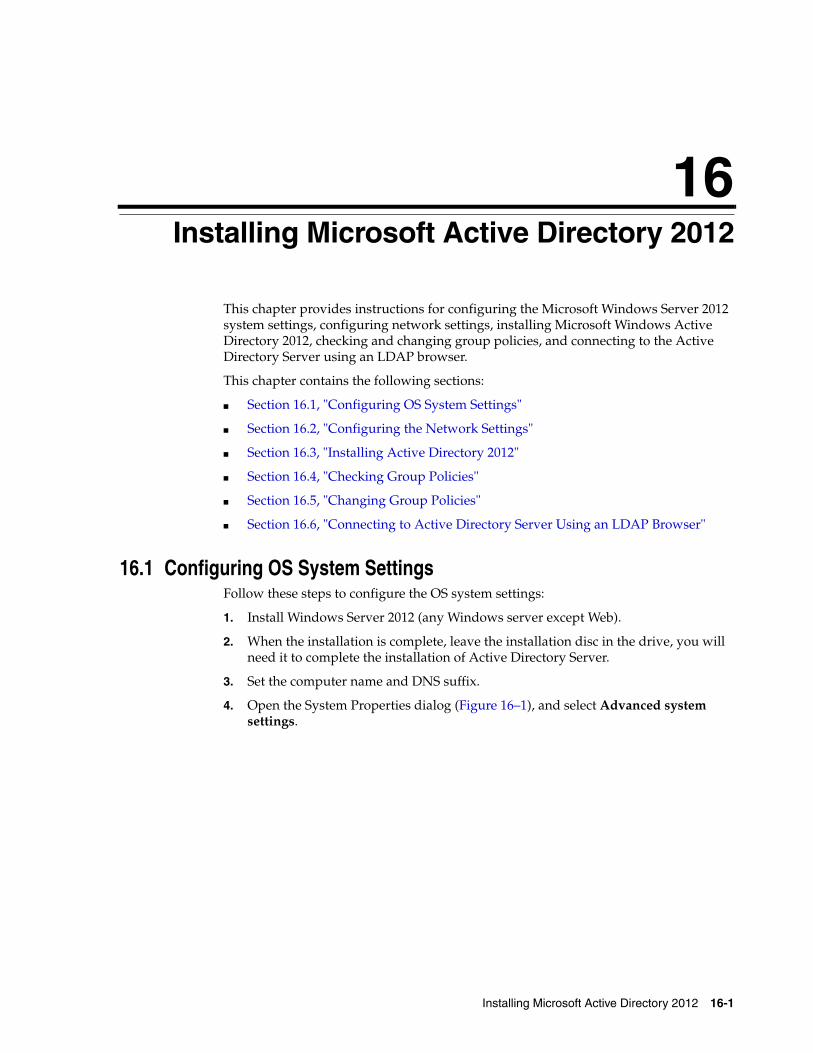
16
Installing Microsoft Active Directory 2012 16-1
16Installing Microsoft Active Directory 2012
This chapter provides instructions for configuring the Microsoft Windows Server 2012 system settings, configuring network settings, installing Microsoft Windows Active Directory 2012, checking and changing group policies, and connecting to the Active Directory Server using an LDAP browser.
This chapter contains the following sections:
■ Section 16.1, "Configuring OS System Settings"
■ Section 16.2, "Configuring the Network Settings"
■ Section 16.3, "Installing Active Directory 2012"
■ Section 16.4, "Checking Group Policies"
■ Section 16.5, "Changing Group Policies"
■ Section 16.6, "Connecting to Active Directory Server Using an LDAP Browser"
16.1 Configuring OS System SettingsFollow these steps to configure the OS system settings:
1. Install Windows Server 2012 (any Windows server except Web).
2. When the installation is complete, leave the installation disc in the drive, you will need it to complete the installation of Active Directory Server.
3. Set the computer name and DNS suffix.
4. Open the System Properties dialog (Figure 16–1), and select Advanced system settings.
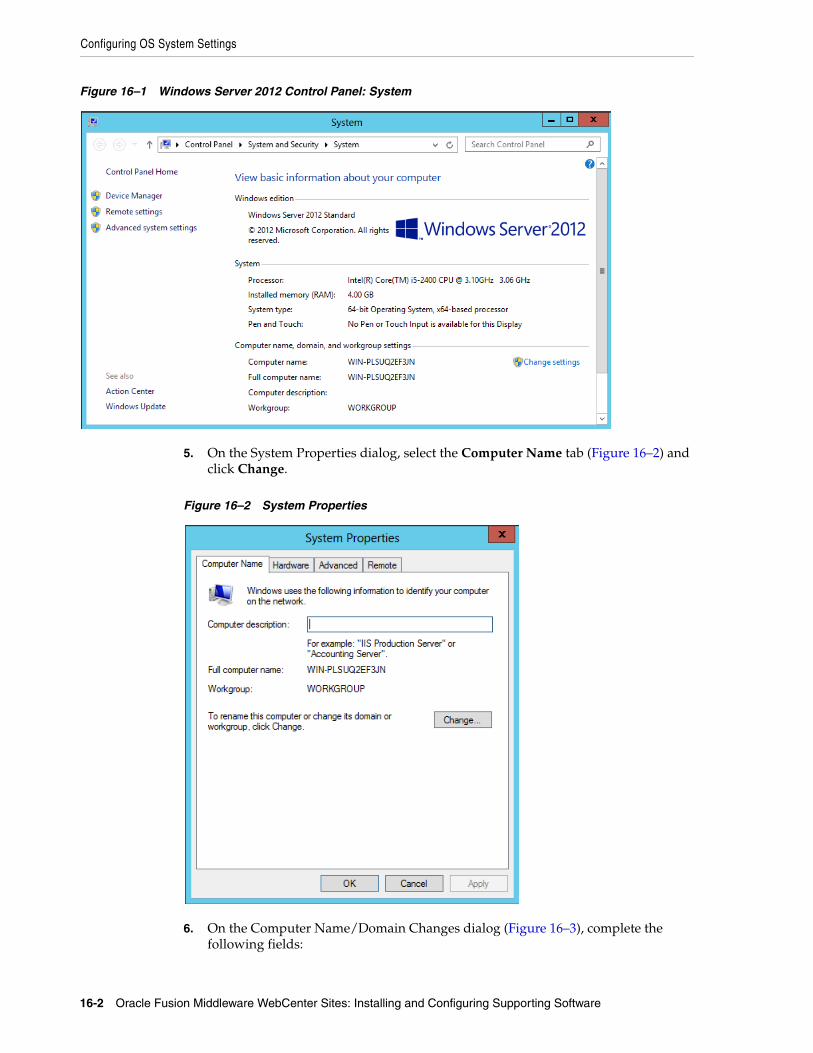
Configuring OS System Settings
16-2 Oracle Fusion Middleware WebCenter Sites: Installing and Configuring Supporting Software
Figure 16–1 Windows Server 2012 Control Panel: System
5. On the System Properties dialog, select the Computer Name tab (Figure 16–2) and click Change.
Figure 16–2 System Properties
6. On the Computer Name/Domain Changes dialog (Figure 16–3), complete the following fields:
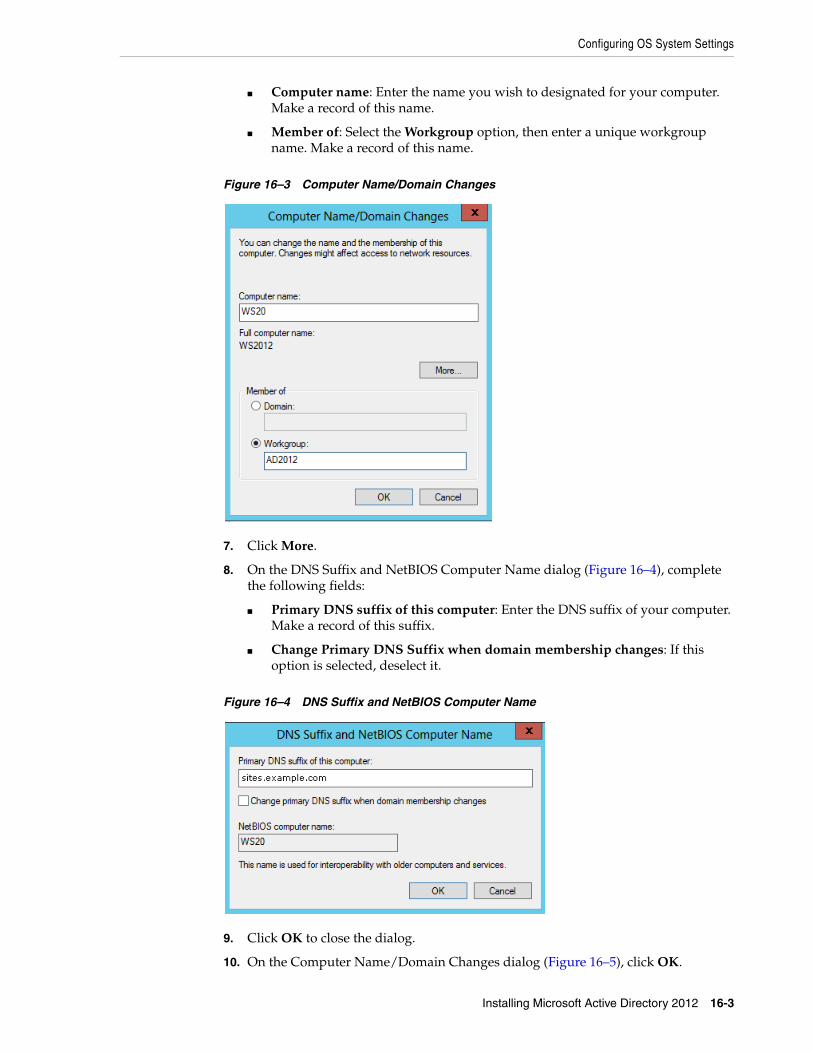
Configuring OS System Settings
Installing Microsoft Active Directory 2012 16-3
■ Computer name: Enter the name you wish to designated for your computer. Make a record of this name.
■ Member of: Select the Workgroup option, then enter a unique workgroup name. Make a record of this name.
Figure 16–3 Computer Name/Domain Changes
7. Click More.
8. On the DNS Suffix and NetBIOS Computer Name dialog (Figure 16–4), complete the following fields:
■ Primary DNS suffix of this computer: Enter the DNS suffix of your computer. Make a record of this suffix.
■ Change Primary DNS Suffix when domain membership changes: If this option is selected, deselect it.
Figure 16–4 DNS Suffix and NetBIOS Computer Name
9. Click OK to close the dialog.
10. On the Computer Name/Domain Changes dialog (Figure 16–5), click OK.
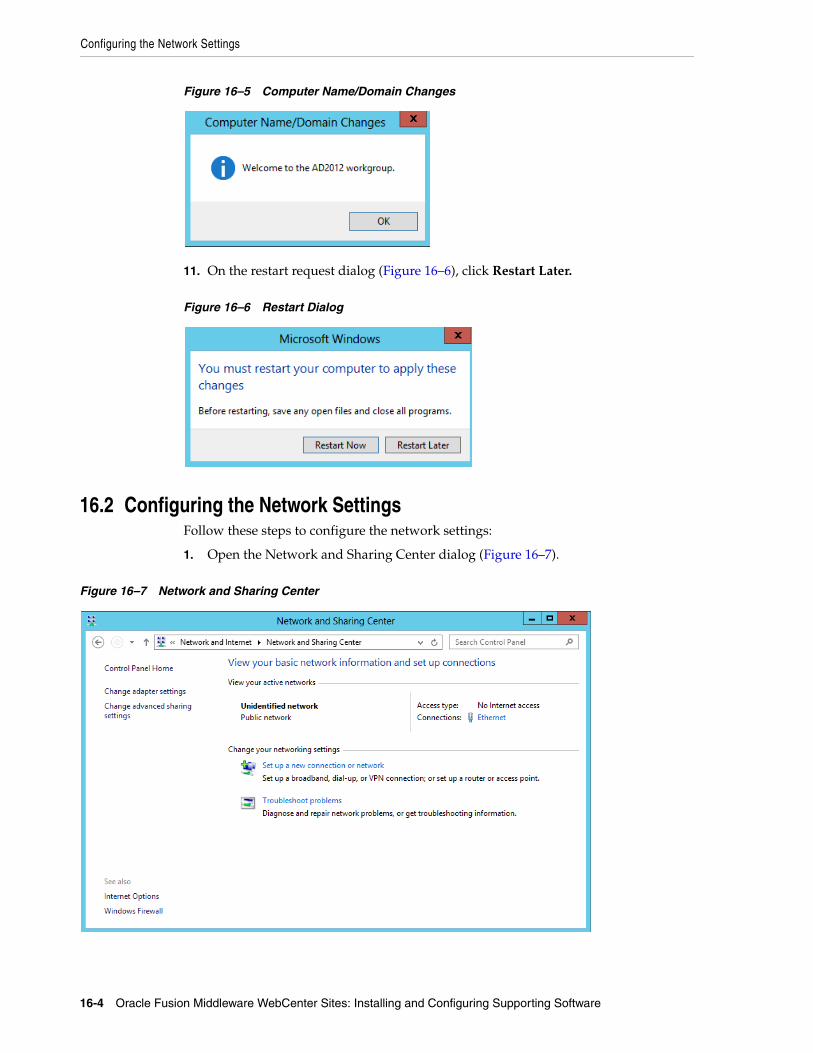
Configuring the Network Settings
16-4 Oracle Fusion Middleware WebCenter Sites: Installing and Configuring Supporting Software
Figure 16–5 Computer Name/Domain Changes
11. On the restart request dialog (Figure 16–6), click Restart Later.
Figure 16–6 Restart Dialog
16.2 Configuring the Network SettingsFollow these steps to configure the network settings:
1. Open the Network and Sharing Center dialog (Figure 16–7).
Figure 16–7 Network and Sharing Center
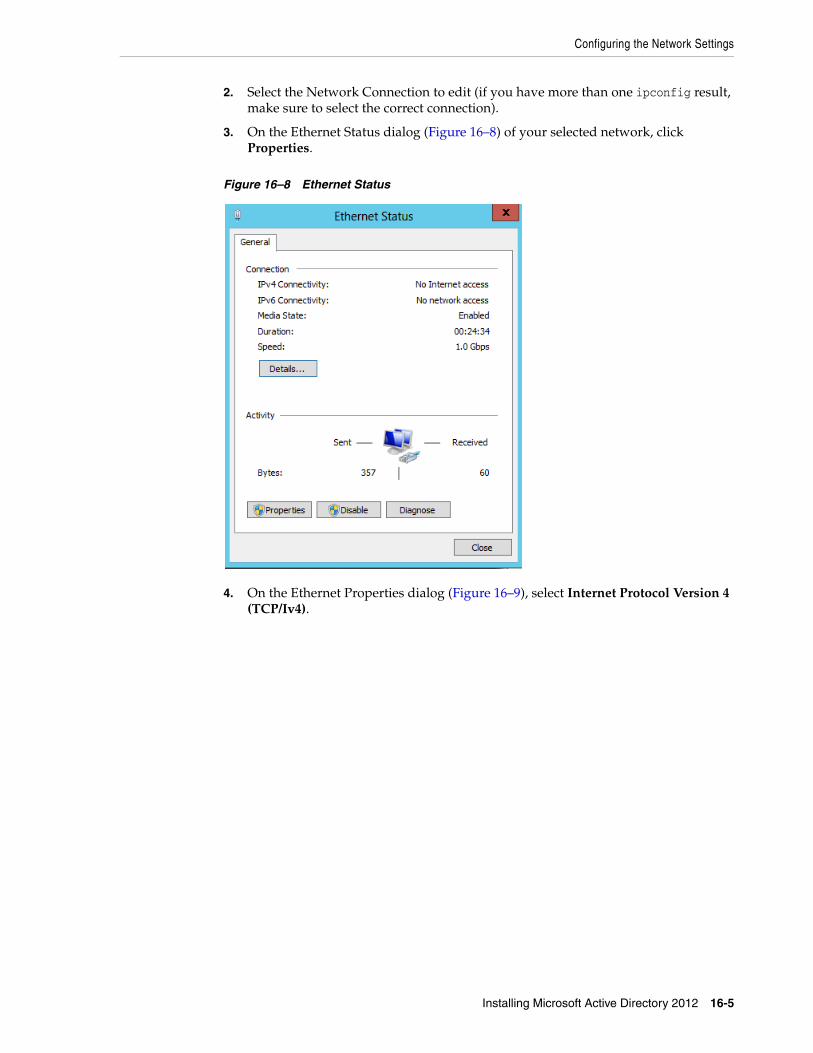
Configuring the Network Settings
Installing Microsoft Active Directory 2012 16-5
2. Select the Network Connection to edit (if you have more than one ipconfig result, make sure to select the correct connection).
3. On the Ethernet Status dialog (Figure 16–8) of your selected network, click Properties.
Figure 16–8 Ethernet Status
4. On the Ethernet Properties dialog (Figure 16–9), select Internet Protocol Version 4 (TCP/Iv4).

Configuring the Network Settings
16-6 Oracle Fusion Middleware WebCenter Sites: Installing and Configuring Supporting Software
Figure 16–9 Ethernet Properties
5. Set the IP address to an unused, static IP address. Set the preferred DNS server to your computer's IP address.
6. Click Advanced.
7. On the Advanced TCP/IP Settings dialog (Figure 16–10), select the DNS tab and complete the following tasks:
■ Enable the Append primary and connection specific DNS suffixes option.
■ Enable the Append parent suffixes of the primary DNS suffix option.
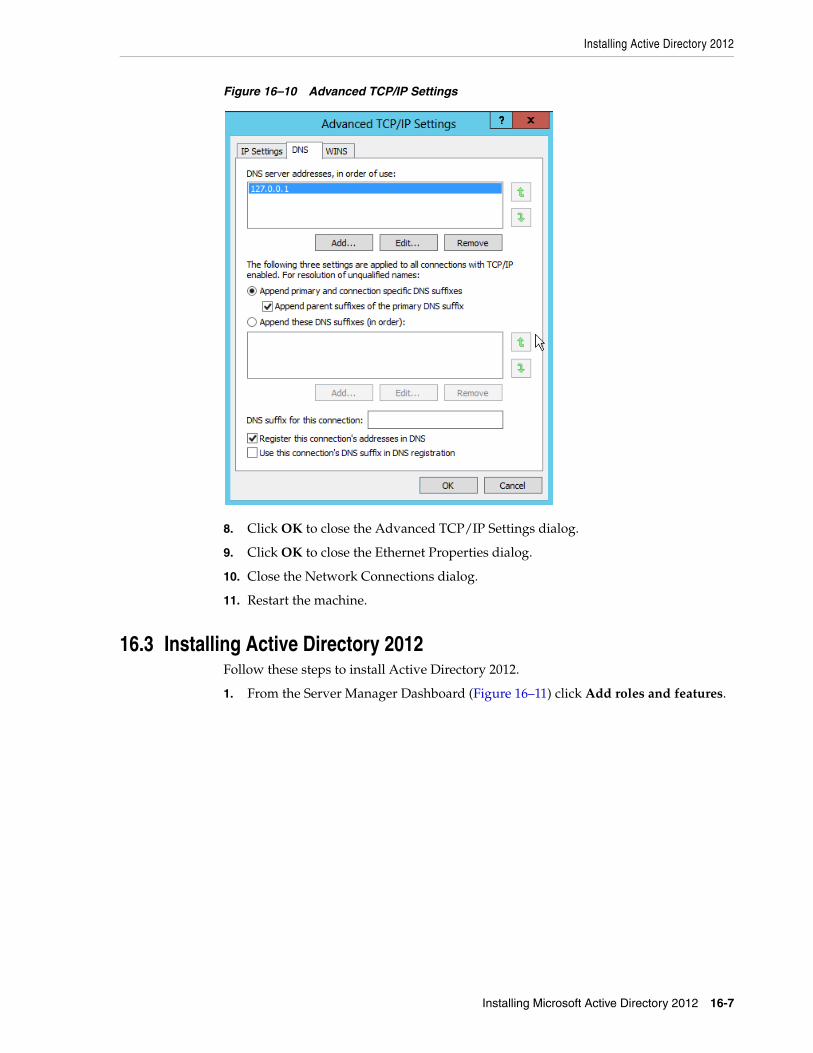
Installing Active Directory 2012
Installing Microsoft Active Directory 2012 16-7
Figure 16–10 Advanced TCP/IP Settings
8. Click OK to close the Advanced TCP/IP Settings dialog.
9. Click OK to close the Ethernet Properties dialog.
10. Close the Network Connections dialog.
11. Restart the machine.
16.3 Installing Active Directory 2012Follow these steps to install Active Directory 2012.
1. From the Server Manager Dashboard (Figure 16–11) click Add roles and features.
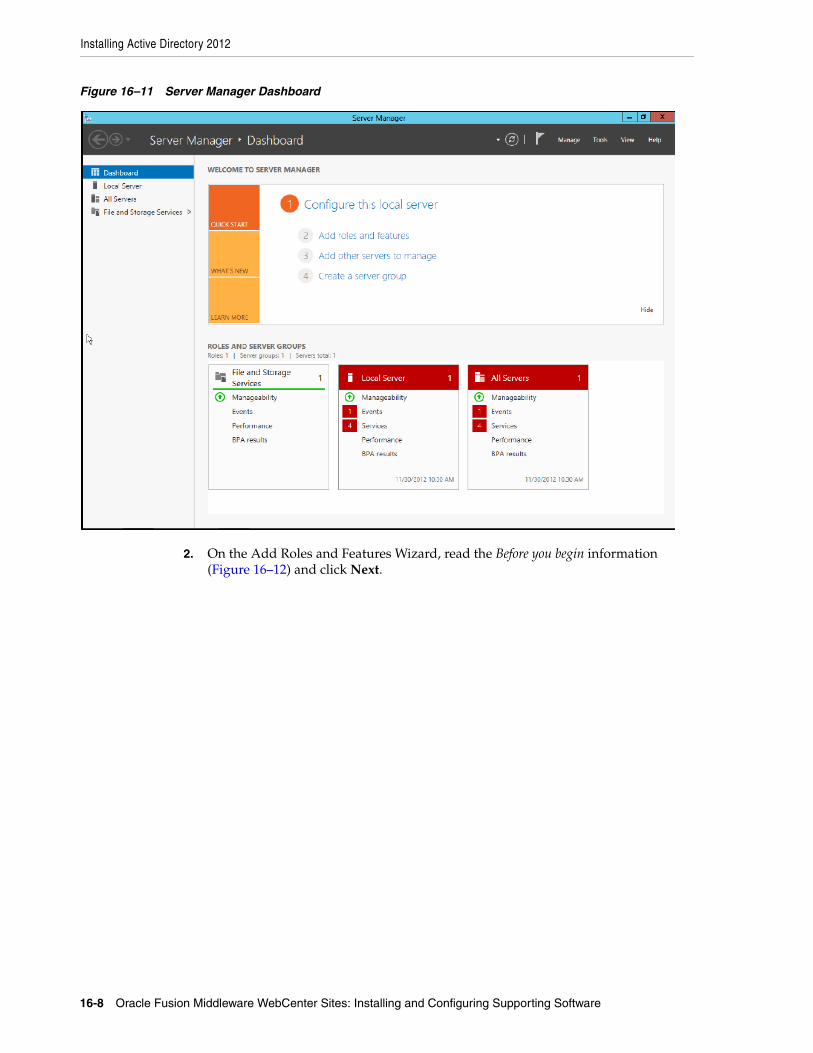
Installing Active Directory 2012
16-8 Oracle Fusion Middleware WebCenter Sites: Installing and Configuring Supporting Software
Figure 16–11 Server Manager Dashboard
2. On the Add Roles and Features Wizard, read the Before you begin information (Figure 16–12) and click Next.
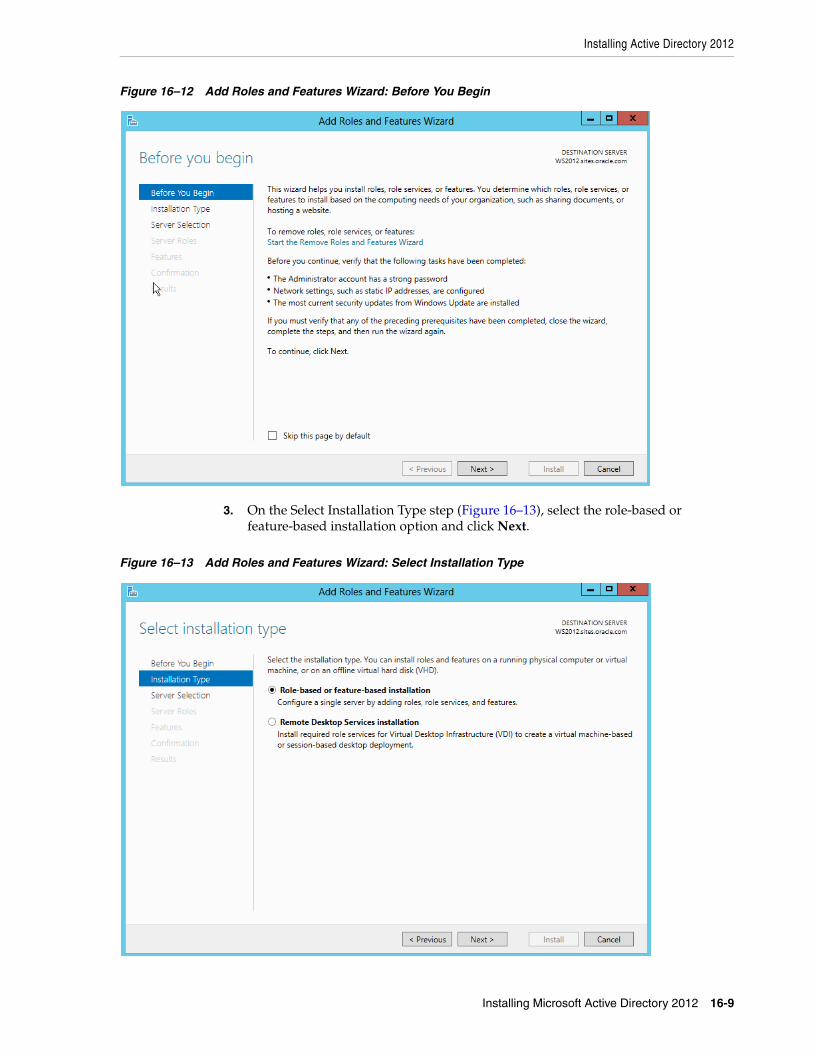
Installing Active Directory 2012
Installing Microsoft Active Directory 2012 16-9
Figure 16–12 Add Roles and Features Wizard: Before You Begin
3. On the Select Installation Type step (Figure 16–13), select the role-based or feature-based installation option and click Next.
Figure 16–13 Add Roles and Features Wizard: Select Installation Type
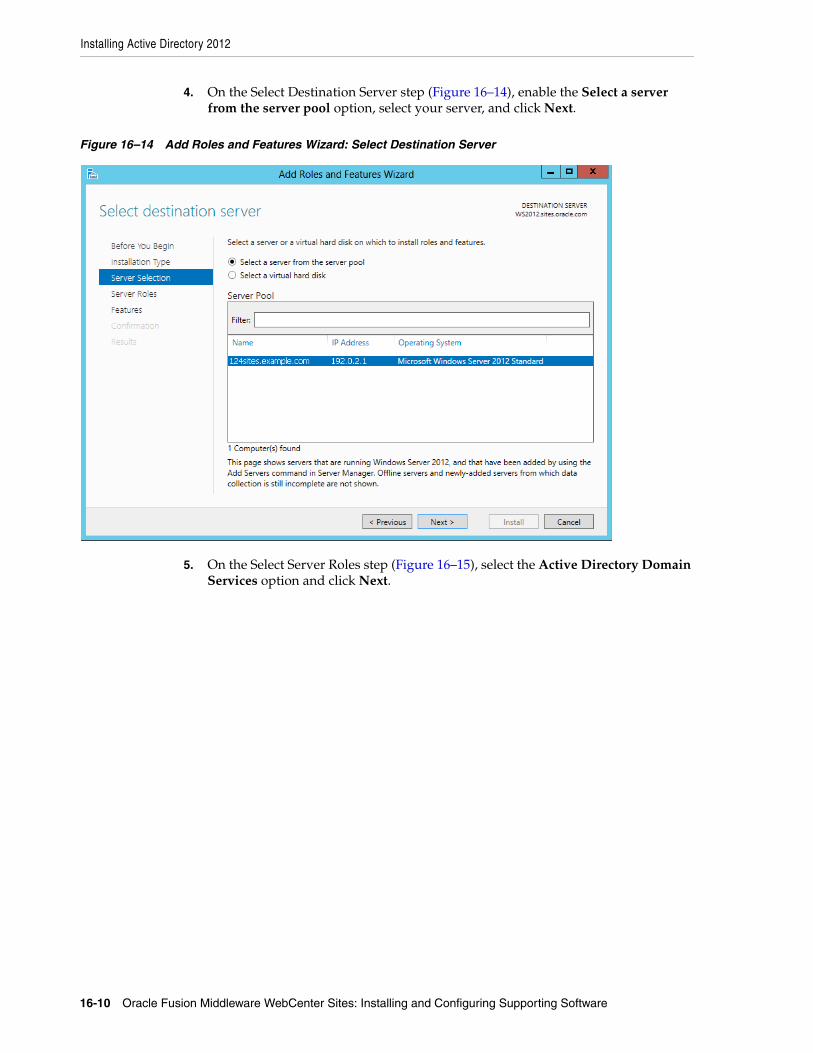
Installing Active Directory 2012
16-10 Oracle Fusion Middleware WebCenter Sites: Installing and Configuring Supporting Software
4. On the Select Destination Server step (Figure 16–14), enable the Select a server from the server pool option, select your server, and click Next.
Figure 16–14 Add Roles and Features Wizard: Select Destination Server
5. On the Select Server Roles step (Figure 16–15), select the Active Directory Domain Services option and click Next.
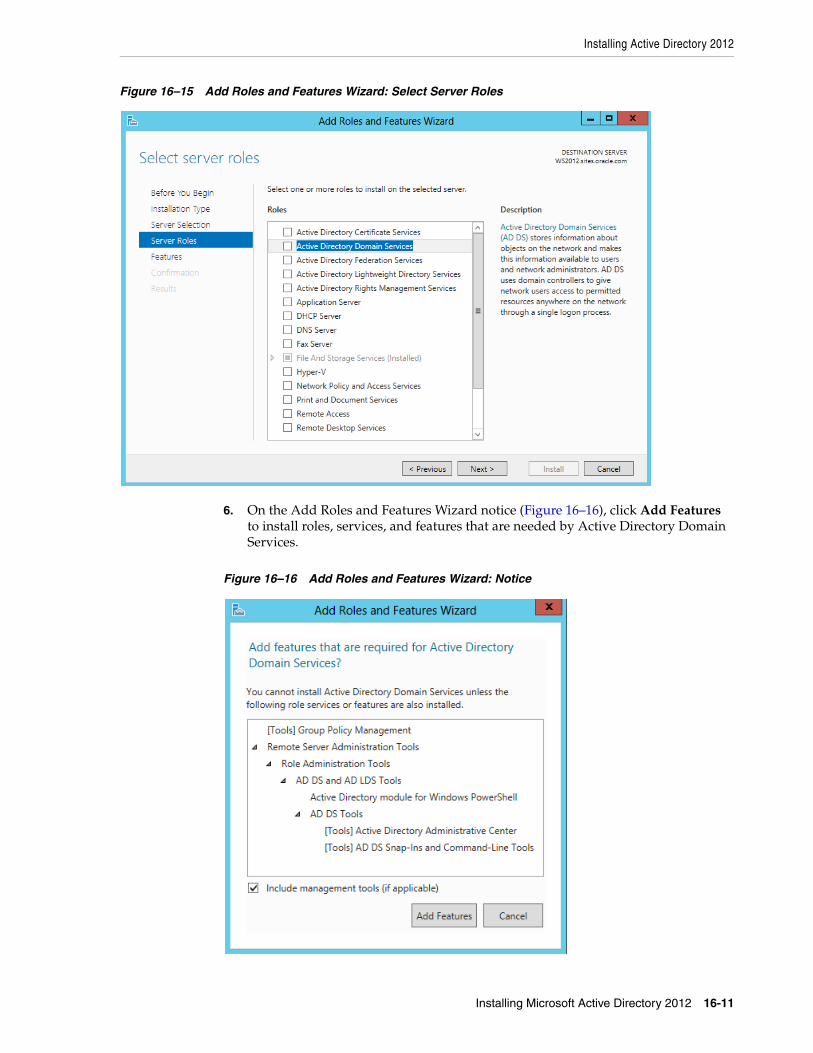
Installing Active Directory 2012
Installing Microsoft Active Directory 2012 16-11
Figure 16–15 Add Roles and Features Wizard: Select Server Roles
6. On the Add Roles and Features Wizard notice (Figure 16–16), click Add Features to install roles, services, and features that are needed by Active Directory Domain Services.
Figure 16–16 Add Roles and Features Wizard: Notice
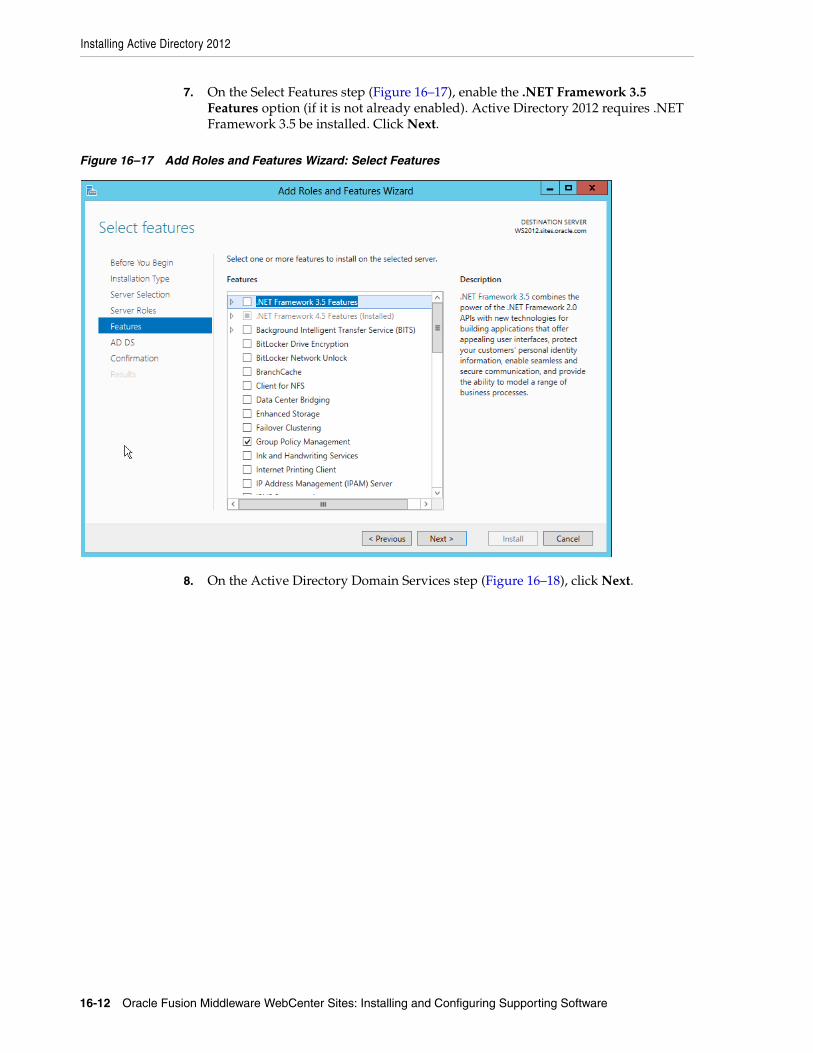
Installing Active Directory 2012
16-12 Oracle Fusion Middleware WebCenter Sites: Installing and Configuring Supporting Software
7. On the Select Features step (Figure 16–17), enable the .NET Framework 3.5 Features option (if it is not already enabled). Active Directory 2012 requires .NET Framework 3.5 be installed. Click Next.
Figure 16–17 Add Roles and Features Wizard: Select Features
8. On the Active Directory Domain Services step (Figure 16–18), click Next.
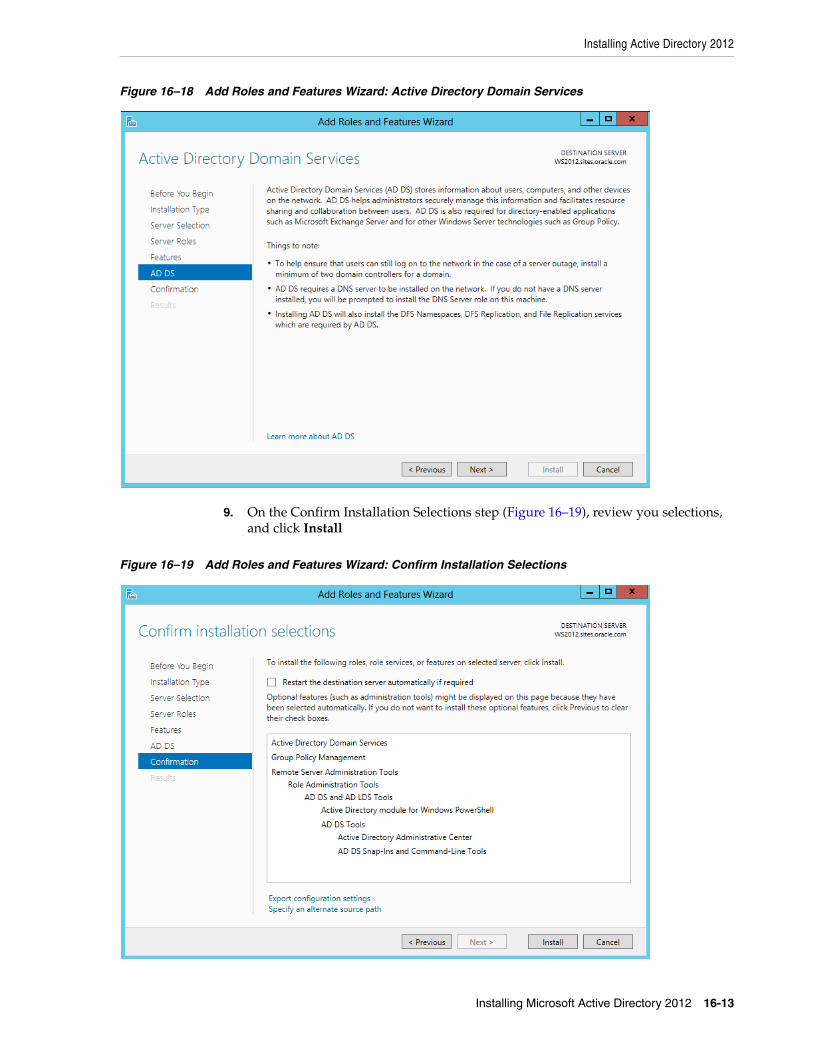
Installing Active Directory 2012
Installing Microsoft Active Directory 2012 16-13
Figure 16–18 Add Roles and Features Wizard: Active Directory Domain Services
9. On the Confirm Installation Selections step (Figure 16–19), review you selections, and click Install
Figure 16–19 Add Roles and Features Wizard: Confirm Installation Selections
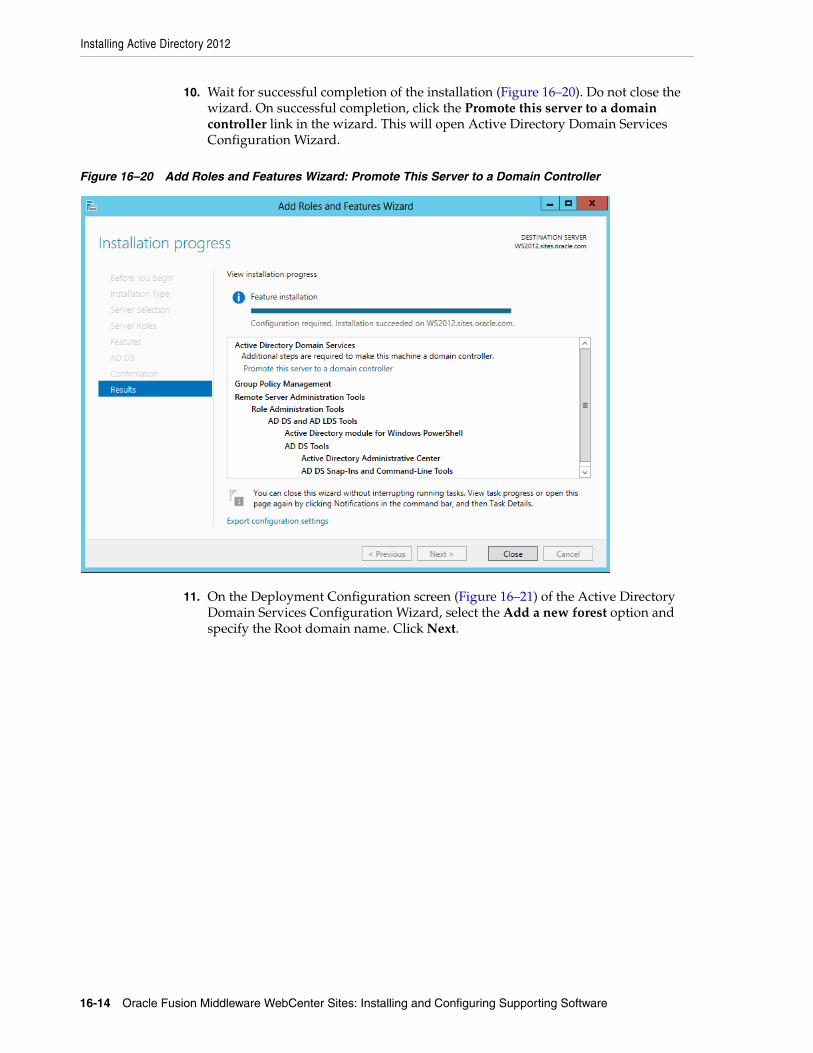
Installing Active Directory 2012
16-14 Oracle Fusion Middleware WebCenter Sites: Installing and Configuring Supporting Software
10. Wait for successful completion of the installation (Figure 16–20). Do not close the wizard. On successful completion, click the Promote this server to a domain controller link in the wizard. This will open Active Directory Domain Services Configuration Wizard.
Figure 16–20 Add Roles and Features Wizard: Promote This Server to a Domain Controller
11. On the Deployment Configuration screen (Figure 16–21) of the Active Directory Domain Services Configuration Wizard, select the Add a new forest option and specify the Root domain name. Click Next.
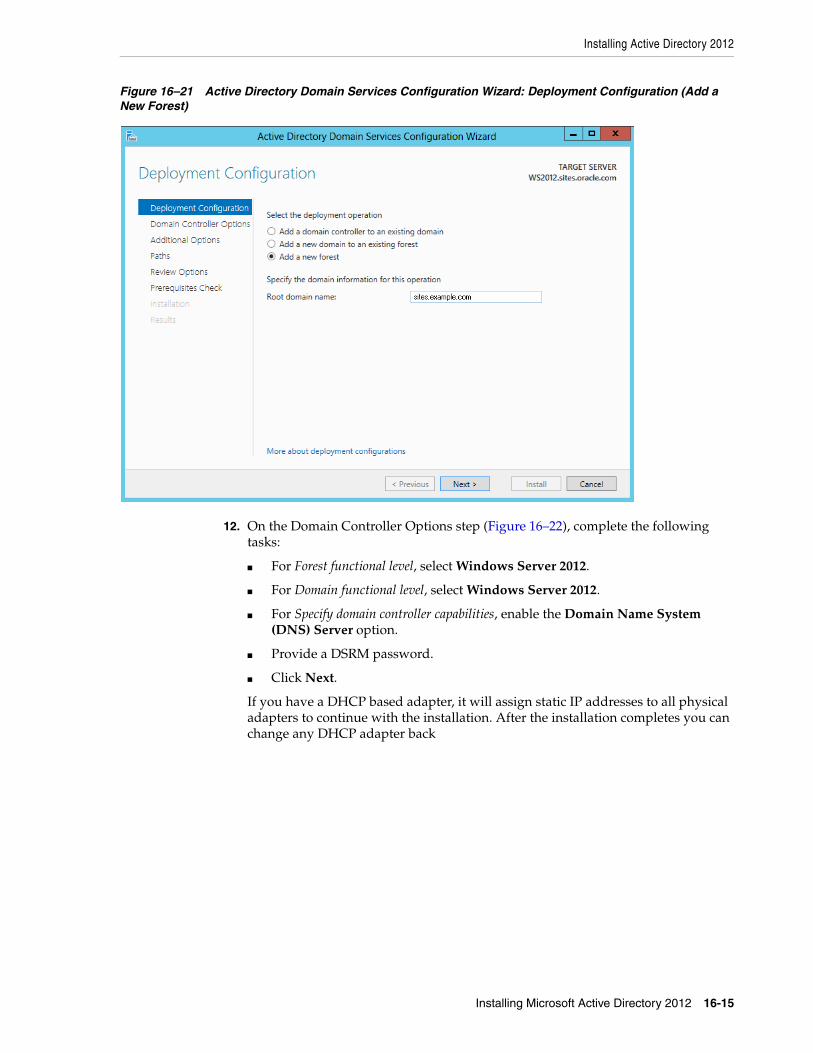
Installing Active Directory 2012
Installing Microsoft Active Directory 2012 16-15
Figure 16–21 Active Directory Domain Services Configuration Wizard: Deployment Configuration (Add a New Forest)
12. On the Domain Controller Options step (Figure 16–22), complete the following tasks:
■ For Forest functional level, select Windows Server 2012.
■ For Domain functional level, select Windows Server 2012.
■ For Specify domain controller capabilities, enable the Domain Name System (DNS) Server option.
■ Provide a DSRM password.
■ Click Next.
If you have a DHCP based adapter, it will assign static IP addresses to all physical adapters to continue with the installation. After the installation completes you can change any DHCP adapter back

Installing Active Directory 2012
16-16 Oracle Fusion Middleware WebCenter Sites: Installing and Configuring Supporting Software
Figure 16–22 Active Directory Domain Services Configuration Wizard: Domain Controller Options
13. On the DNS Options step (Figure 16–23), a warning message will be displayed if the DNS zone you are creating does not have an authoritative parent zone. Click Next.

Installing Active Directory 2012
Installing Microsoft Active Directory 2012 16-17
Figure 16–23 Active Directory Domain Services Configuration Wizard: DNS Options
14. On the DNS Options notice (Figure 16–24), click OK.
Figure 16–24 DNS Options Notice
15. Verify the NetBIOS name on the Additional Options step (Figure 16–25).

Installing Active Directory 2012
16-18 Oracle Fusion Middleware WebCenter Sites: Installing and Configuring Supporting Software
Figure 16–25 Active Directory Domain Services Configuration Wizard: Additional Options
16. On the Paths step (Figure 16–26), accept the defaults and click Next.
Figure 16–26 Active Directory Domain Services Configuration Wizard: Paths

Installing Active Directory 2012
Installing Microsoft Active Directory 2012 16-19
17. On the Review Options step (Figure 16–27), complete the following tasks:
■ Review you settings.
■ Export your setting to script.
■ Click Next.
Figure 16–27 Active Directory Domain Services Configuration Wizard: Review Options
18. Make sure all prerequisite checks (Figure 16–28) pass successfully and review the results. On successful completion of the prerequisite checks, click Install.
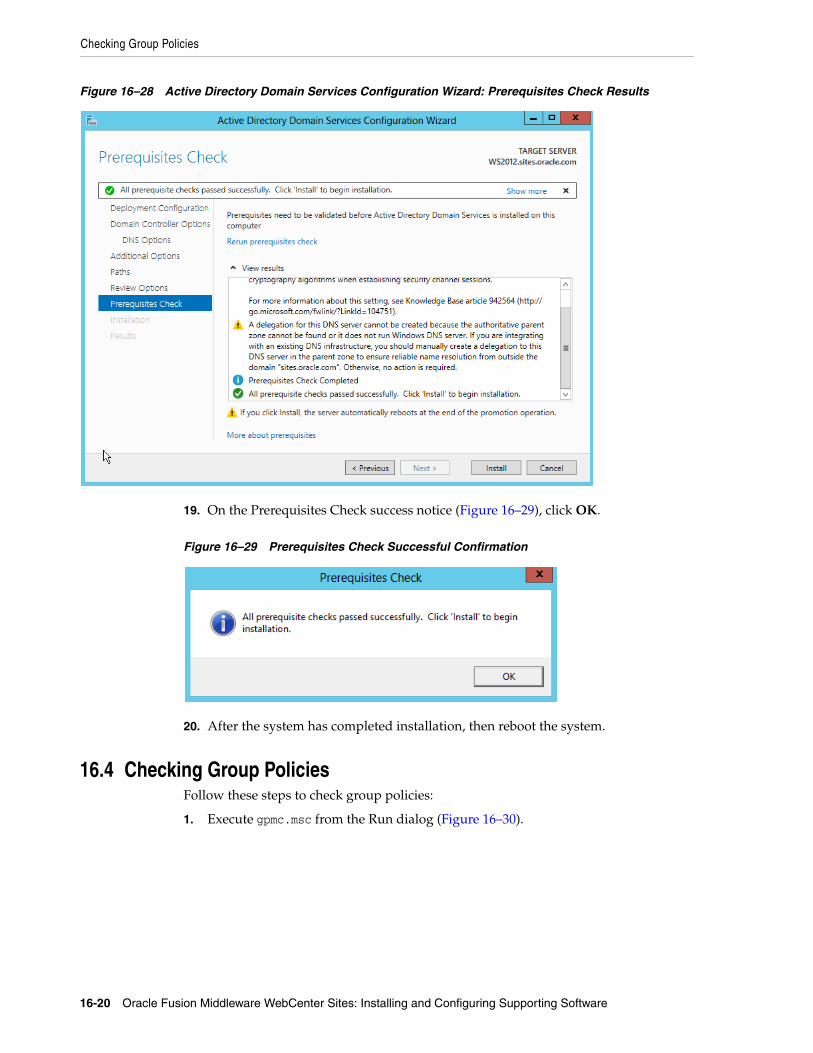
Checking Group Policies
16-20 Oracle Fusion Middleware WebCenter Sites: Installing and Configuring Supporting Software
Figure 16–28 Active Directory Domain Services Configuration Wizard: Prerequisites Check Results
19. On the Prerequisites Check success notice (Figure 16–29), click OK.
Figure 16–29 Prerequisites Check Successful Confirmation
20. After the system has completed installation, then reboot the system.
16.4 Checking Group PoliciesFollow these steps to check group policies:
1. Execute gpmc.msc from the Run dialog (Figure 16–30).
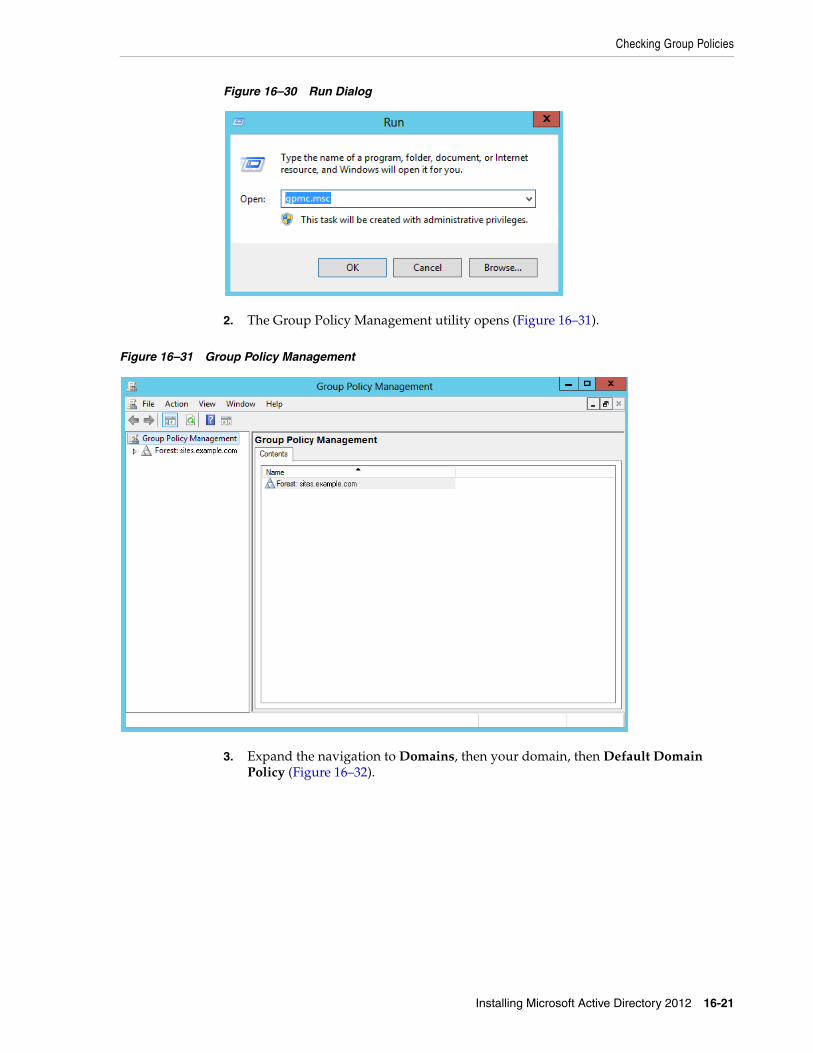
Checking Group Policies
Installing Microsoft Active Directory 2012 16-21
Figure 16–30 Run Dialog
2. The Group Policy Management utility opens (Figure 16–31).
Figure 16–31 Group Policy Management
3. Expand the navigation to Domains, then your domain, then Default Domain Policy (Figure 16–32).
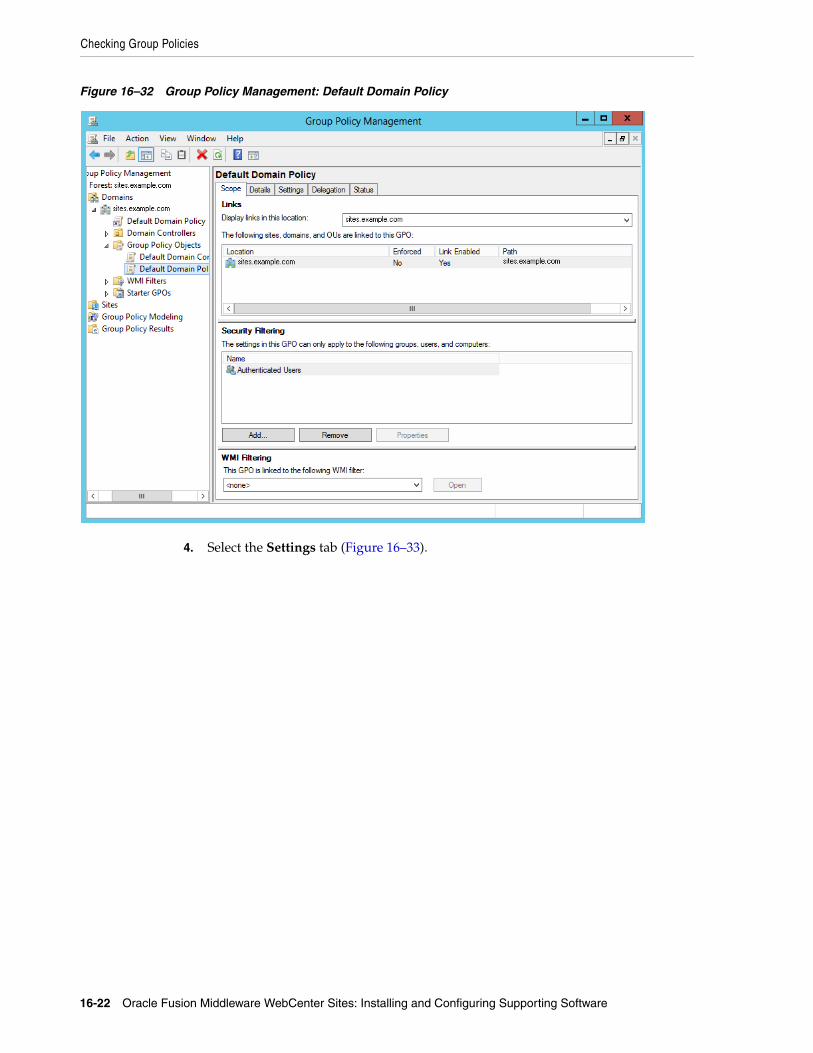
Checking Group Policies
16-22 Oracle Fusion Middleware WebCenter Sites: Installing and Configuring Supporting Software
Figure 16–32 Group Policy Management: Default Domain Policy
4. Select the Settings tab (Figure 16–33).
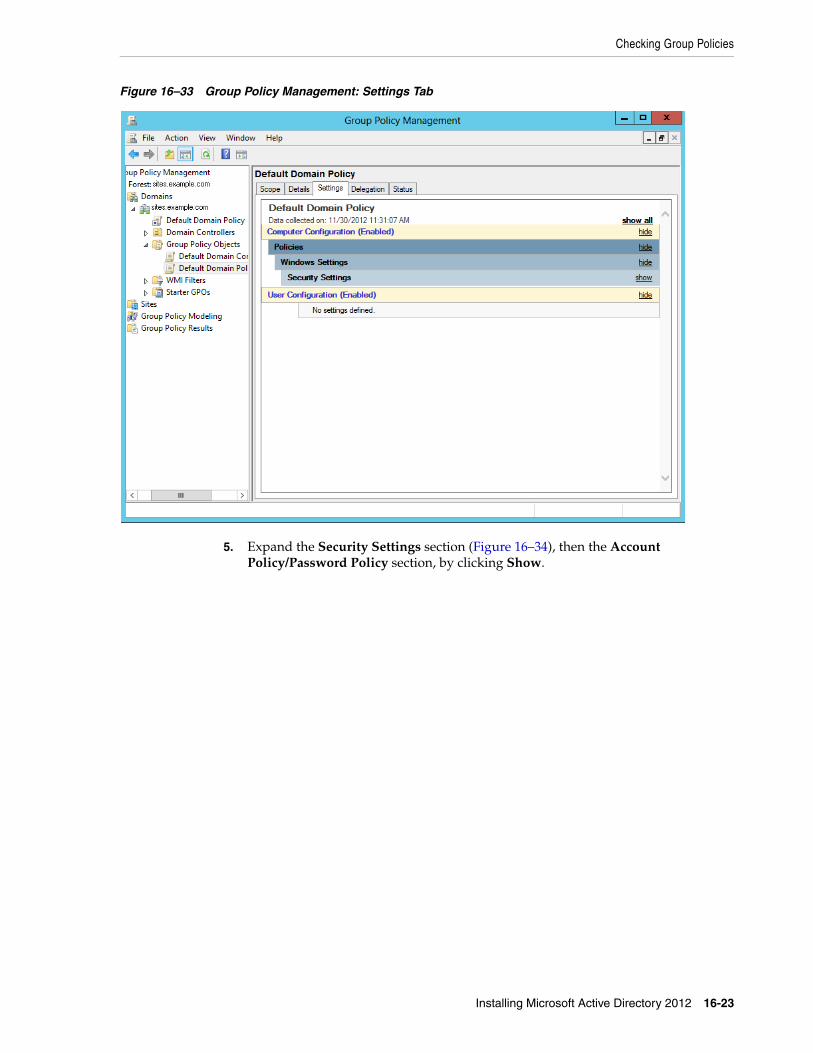
Checking Group Policies
Installing Microsoft Active Directory 2012 16-23
Figure 16–33 Group Policy Management: Settings Tab
5. Expand the Security Settings section (Figure 16–34), then the Account Policy/Password Policy section, by clicking Show.
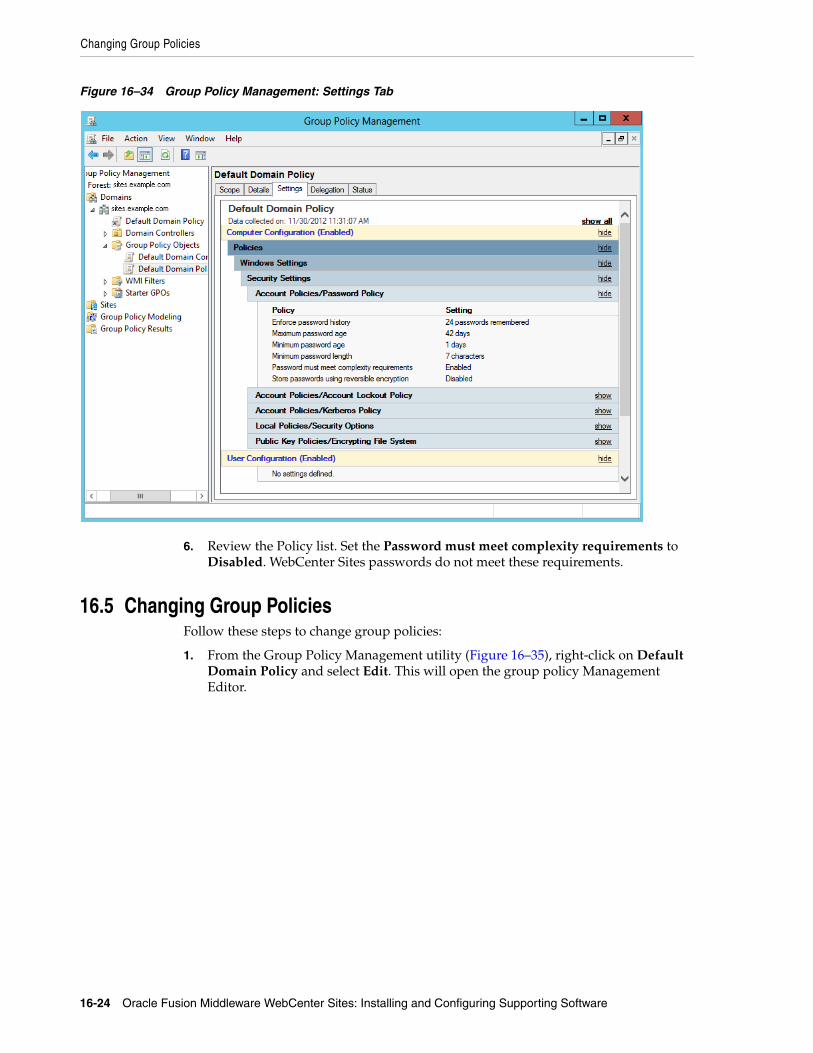
Changing Group Policies
16-24 Oracle Fusion Middleware WebCenter Sites: Installing and Configuring Supporting Software
Figure 16–34 Group Policy Management: Settings Tab
6. Review the Policy list. Set the Password must meet complexity requirements to Disabled. WebCenter Sites passwords do not meet these requirements.
16.5 Changing Group PoliciesFollow these steps to change group policies:
1. From the Group Policy Management utility (Figure 16–35), right-click on Default Domain Policy and select Edit. This will open the group policy Management Editor.
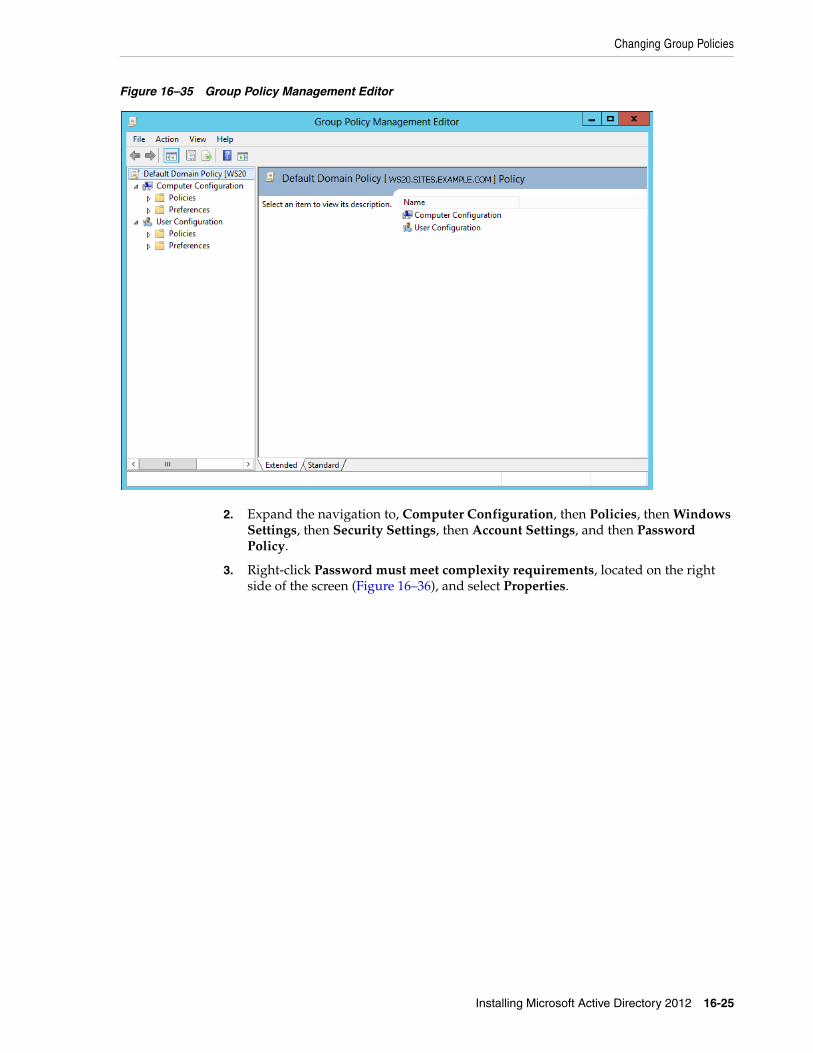
Changing Group Policies
Installing Microsoft Active Directory 2012 16-25
Figure 16–35 Group Policy Management Editor
2. Expand the navigation to, Computer Configuration, then Policies, then Windows Settings, then Security Settings, then Account Settings, and then Password Policy.
3. Right-click Password must meet complexity requirements, located on the right side of the screen (Figure 16–36), and select Properties.
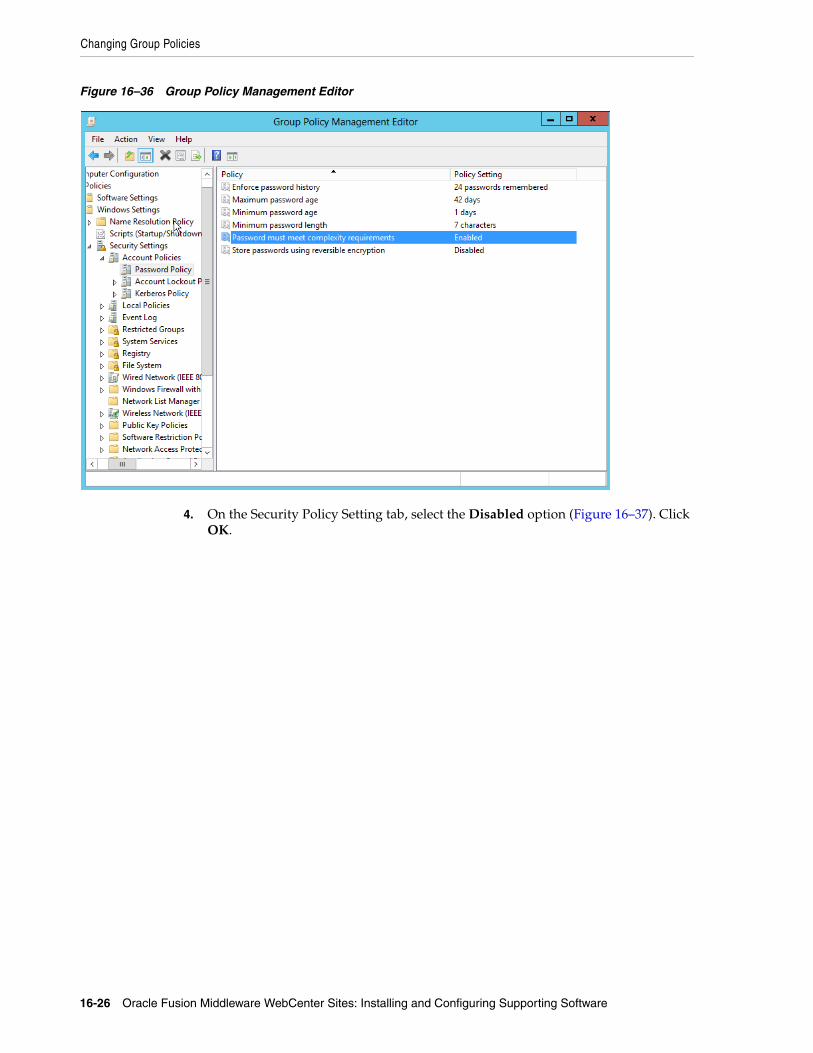
Changing Group Policies
16-26 Oracle Fusion Middleware WebCenter Sites: Installing and Configuring Supporting Software
Figure 16–36 Group Policy Management Editor
4. On the Security Policy Setting tab, select the Disabled option (Figure 16–37). Click OK.
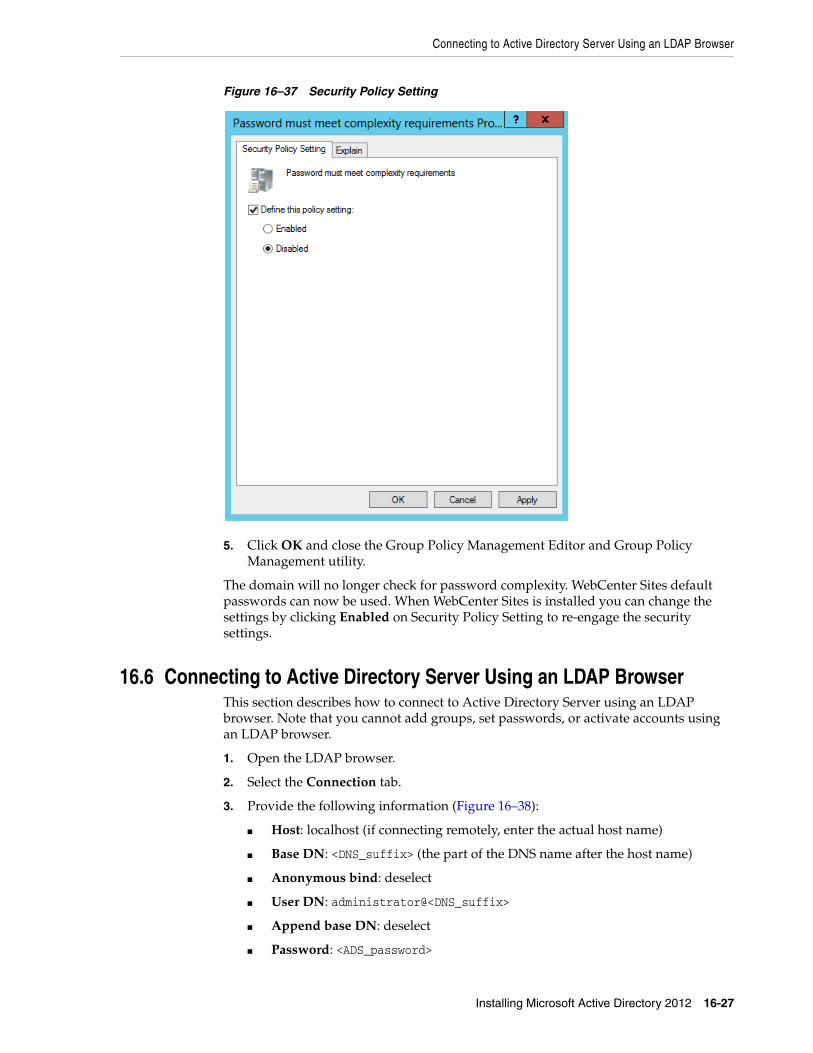
Connecting to Active Directory Server Using an LDAP Browser
Installing Microsoft Active Directory 2012 16-27
Figure 16–37 Security Policy Setting
5. Click OK and close the Group Policy Management Editor and Group Policy Management utility.
The domain will no longer check for password complexity. WebCenter Sites default passwords can now be used. When WebCenter Sites is installed you can change the settings by clicking Enabled on Security Policy Setting to re-engage the security settings.
16.6 Connecting to Active Directory Server Using an LDAP BrowserThis section describes how to connect to Active Directory Server using an LDAP browser. Note that you cannot add groups, set passwords, or activate accounts using an LDAP browser.
1. Open the LDAP browser.
2. Select the Connection tab.
3. Provide the following information (Figure 16–38):
■ Host: localhost (if connecting remotely, enter the actual host name)
■ Base DN: <DNS_suffix> (the part of the DNS name after the host name)
■ Anonymous bind: deselect
■ User DN: administrator@<DNS_suffix>
■ Append base DN: deselect
■ Password: <ADS_password>
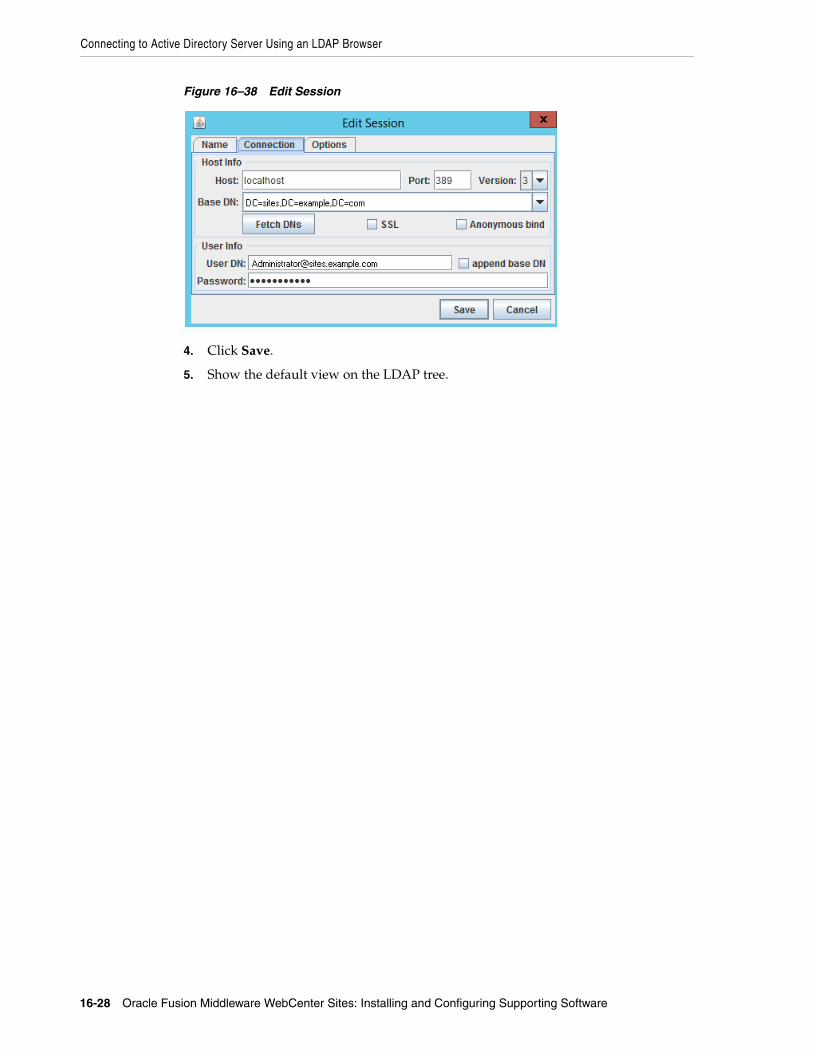
Connecting to Active Directory Server Using an LDAP Browser
16-28 Oracle Fusion Middleware WebCenter Sites: Installing and Configuring Supporting Software
Figure 16–38 Edit Session
4. Click Save.
5. Show the default view on the LDAP tree.
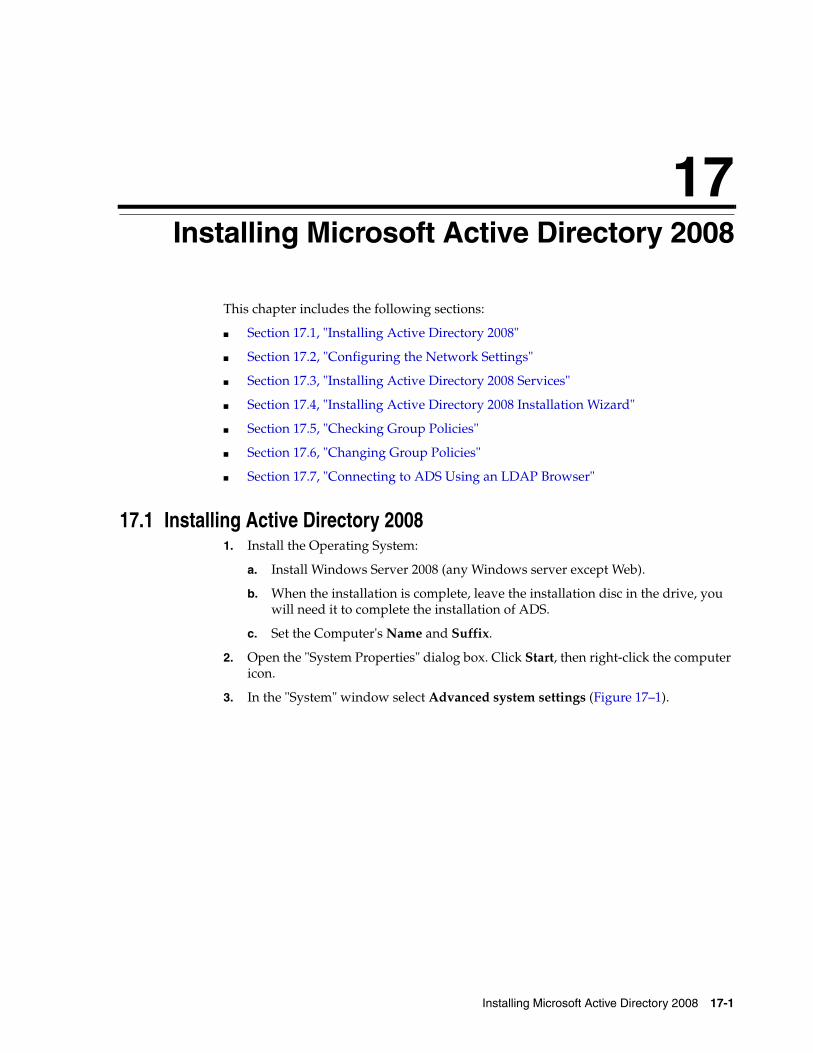
17
Installing Microsoft Active Directory 2008 17-1
17Installing Microsoft Active Directory 2008
This chapter includes the following sections:
■ Section 17.1, "Installing Active Directory 2008"
■ Section 17.2, "Configuring the Network Settings"
■ Section 17.3, "Installing Active Directory 2008 Services"
■ Section 17.4, "Installing Active Directory 2008 Installation Wizard"
■ Section 17.5, "Checking Group Policies"
■ Section 17.6, "Changing Group Policies"
■ Section 17.7, "Connecting to ADS Using an LDAP Browser"
17.1 Installing Active Directory 20081. Install the Operating System:
a. Install Windows Server 2008 (any Windows server except Web).
b. When the installation is complete, leave the installation disc in the drive, you will need it to complete the installation of ADS.
c. Set the Computer's Name and Suffix.
2. Open the "System Properties" dialog box. Click Start, then right-click the computer icon.
3. In the "System" window select Advanced system settings (Figure 17–1).
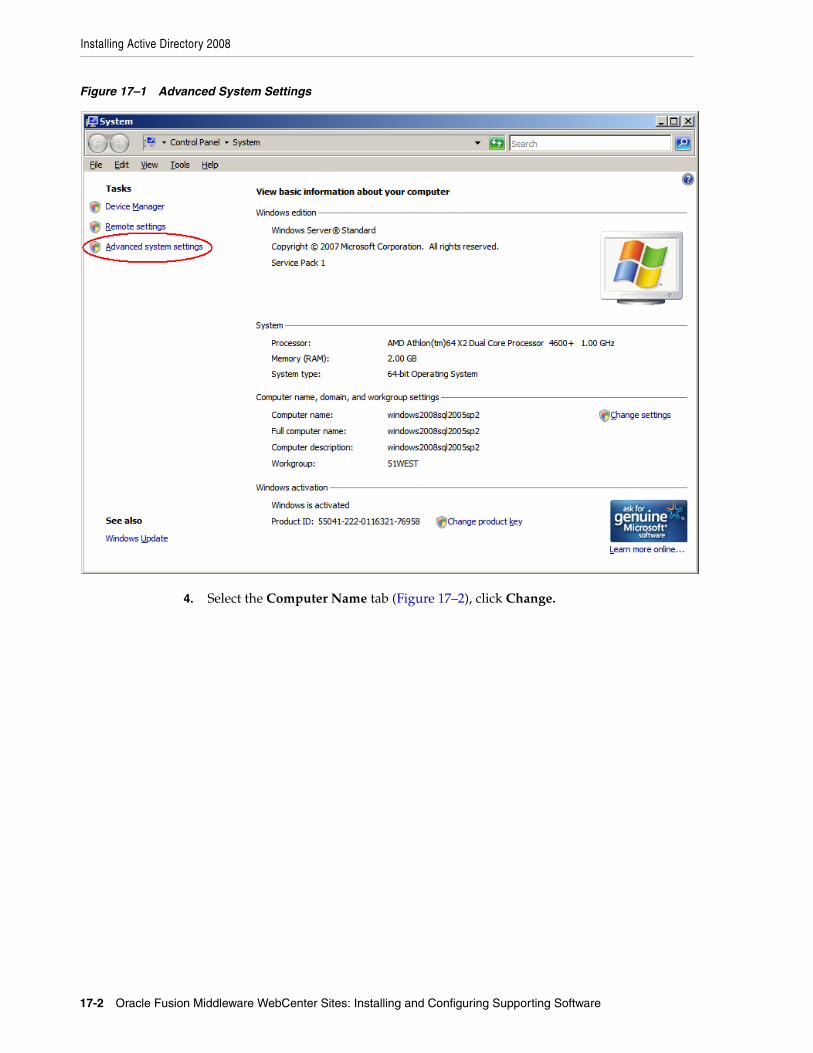
Installing Active Directory 2008
17-2 Oracle Fusion Middleware WebCenter Sites: Installing and Configuring Supporting Software
Figure 17–1 Advanced System Settings
4. Select the Computer Name tab (Figure 17–2), click Change.
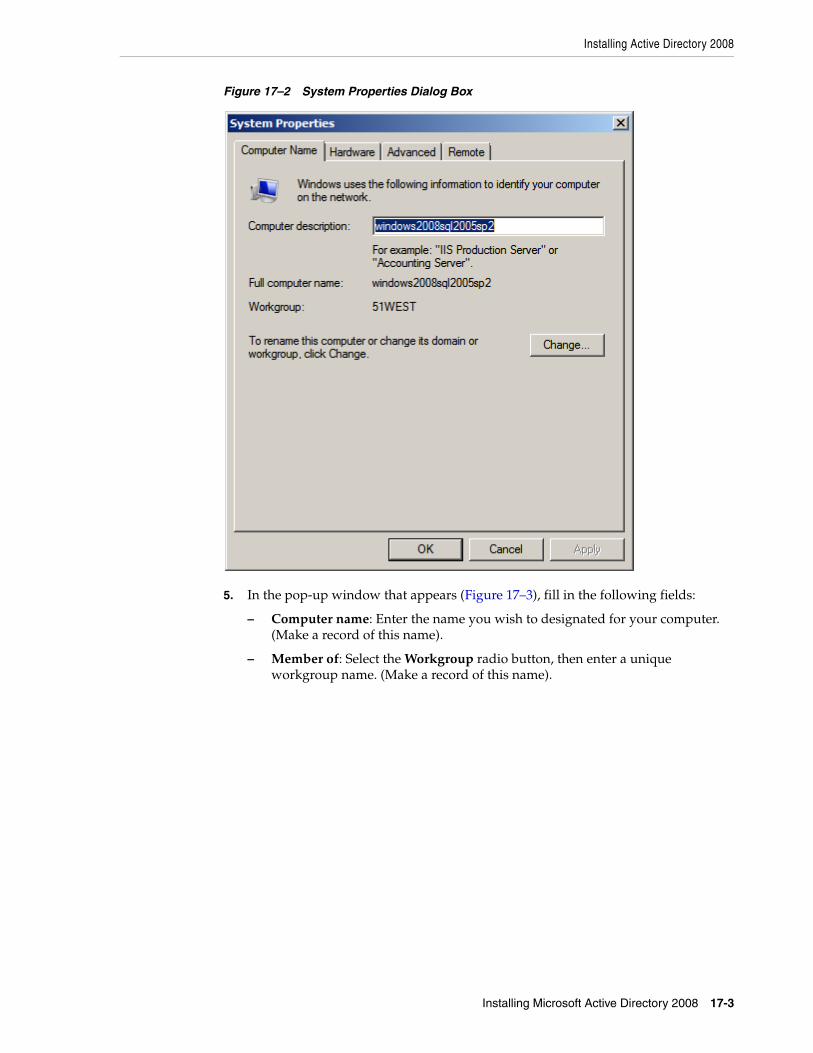
Installing Active Directory 2008
Installing Microsoft Active Directory 2008 17-3
Figure 17–2 System Properties Dialog Box
5. In the pop-up window that appears (Figure 17–3), fill in the following fields:
– Computer name: Enter the name you wish to designated for your computer. (Make a record of this name).
– Member of: Select the Workgroup radio button, then enter a unique workgroup name. (Make a record of this name).
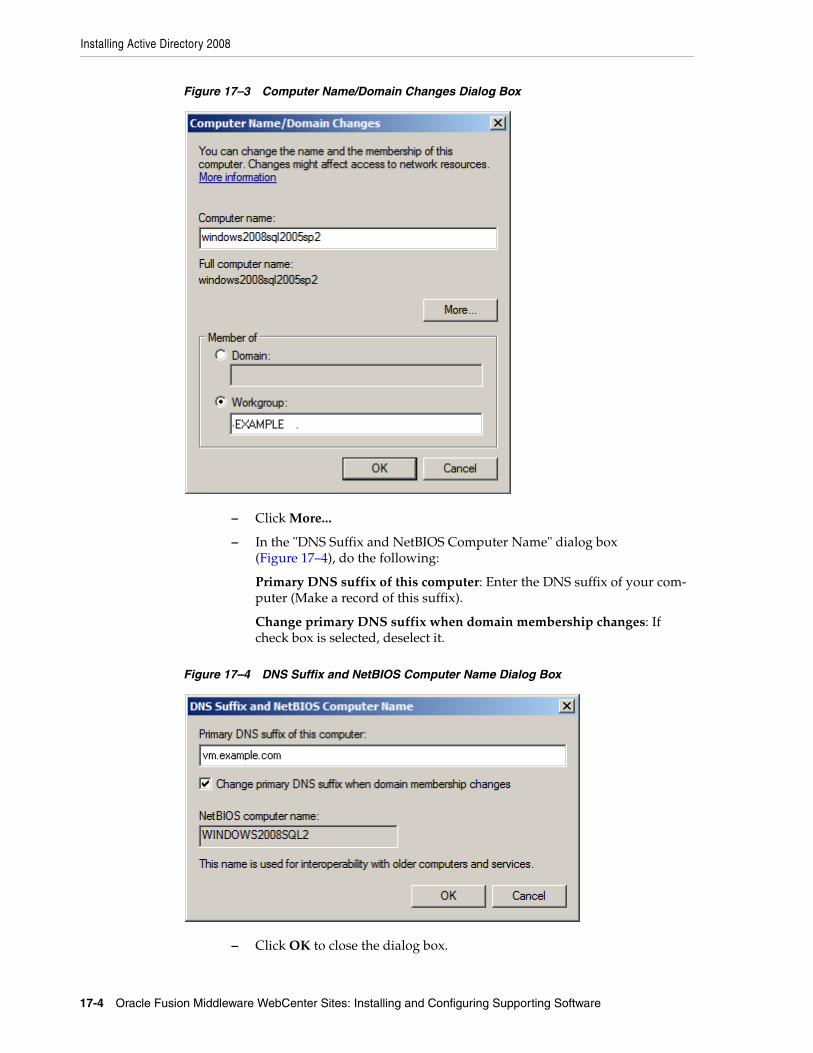
Installing Active Directory 2008
17-4 Oracle Fusion Middleware WebCenter Sites: Installing and Configuring Supporting Software
Figure 17–3 Computer Name/Domain Changes Dialog Box
– Click More...
– In the "DNS Suffix and NetBIOS Computer Name" dialog box (Figure 17–4), do the following:
Primary DNS suffix of this computer: Enter the DNS suffix of your com-puter (Make a record of this suffix).
Change primary DNS suffix when domain membership changes: If check box is selected, deselect it.
Figure 17–4 DNS Suffix and NetBIOS Computer Name Dialog Box
– Click OK to close the dialog box.
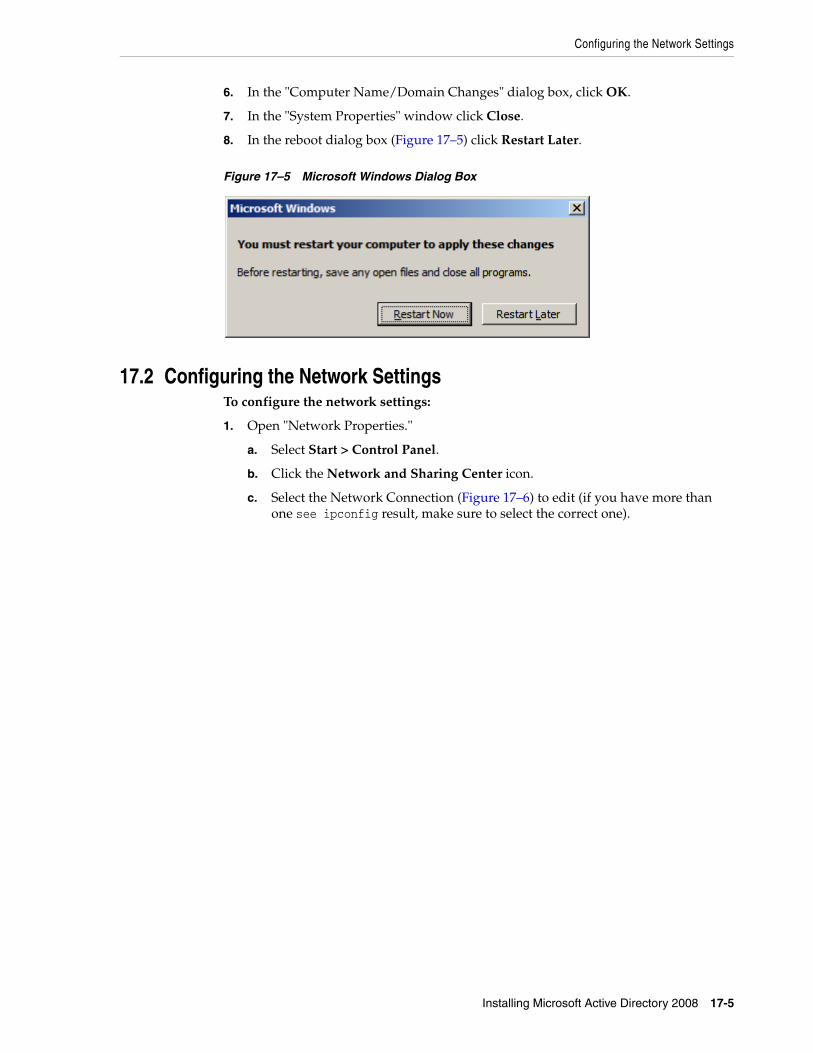
Configuring the Network Settings
Installing Microsoft Active Directory 2008 17-5
6. In the "Computer Name/Domain Changes" dialog box, click OK.
7. In the "System Properties" window click Close.
8. In the reboot dialog box (Figure 17–5) click Restart Later.
Figure 17–5 Microsoft Windows Dialog Box
17.2 Configuring the Network SettingsTo configure the network settings:
1. Open "Network Properties."
a. Select Start > Control Panel.
b. Click the Network and Sharing Center icon.
c. Select the Network Connection (Figure 17–6) to edit (if you have more than one see ipconfig result, make sure to select the correct one).
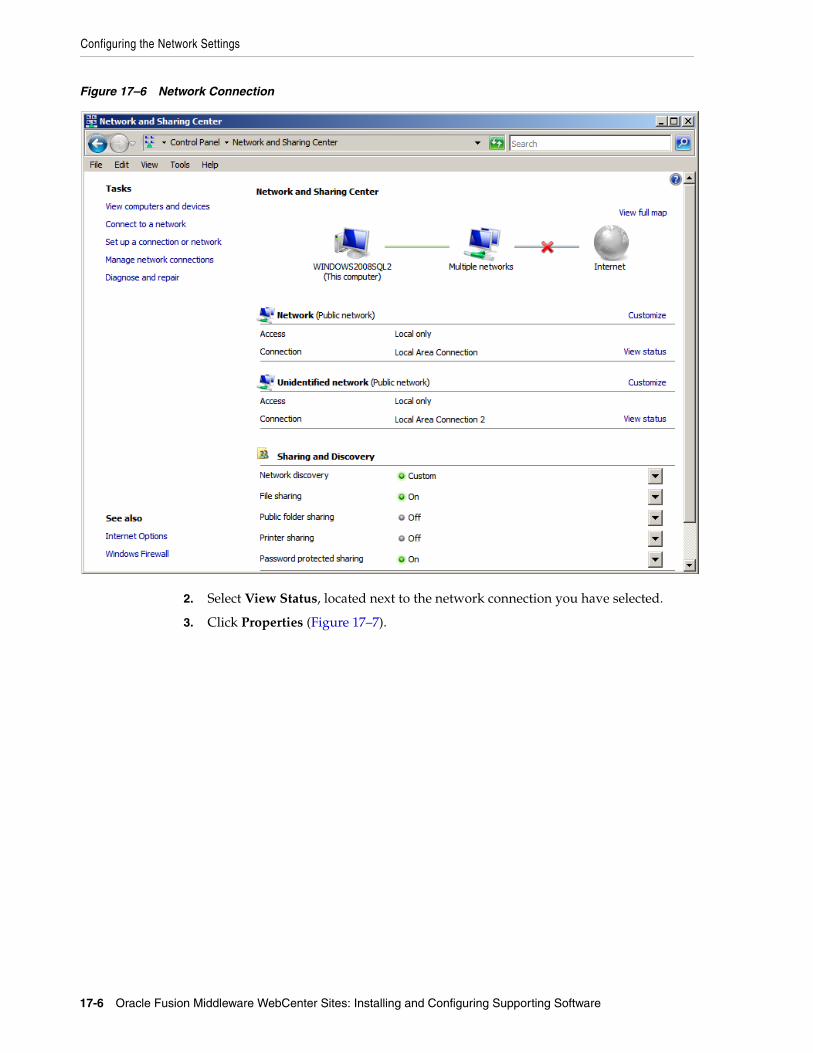
Configuring the Network Settings
17-6 Oracle Fusion Middleware WebCenter Sites: Installing and Configuring Supporting Software
Figure 17–6 Network Connection
2. Select View Status, located next to the network connection you have selected.
3. Click Properties (Figure 17–7).

Configuring the Network Settings
Installing Microsoft Active Directory 2008 17-7
Figure 17–7 Properties Button
4. Select Internet Protocol Version 4 (TCP/Iv4) (Figure 17–8).
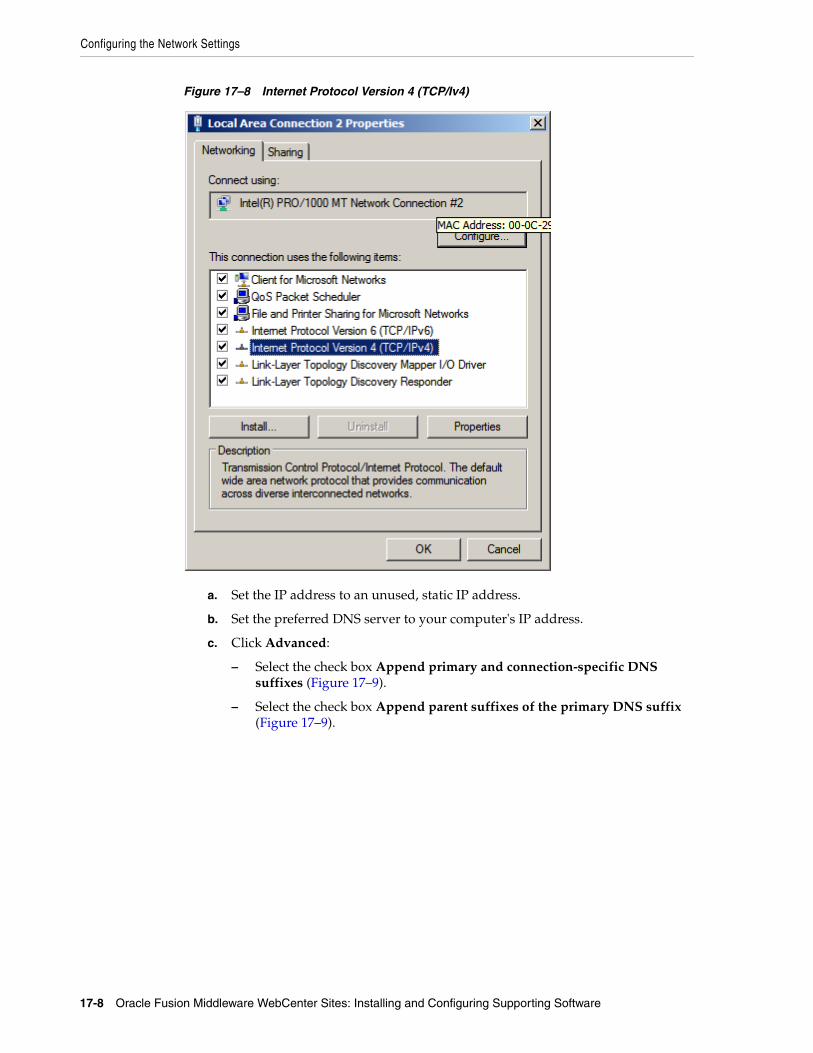
Configuring the Network Settings
17-8 Oracle Fusion Middleware WebCenter Sites: Installing and Configuring Supporting Software
Figure 17–8 Internet Protocol Version 4 (TCP/Iv4)
a. Set the IP address to an unused, static IP address.
b. Set the preferred DNS server to your computer's IP address.
c. Click Advanced:
– Select the check box Append primary and connection-specific DNS suffixes (Figure 17–9).
– Select the check box Append parent suffixes of the primary DNS suffix (Figure 17–9).
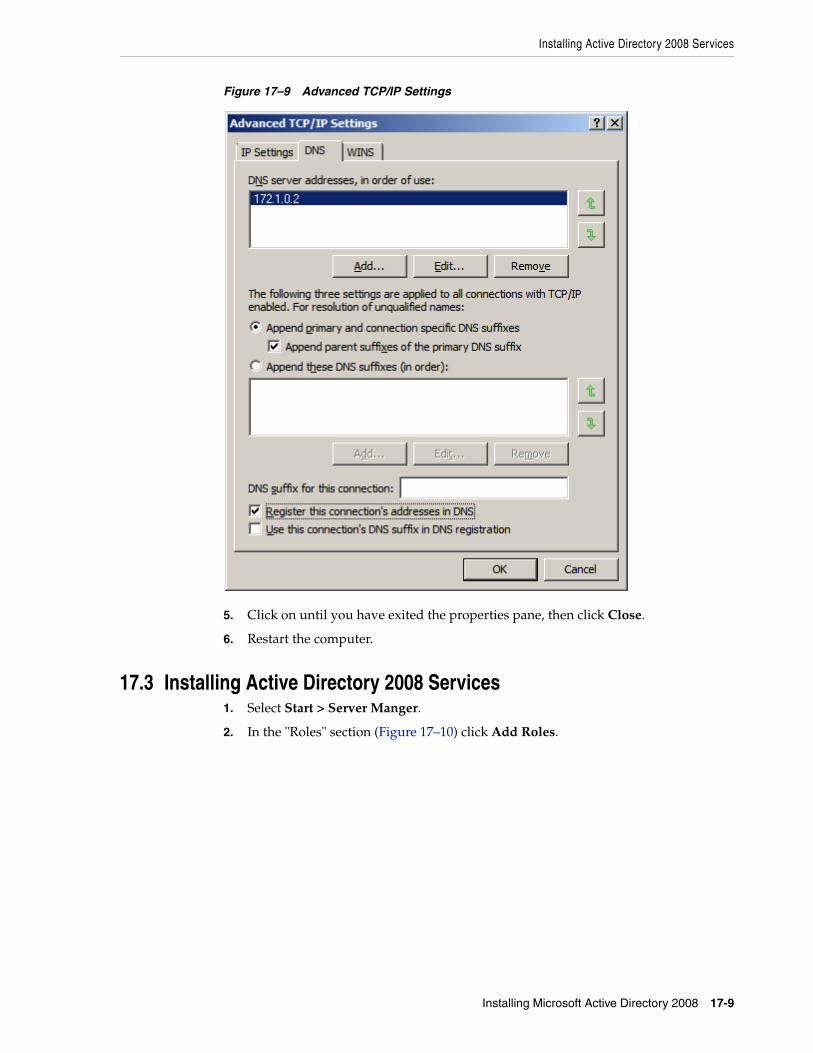
Installing Active Directory 2008 Services
Installing Microsoft Active Directory 2008 17-9
Figure 17–9 Advanced TCP/IP Settings
5. Click on until you have exited the properties pane, then click Close.
6. Restart the computer.
17.3 Installing Active Directory 2008 Services1. Select Start > Server Manger.
2. In the "Roles" section (Figure 17–10) click Add Roles.
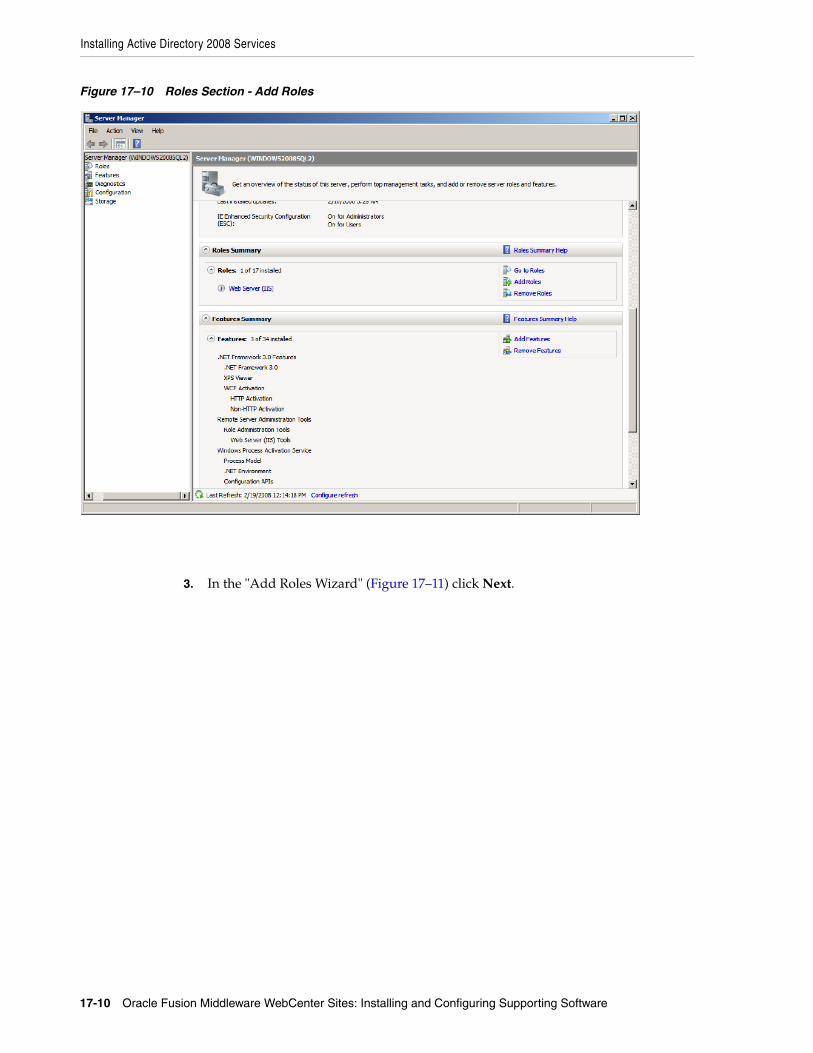
Installing Active Directory 2008 Services
17-10 Oracle Fusion Middleware WebCenter Sites: Installing and Configuring Supporting Software
Figure 17–10 Roles Section - Add Roles
3. In the "Add Roles Wizard" (Figure 17–11) click Next.
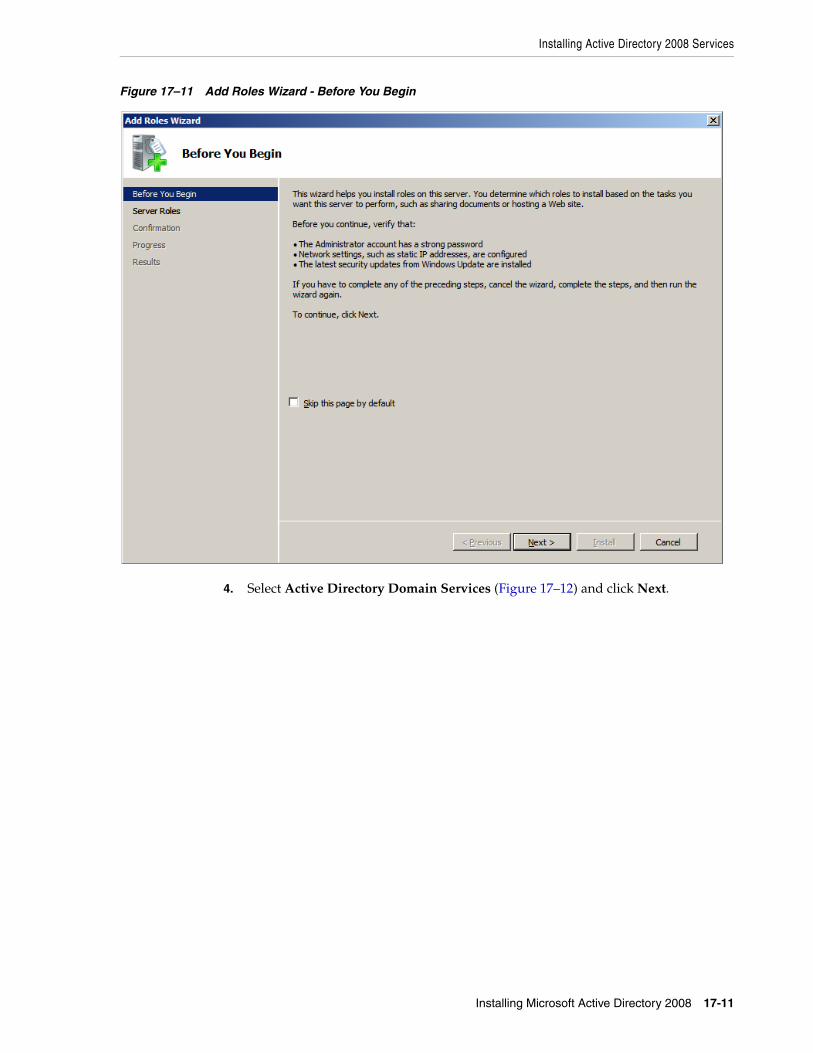
Installing Active Directory 2008 Services
Installing Microsoft Active Directory 2008 17-11
Figure 17–11 Add Roles Wizard - Before You Begin
4. Select Active Directory Domain Services (Figure 17–12) and click Next.
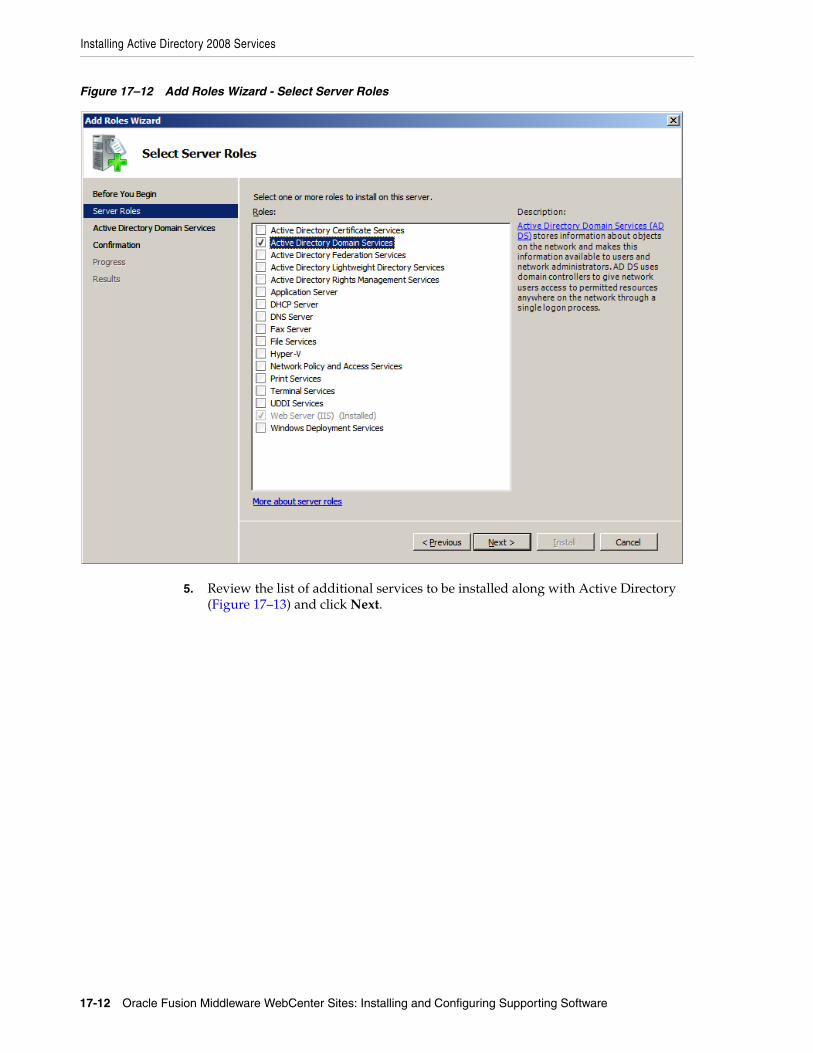
Installing Active Directory 2008 Services
17-12 Oracle Fusion Middleware WebCenter Sites: Installing and Configuring Supporting Software
Figure 17–12 Add Roles Wizard - Select Server Roles
5. Review the list of additional services to be installed along with Active Directory (Figure 17–13) and click Next.
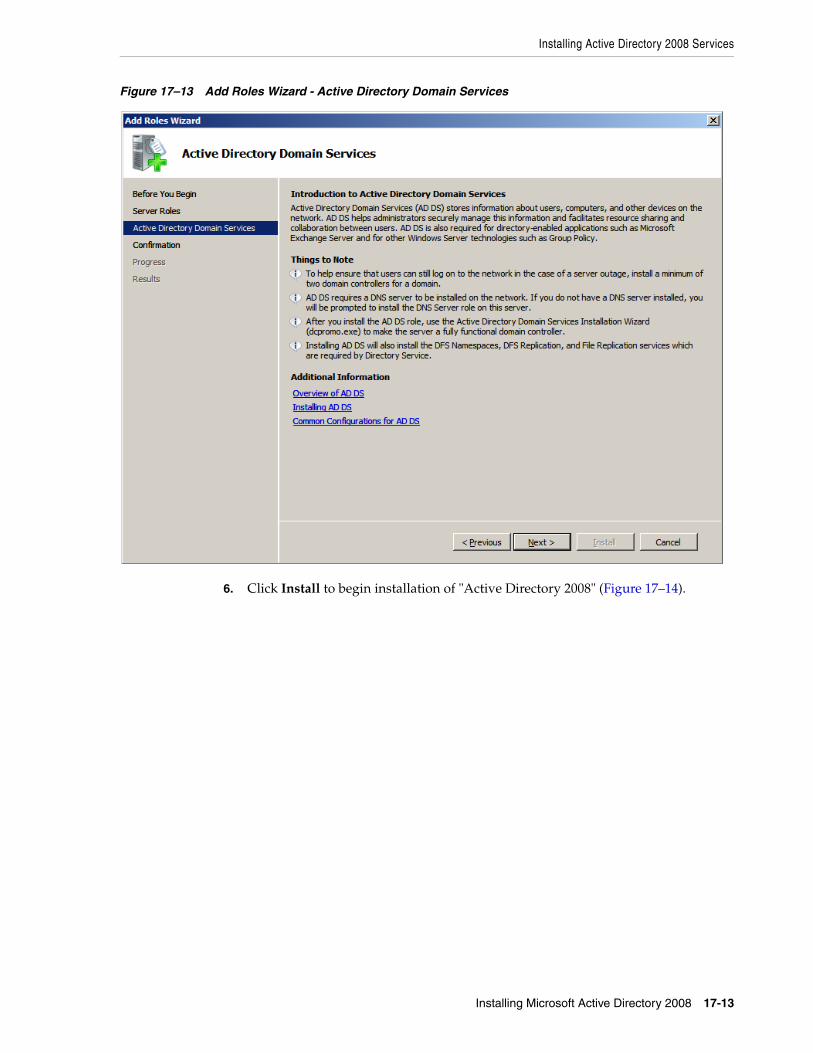
Installing Active Directory 2008 Services
Installing Microsoft Active Directory 2008 17-13
Figure 17–13 Add Roles Wizard - Active Directory Domain Services
6. Click Install to begin installation of "Active Directory 2008" (Figure 17–14).
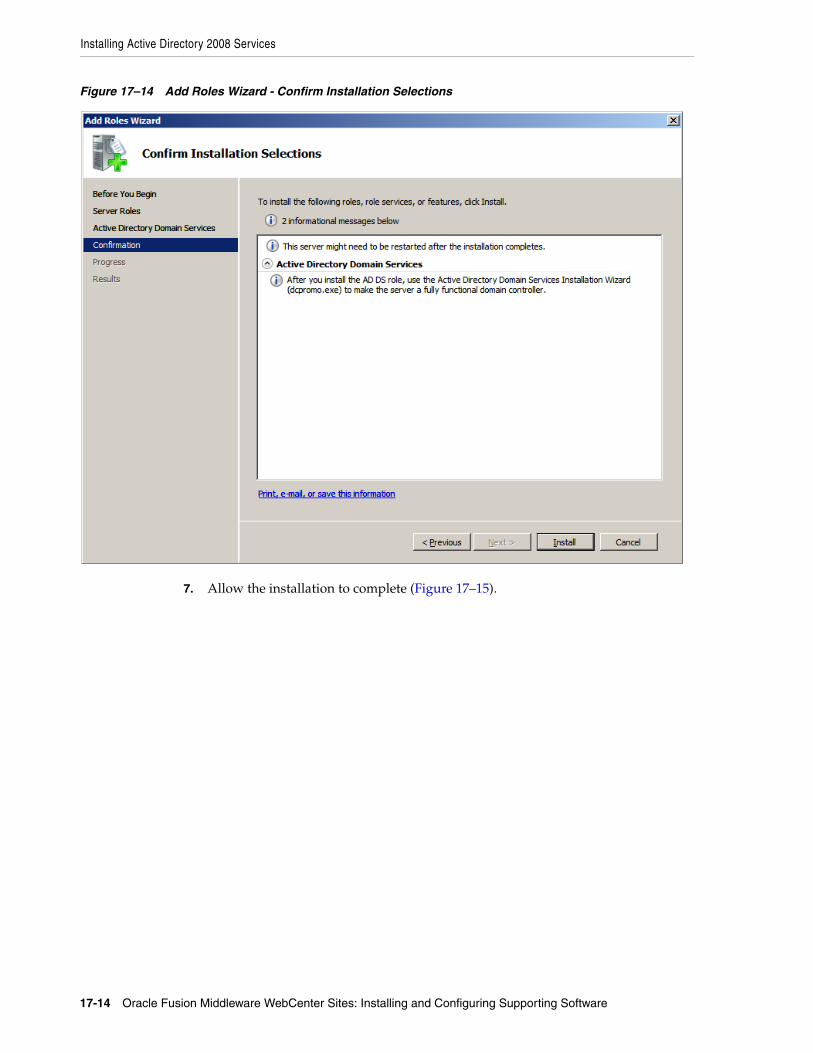
Installing Active Directory 2008 Services
17-14 Oracle Fusion Middleware WebCenter Sites: Installing and Configuring Supporting Software
Figure 17–14 Add Roles Wizard - Confirm Installation Selections
7. Allow the installation to complete (Figure 17–15).
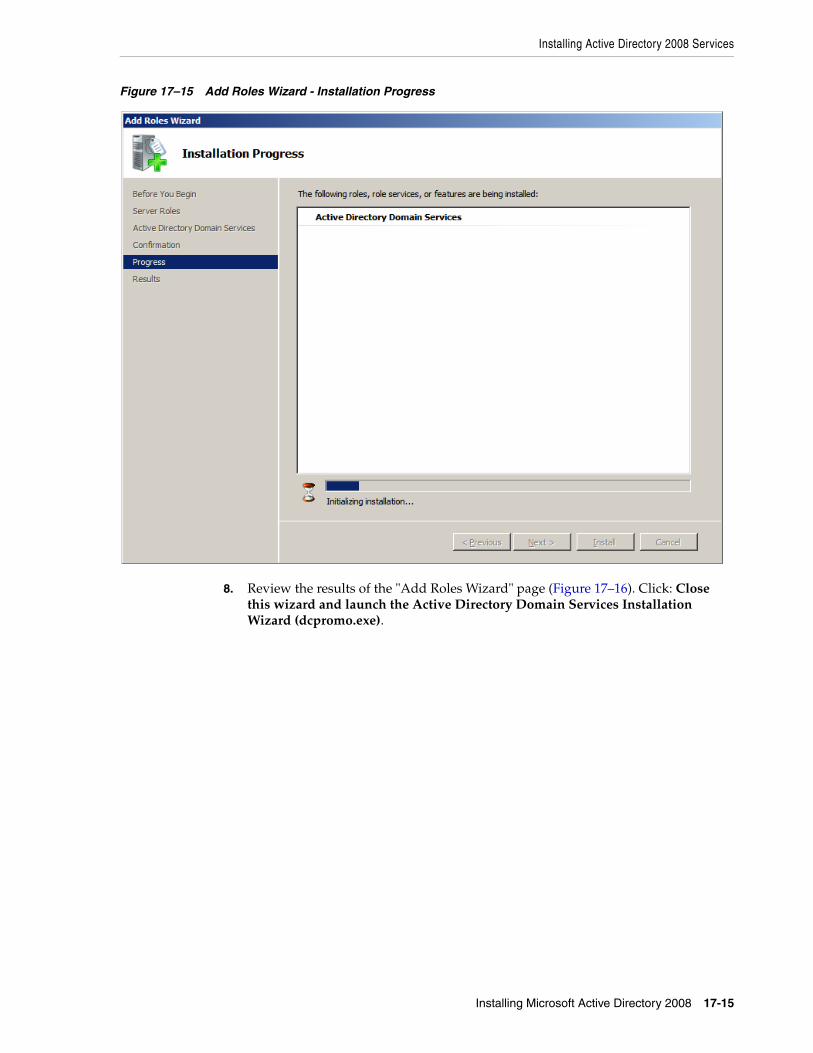
Installing Active Directory 2008 Services
Installing Microsoft Active Directory 2008 17-15
Figure 17–15 Add Roles Wizard - Installation Progress
8. Review the results of the "Add Roles Wizard" page (Figure 17–16). Click: Close this wizard and launch the Active Directory Domain Services Installation Wizard (dcpromo.exe).
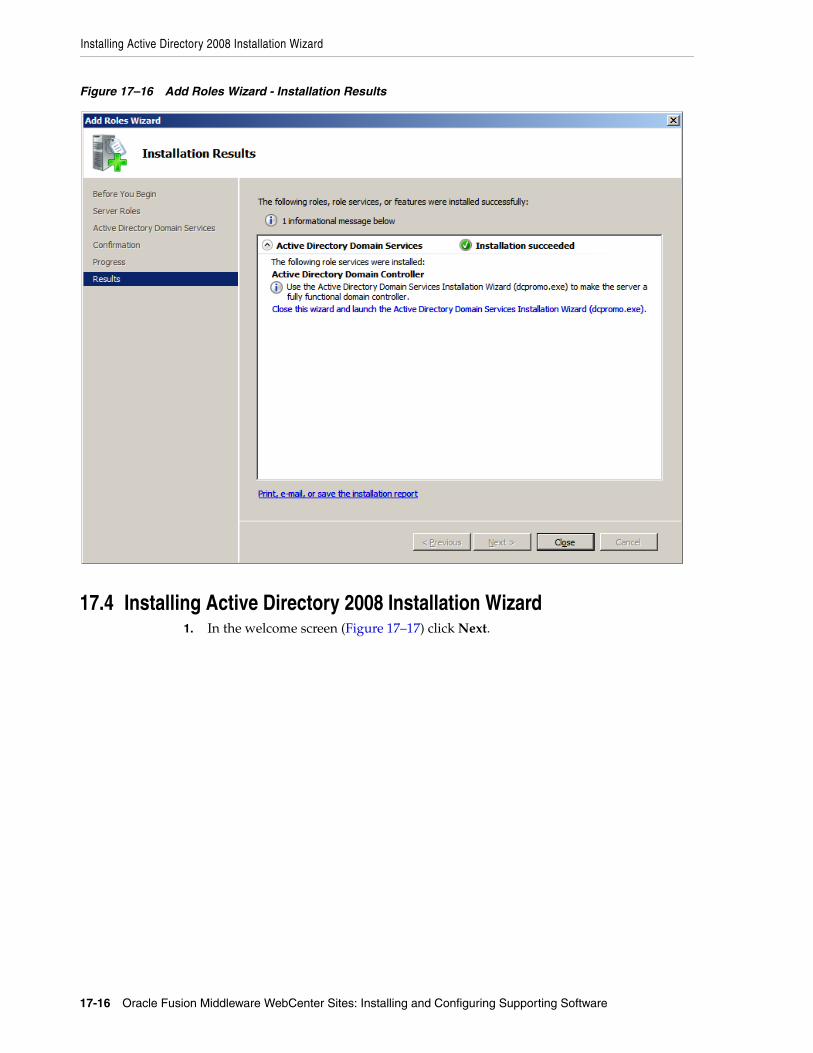
Installing Active Directory 2008 Installation Wizard
17-16 Oracle Fusion Middleware WebCenter Sites: Installing and Configuring Supporting Software
Figure 17–16 Add Roles Wizard - Installation Results
17.4 Installing Active Directory 2008 Installation Wizard1. In the welcome screen (Figure 17–17) click Next.
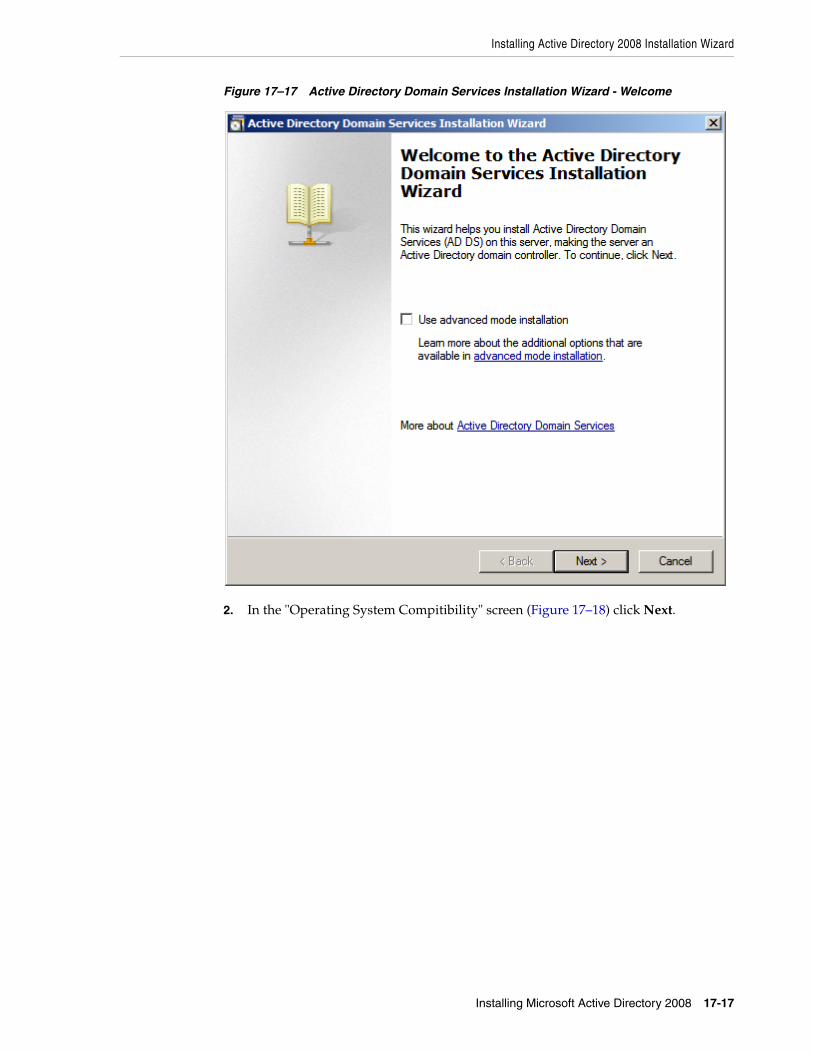
Installing Active Directory 2008 Installation Wizard
Installing Microsoft Active Directory 2008 17-17
Figure 17–17 Active Directory Domain Services Installation Wizard - Welcome
2. In the "Operating System Compitibility" screen (Figure 17–18) click Next.
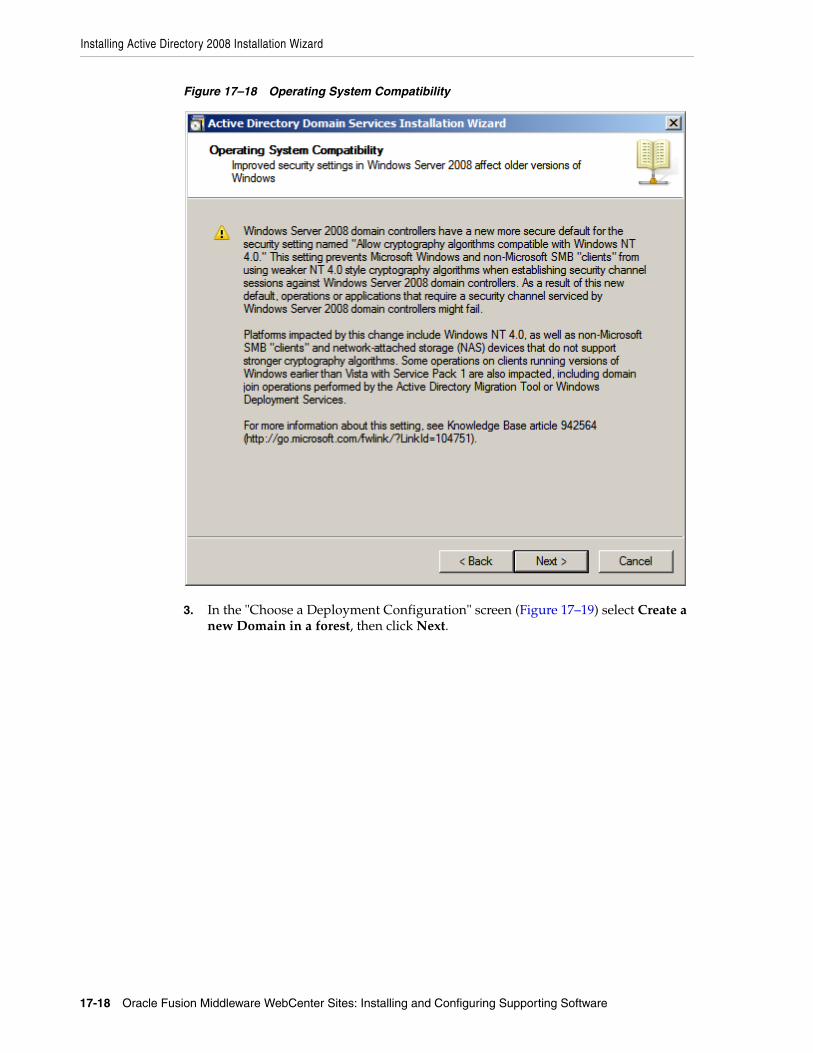
Installing Active Directory 2008 Installation Wizard
17-18 Oracle Fusion Middleware WebCenter Sites: Installing and Configuring Supporting Software
Figure 17–18 Operating System Compatibility
3. In the "Choose a Deployment Configuration" screen (Figure 17–19) select Create a new Domain in a forest, then click Next.
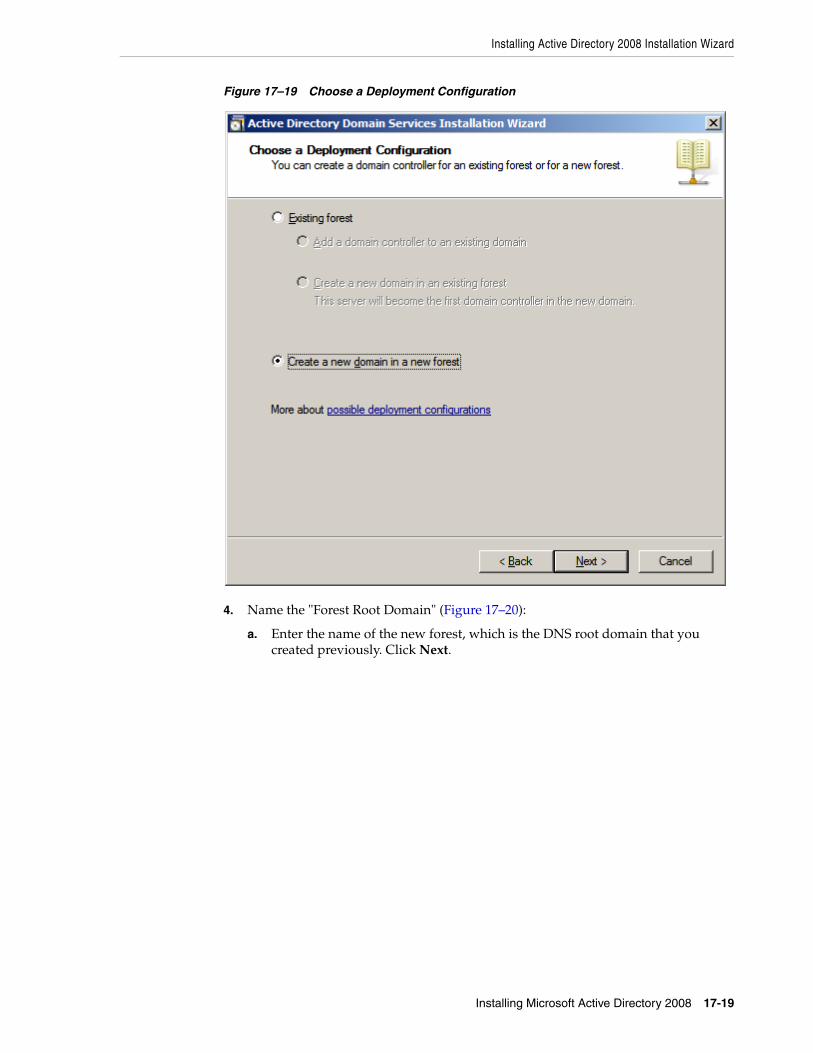
Installing Active Directory 2008 Installation Wizard
Installing Microsoft Active Directory 2008 17-19
Figure 17–19 Choose a Deployment Configuration
4. Name the "Forest Root Domain" (Figure 17–20):
a. Enter the name of the new forest, which is the DNS root domain that you created previously. Click Next.
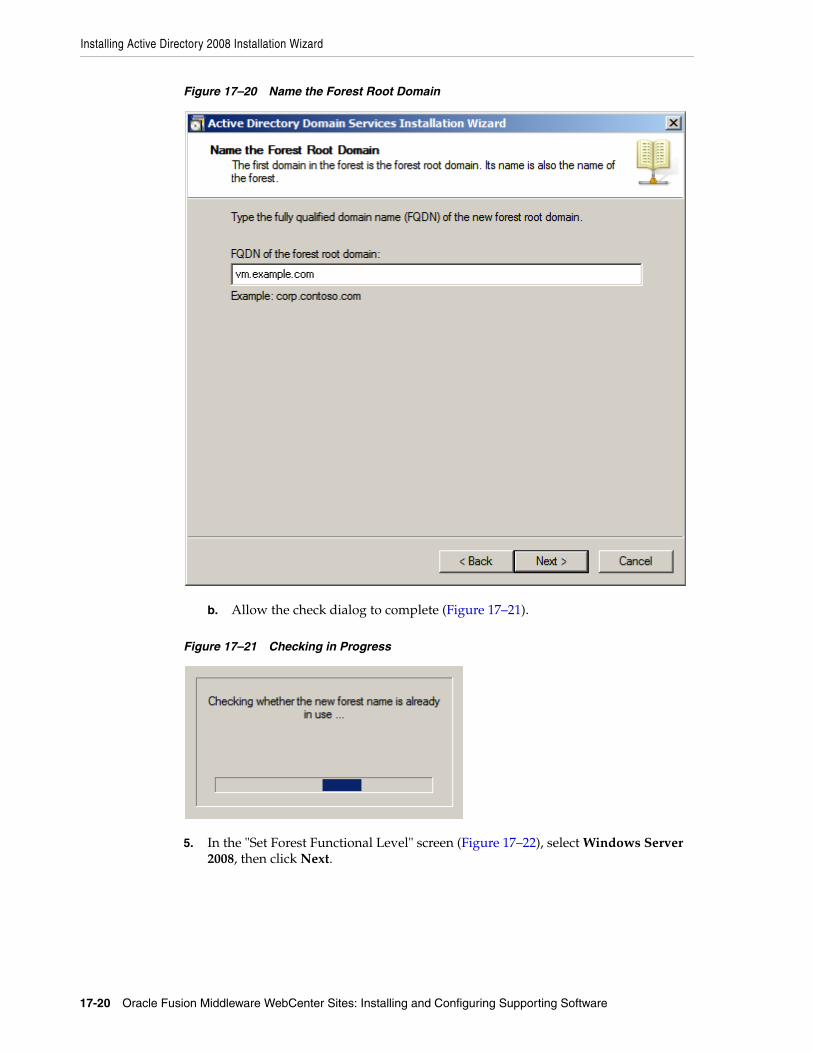
Installing Active Directory 2008 Installation Wizard
17-20 Oracle Fusion Middleware WebCenter Sites: Installing and Configuring Supporting Software
Figure 17–20 Name the Forest Root Domain
b. Allow the check dialog to complete (Figure 17–21).
Figure 17–21 Checking in Progress
5. In the "Set Forest Functional Level" screen (Figure 17–22), select Windows Server 2008, then click Next.
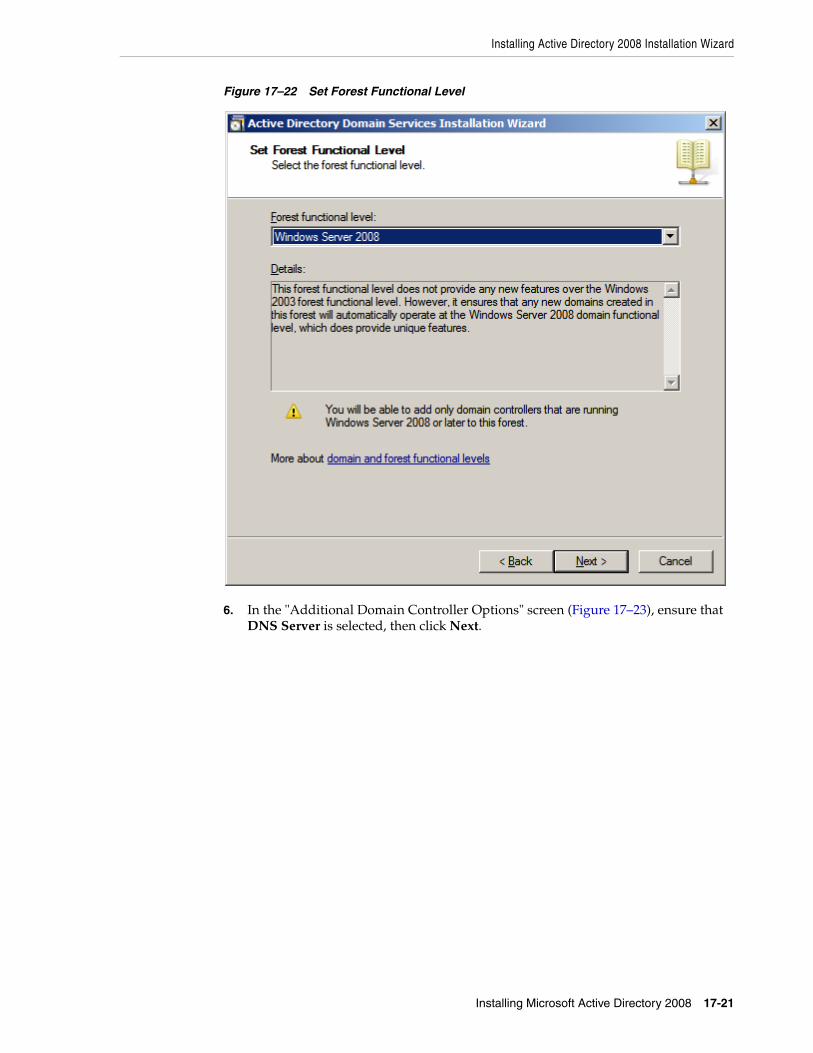
Installing Active Directory 2008 Installation Wizard
Installing Microsoft Active Directory 2008 17-21
Figure 17–22 Set Forest Functional Level
6. In the "Additional Domain Controller Options" screen (Figure 17–23), ensure that DNS Server is selected, then click Next.
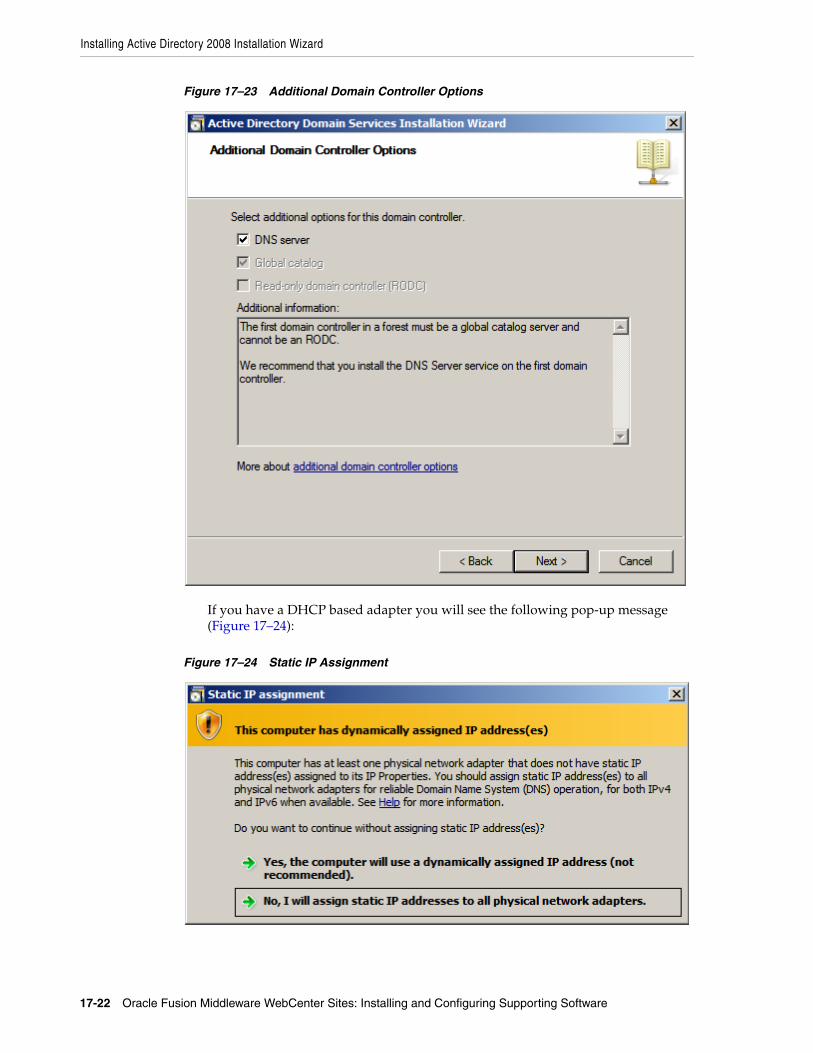
Installing Active Directory 2008 Installation Wizard
17-22 Oracle Fusion Middleware WebCenter Sites: Installing and Configuring Supporting Software
Figure 17–23 Additional Domain Controller Options
If you have a DHCP based adapter you will see the following pop-up message (Figure 17–24):
Figure 17–24 Static IP Assignment
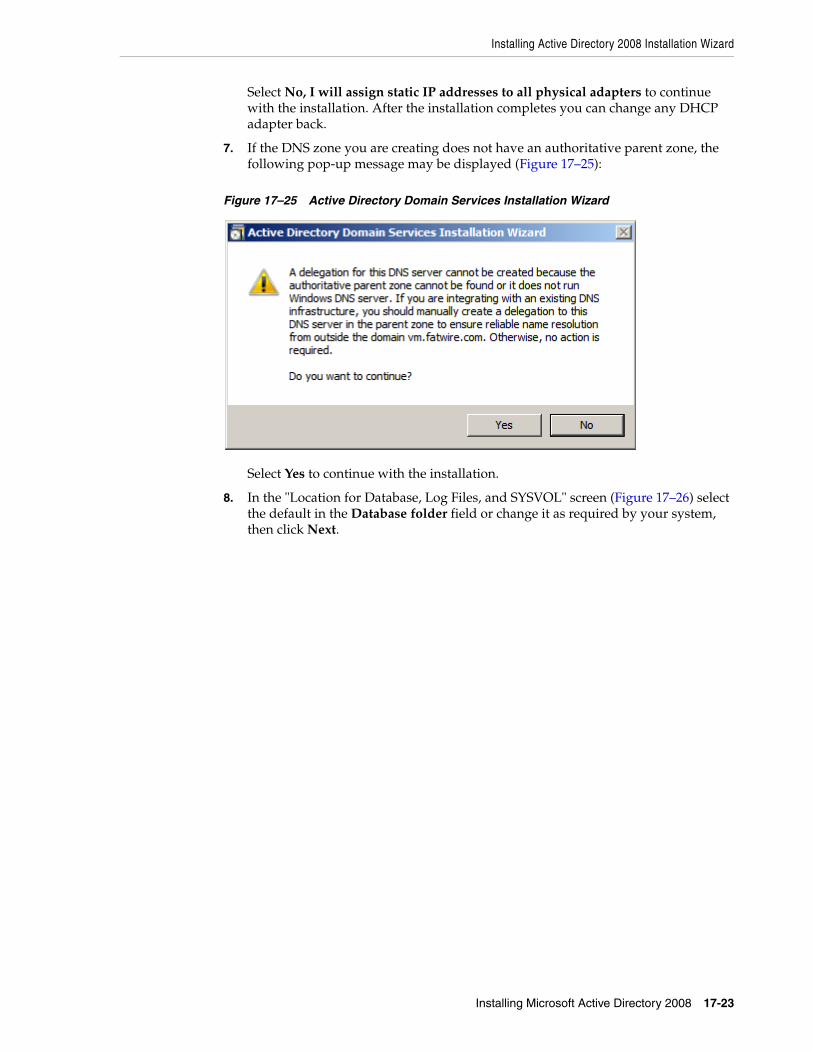
Installing Active Directory 2008 Installation Wizard
Installing Microsoft Active Directory 2008 17-23
Select No, I will assign static IP addresses to all physical adapters to continue with the installation. After the installation completes you can change any DHCP adapter back.
7. If the DNS zone you are creating does not have an authoritative parent zone, the following pop-up message may be displayed (Figure 17–25):
Figure 17–25 Active Directory Domain Services Installation Wizard
Select Yes to continue with the installation.
8. In the "Location for Database, Log Files, and SYSVOL" screen (Figure 17–26) select the default in the Database folder field or change it as required by your system, then click Next.
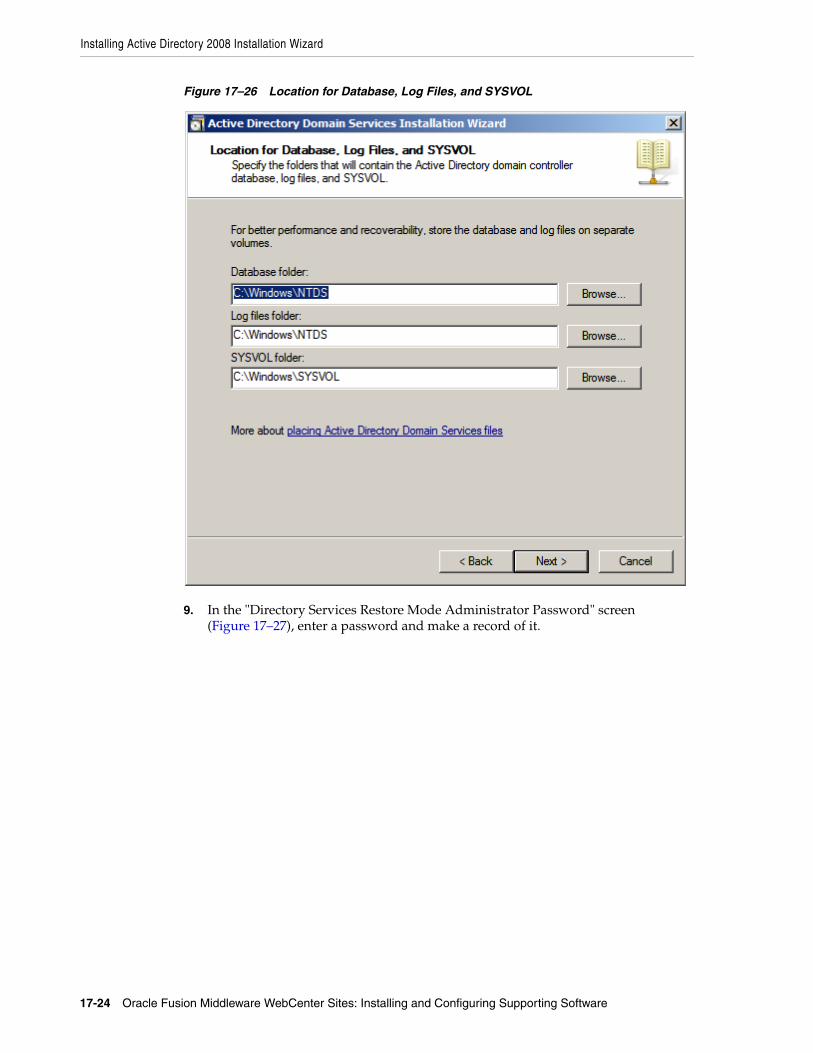
Installing Active Directory 2008 Installation Wizard
17-24 Oracle Fusion Middleware WebCenter Sites: Installing and Configuring Supporting Software
Figure 17–26 Location for Database, Log Files, and SYSVOL
9. In the "Directory Services Restore Mode Administrator Password" screen (Figure 17–27), enter a password and make a record of it.

Installing Active Directory 2008 Installation Wizard
Installing Microsoft Active Directory 2008 17-25
Figure 17–27 Directory Services Restore Mode Administrator Password
10. In the "Summary" screen (Figure 17–28):
a. Review your settings.
b. Export your settings.
c. Click Next.
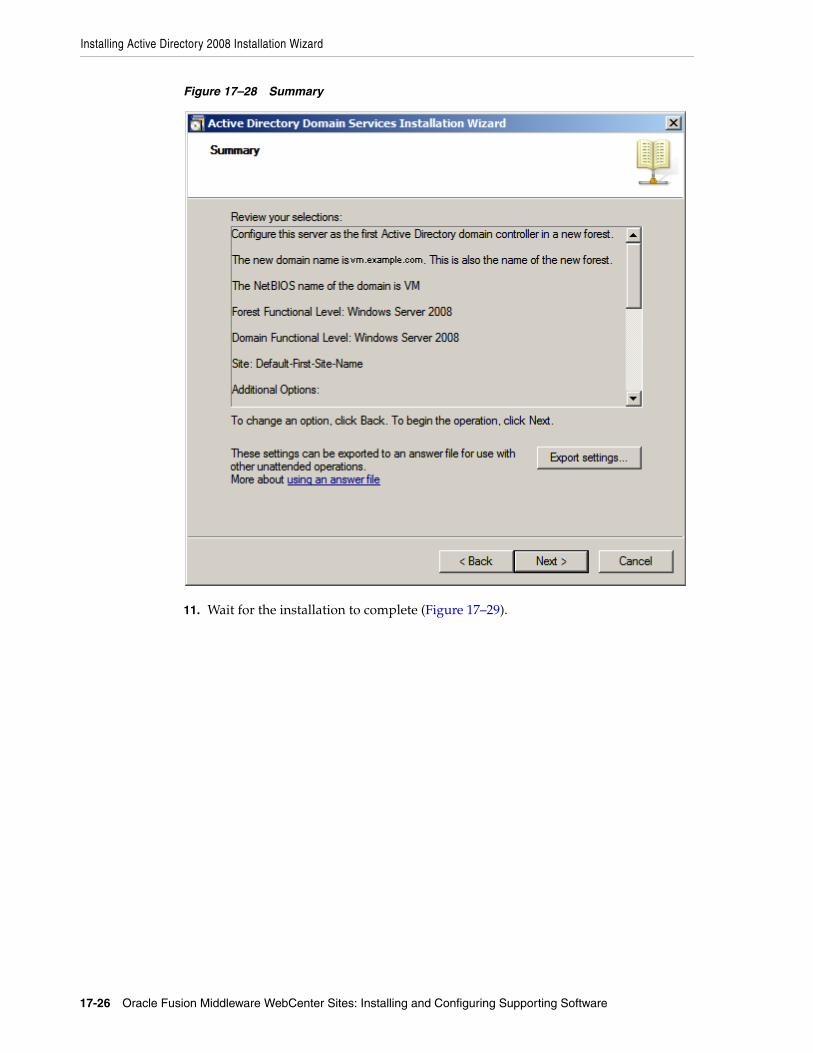
Installing Active Directory 2008 Installation Wizard
17-26 Oracle Fusion Middleware WebCenter Sites: Installing and Configuring Supporting Software
Figure 17–28 Summary
11. Wait for the installation to complete (Figure 17–29).
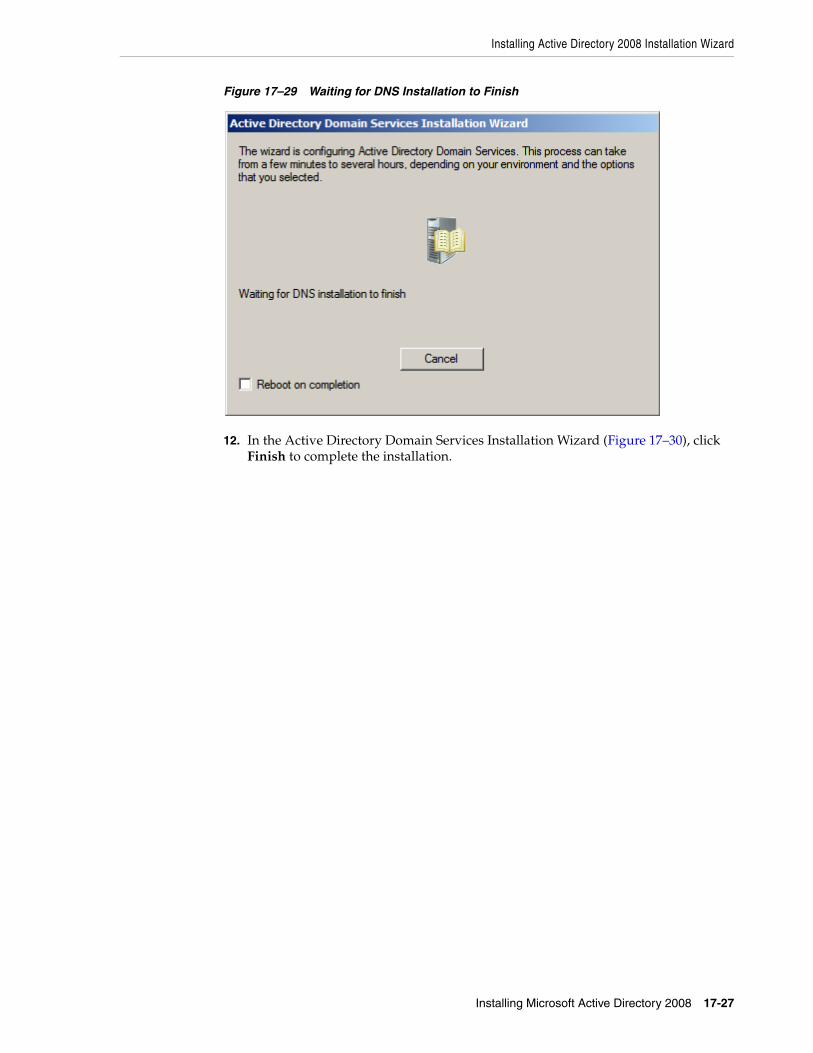
Installing Active Directory 2008 Installation Wizard
Installing Microsoft Active Directory 2008 17-27
Figure 17–29 Waiting for DNS Installation to Finish
12. In the Active Directory Domain Services Installation Wizard (Figure 17–30), click Finish to complete the installation.
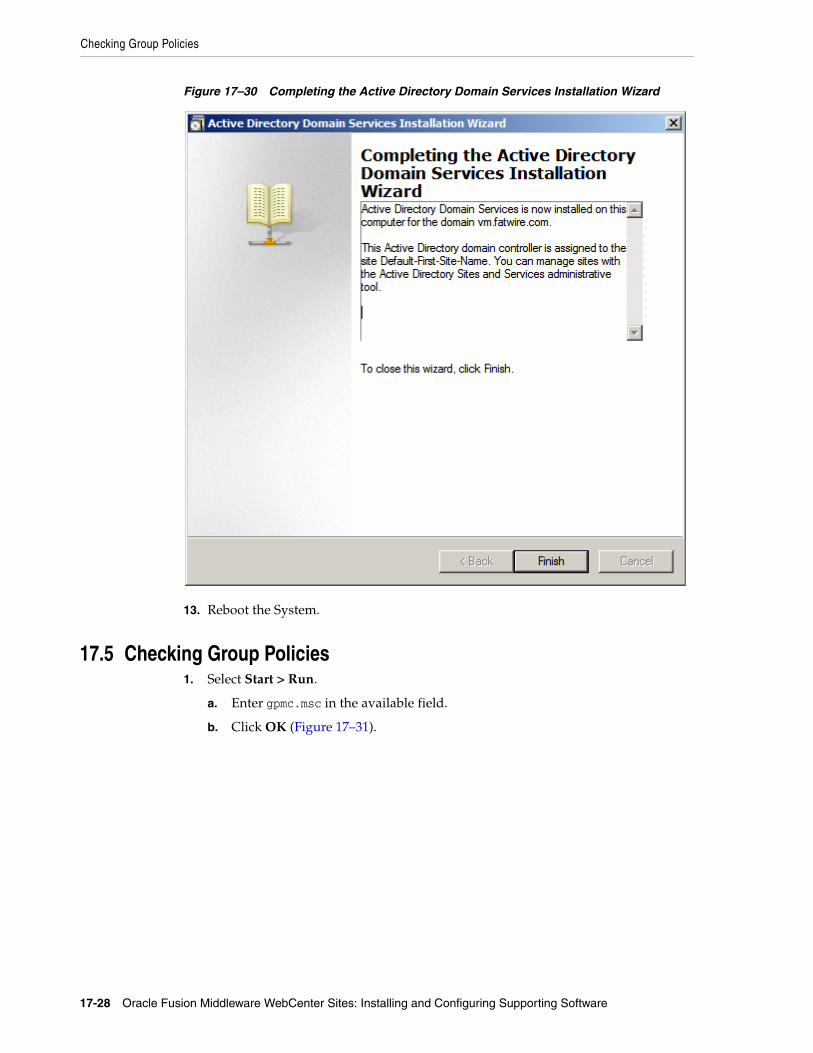
Checking Group Policies
17-28 Oracle Fusion Middleware WebCenter Sites: Installing and Configuring Supporting Software
Figure 17–30 Completing the Active Directory Domain Services Installation Wizard
13. Reboot the System.
17.5 Checking Group Policies1. Select Start > Run.
a. Enter gpmc.msc in the available field.
b. Click OK (Figure 17–31).
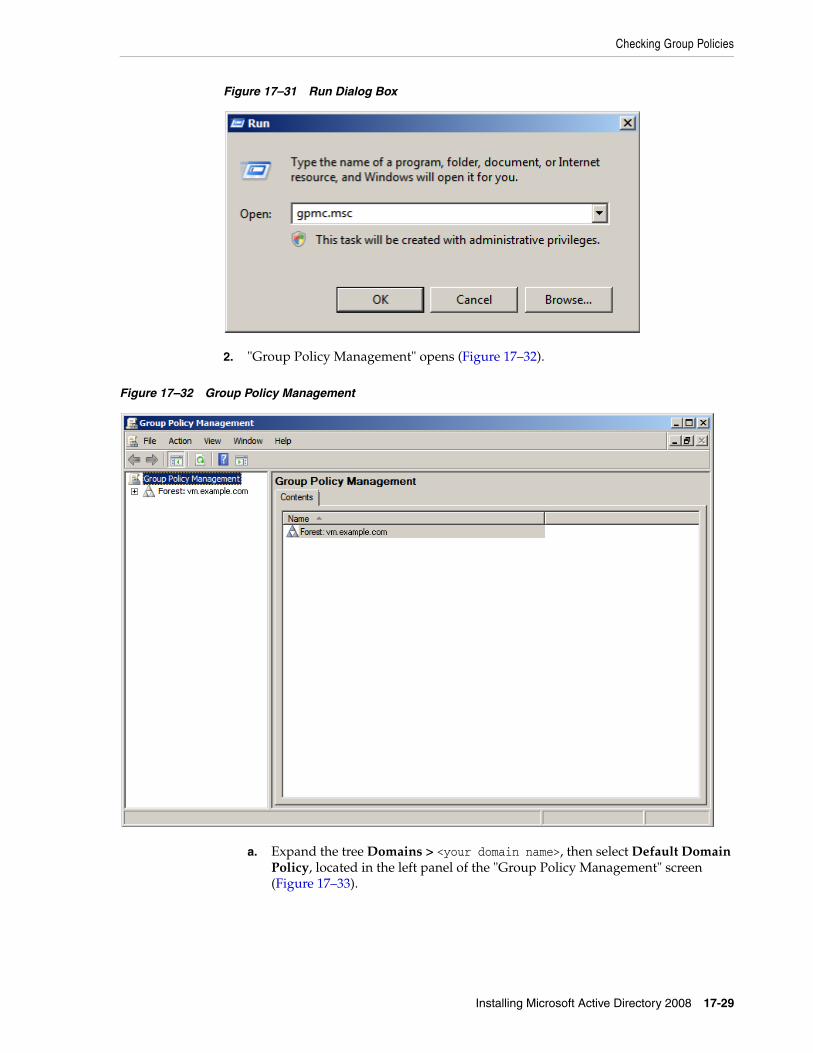
Checking Group Policies
Installing Microsoft Active Directory 2008 17-29
Figure 17–31 Run Dialog Box
2. "Group Policy Management" opens (Figure 17–32).
Figure 17–32 Group Policy Management
a. Expand the tree Domains > <your domain name>, then select Default Domain Policy, located in the left panel of the "Group Policy Management" screen (Figure 17–33).
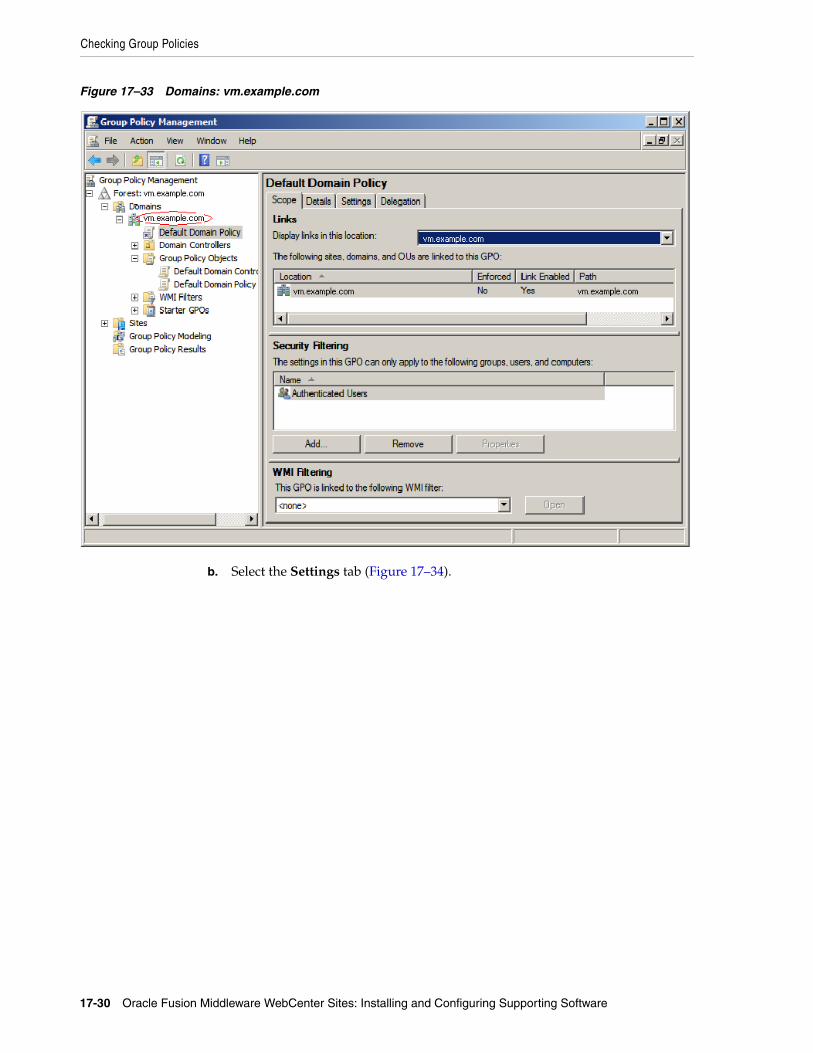
Checking Group Policies
17-30 Oracle Fusion Middleware WebCenter Sites: Installing and Configuring Supporting Software
Figure 17–33 Domains: vm.example.com
b. Select the Settings tab (Figure 17–34).
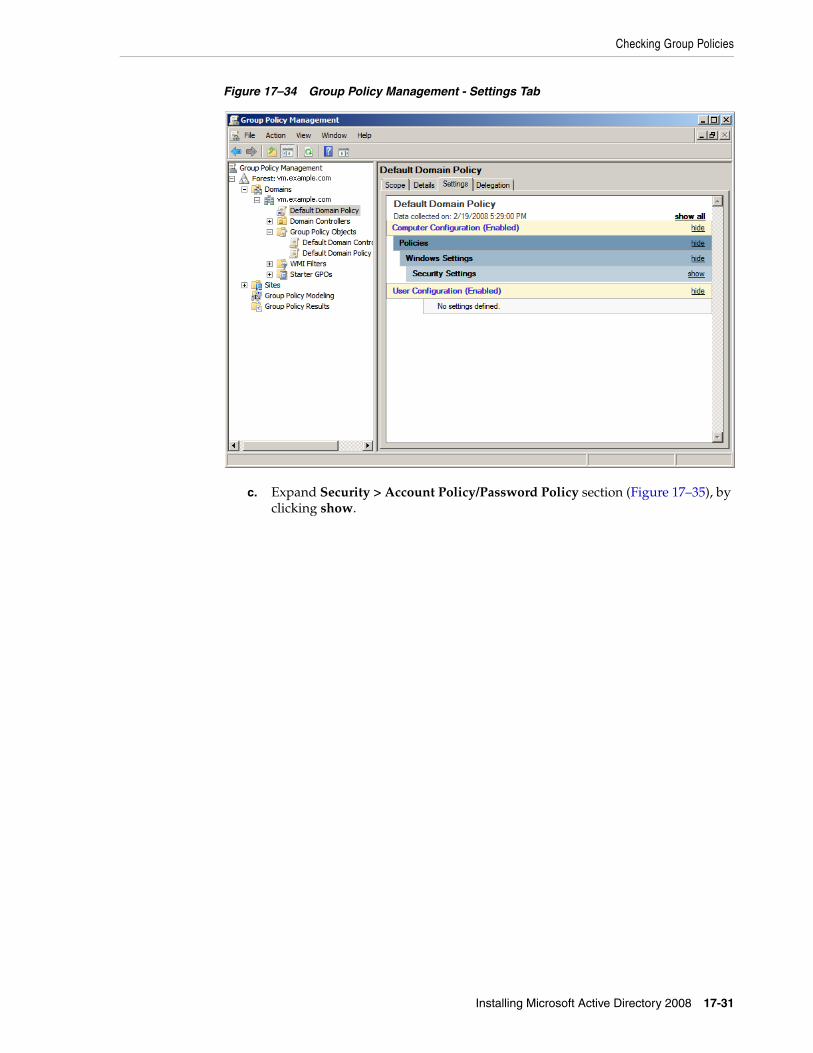
Checking Group Policies
Installing Microsoft Active Directory 2008 17-31
Figure 17–34 Group Policy Management - Settings Tab
c. Expand Security > Account Policy/Password Policy section (Figure 17–35), by clicking show.
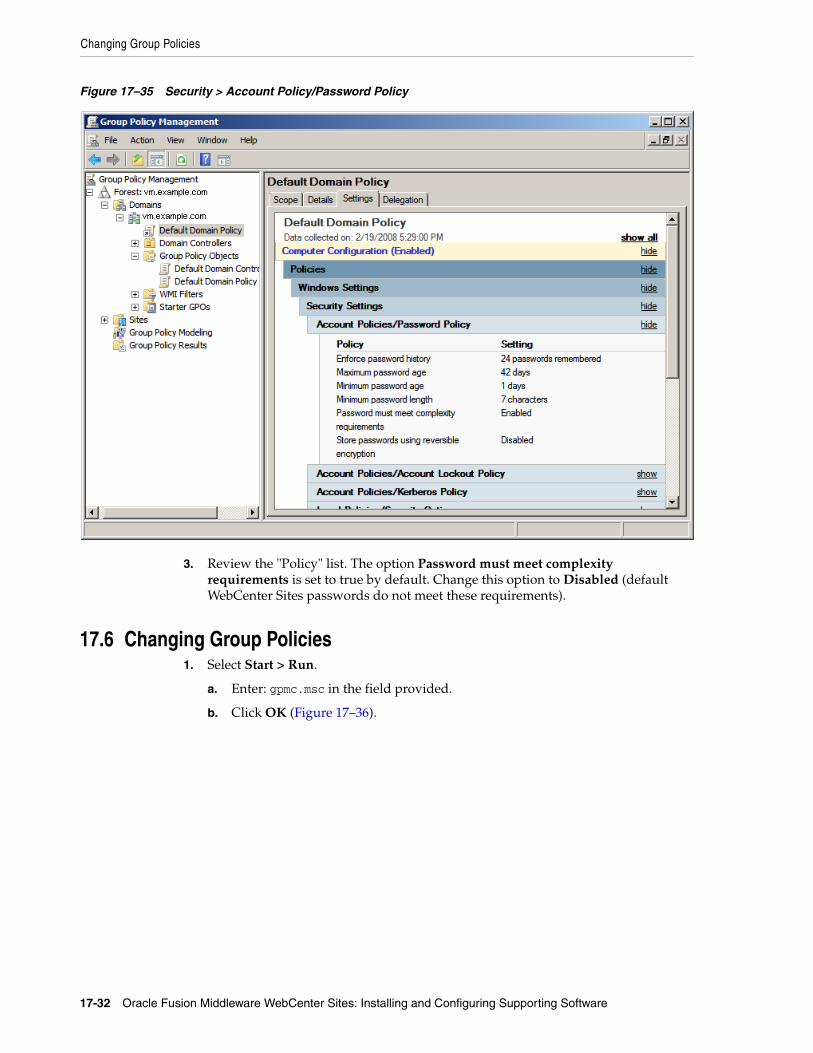
Changing Group Policies
17-32 Oracle Fusion Middleware WebCenter Sites: Installing and Configuring Supporting Software
Figure 17–35 Security > Account Policy/Password Policy
3. Review the "Policy" list. The option Password must meet complexity requirements is set to true by default. Change this option to Disabled (default WebCenter Sites passwords do not meet these requirements).
17.6 Changing Group Policies1. Select Start > Run.
a. Enter: gpmc.msc in the field provided.
b. Click OK (Figure 17–36).
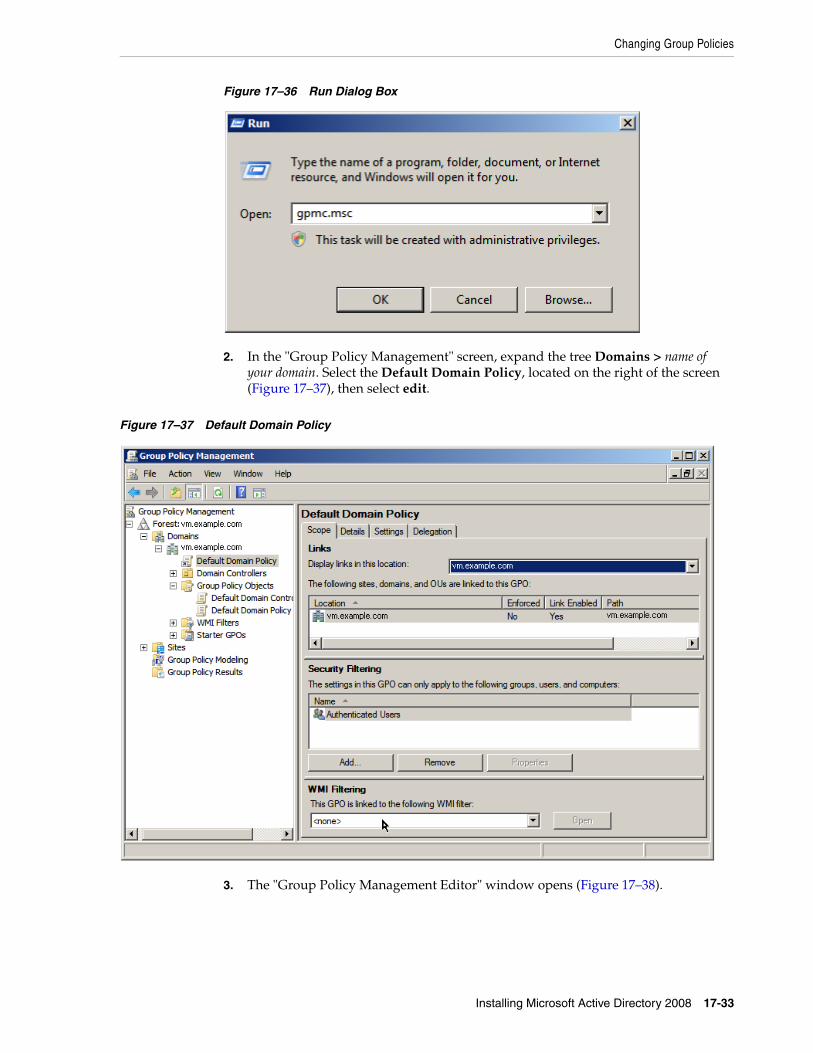
Changing Group Policies
Installing Microsoft Active Directory 2008 17-33
Figure 17–36 Run Dialog Box
2. In the "Group Policy Management" screen, expand the tree Domains > name of your domain. Select the Default Domain Policy, located on the right of the screen (Figure 17–37), then select edit.
Figure 17–37 Default Domain Policy
3. The "Group Policy Management Editor" window opens (Figure 17–38).
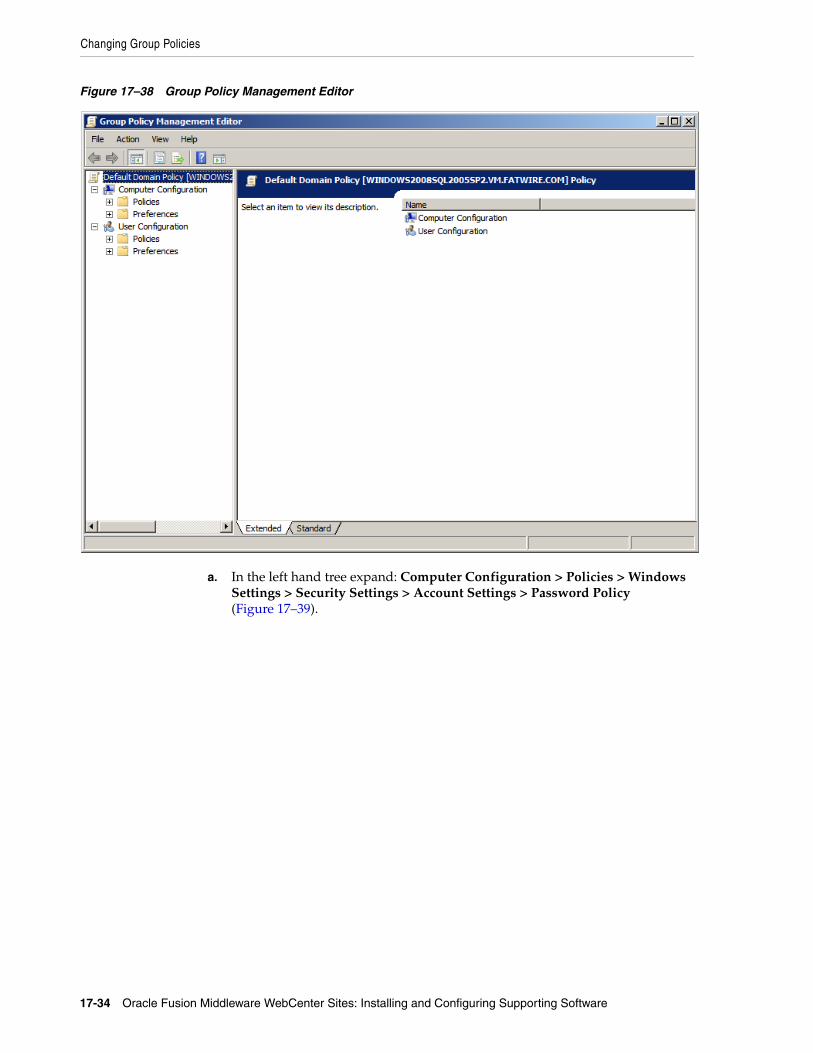
Changing Group Policies
17-34 Oracle Fusion Middleware WebCenter Sites: Installing and Configuring Supporting Software
Figure 17–38 Group Policy Management Editor
a. In the left hand tree expand: Computer Configuration > Policies > Windows Settings > Security Settings > Account Settings > Password Policy (Figure 17–39).
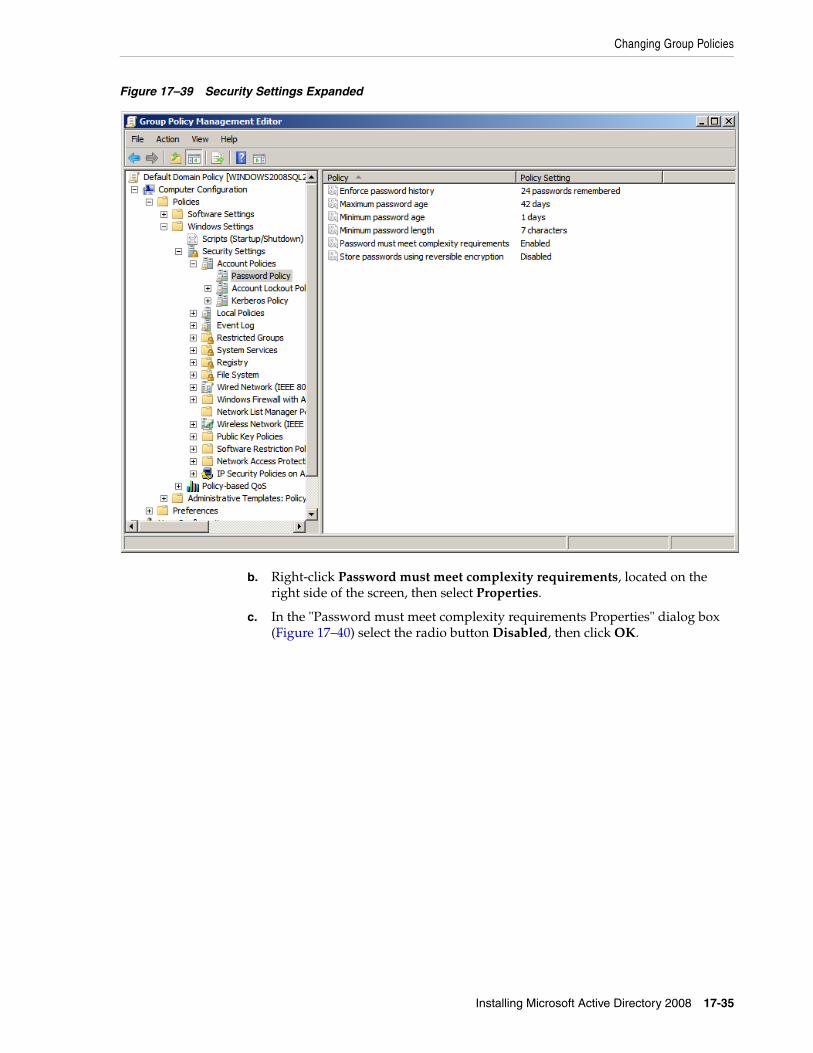
Changing Group Policies
Installing Microsoft Active Directory 2008 17-35
Figure 17–39 Security Settings Expanded
b. Right-click Password must meet complexity requirements, located on the right side of the screen, then select Properties.
c. In the "Password must meet complexity requirements Properties" dialog box (Figure 17–40) select the radio button Disabled, then click OK.
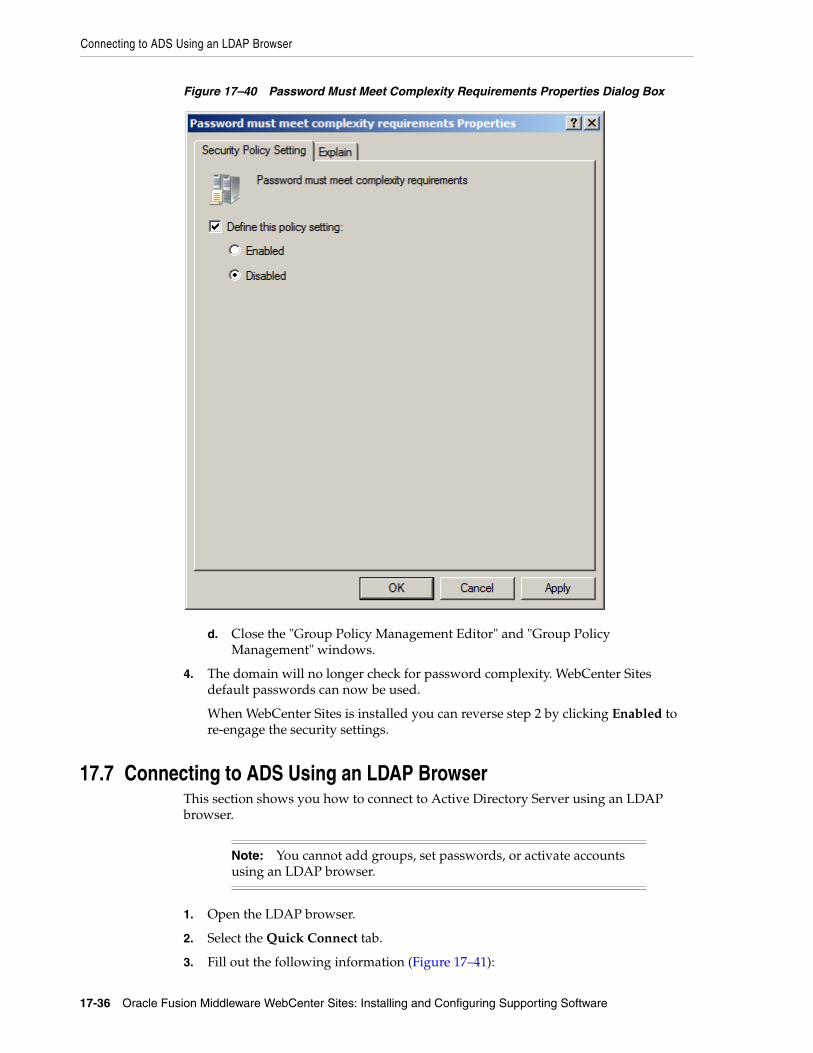
Connecting to ADS Using an LDAP Browser
17-36 Oracle Fusion Middleware WebCenter Sites: Installing and Configuring Supporting Software
Figure 17–40 Password Must Meet Complexity Requirements Properties Dialog Box
d. Close the "Group Policy Management Editor" and "Group Policy Management" windows.
4. The domain will no longer check for password complexity. WebCenter Sites default passwords can now be used.
When WebCenter Sites is installed you can reverse step 2 by clicking Enabled to re-engage the security settings.
17.7 Connecting to ADS Using an LDAP BrowserThis section shows you how to connect to Active Directory Server using an LDAP browser.
1. Open the LDAP browser.
2. Select the Quick Connect tab.
3. Fill out the following information (Figure 17–41):
Note: You cannot add groups, set passwords, or activate accounts using an LDAP browser.
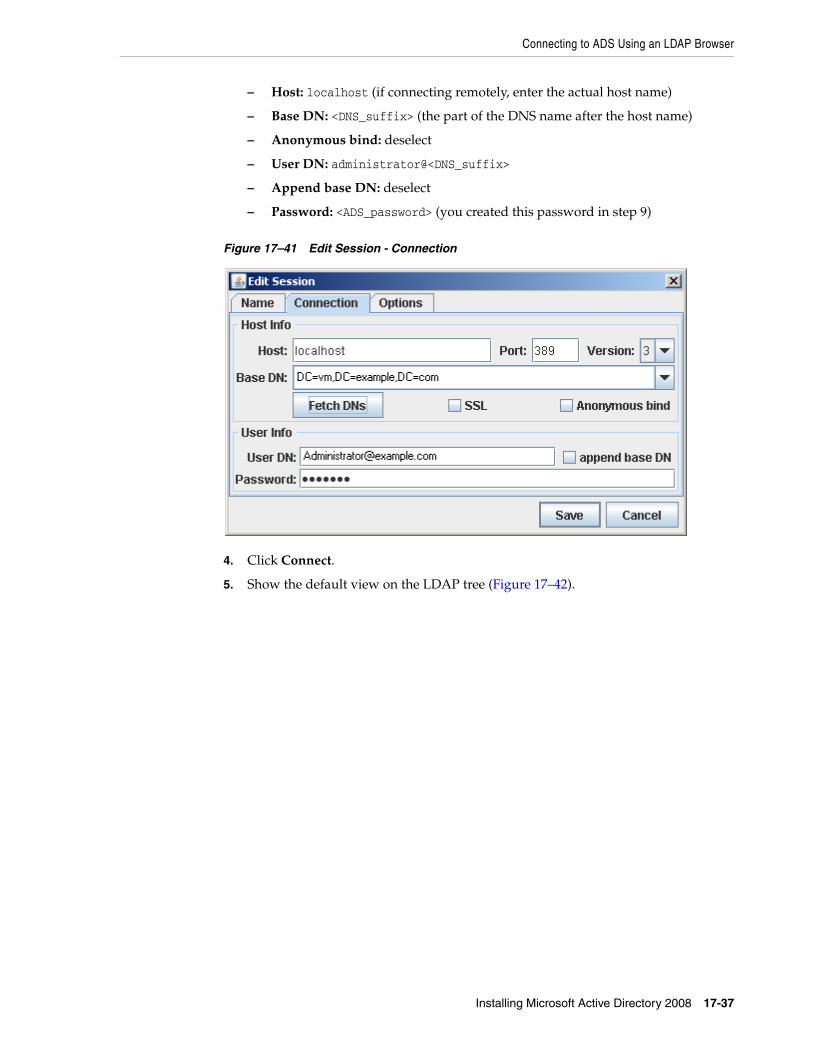
Connecting to ADS Using an LDAP Browser
Installing Microsoft Active Directory 2008 17-37
– Host: localhost (if connecting remotely, enter the actual host name)
– Base DN: <DNS_suffix> (the part of the DNS name after the host name)
– Anonymous bind: deselect
– User DN: administrator@<DNS_suffix>
– Append base DN: deselect
– Password: <ADS_password> (you created this password in step 9)
Figure 17–41 Edit Session - Connection
4. Click Connect.
5. Show the default view on the LDAP tree (Figure 17–42).
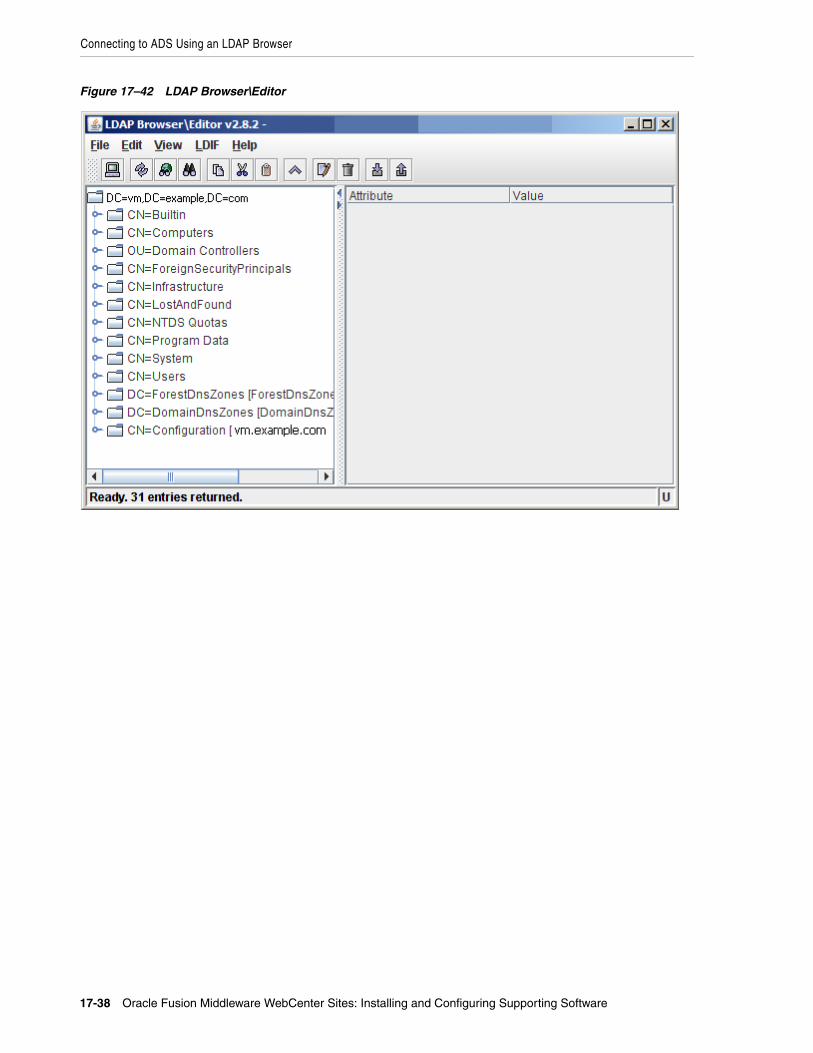
Connecting to ADS Using an LDAP Browser
17-38 Oracle Fusion Middleware WebCenter Sites: Installing and Configuring Supporting Software
Figure 17–42 LDAP Browser\Editor
18
Setting Up OpenLDAP 2.3.x 18-1
18Setting Up OpenLDAP 2.3.x
This chapter explains how to set up OpenLDAP for use with WebCenter Sites.
It contains the following sections:
■ Section 18.1, "OpenLDAP Commands"
■ Section 18.2, "Installing OpenLDAP"
■ Section 18.3, "Configuring OpenLDAP"
■ Section 18.4, "Adding WebCenter Sites Schema to OpenLDAP"
■ Section 18.5, "Modifying User Passwords"
18.1 OpenLDAP CommandsThis section contains the most commonly used OpenLDAP commands. Use it as a reference when configuring OpenLDAP for use with WebCenter Sites.
18.1.1 Starting OpenLDAP
■ To start OpenLDAP normally, use the following command:
/usr/local/libexec/slapd
■ To start OpenLDAP with full debugging (useful when diagnosing configuration issues and installing WebCenter Sites), use the following command:
/usr/local/libexec/slapd -h 'ldap:///' -d 0x5001
18.1.2 Searching an OpenLDAP ServerTo search an OpenLDAP Server, do the following:
1. Execute the following command:
Note: You must set OpenLDAP before you run the WebCenter Sites-LDAP integrator.
Note: This section assumes that the slapd daemon is located in /usr/local/libexec. Depending on your installation, the daemon might be located elsewhere. In such cases, substitute the correct path in the commands listed in this section.
Installing OpenLDAP
18-2 Oracle Fusion Middleware WebCenter Sites: Installing and Configuring Supporting Software
ldapsearch -x -D "cn=Manager,dc=<domain>,dc=<extension>" -W -b '' -s base '(objectClass=*)' namingContexts
where <domain> and <extension> are the values you specified in step a on page 18-6.
2. When prompted for a password, enter the Root DN user password you specified in step d on page 18-7.
A typical response from the ldapsearch command looks as follows:
Enter LDAP Password:# extended LDIF## LDAPv3# base <> with scope baseObject# filter: (objectClass=*)# requesting: namingContexts#
#dn:namingContexts: dc=example,dc=com# search resultsearch: 2result: 0 Success
# numResponses: 2# numEntries: 1
18.1.3 Adding an LDIF File to an OpenLDAP ServerTo add a well-formed LDIF file to your OpenLDAP Server, use the ldapadd command:
ldapadd -D 'cn=Manager,dc=<domain>,dc=<extension>'-w <root_dn_password> -f <LDIF_file_name>
where:
■ <domain> and <extension> are the values you specified in step a on page 18-6.
■ <root_dn_password> is the Root DN user password you specified in step d on page 18-7.
■ <LDIF_file_name> is the name of the LDIF file you are adding.
18.2 Installing OpenLDAPThis section explains how to install OpenLDAP.
To install Open LDAP
1. Download the OpenLDAP tgz archive from the OpenLDAP web site:
http://www.openldap.org/
For example: openldap-stable-20070110.tgz
Note: OpenLDAP is bundled with most Linux distributions. If OpenLDAP is already installed on your system, skip this section.
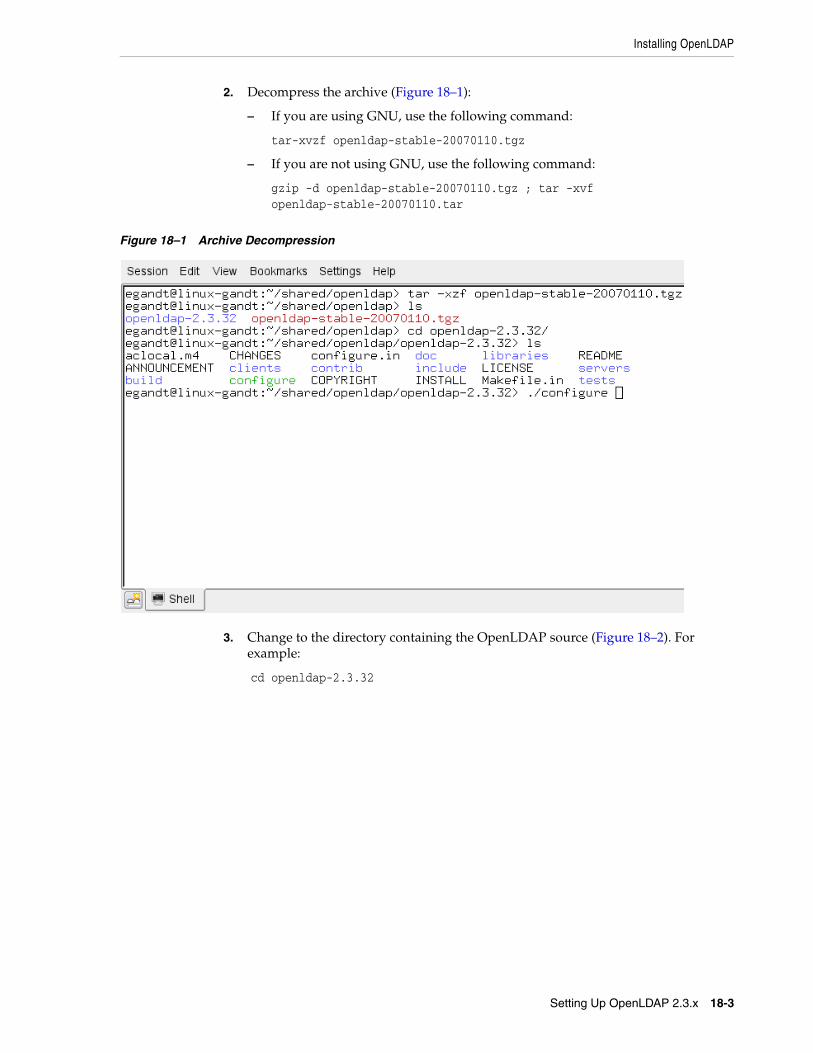
Installing OpenLDAP
Setting Up OpenLDAP 2.3.x 18-3
2. Decompress the archive (Figure 18–1):
– If you are using GNU, use the following command:
tar-xvzf openldap-stable-20070110.tgz
– If you are not using GNU, use the following command:
gzip -d openldap-stable-20070110.tgz ; tar -xvf openldap-stable-20070110.tar
Figure 18–1 Archive Decompression
3. Change to the directory containing the OpenLDAP source (Figure 18–2). For example:
cd openldap-2.3.32
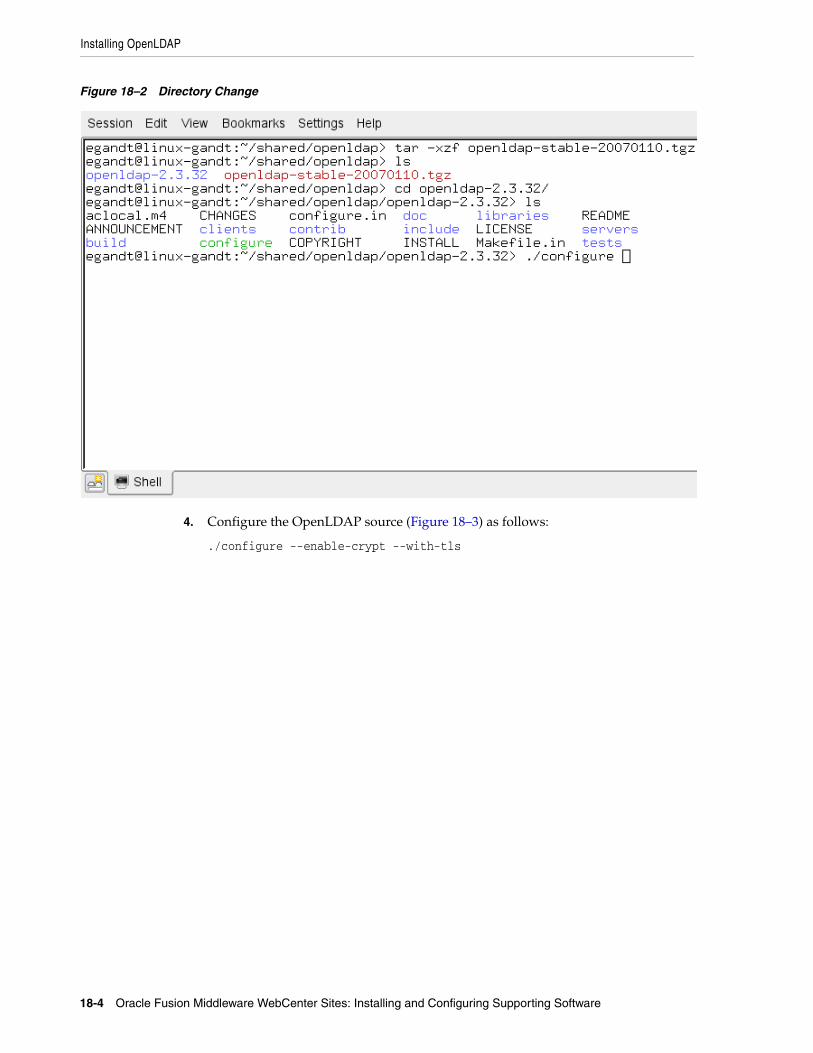
Installing OpenLDAP
18-4 Oracle Fusion Middleware WebCenter Sites: Installing and Configuring Supporting Software
Figure 18–2 Directory Change
4. Configure the OpenLDAP source (Figure 18–3) as follows:
./configure --enable-crypt --with-tls
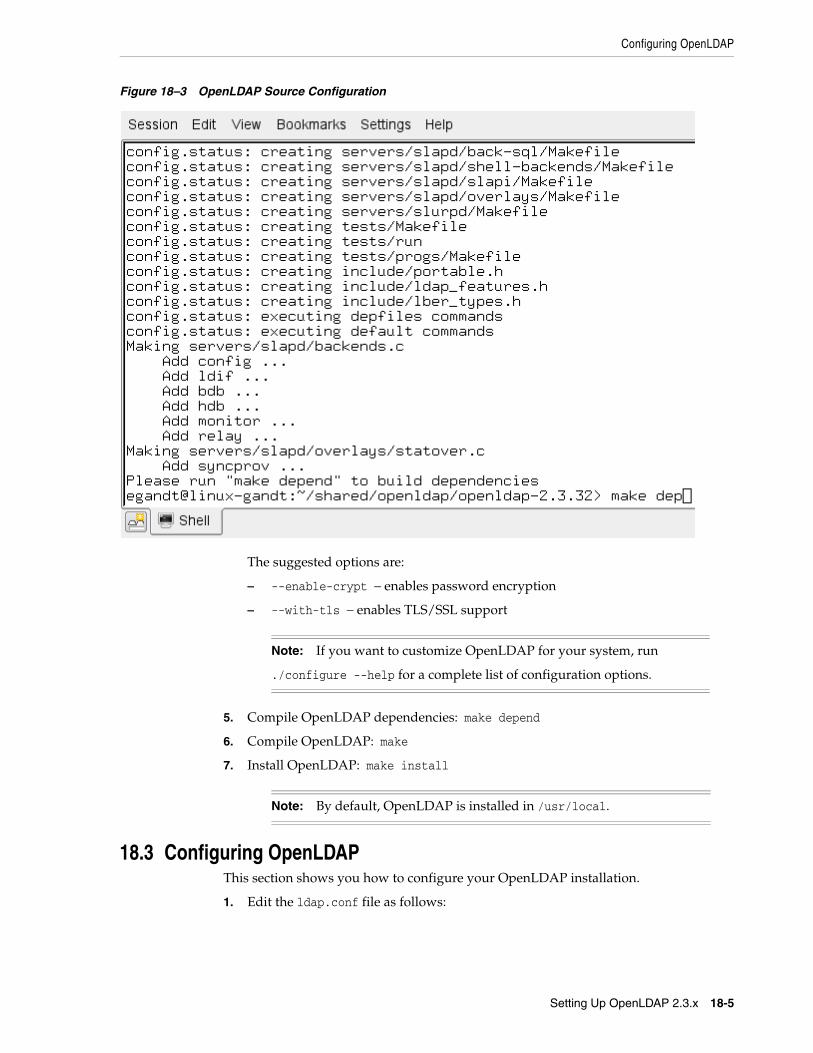
Configuring OpenLDAP
Setting Up OpenLDAP 2.3.x 18-5
Figure 18–3 OpenLDAP Source Configuration
The suggested options are:
– --enable-crypt — enables password encryption
– --with-tls — enables TLS/SSL support
5. Compile OpenLDAP dependencies: make depend
6. Compile OpenLDAP: make
7. Install OpenLDAP: make install
18.3 Configuring OpenLDAPThis section shows you how to configure your OpenLDAP installation.
1. Edit the ldap.conf file as follows:
Note: If you want to customize OpenLDAP for your system, run
./configure --help for a complete list of configuration options.
Note: By default, OpenLDAP is installed in /usr/local.
Configuring OpenLDAP
18-6 Oracle Fusion Middleware WebCenter Sites: Installing and Configuring Supporting Software
a. Specify your Base DN. Locate the following line (or create it if it does not exist):
BASE dc=<domain>,dc=<extension>
where <domain> and <extension> are, respectively, the domain and TLD of your LDAP server.
The Base DN for OpenLDAP should always be two dc's in length. For example, if your full domain is vm.example.com, your Base DN would be example.com, and your BASE line would look as follows:
BASE dc=example,dc=com
b. Specify your URI(s). Locate the following line (or create it if it does not exist):
URI ldap://<hostanme_or_IP> ldap://<hostanme_or_IP>
Enter the host names and/or IP addresses on which on which OpenLDAP is to listen for connections. Separate the entries with spaces. For example:
URI ldap://127.0.0.1 ldap://localhost ldap://172.19.1.2
2. Edit the sldapd.conf file as follows:
a. Locate the following section:
access to * by self write by users readand replace it with:access to * by dn="cn=Manager,dc=<domain>,dc=<extension>" writeby self writeby users readby anonymous auth
where <domain> and <extension> are the values you specified in step 1a on page 18-6.
b. Specify your suffix. Locate the following line (or create it if it does not exist):
suffix dc=<domain>,dc=<extension>
where <domain> and <extension> are the values you specified in step 1a on page 18-6.
c. Specify your Root DN user. (The Root DN user is used to access the LDAP Server.) Locate the following line (or create it if it does not exist):
rootdn cn=<user_name>,dc=<domain>,dc=<domain>
Enter Manager as the user name and replace <domain> and <extension> with the values you specified in step 1a on page 18-6.
Note: If you installed OpenLDAP manually by following the steps in the previous section, ldap.conf is located in /usr/local/etc.
Note: If you installed OpenLDAP manually by following the steps in the previous section, sldapd.conf is located in /usr/local/etc.
Adding WebCenter Sites Schema to OpenLDAP
Setting Up OpenLDAP 2.3.x 18-7
d. Specify a password for the Root DN user. Locate the following line (or create it if it does not exist):
rootpw<password>
e. (Optional) If you chose to use an encrypted password in the previous step, set the password type to SHA. Locate the following line (or create it if it does not exist):
password-hash {SSHA}
This sets the password type to SHA (the default). You can set other password types; see the OpenLDAP documentation for more information.
3. Edit the core.schema file as follows:
a. Locate the following section:
objectclass ( 2.5.6.17 NAME 'groupOfUniqueNames' DESC 'RFC2256: a group of unique names (DN and Unique Identifier)'SUP top STRUCTURAL MAY ( businessCategory $ seeAlso $ owner $ ou $ o $ description $ uniqueMember) MUST ( uniqueMember $ cn ))
b. Comment the section out by placing a # character at the beginning of each line. Then insert the following modified section after it:
objectclass ( 2.5.6.17 NAME 'groupOfUniqueNames' DESC 'RFC2256: a group of unique names (DN and Unique Identifier)'SUP top STRUCTURALMAY ( businessCategory $ seeAlso $ owner $ ou $ o $ description $ uniqueMember) MUST ( cn ))
The difference between the original and modified sections is the last line:
MUST ( uniqueMember $ cn ) becomes MUST ( cn )
OpenLDAP is now configured.
18.4 Adding WebCenter Sites Schema to OpenLDAPThis section shows you how to add WebCenter Sites schema to your OpenLDAP server.
Note: The password can be either encrypted or unencrypted. (Encrypted passwords start with {SSHA}). If you wish to use an encrypted password, do the following:
■ Generate an encrypted password (hash) using the slappasswd command. The command generates a valid encrypted password (hash) and prints it to the terminal.
■ Perform step e below.
Note: If you installed OpenLDAP manually by following the steps in the previous section, core.schema is located in /usr/local/etc/schema.
Adding WebCenter Sites Schema to OpenLDAP
18-8 Oracle Fusion Middleware WebCenter Sites: Installing and Configuring Supporting Software
To configure OpenLDAP for WebCenter Sites1. Create an LDIF file named pre_cs_openldap.ldif with the following contents:
dn: dc=<domain>,dc=<extension>objectClass: dcObjectobjectClass: organizationdc: exampledescription: OpenLDAP pre_cs_setupo: Example Software
# LDAP Manager Roledn: cn=Manager,dc=<domain>,dc=<extension>objectclass: organizationalRolecn: Manager
# add the organizational Unit Peopledn: ou=People,dc=<domain>,dc=<extension>objectClass: organizationalUnitobjectClass: topou: People
# add the organizational Unit Groupdn: ou=Groups,dc=<domain>,dc=<extension>objectClass: organizationalUnitobjectClass: topou: Groups
where <domain> and <extension> are the values you specified in step a on page 18-6.
The file will create a new organization (example) containing two sub-organizations (Groups and People)and the Manager user. The Manager user will be used to access the LDAP server.
2. Add the pre_cs_openldap.ldif file to your OpenLDAP server. Execute the following command:
ldapadd -D 'cn=Manager,dc=<domain>,dc=<extension>'
-w <root_dn_password> -f pre_cs_openldap.ldif
where:
– <domain> and <extension> are the values you specified in step a on page 18-6.
– <root_dn_password> is the Root DN user password you specified in step d on page 18-7.
3. Test your OpenLDAP server. Execute the following command:
ldapsearch -x -b 'ou=Groups,dc=<domain>,dc=<extension>' '(objectclass=*)'
where <domain> and <extension> are the values you specified in step a on page 18-6.
An example response from the ldapsearch command looks as follows:
Note: If you are copying the contents of the sample LDIF file below, make sure to insert an empty line between dn sections and at the end of the file.
Modifying User Passwords
Setting Up OpenLDAP 2.3.x 18-9
# extended LDIF## LDAPv3# base <ou=Groups,dc=example,dc=com> with scope subtree# filter: (objectclass=*)# requesting: ALL#
# search resultsearch: 2result: 0 Success
# numResponses: 1
If the pre_cs_openldap.ldif file was successfully inserted into the LDAP server, the result: line indicates success, at which point you are ready to run the WebCenter Sites LDAP integrator. For instructions, see Part V, "Integrating Oracle WebCenter Sites with LDAP."
18.5 Modifying User PasswordsWhen you ran the WebCenter Sites LDAP integrator, all WebCenter Sites users (except fwadmin, ContentServer, and DefaultReader) were assigned the password which you entered in the "WebCenter Sites Configuration" screen. For security reasons, you might want to manually assign unique passwords to those users.
The following table shows the passwords you must assign to your WebCenter Sites users:
This section covers the following methods for changing passwords in OpenLDAP:
■ Section 18.5.1, "Modifying User Passwords Using an LDAP Browser"
■ Section 18.5.2, "Modifying User Passwords Using the ldapmodify Command"
Note: If you chose to use encrypted passwords when you configured OpenLDAP, you must change the passwords for all users on your WebCenter Sites system, or your WebCenter Sites installation will not function properly. This is because the WebCenter Sites-LDAP integrator writes user passwords into OpenLDAP as plaintext, but OpenLDAP expects password hashes.
User Password
DefaultReader SomeReader
ContentServer The password you supplied during WebCenter Sites installation
fwadmin The password you supplied during WebCenter Sites installation
All other users on your WebCenter Sites system
The password you supplied during WebCenter Sites- LDAP integration
Modifying User Passwords
18-10 Oracle Fusion Middleware WebCenter Sites: Installing and Configuring Supporting Software
18.5.1 Modifying User Passwords Using an LDAP BrowserThis section shows you how to modify user passwords using the free LDAP Browser/Editor program available at http://www-unix.mcs.anl.gov/~gawor/ldap/.
To modify user passwords in OpenLDAP using an LDAP browser
1. Download and install the LDAP browser.
2. Start the LDAP browser: ./lbe.sh
3. Click the Quick Connect tab (Figure 18–4).
Figure 18–4 Quick Connect Tab
4. Fill out the fields as follows:
5. Click Connect.
6. In the left-hand tree, expand the ou=People node (Figure 18–5).
Field Value
Hostname The host name of your OpenLDAP server.
Port 389
Version 3
Base DN The Base DN you specified in step a.
Anonymous bind Yes (select check box)
User DN cn=Manager
Append base DN Yes (select check box)
Password The Root DN user password you specified in step d on page 18-7.
Modifying User Passwords
Setting Up OpenLDAP 2.3.x 18-11
Figure 18–5 ou-People Expanded
7. Double-click the user whose password you want to change and press Ctrl-E.
8. The plaintext password written by the WebCenter Sites-LDAP integrator appears in the userPassword field (Figure 18–6). Click Set.
Figure 18–6 Edit Dialog Box
9. In the pop-up window, enter the user's password (Figure 18–7) and click Set.
Modifying User Passwords
18-12 Oracle Fusion Middleware WebCenter Sites: Installing and Configuring Supporting Software
Figure 18–7 Generate Password Dialog Box
The password appears in its encrypted form.
10. Click Apply to save the new password (Figure 18–8).
Figure 18–8 Edit Dialog Box
11. Repeat steps 7–10 on page 18-12 for each user whose password you want to change. When you are finished, test your integration by logging in to WebCenter Sites.
18.5.2 Modifying User Passwords Using the ldapmodify CommandThe ldapmodify command provides you with an interface in which you can enter valid LDIF statements to make changes to the configuration of your OpenLDAP server. This section shows you how to use the ldapmodify and sldappasswd commands to change the passwords of LDAP users.
To modify user passwords in OpenLDAP using the ldapmodify command
1. Generate an encrypted password for each user. Run the sldappasswd command and enter the plaintext password which you want to encrypt. The command outputs the encrypted password (hash) to the terminal. For example:
{SSHA}ydUT5RCpBAU80P0PW8gaHnsmYmLlmUL8
2. Execute the ldapmodify command as follows:
ldapmodify -D 'cn=Manager,dc=<domain>,dc=<extension>'
Note: If you are generating hashes for a large number of users, it is a good idea to store the hashes in a file, so that you can easily retrieve them in step 3 on page 18-13. When you finish this procedure, make sure that you destroy the file in which the hashes are stored.

Modifying User Passwords
Setting Up OpenLDAP 2.3.x 18-13
-w <root_dn_password>where:
– <domain> and <extension> are the values you specified in step a on page 18-6.
– <root_dn_password> is the Root DN user password you specified in step d on page 18-7.
When the command returns a blank line, you are ready to input LDIF statements.
3. Change the user's password. Issue the following commands:
a. dn:cn=<user_name>,ou=People,dc=<domain>,dc=<extension>
where user_name is the user name of the user whose password you want to change, and <domain> and <extension> are the values you specified in step a on page 18-6.
b. changetype:modify
c. replace:userPassword
d. userpassword:<password_hash>
where <password_hash> is the hash generated by the sldappasswd command in step 1 on page 18-12 of this procedure.
e. Press Ctrl+D.
f. Repeat steps a–e on page 18-13 for each user whose password you want to change. When you are finished, press Ctrl+C to terminate the ldapmodify command.

Modifying User Passwords
18-14 Oracle Fusion Middleware WebCenter Sites: Installing and Configuring Supporting Software

Part VPart V Integrating Oracle WebCenter Sites with
LDAP
Part V contains the following chapters:
■ Chapter 19, "Overview of the Oracle WebCenter Sites-LDAP Integration"
■ Chapter 20, "Integrating Oracle WebCenter Sites with Flat Schema LDAP Servers"
■ Chapter 21, "Integrating Oracle WebCenter Sites with Hierarchical Schema LDAP Servers"
■ Chapter 22, "Reference: Sample LDIF for Hierarchical Schema LDAP"

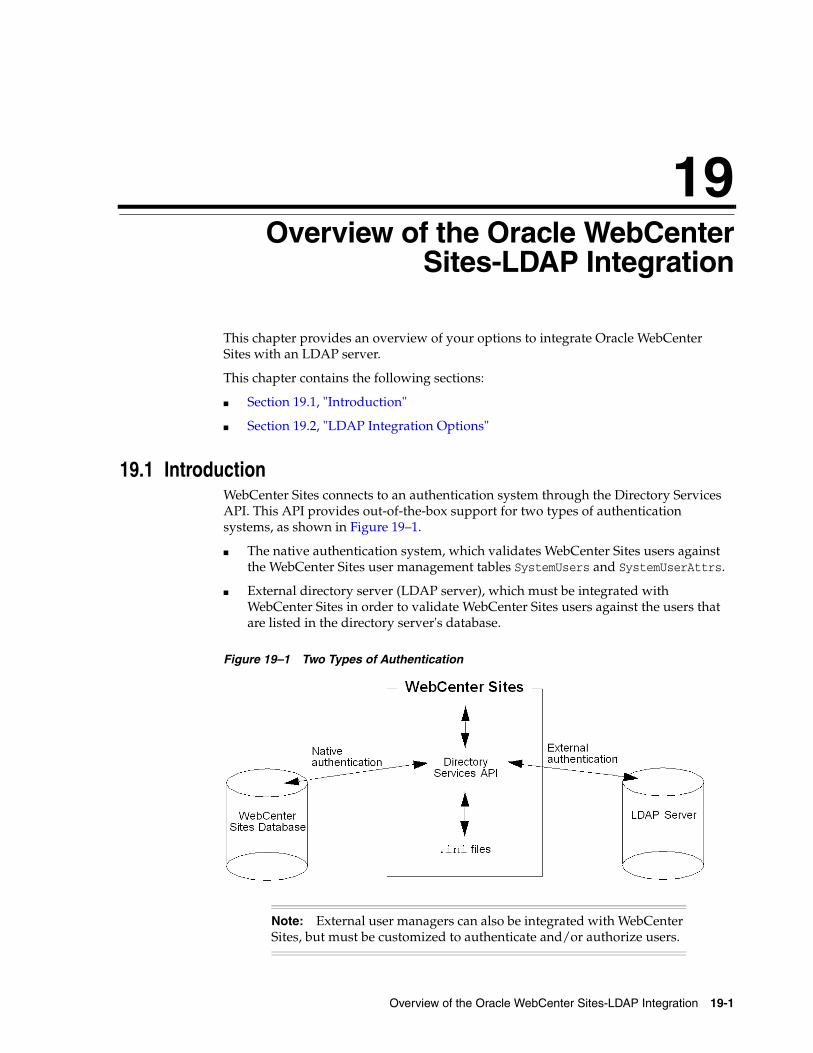
19
Overview of the Oracle WebCenter Sites-LDAP Integration 19-1
19Overview of the Oracle WebCenterSites-LDAP Integration
This chapter provides an overview of your options to integrate Oracle WebCenter Sites with an LDAP server.
This chapter contains the following sections:
■ Section 19.1, "Introduction"
■ Section 19.2, "LDAP Integration Options"
19.1 IntroductionWebCenter Sites connects to an authentication system through the Directory Services API. This API provides out-of-the-box support for two types of authentication systems, as shown in Figure 19–1.
■ The native authentication system, which validates WebCenter Sites users against the WebCenter Sites user management tables SystemUsers and SystemUserAttrs.
■ External directory server (LDAP server), which must be integrated with WebCenter Sites in order to validate WebCenter Sites users against the users that are listed in the directory server's database.
Figure 19–1 Two Types of Authentication
Note: External user managers can also be integrated with WebCenter Sites, but must be customized to authenticate and/or authorize users.

LDAP Integration Options
19-2 Oracle Fusion Middleware WebCenter Sites: Installing and Configuring Supporting Software
19.2 LDAP Integration OptionsThe following types of external directory servers can be integrated with WebCenter Sites:
■ Flat schema LDAP, which provides authentication and authorization services for web applications. LDAP schema is automatically configured when you run the WebCenter Sites-LDAP integrator (included with WebCenter Sites). The integrator requires you to first install a supported LDAP server (listed in the Oracle WebCenter Sites Certification Matrix available here: http://www.oracle.com/technetwork/middleware/webcenter/sites/downloads/index.html).
■ Hierarchical schema LDAP, which provides authentication and authorization services for web applications and requires manual integration with WebCenter Sites.
Both integration options involve connecting the LDAP server to the Directory Services API by setting connection properties in the WebCenter Sites futuretense.ini, futuretense_xcel.ini, and dir.ini files. Integration is complete when the WebCenter Sites user data is written to the LDAP server. Which type of data must be written depends on LDAP schema:
■ Flat schema LDAP requires authentication and authorization to be managed in the LDAP server, which means that WebCenter Sites users, ACLs, roles, and sites must be written to LDAP. Users include user accounts, user profiles, and user attributes.
■ Hierarchical schema LDAP requires only authentication to be managed in the LDAP server, which means that only users and ACLs must be written to LDAP. (Again, users include user accounts, user profiles, and user attributes.)
Writing roles and sites is optional. Choosing this option requires you to create a site organizational unit in the LDAP server by subordinating the WebCenter Sites roles to their relevant sites.
The following table summarizes LDAP schema and integration requirements.
■ For procedures on integrating with flat schema LDAP, see Chapter 20, "Integrating Oracle WebCenter Sites with Flat Schema LDAP Servers."
■ For procedures on integrating with hierarchical schema LDAP, see Chapter 21, "Integrating Oracle WebCenter Sites with Hierarchical Schema LDAP Servers."
Integration Type/Method
Flat Schema LDAP - Authentication
Flat Schema LDAP - Authorization
Hierarchal Schema LDAP - Authentication
Hierarchal Schema LDAP - Authorization
WebCenter Sites Web Application
Required Required Required Optional
Method Integrator writes WebCenter Sites users and ACLs to LDAP
Use integrator or manually write WebCenter Sites roles and sites to LDAP
Integrate manually
Integrate manually
20
Integrating Oracle WebCenter Sites with Flat Schema LDAP Servers 20-1
20Integrating Oracle WebCenter Sites with FlatSchema LDAP Servers
This chapter provides instructions for using Oracle's integrator to automatically integrate WebCenter Sites with a supported LDAP server. The integrator configures a flat schema for authentication and authorization services for the WebCenter Sites web application.
This chapter contains the following sections:
■ Section 20.1, "WebCenter Sites-LDAP Integrator"
■ Section 20.2, "Running the WebCenter Sites-LDAP Integrator"
■ Section 20.3, "Completing the Integration"
■ Section 20.4, "Post-Integration Steps: When CM Sites Have Not Been Created"
■ Section 20.5, "Testing the Integration"
20.1 WebCenter Sites-LDAP IntegratorOracle's LDAP integrator requires a fully functional WebCenter Sites web application and a pre-installed, supported LDAP server.
The integrator works by first prompting you for parameters relating to your WebCenter Sites installation and LDAP server. When you provide the requested information and click Install, the integrator uses your inputs to perform the following steps:
1. The integrator sets LDAP connection properties in the WebCenter Sites futuretense.ini, futuretense_xcel.ini, and dir.ini files in order to:
– Establish communication between the LDAP server and the WebCenter Sites Directory Services API.
– Enable the LDAP server to recognize the user that WebCenter Sites will invoke to query the LDAP server.
– Configure a flat schema.
– Modify the LDAP database to use WebCenter Sites ACLs in LDAP format.
For a listing of the LDAP connection properties that are set by the integrator, see Chapter 21, "Integrating Oracle WebCenter Sites with Hierarchical Schema LDAP Servers." (Note that the properties for flat and hierarchical schema are identical; only the values differ.)
Running the WebCenter Sites-LDAP Integrator
20-2 Oracle Fusion Middleware WebCenter Sites: Installing and Configuring Supporting Software
2. In its final steps, the integrator does one of the following, depending on the option you selected:
– If you selected the Automatic option, the integrator loads the LDAP server with the WebCenter Sites information — users, ACLs, roles, and sites to which the roles apply.
– If you selected Manual, the LDAP integrator requires an LDAP user with write permissions to manually write users, ACLs, and roles (including their relevant sites) to the LDAP server, either directly or via an ldif file. This information is written once the integrator completes its process.
3. Regardless of which option you selected (Automatic or Manual), you will have to complete the integration by resetting (in the LDAP server) the passwords of WebCenter Sites users.
20.2 Running the WebCenter Sites-LDAP IntegratorTo integrate with flat schema LDAP, complete the steps in the following sections:
■ Section 20.2.1, "Prerequisites"
■ Section 20.2.2, "Integration Steps"
20.2.1 PrerequisitesBefore integrating WebCenter Sites with LDAP, prepare your system:
1. The LDAP integrator can run only on a WebCenter Sites full product release. Perform LDAP integration before any hot-fixes or patches are installed.
2. Make sure WebCenter Sites is installed on one of the supported platforms and is fully functional. Currently supported platforms are listed in the Oracle WebCenter Sites Certification Matrix here: http://www.oracle.com/technetwork/middleware/webcenter/sites/downloads/index.html.
For WebCenter Sites installation instructions and verification tests, refer to the Oracle Fusion Middleware WebCenter Sites Installation Guide.
3. Back up the entire WebCenter Sites system. If the integration fails, you can recover the ldif file and import it manually to restore the WebCenter Sites users and permissions.
4. Make sure the LDAP server is ready for integration:
a. If a supported LDAP server is not installed, install it now. (For the list of currently supported LDAP servers, refer to the Oracle WebCenter Sites Certification Matrix available here: http://www.oracle.com/technetwork/middleware/webcenter/sites/downloads/index.html.)
b. Note the following parameters. You will supply values for them during the integration process:
– LDAP host name (or IP address)
– LDAP port number
– People parent DN
– Group parent DN
Running the WebCenter Sites-LDAP Integrator
Integrating Oracle WebCenter Sites with Flat Schema LDAP Servers 20-3
– Base DN, if you are using Sun JES Directory Server
c. Determine whether the user connecting to LDAP will be the same user that is logged in to WebCenter Sites. If the connecting user is not a WebCenter Sites user, you will need to provide a user name and password.
5. During the integration process, you will be prompted to select either the Automatic or Manual integration option.
– If you have write permissions to the LDAP server, select Automatic. The integrator will write the WebCenter Sites users, ACLs, roles, and sites to the LDAP server.
– If you do not have write permissions to the LDAP server, you will select Manual and continue to run the integrator. When the integrator completes its process, an LDAP user with write permissions must be available to complete the integration.
20.2.2 Integration StepsIn this section you will run the WebCenter Sites-LDAP integrator (included on the WebCenter Sites CD) to integrate WebCenter Sites with a supported LDAP server of your choice.
To integrate WebCenter Sites with LDAP1. If you have not already done so, decompress the WebCenter Sites installation
archive to a temporary directory and change to that directory.
2. Run the WebCenter Sites integrator (Figure 20–1) by executing the following command:
– On Windows: configureLDAP.bat
– On Unix: ./configureLDAP.sh
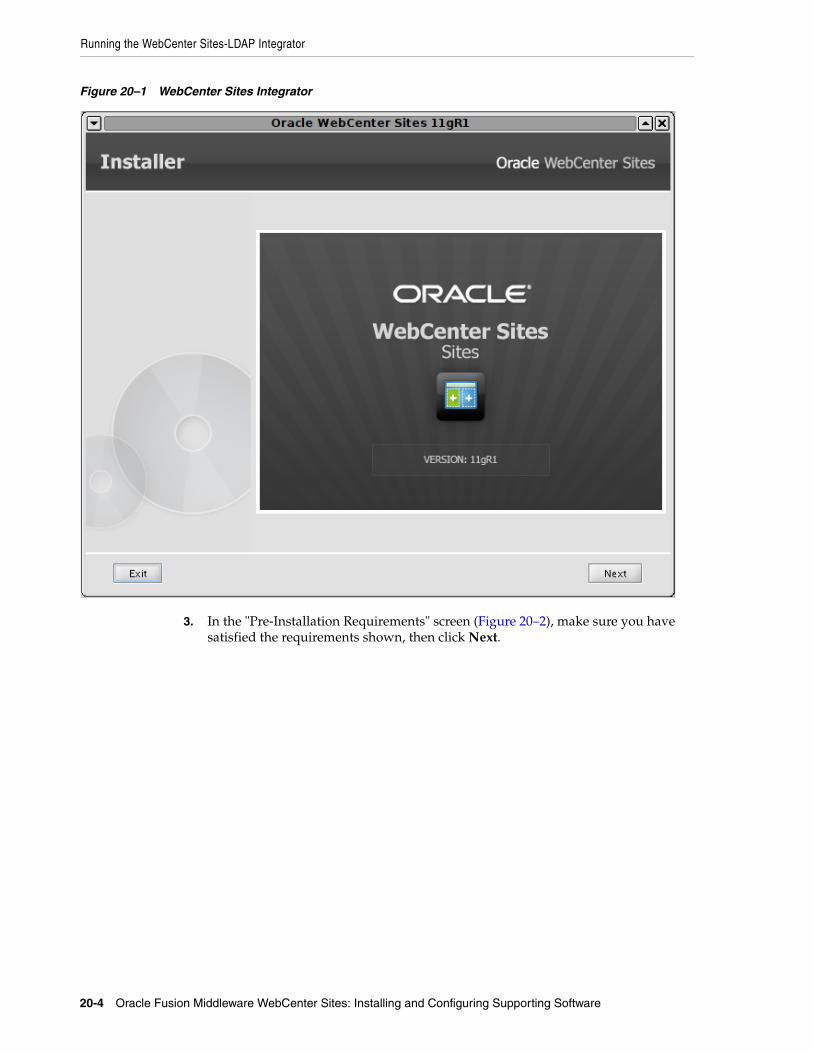
Running the WebCenter Sites-LDAP Integrator
20-4 Oracle Fusion Middleware WebCenter Sites: Installing and Configuring Supporting Software
Figure 20–1 WebCenter Sites Integrator
3. In the "Pre-Installation Requirements" screen (Figure 20–2), make sure you have satisfied the requirements shown, then click Next.
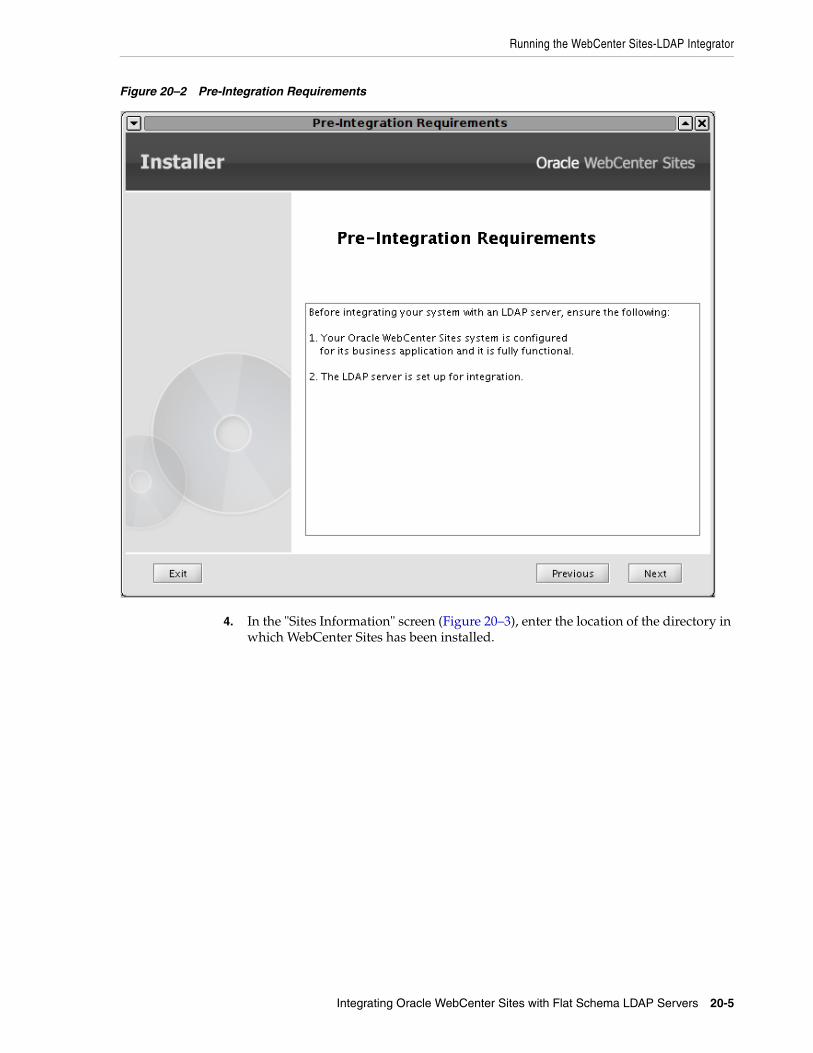
Running the WebCenter Sites-LDAP Integrator
Integrating Oracle WebCenter Sites with Flat Schema LDAP Servers 20-5
Figure 20–2 Pre-Integration Requirements
4. In the "Sites Information" screen (Figure 20–3), enter the location of the directory in which WebCenter Sites has been installed.
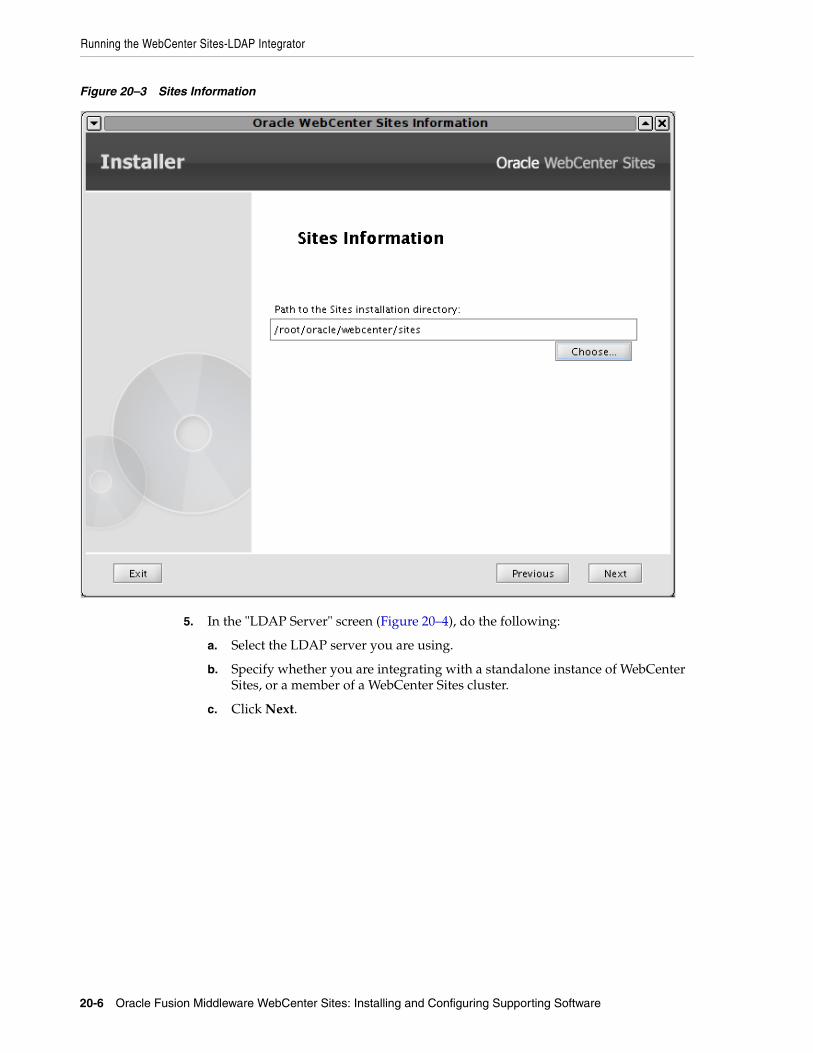
Running the WebCenter Sites-LDAP Integrator
20-6 Oracle Fusion Middleware WebCenter Sites: Installing and Configuring Supporting Software
Figure 20–3 Sites Information
5. In the "LDAP Server" screen (Figure 20–4), do the following:
a. Select the LDAP server you are using.
b. Specify whether you are integrating with a standalone instance of WebCenter Sites, or a member of a WebCenter Sites cluster.
c. Click Next.
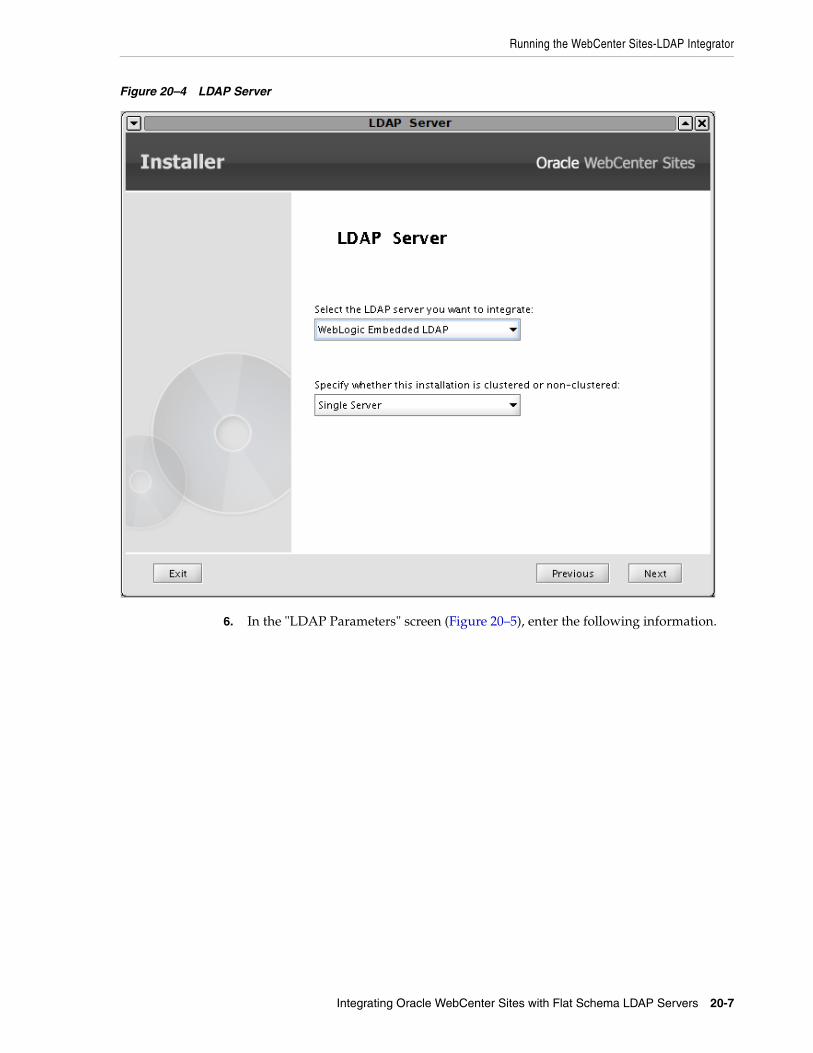
Running the WebCenter Sites-LDAP Integrator
Integrating Oracle WebCenter Sites with Flat Schema LDAP Servers 20-7
Figure 20–4 LDAP Server
6. In the "LDAP Parameters" screen (Figure 20–5), enter the following information.
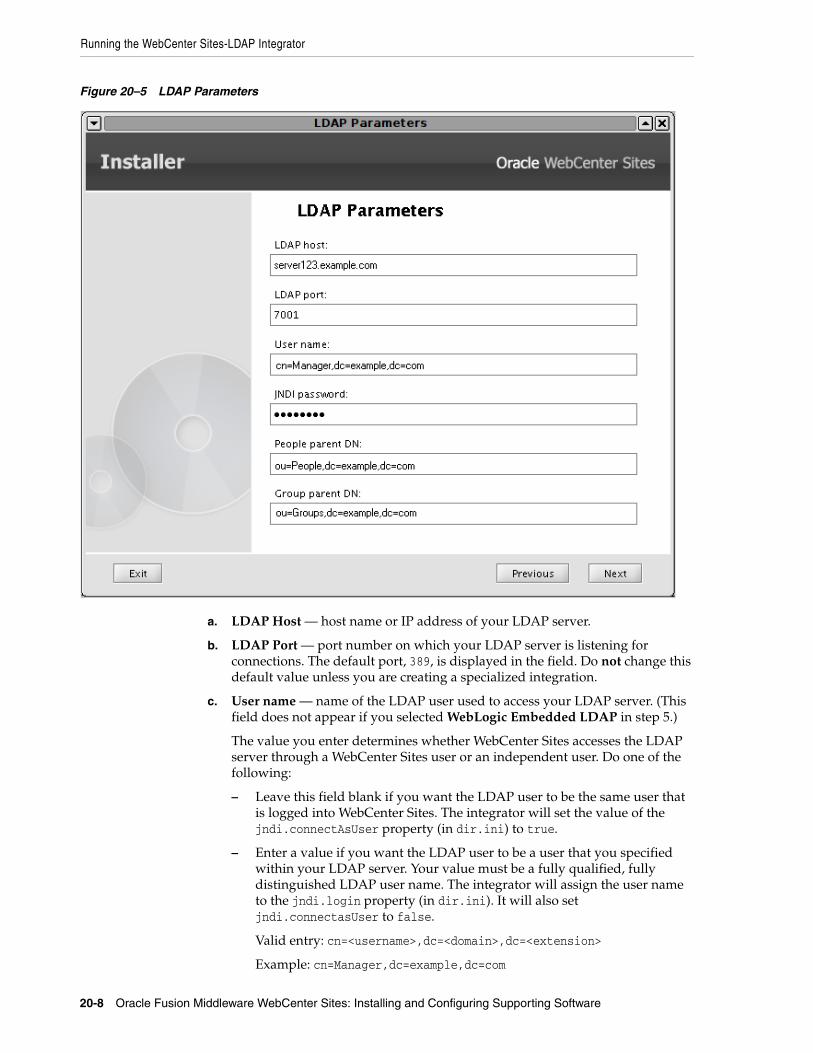
Running the WebCenter Sites-LDAP Integrator
20-8 Oracle Fusion Middleware WebCenter Sites: Installing and Configuring Supporting Software
Figure 20–5 LDAP Parameters
a. LDAP Host — host name or IP address of your LDAP server.
b. LDAP Port — port number on which your LDAP server is listening for connections. The default port, 389, is displayed in the field. Do not change this default value unless you are creating a specialized integration.
c. User name — name of the LDAP user used to access your LDAP server. (This field does not appear if you selected WebLogic Embedded LDAP in step 5.)
The value you enter determines whether WebCenter Sites accesses the LDAP server through a WebCenter Sites user or an independent user. Do one of the following:
– Leave this field blank if you want the LDAP user to be the same user that is logged into WebCenter Sites. The integrator will set the value of the jndi.connectAsUser property (in dir.ini) to true.
– Enter a value if you want the LDAP user to be a user that you specified within your LDAP server. Your value must be a fully qualified, fully distinguished LDAP user name. The integrator will assign the user name to the jndi.login property (in dir.ini). It will also set jndi.connectasUser to false.
Valid entry: cn=<username>,dc=<domain>,dc=<extension>
Example: cn=Manager,dc=example,dc=com
Running the WebCenter Sites-LDAP Integrator
Integrating Oracle WebCenter Sites with Flat Schema LDAP Servers 20-9
d. JNDI Password — password of the LDAP user who will access the LDAP server. Enter a value only if you provided a user name in the preceding field.
The integrator will assign this password in an encrypted form to the jndi.password property (in dir.ini).
e. People parent DN — DN of the People parent node in your LDAP server. WebCenter Sites users will be stored under this node. (This field does not appear if you selected WebLogic Embedded LDAP in step 5.)
Valid entry: ou=People,dc=<domain>,dc=<extension>
Example: ou=People,dc=example,dc=com
f. Group parent DN — DN of the Groups parent node in your LDAP server. WebCenter Sites ACLs will be stored under this node. (This field does not appear if you selected WebLogic Embedded LDAP in step 5.)
Valid entry: ou=Groups,dc=<domain>,dc=<extension>
Example: ou=Groups,dc=example,dc=com
g. Click Next.
7. In the "Existing Sites Password" screen (Figure 20–6), enter the user name and password for your installation's WebCenter Sites System Administrator account. (The default values are ContentServer/password.) Re-enter the password for verification, then click Next.
Note: If you selected WebLogic Embedded LDAP in step 5, enter the password you provided when you enabled the WebLogic Embedded LDAP Server.
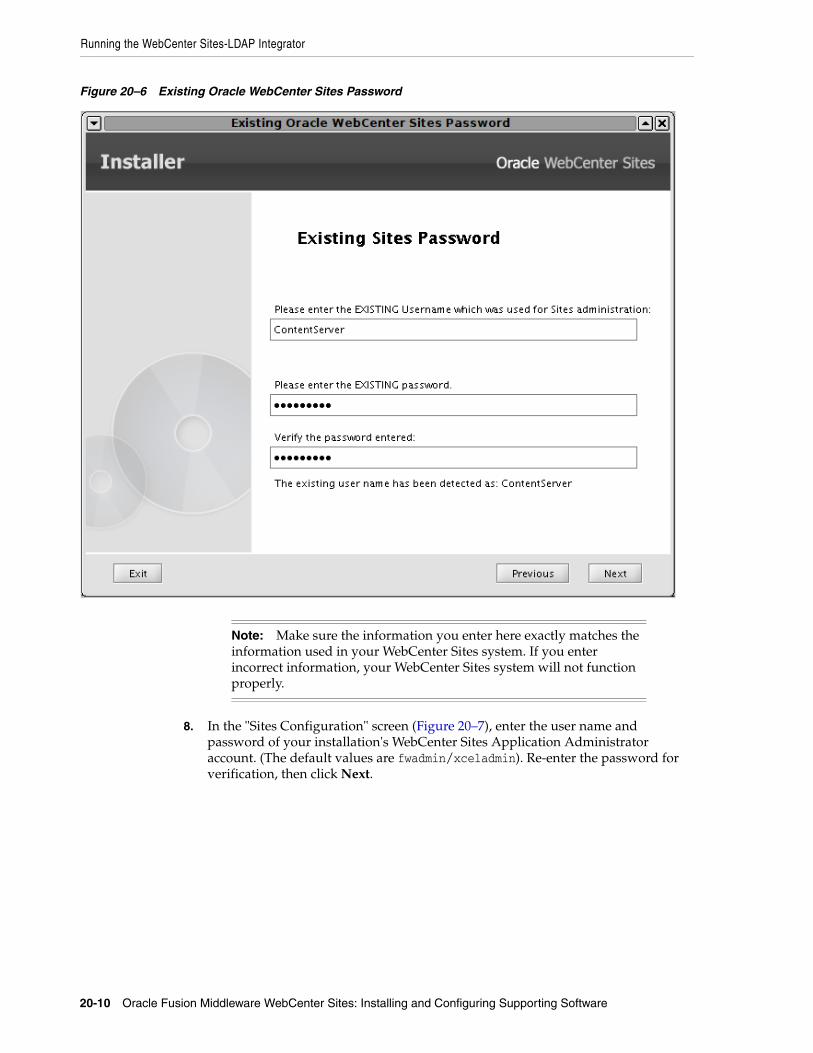
Running the WebCenter Sites-LDAP Integrator
20-10 Oracle Fusion Middleware WebCenter Sites: Installing and Configuring Supporting Software
Figure 20–6 Existing Oracle WebCenter Sites Password
8. In the "Sites Configuration" screen (Figure 20–7), enter the user name and password of your installation's WebCenter Sites Application Administrator account. (The default values are fwadmin/xceladmin). Re-enter the password for verification, then click Next.
Note: Make sure the information you enter here exactly matches the information used in your WebCenter Sites system. If you enter incorrect information, your WebCenter Sites system will not function properly.
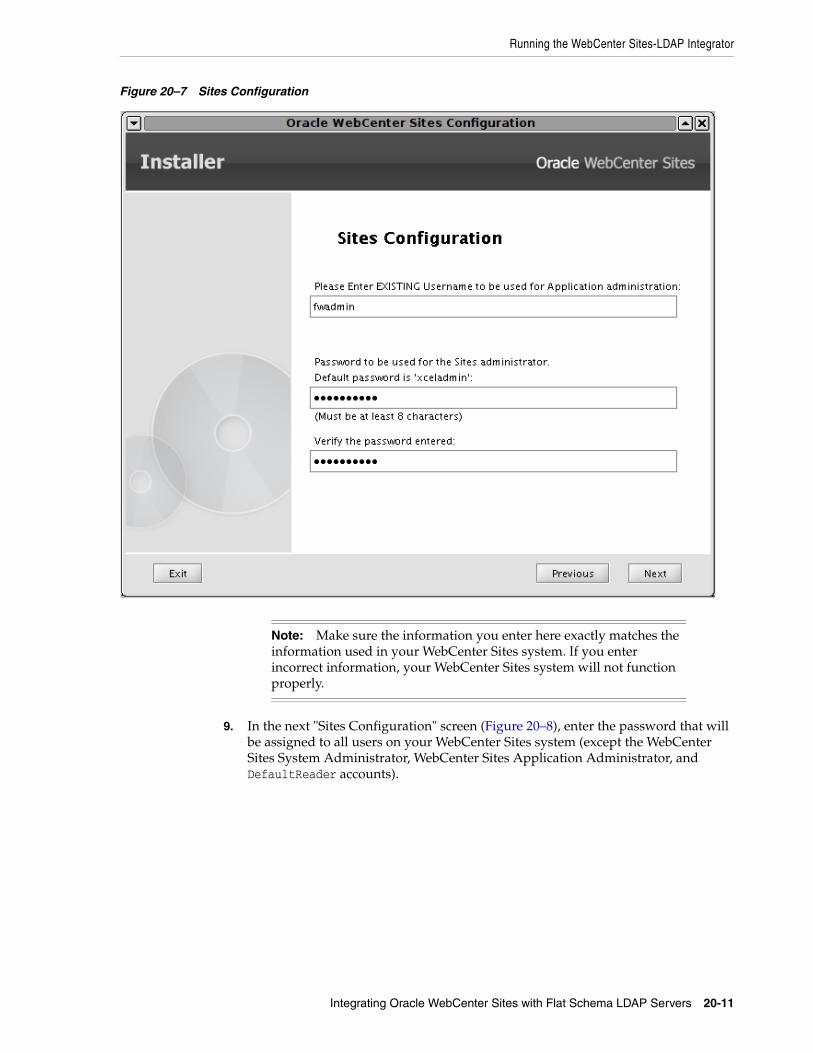
Running the WebCenter Sites-LDAP Integrator
Integrating Oracle WebCenter Sites with Flat Schema LDAP Servers 20-11
Figure 20–7 Sites Configuration
9. In the next "Sites Configuration" screen (Figure 20–8), enter the password that will be assigned to all users on your WebCenter Sites system (except the WebCenter Sites System Administrator, WebCenter Sites Application Administrator, and DefaultReader accounts).
Note: Make sure the information you enter here exactly matches the information used in your WebCenter Sites system. If you enter incorrect information, your WebCenter Sites system will not function properly.
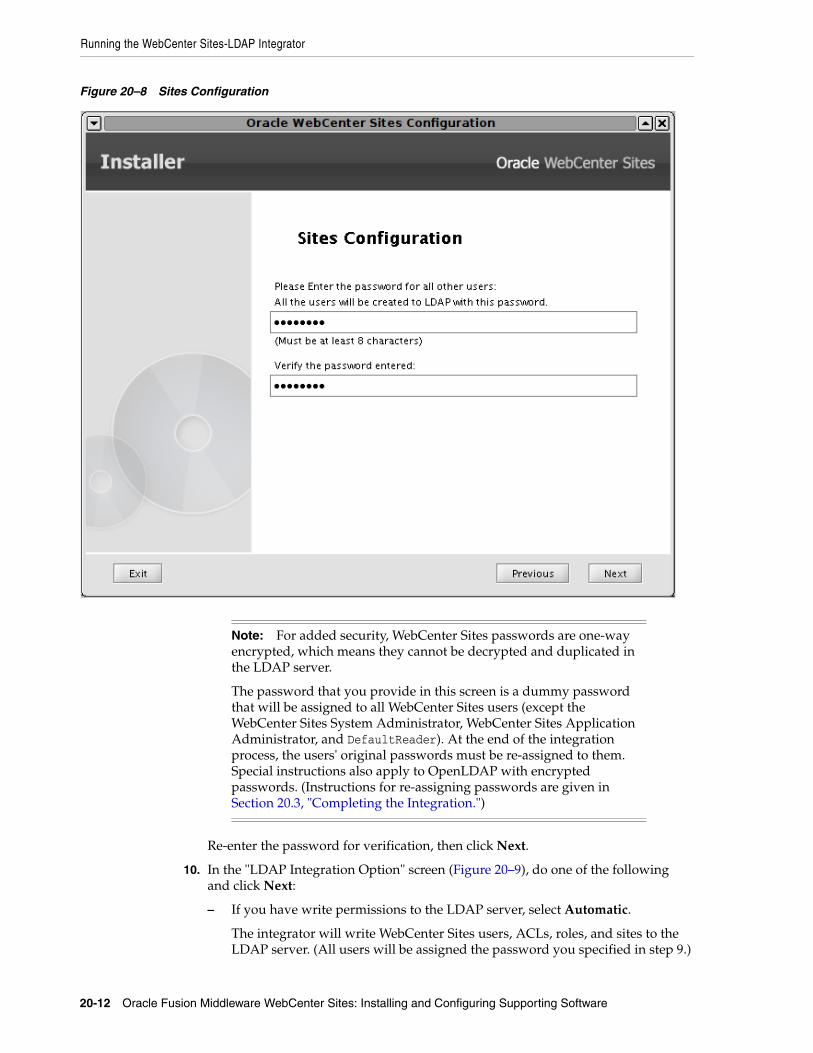
Running the WebCenter Sites-LDAP Integrator
20-12 Oracle Fusion Middleware WebCenter Sites: Installing and Configuring Supporting Software
Figure 20–8 Sites Configuration
Re-enter the password for verification, then click Next.
10. In the "LDAP Integration Option" screen (Figure 20–9), do one of the following and click Next:
– If you have write permissions to the LDAP server, select Automatic.
The integrator will write WebCenter Sites users, ACLs, roles, and sites to the LDAP server. (All users will be assigned the password you specified in step 9.)
Note: For added security, WebCenter Sites passwords are one-way encrypted, which means they cannot be decrypted and duplicated in the LDAP server.
The password that you provide in this screen is a dummy password that will be assigned to all WebCenter Sites users (except the WebCenter Sites System Administrator, WebCenter Sites Application Administrator, and DefaultReader). At the end of the integration process, the users' original passwords must be re-assigned to them. Special instructions also apply to OpenLDAP with encrypted passwords. (Instructions for re-assigning passwords are given in Section 20.3, "Completing the Integration.")
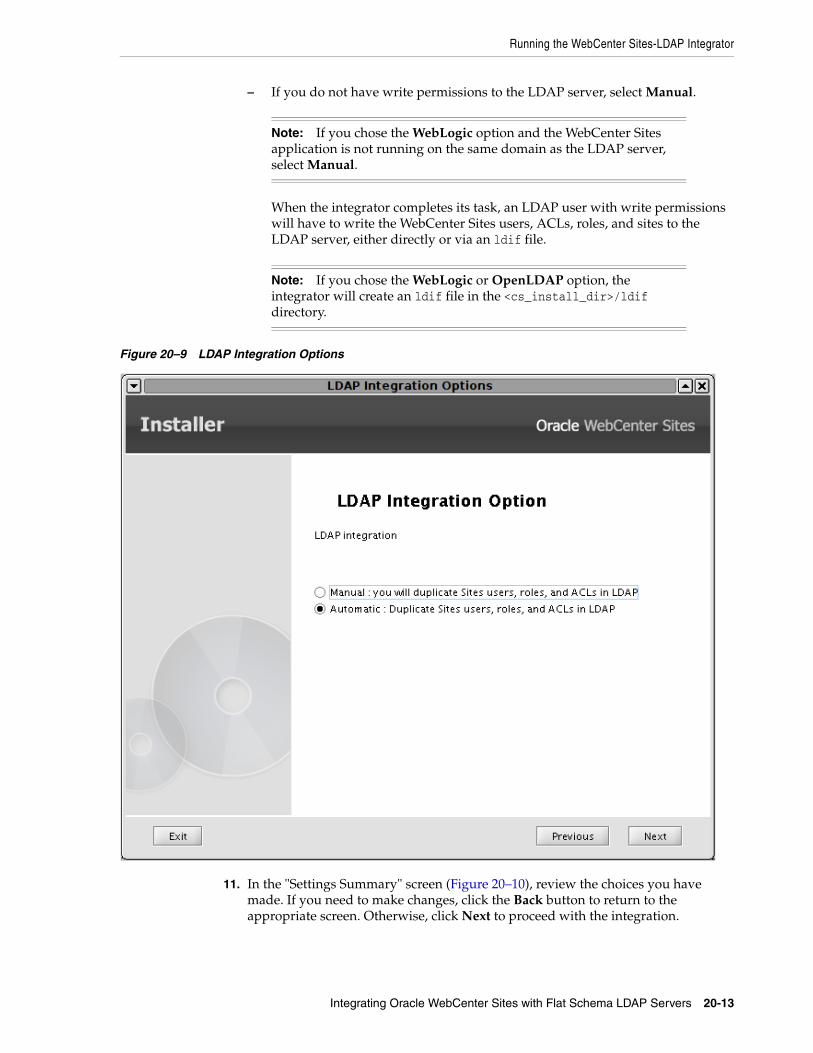
Running the WebCenter Sites-LDAP Integrator
Integrating Oracle WebCenter Sites with Flat Schema LDAP Servers 20-13
– If you do not have write permissions to the LDAP server, select Manual.
When the integrator completes its task, an LDAP user with write permissions will have to write the WebCenter Sites users, ACLs, roles, and sites to the LDAP server, either directly or via an ldif file.
Figure 20–9 LDAP Integration Options
11. In the "Settings Summary" screen (Figure 20–10), review the choices you have made. If you need to make changes, click the Back button to return to the appropriate screen. Otherwise, click Next to proceed with the integration.
Note: If you chose the WebLogic option and the WebCenter Sites application is not running on the same domain as the LDAP server, select Manual.
Note: If you chose the WebLogic or OpenLDAP option, the integrator will create an ldif file in the <cs_install_dir>/ldif directory.
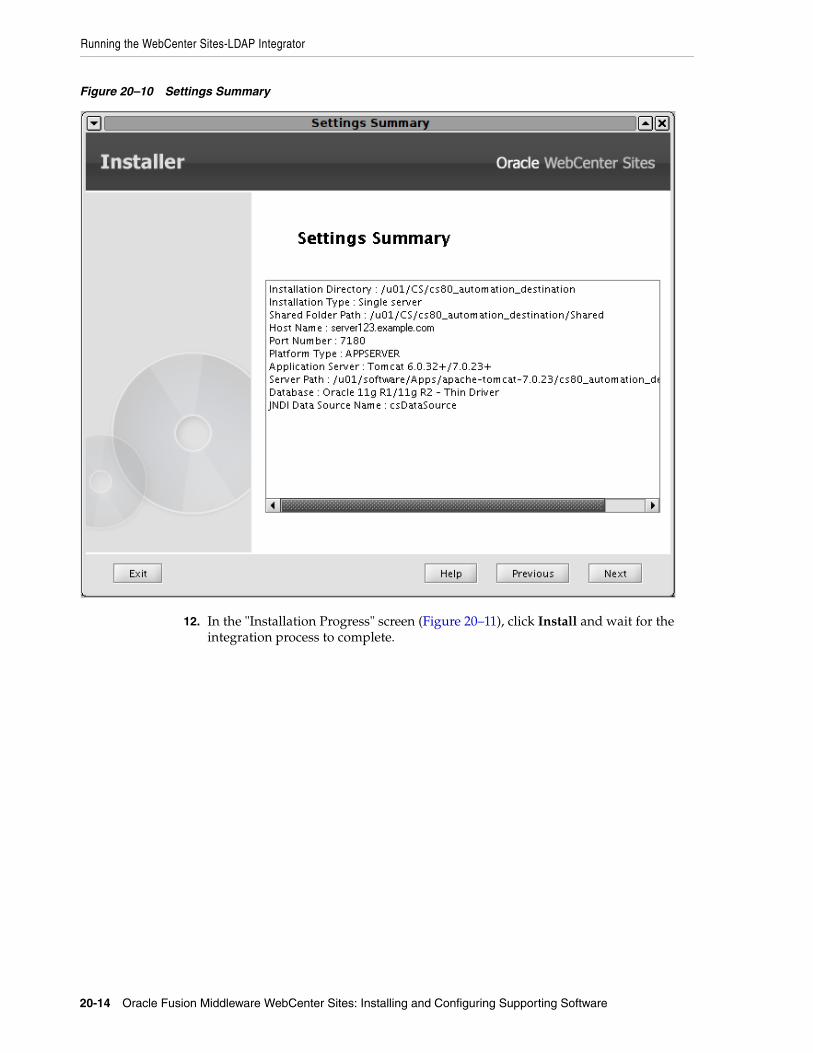
Running the WebCenter Sites-LDAP Integrator
20-14 Oracle Fusion Middleware WebCenter Sites: Installing and Configuring Supporting Software
Figure 20–10 Settings Summary
12. In the "Installation Progress" screen (Figure 20–11), click Install and wait for the integration process to complete.
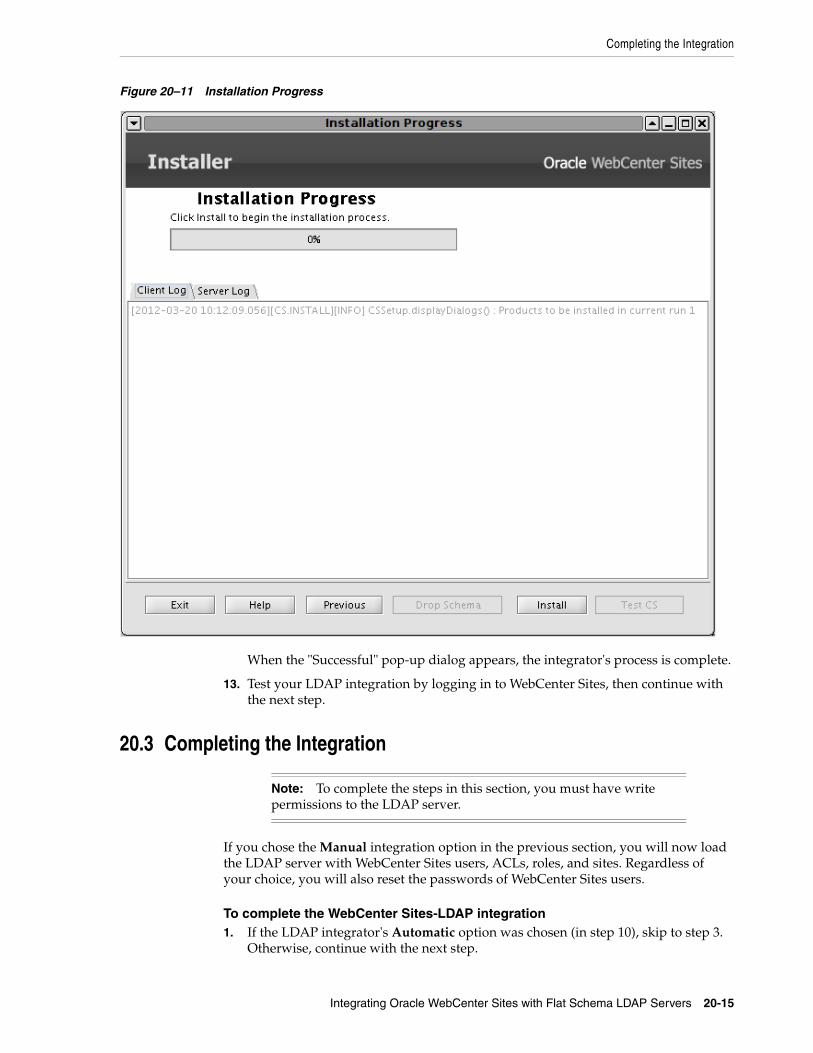
Completing the Integration
Integrating Oracle WebCenter Sites with Flat Schema LDAP Servers 20-15
Figure 20–11 Installation Progress
When the "Successful" pop-up dialog appears, the integrator's process is complete.
13. Test your LDAP integration by logging in to WebCenter Sites, then continue with the next step.
20.3 Completing the Integration
If you chose the Manual integration option in the previous section, you will now load the LDAP server with WebCenter Sites users, ACLs, roles, and sites. Regardless of your choice, you will also reset the passwords of WebCenter Sites users.
To complete the WebCenter Sites-LDAP integration1. If the LDAP integrator's Automatic option was chosen (in step 10), skip to step 3.
Otherwise, continue with the next step.
Note: To complete the steps in this section, you must have write permissions to the LDAP server.
Completing the Integration
20-16 Oracle Fusion Middleware WebCenter Sites: Installing and Configuring Supporting Software
2. If the LDAP integrator's Manual option was chosen (in step 10), load the LDAP server with WebCenter Sites users, ACLs, roles, and sites, using one of the following options:
– Import an ldif file.
– Write users, ACLs, roles, and sites directly to the LDAP server. For information about which users, ACLs, roles, and sites to write, see the following steps in Chapter 21, "Integrating Oracle WebCenter Sites with Hierarchical Schema LDAP Servers":
– Section 21.1.3, "Step 3. Check the mail Attribute"
– Section 21.1.4, "Step 4. Create LDAP User Groups (WebCenter Sites ACLs)"
– Section 21.1.5, "Step 5. Create Required Users and Assign Them to LDAP Groups"
– Section 21.1.6, "Step 6. Create Sites and Roles in the LDAP Server"
3. In the LDAP server, reset the passwords for all WebCenter Sites users as follows:
– All LDAP servers: Set the users' passwords to their original values, except for the WebCenter Sites System Administrator, WebCenter Sites Application Administrator, and DefaultReader accounts.
If you do not change the passwords users will not be able to log in to WebCenter Sites with their originally assigned passwords.
– OpenLDAP with encrypted passwords: If you are using OpenLDAP and have configured it to use encrypted passwords, you must change the passwords for all WebCenter Sites users including passwords for the WebCenter Sites System Administrator, WebCenter Sites Application Administrator, and DefaultReader accounts.
This step is required because the LDAP integrator writes user passwords to the LDAP directory as plaintext, whereas OpenLDAP expects password hashes when password type is configured as SSHA. If you fail to complete this step, your WebCenter Sites system will not function properly.
For instructions on changing user passwords on supported LDAP servers, see Section 18.5, "Modifying User Passwords."
Note: If you are integrating with WebLogic or OpenLDAP, an ldif file was created in the <cs_install_dir>/ldif directory by the integrator. If you chose the WebLogic option, and the WebCenter Sites application is not running on the same domain as the LDAP server, edit the ldif file and replace any instances of your CS WebLogic domain (Variables.CSInstallAdminDomainName) with your LDAP server domain.
For any other LDAP server, you must create your own ldif file.
When integrating WebCenter Sites with Active Directory LDAP provider, the integration script generates a .vbs file as well. After importing the LDIF file on the Active Directory Server, run the VBS script to set roles/ACLs and passwords.
Testing the Integration
Integrating Oracle WebCenter Sites with Flat Schema LDAP Servers 20-17
20.4 Post-Integration Steps: When CM Sites Have Not Been CreatedIf CM sites were not created on the given system, then after integrating WebCenter Sites with LDAP you will be unable to log in. The solution is to manually create the following new group entries in your LDAP server and assign fwadmin to each of these groups:
Management Site-SiteAdmin Management Site-GeneralAdmin Management Site-WorkflowAdmin Management Site-AdvancedUser
In addition, create the SitesUser group only for installations running in content management mode. This group enables the fwadmin user to access the WebCenter Sites Contributor interface:
Management Site-SitesUser
Example 20–1 Example LDIF
dn: cn=Management Site-SiteAdmin,ou=Groups,dc=fatwire,dc=comobjectClass: topobjectClass: groupOfUniqueNamesuniqueMember: cn=fwadmin,ou=People,dc=fatwire,dc=com
dn: cn=Management Site-GeneralAdmin,ou=Groups,dc=fatwire,dc=comobjectClass: topobjectClass: groupOfUniqueNamesuniqueMember: cn=fwadmin,ou=People,dc=fatwire,dc=com
dn: cn=Management Site-WorkflowAdmin,ou=Groups,dc=fatwire,dc=comobjectClass: topobjectClass: groupOfUniqueNamesuniqueMember: cn=fwadmin,ou=People,dc=fatwire,dc=com
dn: cn=Management Site-AdvancedUser,ou=Groups,dc=fatwire,dc=comobjectClass: topobjectClass: groupOfUniqueNamesuniqueMember: cn=fwadmin,ou=People,dc=fatwire,dc=com
dn: cn=Management Site-SitesUser,ou=Groups,dc=fatwire,dc=comobjectClass: topobjectClass: groupOfUniqueNamesuniqueMember: cn=fwadmin,ou=People,dc=fatwire,dc=com
20.5 Testing the IntegrationTest your LDAP-integrated system by opening a browser and entering the following URL:
http://<servername"://CatalogManager?ftcmd=login&username=ContentServer&password=" target="_blank"http://<servername>:<port>/<context>/CatalogManager?ftcmd=login&username=ContentServer&password=<password>
where
<servername> is the name of the machine that is hosting the WebCenter Sites system
Testing the Integration
20-18 Oracle Fusion Middleware WebCenter Sites: Installing and Configuring Supporting Software
<port> is the port number of that server
<username> is user-defined (WebCenter Sites, in this example)
<password> is user-defined (password, in this example)
■ If your browser displays a "Login Successful" message, you have integrated your LDAP plug-in correctly.
■ If you do not see the "Login Successful" message, verify that you created the ContentServer user in the LDAP server, and that all properties are set to the correct values.
21
Integrating Oracle WebCenter Sites with Hierarchical Schema LDAP Servers 21-1
21Integrating Oracle WebCenter Sites withHierarchical Schema LDAP Servers
This chapter provides instructions for integrating WebCenter Sites with hierarchical schema LDAP servers.
This chapter contains the following section:
■ Section 21.1, "Integration Steps"
■ Section 21.2, "Testing the Integration"
21.1 Integration StepsTo integrate with hierarchical schema LDAP, you will complete the following steps:
■ Section 21.1.1, "Step 1. Configure the WebCenter Sites LDAP Connection Properties"
■ Section 21.1.2, "Step 2. Configure the LDAP Server"
■ Section 21.1.3, "Step 3. Check the mail Attribute"
■ Section 21.1.4, "Step 4. Create LDAP User Groups (WebCenter Sites ACLs)"
■ Section 21.1.5, "Step 5. Create Required Users and Assign Them to LDAP Groups"
■ Section 21.1.6, "Step 6. Create Sites and Roles in the LDAP Server"
■ Section 21.1.7, "Step 7. If You Completed Step 6"
■ Section 21.1.8, "Step 8. Post-Integration Steps When CM Sites Have Not Been Created"
21.1.1 Step 1. Configure the WebCenter Sites LDAP Connection PropertiesIn this step, you will configure several properties in the WebCenter Sites .ini files to establish communication with LDAP. The files are:
■ futuretense.ini
■ dir.ini
■ futuretense_xcel.ini (optional, if you wish to manage sites and roles directly in the LDAP server).
Note: In hierarchical schema LDAP, management of users and ACLs is required. Management of sites and roles is optional.
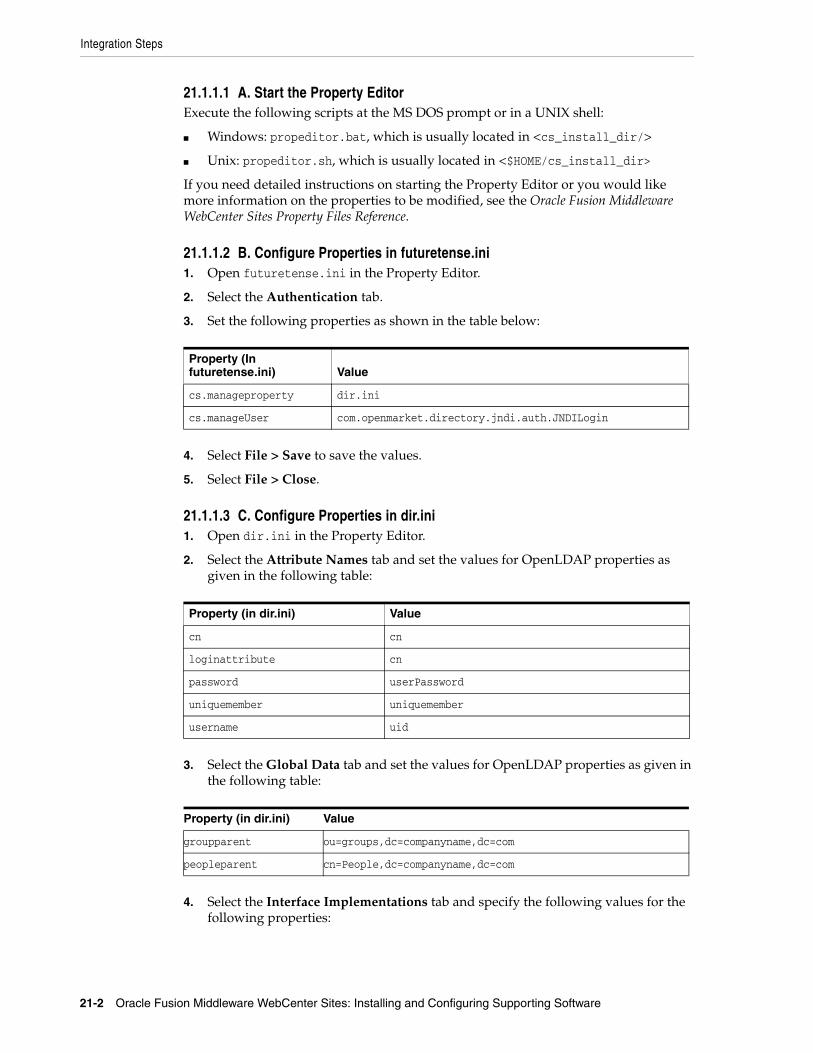
Integration Steps
21-2 Oracle Fusion Middleware WebCenter Sites: Installing and Configuring Supporting Software
21.1.1.1 A. Start the Property EditorExecute the following scripts at the MS DOS prompt or in a UNIX shell:
■ Windows: propeditor.bat, which is usually located in <cs_install_dir/>
■ Unix: propeditor.sh, which is usually located in <$HOME/cs_install_dir>
If you need detailed instructions on starting the Property Editor or you would like more information on the properties to be modified, see the Oracle Fusion Middleware WebCenter Sites Property Files Reference.
21.1.1.2 B. Configure Properties in futuretense.ini1. Open futuretense.ini in the Property Editor.
2. Select the Authentication tab.
3. Set the following properties as shown in the table below:
4. Select File > Save to save the values.
5. Select File > Close.
21.1.1.3 C. Configure Properties in dir.ini1. Open dir.ini in the Property Editor.
2. Select the Attribute Names tab and set the values for OpenLDAP properties as given in the following table:
3. Select the Global Data tab and set the values for OpenLDAP properties as given in the following table:
4. Select the Interface Implementations tab and specify the following values for the following properties:
Property (In futuretense.ini) Value
cs.manageproperty dir.ini
cs.manageUser com.openmarket.directory.jndi.auth.JNDILogin
Property (in dir.ini) Value
cn cn
loginattribute cn
password userPassword
uniquemember uniquemember
username uid
Property (in dir.ini) Value
groupparent ou=groups,dc=companyname,dc=com
peopleparent cn=People,dc=companyname,dc=com
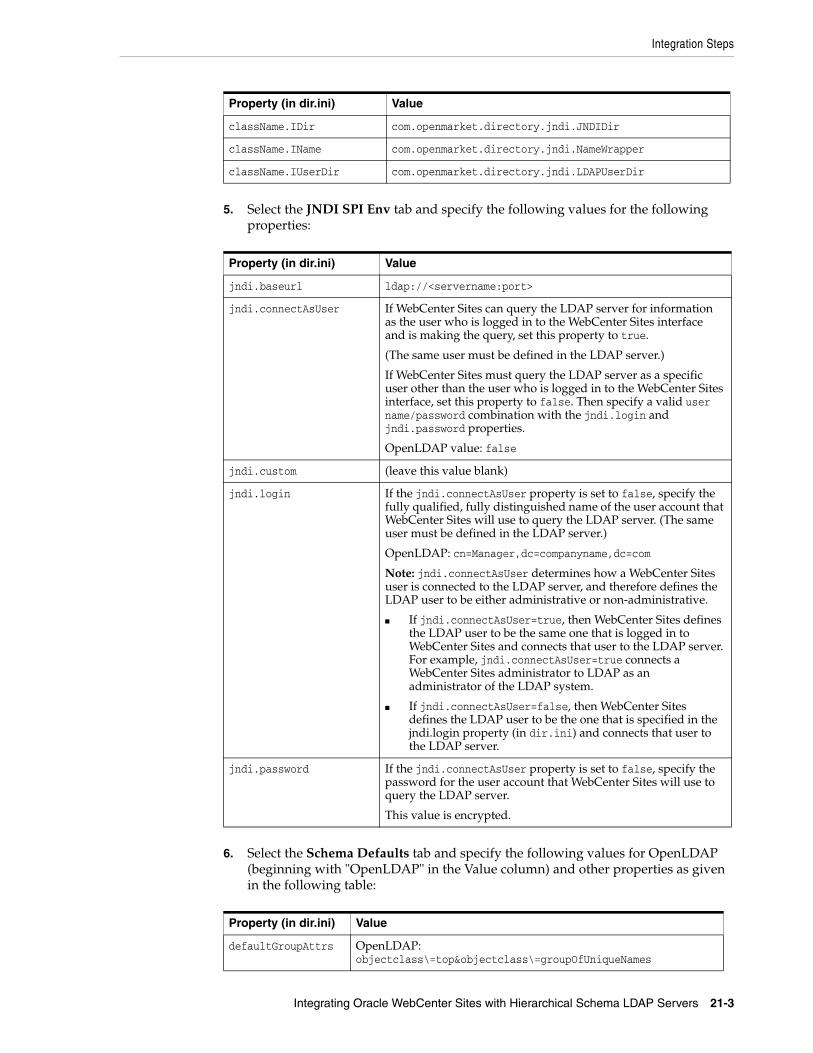
Integration Steps
Integrating Oracle WebCenter Sites with Hierarchical Schema LDAP Servers 21-3
5. Select the JNDI SPI Env tab and specify the following values for the following properties:
6. Select the Schema Defaults tab and specify the following values for OpenLDAP (beginning with "OpenLDAP" in the Value column) and other properties as given in the following table:
Property (in dir.ini) Value
className.IDir com.openmarket.directory.jndi.JNDIDir
className.IName com.openmarket.directory.jndi.NameWrapper
className.IUserDir com.openmarket.directory.jndi.LDAPUserDir
Property (in dir.ini) Value
jndi.baseurl ldap://<servername:port>
jndi.connectAsUser If WebCenter Sites can query the LDAP server for information as the user who is logged in to the WebCenter Sites interface and is making the query, set this property to true.
(The same user must be defined in the LDAP server.)
If WebCenter Sites must query the LDAP server as a specific user other than the user who is logged in to the WebCenter Sites interface, set this property to false. Then specify a valid user name/password combination with the jndi.login and jndi.password properties.
OpenLDAP value: false
jndi.custom (leave this value blank)
jndi.login If the jndi.connectAsUser property is set to false, specify the fully qualified, fully distinguished name of the user account that WebCenter Sites will use to query the LDAP server. (The same user must be defined in the LDAP server.)
OpenLDAP: cn=Manager,dc=companyname,dc=com
Note: jndi.connectAsUser determines how a WebCenter Sites user is connected to the LDAP server, and therefore defines the LDAP user to be either administrative or non-administrative.
■ If jndi.connectAsUser=true, then WebCenter Sites defines the LDAP user to be the same one that is logged in to WebCenter Sites and connects that user to the LDAP server. For example, jndi.connectAsUser=true connects a WebCenter Sites administrator to LDAP as an administrator of the LDAP system.
■ If jndi.connectAsUser=false, then WebCenter Sites defines the LDAP user to be the one that is specified in the jndi.login property (in dir.ini) and connects that user to the LDAP server.
jndi.password If the jndi.connectAsUser property is set to false, specify the password for the user account that WebCenter Sites will use to query the LDAP server.
This value is encrypted.
Property (in dir.ini) Value
defaultGroupAttrs OpenLDAP: objectclass\=top&objectclass\=groupOfUniqueNames
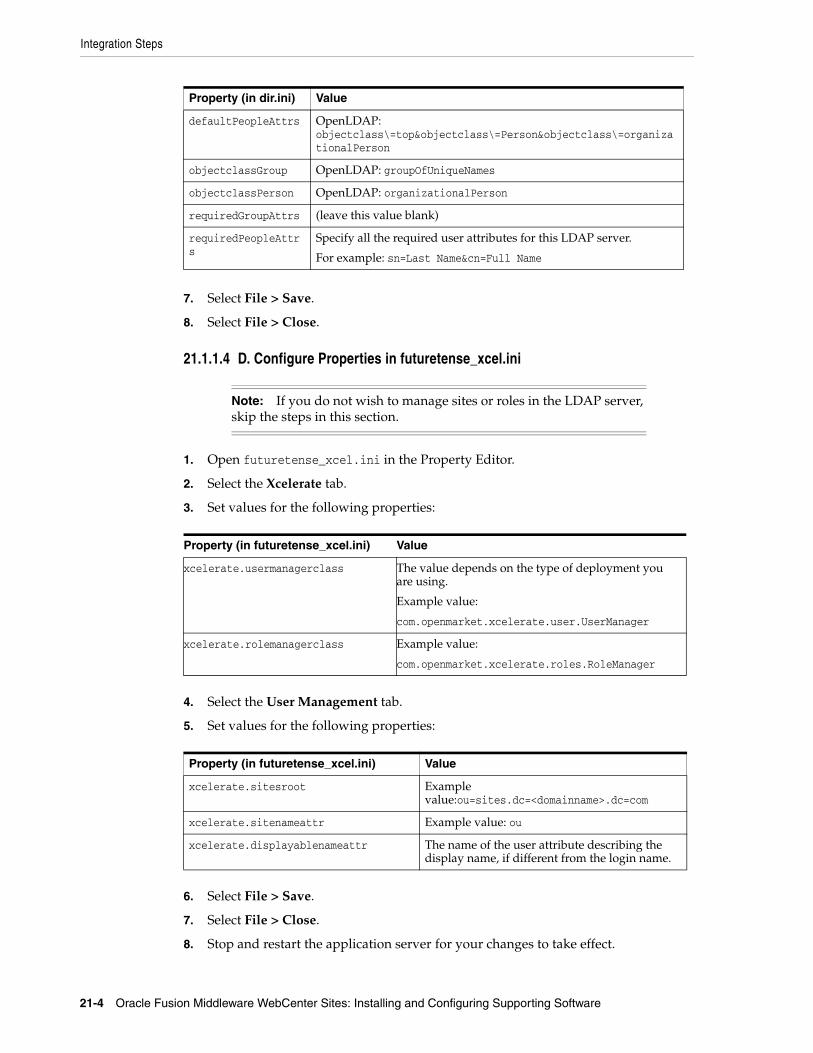
Integration Steps
21-4 Oracle Fusion Middleware WebCenter Sites: Installing and Configuring Supporting Software
7. Select File > Save.
8. Select File > Close.
21.1.1.4 D. Configure Properties in futuretense_xcel.ini
1. Open futuretense_xcel.ini in the Property Editor.
2. Select the Xcelerate tab.
3. Set values for the following properties:
4. Select the User Management tab.
5. Set values for the following properties:
6. Select File > Save.
7. Select File > Close.
8. Stop and restart the application server for your changes to take effect.
defaultPeopleAttrs OpenLDAP: objectclass\=top&objectclass\=Person&objectclass\=organizationalPerson
objectclassGroup OpenLDAP: groupOfUniqueNames
objectclassPerson OpenLDAP: organizationalPerson
requiredGroupAttrs (leave this value blank)
requiredPeopleAttrs
Specify all the required user attributes for this LDAP server.
For example: sn=Last Name&cn=Full Name
Note: If you do not wish to manage sites or roles in the LDAP server, skip the steps in this section.
Property (in futuretense_xcel.ini) Value
xcelerate.usermanagerclass The value depends on the type of deployment you are using.
Example value:
com.openmarket.xcelerate.user.UserManager
xcelerate.rolemanagerclass Example value:
com.openmarket.xcelerate.roles.RoleManager
Property (in futuretense_xcel.ini) Value
xcelerate.sitesroot Example value:ou=sites.dc=<domainname>.dc=com
xcelerate.sitenameattr Example value: ou
xcelerate.displayablenameattr The name of the user attribute describing the display name, if different from the login name.
Property (in dir.ini) Value
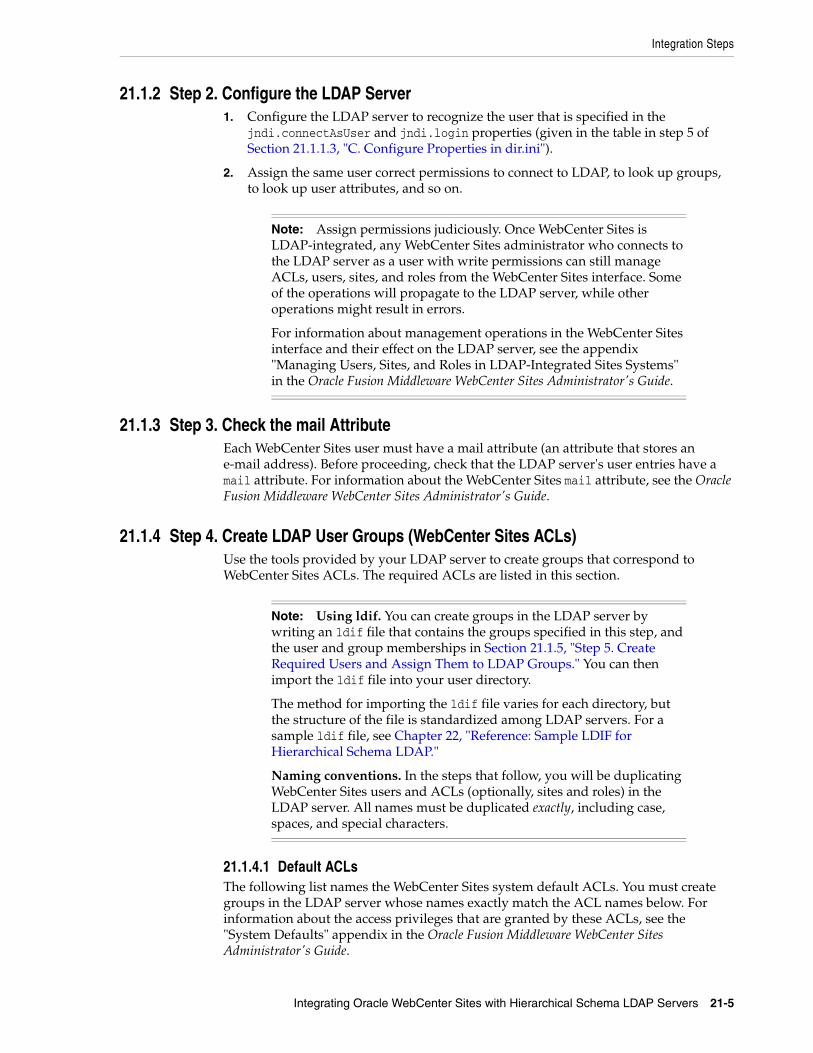
Integration Steps
Integrating Oracle WebCenter Sites with Hierarchical Schema LDAP Servers 21-5
21.1.2 Step 2. Configure the LDAP Server 1. Configure the LDAP server to recognize the user that is specified in the
jndi.connectAsUser and jndi.login properties (given in the table in step 5 of Section 21.1.1.3, "C. Configure Properties in dir.ini").
2. Assign the same user correct permissions to connect to LDAP, to look up groups, to look up user attributes, and so on.
21.1.3 Step 3. Check the mail Attribute Each WebCenter Sites user must have a mail attribute (an attribute that stores an e-mail address). Before proceeding, check that the LDAP server's user entries have a mail attribute. For information about the WebCenter Sites mail attribute, see the Oracle Fusion Middleware WebCenter Sites Administrator's Guide.
21.1.4 Step 4. Create LDAP User Groups (WebCenter Sites ACLs)Use the tools provided by your LDAP server to create groups that correspond to WebCenter Sites ACLs. The required ACLs are listed in this section.
21.1.4.1 Default ACLsThe following list names the WebCenter Sites system default ACLs. You must create groups in the LDAP server whose names exactly match the ACL names below. For information about the access privileges that are granted by these ACLs, see the "System Defaults" appendix in the Oracle Fusion Middleware WebCenter Sites Administrator's Guide.
Note: Assign permissions judiciously. Once WebCenter Sites is LDAP-integrated, any WebCenter Sites administrator who connects to the LDAP server as a user with write permissions can still manage ACLs, users, sites, and roles from the WebCenter Sites interface. Some of the operations will propagate to the LDAP server, while other operations might result in errors.
For information about management operations in the WebCenter Sites interface and their effect on the LDAP server, see the appendix "Managing Users, Sites, and Roles in LDAP-Integrated Sites Systems" in the Oracle Fusion Middleware WebCenter Sites Administrator's Guide.
Note: Using ldif. You can create groups in the LDAP server by writing an ldif file that contains the groups specified in this step, and the user and group memberships in Section 21.1.5, "Step 5. Create Required Users and Assign Them to LDAP Groups." You can then import the ldif file into your user directory.
The method for importing the ldif file varies for each directory, but the structure of the file is standardized among LDAP servers. For a sample ldif file, see Chapter 22, "Reference: Sample LDIF for Hierarchical Schema LDAP."
Naming conventions. In the steps that follow, you will be duplicating WebCenter Sites users and ACLs (optionally, sites and roles) in the LDAP server. All names must be duplicated exactly, including case, spaces, and special characters.
Integration Steps
21-6 Oracle Fusion Middleware WebCenter Sites: Installing and Configuring Supporting Software
■ Browser
■ ContentEditor
■ ElementEditor
■ ElementReader
■ PageEditor
■ PageReader
■ RemoteClient
■ SiteGod
■ TableEditor
■ UserEditor
■ UserReader
■ Visitor
■ VisitorAdmin
■ xceladmin
■ xceleditor
■ xcelpublish
21.1.4.2 Web Services ACLsIf you are using web services, create an LDAP group for each of the following ACLs. A group name must exactly match the ACL name:
■ WSAdmin
■ WSEditor
■ WSUser
For information about the access privileges granted by these ACLs (groups), see the "System Defaults" appendix in the Oracle Fusion Middleware WebCenter Sites Administrator's Guide.
21.1.4.3 Custom ACLsIf any custom ACLs have been created in WebCenter Sites since its installation, duplicate the ACLs as groups in the LDAP server. Group names must exactly match the names of the ACLs.
21.1.5 Step 5. Create Required Users and Assign Them to LDAP GroupsIn this step, you will duplicate the following users and their group memberships in the LDAP server:
■ Section 21.1.5.1, "WebCenter Sites Default Users"
■ Section 21.1.5.3, "Sample Site Users"
■ Section 21.1.5.2, "Custom Users"
21.1.5.1 WebCenter Sites Default Users1. Table 21–1 lists default users of the WebCenter Sites application. Duplicate the
default users in the LDAP server, making sure to name them exactly as shown in
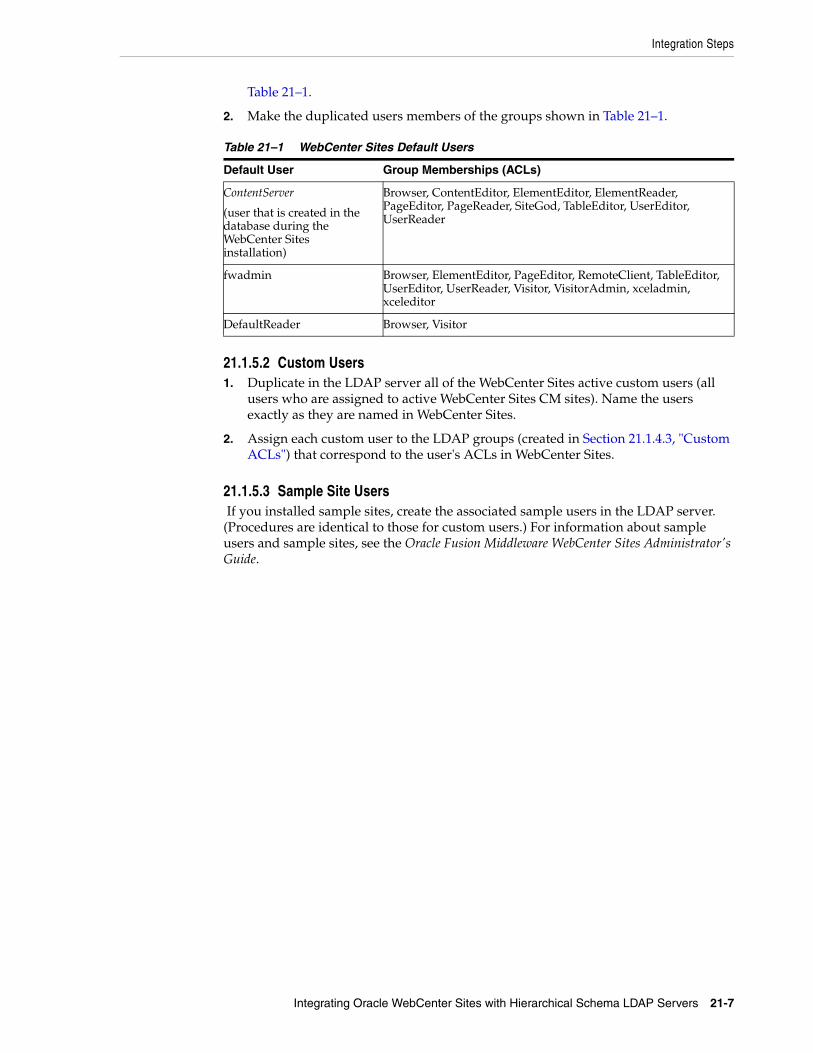
Integration Steps
Integrating Oracle WebCenter Sites with Hierarchical Schema LDAP Servers 21-7
Table 21–1.
2. Make the duplicated users members of the groups shown in Table 21–1.
21.1.5.2 Custom Users1. Duplicate in the LDAP server all of the WebCenter Sites active custom users (all
users who are assigned to active WebCenter Sites CM sites). Name the users exactly as they are named in WebCenter Sites.
2. Assign each custom user to the LDAP groups (created in Section 21.1.4.3, "Custom ACLs") that correspond to the user's ACLs in WebCenter Sites.
21.1.5.3 Sample Site Users If you installed sample sites, create the associated sample users in the LDAP server. (Procedures are identical to those for custom users.) For information about sample users and sample sites, see the Oracle Fusion Middleware WebCenter Sites Administrator's Guide.
Table 21–1 WebCenter Sites Default Users
Default User Group Memberships (ACLs)
ContentServer
(user that is created in the database during the WebCenter Sites installation)
Browser, ContentEditor, ElementEditor, ElementReader, PageEditor, PageReader, SiteGod, TableEditor, UserEditor, UserReader
fwadmin Browser, ElementEditor, PageEditor, RemoteClient, TableEditor, UserEditor, UserReader, Visitor, VisitorAdmin, xceladmin, xceleditor
DefaultReader Browser, Visitor
Integration Steps
21-8 Oracle Fusion Middleware WebCenter Sites: Installing and Configuring Supporting Software
21.1.6 Step 6. Create Sites and Roles in the LDAP Server
If you plan to use LDAP attribute mapping to manage sites and roles in your LDAP server, you will need to hierarchically order the sites and roles, as shown by the example in Figure 21–1 (system-defined roles are listed in Table 21–2). Continue with the steps in this section.
Note: If you are using a hybrid integration, the UserPublication table specifies which Roles are assigned to the user for each site. However, this table still contains all the pre-integrated data. To be able to log in, at least one user is required with the correct UserPublication table records for LDAP. For instance, for the fwadmin user, you must update the username to the LDAP dn.
Originally the username in the UserPublication table is stored as something like userid=1230987654321,ou=People, where 1230987654321 is the Id of the user in the SystemUsers table. The following records are required:
■ Id = {unique number}
■ username = "cn=fwadmin,ou=People,dc=fatwire,dc=com" (user's dn)
■ acl = {the role to be assigned. For example, GeneralAdmin}
■ pubid = {the Id of the site for which this user is assigned this Role}
In the absence of the above records, the user can log in, but a message is displayed that the user does not have access to any sites.
Once you have one user configured, you can use that user to assign roles to other users through the interface (as long as the user has the required Roles).
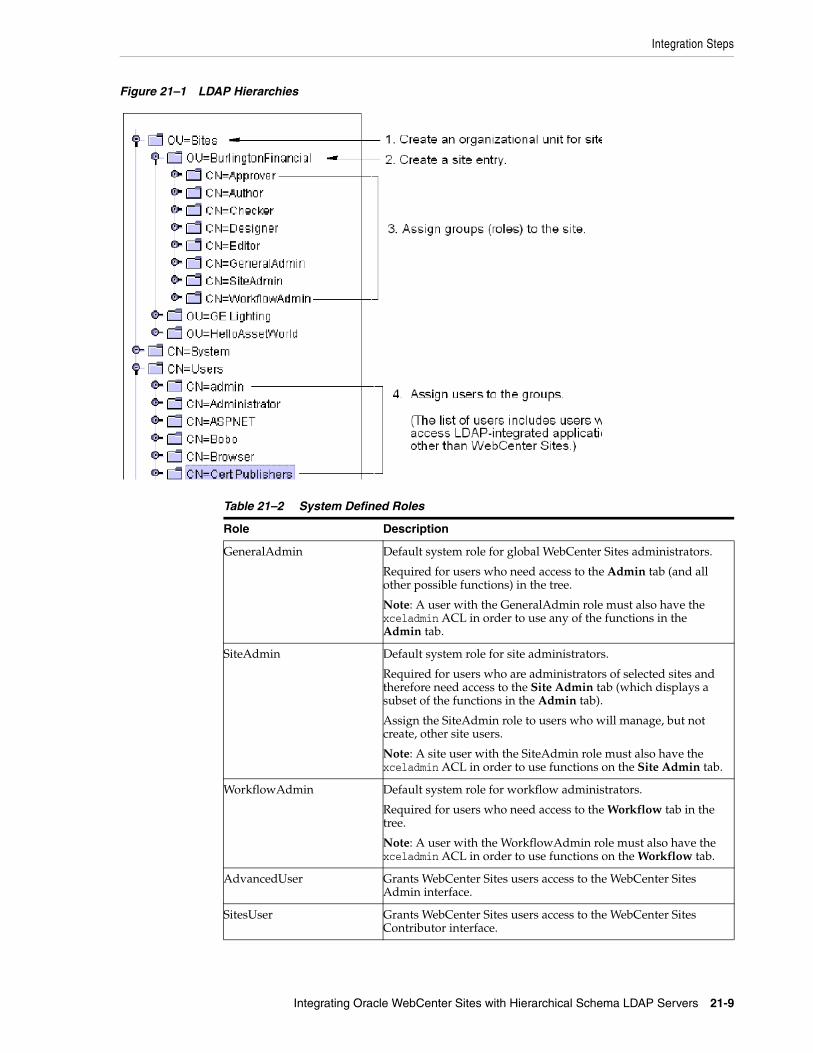
Integration Steps
Integrating Oracle WebCenter Sites with Hierarchical Schema LDAP Servers 21-9
Figure 21–1 LDAP Hierarchies
Table 21–2 System Defined Roles
Role Description
GeneralAdmin Default system role for global WebCenter Sites administrators.
Required for users who need access to the Admin tab (and all other possible functions) in the tree.
Note: A user with the GeneralAdmin role must also have the xceladmin ACL in order to use any of the functions in the Admin tab.
SiteAdmin Default system role for site administrators.
Required for users who are administrators of selected sites and therefore need access to the Site Admin tab (which displays a subset of the functions in the Admin tab).
Assign the SiteAdmin role to users who will manage, but not create, other site users.
Note: A site user with the SiteAdmin role must also have the xceladmin ACL in order to use functions on the Site Admin tab.
WorkflowAdmin Default system role for workflow administrators.
Required for users who need access to the Workflow tab in the tree.
Note: A user with the WorkflowAdmin role must also have the xceladmin ACL in order to use functions on the Workflow tab.
AdvancedUser Grants WebCenter Sites users access to the WebCenter Sites Admin interface.
SitesUser Grants WebCenter Sites users access to the WebCenter Sites Contributor interface.
Integration Steps
21-10 Oracle Fusion Middleware WebCenter Sites: Installing and Configuring Supporting Software
To create a hierarchical schema, complete the following steps in the LDAP server:
1. Create an organizational unit for sites. For an example, see step 1 in Figure 21–1.
2. Create a site entry under the site's organizational unit:
Complete this step by duplicating the names of active WebCenter Sites CM sites exactly as they are named in the WebCenter Sites interface (Admin tab). For an example, see step 2 in Figure 21–1.
3. Assign groups to each site:
Complete this step for each site by exactly duplicating the names of the WebCenter Sites roles that are assigned to the site. For an example, see step 3 in Figure 21–1.
When creating a group for a system default role, name the group to exactly match the role names listed here:
– GeneralAdmin (always assign this group to a site)
– SiteAdmin
– WorkFlowAdmin
– AdvancedUser
– SitesUser
4. Assign users to the groups. Name the users exactly as they are named in WebCenter Sites. For an example, see step 4 in Figure 21–1.
21.1.7 Step 7. If You Completed Step 61. If in the previous step you created sites and roles in the LDAP server, but they do
not exist in the WebCenter Sites database, create the same sites and roles in WebCenter Sites. Name them exactly as in the LDAP server. For instructions on creating sites and roles in the WebCenter Sites database, see the Oracle Fusion Middleware WebCenter Sites Administrator's Guide.
2. Assign the users to their relevant sites. For instructions, see "Granting Users Access to a Site" in the Oracle Fusion Middleware WebCenter Sites Administrator's Guide.
Note: If the sites you plan to use do not yet exist in WebCenter Sites, you can first create them in the LDAP server, then duplicate them (with identical names, including case) in WebCenter Sites.
Note: If the roles you plan to use do not yet exist in WebCenter Sites, you can first create them as groups in the LDAP server, then duplicate them as roles (with identical names, including case) in WebCenter Sites. For the list of system-defined roles, see Table 21–2.
Note: If you are completing the flat schema manual integration process (Chapter 20), reset WebCenter Sites users' passwords. For instructions, see step 3 in Section 20.3, "Completing the Integration."
Testing the Integration
Integrating Oracle WebCenter Sites with Hierarchical Schema LDAP Servers 21-11
21.1.8 Step 8. Post-Integration Steps When CM Sites Have Not Been CreatedIf CM sites were not created on the given system, then after integrating WebCenter Sites with LDAP you will be unable to log in. The solution is to manually create the following new group entries in your LDAP server and assign fwadmin to each of these groups:
Management Site-SiteAdminManagement Site-GeneralAdminManagement Site-WorkflowAdmin
In addition, create the SitesUser group only for installations running in content management mode. This group enables the fwadmin user to access the WebCenter Sites Contributor interface:
Management Site-SitesUser
See Example 21–1.
Example 21–1 Example LDIF
dn: cn=Management Site-SiteAdmin,ou=Groups,dc=fatwire,dc=comobjectClass: topobjectClass: groupOfUniqueNamesuniqueMember: cn=fwadmin,ou=People,dc=fatwire,dc=com
dn: cn=Management Site-GeneralAdmin,ou=Groups,dc=fatwire,dc=comobjectClass: topobjectClass: groupOfUniqueNamesuniqueMember: cn=fwadmin,ou=People,dc=fatwire,dc=com
dn: cn=Management Site-WorkflowAdmin,ou=Groups,dc=fatwire,dc=comobjectClass: topobjectClass: groupOfUniqueNamesuniqueMember: cn=fwadmin,ou=People,dc=fatwire,dc=com
dn: cn=Management Site-SitesUser,ou=Groups,dc=fatwire,dc=comobjectClass: topobjectClass: groupOfUniqueNamesuniqueMember: cn=fwadmin,ou=People,dc=fatwire,dc=com
21.2 Testing the IntegrationTest your LDAP-integrated system by opening a browser and entering the following URL:
http://<servername"://CatalogManager?ftcmd=login&username=ContentServer&password=" target="_blank"http://<servername>:<port>/<context>/CatalogManager?ftcmd=login&username=ContentServer&password=<password
where
<servername> is the name of the machine hosting the WebCenter Sites system
<port> is the port number of that server
<username> is user-defined (ContentServer, in this example)
<password> is user-defined (password, in this example)

Testing the Integration
21-12 Oracle Fusion Middleware WebCenter Sites: Installing and Configuring Supporting Software
■ If the browser displays a "Login Successful" message, you have integrated your LDAP plug-in correctly.
■ If you do not see the "Login Successful" message, verify that you created the ContentServer user in the LDAP server, and that all properties are set to the correct values.
22
Reference: Sample LDIF for Hierarchical Schema LDAP 22-1
22Reference: Sample LDIF for HierarchicalSchema LDAP
This chapter contains a sample ldif file for LDAP servers with hierarchical schema.
22.1 Sample ldif FileThe sample ldif file below defines users and groups for WebCenter Sites sample sites HelloAsetWorld, Burlington Financial, and GE Lighting. The file re-creates the system default users, sample site users, their ACLs, and their roles.
1. dn: dc=fatwire,dc=com
2. dc: fatwire
3. objectClass: dcObject
4. objectClass: organization
5. description: OpenLDAP test pre_cs_setup
6. o: Fatwire Software
7.
8. dn: cn=Manager, dc=fatwire,dc=com
9. objectClass: organizationalRole
10. cn: Manager
11.
12. dn: ou=People, dc=fatwire,dc=com
13. ou: People
14. objectClass: organizationalUnit
15. objectClass: top
16.
17. dn: ou=Groups, dc=fatwire,dc=com
18. ou: Groups
19. objectClass: organizationalUnit
20. objectClass: top
21.
Note: The structure of the sample file below applies to any LDAP server using a hierarchical schema.
Sample ldif File
22-2 Oracle Fusion Middleware WebCenter Sites: Installing and Configuring Supporting Software
22. dn: cn=fwadmin_mine,ou=People, dc=fatwire,dc=com
23. telephoneNumber: (123) 123-4567
24. userPassword:: e1NTSEF9endxNDRoUStuUlNrOU84clJuTU5RSzBxTFlPdEN3azQ=
25. objectClass: organizationalPerson
26. objectClass: top
27. description: admin user mine
28. sn: fwadmin_nime
29. cn: fwadmin_mine
30.
31. dn: cn=newgroupOfUniqueNames,ou=Groups, dc=fatwire,dc=com
32. objectClass: groupOfUniqueNames
33. objectClass: top
34. uniqueMember: cn=fwadmin_mine,ou=People,dc=fatwire,dc=com
35. cn: newgroupOfUniqueNames
36.
37. dn: cn=Browser,ou=Groups, dc=fatwire,dc=com
38. objectClass: top
39. objectClass: groupOfUniqueNames
40. uniqueMember: cn=ContentServer,ou=People,dc=fatwire,dc=com
41. uniqueMember: cn=DefaultReader,ou=People,dc=fatwire,dc=com
42. uniqueMember: cn=fwadmin,ou=People,dc=fatwire,dc=com
43. uniqueMember: cn=Coco,ou=People,dc=fatwire,dc=com
44. uniqueMember: cn=Bobo,ou=People,dc=fatwire,dc=com
45. uniqueMember: cn=Flo,ou=People,dc=fatwire,dc=com
46. uniqueMember: cn=Joe,ou=People,dc=fatwire,dc=com
47. uniqueMember: cn=Moe,ou=People,dc=fatwire,dc=com
48. uniqueMember: cn=user_designer,ou=People,dc=fatwire,dc=com
49. uniqueMember: cn=user_author,ou=People,dc=fatwire,dc=com
50. uniqueMember: cn=user_approver,ou=People,dc=fatwire,dc=com
51. uniqueMember: cn=user_checker,ou=People,dc=fatwire,dc=com
52. uniqueMember: cn=user_editor,ou=People,dc=fatwire,dc=com
53. uniqueMember: cn=editor,ou=People,dc=fatwire,dc=com
54. uniqueMember: cn=mirroruser,ou=People,dc=fatwire,dc=com
55. uniqueMember: cn=user_marketer,ou=People,dc=fatwire,dc=com
56. uniqueMember: cn=user_pricer,ou=People,dc=fatwire,dc=com
57. uniqueMember: cn=user_analyst,ou=People,dc=fatwire,dc=com
58. uniqueMember: cn=user_expert,ou=People,dc=fatwire,dc=com
59. uniqueMember: cn=HelloAssetWorld-SparkAdmin,ou=Groups,dc=fatwire,dc=com
60. uniqueMember: cn=BurlingtonFinancial-SparkAdmin,ou=Groups,dc=fatwire,dc=com
61. uniqueMember: cn=GE Lighting-SparkAdmin,ou=Groups,dc=fatwire,dc=com
62. uniqueMember: cn=Spark-SparkAdmin,ou=Groups,dc=fatwire,dc=com
63. uniqueMember: cn=HelloAssetWorld-SparkContentUser,ou=Groups,dc=fatwire,dc=com
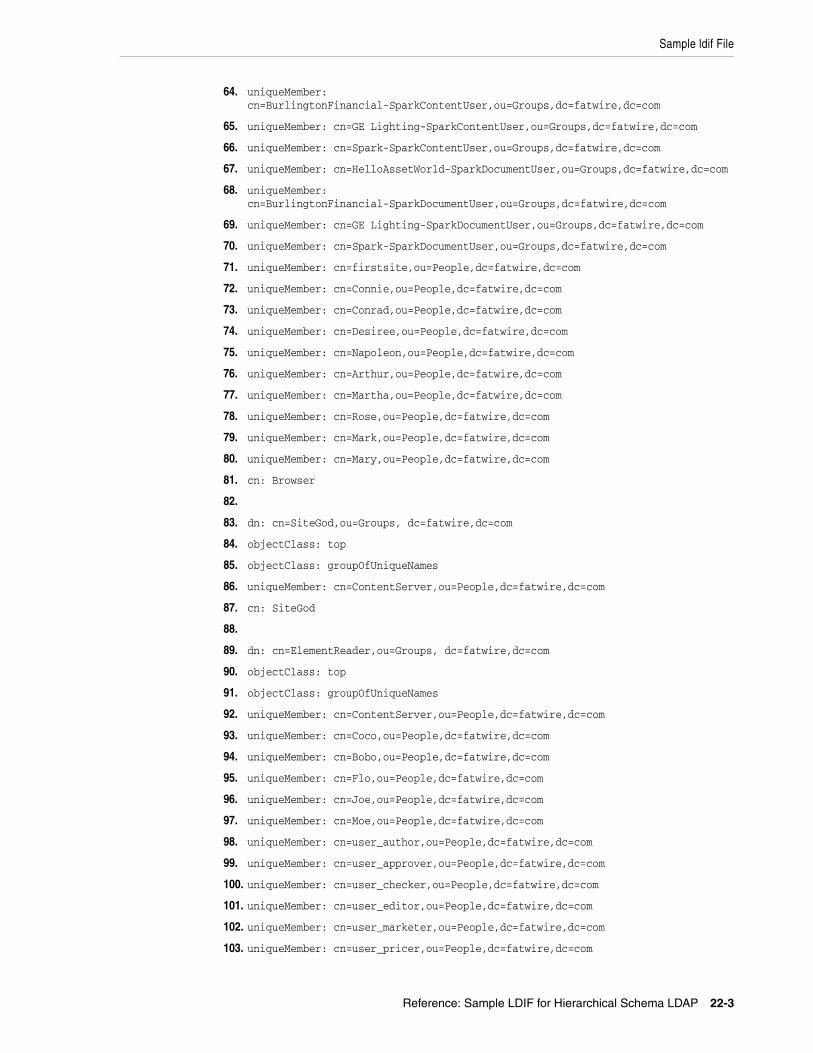
Sample ldif File
Reference: Sample LDIF for Hierarchical Schema LDAP 22-3
64. uniqueMember: cn=BurlingtonFinancial-SparkContentUser,ou=Groups,dc=fatwire,dc=com
65. uniqueMember: cn=GE Lighting-SparkContentUser,ou=Groups,dc=fatwire,dc=com
66. uniqueMember: cn=Spark-SparkContentUser,ou=Groups,dc=fatwire,dc=com
67. uniqueMember: cn=HelloAssetWorld-SparkDocumentUser,ou=Groups,dc=fatwire,dc=com
68. uniqueMember: cn=BurlingtonFinancial-SparkDocumentUser,ou=Groups,dc=fatwire,dc=com
69. uniqueMember: cn=GE Lighting-SparkDocumentUser,ou=Groups,dc=fatwire,dc=com
70. uniqueMember: cn=Spark-SparkDocumentUser,ou=Groups,dc=fatwire,dc=com
71. uniqueMember: cn=firstsite,ou=People,dc=fatwire,dc=com
72. uniqueMember: cn=Connie,ou=People,dc=fatwire,dc=com
73. uniqueMember: cn=Conrad,ou=People,dc=fatwire,dc=com
74. uniqueMember: cn=Desiree,ou=People,dc=fatwire,dc=com
75. uniqueMember: cn=Napoleon,ou=People,dc=fatwire,dc=com
76. uniqueMember: cn=Arthur,ou=People,dc=fatwire,dc=com
77. uniqueMember: cn=Martha,ou=People,dc=fatwire,dc=com
78. uniqueMember: cn=Rose,ou=People,dc=fatwire,dc=com
79. uniqueMember: cn=Mark,ou=People,dc=fatwire,dc=com
80. uniqueMember: cn=Mary,ou=People,dc=fatwire,dc=com
81. cn: Browser
82.
83. dn: cn=SiteGod,ou=Groups, dc=fatwire,dc=com
84. objectClass: top
85. objectClass: groupOfUniqueNames
86. uniqueMember: cn=ContentServer,ou=People,dc=fatwire,dc=com
87. cn: SiteGod
88.
89. dn: cn=ElementReader,ou=Groups, dc=fatwire,dc=com
90. objectClass: top
91. objectClass: groupOfUniqueNames
92. uniqueMember: cn=ContentServer,ou=People,dc=fatwire,dc=com
93. uniqueMember: cn=Coco,ou=People,dc=fatwire,dc=com
94. uniqueMember: cn=Bobo,ou=People,dc=fatwire,dc=com
95. uniqueMember: cn=Flo,ou=People,dc=fatwire,dc=com
96. uniqueMember: cn=Joe,ou=People,dc=fatwire,dc=com
97. uniqueMember: cn=Moe,ou=People,dc=fatwire,dc=com
98. uniqueMember: cn=user_author,ou=People,dc=fatwire,dc=com
99. uniqueMember: cn=user_approver,ou=People,dc=fatwire,dc=com
100. uniqueMember: cn=user_checker,ou=People,dc=fatwire,dc=com
101. uniqueMember: cn=user_editor,ou=People,dc=fatwire,dc=com
102. uniqueMember: cn=user_marketer,ou=People,dc=fatwire,dc=com
103. uniqueMember: cn=user_pricer,ou=People,dc=fatwire,dc=com
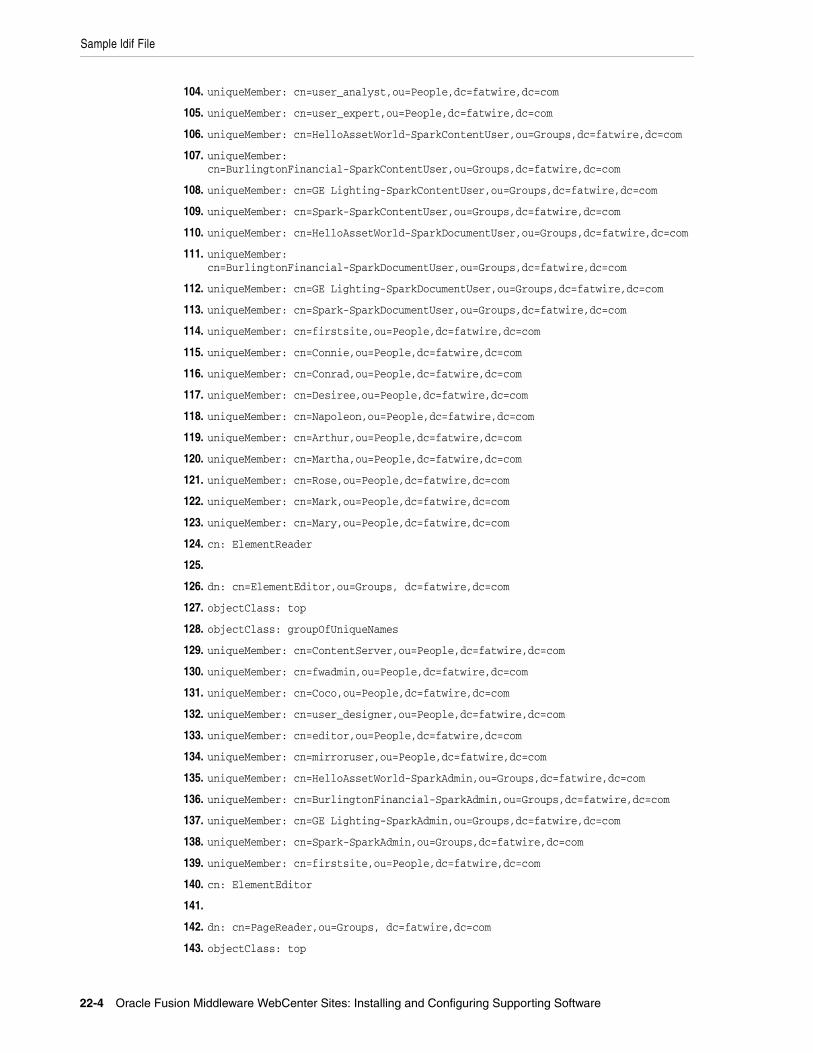
Sample ldif File
22-4 Oracle Fusion Middleware WebCenter Sites: Installing and Configuring Supporting Software
104. uniqueMember: cn=user_analyst,ou=People,dc=fatwire,dc=com
105. uniqueMember: cn=user_expert,ou=People,dc=fatwire,dc=com
106. uniqueMember: cn=HelloAssetWorld-SparkContentUser,ou=Groups,dc=fatwire,dc=com
107. uniqueMember: cn=BurlingtonFinancial-SparkContentUser,ou=Groups,dc=fatwire,dc=com
108. uniqueMember: cn=GE Lighting-SparkContentUser,ou=Groups,dc=fatwire,dc=com
109. uniqueMember: cn=Spark-SparkContentUser,ou=Groups,dc=fatwire,dc=com
110. uniqueMember: cn=HelloAssetWorld-SparkDocumentUser,ou=Groups,dc=fatwire,dc=com
111. uniqueMember: cn=BurlingtonFinancial-SparkDocumentUser,ou=Groups,dc=fatwire,dc=com
112. uniqueMember: cn=GE Lighting-SparkDocumentUser,ou=Groups,dc=fatwire,dc=com
113. uniqueMember: cn=Spark-SparkDocumentUser,ou=Groups,dc=fatwire,dc=com
114. uniqueMember: cn=firstsite,ou=People,dc=fatwire,dc=com
115. uniqueMember: cn=Connie,ou=People,dc=fatwire,dc=com
116. uniqueMember: cn=Conrad,ou=People,dc=fatwire,dc=com
117. uniqueMember: cn=Desiree,ou=People,dc=fatwire,dc=com
118. uniqueMember: cn=Napoleon,ou=People,dc=fatwire,dc=com
119. uniqueMember: cn=Arthur,ou=People,dc=fatwire,dc=com
120. uniqueMember: cn=Martha,ou=People,dc=fatwire,dc=com
121. uniqueMember: cn=Rose,ou=People,dc=fatwire,dc=com
122. uniqueMember: cn=Mark,ou=People,dc=fatwire,dc=com
123. uniqueMember: cn=Mary,ou=People,dc=fatwire,dc=com
124. cn: ElementReader
125.
126. dn: cn=ElementEditor,ou=Groups, dc=fatwire,dc=com
127. objectClass: top
128. objectClass: groupOfUniqueNames
129. uniqueMember: cn=ContentServer,ou=People,dc=fatwire,dc=com
130. uniqueMember: cn=fwadmin,ou=People,dc=fatwire,dc=com
131. uniqueMember: cn=Coco,ou=People,dc=fatwire,dc=com
132. uniqueMember: cn=user_designer,ou=People,dc=fatwire,dc=com
133. uniqueMember: cn=editor,ou=People,dc=fatwire,dc=com
134. uniqueMember: cn=mirroruser,ou=People,dc=fatwire,dc=com
135. uniqueMember: cn=HelloAssetWorld-SparkAdmin,ou=Groups,dc=fatwire,dc=com
136. uniqueMember: cn=BurlingtonFinancial-SparkAdmin,ou=Groups,dc=fatwire,dc=com
137. uniqueMember: cn=GE Lighting-SparkAdmin,ou=Groups,dc=fatwire,dc=com
138. uniqueMember: cn=Spark-SparkAdmin,ou=Groups,dc=fatwire,dc=com
139. uniqueMember: cn=firstsite,ou=People,dc=fatwire,dc=com
140. cn: ElementEditor
141.
142. dn: cn=PageReader,ou=Groups, dc=fatwire,dc=com
143. objectClass: top
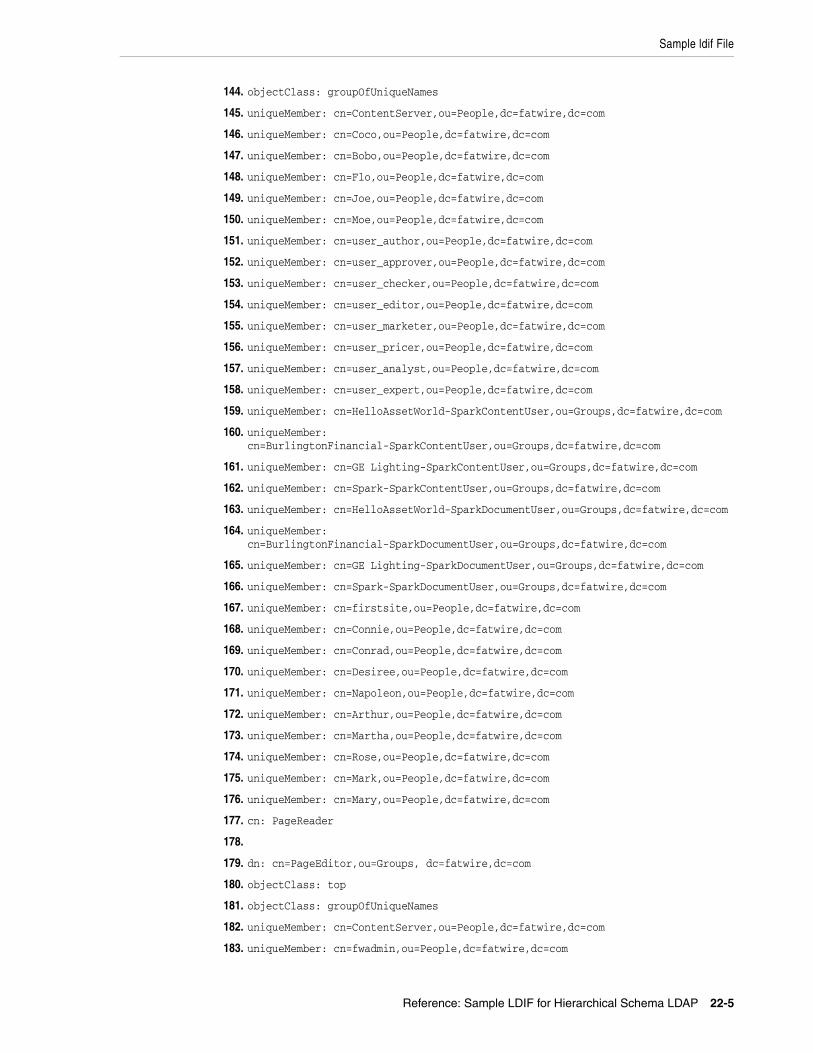
Sample ldif File
Reference: Sample LDIF for Hierarchical Schema LDAP 22-5
144. objectClass: groupOfUniqueNames
145. uniqueMember: cn=ContentServer,ou=People,dc=fatwire,dc=com
146. uniqueMember: cn=Coco,ou=People,dc=fatwire,dc=com
147. uniqueMember: cn=Bobo,ou=People,dc=fatwire,dc=com
148. uniqueMember: cn=Flo,ou=People,dc=fatwire,dc=com
149. uniqueMember: cn=Joe,ou=People,dc=fatwire,dc=com
150. uniqueMember: cn=Moe,ou=People,dc=fatwire,dc=com
151. uniqueMember: cn=user_author,ou=People,dc=fatwire,dc=com
152. uniqueMember: cn=user_approver,ou=People,dc=fatwire,dc=com
153. uniqueMember: cn=user_checker,ou=People,dc=fatwire,dc=com
154. uniqueMember: cn=user_editor,ou=People,dc=fatwire,dc=com
155. uniqueMember: cn=user_marketer,ou=People,dc=fatwire,dc=com
156. uniqueMember: cn=user_pricer,ou=People,dc=fatwire,dc=com
157. uniqueMember: cn=user_analyst,ou=People,dc=fatwire,dc=com
158. uniqueMember: cn=user_expert,ou=People,dc=fatwire,dc=com
159. uniqueMember: cn=HelloAssetWorld-SparkContentUser,ou=Groups,dc=fatwire,dc=com
160. uniqueMember: cn=BurlingtonFinancial-SparkContentUser,ou=Groups,dc=fatwire,dc=com
161. uniqueMember: cn=GE Lighting-SparkContentUser,ou=Groups,dc=fatwire,dc=com
162. uniqueMember: cn=Spark-SparkContentUser,ou=Groups,dc=fatwire,dc=com
163. uniqueMember: cn=HelloAssetWorld-SparkDocumentUser,ou=Groups,dc=fatwire,dc=com
164. uniqueMember: cn=BurlingtonFinancial-SparkDocumentUser,ou=Groups,dc=fatwire,dc=com
165. uniqueMember: cn=GE Lighting-SparkDocumentUser,ou=Groups,dc=fatwire,dc=com
166. uniqueMember: cn=Spark-SparkDocumentUser,ou=Groups,dc=fatwire,dc=com
167. uniqueMember: cn=firstsite,ou=People,dc=fatwire,dc=com
168. uniqueMember: cn=Connie,ou=People,dc=fatwire,dc=com
169. uniqueMember: cn=Conrad,ou=People,dc=fatwire,dc=com
170. uniqueMember: cn=Desiree,ou=People,dc=fatwire,dc=com
171. uniqueMember: cn=Napoleon,ou=People,dc=fatwire,dc=com
172. uniqueMember: cn=Arthur,ou=People,dc=fatwire,dc=com
173. uniqueMember: cn=Martha,ou=People,dc=fatwire,dc=com
174. uniqueMember: cn=Rose,ou=People,dc=fatwire,dc=com
175. uniqueMember: cn=Mark,ou=People,dc=fatwire,dc=com
176. uniqueMember: cn=Mary,ou=People,dc=fatwire,dc=com
177. cn: PageReader
178.
179. dn: cn=PageEditor,ou=Groups, dc=fatwire,dc=com
180. objectClass: top
181. objectClass: groupOfUniqueNames
182. uniqueMember: cn=ContentServer,ou=People,dc=fatwire,dc=com
183. uniqueMember: cn=fwadmin,ou=People,dc=fatwire,dc=com
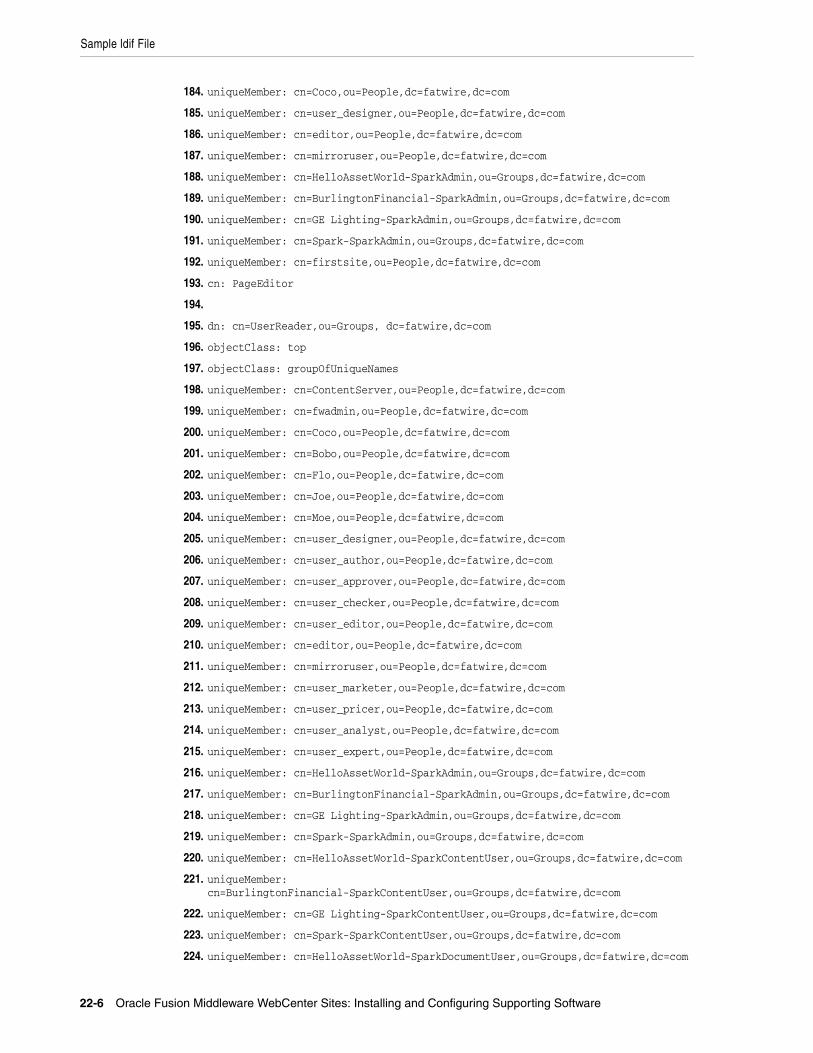
Sample ldif File
22-6 Oracle Fusion Middleware WebCenter Sites: Installing and Configuring Supporting Software
184. uniqueMember: cn=Coco,ou=People,dc=fatwire,dc=com
185. uniqueMember: cn=user_designer,ou=People,dc=fatwire,dc=com
186. uniqueMember: cn=editor,ou=People,dc=fatwire,dc=com
187. uniqueMember: cn=mirroruser,ou=People,dc=fatwire,dc=com
188. uniqueMember: cn=HelloAssetWorld-SparkAdmin,ou=Groups,dc=fatwire,dc=com
189. uniqueMember: cn=BurlingtonFinancial-SparkAdmin,ou=Groups,dc=fatwire,dc=com
190. uniqueMember: cn=GE Lighting-SparkAdmin,ou=Groups,dc=fatwire,dc=com
191. uniqueMember: cn=Spark-SparkAdmin,ou=Groups,dc=fatwire,dc=com
192. uniqueMember: cn=firstsite,ou=People,dc=fatwire,dc=com
193. cn: PageEditor
194.
195. dn: cn=UserReader,ou=Groups, dc=fatwire,dc=com
196. objectClass: top
197. objectClass: groupOfUniqueNames
198. uniqueMember: cn=ContentServer,ou=People,dc=fatwire,dc=com
199. uniqueMember: cn=fwadmin,ou=People,dc=fatwire,dc=com
200. uniqueMember: cn=Coco,ou=People,dc=fatwire,dc=com
201. uniqueMember: cn=Bobo,ou=People,dc=fatwire,dc=com
202. uniqueMember: cn=Flo,ou=People,dc=fatwire,dc=com
203. uniqueMember: cn=Joe,ou=People,dc=fatwire,dc=com
204. uniqueMember: cn=Moe,ou=People,dc=fatwire,dc=com
205. uniqueMember: cn=user_designer,ou=People,dc=fatwire,dc=com
206. uniqueMember: cn=user_author,ou=People,dc=fatwire,dc=com
207. uniqueMember: cn=user_approver,ou=People,dc=fatwire,dc=com
208. uniqueMember: cn=user_checker,ou=People,dc=fatwire,dc=com
209. uniqueMember: cn=user_editor,ou=People,dc=fatwire,dc=com
210. uniqueMember: cn=editor,ou=People,dc=fatwire,dc=com
211. uniqueMember: cn=mirroruser,ou=People,dc=fatwire,dc=com
212. uniqueMember: cn=user_marketer,ou=People,dc=fatwire,dc=com
213. uniqueMember: cn=user_pricer,ou=People,dc=fatwire,dc=com
214. uniqueMember: cn=user_analyst,ou=People,dc=fatwire,dc=com
215. uniqueMember: cn=user_expert,ou=People,dc=fatwire,dc=com
216. uniqueMember: cn=HelloAssetWorld-SparkAdmin,ou=Groups,dc=fatwire,dc=com
217. uniqueMember: cn=BurlingtonFinancial-SparkAdmin,ou=Groups,dc=fatwire,dc=com
218. uniqueMember: cn=GE Lighting-SparkAdmin,ou=Groups,dc=fatwire,dc=com
219. uniqueMember: cn=Spark-SparkAdmin,ou=Groups,dc=fatwire,dc=com
220. uniqueMember: cn=HelloAssetWorld-SparkContentUser,ou=Groups,dc=fatwire,dc=com
221. uniqueMember: cn=BurlingtonFinancial-SparkContentUser,ou=Groups,dc=fatwire,dc=com
222. uniqueMember: cn=GE Lighting-SparkContentUser,ou=Groups,dc=fatwire,dc=com
223. uniqueMember: cn=Spark-SparkContentUser,ou=Groups,dc=fatwire,dc=com
224. uniqueMember: cn=HelloAssetWorld-SparkDocumentUser,ou=Groups,dc=fatwire,dc=com
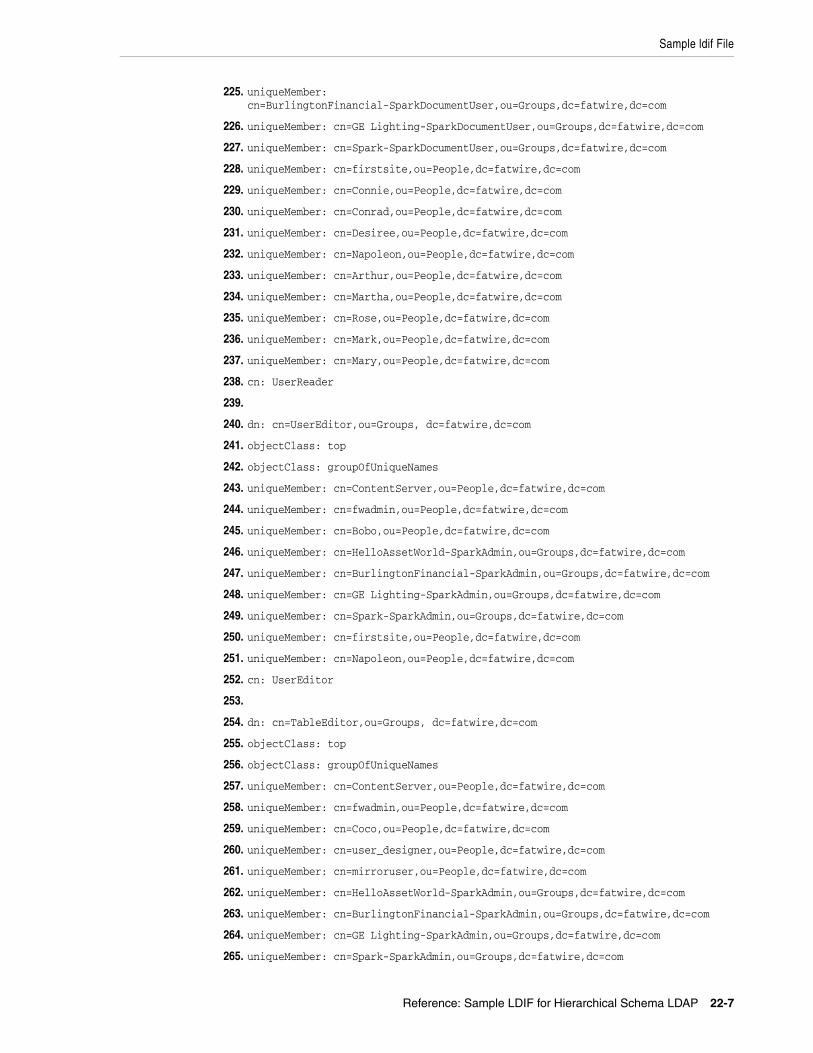
Sample ldif File
Reference: Sample LDIF for Hierarchical Schema LDAP 22-7
225. uniqueMember: cn=BurlingtonFinancial-SparkDocumentUser,ou=Groups,dc=fatwire,dc=com
226. uniqueMember: cn=GE Lighting-SparkDocumentUser,ou=Groups,dc=fatwire,dc=com
227. uniqueMember: cn=Spark-SparkDocumentUser,ou=Groups,dc=fatwire,dc=com
228. uniqueMember: cn=firstsite,ou=People,dc=fatwire,dc=com
229. uniqueMember: cn=Connie,ou=People,dc=fatwire,dc=com
230. uniqueMember: cn=Conrad,ou=People,dc=fatwire,dc=com
231. uniqueMember: cn=Desiree,ou=People,dc=fatwire,dc=com
232. uniqueMember: cn=Napoleon,ou=People,dc=fatwire,dc=com
233. uniqueMember: cn=Arthur,ou=People,dc=fatwire,dc=com
234. uniqueMember: cn=Martha,ou=People,dc=fatwire,dc=com
235. uniqueMember: cn=Rose,ou=People,dc=fatwire,dc=com
236. uniqueMember: cn=Mark,ou=People,dc=fatwire,dc=com
237. uniqueMember: cn=Mary,ou=People,dc=fatwire,dc=com
238. cn: UserReader
239.
240. dn: cn=UserEditor,ou=Groups, dc=fatwire,dc=com
241. objectClass: top
242. objectClass: groupOfUniqueNames
243. uniqueMember: cn=ContentServer,ou=People,dc=fatwire,dc=com
244. uniqueMember: cn=fwadmin,ou=People,dc=fatwire,dc=com
245. uniqueMember: cn=Bobo,ou=People,dc=fatwire,dc=com
246. uniqueMember: cn=HelloAssetWorld-SparkAdmin,ou=Groups,dc=fatwire,dc=com
247. uniqueMember: cn=BurlingtonFinancial-SparkAdmin,ou=Groups,dc=fatwire,dc=com
248. uniqueMember: cn=GE Lighting-SparkAdmin,ou=Groups,dc=fatwire,dc=com
249. uniqueMember: cn=Spark-SparkAdmin,ou=Groups,dc=fatwire,dc=com
250. uniqueMember: cn=firstsite,ou=People,dc=fatwire,dc=com
251. uniqueMember: cn=Napoleon,ou=People,dc=fatwire,dc=com
252. cn: UserEditor
253.
254. dn: cn=TableEditor,ou=Groups, dc=fatwire,dc=com
255. objectClass: top
256. objectClass: groupOfUniqueNames
257. uniqueMember: cn=ContentServer,ou=People,dc=fatwire,dc=com
258. uniqueMember: cn=fwadmin,ou=People,dc=fatwire,dc=com
259. uniqueMember: cn=Coco,ou=People,dc=fatwire,dc=com
260. uniqueMember: cn=user_designer,ou=People,dc=fatwire,dc=com
261. uniqueMember: cn=mirroruser,ou=People,dc=fatwire,dc=com
262. uniqueMember: cn=HelloAssetWorld-SparkAdmin,ou=Groups,dc=fatwire,dc=com
263. uniqueMember: cn=BurlingtonFinancial-SparkAdmin,ou=Groups,dc=fatwire,dc=com
264. uniqueMember: cn=GE Lighting-SparkAdmin,ou=Groups,dc=fatwire,dc=com
265. uniqueMember: cn=Spark-SparkAdmin,ou=Groups,dc=fatwire,dc=com
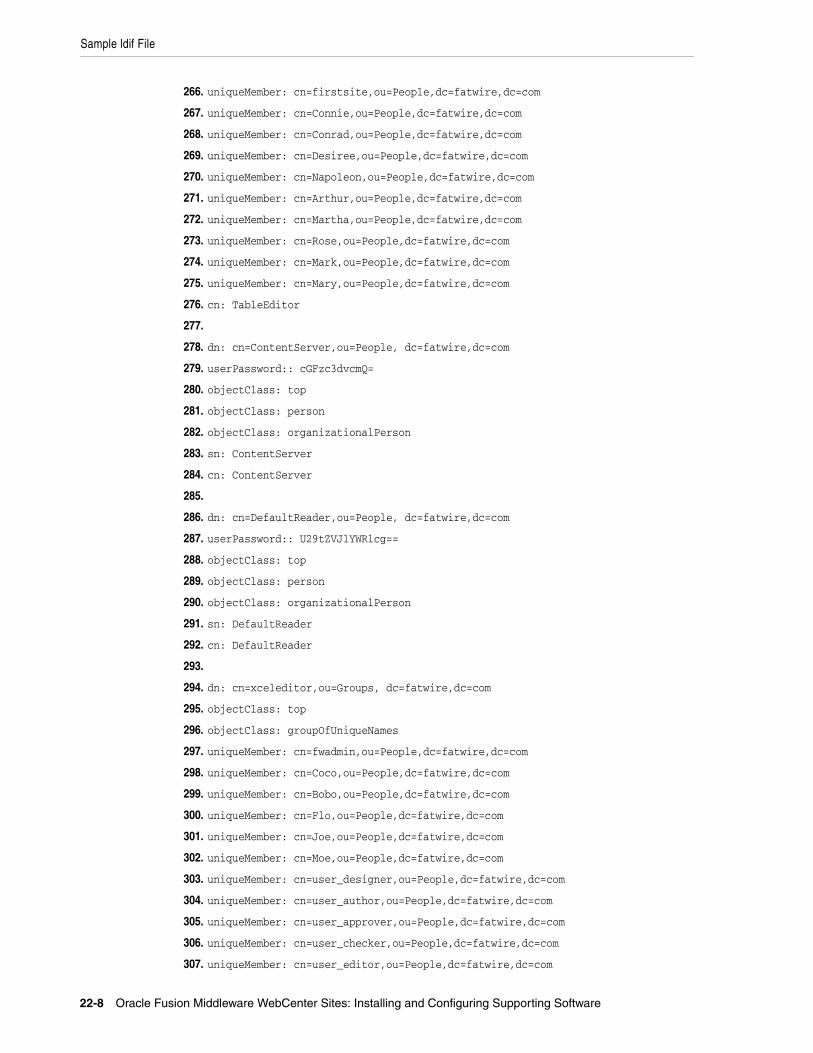
Sample ldif File
22-8 Oracle Fusion Middleware WebCenter Sites: Installing and Configuring Supporting Software
266. uniqueMember: cn=firstsite,ou=People,dc=fatwire,dc=com
267. uniqueMember: cn=Connie,ou=People,dc=fatwire,dc=com
268. uniqueMember: cn=Conrad,ou=People,dc=fatwire,dc=com
269. uniqueMember: cn=Desiree,ou=People,dc=fatwire,dc=com
270. uniqueMember: cn=Napoleon,ou=People,dc=fatwire,dc=com
271. uniqueMember: cn=Arthur,ou=People,dc=fatwire,dc=com
272. uniqueMember: cn=Martha,ou=People,dc=fatwire,dc=com
273. uniqueMember: cn=Rose,ou=People,dc=fatwire,dc=com
274. uniqueMember: cn=Mark,ou=People,dc=fatwire,dc=com
275. uniqueMember: cn=Mary,ou=People,dc=fatwire,dc=com
276. cn: TableEditor
277.
278. dn: cn=ContentServer,ou=People, dc=fatwire,dc=com
279. userPassword:: cGFzc3dvcmQ=
280. objectClass: top
281. objectClass: person
282. objectClass: organizationalPerson
283. sn: ContentServer
284. cn: ContentServer
285.
286. dn: cn=DefaultReader,ou=People, dc=fatwire,dc=com
287. userPassword:: U29tZVJlYWRlcg==
288. objectClass: top
289. objectClass: person
290. objectClass: organizationalPerson
291. sn: DefaultReader
292. cn: DefaultReader
293.
294. dn: cn=xceleditor,ou=Groups, dc=fatwire,dc=com
295. objectClass: top
296. objectClass: groupOfUniqueNames
297. uniqueMember: cn=fwadmin,ou=People,dc=fatwire,dc=com
298. uniqueMember: cn=Coco,ou=People,dc=fatwire,dc=com
299. uniqueMember: cn=Bobo,ou=People,dc=fatwire,dc=com
300. uniqueMember: cn=Flo,ou=People,dc=fatwire,dc=com
301. uniqueMember: cn=Joe,ou=People,dc=fatwire,dc=com
302. uniqueMember: cn=Moe,ou=People,dc=fatwire,dc=com
303. uniqueMember: cn=user_designer,ou=People,dc=fatwire,dc=com
304. uniqueMember: cn=user_author,ou=People,dc=fatwire,dc=com
305. uniqueMember: cn=user_approver,ou=People,dc=fatwire,dc=com
306. uniqueMember: cn=user_checker,ou=People,dc=fatwire,dc=com
307. uniqueMember: cn=user_editor,ou=People,dc=fatwire,dc=com
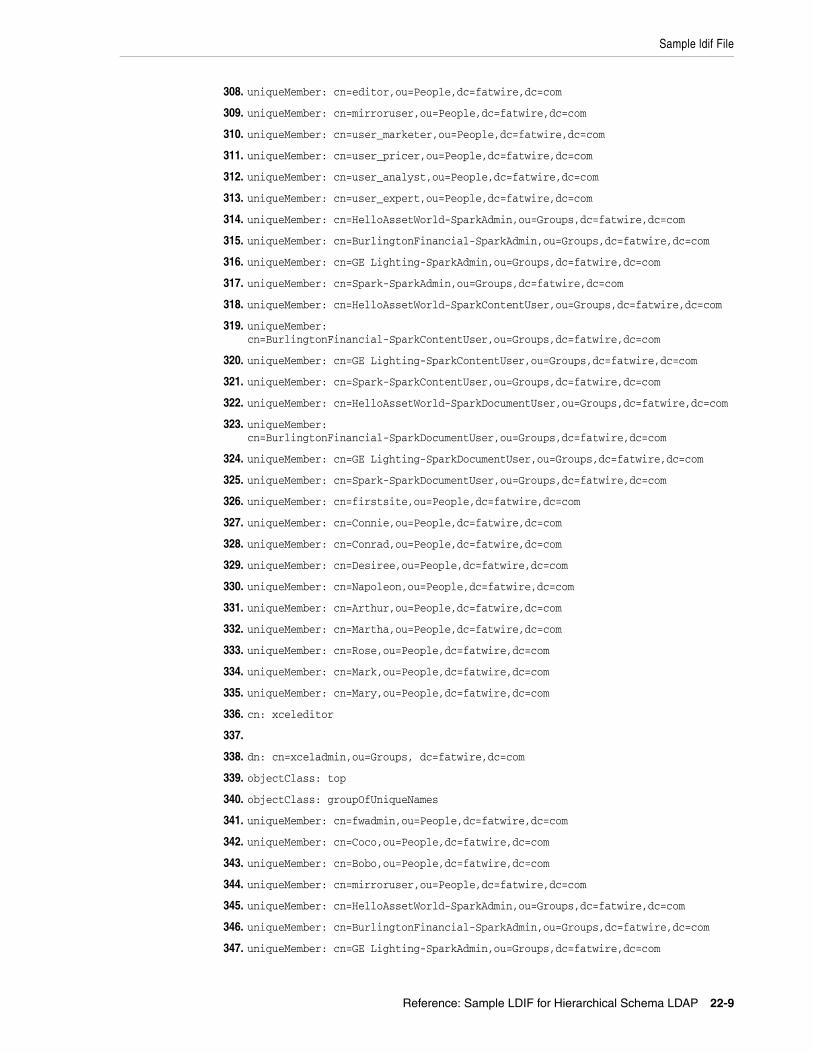
Sample ldif File
Reference: Sample LDIF for Hierarchical Schema LDAP 22-9
308. uniqueMember: cn=editor,ou=People,dc=fatwire,dc=com
309. uniqueMember: cn=mirroruser,ou=People,dc=fatwire,dc=com
310. uniqueMember: cn=user_marketer,ou=People,dc=fatwire,dc=com
311. uniqueMember: cn=user_pricer,ou=People,dc=fatwire,dc=com
312. uniqueMember: cn=user_analyst,ou=People,dc=fatwire,dc=com
313. uniqueMember: cn=user_expert,ou=People,dc=fatwire,dc=com
314. uniqueMember: cn=HelloAssetWorld-SparkAdmin,ou=Groups,dc=fatwire,dc=com
315. uniqueMember: cn=BurlingtonFinancial-SparkAdmin,ou=Groups,dc=fatwire,dc=com
316. uniqueMember: cn=GE Lighting-SparkAdmin,ou=Groups,dc=fatwire,dc=com
317. uniqueMember: cn=Spark-SparkAdmin,ou=Groups,dc=fatwire,dc=com
318. uniqueMember: cn=HelloAssetWorld-SparkContentUser,ou=Groups,dc=fatwire,dc=com
319. uniqueMember: cn=BurlingtonFinancial-SparkContentUser,ou=Groups,dc=fatwire,dc=com
320. uniqueMember: cn=GE Lighting-SparkContentUser,ou=Groups,dc=fatwire,dc=com
321. uniqueMember: cn=Spark-SparkContentUser,ou=Groups,dc=fatwire,dc=com
322. uniqueMember: cn=HelloAssetWorld-SparkDocumentUser,ou=Groups,dc=fatwire,dc=com
323. uniqueMember: cn=BurlingtonFinancial-SparkDocumentUser,ou=Groups,dc=fatwire,dc=com
324. uniqueMember: cn=GE Lighting-SparkDocumentUser,ou=Groups,dc=fatwire,dc=com
325. uniqueMember: cn=Spark-SparkDocumentUser,ou=Groups,dc=fatwire,dc=com
326. uniqueMember: cn=firstsite,ou=People,dc=fatwire,dc=com
327. uniqueMember: cn=Connie,ou=People,dc=fatwire,dc=com
328. uniqueMember: cn=Conrad,ou=People,dc=fatwire,dc=com
329. uniqueMember: cn=Desiree,ou=People,dc=fatwire,dc=com
330. uniqueMember: cn=Napoleon,ou=People,dc=fatwire,dc=com
331. uniqueMember: cn=Arthur,ou=People,dc=fatwire,dc=com
332. uniqueMember: cn=Martha,ou=People,dc=fatwire,dc=com
333. uniqueMember: cn=Rose,ou=People,dc=fatwire,dc=com
334. uniqueMember: cn=Mark,ou=People,dc=fatwire,dc=com
335. uniqueMember: cn=Mary,ou=People,dc=fatwire,dc=com
336. cn: xceleditor
337.
338. dn: cn=xceladmin,ou=Groups, dc=fatwire,dc=com
339. objectClass: top
340. objectClass: groupOfUniqueNames
341. uniqueMember: cn=fwadmin,ou=People,dc=fatwire,dc=com
342. uniqueMember: cn=Coco,ou=People,dc=fatwire,dc=com
343. uniqueMember: cn=Bobo,ou=People,dc=fatwire,dc=com
344. uniqueMember: cn=mirroruser,ou=People,dc=fatwire,dc=com
345. uniqueMember: cn=HelloAssetWorld-SparkAdmin,ou=Groups,dc=fatwire,dc=com
346. uniqueMember: cn=BurlingtonFinancial-SparkAdmin,ou=Groups,dc=fatwire,dc=com
347. uniqueMember: cn=GE Lighting-SparkAdmin,ou=Groups,dc=fatwire,dc=com
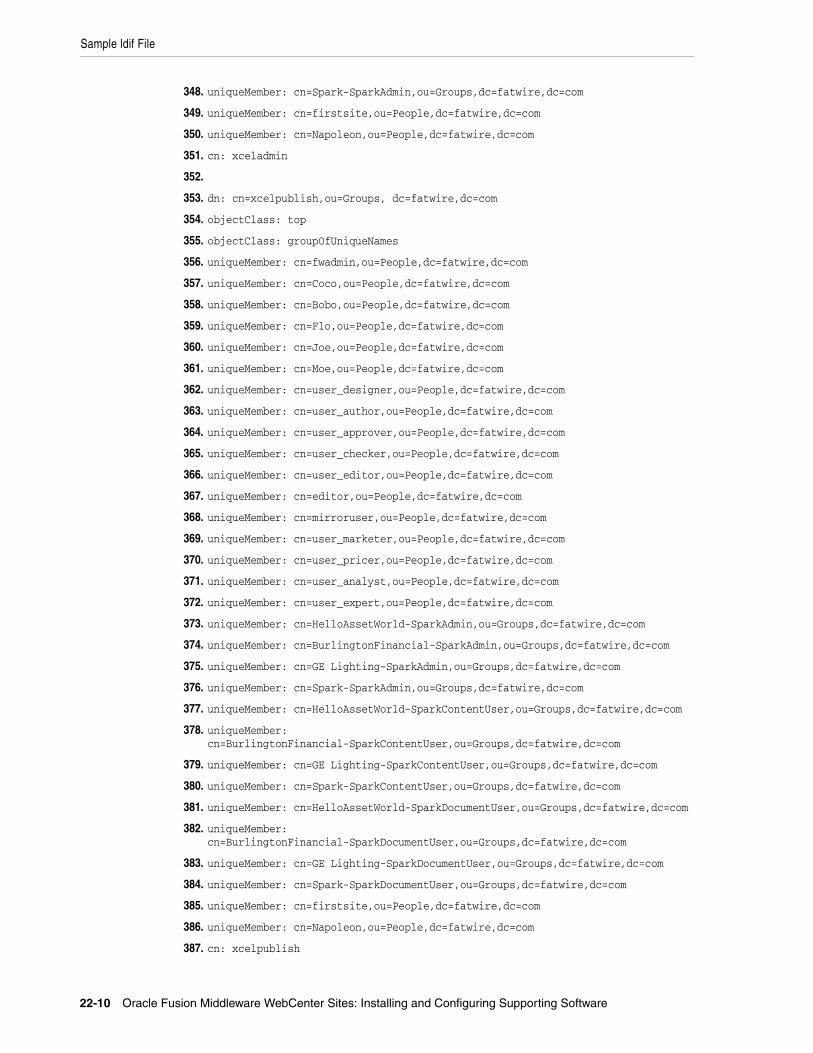
Sample ldif File
22-10 Oracle Fusion Middleware WebCenter Sites: Installing and Configuring Supporting Software
348. uniqueMember: cn=Spark-SparkAdmin,ou=Groups,dc=fatwire,dc=com
349. uniqueMember: cn=firstsite,ou=People,dc=fatwire,dc=com
350. uniqueMember: cn=Napoleon,ou=People,dc=fatwire,dc=com
351. cn: xceladmin
352.
353. dn: cn=xcelpublish,ou=Groups, dc=fatwire,dc=com
354. objectClass: top
355. objectClass: groupOfUniqueNames
356. uniqueMember: cn=fwadmin,ou=People,dc=fatwire,dc=com
357. uniqueMember: cn=Coco,ou=People,dc=fatwire,dc=com
358. uniqueMember: cn=Bobo,ou=People,dc=fatwire,dc=com
359. uniqueMember: cn=Flo,ou=People,dc=fatwire,dc=com
360. uniqueMember: cn=Joe,ou=People,dc=fatwire,dc=com
361. uniqueMember: cn=Moe,ou=People,dc=fatwire,dc=com
362. uniqueMember: cn=user_designer,ou=People,dc=fatwire,dc=com
363. uniqueMember: cn=user_author,ou=People,dc=fatwire,dc=com
364. uniqueMember: cn=user_approver,ou=People,dc=fatwire,dc=com
365. uniqueMember: cn=user_checker,ou=People,dc=fatwire,dc=com
366. uniqueMember: cn=user_editor,ou=People,dc=fatwire,dc=com
367. uniqueMember: cn=editor,ou=People,dc=fatwire,dc=com
368. uniqueMember: cn=mirroruser,ou=People,dc=fatwire,dc=com
369. uniqueMember: cn=user_marketer,ou=People,dc=fatwire,dc=com
370. uniqueMember: cn=user_pricer,ou=People,dc=fatwire,dc=com
371. uniqueMember: cn=user_analyst,ou=People,dc=fatwire,dc=com
372. uniqueMember: cn=user_expert,ou=People,dc=fatwire,dc=com
373. uniqueMember: cn=HelloAssetWorld-SparkAdmin,ou=Groups,dc=fatwire,dc=com
374. uniqueMember: cn=BurlingtonFinancial-SparkAdmin,ou=Groups,dc=fatwire,dc=com
375. uniqueMember: cn=GE Lighting-SparkAdmin,ou=Groups,dc=fatwire,dc=com
376. uniqueMember: cn=Spark-SparkAdmin,ou=Groups,dc=fatwire,dc=com
377. uniqueMember: cn=HelloAssetWorld-SparkContentUser,ou=Groups,dc=fatwire,dc=com
378. uniqueMember: cn=BurlingtonFinancial-SparkContentUser,ou=Groups,dc=fatwire,dc=com
379. uniqueMember: cn=GE Lighting-SparkContentUser,ou=Groups,dc=fatwire,dc=com
380. uniqueMember: cn=Spark-SparkContentUser,ou=Groups,dc=fatwire,dc=com
381. uniqueMember: cn=HelloAssetWorld-SparkDocumentUser,ou=Groups,dc=fatwire,dc=com
382. uniqueMember: cn=BurlingtonFinancial-SparkDocumentUser,ou=Groups,dc=fatwire,dc=com
383. uniqueMember: cn=GE Lighting-SparkDocumentUser,ou=Groups,dc=fatwire,dc=com
384. uniqueMember: cn=Spark-SparkDocumentUser,ou=Groups,dc=fatwire,dc=com
385. uniqueMember: cn=firstsite,ou=People,dc=fatwire,dc=com
386. uniqueMember: cn=Napoleon,ou=People,dc=fatwire,dc=com
387. cn: xcelpublish
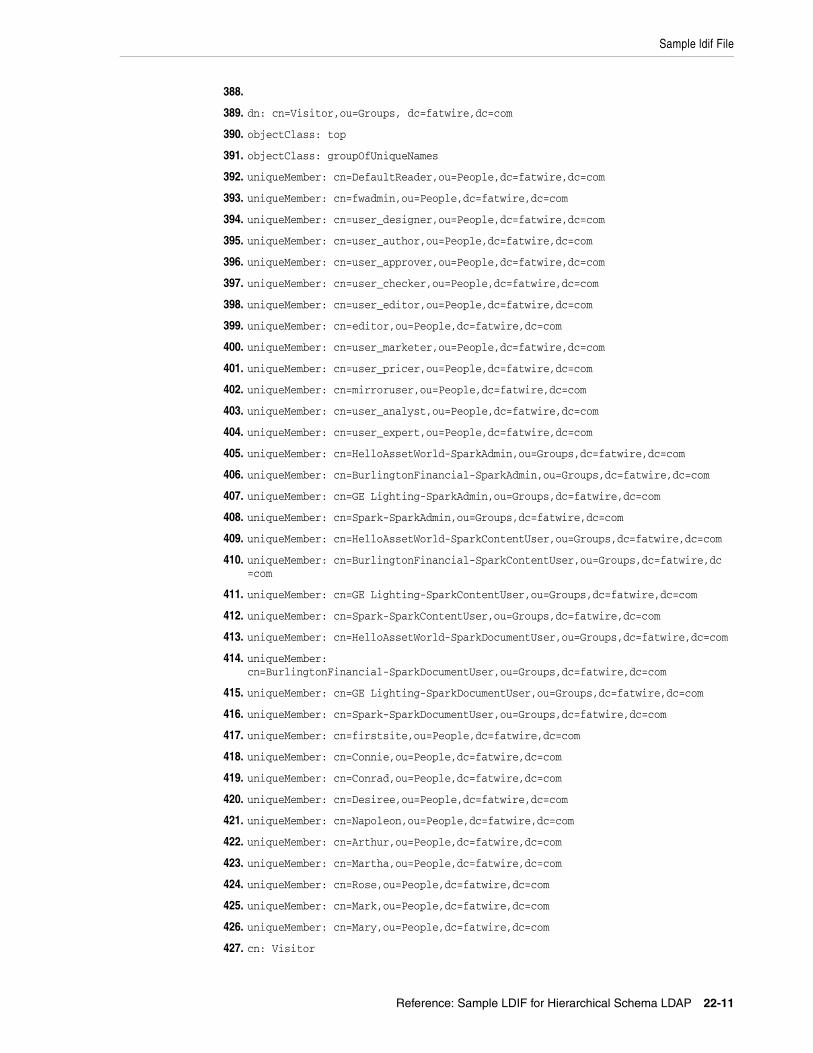
Sample ldif File
Reference: Sample LDIF for Hierarchical Schema LDAP 22-11
388.
389. dn: cn=Visitor,ou=Groups, dc=fatwire,dc=com
390. objectClass: top
391. objectClass: groupOfUniqueNames
392. uniqueMember: cn=DefaultReader,ou=People,dc=fatwire,dc=com
393. uniqueMember: cn=fwadmin,ou=People,dc=fatwire,dc=com
394. uniqueMember: cn=user_designer,ou=People,dc=fatwire,dc=com
395. uniqueMember: cn=user_author,ou=People,dc=fatwire,dc=com
396. uniqueMember: cn=user_approver,ou=People,dc=fatwire,dc=com
397. uniqueMember: cn=user_checker,ou=People,dc=fatwire,dc=com
398. uniqueMember: cn=user_editor,ou=People,dc=fatwire,dc=com
399. uniqueMember: cn=editor,ou=People,dc=fatwire,dc=com
400. uniqueMember: cn=user_marketer,ou=People,dc=fatwire,dc=com
401. uniqueMember: cn=user_pricer,ou=People,dc=fatwire,dc=com
402. uniqueMember: cn=mirroruser,ou=People,dc=fatwire,dc=com
403. uniqueMember: cn=user_analyst,ou=People,dc=fatwire,dc=com
404. uniqueMember: cn=user_expert,ou=People,dc=fatwire,dc=com
405. uniqueMember: cn=HelloAssetWorld-SparkAdmin,ou=Groups,dc=fatwire,dc=com
406. uniqueMember: cn=BurlingtonFinancial-SparkAdmin,ou=Groups,dc=fatwire,dc=com
407. uniqueMember: cn=GE Lighting-SparkAdmin,ou=Groups,dc=fatwire,dc=com
408. uniqueMember: cn=Spark-SparkAdmin,ou=Groups,dc=fatwire,dc=com
409. uniqueMember: cn=HelloAssetWorld-SparkContentUser,ou=Groups,dc=fatwire,dc=com
410. uniqueMember: cn=BurlingtonFinancial-SparkContentUser,ou=Groups,dc=fatwire,dc =com
411. uniqueMember: cn=GE Lighting-SparkContentUser,ou=Groups,dc=fatwire,dc=com
412. uniqueMember: cn=Spark-SparkContentUser,ou=Groups,dc=fatwire,dc=com
413. uniqueMember: cn=HelloAssetWorld-SparkDocumentUser,ou=Groups,dc=fatwire,dc=com
414. uniqueMember: cn=BurlingtonFinancial-SparkDocumentUser,ou=Groups,dc=fatwire,dc=com
415. uniqueMember: cn=GE Lighting-SparkDocumentUser,ou=Groups,dc=fatwire,dc=com
416. uniqueMember: cn=Spark-SparkDocumentUser,ou=Groups,dc=fatwire,dc=com
417. uniqueMember: cn=firstsite,ou=People,dc=fatwire,dc=com
418. uniqueMember: cn=Connie,ou=People,dc=fatwire,dc=com
419. uniqueMember: cn=Conrad,ou=People,dc=fatwire,dc=com
420. uniqueMember: cn=Desiree,ou=People,dc=fatwire,dc=com
421. uniqueMember: cn=Napoleon,ou=People,dc=fatwire,dc=com
422. uniqueMember: cn=Arthur,ou=People,dc=fatwire,dc=com
423. uniqueMember: cn=Martha,ou=People,dc=fatwire,dc=com
424. uniqueMember: cn=Rose,ou=People,dc=fatwire,dc=com
425. uniqueMember: cn=Mark,ou=People,dc=fatwire,dc=com
426. uniqueMember: cn=Mary,ou=People,dc=fatwire,dc=com
427. cn: Visitor
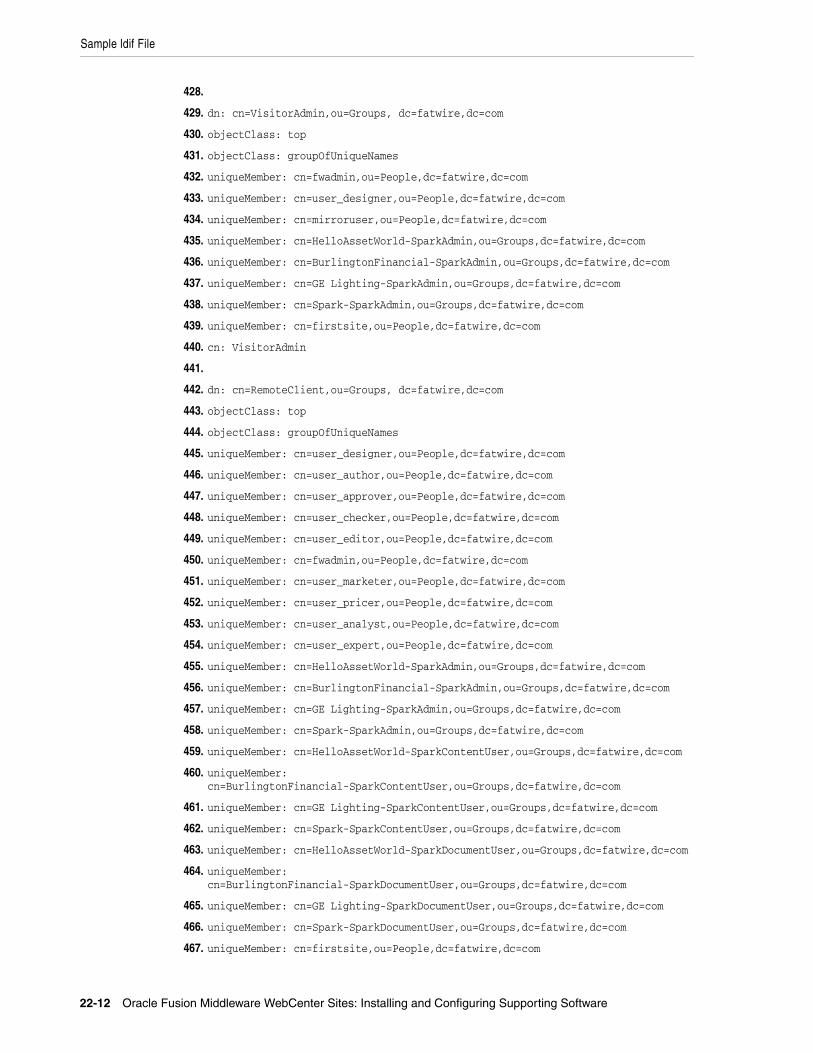
Sample ldif File
22-12 Oracle Fusion Middleware WebCenter Sites: Installing and Configuring Supporting Software
428.
429. dn: cn=VisitorAdmin,ou=Groups, dc=fatwire,dc=com
430. objectClass: top
431. objectClass: groupOfUniqueNames
432. uniqueMember: cn=fwadmin,ou=People,dc=fatwire,dc=com
433. uniqueMember: cn=user_designer,ou=People,dc=fatwire,dc=com
434. uniqueMember: cn=mirroruser,ou=People,dc=fatwire,dc=com
435. uniqueMember: cn=HelloAssetWorld-SparkAdmin,ou=Groups,dc=fatwire,dc=com
436. uniqueMember: cn=BurlingtonFinancial-SparkAdmin,ou=Groups,dc=fatwire,dc=com
437. uniqueMember: cn=GE Lighting-SparkAdmin,ou=Groups,dc=fatwire,dc=com
438. uniqueMember: cn=Spark-SparkAdmin,ou=Groups,dc=fatwire,dc=com
439. uniqueMember: cn=firstsite,ou=People,dc=fatwire,dc=com
440. cn: VisitorAdmin
441.
442. dn: cn=RemoteClient,ou=Groups, dc=fatwire,dc=com
443. objectClass: top
444. objectClass: groupOfUniqueNames
445. uniqueMember: cn=user_designer,ou=People,dc=fatwire,dc=com
446. uniqueMember: cn=user_author,ou=People,dc=fatwire,dc=com
447. uniqueMember: cn=user_approver,ou=People,dc=fatwire,dc=com
448. uniqueMember: cn=user_checker,ou=People,dc=fatwire,dc=com
449. uniqueMember: cn=user_editor,ou=People,dc=fatwire,dc=com
450. uniqueMember: cn=fwadmin,ou=People,dc=fatwire,dc=com
451. uniqueMember: cn=user_marketer,ou=People,dc=fatwire,dc=com
452. uniqueMember: cn=user_pricer,ou=People,dc=fatwire,dc=com
453. uniqueMember: cn=user_analyst,ou=People,dc=fatwire,dc=com
454. uniqueMember: cn=user_expert,ou=People,dc=fatwire,dc=com
455. uniqueMember: cn=HelloAssetWorld-SparkAdmin,ou=Groups,dc=fatwire,dc=com
456. uniqueMember: cn=BurlingtonFinancial-SparkAdmin,ou=Groups,dc=fatwire,dc=com
457. uniqueMember: cn=GE Lighting-SparkAdmin,ou=Groups,dc=fatwire,dc=com
458. uniqueMember: cn=Spark-SparkAdmin,ou=Groups,dc=fatwire,dc=com
459. uniqueMember: cn=HelloAssetWorld-SparkContentUser,ou=Groups,dc=fatwire,dc=com
460. uniqueMember: cn=BurlingtonFinancial-SparkContentUser,ou=Groups,dc=fatwire,dc=com
461. uniqueMember: cn=GE Lighting-SparkContentUser,ou=Groups,dc=fatwire,dc=com
462. uniqueMember: cn=Spark-SparkContentUser,ou=Groups,dc=fatwire,dc=com
463. uniqueMember: cn=HelloAssetWorld-SparkDocumentUser,ou=Groups,dc=fatwire,dc=com
464. uniqueMember: cn=BurlingtonFinancial-SparkDocumentUser,ou=Groups,dc=fatwire,dc=com
465. uniqueMember: cn=GE Lighting-SparkDocumentUser,ou=Groups,dc=fatwire,dc=com
466. uniqueMember: cn=Spark-SparkDocumentUser,ou=Groups,dc=fatwire,dc=com
467. uniqueMember: cn=firstsite,ou=People,dc=fatwire,dc=com
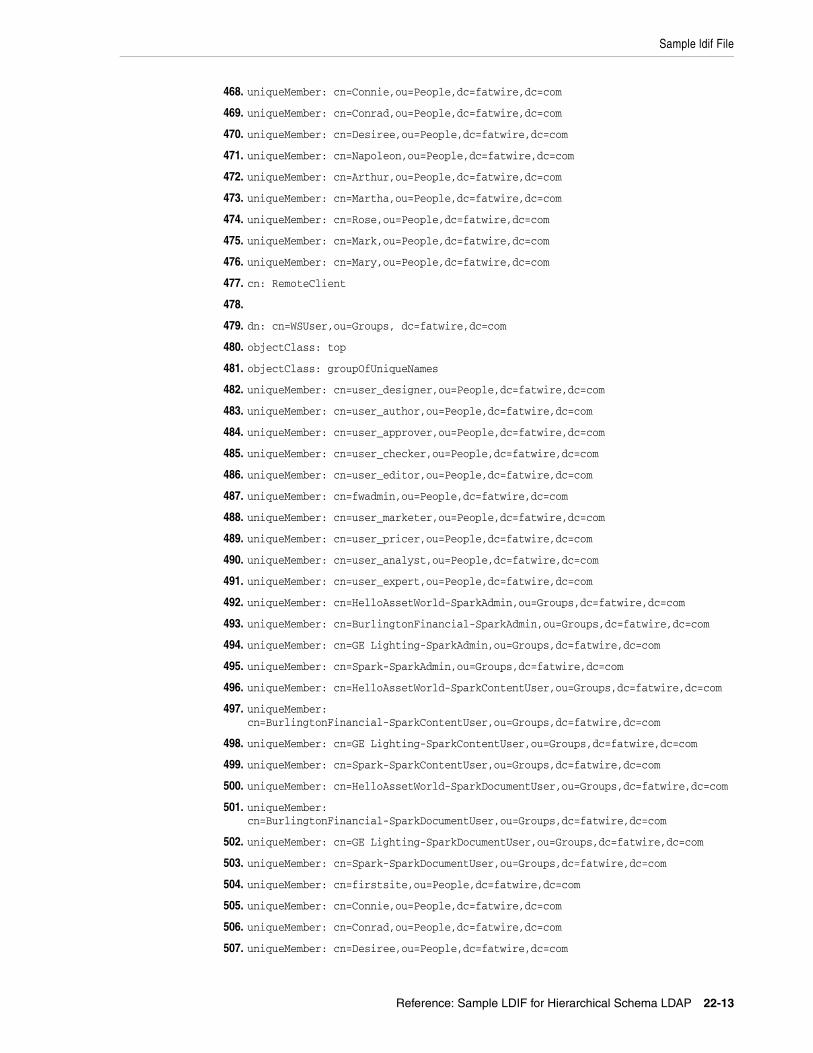
Sample ldif File
Reference: Sample LDIF for Hierarchical Schema LDAP 22-13
468. uniqueMember: cn=Connie,ou=People,dc=fatwire,dc=com
469. uniqueMember: cn=Conrad,ou=People,dc=fatwire,dc=com
470. uniqueMember: cn=Desiree,ou=People,dc=fatwire,dc=com
471. uniqueMember: cn=Napoleon,ou=People,dc=fatwire,dc=com
472. uniqueMember: cn=Arthur,ou=People,dc=fatwire,dc=com
473. uniqueMember: cn=Martha,ou=People,dc=fatwire,dc=com
474. uniqueMember: cn=Rose,ou=People,dc=fatwire,dc=com
475. uniqueMember: cn=Mark,ou=People,dc=fatwire,dc=com
476. uniqueMember: cn=Mary,ou=People,dc=fatwire,dc=com
477. cn: RemoteClient
478.
479. dn: cn=WSUser,ou=Groups, dc=fatwire,dc=com
480. objectClass: top
481. objectClass: groupOfUniqueNames
482. uniqueMember: cn=user_designer,ou=People,dc=fatwire,dc=com
483. uniqueMember: cn=user_author,ou=People,dc=fatwire,dc=com
484. uniqueMember: cn=user_approver,ou=People,dc=fatwire,dc=com
485. uniqueMember: cn=user_checker,ou=People,dc=fatwire,dc=com
486. uniqueMember: cn=user_editor,ou=People,dc=fatwire,dc=com
487. uniqueMember: cn=fwadmin,ou=People,dc=fatwire,dc=com
488. uniqueMember: cn=user_marketer,ou=People,dc=fatwire,dc=com
489. uniqueMember: cn=user_pricer,ou=People,dc=fatwire,dc=com
490. uniqueMember: cn=user_analyst,ou=People,dc=fatwire,dc=com
491. uniqueMember: cn=user_expert,ou=People,dc=fatwire,dc=com
492. uniqueMember: cn=HelloAssetWorld-SparkAdmin,ou=Groups,dc=fatwire,dc=com
493. uniqueMember: cn=BurlingtonFinancial-SparkAdmin,ou=Groups,dc=fatwire,dc=com
494. uniqueMember: cn=GE Lighting-SparkAdmin,ou=Groups,dc=fatwire,dc=com
495. uniqueMember: cn=Spark-SparkAdmin,ou=Groups,dc=fatwire,dc=com
496. uniqueMember: cn=HelloAssetWorld-SparkContentUser,ou=Groups,dc=fatwire,dc=com
497. uniqueMember: cn=BurlingtonFinancial-SparkContentUser,ou=Groups,dc=fatwire,dc=com
498. uniqueMember: cn=GE Lighting-SparkContentUser,ou=Groups,dc=fatwire,dc=com
499. uniqueMember: cn=Spark-SparkContentUser,ou=Groups,dc=fatwire,dc=com
500. uniqueMember: cn=HelloAssetWorld-SparkDocumentUser,ou=Groups,dc=fatwire,dc=com
501. uniqueMember: cn=BurlingtonFinancial-SparkDocumentUser,ou=Groups,dc=fatwire,dc=com
502. uniqueMember: cn=GE Lighting-SparkDocumentUser,ou=Groups,dc=fatwire,dc=com
503. uniqueMember: cn=Spark-SparkDocumentUser,ou=Groups,dc=fatwire,dc=com
504. uniqueMember: cn=firstsite,ou=People,dc=fatwire,dc=com
505. uniqueMember: cn=Connie,ou=People,dc=fatwire,dc=com
506. uniqueMember: cn=Conrad,ou=People,dc=fatwire,dc=com
507. uniqueMember: cn=Desiree,ou=People,dc=fatwire,dc=com
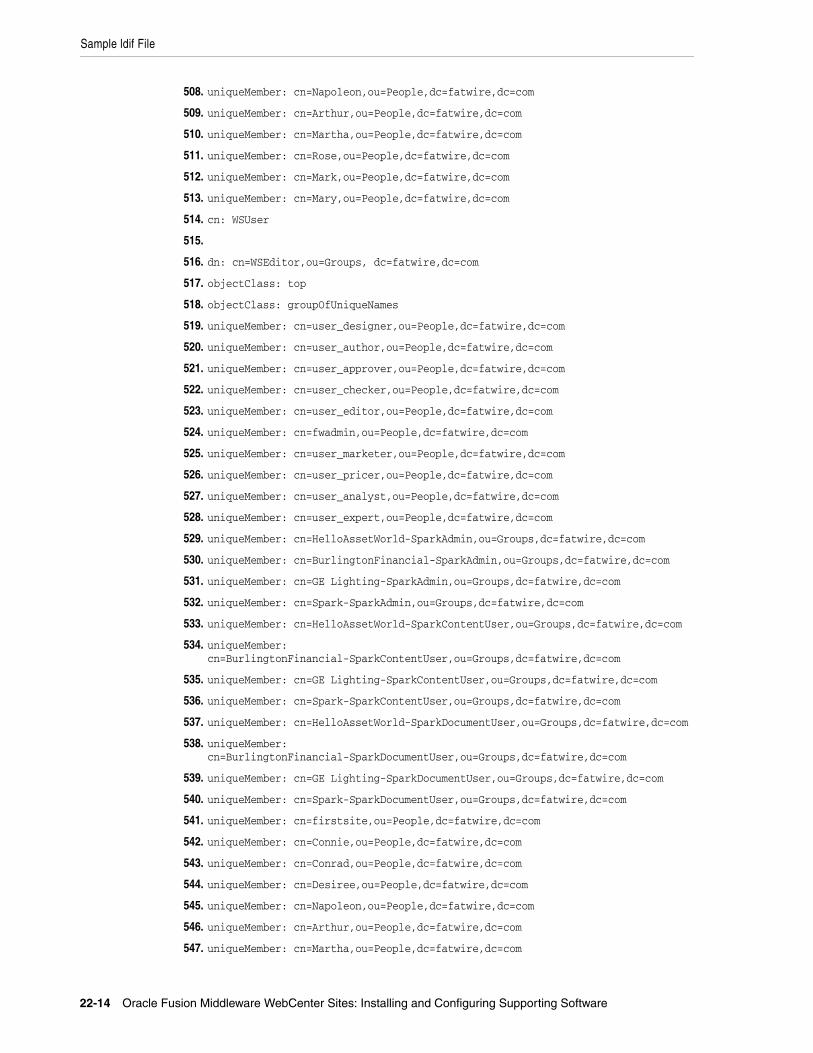
Sample ldif File
22-14 Oracle Fusion Middleware WebCenter Sites: Installing and Configuring Supporting Software
508. uniqueMember: cn=Napoleon,ou=People,dc=fatwire,dc=com
509. uniqueMember: cn=Arthur,ou=People,dc=fatwire,dc=com
510. uniqueMember: cn=Martha,ou=People,dc=fatwire,dc=com
511. uniqueMember: cn=Rose,ou=People,dc=fatwire,dc=com
512. uniqueMember: cn=Mark,ou=People,dc=fatwire,dc=com
513. uniqueMember: cn=Mary,ou=People,dc=fatwire,dc=com
514. cn: WSUser
515.
516. dn: cn=WSEditor,ou=Groups, dc=fatwire,dc=com
517. objectClass: top
518. objectClass: groupOfUniqueNames
519. uniqueMember: cn=user_designer,ou=People,dc=fatwire,dc=com
520. uniqueMember: cn=user_author,ou=People,dc=fatwire,dc=com
521. uniqueMember: cn=user_approver,ou=People,dc=fatwire,dc=com
522. uniqueMember: cn=user_checker,ou=People,dc=fatwire,dc=com
523. uniqueMember: cn=user_editor,ou=People,dc=fatwire,dc=com
524. uniqueMember: cn=fwadmin,ou=People,dc=fatwire,dc=com
525. uniqueMember: cn=user_marketer,ou=People,dc=fatwire,dc=com
526. uniqueMember: cn=user_pricer,ou=People,dc=fatwire,dc=com
527. uniqueMember: cn=user_analyst,ou=People,dc=fatwire,dc=com
528. uniqueMember: cn=user_expert,ou=People,dc=fatwire,dc=com
529. uniqueMember: cn=HelloAssetWorld-SparkAdmin,ou=Groups,dc=fatwire,dc=com
530. uniqueMember: cn=BurlingtonFinancial-SparkAdmin,ou=Groups,dc=fatwire,dc=com
531. uniqueMember: cn=GE Lighting-SparkAdmin,ou=Groups,dc=fatwire,dc=com
532. uniqueMember: cn=Spark-SparkAdmin,ou=Groups,dc=fatwire,dc=com
533. uniqueMember: cn=HelloAssetWorld-SparkContentUser,ou=Groups,dc=fatwire,dc=com
534. uniqueMember: cn=BurlingtonFinancial-SparkContentUser,ou=Groups,dc=fatwire,dc=com
535. uniqueMember: cn=GE Lighting-SparkContentUser,ou=Groups,dc=fatwire,dc=com
536. uniqueMember: cn=Spark-SparkContentUser,ou=Groups,dc=fatwire,dc=com
537. uniqueMember: cn=HelloAssetWorld-SparkDocumentUser,ou=Groups,dc=fatwire,dc=com
538. uniqueMember: cn=BurlingtonFinancial-SparkDocumentUser,ou=Groups,dc=fatwire,dc=com
539. uniqueMember: cn=GE Lighting-SparkDocumentUser,ou=Groups,dc=fatwire,dc=com
540. uniqueMember: cn=Spark-SparkDocumentUser,ou=Groups,dc=fatwire,dc=com
541. uniqueMember: cn=firstsite,ou=People,dc=fatwire,dc=com
542. uniqueMember: cn=Connie,ou=People,dc=fatwire,dc=com
543. uniqueMember: cn=Conrad,ou=People,dc=fatwire,dc=com
544. uniqueMember: cn=Desiree,ou=People,dc=fatwire,dc=com
545. uniqueMember: cn=Napoleon,ou=People,dc=fatwire,dc=com
546. uniqueMember: cn=Arthur,ou=People,dc=fatwire,dc=com
547. uniqueMember: cn=Martha,ou=People,dc=fatwire,dc=com
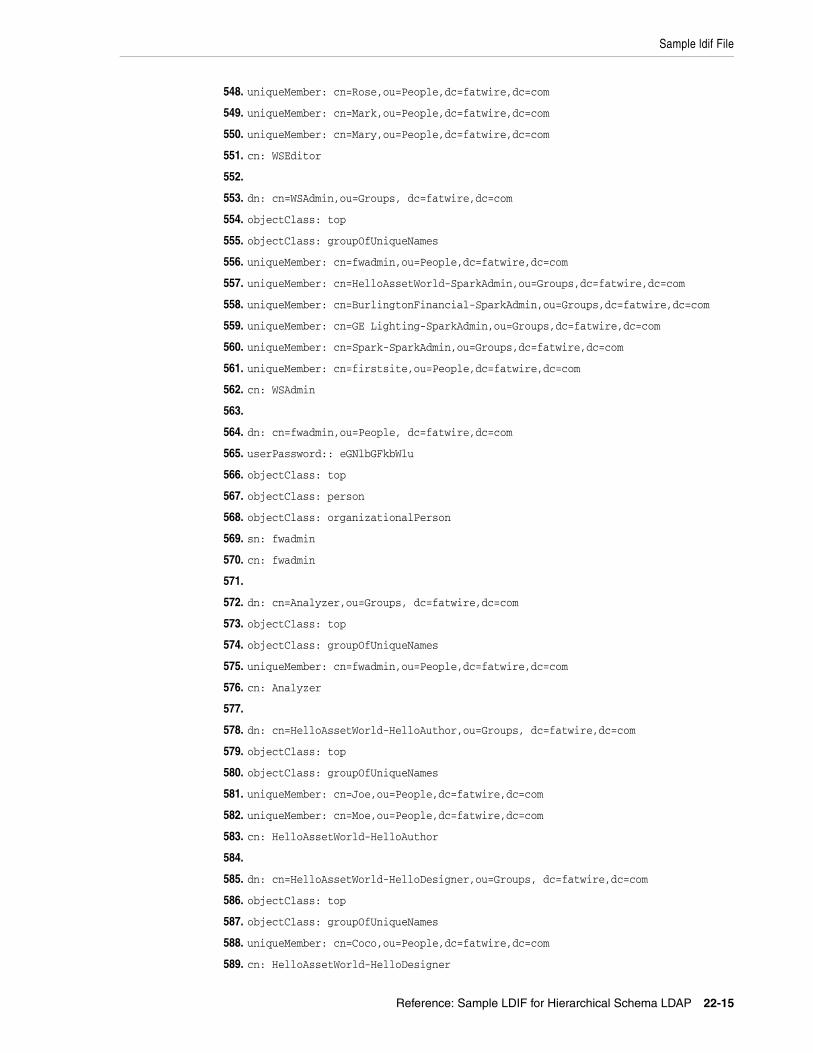
Sample ldif File
Reference: Sample LDIF for Hierarchical Schema LDAP 22-15
548. uniqueMember: cn=Rose,ou=People,dc=fatwire,dc=com
549. uniqueMember: cn=Mark,ou=People,dc=fatwire,dc=com
550. uniqueMember: cn=Mary,ou=People,dc=fatwire,dc=com
551. cn: WSEditor
552.
553. dn: cn=WSAdmin,ou=Groups, dc=fatwire,dc=com
554. objectClass: top
555. objectClass: groupOfUniqueNames
556. uniqueMember: cn=fwadmin,ou=People,dc=fatwire,dc=com
557. uniqueMember: cn=HelloAssetWorld-SparkAdmin,ou=Groups,dc=fatwire,dc=com
558. uniqueMember: cn=BurlingtonFinancial-SparkAdmin,ou=Groups,dc=fatwire,dc=com
559. uniqueMember: cn=GE Lighting-SparkAdmin,ou=Groups,dc=fatwire,dc=com
560. uniqueMember: cn=Spark-SparkAdmin,ou=Groups,dc=fatwire,dc=com
561. uniqueMember: cn=firstsite,ou=People,dc=fatwire,dc=com
562. cn: WSAdmin
563.
564. dn: cn=fwadmin,ou=People, dc=fatwire,dc=com
565. userPassword:: eGNlbGFkbWlu
566. objectClass: top
567. objectClass: person
568. objectClass: organizationalPerson
569. sn: fwadmin
570. cn: fwadmin
571.
572. dn: cn=Analyzer,ou=Groups, dc=fatwire,dc=com
573. objectClass: top
574. objectClass: groupOfUniqueNames
575. uniqueMember: cn=fwadmin,ou=People,dc=fatwire,dc=com
576. cn: Analyzer
577.
578. dn: cn=HelloAssetWorld-HelloAuthor,ou=Groups, dc=fatwire,dc=com
579. objectClass: top
580. objectClass: groupOfUniqueNames
581. uniqueMember: cn=Joe,ou=People,dc=fatwire,dc=com
582. uniqueMember: cn=Moe,ou=People,dc=fatwire,dc=com
583. cn: HelloAssetWorld-HelloAuthor
584.
585. dn: cn=HelloAssetWorld-HelloDesigner,ou=Groups, dc=fatwire,dc=com
586. objectClass: top
587. objectClass: groupOfUniqueNames
588. uniqueMember: cn=Coco,ou=People,dc=fatwire,dc=com
589. cn: HelloAssetWorld-HelloDesigner
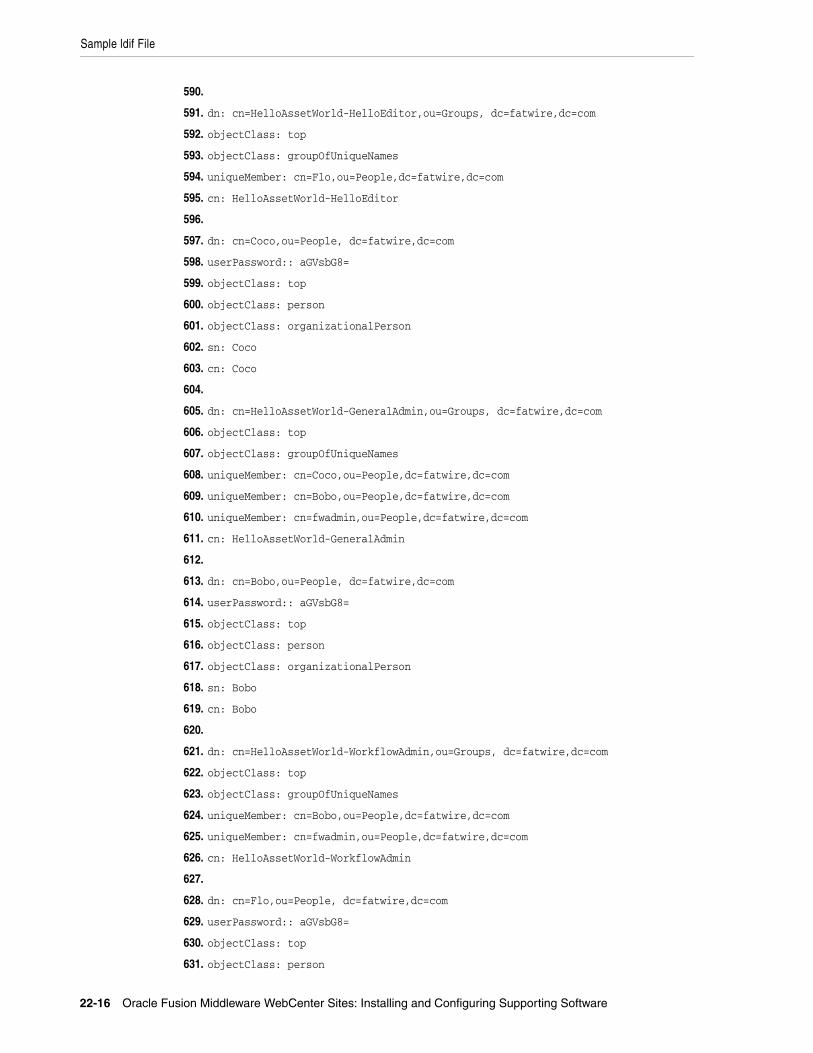
Sample ldif File
22-16 Oracle Fusion Middleware WebCenter Sites: Installing and Configuring Supporting Software
590.
591. dn: cn=HelloAssetWorld-HelloEditor,ou=Groups, dc=fatwire,dc=com
592. objectClass: top
593. objectClass: groupOfUniqueNames
594. uniqueMember: cn=Flo,ou=People,dc=fatwire,dc=com
595. cn: HelloAssetWorld-HelloEditor
596.
597. dn: cn=Coco,ou=People, dc=fatwire,dc=com
598. userPassword:: aGVsbG8=
599. objectClass: top
600. objectClass: person
601. objectClass: organizationalPerson
602. sn: Coco
603. cn: Coco
604.
605. dn: cn=HelloAssetWorld-GeneralAdmin,ou=Groups, dc=fatwire,dc=com
606. objectClass: top
607. objectClass: groupOfUniqueNames
608. uniqueMember: cn=Coco,ou=People,dc=fatwire,dc=com
609. uniqueMember: cn=Bobo,ou=People,dc=fatwire,dc=com
610. uniqueMember: cn=fwadmin,ou=People,dc=fatwire,dc=com
611. cn: HelloAssetWorld-GeneralAdmin
612.
613. dn: cn=Bobo,ou=People, dc=fatwire,dc=com
614. userPassword:: aGVsbG8=
615. objectClass: top
616. objectClass: person
617. objectClass: organizationalPerson
618. sn: Bobo
619. cn: Bobo
620.
621. dn: cn=HelloAssetWorld-WorkflowAdmin,ou=Groups, dc=fatwire,dc=com
622. objectClass: top
623. objectClass: groupOfUniqueNames
624. uniqueMember: cn=Bobo,ou=People,dc=fatwire,dc=com
625. uniqueMember: cn=fwadmin,ou=People,dc=fatwire,dc=com
626. cn: HelloAssetWorld-WorkflowAdmin
627.
628. dn: cn=Flo,ou=People, dc=fatwire,dc=com
629. userPassword:: aGVsbG8=
630. objectClass: top
631. objectClass: person
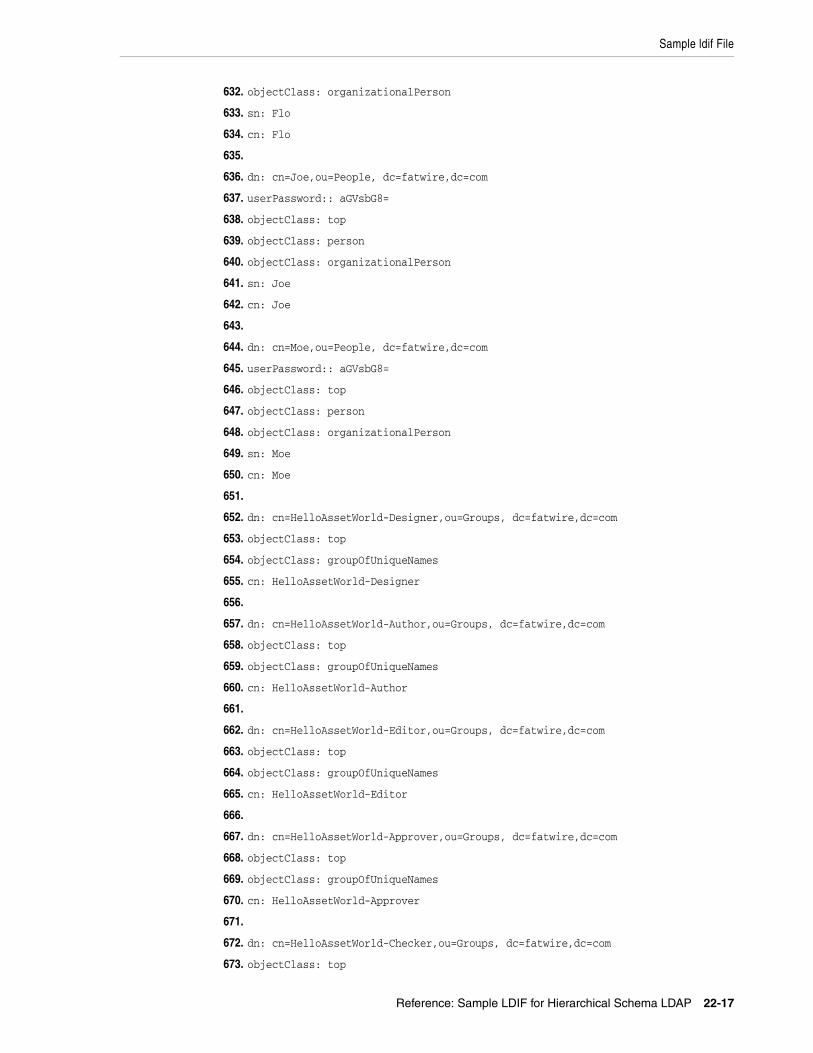
Sample ldif File
Reference: Sample LDIF for Hierarchical Schema LDAP 22-17
632. objectClass: organizationalPerson
633. sn: Flo
634. cn: Flo
635.
636. dn: cn=Joe,ou=People, dc=fatwire,dc=com
637. userPassword:: aGVsbG8=
638. objectClass: top
639. objectClass: person
640. objectClass: organizationalPerson
641. sn: Joe
642. cn: Joe
643.
644. dn: cn=Moe,ou=People, dc=fatwire,dc=com
645. userPassword:: aGVsbG8=
646. objectClass: top
647. objectClass: person
648. objectClass: organizationalPerson
649. sn: Moe
650. cn: Moe
651.
652. dn: cn=HelloAssetWorld-Designer,ou=Groups, dc=fatwire,dc=com
653. objectClass: top
654. objectClass: groupOfUniqueNames
655. cn: HelloAssetWorld-Designer
656.
657. dn: cn=HelloAssetWorld-Author,ou=Groups, dc=fatwire,dc=com
658. objectClass: top
659. objectClass: groupOfUniqueNames
660. cn: HelloAssetWorld-Author
661.
662. dn: cn=HelloAssetWorld-Editor,ou=Groups, dc=fatwire,dc=com
663. objectClass: top
664. objectClass: groupOfUniqueNames
665. cn: HelloAssetWorld-Editor
666.
667. dn: cn=HelloAssetWorld-Approver,ou=Groups, dc=fatwire,dc=com
668. objectClass: top
669. objectClass: groupOfUniqueNames
670. cn: HelloAssetWorld-Approver
671.
672. dn: cn=HelloAssetWorld-Checker,ou=Groups, dc=fatwire,dc=com
673. objectClass: top
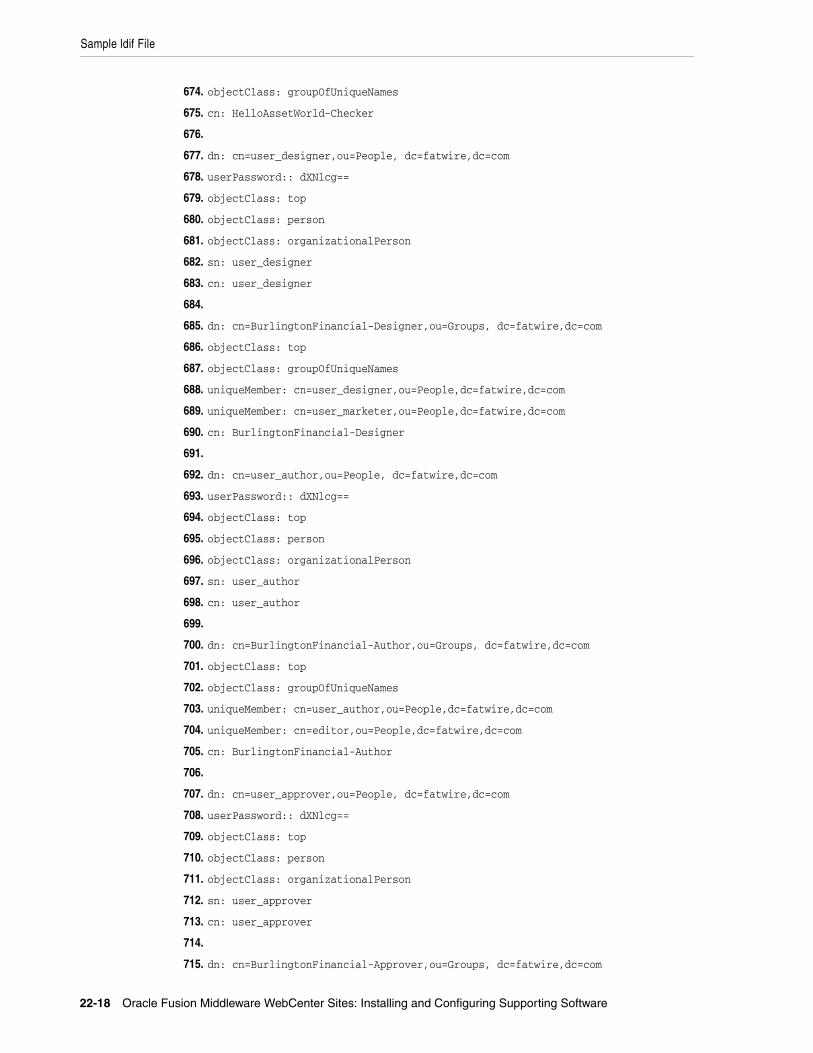
Sample ldif File
22-18 Oracle Fusion Middleware WebCenter Sites: Installing and Configuring Supporting Software
674. objectClass: groupOfUniqueNames
675. cn: HelloAssetWorld-Checker
676.
677. dn: cn=user_designer,ou=People, dc=fatwire,dc=com
678. userPassword:: dXNlcg==
679. objectClass: top
680. objectClass: person
681. objectClass: organizationalPerson
682. sn: user_designer
683. cn: user_designer
684.
685. dn: cn=BurlingtonFinancial-Designer,ou=Groups, dc=fatwire,dc=com
686. objectClass: top
687. objectClass: groupOfUniqueNames
688. uniqueMember: cn=user_designer,ou=People,dc=fatwire,dc=com
689. uniqueMember: cn=user_marketer,ou=People,dc=fatwire,dc=com
690. cn: BurlingtonFinancial-Designer
691.
692. dn: cn=user_author,ou=People, dc=fatwire,dc=com
693. userPassword:: dXNlcg==
694. objectClass: top
695. objectClass: person
696. objectClass: organizationalPerson
697. sn: user_author
698. cn: user_author
699.
700. dn: cn=BurlingtonFinancial-Author,ou=Groups, dc=fatwire,dc=com
701. objectClass: top
702. objectClass: groupOfUniqueNames
703. uniqueMember: cn=user_author,ou=People,dc=fatwire,dc=com
704. uniqueMember: cn=editor,ou=People,dc=fatwire,dc=com
705. cn: BurlingtonFinancial-Author
706.
707. dn: cn=user_approver,ou=People, dc=fatwire,dc=com
708. userPassword:: dXNlcg==
709. objectClass: top
710. objectClass: person
711. objectClass: organizationalPerson
712. sn: user_approver
713. cn: user_approver
714.
715. dn: cn=BurlingtonFinancial-Approver,ou=Groups, dc=fatwire,dc=com
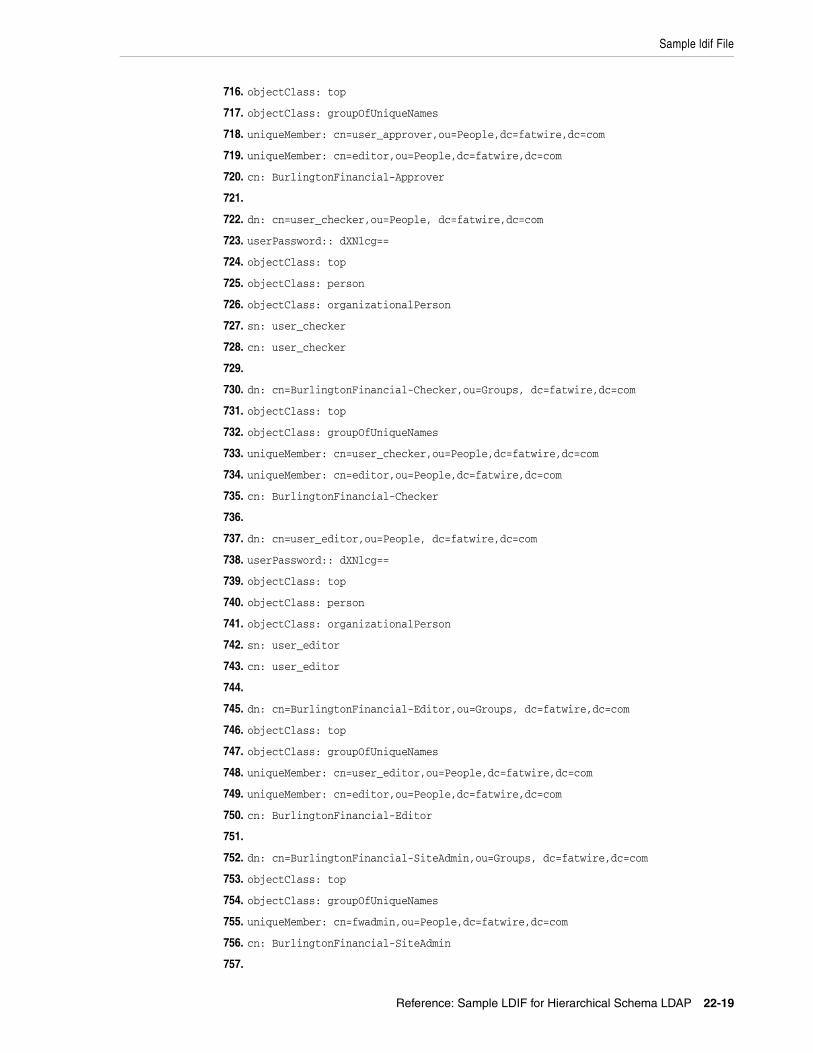
Sample ldif File
Reference: Sample LDIF for Hierarchical Schema LDAP 22-19
716. objectClass: top
717. objectClass: groupOfUniqueNames
718. uniqueMember: cn=user_approver,ou=People,dc=fatwire,dc=com
719. uniqueMember: cn=editor,ou=People,dc=fatwire,dc=com
720. cn: BurlingtonFinancial-Approver
721.
722. dn: cn=user_checker,ou=People, dc=fatwire,dc=com
723. userPassword:: dXNlcg==
724. objectClass: top
725. objectClass: person
726. objectClass: organizationalPerson
727. sn: user_checker
728. cn: user_checker
729.
730. dn: cn=BurlingtonFinancial-Checker,ou=Groups, dc=fatwire,dc=com
731. objectClass: top
732. objectClass: groupOfUniqueNames
733. uniqueMember: cn=user_checker,ou=People,dc=fatwire,dc=com
734. uniqueMember: cn=editor,ou=People,dc=fatwire,dc=com
735. cn: BurlingtonFinancial-Checker
736.
737. dn: cn=user_editor,ou=People, dc=fatwire,dc=com
738. userPassword:: dXNlcg==
739. objectClass: top
740. objectClass: person
741. objectClass: organizationalPerson
742. sn: user_editor
743. cn: user_editor
744.
745. dn: cn=BurlingtonFinancial-Editor,ou=Groups, dc=fatwire,dc=com
746. objectClass: top
747. objectClass: groupOfUniqueNames
748. uniqueMember: cn=user_editor,ou=People,dc=fatwire,dc=com
749. uniqueMember: cn=editor,ou=People,dc=fatwire,dc=com
750. cn: BurlingtonFinancial-Editor
751.
752. dn: cn=BurlingtonFinancial-SiteAdmin,ou=Groups, dc=fatwire,dc=com
753. objectClass: top
754. objectClass: groupOfUniqueNames
755. uniqueMember: cn=fwadmin,ou=People,dc=fatwire,dc=com
756. cn: BurlingtonFinancial-SiteAdmin
757.
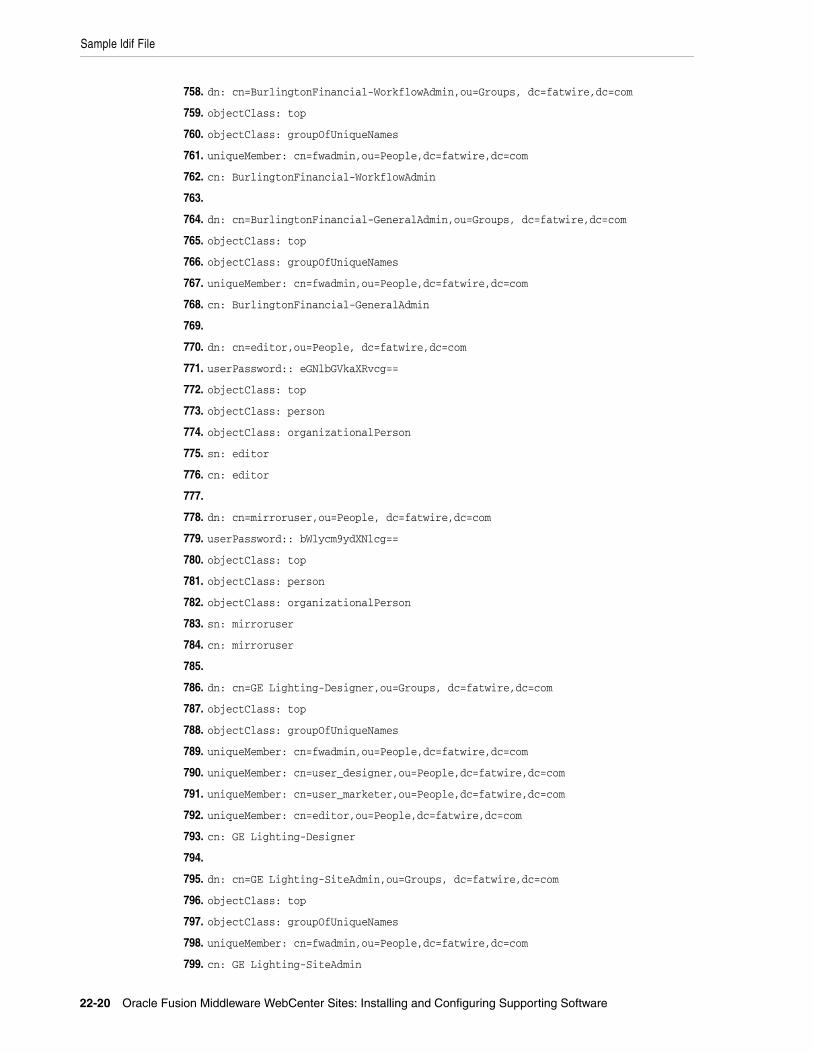
Sample ldif File
22-20 Oracle Fusion Middleware WebCenter Sites: Installing and Configuring Supporting Software
758. dn: cn=BurlingtonFinancial-WorkflowAdmin,ou=Groups, dc=fatwire,dc=com
759. objectClass: top
760. objectClass: groupOfUniqueNames
761. uniqueMember: cn=fwadmin,ou=People,dc=fatwire,dc=com
762. cn: BurlingtonFinancial-WorkflowAdmin
763.
764. dn: cn=BurlingtonFinancial-GeneralAdmin,ou=Groups, dc=fatwire,dc=com
765. objectClass: top
766. objectClass: groupOfUniqueNames
767. uniqueMember: cn=fwadmin,ou=People,dc=fatwire,dc=com
768. cn: BurlingtonFinancial-GeneralAdmin
769.
770. dn: cn=editor,ou=People, dc=fatwire,dc=com
771. userPassword:: eGNlbGVkaXRvcg==
772. objectClass: top
773. objectClass: person
774. objectClass: organizationalPerson
775. sn: editor
776. cn: editor
777.
778. dn: cn=mirroruser,ou=People, dc=fatwire,dc=com
779. userPassword:: bWlycm9ydXNlcg==
780. objectClass: top
781. objectClass: person
782. objectClass: organizationalPerson
783. sn: mirroruser
784. cn: mirroruser
785.
786. dn: cn=GE Lighting-Designer,ou=Groups, dc=fatwire,dc=com
787. objectClass: top
788. objectClass: groupOfUniqueNames
789. uniqueMember: cn=fwadmin,ou=People,dc=fatwire,dc=com
790. uniqueMember: cn=user_designer,ou=People,dc=fatwire,dc=com
791. uniqueMember: cn=user_marketer,ou=People,dc=fatwire,dc=com
792. uniqueMember: cn=editor,ou=People,dc=fatwire,dc=com
793. cn: GE Lighting-Designer
794.
795. dn: cn=GE Lighting-SiteAdmin,ou=Groups, dc=fatwire,dc=com
796. objectClass: top
797. objectClass: groupOfUniqueNames
798. uniqueMember: cn=fwadmin,ou=People,dc=fatwire,dc=com
799. cn: GE Lighting-SiteAdmin
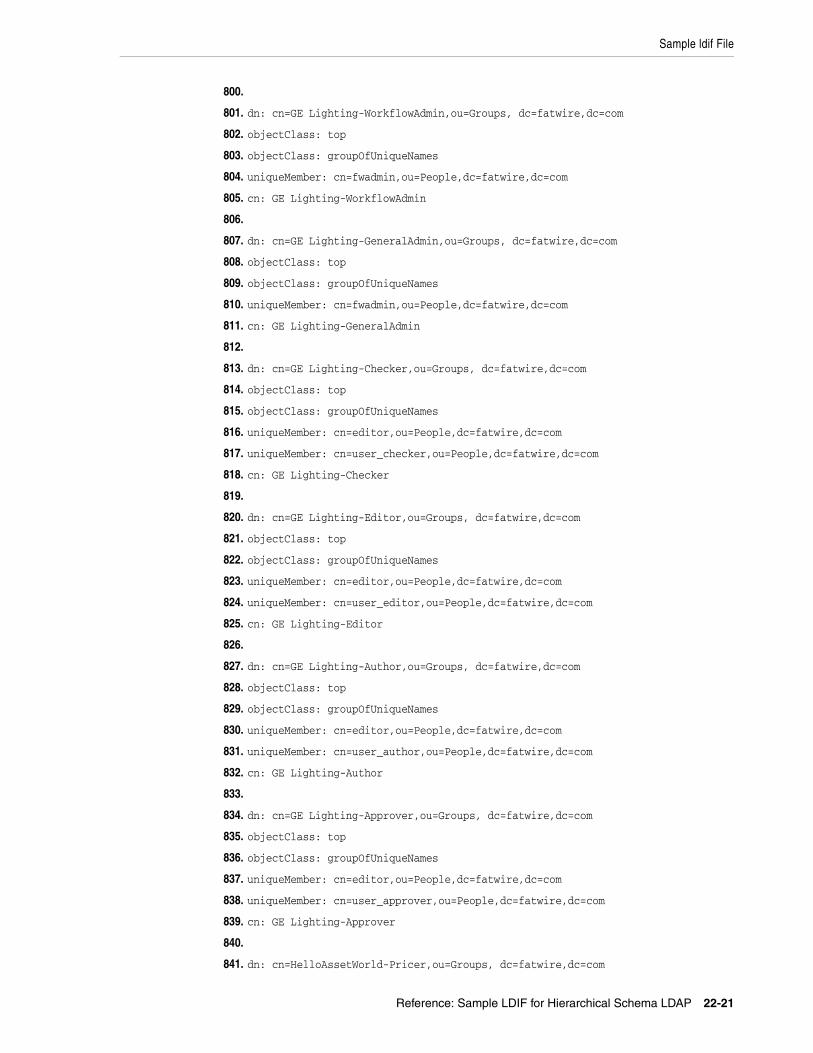
Sample ldif File
Reference: Sample LDIF for Hierarchical Schema LDAP 22-21
800.
801. dn: cn=GE Lighting-WorkflowAdmin,ou=Groups, dc=fatwire,dc=com
802. objectClass: top
803. objectClass: groupOfUniqueNames
804. uniqueMember: cn=fwadmin,ou=People,dc=fatwire,dc=com
805. cn: GE Lighting-WorkflowAdmin
806.
807. dn: cn=GE Lighting-GeneralAdmin,ou=Groups, dc=fatwire,dc=com
808. objectClass: top
809. objectClass: groupOfUniqueNames
810. uniqueMember: cn=fwadmin,ou=People,dc=fatwire,dc=com
811. cn: GE Lighting-GeneralAdmin
812.
813. dn: cn=GE Lighting-Checker,ou=Groups, dc=fatwire,dc=com
814. objectClass: top
815. objectClass: groupOfUniqueNames
816. uniqueMember: cn=editor,ou=People,dc=fatwire,dc=com
817. uniqueMember: cn=user_checker,ou=People,dc=fatwire,dc=com
818. cn: GE Lighting-Checker
819.
820. dn: cn=GE Lighting-Editor,ou=Groups, dc=fatwire,dc=com
821. objectClass: top
822. objectClass: groupOfUniqueNames
823. uniqueMember: cn=editor,ou=People,dc=fatwire,dc=com
824. uniqueMember: cn=user_editor,ou=People,dc=fatwire,dc=com
825. cn: GE Lighting-Editor
826.
827. dn: cn=GE Lighting-Author,ou=Groups, dc=fatwire,dc=com
828. objectClass: top
829. objectClass: groupOfUniqueNames
830. uniqueMember: cn=editor,ou=People,dc=fatwire,dc=com
831. uniqueMember: cn=user_author,ou=People,dc=fatwire,dc=com
832. cn: GE Lighting-Author
833.
834. dn: cn=GE Lighting-Approver,ou=Groups, dc=fatwire,dc=com
835. objectClass: top
836. objectClass: groupOfUniqueNames
837. uniqueMember: cn=editor,ou=People,dc=fatwire,dc=com
838. uniqueMember: cn=user_approver,ou=People,dc=fatwire,dc=com
839. cn: GE Lighting-Approver
840.
841. dn: cn=HelloAssetWorld-Pricer,ou=Groups, dc=fatwire,dc=com
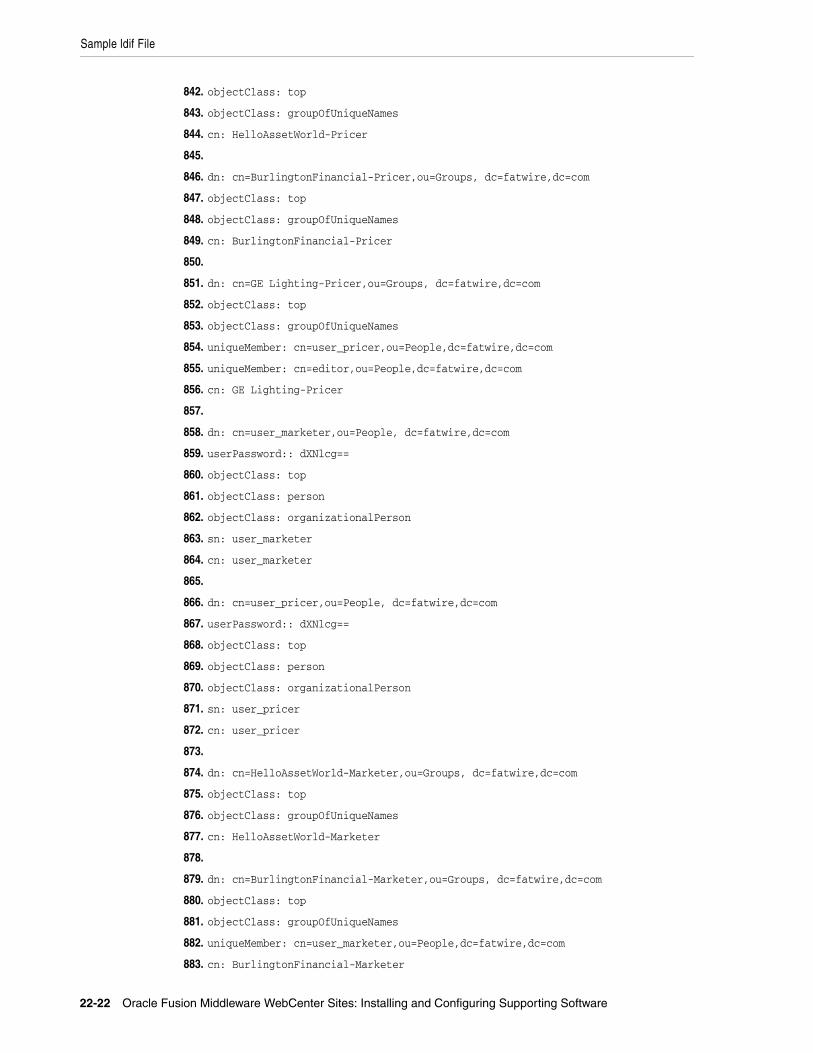
Sample ldif File
22-22 Oracle Fusion Middleware WebCenter Sites: Installing and Configuring Supporting Software
842. objectClass: top
843. objectClass: groupOfUniqueNames
844. cn: HelloAssetWorld-Pricer
845.
846. dn: cn=BurlingtonFinancial-Pricer,ou=Groups, dc=fatwire,dc=com
847. objectClass: top
848. objectClass: groupOfUniqueNames
849. cn: BurlingtonFinancial-Pricer
850.
851. dn: cn=GE Lighting-Pricer,ou=Groups, dc=fatwire,dc=com
852. objectClass: top
853. objectClass: groupOfUniqueNames
854. uniqueMember: cn=user_pricer,ou=People,dc=fatwire,dc=com
855. uniqueMember: cn=editor,ou=People,dc=fatwire,dc=com
856. cn: GE Lighting-Pricer
857.
858. dn: cn=user_marketer,ou=People, dc=fatwire,dc=com
859. userPassword:: dXNlcg==
860. objectClass: top
861. objectClass: person
862. objectClass: organizationalPerson
863. sn: user_marketer
864. cn: user_marketer
865.
866. dn: cn=user_pricer,ou=People, dc=fatwire,dc=com
867. userPassword:: dXNlcg==
868. objectClass: top
869. objectClass: person
870. objectClass: organizationalPerson
871. sn: user_pricer
872. cn: user_pricer
873.
874. dn: cn=HelloAssetWorld-Marketer,ou=Groups, dc=fatwire,dc=com
875. objectClass: top
876. objectClass: groupOfUniqueNames
877. cn: HelloAssetWorld-Marketer
878.
879. dn: cn=BurlingtonFinancial-Marketer,ou=Groups, dc=fatwire,dc=com
880. objectClass: top
881. objectClass: groupOfUniqueNames
882. uniqueMember: cn=user_marketer,ou=People,dc=fatwire,dc=com
883. cn: BurlingtonFinancial-Marketer
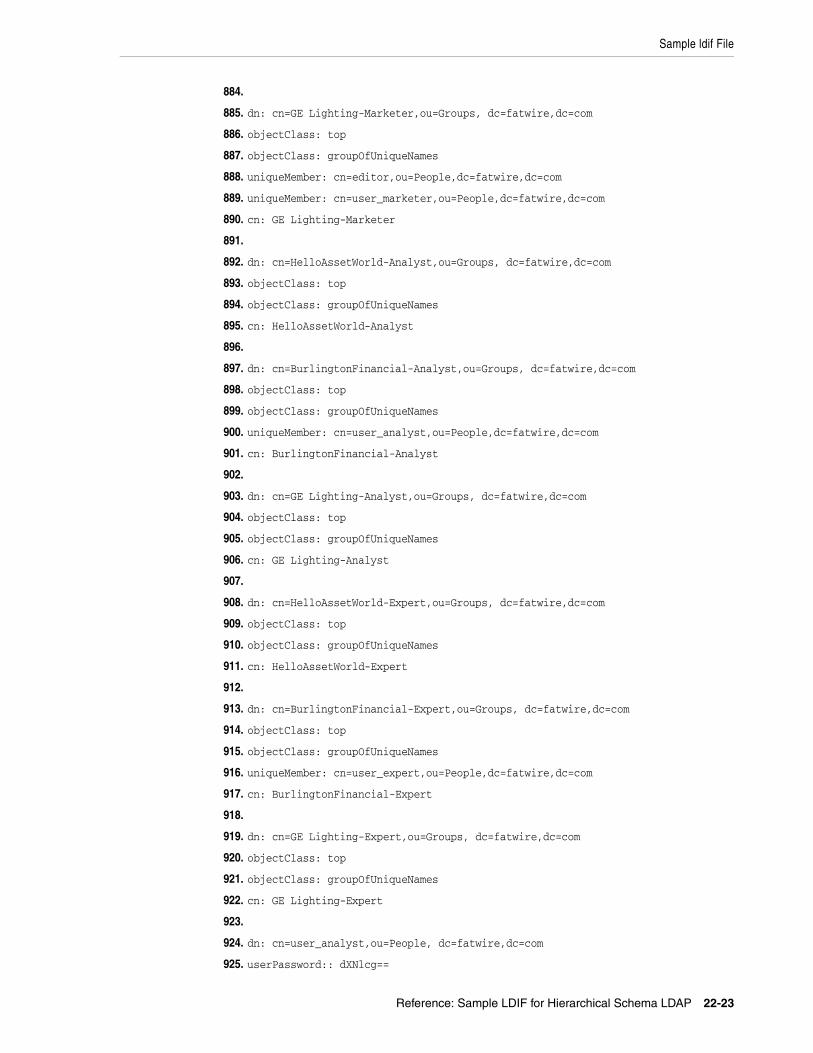
Sample ldif File
Reference: Sample LDIF for Hierarchical Schema LDAP 22-23
884.
885. dn: cn=GE Lighting-Marketer,ou=Groups, dc=fatwire,dc=com
886. objectClass: top
887. objectClass: groupOfUniqueNames
888. uniqueMember: cn=editor,ou=People,dc=fatwire,dc=com
889. uniqueMember: cn=user_marketer,ou=People,dc=fatwire,dc=com
890. cn: GE Lighting-Marketer
891.
892. dn: cn=HelloAssetWorld-Analyst,ou=Groups, dc=fatwire,dc=com
893. objectClass: top
894. objectClass: groupOfUniqueNames
895. cn: HelloAssetWorld-Analyst
896.
897. dn: cn=BurlingtonFinancial-Analyst,ou=Groups, dc=fatwire,dc=com
898. objectClass: top
899. objectClass: groupOfUniqueNames
900. uniqueMember: cn=user_analyst,ou=People,dc=fatwire,dc=com
901. cn: BurlingtonFinancial-Analyst
902.
903. dn: cn=GE Lighting-Analyst,ou=Groups, dc=fatwire,dc=com
904. objectClass: top
905. objectClass: groupOfUniqueNames
906. cn: GE Lighting-Analyst
907.
908. dn: cn=HelloAssetWorld-Expert,ou=Groups, dc=fatwire,dc=com
909. objectClass: top
910. objectClass: groupOfUniqueNames
911. cn: HelloAssetWorld-Expert
912.
913. dn: cn=BurlingtonFinancial-Expert,ou=Groups, dc=fatwire,dc=com
914. objectClass: top
915. objectClass: groupOfUniqueNames
916. uniqueMember: cn=user_expert,ou=People,dc=fatwire,dc=com
917. cn: BurlingtonFinancial-Expert
918.
919. dn: cn=GE Lighting-Expert,ou=Groups, dc=fatwire,dc=com
920. objectClass: top
921. objectClass: groupOfUniqueNames
922. cn: GE Lighting-Expert
923.
924. dn: cn=user_analyst,ou=People, dc=fatwire,dc=com
925. userPassword:: dXNlcg==
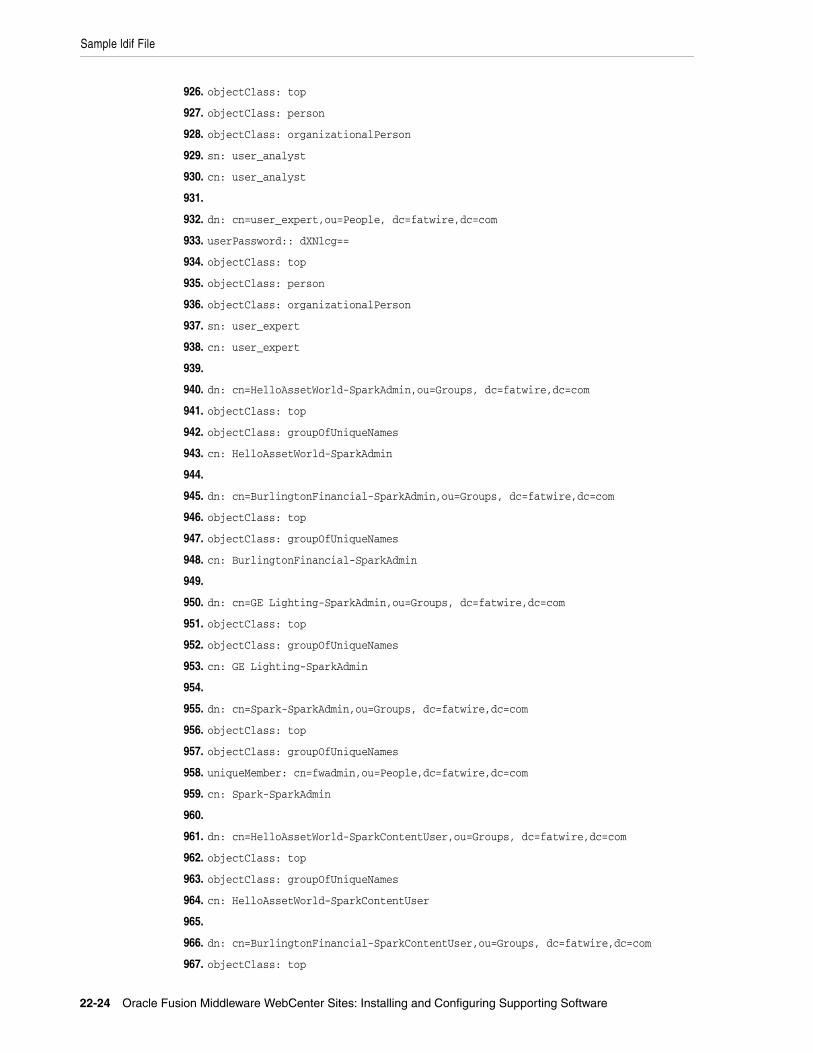
Sample ldif File
22-24 Oracle Fusion Middleware WebCenter Sites: Installing and Configuring Supporting Software
926. objectClass: top
927. objectClass: person
928. objectClass: organizationalPerson
929. sn: user_analyst
930. cn: user_analyst
931.
932. dn: cn=user_expert,ou=People, dc=fatwire,dc=com
933. userPassword:: dXNlcg==
934. objectClass: top
935. objectClass: person
936. objectClass: organizationalPerson
937. sn: user_expert
938. cn: user_expert
939.
940. dn: cn=HelloAssetWorld-SparkAdmin,ou=Groups, dc=fatwire,dc=com
941. objectClass: top
942. objectClass: groupOfUniqueNames
943. cn: HelloAssetWorld-SparkAdmin
944.
945. dn: cn=BurlingtonFinancial-SparkAdmin,ou=Groups, dc=fatwire,dc=com
946. objectClass: top
947. objectClass: groupOfUniqueNames
948. cn: BurlingtonFinancial-SparkAdmin
949.
950. dn: cn=GE Lighting-SparkAdmin,ou=Groups, dc=fatwire,dc=com
951. objectClass: top
952. objectClass: groupOfUniqueNames
953. cn: GE Lighting-SparkAdmin
954.
955. dn: cn=Spark-SparkAdmin,ou=Groups, dc=fatwire,dc=com
956. objectClass: top
957. objectClass: groupOfUniqueNames
958. uniqueMember: cn=fwadmin,ou=People,dc=fatwire,dc=com
959. cn: Spark-SparkAdmin
960.
961. dn: cn=HelloAssetWorld-SparkContentUser,ou=Groups, dc=fatwire,dc=com
962. objectClass: top
963. objectClass: groupOfUniqueNames
964. cn: HelloAssetWorld-SparkContentUser
965.
966. dn: cn=BurlingtonFinancial-SparkContentUser,ou=Groups, dc=fatwire,dc=com
967. objectClass: top
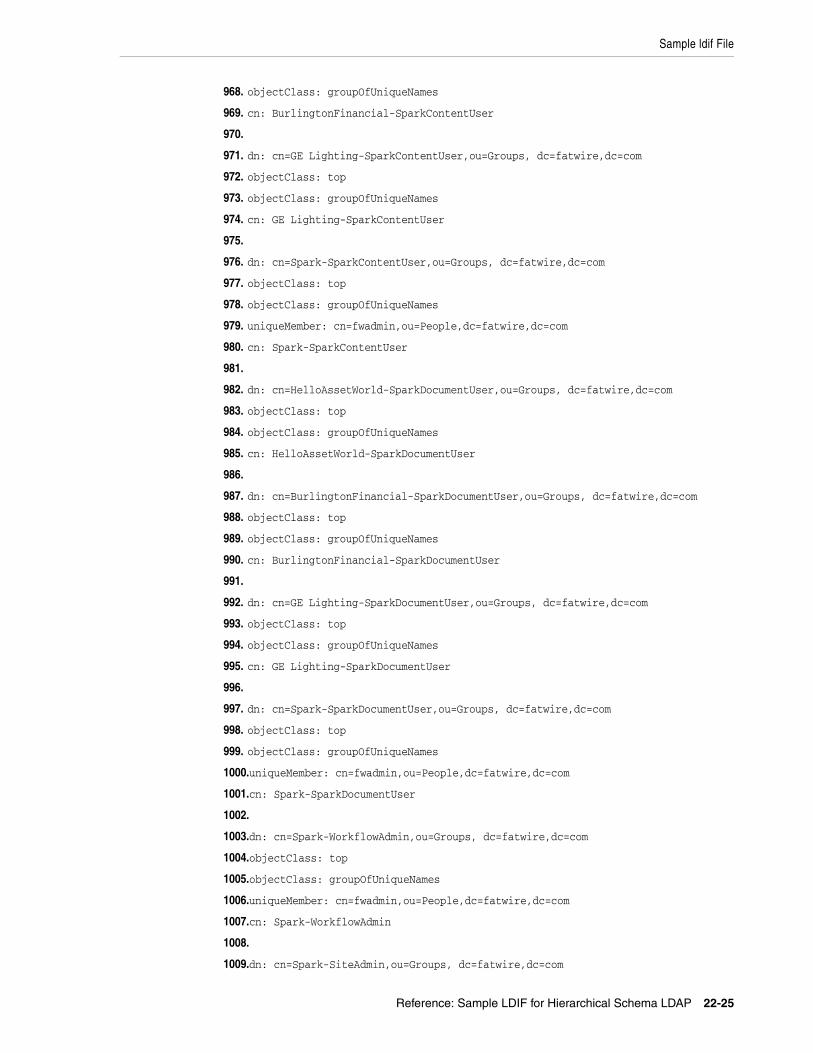
Sample ldif File
Reference: Sample LDIF for Hierarchical Schema LDAP 22-25
968. objectClass: groupOfUniqueNames
969. cn: BurlingtonFinancial-SparkContentUser
970.
971. dn: cn=GE Lighting-SparkContentUser,ou=Groups, dc=fatwire,dc=com
972. objectClass: top
973. objectClass: groupOfUniqueNames
974. cn: GE Lighting-SparkContentUser
975.
976. dn: cn=Spark-SparkContentUser,ou=Groups, dc=fatwire,dc=com
977. objectClass: top
978. objectClass: groupOfUniqueNames
979. uniqueMember: cn=fwadmin,ou=People,dc=fatwire,dc=com
980. cn: Spark-SparkContentUser
981.
982. dn: cn=HelloAssetWorld-SparkDocumentUser,ou=Groups, dc=fatwire,dc=com
983. objectClass: top
984. objectClass: groupOfUniqueNames
985. cn: HelloAssetWorld-SparkDocumentUser
986.
987. dn: cn=BurlingtonFinancial-SparkDocumentUser,ou=Groups, dc=fatwire,dc=com
988. objectClass: top
989. objectClass: groupOfUniqueNames
990. cn: BurlingtonFinancial-SparkDocumentUser
991.
992. dn: cn=GE Lighting-SparkDocumentUser,ou=Groups, dc=fatwire,dc=com
993. objectClass: top
994. objectClass: groupOfUniqueNames
995. cn: GE Lighting-SparkDocumentUser
996.
997. dn: cn=Spark-SparkDocumentUser,ou=Groups, dc=fatwire,dc=com
998. objectClass: top
999. objectClass: groupOfUniqueNames
1000.uniqueMember: cn=fwadmin,ou=People,dc=fatwire,dc=com
1001.cn: Spark-SparkDocumentUser
1002.
1003.dn: cn=Spark-WorkflowAdmin,ou=Groups, dc=fatwire,dc=com
1004.objectClass: top
1005.objectClass: groupOfUniqueNames
1006.uniqueMember: cn=fwadmin,ou=People,dc=fatwire,dc=com
1007.cn: Spark-WorkflowAdmin
1008.
1009.dn: cn=Spark-SiteAdmin,ou=Groups, dc=fatwire,dc=com

Sample ldif File
22-26 Oracle Fusion Middleware WebCenter Sites: Installing and Configuring Supporting Software
1010.objectClass: top
1011.objectClass: groupOfUniqueNames
1012.uniqueMember: cn=fwadmin,ou=People,dc=fatwire,dc=com
1013.cn: Spark-SiteAdmin
1014.
1015.dn: cn=Spark-GeneralAdmin,ou=Groups, dc=fatwire,dc=com
1016.objectClass: top
1017.objectClass: groupOfUniqueNames
1018.uniqueMember: cn=fwadmin,ou=People,dc=fatwire,dc=com
1019.cn: Spark-GeneralAdmin
1020.
1021.dn: cn=ContentEditor,ou=Groups, dc=fatwire,dc=com
1022.objectClass: top
1023.objectClass: groupOfUniqueNames
1024.uniqueMember: cn=firstsite,ou=People,dc=fatwire,dc=com
1025.uniqueMember: cn=Connie,ou=People,dc=fatwire,dc=com
1026.uniqueMember: cn=Conrad,ou=People,dc=fatwire,dc=com
1027.uniqueMember: cn=Desiree,ou=People,dc=fatwire,dc=com
1028.uniqueMember: cn=Napoleon,ou=People,dc=fatwire,dc=com
1029.uniqueMember: cn=Arthur,ou=People,dc=fatwire,dc=com
1030.uniqueMember: cn=Martha,ou=People,dc=fatwire,dc=com
1031.uniqueMember: cn=Rose,ou=People,dc=fatwire,dc=com
1032.uniqueMember: cn=Mark,ou=People,dc=fatwire,dc=com
1033.uniqueMember: cn=Mary,ou=People,dc=fatwire,dc=com
1034.cn: ContentEditor
1035.
1036.dn: cn=firstsite,ou=People, dc=fatwire,dc=com
1037.userPassword:: Zmlyc3RzaXRl
1038.objectClass: top
1039.objectClass: person
1040.objectClass: organizationalPerson
1041.sn: firstsite
1042.cn: firstsite
1043.
1044.dn: cn=FirstSiteII-Approver,ou=Groups, dc=fatwire,dc=com
1045.objectClass: top
1046.objectClass: groupOfUniqueNames
1047.uniqueMember: cn=firstsite,ou=People,dc=fatwire,dc=com
1048.uniqueMember: cn=Napoleon,ou=People,dc=fatwire,dc=com
1049.cn: FirstSiteII-Approver
1050.
1051.dn: cn=FirstSiteII-Designer,ou=Groups, dc=fatwire,dc=com
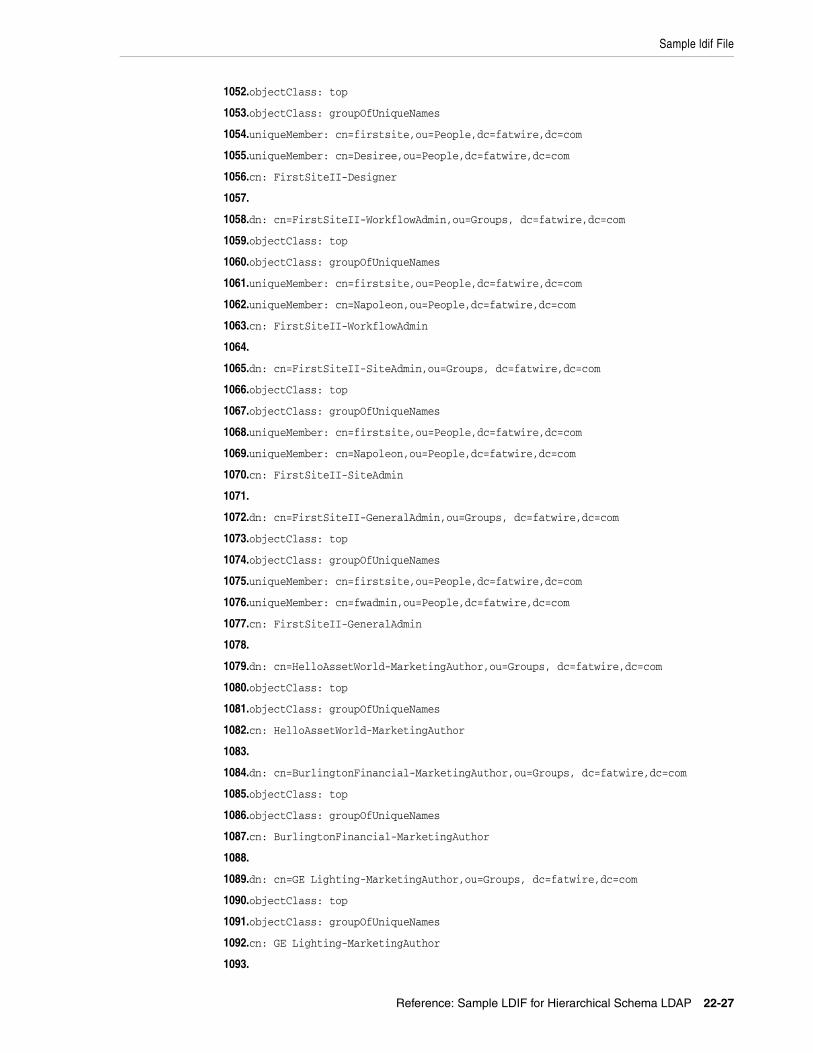
Sample ldif File
Reference: Sample LDIF for Hierarchical Schema LDAP 22-27
1052.objectClass: top
1053.objectClass: groupOfUniqueNames
1054.uniqueMember: cn=firstsite,ou=People,dc=fatwire,dc=com
1055.uniqueMember: cn=Desiree,ou=People,dc=fatwire,dc=com
1056.cn: FirstSiteII-Designer
1057.
1058.dn: cn=FirstSiteII-WorkflowAdmin,ou=Groups, dc=fatwire,dc=com
1059.objectClass: top
1060.objectClass: groupOfUniqueNames
1061.uniqueMember: cn=firstsite,ou=People,dc=fatwire,dc=com
1062.uniqueMember: cn=Napoleon,ou=People,dc=fatwire,dc=com
1063.cn: FirstSiteII-WorkflowAdmin
1064.
1065.dn: cn=FirstSiteII-SiteAdmin,ou=Groups, dc=fatwire,dc=com
1066.objectClass: top
1067.objectClass: groupOfUniqueNames
1068.uniqueMember: cn=firstsite,ou=People,dc=fatwire,dc=com
1069.uniqueMember: cn=Napoleon,ou=People,dc=fatwire,dc=com
1070.cn: FirstSiteII-SiteAdmin
1071.
1072.dn: cn=FirstSiteII-GeneralAdmin,ou=Groups, dc=fatwire,dc=com
1073.objectClass: top
1074.objectClass: groupOfUniqueNames
1075.uniqueMember: cn=firstsite,ou=People,dc=fatwire,dc=com
1076.uniqueMember: cn=fwadmin,ou=People,dc=fatwire,dc=com
1077.cn: FirstSiteII-GeneralAdmin
1078.
1079.dn: cn=HelloAssetWorld-MarketingAuthor,ou=Groups, dc=fatwire,dc=com
1080.objectClass: top
1081.objectClass: groupOfUniqueNames
1082.cn: HelloAssetWorld-MarketingAuthor
1083.
1084.dn: cn=BurlingtonFinancial-MarketingAuthor,ou=Groups, dc=fatwire,dc=com
1085.objectClass: top
1086.objectClass: groupOfUniqueNames
1087.cn: BurlingtonFinancial-MarketingAuthor
1088.
1089.dn: cn=GE Lighting-MarketingAuthor,ou=Groups, dc=fatwire,dc=com
1090.objectClass: top
1091.objectClass: groupOfUniqueNames
1092.cn: GE Lighting-MarketingAuthor
1093.
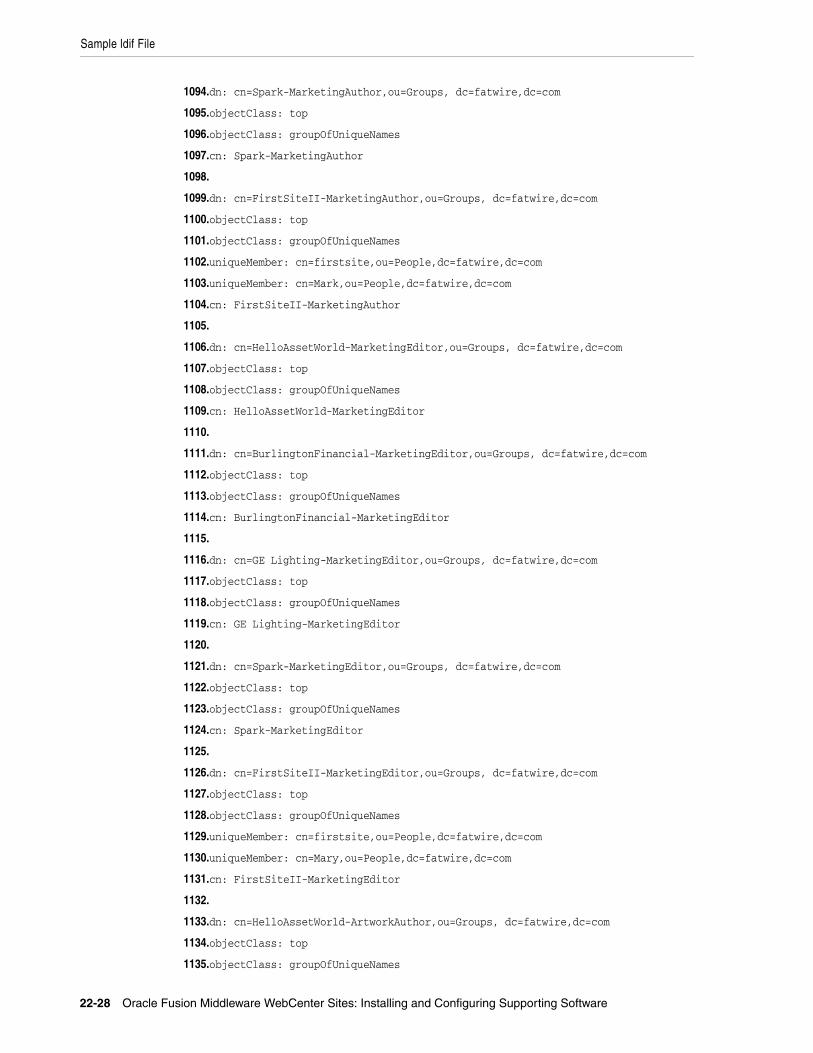
Sample ldif File
22-28 Oracle Fusion Middleware WebCenter Sites: Installing and Configuring Supporting Software
1094.dn: cn=Spark-MarketingAuthor,ou=Groups, dc=fatwire,dc=com
1095.objectClass: top
1096.objectClass: groupOfUniqueNames
1097.cn: Spark-MarketingAuthor
1098.
1099.dn: cn=FirstSiteII-MarketingAuthor,ou=Groups, dc=fatwire,dc=com
1100.objectClass: top
1101.objectClass: groupOfUniqueNames
1102.uniqueMember: cn=firstsite,ou=People,dc=fatwire,dc=com
1103.uniqueMember: cn=Mark,ou=People,dc=fatwire,dc=com
1104.cn: FirstSiteII-MarketingAuthor
1105.
1106.dn: cn=HelloAssetWorld-MarketingEditor,ou=Groups, dc=fatwire,dc=com
1107.objectClass: top
1108.objectClass: groupOfUniqueNames
1109.cn: HelloAssetWorld-MarketingEditor
1110.
1111.dn: cn=BurlingtonFinancial-MarketingEditor,ou=Groups, dc=fatwire,dc=com
1112.objectClass: top
1113.objectClass: groupOfUniqueNames
1114.cn: BurlingtonFinancial-MarketingEditor
1115.
1116.dn: cn=GE Lighting-MarketingEditor,ou=Groups, dc=fatwire,dc=com
1117.objectClass: top
1118.objectClass: groupOfUniqueNames
1119.cn: GE Lighting-MarketingEditor
1120.
1121.dn: cn=Spark-MarketingEditor,ou=Groups, dc=fatwire,dc=com
1122.objectClass: top
1123.objectClass: groupOfUniqueNames
1124.cn: Spark-MarketingEditor
1125.
1126.dn: cn=FirstSiteII-MarketingEditor,ou=Groups, dc=fatwire,dc=com
1127.objectClass: top
1128.objectClass: groupOfUniqueNames
1129.uniqueMember: cn=firstsite,ou=People,dc=fatwire,dc=com
1130.uniqueMember: cn=Mary,ou=People,dc=fatwire,dc=com
1131.cn: FirstSiteII-MarketingEditor
1132.
1133.dn: cn=HelloAssetWorld-ArtworkAuthor,ou=Groups, dc=fatwire,dc=com
1134.objectClass: top
1135.objectClass: groupOfUniqueNames
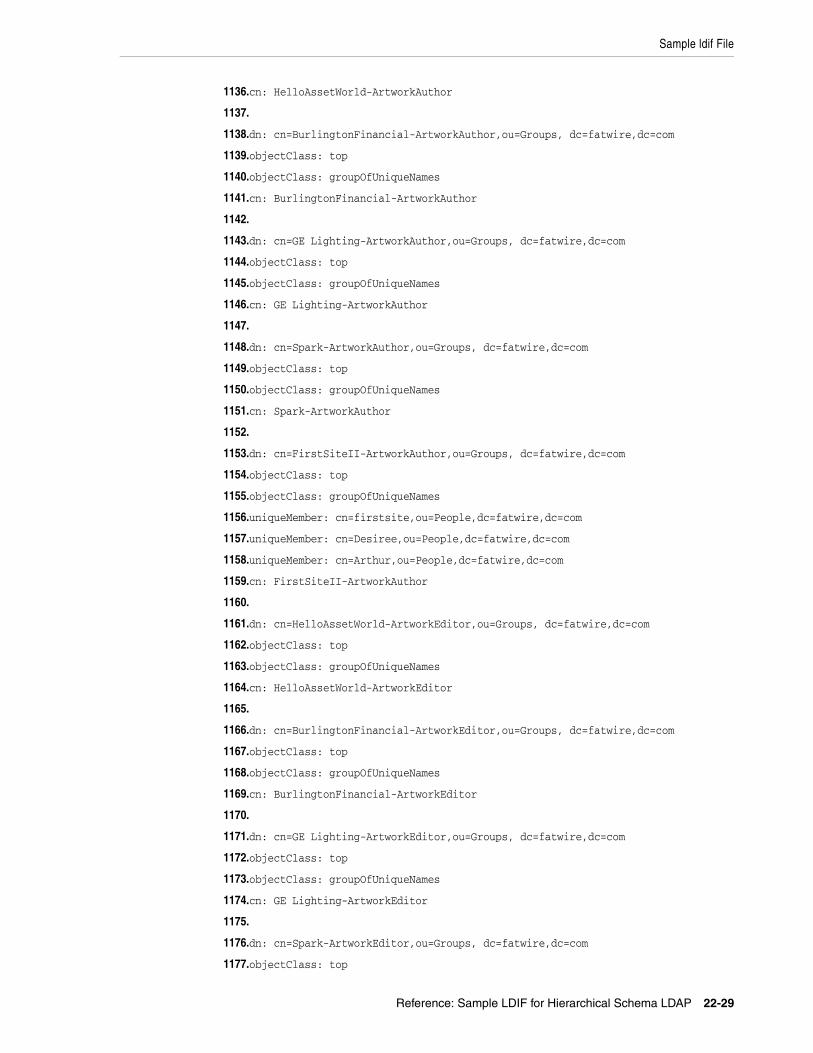
Sample ldif File
Reference: Sample LDIF for Hierarchical Schema LDAP 22-29
1136.cn: HelloAssetWorld-ArtworkAuthor
1137.
1138.dn: cn=BurlingtonFinancial-ArtworkAuthor,ou=Groups, dc=fatwire,dc=com
1139.objectClass: top
1140.objectClass: groupOfUniqueNames
1141.cn: BurlingtonFinancial-ArtworkAuthor
1142.
1143.dn: cn=GE Lighting-ArtworkAuthor,ou=Groups, dc=fatwire,dc=com
1144.objectClass: top
1145.objectClass: groupOfUniqueNames
1146.cn: GE Lighting-ArtworkAuthor
1147.
1148.dn: cn=Spark-ArtworkAuthor,ou=Groups, dc=fatwire,dc=com
1149.objectClass: top
1150.objectClass: groupOfUniqueNames
1151.cn: Spark-ArtworkAuthor
1152.
1153.dn: cn=FirstSiteII-ArtworkAuthor,ou=Groups, dc=fatwire,dc=com
1154.objectClass: top
1155.objectClass: groupOfUniqueNames
1156.uniqueMember: cn=firstsite,ou=People,dc=fatwire,dc=com
1157.uniqueMember: cn=Desiree,ou=People,dc=fatwire,dc=com
1158.uniqueMember: cn=Arthur,ou=People,dc=fatwire,dc=com
1159.cn: FirstSiteII-ArtworkAuthor
1160.
1161.dn: cn=HelloAssetWorld-ArtworkEditor,ou=Groups, dc=fatwire,dc=com
1162.objectClass: top
1163.objectClass: groupOfUniqueNames
1164.cn: HelloAssetWorld-ArtworkEditor
1165.
1166.dn: cn=BurlingtonFinancial-ArtworkEditor,ou=Groups, dc=fatwire,dc=com
1167.objectClass: top
1168.objectClass: groupOfUniqueNames
1169.cn: BurlingtonFinancial-ArtworkEditor
1170.
1171.dn: cn=GE Lighting-ArtworkEditor,ou=Groups, dc=fatwire,dc=com
1172.objectClass: top
1173.objectClass: groupOfUniqueNames
1174.cn: GE Lighting-ArtworkEditor
1175.
1176.dn: cn=Spark-ArtworkEditor,ou=Groups, dc=fatwire,dc=com
1177.objectClass: top
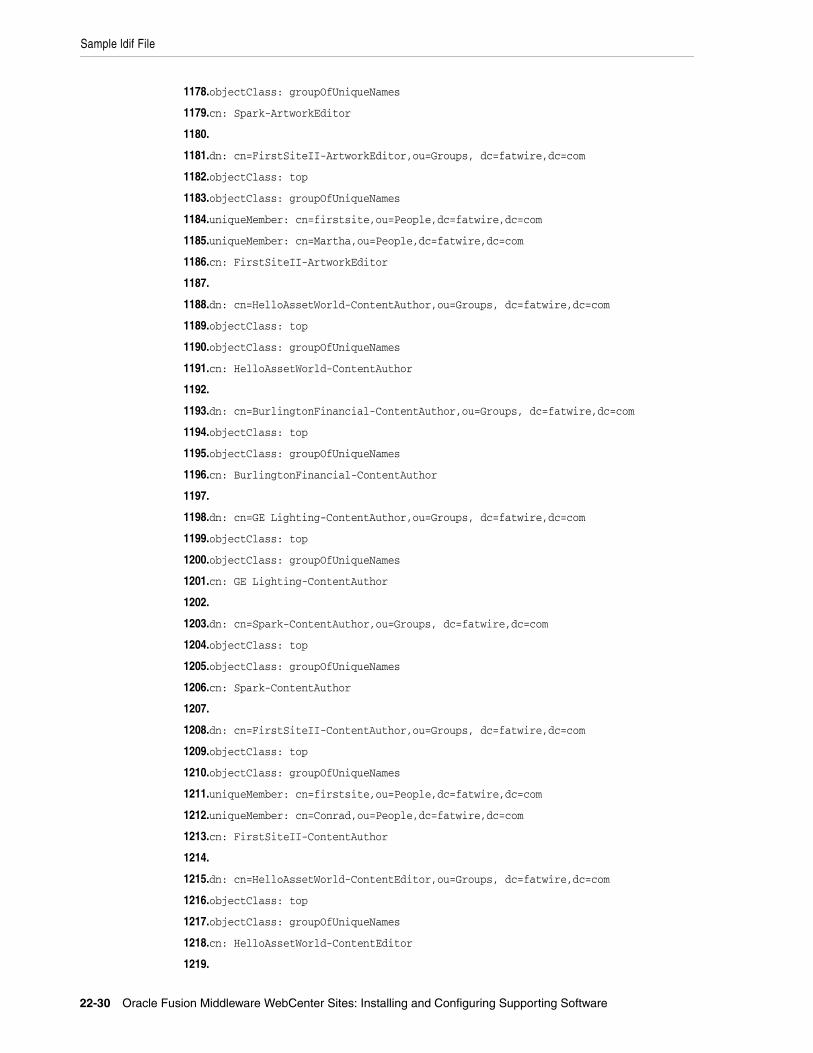
Sample ldif File
22-30 Oracle Fusion Middleware WebCenter Sites: Installing and Configuring Supporting Software
1178.objectClass: groupOfUniqueNames
1179.cn: Spark-ArtworkEditor
1180.
1181.dn: cn=FirstSiteII-ArtworkEditor,ou=Groups, dc=fatwire,dc=com
1182.objectClass: top
1183.objectClass: groupOfUniqueNames
1184.uniqueMember: cn=firstsite,ou=People,dc=fatwire,dc=com
1185.uniqueMember: cn=Martha,ou=People,dc=fatwire,dc=com
1186.cn: FirstSiteII-ArtworkEditor
1187.
1188.dn: cn=HelloAssetWorld-ContentAuthor,ou=Groups, dc=fatwire,dc=com
1189.objectClass: top
1190.objectClass: groupOfUniqueNames
1191.cn: HelloAssetWorld-ContentAuthor
1192.
1193.dn: cn=BurlingtonFinancial-ContentAuthor,ou=Groups, dc=fatwire,dc=com
1194.objectClass: top
1195.objectClass: groupOfUniqueNames
1196.cn: BurlingtonFinancial-ContentAuthor
1197.
1198.dn: cn=GE Lighting-ContentAuthor,ou=Groups, dc=fatwire,dc=com
1199.objectClass: top
1200.objectClass: groupOfUniqueNames
1201.cn: GE Lighting-ContentAuthor
1202.
1203.dn: cn=Spark-ContentAuthor,ou=Groups, dc=fatwire,dc=com
1204.objectClass: top
1205.objectClass: groupOfUniqueNames
1206.cn: Spark-ContentAuthor
1207.
1208.dn: cn=FirstSiteII-ContentAuthor,ou=Groups, dc=fatwire,dc=com
1209.objectClass: top
1210.objectClass: groupOfUniqueNames
1211.uniqueMember: cn=firstsite,ou=People,dc=fatwire,dc=com
1212.uniqueMember: cn=Conrad,ou=People,dc=fatwire,dc=com
1213.cn: FirstSiteII-ContentAuthor
1214.
1215.dn: cn=HelloAssetWorld-ContentEditor,ou=Groups, dc=fatwire,dc=com
1216.objectClass: top
1217.objectClass: groupOfUniqueNames
1218.cn: HelloAssetWorld-ContentEditor
1219.
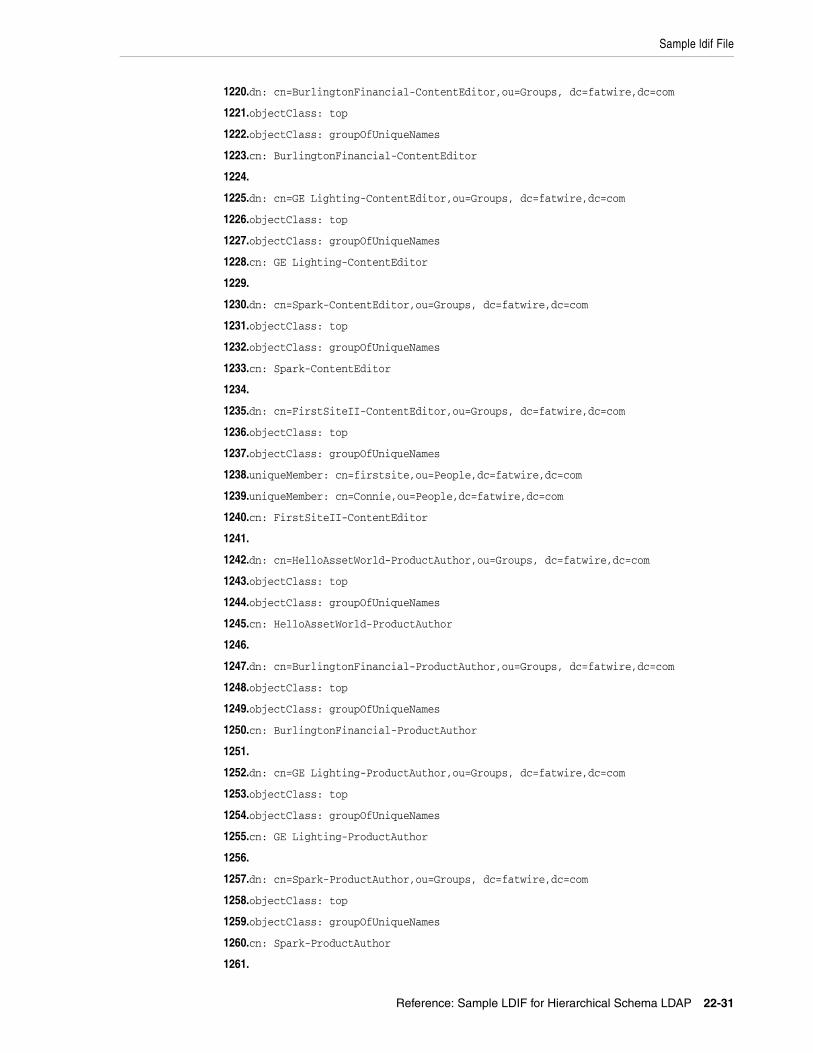
Sample ldif File
Reference: Sample LDIF for Hierarchical Schema LDAP 22-31
1220.dn: cn=BurlingtonFinancial-ContentEditor,ou=Groups, dc=fatwire,dc=com
1221.objectClass: top
1222.objectClass: groupOfUniqueNames
1223.cn: BurlingtonFinancial-ContentEditor
1224.
1225.dn: cn=GE Lighting-ContentEditor,ou=Groups, dc=fatwire,dc=com
1226.objectClass: top
1227.objectClass: groupOfUniqueNames
1228.cn: GE Lighting-ContentEditor
1229.
1230.dn: cn=Spark-ContentEditor,ou=Groups, dc=fatwire,dc=com
1231.objectClass: top
1232.objectClass: groupOfUniqueNames
1233.cn: Spark-ContentEditor
1234.
1235.dn: cn=FirstSiteII-ContentEditor,ou=Groups, dc=fatwire,dc=com
1236.objectClass: top
1237.objectClass: groupOfUniqueNames
1238.uniqueMember: cn=firstsite,ou=People,dc=fatwire,dc=com
1239.uniqueMember: cn=Connie,ou=People,dc=fatwire,dc=com
1240.cn: FirstSiteII-ContentEditor
1241.
1242.dn: cn=HelloAssetWorld-ProductAuthor,ou=Groups, dc=fatwire,dc=com
1243.objectClass: top
1244.objectClass: groupOfUniqueNames
1245.cn: HelloAssetWorld-ProductAuthor
1246.
1247.dn: cn=BurlingtonFinancial-ProductAuthor,ou=Groups, dc=fatwire,dc=com
1248.objectClass: top
1249.objectClass: groupOfUniqueNames
1250.cn: BurlingtonFinancial-ProductAuthor
1251.
1252.dn: cn=GE Lighting-ProductAuthor,ou=Groups, dc=fatwire,dc=com
1253.objectClass: top
1254.objectClass: groupOfUniqueNames
1255.cn: GE Lighting-ProductAuthor
1256.
1257.dn: cn=Spark-ProductAuthor,ou=Groups, dc=fatwire,dc=com
1258.objectClass: top
1259.objectClass: groupOfUniqueNames
1260.cn: Spark-ProductAuthor
1261.
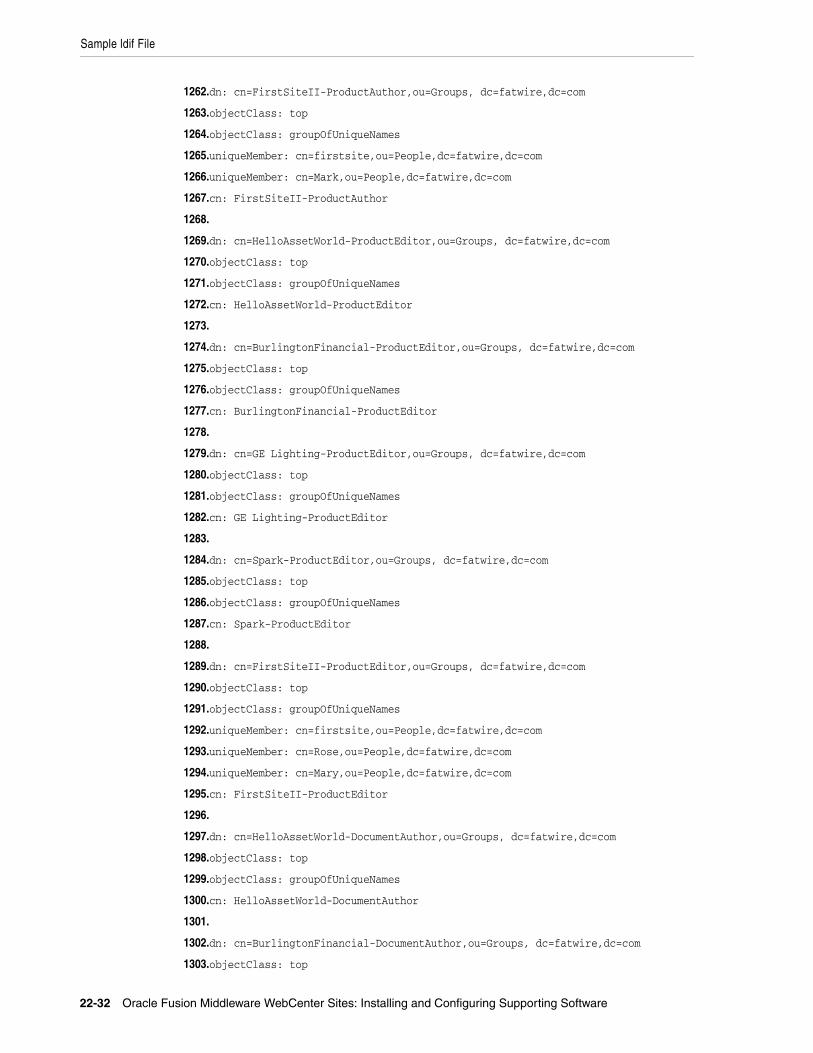
Sample ldif File
22-32 Oracle Fusion Middleware WebCenter Sites: Installing and Configuring Supporting Software
1262.dn: cn=FirstSiteII-ProductAuthor,ou=Groups, dc=fatwire,dc=com
1263.objectClass: top
1264.objectClass: groupOfUniqueNames
1265.uniqueMember: cn=firstsite,ou=People,dc=fatwire,dc=com
1266.uniqueMember: cn=Mark,ou=People,dc=fatwire,dc=com
1267.cn: FirstSiteII-ProductAuthor
1268.
1269.dn: cn=HelloAssetWorld-ProductEditor,ou=Groups, dc=fatwire,dc=com
1270.objectClass: top
1271.objectClass: groupOfUniqueNames
1272.cn: HelloAssetWorld-ProductEditor
1273.
1274.dn: cn=BurlingtonFinancial-ProductEditor,ou=Groups, dc=fatwire,dc=com
1275.objectClass: top
1276.objectClass: groupOfUniqueNames
1277.cn: BurlingtonFinancial-ProductEditor
1278.
1279.dn: cn=GE Lighting-ProductEditor,ou=Groups, dc=fatwire,dc=com
1280.objectClass: top
1281.objectClass: groupOfUniqueNames
1282.cn: GE Lighting-ProductEditor
1283.
1284.dn: cn=Spark-ProductEditor,ou=Groups, dc=fatwire,dc=com
1285.objectClass: top
1286.objectClass: groupOfUniqueNames
1287.cn: Spark-ProductEditor
1288.
1289.dn: cn=FirstSiteII-ProductEditor,ou=Groups, dc=fatwire,dc=com
1290.objectClass: top
1291.objectClass: groupOfUniqueNames
1292.uniqueMember: cn=firstsite,ou=People,dc=fatwire,dc=com
1293.uniqueMember: cn=Rose,ou=People,dc=fatwire,dc=com
1294.uniqueMember: cn=Mary,ou=People,dc=fatwire,dc=com
1295.cn: FirstSiteII-ProductEditor
1296.
1297.dn: cn=HelloAssetWorld-DocumentAuthor,ou=Groups, dc=fatwire,dc=com
1298.objectClass: top
1299.objectClass: groupOfUniqueNames
1300.cn: HelloAssetWorld-DocumentAuthor
1301.
1302.dn: cn=BurlingtonFinancial-DocumentAuthor,ou=Groups, dc=fatwire,dc=com
1303.objectClass: top
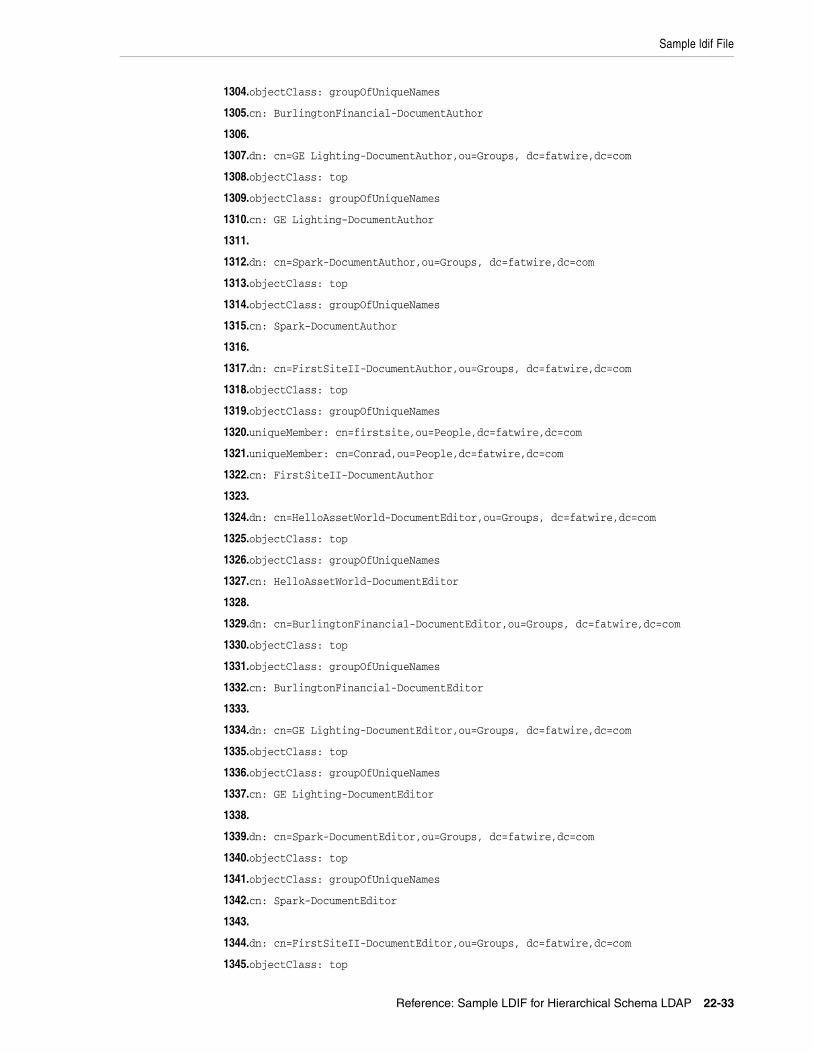
Sample ldif File
Reference: Sample LDIF for Hierarchical Schema LDAP 22-33
1304.objectClass: groupOfUniqueNames
1305.cn: BurlingtonFinancial-DocumentAuthor
1306.
1307.dn: cn=GE Lighting-DocumentAuthor,ou=Groups, dc=fatwire,dc=com
1308.objectClass: top
1309.objectClass: groupOfUniqueNames
1310.cn: GE Lighting-DocumentAuthor
1311.
1312.dn: cn=Spark-DocumentAuthor,ou=Groups, dc=fatwire,dc=com
1313.objectClass: top
1314.objectClass: groupOfUniqueNames
1315.cn: Spark-DocumentAuthor
1316.
1317.dn: cn=FirstSiteII-DocumentAuthor,ou=Groups, dc=fatwire,dc=com
1318.objectClass: top
1319.objectClass: groupOfUniqueNames
1320.uniqueMember: cn=firstsite,ou=People,dc=fatwire,dc=com
1321.uniqueMember: cn=Conrad,ou=People,dc=fatwire,dc=com
1322.cn: FirstSiteII-DocumentAuthor
1323.
1324.dn: cn=HelloAssetWorld-DocumentEditor,ou=Groups, dc=fatwire,dc=com
1325.objectClass: top
1326.objectClass: groupOfUniqueNames
1327.cn: HelloAssetWorld-DocumentEditor
1328.
1329.dn: cn=BurlingtonFinancial-DocumentEditor,ou=Groups, dc=fatwire,dc=com
1330.objectClass: top
1331.objectClass: groupOfUniqueNames
1332.cn: BurlingtonFinancial-DocumentEditor
1333.
1334.dn: cn=GE Lighting-DocumentEditor,ou=Groups, dc=fatwire,dc=com
1335.objectClass: top
1336.objectClass: groupOfUniqueNames
1337.cn: GE Lighting-DocumentEditor
1338.
1339.dn: cn=Spark-DocumentEditor,ou=Groups, dc=fatwire,dc=com
1340.objectClass: top
1341.objectClass: groupOfUniqueNames
1342.cn: Spark-DocumentEditor
1343.
1344.dn: cn=FirstSiteII-DocumentEditor,ou=Groups, dc=fatwire,dc=com
1345.objectClass: top
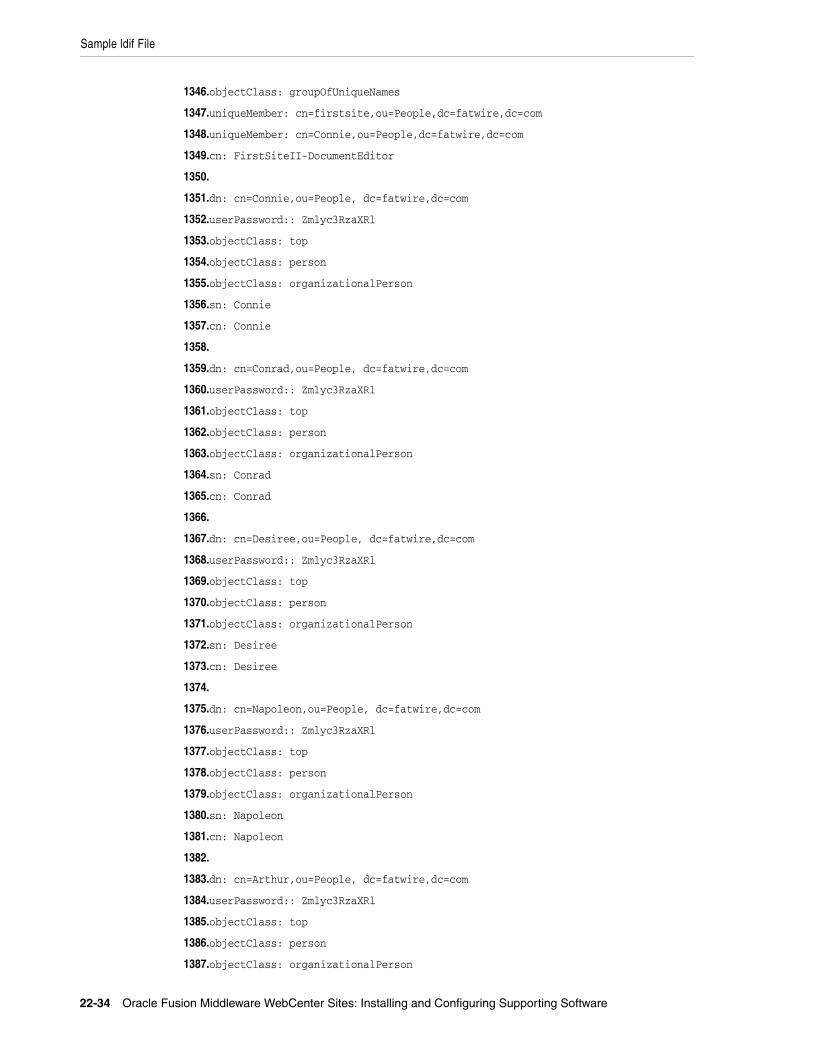
Sample ldif File
22-34 Oracle Fusion Middleware WebCenter Sites: Installing and Configuring Supporting Software
1346.objectClass: groupOfUniqueNames
1347.uniqueMember: cn=firstsite,ou=People,dc=fatwire,dc=com
1348.uniqueMember: cn=Connie,ou=People,dc=fatwire,dc=com
1349.cn: FirstSiteII-DocumentEditor
1350.
1351.dn: cn=Connie,ou=People, dc=fatwire,dc=com
1352.userPassword:: Zmlyc3RzaXRl
1353.objectClass: top
1354.objectClass: person
1355.objectClass: organizationalPerson
1356.sn: Connie
1357.cn: Connie
1358.
1359.dn: cn=Conrad,ou=People, dc=fatwire,dc=com
1360.userPassword:: Zmlyc3RzaXRl
1361.objectClass: top
1362.objectClass: person
1363.objectClass: organizationalPerson
1364.sn: Conrad
1365.cn: Conrad
1366.
1367.dn: cn=Desiree,ou=People, dc=fatwire,dc=com
1368.userPassword:: Zmlyc3RzaXRl
1369.objectClass: top
1370.objectClass: person
1371.objectClass: organizationalPerson
1372.sn: Desiree
1373.cn: Desiree
1374.
1375.dn: cn=Napoleon,ou=People, dc=fatwire,dc=com
1376.userPassword:: Zmlyc3RzaXRl
1377.objectClass: top
1378.objectClass: person
1379.objectClass: organizationalPerson
1380.sn: Napoleon
1381.cn: Napoleon
1382.
1383.dn: cn=Arthur,ou=People, dc=fatwire,dc=com
1384.userPassword:: Zmlyc3RzaXRl
1385.objectClass: top
1386.objectClass: person
1387.objectClass: organizationalPerson
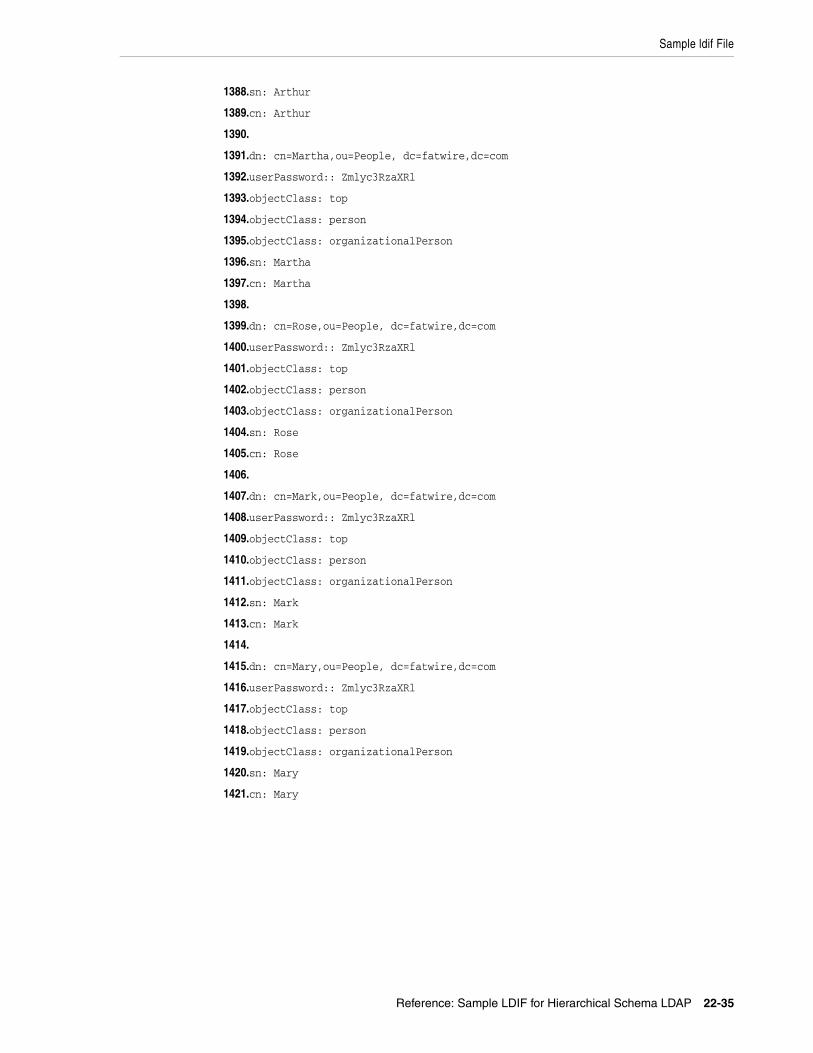
Sample ldif File
Reference: Sample LDIF for Hierarchical Schema LDAP 22-35
1388.sn: Arthur
1389.cn: Arthur
1390.
1391.dn: cn=Martha,ou=People, dc=fatwire,dc=com
1392.userPassword:: Zmlyc3RzaXRl
1393.objectClass: top
1394.objectClass: person
1395.objectClass: organizationalPerson
1396.sn: Martha
1397.cn: Martha
1398.
1399.dn: cn=Rose,ou=People, dc=fatwire,dc=com
1400.userPassword:: Zmlyc3RzaXRl
1401.objectClass: top
1402.objectClass: person
1403.objectClass: organizationalPerson
1404.sn: Rose
1405.cn: Rose
1406.
1407.dn: cn=Mark,ou=People, dc=fatwire,dc=com
1408.userPassword:: Zmlyc3RzaXRl
1409.objectClass: top
1410.objectClass: person
1411.objectClass: organizationalPerson
1412.sn: Mark
1413.cn: Mark
1414.
1415.dn: cn=Mary,ou=People, dc=fatwire,dc=com
1416.userPassword:: Zmlyc3RzaXRl
1417.objectClass: top
1418.objectClass: person
1419.objectClass: organizationalPerson
1420.sn: Mary
1421.cn: Mary
Sample ldif File
22-36 Oracle Fusion Middleware WebCenter Sites: Installing and Configuring Supporting Software
Part VIPart VI Installing and Configuring Authentication
Services
WebCenter Sites can be integrated with supported applications that provide authentication services and single sign-on.
Part VI contains the following chapters:
■ Chapter 23, "Integrating Oracle Access Manager with Oracle WebCenter Sites"
■ Chapter 24, "Enabling Community-Gadgets to Communicate with OAM-Integrated WebCenter Sites"
■ Chapter 25, "Integrating Oracle Access Manager with Oracle WebCenter Sites: Site Capture"

23
Integrating Oracle Access Manager with Oracle WebCenter Sites 23-1
23Integrating Oracle Access Manager withOracle WebCenter Sites
Use this chapter to integrate Oracle Access Manager (OAM) with Oracle WebCenter Sites installations.
This chapter contains the following sections:
■ Section 23.1, "Overview"
■ Section 23.2, "OAM Integration Prerequisites"
■ Section 23.3, "Integrating OAM with Oracle WebCenter Sites"
■ Section 23.4, "Integrating OAM with Oracle WebCenter Sites: Satellite Server"
23.1 OverviewThis section contains the following topics:
■ Section 23.1.1, "Integration Components"
■ Section 23.1.2, "Flow for Browser Requests"
■ Section 23.1.3, "REST Service Flow"
23.1.1 Integration ComponentsIntegration with Oracle Access Manager requires replacement of the Single Sign-On (SSO) authentication plug-in classes for the WebCenter Sites application, and the addition of a token authority servlet for REST client authentication. Optionally the WebCenter Sites challenge (login) page can be deployed.
Each component is described more fully in the following:
1. SSO authentication plug-in classes are delivered in the wem-sso-api-oam-11.1.1.8.0.jar that is included with the WebCenter Sites product. There are three primary classes included in this JAR that must be configured to load with the WebCenter Sites application when it starts.
Note: When integrated with WebCenter Sites systems running in content management (development) mode, Oracle Access Manager, is used for browser and REST authentication. On production systems (running in delivery mode), OAM is used for management authentication, but not for website visitors.
Overview
23-2 Oracle Fusion Middleware WebCenter Sites: Installing and Configuring Supporting Software
a. OAMFilter provides recognition of an authenticated user (either by WebLogic Server (WLS) perimeter security or REST credential token) before allowing access to a protected resource.
b. OAMProvider contains the JAVA API which is used by REST client programs to obtain an authenticated credential before requesting a resource from the WebCenter Sites application. It also contains methods used internally to authenticate REST credentials by OAMFilter.
c. OAMListener is a session filter that monitors the creation and termination of HTTP sessions to facilitate cleanup of session related cached information.
2. The token authority servlet is delivered in the oamtoken.war file. It is an OAM AccessGate that will either authenticate a user against the OAM server or check, upon request, that an OAM authenticated session is still valid.
3. The WebCenter Sites challenge page is optional and is delivered in the oamlogin.war file. The servlet within oamlogin.war provides a custom branded challenge request when OAM must obtain credentials to authenticate a user. It is included to provide a replacement of the standard WebCenter Sites branded login page that is installed with the Central Authentication Service (CAS). This page is called directly by OAM and must be specifically configured within the OAM Authentication Scheme used to protect WebCenter Sites resources.
Installation of these components and the configuration of the Oracle Access Manager must be done to complete an operational OAM integration with WebCenter Sites.
Much of OAM integration regards the configuration of the elements of OAM itself. OAM configuration is done mainly within the OAM Administrative console, as well as across several WebCenter Sites server configuration files, and the Oracle HTTP Server (OHS) configuration files. The Host Identifiers, URL Resources, Domain policies, and OAM Agents must be properly configured to achieve proper operation. The WebCenter Sites challenge screen is supplied as an independent HTTP Servlet. You have the choice to use the WebCenter Sites challenge screen, the default OAM challenge screen, or a custom challenge screen through the Authentication Scheme attached to the configured policies.Control over all policies for authentication and authorization through the OAM Administrator console provides extensive configuration capabilities.
23.1.2 Flow for Browser RequestsOAM Integration components and process flow for logging in to and out of WebCenter Sites is shown in Figure 23–1. The core integration revolves around the OAMFilter and OAMProvider classes. These classes are injected into the WebCenter Sites Web application by Spring initialization to replace CAS equivalents which are not necessary with OAM. There are no internal changes to the WebCenter Sites application to accommodate this integration.

Overview
Integrating Oracle Access Manager with Oracle WebCenter Sites 23-3
Figure 23–1 OAM Flowchart
23.1.2.1 Login ProcessingAll browser access is directed through the standard OHS WebGate and uses perimeter security provided by the WLS container. The WebGate functions as a reverse proxy, checking protection policies through Access Manager. It issues the challenge/login form when necessary. A request is never passed directly to the WLS container but always passes through the WebGate to ensure authentication and authorization are satisfied. When a valid request is received from the WebGate, the WLS container presents an identity assertion to the OAM filter. This assertion will identify the authenticated user and cause the information for that user to be fetched from the WebCenter Sites SystemUsers table. User information consists of the user ID, name, and ACL needed to prepare the proper internal assertion for reference within the WebCenter Sites application. The user name in the WebCenter Sites SystemUsers table and in the Oracle Internet Directory (or LDAP directory) must match exactly for authentication to work properly. Although OAM includes authorization protection as well as authentication, WebCenter Sites uses only OAM authentication and does not rely on full OAM authorization.
When the OAMFilter receives control, the request has already been authenticated by the WebGate and an OAM Identity Assertion created by WLS perimeter security. This assertion provides the authenticated user's name which is used to find that user information in the WebCenter Sites SystemUsers table. The information thus obtained is used to create an internal assertion used within the WebCenter Sites application.
After an OAM Identity Assertion has been converted into an internal Assertion, the internal Assertion is added to the HTTP Session object. This allows subsequent requests to access URLs (resources) directly for the lifetime of the application session. However, the WebGate provides overriding protection based upon the OAM security policies in effect. If the OAM user session (different from HTTP session) expires, then the user will be required to re-authenticate.
The creation of OAM Identity Assertions is required by default. However, there is a possibility of an OAM Identity Assertion invoking a performance penalty. By default,
Overview
23-4 Oracle Fusion Middleware WebCenter Sites: Installing and Configuring Supporting Software
the OAMFilter expects to see OAM Assertions to counter the possibility of a browser accessing WebCenter Sites directly from the Internet. This requirement can be avoided by a simple configuration change and the establishment of a trust relationship between the WebLogic Server and the OHS WebGate. This trust relationship is created by defining a connection filter in WebLogic that only accepts requests from a trusted source (the OHS server).
23.1.2.2 SSO and LogoffThe WebGate manages the OAM cookies which govern SSO. This is transparent to the WebCenter Sites OAM Filter and provides a seamless integration with other Oracle applications.
When WebCenter Sites logoff is requested, the standard OAM logoff facility is invoked by the OAM logoff URL which includes an end_URL parameter. The end_URL parameter establishes the next page that must appear after OAM finishes all logoff activities. OAM removes the SSO cookies, terminates the OAM session, and calls the registered logout success URL. The logout success URL is recognized by the OAM Filter to invalidate the HTTP session. After OAM logout has completed all its work it redirects the browser back to the WebCenter Sites welcome URL, specified through the end_URL parameter. This triggers a new challenge for the user to supply login credentials. The Logout URL settings are defined in the OHS WebGate configuration and the end_URL is defined in the SSOConfig.xml file.
23.1.3 REST Service FlowREST processing follows a slightly different flow. This is also illustrated in Figure 23–1. The REST client uses the OAM Provider API to obtain a service ticket from the Token Authority. This ticket is required as a parameter in the REST request to grant access to a resource on the WebCenter Sites server. The TokenAuthority functions as an OAM Access Gate. It will authenticate the user against the policies defined for the REST endpoint URL. When a proper user name and password has passed authentication, the REST client is issued a service ticket to be used when requesting the resource. The TokenAuthority is an HTTP Servlet and it is recommended it be secured through SSL. The TokenAuthority performs three services:
■ Request – Takes a user name/password combination and endpoint URL (as the resource) and authenticate through the OAM SDK. The result is an OAM UserSession for the request. The associated session token is extracted from the UserSession and retained in a cache keyed by UUID. The UUID is returned to the requestor to be used as the service request ticket associated with the OAM Session.
■ Validate – Given a request ticket, the associated session token is retrieved from the cache and the authenticated user name is returned. The OAM UserSession is checked to make sure it remains valid. If the session is no longer valid or indicates that the user associated with the ticket is no longer logged in then a 'not authorized' 403 status is returned.
■ Invalidate – Given a request ticket, the associated session token is retrieved from the cache, removed, and then converted into an OAM UserSession object which is immediately terminated. This invalidates the OAM session and occurs after a request ticket has been used.
When the OAM Filter receives a REST request it must always be accompanied by a parameter that supplies a request ticket. This ticket is validated through the OAM Provider (the SSO Provider calls the Token Authority) before access to the resource is granted. A normal ticket request is for one time only and its maximum lifetime is dictated by the OAM session timeout. For a valid ticket, the OAM user session is
OAM Integration Prerequisites
Integrating Oracle Access Manager with Oracle WebCenter Sites 23-5
invalidated immediately and access to the resource is allowed only once. A multi-ticket is handled in a similar manner but the ticket is cached locally so it may be reused by the REST client for a finite amount of time.
The published REST API remains the same. REST client programming is not affected by this integration and works exactly as it did with the CAS provider. Internally, the API dynamically instantiates the required classes based on which authentication provider is being used. Remote REST client programs are written in JAVA and require the wem-sso-api-oam-11.1.1.8.0.jar for compilation and execution.
The REST client goes directly to the WebCenter Sites server directly as shown in Figure 23–1. The client has the choice of two possible endpoints. It can go directly to the WebCenter Sites application as shown in the figure or pass through the OHS WebGate. A policy is defined for the latter case which allows this endpoint to be used. The decision of which endpoint to use is a choice dependent upon performance and/or security concerns.
23.2 OAM Integration Prerequisites
Installing OAM ComponentsBefore you set up Oracle Access Manager integration, the Oracle components needed to support the environment must be installed and working properly. If you already have OAM installed and running at the support level specified in the Oracle WebCenter Sites Certification Matrix and in this document then you can disregard this section and skip to Section 23.3, "Integrating OAM with Oracle WebCenter Sites." Otherwise, continue with the steps below.
OAM 11.1.1.5.0 Components1. Oracle Database 11.2.0
See Section 23.2.1, "Oracle Database 11g - Version 11.2.0."
2. Oracle Fusion Middleware Repository Creation Utility 11.1.1.5.0
See Section 23.2.2, "Oracle Fusion Middleware Repository Creation Utility."
3. Oracle WebLogic Server 10.3.5 Generic and Coherence
See Section 23.2.3, "Oracle WebLogic Server Generic and Coherence."
4. Oracle Identity and Access Management 11.1.1.5.0
See Section 23.2.4, "Oracle Identity Management and Access Management."
Note: Choose the list of system components below that corresponds with the version of OAM that will be installed. Install the system components in the order given. The steps as listed are not comprehensive steps, and should be treated as guidelines.
Ensure that the proper versions are being used. The Oracle installer for each package requires that particular versions of related components are installed on the system. If version requirements are not observed then the installer will not allow a specific installation to continue. Each listed package includes one or more links to additional documentation.
All components listed can be downloaded from the Oracle Software Delivery Cloud site.
OAM Integration Prerequisites
23-6 Oracle Fusion Middleware WebCenter Sites: Installing and Configuring Supporting Software
5. Oracle Fusion Middleware Web Tier Utilities 11.1.1.2.0
Oracle Fusion Middleware Web Tier Utilities Patch Set 11.1.1.5.0
See Section 23.2.5, "Oracle Fusion Middleware Web Tier Utilities."
6. Oracle Access Manager OHS WebGates 11.1.1.5.0
See Section 23.2.6, "Oracle Access Manager OHS WebGates."
OAM 11.1.1.7.0 Components1. Oracle Database 11.2.0
See Section 23.2.1, "Oracle Database 11g - Version 11.2.0."
2. Oracle Fusion Middleware Repository Creation Utility 11.1.1.7.0
See Section 23.2.2, "Oracle Fusion Middleware Repository Creation Utility."
3. Oracle WebLogic Server 10.3.6 Generic and Coherence
See Section 23.2.3, "Oracle WebLogic Server Generic and Coherence."
4. Oracle Identity and Access Management 11.1.1.7.0
See Section 23.2.4, "Oracle Identity Management and Access Management."
5. Oracle Fusion Middleware Web Tier Utilities 11.1.1.7.0
See Section 23.2.5, "Oracle Fusion Middleware Web Tier Utilities."
6. Oracle Access Manager OHS WebGates 11.1.1.7.0
See Section 23.2.6, "Oracle Access Manager OHS WebGates."
OAM 11.1.2.1.0 Components1. Oracle Database 11.2.0
See Section 23.2.1, "Oracle Database 11g - Version 11.2.0."
2. Oracle Fusion Middleware Repository Creation Utility 11.1.2.1.0
See Section 23.2.2, "Oracle Fusion Middleware Repository Creation Utility."
3. Oracle WebLogic Server 10.3.6 Generic and Coherence
See Section 23.2.3, "Oracle WebLogic Server Generic and Coherence."
4. Oracle Identity and Access Management 11.1.2.1.0
See Section 23.2.4, "Oracle Identity Management and Access Management."
5. Oracle Fusion Middleware Web Tier Utilities 11.1.1.6.0
See Section 23.2.5, "Oracle Fusion Middleware Web Tier Utilities."
6. Oracle Access Manager OHS WebGates 11.1.2.1.0
See Section 23.2.6, "Oracle Access Manager OHS WebGates."
23.2.1 Oracle Database 11g - Version 11.2.01. Install Oracle Database 11g - Version 11.2.0.
http://docs.oracle.com/cd/E11882_01/install.112/e24321/toc.htm
2. Create and configure an Oracle 11g database. For specific instructions, see Chapter 1, "Creating and Configuring an Oracle 11g Database."
OAM Integration Prerequisites
Integrating Oracle Access Manager with Oracle WebCenter Sites 23-7
3. Increase the maximum processes and open cursors allowed for the newly created database by running the following commands in sqlplus and restarting the database:
alter system set processes=500 scope=spfile;alter system set open_cursors=800 scope=both;
23.2.2 Oracle Fusion Middleware Repository Creation Utility1. Create Schemas using the Repository Creation Utility.
http://docs.oracle.com/cd/E28280_01/doc.1111/e14259/rcu.htm#CHDHHDHE
2. On the Select Components screen, expand Identity Management and select Oracle Access Manager.
3. Select all components.
23.2.3 Oracle WebLogic Server Generic and CoherenceInstall WebLogic Server.
10.3.5http://docs.oracle.com/cd/E21764_01/doc.1111/e14142/guimode.htm#BABHJJEG
10.3.6http://docs.oracle.com/cd/E28280_01/doc.1111/e14142/guimode.htm#BABHJJEG
23.2.4 Oracle Identity Management and Access Management1. Install Oracle Identity Management and Access Management
■ 11.1.1.5.0: http://docs.oracle.com/cd/E23943_01/install.1111/e12002/common.htm#BABIADBF
■ 11.1.1.7.0: http://docs.oracle.com/cd/E28280_01/doc.1111/e36891/install.htm#CIHBBHGG
■ 11.1.2.1.0: http://docs.oracle.com/cd/E37115_01/install.1112/e27301/install.htm#BALIADBF
2. Create a domain.
a. Run <IAM_HOME>/common/bin/config.sh
For example:
/u01/software/Apps/OraMiddleware/Oracle_IDM1/common/bin/config.sh
b. Select Create a new WebLogic domain.
c. Select the following products based on the release:
OAM 11.1.1.5.0:
– Basic WebLogic Server Domain – 10.3.4.0 [wlserver_10.3]*
– Oracle Enterprise Manager – 11.1.1.0 [oracle_common]
– Oracle Access Manager with Database Policy Store – 11.1.1.3.0 [Oracle_IDM2]
– Oracle JRF – 11.1.1.0 [oracle_common]
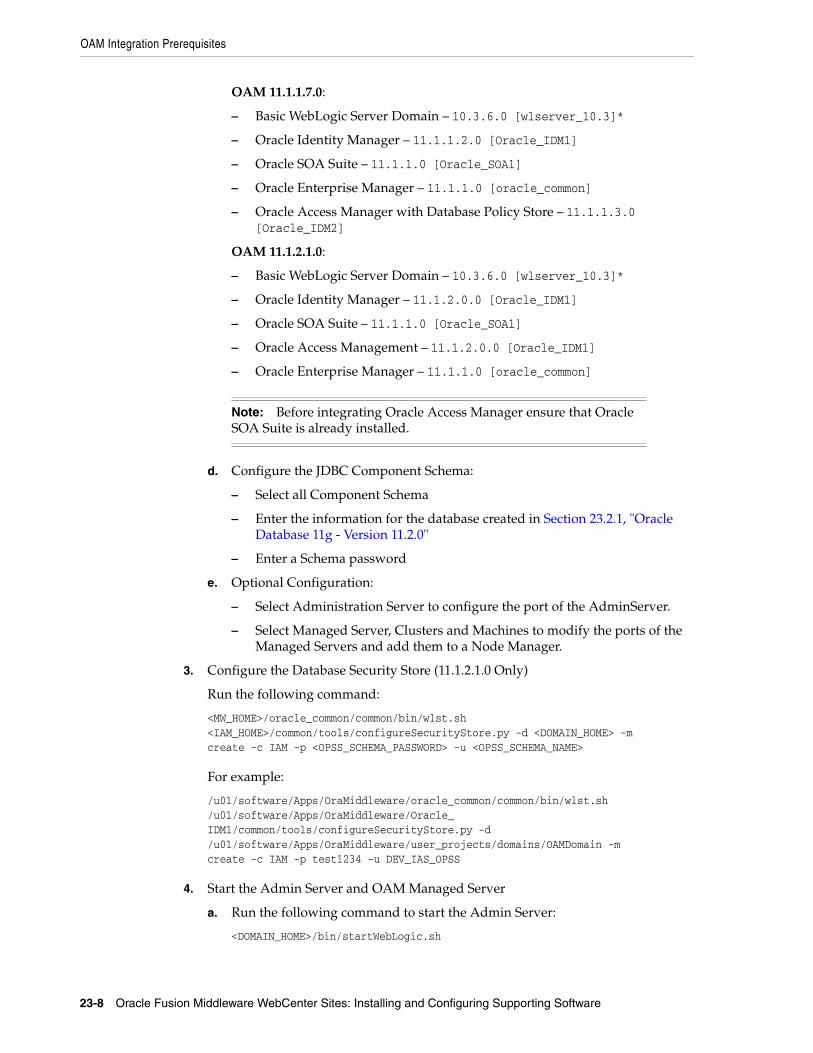
OAM Integration Prerequisites
23-8 Oracle Fusion Middleware WebCenter Sites: Installing and Configuring Supporting Software
OAM 11.1.1.7.0:
– Basic WebLogic Server Domain – 10.3.6.0 [wlserver_10.3]*
– Oracle Identity Manager – 11.1.1.2.0 [Oracle_IDM1]
– Oracle SOA Suite – 11.1.1.0 [Oracle_SOA1]
– Oracle Enterprise Manager – 11.1.1.0 [oracle_common]
– Oracle Access Manager with Database Policy Store – 11.1.1.3.0 [Oracle_IDM2]
OAM 11.1.2.1.0:
– Basic WebLogic Server Domain – 10.3.6.0 [wlserver_10.3]*
– Oracle Identity Manager – 11.1.2.0.0 [Oracle_IDM1]
– Oracle SOA Suite – 11.1.1.0 [Oracle_SOA1]
– Oracle Access Management – 11.1.2.0.0 [Oracle_IDM1]
– Oracle Enterprise Manager – 11.1.1.0 [oracle_common]
d. Configure the JDBC Component Schema:
– Select all Component Schema
– Enter the information for the database created in Section 23.2.1, "Oracle Database 11g - Version 11.2.0"
– Enter a Schema password
e. Optional Configuration:
– Select Administration Server to configure the port of the AdminServer.
– Select Managed Server, Clusters and Machines to modify the ports of the Managed Servers and add them to a Node Manager.
3. Configure the Database Security Store (11.1.2.1.0 Only)
Run the following command:
<MW_HOME>/oracle_common/common/bin/wlst.sh <IAM_HOME>/common/tools/configureSecurityStore.py -d <DOMAIN_HOME> -mcreate -c IAM -p <OPSS_SCHEMA_PASSWORD> -u <OPSS_SCHEMA_NAME>
For example:
/u01/software/Apps/OraMiddleware/oracle_common/common/bin/wlst.sh/u01/software/Apps/OraMiddleware/Oracle_IDM1/common/tools/configureSecurityStore.py -d /u01/software/Apps/OraMiddleware/user_projects/domains/OAMDomain -m create -c IAM -p test1234 -u DEV_IAS_OPSS
4. Start the Admin Server and OAM Managed Server
a. Run the following command to start the Admin Server:
<DOMAIN_HOME>/bin/startWebLogic.sh
Note: Before integrating Oracle Access Manager ensure that Oracle SOA Suite is already installed.
OAM Integration Prerequisites
Integrating Oracle Access Manager with Oracle WebCenter Sites 23-9
For example:
/u01/software/Apps/OraMiddleware/user_projects/domains/OAMDomain/bin/startWebLogic.sh
b. Run the following command to start the OAM Managed Server:
<DOMAIN_HOME/bin/startManagedWebLogic.sh oam_server1 http://<ADMIN_HOST>:<ADMIN_PORT>
For example:
/u01/software/Apps/OraMiddleware/user_projects/domains/OAMDomain/bin/startManagedWebLogic.sh oam_server1 http://localhost:7001
23.2.5 Oracle Fusion Middleware Web Tier Utilities1. Install Oracle Fusion Middleware Web Tier Utilities
■ 11.1.1.2.0 (Will install Patch Set also): http://docs.oracle.com/cd/E21764_01/install.1111/e14260/install.htm#WTINS101
■ 11.1.1.7.0: http://docs.oracle.com/cd/E28280_01/install.1111/e14260/config.htm#WTINS313
■ 11.1.1.6.0: http://docs.oracle.com/cd/E23943_01/install.1111/e14260/config.htm#WTINS313
Select Install Software - Do Not Configure.
2. Install Oracle Fusion Middleware Web Tier Utilities Patch Set (11.1.1.5.0 Only)
http://docs.oracle.com/cd/E14571_01/doc.1111/e16793/patch_set_installer.htm#PATCH246
3. Configure Oracle Fusion Middleware Web Tier Utilities
a. Run <WEB_TIER_HOME>/bin/config.sh
For example:
u01/software/Apps/OraMiddleware/Oracle_WT1/bin/config.sh
b. On the Configure Components screen, select Oracle HTTP Server and Associate Selected Components with WebLogic Domain.
c. On the Specify WebLogic Domain screen, select the domain created in step 2 of Section 23.2.4, "Oracle Identity Management and Access Management."
23.2.6 Oracle Access Manager OHS WebGates1. Install Oracle Access Manager OHS WebGates
■ 11.1.1.5.0: http://docs.oracle.com/cd/E21764_01/install.1111/e12002/webgate.htm#CACGIGBB
Note: Repeat the following steps for each Sites environment (for example - management, delivery, and so forth) that will be integrated with OAM.
Integrating OAM with Oracle WebCenter Sites
23-10 Oracle Fusion Middleware WebCenter Sites: Installing and Configuring Supporting Software
■ 11.1.1.7.0: http://docs.oracle.com/cd/E28280_01/doc.1111/e38584/webgate_ohs.htm#CACJIABJ
■ 11.1.1.2.1: http://docs.oracle.com/cd/E37115_01/install.1112/e38922/webgate_ohs.htm#CACJIABJ
2. Complete the post-installation steps.
Example values for the parameters:
<WEBGATE_HOME>
Example:
/u01/software/Apps/OraMiddleware/Oracle_OAMWebGate1
<WEBGATE_INSTANCE_DIR>
Example:
/u01/software/Apps/OraMiddleware/Oracle_WT1/instances/instance1/config/OHS/ohs1
<OHS_ORACLE_HOME>
Example:
/u01/software/Apps/OraMiddleware/Oracle_WT1
a. Deploy a Webgate instance:
cd <WEBGATE_HOME>/webgate/ohs/tools/deployWebGate./deployWebgateInstance.sh -w <WEBGATE_INSTANCE_DIR> -oh <WEBGATE_HOME>
b. Modify the OHS configuration files:
export LD_LIBRARY_PATH=$LD_LIBRARY_PATH:<OHS_ORACLE_HOME>/libcd <WEBGATE_HOME>/webgate/ohs/tools/setup/InstallTools./EditHttpConf -w <WEBGATE_INSTANCE_DIR> -oh <WEBGATE_HOME>
23.3 Integrating OAM with Oracle WebCenter SitesThis section includes the following topics:
■ Section 23.3.1, "Before You Start"
■ Section 23.3.2, "Integration Steps"
■ Section 23.3.3, "Allowing Anonymous Access to External Users"
23.3.1 Before You StartThere are some important considerations regarding the integration of WebCenter Sites with OAM authentication:
■ Up to this point, this chapter has described the required software and related components needed to integrate OAM with Oracle WebCenter Sites. If you have
Note: Repeat the following steps for each OHS instance you configured in step 3 of Section 23.2.5, "Oracle Fusion Middleware Web Tier Utilities."
Integrating OAM with Oracle WebCenter Sites
Integrating Oracle Access Manager with Oracle WebCenter Sites 23-11
not reviewed the chapter, and have not ensured that the required components are installed and properly set up, then review the document.
■ WebCenter Sites must be installed and working properly with the default CAS.
■ The Oracle Access Manager Administration Console (OAMCONSOLE) application is required to perform a majority of the setup activities. Ensure you have permission to use this facility.
The integration procedure is a set of manual steps to be completed as described in the rest of this chapter.
23.3.2 Integration StepsFor a Sites delivery environment, use a separate OHS instance and perform the steps below, creating and configuring an additional WebGate, host identifier, authentication scheme, and application domain.
To integrate OAM, complete the following:
1. Define WebCenter Sites users in the OAM User Identity Store.
OAM provides enforcement of authentication and authorization policies. WebCenter Sites uses only the authentication policies to protect resources. WebCenter Sites uses its own authorization policies.
User names in Oracle WebLogic Embedded LDAP must match the user names located in the WebCenter Sites SystemUsers table. The steps for adding users to WebLogic Embedded LDAP are as follows:
a. Log in to WebLogic Admin Console.
b. Click Security Realms.
c. Click myrealm.
d. Select the Users and Groups tab (Figure 23–2).
Note: If you plan on using an LDAP Server to store roles for WebCenter Sites, this configuration should be done before OAM Integration.
You may want to use the same LDAP Server for WebCenter Sites and OAM if user duplication is an issue.
Note: OAM is used for authentication only and does not rely on OAM authorization. While Oracle Internet Directory, Oracle Directory Server, and others can be used as user identity stores, Oracle WebLogic Embedded LDAP is the default, and is the user identity store used throughout the rest of this chapter. User names must match the user names located in the WebCenter Sites SystemUsers table.
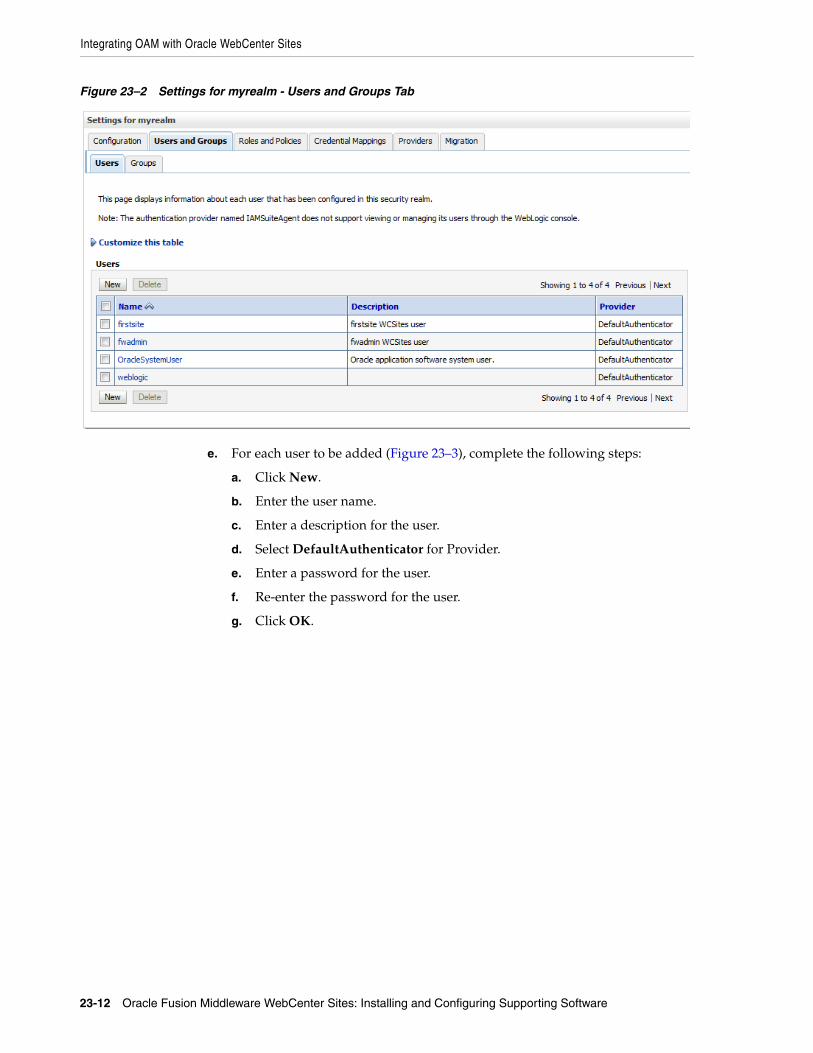
Integrating OAM with Oracle WebCenter Sites
23-12 Oracle Fusion Middleware WebCenter Sites: Installing and Configuring Supporting Software
Figure 23–2 Settings for myrealm - Users and Groups Tab
e. For each user to be added (Figure 23–3), complete the following steps:
a. Click New.
b. Enter the user name.
c. Enter a description for the user.
d. Select DefaultAuthenticator for Provider.
e. Enter a password for the user.
f. Re-enter the password for the user.
g. Click OK.

Integrating OAM with Oracle WebCenter Sites
Integrating Oracle Access Manager with Oracle WebCenter Sites 23-13
Figure 23–3 Create a New User Screen
2. Create an OAM WebGate Agent for deployment on OHS (Figure 23–4).
a. Log in to the OAM Console application.
http://<oam_server_host>:<weblogic_admin_port>/oamconsole
b. Select the System Configuration tab.
c. Under SSO Agents, click New OAM 11g Webgate.
d. For Name, enter a name for the WebGate. This guide will use WCSitesWebGate.
e. For Preferred Host, enter a name for the Host Identifier to be created, and click Apply. The guide will use WCSites.
f. For Logout Callback URL, enter /<sites_context_root>/oam_logout_success and click Apply.
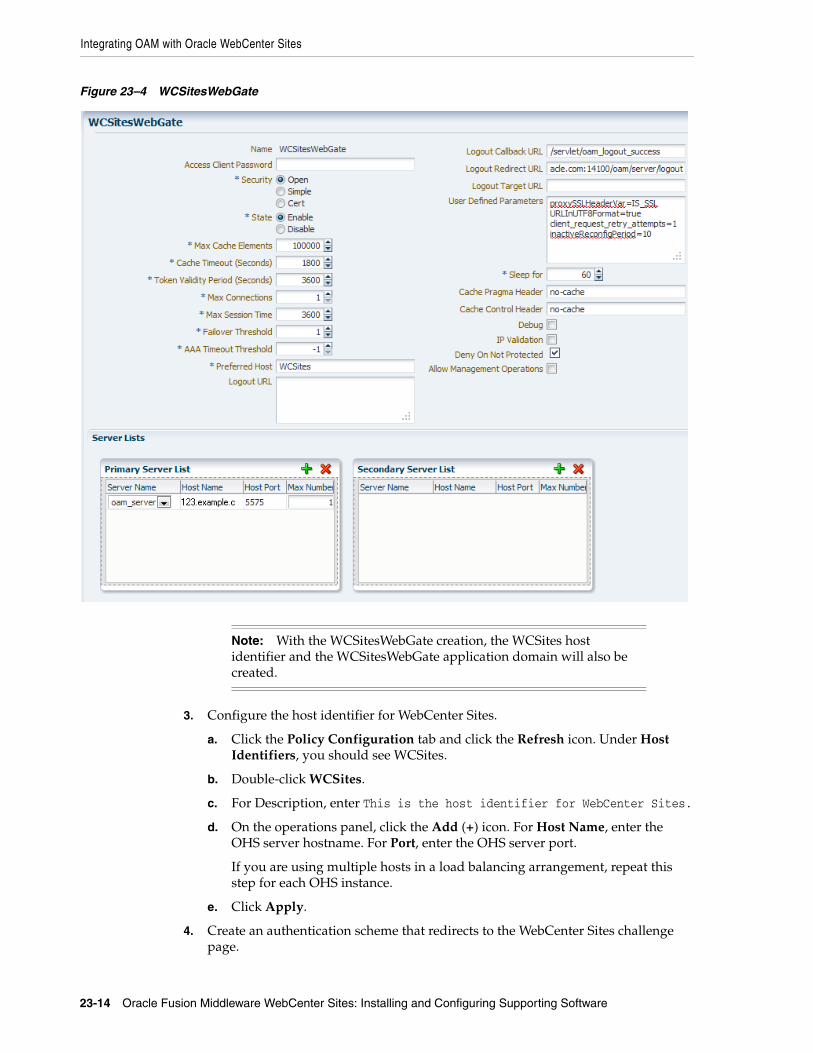
Integrating OAM with Oracle WebCenter Sites
23-14 Oracle Fusion Middleware WebCenter Sites: Installing and Configuring Supporting Software
Figure 23–4 WCSitesWebGate
3. Configure the host identifier for WebCenter Sites.
a. Click the Policy Configuration tab and click the Refresh icon. Under Host Identifiers, you should see WCSites.
b. Double-click WCSites.
c. For Description, enter This is the host identifier for WebCenter Sites.
d. On the operations panel, click the Add (+) icon. For Host Name, enter the OHS server hostname. For Port, enter the OHS server port.
If you are using multiple hosts in a load balancing arrangement, repeat this step for each OHS instance.
e. Click Apply.
4. Create an authentication scheme that redirects to the WebCenter Sites challenge page.
Note: With the WCSitesWebGate creation, the WCSites host identifier and the WCSitesWebGate application domain will also be created.

Integrating OAM with Oracle WebCenter Sites
Integrating Oracle Access Manager with Oracle WebCenter Sites 23-15
a. Click Authentication Schemes, and then click the Create icon.
The Authentication Schemes form is displayed.
Figure 23–5 Authentication Schemes form
b. For Name, enter a name for the authentication scheme to be created. This guide will use LDAPWemScheme
c. For Description, enter Challenge for WebCenter Sites applications
d. For Authentication Level, enter 2
e. For Challenge Method, select FORM
f. For Challenge Redirect URL, enter /oam/server
g. For Authentication Module, select LDAP
h. For Challenge URL, use the host and port that will be used to access the oamlogin application after it is deployed. Enter http://<oamlogin_server_host>:<oamlogin_port>/oamlogin/oamsso/oamLoginView.jsp
i. For Context Type, select external
j. Click Apply.
5. In steps 5-6, you will be configuring the WCSitesWebGate application domain created during WebGate creation. The Protected Resource Policy authentication policy forces a challenge for any of its resources that are accessed without
Note: This step is optional and can be skipped if using the default OAM login form or another custom login form.
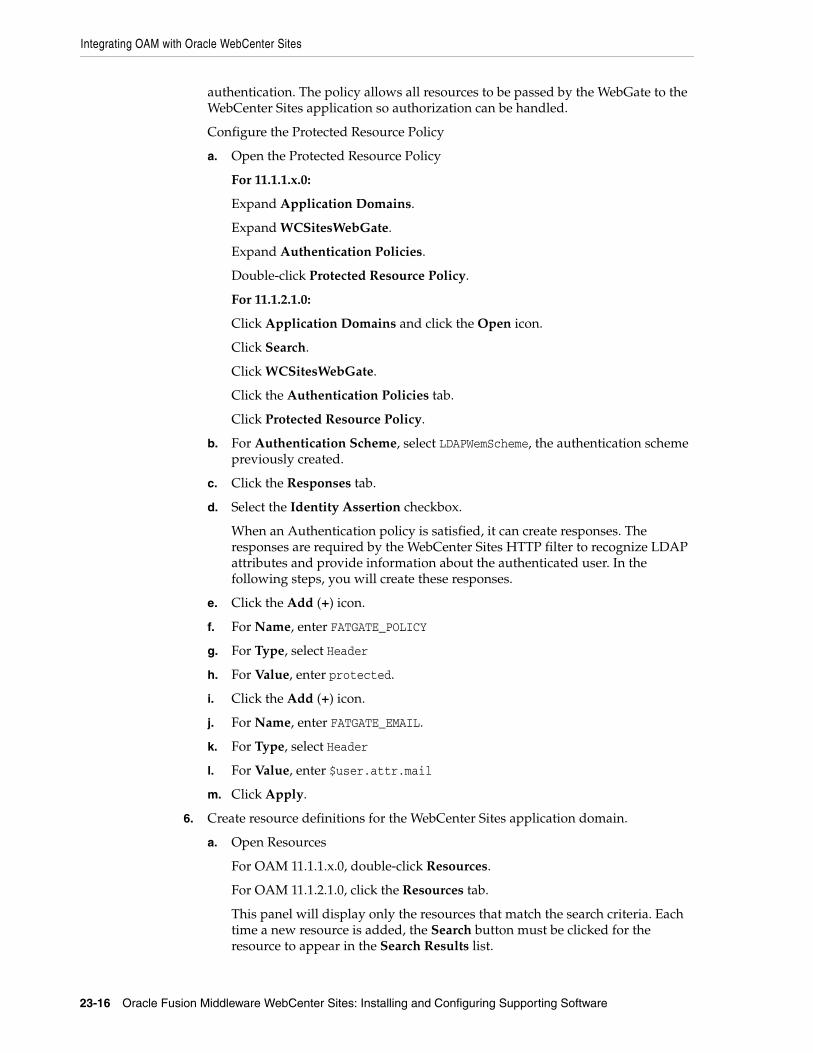
Integrating OAM with Oracle WebCenter Sites
23-16 Oracle Fusion Middleware WebCenter Sites: Installing and Configuring Supporting Software
authentication. The policy allows all resources to be passed by the WebGate to the WebCenter Sites application so authorization can be handled.
Configure the Protected Resource Policy
a. Open the Protected Resource Policy
For 11.1.1.x.0:
Expand Application Domains.
Expand WCSitesWebGate.
Expand Authentication Policies.
Double-click Protected Resource Policy.
For 11.1.2.1.0:
Click Application Domains and click the Open icon.
Click Search.
Click WCSitesWebGate.
Click the Authentication Policies tab.
Click Protected Resource Policy.
b. For Authentication Scheme, select LDAPWemScheme, the authentication scheme previously created.
c. Click the Responses tab.
d. Select the Identity Assertion checkbox.
When an Authentication policy is satisfied, it can create responses. The responses are required by the WebCenter Sites HTTP filter to recognize LDAP attributes and provide information about the authenticated user. In the following steps, you will create these responses.
e. Click the Add (+) icon.
f. For Name, enter FATGATE_POLICY
g. For Type, select Header
h. For Value, enter protected.
i. Click the Add (+) icon.
j. For Name, enter FATGATE_EMAIL.
k. For Type, select Header
l. For Value, enter $user.attr.mail
m. Click Apply.
6. Create resource definitions for the WebCenter Sites application domain.
a. Open Resources
For OAM 11.1.1.x.0, double-click Resources.
For OAM 11.1.2.1.0, click the Resources tab.
This panel will display only the resources that match the search criteria. Each time a new resource is added, the Search button must be clicked for the resource to appear in the Search Results list.
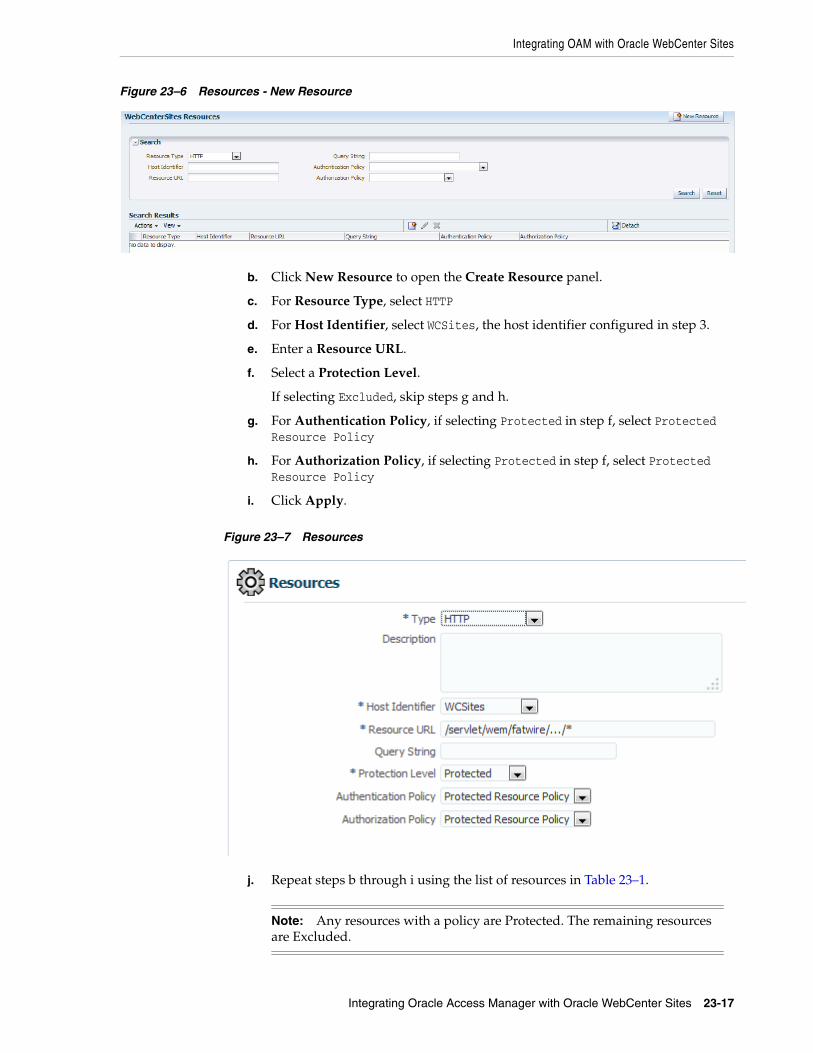
Integrating OAM with Oracle WebCenter Sites
Integrating Oracle Access Manager with Oracle WebCenter Sites 23-17
Figure 23–6 Resources - New Resource
b. Click New Resource to open the Create Resource panel.
c. For Resource Type, select HTTP
d. For Host Identifier, select WCSites, the host identifier configured in step 3.
e. Enter a Resource URL.
f. Select a Protection Level.
If selecting Excluded, skip steps g and h.
g. For Authentication Policy, if selecting Protected in step f, select Protected Resource Policy
h. For Authorization Policy, if selecting Protected in step f, select Protected Resource Policy
i. Click Apply.
Figure 23–7 Resources
j. Repeat steps b through i using the list of resources in Table 23–1.
Note: Any resources with a policy are Protected. The remaining resources are Excluded.
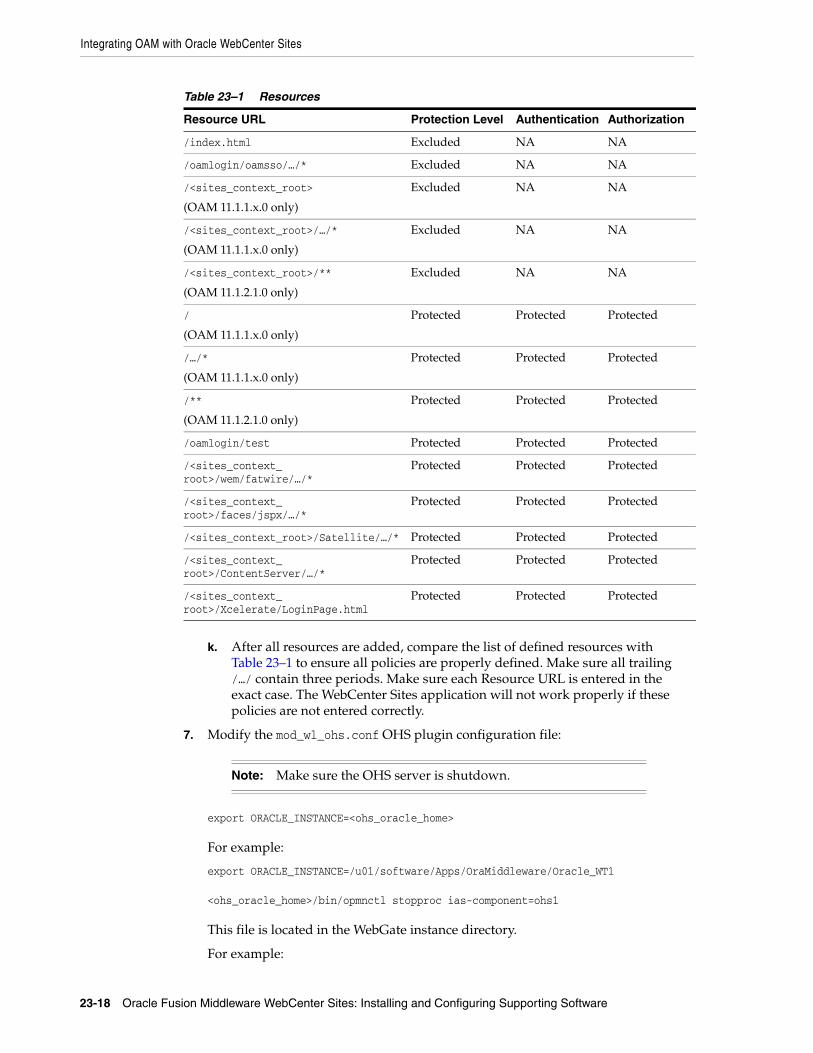
Integrating OAM with Oracle WebCenter Sites
23-18 Oracle Fusion Middleware WebCenter Sites: Installing and Configuring Supporting Software
k. After all resources are added, compare the list of defined resources with Table 23–1 to ensure all policies are properly defined. Make sure all trailing /…/ contain three periods. Make sure each Resource URL is entered in the exact case. The WebCenter Sites application will not work properly if these policies are not entered correctly.
7. Modify the mod_wl_ohs.conf OHS plugin configuration file:
export ORACLE_INSTANCE=<ohs_oracle_home>
For example:
export ORACLE_INSTANCE=/u01/software/Apps/OraMiddleware/Oracle_WT1
<ohs_oracle_home>/bin/opmnctl stopproc ias-component=ohs1
This file is located in the WebGate instance directory.
For example:
Table 23–1 Resources
Resource URL Protection Level Authentication Authorization
/index.html Excluded NA NA
/oamlogin/oamsso/…/* Excluded NA NA
/<sites_context_root>
(OAM 11.1.1.x.0 only)
Excluded NA NA
/<sites_context_root>/…/*
(OAM 11.1.1.x.0 only)
Excluded NA NA
/<sites_context_root>/**
(OAM 11.1.2.1.0 only)
Excluded NA NA
/
(OAM 11.1.1.x.0 only)
Protected Protected Protected
/…/*
(OAM 11.1.1.x.0 only)
Protected Protected Protected
/**
(OAM 11.1.2.1.0 only)
Protected Protected Protected
/oamlogin/test Protected Protected Protected
/<sites_context_root>/wem/fatwire/…/*
Protected Protected Protected
/<sites_context_root>/faces/jspx/…/*
Protected Protected Protected
/<sites_context_root>/Satellite/…/* Protected Protected Protected
/<sites_context_root>/ContentServer/…/*
Protected Protected Protected
/<sites_context_root>/Xcelerate/LoginPage.html
Protected Protected Protected
Note: Make sure the OHS server is shutdown.
Integrating OAM with Oracle WebCenter Sites
Integrating Oracle Access Manager with Oracle WebCenter Sites 23-19
/u01/software/Apps/OraMiddleware/Oracle_WT1/instances/instance1/config/OHS/ohs1/mod_wl_ohs.conf
Consider this template for modification:
# NOTE : This is a template to configure mod_weblogic.
LoadModule weblogic_module "${ORACLE_HOME}/ohs/modules/mod_wl_ohs.so"
# This empty block is needed to save mod_wl related configuration from EM to # this file when changes are made at the Base Virtual Host Level<IfModule weblogic_module># WebLogicHost <WEBLOGIC_HOST># WebLogicPort <WEBLOGIC_PORT># Debug ON# WLLogFile /tmp/weblogic.log# MatchExpression *.jsp</IfModule>
<IfModule weblogic_module> <Location /oamlogin> SetHandler weblogic-handler WebLogicHost {oamlogin_server_host} WebLogicPort {oamlogin_port} </Location></IfModule>
<IfModule weblogic_module> <Location /{sites_context_root}> SetHandler weblogic-handler WebLogicHost {sites_server_host} WebLogicPort {sites_port} </Location></IfModule>
# <Location /weblogic># SetHandler weblogic-handler# PathTrim /weblogic# ErrorPage http:/WEBLOGIC_HOME:WEBLOGIC_PORT/# </Location>
8. Copy the WebGate configuration files (ObAccessClient.xml and cwallet.sso) to the WebGate instance:
cp <oam_domain_home>/output/<webgate_name>/* <webgate_instance_dir>/webgate/config
For example:
cp /u01/software/Apps/OraMiddleware/user_projects/domains/OAMDomain/output/WCSitesWebGate/*
Note: Make sure there is an include statement in the http.conf files for the mod_wl_ohs.conf file.
For example:
include "/u01/software/Apps/OraMiddleware/Oracle_WT1/instances/instance1/config/OHS/ohs1/mod_wl_ohs.conf"
Integrating OAM with Oracle WebCenter Sites
23-20 Oracle Fusion Middleware WebCenter Sites: Installing and Configuring Supporting Software
/u01/software/Apps/OraMiddleware/Oracle_WT1/instances/instance1/config/OHS/ohs1/webgate/config
9. Start the OHS server:
export ORACLE_INSTANCE=<ohs_oracle_home>
For example:
export ORACLE_INSTANCE=/u01/software/Apps/OraMiddleware/Oracle_WT1<ohs_oracle_home>/bin/opmnctl startproc ias-component=ohs1
10. Deploy the oamtoken.war file:
a. Create a directory where the oamtoken.war file will be deployed from, and explode the oamtoken.war file into the directory from the wem directory of the WebCenter Sites installer.
For example:
mkdir /u01/software/Apps/OraMiddleware/user_projects/domains/OAMSitesDomain/applications/oamtokencd /u01/software/Apps/OraMiddleware/user_projects/domains/OAMSitesDomain/applications/oamtoken jar -xvf /u01/installation_files/Sites/wem/oamtoken.war
b. Modify the oamtoken.xml file located in the WEB-INF/classes directory of the exploded oamtoken web application.
For OAM 11.1.1.5.0, set the value of compatibilityMode to 10G.
For OAM 11.1.1.7.0 and 11.1.2.1.0, set the value of compatibilityMode to 11G.
c. Copy the WebGate configuration files (ObAccessClient.xml and cwallet.sso) created in step 2 to the WEB-INF/oblix/lib directory of the exploded oamtoken web application.
Overwrite any existing file.
The WebGate configuration files are located in the <oam_domain_home>/output/<webgate_name> directory on the system where OAM is deployed.
For OAM 11.1.1.5.0, skip steps d through f.
d. Copy the jps-config.xml file from the config directory of the exploded oamtoken web application to <oamtoken_domain_home>/config.
e. Modify the file copied in step d, changing the value of the location parameter to the path of the directory where the cwallet.sso file is located.
For example:
../applications/oamtoken/WEB-INF/oblix/lib
f. Modify the weblogic.policy file located in the <weblogic_home>/server/lib directory on the host where oamtoken will be deployed.
Add the following lines after the beginning commented section of the file, setting the file value to the path of WEB-INF/lib/* in the exploded oamtoken web application:
// grant permission for oamtokengrant codebase "file:<path_to_exploded_oamtoken_app>/WEB-INF/lib/*" { permission
Integrating OAM with Oracle WebCenter Sites
Integrating Oracle Access Manager with Oracle WebCenter Sites 23-21
oracle.security.jps.service.credstore.CredentialAccessPermission "context=SYSTEM,mapName=OAMAgent,keyName=*", "read";};
g. Deploy the exploded oamtoken web application.
11. Deploy the oamlogin.war file. This web application contains the WebCenter Sites challenge page.
a. Create a directory where the oamlogin.war file will be deployed from, and explode the oamlogin.war file into the directory from the wem directory of the WebCenter Sites installer.
For example:
mkdir /u01/software/Apps/OraMiddleware/user_projects/domains/OAMSitesDomain/applications/oamlogincd /u01/software/Apps/OraMiddleware/user_projects/domains/OAMSitesDomain/applications/oamloginjar -xvf /u01/installation_files/Sites/wem/oamlogin.war
b. Create a file named wemsites_settings.properties in the WEB-INF/classes directory of the exploded oamlogin web application, using the code below. Replace the variables with the correct values for your environment:
oamredirect=http://<oam_server_host>:<oam_port>/oam/server/auth_cred_submitoamlogout=http://<oam_server_host>:<oam_port>/oam/server/logoutforgotpassword=<email_account>@<email_domain>
If the oamredirect property is not configured correctly, the username and password will fail to authenticate.
c. Deploy the exploded oamlogin web application. On WebLogic, make the deployment accessible from the current location.
12. Modify the SSOConfig.xml file of the WebCenter Sites deployment. This file controls which authentication classes are loaded and the properties that are required by those classes.
1. Shutdown the Sites server.
2. Back up the SSOConfig.xml file, located in the WEB-INF/classes directory of the deployed WebCenter Sites application.
For example:
/u01/software/Apps/OraMiddleware/user_projects/domains/OAMSitesDomain/applications/Sites/WEB-INF/classes/SSOConfig.xml
Note: On WebLogic, make the deployment accessible from the current location.
The servlet contained in the oamtoken web application may be called with visible username and password credentials. It is recommended to deploy the application as a secured web application user SSL.
Note: This step is optional and can be skipped if using the default OAM login form or another custom login form
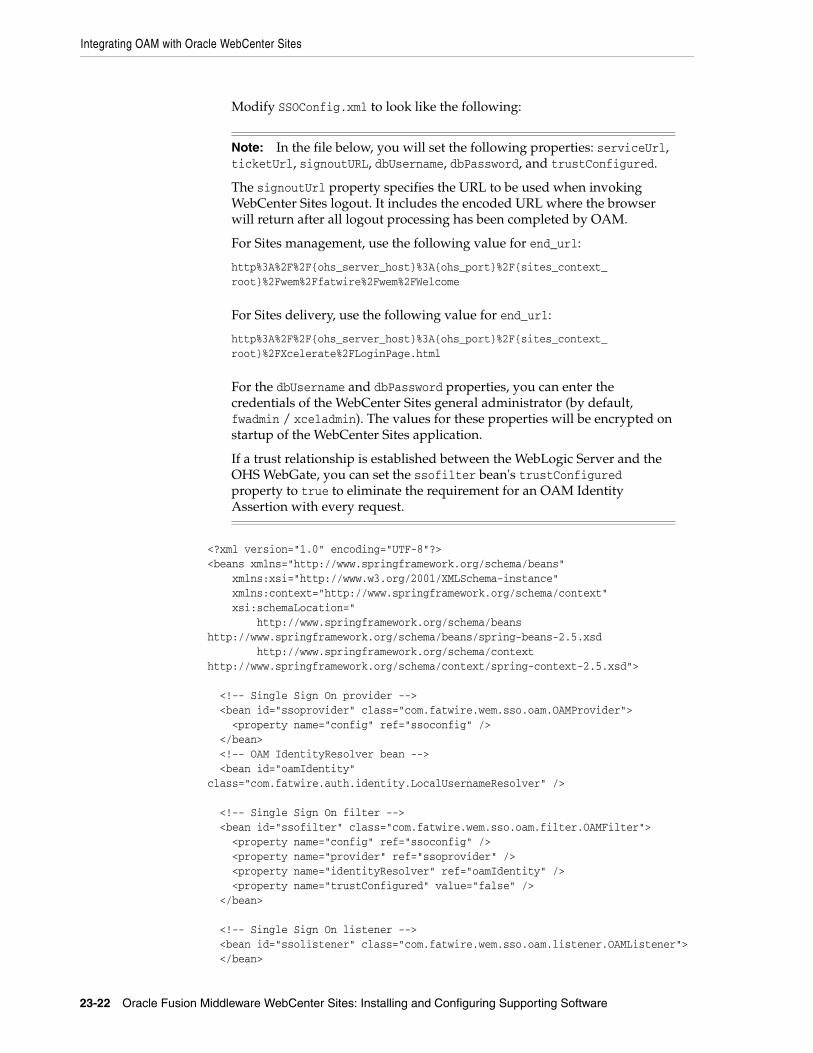
Integrating OAM with Oracle WebCenter Sites
23-22 Oracle Fusion Middleware WebCenter Sites: Installing and Configuring Supporting Software
Modify SSOConfig.xml to look like the following:
<?xml version="1.0" encoding="UTF-8"?><beans xmlns="http://www.springframework.org/schema/beans" xmlns:xsi="http://www.w3.org/2001/XMLSchema-instance" xmlns:context="http://www.springframework.org/schema/context" xsi:schemaLocation=" http://www.springframework.org/schema/beans http://www.springframework.org/schema/beans/spring-beans-2.5.xsd http://www.springframework.org/schema/context http://www.springframework.org/schema/context/spring-context-2.5.xsd">
<!-- Single Sign On provider --> <bean id="ssoprovider" class="com.fatwire.wem.sso.oam.OAMProvider"> <property name="config" ref="ssoconfig" /> </bean> <!-- OAM IdentityResolver bean --> <bean id="oamIdentity" class="com.fatwire.auth.identity.LocalUsernameResolver" />
<!-- Single Sign On filter --> <bean id="ssofilter" class="com.fatwire.wem.sso.oam.filter.OAMFilter"> <property name="config" ref="ssoconfig" /> <property name="provider" ref="ssoprovider" /> <property name="identityResolver" ref="oamIdentity" /> <property name="trustConfigured" value="false" /> </bean>
<!-- Single Sign On listener --> <bean id="ssolistener" class="com.fatwire.wem.sso.oam.listener.OAMListener"> </bean>
Note: In the file below, you will set the following properties: serviceUrl, ticketUrl, signoutURL, dbUsername, dbPassword, and trustConfigured.
The signoutUrl property specifies the URL to be used when invoking WebCenter Sites logout. It includes the encoded URL where the browser will return after all logout processing has been completed by OAM.
For Sites management, use the following value for end_url:
http%3A%2F%2F{ohs_server_host}%3A{ohs_port}%2F{sites_context_root}%2Fwem%2Ffatwire%2Fwem%2FWelcome
For Sites delivery, use the following value for end_url:
http%3A%2F%2F{ohs_server_host}%3A{ohs_port}%2F{sites_context_root}%2FXcelerate%2FLoginPage.html
For the dbUsername and dbPassword properties, you can enter the credentials of the WebCenter Sites general administrator (by default, fwadmin / xceladmin). The values for these properties will be encrypted on startup of the WebCenter Sites application.
If a trust relationship is established between the WebLogic Server and the OHS WebGate, you can set the ssofilter bean's trustConfigured property to true to eliminate the requirement for an OAM Identity Assertion with every request.
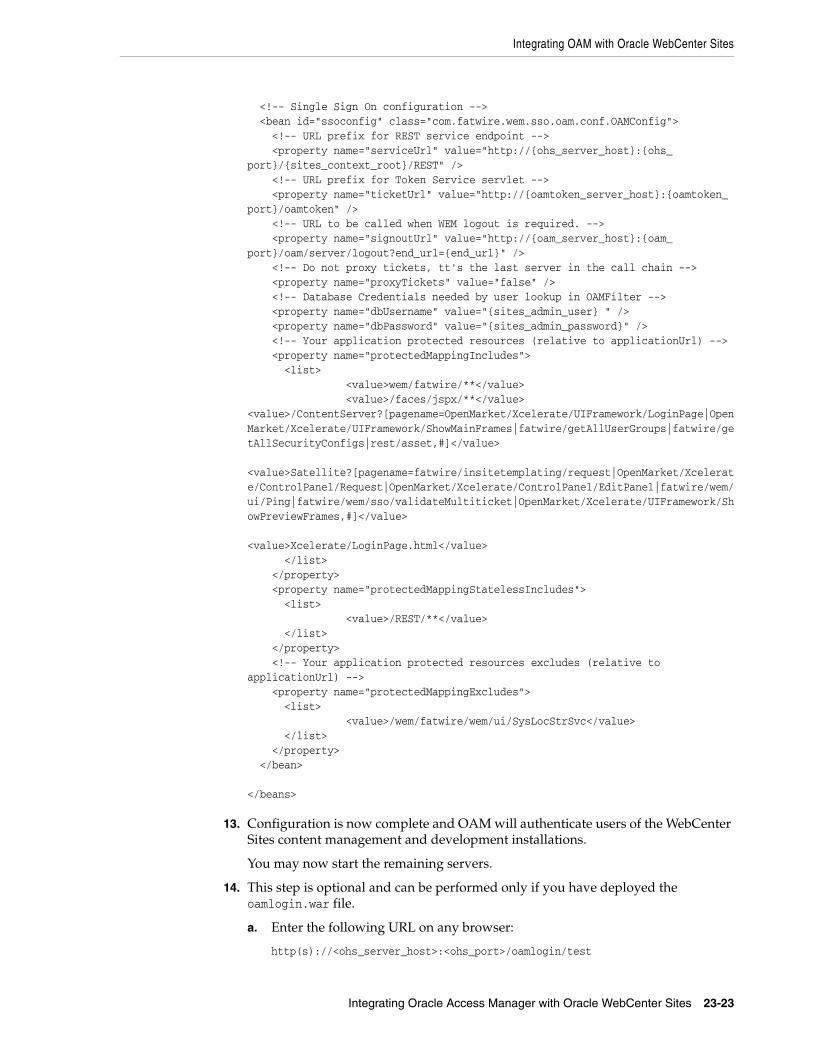
Integrating OAM with Oracle WebCenter Sites
Integrating Oracle Access Manager with Oracle WebCenter Sites 23-23
<!-- Single Sign On configuration --> <bean id="ssoconfig" class="com.fatwire.wem.sso.oam.conf.OAMConfig"> <!-- URL prefix for REST service endpoint --> <property name="serviceUrl" value="http://{ohs_server_host}:{ohs_port}/{sites_context_root}/REST" /> <!-- URL prefix for Token Service servlet --> <property name="ticketUrl" value="http://{oamtoken_server_host}:{oamtoken_port}/oamtoken" /> <!-- URL to be called when WEM logout is required. --> <property name="signoutUrl" value="http://{oam_server_host}:{oam_port}/oam/server/logout?end_url={end_url}" /> <!-- Do not proxy tickets, tt's the last server in the call chain --> <property name="proxyTickets" value="false" /> <!-- Database Credentials needed by user lookup in OAMFilter --> <property name="dbUsername" value="{sites_admin_user} " /> <property name="dbPassword" value="{sites_admin_password}" /> <!-- Your application protected resources (relative to applicationUrl) --> <property name="protectedMappingIncludes"> <list> <value>wem/fatwire/**</value> <value>/faces/jspx/**</value><value>/ContentServer?[pagename=OpenMarket/Xcelerate/UIFramework/LoginPage|OpenMarket/Xcelerate/UIFramework/ShowMainFrames|fatwire/getAllUserGroups|fatwire/getAllSecurityConfigs|rest/asset,#]</value>
<value>Satellite?[pagename=fatwire/insitetemplating/request|OpenMarket/Xcelerate/ControlPanel/Request|OpenMarket/Xcelerate/ControlPanel/EditPanel|fatwire/wem/ui/Ping|fatwire/wem/sso/validateMultiticket|OpenMarket/Xcelerate/UIFramework/ShowPreviewFrames,#]</value>
<value>Xcelerate/LoginPage.html</value> </list> </property> <property name="protectedMappingStatelessIncludes"> <list> <value>/REST/**</value> </list> </property> <!-- Your application protected resources excludes (relative to applicationUrl) --> <property name="protectedMappingExcludes"> <list> <value>/wem/fatwire/wem/ui/SysLocStrSvc</value> </list> </property> </bean>
</beans>
13. Configuration is now complete and OAM will authenticate users of the WebCenter Sites content management and development installations.
You may now start the remaining servers.
14. This step is optional and can be performed only if you have deployed the oamlogin.war file.
a. Enter the following URL on any browser:
http(s)://<ohs_server_host>:<ohs_port>/oamlogin/test
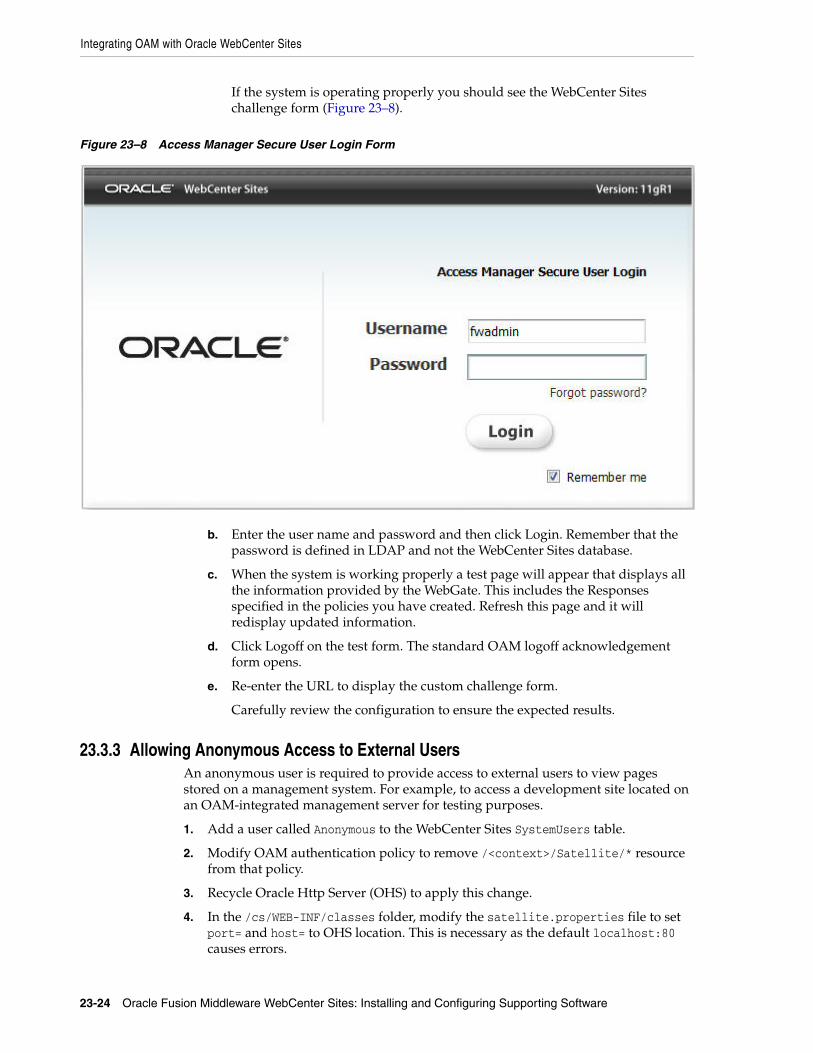
Integrating OAM with Oracle WebCenter Sites
23-24 Oracle Fusion Middleware WebCenter Sites: Installing and Configuring Supporting Software
If the system is operating properly you should see the WebCenter Sites challenge form (Figure 23–8).
Figure 23–8 Access Manager Secure User Login Form
b. Enter the user name and password and then click Login. Remember that the password is defined in LDAP and not the WebCenter Sites database.
c. When the system is working properly a test page will appear that displays all the information provided by the WebGate. This includes the Responses specified in the policies you have created. Refresh this page and it will redisplay updated information.
d. Click Logoff on the test form. The standard OAM logoff acknowledgement form opens.
e. Re-enter the URL to display the custom challenge form.
Carefully review the configuration to ensure the expected results.
23.3.3 Allowing Anonymous Access to External UsersAn anonymous user is required to provide access to external users to view pages stored on a management system. For example, to access a development site located on an OAM-integrated management server for testing purposes.
1. Add a user called Anonymous to the WebCenter Sites SystemUsers table.
2. Modify OAM authentication policy to remove /<context>/Satellite/* resource from that policy.
3. Recycle Oracle Http Server (OHS) to apply this change.
4. In the /cs/WEB-INF/classes folder, modify the satellite.properties file to set port= and host= to OHS location. This is necessary as the default localhost:80 causes errors.
Integrating OAM with Oracle WebCenter Sites: Satellite Server
Integrating Oracle Access Manager with Oracle WebCenter Sites 23-25
23.4 Integrating OAM with Oracle WebCenter Sites: Satellite ServerConfiguring a Satellite Server for Oracle Access Manager integration is a simpler procedure than for WebCenter Sites. The procedure outlined in this section is specific to configuring a single Satellite Server, but the process is the same for additional Satellite Servers.
This section includes the following topics:
■ Section 23.4.1, "Before You Start"
■ Section 23.4.2, "Integration Steps"
23.4.1 Before You StartEnsure the following actions are complete before integrating Satellite Server:
■ Oracle Access Manager is installed and running.
■ WebCenter Sites has been successfully integrated with OAM.
■ Satellite Server is installed.
23.4.2 Integration StepsIn these steps, you will modify the SSOConfig.xml file of the WebCenter Sites SatelliteServer deployment. This file controls which authentication classes are loaded and the various properties that are required by those classes.
1. Shut down the server where SatelliteServer is deployed.
2. Back up the SSOConfig.xml file, located in the deployed WEB-INF/classes directory of the deployed WebCenter Sites SatelliteServer application.
For example:
/u01/software/Apps/OraMiddleware/user_projects/domains/OAMSitesDomain /applications/SatelliteServer/WEB-INF/classes/SSOConfig.xml
3. Modify SSOConfig.xml to look like the file shown below.
<?xml version="1.0" encoding="UTF-8"?><beans xmlns="http://www.springframework.org/schema/beans" xmlns:xsi="http://www.w3.org/2001/XMLSchema-instance" xmlns:context="http://www.springframework.org/schema/context" xsi:schemaLocation="http://www.springframework.org/schema/beans http://www.springframework.org/schema/beans/spring-beans-2.5.xsd http://www.springframework.org/schema/context http://www.springframework.org/schema/context/spring-context-2.5.xsd">
Note: In the file below, you will set the following properties: serviceUrl, ticketUrl, and signoutURL.
The signoutUrl property specifies the URL to be used when invoking WebCenter Sites logout. It includes the encoded URL where the browser will return after all logout processing has been completed by OAM.
If a trust relationship is established between the WebLogic Server and the OHS WebGate, you can set the ssofilter bean's trustConfigured property to true to eliminate the requirement for an OAM Identity Assertion with every request.
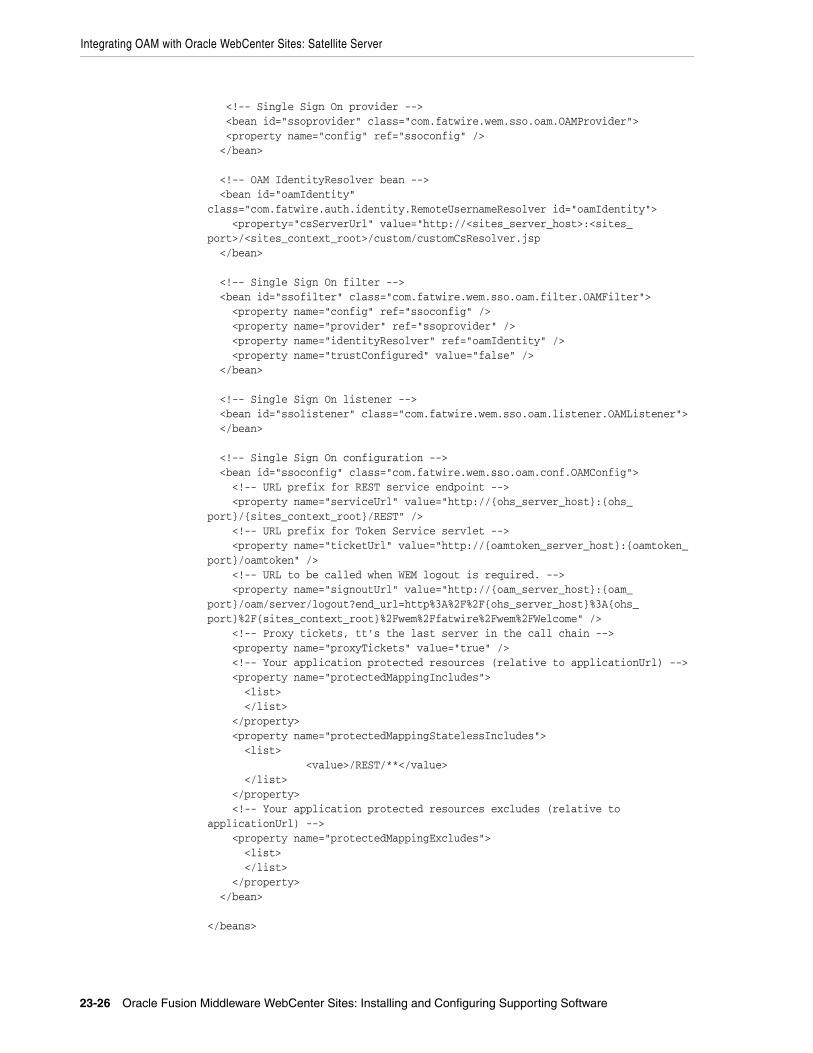
Integrating OAM with Oracle WebCenter Sites: Satellite Server
23-26 Oracle Fusion Middleware WebCenter Sites: Installing and Configuring Supporting Software
<!-- Single Sign On provider --> <bean id="ssoprovider" class="com.fatwire.wem.sso.oam.OAMProvider"> <property name="config" ref="ssoconfig" /> </bean>
<!-- OAM IdentityResolver bean --> <bean id="oamIdentity" class="com.fatwire.auth.identity.RemoteUsernameResolver id="oamIdentity"> <property="csServerUrl" value="http://<sites_server_host>:<sites_port>/<sites_context_root>/custom/customCsResolver.jsp </bean>
<!-- Single Sign On filter --> <bean id="ssofilter" class="com.fatwire.wem.sso.oam.filter.OAMFilter"> <property name="config" ref="ssoconfig" /> <property name="provider" ref="ssoprovider" /> <property name="identityResolver" ref="oamIdentity" /> <property name="trustConfigured" value="false" /> </bean>
<!-- Single Sign On listener --> <bean id="ssolistener" class="com.fatwire.wem.sso.oam.listener.OAMListener"> </bean>
<!-- Single Sign On configuration --> <bean id="ssoconfig" class="com.fatwire.wem.sso.oam.conf.OAMConfig"> <!-- URL prefix for REST service endpoint --> <property name="serviceUrl" value="http://{ohs_server_host}:{ohs_port}/{sites_context_root}/REST" /> <!-- URL prefix for Token Service servlet --> <property name="ticketUrl" value="http://{oamtoken_server_host}:{oamtoken_port}/oamtoken" /> <!-- URL to be called when WEM logout is required. --> <property name="signoutUrl" value="http://{oam_server_host}:{oam_port}/oam/server/logout?end_url=http%3A%2F%2F{ohs_server_host}%3A{ohs_port}%2F{sites_context_root}%2Fwem%2Ffatwire%2Fwem%2FWelcome" /> <!-- Proxy tickets, tt's the last server in the call chain --> <property name="proxyTickets" value="true" /> <!-- Your application protected resources (relative to applicationUrl) --> <property name="protectedMappingIncludes"> <list> </list> </property> <property name="protectedMappingStatelessIncludes"> <list> <value>/REST/**</value> </list> </property> <!-- Your application protected resources excludes (relative to applicationUrl) --> <property name="protectedMappingExcludes"> <list> </list> </property> </bean>
</beans>
Integrating OAM with Oracle WebCenter Sites: Satellite Server
Integrating Oracle Access Manager with Oracle WebCenter Sites 23-27
Ensure that the proxyTickets parameter is set to true. This is required so that Satellite Server will pass authenticated tickets allocated by REST client programs to WebCenter Sites.
The location of the REST endpoint (defined by the serviceUrl property) depends on the location of the Satellite Server. When located inside the firewall, it can refer directly to the WebCenter Sites to achieve the highest performance without compromising security. When the Satellite Server is located elsewhere, or exposed directly to the Internet, the endpoint must direct all requests through the OHS to secure and protect WebCenter Sites.
An advanced configuration using OHS in front of Satellite Server is an alternative way of securing the WebCenter Sites configurations. This configuration would access the WebCenter Sites.
Integrating OAM with Oracle WebCenter Sites: Satellite Server
23-28 Oracle Fusion Middleware WebCenter Sites: Installing and Configuring Supporting Software
24
Enabling Community-Gadgets to Communicate with OAM-Integrated WebCenter Sites 24-1
24Enabling Community-Gadgets toCommunicate with OAM-Integrated
WebCenter Sites
Oracle WebCenter Sites can be integrated with Oracle Access Manager (OAM) instead of CAS to make use of its authentication and single sign-on services. If Community-Gadgets is also installed, it must be enabled to communicate with WebCenter Sites through its OAM, as described in this chapter.
This chapter contains the following sections:
■ Section 24.1, "Before You Start"
■ Section 24.2, "Enabling Communication with the OAM-Integrated Management WebCenter Sites"
■ Section 24.3, "Enabling Communication with the OAM-Integrated Production WebCenter Sites"
■ Section 24.4, "Next Step"
24.1 Before You StartBefore configuring support for communications between Community-Gadgets and OAM-integrated WebCenter Sites, ensure the following:
■ WebCenter Sites management and production installations are fully functional. Also, WebCenter Sites is (or will be) successfully integrated with OAM.
■ The Community-Gadgets war/ear files have been generated, as described in the Oracle Fusion Middleware WebCenter Sites Installation Guide.
If the above conditions hold, complete the steps in this chapter as follows:
■ If the management WebCenter Sites is OAM-integrated, complete the steps in Section 24.2, "Enabling Communication with the OAM-Integrated Management WebCenter Sites." Follow up with Section 24.4, "Next Step."
■ If the production WebCenter Sites is OAM-integrated, complete the steps in Section 24.3, "Enabling Communication with the OAM-Integrated Production WebCenter Sites." Follow up with Section 24.4, "Next Step."
■ If the management and production WebCenter Sites systems are OAM-integrated, complete the steps in Section 24.2, "Enabling Communication with the OAM-Integrated Management WebCenter Sites" and
Section 24.3, "Enabling Communication with the OAM-Integrated Production WebCenter Sites." Follow up with Section 24.4, "Next Step."
Enabling Communication with the OAM-Integrated Management WebCenter Sites
24-2 Oracle Fusion Middleware WebCenter Sites: Installing and Configuring Supporting Software
24.2 Enabling Communication with the OAM-Integrated Management WebCenter Sites
If your management WebCenter Sites is integrated with OAM, complete the steps in this section. This section contains the following topics:
■ Section 24.2.1, "Updating the Management OAM-WebCenter Sites Configuration to Support Community-Gadgets"
■ Section 24.2.2, "Configuring Community-Gadgets to Use the OAM-Integrated Management WebCenter Sites"
24.2.1 Updating the Management OAM-WebCenter Sites Configuration to Support Community-Gadgets
In this step, you will first add management Community-Gadgets resource definitions to the OAM configuration for the WebCenter Sites management application, and then register the WebLogic managed server (where management Community-Gadgets is deployed) with Oracle HTTP Server.
This section contains the following topics:
■ Section 24.2.1.1, "Adding the Management Community-Gadgets Resource Definitions to the OAM-WebCenter Sites Configuration"
■ Section 24.2.1.2, "Enabling Identity Assertion for the Authorization Policy"
■ Section 24.2.1.3, "Registering the WebLogic Managed Server for the Management Community-Gadgets with Oracle HTTP Server"
■ Section 24.2.1.4, "Increasing Maximum Number of Sessions"
24.2.1.1 Adding the Management Community-Gadgets Resource Definitions to the OAM-WebCenter Sites ConfigurationAdd the management Community-Gadgets resource definitions listed in Table 24–1 to OAM for the WebCenter Sites application domain. For information about how to add resource definitions to OAM, see Section 23.3.2, "Integration Steps."
Note: In the resource definitions (Table 24–1):
■ Replace <sites-context> with the context root of the WebCenter Sites web application running on the management system.
■ Replace <cg-context> with the context root of the Community-Gadgets application running on the management system.
■ Replace <shindig-context> with the context root of the Shindig application running on the management system.
Table 24–1 Management Community-Gadgets Resource Definitions
Resource Definition Protection Level Authentication Authorization
/<sites-context>/custom/customCsResolver.jsp Unprotected Public All Allowed
/<cg-context>/rest/sites/.../* Unprotected Public All Allowed
/<cg-context>/rest/.../* Protected Browser All Allowed
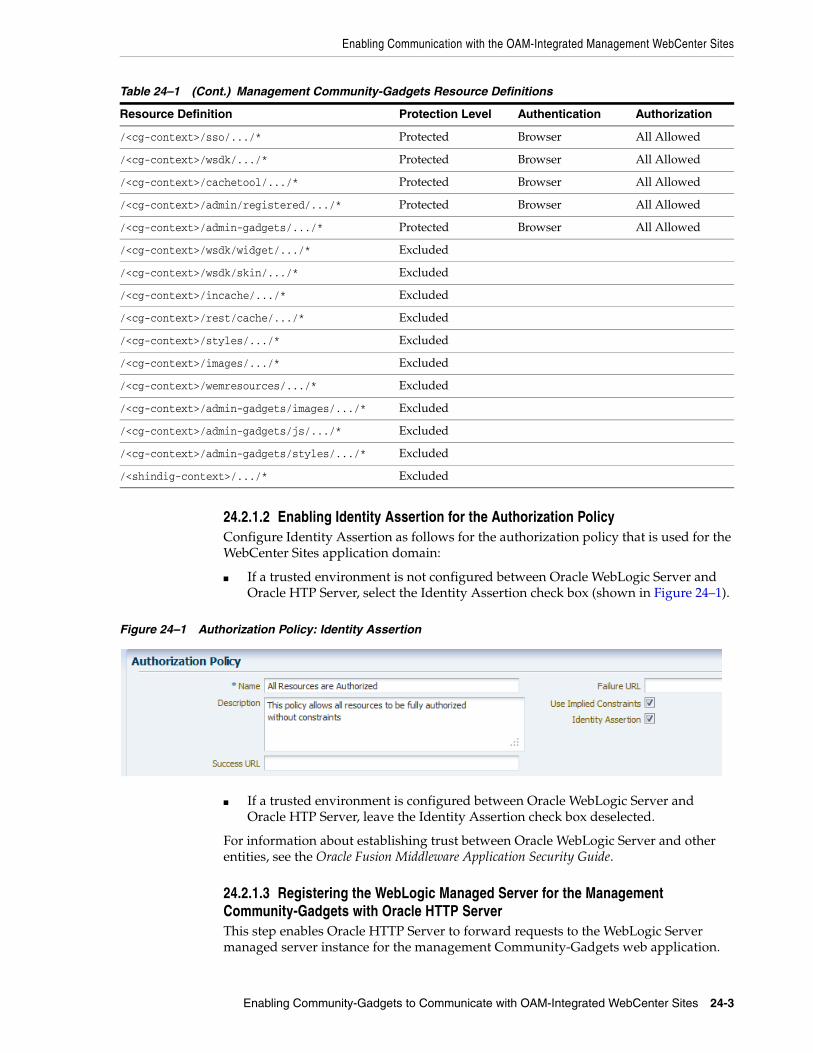
Enabling Communication with the OAM-Integrated Management WebCenter Sites
Enabling Community-Gadgets to Communicate with OAM-Integrated WebCenter Sites 24-3
24.2.1.2 Enabling Identity Assertion for the Authorization PolicyConfigure Identity Assertion as follows for the authorization policy that is used for the WebCenter Sites application domain:
■ If a trusted environment is not configured between Oracle WebLogic Server and Oracle HTP Server, select the Identity Assertion check box (shown in Figure 24–1).
Figure 24–1 Authorization Policy: Identity Assertion
■ If a trusted environment is configured between Oracle WebLogic Server and Oracle HTP Server, leave the Identity Assertion check box deselected.
For information about establishing trust between Oracle WebLogic Server and other entities, see the Oracle Fusion Middleware Application Security Guide.
24.2.1.3 Registering the WebLogic Managed Server for the Management Community-Gadgets with Oracle HTTP ServerThis step enables Oracle HTTP Server to forward requests to the WebLogic Server managed server instance for the management Community-Gadgets web application.
/<cg-context>/sso/.../* Protected Browser All Allowed
/<cg-context>/wsdk/.../* Protected Browser All Allowed
/<cg-context>/cachetool/.../* Protected Browser All Allowed
/<cg-context>/admin/registered/.../* Protected Browser All Allowed
/<cg-context>/admin-gadgets/.../* Protected Browser All Allowed
/<cg-context>/wsdk/widget/.../* Excluded
/<cg-context>/wsdk/skin/.../* Excluded
/<cg-context>/incache/.../* Excluded
/<cg-context>/rest/cache/.../* Excluded
/<cg-context>/styles/.../* Excluded
/<cg-context>/images/.../* Excluded
/<cg-context>/wemresources/.../* Excluded
/<cg-context>/admin-gadgets/images/.../* Excluded
/<cg-context>/admin-gadgets/js/.../* Excluded
/<cg-context>/admin-gadgets/styles/.../* Excluded
/<shindig-context>/.../* Excluded
Table 24–1 (Cont.) Management Community-Gadgets Resource Definitions
Resource Definition Protection Level Authentication Authorization
Enabling Communication with the OAM-Integrated Management WebCenter Sites
24-4 Oracle Fusion Middleware WebCenter Sites: Installing and Configuring Supporting Software
To register the WebLogic managed server on which the management Community-Gadgets is deployed:
1. Using a text editor, update the mod_wl_ohs.conf configuration file that was used during the OAM-WebCenter Sites integration, as follows:
a. Locate the mod_wl_ohs.conf file for the Oracle HTTP Server instance, for example:
/u01/software/Apps/OraMiddleware/asinst_1/config/OHS/ohs1/mod_wl_ohs.conf
b. Add the following block of code to the mod_wl_ohs.conf file:
<IfModule weblogic_module> <location /{management-community-gadgets-context-root}> SetHandler weblogic-handler WebLogicHost {hostname|IP of WebLogic server where management Community-Gadgets is deployed} WebLogicPort {port of WebLogic server where management Community-Gadgets is deployed}</location></IfModule>
<IfModule weblogic_module> <location /{management-shindig-context-root}> SetHandler weblogic-handler WebLogicHost {hostname|IP of WebLogic server where management Shindig is deployed} WebLogicPort {port of WebLogic server where management Shindig is deployed} </location></IfModule>
c. Save the file.
2. Restart Oracle HTTP Server.
24.2.1.4 Increasing Maximum Number of SessionsTo increase the maximum number of sessions:
1. Log in to the OAM console.
2. Under System Configuration, click Common Settings.
3. For the Maximum Number of Sessions per User parameter, click the Up arrow to increase the number to 100 (Figure 24–2).
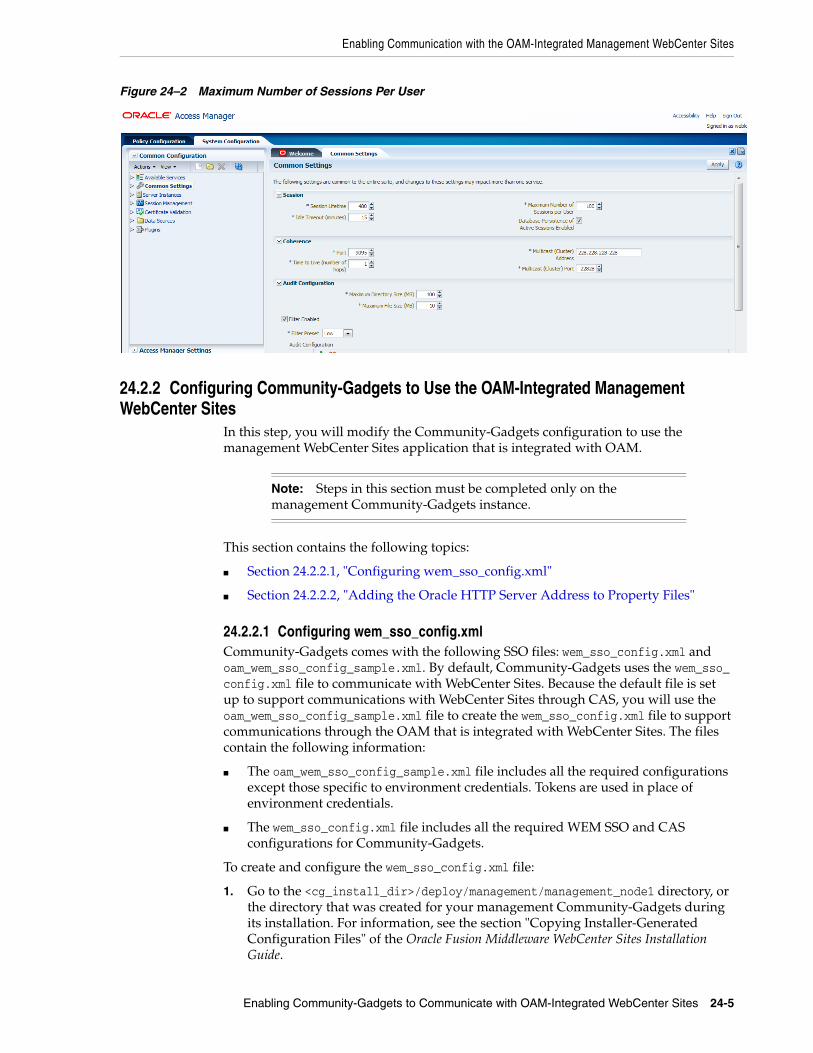
Enabling Communication with the OAM-Integrated Management WebCenter Sites
Enabling Community-Gadgets to Communicate with OAM-Integrated WebCenter Sites 24-5
Figure 24–2 Maximum Number of Sessions Per User
24.2.2 Configuring Community-Gadgets to Use the OAM-Integrated Management WebCenter Sites
In this step, you will modify the Community-Gadgets configuration to use the management WebCenter Sites application that is integrated with OAM.
This section contains the following topics:
■ Section 24.2.2.1, "Configuring wem_sso_config.xml"
■ Section 24.2.2.2, "Adding the Oracle HTTP Server Address to Property Files"
24.2.2.1 Configuring wem_sso_config.xmlCommunity-Gadgets comes with the following SSO files: wem_sso_config.xml and oam_wem_sso_config_sample.xml. By default, Community-Gadgets uses the wem_sso_config.xml file to communicate with WebCenter Sites. Because the default file is set up to support communications with WebCenter Sites through CAS, you will use the oam_wem_sso_config_sample.xml file to create the wem_sso_config.xml file to support communications through the OAM that is integrated with WebCenter Sites. The files contain the following information:
■ The oam_wem_sso_config_sample.xml file includes all the required configurations except those specific to environment credentials. Tokens are used in place of environment credentials.
■ The wem_sso_config.xml file includes all the required WEM SSO and CAS configurations for Community-Gadgets.
To create and configure the wem_sso_config.xml file:
1. Go to the <cg_install_dir>/deploy/management/management_node1 directory, or the directory that was created for your management Community-Gadgets during its installation. For information, see the section "Copying Installer-Generated Configuration Files" of the Oracle Fusion Middleware WebCenter Sites Installation Guide.
Note: Steps in this section must be completed only on the management Community-Gadgets instance.
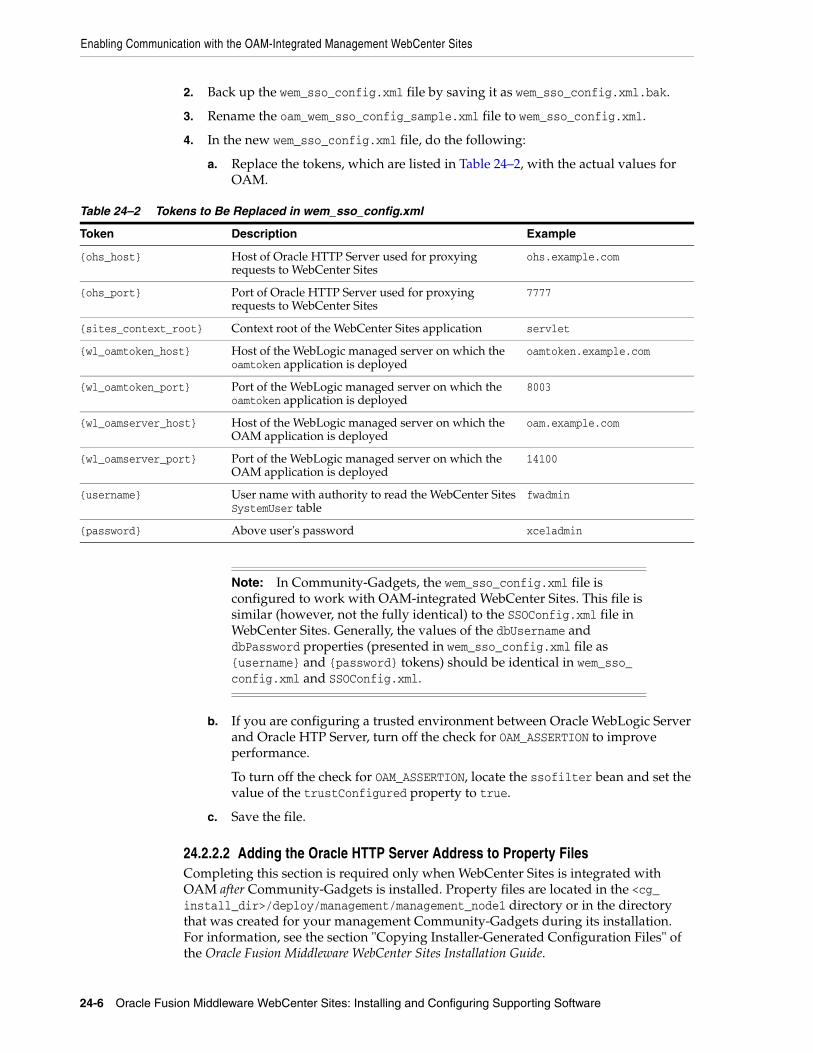
Enabling Communication with the OAM-Integrated Management WebCenter Sites
24-6 Oracle Fusion Middleware WebCenter Sites: Installing and Configuring Supporting Software
2. Back up the wem_sso_config.xml file by saving it as wem_sso_config.xml.bak.
3. Rename the oam_wem_sso_config_sample.xml file to wem_sso_config.xml.
4. In the new wem_sso_config.xml file, do the following:
a. Replace the tokens, which are listed in Table 24–2, with the actual values for OAM.
b. If you are configuring a trusted environment between Oracle WebLogic Server and Oracle HTP Server, turn off the check for OAM_ASSERTION to improve performance.
To turn off the check for OAM_ASSERTION, locate the ssofilter bean and set the value of the trustConfigured property to true.
c. Save the file.
24.2.2.2 Adding the Oracle HTTP Server Address to Property FilesCompleting this section is required only when WebCenter Sites is integrated with OAM after Community-Gadgets is installed. Property files are located in the <cg_install_dir>/deploy/management/management_node1 directory or in the directory that was created for your management Community-Gadgets during its installation. For information, see the section "Copying Installer-Generated Configuration Files" of the Oracle Fusion Middleware WebCenter Sites Installation Guide.
Table 24–2 Tokens to Be Replaced in wem_sso_config.xml
Token Description Example
{ohs_host} Host of Oracle HTTP Server used for proxying requests to WebCenter Sites
ohs.example.com
{ohs_port} Port of Oracle HTTP Server used for proxying requests to WebCenter Sites
7777
{sites_context_root} Context root of the WebCenter Sites application servlet
{wl_oamtoken_host} Host of the WebLogic managed server on which the oamtoken application is deployed
oamtoken.example.com
{wl_oamtoken_port} Port of the WebLogic managed server on which the oamtoken application is deployed
8003
{wl_oamserver_host} Host of the WebLogic managed server on which the OAM application is deployed
oam.example.com
{wl_oamserver_port} Port of the WebLogic managed server on which the OAM application is deployed
14100
{username} User name with authority to read the WebCenter Sites SystemUser table
fwadmin
{password} Above user's password xceladmin
Note: In Community-Gadgets, the wem_sso_config.xml file is configured to work with OAM-integrated WebCenter Sites. This file is similar (however, not the fully identical) to the SSOConfig.xml file in WebCenter Sites. Generally, the values of the dbUsername and dbPassword properties (presented in wem_sso_config.xml file as {username} and {password} tokens) should be identical in wem_sso_config.xml and SSOConfig.xml.
Enabling Communication with the OAM-Integrated Production WebCenter Sites
Enabling Community-Gadgets to Communicate with OAM-Integrated WebCenter Sites 24-7
1. Update the setup_cs.properties file by updating the value of the widgets.cs.management.attrs.urls parameters to use {ohs_host) and {ohs_port}.
For example:
widgets.cs.management.attrs.urls=http://{ohs_host}:{ohs_port}
2. Update the setup_cos.properties file as follows:
■ Update the widgets.cos.management.attrs.url parameter to use {ohs_host} and {ohs_port}
For example:
widgets.cos.management.attrs.url=http://{ohs_host}:{ohs_port}
■ Update the widgets.gadgets.opensocial.management.attrs.url parameter to use {ohs_host} and {ohs_port}.
For example:
widgets.gadgets.opensocial.management.attrs.url=http://{ohs_host}:{ohs_port}
24.3 Enabling Communication with the OAM-Integrated Production WebCenter Sites
If your production WebCenter Sites is integrated with OAM, complete the steps in this section. This section contains the following topics:
■ Section 24.3.1, "Updating the Production OAM-WebCenter Sites Configuration to Support Community-Gadgets"
■ Section 24.3.2, "Configuring Community-Gadgets to Use OAM-Integrated Production WebCenter Sites"
24.3.1 Updating the Production OAM-WebCenter Sites Configuration to Support Community-Gadgets
This section contains the following topics:
■ Section 24.3.1.1, "Adding Production Community-Gadgets Resource Definitions to the OAM-WebCenter Sites Configuration"
■ Section 24.3.1.2, "Enabling Identity Assertion for the Authorization Policy"
■ Section 24.3.1.3, "Registering the WebLogic Managed Server for the Production Community-Gadgets Application with Oracle HTTP Server"
24.3.1.1 Adding Production Community-Gadgets Resource Definitions to the OAM-WebCenter Sites ConfigurationAdd production Community-Gadgets resource definitions listed in Table 24–3 to OAM for the production WebCenter Sites application domain. For information about how to add resource definitions to OAM, see Section 23.3.2, "Integration Steps."
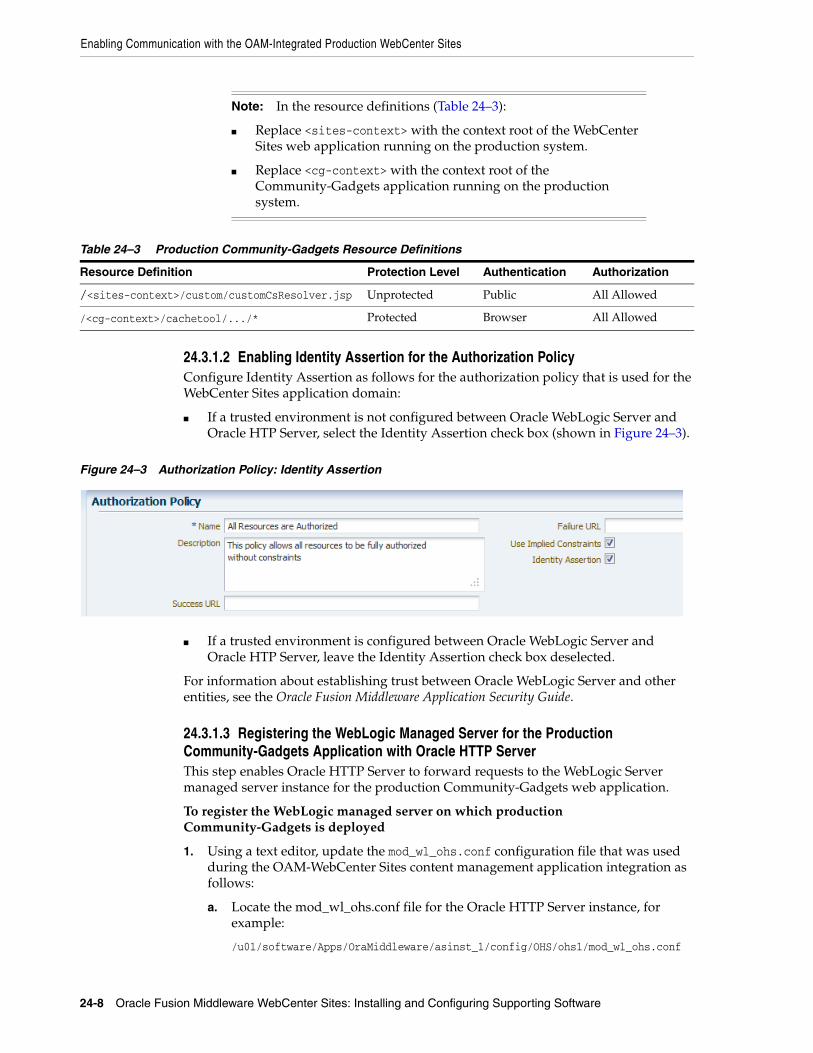
Enabling Communication with the OAM-Integrated Production WebCenter Sites
24-8 Oracle Fusion Middleware WebCenter Sites: Installing and Configuring Supporting Software
24.3.1.2 Enabling Identity Assertion for the Authorization PolicyConfigure Identity Assertion as follows for the authorization policy that is used for the WebCenter Sites application domain:
■ If a trusted environment is not configured between Oracle WebLogic Server and Oracle HTP Server, select the Identity Assertion check box (shown in Figure 24–3).
Figure 24–3 Authorization Policy: Identity Assertion
■ If a trusted environment is configured between Oracle WebLogic Server and Oracle HTP Server, leave the Identity Assertion check box deselected.
For information about establishing trust between Oracle WebLogic Server and other entities, see the Oracle Fusion Middleware Application Security Guide.
24.3.1.3 Registering the WebLogic Managed Server for the Production Community-Gadgets Application with Oracle HTTP ServerThis step enables Oracle HTTP Server to forward requests to the WebLogic Server managed server instance for the production Community-Gadgets web application.
To register the WebLogic managed server on which production Community-Gadgets is deployed
1. Using a text editor, update the mod_wl_ohs.conf configuration file that was used during the OAM-WebCenter Sites content management application integration as follows:
a. Locate the mod_wl_ohs.conf file for the Oracle HTTP Server instance, for example:
/u01/software/Apps/OraMiddleware/asinst_1/config/OHS/ohs1/mod_wl_ohs.conf
Note: In the resource definitions (Table 24–3):
■ Replace <sites-context> with the context root of the WebCenter Sites web application running on the production system.
■ Replace <cg-context> with the context root of the Community-Gadgets application running on the production system.
Table 24–3 Production Community-Gadgets Resource Definitions
Resource Definition Protection Level Authentication Authorization
/<sites-context>/custom/customCsResolver.jsp Unprotected Public All Allowed
/<cg-context>/cachetool/.../* Protected Browser All Allowed
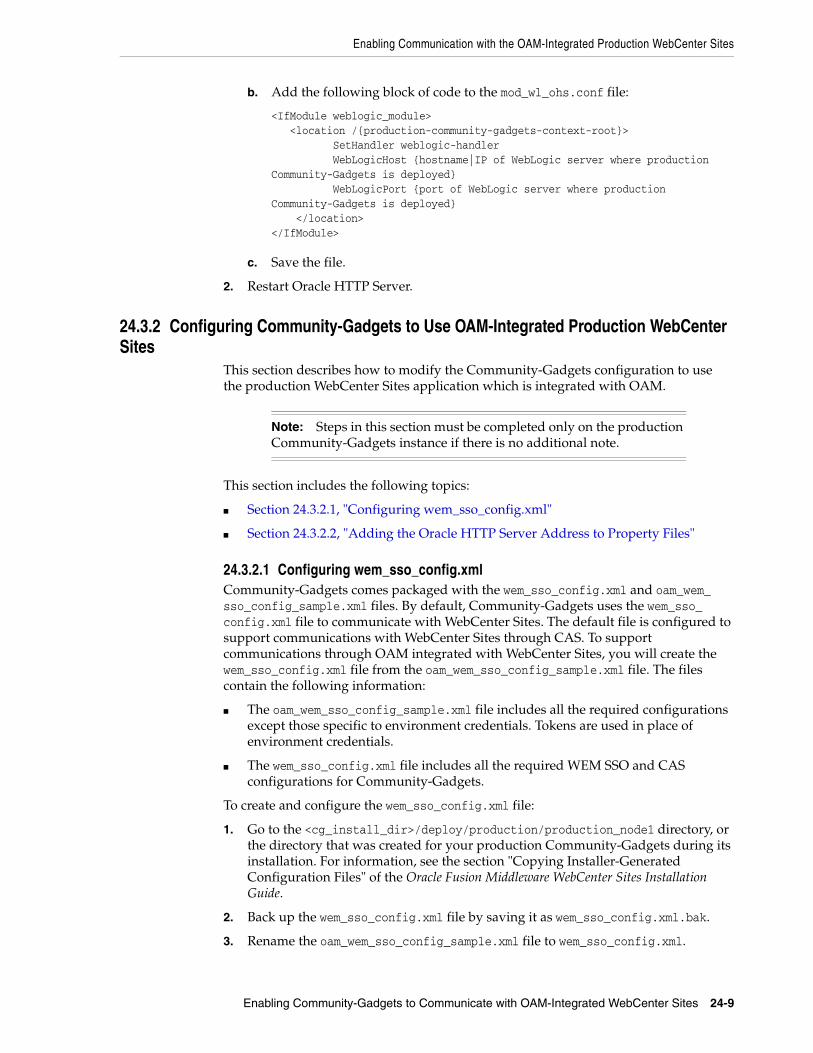
Enabling Communication with the OAM-Integrated Production WebCenter Sites
Enabling Community-Gadgets to Communicate with OAM-Integrated WebCenter Sites 24-9
b. Add the following block of code to the mod_wl_ohs.conf file:
<IfModule weblogic_module> <location /{production-community-gadgets-context-root}> SetHandler weblogic-handler WebLogicHost {hostname|IP of WebLogic server where production Community-Gadgets is deployed} WebLogicPort {port of WebLogic server where production Community-Gadgets is deployed} </location></IfModule>
c. Save the file.
2. Restart Oracle HTTP Server.
24.3.2 Configuring Community-Gadgets to Use OAM-Integrated Production WebCenter Sites
This section describes how to modify the Community-Gadgets configuration to use the production WebCenter Sites application which is integrated with OAM.
This section includes the following topics:
■ Section 24.3.2.1, "Configuring wem_sso_config.xml"
■ Section 24.3.2.2, "Adding the Oracle HTTP Server Address to Property Files"
24.3.2.1 Configuring wem_sso_config.xmlCommunity-Gadgets comes packaged with the wem_sso_config.xml and oam_wem_sso_config_sample.xml files. By default, Community-Gadgets uses the wem_sso_config.xml file to communicate with WebCenter Sites. The default file is configured to support communications with WebCenter Sites through CAS. To support communications through OAM integrated with WebCenter Sites, you will create the wem_sso_config.xml file from the oam_wem_sso_config_sample.xml file. The files contain the following information:
■ The oam_wem_sso_config_sample.xml file includes all the required configurations except those specific to environment credentials. Tokens are used in place of environment credentials.
■ The wem_sso_config.xml file includes all the required WEM SSO and CAS configurations for Community-Gadgets.
To create and configure the wem_sso_config.xml file:
1. Go to the <cg_install_dir>/deploy/production/production_node1 directory, or the directory that was created for your production Community-Gadgets during its installation. For information, see the section "Copying Installer-Generated Configuration Files" of the Oracle Fusion Middleware WebCenter Sites Installation Guide.
2. Back up the wem_sso_config.xml file by saving it as wem_sso_config.xml.bak.
3. Rename the oam_wem_sso_config_sample.xml file to wem_sso_config.xml.
Note: Steps in this section must be completed only on the production Community-Gadgets instance if there is no additional note.
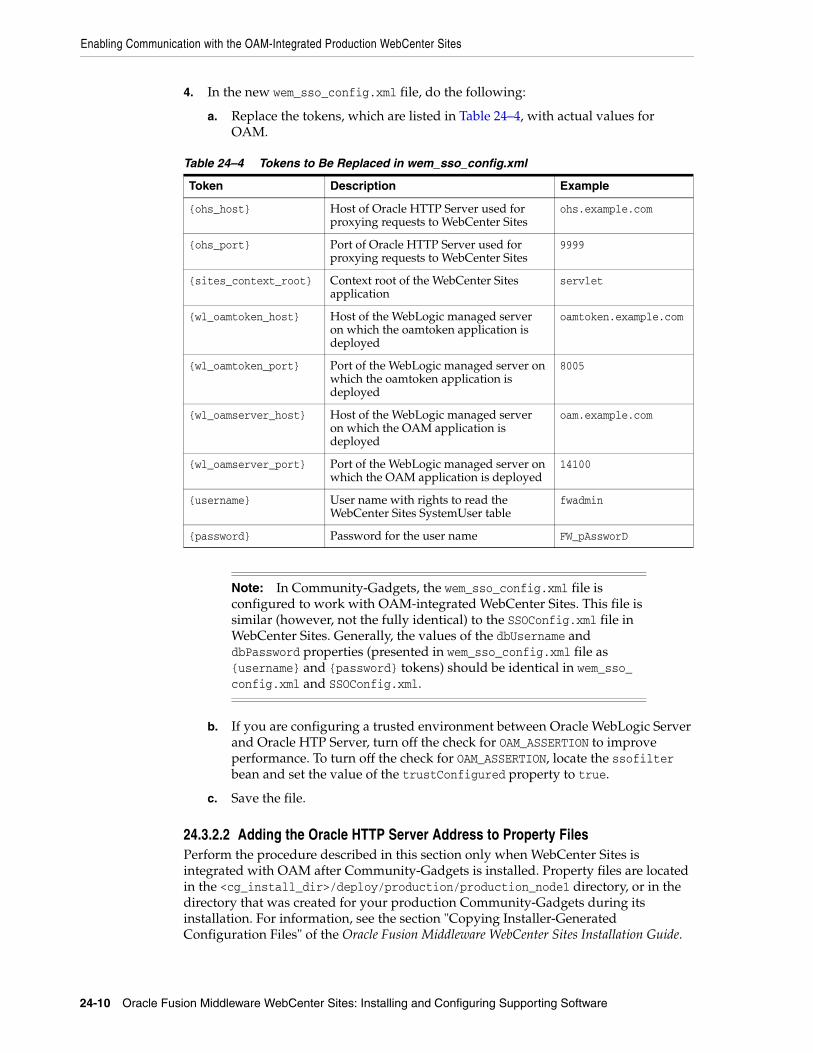
Enabling Communication with the OAM-Integrated Production WebCenter Sites
24-10 Oracle Fusion Middleware WebCenter Sites: Installing and Configuring Supporting Software
4. In the new wem_sso_config.xml file, do the following:
a. Replace the tokens, which are listed in Table 24–4, with actual values for OAM.
b. If you are configuring a trusted environment between Oracle WebLogic Server and Oracle HTP Server, turn off the check for OAM_ASSERTION to improve performance. To turn off the check for OAM_ASSERTION, locate the ssofilter bean and set the value of the trustConfigured property to true.
c. Save the file.
24.3.2.2 Adding the Oracle HTTP Server Address to Property FilesPerform the procedure described in this section only when WebCenter Sites is integrated with OAM after Community-Gadgets is installed. Property files are located in the <cg_install_dir>/deploy/production/production_node1 directory, or in the directory that was created for your production Community-Gadgets during its installation. For information, see the section "Copying Installer-Generated Configuration Files" of the Oracle Fusion Middleware WebCenter Sites Installation Guide.
Table 24–4 Tokens to Be Replaced in wem_sso_config.xml
Token Description Example
{ohs_host} Host of Oracle HTTP Server used for proxying requests to WebCenter Sites
ohs.example.com
{ohs_port} Port of Oracle HTTP Server used for proxying requests to WebCenter Sites
9999
{sites_context_root} Context root of the WebCenter Sites application
servlet
{wl_oamtoken_host} Host of the WebLogic managed server on which the oamtoken application is deployed
oamtoken.example.com
{wl_oamtoken_port} Port of the WebLogic managed server on which the oamtoken application is deployed
8005
{wl_oamserver_host} Host of the WebLogic managed server on which the OAM application is deployed
oam.example.com
{wl_oamserver_port} Port of the WebLogic managed server on which the OAM application is deployed
14100
{username} User name with rights to read the WebCenter Sites SystemUser table
fwadmin
{password} Password for the user name FW_pAssworD
Note: In Community-Gadgets, the wem_sso_config.xml file is configured to work with OAM-integrated WebCenter Sites. This file is similar (however, not the fully identical) to the SSOConfig.xml file in WebCenter Sites. Generally, the values of the dbUsername and dbPassword properties (presented in wem_sso_config.xml file as {username} and {password} tokens) should be identical in wem_sso_config.xml and SSOConfig.xml.
Next Step
Enabling Community-Gadgets to Communicate with OAM-Integrated WebCenter Sites 24-11
1. In the setup_cs.properties file, update the value of the widgets.cs.production.attrs.urls parameters to use {ohs_host} and {ohs_port}.
For example:
widgets.cs.production.attrs.urls=http://{ohs_host}:{ohs_port}
2. In the setup_cos.properties file, update the value of the widgets.cos.production.attrs.url parameter to use {ohs_host} and {ohs_port}.
For example:
widgets.cos.production.attrs.url=http://{ohs_host}:{ohs_port}
24.4 Next StepVerify the configurations you have created in this chapter by logging in to the management WebCenter Sites and ensuring that the Community and Gadgets interfaces can be displayed. For instructions, see the Oracle Fusion Middleware WebCenter Sites Installation Guide.
Note: Additionally, repeat step 1 for the setup_cs.properties file located in the <cg_install_dir>/deploy/management/management_node1 directory or in the directory which was created for your management Community-Gadgets during its installation. For information, see the section "Copying Installer-Generated Configuration Files" of the Oracle Fusion Middleware WebCenter Sites Installation Guide.
Next Step
24-12 Oracle Fusion Middleware WebCenter Sites: Installing and Configuring Supporting Software
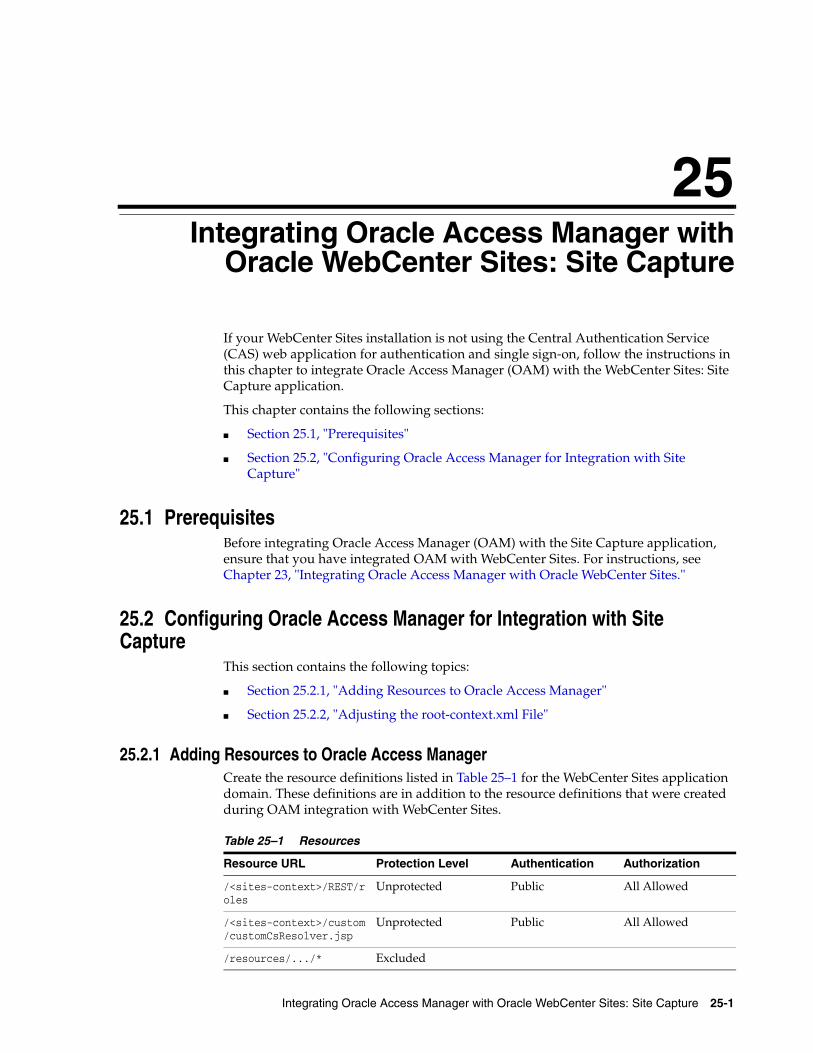
25
Integrating Oracle Access Manager with Oracle WebCenter Sites: Site Capture 25-1
25Integrating Oracle Access Manager withOracle WebCenter Sites: Site Capture
If your WebCenter Sites installation is not using the Central Authentication Service (CAS) web application for authentication and single sign-on, follow the instructions in this chapter to integrate Oracle Access Manager (OAM) with the WebCenter Sites: Site Capture application.
This chapter contains the following sections:
■ Section 25.1, "Prerequisites"
■ Section 25.2, "Configuring Oracle Access Manager for Integration with Site Capture"
25.1 PrerequisitesBefore integrating Oracle Access Manager (OAM) with the Site Capture application, ensure that you have integrated OAM with WebCenter Sites. For instructions, see Chapter 23, "Integrating Oracle Access Manager with Oracle WebCenter Sites."
25.2 Configuring Oracle Access Manager for Integration with Site Capture
This section contains the following topics:
■ Section 25.2.1, "Adding Resources to Oracle Access Manager"
■ Section 25.2.2, "Adjusting the root-context.xml File"
25.2.1 Adding Resources to Oracle Access ManagerCreate the resource definitions listed in Table 25–1 for the WebCenter Sites application domain. These definitions are in addition to the resource definitions that were created during OAM integration with WebCenter Sites.
Table 25–1 Resources
Resource URL Protection Level Authentication Authorization
/<sites-context>/REST/roles
Unprotected Public All Allowed
/<sites-context>/custom/customCsResolver.jsp
Unprotected Public All Allowed
/resources/.../* Excluded
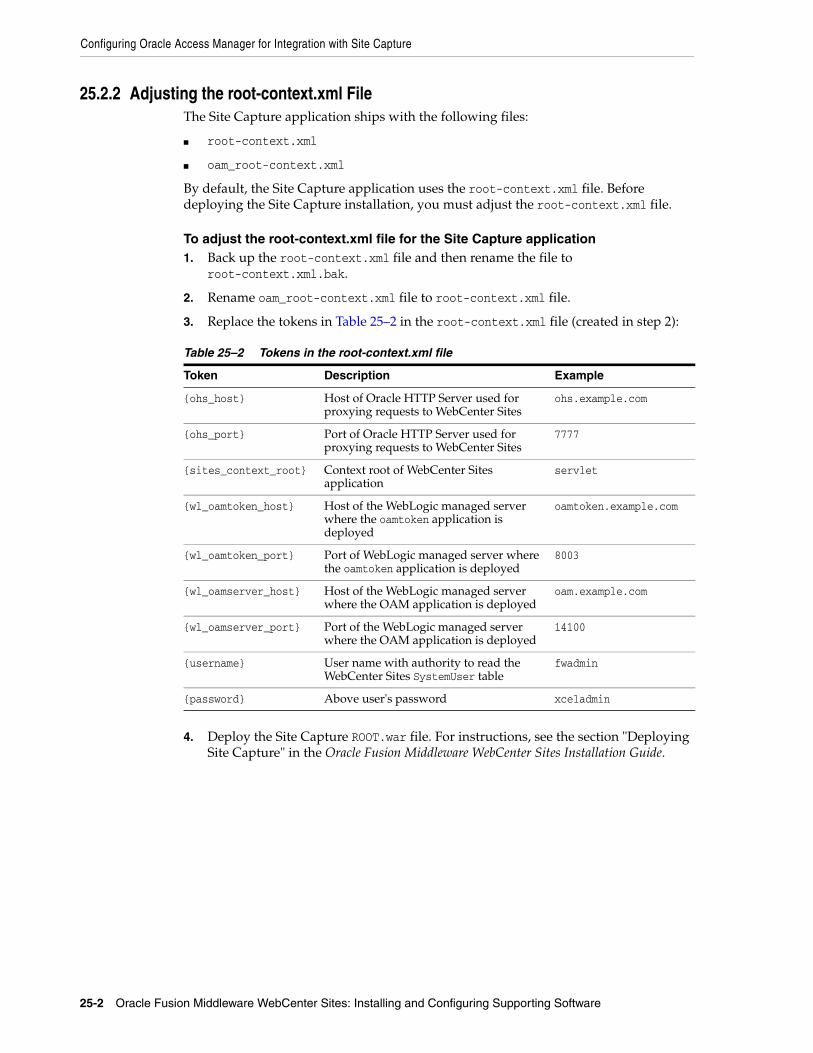
Configuring Oracle Access Manager for Integration with Site Capture
25-2 Oracle Fusion Middleware WebCenter Sites: Installing and Configuring Supporting Software
25.2.2 Adjusting the root-context.xml FileThe Site Capture application ships with the following files:
■ root-context.xml
■ oam_root-context.xml
By default, the Site Capture application uses the root-context.xml file. Before deploying the Site Capture installation, you must adjust the root-context.xml file.
To adjust the root-context.xml file for the Site Capture application1. Back up the root-context.xml file and then rename the file to
root-context.xml.bak.
2. Rename oam_root-context.xml file to root-context.xml file.
3. Replace the tokens in Table 25–2 in the root-context.xml file (created in step 2):
4. Deploy the Site Capture ROOT.war file. For instructions, see the section "Deploying Site Capture" in the Oracle Fusion Middleware WebCenter Sites Installation Guide.
Table 25–2 Tokens in the root-context.xml file
Token Description Example
{ohs_host} Host of Oracle HTTP Server used for proxying requests to WebCenter Sites
ohs.example.com
{ohs_port} Port of Oracle HTTP Server used for proxying requests to WebCenter Sites
7777
{sites_context_root} Context root of WebCenter Sites application
servlet
{wl_oamtoken_host} Host of the WebLogic managed server where the oamtoken application is deployed
oamtoken.example.com
{wl_oamtoken_port} Port of WebLogic managed server where the oamtoken application is deployed
8003
{wl_oamserver_host} Host of the WebLogic managed server where the OAM application is deployed
oam.example.com
{wl_oamserver_port} Port of the WebLogic managed server where the OAM application is deployed
14100
{username} User name with authority to read the WebCenter Sites SystemUser table
fwadmin
{password} Above user's password xceladmin