player handbook - dunfermline waterpolo club
TRANSCRIPT

PLAYER HANDBOOK
Player Name:_______________

Foreward by Nick Hume National Performance Director Welcome to Millfield School and the home of British Water Polo’s National Academy Week. The National Academy is now in its 7th year and over that time it has continued to expand with this year being the biggest yet. With the news of the Olympics coming to London in 2012 it has given a huge boost to the sports world. If you want to be there in 6 years time, the National Academy is the place to start. As you will know from last year the Academy Week is the first step towards being a National Team water polo player. From where you are today (in the Academy age group) the pathway to become an Olympic athlete is in front of you. You will spend 2 years in the Academy age group before moving on to the Youth Squad, from there you become a Junior team member before finally reaching the Senior squad….which, if all goes to plan, will be in 2010! Just in time for the Olympics! Over the coming week you will start to learn what it takes become an elite athlete. There will be plenty of training, both in the pool and out of it. You will spend time learning new polo skills, but also swimming laps. You will be taught band, Swiss ball and core stability exercises, all of which are crucial to your long term development. Similar to last year we have changed the way players have been selected to attend the Academy Week. Over the past year all of the players here have been involved in weekly training sessions at Regional Training Centres, this has given us a year’s head start to all previous years. So you are off and running. Good luck and I hope you enjoy your second Academy Week. Nick Hume National Performance Director

National Water Polo Academy Handbook: The Academy Contents:
Page
Academy Information 4 Training Diary
5
Dry Land
• Bands 6-9 • Medicine Ball 10-12 • Swiss Ball 12-14 • Bedroom
Circuit 14-17
Flexibility & Stretching
18-22
Testing
23-24
Testing Log
25
Player Profile
26

The Academy The Academy age group builds up over a two year period through Regional Academies and the National Water Polo Academy, held at Millfield School in Somerset. The Academy age group aims to provide those players with talent and desire with an environment where they can develop their skills as a Water Polo player. By skills, we do not just mean the techniques you learn in Water Polo training or games, such as passing, shooting or swimming with the ball, that is only a small part. During the two years spent in the Academy age group, players will learn about Trident Training, that Swimming and Dry Land training play just as an important part in the long term development of a player as Water Polo. Trident Training the concept for individual Water Polo training which explains that the total number of hours an individual spends training in any given time should be split into 3 key areas: • Swimming skill and fitness • Dry land • Water Polo technical and Tactical
National Teams When players leave the Academy age group they should have been provided with the best possible environment to learn, develop and prepare them for life as an international athlete, should they have to desire. The next stage is to progress through the National teams, all building up with the overall aim of creating medal winning senior athletes. The National Youth team provides a solid training foundation and an introduction to competition at elite level whilst the National Junior team takes what the players have learnt and competes in competitions such as the European Youth and Junior Championships and the World Junior Championships.
High Performance Centres It is unfeasible to expect clubs to be able to maintain training at the levels required for gold medal success on the world stage. Therefore the ASA have established High Performance Centres (HPC’s) which allow players to train within a permanent, residential environment with players of similar talent and desire and coached by International level coaches. These centres have been deliberately located within academic settings to allow players to concentrate equally on their academic studies. • The Junior HPC has been established at Grantham College in Lincolnshire • The Senior HPC has been established in Manchester

Training Diary Players who want to play for the National Team and become an international athlete should know exactly what training they are doing. This is why players should keep a training diary. You can buy a diary from a stationer, use the sheets given here to either keep a record on your computer or on printed sheets, or simply make up your own. What is important is that you keep it up to date and that you know what you are doing and when. This will help all the people that support you, from your parents or school teachers to club, regional and national coaches, to help you to get better. All athletes within the National Team programme use a training log or diary to help them to plan, chart, record and monitor progress against goals. Although it may seem boring and a chore, it is:
• Essential to plan properly, otherwise you are unlikely to meet any of your goals
• Motivating to look back and see your progress and development; it will remind you how hard you’ve worked
• Valuable, because you are constantly reminded of your goals which helps to focus your training
• Informative because it shows your long term development and you can see patterns in training behaviour and what is working well or not so well
• Helpful in getting you fit again if you get injured • Good for your coach who can see your individual progression, explain dips in
development and will know how you’re feeling

Dry Land Before every session, players should complete about half an hour of dry land work consisting of the following:
• 5 minutes of active movement to warm up the body • 15 minutes of band work • 10 minutes of med ball work
Then the Core Strength exercises should be undertaken at least 3 times a week. Active Movement Warm Up This could include exercises such as running on the spot, star jumps, skipping or bounding, dependent on the surface you are on – be careful if the surface is wet and slippery. Ensure that you wear well cushioned shoes that are stable and can absorb some of the inevitable impact that will occur when carrying out ‘jumping type’ activities. You should feel slightly out of breath and your body should feel warm before you go on to the next stage.
Band Work Band exercises are important to strengthen joints and to prevent injuries from occurring. It is extremely important that all band exercises are completed with correct posture and in a neutral spine position. If correct posture is not maintained throughout, you will work the wrong areas of the body, fail to strengthen the joints and risk injury. Posture Prior to starting the following exercises, it is important to find ‘Neutral spine’ position. Neutral Spine
To find neutral spine:
• Lie flat on back • Knees bent • Repeatedly tilt pelvis slowly • Find middle position • Draw in navel towards spine • Feel lower abdominal muscle tighten

When carrying out the exercises in standing, try to maintain neutral spine by checking the following points:
• Imagine there is a piece of string attached to your head pulling you upwards • Imagine there is a straight line running through your ears, shoulders, waist
and ankles. You can help this by standing next to a wall (see picture below) • Roll your shoulders up and back, squeezing your shoulder blades together • Pull your belly button towards your spine • Squeeze your lower abdominal muscles. You can feel these by lying on the
floor (see picture below) and placing your hands just below your waist.
Shoulder Shrugs
• Stand on your band with your feet shoulder width apart • Ensure your posture is set • Shrug your shoulders and pull the band up • Return to starting position, allowing the band to pull your shoulders down

Elbows away from the body
• Ensure that your band is attached to a solid object at the same level as your elbow and hold the band with your thumb upwards
• Make sure that your elbow remains by your side at all times– you may find it helpful to hold a piece of paper to check you are doing this properly (see picture)
• Begin with your fist out in front of your body • Slowly move your fist away from the body • Slowly return to starting position and repeat.
Elbows to the body
• Ensure that your band is attached to a solid object at the same level as your elbow and hold the band with your thumb upwards
• Make sure that your elbow remains by your side at all times– again, you may find it helpful to hold a piece of paper to check you are doing this properly
• Begin with your fist away from your body • Slowly move your fist towards the body • Slowly return to starting position and repeat

Arms away from the body
• Ensure that your band is attached to a solid object at the same level as your Shoulder
• Begin with your arm slightly bent above your head • Bring your arm slowly down in front of your body • Return to starting position and repeat
Arms to the body
• Ensure that your band is attached to a solid object at the same level as your shoulder
• Begin with your arm slightly bent in front of your body, with the band slightly loose
• Bring your arm slowly up until it is just above your head • Return to starting position and repeat

Medicine ball
• These exercises should be completed using about a 1kg medicine ball. • Each exercise should be repeated 12 times. • 3 sets of each exercise should be performed. • Allow 60 -90 seconds rest between each set.
Chest Pass
• Stand facing the wall (about 2-3m away) • Legs slightly bent with one leg in front of the other • Hold the ball to your chest and throw the ball firmly towards the wall
Overhead Pass
• Stand facing the wall (about 2-3m away) • Legs slightly bent with one leg in front of the other • Hold the ball above and slightly behind your head and throw the ball firmly
towards the wall
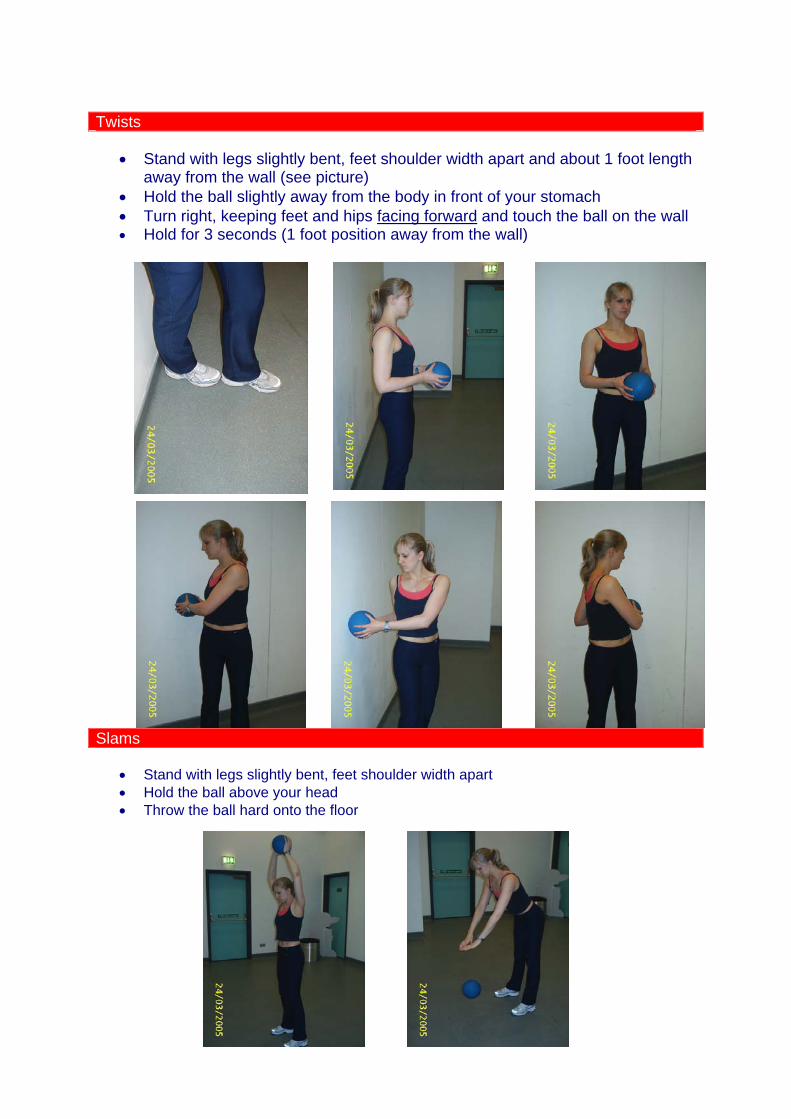
Twists
• Stand with legs slightly bent, feet shoulder width apart and about 1 foot length away from the wall (see picture)
• Hold the ball slightly away from the body in front of your stomach • Turn right, keeping feet and hips facing forward and touch the ball on the wall • Hold for 3 seconds (1 foot position away from the wall)
Slams
• Stand with legs slightly bent, feet shoulder width apart • Hold the ball above your head • Throw the ball hard onto the floor

Core Stability and Swiss Ball Exercises
In order to gain maximum benefit from each exercise, the pelvis should be in the correct position ‘Neutral Spine’, as described earlier. When conducting the exercises, ensure that the training environment is as safe as possible; ideally use a floor mat for greater protection. All exercises should be carried out slowly and accurately. Core stability exercises should make your muscles feel as if they are working, but not cause any pain. If you experience any pain stop immediately and discuss this with your coach. Swiss Ball Rather than sitting on a chair or sofa at home, sit on a Swiss ball with good posture and you will increase the number of hours dry land training you are doing. Try the following exercises or make up your own: Forward and Back: Side to Side:

You could also try:
• Circles • Figure of 8’s • Spelling out your name or going through the alphabet
The Swiss Ball exercises below are more advanced. As a guideline, begin with 1 set of each exercise, carrying out 12 repetitions, building to 3 sets over time. Planks
• Kneel on floor • Elbows on ball • Find neutral spine • Roll ball away from body • Maintain neutral spine throughout • Hold position • Relax & return to start position
Press Ups
• Kneel on floor • Find neutral spine • Ensure neutral spine is
maintained throughout exercise • Bend elbows until chest lowers
to ball • Slowly return to start & repeat
Ball Sit-Ups
• Start in sitting position • Roll forwards so ball is under lower
back • Hands on temples
Superman
• Lying prone over ball • Ball under abdomen • Slowly raise extended arm and
opposite leg off ball • Return to start position

• Slowly lift shoulders towards hip • Return to start and repeat.
• Repeat with opposite arm/leg
Titanic
• Lying prone • Chest and abdomen on ball • Legs extended, feet on floor • Maintain neutral spine • Raise trunk & externally rotate
shoulders • Hold for 3 seconds • Return to start & repeat
Bridging
• Lying supine • Legs extended • Feet on ball • Slowly raise hips off floor • Find neutral spine & hold • Slowly release • Return to start & repeat
Core Body Strength Bedroom Circuit
As well as the Swiss ball exercises mentioned above, you can also do exercises utilising little equipment, at home to help to increase your strength. Try to do the following exercises at home, at least 3 times a week. Each exercise should be repeated 12 times, with 3 sets of each exercise being performed. Allow 60 – 90 seconds rest between each set. When performing the following exercises, your muscles should feel as if they are working, but not cause any pain. If you experience any pain stop immediately and discuss this with your coach. Press Ups
• Stand about 3 foot lengths away from the wall • Place your hands on the wall just outside shoulder width • Lower your body slowly towards the wall • Push back to starting position and repeat

Crunches
• Lie flat on the floor with your knees bent and your hands resting on the top of your legs
• Lift up your body until your hands are almost to your knees • Slowly return to starting position and repeat

Dips
• Sit on the floor with your knees bent and your hands behind you, fingers facing forwards
• Lower yourself slowly a short distance backwards • Return to starting position and repeat
Squats
• Lean on your Swiss ball as shown in the picture • Lower yourself, using the ball for support, until your legs are in a seating
position (but no further) • Return to starting position and repeat.

Knee Press Ups
• Kneel on the floor on all fours. • Bend your arms and drop your chest forward and down towards the floor
and inhale. • Keeping your legs in the kneeling position, exhale as you push yourself up
using your arms. Control the move by counting to three on the way up. • As you push up, tighten your stomach muscles to take pressure off your
back. Hold for a second. And slowly repeat.
Prone Opposite Arm and Leg Raise
• Lie on the floor on your front, with arms and legs stretched out. • Keep the head in line with the spine • Slowly lift opposite arm and leg together • Keeping the movements slow and smooth, lower the leg and arm to floor. • Repeat with other arm and leg.

Lunges
• Step forward with one leg and lower your upper body down, bending your leg (don't step out too far). You should have about two to two and a half feet between your feet.
• Do not allow your knee to go forward beyond your toes as you come down, keeping your front shin perpendicular to the ground.
• Push up and back and repeat completing all the reps with one leg. • Throughout the lunge ensure that you keep your body upright and positioned
directly above your hips. • Go down until your bottom knee almost touches the ground. • Think about sitting back when doing these. This will prevent you from leaning
too far forward.
Flexibility & Stretching Flexibility exercises should not only be performed as part of a warm up or cool down, but they should also form a core part of any land-based training programme. The key areas for flexibility in Water Polo are:

• Shoulders • Hips • Groin • Back • Legs
Stretching exercises should be performed on a daily basis, using the following guidelines:
1. Only stretch when muscles are warm 2. Hold all stretches for a minimum of 20 seconds 3. Relax and concentrate on breathing when stretching 4. Stretch to a point just where you feel the muscles lengthening, but not to the
point of pain. Chest Stretch
• Stand tall, feet slightly wider than shoulder-width apart, knees slightly bent • Place hand, loosely clasped on small of back, keep spine long and away from
your ears. • Without arching spine, ease elbows towards each other as far as possible. • You should feel the stretch across your chest
Upper Back Stretch
• Stand tall, feet slightly wider than shoulder-width apart, knees slightly bent • Interlock your fingers and push your hands as far away from your chest as
possible, allowing your upper back to relax • You should feel the stretch between your shoulder blades

Shoulder Stretch
• Stand tall, feet slightly wider than shoulder-width apart, knees slightly bent • Place your right arm, parallel with the ground across the front of your chest • Bend the left arm up and use the left forearm to ease the right arm closer to
you chest • You will feel the stretch in the shoulder • Repeat with the other arm
Shoulder & Tricep Stretch
• Stand tall, feet slightly wider than shoulder-width apart, knees slightly bent • Place both hands above your head then place right hand behind left elbow,
easing left arm towards your head. • Take elbow behind head and down middle of spine as far as possible. • You will feel the stretch in the shoulders and the triceps
Quadriceps
• Clasp your foot behind your body with opposite hand • Pull your foot upwards, and push the knee backward

• Contract your abdominals to stabilize the pelvis (do not arch your back) • Press the front hip bone forward and slightly extend the hip • Hold the stretch • Repeat with other leg
Standing Groin Stretch (adductors)
• Lunge slowly to right whilst keeping left leg straight, left foot facing straight ahead and entirely on floor.
• Lean over right leg while stretching left groin muscles. • Hold stretch for 20 seconds • Repeat with the left leg.
Hamstring Stretch
• Sit on the floor with the leg to be stretched extended, and the other leg bent with the foot towards your body.
• Reach out with your hands, lean your upper body forward, and bring your chest towards your thigh.
• Make sure you don't round the upper back, your lower back should be slightly curved.
• Get to the point of a mild stretch and hold. • Repeat with other leg.
Standing Psoas Stretch

• Begin in a standing position, one leg bent and slightly forward. • Position the back leg in internal rotation (foot facing inwards slightly). • Keep you abdominals tight, and slowly move your body forwards until a mild
stretch is achieved in the front of the hip being stretched. • Next raise your stretch side are up and over to the opposite side. • Hold side bend position and stretch for 20 seconds. • Repeat to other side.
Gluteal Stretch
• Lie on your back with both legs straight out in front of you. • Bring up your right leg bent at the knee, with your foot flat on the floor. • Bend your left knee and hip to place the side of your left foot on top of the
lower part of the right thigh (half cross legged). • Bring your right leg up further with the left foot still resting on the thigh, and
thread your arms through the gap, so that your hands are clasped in front of your right knee.
• Use your arms to bring the right leg up further until you reach a barrier point in the right buttock.
• Rock your leg in and out of the barrier for a few minutes, feeling that the buttock muscles are progressively stretching.
Back & Buttock Stretch
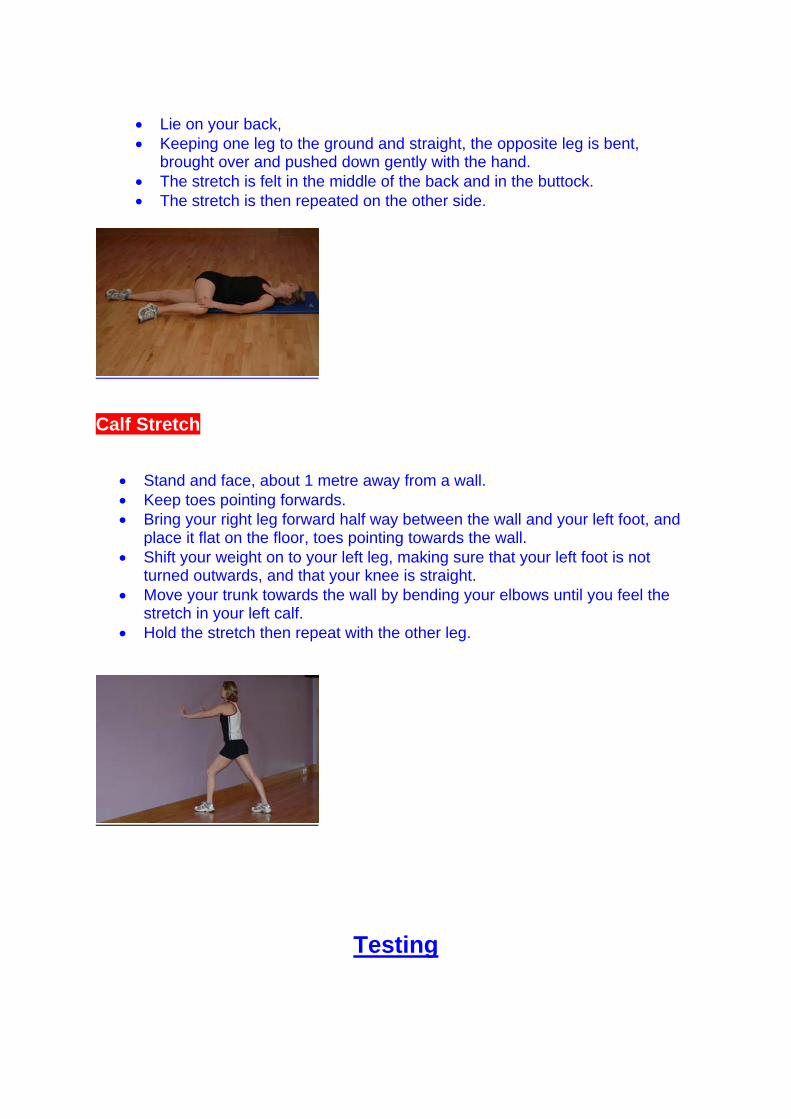
• Lie on your back, • Keeping one leg to the ground and straight, the opposite leg is bent,
brought over and pushed down gently with the hand. • The stretch is felt in the middle of the back and in the buttock. • The stretch is then repeated on the other side.
Calf Stretch
• Stand and face, about 1 metre away from a wall. • Keep toes pointing forwards. • Bring your right leg forward half way between the wall and your left foot, and
place it flat on the floor, toes pointing towards the wall. • Shift your weight on to your left leg, making sure that your left foot is not
turned outwards, and that your knee is straight. • Move your trunk towards the wall by bending your elbows until you feel the
stretch in your left calf. • Hold the stretch then repeat with the other leg.
Testing

In order to gauge the potential and progressive development of young Water Polo players within the Development and Academy age groups, the 3 areas of Trident Training are to be tested. Swimming The T20 test is the base swimming test for Water Polo which simply requires a player to swim for 20 minutes as far as they can. This establishes a benchmark for a player’s swimming fitness and allows progressive development to be recognised and monitored 1) T20: The lead coach for the session will time the 20 minutes, starting and finishing with a long blast of the whistle. The first player in each lane should start on the whistle, with consequent players starting at 5 second intervals on the whistle, not the pace clock. At 20 minutes, and on the second whistle, all players stop where they are and remain static so that the distance can be recorded. 2) Timed 400m Swim Test The 400m swimming test simply requires a player to swim 400m as quickly as they can. This establishes a benchmark for a player’s swimming fitness and allows progressive development to be recognised and monitored. Dry Land Testing The Academy is the first step for individuals to recognise their ability to change their own trainng environment. The Academy will introduce rudimentary medicine and Swiss ball work, which will help to improve core stability, fitness and strength. In line with Long Term Athlete Development guidelines, it is invisaged that all athletes in the academy will undertake Swiss ball, core body strength and band work frequently, to complete at least 3 hours of dry land training a week. Why do Fitness tests? Fitness tests are invaluable, as by carrying out standardised tests, which are repeated frequently, you can gain a valid estimate of your progress. If your fitness/ strength does not appear to be improving, you can discuss your training with your coach, so that together you can make adjustments to your training programme and lifestyle to ensure that the training your are doing is beneficial. If on the other hand, the tests indicate that your fitness and strength are improving, you can gain confidence from knowing that you are on the right track with your training. Core Body Strength Test If core strength is poor, the torso tends to move unnecessarily during motion, wasting energy; if core strength is good, an athlete can move with high efficiency. You can test your core strength as follows: Assume the prone ‘Plank’ position, with full body weight supported only by your forearms and toes. Your body should be absolutely linear as you do this and your

pelvis tucked (for proper tucking, tighten your butt muscles so that the bottom of your pelvic girdle moves forward or – in this case – towards the ground): 1) Test 1: BASIC (Plank) Hold the basic 'plank' position (weight on forearms and toes) for 60 seconds. 1b) Test 2: Modified Functional Plank
1. Assume the prone ‘Plank’ position' as discribed above. 2) Sit Up Test
1. Start by lying on your back with knees bent, feet together, and heels flat on the floor.
2. A partner holds the feet down. 3. The fingers are locked behind the head or the hands are cupped over the
ears. 4. In the up position, you must touch both elbows to both knees and then return
to a lying position at which the shoulder blades must touch the ground. This will constitute one sit-up
Score: total number of sit ups in one minute 3) Press Up Test
1. Begin in a press up position, with feet together, back straight and hands shoulder width apart.
2. A partner places a fist on the ground under the chest of the subject. 3. From the up position, the subject lowers himself/herself to the ground until
his/her chest touches the partner's fist and then pushes back to the up position.
4. Note: The elbows must lock out in the up position. This will constitute one push-up.
A repetition will not be counted if the protocol is violated. Score: Total number of press ups in one minute. Testing log Date Type of Test Result Comment
Player Profile Section 1: Personal details Name
Squad
Date

Additional Comments Coach Name Coach
Signature
Player Signature
Section 3: Profile
Area Comment
1 2 3
1. Swimming
2. Water Polo Skills
3. Core Stability/ Weights