preps 5.2 release notes (alpha) - kodakdownload.kodak.com/creo/preps/preps 5.2/preps_5.2_beta...2...
TRANSCRIPT
Release NotesEnglish
Preps 5.2
BETA
717-00088F-EN Rev A graphics.kodak.com
Copyright
© 2006 Kodak. All rights reserved.
Creo, Preps, SmartMarks, Prinergy, Prinergy Evo, and Brisque are trademarks of Kodak.
Adobe, Acrobat, Adobe Illustrator, Distiller, Photoshop, PostScript, and PageMaker are trademarks of Adobe Systems Incorporated.
Apple, iMac, Power Macintosh, Mac OS, AppleShare, AppleTalk, TrueType, ImageWriter, and LaserWriter are registered trademarks of Apple Computer, Inc. Macintosh is a trademark of Apple Computer, Inc., registered in the U.S.A. and other countries.
PANTONE, Hexachrome, PANTONE Hexachrome, and PANTONE MATCHING SYSTEM are the property of Pantone, Inc.
PEARL, PEARLsetter, PEARLhdp, PEARLdry, and PEARLgold are registered trademarks of Presstek, Inc.
XEROX® is a trademark of XEROX CORPORATION.
QuarkXPress is a trademark of Quark, Inc.
http://graphics.kodak.com/
Internal 731-00088F-EN Rev A Beta
Revised January 2006
Introduction
We are pleased to send you the latest revision of Preps software. These release notes highlight the changes and improvements that were made in release 5.2 of Preps software.
Note: With this beta release of Preps 5.2 software, we invite you to participate in the final stages of feature testing. If you encounter a problem or unexpected feature behavior, first check the Known Problems section of these release notes to see if that problem has already been identified. If is not listed, please contact us with enough details of what you were doing when the problem occurred so that we can attempt to replicate and fix it.
Also, it is not recommended that you use a beta release in your production environment.
Preps PJTF and JDF output compatibility
• Prinergy 2.3.1 and later accepts PJTF output from Preps 5.2.
• Prinergy 3.0.3.0 accepts JDF output from Preps 5.2.
What Is in These Release NotesThe release notes include the following sections:
“Installation” provides software installation guidelines and instructions.
“Problems Fixed” lists problems in the previous release of Preps that are now resolved.
“New Features and Enhancements” describes new features and capabilities that were added to Preps software, including menu commands, options, or dialog boxes.
“Known Problems” lists problems that are not yet resolved.
InstallationPreps 5.2 software is available only as a full installer both for new installations and for existing Preps 5.x systems. If you are installing this software onto a computer with a previously installed Preps release, we recommend that you install the new software to a separate, new folder, and then use the Migration Utility to copy your marks, templates, and other files to the new location.
Only users who are logged in at the Administrator level may install this software.
See also “Additional Important Notes for CJK Installations” on page 5.
Note: Do not attempt to install Preps on a computer that is or was previously configured with Prinergy server software.
2 Preps 5.2 Beta Release Notes
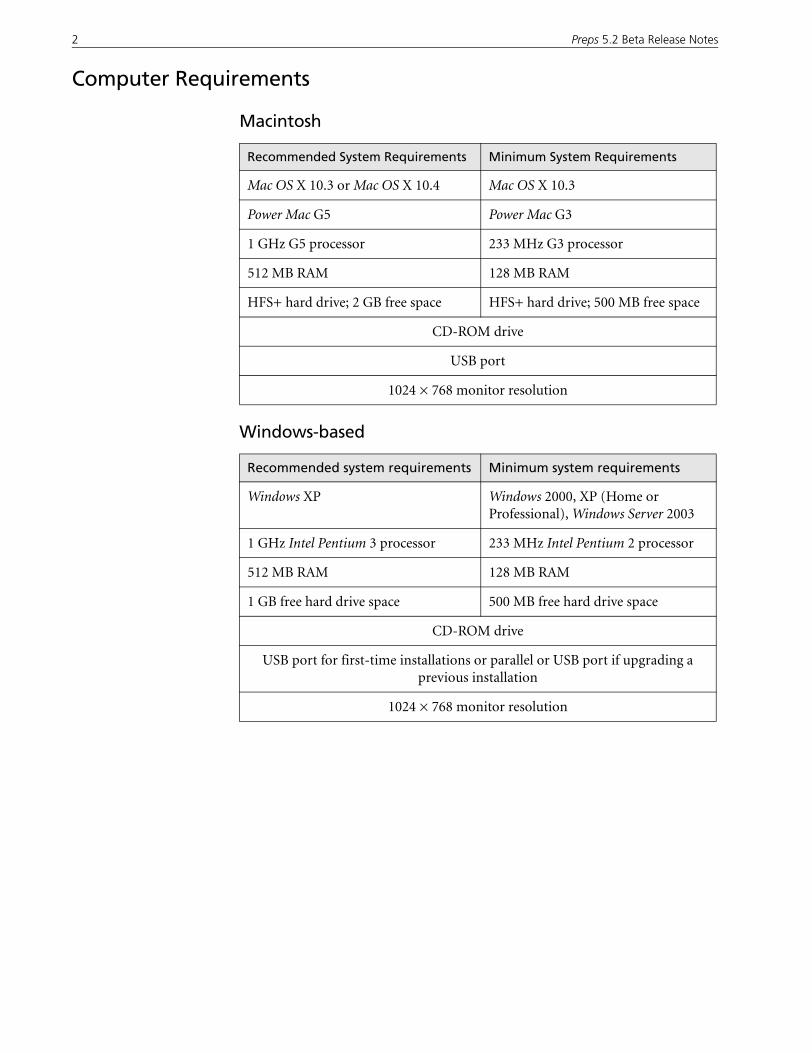
Computer Requirements
Macintosh
Windows-based
Recommended System Requirements Minimum System Requirements
Mac OS X 10.3 or Mac OS X 10.4 Mac OS X 10.3
Power Mac G5 Power Mac G3
1 GHz G5 processor 233 MHz G3 processor
512 MB RAM 128 MB RAM
HFS+ hard drive; 2 GB free space HFS+ hard drive; 500 MB free space
CD-ROM drive
USB port
1024 × 768 monitor resolution
Recommended system requirements Minimum system requirements
Windows XP Windows 2000, XP (Home or Professional), Windows Server 2003
1 GHz Intel Pentium 3 processor 233 MHz Intel Pentium 2 processor
512 MB RAM 128 MB RAM
1 GB free hard drive space 500 MB free hard drive space
CD-ROM drive
USB port for first-time installations or parallel or USB port if upgrading a previous installation
1024 × 768 monitor resolution
Introduction 3
Preps 5.2 License and Dongle RequirementsThis release requires a valid Preps dongle and password.
Dongle compatibility• Purple Eve3 dongles: Preps 5.2 software will not run on Mac OS X (Tiger) if an
Eve3 dongle is used. You can, however, run Preps 5.2 with a purple dongle on Mac OS X v10.3 (Panther).
• Blue iKey dongle on Mac OS X 10.4: To run Preps 5.2 on Tiger, you require a blue iKey dongle—if you have a purple Eve3, you must exchange it for an iKey.
• Parallel dongles: Preps 5.x series software running on Windows Server 2003 or Windows XP-SP2 is not compatible with the older parallel dongle. This dongle type can continue to be used on Windows 2000 or Windows XP-SP1.
Entering a New Password to Upgrade a Preps LicenseIf you receive a new password, such as when you upgrade from a Preps Plus version to Preps Pro license, you must enter the password before the change can take effect.
To upgrade the license, start Preps, press COMMAND+U (Mac OS) or CTRL+U (Windows), and in the Password dialog box, type the new password in the Password box. You can also provide names in the Licensed to and Company boxes.
Preps floating licensePreps can now be integrated into Prinergy software, licensed via a server-based floating license instead of a dongle. These release notes do not discuss this feature and its licensing options. For an overview, see the technical bulletin, About Preps Floating Licenses, available from http://graphics.kodak.com/.
4 Preps 5.2 Beta Release Notes
Installing Preps 5.2 The Preps installer places the Preps software into a new folder called Preps 5.2. Download the Preps 5.2 Installer from the Preps Downloads page, accessible from http://graphics.kodak.com/.
Note: On Mac OS, if you use Windows Explorer to download an installer, you must rename the file when prompted—it is important that you give the file a .dmg extension.
Install the software, using the procedure for the applicable operating system.
Mac OS X v10.3 or v10.4
You can install this release on either of the following:
• Mac OS X 10.4 with an iKey dongle only
• Mac OS X 10.3 with an existing dongle
1. Double-click the Preps_5-2_Installer.dmg icon and then accept the license agreement to open the Preps disk image.
2. Drag the Preps 5.2 icon to the Applications folder on your hard drive.
Note: If you are keeping a previous version of Preps, the following step is a precaution to prevent post-installation folder permission problems, such as Preps being available only to the user who created the new Preps folder.
3. From the older Preps X\Preps folder, copy the *.pwd password file to the new Preps 5.2\Preps folder. This file is named with your dongle number and contains the Preps password for this installation.
4. Run the Migration Utility, contained in the Preps Extras folder, if you want to continue using any previous output devices, marks, SmartMarks, templates, and custom profiles.
5. Optional: To preserve custom settings from your previous default profile, copy the default.cfg file from the old Profiles\default folder to the new folder.
Windows
1. Double-click the Preps_5-2_Installer.exe to start the installer.
2. Follow the instructions as they appear until installation is complete.
3. Run the Migration Utility, contained in the Preps Extras folder, if you want to continue using any previous output devices, marks, SmartMarks, templates, and custom profiles.
4. Optional: To preserve custom settings from your previous default profile, copy the default.cfg file from the old Profiles\default folder to the new folder.
Introduction 5
Additional Important Notes for CJK Installations
Migrating Preps 3.5.5 filesTo avoid complications and extra work, it is strongly recommended that you work separately with Preps 3.5.5 files and Preps 5.2 files.
Although Preps Migration Utility 1.4 supports Asian fonts, any files created in Preps 3.5.5 (which is Japanese-only) that are migrated to Preps 5.2 cannot be opened again in Preps 3.5.5 without an intermediate step: You must convert each file from UTF-8 encoding format to Shift-JIS. To do this you use a third-party tool such as Cyclone, or, on the Mac OS only, you can apply Japanese in the Mac OS international settings, then in the Preps Preferences dialog box select Maintain compatibility with previous versions of Preps, and finally, resave each template.
If you move files back to Preps 3.5.5 and then want to move them back to Preps 5.2, you must use the Migration Utility to move these files back, so that Preps 5.2 will render the Japanese text correctly.
Using Chinese, Japanese, or Korean text marks on Mac OSIf you intend to create CJK character text marks, it is a good idea to edit the Preps default configuration file before you start using Preps 5.2 on a Macintosh computer.
For details, see the technical bulletin, CJK Text Marks in Preps, available from the Preps Documentation page of http://graphics.kodak.com/.
Asian language packs required for Asian Preps on WindowsA corresponding language pack must be separately installed for any Windows-based computer on which you use Preps with an Asian language. If the necessary pack is not already installed, you can obtain it from http://www.microsoft.com.
Installing Japanese Preps on non-Japanese Windows 2000The third-party installation software used for the Preps installer wizard is unable to display Japanese text correctly. Because the text is garbled, you are unable to read the instructions. However, if you press Enter as each dialog box appears, you will successfully complete a default installation of Preps.
Asian language support and version of Adobe Acrobat PDFIf you are planning to run Preps in Japanese or Chinese, you require a version of Adobe Acrobat PDF that supports Unicode characters. PDF 1.3 does not support Unicode; you require PDF 1.4 or later, provided in Acrobat 5 or later software.
Note: Korean text-mark fonts will be available with the production release of Preps 5.2, and all the Preps CJK text-mark fonts will be available in enhanced installers.
6 Preps 5.2 Beta Release Notes
Problems Fixed
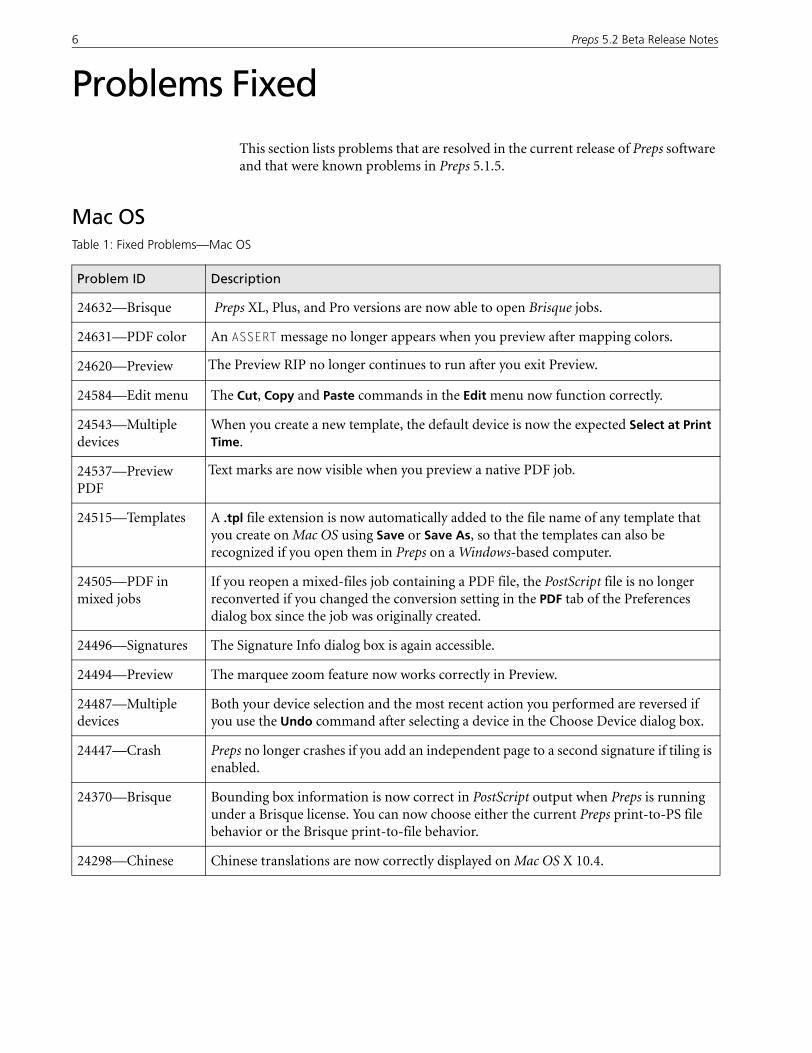
This section lists problems that are resolved in the current release of Preps software and that were known problems in Preps 5.1.5.
Mac OSTable 1: Fixed Problems—Mac OS
Problem ID Description
24632—Brisque Preps XL, Plus, and Pro versions are now able to open Brisque jobs.
24631—PDF color An ASSERT message no longer appears when you preview after mapping colors.
24620—Preview The Preview RIP no longer continues to run after you exit Preview.
24584—Edit menu The Cut, Copy and Paste commands in the Edit menu now function correctly.
24543—Multiple devices
When you create a new template, the default device is now the expected Select at Print Time.
24537—Preview PDF
Text marks are now visible when you preview a native PDF job.
24515—Templates A .tpl file extension is now automatically added to the file name of any template that you create on Mac OS using Save or Save As, so that the templates can also be recognized if you open them in Preps on a Windows-based computer.
24505—PDF in mixed jobs
If you reopen a mixed-files job containing a PDF file, the PostScript file is no longer reconverted if you changed the conversion setting in the PDF tab of the Preferences dialog box since the job was originally created.
24496—Signatures The Signature Info dialog box is again accessible.
24494—Preview The marquee zoom feature now works correctly in Preview.
24487—Multiple devices
Both your device selection and the most recent action you performed are reversed if you use the Undo command after selecting a device in the Choose Device dialog box.
24447—Crash Preps no longer crashes if you add an independent page to a second signature if tiling is enabled.
24370—Brisque Bounding box information is now correct in PostScript output when Preps is running under a Brisque license. You can now choose either the current Preps print-to-PS file behavior or the Brisque print-to-file behavior.
24298—Chinese Chinese translations are now correctly displayed on Mac OS X 10.4.

Problems Fixed 7
WindowsTable 2: Fixed Problems—Windows
Problem ID Description
24639—PDF color Color-mapped PDF output from a native PDF job is now available.
24635—PDF color You are can now map spot colors to individual process colors in Preview Color Setup.
24630—Color setup The Apply Settings button has been removed from the Color Setup dialog box.
24615—Page-based marks
Page-based marks now appear correctly in the Template Editor.
24520—Preview When you preview a signature and tab through the Page Position Adjustment boxes to edit the offsets, the cursor now highlights the current value so that you can simply type in a new value.
24518—JDF, crash Preps no longer crashes when you click Resolve if the Template Editor is open at the same time.
24507—Multiple devices
When a Preps job that refers to missing devices is imported into Prinergy, the correct error message now appears.
24504—Crash If you change the Templates and Marks folder location to a new location that does not contain any marks, Preps no longer crashes when you try to create a new SmartMarks.
24497—Crash Preps no longer crashes when you create a Dupmark from a mark on a server.
24489—Signatures To modify the current signature selection in a job, it is necessary to navigate through all the template files again to return to the currently applied template. The previously selected template for that job should be presented when you re-open the Signature Selection dialog box.
24480—QuarkXPress
If you add a PostScript file generated in QuarkXPress software to a mixed-files job, the bounding box information for the file is now interpreted correctly in Preps.
24434—Color The Build button is no longer disabled in the Color Separations tab of the Print dialog box and does not crash if you right-click it.
24377—Preps Evo Preps for Prinergy Evo now logs a proper error message before failing a function.
24082—JDF resolve The path in the Resolve Signature Placeholder dialog box is now displayed using the Windows convention (backslashes).
8 Preps 5.2 Beta Release Notes
Mac OS and WindowsTable 3: Fixed Problems—Mac OS and Windows
Problem ID Description
24644—JDF import Preps now imports the customer name from an imported JDF file.
24637—Page-based marks
You can now apply page-based SmartMarks to template sections.
24633—Page-based marks
If you open a file that uses a custom, page-based SmartMark and its mark file is missing, Preps no longer crashes.
24624—Text marks Screened colors in native PDF jobs for Adobe Job Ticket (also called PJTF) output are now honored for text marks with variable tags.
24617—Page-based marks
Page-based marks no longer sometimes disappear when you zoom in Preview.
24612—Page-based marks
Page-based marks now print or preview when applied to independent pages, whether or not they are already imposed.
24611—Page-based marks
Page-based marks now correctly appear on the side to which you applied them.
24594—Preview Text marks no longer disappear in Preview when you click Preview Again.
24558—Devices If you try to add a signature to a job for which the device is missing, an error message warns you that the device is missing, and the missing device name is automatically added to the device list and selected as the default.
24554—Multiple devices, PJTF
You can now print PJTF to multiple devices.
24522—JDF resolve Preps now applies a more relaxed comparison when matching a JDF signature’s trim size to Preps signature trim sizes, to increase the likelihood of finding a suitable match.
24521—Multiple devices
Multiple-device output to individual PostScript files applies the page size of the current default device, as set in the Device Setup dialog box, instead of the various sizes for the multiple devices.
24464—Creep Preps now calculates shingling (creep) correctly for perfect-bound jobs.
24452—Japanese JDF files can now be processed if they include source PDF files with Japanese content.
24390—Acrobat You can now preview or print certain files using Preps internal converter without receiving an error message about missing fonts on RIP or in Distiller.
24345—QuarkXPress Preps can now correctly process pre-separated PostScript files from QuarkXPress.
24277—JDF template A template containing over 200 signatures now opens faster than previously, and the Resolve button functions correctly.
New Features and Enhancements 9
New Features and Enhancements
This section lists features that were added or improved in the new release of Preps software. Features that were modified as a result of a problem in the software are described in “Problems Fixed” on page 6.
Note: In the Preps 5.2 beta release, you might encounter an occasional Assert message on Mac OS. Please disregard these messages—click OK to dismiss the message.
Miscellaneous Enhancements• For demonstrations of several new features, you can view QuickTime movies
(English only) posted at http://graphics.kodak.com/.
• When you first start Preps 5.2, a What’s New in Preps 5.2 document appears.
• In the Build dialog box, the Use new build check box is now automatically selected as soon as you type a new value for a process color.
• In the Folders tab of the Preferences dialog box, you now have the option to set the default output path to Use last location instead of a specific folder.
• On Mac OS, when you Save (or Save As) a template, Preps now automatically adds a .tpl extension, which makes the template file portable to Windows.
Acrobat 7 CompatibilityPreps 5.2 fully supports Adobe Acrobat 7 software. You can impose, preview, and print PDF files that were created using Acrobat 7 (PDF 1.6). For converting PDF files to Adobe PostScript language, you can use either your installed copy of Acrobat 7 with the latest Preps plug-in or the Preps 5.2 internal converter.
Improved Previewing of Native PDF Jobs PDF previewing is now approximately three times faster than before. Other native PDF previewing enhancements provide:
• Accurate overprint previews
• Better text anti-aliasing and fewer pixel artifacts
• Better color separation previewing
• Remapping of spot to process colors using the Preview > Color Setup option.
When you select a PDF conversion option in the Preferences dialog box PDF tab, your selection is used only for PostScript output, because Preps no longer needs to convert native PDF files to PostScript before displaying the rasterized images.
10 Preps 5.2 Beta Release Notes
Native PDF Color MappingColor mapping is now available to native PDF jobs in Preps Pro or Preps Plus, for output to PostScript or PDF files or to a printer. You can output the colors in either in a composite PDF file or in separated PostScript color files for in-RIP separation.
Note: For a more complete color handling solution, use a fully featured workflow such as Prinergy or Prinergy Evo.
Affected dialog boxes: Preview, Preview—Color Setup dialog box, and Print dialog box—General and Color Separations tabs
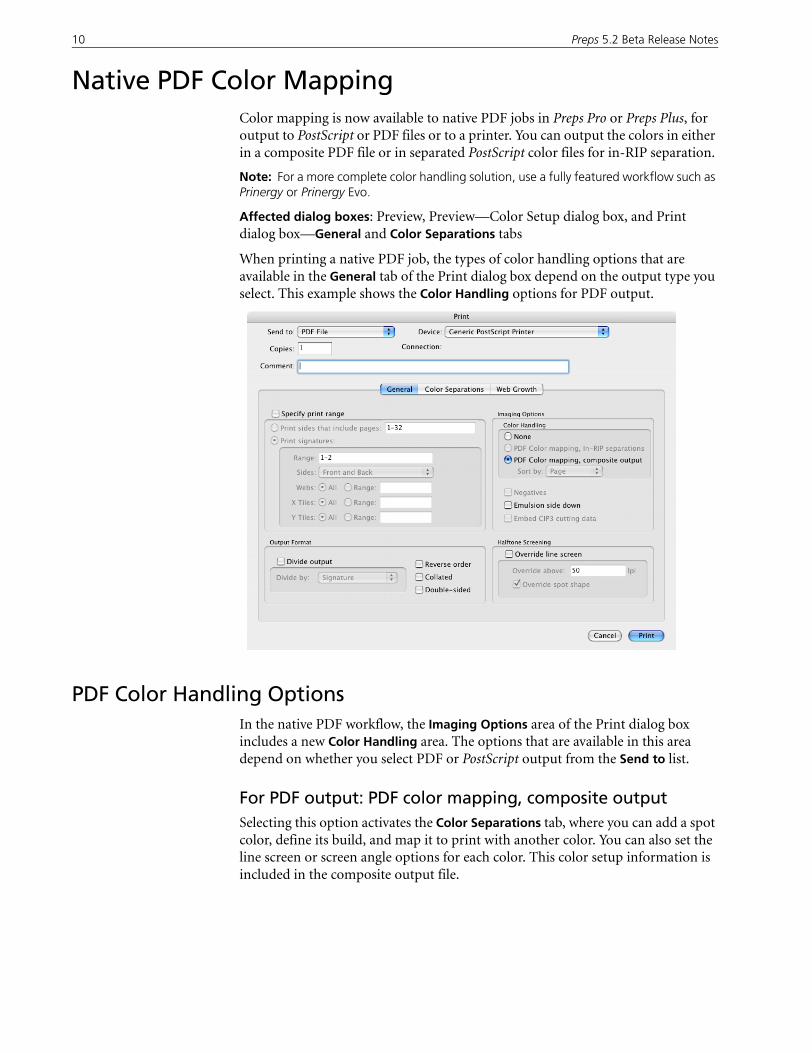
When printing a native PDF job, the types of color handling options that are available in the General tab of the Print dialog box depend on the output type you select. This example shows the Color Handling options for PDF output.
PDF Color Handling OptionsIn the native PDF workflow, the Imaging Options area of the Print dialog box includes a new Color Handling area. The options that are available in this area depend on whether you select PDF or PostScript output from the Send to list.
For PDF output: PDF color mapping, composite outputSelecting this option activates the Color Separations tab, where you can add a spot color, define its build, and map it to print with another color. You can also set the line screen or screen angle options for each color. This color setup information is included in the composite output file.
New Features and Enhancements 11
For PostScript output: PDF color mapping, In-RIP separationsThis option is available for PostScript, Printer, or Discard output when you select a device that supports in-RIP separations. Selecting this option activates the Color Separations tab, where you can set the line screen or screen angle options for each color in the job. The RIP uses the information in the color-separated PostScript output files to generate the separations.
For no color mapping in Preps: NoneYou can select this option if no color-handling is to be applied in Preps, and it is selected by default for output types that do not support native PDF color handling. None of the options on the Color Separations tab are available if None is selected. Any source color information contained in the original PDF input files passes through Preps unchanged and is included in the output file.
Previewing color separationsIn Preview, you can now click Color Setup to access the options in the Color Separations dialog box, which now includes the same color check boxes as in the Print dialog box. The process colors are preselected, and cannot be deselected. The Print dialog box and this dialog box share the color information when you update either one. Also, when you remap a color, the color that you see in Preview is the same color produced after output to the RIP.
SmartMarks Anchored to Pages or Page BleedsPreps SmartMarks software has been updated to allow you to place custom, duplicating, line, rectangle, and text SmartMarks relative to pages or to page bleeds. Marks are placed on all instances of the page or pages you specify in the signature, including nonsequential pages.
In the output, any page-anchored marks are shifted to match any shingling, bottling, and page orientation changes that you apply. Preps never places a mark if it will overlap the page content or bleed margin. On the Mac OS, you can view the placement of page-anchored marks on rotated pages in the Template Editor (the Windows Template Editor is not capable of showing this).
Setting up Page-Based SmartMarksDialog boxes: Edit SmartMark, Edit .smk for applicable mark types
Setting up a page-anchored SmartMark for a template is like adding any type of SmartMark, except that you use a page-based anchor type and specify the pages or page ranges to which the mark is to be applied. For example, you can create a group of four line SmartMarks anchored to the page top, bottom, and sides and apply a spot color (SSiCustomColor 101) to indicate the imposition’s trim box. This box, however, does not shift with any offsets or scaling that you might apply.
Note: You can now also specify a page range when adding crop marks.
12 Preps 5.2 Beta Release Notes
To add a page-based mark:
1. In the applicable Edit SmartMark dialog box, select either Page or Page Bleeds from the Template anchor list. Specify whether the mark is to be added to all front pages, all back pages, all pages (both front and back), or a specified range of pages.
Note: If you apply a page-anchored mark to a multi-section template, the mark is added to the specified pages in all sections. You are unable to restrict the page range to certain sections.
2. Specify the pages if applicable. Separate the start and end pages of any ranges with a dash, and any individual page numbers or page ranges with a comma. Do not insert spaces.
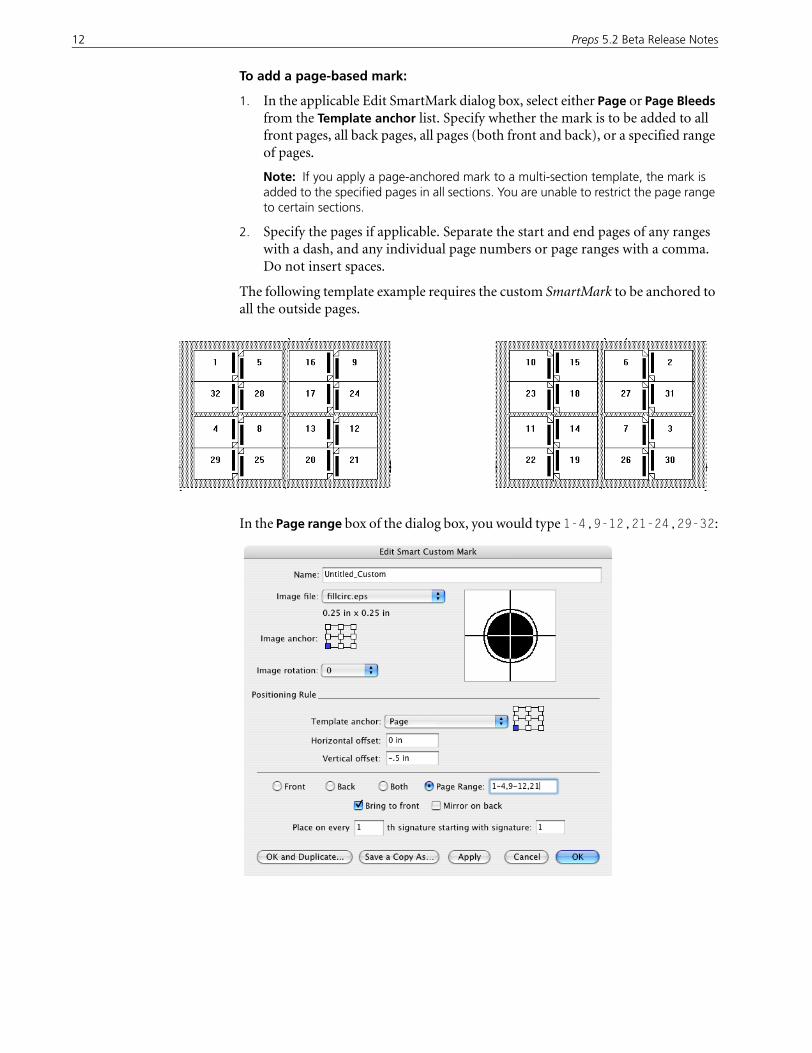
The following template example requires the custom SmartMark to be anchored to all the outside pages.
In the Page range box of the dialog box, you would type 1-4,9-12,21-24,29-32:
New Features and Enhancements 13
Simultaneously Edit Multiple Template ObjectsYou can select multiple gutters or template pages—including imposition and independent pages—and edit some or all of their properties at once. Properties that you edit for the selected objects override any previous values for those properties and objects, and any properties that you do not edit retain their individual settings for each of the selected pages or gutters.
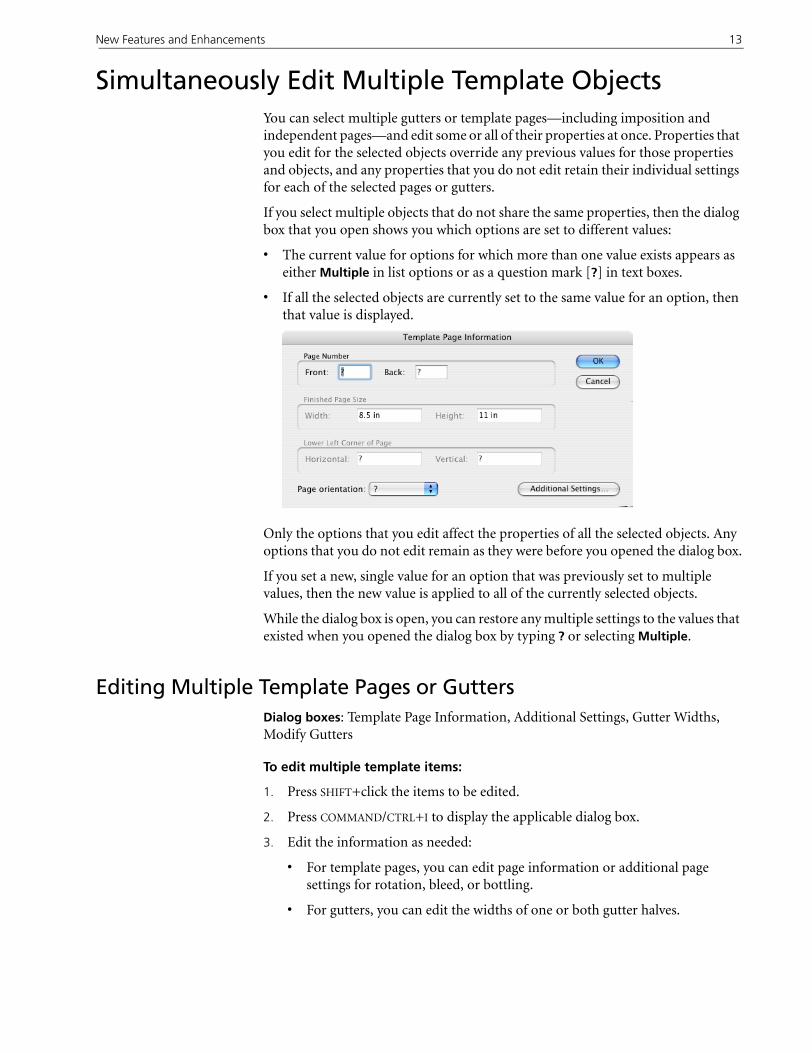
If you select multiple objects that do not share the same properties, then the dialog box that you open shows you which options are set to different values:
• The current value for options for which more than one value exists appears as either Multiple in list options or as a question mark [?] in text boxes.
• If all the selected objects are currently set to the same value for an option, then that value is displayed.
Only the options that you edit affect the properties of all the selected objects. Any options that you do not edit remain as they were before you opened the dialog box.
If you set a new, single value for an option that was previously set to multiple values, then the new value is applied to all of the currently selected objects.
While the dialog box is open, you can restore any multiple settings to the values that existed when you opened the dialog box by typing ? or selecting Multiple.
Editing Multiple Template Pages or GuttersDialog boxes: Template Page Information, Additional Settings, Gutter Widths, Modify Gutters
To edit multiple template items:
1. Press SHIFT+click the items to be edited.
2. Press COMMAND/CTRL+I to display the applicable dialog box.
3. Edit the information as needed:
• For template pages, you can edit page information or additional page settings for rotation, bleed, or bottling.
• For gutters, you can edit the widths of one or both gutter halves.
14 Preps 5.2 Beta Release Notes
Color Bars For Uncalibrated UseNote: This feature is not ready for use in Preps 5.2 Beta; it will be available in the production release.
For JDF or Adobe Job Ticket (PJTF) output, you can choose to print uncalibrated color bar SmartMarks that are not affected by color profiles or curves applied to jobs.A pair of marks flats is then generated, one containing the uncalibrated marks, the other with calibrated marks in case this is needed downstream.
Bar Code MarksDialog boxes: Edit Custom.smk, Edit Smart Custom Mark, Add Template Mark
You can now prevent collation and folding errors in postpress equipment by adding new bar code marks that can be read by Müller Martini and Wafer Systems Technologies (WST) optical scanners during job finishing. Identifying a faulty job assembly at this stage can save time and costly problems later.
How the Bar Codes are UsedBar code marks can be applied to a mixed-files job only, and the mark on each signature carries the job and signature information. To implement bar codes, you set up a template containing a bar code mark, apply the template to a job, and send the output for finishing.
After the job is ready for postpress, the finishing equipment scans each bar code to check that all the signatures belong to the same job and are in the correct sequence. For example, this might take place before or after the signatures go through the folding equipment, depending on the location of the scanner.
Available Bar Code MarksThe bar code mark on each signature in a job contains dynamically updated variables that represent the job ID—derived from Preps job information or JDF data—and the signature number. The bar code that you select depends on the target equipment that the mark was designed for. In accordance to the manufacturers' requirements:
• The MM-Barcode128c.eps bar code for Müller Martini's automatic signature detection (Asir) or compliant equipment contains the job ID (0-4999), signature ID (0-99), and total number of signatures in the output.
• The WST-bar2of5.eps WST-compliant bar code contains the job ID (0-99999) and signature ID (0-99), and the WST-bar2of5w-text.eps mark also displays a human-readable version of the numbers represented by the bar code symbols.
Cross-Platform CompatibilityBar code marks are cross-platform compatible—a job’s bar code marks can be previewed or printed from either platform. However, they are visible in the Template Editor only on the same platform (Windows or Mac OS) on which the template was created.
New Features and Enhancements 15
Job and Signature ID DigitsA defined number of numeric digits is allocated for each ID type in a bar code. If an ID contains fewer digits, then leading zeros automatically fill the bar code. If it has more, it is truncated from the front to the defined number of digits for that ID.
For example:
• If a bar code allocates 2 digits for the signature ID, and the actual job signature number is 5, 105, or 205, the bar code represents the signature as number 05.
• If a job ID is allocated 5 digits, and the actual job ID is 123, the bar code uses number 00123. If the actual job ID is 12345678, the number 45678 is used.
• The number of digits for the signature and job ID can be edited by someone with a solid understanding of the PostScript language and bar code technology.
Note: All ID numbers must contain numeric characters only. The job will fail to print or preview if an applicable ID contains any non numeric characters.
If the job does not contain a job ID and the bar code requires the job ID, the job will still print, but the job ID portion of the bar code will be set to all zeros.
Positioning the Bar CodesYou can add these bar codes to a template as either static marks or SmartMarks; however, we strongly recommend that you use a custom SmartMarks bar code. Typically, you place the bar code on the spine or grip area, positioned so that the bar code scanner will be able to read it. The position of the scanner is different in each production line—be sure to apply any guidelines provided by the finishing equipment manufacturer when deciding where to place a bar code mark.
Simultaneously Target Multiple Devices for OutputYou no longer have to use a separate Print command for each part of a job that uses a different device or media size. For a single mixed-files or native PDF job, you can target a different device for all or some of the job’s signatures, and then use a single Print command to send the output to the devices. You can print file-based output to multiple devices; however, you cannot print to multiple Printer devices.
You can print to different physical devices—useful, for example, if a job includes a mix of 4-up and 8-up signatures—or to different device configurations for the same type of device, but with different requirements such as plate size or screening. A single JDF or PJTF output file can hold separate device information for each signature in a job, and PostScript and PDF output generates a separate file for each device. The device name is automatically included in output file names.
You can prepare and store device-specific templates and signatures, and the device assignments can be changed on a per job basis as needed. At the job level, you can choose a device for a job signature and then optionally have that device become the new default for the corresponding template signature or entire template.
16 Preps 5.2 Beta Release Notes
JDF and PJTF OutputA single JDF or PJTF file is generated when you print a job that targets more than one device, with one separate marks flat for each device. Each marks flat includes all the signatures that use the same device.
Note: In Preps 5.2 beta, please do not print native PDF jobs to Adobe Job Ticket output if multiple devices are selected.
PostScript OutputSimilar to the divided output feature, separate PostScript or PDF files are generated when you print from a job that targets multiple devices. Sequential output signatures destined for the same device are output as a single file. Non sequential signatures that target the same device are output as separate files in the correct sequence.
For example, if signatures 1 and 4 use the same device, and 2 and 3 use another, the generated output consists of three files in this sequence:
• File 1 targets Device 1 and contains Signature 1.
• File 2 targets Device 2 and contains Signatures 2 and 3.
• File 3 targets Device 1 and contains Signature 4.
PDF OutputPrinting PDF output from native PDF workflows to multiple devices generates a single file that contains the different page sizes based on the devices selected for the signatures. This file is sent to all the selected devices, where only the applicable signatures are printed. If you want to send separate files to each device, you can use the Divided Output option on the Print dialog box.
Output Types That do Not Print to Multiple DevicesThe Discard or PPF forms of output disregard any device information. Also, you cannot print to multiple devices from a Brisque ICF job.
Supported Output Features The Color Separation tab remains available if an Imaging Option is selected on the General tab. Availability of such options as color mapping, spot shape, line screen, and resolution are determined automatically based on the lowest supported capabilities of the associated output devices and workflow type. Any changes you make here are applied to all signatures in the output, including those that target other devices.
Output Features Not SupportedThe following print features do not support multiple devices:
• Web growth compensation
• Tiling
• On-demand printing
New Features and Enhancements 17
Selecting the DevicesYou can specify a default device for a template, signature, or job signature, or you can choose not to use the device selection feature:
Template: When you create a template, you can associate it with a device that becomes the default device for each signature within that template.
Template signature: You can override the template’s default device and set a different device for any of its signatures. That device becomes the default device whenever you select that signature for a job. The currently assigned device is listed beside the signature name in all signature lists.
Job signature: At the job level, the device associated with a template signature is presented as the default when you first select a signature for a job, and you can override this by applying a different device to any of the job signatures. You then have the option of setting that device become the new default for the corresponding template signature or entire template
None: If no device is associated with a template, signature, or job—such as for older items—the default is, as before, the device that is currently selected in the Device Setup dialog box, and no device name appears in any signature lists. When you print a job, all signatures are selected for printing by default, also as before.
The following sections guide you through the areas in Preps where you can now edit or view the default devices associated with templates, signatures, and jobs.
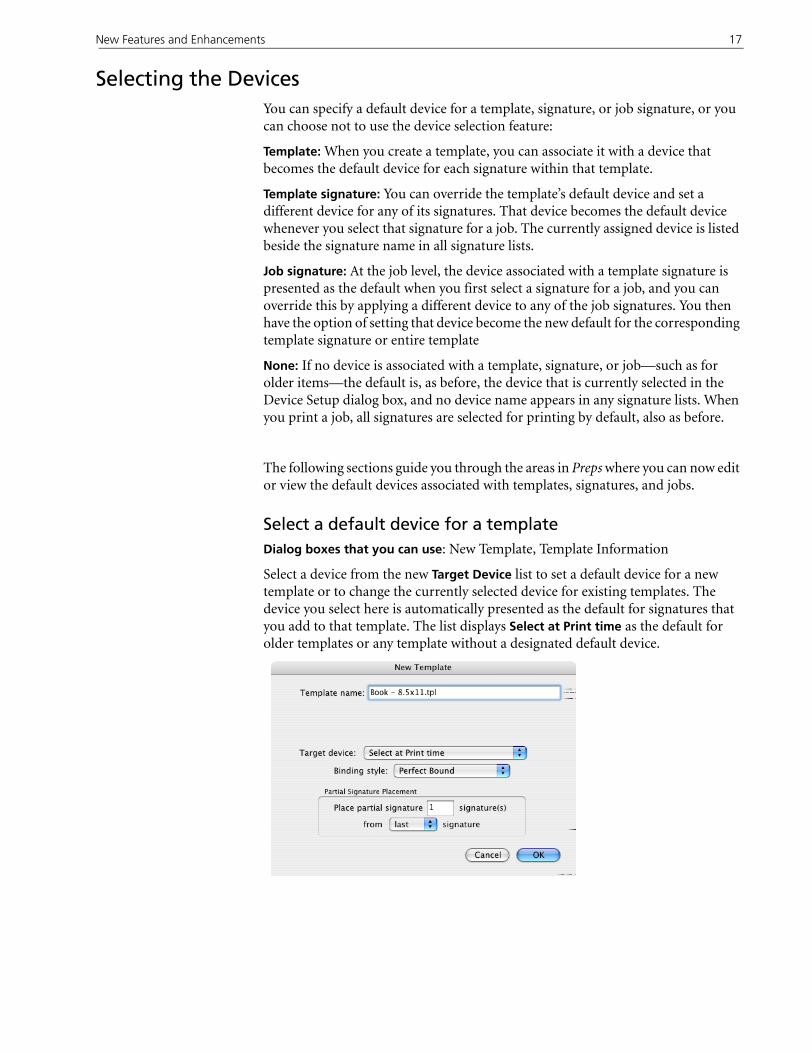
Select a default device for a templateDialog boxes that you can use: New Template, Template Information
Select a device from the new Target Device list to set a default device for a new template or to change the currently selected device for existing templates. The device you select here is automatically presented as the default for signatures that you add to that template. The list displays Select at Print time as the default for older templates or any template without a designated default device.
18 Preps 5.2 Beta Release Notes
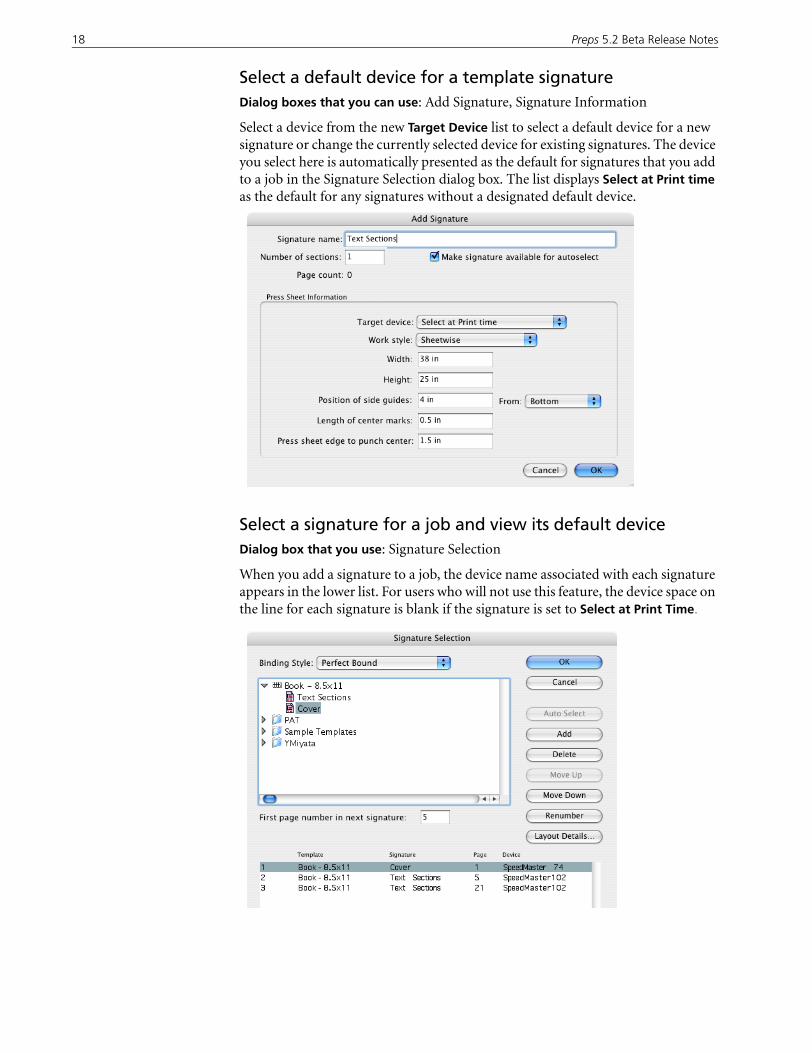
Select a default device for a template signatureDialog boxes that you can use: Add Signature, Signature Information
Select a device from the new Target Device list to select a default device for a new signature or change the currently selected device for existing signatures. The device you select here is automatically presented as the default for signatures that you add to a job in the Signature Selection dialog box. The list displays Select at Print time as the default for any signatures without a designated default device.
Select a signature for a job and view its default deviceDialog box that you use: Signature Selection
When you add a signature to a job, the device name associated with each signature appears in the lower list. For users who will not use this feature, the device space on the line for each signature is blank if the signature is set to Select at Print Time.
New Features and Enhancements 19
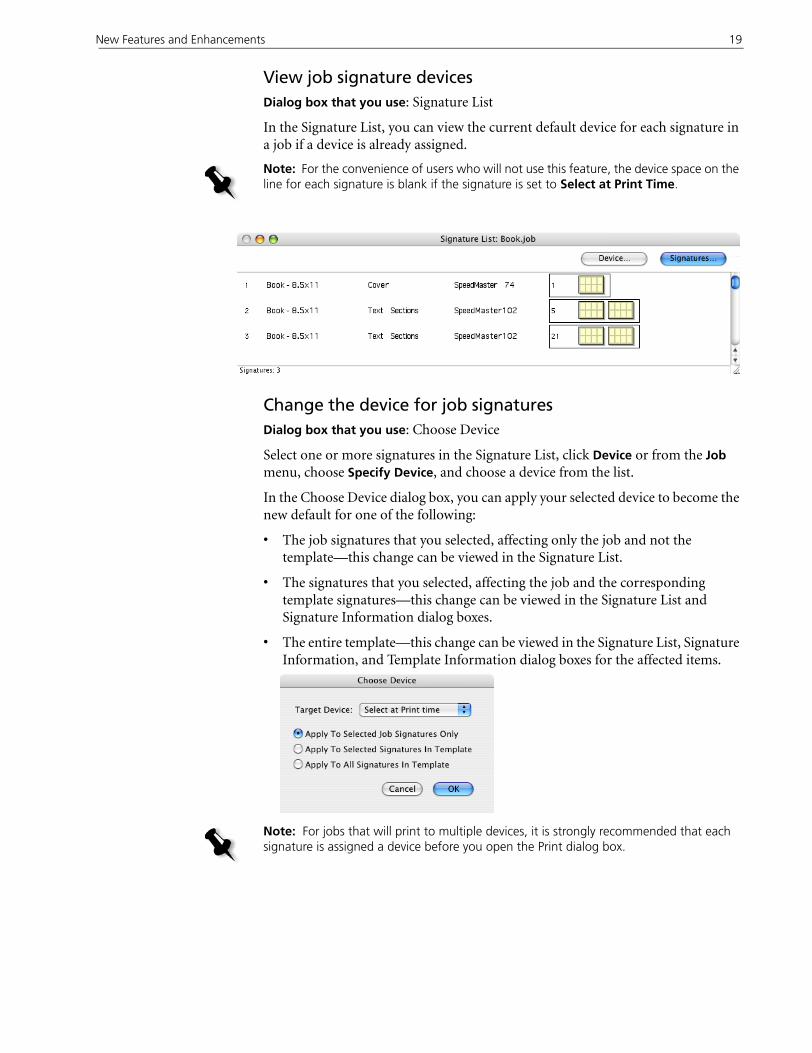
View job signature devicesDialog box that you use: Signature List
In the Signature List, you can view the current default device for each signature in a job if a device is already assigned.
Change the device for job signaturesDialog box that you use: Choose Device
Select one or more signatures in the Signature List, click Device or from the Job menu, choose Specify Device, and choose a device from the list.
In the Choose Device dialog box, you can apply your selected device to become the new default for one of the following:
• The job signatures that you selected, affecting only the job and not the template—this change can be viewed in the Signature List.
• The signatures that you selected, affecting the job and the corresponding template signatures—this change can be viewed in the Signature List and Signature Information dialog boxes.
• The entire template—this change can be viewed in the Signature List, Signature Information, and Template Information dialog boxes for the affected items.
Note: For the convenience of users who will not use this feature, the device space on the line for each signature is blank if the signature is set to Select at Print Time.
Note: For jobs that will print to multiple devices, it is strongly recommended that each signature is assigned a device before you open the Print dialog box.
20 Preps 5.2 Beta Release Notes
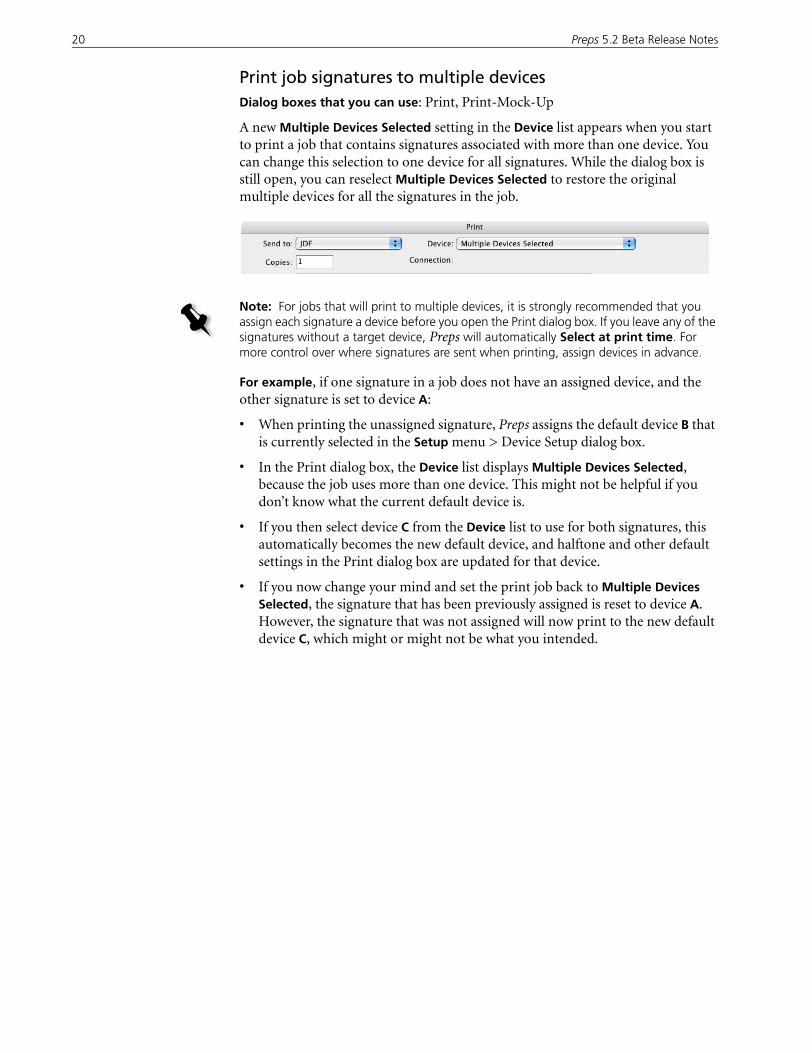
Print job signatures to multiple devicesDialog boxes that you can use: Print, Print-Mock-Up
A new Multiple Devices Selected setting in the Device list appears when you start to print a job that contains signatures associated with more than one device. You can change this selection to one device for all signatures. While the dialog box is still open, you can reselect Multiple Devices Selected to restore the original multiple devices for all the signatures in the job.
For example, if one signature in a job does not have an assigned device, and the other signature is set to device A:
• When printing the unassigned signature, Preps assigns the default device B that is currently selected in the Setup menu > Device Setup dialog box.
• In the Print dialog box, the Device list displays Multiple Devices Selected, because the job uses more than one device. This might not be helpful if you don’t know what the current default device is.
• If you then select device C from the Device list to use for both signatures, this automatically becomes the new default device, and halftone and other default settings in the Print dialog box are updated for that device.
• If you now change your mind and set the print job back to Multiple Devices Selected, the signature that has been previously assigned is reset to device A. However, the signature that was not assigned will now print to the new default device C, which might or might not be what you intended.
Note: For jobs that will print to multiple devices, it is strongly recommended that you assign each signature a device before you open the Print dialog box. If you leave any of the signatures without a target device, Preps will automatically Select at print time. For more control over where signatures are sent when printing, assign devices in advance.
New Features and Enhancements 21
JDF Roundtripping and Other EnhancementsPreps support of JDF workflows includes enhancements described in this section. For more technical information about JDF components supported, see the Preps Implementation of the JDF Standard technical bulletin (an update is pending).
Reuse a Preps JDF Job via RoundtrippingUsing Preps JDF roundtripping, you can reconstruct a Preps job that was previously exported from Preps as a JDF file, because all of the required information is contained in the original JDF output. This is useful for repeated output, such as when a job needs to be replated.
Export JDF Cutting Data (Preps Pro)You can export cutting data in JDF output in addition to the already supported PPF output format for exporting CIP3 data.
View JDF Signature NamesIf an incoming JDF file contains MIS ID information, you can click a signature icon to display its JDF Signature Name in the bottom line of the Signature List. The actual information displayed depends on what the MIS provides in the JDF file.
New Signature-Matching CriteriaFor closer matches when resolving JDF signatures, Preps can now search on additional criteria if you enable them in the default.cfg profile. If you have a large inventory of templates, this helps Preps to return the results faster than previously.
These new matching items appear in the Resolve Signature Placeholders dialog box.
By default, these options are turned off:
-JDFResolveCheckSheetSize:NOChange this option to YES if you would like Preps to consider sheet size when matching signatures. (Problem 24702 indicates that this is not yet working in beta.)
-JDFResolveCheckHeadFootTrim:NOThis is a placeholder for a future enhancement. It does not work—please leave this unchanged in Preps 5.2.
-JDFResolveCheckFoldingPattern:NOChange this option to YES if you would like Preps to consider the folding pattern when matching signatures, if this information is provided in the incoming JDF file. Preps looks for a match based on SignatureCell parameters, such as those provided
Note: The Resolve button is available only if the incoming JDF file originated at an MIS. When you reopen a JDF job that was originally created in Preps, you must use the Signature Selection dialog box to select a different signature.
22 Preps 5.2 Beta Release Notes
in JDF imported from UpFront, or on the specific pattern ID specified in an MIS JDF file, as derived from the JDF FoldCatalog. For more information, see the Preps Implementation of the JDF Standard technical bulletin (an update is pending).
NGP/CIP4 Vendor SupportJDF output from Preps is compliant with the JDF 1.3 Specification and now includes the SeparationName tag. Press sheet scaling for Preps Pro web growth compensation is supported; however, color separation is not. We expect to support the Layout Creator to Imposition ICS 1.3 when it is defined.
To give our workflow partners adequate time to implement support for our new JDF 1.3 tags, Preps 5.2 supports any private tags in Preps output that have been deprecated and replaced with newly available JDF 1.3 tags. Preps 5.2 is the only release that will offer this support.
For more information, see the Preps Implementation of the JDF Standard technical bulletin (an update is pending).
Standard and Brisque Preps MergedThe Standard/Prinergy and Brisque editions of Preps software are now merged into a single edition, giving all users a greater selection of output types so that you can process jobs from multiple workflows with a single copy of Preps.
Use this feature on Mac OS to print mixed jobs to Brisque devices
If you need to generate Brisque-style PostScript or printer output from a mixed-files job, you can now select these options in the Print dialog box:
• To generate PostScript output with the correct bounding box information for a Brisque workflow, select Brisque PS from the Send to list.
Brisque-style PostScript draws the bounding box just big enough to encompass everything printed on the page, not on the whole sheet. Choosing PS File output does not generate the correct bounding box information for Brisque devices.
• To ensure correct punch and hot folder configurations when sending to a printer, select Brisque Printer from the Send to list. Do not select just Printer.
You can also print Brisque jobs to non Brisque devices
If you want to output an existing Brisque job to a non Brisque workflow, you can use the new Brisque Job Converter software to convert the Brisque job to either a mixed-files or native PDF job. You can then print the job to any of the output options available to these job types.
Of course, you can continue to use Preps in Brisque workflows as before
If you previously used Preps Brisque, you use the same dialog boxes to work with Brisque jobs as before.
For more information, see the technical bulletin, Migrate From a Brisque Workflow With Preps 5.2.
New Features and Enhancements 23
If you want Brisque to be the default job type, set the Default workflow option in the Preferences dialog box to Brisque.
The Brisque ICF reader spreads feature continues to be available. You set the reader spreads options in the Brisque tab of the Preferences dialog box, select Brisque job type when starting a new job, and then proceed as usual.
Not everyone will use this feature
Brisque jobs are processed only on Mac OS X, so Windows users are not affected.
If you are imposing jobs in a non Brisque workflow, you typically ignore any Preps options that include the word “Brisque”.
You cannot generate Brisque-style output from a native PDF job.
24 Preps 5.2 Beta Release Notes
Known Problems
This section lists known problems in Preps software. They may be outstanding issues from a previous release or new problems. When a problem listed here is resolved, the solution is described in the Problems Fixed section of the release notes for the next version of Preps software.
JDF Problems
Mac OS
Windows
Table 4: JDF Problems—Mac OS
Problem ID Description
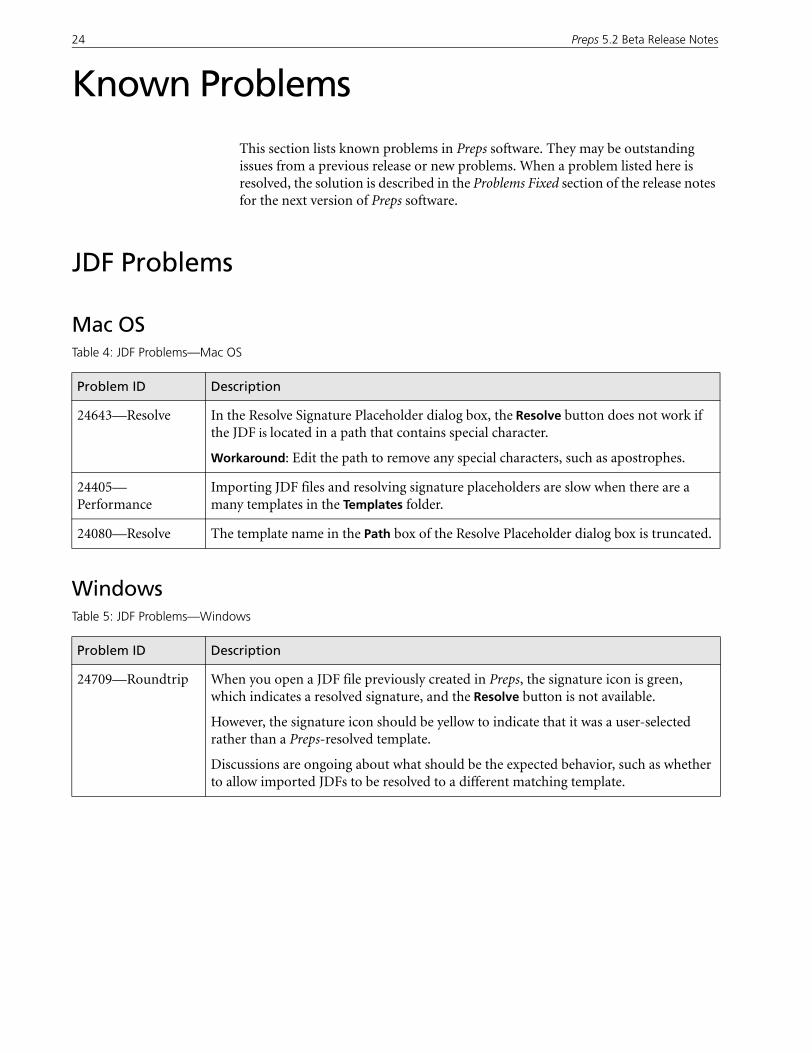
24643—Resolve In the Resolve Signature Placeholder dialog box, the Resolve button does not work if the JDF is located in a path that contains special character.
Workaround: Edit the path to remove any special characters, such as apostrophes.
24405—Performance
Importing JDF files and resolving signature placeholders are slow when there are a many templates in the Templates folder.
24080—Resolve The template name in the Path box of the Resolve Placeholder dialog box is truncated.
Table 5: JDF Problems—Windows
Problem ID Description
24709—Roundtrip When you open a JDF file previously created in Preps, the signature icon is green, which indicates a resolved signature, and the Resolve button is not available.
However, the signature icon should be yellow to indicate that it was a user-selected rather than a Preps-resolved template.
Discussions are ongoing about what should be the expected behavior, such as whether to allow imported JDFs to be resolved to a different matching template.
Known Problems 25
Mac OS and Windows Table 6: JDF Problems—Mac OS and Windows
Problem ID Description
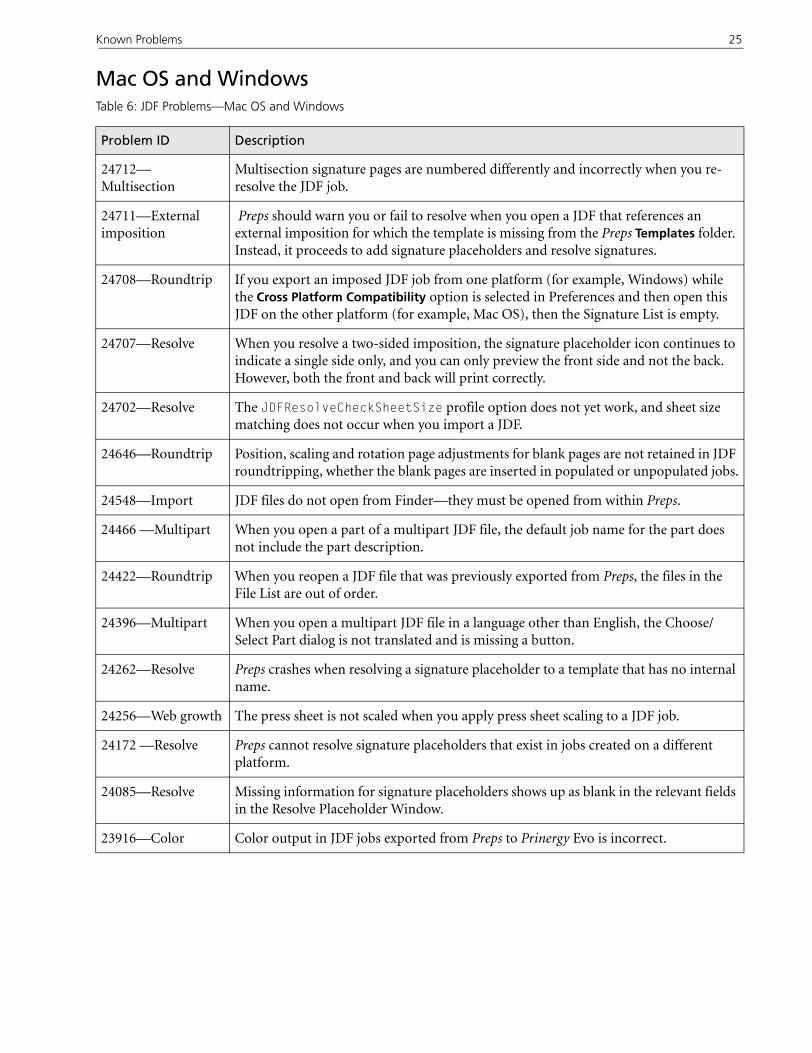
24712—Multisection
Multisection signature pages are numbered differently and incorrectly when you re-resolve the JDF job.
24711—External imposition
Preps should warn you or fail to resolve when you open a JDF that references an external imposition for which the template is missing from the Preps Templates folder. Instead, it proceeds to add signature placeholders and resolve signatures.
24708—Roundtrip If you export an imposed JDF job from one platform (for example, Windows) while the Cross Platform Compatibility option is selected in Preferences and then open this JDF on the other platform (for example, Mac OS), then the Signature List is empty.
24707—Resolve When you resolve a two-sided imposition, the signature placeholder icon continues to indicate a single side only, and you can only preview the front side and not the back. However, both the front and back will print correctly.
24702—Resolve The JDFResolveCheckSheetSize profile option does not yet work, and sheet size matching does not occur when you import a JDF.
24646—Roundtrip Position, scaling and rotation page adjustments for blank pages are not retained in JDF roundtripping, whether the blank pages are inserted in populated or unpopulated jobs.
24548—Import JDF files do not open from Finder—they must be opened from within Preps.
24466 —Multipart When you open a part of a multipart JDF file, the default job name for the part does not include the part description.
24422—Roundtrip When you reopen a JDF file that was previously exported from Preps, the files in the File List are out of order.
24396—Multipart When you open a multipart JDF file in a language other than English, the Choose/Select Part dialog is not translated and is missing a button.
24262—Resolve Preps crashes when resolving a signature placeholder to a template that has no internal name.
24256—Web growth The press sheet is not scaled when you apply press sheet scaling to a JDF job.
24172 —Resolve Preps cannot resolve signature placeholders that exist in jobs created on a different platform.
24085—Resolve Missing information for signature placeholders shows up as blank in the relevant fields in the Resolve Placeholder Window.
23916—Color Color output in JDF jobs exported from Preps to Prinergy Evo is incorrect.
26 Preps 5.2 Beta Release Notes
Multiple Device Output Problems
Mac OS
Windows
Table 7: Multiple Device Output Problems—Mac OS
Problem ID Description
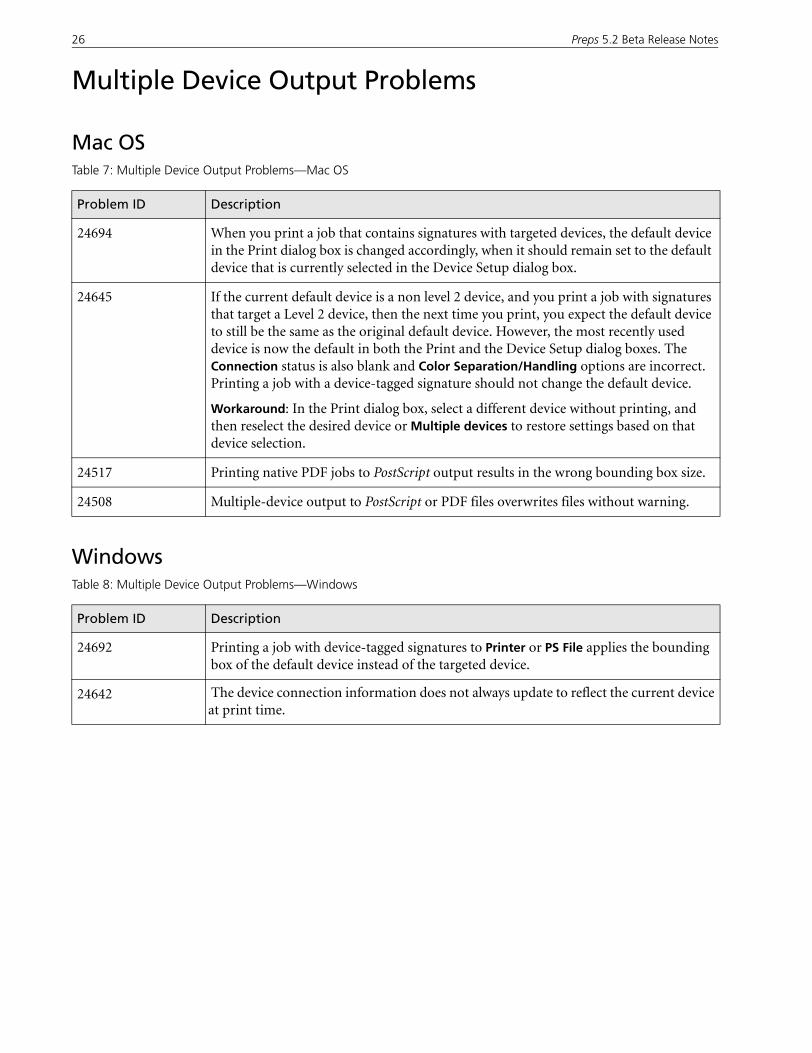
24694 When you print a job that contains signatures with targeted devices, the default device in the Print dialog box is changed accordingly, when it should remain set to the default device that is currently selected in the Device Setup dialog box.
24645 If the current default device is a non level 2 device, and you print a job with signatures that target a Level 2 device, then the next time you print, you expect the default device to still be the same as the original default device. However, the most recently used device is now the default in both the Print and the Device Setup dialog boxes. The Connection status is also blank and Color Separation/Handling options are incorrect. Printing a job with a device-tagged signature should not change the default device.
Workaround: In the Print dialog box, select a different device without printing, and then reselect the desired device or Multiple devices to restore settings based on that device selection.
24517 Printing native PDF jobs to PostScript output results in the wrong bounding box size.
24508 Multiple-device output to PostScript or PDF files overwrites files without warning.
Table 8: Multiple Device Output Problems—Windows
Problem ID Description
24692 Printing a job with device-tagged signatures to Printer or PS File applies the bounding box of the default device instead of the targeted device.
24642 The device connection information does not always update to reflect the current device at print time.
Known Problems 27
Mac OS and Windows
Preview Problems
Mac OS
Table 9: Multiple Device Output Problems—Mac OS and Windows
Problem ID Description
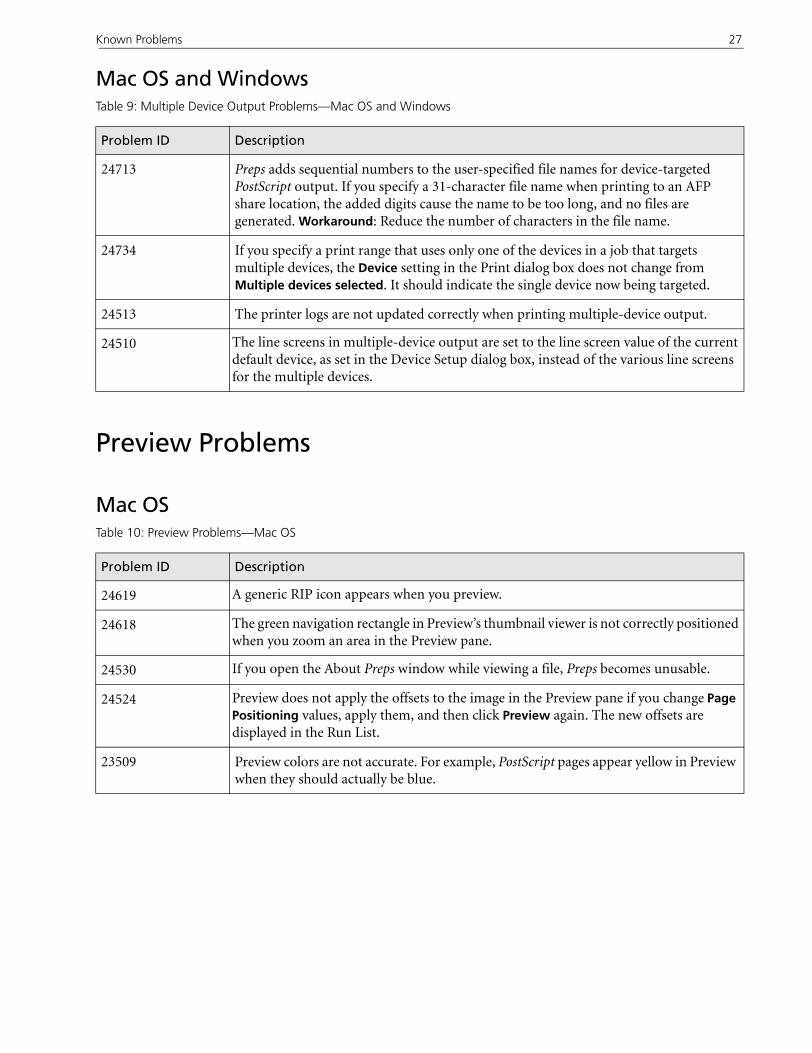
24713 Preps adds sequential numbers to the user-specified file names for device-targeted PostScript output. If you specify a 31-character file name when printing to an AFP share location, the added digits cause the name to be too long, and no files are generated. Workaround: Reduce the number of characters in the file name.
24734 If you specify a print range that uses only one of the devices in a job that targets multiple devices, the Device setting in the Print dialog box does not change from Multiple devices selected. It should indicate the single device now being targeted.
24513 The printer logs are not updated correctly when printing multiple-device output.
24510 The line screens in multiple-device output are set to the line screen value of the current default device, as set in the Device Setup dialog box, instead of the various line screens for the multiple devices.
Table 10: Preview Problems—Mac OS
Problem ID Description
24619 A generic RIP icon appears when you preview.
24618 The green navigation rectangle in Preview’s thumbnail viewer is not correctly positioned when you zoom an area in the Preview pane.
24530 If you open the About Preps window while viewing a file, Preps becomes unusable.
24524 Preview does not apply the offsets to the image in the Preview pane if you change Page Positioning values, apply them, and then click Preview again. The new offsets are displayed in the Run List.
23509 Preview colors are not accurate. For example, PostScript pages appear yellow in Preview when they should actually be blue.
28 Preps 5.2 Beta Release Notes
Mac OS and Windows
PDF Color Mapping Problems
Windows
Mac OS and Windows
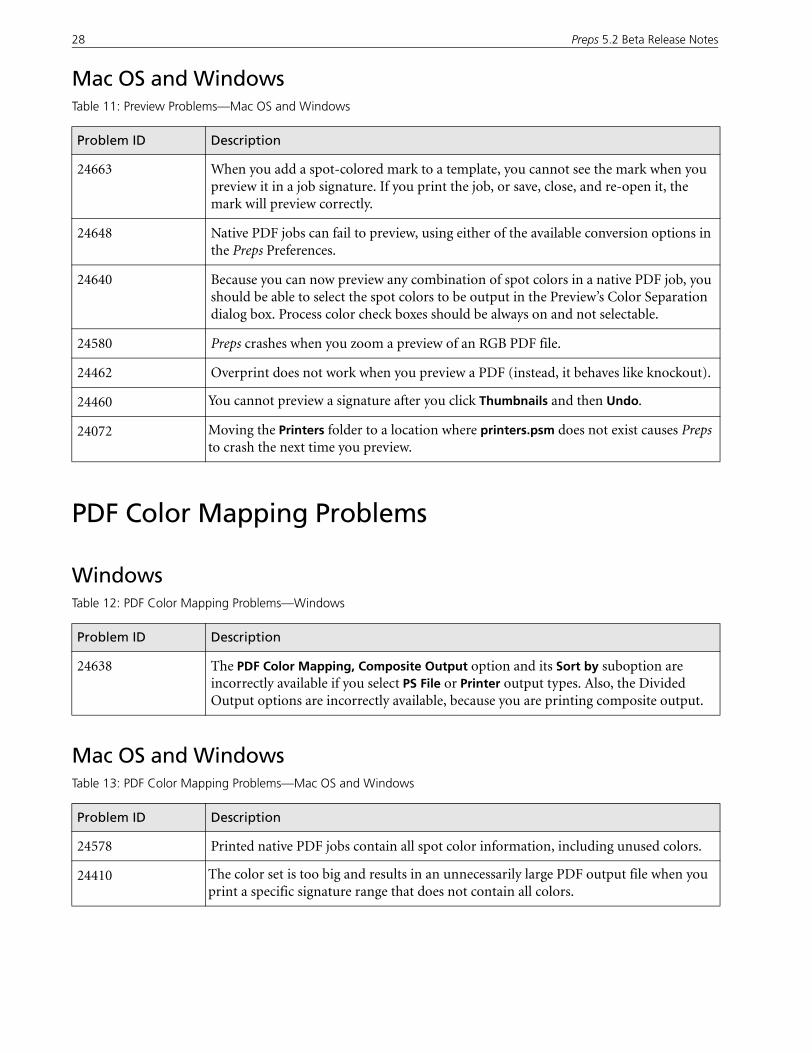
Table 11: Preview Problems—Mac OS and Windows
Problem ID Description
24663 When you add a spot-colored mark to a template, you cannot see the mark when you preview it in a job signature. If you print the job, or save, close, and re-open it, the mark will preview correctly.
24648 Native PDF jobs can fail to preview, using either of the available conversion options in the Preps Preferences.
24640 Because you can now preview any combination of spot colors in a native PDF job, you should be able to select the spot colors to be output in the Preview’s Color Separation dialog box. Process color check boxes should be always on and not selectable.
24580 Preps crashes when you zoom a preview of an RGB PDF file.
24462 Overprint does not work when you preview a PDF (instead, it behaves like knockout).
24460 You cannot preview a signature after you click Thumbnails and then Undo.
24072 Moving the Printers folder to a location where printers.psm does not exist causes Preps to crash the next time you preview.
Table 12: PDF Color Mapping Problems—Windows
Problem ID Description
24638 The PDF Color Mapping, Composite Output option and its Sort by suboption are incorrectly available if you select PS File or Printer output types. Also, the Divided Output options are incorrectly available, because you are printing composite output.
Table 13: PDF Color Mapping Problems—Mac OS and Windows
Problem ID Description
24578 Printed native PDF jobs contain all spot color information, including unused colors.
24410 The color set is too big and results in an unnecessarily large PDF output file when you print a specific signature range that does not contain all colors.
Known Problems 29
Page-Anchored Marks Problems
Mac OS
Windows
Brisque Workflow Problems
Mac OS
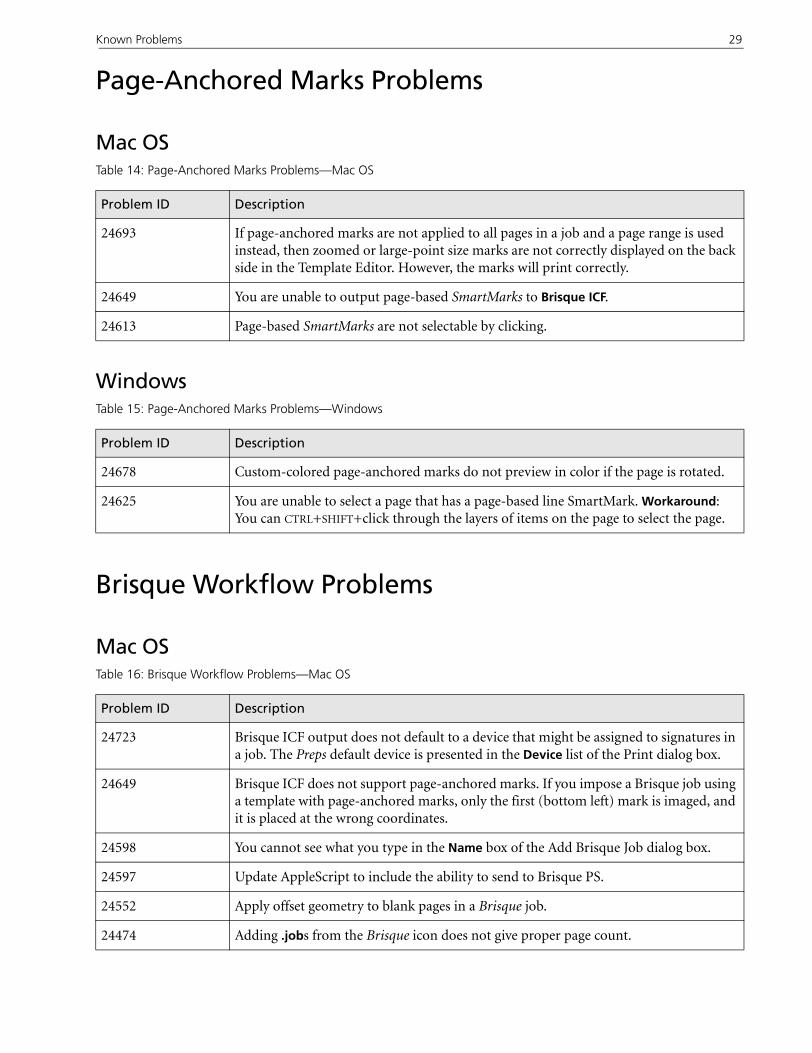
Table 14: Page-Anchored Marks Problems—Mac OS
Problem ID Description
24693 If page-anchored marks are not applied to all pages in a job and a page range is used instead, then zoomed or large-point size marks are not correctly displayed on the back side in the Template Editor. However, the marks will print correctly.
24649 You are unable to output page-based SmartMarks to Brisque ICF.
24613 Page-based SmartMarks are not selectable by clicking.
Table 15: Page-Anchored Marks Problems—Windows
Problem ID Description
24678 Custom-colored page-anchored marks do not preview in color if the page is rotated.
24625 You are unable to select a page that has a page-based line SmartMark. Workaround: You can CTRL+SHIFT+click through the layers of items on the page to select the page.
Table 16: Brisque Workflow Problems—Mac OS
Problem ID Description
24723 Brisque ICF output does not default to a device that might be assigned to signatures in a job. The Preps default device is presented in the Device list of the Print dialog box.
24649 Brisque ICF does not support page-anchored marks. If you impose a Brisque job using a template with page-anchored marks, only the first (bottom left) mark is imaged, and it is placed at the wrong coordinates.
24598 You cannot see what you type in the Name box of the Add Brisque Job dialog box.
24597 Update AppleScript to include the ability to send to Brisque PS.
24552 Apply offset geometry to blank pages in a Brisque job.
24474 Adding .jobs from the Brisque icon does not give proper page count.
30 Preps 5.2 Beta Release Notes
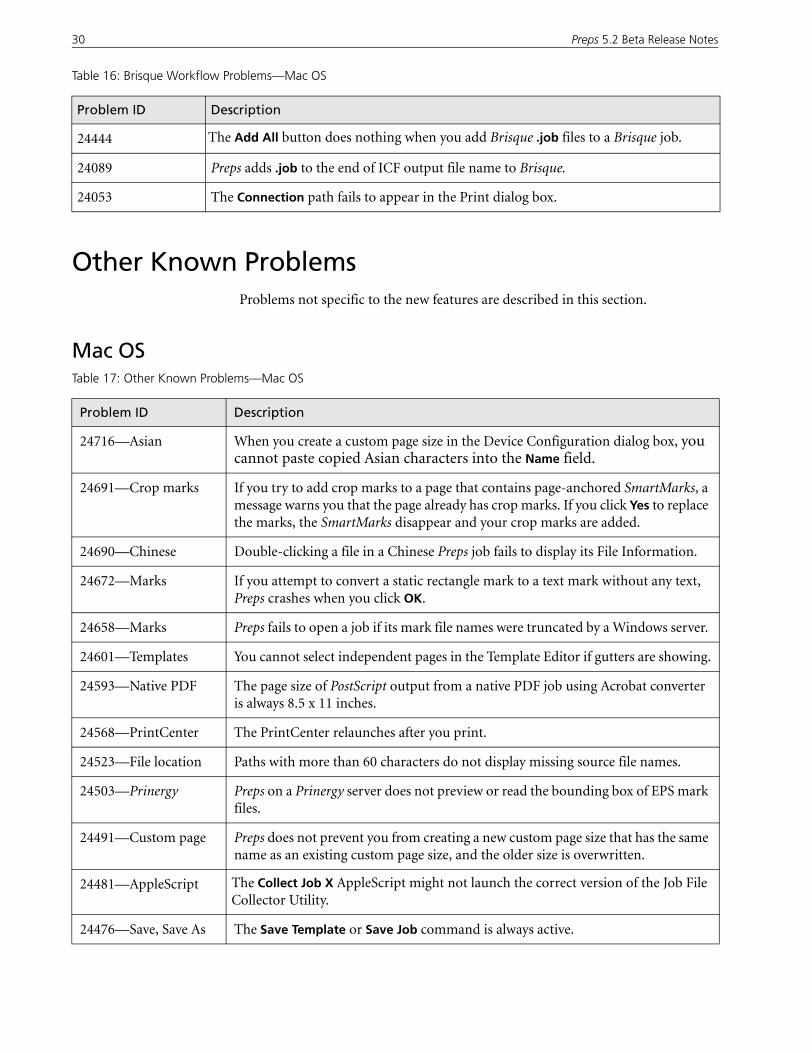
Other Known ProblemsProblems not specific to the new features are described in this section.
Mac OS
24444 The Add All button does nothing when you add Brisque .job files to a Brisque job.
24089 Preps adds .job to the end of ICF output file name to Brisque.
24053 The Connection path fails to appear in the Print dialog box.
Table 16: Brisque Workflow Problems—Mac OS
Problem ID Description
Table 17: Other Known Problems—Mac OS
Problem ID Description
24716—Asian When you create a custom page size in the Device Configuration dialog box, you cannot paste copied Asian characters into the Name field.
24691—Crop marks If you try to add crop marks to a page that contains page-anchored SmartMarks, a message warns you that the page already has crop marks. If you click Yes to replace the marks, the SmartMarks disappear and your crop marks are added.
24690—Chinese Double-clicking a file in a Chinese Preps job fails to display its File Information.
24672—Marks If you attempt to convert a static rectangle mark to a text mark without any text, Preps crashes when you click OK.
24658—Marks Preps fails to open a job if its mark file names were truncated by a Windows server.
24601—Templates You cannot select independent pages in the Template Editor if gutters are showing.
24593—Native PDF The page size of PostScript output from a native PDF job using Acrobat converter is always 8.5 x 11 inches.
24568—PrintCenter The PrintCenter relaunches after you print.
24523—File location Paths with more than 60 characters do not display missing source file names.
24503—Prinergy Preps on a Prinergy server does not preview or read the bounding box of EPS mark files.
24491—Custom page Preps does not prevent you from creating a new custom page size that has the same name as an existing custom page size, and the older size is overwritten.
24481—AppleScript The Collect Job X AppleScript might not launch the correct version of the Job File Collector Utility.
24476—Save, Save As The Save Template or Save Job command is always active.
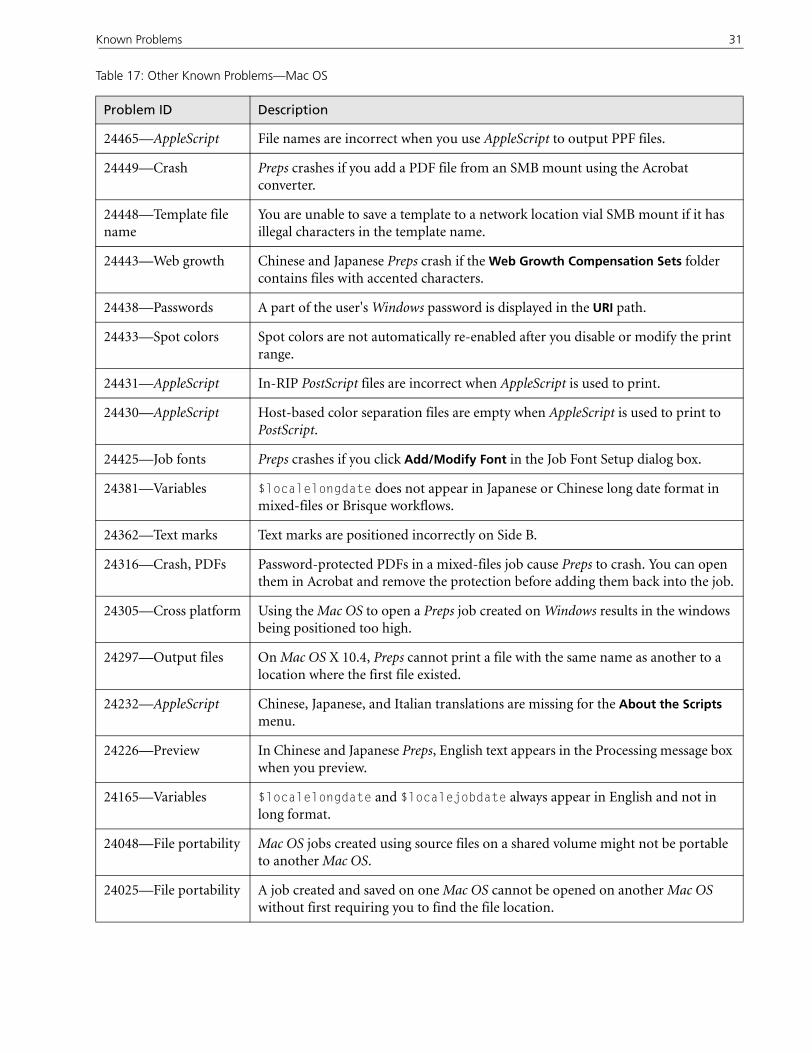
Known Problems 31
24465—AppleScript File names are incorrect when you use AppleScript to output PPF files.
24449—Crash Preps crashes if you add a PDF file from an SMB mount using the Acrobat converter.
24448—Template file name
You are unable to save a template to a network location vial SMB mount if it has illegal characters in the template name.
24443—Web growth Chinese and Japanese Preps crash if the Web Growth Compensation Sets folder contains files with accented characters.
24438—Passwords A part of the user's Windows password is displayed in the URI path.
24433—Spot colors Spot colors are not automatically re-enabled after you disable or modify the print range.
24431—AppleScript In-RIP PostScript files are incorrect when AppleScript is used to print.
24430—AppleScript Host-based color separation files are empty when AppleScript is used to print to PostScript.
24425—Job fonts Preps crashes if you click Add/Modify Font in the Job Font Setup dialog box.
24381—Variables $localelongdate does not appear in Japanese or Chinese long date format in mixed-files or Brisque workflows.
24362—Text marks Text marks are positioned incorrectly on Side B.
24316—Crash, PDFs Password-protected PDFs in a mixed-files job cause Preps to crash. You can open them in Acrobat and remove the protection before adding them back into the job.
24305—Cross platform Using the Mac OS to open a Preps job created on Windows results in the windows being positioned too high.
24297—Output files On Mac OS X 10.4, Preps cannot print a file with the same name as another to a location where the first file existed.
24232—AppleScript Chinese, Japanese, and Italian translations are missing for the About the Scripts menu.
24226—Preview In Chinese and Japanese Preps, English text appears in the Processing message box when you preview.
24165—Variables $localelongdate and $localejobdate always appear in English and not in long format.
24048—File portability Mac OS jobs created using source files on a shared volume might not be portable to another Mac OS.
24025—File portability A job created and saved on one Mac OS cannot be opened on another Mac OS without first requiring you to find the file location.
Table 17: Other Known Problems—Mac OS
Problem ID Description
32 Preps 5.2 Beta Release Notes
Windows
Mac OS and Windows
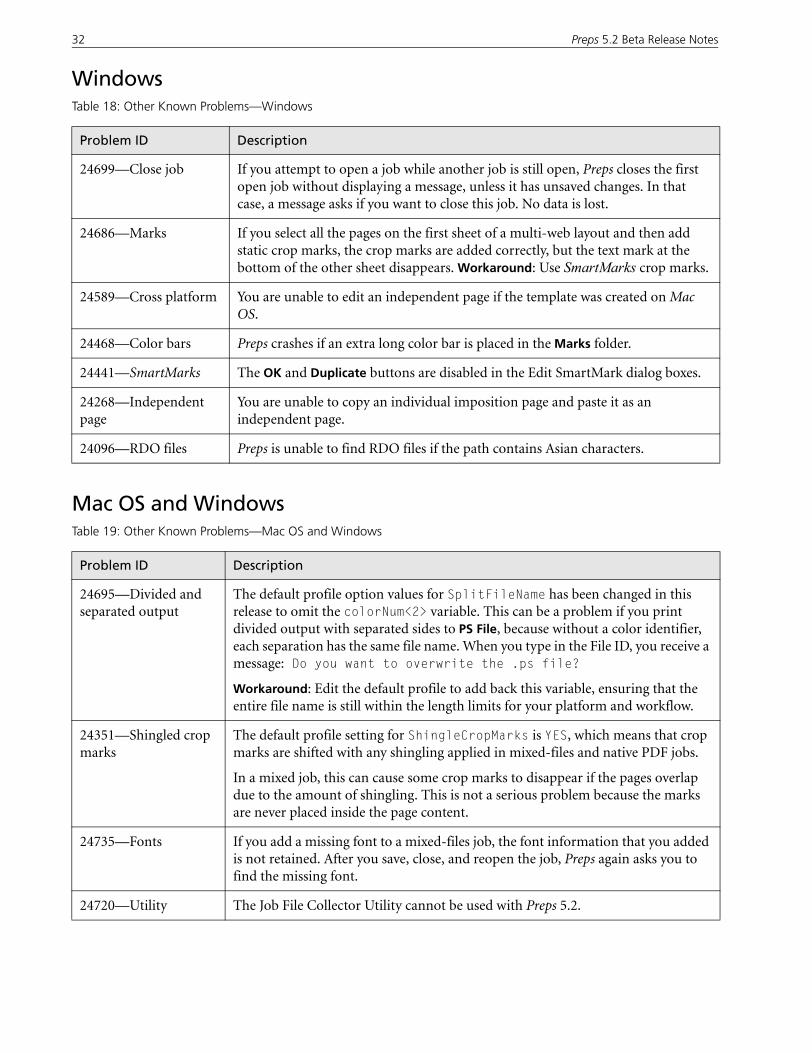
Table 18: Other Known Problems—Windows
Problem ID Description
24699—Close job If you attempt to open a job while another job is still open, Preps closes the first open job without displaying a message, unless it has unsaved changes. In that case, a message asks if you want to close this job. No data is lost.
24686—Marks If you select all the pages on the first sheet of a multi-web layout and then add static crop marks, the crop marks are added correctly, but the text mark at the bottom of the other sheet disappears. Workaround: Use SmartMarks crop marks.
24589—Cross platform You are unable to edit an independent page if the template was created on Mac OS.
24468—Color bars Preps crashes if an extra long color bar is placed in the Marks folder.
24441—SmartMarks The OK and Duplicate buttons are disabled in the Edit SmartMark dialog boxes.
24268—Independent page
You are unable to copy an individual imposition page and paste it as an independent page.
24096—RDO files Preps is unable to find RDO files if the path contains Asian characters.
Table 19: Other Known Problems—Mac OS and Windows
Problem ID Description
24695—Divided and separated output
The default profile option values for SplitFileName has been changed in this release to omit the colorNum<2> variable. This can be a problem if you print divided output with separated sides to PS File, because without a color identifier, each separation has the same file name. When you type in the File ID, you receive a message: Do you want to overwrite the .ps file?
Workaround: Edit the default profile to add back this variable, ensuring that the entire file name is still within the length limits for your platform and workflow.
24351—Shingled crop marks
The default profile setting for ShingleCropMarks is YES, which means that crop marks are shifted with any shingling applied in mixed-files and native PDF jobs.
In a mixed job, this can cause some crop marks to disappear if the pages overlap due to the amount of shingling. This is not a serious problem because the marks are never placed inside the page content.
24735—Fonts If you add a missing font to a mixed-files job, the font information that you added is not retained. After you save, close, and reopen the job, Preps again asks you to find the missing font.
24720—Utility The Job File Collector Utility cannot be used with Preps 5.2.

Known Problems 33
24717—Preps XL Preps XL might return to the default Print Send to setting instead of retaining the most recent setting when you print to different output types while a job is open.
24714—Divided output
When you print divided PostScript output files, Preps incorrectly uses the p_pstitle field in the PostScript to generate the file names, instead of the p_jobfile_name field that was previously used.
24684—PJTF pages When you place the same source page in multiple page positions but with different rotations, the PJTF’s SSiTB1 values for the first instance of the source page are applied to all of the other instances of that page, resulting in an incorrect trim box for those other pages.
Workaround: You can manually edit the SSiTB1 values in the PJTF.
24681—Passwords The error messages that you receive when you try to run Preps with a non valid license or password are not correct.
24669—Divided output
When you print divided output to PDF, PS, Discard or Printer in a native PDF job with any color handling settings, the internal file name does not follow the PDFSPLITFILENAME in the profile. The internal name should match the external file name, as it does for mixed-job files.
24665—Templates You are unable to print a template mock-up.
24659—Window sizing The Signature List window can be expanded, but this does not increase the space for viewing the signature and template names.
24608—Divided output
The file name is omitted when you print divided output to Printer.
24525—Multi-section The signature print range in multi-section jobs is not functional.
24519—Placeholders CJK page placeholders do not display correctly.
24501—Prinergy The Preps Site License edition does not display multiple sections.
24500—Divided output
In native PDF jobs, you are unable to print divided output to Printer.
24493—Web growth Using web growth compensation results in distorted horizontal marks.
24486—Printer folder It is necessary to restart Preps for changes to Printer folder location to take effect.
24451—Tiling Tiling is incorrect if the output page and press sheet dimensions are the same.
24442—Bar code mark The barcode.eps mark does not preview or print correctly.
24403—Divided output, native PDF
Printing divided native PDF output to Printer results in PDF files being saved to the Preps default output path instead of being printed. The divided output option needs to be disabled for native PDF output to printers.
24391—Divided output
You are unable to overwrite divided output files that were previously printed.
Table 19: Other Known Problems—Mac OS and Windows
Problem ID Description

34 Preps 5.2 Beta Release Notes
24273—Japanese Several vertical Japanese glyphs are missing.
23913—Custom page Custom page size accepts special characters, but these are not valid when you edit the PPD in PPD Browser.
Table 19: Other Known Problems—Mac OS and Windows
Problem ID Description