qvp user guide
TRANSCRIPT

QVPUser Guide
Document Version: 605/05/2021

Contents
1. IntroductionAbout QVP....................................................................................................................................................5Key Features and Benefits........................................................................................................................... 5Getting Started..............................................................................................................................................6
2. Overview and Basic OperationsQVP Installation............................................................................................................................................ 8
Installing QVP Using Qfinder Pro............................................................................................................. 8Installing QVP Using an HDMI Connection.............................................................................................. 9
QVP Navigation............................................................................................................................................ 9Desktop.................................................................................................................................................. 10Task Bar..................................................................................................................................................10Main Menu..............................................................................................................................................16
3. Control PanelGeneral Settings......................................................................................................................................... 18Security.......................................................................................................................................................18
Certificate & Private Key.........................................................................................................................19Hardware.................................................................................................................................................... 20Power..........................................................................................................................................................21
EuP Mode Configuration........................................................................................................................ 21Wake-on-LAN......................................................................................................................................... 22
Notification.................................................................................................................................................. 22Firmware Update........................................................................................................................................ 22
Updating the Firmware Manually............................................................................................................22Updating the Firmware Using Qfinder Pro..............................................................................................23
QVR Pro Backup / Restore.........................................................................................................................24System Reset..............................................................................................................................................24External Device...........................................................................................................................................26
UPS Settings.......................................................................................................................................... 27System Status.............................................................................................................................................27Logs............................................................................................................................................................ 28Resource Monitor....................................................................................................................................... 28
4. Storage ManagerGlobal Settings........................................................................................................................................... 30
Storage Global Settings..........................................................................................................................30Disk Health Global Settings....................................................................................................................30
Storage....................................................................................................................................................... 31Disks.......................................................................................................................................................31Volumes..................................................................................................................................................38RAID.......................................................................................................................................................45
Self-Encrypting Drives (SEDs)....................................................................................................................53Creating an SED Secure Static Volume................................................................................................. 54SED Storage Pool and Static Volume Actions........................................................................................56Removing a Locked SED Pool or Volume..............................................................................................57SED Erase..............................................................................................................................................58
External Storage......................................................................................................................................... 58External Storage Device Actions............................................................................................................58External Storage Partition Actions..........................................................................................................58
QVP User Guide
1
5. Surveillance SettingsCamera Settings......................................................................................................................................... 61
Adding Cameras.....................................................................................................................................61Editing the Camera Settings...................................................................................................................64Assigning a Network Interface to a Camera...........................................................................................70Testing the Camera Connection............................................................................................................. 71Deleting a Camera..................................................................................................................................71Sharing a Channel..................................................................................................................................71Customizing the Camera List................................................................................................................. 72Using the Search Features.....................................................................................................................73Importing or Exporting Camera Settings................................................................................................ 74
Recording Storage......................................................................................................................................75Overview.................................................................................................................................................75Recording Management......................................................................................................................... 82Advanced Settings..................................................................................................................................88
Event Management.....................................................................................................................................88Rules...................................................................................................................................................... 88Events.....................................................................................................................................................92Actions....................................................................................................................................................93Motion Detection.....................................................................................................................................94
Recovery Management...............................................................................................................................95Metadata Vault............................................................................................................................................95
6. Privilege SettingsUsers...........................................................................................................................................................96
Creating a Local User.............................................................................................................................96Creating Multiple Users.......................................................................................................................... 97Importing or Exporting Users..................................................................................................................98Editing User Privileges........................................................................................................................... 98
User Groups................................................................................................................................................99Creating a User Group........................................................................................................................... 99
Roles.........................................................................................................................................................100Creating a Role.....................................................................................................................................100
Privilege Summary....................................................................................................................................101Generating a Privilege Summary..........................................................................................................101
7. myQNAPcloudGetting Started..........................................................................................................................................102
Creating a QNAP ID............................................................................................................................. 102Registering a Device to myQNAPcloud................................................................................................103
Overview...................................................................................................................................................104Configuring Port Forwarding.....................................................................................................................104Configuring My DDNS Settings................................................................................................................ 105Configuring Published Services................................................................................................................106Enabling myQNAPcloud Link....................................................................................................................106Configuring Device Access Controls........................................................................................................ 107Installing an SSL Certificate......................................................................................................................107
8. File StationOverview...................................................................................................................................................109
About File Station................................................................................................................................. 109System Requirements.......................................................................................................................... 109Supported File Formats........................................................................................................................109Parts of the User Interface....................................................................................................................110Settings................................................................................................................................................. 111
2

File Operations..........................................................................................................................................113Uploading a File....................................................................................................................................114Downloading a File............................................................................................................................... 115Opening a File...................................................................................................................................... 115Opening Microsoft Word, Excel, and PowerPoint Files Using the Chrome Extension......................... 116Viewing a File in Google Docs..............................................................................................................116Viewing a File in Microsoft Office Online.............................................................................................. 117Viewing File Properties......................................................................................................................... 117Modifying File Permissions................................................................................................................... 118Sorting Files..........................................................................................................................................119Copying a File.......................................................................................................................................119Moving a File........................................................................................................................................ 120Renaming a File................................................................................................................................... 121Deleting a File.......................................................................................................................................122Restoring a Deleted File.......................................................................................................................122Compressing a File...............................................................................................................................123Extracting Compressed Files or Folders.............................................................................................. 124Sharing a File or Folder Using Share Links..........................................................................................124Playing an Audio File............................................................................................................................125Playing a Video File..............................................................................................................................125Opening a 360-degree Image or Video File......................................................................................... 126
Folder Operations..................................................................................................................................... 126Uploading a Folder............................................................................................................................... 127Uploading a Folder Using Drag and Drop............................................................................................ 127Viewing Folder Properties.................................................................................................................... 128Viewing Storage Information................................................................................................................ 129Modifying Folder Permissions.............................................................................................................. 129Managing Share Links..........................................................................................................................130Viewing Files and Folders Shared with Me.......................................................................................... 131Creating a Folder..................................................................................................................................131Copying a Folder.................................................................................................................................. 131Adding a Folder to Favorites................................................................................................................ 132Removing a Folder from Favorites....................................................................................................... 132Compressing a Folder.......................................................................................................................... 133Deleting a Folder.................................................................................................................................. 134
9. Network & Virtual SwitchAbout Network & Virtual Switch................................................................................................................ 135
Basic and Advanced Mode...................................................................................................................135Overview...................................................................................................................................................135Interfaces.................................................................................................................................................. 135
IP Address............................................................................................................................................135System Default Gateway......................................................................................................................139Virtual LANs (VLANs)........................................................................................................................... 140
Virtual Switches........................................................................................................................................ 140Creating a Virtual Switch in Software-defined Switch Mode.................................................................141Creating a Virtual Switch in Basic Mode...............................................................................................141Creating a Virtual Switch in Advanced Mode....................................................................................... 141
DHCP Server ........................................................................................................................................... 145Creating a DHCP Server ..................................................................................................................... 145RADVD.................................................................................................................................................147
Route........................................................................................................................................................ 150Creating a Static Route........................................................................................................................ 150
DDNS........................................................................................................................................................150Adding a DDNS Service....................................................................................................................... 150
QVP User Guide
3

10. License CenterLicense Activation.....................................................................................................................................152
Activating a License Using a Product or License Key.......................................................................... 152Activating a License Using a PAK........................................................................................................ 153Activating a License Offline.................................................................................................................. 154Generating a License Key.................................................................................................................... 155
License Deactivation.................................................................................................................................155Deactivating a License Using QNAP ID............................................................................................... 156Deactivating a License Offline.............................................................................................................. 156
License Extension.....................................................................................................................................157Extending a License Offline Using an Unused License........................................................................157Extending a License Offline Using a Product Key................................................................................ 159
License Management............................................................................................................................... 160Recovering Licenses............................................................................................................................ 160Transferring a License to the New QNAP License Server................................................................... 160Deleting a License................................................................................................................................161
4

1. Introduction
About QVP
QVP is the system designed for the QVR Pro appliance, a QNAP NAS device dedicated to thecomprehensive surveillance system QVR Pro.
Integrated with storage, network, and file management utilities, QVP enables you to easily leverage thesurveillance features of QVR Pro.
QVP includes the following components.
Component DescriptionQVR Pro QVR Pro allows you to create a surveillance and recording
environment on the QVP NAS, which can function as a dedicatedsurveillance server.For details, see Surveillance Settings.
QVR Pro Client QVR Pro Client allows you to monitor live views and play backrecordings on Windows or Mac devices, or in HD Station on a QNAPNAS.
NoteFor more information on QVR Pro Client, see the QVRPro Client User Guide.
System utilities QVP includes many system utilities, allowing you to configure settings,manage content, and control access according to your needs.For details, see the following chapters:
• Control Panel
• Storage Manager
• Privilege Settings
• myQNAPcloud
• File Station
• Network & Virtual Switch
• License Center
Key Features and Benefits
QVP provides the following features and benefits.
Feature DescriptionDedicated recording space QVR Pro supports creating recording spaces using volumes.
You can decide how much space to allocate for surveillancerecordings.
Spare volume or shared folder QVR Pro allows you to assign a spare volume or a shared folder toensure the continuity of recording even when the current storagespace is unavailable.
QVP User Guide
Introduction 5

Feature DescriptionExpandable storage QVR Pro provides a scalable solution. You can expand existing
recording spaces without losing your data by allocating more volumesusing different types of storage.
Recording backup QVR Pro allows you to back up recordings from the QVR Pro server toa remote NAS, helping safeguard important data.
Recording import QVR Pro allows you to import existing recordings to a specifieddestination.
Batch adding and cameramanagement
QVR Pro allows you to add and access multiple cameras at the sametime to simplify camera management.
Advanced camera search QVR Pro allows you to search and add cameras that are on anothernetwork. Even if your network environment uses multiple LANs, youcan still use QVR Pro to quickly locate and add IP cameras.
Individual camera recordingmanagement
QVR Pro allows you to modify the recording settings of each camera tobetter manage your resources. For example, you can assign 4K ultra-high resolution streams to event recording tasks and save the footageto SSDs for optimal video quality.
Network interface assignment QVR Pro allows you to assign a specific network interface for eachcamera to improve bandwidth load balancing and ensure videorecording quality.
Real-time messaging protocol(RTMP) support
QVR Pro supports RTMP, which creates an open video input platformwhere you can receive and record RTMP streams from a third-partyapplication.
Share live channel views QVR Pro allows you to share a live channel view without requiringviewers to install any plug-ins.
External events and actions QVR Pro is an open event management system that supports externalevents and actions. You can receive custom external events andtrigger external actions using an HTTP URL.
Storage management Storage Manager allows you to manage and configure disks, volumes,RAID groups, and external storage devices on the QVP NAS, providinga secure and flexible storage environment for your recording data.
File management File Station is a file management center for your recording data,allowing you to easily browse files, manage content, and configurepermissions.
Privilege management QVP enables you to configure user privilege settings and controlaccess to your recording data.
Network management Network & Virtual Switch allows you to manage physical networkinterfaces, virtual adapters, and Wi-Fi connections. You can alsoconfigure DHCP, DDNS, and gateway services.
License management License Center allows you to manage and monitor the licenses of yourapplications running on the QVP NAS.
Getting Started
1. Install QVP. For details, see QVP Installation.
2. Add a volume. For details, see Creating a Static Volume.
3. Add a recording space.
QVP User Guide
Introduction 6

For details, see Adding a Recording Space.
4. Add a camera. For details, see Adding Cameras.
5. Add an event rule. For details, see Adding a Rule.
6. Install QVR Pro Client.
a. Go to the QVP desktop.
b. Click the QVR Pro Client shortcut or go to Main Menu > QVR Pro Client .
c. Select an operating system.
d. Click Download.
e. Run the installer.
QVP User Guide
Introduction 7

2. Overview and Basic Operations
QVP Installation
Installing QVP Using Qfinder Pro
WarningInstalling QVP deletes all data on the drives. Back up your data before proceeding.
1. Power on the NAS.
2. Connect the NAS to your local area network.
3. Run Qfinder Pro on a computer that is connected to the same local area network.
NoteTo download Qfinder Pro, go to https://www.qnap.com/utilities.
4. Locate the NAS on the list and then double-click the name or IP address. The Smart Installation Guide opens in the default web browser.
5. Click Start Smart Installation Guide.
6. Specify the following information.
• NAS name: Specify a name with 1 to 14 characters. The NAS name can contain the followingcharacters:
• Letters (A to Z, a to z)
• Numbers (0 to 9)
• Hyphens (-)
NoteThe NAS name cannot end with a hyphen.
• Password: Specify an administrator password with 1 to 64 characters. The password supports allASCII characters.
7. Click Next.
8. Specify the time zone, date, and time.
TipQNAP recommends connecting to an NTP server to ensure that the NAS follows theCoordinated Universal Time (UTC) standard.
9. Click Next.
10. Select Obtain an IP address automatically (DHCP).
11. Click Next.
12. Select the types of devices that you will use to access shared folders on the NAS.
13. Click Next.
QVP User Guide
Overview and Basic Operations 8
14. Configure the disk settings.
a. Select disks for creating a volume.
b. Select a RAID type.
15. Click Next.
16. Review the settings.
17. Click Apply. A confirmation message appears.
WarningClicking Confirm deletes all data on the drive before starting the installation.
18. Click Confirm.
QVP is installed.
Installing QVP Using an HDMI Connection
WarningInstalling QVP deletes all data on the drives. Back up your data before proceeding.
1. Connect an HDMI display to the NAS.
2. Connect a USB keyboard to the NAS.
3. Power on the NAS. The Welcome screen of the Smart Installation Guide appears.
4. Select Start Smart Installation Guide. The disk configuration screen appears.
5. Select disks for creating a storage pool.
6. Click Next.
7. Select the RAID type.
8. Click Next.
9. Review the settings.
10. Click Next. The Confirm screen appears.
WarningClicking Next deletes all data on the drive before starting the installation.
11. Click Next.
QVP is installed.
QVP Navigation
QVP User Guide
Overview and Basic Operations 9

Desktop
Manage and run applications, check notifications, and more. The desktop gives you direct access to themain menu, toolbar, dashboard, and desktop space, enabling you to take full advantage of the QVP features.
Task Bar
No. Element Possible User Actions1 Show Desktop Click the button to minimize or restore all open windows.2 Main Menu Click the button to open the Main Menu panel on the left side of
the desktop.3 Search Type key words to locate settings, applications, and help content.4 Background Tasks • Position the mouse pointer over the button to see the number
of background tasks that are running.
• Click the button to see the following details for eachbackground task:
• Task name
• Task description
• Progress (percentage of completion)
• Click to stop a task.
NoteTo manage a recording backup task, you need togo to Recording Storage > Recording Backup .
QVP User Guide
Overview and Basic Operations 10

No. Element Possible User Actions5 Event Notifications • Position the mouse pointer over the button to see the number
of recent errors, warnings, and notices.
• Click the button to view the following details for each event:
• Event type
• Description
• Timestamp
• Number of instances
• Click a list entry to view the related utility or applicationscreen.Clicking a warning or error log entry opens the System Logswindow.
• Click More>> to open the System Logs window.
• Click Clear All to delete all list entries.6 Options Click your profile picture to open the Options screen.7 [USER_NAME] Click the button to view the last login time and the following menu
items:
• Options: Opens the Options window
• Restart: Restarts the NAS
• Shutdown: Shuts down QVR Pro and then powers off theNAS
NoteYou can also power off the NAS using one of thefollowing methods:
• Press and hold the power button for 1.5seconds.
• Open Qfinder Pro, and then go to Tools > Shutdown Device .
• Logout: Logs the user out of the current session
QVP User Guide
Overview and Basic Operations 11

No. Element Possible User Actions8 More Click the button to view the following menu items:
• Help: Displays links to the Quick Setup Tutorial, Help Center,and Tutorials.
• Language: Opens a list of supported languages and allowsyou to change the language of the operating system
• Desktop Preferences: Opens a list of display modes andallows you to select your preferred mode of displaying theQVR Pro desktop based on your device type
• Help Request: Opens the Helpdesk window
• Data & Privacy: Displays the QNAP privacy policy.
• About: Displays the following information:
• QVR Pro application version9 Dashboard Click the button to display the dashboard.10 QVR Pro Event Notification • Position the mouse pointer over the button to see the number
of recent errors, warnings, and notices.
• Click the button to view the following details for each event:
• Event type
• Camera IP
• Camera name
• Content
• Timestamp
• Users
• Click a list entry to view the related utility or applicationscreen.
• Click a warning or error log entry to open the Logs window.
• Click More>> to open the Logs window.
QVP User Guide
Overview and Basic Operations 12

Options
# Tab Possible User Actions1 Profile • Specify the following optional information:
• Profile picture
• Phone number
• Click Apply to save all changes.2 Wallpaper • Select a wallpaper from the built-in options or upload a photo.
• Click Apply to save all changes.3 Change Password • Specify the following information:
• Old password
• New password: Specify a password with a maximum of64 characters. QVR Pro recommends using passwordswith at least 6 characters.
• Click Apply to save all changes.
QVP User Guide
Overview and Basic Operations 13

# Tab Possible User Actions4 Miscellaneous • Enable the following settings.
• Auto logout after an idle period of: You can specify theduration of inactivity after which the user is automaticallylogged out.
• Warn me when leaving QVR Pro: When enabled, QVRPro displays a confirmation message whenever you try toleave the desktop (by clicking the Back button or closingthe browser). QVR Pro recommends enabling this setting.
• Reopen windows when logging back into QVR Pro:When enabled, the current desktop settings (including allopen windows) are retained until the next session.
• Show the desktop switching button: When enabled,QVR Pro displays the desktop switching buttons < > onthe left and right sides of the desktop.
• Show the link bar on the desktop: When enabled, QVRPro displays the link bar on the bottom of the desktop.
• Show the Dashboard button: When enabled, QVR Prodisplays the Dashboard button on the task bar.
• Show the QVR Pro time on the desktop: Whenenabled, QVR Pro displays the server date and time onthe desktop.
• Keep Main Menu open after selection: When enabled,QVR Pro keeps the main menu pinned to the desktopafter you open it.
• Click Apply to save all changes.
Dashboard
QVP User Guide
Overview and Basic Operations 14

The dashboard opens in the lower right corner of the desktop.
TipYou can click and drag a section onto any area of the desktop.
# Section Displayed Information User Actions1 System Health • NAS name
• Uptime (number of days, hours,minutes and seconds)
• Health status
Click the heading to open the SystemInformation screen in the SystemStatus window.If disk-related issues occur, clickingthe heading opens the StorageManager window.
2 HardwareInformation
• System temperature
• CPU fan speed
• System fan speed
Click the heading to open theHardware Information screen in theSystem Status window.
3 Resource Monitor • CPU usage in %
• Memory usage in %
• Network upload and downloadspeeds/rates
Click the heading to open theOverview screen in the ResourceMonitor window.
4 Disk Health • Number of installed disks
• Health status of installed disks
• Click the heading to open theDisk Health screen in theStorage Manager window.
• Click to view the followinginformation for each installed disk:
• Capacity/size
• Temperature
• Health status
• Click Details to open theOverview screen in the StorageManager window.
5 Recording SpaceSettings
• Status
• Total number of recording spaces
• Number of recording spaces notused for normal recording
• Number of recording spaces notused for event recording
• Click the heading to open theRecording Storage window.
• Select the recording space tomodify the displayed information.
6 Online Users • User name
• Session duration
• IP address
Click the heading to open the OnlineUsers screen in the System Logswindow.
7 Camera Settings • Channel recording status Click the heading to open the CameraSettings window.
QVP User Guide
Overview and Basic Operations 15
Main Menu
No. Section Description Possible User Actions1 NAS Information Displays the NAS name and
model number.N/A
2 System Displays a list of systemutilities and other programsthat enable you to manage theNAS.The following are the defaultsystem utilities:
• Control Panel
• Storage Manager
• Privilege
• Network & Virtual Switch
• Resource Monitor
• myQNAPcloud
• Helpdesk
• Open a system utility orapplication on the QVR Prodesktop
• Click a menu item.
• Right-click a menuitem and then select Open.
• Open an application in anew browser tab (only forcertain apps)
• Create a shortcut on thedesktop
• Right-click a menuitem and then select Create shortcut.
• Click and drag a menuitem to the desktop.
QVP User Guide
Overview and Basic Operations 16

No. Section Description Possible User Actions3 Surveillance Settings • Camera Settings
• Recording Storage
• Event Management
• Recovery Management
• Logs
• Metadata Vault
• Plug-in Center
• Motion Detection
• Open a surveillanceapplication in the QVR Prodesktop
• Click a menu item.
• Right-click a menuitem and then select Open.
• Create a shortcut on thedesktop
• Right-click a menuitem and then select Create shortcut.
• Click and drag a menuitem to the desktop.
4 Applications When an app is installed, it isautomatically added to theapplications list.The following are the defaultapplications:
• File Station
• QVR Pro Client
• License Center
QVP User Guide
Overview and Basic Operations 17

3. Control Panel
General Settings
The General Settings screen includes the following tabs.
Tab Possible User ActionsSystem Administration • Specify the following information.
• Server name
• System port
• Select any of the following.
• Enable secure connection (HTTPS)
• Force secure connection (HTTPS) only
• Click Apply to save all changes.
ImportantThese settings are applied to all NAS services.
Time • Review the current date and time.
• Specify the time zone.
• Specify the date and time format.
• Specify whether to manually set the time or synchronize the NAStime with a Network Time Protocol (NTP) server.
• Click Apply to save all changes.Daylight Saving Time • Select Adjust system clock automatically for daylight saving
time.
• Select Enable customized daylight saving time table and thenadd the daylight savings time data.
• Click Apply to save all changes.Codepage • Select the filename encoding for non-Unicode filename conversion.
• Click Apply to save all changes.
Security
The Security page includes the following tabs.
QVP User Guide
Control Panel 18

Tab Possible User ActionsAllow/Deny List • Select one of the following.
• Allow all connections
• Deny connections from the list
• Allow connections from the list only
• Add IP addresses or network domains.
• Click Apply All to save all changes.
ImportantBlocking an IP address prevents connections to theserver regardless of the connection ports used.
Network Access Protection • Select Enable Network Access Protection and then select andconfigure the following settings.
• SSH
• Telnet
• HTTP(S)
• FTP
• SAMBA
• AFP
• Click Apply All to save all changes.Certificate & Private Key • Replace the certificate
• Download the certificate
For details, see Certificate & Private Key.Password Policy • Select the requirements for password strength.
• Force NAS users to regularly change their password.
TipYou can choose to send a notification email to usersbefore their passwords expire.
• Click Apply All to save all changes.
Certificate & Private Key
Certificates are used to verify the identity of a QNAP NAS and to create SSL/TLS encrypted communicationsbetween users and their NAS services (including web sites, FTP, and more).
Button DescriptionDownload Certificate Click to download a certificate, private key (or intermediate certificate).
QVP User Guide
Control Panel 19
Button DescriptionReplace Certificate Click to replace the original certificate. You can choose one of following
methods:
• Import certificate: Upload a certificate and private key (orintermediate certificate) from your PC.
• Get from Let's Encrypt: Obtain a free certificate from an opencertificate authority.
NoteLet's Encrypt is not affiliated with QNAP, and QNAPcannot not guarantee its safety, browser compatibility,or quality. If you have any concerns about using a Let'sEncrypt certificate, use a myQNAPcloud SSLcertificate instead.
• Create self-signed certificate: Enter the required information tocreate a self-signed certificate.
Hardware
The Hardware screen includes the following tabs.
Tab Possible User ActionsGeneral • Select one or more of the following settings.
• Enable configuration reset switch
• Turn on LED light
• Click Apply All to save all changes.Audio Alert • Select one or more of the following events for playing a system
notification sound.
• System operations (startup, shutdown, and firmwareupgrade)
• System events (error and warning)
• Enable speech notification
• Click Apply All to save all changes.Smart Fan After enabling Smart Fan, the fan rotation speed will be automatically
adjusted according to the server temperature. QNAP recommendsenabling this option. You can define the system temperatures to triggerhigh speed or low speed rotation of the fan. By manually setting the fanrotation speed, the fan will rotate at the defined speed continuously.
NoteThe available smart fan settings vary depending on theNAS model.
QVP User Guide
Control Panel 20

Power
The Power screen includes the following tabs.
Tab Possible User ActionsEuP Mode Configuration • Select one of the following options.
• Enable
• Disable
• Click Apply to save the changes.
For details, see EuP Mode Configuration.Wake-on-LAN • Select one of the following options.
• Enable
• Disable
• Click Apply to save the changes.
For details, see Wake-on-LAN.Power Recovery • Select one of the following.
• Restore the previous NAS power state
• Turn on the NAS automatically
• Keep the NAS turned off
• Click Apply to save the changes.
EuP Mode Configuration
EuP (also Energy-using Products) is a European Union (EU) directive designed to improve the energyefficiency of electrical devices, reduce use of hazardous substances, increase ease of product recycling, andimprove environment-friendliness of the product.
Option DescriptionEnable When EuP is enabled, the following settings will be affected so that the server
maintains low power consumption (less than 1W) when the server is poweredoff:
• Wake on LAN: Disabled.
• AC power resumption: The server will remain off after the power restoresfrom an outage.
• Schedule power on/ off/ restart settings: Disabled.Disable (default) When EuP is disabled, the power consumption of the server is slightly higher
than 1W when the server is powered off. EuP is disabled by default so that youcan use the functions Wake on LAN, AC power resumption, and powerschedule settings properly.
QVP User Guide
Control Panel 21

Wake-on-LAN
This option allows you to enable or disable the Configure Wake on LAN feature. If enabled, this featureallows the NAS to be powered on remotely from the LAN by the NSS Discovery Tool found in the set-upwizard CD or by a user-generated program incorporating a magic packet in the code.
NoteThe function or its content is only applicable on some models.
Notification
The Notification screen includes the following tab.
Tab Possible User ActionsPush Important
To receive push notifications, you must first sign in tomyQNAPcloud and add push notification as an actionin Event Management.
• Download the QVR Pro Client mobile application and then enablepush notification.
• View the list of paired devices.
NoteAfter you sign in to QVR Pro Client from your mobiledevice, the device will be automatically paired with theNAS and added to the Paired Devices list.
Firmware Update
QNAP recommends keeping your QVP version up to date. This ensures that your NAS can benefit from newfeatures, enhancements, and bug fixes.
Updating the Firmware Manually
Important
• QNAP recommends backing up all data on the NAS before updating QVP.
• The update may require several minutes or longer, depending on your hardwareconfiguration and network connection. Do not power off the NAS during the update.
1. Download the firmware.
a. Go to https://www.qnapsecurity.com.
b. Select Support and then select Download
NoteIf you are not able to find the download page on https://www.qnapsecurity.com. You can go tohttps://www.qnap.com/download.
c. Select the number of drive bays on your NAS model.
QVP User Guide
Control Panel 22

d. Select your NAS model.
e. Read the release notes and confirm the following:
• The NAS model matches the firmware version.
• Updating the firmware is necessary.
f. Ensure that the product model and firmware version are correct.
g. Download the firmware package.
h. Extract the firmware image file.
2. Go to Control Panel > System > Firmware Update > Firmware Update .
3. Click Browse and then select the extracted firmware image file.
4. Click Update System.
Updating the Firmware Using Qfinder Pro
Important
• QNAP recommends backing up all data on the NAS before updating QVP.
• The update may require several minutes or longer, depending on your hardwareconfiguration and network connection. Do not power off the NAS during the update.
1. Download the firmware.
a. Go to https://www.qnapsecurity.com.
b. Select Support and then select Download
NoteIf you are not able to find the download page on https://www.qnapsecurity.com. You can go tohttps://www.qnap.com/download.
c. Select the number of drive bays on your NAS model.
d. Select your NAS model.
e. Read the release notes and confirm the following:
• The NAS model matches the firmware version.
• Updating the firmware is necessary.
f. Ensure that the product model and firmware version are correct.
g. Download the firmware package.
h. Extract the firmware image file.
2. Open Qfinder Pro. Qfinder Pro displays a list of NAS devices on your network.
3. Select a NAS model from the device list.
QVP User Guide
Control Panel 23

4. Go to Tools > Update Firmware .
TipYou can also right-click the NAS model on the list and then select Update Firmware.
The Firmware Update window appears.
5. Specify your QVP username and password. To update the firmware, you must be the administrator of the selected NAS.Qfinder Pro displays the Update Firmware screen.
6. Click Browse and then select a firmware image file.
7. Perform one of the following actions:
Action StepsUpdate a single NAS device Select the NAS that you want to update.Update multiple NAS devices of the samemodel
a. Select a NAS model from the list.
b. Select Update all the devices with the same modelnumber within the network.
c. Select the NAS devices that you want to update.
8. Click Start.
QVR Pro Backup / RestoreBack Up Surveillance Settings
Click Backup to back up the surveillance settings, including recording storage, network settings, camerasettings, event management, users, privileges, e-maps, and views.
Restore Surveillance Settings
Click Browse to select the backup file and then click Restore.
System Reset
QVP provides several options for resetting or restoring the NAS to its default state.
ImportantQNAP recommends backing up your data before performing this task.
QVP User Guide
Control Panel 24

Option Description StepsBasic system reset This resets the following settings to
the default values without deleting theuser data stored on the disks.
• System administrator password:MAC address of adapter 1without special characters (allletters must be uppercase). Forexample, if the MAC address ofadapter 1 is 11:22:33:AA:BB:CCthen the default admin passwordwill be 112233AABBCC.
TipYou can find the MACaddress of adapter 1 usingQfinder Pro. It is also printedon a sticker on the device as"MAC1".
• TCP/IP configuration:
• Obtain IP address settingsautomatically via DHCP
• Disable jumbo frames
• System port: 8080 (systemservice port)
• Security level: Low (Allow allconnections)
• LCD panel password: (blank)
• VLAN: Disabled
• Service binding: All NASservices can run on all availablenetwork interfaces.
1. Power on the NAS.
2. Press and hold the reset buttonfor 3 seconds.
QVP User Guide
Control Panel 25

Option Description StepsAdvanced system reset This performs a basic system reset
and then restores the QVP defaultsettings, deleting all users, usergroups, and shared folders previouslycreated. The user data stored on thedisks is retained.
NoteTo retrieve old data after anadvanced system reset, re-create the previous folderstructure on the NAS.
Perform an advanced system resetusing one of the following methods.
• Using QVP:
a. Go to Control Panel > System > QVR Pro Backup/Restore > Restore toFactory Default .
b. Click Reset Settings.
c. Choose to restart or shutdown the NAS after thesystem is reset.
d. Click OK.
• Using the reset button:
a. Power on the NAS.
b. Press and hold the resetbutton for 10 seconds.
Reinitialize the NAS This deletes all data on the disks andreinstalls QVP.
1. Go to Control Panel > System > QVR Pro Backup/Restore > Restore to Factory Default .
2. Click Reinitialize NAS.
3. Choose to restart or shut downthe NAS after the NAS isreinitialized.
4. Click OK.
External Device
The External Devices screen includes the following tabs.
Tab Possible User ActionsUPS • Select one of the following.
• USB connection
• SNMP connection
• Network UPS slave
• Click Apply All to save all changes.
For details, see UPS Settings.
QVP User Guide
Control Panel 26

UPS Settings
Enable UPS (Uninterruptible Power Supply) support to protect your NAS from abnormal system shutdowncaused by power disruption. There are two options provided for the NAS during a power failure:
• Turn off the server after the AC power fails: The NAS shuts itself down after the specified time.
• Enter the auto-protection mode after the AC power fails: The NAS stops all running services andunmounts all volumes after the specified time.
However, regardless of the specified time, the NAS automatically turns itself off or enters the auto-protectionmode 30 seconds after a power outage if the remaining UPS battery charge is less than 15%.
System Status
The System Status screen includes the following tabs.
Tab Possible User ActionsSystem Information View the following information.
• Server name
• Model name
• CPU
• Serial number
• Total number
• Dual channel supported
• Memory slots
• Firmware version
• System up time
• Time zone
• Filename encoding
NoteThis page refreshes every 6 seconds.
QVP User Guide
Control Panel 27

Tab Possible User ActionsNetwork Status View the following information for each Ethernet port.
• Link
• IP address
• MAC address
• Subnet mask
• DNS
• Packets received
• Packets sent
• Error packetsHardware Information View the overview of the CPU and memory usage, system and disk
drive temperatures, and fan speed.
Logs
QVR Pro displays the following logs:
Log DescriptionSystem events Displays a list of system-related events such as volume creation,
application installation, and firmware updates.System connections Displays a list of connection attempts to the system.Surveillance events Displays a list of surveillance-related events such as motion detection,
recording space full, and event URL.Surveillance connections Displays a list of connection attempts to the QVR Pro Client.Surveillance settings Displays a list of the changes made to the surveillance settings.
Resource Monitor
The Resource Monitor displays the following tabs.
Tab Possible User ActionsOverview View the following information.
• Average CPU Usage
• Memory Usage
• Total Physical Network Usage
• Processes
QVP User Guide
Control Panel 28

Tab Possible User ActionsSystem Resource View the following information.
• CPU
• Memory
• NetworkStorage Resource View the following information.
• Volume/LUN activity
• Pool activity
• RAID activity
• Disk activity
• Storage spaceProcesses View the list of processes and the following information.
• Process name
• User
• PID
• Status
• CPU usage
• Memory
QVP User Guide
Control Panel 29

4. Storage Manager
Global Settings
You can access global settings by clicking in the Storage Manager window.
Storage Global Settings
Setting DescriptionRAID Resync Priority Specify the minimum speed of the following RAID operations:
• Rebuild
• Migration
• Scrubbing
• Sync
You can select one of the following priorities:
• Service First: QVP performs RAID operations at lower speeds in orderto maintain NAS storage performance.
• Default: QVP performs RAID operations at the default speed.
• Resync First: QVP performs RAID operations at higher speeds. Usersmay notice a decrease in NAS storage performance while RAIDoperations are in progress.
ImportantThis setting only affects RAID operation speeds when theNAS is in use. When the NAS is idle, all RAID operationsare performed at the highest possible speeds.
RAID Scrubbing Schedule Enable this feature to periodically scan for and fix bad sectors on RAID 5and RAID 6 groups. For details, see Running RAID Scrubbing on aSchedule.
Disk Health Global Settings
Setting DescriptionActivate PredictiveS.M.A.R.T. Migration
Enable this feature to regularly monitor disk health. If S.M.A.R.T. errors aredetected on a disk, QVP displays a warning and then begins migrating datafrom the faulty disk to a spare disk. After the migration is finished, thehealthy disk is used in place of the faulty disk.This process is safer than manually initiating a full RAID rebuild after a diskhas failed.
S.M.A.R.T. polling time Specify how often QVP checks disks for S.M.A.R.T. errors in minutes.Disk Temperature Alarm Enable this feature to monitor the disk temperatures. QVP displays a
warning when the disk temperature is equal to or above the specifiedthreshold. You can set separate thresholds for hard disk drives and solidstate drives.
QVP User Guide
Storage Manager 30

Setting DescriptionTLER/ERC Timer Enable this feature to specify a maximum response time of all disks in
seconds.When a disk encounters a read or write error, it may become unresponsivewhile the disk firmware attempts to correct the error. QVP might interpretthis unresponsiveness as a disk failure. Enabling this feature ensures that adisk has sufficient time to recover from a read or write error before QVPmarks it as failed and initiates a RAID group rebuild.
Tip
• This setting is also known as Error recovery control(ERC), Time-limited error recovery (TLER) orCommand completion time limit (CCTL).
• When this feature is disabled, QVP uses the defaultTLER/ERC settings specified by the disk manufacturer.
Storage
QVP provides a flexible volume architecture that enables you to easily manage, store, and share files.
DisksDisk Types
QVP restricts which type of disk can be used to create SSD cache, storage pools, and static volumes.
ImportantFor compatibility reasons, PCIe form-factor SSDs and PCIe M.2 SSDs installed in third-party adapter cards can no longer be used to create new storage pools and static volumes.If you are already using NVMe PCIe SSDs for data storage, then your existing storageconfiguration will not be affected after upgrading to the latest version of QVP.
Disk Type Installation Method SSD Cache Storage Pools/StaticVolumes
SATA/SAS/NL-SAS 3.5”HDD
NAS drive bay No Yes
SATA/SAS 2.5” HDD NAS drive bay No YesSATA/SAS 2.5” SSD NAS drive bay Yes YesPCIe NVMe M.2 SSD QM2 card Yes YesPCIe NVMe M.2 SSD Third-party M.2 to PCIe
adapter cardYes No
SATA M.2 SSD QM2 card Yes YesSATA M.2 SSD NAS internal M.2 slot Yes YesPCIe form-factor SSD PCIe slot Yes No
Disk Management
You can manage disks at Main Menu > Storage Manager > Disks . Select a disk to view its status andhardware details.
QVP User Guide
Storage Manager 31

Disk Status
Status Color DescriptionCache The disk is used as an SSD cache.
Data The disk contains data and is part of a static volume or storage pool.
Spare The disk is configured as a hot spare. For details, see RAID Spare Disks.
Free The disk is not in use.
None There is no disk in the drive bay.
Warning QVP has detected S.M.A.R.T. errors. Run a full S.M.A.R.T. test and a diskscan.
Error QVP has detected I/O errors. You must replace the disk immediately.
Disk Information
Information DescriptionDisk Health Status The general health status of the disk
• Good: The disk is healthy.
• Warning: QVP has detected an error. Run a full S.M.A.R.T.test and a disk scan.
• Error: QVP has detected a critical error. You must replace thedisk immediately.
Manufacturer The manufacturer of the diskModel The disk model
QVP User Guide
Storage Manager 32

Information DescriptionDisk Capacity The capacity of the disk, in both binary and decimal formats
Note
• Binary format assumes that 1 GB =1,073,741,824 bytes. This is the true capacityof the disk and is used by computers andoperating systems such as QVP.
• Decimal format assumes that 1 GB =1,000,000,000 bytes. This format is used bydisk manufacturers and appears inadvertising, on the disk's box, and in the disk'shardware specifications.
• Due to differences in the number of bytes pergigabyte, a disk's binary capacity will beslightly lower than its decimal capacity. Forexample, a disk advertised as 500 GB(decimal) has a true capacity of 456 GB(binary).
Bus Type The interface that the disk usesStatus The hardware status of the diskCurrent Speed The speed at which the disk is connected to the enclosureMaximum Speed The maximum transfer speed supported by the drive bay or slot
that the disk is installed inTemperature The current temperature of the disk
Disk temperature is retrieved from the disk's firmware usingS.M.A.R.T.
Disk Access History (I/O) • Good: QVP has not detected any I/O errors on the disk.
• Error: QVP has detected one or more I/O errors on the disk.Disk SMART Information Important
If any of the S.M.A.R.T. attribute values reach thethreshold set by the disk manufacturer or apredefined threshold determined by QVP, thisfield will change to Warning.
Estimated Life Remaining The remaining life of the disk, as calculated by the disk'sfirmware. When the value reaches 0, you should replace the disk.This information is only available for solid-state drives (SSDs).
Disk Actions
Action DescriptionDisk Info View disk details, including the disk manufacturer, model, serial number,
disk capacity, bus type, firmware version, ATA version, and ATA standard.Disk Health View disk S.M.A.R.T information. For details, see Disk Health Information.
QVP User Guide
Storage Manager 33

Action DescriptionScan Now Scan the disk for bad blocks.
TipRun this scan if the disk's status changes to Warning or Error. If QVP does not detect any bad blocks, the statuschanges back to Ready.
To view the number of bad blocks, see Disk Health > Summary .Locate Prompt the drive LEDs to blink so that you can locate the drive in a NAS or
expansion unit.Detach Remove the disk from its RAID group. The group must be of type: RAID 1,
RAID 5, RAID 6, RAID 10.Set as Enclosure Spare Assign the disk as a global hot spare for all RAID groups within the same
enclosure (NAS or expansion unit). For details, see Configuring a GlobalHot Spare.
Disable Spare Unassign the disk as a global hot spare.New Volume Create a new volume.Secure Erase Permanently erase all data on a disk. For details, see Secure Erase.RAID Group Select a RAID group to view its RAID type, capacity, and member disks.
Disk Health Information
Tab Description ActionsSummary Displays an overview of S.M.A.R.T. disk
information and the results from the mostrecent disk scan and S.M.A.R.T. test.
No actions
SSD Features List Displays all supported SSD ATA features. No actionsSMART Information Displays S.M.A.R.T. disk information and
supported attributes.
ImportantIf the value of a S.M.A.R.T.attribute reaches the thresholdset by the disk manufacturer or apredefined threshold determinedby QVP, the SMART attribute'sstatus will change to Warning.
No actions
QVP User Guide
Storage Manager 34

Tab Description ActionsTest Run a S.M.A.R.T. disk self-test. Select one of the following options:
• Rapid Test: Tests theelectrical and mechanicalproperties of the disk, and asmall portion of the disksurface. The test takesapproximately one minute.
• Complete Test: Tests theelectrical and mechanicalproperties of the disk, and thefull disk surface. This testduration varies depending onthe storage environment.
Settings Disk settings can be applied individually, orto multiple disks at once.
Configure the following settings:
• Enable temperature alarm:QVP displays a warning whenthe disk temperature is equalto or above the specifiedthreshold.
• S.M.A.R.T. Test schedule:Schedule periodic rapid andcomplete S.M.A.R.T. disktests. The results aredisplayed on the Summaryscreen.
TipYou can apply thesesettings to the currentdisk, all disks, or to diskswith the same type as thecurrent disk (HDD orSSD).
Disk Performance Tests
QVP can test the sequential and random read speeds of your disks.
Important
• The results provided by these tests are specific to the NAS being tested.
• For accurate results, do not use any resource-intensive applications while the tests arerunning.
Testing Disk Performance
1. Go to Main Menu > Storage Manager > Disks .
2. Click Performance Test.
QVP User Guide
Storage Manager 35

The Performance Test screen appears.
3. Select one or more disks.
4. Click Performance Test and then select a test type.
Test Type Description Test Results FormatSequential read Test sequential read speed. MB/sIOPS read Test random read speed. IOPS
A confirmation message appears.
5. Click OK.
6. Optional: Schedule a weekly sequential read test for all disks. The weekly test runs every Monday at6:30 AM.
a. Click Weekly Test.
b. Click OK.
QVP runs the test and then displays the results on the Performance Test screen. To see detailed results forthe IOPS read test, select one or more disks and then select Result > IOPS read result .
Secure Erase
Secure erase permanently deletes all data on a disk, ensuring that the data is unrecoverable. Using secureerase on an SSD also restores the disk's performance to its original factory state.
Securely Erasing a Disk
ImportantDo not disconnect any disks or power off the NAS while secure erase is running.
1. Go to Main Menu > Storage Manager > Disks .
2. Select a free disk.
3. Select Action > Secure Erase . The Secure Erase window opens.
4. Optional: Select additional disks to erase.
5. Click Next.
6. Select an erase mode.
Mode DescriptionComplete QVP writes over all blocks on the disk with zeros or ones. This mode is the
most secure but can take a long time to finish.Select Customized to configure the following the erase settings.
• Number of rounds: QVP writes over all blocks on the disk the specifiednumber of times.
• Overwrite with: Overwrite all blocks with zeros, ones, or a random zeroor one.
QVP User Guide
Storage Manager 36

Mode DescriptionSSD QVP issues a solid state drive (SSD) secure erase ATA command. The
SSD firmware then erases all data and restores the disk to its originalfactory performance.
ImportantThis feature is only supported on specific SSD models.
Fast QVP overwrites the partition and RAID configuration data on the disk withzeros. This mode is the quickest but is less secure than the other modes.
7. Click Next.
8. Enter the administrator password.
9. Click Apply.
QVP starts erasing the disk. You can monitor the progress in Background Tasks.
Expansion Units
Expansion units are designed to expand the storage capacity of a QNAP NAS by adding extra drive bays.Expansion units can be connected to the NAS via various interfaces. For details, see hardware specificationson https://www.qnapsecurity.com and https://www.qnap.com.
TipExpansion units used to be known as JBODs.
Expansion Unit Actions
Go to Main Menu > Storage Manager > Disks and select an expansion unit to perform one of the followingactions.
Action DescriptionEnclosure Info View full hardware details of the expansion unit,
including the model, serial number, firmware version,BUS type, CPU temperature, system temperature,power status, and fan speeds.
Action > Locate Prompt the expansion unit chassis LEDs to blink, sothat you can locate the device in a server room orrack.
Action > Safely Detach Stop all activity and safely unmount the enclosurefrom the host NAS.
Action > Update Firmware Update the expansion unit's firmware.Action > Rename Enclosure Rename the selected expansion unit.RAID Group View details about each RAID group on the
expansion unit, including its RAID type, capacity, andmember disks.
Expansion Unit Recovery
Go to Main Menu > Storage Manager > Disks , select an expansion unit, and then click Recover toperform one of the following actions.
QVP User Guide
Storage Manager 37
Action DescriptionRecover Enclosure Recover storage pools or static volumes on an
enclosure that was accidentally disconnected fromthe NAS, for example by an unscheduled shutdownor disconnected cable. from the NAS host.
NoteWhen an expansion unit is accidentallydisconnected:
• The status of all storage pools onthe expansion unit will change to Error.
• The status of all RAID groups on theexpansion unit will change to NotActive.
Reinitialize enclosure ID Reset all expansion unit IDs, and then give each unita new ID number starting from 1 based on the orderthan they are physically connected.
TipUse this action if the expansion unit IDsappear out of sequential order in theenclosure list.
Scan and Recover Storage Space Scan all free disks on the NAS and all connectedexpansion units for existing volumes and storagepools.
TipPerform this action after moving disksbetween NAS devices.
Volumes
A volume is a storage space created from a storage pool or RAID group. Volumes are used to divide andmanage your NAS storage space.
Creating a Static Volume
1. Go to Main Menu > Storage Manager > Storage Space .
2. Perform one of the following actions.
NAS State ActionNo volumes or storage pools Click New Volume.One or more volumes or storage pools Click Create > New Volume .
The Volume Creation Wizard window opens.
3. Select Static Volume.
4. Click Next.
QVP User Guide
Storage Manager 38

5. Optional: Select an expansion unit from the Enclosure Unit list.
Important
• You cannot select disks from multiple expansion units.
• If the expansion unit is disconnected from the NAS, the storage pool will becomeinaccessible until it is reconnected.
6. Select one or more disks.
7. Select a RAID type. QVP displays all available RAID types and automatically selects the most optimized RAID type.
Number of disks Supported RAID Types Default RAID TypeOne Single SingleTwo JBOD, RAID 0, RAID 1 RAID 1Three JBOD, RAID 0, RAID 5 RAID 5Four JBOD, RAID 0, RAID 5, RAID 6, RAID 10
ImportantRAID 10 requires an even number of disks.
RAID 5
Five JBOD, RAID 0, RAID 5, RAID 6 RAID 6Six or more JBOD, RAID 0, RAID 5, RAID 6, RAID 10, RAID 50 RAID 6Eight or more JBOD, RAID 0, RAID 5, RAID 6, RAID 10, RAID 50,
RAID 60RAID 6
TipUse the default RAID type if you are unsure of which option to choose.For details, see RAID Types.
8. Optional: Select the disk that will be used as a hot spare for this RAID group. The designated hot spare automatically replaces any disk in the RAID group that fails.For details, see RAID Spare Disks.
9. Optional: Select the number of RAID 50 or RAID 60 subgroups. The selected disks are divided evenly into the specified number of RAID 5 or 6 groups.
• A higher number of subgroups results in faster RAID rebuilding, increased disk failure tolerance,and better performance if all the disks are SSDs.
• A lower number of subgroups results in more storage capacity, and better performance if all thedisks are HDDs.
WarningIf a RAID group is divided unevenly, the excess space becomes unavailable. For example, 10disks divided into 3 subgroups of 3 disks, 3 disks, and 4 disks will provide only 9 disks ofstorage capacity.
10. Click Next.
11. Optional: Specify an alias for the volume. The alias must consist of 1 to 64 characters from any of the following groups:
• Letters: A to Z, a to z
QVP User Guide
Storage Manager 39

• Numbers: 0 to 9
• Special characters: Hyphen (-), underscore (_)
12. Optional: Configure SSD over-provisioning. Over-provisioning reserves a percentage of SSD storage space on each disk in the RAID group toimprove write performance and extend the disk's lifespan. You can decrease the amount of spacereserved for over-provisioning after QVP has created the RAID group.
TipTo determine the optimal amount of over-provisioning for your SSDs, download and run SSDProfiling Tool from App Center.
13. Specify the number of bytes per inode. The number of bytes per inode determines the maximum volume size, and the number of files andfolders that the volume can store. Increasing the number of bytes per inode results in a largermaximum volume size, but a lower maximum number of files and folders.
14. Optional: Configure advanced settings.
Setting Description User ActionsAlert threshold QVP issues a
warning notificationwhen thepercentage of usedvolume space isequal to or abovethe specifiedthreshold.
Specify a value.
Encryption QVP encrypts alldata on the volumewith 256-bit AESencryption.
• Specify an encryption password containing 8 to 32characters, with any combination of letters, numbers andspecial characters. Spaces are not allowed.
• Select Save encryption key to save a local copy of theencryption key on the NAS. This enables QVP toautomatically unlock and mount the encrypted volumewhen the NAS starts up. If the encryption key is not saved,you must specify the encryption password each time theNAS restarts.
Warning
• Saving the encryption key on the NAS canresult in unauthorized data access ifunauthorized personnel are able to physicallyaccess the NAS.
• If you forget the encryption password, thevolume will become inaccessible and all datawill be lost.
Accelerateperformance withSSD cache
QVP adds datafrom this volume tothe SSD cache toimprove read orwrite performance.
No actions
QVP User Guide
Storage Manager 40

Setting Description User ActionsCreate a sharedfolder on thevolume
QVP automaticallycreates the sharedfolder when thevolume is ready.Only the NASadmin account canaccess the newfolder.
• Specify a folder name.
• Select Create this folder as a snapshot shared folder.
A snapshot shared folder enables faster snapshot creation andrestoration.
15. Click Next.
16. Click Finish. A confirmation message appears.
WarningClicking OK deletes all data on the selected disks.
QVP creates and initializes the volume, and then creates the optional shared folder.
Volume ManagementDeleting a Volume
1. Go to Main Menu > Storage Manager > Storage Space .
2. Select a volume.
WarningAll data on the selected volume will be deleted.
3. Click Manage.
4. Select Remove > Remove Volume . The Volume Removal Wizard window opens.
5. Click Apply.
Configuring a Volume Space Alert
1. Go to Storage Manager > Storage > Storage Space .
2. Select a volume.
3. Click Manage.
4. Select Actions > Set Threshold .
5. Enable or disable volume space alerts.
6. Specify an alert threshold. QVP issues a warning notification when the percentage of used volume space is equal to or above thespecified threshold.
7. Click Apply.
QVP User Guide
Storage Manager 41

Volume File System Check
A file system check scans for and automatically repairs errors in the file system of a thick, thin, or staticvolume. QVP will prompt you to start a file system check if detects file system errors on one or morevolumes. You can also a run file system check manually or schedule a one-time check.
Running a File System Check Manually
Warning
• A volume is unmounted and becomes inaccessible while its file system is beingchecked.
• This process might take a long time, depending on the size of the volume.
ImportantQVP will scan the specified volume, even if QVP has not detected any errors on thevolume's file system.
1. Go to Main Menu > Storage Manager > Storage Space .
2. Select a volume.
3. Click Manage. The Volume Management window opens.
4. Click Actions, and then select Check File System. The Check File System window opens.
5. Click OK.
QVP creates a background task for the file system check. The status of the volume changes to Checking....
Volume Expansion
Expanding a volume increases its maximum capacity so that it can store more data.
Expanding a Static Volume by Adding Disks to a RAID Group
The total storage capacity of a static volume can be expanded by adding one or more additional disks to aRAID group in the static volume. This extra capacity can be added online, without any interruption to dataaccess.
Important
• Adding disks to a RAID 1 group changes the RAID type of the group to RAID 5.
• To expand a RAID 50 or RAID 60 group, every sub-group must be expanded with thesame number of disks.
1. Verify the following:
• The storage pool you want to expand contains at least one RAID group of type: RAID 1, RAID 5,RAID 6, RAID 50 or RAID 60.
QVP User Guide
Storage Manager 42

• The NAS contains one or more free disks. Each free disk must be the same type as the otherdisks in the RAID group (either HDD or SSD), and have a capacity that is equal to or greater thanthe smallest disk in the group.
• The status of the RAID group that you want to expand is Ready.
2. Go to Main Menu > Storage Manager > Storage Space .
3. Select a static volume.
4. Click Manage. The Volume Management window opens.
5. Click Expand. The Expand Static Volume Wizard window opens.
6. Select Add new disk(s) to an existing RAID group.
7. Select a RAID group. The group must be of type: RAID 1, RAID 5, RAID 6, RAID 50, RAID 60.
8. Click Next.
9. Select one or more disks.
WarningAll data on the selected disks will be deleted.
10. Click Next.
11. Optional: Configure SSD over-provisioning. Over-provisioning reserves a percentage of SSD storage space on each disk in the RAID group toimprove write performance and extend the disk's lifespan. You can decrease the amount of spacereserved for over-provisioning after QVP has created the RAID group.
TipTo determine the optimal amount of over-provisioning for your SSDs, download and run SSDProfiling Tool from App Center.
12. Click Next.
13. Click Expand. A confirmation message appears.
14. Click OK.
15. Optional: For a RAID 50 or RAID 60 volume, repeat these steps for each sub-group.
QVP starts rebuilding the RAID group. The storage capacity of the volume increases after RAID rebuilding isfinished.
Expanding a Single Static Volume By Adding a New RAID Group
The storage capacity of a static volume can be expanded by creating a new RAID group and then adding itto the volume. This operation can be performed while the volume is online and accessible to users. QVPwrites data linearly to storage pools containing multiple RAID groups. This means that it writes data to aRAID group until is it full before writing data to the next RAID group.
QVP User Guide
Storage Manager 43

Warning
• If a static volume contains multiple RAID groups and one RAID group fails, all data onthe volume will be lost. Ensure that you have a complete data backup plan.
• To expand a RAID 50 or RAID 60 pool, you must create a new RAID 50 or 60 groupwith the same number of disks and sub-groups as the original pool. It is not possible toadd additional sub-groups.
1. Go to Main Menu > Storage Manager > Storage Space .
2. Select a static volume.
3. Click Manage. The Volume Management window opens.
4. Click Expand. The Expanding Static Volume Wizard window opens.
5. Select Create and add a new RAID group.
6. Click Next.
7. Optional: Select an expansion unit from the Enclosure Unit list.
ImportantIf the expansion unit is disconnected from the NAS, the storage pool will become inaccessibleuntil it is reconnected.
8. Select one or more disks.
WarningAll data on the selected disks will be deleted.
9. Select a RAID type. QVP displays all available RAID types and automatically selects the most optimized RAID type.
Important
• If the storage pool contains a RAID 1, RAID 5, RAID 6 or RAID 10 group, the new RAIDgroup must also have one of the mentioned RAID types.
• For RAID 50 or RAID 60, you cannot select a different RAID type.
10. Optional: Select the disk that will be used as a hot spare for this RAID group. For details, see Configuring a RAID Group Hot Spare.
11. Click Next.
12. Optional: Configure SSD over-provisioning. Over-provisioning reserves a percentage of SSD storage space on each disk in the RAID group toimprove write performance and extend the disk's lifespan. You can decrease the amount of spacereserved for over-provisioning after QVP has created the RAID group.
TipTo determine the optimal amount of over-provisioning for your SSDs, download and run SSDProfiling Tool from App Center.
13. Click Next.
QVP User Guide
Storage Manager 44

14. Click Expand. A confirmation message appears.
15. Click OK.
QVP creates the new RAID group and then starts rebuilding the volume. The capacity of the volumeincreases after RAID rebuilding is finished.
The System Volume
The system volume is a regular static or thick volume that QVP uses to store system data such as logs,metadata, and thumbnails. By default, applications are installed to the system volume. If no system volumeexists, either because the NAS has recently been initialized or the system volume was deleted, QVP willassign the next static or thick volume that you create as the system volume.
ImportantQNAP recommends creating a system volume of at least 10 GB. This is to prevent errorscaused by insufficient system volume space
RAID
Redundant array of independent disks (RAID) combines multiple physical disks into a single storage unit,and then distributes data across the disks in one of several predefined methods.
The following features make RAID ideal for use with data storage and NAS applications.
RAID Feature Description Advantages DisadvantagesGrouping Disks that are combined
using RAID form a RAIDgroup, which QVPconsiders one largelogical disk.
Managing the storage space ofone large disk is simpler andmore efficient than multiple smalldisks.
Initial configuration can bemore complicated.
Striping Data is split into smallerpieces. Each piece isstored on a different diskin the RAID group. QVPcan then access thatdata by reading from orwriting to multiple diskssimultaneously,increasing read and writespeeds.
• Greater read/write speeds,compared to a single disk
• Speeds can be increasedfurther by adding disks
If one disk in the RAIDgroup fails, and the RAIDgroup has no redundancy,all data will be lost.
Redundancy Each disk in the RAIDgroup can store thefollowing:
• Complete copy of thestored data
• Metadata that allowsreconstruction of lostdata
• Disks can fail or be removedfrom the RAID group withoutany loss of data
• Users can access data whilefailed disks are beingreplaced
Total storage capacity ofthe RAID group is reduced.
QVP User Guide
Storage Manager 45

RAID Types
QVP supports several RAID types. Each type provides a different combination of performance andredundancy.
Important
• If disks with different capacities are combined in one RAID group, all disks functionaccording to the capacity of the smallest disk. For example, if a RAID group containsfive 2 TB disks and one 1 TB disk, QVP detects six 1 TB disks.QNAP recommends the following when mixing disks of different capacities.
a. Create a separate RAID group for each capacity.
b. Combine the RAID groups using storage pools.
• If different types of disk (HDD, SSD, SAS) are combined in one RAID group, the RAIDgroup will function according to the speed of the slowest disk.
RAID Type Number ofDisks
Disk FailureTolerance
Capacity Overview
Single 1 0 Total disk capacity • Uses a single disk for storage.
• Provides no disk failureprotection or performancebenefits.
• Suitable for single diskconfigurations that have a databackup plan in place.
JBOD (justa bunch ofdisks)
≥ 2 0 Total combined diskcapacity
• Combines disks together in alinear fashion. QVP writes data toa disk until it is full before writingto the next disk.
• Uses the total capacity of all thedisks.
• Not a real RAID type. It providesno disk failure protection orperformance benefits.
• Unless you have a specificreason to use JBOD, you shoulduse RAID 0 instead.
QVP User Guide
Storage Manager 46

RAID Type Number ofDisks
Disk FailureTolerance
Capacity Overview
RAID 0 ≥ 2 0 Total combined diskcapacity
• Disks are combined togetherusing striping.
• RAID 0 offers the fastest readand write speeds, and uses thetotal capacity of all the disks.
• Provides no disk failureprotection. This RAID type mustbe paired with a data backupplan.
• Recommended for high-performance applications suchas video editing.
RAID 1 2 1 Half of the totalcombined diskcapacity
• An identical copy of data isstored on each disk.
• Half of the total disk capacity islost, in return for a high level ofdata protection.
• Recommended for NAS deviceswith two disks.
RAID 5 ≥ 3 1 Total combined diskcapacity minus 1disk
• Data and parity information arestriped across all disks.
• The capacity of one disk is lost tostore parity information.
• Striping means read speeds areincreased with each additionaldisk in the group.
• Recommended for a goodbalance between data protection,capacity, and speed.
RAID 6 ≥ 4 2 Total combined diskcapacity minus 2disks
• Data and parity information arestriped across all disks.
• The capacity of two disks are lostto store parity information.
• Recommended for critical dataprotection, business and generalstorage use. It provides high diskfailure protection and readperformance.
QVP User Guide
Storage Manager 47

RAID Type Number ofDisks
Disk FailureTolerance
Capacity Overview
RAID 10 ≥ 4(Must be aneven number)
1 per pair ofdisks
Half of the totalcombined diskcapacity
• Every two disks are paired usingRAID 1 for failure protection.Then all pairs are stripedtogether using RAID 0.
• Excellent random read and writespeeds and high failureprotection, but half the total diskcapacity is lost.
• Recommended for applicationsthat require high random accessperformance and fault tolerance,such as databases.
RAID 50 ≥ 6 1 per disksubgroup
Total combined diskcapacity minus 1disk per subgroup
• Multiple small RAID 5 groups arestriped to form one RAID 50group.
• Better failure protection andfaster rebuild times than RAID 5.More storage capacity than RAID10.
• Better random accessperformance than RAID 5 if all ofthe disks are SSDs.
• Recommended for enterprisebackup with ten or more disks.
RAID 60 ≥ 8 2 per disksubgroup
Total combined diskcapacity minus 2disks per subgroup
• Multiple small RAID 6 groups arestriped to form one RAID 60group.
• Better failure protection andfaster rebuild time than RAID 6.More storage capacity than RAID10.
• Better random accessperformance than RAID 6 if all ofthe disks are SSDs.
• Recommended for businessstorage and online video editingwith twelve or more disks.
RAID Spare DisksConfiguring a RAID Group Hot Spare
Assigning a hot spare gives extra protection against data loss. In normal conditions, a hot spare disk isunused and does not store any data. When a disk in the RAID group fails, the hot spare disk automaticallyreplaces the faulty disk. QVP copies the data to the spare disk in a process called RAID rebuilding.
1. Verify that the NAS contains one or more free disks.
QVP User Guide
Storage Manager 48
2. Go to Main Menu > Storage Manager > Storage Space .
3. Select a storage pool or single static volume.
4. Click Manage.
5. Select a RAID 1, RAID, 5, RAID 6, or RAID 10 group.
6. Select Manage > Configure Spare Disk .
7. Select one or more disks.
WarningAll data on the selected disks will be deleted.
8. Click Apply. A confirmation message appears.
9. Click OK.
The spare disks are added to the RAID group. The disk appears as a green Spare in the disks summary atDisks/VJBOD.
Configuring a Global Hot Spare
A global spare disk acts as a hot spare for all RAID groups in a NAS or a connected expansion unit. Undernormal conditions, the disk is unused and does not store any data. When a disk in any RAID group fails, thehot spare disk automatically replaces the faulty disk. QVP copies the data to the spare disk in a processcalled RAID rebuilding.
ImportantStorage enclosures (the NAS and connected expansion units) cannot share global sparedisks. A unique global hot spare disk must be assigned to each storage enclosure.
1. Go to Storage Manager > Storage > Disks
2. Optional: Select a connected expansion unit.
3. Select a free disk.
WarningAll data on the selected disk will be deleted.
4. Select Action > Set as Enclosure Spare . A confirmation message appears.
5. Click OK.
The disk appears as a green Spare on the Disks/VJBOD screen.
RAID Bitmaps
If a disk is temporarily disconnected from its RAID group and then reconnected, the RAID group mustsynchronize all of its data. This process may take a long time. If the RAID group has a bitmap then onlychanges that were made after the disk was disconnected need to be synchronized, greatly speeding up theprocess.
A disk can become temporarily disconnected in the following situations.
QVP User Guide
Storage Manager 49

• A disk is accidentally removed from the NAS while the NAS is powered on.
• The NAS unexpectedly shuts down because of a hardware or software error.
• A user presses the power button for 10 seconds or disconnects the power cable while the NAS ispowered on.
Important
• You can only create bitmaps for RAID 1, RAID 5, RAID 6, and RAID 10 groups.
• Enabling a RAID bitmap may slightly decrease the read and write performance of theRAID group.
• A bitmap improves synchronization time only if the same disk is disconnected thenreconnected. Having a bitmap does not improve synchronization time when a new diskis added to the RAID group.
Creating a RAID Bitmap
1. Go to Main Menu > Storage Manager > Storage Space .
2. Select a storage pool or single static volume.
3. Click Manage.
4. Select a RAID 1, RAID 5, RAID 6, or RAID 10 group.
5. Select Manage > Enable Bitmap . A confirmation message appears.
QVP creates a bitmap for the RAID group.
RAID ManagementExpanding a RAID Group by Replacing all Disks
You can increase the maximum storage capacity of a RAID group by replacing all member disks with higher-capacity disks. This operation can be performed while the RAID group is online and accessible to users.
1. Go to Main Menu > Storage Manager > Storage Space .
2. Select a storage pool or static volume.
3. Click Manage.
4. Select a RAID group of type: RAID 1, RAID 5, RAID 6, RAID 10.
5. Disable all hot spares and global hot spares assigned to the RAID group.
6. Select Manage > Replace Disks One by One .
7. Select a disk to replace. Ensure that the capacity of the new disk is greater than the capacity of the disk that it is replacing.
8. Click Change. The disk description changes to Please remove this drive.
9. Remove the disk from the NAS drive bay. The NAS beeps twice. Then the disk description changes to Please insert the new disk.
QVP User Guide
Storage Manager 50

10. Insert a new disk into the same bay. The NAS beeps twice. Then the status of the disk and RAID group change to Rebuilding.
11. Wait for rebuilding to finish.
WarningDo not remove any disks while the RAID group is rebuilding.
The disks status changes back to Good.
12. Repeat the previous steps until all disks in the RAID group have been replaced. The Expand Capacity button is enabled after all disks have been replaced and rebuilding has finished.
13. Click Expand Capacity. A confirmation message appears.
14. Click OK. The NAS beeps and the RAID group status changes to Synchronizing.
WarningDo not power off the NAS or remove any disks while synchronization is in progress.
The RAID group status changes to Ready.
Changing the RAID Type of a RAID Group
You can change the RAID type of an existing RAID group online, without losing access to data or anyinterruption to NAS services. Changing the RAID type of a RAID group is called RAID migration. QVP allowsthe following migrations.
Original RAID Type New RAID Type Additional Disks RequiredSingle RAID 1 OneRAID 1 RAID 5 One or moreRAID 5 RAID 6 One or more
TipMigration from a single disk to RAID 6 is performed in stages. First migrate the group toRAID 1, then to RAID 5, and then finally to RAID 6.
1. Go to Main Menu > Storage Manager > Storage Space .
2. Verify the following:
• The NAS contains one or more available disks.
• The capacity of each available disk is greater than or equal to the smallest disk in the RAID group.
3. Select a storage pool or static volume.
4. Click Manage.
5. Select a RAID group.
6. Select Manage > Migrate .
7. Select one or more disks.
QVP User Guide
Storage Manager 51

WarningAll data on the selected disks will be deleted.
8. Click Apply. A confirmation message appears.
9. Click OK. The RAID group status changes to Rebuilding....
The RAID type changes to the new type and the RAID group status changes to Ready after migration hasfinished.
Recovering a RAID Group
RAID recovery enables you to recover a RAID group in the event of accidental disk removal or SATAconnector failure. When several disks are removed or disconnected from a RAID group:
• The status of the group changes to Error.
• The statuses of all volumes and storage pools using the RAID group change to Inactive.
• All data on the affected volumes and LUNs becomes inaccessible.
ImportantRAID recovery only helps when disks are temporarily disconnected and then reconnected.It does not help in the event of disk failure.
1. Reconnect all disconnected disks.
ImportantEnsure that each disk is reinserted into its original drive bay.
2. Go to Main Menu > Storage Manager > Storage Space .
3. Select a storage pool or single static volume with the status Inactive.
4. Click Manage.
5. Select a RAID group with the status Error.
6. Select Manage > Recover .
QVP starts to rebuild the RAID group.
RAID Scrubbing
RAID scrubbing helps maintain the consistency of data on the NAS. QVP scans the sectors of a RAID 5 orRAID 6 group and automatically attempts to repair any detected errors. You can run RAID scrubbingmanually, or on a schedule.
TipQNAP recommends performing RAID scrubbing at least once a month to maintain systemhealth and prevent data loss.
QVP User Guide
Storage Manager 52

Running RAID Scrubbing Manually
WarningThe read/write speeds of the RAID group may decrease while RAID scrubbing is inprogress.
1. Go to Main Menu > Storage Manager > Storage Space .
2. Select a storage pool or static volume.
3. Click Manage.
4. Select a RAID 5 or RAID 6 group. The RAID group status must be Ready.
5. Select Manage > RAID Scrubbing .
The RAID group status changes to Scrubbing.
Running RAID Scrubbing on a Schedule
You can schedule periodic RAID scrubbing of all RAID 5 and RAID 6 groups.
WarningThe read/write speeds of the RAID group may decrease while RAID scrubbing is inprogress.
1. Go to Main Menu > Storage Manager .
2.Click the Global Settings icon . The Global Settings menu opens.
3. Enable RAID Scrubbing Schedule.
4. Specify how often data scrubbing will run.
• Daily
• Weekly
• Monthly
5. Specify when data scrubbing will run.
TipQNAP recommends specifying a time when the NAS is not in use, such as after business hoursor on weekends.
6. Click Apply.
Data scrubbing will run according to the specified schedule. When data scrubbing is running on a RAIDgroups, the status of the group changes to Scrubbing.
Self-Encrypting Drives (SEDs)
A self-encrypting drive (SED) is a drive with encryption hardware built into the drive controller. An SEDautomatically encrypts all data as it is written to the drive and decrypts all data as it is read from the drive.
QVP User Guide
Storage Manager 53

Data stored on an SED is always fully encrypted by a data encryption key (DEK). The DEK can also beencrypted by a user-specified authentication key (AK) that allows the SED to be locked and unlocked. Bothencryption keys are stored in the drive's hardware and cannot be accessed by the host operating system orunauthorized users.
Creating an SED Secure Static Volume
1. Go to Main Menu > Storage Manager > Storage Space .
2. Perform one of the following actions.
NAS State ActionNo volumes or storage pools Click New Volume.One or more volumes or storage pools Click Create > New Volume .
The Volume Creation Wizard window opens.
3. Select Static volume.
4. Click Next.
5. Optional: Select an expansion unit from the Enclosure Unit list.
Important
• You cannot select disks from multiple expansion units.
• If the expansion unit is disconnected from the NAS, the storage pool will becomeinaccessible until it is reconnected.
6. Select Create SED secure static volume. The list of disks only displays SED disks.
7. Select one or more disks.
8. Select a RAID type. QVP displays all available RAID types and automatically selects the most optimized RAID type.
Number of disks Supported RAID Types Default RAID TypeOne Single SingleTwo JBOD, RAID 0, RAID 1 RAID 1Three JBOD, RAID 0, RAID 5 RAID 5Four JBOD, RAID 0, RAID 5, RAID 6,
RAID 10
ImportantRAID 10 requires an evennumber of disks.
RAID 5
Five JBOD, RAID 0, RAID 5, RAID 6 RAID 6Six or more JBOD, RAID 0, RAID 5, RAID 6,
RAID 10, RAID 50RAID 6
Eight or more JBOD, RAID 0, RAID 5, RAID 6,RAID 10, RAID 50, RAID 60
RAID 6
QVP User Guide
Storage Manager 54

TipUse the default RAID type if you are unsure of which option to choose.For details, see RAID Types.
9. Optional: Select the disk that will be used as a hot spare for this RAID group. The designated hot spare automatically replaces any disk in the RAID group that fails.For details, see RAID Spare Disks.
10. Optional: Select the number of RAID 50 or RAID 60 subgroups. The selected disks are divided evenly into the specified number of RAID 5 or 6 groups.
• A higher number of subgroups results in faster RAID rebuilding, increased disk failure tolerance,and better performance if all the disks are SSDs.
• A lower number of subgroups results in more storage capacity, and better performance if all thedisks are HDDs.
WarningIf a RAID group is divided unevenly, the excess space becomes unavailable. For example, 10disks divided into 3 subgroups of 3 disks, 3 disks, and 4 disks will provide only 9 disks ofstorage capacity.
11. Click Next.
12. Optional: Specify an alias for the volume. The alias must consist of 1 to 64 characters from any of the following groups:
• Letters: A to Z, a to z
• Special characters: Hyphen (-), underscore (_)
13. Optional: Configure SSD over-provisioning. Over-provisioning reserves a percentage of SSD storage space on each disk in the RAID group toimprove write performance and extend the disk's lifespan. You can decrease the amount of spacereserved for over-provisioning after QVP has created the RAID group.
TipTo determine the optimal amount of over-provisioning for your SSDs, download and run SSDProfiling Tool from App Center.
14. Specify the number of bytes per inode. The number of bytes per inode determines the maximum volume size, and the number of files andfolders that the volume can store. Increasing the number of bytes per inode results in a largermaximum volume size, but a lower maximum number of files and folders.
15. Specify the SED password.
WarningRemember this password. If you forget the password, the pool will become inaccessible and alldata will be unrecoverable.
16. Optional: Save the encryption key to the local NAS Saving the encryption key enables QVP to automatically unlock and mount the SED pool when theNAS starts up. If the encryption key is not saved, you must specify the encryption password every timethe NAS restarts.
Warning
QVP User Guide
Storage Manager 55

Saving the encryption key can result in unauthorized data access if unauthorized personnel areable to physically access the NAS.
17. Optional: Configure advanced settings.
Setting Description User ActionsAlert threshold QVP issues a warning notification
when the percentage of usedvolume space is equal to or abovethe specified threshold.
Specify a value.
Accelerate performance with SSDcache
QVP adds data from this volumeto the SSD cache to improve reador write performance.
No actions
Create a shared folder on thevolume
QVP automatically creates theshared folder when the volume isready. Only the NAS adminaccount can access the newfolder.
• Specify a folder name.
• Select Create this folder as asnapshot shared folder.
A snapshot shared folder enablesfaster snapshot creation andrestoration.
18. Click Next.
19. Click Finish. A confirmation message appears.
WarningClicking OK deletes all data on the selected disks.
QVP creates and initializes the volume, and then creates the optional shared folder.
SED Storage Pool and Static Volume Actions
Go to Main Menu > Storage Manager > Storage Space , select a SED pool or volume, click Manage, thenselect Actions > SED Settings to perform the following actions.
QVP User Guide
Storage Manager 56

Action DescriptionChange SED Pool PasswordChange SED Volume Password
Change the SED security password. You can alsochoose to save the encryption key to the local NAS.
WarningRemember this password. If you forgetthe password, the pool will becomeinaccessible and all data will beunrecoverable.
Saving the encryption key enables QVP toautomatically unlock and mount the SED pool whenthe NAS starts up. If the encryption key is not saved,you must specify the encryption password every timethe NAS restarts.
WarningSaving the encryption key can result inunauthorized data access ifunauthorized personnel are able tophysically access the NAS.
Lock Lock the pool or volume. All volumes, LUNs,snapshots, and data will become inaccessible until itis unlocked.
Unlock Unlock a locked SED pool or volume. All volumes,LUNs, snapshots, and data will become accessible.
Disable SED Security Remove user password and disable the ability tolock and unlock the volume or pool.
Enable SED Security Add user password and enable the ability to lock andunlock the volume or pool.
Removing a Locked SED Pool or Volume
1. Go to Main Menu > Storage Manager > Storage Space .
2. Select a locked SED storage pool or static volume.
3. Select Manage > Remove The Removal Wizard window opens.
4. Select a removal option.
Option DescriptionEnter the password of the pool QVP will unlock the SED disks in the pool or volume,
and then delete all data.Forget password QVP will remove the storage pool or static volume.
The SED disks will remain locked, and cannot beused until they have been unlocked using Find andRecover Storage Space or erased using SED Erase.
5. Click Apply.
QVP User Guide
Storage Manager 57

SED Erase
SED Erase erases all of the data on a locked or unlocked SED disk and removes the SED securitypassword.
Erasing a Disk Using SED Erase
1. Go to Main Menu > Storage Manager > Disks .
2. Select an SED disk.
3. Click Actions and then select SED Erase. The SED Erase window opens.
4. Enter the disk's PSID.
TipThe PSID can usually be found on the front of the disk.
5. Click Apply.
External Storage
QVP supports various external storage devices, such as flash drives, portable hard drives, and storageenclosures. After connecting external storage device to the NAS, the device and all of its readable partitionswill be displayed on this page. QVP will also create a shared folder for each readable partition on the device.For details on supported external device types, see hardware specifications on https://www.qnap.com andhttps://www.qnapsecurity.com.
NoteTo access partitions formatted using the exFAT file system, you must purchase an exFATdriver license in License Center.
External Storage Device Actions
Action DescriptionErase Delete all data and partitions on the device.Eject Safely unmount the external storage device from the
NAS, so that you can disconnect it.
External Storage Partition Actions
Action DescriptionStorage Information View details about the selected partition, including
partition name, capacity, used space, and file systemtype.
Format Format the partition. For details, see Formatting anExternal Storage Partition.
Eject Unmount the partition. The external storage deviceand other partitions on it will continue working.
QVP User Guide
Storage Manager 58

Formatting an External Storage Partition
1. Go to Main Menu > Storage Manager > External Storage .
2. Select a storage partition.
3. Click Action, and then select Format. The Format Partition window opens.
4. Select a file system.
File System Recommended Operating Systems and DevicesNTFS WindowsHTS+ macOSFAT32 Windows, macOS, NAS devices, most cameras,
mobile phones, video game consoles, tablets
ImportantThe maximum file size is 4 GB.
exFAT Windows, macOS, some cameras, mobile phones,video game consoles, tablets
Important
• Using exFAT on QVP requires anexFAT driver license. You canpurchase the license in LicenseCenter.
• Verify that your device is compatiblewith exFAT before selecting thisoption.
EXT3 Linux, NAS devicesEXT4 Linux, NAS devices
5. Specify a disk label. The label must consist of 1 to 16 characters from any of the following groups:
• Letters: A to Z, a to z
• Numbers: 0 to 9
• Special characters: Hyphen "-"
6. Optional: Enable encryption.
a. Select an encryption type. Select one of the following options:
• AES 128 bits
• AES 192 bits
• AES 256 bits
b. Specify an encryption password.
QVP User Guide
Storage Manager 59
The password must consist of 8 to 16 characters from any of the following groups:
• Letters: A to Z, a to z
• Numbers: 0 to 9
• All special characters (excluding spaces)
c. Confirm the encryption password.
d. Optional: Select Save encryption key. Select this option to save a local copy of the encryption key on the NAS. This enables QVP toautomatically unlock and mount the encrypted volume when the NAS starts up. If the encryptionkey is not saved, you must specify the encryption password each time the NAS restarts.
Warning
• Saving the encryption key on the NAS can result in unauthorized data access ifunauthorized personnel are able to physically access the NAS.
• If you forget the encryption password, the volume will become inaccessible and all data willbe lost.
7. Click Format. A warning message appears.
8. Click OK.
QVP User Guide
Storage Manager 60

5. Surveillance Settings
Camera Settings
The Camera Settings screen enables you to manage the cameras in your network.
You can modify the following settings.
Setting DescriptionConnection QVR Pro automatically detects the settings of added cameras. You can
modify the connection settings as required.For details, see Connection Settings.
Stream and Recording QVR Pro automatically detects the video stream settings and displaysthe information for all available streams. One camera can support up tothree video streams depending on a camera's capabilities.QVR Pro allows you to configure various recording settings, includingnormal recording, event recording, and Autosnap.For details, see Stream and Recording Settings.
Event QVR Pro allows you to specify which digital input status is consideredan event.The options vary depending on the camera.
Adding Cameras
NoteThe maximum number of cameras allowed depends on the NAS model and the number ofcamera licenses installed.
There are several ways to add a camera:
• Add a camera that is connected to the network. For details, see Adding a Camera Connected to theNetwork.
• Add a camera manually. For details, see Adding a Camera Manually.
• Batch add multiple cameras. For details, see Batch Adding Multiple Cameras.
Adding a Camera Connected to the Network
QVR Pro displays the list of added cameras on the Camera Settings screen. Perform the following task toadd a camera that is connected to the network.
1. Open Camera Settings from the desktop or from the main menu.
2. Click one of the following buttons.
Option Description+ Click to add your first camera.Add Click to add more cameras.
The Camera Selection screen appears.
QVP User Guide
Surveillance Settings 61
3. Select a camera from the list.
• QVR Pro automatically scans the network for available cameras.
• To add a camera from a different network, use the Advanced Search feature. To add a camera ofa specific brand or model, use the Filter feature.For details, see Using Search Filters and Using the Search Features.
4. Click Next. The Edit Camera Selection screen appears.
5. Specify the camera information, including the account name and password.
TipYou can click Test to verify the camera connection.For details, see Testing the Camera Connection.
6. Click Next. A confirmation message appears.
7. Select one of the following options and then click OK.
Option DescriptionEdit now Immediately modify the camera settings.Edit later Use the default camera settings.
You can modify the settings later.
8. Depending on your selection in the previous step, perform one of the following steps.
• Modify the camera settings.For details on the camera settings, see Editing the Camera Settings.
• Proceed to the next step.
9. Click Finish.
The camera is added to the QVR Pro server.
Adding a Camera Manually
1. Open Camera Settings from the desktop or from the main menu.
2. Click one of the following buttons.
Option Description+ Click to add your first camera.Add Click to add more cameras.
The Camera Selection screen appears.
3. Click Next.
4. Click Add Manually. A new entry is added to the list.
5. Specify the following information.
QVP User Guide
Surveillance Settings 62

Field TaskName Specify a name for the camera.Brand Select the camera brand.Model Select the camera model.IP Address Specify the IP address.Port Modify the port number.
The default value is 80.RTSP Port Modify the real time streaming protocol (RTSP) port number.
The default value is 554.Account Specify the camera username.Password Specify the camera password.
TipYou can click Test to verify the camera connection.For details, see Testing the Camera Connection.
6. Click Next. A confirmation message appears.
7. Select one of the following options and then click OK.
Option DescriptionEdit now Immediately modify the camera settings.Edit later Use the default camera settings.
You can modify the settings later.
8. Depending on your selection in the previous step, perform one of the following steps.
• Modify the camera settings.For details on the camera settings, see Editing the Camera Settings.
• Proceed to the next step.
9. Click Finish.
The camera is added to the QVR Pro server.
Batch Adding Multiple Cameras
You can batch add multiple cameras to the QVR Pro server if they share the same login credentials.
1. Open Camera Settings from the desktop or from the main menu.
2. Click one of the following buttons.
Option Description+ Click to add your first camera.Add Click to add more cameras.
The Camera Selection screen appears.
QVP User Guide
Surveillance Settings 63

3. Select the cameras from the list. To add cameras from a different network, use the Advanced Search feature. To add cameras of specificbrands or models, use the Filter feature.For details, see Using Search Filters and Using the Search Features.
4. Click Next. The Edit Camera Selection screen appears.
5. Select the cameras that share the same login credentials.
6. Click Batch Login.
7. Specify the following information.
Field TaskUsername Specify the camera username.Password Specify the camera password.Port Specify the port number.RTSP Port Specify the real time streaming protocol (RTSP) port number.
8. Click Apply.
9. Click Next. A confirmation message appears.
10. Select one of the following options and then click OK.
Option DescriptionEdit now Immediately modify the camera settings.Edit later Use the default camera settings.
You can modify the settings later.
11. Depending on your selection in the previous step, perform one of the following steps.
• Modify the camera settings.For details on modifying the camera settings, see Editing the Camera Settings.
• Proceed to the next step.
12. Click Finish.
The cameras are added to the QVR Pro server.
Editing the Camera Settings
• After adding a camera, you can click Edit ( ) to modify its connection, stream, recording, and eventsettings.
Connection Settings
The following settings are available on the Connection tab.
Field DescriptionPreview Displays a snapshot of the video feed if the camera connection to QVR Pro has
been established.
QVP User Guide
Surveillance Settings 64
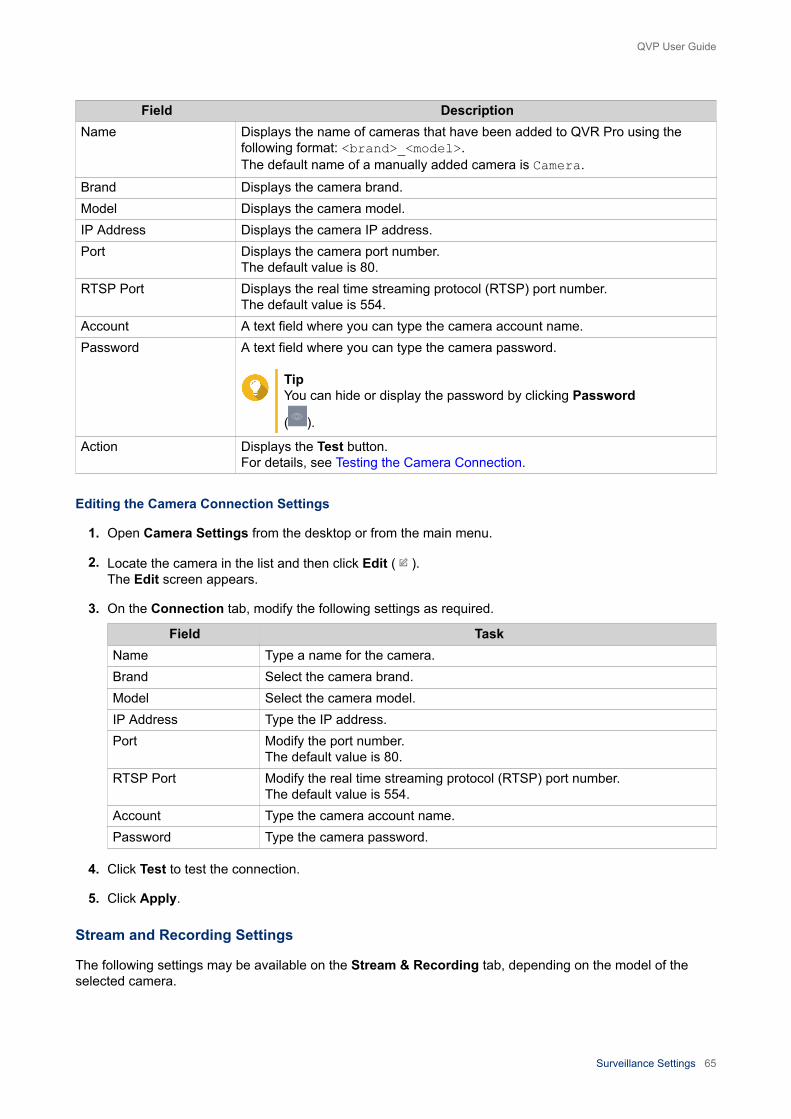
Field DescriptionName Displays the name of cameras that have been added to QVR Pro using the
following format: <brand>_<model>.The default name of a manually added camera is Camera.
Brand Displays the camera brand.Model Displays the camera model.IP Address Displays the camera IP address.Port Displays the camera port number.
The default value is 80.RTSP Port Displays the real time streaming protocol (RTSP) port number.
The default value is 554.Account A text field where you can type the camera account name.Password A text field where you can type the camera password.
TipYou can hide or display the password by clicking Password
( ).
Action Displays the Test button.For details, see Testing the Camera Connection.
Editing the Camera Connection Settings
1. Open Camera Settings from the desktop or from the main menu.
2. Locate the camera in the list and then click Edit ( ). The Edit screen appears.
3. On the Connection tab, modify the following settings as required.
Field TaskName Type a name for the camera.Brand Select the camera brand.Model Select the camera model.IP Address Type the IP address.Port Modify the port number.
The default value is 80.RTSP Port Modify the real time streaming protocol (RTSP) port number.
The default value is 554.Account Type the camera account name.Password Type the camera password.
4. Click Test to test the connection.
5. Click Apply.
Stream and Recording Settings
The following settings may be available on the Stream & Recording tab, depending on the model of theselected camera.
QVP User Guide
Surveillance Settings 65

Stream Settings
Field DescriptionFisheye mount type Displays the specified mount type.
The mount type determines the location of the fisheye camera.Stream mode Displays the specified stream mode.
The options are hidden when a camera only supports the single streammode.
Name The default format of a stream name is Stream<number>. Thenumber changes depending on the number of supported streams.
Video compression Displays the default video compression settings of the stream.Resolution Displays the default resolution of the stream.
In cases where a camera has multiple streams and two or all streamsuse the same resolution, QVR Pro checks the video compressionsettings of each stream. When a camera has multiple streams, QVRPro automatically assigns different resolutions to different streams.
Frame rate Displays the frame rate or frequency in the number of frames persecond (FPS).
Bitrate control Displays the default bitrate control. You can choose to use one of thefollowing options.
• VBR: variable bit rate
• CBR: constant bit rateBit rate Displays the bit rate when CBR is selected.Quality Displays the quality when VBR is selected.
Recording Settings
QVP User Guide
Surveillance Settings 66

Option DescriptionEnable video recording Selecting this option allows you to enable and configure the following
features.
• Normal recording: QVR Pro records videos based on the specifiedschedule.
NoteThe schedule indicates the hours and days when QVRPro records videos. Workdays are days from everyMonday to Friday. Weekends include every Saturdayand Sunday.
• Event recording: QVR Pro only records video streams when anevent is detected.
• Audio recording: QVR Pro captures the audio when recordingvideos.
• Edge recording recovery: QVR Pro records and saves the selectedstream directly to a camera SD card. The recorded stream can beused for recording recovery in the future.
NoteThis feature only supports using Stream 1 and H.264codec.
For details, see Enabling Video Recording.Enable Autosnap Selecting this option allows QVR Pro to take snapshots at regular
intervals.For details, see Enabling Autosnap.
Editing the Stream Settings
ImportantQVR Pro hides the features that the selected camera does not support. Some of theoptions may not be available to your camera.
1. Open Camera Settings from the desktop or from the main menu.
2. Locate the camera in the list and then click Edit ( ). The Edit screen appears.
3. Select the Stream & Recording tab.
4. Optional: Select the stream mode.
• Single stream
• Multiple stream
5. Click Edit ( ) beside Stream Settings. The Stream Settings screen appears.
6. Optional: Configure the fisheye settings.
a. Select Enable fisheye lens.
QVP User Guide
Surveillance Settings 67

b. Select the fisheye mount type.
• Wall mount
• Ceiling mount
• Table mount
c. Select the display mode.
NoteEnsure that the camera fisheye lens has been installed before enabling this feature. Afterinstalling the lens, you must also verify that the camera displays a circular video image.Otherwise, the dewarped image would be incorrect.
7. Configure the bitrate reduction settings.
a. Click Edit ( ) beside Bitrate Reduction. The Codec Optimization screen appears.
b. Select the following options if needed.
Option DescriptionEnable bitrate reduction Bitrate reduction is a compression method that
lowers the bitrate, and reduces the number ofkeyframes and frames per second (FPS). Thisfeature works best with still videos.When this feature is enabled, you can customize thedynamic keyframe interval. You can also enabledynamic FPS to decrease the number of frames persecond for still videos.
Enable dynamic keyframe interval Dynamic keyframe interval increases the intervalbetween keyframes to reduce the video size. Thisfeature works best with still videos.
c. Click Apply.
8. Modify the following settings if needed.
Field TaskVideo compression Select the video compression.Resolution Select the resolution.Frame rate Select the frame rate.Bitrate control Select one of the following bitrate controls.
• VBR: variable bit rate
• CBR: constant bit rateBit rate Select the bitrate.
This option is only available when CBR is selected.Quality Select the quality.
This option is only available when VBR is selected.
9. Optional: Click Preview
QVP User Guide
Surveillance Settings 68

Note
• To see the stream preview, ensure that you allow pop-ups in your browser settings.
• Depending on the camera model, you may need to restart the camera to see the preview.Restarting the camera may affect recording sessions that are using the selected stream.
QVR Pro displays a preview of the camera stream.
10. Click Apply.
Enabling Video Recording
1. Click Camera Settings from the desktop or from the main menu.
2. Locate the camera from the list and then click Edit ( ). The Edit window opens.
3. Select the Stream & Recording tab.
4. Select Enable video recording.
5. Modify the following settings as required.
Option Possible User ActionsNormal Recording • Select one or multiple streams.
• Specify the schedule.
TipThe schedule indicates the hours and days when QVR Properforms normal recording. Workdays are days fromevery Monday to Friday. Weekends include everySaturday and Sunday.You can use the default schedule or click Add ( ) tocreate a custom schedule and specify active and inactivetime slots.
Event Recording • Select one stream or multiple streams
• Click Edit ( ) to configure the following settings:
• Pre-recording: the duration (seconds) of video recordingbefore the actual alarm event.
• Post-recording: the duration (seconds) of videorecording after the actual alarm event.
6. Optional: Select Enable audio recording on this camera and Edge Recording Recovery.
7. Click Apply.
Enabling Autosnap
1. Click Camera Settings from the desktop or from the main menu.
2. Locate the camera from the list and then click Edit ( ). The Edit window opens.
QVP User Guide
Surveillance Settings 69

3. Select the Stream & Recording tab.
4. Select Enable Autosnap.
5. Select a stream.
6. Specify the schedule.
TipThe schedule indicates the hours and days when QVR Pro performs normal recording. Workdays are days from every Monday to Friday. Weekends include every Saturday andSunday.You can use the default schedule or click Add ( ) to create a custom schedule and specifyactive and inactive time slots.
7. Click Edit ( ) beside Enable Autosnap. The Autosnap window appears.
8. Specify the interval between every snapshot.
9. Specify the location to save the snapshots.
• NAS folder
• Remote destination
1. Remote host IP address
2. Destination path
3. User name
4. Password
TipYou can click Test to test the connection.
10. Click Apply. QVR Pro applies the Autosnap settings and closes the Autosnap window.
11. Click Apply.
Event Settings
NoteOnly specific camera models support this feature.
The following settings are available on the Event tab.
Feature Possible User TasksAlarm Input Select the alarm input for each camera.Alarm Output Select the alarm output for each camera.
Assigning a Network Interface to a Camera
QVR Pro allows you to assign a network interface to each camera. This ensures that the bandwidth is load-balanced.
QVP User Guide
Surveillance Settings 70
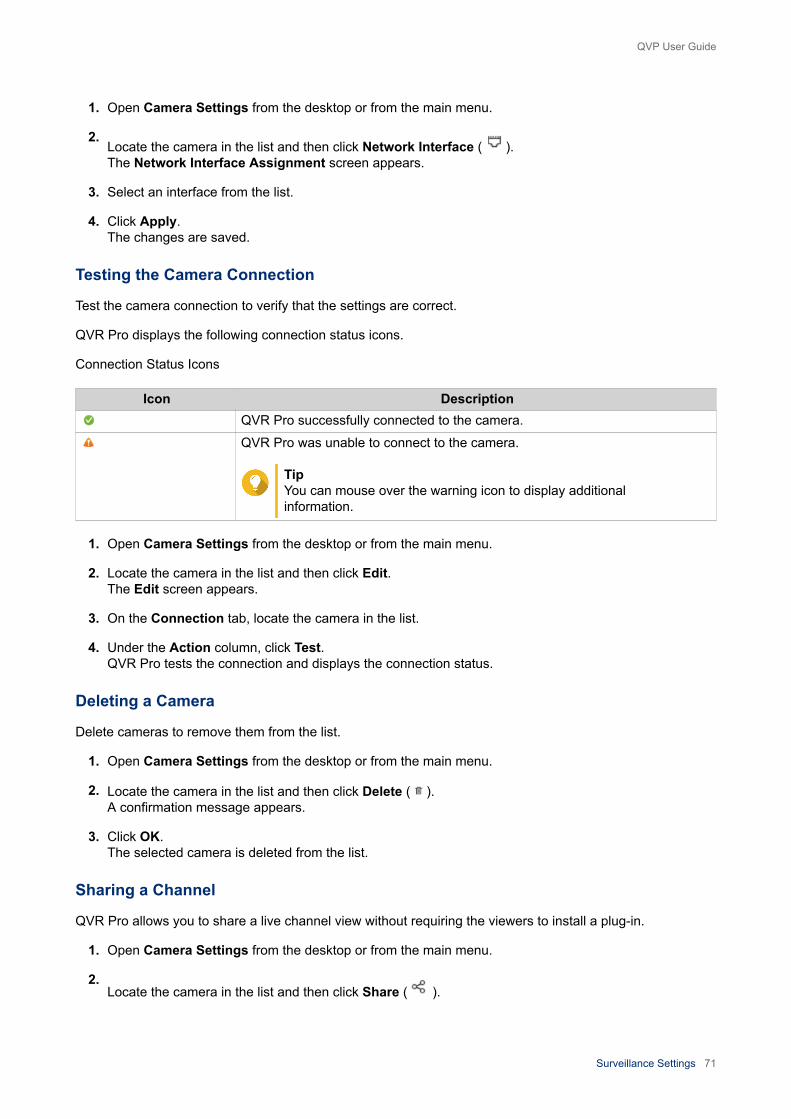
1. Open Camera Settings from the desktop or from the main menu.
2.Locate the camera in the list and then click Network Interface ( ). The Network Interface Assignment screen appears.
3. Select an interface from the list.
4. Click Apply. The changes are saved.
Testing the Camera Connection
Test the camera connection to verify that the settings are correct.
QVR Pro displays the following connection status icons.
Connection Status Icons
Icon DescriptionQVR Pro successfully connected to the camera.QVR Pro was unable to connect to the camera.
TipYou can mouse over the warning icon to display additionalinformation.
1. Open Camera Settings from the desktop or from the main menu.
2. Locate the camera in the list and then click Edit. The Edit screen appears.
3. On the Connection tab, locate the camera in the list.
4. Under the Action column, click Test. QVR Pro tests the connection and displays the connection status.
Deleting a Camera
Delete cameras to remove them from the list.
1. Open Camera Settings from the desktop or from the main menu.
2. Locate the camera in the list and then click Delete ( ). A confirmation message appears.
3. Click OK. The selected camera is deleted from the list.
Sharing a Channel
QVR Pro allows you to share a live channel view without requiring the viewers to install a plug-in.
1. Open Camera Settings from the desktop or from the main menu.
2.Locate the camera in the list and then click Share ( ).
QVP User Guide
Surveillance Settings 71

The Share Channel screen appears.
3. Select Share this channel. The available streams for the selected channel are displayed.
4. Select the stream.
5. Optional: Enable the validation code.
a. Select Enable.
b. Enter a validation code.
6. Click Apply. QVR Pro creates the shareable link.
Customizing the Camera List
The camera list displays all the cameras that have been added to QVR Pro. You can choose to modify thecamera list in two ways.
• Click .
a. Specify the search parameters or type the camera name.
• Camera Brand
• Camera Model
• Status
• Camera Name
TipYou can specify one or all options, as required.
b. Click Apply.
The search results appear.
• Click to display the list of available camera information.
a. Select or deselect any of the following to customize the table columns.
• Channel
• Status
• Recording Settings
• Days Recorded
• Brand
• Camera Model
• IP Address
• MAC Address
QVP User Guide
Surveillance Settings 72

• Firmware Version
The selected items are added to the camera list table.
Using the Search Features
QVR Pro provides the following search methods.
• Use advanced search. For details, see Using Advanced Search.
• Use search filters. For details, see Using Search Filters.
Using Advanced Search
TipWhen searching a different network, use the camera's login username, password, or portnumber for more accurate search results.
1. Open Camera Settings from the desktop or from the main menu.
2. Click one of the following buttons.
Option Description+ Click to add your first camera.Add Click to add more cameras.
The Camera Selection screen appears.
3. Click Advanced Search ( ). The advanced search options appear.
4. Specify the search parameters.
Option DescriptionSearch this NAS network QVR Pro searches for cameras connected to the
network.Search a different network QVR Pro searches for cameras connected to
another network.Specify the search parameters by providing thefollowing information.
• Start IP - Type the first IP address in thesearch range.
• End IP - Type the last IP address in thesearch range.
• Optional: Port - Type the camera portnumber.
• Optional: Username - Type the camera username.
QVP User Guide
Surveillance Settings 73

• Optional: Password - Type the camerapassword.
TipYou can select one or both options, as required.
5. Click Apply. The search results appear.
Using Search Filters
TipUse the filter feature to only display cameras of a specific brand and model. For bestresults, add cameras of the same brand and model by batch.
1. Open Camera Settings from the desktop or from the main menu.
2. Click one of the following buttons.
Option Description+ Click to add your first camera.Add Click to add more cameras.
The Camera Selection screen appears.
3. Click Filter ( ). The filter options appear.
4. Specify the search parameters.
• Camera Brand
• Camera Model
TipYou can specify one or both options, as required.
5. Click Apply. The search results appear.
Importing or Exporting Camera Settings
You can import or export the profiles of your surveillance cameras to quickly configure or back up cameraconnection settings.
Note
• QVR Pro only supports importing CSV files in the UTF-8 format.
• You can edit the CSV files using Microsoft Excel or other software programs thatsupport the CSV format.
1. Open Camera Settings from the desktop or the main menu.
QVP User Guide
Surveillance Settings 74

2. Click Export/Import Camera Settings.
3. Perform one of the following tasks.
Task StepsExport Camera Settings a. Click Export Camera Settings.
b. Choose whether to include camerapasswords in the exported CSVconfiguration file.
c. Click Export.Import Camera Settings a. Click Import Camera Settings.
b. Click Browse and select a CSVconfiguration file.
c. Click Next.
d. Select the camera profiles that you want toimport.
e. Click Apply.
Recording Storage
The Recording Storage screen provides an overview of recording spaces and cameras as well as severalconfiguration options for managing your storage space.
OverviewRecording Space
A recording space is composed of one or more volumes allocated for video surveillance. By creating adedicated storage space for video recordings, QVR Pro transforms your NAS into a powerful video recordingdevice.
Adding a Recording Space
You can add a recording space to allocate a fixed amount of storage space for video recordings.
WarningModifying, moving, or deleting the files in the QVRProDB and QVRProSpace_[volumename] folders will cause QVR Pro to malfunction.
1. Open Recording Storage from the desktop or main menu.
2. Go to Recording Space.
3. Click one of the following buttons.
Button Description+ Click to add your first recording space.Add Click to add more recording spaces.
The Add Recording Space screen appears.
QVP User Guide
Surveillance Settings 75

4. Select Local.
5. Specify the following information.
Field TaskName Specify a name for the recording space.
NoteName requirements:
• Length: 1-30 characters.
• Valid characters: A-Z, a-z, 0-9
• Valid special characters: space ( ),hyphen (-), underscore (_), andperiod (.)
Overwrite Trigger Threshold Select the overwrite trigger threshold.
NoteQVR Pro starts overwriting the oldestrecording data when the percentage ofused recording space exceeds thespecified threshold.
Pre-allocated Select this option to pre-allocate storage space forrecording data.
ImportantIf you choose not to enable this option,ensure that you have enough storagespace and the overwrite mechanism canbe triggered as expected. Otherwise,QVR Pro would stop recording due toinsufficient space.
6. Select a volume.
7. Specify the estimated size of allocated space.
8. Click Next.
9. Optional: Assign a spare volume if available.
a. Select a volume.
b. Specify the amount of allocated space.
10. Click Next.
11. View the summary of the recording space.
TipClick Back to return to earlier steps and modify settings.
12. Click Apply. A confirmation message appears.
QVP User Guide
Surveillance Settings 76

13. Click Apply.
14. Click Finish. The new recording space is created. QVR Pro creates a shared folder using the name QVRProSpace_[volume name].
Editing Recording Space Settings
You can edit the recording space name, change the retention ratio, expand the allocated volume, or add aspare volume.
1. Open Recording Storage from the desktop or main menu.
2. Go to Recording Space.
3. Select a recording space.
4. Under Action, click Edit ( ). The Edit Recording Space Settings screen appears.
5. Under Allocated Volume(s), modify any of the following information.
Field TaskName Specify a name for the recording space.
NoteName requirements:
• Length: 1-30 characters.
• Valid characters: A-Z, a-z, 0-9
• Valid special characters: space ( ),hyphen (-), underscore (_), andperiod (.)
Overwrite trigger threshold Specify the overwrite trigger threshold.
NoteQVR Pro starts overwriting the oldestrecording data when the percentage ofused recording space exceeds thespecified threshold.
6. Optional: Expand the estimated size of allocated space.
ImportantThe new volume size must be larger than the current size.
a. Under the Allocated Size column, click Expand Size ( ).
b. On the Expand Size screen, select the new volume size.
c. Click Apply.
7. Optional: Add a new volume.
QVP User Guide
Surveillance Settings 77

ImportantDeleting an existing volume is not allowed.
a. Select a volume from the list of available volumes.
b. Specify the allocated amount.
8. Optional: Assign a spare volume if available.
a. Select a volume.
b. Specify the amount of allocated space.
9. Click Apply.
Viewing the Recording Space Dashboard
Check the health status of the recording spaces and review the list of recording spaces.
1. Open Recording Storage from the desktop or from the main menu.
2. Go to Recording Space.
3. Check the following widgets.
Widget DescriptionStorage Overview Displays each recording space as a slice in the pie chart.
The pie chart is a visual representation of how each recordingspace relates to other recording spaces.
Camera Overview Displays the overall status of the cameras in QVR Pro.The widget also lists the following information:
• Total: the total number of cameras that have been added toQVR Pro
• Without recording space assigned: the number of cameras towhich no recording space is assigned
• Overwrite disabled: the number of cameras where QVR Prodoes not delete the oldest recordings to make room for newrecordings.
4. Check the recording space list.
Column DescriptionName Displays the specified recording space name.
QVP User Guide
Surveillance Settings 78

Column DescriptionStatus Displays the status of the recording space health.
The status can be any of the following:
• Normal: the recording space is available and in use
• Idle: the recording space is available but not in use.
• Allocating: QVR Pro is creating the recording space
• Spare Enabled: the spare volume is in use
• Deleting: QVR Pro is deleting the recording space
• Error: the recording space has encountered an issue and is notavailable
• Warning: QVR Pro has detected an issue that might result in anerror
• Normal (Expanding): QVR Pro is increasing the recording spacesize
Recording space capacity Displays the following information:
• Total: total storage space
• Used: total storage space used
• Reserved: the percentage of the reserved volume that remainsunused before overwriting starts
Recording status Displays the total number of channels recording to the space.Action Displays the following buttons:
• Edit: click to modify the recording space settings
• Remove: click to delete a volumeYou must provide the password and confirm the action before QVRPro deletes the volume.
• Details: click to view the recording space detailsFor details, see Viewing Recording Space Details.
Viewing Recording Space Details
The Details screen gives you a quick overview of the recording space information.
1. Open Recording Storage from the desktop or from the main menu.
2. Go to Recording Space.
3. Select the recording space and then click under the Action column. The Details screen appears.
4. Review the following information.
Field DescriptionName Displays the recording space name
QVP User Guide
Surveillance Settings 79

Field DescriptionNumber of allocated volume(s) Displays the total number of allocated volumesOverwrite trigger threshold Displays the percentage of the reserved volume that
will remain unused before overwriting the recordingfiles
Total allocated size Displays the total size of the allocated volume(s)Allocated volume(s) Displays the volume name, RAID Type/Disk, storage
space name, comparison between the allocated sizeand the total size, and the space status of theallocated volumes
Spare volume(s) Displays the volume name, RAID Type/Disk, storagespace name, comparison between the allocated sizeand the total size, and the space status of the sparevolumes
5. Click OK.
Deleting a Recording Space
Delete an existing recording space if you no longer need the space or if you want to re-allocate the volume.
WarningDeleting a recording space also deletes the recording information. The deleted spacecannot be recovered.
1. Open Recording Storage from the desktop or from the main menu.
2. Go to Recording Space.
3. Select the recording space and then click under the Action column. A confirmation message appears.
4. Review the recording space details and then click Delete. A warning message appears.
5. Type the password and then click OK. The recording space is deleted.
Recording Location and Days
QVR Pro allows you to specify where to save recorded videos. You can also specify the number of days thatnormal and event recording streams are recorded, the maximum file size for the saved files, and whether ornot to overwrite files older files to make space for new recordings.
Editing the Channel Recording Settings
1. Open Recording Storage from the desktop or from the main menu.
2. Go to Recording Location and Days.
3. Click beside any camera on the list. The Edit Channel Recording Settings screen appears.
4. Select Use custom settings and then modify the following settings as required.
QVP User Guide
Surveillance Settings 80

Stream Type Possible User ActionsNormal • Select the recording location.
• Specify the minimum and maximum number of days.
• Specify the maximum file size.
• Select Enable or Disable to specify whether or not to overwriteolder files.
ImportantSpecifying the minimum number of days and selecting Disable may cause conflict. In such cases, QVR Prostill overwrites the oldest recording and creates a logentry for this action.
Event
5. Click Apply. The changes are applied.
Editing the Default Channel Settings
NoteChanges to the default settings only apply to the currently selected channel. You mustmanually repeat the process for other channels.
1. Open Recording Storage from the desktop or from the main menu.
2. Go to Recording Location and Days.
3. Click beside any camera on the list. The Edit Channel Recording Settings screen appears.
4. Click Edit Default Settings. The Edit Default Settings screen appears.
5. Select Use default settings and then modify the following settings as required.
Stream Type Possible User ActionsNormal • Select the recording location.
• Specify the minimum and maximum number of days.
• Specify the maximum file size.
• Select Enable or Disable to specify whether or not the overwritingof older files is allowed.
ImportantSpecifying the minimum number of days, and Disablemay cause conflict. In such cases, QVR Pro stilloverwrites the oldest recording and creates a log entryfor this action.
Event
6. Click Apply. The default channel settings are modified.
QVP User Guide
Surveillance Settings 81

Recording ManagementRecording ImportImporting Recording Data
You can import recording data to QVR Pro from the local or a remote NAS.
1. Open Recording Storage from the desktop or main menu.
2. Go to Recording Import.
3. Click Import Recording. The Import Recording window appears.
4. Click Browse.
5. Perform one of the following tasks.
Task ActionImport recordings from the local NAS a. Select Local NAS.
QVR Pro displays the folders on the local NAS.
b. Select a folder.
ImportantYou must select a QVI_Format folderto import recording data.
c. Click Next.Import recordings from a remote NAS a. Click Remote NAS.
The Remote NAS Login window appears.
b. Specify the following information.
• Host name/IP address
• Port number
• Username
• Password
c. Click Connect.QVR Pro displays the folders on the remoteNAS.
d. Select a folder.
ImportantYou must select a QVI_Format folderto import recording data.
e. Click Next.
6. Select a source channel.
7. Select a destination channel.
QVP User Guide
Surveillance Settings 82

8. Select a recording space.
9. Specify a time range for the imported recording.
10. Click Apply. The Important Notice window appears.
11. Read the Important Notice.
12. Select a policy for handling duplicate recordings.
• Keep the recording on the destination
• Overwrite the recording on the destination
13. Select I have read and understood this import notice.
14. Click OK.
QVR Pro starts importing recording data to the specified destination. You can view import tasks in ImportHistory.
Recording BackupBacking Up Recording Data
1. Open Recording Storage from the desktop or main menu.
2. Go to Recording Backup.
3. Click Create Task.
4. Specify the following information for the destination NAS.
Field ActionTask name Specify a name for the backup task.
NoteName requirements:
• Length: 1-64 characters.
• Valid characters: A-Z, a-z, 0-9
• Valid special characters: space ( ),hyphen (-), underscore (_), andperiod (.)
Name or IP address Specify the name or the IP address of thedestination NAS.
Port number Specify a port number for the connection.Username Specify a username for the destination NAS.Password Specify the password.Path Specify a path for the backup recording data.
5. Optional: Click Test. QVR Pro tries to connect to the destination NAS with the specified credentials and then displays thetest result.
QVP User Guide
Surveillance Settings 83

6. Click Next.
7. Select camera channels from the channel list.
8. Click Next.
9. Select one of the following backup plans.
Plan ActionBack up recording data in the last few days a. Select Back up recording data in the last few
days.
b. Specify the number of days.Back up recording data in a specific time range a. Select Back up recording data in a specific
time range.
b. Specify the start time and end time.
10. Specify a backup schedule.
a. Click Backup Schedule. The Backup Schedule window appears.
b. Select one of the schedule options.
c. Specify the backup time or the interval between every backup.
d. Click Apply.
11. Optional: Select Perform the backup task immediately.
12. Select a recording type.
• Back up normal recordings only
• Back up event recordings only
• Back up both normal and event recordings
13. Select a recording format.
• Standard format (mp4)
• QVR Pro format (can be imported to other QVR Pro servers)
14. Configure backup rules.
a. Optional: Specify a retention period for the recording data.
b. Specify a storage policy in the event that the destination space is full.
15. Click Finish.
QVR Pro creates the recording backup task. You can view and manage tasks on the task list.
Editing Recording Backup Settings
1. Open Recording Storage from the desktop or main menu.
2. Go to Recording Backup.
QVP User Guide
Surveillance Settings 84

3. Locate a recording backup task from the task list.
4. Click The Edit Recording Backup Task window appears.
5. Specify the following information for the destination NAS.
Field ActionTask name Specify a name for the backup task.
NoteName requirements:
• Length: 1-64 characters.
• Valid characters: A-Z, a-z, 0-9
• Valid special characters: space ( ),hyphen (-), underscore (_), andperiod (.)
Name or IP address Specify the name or the IP address of thedestination NAS.
Port number Specify a port number for the connection.Username Specify a username for the destination NAS.Password Specify the password.Path Specify a path for the backup recording data.
6. Optional: Click Test. QVR Pro tries to connect to the destination NAS with the specified credentials and then displays thetest result.
7. Click Next.
8. Select camera channels from the channel list.
9. Click Next.
10. Select one of the following backup plans.
Plan ActionBack up recording data in the last few days a. Select Back up recording data in the last few
days.
b. Specify the number of days.Back up recording data in a specific time range a. Select Back up recording data in a specific
time range.
b. Specify the start time and end time.
11. Specify a backup schedule.
a. Click Backup Schedule. The Backup Schedule window appears.
b. Select one of the schedule options.
QVP User Guide
Surveillance Settings 85

c. Specify the backup time or the interval between every backup.
d. Click Apply.
12. Optional: Select Perform the backup task immediately.
13. Select a recording type.
• Back up normal recordings only
• Back up event recordings only
• Back up both normal and event recordings
14. Select a recording format.
• Standard format (mp4)
• QVR Pro format (can be imported to other QVR Pro servers)
15. Configure backup rules.
a. Optional: Specify a retention period for the recording data.
b. Specify a storage policy in the event that the destination space is full.
16. Click Finish.
QVR Pro saves changes to the recording backup task.
Managing Recording Backup Tasks
1. Open Recording Storage from the desktop or main menu.
2. Go to Recording Backup.
3. Select a recording backup task from the task list.
4. Perform any of the following actions.
Action StepStart a task
Click .Stop a task Click .Delete a task a. Perform one of the following actions.
• Click .
• Click Delete.
A confirmation message appears.
b. Click OK.Enable a task
Click .Disable a task
Click .
QVP User Guide
Surveillance Settings 86
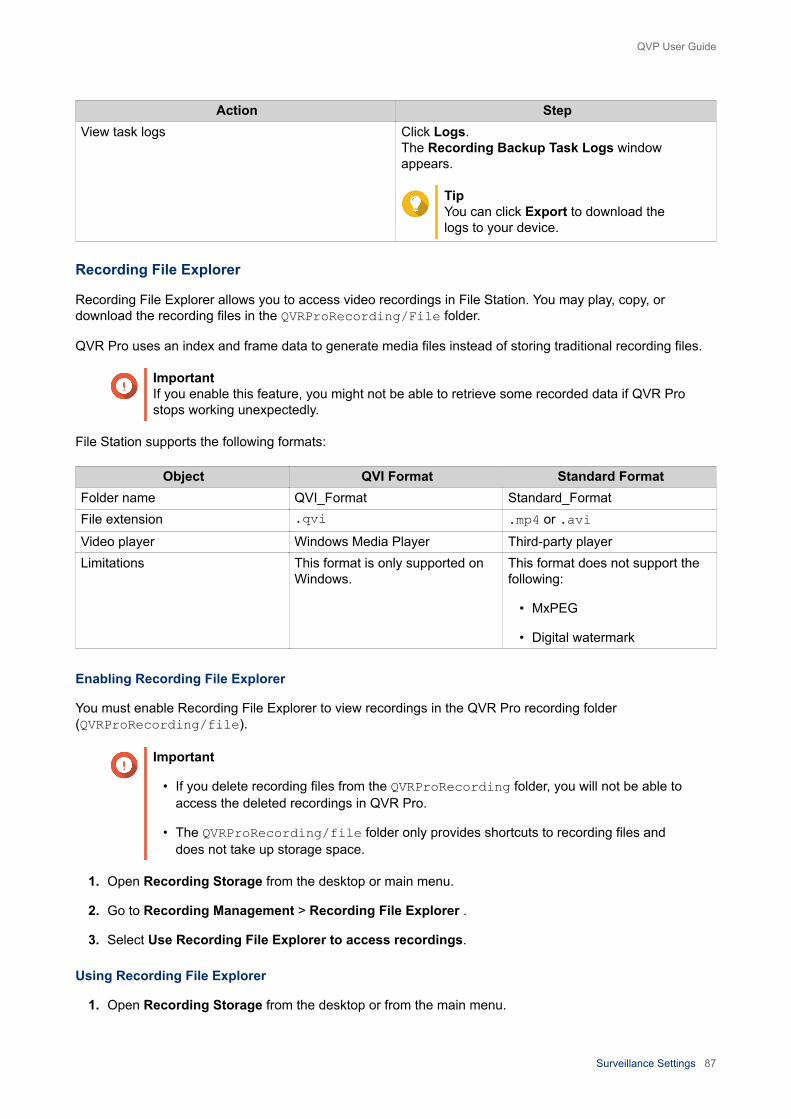
Action StepView task logs Click Logs.
The Recording Backup Task Logs windowappears.
TipYou can click Export to download thelogs to your device.
Recording File Explorer
Recording File Explorer allows you to access video recordings in File Station. You may play, copy, ordownload the recording files in the QVRProRecording/File folder.
QVR Pro uses an index and frame data to generate media files instead of storing traditional recording files.
ImportantIf you enable this feature, you might not be able to retrieve some recorded data if QVR Prostops working unexpectedly.
File Station supports the following formats:
Object QVI Format Standard FormatFolder name QVI_Format Standard_FormatFile extension .qvi .mp4 or .aviVideo player Windows Media Player Third-party playerLimitations This format is only supported on
Windows.This format does not support thefollowing:
• MxPEG
• Digital watermark
Enabling Recording File Explorer
You must enable Recording File Explorer to view recordings in the QVR Pro recording folder(QVRProRecording/file).
Important
• If you delete recording files from the QVRProRecording folder, you will not be able toaccess the deleted recordings in QVR Pro.
• The QVRProRecording/file folder only provides shortcuts to recording files anddoes not take up storage space.
1. Open Recording Storage from the desktop or main menu.
2. Go to Recording Management > Recording File Explorer .
3. Select Use Recording File Explorer to access recordings.
Using Recording File Explorer
1. Open Recording Storage from the desktop or from the main menu.
QVP User Guide
Surveillance Settings 87
2. Go to Recording Management > Recording File Explorer .
3. Click Open Recording File Explorer. File Station opens in a new tab or window.
4. Specify the duration of a single recording file.
You can play, copy, or download the recording files in the QVRProRecording/File folder. Recording filesare read-only.
WarningModifying, moving, or deleting the files in the QVRProDB and QVRProSpace_[volumename] folders will cause QVR Pro to malfunction.
Advanced SettingsRebuilding the Recording Index
QVR Pro allows you to rebuild the recording index to repair corrupted data. The index usually becomescorrupted when removing a volume with stored recordings.
1. Open Recording Storage from the desktop or from the main menu.
2. Go to Advanced Settings > Rebuild Recording Index . The Rebuild Recording Index screen appears.
3. Click Rebuild Recording Index.
4. Select the channel of the recording indexes that you want to rebuild.
5. Click Rebuild.
Event Management
The Event Management screen enables you to define rules that identify the types of events and actions thatwill be monitored in your organization.
Rules
A rule follows a schedule, and a set of events and actions. When the specified events occur within thespecified schedule, QVR Pro performs the corresponding actions.
Each rule must have at least one event and one action.
Component DescriptionName A rule name briefly describes the purpose of the rule.
For example, Start recording after detecting movement -lobby.
Schedule A schedule specifies the days of the week and the hours of the daythat QVR Pro monitors. There are default schedules available.However, you can create custom schedules as needed.
Event A predefined behavior or activity that usually signals a problem. Eachevent triggers a corresponding action or set of actions.For details, see Events.
QVP User Guide
Surveillance Settings 88

Component DescriptionAction A predefined response to an event. Each action is triggered by an
event or set of events.For details, see Actions.
Adding a Rule
Add a rule to monitor events and assign actions. Each rule follows a specified schedule, and a set of eventsand actions. When the events occur within the selected schedule, QVR Pro performs the correspondingactions.
You can also decide whether all events are required to occur within a specified period before applying theactions.
TipYou can add up to 128 rules.
1. Open Event Management from the desktop or from the main menu.
2. Click one of the following buttons.
Option Description+ Click to add your first rule.Add Click to add more rules.
The Add Rule screen appears.
3. Under Name, type the following information.
Field TaskName Type a name for the rule.Description Type a description that provides more detailed
information about the rule.
4. Select Enable rule.
5. Under Schedule, select a schedule.
NoteThe schedule indicates the hours and days when an event is considered valid. You can use thedefault settings or create custom schedules by clicking Add ( ).
6. Click Next. The Add Events and Actions screen appears.
7. Add an event.
a. Under If, click Add. The Add Event screen appears.
b. Complete the following information.
Field TaskName Type a name for the event.
QVP User Guide
Surveillance Settings 89

Field TaskType Select an event type.
For details, see Event Types.
TipYou can also copy an existing event from the eventslist.For details, see Events List.
Source Select the camera, server, or other event source to be monitored forthe specified events.
NoteThe options vary depending on the selected eventtype.
c. Click OK. You can add multiple events to one rule.
8. Add an action.
a. Under Then, click Add. The Add Action screen appears.
b. Complete the following information.
Field TaskName Type a name for the action.Type Select an event type.
For details, see Action Types.
TipYou can also copy an existing action from the actionslist.For details, see Actions List.
Target Select the target that receives the specified actions.
NoteThe options vary depending on the selected actiontype.You can choose to send the camera action toindividual cameras or to all cameras on the selectedserver. You can also send an email or SMS messageto the specified recipients.
c. Click OK. You can add multiple actions to one rule.
9. Optional: Select All events must occur within the specified period.
10. Click Next.
11. Click Finish.
QVP User Guide
Surveillance Settings 90

Enabling or Disabling a Rule
Enable or disable rules as required. Disabling a rule does not delete it from the rule list. You can choose toenable a rule again at a later time.
TipYou can also enable or disable a rule from the Edit Rule screen.
1. Open Event Management from the desktop or from the main menu.
2. Locate the rule from the list.
3. Under Status, perform one of the following steps.
Option TaskEnable Move the slider to the right.Disable Move the slider to the left.
Editing a Rule
Modify the rule information, events, and actions.
1. Open Event Management from the desktop or from the main menu.
2. Locate a rule from the list and then click Edit ( ). The Edit Rule screen appears.
3. Optional: Perform any of the following tasks.
• Modify the rule name.
• Modify the description.
• Select or deselect Enable rule.
• Modify the schedule.
TipYou can also add, edit, or delete a schedule from this screen.
4. Modify the list of events and actions. For details, see Editing Events and Actions.
5. Click Apply.
Editing Events and Actions
1. Go to Event Management > Edit > Events and Actions . The Events and Actions tab appears.
2. Optional: Under If, you can perform any of the following tasks.
• Click Add and then follow the steps for adding an event.
• Click Edit ( ) and then modify the event details.
• Click Remove ( ) or select the event and then click Remove.
QVP User Guide
Surveillance Settings 91

3. Optional: Under Then, you can perform any of the following tasks.
• Click Add and then follow the steps for adding an action.
• Click Edit ( ) and then modify the action details.
• Click Remove ( ) or select an action and then click Remove.
4. Click Apply.
Deleting a Rule
Delete a rule to remove it from the rule list.
1. Click Event Management from the desktop or from the main menu.
2. Locate a rule from the list and then click Remove ( ). A confirmation message appears.
3. Click OK. The rule is deleted from the list.
Events
In QVR Pro, an event is a predefined behavior or activity that usually signals a problem. Each event triggersa corresponding action or set of actions.
Event Types
QVR Pro supports the following event types detected by the camera.
Camera
Event DescriptionMotion Detection Triggers the specified actions when a moving object is detected.Alarm Input Triggers the specified actions when the camera's alarm sensors go off.Audio Detection Triggers the specified actions when the audio exceeds the specified
decibel level.You must configure the settings on the camera web page.
Cross Line Triggers the specified actions when an object crosses the specifiedline.You must configure the settings on the camera web page.
Intrusion Detection Triggers the specified actions when an object intrudes the specifiedarea.You must configure the settings on the camera web page.
Tampering Detection Triggers the specified actions when the camera is tampered with.PIR Detection Triggers the specified actions when the camera's embedded passive
infrared sensor (PID) detects an object.You must configure the settings on the camera web page.
Connection Error Triggers the specified actions when QVR Pro encounters issuesconnecting to a camera.
Reconnection Triggers the specified actions when QVR Pro successfully reconnectsto a camera after disconnection.
QVP User Guide
Surveillance Settings 92

QVR Pro supports the following event types detected by the recording storage.
Recording Storage
Event DescriptionRecording Space Error Triggers the specified actions when a recording space error occurs.Recording Space Warning Triggers the specified actions when a recording space warning is
displayed.Recording Space Full Triggers the specified actions when the recording space is full.Recording Space Restored Triggers the specified actions when the recording space has been
restored after an error.
QVR Pro supports the following customized event types.
Customized Event
Event DescriptionEvent URL Triggers the specified actions when QVR Pro receives an event
notification from a third-party interface.
Events List
The Events List screen displays all events that are already in use. You can reuse and modify any event fromthe list without affecting the original event.
Actions
In QVR Pro, an action is a predefined response to an event. Each action is triggered by an event or set ofevents.
Action Types
QVR Pro supports the following action types.
Camera
Action DescriptionEvent Recording Starts recording when the specified event or set of events is triggeredAlarm Output Performs the specified alarm output type when the specified event or
set of events is triggeredFor details on modifying the alarm output settings, see Event Settings.
Camera Control Adjusts the PTZ (pan, tilt, zoom) camera to the specified presetposition
Notification
Action DescriptionPush Notification Displays messages on a mobile device when a warning or error event
occursTo use this feature, you must first set up myQNAPcloud.
QVP User Guide
Surveillance Settings 93

Action DescriptionEmail Sends an email to the predefined list of recipients
You can take and attach event snapshots to emails from up to 16channels.
SMS Sends an SMS message to the predefined list of recipients
Custom
Action DescriptionAction URL Sends QVR Pro event notifications to third-party applications
Actions List
The Actions List screen displays all actions that are already in use. You can reuse and modify any actionfrom the list without affecting the original action.
Motion Detection
Motion Detection enables you to detect moving objects or people in the monitored area. You can chooseeither QVR Pro or the camera itself as the detector (if the camera supports motion detection). This featuresupports up to 2 camera channels.
Editing Motion Detection Settings
1. Open Motion Detection from the desktop or from the main menu. The Motion Detection screen appears.
2. Under Detection Settings, click Edit.
NoteEdit becomes Completed after the detection settings are configured.
The Motion Detection Settings screen appears.
3. Select a motion detector.
• Using the camera itself as the detector
1. Select Camera.
2. Optional: Click Camera Settings.
3. Optional: Specify your username and password for the camera.
4. Optional: Modify the settings.
• Using QVR Pro as the detector
1. Select QVR Pro.
2. Specify the sensitivity.
3. Select the minimum detectable movement.
4. Specify the detection zone.Select Full to enable motion detection on the entire frame.
QVP User Guide
Surveillance Settings 94

Select Regional and click Edit to specify one or more detection zones. You can then create,resize, or delete detection zones.
NoteFor cameras that do not support motion detection, QVR Pro is the only detector option.
4. Click Apply.
After detection settings are configured, motion detection can be used in event rules as an event that triggersspecified actions. For details, see Rules.
Recovery Management
The Recovery Management screen displays the following information when edge recording is enabled.
Tab DescriptionRecording Status • Displays the list of cameras that have edge recording enabled
• Displays the edge recording statusRecovery Status Displays the recovery status of lost videos
Metadata Vault
The Metadata Vault screen includes the following tabs.
Tab Possible User ActionsData Source List • Click Add Data Source to select a data source that will send
metadata to QVR Pro.
• Click Camera Pairing ( ) beside a data source to configurecamera pairing.
•Click OSD Settings ( ) to configure the on-screen display (OSD)settings for the metadata.
• Click Edit ( ) to modify the data source settings.
• Click Remove ( ) to delete a data source from the list.
• Enable or disable the data source.Metadata List View the list of metadata from data sources connected to QVR Pro.
QVP User Guide
Surveillance Settings 95

6. Privilege Settings
Users
Creating a Local User
1. Go to Control Panel > Privilege > Users . The Users screen appears.
2. Click Create, and then select Create a User. The Create a User window opens.
3. Specify the following information:
Field DescriptionUsername Specify a username that contains 1 to 32 characters from any of
the following groups:
• Letters: A to Z, a to z
• Numbers: 0 to 9
• Multi-byte characters: Chinese, Japanese, Korean, andRussian
• Special characters: ~ ! @ # $ ^ & ( ) - _ . { }Password Specify a password that contains 1 to 64 ASCII characters.Phone number (optional) The information is for your reference and is not used by QVR Pro.Email (optional) QVR Pro sends a notification to this email address when the
account password is going to expire.(Optional) Send a notificationmail to the newly created user
When selected, QVR Pro sends a message that contains thefollowing information to the specified email address.
• URLs for connecting to the NAS
• Username and password
4. Optional: Add the user to one or more user groups.
a. Under User Groups, click Select User Group.
b. Select one or more user groups. QVR Pro provides two default user groups.
User Group DescriptionAdministrators Users in this group can configure settings, create users, and install
applications.Everyone All users created from QVR Pro are automatically assigned to this
group.By default, users in this group do not have access to QVR Pro settings.
TipYou can click Create User Group to add a new user group.For details, see Creating a User Group.
QVP User Guide
Privilege Settings 96

c. Click OK.
5. Optional: Specify the user privileges.
a. Under User Privileges, click Specify User Privileges.
b. Specify the features that the user can access. For details, see Editing User Privileges.
c. Click OK.
6. Optional: Specify the user role.
a. Under Role, click Select User Role.
b. Select one or more roles.
Tip
• You can click Preview User Privilege to view the privileges currently granted to this user.
• You can click Create to add a new role.For details on creating a new role, see Creating a Role.
c. Click OK.
7. Click Create.
QVR Pro creates and adds the user to the user list.
Creating Multiple Users
1. Go to Control Panel > Privilege > Users . The Users screen appears.
2. Click Create and then select Create Multiple Users. The Create Multiple Users window opens.
3. Specify the following information:
Field DescriptionUser Name Prefix Specify the prefix that will be used for the user names.User Name Start No. Specify the start number. The numbers are automatically appended
to the specified user name prefix.Number of Users Specify the number of users that you want to create.Password Specify a password that contains 1 to 64 ASCII characters.Verify Password Type the previously specified password.Show password When selected, QVR Pro displays the password.
4. Optional: Specify the user privileges.
a. Under User Privileges, click Edit.
b. Specify the features that the user can access. For details, see Editing User Privileges.
c. Click OK.
QVP User Guide
Privilege Settings 97
5. Optional: Specify the user roles.
a. Under Role, click Edit.
b. Select one or more roles.
Tip
• You can click Preview User Privilege to view the privileges currently granted to this user.
• You can click Create to add a new role.For details on creating a new role, see Creating a Role.
c. Click OK.
6. Click Create.
QVR Pro creates and adds the users to the user list.
Importing or Exporting Users
1. Go to Control Panel > Privilege > Users . The Users screen appears.
2. Click Create and then select Import/Export Users. The Import/Export Users window opens.
3. Perform one of the following tasks.
Task StepsImporting user and user groupsettings
a. Select Import user and user group settings
b.Click and then select a TXT, CSV, or BIN file thatcontains the user information.
c. Optional: Select Overwrite duplicate users.
d. Click Next.A confirmation message appears.
e. Click Next.
f. Click Finish.
QVR Pro imports the user and user group settings specified in theuploaded file.
Exporting user and user groupsettings
a. Select Export user and user group settings.
b. Click Next.
QVR Pro downloads a file that contains the user and user groupsettings on this server.
Editing User Privileges
1. Go to Control Panel > Privilege > Users . The Users screen appears.
QVP User Guide
Privilege Settings 98

2.Click Edit User Privilege ( ).
NoteYou are not able to modify the user privileges of the admin account.
The Edit User Privilege screen appears.
3. Select Allow or Deny for each of the following privileges.
ImportantAllow: grants users access to features or operations.Deny: denies users access to features or operations.When none of the options is selected, the privilege is not enabled.The access rights of users depend on their user privileges, roles, and user groups. Denypermissions always override any other Allow permissions when conflicts arise between thesettings.
Privilege DescriptionSystem Management Specify whether users are allowed to manage the following
management settings.
• System management
• Surveillance management
• E-map management
• View management
• Logs and Metadata VaultCamera Specify whether users are allowed to access the following features
on each camera.
• Live view
• Playback
• Audio
• PTZ controlE-maps Specify the e-maps that users can access.Views Specify the layouts that users can access.
4. Click OK.
User Groups
Creating a User Group
1. Go to Control Panel > Privilege > User Groups . The User Groups screen appears.
2. Click Create. The Create a User Group window opens.
3. Specify the following information:
QVP User Guide
Privilege Settings 99
• User group name: The name must contain 1 to 128 characters, and cannot include the followingcharacters: ` * @ = + [ ] \ | ; : " , < > / ? % ' SPACE.
• Description: The description must contain 1 to 128 ASCII characters.
4. Optional: Add users to the user group.
a. Under Assign users to this group, click Select Group Members.
b. Select one or more users.
c. Click Apply.
5. Optional: Specify the group privileges.
a. Under Group Privilege, click Edit Group Privileges.
b. Specify the privileges for the user group.
c. Click Apply.
6. Optional: Specify the group role.
a. Under Role, click Select Group Role.
b. Select one or more roles.
Tip
• You can click Preview Group Privilege to view the privileges currently granted to this usergroup.
• You can click Create to add a new role.For details on creating a new role, see Creating a Role.
c. Click Apply.
7. Click Create.
QVR Pro creates and adds the user group to the group list.
Roles
Administrators can create roles to quickly assign privileges to different users.
Creating a Role
1. Go to Control Panel > Privilege > Roles . The Roles screen appears.
2. Click Create. The Create Role screen appears.
3. Specify the following information:
Field DescriptionRole Specify a role name that contains 1 to 32
characters from any of the following groups:
• Letters: A to Z, a to z
QVP User Guide
Privilege Settings 100
• Numbers: 0 to 9
• Special characters: ~ ! @ # $ ^ & ( ) - _ . { }Description The description must contain 1 to 128 ASCII
characters.
4. Select Allow or Deny for each of the following privileges.
Privilege DescriptionSystem Management Specify whether users are allowed to manage the following
management settings.
• System management
• Surveillance management
• E-map management
• View management
• Logs and Metadata VaultCamera Specify whether users are allowed to access the following features
on each camera.
• Live view
• Playback
• Audio
• PTZ controlE-maps Specify the e-maps that users can access.Views Specify the layouts that users can access.
5. Click OK. QVR Pro creates and adds the role to the role list.
Privilege Summary
QVR Pro provides privilege summaries for users, user groups, roles, cameras, e-maps, and views.
Generating a Privilege Summary
1. Go to Control Panel > Privilege > Privilege Summary . The Privilege Summary screen appears.
2. Specify the search criteria.
ImportantThe options vary depending on the selected information.
3. Click OK. QVR Pro generates the privilege summary.
4. Optional: Click Export. QVR Pro exports the report as an HTML file and then downloads a copy to your computer.
QVP User Guide
Privilege Settings 101

7. myQNAPcloudmyQNAPcloud is a service that allows you to access, manage, and share files stored on your QNAP devicesremotely through the internet.
Getting Started
1. Create a QNAP ID. For details, see Creating a QNAP ID.
2. Add a NAS to myQNAPcloud. For details, see Registering a Device to myQNAPcloud.
3. Optional: Configure any of the following settings.
Settings DescriptionPort forwarding Port forwarding allows you to access your device on the internet through a
UPnP router. For details, see Configuring Port Forwarding.My DDNS My DDNS allows you to specify a dedicated myQNAPcloud subdomain name
that you can use to access your device on the internet. For details, seeConfiguring My DDNS Settings.
Published services You can publish QNAP services on your device, such as the QNAP desktop andFile Station, so they can be accessible on myQNAPcloud. For details, seeConfiguring Published Services.
myQNAPcloud Link myQNAPcloud Link allows you to access your device on the myQNAPcloudwebsite or through mobile apps and client utilities without changing your routersettings. Using shared links, you can also simultaneously download and syncfiles to a remote NAS without needing to first save them to client device.For details, see Enabling myQNAPcloud Link.
Access controls Access controls allow you to configure device access permissions formyQNAPcloud users. For details, see Configuring Device Access Controls.
SSL certificates myQNAPcloud allows you to add SSL certificates to help secure your networkcommunication. You can either download and install a myQNAPcloud or Let'sEncrypt ceritificate. For details, see Installing an SSL Certificate.
Creating a QNAP ID
1. Go to https://www.myqnapcloud.com.
2. Click Sign up. The Create Account screen appears.
3. Specify a nickname, a valid email address or phone number, and a password.
4. Read and acknowledge the Terms of Service and Privacy Policy.
5. Click Sign Up. The Data Privacy Notice box appears.
6. Read the notice, and then click I Agree. myQNAPcloud sends a verification email or message.
7. Confirm the registration. Your QNAP ID is activated.
QVP User Guide
myQNAPcloud 102

Registering a Device to myQNAPcloud
1. Log on to QVP as administrator.
2. Go to myQNAPcloud > Overview .
3. Click Get Started. The myQNAPcloud wizard appears.
4. Click Start.
5. Specify your QNAP ID and password.
6. Click Next.
7. Specify a device name containing up to 30 alphanumeric characters. You may reuse an existing device name. The device currently using this name will be deregistered frommyQNAPcloud.
8. Click Next.
9. Select the services you want to enable. QNAP recommends selecting all services.
Service DescriptionAuto RouterConfiguration
This allows you to configure port forwarding. For details, see Configuring PortForwarding.
DDNS This allows you to access your device on the internet using a dedicatedaddress. For details, see Configuring My DDNS Settings.
Published Services This allows you to select which services you want to publish on themyQNAPcloud website. For details, Configuring Published Services.
myQNAPcloud Link myQNAPcloud Link allows you to access your device on the myQNAPcloudwebsite or through mobile apps and client utilities without changing your routersettings. Using shared links, you can also simultaneously download and syncfiles to a remote NAS without needing to first save them to client device. Fordetails, see Enabling myQNAPcloud Link.If you enable this option and your device does not have myQNAPcloud Link,myQNAPcloud Link will automatically be downloaded and installed after youclick Next.
10. Select an access control option.
Option DescriptionPublic All users can search for your device and view the published services on the
myQNAPcloud website.Private Your device will not appear in the search results. Only you can access your
device on the myQNAPcloud website.Customized Your device will only be visible to you and invited users. Other users will not be
able to access your device even with a SmartURL.
11. Click Next. myQNAPcloud applies your settings.The Summary screen appears.
12. Review the details, and then click Finish.
QVP User Guide
myQNAPcloud 103

Overview
The Overview screen displays your basic myQNAPcloud settings, as well as the device network connectivityand DDNS status.
Status Icon DescriptionThe item is enabled and functioning properly.
The item is disabled.
One or more settings need to be configured for the item to function properly.
There is no network connectivity.
Button DescriptionClick this to view your QNAP ID details.
Click this to sign out of myQNAPcloud.
Click this to modify your device name.
Click this to copy the SmartURL to your clipboard.
Click this to open the myQNAPcloud FAQ page on your browser.
Click this to diagnose connection problems.
Test Click this to test the internet connectivity.
Configuring Port Forwarding
Port forwarding is only available if your router supports UPnP.
1. Go to Auto Router Configuration.
QVP User Guide
myQNAPcloud 104

2. Select Enable UPnP port forwarding. Your device scans for UPnP routers on the network.
TipIf your device cannot locate the router, click Rescan. If the issue persists, click Diagnostics,and then verify your network configuration or contact QNAP support through Helpdesk.
3. Optional: Add a new service to the Forwarded Services table.
a. Click Add NAS Service. The Add NAS Service window appears.
b. Specify a NAS service name that contains 1 to 64 ASCII characters.
c. Specify a port number.
d. Select an external port setting.
• Auto: myQNAPcloud automatically selects an available external port.
• Manual: You can specify a new port if the current service port is being used by otherservices.
e. Select a protocol. If you are unsure about this setting, select TCP.
f. Click OK.
4. In the Forwarded Services table, select the services you want to forward.
5. Click Apply to Router.
TipYou can go to Overview to verify that there are no connectivity errors.
Configuring My DDNS Settings
1. Open myQNAPcloud.
2. Go to My DDNS.
3. Enable My DDNS.
4. Perform any of the following tasks.
Task User ActionChange themyQNAPcloud DDNSdomain name
a. Click here.The Change Device Name Wizard appears.
b. Specify a device name containing up to 30 alphanumeric characters.
c. Click Apply.Update myQNAPcloud Click Update.
QVP User Guide
myQNAPcloud 105

Task User ActionManually configure theDDNS IP address
a. Click Click here to manually configure your DDNS IP address.The Public IP Address window appears.
b. Select an option.
• Assign a static IP address
• Obtain an IP address automatically
c. Click Apply.
Configuring Published Services
1. Open myQNAPcloud.
2. Go to Published Services.
3. In the Publish column, select all the services you want published. Published services are accessible through the myQNAPcloud website.
4. Optional: In the Private column, select all the services you want publish privately. Private services are only available to specified users with the access code.
a. Specify an access code containing 6 to 16 alphanumeric characters.
b. In the User Management table, select the users you want to grant access to. You can select a maximum of 9 users.
TipClick Add Users to add users to the list.Click Delete to remove users from the list.
c. Optional: Modify user access privileges.
Option DescriptionmyQNAPcloud Connect (VPN) Select this option to grant users access to private NAS services
when they use the myQNAPcloud Connect utility.Users can download myQNAPcloud Connect from the QNAPUtilities page (https://www.qnap.com/en/utilities/essentials).
myQNAPcloud Website Select this option to grant users access to private NAS servicespublished in the myQNAPcloud website (https://www.myqnapcloud.com/).
5. Click Apply.
Enabling myQNAPcloud Link
1. Open myQNAPcloud.
2. Go to myQNAPcloud Link.
3. Enable myQNAPcloud Link.
TipIf there are issues with the connection, click Reconnect.
QVP User Guide
myQNAPcloud 106
Configuring Device Access Controls
1. Open myQNAPcloud.
2. Go to Access Control.
3. Select an access control option.
Option Description User ActionPublic All users can search for your device and
view the published services on themyQNAPcloud website.
Select Public.
Private Your device will not appear in the searchresults. Only you can access your deviceon the myQNAPcloud website.
Select Private.
Customized Your device will only be visible to you andinvited users. Other users will not be able toaccess your device even with a SmartURL
a. Select Customized.
b. Optional: Add a user.
1. Click Add.
2. Specify the user's email address orphone number.
3.Click .
c. Optional: Remove a user.
• From the list of users, identify auser you want to remove.
• Click
.
4. Click Apply.
Installing an SSL Certificate
ImportantmyQNAPcloud SSL web service and Let's Encrypt certificates can only be used with themyqnapcloud domain.
1. Open myQNAPcloud.
2. Go to SSL Certificate.
3. Download and install a certificate.
QVP User Guide
myQNAPcloud 107

Type Description User ActionmyQNAPcloudSSL webservicecertificate
This certificate provides a secureenvironment for exchanging confidentialinformation online and confirms the identityof your site to employees, businesspartners, and other users.You can purchase certificates on themyQNAPcloud website.
a. Under myQNAPcloud SSLCertificate, click Download andinstall.The Download & Install SSLCertificate window appears.
b. Select a license from the list.A notification appears if you have notyet purchased a myQNAPcloudcertificate.
Let's Encryptcertificate
Let's Encrypt is a free, automated, andopen certificate authority that issuesdomain-validated security certificates. Youcan install Let's Encrypt certificates with themyQNAPcoud DDNS service. You canchoose to automatically renew thiscertificate before it expires.
a. Under Let's Encrypt, click Downloadand install.The Download & Install SSLCertificate window appears.
b. Specify a valid email address.This address is required for the Let'sEncrypt account registration.
c. Optional: Select Automatically renewdomain before expiration.
4. Click Confirm. myQNAPcloud applies the certificate and displays the details.
TipTo delete the certificate from the device, click Release and then Confirm.
QVP User Guide
myQNAPcloud 108

8. File Station
Overview
About File Station
File Station is a file management application that allows you to access files on the NAS. You can quicklylocate files and folders, manage access permissions, play media files, and share data with other users.
System Requirements
Category DetailWeb browser • Microsoft Internet Explorer 9 or later
• Microsoft Edge
• Mozilla Firefox 3.6 or later
• Apple Safari 5 or later
• Google ChromeJava program Java Runtime Environment (JRE) 7 or laterFlash player Adobe Flash Player 9 or later is required for viewing
media files.
Supported File Formats
Category File ExtensionImage • BMP
• JPG
• JPE
• PNG
• TGA
• GIFMusic • MP3
• FLAC
• OGG
• WAV
• AIF
• AIFFVideo • AVI
• MP4
QVP User Guide
File Station 109

Parts of the User InterfaceLeft Panel
Label UI Element Description1 Volume Displays all the folders on the volume, including shared
folders. Default shared folders vary depending on the NASmodel.
2 Favorites Displays bookmarked folders.3 Share link management Displays links to NAS files shared by the current user
account.
NoteAdministrators see links shared by all NASusers.
4 Shared with me Displays files and folders shared with the current useraccount.
5 Recycle Bin Displays deleted files and folders.
QVP User Guide
File Station 110

Toolbar
Label Item Description1 Search Search files and folders by their name or type.
TipYou can select Advanced Search to specify morecriteria.
2 Refresh Refresh the current page.3 Smart Filter Filter files and folders based on the specified criteria.4 More Settings Configure File Station settings, open the Help guide, or view
application information.5 Browsing Mode Select a browsing mode.6 Create folder Create a folder7 Copy Copy the selected files and folders.
NoteThis button only appears when a file or folder isselected.
8 Upload Upload files or folders to the selected shared folder.9 More Actions Perform different tasks.
NoteSome task options only appear when you selectcertain types of files.
10 Share Share the selected files and folders.
NoteThis button only appears when a file or folder isselected.
SettingsModifying General Settings
1. Click on the top-right corner.
2. Select Settings. The Options window appears.
QVP User Guide
File Station 111

3. Select General.
4. Modify the following settings.
Option DescriptionShow hidden files on NAS File Station displays files and folders.Allow all users to create shared links All users can share data from the NAS using shared
links.Show Network Recycle Bin(s) File Station displays the @Recycle folder in all user
folders.
5. Click Close.
Modifying File Transfer Settings
1. Click on the top-right corner.
2. Select Settings. The Options window appears.
3. Select File Transfer.
4. Under Duplicate File Name Policy, specify policies for handling duplicate files.
Scenario PolicyWhen uploading files • Always ask me
• Rename duplicate files
• Skip duplicate files
• Overwrite duplicate filesWhen copying or moving files • Always ask me
• Rename duplicate files
• Skip duplicate files
• Overwrite duplicate files
5. Optional: Select Always merge all file transfer processes into one task.
6. Under Google Drive File Transfer Policy, specify policies for handling Google Drive files.
Scenario PolicyWhen downloading or moving Google Drive files • Always ask me
• Download as Microsoft Office file formats(.docx, .pptx, .xlsx)
• Keep Google Drive file formats
QVP User Guide
File Station 112

Scenario PolicyWhen downloading a single Google Drive file to myPC
• Always ask me
• Download as Microsoft Office file formats(.docx, .pptx, .xlsx)
• Keep Google Drive file formats
7. Click Apply.
8. Click Close.
Modifying Document Settings
1. Click on the top-right corner.
2. Select Settings. The Options window appears.
3. Select Documents.
4. Under Microsoft Office File Policy, specify policies for handling Microsoft Office files.
File Format PolicyFor .doc, .ppt, .xls files • Always ask me
• View in Google docs
• Open with Chrome Extension
• Open with web browserFor .docx, .pptx, .xlsx files • Always ask me
• Edit with Office Online
• View in Google docs
• Open with Chrome Extension
• Open with web browser
5. Click Apply.
6. Click Close.
File Operations
File Station enables you to perform the following tasks.
Operation TaskStore • Uploading a File
QVP User Guide
File Station 113

Operation TaskAccess • Downloading a File
• Opening a File
• Opening Microsoft Word, Excel, and PowerPoint Files Using theChrome Extension
• Viewing a File in Google Docs
• Viewing a File in Microsoft Office Online
• Viewing File Properties
• Modifying File PermissionsOrganize • Sorting Files
• Copying a File
• Moving a File
• Renaming a File
• Deleting a File
• Restoring a Deleted File
• Compressing a File
• Extracting Compressed Files or FoldersShare • Sharing a File or Folder Using Share LinksPlay • Playing an Audio File
• Playing a Video File
• Opening a 360-degree Image or Video File
Uploading a File
1. Open File Station.
2. Perform one of the following actions.
Action StepsUse the toolbar a.
Click and then select File.The File Upload window opens.
b. Select the file and then click Open.Use drag and drop a. Locate the file on your computer.
b. Drag and drop the file to the File Station window.
A confirmation message appears.
3. Select one of the following policies for handling duplicate files.
QVP User Guide
File Station 114

Option DescriptionRename duplicate files Upload and rename a file if another file with the same name and
extension already exists in the destination folder.Skip duplicate files Do not upload a file if another file with the same file name and
extension already exists in the destination folder.Overwrite duplicate files Upload the file and then overwrite an existing file with the same
name and extension in the destination folder.
TipYou can set the selected option as the default policy. File Station will not ask again afterremembering the setting. You can still change the policy in File Station > More Settings > Settings > File Transfer .
4. Click OK. File Station uploads the file.
Downloading a File
1. Open File Station.
2. Locate the file.
3. Perform one of the following actions.
Action StepsUse the toolbar a. Select the file.
b.Click .
c. Select Download.
d. Click OK.Use the context menu Right-click the file and then click Download.
Depending on your browser, a confirmation message appears before the file is downloaded to yourcomputer.
Opening a File
1. Open File Station.
2. Locate the file.
3. Perform one of the following actions.
QVP User Guide
File Station 115

Action StepsUse the toolbar a. Select the file.
b.Click .
c. Select Open.Use the context menu Right-click and then select Open.Open the file directly Double-click the file.
Note
• File Station performs various actionsdepending on the type of theselected file.
• For document files, you can choosean action from the following options.
• Edit with Office Online
• View in Google Docs
• Open with Chrome Extension
• Open with web browser
File Station opens the selected file.
Opening Microsoft Word, Excel, and PowerPoint Files Using the Chrome Extension
This task requires that you use the Google Chrome browser and install the Office Editing for Docs, Sheets &Slides extension.
1. Open File Station.
2. Locate the file.
3. Perform one of the following actions.
Action StepsUse the toolbar a. Select the file.
b.Click .
c. Select Open with Chrome Extension.Use the context menu Right-click the file and then select Open with Chrome Extension.
File Station opens an editable file on Google Docs, Sheets, or Slides.
Viewing a File in Google Docs
This task requires that you use the Google Chrome browser and enable myQNAPcloud Link onmyQNAPcloud.
QVP User Guide
File Station 116
You can open and view files in Google Docs. To use this feature, your web browser must allow pop-upwindows.
1. Open File Station.
2. Locate the file.
3. Perform one of the following actions.
Action StepsUse the toolbar a. Select the file.
b.Click .
c. Select View in Google docs.Use the context menu Right-click and then select View in Google docs.
File Station opens a preview of the file in Google Docs.
Viewing a File in Microsoft Office Online
This task requires that you enable myQNAPcloud Link on myQNAPcloud.
You can open and edit Microsoft Word, Excel, and Powerpoint files using Office Online. To use this feature,your web browser must allow pop-up windows.
NoteEditing a file in Microsoft Office Online overwrites the file saved on the NAS.
1. Open File Station.
2. Locate the file.
3. Perform one of the following actions.
Action StepsUse the toolbar a. Select the file.
b.Click .
c. Select Edit with Office Online.Use the context menu Right-click the file and then select Edit with Office Online.
File Station opens the file in Microsoft Office Online.
Viewing File Properties
1. Open File Station.
2. Locate the file.
3. Perform one of the following actions.
QVP User Guide
File Station 117

Action StepsUse the toolbar a. Select the file.
b.Click .
c. Select Properties.Use the context menu a. Right-click the file.
b. Select Properties.
The Properties window opens and displays the following information.
Field DescriptionType Displays the file type.Size Displays the file size.File Path Displays the folder location.Modified Date Displays the date that the file was last modified.Owner Displays name of the NAS user who uploaded the file.Group Displays the name of the NAS group that can access the file.Storage Pool Displays the name of the storage pool on which the volume is located.Volume Displays the name of the volume on which the file is stored.View Access Logs Keeps track of access to the file.
TipTo enable this feature, click Start Logging in ControlPanel > System > System Logs > SystemConnection Logs .
Modifying File Permissions
This task requires that you enable advanced folder permissions in Control Panel > Privilege > SharedFolders > Advanced Permissions .
1. Open File Station.
2. Locate the file.
3. Perform one of the following actions.
Action StepsUse the toolbar a. Select the file.
b.Click .
c. Select Properties.Use the context menu a. Right-click the file.
b. Select Properties.
The Properties window opens.
QVP User Guide
File Station 118

4. Click .
5. Enable or disable the following permissions for the owner, group, or other users on the list.
Permission DescriptionRead Only Allows a user to view the file.Read/Write Allows a user to view and make changes to the file.Deny Denies any access to the file.
TipYou can click + to add users to the list and click - to remove users from the list.
6. Optional: Select the access rights for guest users.
7. Optional: Specify the ownership of the file.
a. Click .
b. Select a user.
c. Click Set.
8. Click Apply.
Sorting Files
1. Open File Station.
2. Locate the folder.
3.Click .
4. Select List. File Station displays files in a list view.
5. Click a column title. File Station sorts files in an ascending or descending order based on the selected column.
Copying a File
1. Open File Station.
2. Locate the file.
3. Perform one of the following actions.
Action StepsUse the toolbar a. Select the file.
b.Click .
c. Select Copy to/Move to and then select Copy to.
d. Select the destination folder.
QVP User Guide
File Station 119

e. Click OK.Use the context menu a. Right-click the file.
b. Select Copy.
c. Go to the destination folder.
d. Right-click inside the folder and then select Paste.Use keyboard shortcuts a. Select the file.
b. Press CTRL + C or Command-C.
c. Go to the destination folder.
d. Press CTRL + V or Command-V.Use drag and drop a. Select the file.
b. Drag and drop to the destination folder.Step result: A context menu appears.
c. Select one of the following actions.
• Copy and skip
• Copy and overwrite
• Copy and rename automatically
File Station creates a copy of the selected file.
Moving a File
1. Open File Station.
2. Locate the file.
3. Perform one of the following actions.
Action StepsUse the toolbar a. Select the file.
b.Click .
c. Select Copy to/Move to and then select Move to.
d. Select the destination folder.
e. Click OK.a. Select the file.
b.Click .
c. Select Cut.
d. Select the destination folder.
QVP User Guide
File Station 120

e.Click .
f. Select Paste.Use the context menu a. Right-click the file and then select Copy to/Move to and
Move to.
b. Select the destination folder.
c. Click OK.a. Right-click the file and then select Cut.
b. Select the destination folder.
c. Right-click inside the folder and then select Paste.Use keyboard shortcuts a. Select the file.
b. Press CTRL + X or Command-X.
c. Go to the destination folder.
d. Press CTRL + V or Command-V.Use drag and drop a. Select the file.
b. Drag and drop to the destination folder.
c. Step result: A context menu appears.
d. Select one of the following actions.
• Move and skip
• Move and overwrite
• Move (and rename if a file exists with the same name)
File Station moves the selected file to the specified folder.
Renaming a File
1. Open File Station.
2. Locate the file.
3. Perform one of the following actions.
Action StepsUse the toolbar a. Select the file.
b.Click .
c. Select Rename.Use the context menu a. Right-click the file.
b. Select Rename.
QVP User Guide
File Station 121
Use a keyboard shortcut. Press F2.
4. Specify the file name and then click OK. File Station renames the file.
Deleting a File
1. Open File Station.
2. Locate the file.
3. Perform one of the following actions.
Action StepsUse the toolbar a. Select the file.
b.Click .
c. Select Delete.Use the context menu a. Right-click the file.
b. Select Delete.Use the keyboard Press Delete.
A confirmation message appears.
4. Specify how to delete the file.
• Move to Network Recycle Bin
• Delete permanently
5. Click OK. File Station either moves the selected file to the Recycle Bin or deletes it permanently.
Restoring a Deleted File
1. Open File Station.
2. Go to Recycle Bin.
3. Locate the file.
4. Perform one of the following actions.
Action StepsUse the toolbar a. Select the file.
b.Click .
c. Select Recover.Use the context menu a. Right-click the file.
b. Select Recover.
QVP User Guide
File Station 122

A confirmation message appears.
5. Click Yes. File Station restores the selected file.
Compressing a File
1. Open File Station.
2. Locate the file or folder.
3. Perform one of the following actions.
Action StepsUse the toolbar a. Select the file or folder.
b.Click .
c. Select Compress(Zip).Use the context menu a. Right-click the file or folder.
b. Select Compress(Zip).
4. Configure the file compression settings.
Option TaskArchive name Specify a name for the compressed file.Compression level Select the type of compression method.
• Normal - Standard compression
• Maximum compression - Prioritizes compression quality
• Fast compression - Prioritizes compression speedArchive format Select the format of file compression.
• zip
• 7zUpdate mode Specify how the files should be updated.
• Add and replace files - Add and replace the specified files.
• Update and add files - Update old files and add new files.
• Update existing files - Update older versions of existing files.
• Synchronize files - Update old files, add new files, andremove files that are no longer in the folder.
5. Optional: Specify a password to encrypt the file.
6. Click OK. File Station compresses the selected file and creates a archive file.
QVP User Guide
File Station 123
Extracting Compressed Files or Folders
1. Open File Station.
2. Locate the compressed archive file.
3. Perform one of the following actions.
Action StepsUse the toolbar a. Select the file.
b.Click .
c. Select Extract.Use the context menu a. Right-click the file.
b. Select Extract.
4. Select one of the following extraction options.
Option DescriptionExtract files Select specific files to extract.Extract here Extract all files in the current folder.Extract to /<new folder>/ Extract all files in a new folder.
The new folder uses the file name of the compressed file.
File Station extracts the compressed files to the specified folder.
Sharing a File or Folder Using Share Links
1. Open File Station.
2. Locate the file or folder.
3. Perform one of the following actions.
Action StepsUse the toolbar a. Select the file or folder.
b. Click Share.
c. Select Create share link only.Use the context menu a. Right-click the file or folder.
b. Select Share and then select Create share link only.
The Share window appears.
4. Configure the following settings.
Field TaskLink Name Type a name for the link or use the current file or folder name.
QVP User Guide
File Station 124

Domain name/IP Select the domain name or IP address.Show SSL in URL Use an HTTPS URL.File upload Allow users to upload files to this folder
NoteThis setting only appears when you share a folder.
Expire in Specify the expiration date.
NoteThis setting only appears when you share a folder.
Password Require a password to access the link.
5. Click Create Now. File Station generates a link.
Playing an Audio File
1. Open File Station.
2. Locate the file.
3. Perform one of the following actions.
Action StepsUse the toolbar a. Select the file.
b.Click .
c. Select Play.Use the context menu a. Right-click the file.
b. Select Play.
File Station plays the selected audio file using Media Viewer.
Playing a Video File
1. Open File Station.
2. Locate the file.
3. Perform one of the following actions.
Action StepsUse the toolbar a. Select the file.
b.Click .
c. Select Play.
d. Select a resolution.Use the context menu a. Right-click the file.
QVP User Guide
File Station 125

b. Select Play.
c. Select a resolution.
File Station plays the selected file using Media Viewer.
Opening a 360-degree Image or Video File
1. Open File Station.
2. Locate the folder.
3. Perform one of the following actions.
Action StepsUse the toolbar a. Select the file.
b.Click .
c. Select Play.Use the context menu a. Right-click the file.
b. Select Play.
4. Optional: Select the resolution.
File Station opens the selected file using the Media Viewer. You can click 360 Panorama Mode ( ) onMedia Viewer to view the photo or video in Panorama Mode.
Folder Operations
File Station enables you to perform the following tasks.
Operation TaskStore • Uploading a Folder
• Uploading a Folder Using Drag and DropAccess • Viewing Folder Properties
• Viewing Storage Information
• Modifying Folder Permissions
• Managing Share Links
• Viewing Files and Folders Shared with Me
QVP User Guide
File Station 126

Operation TaskOrganize • Creating a Folder
• Copying a Folder
• Adding a Folder to Favorites
• Removing a Folder from Favorites
• Compressing a Folder
Uploading a Folder
NoteThis feature is only available on Google Chrome browsers.
1. Open File Station.
2. Open the destination folder.
3.Click and then select Folder. The Browse for Folder window opens.
4. Select the folder to upload. A confirmation message appears.
5. Select one of the following policies for handling duplicate files.
Option DescriptionRename duplicate files Upload and rename a file if another file with the same name and
extension already exists in the destination folder.Skip duplicate files Do not upload a file if another file with the same file name and
extension already exists in the destination folder.Overwrite duplicate files Upload the file and then overwrite an existing file with the same
name and extension in the destination folder.
TipYou can set the selected option as the default policy. File Station will not ask again afterremembering the setting. You can change the policy later in File Station > More Settings > Settings > File Transfer .
6. Click OK. File Station uploads the selected folder.
Uploading a Folder Using Drag and Drop
NoteThis feature is only available on Google Chrome browsers.
1. Open File Station.
2. Drag and drop the local folder to File Station.
QVP User Guide
File Station 127

3. Select one of the following policies for handling duplicate files.
Option DescriptionRename duplicate files Upload and rename a file if another file with the same name and
extension already exists in the destination folder.Skip duplicate files Do not upload a file if another file with the same file name and
extension already exists in the destination folder.Overwrite duplicate files Upload the file and then overwrite an existing file with the same
name and extension in the destination folder.
4. Click OK. File Station uploads the selected folder.
Viewing Folder Properties
1. Open File Station.
2. Locate the folder.
3. Perform one of the following actions.
Action StepsUse the toolbar a. Select the folder.
b.Click .
c. Select Properties.Use the context menu a. Position the mouse pointer inside the folder.
b. Right-click the folder.
c. Select Properties.Use the left panel a. Right-click the folder.
b. Select Properties.
The Properties window opens and displays the following information.
Field DescriptionType Displays the folder type.Size
Click to display the folder size and total file count.File Path Displays the folder location.Modified Date Displays the date that the folder was last modified.Owner Displays name of the NAS user who uploaded the folder.Group Displays the name of the NAS group that can access the folder.Storage Pool Displays the name of the storage pool on which the volume is located.Volume Displays the name of the volume on which the folder is stored.
QVP User Guide
File Station 128

Field DescriptionView Access Logs Keeps track of access to the folder.
TipTo enable this feature, click Start Logging in ControlPanel > System > System Logs > SystemConnection Logs .
4. Click Apply.
Viewing Storage Information
1. Open File Station.
2. Locate the folder.
3. Perform one of the following actions.
Action StepsUse the toolbar a. Select the folder.
b.Click .
c. Select Storage Info.Use the context menu a. Right-click the folder.
b. Select Storage Info.
The Storage Info window opens and displays the following information.
Information DescriptionShared folder Displays the names of shared folders.Used size Displays the total storage size currently in use.Volume Displays the volume name.Capacity Displays the total storage capacity of the shared folder.Free size Displays the total available storage space in the shared folder.Volume status Displays the volume status.
Modifying Folder Permissions
This task requires that you enable advanced folder permissions in Control Panel > Privilege > SharedFolders > Advanced Permissions .
1. Open File Station.
2. Locate the folder.
3. Perform one of the following actions.
Action StepsUse the toolbar a. Select the folder.
QVP User Guide
File Station 129

b.Click .
c. Select Properties.Use the context menu a. Right-click the folder.
b. Select Properties.
The Properties window opens.
4. Click .
5. Enable or disable the following permissions for the owner, group, and other users on the list.
Permission DescriptionRead Only Allows a user to view the folder.Read/Write Allows a user to view and make changes to the folder.Deny Denies a user any access to the folder
TipYou can click + to add users to the list and click - to remove users from the list.
6. Optional: Select the access right for guest users.
7. Optional: Specify the ownership of the folder.
a. Click .
b. Select a user.
c. Click Set.
8. Optional: Enable one or more of the following settings if needed.
• Only the owner can delete the contents
• Only admin can create files and folders
• Apply changes to files and subfolders
• Apply and replace all existing permissions
9. Click Apply.
Managing Share Links
1. Open File Station.
2. On the left panel, click Share link management. File Station displays the list of shared files and folders.
3. Select an item from the list and then perform one of the following tasks.
Task Steps
QVP User Guide
File Station 130

Re-shareClick and then select the following share method.
• Sharing a File or Folder Using Share LinksStop sharing
Click .Copy the link to the clipboard
Click .
File Station performs the specified task.
Viewing Files and Folders Shared with Me
1. Open File Station.
2. On the left panel, click Shared with me.
File Station lists the files and folders shared with the current account. You can copy, open, or download aselected file or folder.
Creating a Folder
1. Open File Station.
2. Locate the destination folder.
3. Perform one of the following tasks.
Task StepsUse the toolbar a. Click
b. Select Folder.The Create folder window opens.
c. Specify the folder name.
d. Click OK.Use the context menu a. Right-click inside the folder and then select
Create folder.
b. Specify the folder name.
c. Click OK.
File Station creates a new folder.
Copying a Folder
1. Open File Station.
2. Locate the folder.
3. Perform one of the following actions.
QVP User Guide
File Station 131

Action StepsUse the toolbar a. Select the folder.
b.Click .
c. Select Copy to/Move to and then select Copy to.
d. Select the destination folder.
e. Click OK.Use the context menu a. Right-click the folder.
b. Select Copy.
c. Go to the destination folder.
d. Right-click inside the folder and then select Paste.
File Station creates a copy of the selected folder.
Adding a Folder to Favorites
1. Open File Station.
2. Locate the folder.
3. Perform one of the following actions.
Action StepsUse the toolbar a. Select the folder.
b.Click .
c. Select Add to Favorites.Use the context menu a. Right-click the folder.
b. Select Add to Favorites.Use the Favorites button a. Select the folder.
b. Click .
File Station adds the selected folder to the Favorites folder.
Removing a Folder from Favorites
1. Open File Station.
2. Locate the folder.
3. Perform one of the following actions.
Action Steps
QVP User Guide
File Station 132

Use the toolbar a. Select the folder.
b.Click .
c. Select Remove from Favorites.Use the context menu a. Right-click the folder.
b. Select Remove from Favorites.Use the Favorites button a. Select the folder.
b. Click .
File Station removes the selected folder from the Favorites folder.
Compressing a Folder
1. Open File Station.
2. Locate the folder.
3. Perform one of the following actions.
Action StepsUse the toolbar a. Select the folder.
b.Click .
c. Select Compress(Zip).Use the context menu a. Right-click the folder.
b. Select Compress(Zip).
4. Configure the folder compression settings.
Option TaskArchive name Specify a name for the compressed file.Compression level Select the type of compression method.
• Normal - Standard compression
• Maximum compression - Prioritizes compression quality
• Fast compression - Prioritizes compression speedArchive format Select the format of file compression.
• zip
• 7zUpdate mode Specify how the files should be updated.
• Add and replace files - Add and replace the specified files.
• Update and add files - Update old files and add new files.
QVP User Guide
File Station 133
• Update existing files - Update older versions of existing files.
• Synchronize files - Update old files, add new files, andremove files that are no longer in the folder.
5. Optional: Specify a password to encrypt the file.
6. Click OK. File Station compresses the selected folder and creates an archive file.
Deleting a Folder
1. Open File Station.
2. Locate the folder.
3. Perform one of the following actions.
Action StepsUse the toolbar a. Select the folder.
b.Click .
c. Select Delete.Use the context menu a. Right-click the folder.
b. Select Delete.Use the keyboard Press Delete.
A confirmation message appears.
4. Specify how to delete the folder.
• Move to Network Recycle Bin
• Delete permanently
5. Click OK. File Station either moves the selected folder to the Recycle Bin or deletes it permanently.
QVP User Guide
File Station 134
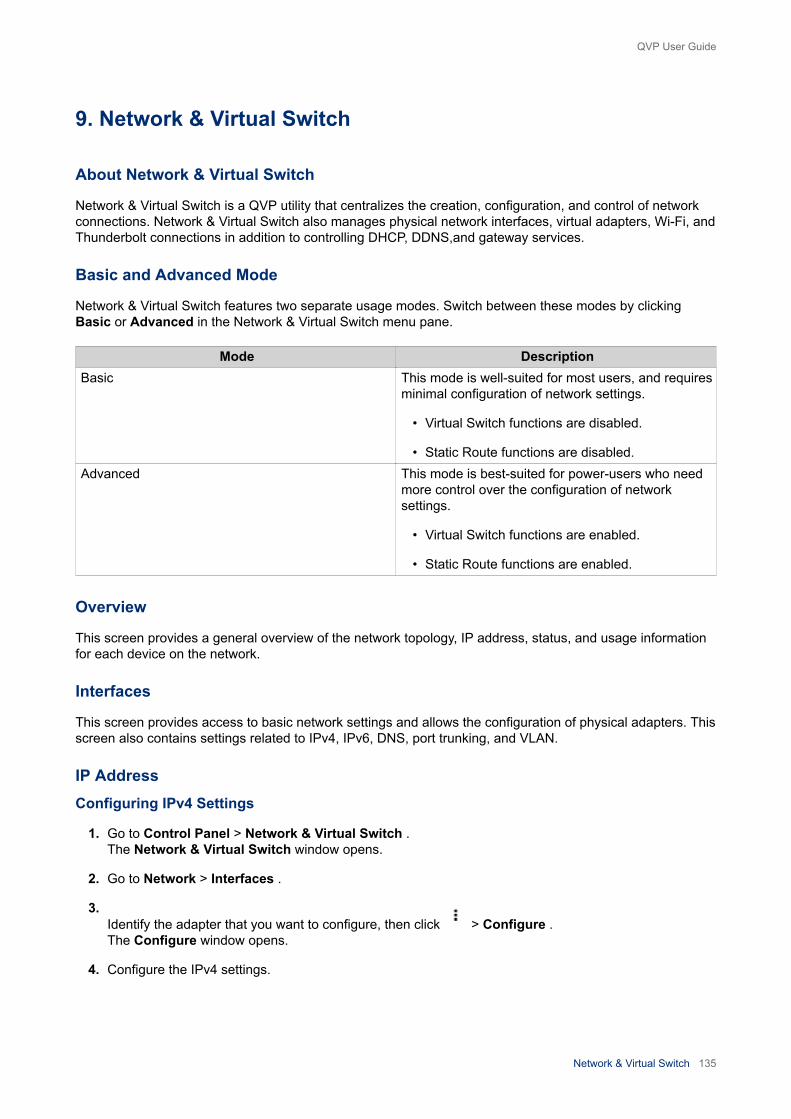
9. Network & Virtual Switch
About Network & Virtual Switch
Network & Virtual Switch is a QVP utility that centralizes the creation, configuration, and control of networkconnections. Network & Virtual Switch also manages physical network interfaces, virtual adapters, Wi-Fi, andThunderbolt connections in addition to controlling DHCP, DDNS,and gateway services.
Basic and Advanced Mode
Network & Virtual Switch features two separate usage modes. Switch between these modes by clicking Basic or Advanced in the Network & Virtual Switch menu pane.
Mode DescriptionBasic This mode is well-suited for most users, and requires
minimal configuration of network settings.
• Virtual Switch functions are disabled.
• Static Route functions are disabled.Advanced This mode is best-suited for power-users who need
more control over the configuration of networksettings.
• Virtual Switch functions are enabled.
• Static Route functions are enabled.
Overview
This screen provides a general overview of the network topology, IP address, status, and usage informationfor each device on the network.
Interfaces
This screen provides access to basic network settings and allows the configuration of physical adapters. Thisscreen also contains settings related to IPv4, IPv6, DNS, port trunking, and VLAN.
IP AddressConfiguring IPv4 Settings
1. Go to Control Panel > Network & Virtual Switch . The Network & Virtual Switch window opens.
2. Go to Network > Interfaces .
3.Identify the adapter that you want to configure, then click > Configure . The Configure window opens.
4. Configure the IPv4 settings.
QVP User Guide
Network & Virtual Switch 135

Setting DescriptionObtain IP address settings automatically via DHCP If the network supports DHCP, the adapter
automatically obtains the IP address and networksettings.
Use static IP address Manually assign a static IP address. You mustspecify the following information:
• Fixed IP Address
• Subnet Mask
• Default GatewayJumbo Frame Jumbo Frames are Ethernet frames that are larger
than 1500 bytes. They are designed to enhanceEthernet networking throughput, and to reduce CPUusage when transferring large files. QVP supportsthe following MTU sizes:
• 1500 bytes (default)
• 4074 bytes
• 7418 bytes
• 9000 bytes
Important
• All connected network devices mustenable Jumbo Frames and use thesame MTU size.
• Only certain NAS models supportJumbo Frames.
• Using Jumbo Frames requires anetwork speed of 1000 Mbps orfaster.
Network Speed Select the network transfer rate allowed by the NASnetwork environment.
TipSelecting Auto-negotiation willautomatically detect and set the transferrate.
ImportantThe Network Speed field isautomatically set to Auto-negotiationand hidden when configuring 10GbE &40GbE adapters.
5. Click Apply.
QVP User Guide
Network & Virtual Switch 136

Configuring IPv6 Settings
1. Go to Control Panel > Network & Virtual Switch . The Network & Virtual Switch window opens.
2. Go to Network > Interfaces .
3.Identify the adapter that you want to configure and then click > Configure . The Configure window opens.
4. Go to the IPv6 tab.
5. Configure the IPv6 settings.
Setting DescriptionDisable Do not assign an IPv6 address.IPv6 Auto-Configuration (Stateful) The adapter automatically acquires an IPv6 address
and DNS settings from the DHCPv6-enabled server.
ImportantThis option requires an availableDHCPv6-enabled server on thenetwork.
IPv6 Auto-Configuration (Stateless) The adapter automatically acquires an IPv6 addressand DNS settings from the router.
ImportantThis option requires an available IPv6RA(router advertisement)-enabledrouter on the network.
Use static IP address Manually assign a static IP address to the adapter.You must specify the following information:
• Fixed IP Address
• Prefix length
TipObtain the prefix length information fromyour network administrator.
• Default Gateway
6. Click Apply.
Configuring DNS Settings
1. Go to Control Panel > Network & File Services > Network & Virtual Switch . The Network & Virtual Switch window opens.
2. Go to Network > Interfaces .
3.Identify the adapter that you want to configure, then click > Configure . The Configure window opens.
QVP User Guide
Network & Virtual Switch 137

4. Go to the DNS tab.
5. Select one of the following options:
Setting DescriptionObtain DNS server address automatically Automatically obtain the IP address using DHCP.Use the following DNS server address Manually assign the IP address for the primary and
secondary DNS servers.
ImportantQNAP recommends specifying at leastone DNS server to allow URL lookups.
6. Click Apply.
Configuring Port Trunking
ImportantBefore configuring Port Trunking, ensure at least two network interfaces are connected tothe same switch.
1. Go to Control Panel > Network & File Services > Network & Virtual Switch . The Network & Virtual Switch window opens.
2. Go to Network > Interfaces .
3. Click Port Trunking. The Port Trunking window opens.
4. Click Add. The Port Trunking (Add) window opens.
5. Select two or more network interfaces to add to the trunking group.
6. Click Next.
7. Select a switch type.
8. Click Next.
9. Select a trunking mode.
ImportantSome port trunking modes must be supported by your network switches. Selecting anunsupported mode may affect network performance or cause the network interface to freeze.
Mode DescriptionFault Tolerance (Failover)Active-Backup All traffic is sent and received using the interface that was first added to the
trunking group. If this primary interface becomes unavailable, the secondaryinterface will become active.
Broadcast Transmits the same network packets to all the network interface cards.Load balancing & Failover
QVP User Guide
Network & Virtual Switch 138

Mode DescriptionBalance-tlb Incoming traffic is received by the current interface. If the interface fails, a slave
interface takes over the MAC address of the failed interface. Outgoing traffic isdistributed based on the current load for each interface relative to the interface'smaximum speed.
Balance-alb Similar to Balance-tlb, but offers additional load balancing for incoming IPv4traffic.
Balance-rr Transmits network packets sequentially to each network interface card in order todistribute the internet traffic among all the NICs.
Balance-xor Transmits network packets using the Hash algorithm, which selects the same NICslave for each destination MAC address.
802.3ad dynamic Uses a complex algorithm to aggregate NICs and configure speed and duplexsettings.
10. Click Apply.
System Default Gateway
The system default gateway serves as the network access point for the NAS. By default, all external networktraffic will pass through the gateway. A network interface must be specified for the default gateway.
Configuring the System Default Gateway
1. Go to Control Panel > Network & File Services > Network & Virtual Switch . The Network & Virtual Switch window opens.
2. Go to Network > Interfaces .
3. Click System Default Gateway. The System Default Gateway window opens.
4. Configure the system default gateway.
Setting DescriptionAuto-select system default gateway QVP automatically detects all adapter, virtual switch,
PPPoE, and VPN connections that can be used toconnect to the internet. It selects one of theseconnections and then sets it as the default gateway.
Select the system default gateway Manually assign an adapter to serve as the systemdefault gateway. Optionally, set a backup failovergateway. The failover default gateway field is onlyavailable when multiple interfaces are connected.
TipWhen assigning a PPPoE or VPNconnection as the default gateway,ensure a stable physical connection isalso set as the failover default gateway.
5. Optional: Disable the NCSI service.
TipThe QVP Network Connectivity Status Indicator (NCSI) periodically performs tests to check thespeed and status of NAS network connections.
QVP User Guide
Network & Virtual Switch 139

6. Click Apply.
Virtual LANs (VLANs)
A Virtual LAN (VLAN) is a group of hosts which communicate as if they were attached to the same broadcastdomain even if they are in different locations. You can use VLANs to increase security and flexibility, whiledecreasing network latency and load.
Adding an Interface to a VLAN
ImportantWhen using both port trunking and a VLAN, port trunking must be configured first.
1. Go to Control Panel > Network & File Services > Network & Virtual Switch . The Network & Virtual Switch window opens.
2. Go to Network > Interfaces .
3.Identify the adapter that you want to configure, then click > Configure . The Configure window opens.
4. Go to the VLAN tab.
5. Select Enable VLAN.
6. Specify a VLAN ID.
Important
• The VLAN ID must be between 1 and 4094.
• Make a note of the VLAN ID before completing this process. If the VLAN ID is lost, thenetwork settings will need to be reset.
7. Click Apply.
Virtual Switches
This screen controls the configuration and management of virtual switches running on the NAS. VirtualSwitches allow physical interfaces and virtual adapters to communicate with each other.
QVP supports three different virtual switch modes.
Mode DescriptionBasic This mode is well-suited for most users, and requires
minimal configuration of network settings.Advanced This mode is best-suited for power-users who need
more control over the configuration of networksettings.
Software-Defined Switch This mode is suited for power-users who need tosimulate an L2 physical switch.
ImportantPacket forwarding rates are limitedwhen using this mode.
QVP User Guide
Network & Virtual Switch 140

TipTo access this page, Network & Virtual Switch must be operating in Advanced Mode.
Creating a Virtual Switch in Software-defined Switch Mode
ImportantTo avoid bridge loops, ensure that any Ethernet cables are connected to the same switchbefore configuring a Software-defined Switch.
1. Go to Control Panel > Network & File Services > Network & Virtual Switch . The Network & Virtual Switch window opens.
2. Go to Network > Virtual Switch .
3. Click Add. The Create a Virtual Switch window opens.
4. Select Software-defined Switch Mode.
5. Select one or more adapters.
6. Optional: Select Enable the Spanning Tree Protocol.
TipEnabling this setting prevents bridge loops.
7. Click Apply.
Creating a Virtual Switch in Basic Mode
1. Go to Control Panel > Network & File Services > Network & Virtual Switch . The Network & Virtual Switch window opens.
2. Go to Network > Virtual Switch .
3. Click Add. The Create a Virtual Switch window opens.
4. Select Basic Mode.
5. Select one or more adapters.
6. Optional: Select Enable the Spanning Tree Protocol.
TipEnabling this setting prevents bridge loops.
7. Click Apply.
Creating a Virtual Switch in Advanced Mode
1. Go to Control Panel > Network & File Services > Network & Virtual Switch . The Network & Virtual Switch window opens.
2. Go to Network > Virtual Switch .
3. Click Add.
QVP User Guide
Network & Virtual Switch 141

The Create a Virtual Switch window opens.
4. Select Advanced Mode.
5. Select one or more adapters.
6. Optional: Select Enable the Spanning Tree Protocol.
TipEnabling this setting prevents bridge loops.
7. Click Next.
8. Configure the virtual switch IP address.
Address Type DescriptionDHCP Client Assigns a dynamic IP address to the virtual switch.Static IP Assigns a static IP address to the virtual switch.
TipExamine your network setup forguidance on how to best configurethese settings.
Do not assign IP Addresses Does not assign an IP address to the virtual switchafter creation.
TipThis setting should be used whencreating a virtual switch for specialpurposes, such as when building anexternal or isolated network.
9. Click Next.
10. Configure the virtual switch services.
a. Enable the NAT service.
Important
• The virtual switch must be configured with a static IP address. The IP address cannot bewithin the subnet of an interface that is currently in use.
• The IP address of the virtual switch cannot be in a reserved range that doesn't supportforwarding:
• 127.xxx.xxx.xxx
• 169.254..xxx.xxx
• 192.0.2.xxx
• 198.51.100.xxx
• 203.0.113.xxx
b. Optional: Enable the DHCP Server.
QVP User Guide
Network & Virtual Switch 142

Important
• The virtual switch must be configured with a static IP address. The IP address cannot bewithin the subnet of an interface that is currently in use.
• To avoid IP address conflicts, do not enable DHCP server if there is another DHCP serverrunning on the local network.
Setting DescriptionStart IP Address Specify the starting IP address in a range allocated
to DHCP clients.End IP Address Specify the ending IP addresses in a range allocated
to DHCP clients.Subnet Mask Specify the subnet mask used to subdivide your IP
address.Lease Time Specify the length of time that an IP address is
reserved for a DHCP client. The IP address is madeavailable to other clients when the lease expires.
Default Gateway Specify the IP address of the default gateway for theDHCP server.
Primary DNS Server Specify a DNS server for the DHCP server.Secondary DNS Server Specify a secondary DNS server for the DHCP
server.
ImportantQNAP recommends specifying at leastone DNS server to allow URL lookups.
WINS Server Specify the WINS server IP address.
TipWindows Internet Naming Service(WINS ) converts computer names(NetBIOS names) to IP addresses,allowing Windows computers on anetwork to easily find and communicatewith each other.
DNS Suffix Specify the DNS suffix.
TipThe DNS suffix is used for resolvingunqualified or incomplete host names.
TFTP Server Specify the public IP address for the TFTP server.
TipQVP supports both PXE and remotebooting of devices.
Boot File Specify location and file name of the TFTP serverboot file.
TipQVP supports both PXE and remotebooting of devices.
QVP User Guide
Network & Virtual Switch 143

11. Click Next.
12. Configure the virtual switch IPv6 address.
Setting DescriptionDisable Do not assign an IPv6 address.IPv6 Auto-Configuration (Stateful) The adapter automatically acquires an IPv6 address
and DNS settings from the DHCPv6-enabled server.
ImportantThis option requires an availableDHCPv6-enabled server on thenetwork.
IPv6 Auto-Configuration (Stateless) The adapter automatically acquires an IPv6 addressand DNS settings from the router.
ImportantThis option requires an available IPv6RA(router advertisement)-enabledrouter on the network.
Use static IP address Manually assign a static IP address. You mustspecify the following information:
• Fixed IP Address
• Prefix length
TipObtain the prefix length information fromyour network administrator.
• Default Gateway
13. Click Next.
14. Configure the DNS settings.
Setting DescriptionObtain DNS server address automatically Automatically obtain the DNS server address using
DHCP.Use the following DNS server address Manually assign the IP address for the primary and
secondary DNS servers.
ImportantQNAP recommends specifying at leastone DNS server to allow URL lookups.
15. Click Next.
16. Confirm the virtual switch settings.
17. Click Apply.
QVP User Guide
Network & Virtual Switch 144

DHCP Server
This screen controls the creation and management of Dynamic Host Configuration Protocol (DHCP) servers.DHCP servers can assign IPv4 addresses to clients on the network, while RADVD servers assign IPv6addresses.
ImportantDo not create a new DHCP server if one already exists on the network. Enabling multipleDHCP servers on the same network can cause IP address conflicts or network accesserrors.
Creating a DHCP Server
1. Go to Control Panel > Network & File Services > Network & Virtual Switch . The Network & Virtual Switch window opens.
2. Go to Network > DHCP Server .
3. Click Add. The DHCP Server window opens.
4. Select an interface.
5. Click Next.
6. Select the network environment for the DHCP server.
Option DescriptionEnable DHCP server on the current network. • The adapter keeps the existing IP address and
subnet mask.
• The DHCP server shares the subnet mask withthe adapter and is assigned the next available IPaddress.
Reassign an IP address to the adapter and enable aDHCP server on a new subnet.
• The adapter is assigned a new IP address andsubnet mask.
• The DHCP server uses a different subnet maskand IP address.
Enable DHCP server for another subnet. • The adapter keeps the existing IP address andsubnet mask.
• The DHCP server uses a different subnet maskand IP address.
7. Click Next.
8. Configure a static IP address for the adapter.
ImportantA static IP address must be configured when creating a DHCP server.
a. Click Yes.
b. Configure IP address settings.
QVP User Guide
Network & Virtual Switch 145

Setting DescriptionFixed IP Address Specify a fixed IP address.
TipExamine your network setup forguidance on how to best configurethese settings.
Subnet Mask Specify the subnet mask used to subdivide your IPaddress.
Default Gateway Specify the IP address of the default gateway for theadapter.
Jumbo Frame Jumbo Frames are Ethernet frames that are largerthan 1500 bytes. They are designed to enhanceEthernet networking throughput, and to reduce CPUusage when transferring large files. QVP supportsthe following Jumbo Frame sizes:
• 1500 bytes (default)
• 4074 bytes
• 7418 bytes
• 9000 bytes
Important
• Jumbo Frames are only supportedby certain NAS models.
• Using Jumbo Frames requires anetwork speed of 1000 Mbps orfaster. All connected networkdevices must enable Jumbo Framesand use the same MTU size.
Network Speed Specify the speed at which the adapter will operate.
TipAuto-negotiation will automaticallydetect and set the transfer rate.
Primary DNS Server Assign an IP address for the primary DNS server.Secondary DNS server Assign an IP address for the secondary DNS server.
ImportantQNAP recommends specifying at leastone DNS server to allow URL lookups.
c. Click Next.
9. Configure DHCP settings.
Setting DescriptionStart IP Address Specify the starting IP address in a range allocated
to DHCP clients.
QVP User Guide
Network & Virtual Switch 146
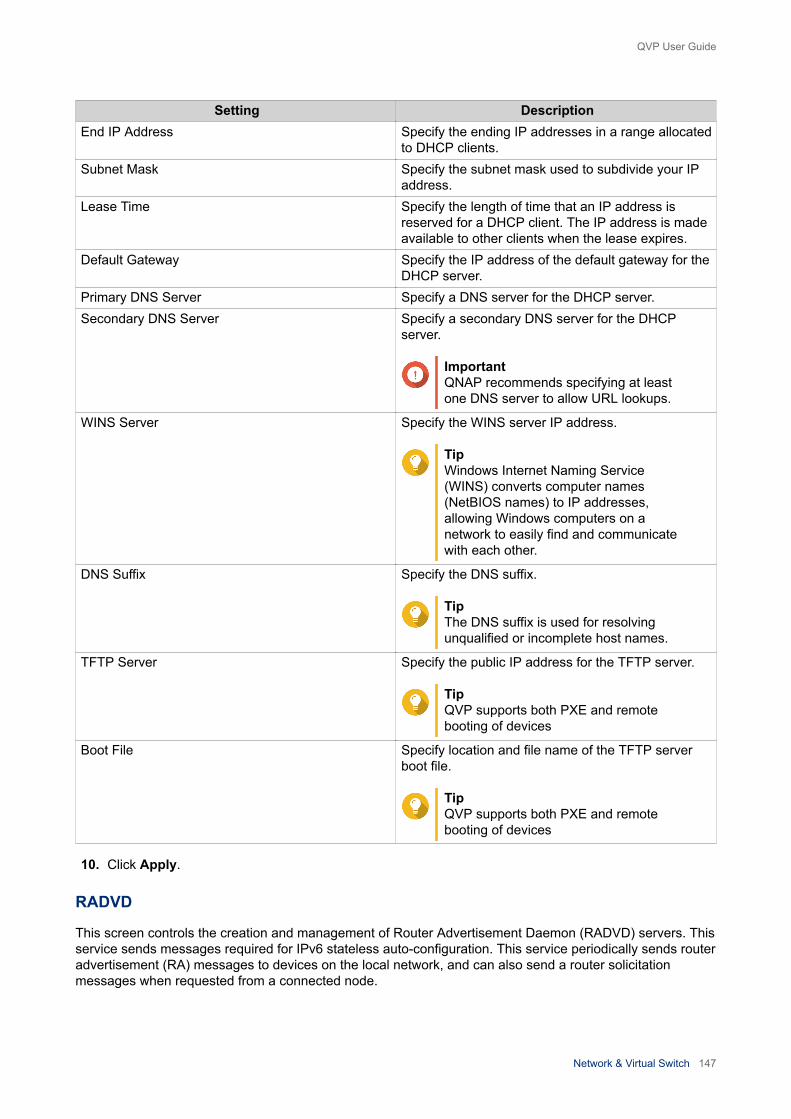
Setting DescriptionEnd IP Address Specify the ending IP addresses in a range allocated
to DHCP clients.Subnet Mask Specify the subnet mask used to subdivide your IP
address.Lease Time Specify the length of time that an IP address is
reserved for a DHCP client. The IP address is madeavailable to other clients when the lease expires.
Default Gateway Specify the IP address of the default gateway for theDHCP server.
Primary DNS Server Specify a DNS server for the DHCP server.Secondary DNS Server Specify a secondary DNS server for the DHCP
server.
ImportantQNAP recommends specifying at leastone DNS server to allow URL lookups.
WINS Server Specify the WINS server IP address.
TipWindows Internet Naming Service(WINS) converts computer names(NetBIOS names) to IP addresses,allowing Windows computers on anetwork to easily find and communicatewith each other.
DNS Suffix Specify the DNS suffix.
TipThe DNS suffix is used for resolvingunqualified or incomplete host names.
TFTP Server Specify the public IP address for the TFTP server.
TipQVP supports both PXE and remotebooting of devices
Boot File Specify location and file name of the TFTP serverboot file.
TipQVP supports both PXE and remotebooting of devices
10. Click Apply.
RADVD
This screen controls the creation and management of Router Advertisement Daemon (RADVD) servers. Thisservice sends messages required for IPv6 stateless auto-configuration. This service periodically sends routeradvertisement (RA) messages to devices on the local network, and can also send a router solicitationmessages when requested from a connected node.
QVP User Guide
Network & Virtual Switch 147

Creating an RADVD Server
1. Go to Control Panel > Network & File Services > Network & Virtual Switch . The Network & Virtual Switch window opens.
2. Go to Network > DHCP Server .
3. Go to the RADVD tab.
4. Click Add. The RADVD - Outgoing Interface window opens.
5. Select the outgoing interface.
6. Click Next.
7. Configure a static IP address for the adapter.
ImportantA static IP address must be configured when creating a RADVD server.
a. Click Yes.
b. Optional: Configure Static IP address settings.
Setting DescriptionFixed IP Address Specify a fixed IP address.
TipExamine your network setup forguidance on how to best configurethese settings.
Prefix Length Specify the prefix length for the adapter.
TipObtain the prefix and the prefix lengthinformation from your ISP.
Default Gateway Specify the IP address of the default gateway for theDHCP server.
Primary DNS Server Assign an IP address for the primary DNS server.Secondary DNS server Assign an IP address for the secondary DNS server.
ImportantQNAP recommends specifying at leastone DNS server to allow URL lookups.
c. Click Next.
8. Select a second adapter for the RADVD service interface.
9. Click Next.
10. Optional: Configure a static IP address for the second RADVD adapter.
QVP User Guide
Network & Virtual Switch 148

ImportantCreating an RADVD interface requires that the adapter use a static IP address. If the adapteralready uses a static IP address, skip this step.
a. Click Yes.
b. Configure Static IP address settings.
Setting DescriptionFixed IP Address Specify a fixed IP address.
TipExamine your network setup forguidance on how to best configurethese settings.
Prefix Length Specify the prefix length for the adapter.
TipObtain the prefix and the prefix lengthinformation from your ISP.
Default Gateway Specify the IP address of the default gateway for theadapter.
Primary DNS Server Specify the DNS server address.Secondary DNS server Specify the DNS server address.
ImportantQNAP recommends specifying at leastone DNS server to allow URL lookups.
c. Click Apply.
11. Configure the RADVD server settings.
Setting DescriptionPrefix Specify the routing prefix for the adapter.
TipExamine your network setup forguidance on how to best configurethese settings.
Prefix Length Specify the prefix length for the adapter.
TipObtain the prefix and the prefix lengthinformation from your ISP.
Lease Time Specify the length of time that an IP address isreserved for a DHCP client. The IP address is madeavailable to other clients when the lease expires.
Primary DNS Server Specify the DNS server address.
QVP User Guide
Network & Virtual Switch 149
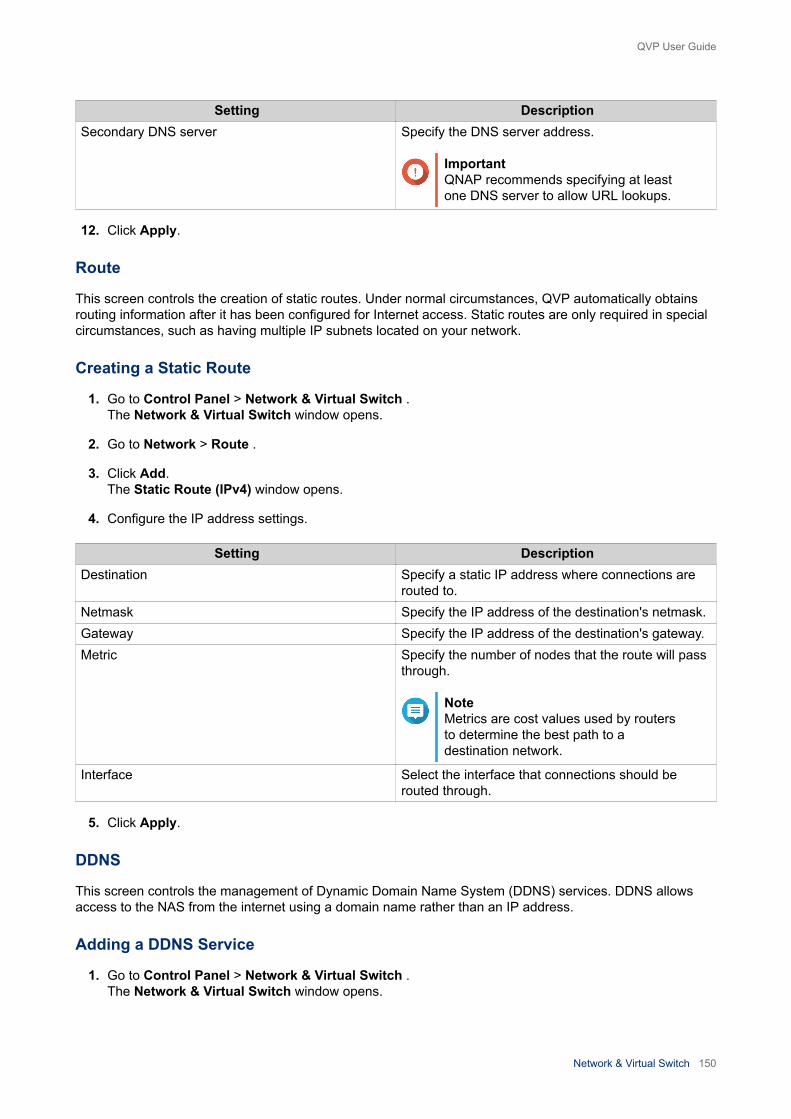
Setting DescriptionSecondary DNS server Specify the DNS server address.
ImportantQNAP recommends specifying at leastone DNS server to allow URL lookups.
12. Click Apply.
Route
This screen controls the creation of static routes. Under normal circumstances, QVP automatically obtainsrouting information after it has been configured for Internet access. Static routes are only required in specialcircumstances, such as having multiple IP subnets located on your network.
Creating a Static Route
1. Go to Control Panel > Network & Virtual Switch . The Network & Virtual Switch window opens.
2. Go to Network > Route .
3. Click Add. The Static Route (IPv4) window opens.
4. Configure the IP address settings.
Setting DescriptionDestination Specify a static IP address where connections are
routed to.Netmask Specify the IP address of the destination's netmask.Gateway Specify the IP address of the destination's gateway.Metric Specify the number of nodes that the route will pass
through.
NoteMetrics are cost values used by routersto determine the best path to adestination network.
Interface Select the interface that connections should berouted through.
5. Click Apply.
DDNS
This screen controls the management of Dynamic Domain Name System (DDNS) services. DDNS allowsaccess to the NAS from the internet using a domain name rather than an IP address.
Adding a DDNS Service
1. Go to Control Panel > Network & Virtual Switch . The Network & Virtual Switch window opens.
QVP User Guide
Network & Virtual Switch 150

2. Go to Network > DDNS .
3. Click Add. The DDNS (Add) window opens.
4. Configure the DDNS settings.
Setting DescriptionSelect DDNS server Select the DDNS service provider.Username Specify the username for the DDNS service.Password Specify the password for the DDNS service.Hostname Specify the hostname or domain name for the DDNS
service.Check the External IP Address Specify how often to update the DDNS record.
5. Click Apply.
QVP User Guide
Network & Virtual Switch 151

10. License Center
License Activation
You can activate QNAP or QNAP-affiliated licenses using the following methods.
Activation Method DescriptionUsing a product key The 25-character product key is purchased together with the
product from either QNAP or an authorized reseller. The productkey is normally printed on the product package.You can use product keys to activate licenses in License Center.For details, see Activating a License Using a Product or LicenseKey.
Using a license key You can generate the 25-character license key after purchasinglicenses. For details, see Generating a License KeyYou can use license keys to activate licenses in License Center.For details, see Activating a License Using a Product or LicenseKey.License details for licenses activated using license keys are notdisplayed on the QNAP License Store.
Using a product authorization key(PAK)
The 24-character PAK is purchased together with the product fromeither QNAP or an authorized reseller. The product key is normallyprinted on the product package.If you are using NAS devices running QVP version 4.3.4.0435 orolder, use PAKs to activate licenses through App Center.If you are using NAS devices running QVP version 4.3.4.0483 orlater, you can transfer PAKs purchased from the Old QNAPLicense Store to NAS devices. For details, see Activating aLicense Using a PAK.
Offline Use this method when the NAS is not connected to the internet.For details, see Activating a License Offline.
Activating a License Using a Product or License Key
Before activating your license using a product or license key, ensure the following.
• Your NAS is connected to the internet.
• You are signed in to myQNAPcloud.
1. Open License Center.
2. Go to My Licenses.
3. Click Add. The License Activation window appears.
4. Select Use a product or license key.
5. Click Next.
6. Specify the key.
QVP User Guide
License Center 152

Key DescriptionProduct key The product key is purchased together with the product from either QNAP or an
authorized reseller. The product key is normally printed on the product package.License key Users can generate a license key from the QNAP Store. For details, see
Generating a License Key.
7. Read and agree to the terms of service.
8. Click Activate. A notification message appears.
9. Click Activate. License Center activates the license.A confirmation message appears.
10. Click Close. The license appears on the list of active licenses.
Generating a License Key
1. Open your web browser.
2. Go to https://license.qnap.com.
3. Sign in with your QNAP ID.
4. Go to My Licenses.
5. From the list of licenses, select the license you want to generate a key for.
6. In the table below, click Activation and Installation > Activate on QTS . The Activate License window appears.
7. Select Activate using the license key.
8. Click Next. License Store generates the license key.
TipClick Renew License Key to generate a new key.
9.Click . Your system copies the license.
10. Click Done.
Activating a License Using a PAK
Before activating a license using a product authorization key (PAK), ensure the following.
• Your NAS is connected to the internet.
• You are signed in to myQNAPcloud.
1. Open License Center.
2. Go to My Licenses.
QVP User Guide
License Center 153

3. Click Add. The License Activation window appears.
4. Select Use product authorization key (PAK).
5. Click Next.
6. Specify the PAK.
7. Click Next. License Center transfers and activates the license.A confirmation message appears.
8. Click Close. The license appears on the list of active licenses.
Activating a License Offline
1. Open License Center.
2. Go to My Licenses.
3. Click Add. The License Activation window appears.
4. Select Offline Activation.
5. Click Next.
6. Read the instructions, and then click Download. License Center downloads the device identity file (DIF) file to your computer.
7. Read and agree to the terms of service.
8. Click Next.
9. Read the instructions, and then click Go to License Store. Your web browser opens the QNAP License Store.
10. Sign in with your QNAP ID.
11. Go to My Licenses.
12. From the list of licenses, select the license you want to activate.
13. In the table below, click Activation and Installation. The license activation details appear.
14. Click Activate on QTS. The Activate License dialog box appears.
15. Select Offline Activation.
16. Click Next.
17. Click Browse. The file browser appears.
18. Locate and select the DIF from your computer.
QVP User Guide
License Center 154

19. Click Upload. License Store activates the license.A confirmation message appears.
20. Click Download. The QNAP License Store downloads the license install file (LIF) to your computer.
21. Click Done.
22. Go back to License Center.
23. In the License Activation window, click Next.
24. Click Browse Files. The file browser appears.
25. Locate and select the LIF from your computer.
26. Click Next. License Center uploads the LIF and displays the license summary.
27. Click Activate. The license appears on the list of active licenses.
Generating a License Key
1. Open your web browser.
2. Go to https://license.qnap.com.
3. Sign in with your QNAP ID.
4. Go to My Licenses.
5. From the list of licenses, select the license you want to generate a key for.
6. In the table below, click Activation and Installation > Activate on QTS . The Activate License window appears.
7. Select Activate using the license key.
8. Click Next. License Store generates the license key.
TipClick Renew License Key to generate a new key.
9.Click . Your system copies the license.
10. Click Done.
License Deactivation
You can deactivate QNAP or QNAP-affiliated licenses using the following methods.
QVP User Guide
License Center 155

Activation Method DescriptionUsing QNAP ID Purchased licenses are stored in your QNAP ID account, and can
be accessed through both License Center and the online LicenseStore.To deactivate this type of license, see Deactivating a LicenseUsing QNAP ID.
Offline Use this method when the NAS is not connected to the internet.For details, see Deactivating a License Offline.
Deactivating a License Using QNAP ID
1. Open License Center.
2. Go to My Licenses.
3. Identify the license you want to deactivate, and then click . The License Deactivation window appears.
4. Select Use QNAP ID.
5. Read and acknowledge the warning.
6. Click Next. License Center deactivates the license.A confirmation message appears.
7. Click Close. License Center removes the license from the list of active licenses.
Deactivating a License Offline
1. Open License Center.
2. Go to My Licenses.
3. Identify the license you want to deactivate, and then click . The License Deactivation window appears.
4. Select Offline Deactivation.
5. Read and acknowledge the warning.
6. Click Next.
7. Read the instructions, and then click Download. License Center downloads the license uninstall file (LUF) to your computer.
8. Click Next.
9. Read the instructions, and then click Finish.
10. Open your web browser.
11. Go to https://license.qnap.com.
12. Sign in with your QNAP ID.
QVP User Guide
License Center 156

13. Go to My Licenses.
14. From the list of licenses, select the license you want to deactivate.
15. In the table below, click Activation and Installation. The license activation details appear.
16.Under Advanced Options, click . The Deactivate License window appears.
17. Click Offline Deactivation.
18. Click Browse. The file browser appears.
19. Locate and select the LUF from your computer.
20. Click Upload. License Store deactivates the license.A confirmation message appears.
21. Click Done.
TipIf the license is still listed in My Licenses, click to remove it from the list. If the license hasnot yet expired, this action does not permanently delete the license from License Center.
License Extension
License Center will notify you 30 days before any of your subscription-based licenses expire. You can extendyour QNAP or QNAP-affiliated licenses using the following methods.
Activation Method DescriptionOffline using an unused license If you have a valid, unused subscription-based license and your
NAS is not connected to the internet, you can use this method toextend your expiring license. For details, see Extending a LicenseOffline Using an Unused License.
Offline using a product key The 25-character product key is purchased together with theproduct from either QNAP or an authorized reseller. The productkey is normally printed on the product package.If you have a valid, unused product key for a subscription-basedlicense, and your NAS is not connected to the internet, you canuse this method to extend your expiring license. For details, seeExtending a License Offline Using a Product Key.
Extending a License Offline Using an Unused License
1. Open License Center.
2. Go to My Licenses.
3. Identify the license you want to extend, and then click .
TipIf a license is expiring in 30 days or less, its status is Expires soon.
QVP User Guide
License Center 157

The License Extension window appears.
4. Read the instructions, and then click Download. License Center downloads the device identity file (DIF) file to your computer.
5. Read and agree to the terms of service.
6. Click Next.
7. Read the instructions, and then click Go to License Store. Your web browser opens the QNAP License Store.
8. Sign in with your QNAP ID.
9. Go to My Licenses.
10. From the list of licenses, select the license you want to activate.
11. In the table below, click Activation and Installation. The license activation details appear.
12. Click Extend on QTS. The Extend License window appears.
13. Select Use an unused license, and then click Next. The list of unused licenses appears.
14. Select an unused license.
WarningLicense Center will use this license to extend your expiring license. This process is irreversible.Once this license is used for extension, you cannot use it for anything else.
15. Click Next.
16. Click Browse. The file browser appears.
17. Locate and select the DIF from your computer.
18. Click Upload. A confirmation message appears.
19. Click Download. The QNAP License Store downloads the license install file (LIF) to your computer.
20. Click Done.
21. Go back to License Center.
22. In the License Extension window, click Next.
23. Click Browse Files. The file browser appears.
24. Locate and select the LIF from your computer.
25. Click Next. License Center uploads the LIF and displays the license summary.
26. Click Extend.
QVP User Guide
License Center 158

A confirmation message appears.
27. Click Close. The license appears on the list of active licenses.
Extending a License Offline Using a Product Key
1. Open License Center.
2. Go to My Licenses.
3. Identify the license you want to extend, and then click .
TipIf a license is expiring in 30 days or less, its status is Expires soon.
The License Extension window appears.
4. Read the instructions, and then click Download. A notification message appears.
5. Click Download. License Center downloads the device identity file (DIF) file to your computer.
6. Read and agree to the terms of service.
7. Click Next.
8. Read the instructions, and then click Go to License Store. Your web browser opens the QNAP License Store.
9. Sign in with your QNAP ID.
10. Go to My Licenses.
11. From the list of licenses, select the license you want to activate.
12. In the table below, click Activation and Installation. The license activation details appear.
13. Click Extend on QTS. The Extend License window appears.
14. Select Use a product key, and then click Next.
15. Specify the product key.
16. Click Next. A confirmation message appears.
17. Click Download. The QNAP License Store downloads the license install file (LIF) to your computer.
18. Click Done.
19. Go back to License Center.
20. In the License Extension window, click Next.
21. Click Browse Files.
QVP User Guide
License Center 159

The file browser appears.
22. Locate and select the LIF from your computer.
23. Click Next. License Center uploads the LIF and displays the license summary.
24. Click Extend. A confirmation message appears.
25. Click Close. The license appears on the list of active licenses.
License Management
License Center allows you to perform any of the following license management tasks. For licensemanagement tasks that are not included in this list, contact customer support through the QNAP Helpdesk.
Task DescriptionRecover a license Restoring QNAP NAS devices to factory settings causes licenses
to become unavailable. To recover licenses, see RecoveringLicenses.
Transfer a license to the new QNAPLicense Server
When upgrading older versions of QTS to QTS 4.3.4.0483 build20180213 and above, valid PAKs purchased from the old QNAPLicense Store are deactivated. These PAKs are accessible onLicense Center and can be transferred to and activated on thenew QNAP License Server. For details, see Transferring a Licenseto the New QNAP License Server.
Delete a license You can delete expired subscription-based licenses from the MyLicenses screen. For details, see Deleting a License.
Recovering Licenses
Before recovering licenses, ensure the following.
• Your NAS is connected to the internet.
• You are signed in to myQNAPcloud.
1. Open License Center.
2. Go to Recover Licenses.
3. Click Get Started. The License Recovery dialog box appears.
4. Read and agree to the terms of service.
5. Click Recover. License Center automatically recovers all available licenses for applications installed on your NAS.
Transferring a License to the New QNAP License Server
Before transferring licenses, ensure the following.
• Your NAS is connected to the internet.
QVP User Guide
License Center 160

• You are signed in to myQNAPcloud.
1. Open License Center.
2. Go to My Licenses.
3. Identify the license you want to transfer, and then click . A confirmation message appears.
4. Read the terms of service, and then click Transfer & Activate.
WarningAfter you register a license with your current QNAP ID, it will no longer be transferable.
License Center transfers the license.A confirmation message appears.
5. Optional: Click QNAP License Store to review the license details.
6. Click Close.
Deleting a License
1. Open License Center.
2. Go to My Licenses.
3. Identify the license you want to delete, and then click . A confirmation message appears.
4. Click Yes. License Center deletes the license.
TipIf the license has not yet expired, the license will still be listed in the License Activation table.
QVP User Guide
License Center 161