stained glass in the current middle ages - … glass in the current middle ages ... making glass in...
TRANSCRIPT

Stained Glass in the Current Middle Ages
A Comparison of 12th and 20th Century Techniques, Processes and Materials Used inBuilding Stained Glass Windows
November 13, 1999
By Jimi Lee
Known in the SCA as Lord Conor O Ceallaigh AoA, GMB, OSag, OM And in the Silver Horde as Subedei Qorchi
James D. Lee 1999 - 2014
DraftVersion 21
Date: 8/30/15Time: 03:49:09

Stained Glass in the Current Middle Ages
Page 2 of 56 James D. Lee 1999 - 2015

Stained Glass in the Current Middle Ages
Table of Conten
Table of Figures.............................................................................................5
Introduction....................................................................................................6
My Introduction to Stained Glass................................................................................6
Stained Glass Projects...................................................................................................7
How Glass is Made.........................................................................................8
What is Glass?................................................................................................................8
Making Glass in the 12th Century.................................................................................8
Making Glass in the 20th Century...............................................................................11
Art (Colored) Glass......................................................................................................13
To Paint or Not To Paint, That is the Question.........................................................15
On the Basic Construction of a Stained Glass Window.............................16
The Project...................................................................................................................16
Creating the pattern and selecting your colors.........................................................17Creating the Pattern in the 12th Century...................................................................17Creating the Pattern in the 20th Century...................................................................18How this Step was Completed...................................................................................18
Cutting the Glass..........................................................................................................19Glass Cutting Techniques in the 12th Century...........................................................19Glass Cutting Techniques in the 20th Century...........................................................21How this Step was Completed...................................................................................21
Fitting the Glass to the Pattern...................................................................................2212th Century Fitting...................................................................................................2220th Century Fitting...................................................................................................22How this Step was Completed...................................................................................23
Painting and Firing the Glass.....................................................................................24Painting Glass in the 12th Century............................................................................25Painting Glass on the 20th Century...........................................................................26How this Step was completed....................................................................................26
Leading the Glass.........................................................................................................26Leading Techniques of the 12th Century....................................................................26Leading Techniques of the 20th Century....................................................................27How this Step was Completed...................................................................................28
Soldering.......................................................................................................................28Flux in the 20th Century.............................................................................................28Flux in the 12th Century.............................................................................................28Solder and Soldering in the 12th Century..................................................................28Solder and Soldering in the 20th Century..................................................................29
James D. Lee 1999 - 2015 Page 3 of 56
Page 3
Stained Glass in the Current Middle Ages
How this Step was Completed...................................................................................29
Weatherproofing the Window....................................................................................29Weatherproofing the 12th Century Window................................................................30Weatherproofing the 20th Century Window................................................................30How this Step was Completed...................................................................................30
Framing the Window...................................................................................................30In the 12th Century.....................................................................................................30In the 20th Century.....................................................................................................31How this Step was Completed...................................................................................31
Reinforcing the Window..............................................................................................31
The Finished Panel......................................................................................................31
More on the Techniques of Painting on Glass for Windows......................32
Background and History.............................................................................................32
Painting on Glass for Windows..................................................................................33The Paint...................................................................................................................33The Tools...................................................................................................................34The Techniques..........................................................................................................34
The Projects..................................................................................................................35Review of Steps in Making a Stained Glass Window.................................................36
Panel for King Andreas I.............................................................................................37
Just for Kicks...............................................................................................................38The Pattern................................................................................................................38Selecting the Glass....................................................................................................38The Pattern Board.....................................................................................................38Cutting and Fitting the Glass....................................................................................38Painting on the Glass................................................................................................39Consideration for Painting........................................................................................39Leading, Soldering and Glazing the Panel...............................................................40Reinforcement and Framing......................................................................................41
Medieval Society and The Craft of Stained Glass......................................42
Social Status of the Glass Craftsman.........................................................................42
The Guilds....................................................................................................................44Training.....................................................................................................................45
Restoration of Stained Glass Windows........................................................46
Overview of Restoring a Stained Glass Window......................................................46
Bibliography.................................................................................................52
Glossary........................................................................................................53
Biography.....................................................................................................55
Page 4 of 56 James D. Lee 1999 - 2015

Stained Glass in the Current Middle Ages
Table of FiguresYFigure 1 - Line drawing of ceramic pots used in 12th century glassmaking...........................................9Figure 2 - The Continuous Ribbon Process..................................................................................12Figure 3 - Metal oxides used to make colored glass in the Middle Ages.............................................13Figure 4 - Glass Coloring Agents in the 20th Century....................................................................14Figure 5 - Pattern Board used for this Project...............................................................................19Figure 6 - 12th Century Glass Cutting Tool..................................................................................20Figure 7 - 20th Century Glass Cutting Tools.................................................................................21Figure 8 - 20th Century Grozing and Breaking Tools.....................................................................23Figure 9 - Arms of the York Guild of Glaziers..............................................................................23Figure 10 – Mosaic stained glass window from St. Paul’s Monastery in Jarrow, England......................24Figure 11 - Came Mold............................................................................................................27Figure 12 - 12th Century Soldering Iron......................................................................................28Figure 13 - 20th Century Soldering Iron and Rheostat....................................................................29Figure 14 - Finished Panel from the Marwick Event......................................................................31Figure 15 - Picture of Finished Panel for King Andreas I................................................................37Figure 16 - Completed "Just for Kicks" Panel...............................................................................41
James D. Lee 1999 - 2015 Page 5 of 56
Page 5

Stained Glass in the Current Middle Ages
Introduction
Stained Glass! That wondrously beautiful art form that transforms pieces of colored glassinto intricate masterpieces. It adorns our places of worship, our homes, even our places of business. But what really is stained glass?
The term "stained glass" is misleading. It’s the popular name for the glass used in making windows with colored glass. It wasn’t until the 14th century that glass was stained. It was discovered that a liquid solution of silver nitrate when applied to the exterior surface of the glass and the glass fired, would “stain” white glass yellow and sometimes blue glass green.1 Prior to this discovery, the “stain” used to add any designs to the colored glass was a combination of metal oxides and finely ground glass, mixed with wine or urine. This mixture is commonly called a vitreous paint. Stained (painted) glass is only one of the many types of glasses used for this purpose2. The art of painting on glass is still practiced today.
Stained glass is most certainly period. A 12th century monk named Theophilus3 describedthe procedure for making stained glass windows in a "how to" manual for craftsmen. He wrote: 4
If you want to assemble simple windows, first mark out the dimensions of their length and breadth on a wooden board, then draw scroll work or anything else that pleases you and select the colors that are to be put on it. Cut the glass and fitthe pieces together with a grozing iron. Enclose them in lead [cames], putting in nails and solder on both sides. Surround with a wooden frame, strengthen with nails and set it up a place where you wish.
My Introduction to Stained Glass
Another of my pastimes is recreating the Middle Ages as a member of the Society for Creative Anachronism (The SCA). It was through the SCA that I got my introduction to stained glass. At the time, I belonged to a household whose feast regalia was starting to fall apart. One of the members of that household, Ronn Matia, operated a stained glass studio on Staten Island, New York. He suggested that we make lanterns to replace the wooden candelabra in stained glass and offered to teach anyone that was interested. We chose a night to get together for the classes and I immediately fell in love with this
1 Medieval Craftsmen, Glass-Painters, chapter 5.
2 The Catholic Encyclopedia - Stained Glass (www.newadvent.org/cathen).
3 Theophilus was a pseudonym used by a Benedictine monk who wrote a 3 part “how-to” manual forcraftsmen De Diversis Artibus (On Divers Arts). Book 1 was dedicated to easel artists, Book 2 to glassartists and Book 3 to metalsmiths. Some historians believe that Theophilus was actually Roger of Helmarshausen, a 12th century metalsmith.
4 De Diversis Artibus, Book II chapter 29.
Page 6 of 56 James D. Lee 1999 - 2015

Stained Glass in the Current Middle Ages
beautiful art and craft. For those people that complain that I spend too much time doing stained glass, including my wife Donna Rose, blame Ronn!
Stained Glass Projects
In order to get a better understanding of the information that follows I undertook several stained glass projects. The chapter On the Basic Construction of a Stained Glass Windowserved as the documentation for a on a project I made for an SCA event, The Marwick Harvest Faire and Arts Exhibition held in The Royal Forest of Rusted Woodlands (northern New Jersey), East Kingdom (northeastern US) in November 1999. The intent of this project was to compare the overall techniques, processes and materials used in building a stained glass window between the 12th and 20th centuries. I actually built a small stained glass window at the event much to the delight and surprise of everyone whoattended, including the Vicereine of the Crown Province of Ostgardr. However, as I did the research for this SCA event, I became fascinated with the history of stained glass and continued researching and expanding this paper. This led to two additional projects.
Since painting on glass was (and is) an important aspect of stained glass windows, I felt that a separate project dedicated to the techniques of painting on glass for windows pertinent. As it turned out, I did two projects. Once again I did this as a comparison of 12th and 20th century techniques, processes and materials.
The first was a panel that was made for another SCA event. My current household, The Silver Horde, made several presentations to the “King” (Andreas I) of the “East Kingdom” at the Twelfth Night Celebration in January of 2001. The second project was done for the sake of doing it. The stained glass window that was created in the second project was secondary to demonstrating the techniques of painting and firing glass for windows as well as showing some of the more common components of a Medieval stained glass window.
A study of stained glass in the Middle Ages wouldn’t be complete if we didn’t examine the social structure of the period. A chapter on the social status of the glass craftsman is included.
Eventually, stained glass windows will need servicing. There are distinct problems that are encountered in stained glass restoration. Therefore, I’ve included a chapter on restoration. This chapter is based on my experiences in restoration work at Stained Glass Imagery.
But to start things off right, since the main material for stained glass is glass, let’s first seehow glass is made.
James D. Lee 1999 - 2015 Page 7 of 56
Page 7
Stained Glass in the Current Middle Ages
How Glass is Made
For the most part, neither the 12th nor the 20th century stained glass studio manufacture glass in the studio. For the 12th century studio, this was due in large part to logistics. Where the studio needed to be readily accessible by its clients and patrons and was located in cities and towns, the manufacturing factory needed to be located near the raw materials required to make glass. This is not so much of an issue in the 20th century with mass transportation, but the ideal location for a 12th century glass manufacturing factory would be on a river in a beech wood forest.
However, before I get into the specifics of glass manufacturing, let me ask a question.
What is Glass?
What is glass? This question has been debated for quite some time. Have you ever heardsomeone say that glass is a liquid? If you had, you might reply to this person that glass could certainly be a liquid depending on its temperature, like water, right? Well, not exactly. Using dictionary definitions of a liquid (a substance which shows a readiness to flow) and a solid (of definite shape and volume; not liquid or gas), glass would seem to fall into the “solid” definition. However, scientists will tell you that something is a solid when its molecules are motionless and lined up in flawless geometric fashion, like soldiers at attention. This molecular configuration is called crystalline. A liquid, on the other hand, is exactly the opposite. Liquid molecules are in a constant state of movementand entirely random in their configuration. To every rule, there is an exception, and glassis that exception. Cold glass is neither a liquid nor a solid (or both, depending on your outlook) because its molecules are motionless (like a solid) but random in their configuration (like a liquid). This molecular structure is characteristic of all vitreous (glassy) substances.5
Making Glass in the 12 th Century
The glass factory had three furnaces. The main (work) furnace was 15 feet long and 10 feet wide6 and was used to make the frit7 from the raw materials and melt the frit into glass. The annealing (cooling) furnace was 10 feet long, 8 feet wide and 4 feet high8 and was used to cool the glass. The cooling was done at a controlled rate of time and temperature change for the purpose of relieving thermal stress. The spreading furnace
5 A Bit About Glass, by Jim Matthews. From The Score #40, published by Spectrum Glass Company, Inc.
6 De Diversis Artibus, Book II, chapter 1.
7 Frit is ground glass ranging in size from gravel-like to a fine powder. It’s sometimes used as a raw material for making glass and sometimes as a coloring agent or for decorative effect in glass blowing and fusing.
8 De Diversis Artibus, Book II, chapter 2.
Page 8 of 56 James D. Lee 1999 - 2015

Stained Glass in the Current Middle Ages
was 6 feet long, 4 feet wide and 3 feet high9 and was used to turn cylinders of blown glass into sheets.
Glass is a combination of sand and beech wood ashes (potash). 10
If you have intention of making glass, first cut many beechwood logs and dry them out. Then burn them all together in a clean place and carefully collect the ashes, taking care that you do not mix any earth or stones with them.
The sand is cleaned and mixed with the beechwood ashes and the mixture placed in the work furnace to make the frit.11
When you have arranged all this,12 take beechwood logs completely dried out in smoke, and light large fires in both sides of the bigger furnace. Then take two parts of the ashes of which we have spoken before, and a third part of sand, collected out of water, and carefully cleaned of earth and stones. Mix them in a clean place, and when they have been long and well mixed together lift them up with the long-handled iron ladle and put them on the upper hearth in the smaller section of the furnace so that they may be fritted. When they begin to get hot, stir them at once with the same ladle to prevent them from melting from the heat of the fire and agglomerating. Continue doing this for a night and a day.
While the frit is being made, the glassmaker made the pots that were used to melt the frit into glass. These were cone-shaped ceramic vessels that fit into holes in the large section of the work furnace.
Figure 1 - Line drawing of ceramic pots used in 12th century glassmaking
9 De Diversis Artibus, Book II, chapter 3.
10 De Diversis Artibus, Book II, chapter 1, first paragraph.
11 De Diversis Artibus, Book II, chapter 4.
12 Theophilus is referring to the building of the 3 furnaces which he describes in chapters 1 (the Work Furnace), 2 (the Annealing Furnace) and 3 (the Spreading Furnace).
James D. Lee 1999 - 2015 Page 9 of 56
Page 9
Stained Glass in the Current Middle Ages
Theophilus provides these instructions.13
Meanwhile take some white pottery clay, dry it out, grind it carefully, pour water over it, knead it hard with a piece of wood, and make your pots. These should be wide at the top, narrowing at the bottom, and should have a small in-curving lip around their rims. When they are dry, pick them up with the tongs and set them inthe red-hot furnace in the holes [in the hearth] made for this purpose.14 Pick up the fritted mixture of ashes and sand with the ladle and fill all the pots [with it] inthe evening. Add dry wood all through the night so that the glass, formed by the fusion of the ashes and sand, may be fully melted.
The next morning, the melted frit was blown into a cylindrical shape and placed in an annealing furnace to cool. When all the glass in the pots was blown into cylinders and the cylinders have cooled in the annealing furnace, a fire was kindled in the spreading furnace. The spreading furnace was heated to red-hot. When the furnace was ready, the cylinders were split with a hot iron (see Glass Cutting Techniques in the 12th Century, below) along one side and put on the hearth of the furnace. As the cylinder began to soften, it was flattened with iron tongs and a smooth flat board. When the sheet of glass was completely flat it was immediately moved to the annealing furnace which was moderately hot. The glass sheets were stood on their edge and leaned against the wall of the annealing furnace.15
At the first hour next morning, if you want to make sheets of glass, take the iron blowpipe, put its end in a pot full of glass, and when the glass sticks to it turn the pipe in your hand until as much glass as you want agglomerates around it. Take it out at once, put it to your mouth, and blow gently; then take it immediately out of your mouth and hold it near your cheek, lest by chance you should suck the flame into your mouth when you draw in a breath. You should also have a smoothflat stone in front of the window on top of which you should gently strike the glowing glass, so that it hangs down equally on all sides. At once blow quickly and repeatedly, taking it out of your mouth each time. When you see it hanging down like a long bladder, put the end into the flame and as soon as it melts, [when you blow] a hole will appear. Then take a round piece of wood made for the purpose, and make the hole as wide as the middle [of the cylinder]. Then jointogether the upper and lower parts of the rim so that an opening appears in each side of the join. Immediately touch the glass close to the pipe with a wet stick, shake it a little, and it will be separated. Then heat the blowpipe in the flame of the furnace until any glass sticking to it melts, and quickly put it on the two [partsof the] rim of the glass where they are joined together and it will stick to them. Pick up the glass at once and put it in the flame of the furnace, until the hole
13 De Diversis Artibus, Book II, chapter 5.
14 I’m sure the pots were fired before being used.
15 De Diversis Artibus, Book II, chapter 6.
Page 10 of 56 James D. Lee 1999 - 2015
Stained Glass in the Current Middle Ages
where you previously separated it from the pipe melts. Take the round piece of wood and widen this hole like the other. Then, enfolding the rim in the middle [atthe other end] with a wet stick, separate [the cylinder] from the pipe. Then give itto a boy who will carry it on a piece of wood inserted through one of its holes to the annealing furnace, which should be moderately hot. This kind of glass is pureand white [i.e., clear]. In the same way, by the same sequence of operations, work similar pieces of glass until you have emptied the pots.
This technique of making sheets of glass is called the Blown Cylinder Method or Muff Method.
Making Glass in the 20 th Century
Some glass is still hand blown using techniques such as the Cylinder Process today. But, like everything else in the art of stained glass, the processes have improved over time. For example, by the late 19th century, larger sheets of glass were made with the Blown Cylinder Process by blowing the cylinders in an iron pit. This allowed larger cylinders tobe blown, thus producing larger sheets of glass. In 1871, William Pilkington invented a machine that helped the glass blower to support, swing and rotate the cylinder. This allowed even larger sheets of glass to be made.16
There are several methods of sheet-glass manufacturing used in the 20th century. The Blown Cylinder Method is still used to make what’s known as Antique Glass. Fremont Antique Glass (Seattle, WA), St Just (in France) and Lamberts (in Germany) are but a fewthat still uses this method.
With the Single Roll Method, the molten glass is poured onto a metal table and a single metal roller is used to flatten the glass into sheets. This is sometimes called hand-cast glass. The Double Roll Method is the same as the Single Roll Method, but uses two rollers instead of one. The two rollers resemble the wringers on an old style washing machine.
The Vertical Draw Method pulls the molten glass up through a slit in a refractory block that is floating on the glass surface. The annealing oven (called a lehr or leer) is mountedover the draw chamber. Drawn glass is more pristine than rolled glass because its surfacehas remained untouched during its forming.
The Float Process pulls the molten glass from the forehearth on a bath of molten tin. Thisprocess produces perfectly smooth sheets of uniform thickness. This process is used to produce virtually all common window glass, but is not used for art glass production.
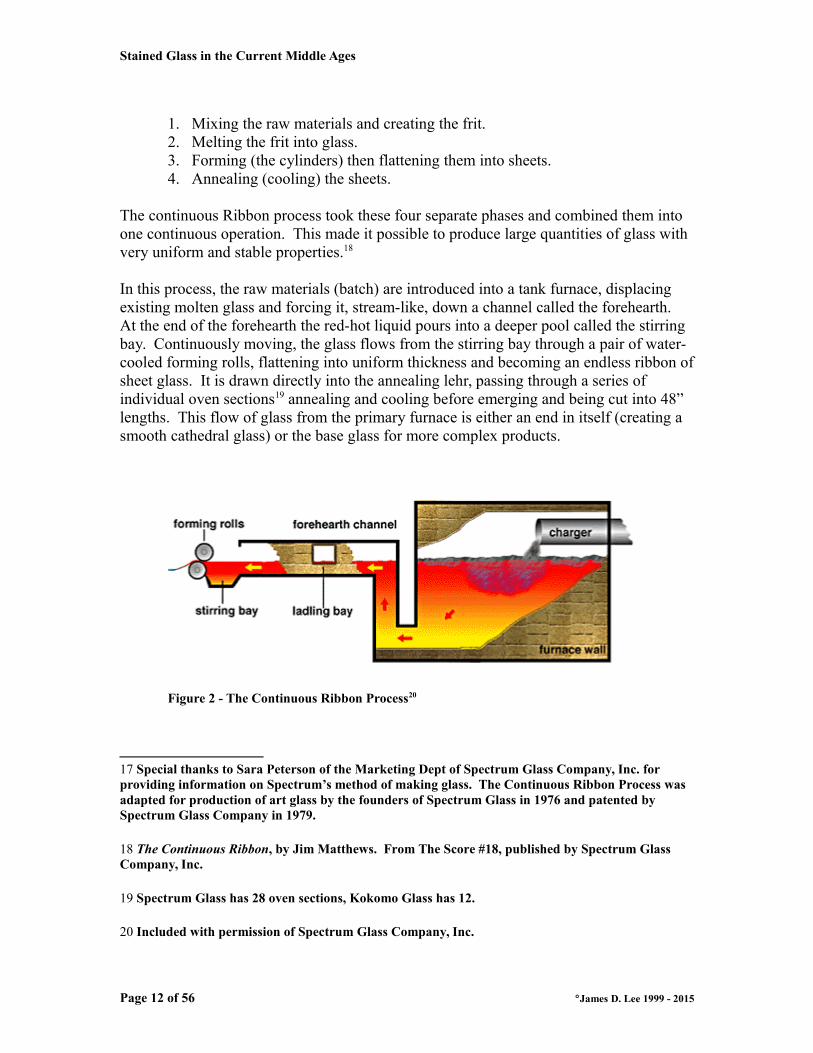
One of the most important technological breakthroughs in the manufacture of sheet glass took place in the 1920’s with the development of the Continuous Ribbon Process17. As I explained previously, glass manufacture consisted of four major phases:
16 www.pfg.co.za/history.htm
James D. Lee 1999 - 2015 Page 11 of 56
Page 11
Stained Glass in the Current Middle Ages
1. Mixing the raw materials and creating the frit.2. Melting the frit into glass.3. Forming (the cylinders) then flattening them into sheets.4. Annealing (cooling) the sheets.
The continuous Ribbon process took these four separate phases and combined them into one continuous operation. This made it possible to produce large quantities of glass with very uniform and stable properties.18
In this process, the raw materials (batch) are introduced into a tank furnace, displacing existing molten glass and forcing it, stream-like, down a channel called the forehearth. At the end of the forehearth the red-hot liquid pours into a deeper pool called the stirring bay. Continuously moving, the glass flows from the stirring bay through a pair of water-cooled forming rolls, flattening into uniform thickness and becoming an endless ribbon ofsheet glass. It is drawn directly into the annealing lehr, passing through a series of individual oven sections19 annealing and cooling before emerging and being cut into 48” lengths. This flow of glass from the primary furnace is either an end in itself (creating a smooth cathedral glass) or the base glass for more complex products.
Figure 2 - The Continuous Ribbon Process20
17 Special thanks to Sara Peterson of the Marketing Dept of Spectrum Glass Company, Inc. for providing information on Spectrum’s method of making glass. The Continuous Ribbon Process was adapted for production of art glass by the founders of Spectrum Glass in 1976 and patented by Spectrum Glass Company in 1979.
18 The Continuous Ribbon, by Jim Matthews. From The Score #18, published by Spectrum Glass Company, Inc.
19 Spectrum Glass has 28 oven sections, Kokomo Glass has 12.
20 Included with permission of Spectrum Glass Company, Inc.
Page 12 of 56 James D. Lee 1999 - 2015
Stained Glass in the Current Middle Ages
There are quite a number of manufacturers of art glass in America alone. Each of them has their own method for making glass using some form of one of the methods described above. Some of them have patents for their process. For example, Spectrum Glass Company (Woodinville, WA) adapted the Continuous Ribbon process of making sheet glass for art glass. Their process is totally automated.
On the other hand, Kokomo Opalescent Glass (Kokomo, IN) uses the Double Rolled Method. They melt the raw materials in clay pots (as was done in the 12th century). Factory workers remove some of the molten glass from the pots using ladles and walk theladles to steel mixing tables where the glass is mixed, and in the case of multi-colored glass, blended by hand. When the mixer “feels” that the glass is blended sufficiently, he forces it through the rollers. The rollers flatten the glass into sheets. The sheets are then pushed onto a conveyor belt that takes it into the annealing lehr.21
None of the glass manufactures I contacted employs a fritting phase in their operation. They all just add the raw materials into the furnace.
Art (Colored) Glass
Not all stained glass in the 12th century was white (clear) glass with figures painted on it. The glass artists in the 12th century did have colored glass available to them. A metal oxide, called a pot metal, was added to the mixture to make the colored glass. An appropriate metal oxide (see Figure 3) was added to the mixture in the pot. Thus the termpot metal.
Metal Oxide Color AchievedCopper Deep Ruby RedIron GreenCobalt BlueManganese PurpleSulfur or Soot Yellow
Figure 3 - Metal oxides used to make colored glass in the Middle Ages
If one were to accept only the information provided by Theophilus, it might look as though the colored glass was produced "by accident" due to impurities in the sand or beechwood ashes, or by oxidation occurring in the furnaces. However, other sources of the period22 and later23 (but still in SCA period) provide a more complete "recipe" for "purposely" getting colored glass.
21 Man and Machine: A Legacy of Excellence by Diane Roberts at www.kog.com/History
22 De Coloribus et Artibus de Romanarum, Eraclius (12th Century). This reference is from On Divers Arts. The translators have cited this work as a source of additional information on the formulae for making glass in their introduction and again in a footnote in Book II chapter 11.
23 Schriften uber technische Chemie und Huttenwesen, Peder Massons. See note 22 above.
James D. Lee 1999 - 2015 Page 13 of 56
Page 13
Stained Glass in the Current Middle Ages
Impurities in the ingredients or the kiln were certainly an issue and glass could take on colors unexpectedly. For example, if there was too much iron content in the sand, clear glass could take on a greenish tint. Theophilus realized this and provides the 12th century glass maker with these suggestions24
If you see [the glass in] a pot changing to a saffron yellow color, heat it until the third hour and you will get a light saffron yellow. Work up as much of it in the same way above25. And if you wish, let it heat until the sixth hour and you will geta reddish saffron yellow. Make from it what you choose.
But [alternatively] if you see [the glass in] any pot happening to turn a tawny color, like flesh, use this glass for flesh-color, and taking out as much as you wish,heat the remainder for two hours, namely, from the first to the third hour and you will get a light purple. Heat it from the third to the sixth hour and it will be a reddish purple and exquisite.
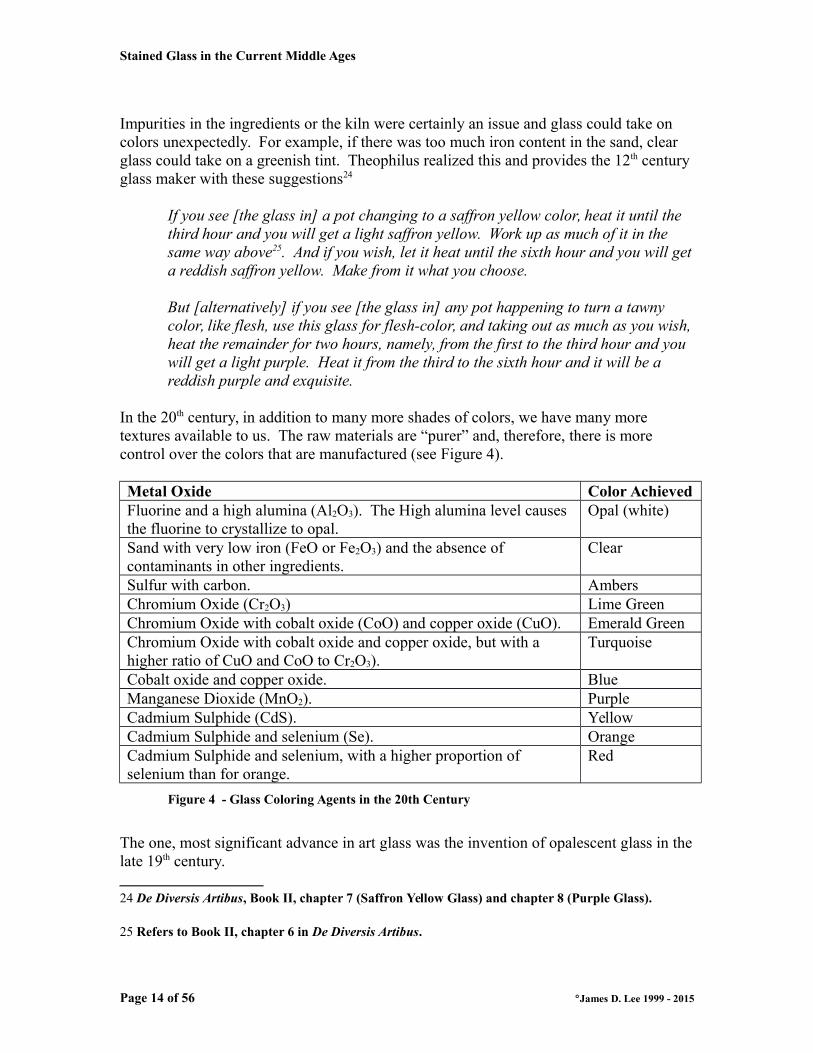
In the 20th century, in addition to many more shades of colors, we have many more textures available to us. The raw materials are “purer” and, therefore, there is more control over the colors that are manufactured (see Figure 4).
Metal Oxide Color AchievedFluorine and a high alumina (Al2O3). The High alumina level causes the fluorine to crystallize to opal.
Opal (white)
Sand with very low iron (FeO or Fe2O3) and the absence of contaminants in other ingredients.
Clear
Sulfur with carbon. AmbersChromium Oxide (Cr2O3) Lime GreenChromium Oxide with cobalt oxide (CoO) and copper oxide (CuO). Emerald GreenChromium Oxide with cobalt oxide and copper oxide, but with a higher ratio of CuO and CoO to Cr2O3).
Turquoise
Cobalt oxide and copper oxide. BlueManganese Dioxide (MnO2). PurpleCadmium Sulphide (CdS). YellowCadmium Sulphide and selenium (Se). OrangeCadmium Sulphide and selenium, with a higher proportion of selenium than for orange.
Red
Figure 4 - Glass Coloring Agents in the 20th Century
The one, most significant advance in art glass was the invention of opalescent glass in thelate 19th century.
24 De Diversis Artibus, Book II, chapter 7 (Saffron Yellow Glass) and chapter 8 (Purple Glass).
25 Refers to Book II, chapter 6 in De Diversis Artibus.
Page 14 of 56 James D. Lee 1999 - 2015

Stained Glass in the Current Middle Ages
Opalescent glass is any glass that has had a material such as fluorine or phosphorous introduced at the raw material stage in its manufacture. This causes a degree of crystallization to occur, creating opacity in the glass. The degree of opacity is variable and depends on the composition of the raw materials and temperatures used in the manufacturing process.
There are two basic types of opalescent glass, solid color opalescent glass and mixed opalescent glass. Solid color opalescent glass is both colored and crystallized, creating a single color sheet, more opaque than cathedral. This is sometimes called “opalized”. Mixed color opalescent glass is white glass mixed with one or more colors of glass to create a variegated, multi-colored sheet. Light transmission varies with the composition. Other names for mixed color opalescent glass is variegated opalescent and streaky.
To Paint or Not To Paint, That is the Question
In the 12th century (and prior) there were two “schools” of stained glass.26
In the very beginning – the 11th and 12th centuries – there were two methods of work: one school of artists freely employed paint in their windows, the other avoided its use, striving to obtain the result sought by a purely mosaic method, a system destined to be revived and developed in after ages; but the former school almost at once gained the mastery and held it for eight hundred years.
26 The Catholic Encyclopedia - Stained Glass (www.newadvent.org/cathen).
James D. Lee 1999 - 2015 Page 15 of 56
Page 15
Stained Glass in the Current Middle Ages
On the Basic Construction of a Stained Glass Window
The procedures for creating a stained glass window are basically the same in both the 12th
and 20th centuries. Specifically you would:
1. Prepare your pattern and select your colors.2. Cut your glass.3. Fit the glass to the pattern.4. Paint the figures on the glass pieces and fire harden the painted figures.5. Lead the glass.6. Solder the lead joints.7. Weatherproof the window.8. Frame the window.
The techniques used aren't so much different as improved. For example, a window is framed with wood. In the 12th century they used nails to hold the window in the wooden frame. In the 20th century, glazing putty or window caulking is used in addition to the nails. Glazing putty and window caulking not only lasts longer, it's also more waterproof and attaches the window to the frame more securely.
The tools used are vastly improved also. For example, to cut glass in the 12th century, theglass craftsman would heat an iron that has a wedge-shaped tip in a fire to red-hot and touch the tip of iron to the glass where he wanted to cut. If a crack didn't develop immediately, he would wet his finger with spit, rub the glass on the spot he wanted to cut with his wet finger and then touch the iron to the glass with the red-hot tool to get a crackin the glass. When a crack appeared, he would draw the cutting tool along the pattern line. He would do this until the piece was cut. As you can imagine, the glass craftsman needed to be extremely experienced in their cutting skills. Although, at first glance, this technique may seem to be inaccurate at best, the glass craftsman could actually cut a circle out of the middle of a pane of glass! The glass craftsman in the 20th century uses a glasscutter with a carbide steel wheel. The wheel is "rolled" on the surface of the glass, following the pattern line, producing a score line on the glass. The glass is then "broken" off along the score line. This improved method of cutting glass allows a less experiencedglass craftsman to cut intricate shapes.
The Project
So, armed with a copy of Theophilus’ treatise, I attempted to produce a window using thetechniques of the 12th century where practical. The subject I selected for this project is my arms, which is emblazoned:
Sable crusily Or Maltese, a Maltese cross azure on a lozenge Or
Each step in the project will have a detailed explanation of the process used in the 12th and 20th centuries. I'll then explain how I completed the step.
Page 16 of 56 James D. Lee 1999 - 2015

Stained Glass in the Current Middle Ages
Creating the pattern and selecting your colors
The first thing that needs to be done is to create your pattern. This is the most important phase of any stained glass project. A design that isn't carefully thought out may cause you to "redesign as you go", causing you to waste time, energy and supplies. Take your time with this.
As you design your window, you should be thinking about the colors that you want to use. Poorly matched colors or shades can make the best design look amateurish. If you're not artistically inclined, learn! Get the opinion of someone not involved with art or stained glass. There isn't really that much of a difference between the 12th century and the 20th century in color and glass selection. The 12th century artists did have colored glass (blue, green, yellow, red and purple) as well as clear glass. Clear glass was also called white glass in the 12th century. The 20th century artist has a much wider selection of colors and shades to choose from as well as a variety of textures. Where the 12th century artist may have had to use paint to get a color or shade not available in glass, the 20th century artist should be able to get it. The 12th century artist also painted on the glass to attain shading and highlighting. Once again the 20th century artist could get a multi-colored glass and use the glass' transition from light to dark (or vice versa) to get the same effect.
Creating the Pattern in the 12 th Century
In the 12th century, the pattern was drawn on a wooden board. Theophilus provides detailed instructions on preparing the board and drawing the pattern. 27
When you want to lay out glass windows, first make yourself a smooth flat wooden board, wide and long enough so that you can work two sections of each window on it. Then take a piece of chalk, scrape it with a knife all over the board, sprinkle water on it everywhere, and rub it all over with a cloth. When it has dried, take the measurements, namely, the length and breadth of one section in a window, and draw it on the board with a rule and compasses with [a point made of] lead or tin.28 If you want to have a border on it, draw it as wide as you like and with any kind of work you wish. After doing this draw as many figures asyou wish, first with [a point made of] lead or tin, then with red or black pigment, making all the lines carefully, because, when you have painted the glass, you will have to fit together the shadows and highlights in accordance with [the design on] the board. Then arrange the different kinds of robes and designate the color
27 De Diversis Artibus, Book II, chapter 17, first paragraph.
28 The use of a metal point for writing, probably a Roman invention, required a surface dressed with a white mild abrasive. It was commonly used in the Middle Ages for laying out writing space onvellum or parchment manuscripts. Graphite was not used before the 16th century. Footnote from DeDiversis Artibus, Book II, chapter 17.
James D. Lee 1999 - 2015 Page 17 of 56
Page 17

Stained Glass in the Current Middle Ages
of each with a mark in its proper place; and indicate the color of anything else you want to paint with a letter.
Creating the Pattern in the 20 th Century
The 20th century process for creating a pattern uses paper, pencils and markers or a computer. The pattern is drawn on the paper or with computer software. If you're working with a large pattern, it may be drawn to scale and then enlarged. The pieces of the pattern are numbered, the color of the piece marked on the pattern piece and the "grain" direction indicated. Colored glass used for stained glass in the 20th century can bea combination of 2 or more colors as well as one solid color. Sometimes the colors are mixed so that a swirled effect is made. Other times, the colors are mixed to give a streaked effect. In either case, the swirl or streak will create a "grain" which should to be taken into consideration when the piece is cut. However, this is purely for aesthetic reasons.
Once you have a pattern you're satisfied with, make 2 identical copies using transfer or carbon paper. The first copy should be made on thick paper (like brown craft paper). This copy is usually used in the fitting process. The second copy is made on vellum or 100-lb. manila. This copy is cut into the individual pieces of the pattern and used for cutting the glass. The pattern is cut into its pieces using a special scissors known as a pattern shears. In order to prevent your finished product from "growing", you need to allow for the lead between the pieces. If you look at a piece of lead from the end, it will look like an "H". The crosspiece of the "H" is known as the heart. The heart is approximately 1/16" thick. The pattern shears has three blades, 2 opposing 1. Instead of just cutting a line like a regular scissors, the single blade of the pattern shears actually removes part of the pattern. Thus the pattern shears will make the necessary allowance for the heart as you cut out the pattern.
How this Step was Completed
I used a combination of the 2 periods for this step. I designed the pattern on paper to full scale. A piece of plywood of was prepared in the 12th century manner (coated with the chalk and water mixture but not planed), for the experience and to be able to accurately document the process. I used plywood because I couldn't get a board wide enough for my pattern. The pattern was transferred to brown craft paper for the "cut apart" copy and to the prepared piece of plywood using transfer paper. The lines on the pattern board were filled in with a green marker. A pattern shears was used to cut the pattern into its pieces.
Page 18 of 56 James D. Lee 1999 - 2015

Stained Glass in the Current Middle Ages
Figure 5 - Pattern Board used for this Project
I selected glass in colors that were mostly available to the 12th century artist (yellow for the lozenge and blue for the border). Black glass wasn’t made until the mid-17th century and in the 12th century, would have been clear glass matted (painted with) black paint (glass stainer’s' colors). However, I painted the Maltese crosses. The cross on the lozenge (blue) was done for the experience and the crosses on the field (gold) out of necessity. I wasn't going to try to cut such small pieces for the gold crosses, nor was I going to try to design the cuts on the field to be able to fit the crosses.
Cutting the Glass
Before any glass is cut, the shape and size of the piece needs to be transferred from the pattern to the glass.
Glass Cutting Techniques in the 12 th Century
In the 12th century, they ground chalk in a lead pot and added water to it. Then, using brushes made from the tail of a marten, badger, squirrel or cat or the mane of a donkey, traced the outline of the pattern onto the glass. A piece of glass, slightly larger than the finished size was placed on top of the pattern board and the outline of the piece was traced onto the glass using the chalk and water mixture with one of the brushes that were made. If the glass was too opaque and the pattern couldn't be seen through it, the outline of the piece was traced onto a piece of clear glass. When the chalk was dry on the piece of clear glass, the piece of opaque glass was placed on top of it and both pieces were heldup to the light and the pattern lines transferred to the opaque glass with the chalk and water mixture.29
After this, take a lead pot and in it put chalk ground with water. Make yourself two or three brushes out of hair from the tail of a marten, badger, squirrel or a cat or from the mane of a donkey. Now take a piece of glass of whatever kind youhave chosen, but larger on all sides than the place in which it is to be set, and lay it on the ground for that place. Then you will see the drawing on the board
29 De Diversis Artibus. Book II, chapter 17, second paragraph.
James D. Lee 1999 - 2015 Page 19 of 56
Page 19
Stained Glass in the Current Middle Ages
through the intervening glass, and, following it draw the outlines only on the glass with chalk. If the glass is so opaque that you cannot see the drawing on the board through it, take a piece of [clear] white glass and draw on that. As soon asthe chalk is dry, lay the opaque glass over the white glass and hold them up to thelight; then draw [on the opaque glass] in accordance with the lines that you see through it. Delineate all kinds of glass in the same way, whether for the face, the robes, the hands, the feet, the border, or any other place where you want to put colors.
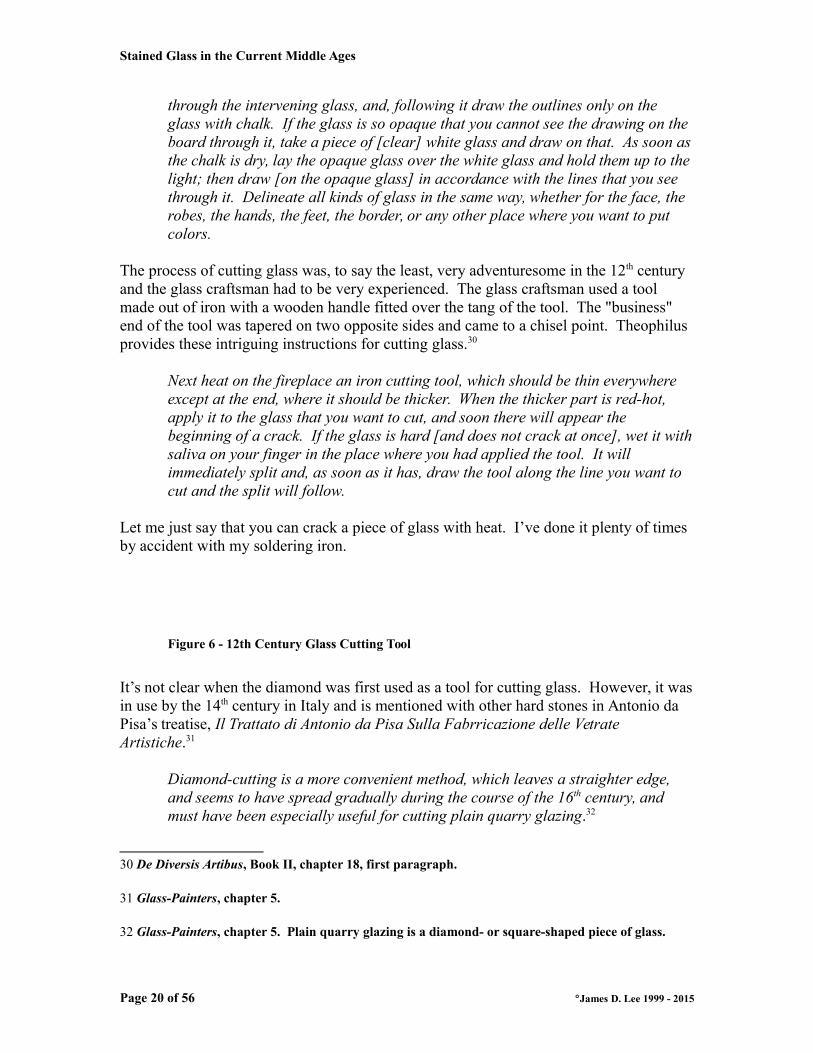
The process of cutting glass was, to say the least, very adventuresome in the 12th century and the glass craftsman had to be very experienced. The glass craftsman used a tool made out of iron with a wooden handle fitted over the tang of the tool. The "business" end of the tool was tapered on two opposite sides and came to a chisel point. Theophilus provides these intriguing instructions for cutting glass.30
Next heat on the fireplace an iron cutting tool, which should be thin everywhere except at the end, where it should be thicker. When the thicker part is red-hot, apply it to the glass that you want to cut, and soon there will appear the beginning of a crack. If the glass is hard [and does not crack at once], wet it withsaliva on your finger in the place where you had applied the tool. It will immediately split and, as soon as it has, draw the tool along the line you want to cut and the split will follow.
Let me just say that you can crack a piece of glass with heat. I’ve done it plenty of times by accident with my soldering iron.
Figure 6 - 12th Century Glass Cutting Tool
It’s not clear when the diamond was first used as a tool for cutting glass. However, it wasin use by the 14th century in Italy and is mentioned with other hard stones in Antonio da Pisa’s treatise, Il Trattato di Antonio da Pisa Sulla Fabrricazione delle Vetrate Artistiche.31
Diamond-cutting is a more convenient method, which leaves a straighter edge, and seems to have spread gradually during the course of the 16th century, and must have been especially useful for cutting plain quarry glazing.32
30 De Diversis Artibus, Book II, chapter 18, first paragraph.
31 Glass-Painters, chapter 5.
32 Glass-Painters, chapter 5. Plain quarry glazing is a diamond- or square-shaped piece of glass.
Page 20 of 56 James D. Lee 1999 - 2015

Stained Glass in the Current Middle Ages
Glass Cutting Techniques in the 20 th Century
There are several different ways to transfer the pattern to a piece of glass in the 20th century. These include:
1. Gluing the piece of the pattern to the glass with rubber cement.2. Tracing the outline of the pattern piece onto the glass with a marker.3. Holding the pattern piece on the glass while you score the glass.4. Placing the pattern on a light table, the glass over the pattern and scoring.
Which technique the artist uses depends on the artist's level of expertise and confidence in their glass cutting ability.
We, in the 20th century, have a much easier means of cutting glass. It's called a glasscutter. Actually it should really be called a glass scorer since it really doesn't cut the glass it just scores it. In its simplest form, a glasscutter is held in the hand. A tiny wheel made of carbide steel is run along the pattern line and it scores the glass. The glass is then "broken" along the score line either with another tool or with the hands. This is known as running the score, and the tool that might be used (instead of the hands) is called running pliers.
Figure 7 - 20th Century Glass Cutting Tools
How this Step was Completed
To transfer my pattern to the glass, I hold the pattern piece on the glass (technique #3 above) because it takes less time. There are 17 pieces of glass in the panel I made. It would take approximately 30 minutes to glue all the pattern pieces to the glass, wait for the rubber cement to dry and remove any excess cement so that my cutter wheel is not running through rubber cement. It would take about an hour to trace the outline of the pieces onto the glass. Additionally, I'd have to use a white paint pen on the black glass, which gets messy after the first or second transfer. By just placing the pattern piece on the glass and cutting around it, I'm saving at least 30 minutes. Think about how much
James D. Lee 1999 - 2015 Page 21 of 56
Page 21

Stained Glass in the Current Middle Ages
time I'd save on a window that has 500 pieces! Needless to say, I'm using 20th century techniques to cut my glass.
The fourth technique above is called Trace cutting. For cutting the glass, it is just as fast as the technique I use. However, it requires that you work directly over the glass becauseany deviation of position (either yours or the glass or pattern) will change the perspective of the cut. This could lead to inaccurately cut glass.
Fitting the Glass to the Pattern
12 th Century Fitting
In the 12th century, the glass craftsmen used a tool they called a grozing iron.33
When all the pieces have been cut like this, take a grozing iron, a span long and bent back at each end, and trim and fit together all the pieces with it, each in its proper place. When everything has been laid out in this way, take the pigment with which you are to paint the glass and which you will prepare in the following way.
This tool is a flat iron bar about 9” long34 with a “hook” on the end. The hook is used to nibble away at the edge of the glass. Figure 9 below shows a 12th century grozing iron.
20 th Century Fitting
The grozing technique is still used in the 20th century and the tool comes in 2 basic forms.If you’ve ever seen a glasscutter, you may have noticed a few “square” notches just abovethe cutting head. This is a 20th century grozing iron in its simplest form and most closely matches a 12th century grozing iron (see Figure 7 above).
In its other form, the tool looks like a pair of pliers and is actually called grozing pliers. The insides of the jaws are flat with the area towards the front serrated (see Figure 8 below).
Both forms of the tool employ a rocking motion to nibble away at the edge of the glass.
33 De Diversis Artibus, Book II, chapter 18, second paragraph. This paragraph ends the chapter on glass cutting and fitting. In the next chapter, Theophilus explains how to make the pigment (paint) for painting on the glass.
34 Theophilus specifies the length as a span.
Page 22 of 56 James D. Lee 1999 - 2015

Stained Glass in the Current Middle Ages
Figure 8 - 20th Century Grozing and Breaking Tools
The problem with grozing is that it leaves a rough edge on the glass. In lead came work, this is not too much of a problem because the channel in the lead hides the rough edge. The primary tool in the 20th century for fine fitting a pattern piece to a pattern is the glass grinder. This is a power tool that has a diamond impregnated router bit which spins at 3600 RPM and gives the edge of the glass a nice smooth finish.
How this Step was Completed
I used the 12th century technique of grozing, using a 20th century grozing pliers to fine fit the pattern piece to the pattern.
Here’s an interesting tidbit. A patched shield dated to around 1530 in St. Helen’s Church,York depicts the arms of the local Guild of Glazier’s which consists of glazing nails between two grozing irons crossed in saltaire.35
Figure 9 - Arms of the York Guild of Glaziers
35 Glass-Painters, chapter 5. See plate 63.
James D. Lee 1999 - 2015 Page 23 of 56
Page 23

Stained Glass in the Current Middle Ages
Painting and Firing the Glass
Decorative glass windows appeared in Christian churches at a very early date. For example, when describing Constantinople, the poet Prudentius (348 – c.410) was so impressed by the wide spread use of glass that he wrote:36
In the round arches of the windows in the basilica shone glass in colours without number.
The emphasis here is on color, not subject matter and it is certainly possible that many early glazing schemes consisted of abstract mosaics rather than painted historiated windows. The term mosaic should not be confused with what we call mosaics today; small pieces of glass held in a pattern or design by concrete. In this context, it denotes the construction of the stained glass window; cut pieces of colored glass whose design is delineated by thin strips of lead. In the oldest windows, the lead was an integral part of the design as well as the construction of the window.
An excellent example of this is the 7th century window fragment excavated at St. Paul’s Monastery in Jarrow, England (see Figure 10 below). This is the oldest known example of a mosaic window.
Figure 10 – Mosaic stained glass window from St. Paul’s Monastery in Jarrow, England
36 Glass-Painters, chapter 1.
Page 24 of 56 James D. Lee 1999 - 2015
Stained Glass in the Current Middle Ages
An important characteristic of most stained glass windows is the application of paint to the surface of the glass. This both enhanced the decorative, devotional and didactic possibilities of the medium and raised its creators to the status of artists as well as artisans.
Painting Glass in the 12 th Century
The 12th century glass artist made his own paints. These were a mixture of equal parts of a powdered metal and finely ground blue and green glass. The ingredients were first ground separately, then combined and mixed with wine or urine, and ground again.
The figures were painted on the glass first. The glass artist would place the piece of glassover the pattern board and copy the figure or design onto the glass using the pigment. This is called tracing. When the tracing was dry the shadows and highlights were added. This is called matting. If letters were desired, the glass artists simply wrote them in the matting pigment using the pointed handle of his brush. Scratching figures (including letters) into the matting with a sharp instrument is called scriffito.
After the matting was applied, shadows and highlights were created for robes (similar to a painting on canvas) and other areas that required it. The areas where there was a robe was smeared with the brush in such a way that the area is opaque in one part, light in another, and still lighter (translucent?) in a third. The "smearing" made it appear that there were three different colors painted side by side. This shading and highlighting was also done around eyes, nostrils and chins, as well as around the faces of young men and any body parts that were naked (hands, feet, etc).
When the glass was dry, the glass artist would paint the background and add any embellishments that were required. The areas of the glass not affected with shading and highlighting were covered with a light pigment. Not as light as the lightest shaded area and not as "dark" as the middle shaded area, but somewhere in between. This is still considered to be matting. When this was dry, the scriffito technique was used to make fine lines on each side close to the first shadow, allowing narrow strips of the backgroundto remain between the lines and the first shadow. Flowers, branches, leaves or small animals or birds were painted on letters as they were in manuscripts. Any exposed body part (faces, hands, feet, limbs) were painted with this background pigment.
When all the glass has been painted, the glass was placed in a kiln to set the pigments to the glass. An iron plate that fit into the kiln was sprinkled with dry quicklime or ashes then pressed with a smooth board. The pieces of glass were carefully placed on this, close together, with the green and blue glass on the outside and the white, yellow and purple glass towards the middle, these being more resistant to fire. The kiln was fueled by wood (smoked beechwood).37
37 De Diversis Artibus, Book II chapter 23.
James D. Lee 1999 - 2015 Page 25 of 56
Page 25
Stained Glass in the Current Middle Ages
Now take some beechwood logs that have been well dried in smoke and kindle a moderate fire in the kiln, and then later a bigger one until you see the flame risingat the back and on each side between the kiln [walls] and the iron plate and, by passing over the glass and licking it, so to speak, covering it long enough to makeit slightly red-hot.
When the glass reached red-hot, the wood was removed immediately and all air holes in the kiln were carefully blocked. The glass stayed in the kiln until the kiln cooled completely. At this point, the paint on the glass was scraped with a fingernail. If the paint didn't chip off, it was ready for the next step in the process. If it did chip off, the paint would be reapplied and the glass would be re-fired until it didn't chip. When all the pieces were sufficiently fired, they were brought back to the pattern board.
Painting Glass on the 20 th Century
The techniques detailed above are still in practice today, with some enhancements. The pigments can be purchased, and the kiln is powered by electricity or gas (such as propaneor methane) with gauges and timers, etc to let the 20th century glass artists know when theglass has been sufficiently fired.
Also available are paints manufactured specifically for painting on glass that can be fired in a kitchen oven. These paints provide the hobbyist who can't afford or doesn't have the room for a firing kiln the opportunity to produce stained glass pieces that consist of both pot metal glass and painted glass.
How this Step was completed
The painted pieces of this project used the type of paint that could be fired in a kitchen oven.
Leading the Glass
Now that the paint on the glass has been heat hardened, the window can be put together. The glass pieces are wrapped in lead strips. The lead strips have a channel in which the edge of the glass is inserted. The lead strips are called came. Nails are required at this stage. Once the pieces were wrapped in came and placed on the pattern board, the nails are hammered into the pattern board around the pattern piece to prevent it from moving. Theophilus says: 38
You should have 40 nails, a finger long, slender and round at one end and at the other square and well bent outward so that a hole appears in the middle.
Leading Techniques of the 12 th Century
38 De Diversis Artibus. Book II chapter 27.
Page 26 of 56 James D. Lee 1999 - 2015

Stained Glass in the Current Middle Ages
A 12th century glass craftsman made his own lead came. He made a mold out of iron (preferred) or wood, melted pure lead and cast the came.39
Figure 11 - Came Mold
Working with the pattern board, a glass piece was wrapped in lead came and carefully placed on the pattern board in its proper place. The piece was kept in place by hammering nails into the pattern board around the piece. This was repeated until all the pieces were leaded and positioned on the pattern board. The 12th century glass artist would work from the middle of the pattern out towards the edge.
Leading Techniques of the 20 th Century
Glass craftsmen in the 20th century buy their lead came. In addition to lead, came is available in copper, brass, brass coated lead (called bendable brass) and zinc. The process of wrapping a piece of glass in came and setting it on the pattern board is basically the same.
The 20th century glass craftsman follows the same procedure for leading a window as the 12th century craftsman did. Actually, the glass craftsman will find a "key" area in which to start. This is typically an area where an intricate figure is located. Once this figure is properly fit and secured to the pattern board, the glass craftsman will "build out" from that area, going to the next "intricate" figure. It's far easier to adjust the size of a piece onthe edge of the window where the pieces are typically square or rectangular, than it is to adjust a piece in the middle that could be part of a figure. The piece on the edge could even be re-cut to account for a window "growing". However, both the 12th and 20th century glass craftsman will take great pains to make sure that this doesn't happen. He would also make sure that the window is plumb and square when it was complete.
39 De Diversis Artibus. Book II, chapters 24 (Iron Molds), 25 (Casting the Came) and 26 (Wooden Molds).
James D. Lee 1999 - 2015 Page 27 of 56
Page 27
Stained Glass in the Current Middle Ages
How this Step was Completed
I used lead throughout the piece as they did in the 12th century. Starting at the center, I leaded the lozenge first, added the field and finally put on the border.
Soldering
In general, solder is a mixture of tin and lead. The more tin in the mixture, the lower the temperature required to melt the solder. Lead came is soldered only at the joint where 2 pieces of came meet. The molten solder flows into the joint connecting the two pieces of came. To facilitate this, a caustic material called flux is used.
Flux in the 20 th Century
In the 20th century, soleic acid is the preferred flux for lead came. However, a zinc chloride and ammonium chloride mixture (primarily used with the copper foil method of stained glass making) can be used.
Flux in the 12 th Century
The 12th century glass artists also needed a flux. What was used is sketchy, at best. Theophilus doesn't even mention flux. I believe that the caustic material was lye. Theophilus does provide instructions on how solder was made in the 12th century (see below). The last step was to cover the solder with wax. It seems logical to replace wax with tallow. If I do that, then it was tallow prepared for soap making and not for candle making, since the formula for soap making tallow includes lye, whereas the formula for candle making tallow does not.
Solder and Soldering in the 12 th Century
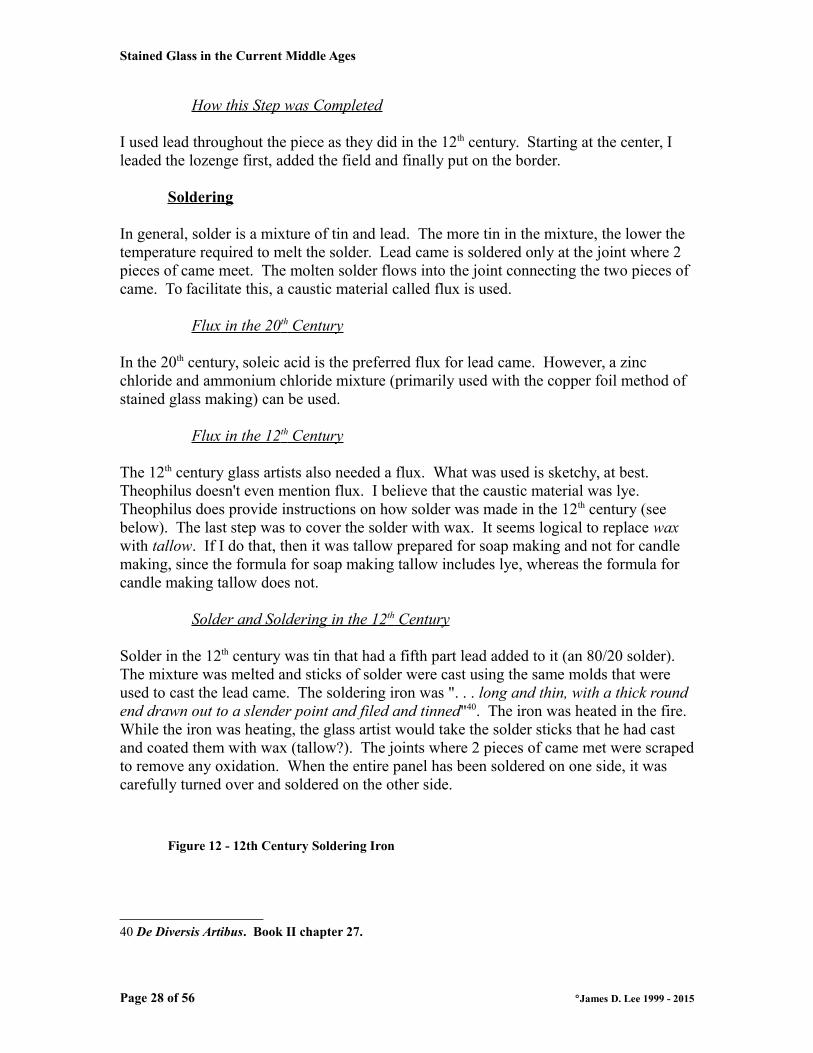
Solder in the 12th century was tin that had a fifth part lead added to it (an 80/20 solder). The mixture was melted and sticks of solder were cast using the same molds that were used to cast the lead came. The soldering iron was ". . . long and thin, with a thick round end drawn out to a slender point and filed and tinned"40. The iron was heated in the fire. While the iron was heating, the glass artist would take the solder sticks that he had cast and coated them with wax (tallow?). The joints where 2 pieces of came met were scrapedto remove any oxidation. When the entire panel has been soldered on one side, it was carefully turned over and soldered on the other side.
Figure 12 - 12th Century Soldering Iron
40 De Diversis Artibus. Book II chapter 27.
Page 28 of 56 James D. Lee 1999 - 2015

Stained Glass in the Current Middle Ages
Solder and Soldering in the 20 th Century
In the 20th century, solder is available in several different tin/lead combinations, including50/50, 60/40, 63/37 and 100/0 (called lead-free or Ultimate). The heating elements of soldering irons are made of steel or ceramic and run on electricity. A 20th century soldering iron should be at least 60 watts. In addition to the iron, a rheostat should be used to control the temperature. Soldering in the 20th century is basically the same. The soldering iron is heated until it will melt the solder (but not the lead). The came is cleaned of oxidation wherever it's going to be soldered. Flux is applied to the joint. The soldering iron is placed on the came heating (but not melting) it and the solder is placed on the tip of the iron. The solder will run down the tip of the iron onto the came.
Figure 13 - 20th Century Soldering Iron and Rheostat
How this Step was Completed
I use a 60/40 solder for all my stained glass projects. I also use a 100-watt soldering iron with a rheostat. I use soleic acid for lead work and a zinc chloride and ammonium chloride flux for copper foil work.
Weatherproofing the Window
In general, this step serves a couple of purposes. It helps to further secure the glass in thelead came, provide some measure of weatherproofing (wind, rain, etc) and adds rigidity and strength to the window.
The technique is to "press" a substance (such as putty) under the lead came on both sides of the window that when dried will harden. To facilitate the drying and to add strength tothe window, a curing agent was applied in the same manner to both sides of the window.
James D. Lee 1999 - 2015 Page 29 of 56
Page 29

Stained Glass in the Current Middle Ages
Weatherproofing the 12 th Century Window
Windows in the 12th century were certainly glazed in some way. It seems to me that the glazing compound would have been clay, most probably clay used for making ceramic pots, mixed with linseed oil. The linseed oil would have served 2 purposes. First it would make the glazing compound more pliable and therefore easier to work with. Second, the linseed oil could have acted as a water-repellant. The curing agent that they probably used was gypsum powder.
The logic behind these assumptions is:
1. Ceramic pots and crucibles were used in the glass craftsman's workshop.41
2. They knew about linseed oil.42 3. They knew about gypsum.43
Weatherproofing the 20 th Century Window
The glazing compound used by the 20th century glass artist is petroleum based with additives like magnesium silicate and calcium carbonate included for strength and durability. Like the 12th century glass artist, the glazing putty is mixed with a little linseed oil to make it easier to work with. Since the products in the 20th century are petroleum based, the water-repellant qualities of the linseed oil doesn't matter. The mixture is "pressed" into the spaces between the glass and the lead. Then, to help cure and dry the putty, whiting powder is sprinkled on the window and brushed into the spacesbetween the glass and the lead. This is done on both sides. When the second side is puttied, the window is laid flat and allowed to dry for two to three days.
How this Step was Completed
I used 20th century materials in this step.
Framing the Window
In the 12 th Century
Here also, there is little difference in the techniques used in the 12th century and the 20th century. In the 12th century, they used wood to frame the window. They probably used nails to construct it and animal hide glue if glue was used at all. To hold the window in place in the frame, they used nails driven into the wooden frame at an angle.
41 De Diversis Artibus, Book II chapters 1, 4 and 5 for example.
42 De Diversis Artibus. Book I chapters 20, 21, 25 and 27 for example.
43 De Diversis Artibus. Book I chapters 1, 2, 19 and 22, Book II chapter 27 for example.
Page 30 of 56 James D. Lee 1999 - 2015

Stained Glass in the Current Middle Ages
In the 20 th Century
In addition to wood, the 20th century has metal and plastics that could be used for the frame. Screws could be used to construct the frame and better, waterproof glues are available. Glazing putty or caulking can be used to hold the window into the frame.
How this Step was Completed
For my window, I used a metal frame I purchased in an Arts and Crafts store. If I had used wood, I’d use screws instead of nails to construct the frame. I’d also use modern glue to reinforce the joints. I’d use brads to hold the window in place in the frame, then window glazing putty to reinforce the brads.
Reinforcing the Window
A note on reinforcing the window for strength. I don't need to worry about reinforcing the finished panel since I'm framing it. If I weren't framing the piece, I'd use zinc around the perimeter. It's a stronger, stiffer metal than lead and would provide additional supportfor the panel. Also, if the piece were bigger, I'd reinforce the panel with a piece of steel rebar across the middle. The 12th century craftsman would obtain the services of a smith to create a trellis-like structure. This trellis was structural in nature, being built into the window enclosure. The frame of the stained glass window would be attached to the ironwork structure, holding it in place.
The Finished Panel
Here’s a picture of the panel that was built at the event.
Figure 14 - Finished Panel from the Marwick Event
James D. Lee 1999 - 2015 Page 31 of 56
Page 31
Stained Glass in the Current Middle Ages
More on the Techniques of Painting on Glass for Windows
Background and History
The colors in stained glass windows come from the light that passes through the glass. The object of painting is to prevent light from passing through it. By varying the opaqueness and translucence of the glass with the paint, you can create shadows and highlights. Also, figures can be made to stand out on the glass by applying a thick coat ofpaint to the outline of the figure, obscuring the underlying color of the glass. A pattern oflines or scrollwork on the glass adds decoration but also serves to reduce the dominating brilliance of the glass.
In the 12th century, stained glass windows were “stained” by painting on the glass with a vitreous paint. This was a mixture of s metal oxide and ground glass. Theophilus describes the mixture as 1/3 burnt copper, 1/3 ground blue glass and 1/3 ground green glass combined with urine or wine and calls it a pigment.
By contrast, the 20th century glass artist buys the powdered pigments. These come in twobasic categories: (1) Glass Stainers' Colors and (2) Translucent Glass Colors (known as enamels). Neither of these are stains.
By the 14th century, silver nitrate was used to actually stain glass.44 Glass artists discovered that applying a liquid solution of silver nitrate to the exterior surface of the glass and firing it, white glass would turn yellow and sometimes, blue glass would turn green. Records for the windows at St. Stephen’s Chapel, Westminster has several references to the purchase of silver filings.45 These windows were built in 1351-1352. Nitrated silver is still used to stain glass.
In order for the paint to last, it is fired in a kiln. That is, after the pigment is dry, the painted glass was placed in a kiln and heated. Depending on the pigment, the kiln is heated to between 1250 and 1400 F. Glass melts at between 1500 and 2000 F. Firing the painted glass to the lower temperature will fuse the paint onto the glass at the point when the glass starts to soften.
The kiln used in the 12th century for firing the glass was constructed of clay and horse dung fit over a framework of bent (arched) cane. It was fueled with smoke-dried beechwood. Theophilus gives detained instructions on how to build a firing kiln.46 The 20th century glass painter can choose between electric and gas (propane or methane) powered kilns.
44 Elskus calls this nitrated silver. See The Art of Painting on Glass chapter 7.
45 Glass-Painters, chapter 5.
46 De Diversis Artibus, Book II, chapter 22.
Page 32 of 56 James D. Lee 1999 - 2015

Stained Glass in the Current Middle Ages
The glass artist in the Middle Ages would first cut all the glass using the pattern board. Then he would paint the pieces that required painting. When all the pieces that required painting were painted, the glass was fired in a kiln used specifically for this purpose. When the firing was complete, the glass artist would try to chip the paint off the glass with a fingernail. If the paint didn’t come off, it was ready for the next step in building the window. If the paint came off, the glass piece was repainted and re-fired.
Painting on Glass for Windows
The Paint
In the 12th century the glass craftsman would make his own pigments. The pigment varied in color from gray to reddish-brown or dark black.47 The mixture consisted of a metal oxide,48 ground glass, and gum arabic, urine or wine. Theophilus provides the following instructions for making the pigment: 49
Take copper which has been beaten thin and burn it in a small iron pan until it has all fallen to powder. Then take pieces of green glass and Byzantine blue glassand grind them separately between two porphyry stones. Mix these three togetherin such a way that there is one third of [copper] powder, one third of green and one third of blue. Then grind them on the same stone very carefully with wine or urine, put them in an iron or lead pot and with the greatest care paint the glass following the lines on the board.50 If you want to make letters on the glass, completely cover the appropriate parts with this pigment51 and write the letters with the point of the handle of the brush. 52
The pigment described above was the only color that the glass painter applied to the glassin the 12th century. The discovery of silver stain in the 14th century, the addition of carnation and sanguine colors in the late 15th century and the introduction of colored enamels in the 16th century added to the glass painters’ palette.
The 20th century glass painter can purchase the powdered pigments. However, like his 12th century counterpart, has to mix the pigment with a binder and a liquid mixing agent. The powdered pigments are mixed with a compatible binder such as gum arabic, sugar (regular granulated sugar) or oil of turpentine (also known as Venice turpentine). These
47 Glass-painters, chapter 5.
48 Brown and O’Connor indicate that iron oxide was used. Theophilus recommends copper.
49 De Diversis Artibus, Book II, chapter 19.
50 Tracing technique of painting on glass.
51 Matting technique of painting on glass.
52 Scriffito technique of painting on glass.
James D. Lee 1999 - 2015 Page 33 of 56
Page 33

Stained Glass in the Current Middle Ages
hold the pigment on the glass. A liquid such as water or white vinegar (acetic acid) if the binder is sugar or gum arabic or turpentine if the binder is Venice turpentine is then addedto allow the mixture to be painted onto the glass.53
The Tools
The tools used by the glass painter are the same in the 20th century as they were in the 12th
century. A variety of brushes made from various animals (squirrel, badger, ox, camel, donkey’s mane) are used to apply the paint and to create shading and highlights. Sharpened sticks, needles or even the tip of a brush handle could be used to scratch away painted areas to create ornamentation, lettering and additional shading and highlights. Even the fingers were used to spread and remove paint.
Brushes used in the 20th century are also made of animal hair. The applicator brush, used to apply wet paint or stain to the glass, is made from either camel hair or ox hair. Tracingbrushes are made from red sable, fine ox hair or soft camel hair. The hairs of a tracing brush are long and tapered to form a point. They should be firm and should spring back into a straight position after the stroke is completed. The English Stippler, introduced into the craft in the 14th century, is used for shading, working up drapery, intensifying shadows and producing textural effects. They are made from fitch hair. Scrubs are used to remove paint. These are made of white hog bristles. The blender, the most important and versatile brush used in glass painting, is made from badger hair. Its primary use is for blending wet paint on the glass into an even, flat coating. Secondarily, and of equal importance, it’s used to create textures, striations, stipples and blending of the paint from light to dark for highlighting and shadowing.
Brushes used for glass stainers' colors and enamels are never used for silver stains and vice versa.
In addition to bushes, the glass-painter has other implements such as sticks and needles that are used to remove paint, palettes that are used to blend the paint with the medium, palette knives and a mullet. The glass-painters palette is made of glass, typically ¼” (plate glass) thick. The palette knife is used to measure out pigment and for mixing on the palette. The mullet is like a flat-bottomed pestle and is used to further grind the pigments if desired.
The Techniques
Painting on glass encompasses three distinct techniques. The actual painting of figures ordesigns is called tracing. Applying paint to a large area of glass either for shading or highlighting or to prevent light from passing through the glass is called matting. Scratching the matting coat off to write letters or to add additional designs to enhance the window is called scriffito.
53 The Art of Painting on Glass, chapter 2.
Page 34 of 56 James D. Lee 1999 - 2015

Stained Glass in the Current Middle Ages
Painting was usually done on the interior surface of the glass. However, back painting onthe exterior surface was commonly used in the Middle Ages to reinforce shading on the inner surface or to create special effects. Silver stain is and was always applied to the exterior surface of the glass.
Although the techniques haven’t changed over the centuries, the emphasis of one technique over another has. 54
Throughout the centuries, matting techniques and their uses changed continuously. In early windows, the matting was applied as a light, even wash to soften the contrast between the sharp, dark traceline and the unpainted background. The highlighted areas were produced by clearing off the matting with sharp sticks and hard brushes, thus not only creating a softer contrast, but also adding another dimension in the manner of topographical relief.
Later, when artists in stained glass turned toward a more realistic approach to human figures and objects, the matting technique became significantly more complex. While tracing is the dominant feature in glass painting of the 12th and 13th centuries, the 14th and 15th centuries show a definite turn of interest to matting as the major technique.
There is a “sub-category” of matting called stippling, which is also used to obtain highlights and shadows. The brush technique is different however. With matting, the glass-painter uses long, even strokes to spread the paint. Stippling employs a dabbing motion of the bristles of the brush on the glass, giving the glass a dappled effect. The amount of shading and highlights attained depends on the amount of dabbing on the glassand the amount of paint on the brush.
The Projects
The projects undertaken for this chapter focused on the techniques, processes, materials used in painting on glass and the effect of painting on glass for making stained glass windows. These also were done as a comparison between the 12th and 20th centuries. However, only the aspect of painting on glass and firing for stained glass windows was stressed.55
With each phase of both projects, I will explain the 12th and 20th century technique, process or material and tell how I did it and why.
Review of Steps in Making a Stained Glass Window
54 The Art of Painting on Glass chapter 6.
55 I have previously demonstrated the basic technique for making a stained glass window at the Marwick Harvest Faire and Arts Exhibition in November of 1999. Please see the pertinent sections in the chapter On the Basic Construction of a Stained Glass Window.
James D. Lee 1999 - 2015 Page 35 of 56
Page 35

Stained Glass in the Current Middle Ages
Making a stained glass window encompasses several steps. Each step must be completedbefore the next one can be started. Painting on the glass is in the middle of the process. To get to the point where the glass artist can paint the glass, the following steps have already been completed:
1. Preparing the pattern and choosing the glass colors.2. Cutting the glass.3. Fitting the glass to the pattern.
I have given a detailed comparison and explanation of the techniques, processes and materials used to complete these steps in the previous chapter. The technique, process or material I used to complete these steps is the same for both projects.
To recap these steps:
1. The 12th century glass craftsman smoothed and leveled a board, coated it with a mixture of chalk and water and drew the pattern on it. The 20th century craftsman uses paper and pencils or computer software.
2. Glass was cut in the 12th century by applying a hot iron to the glass, trying to get it to crack. In the 20th century a glasscutter is used.
3. The cut pieces of glass were fit to the pattern with a grozing iron in the 12th century. The 20th century glass craftsman can either use grozing pliers as they did in the 12th century or use a glass grinder.
The glass is then painted and fired.
In the 12th century, the pattern was drawn on a board that was planed smooth and flat. Theophilus gives detailed instructions on this process (see notes 27 and 28 above).
According to Cennini56 the stained glass craftsman obtained the services of an “easel” artist to create the cartoon on paper or parchment. However, Theophilus intimates that57
All aspects of the creation of a window were unified within one workshop, although the extent to which individuals executed every operation no doubt depended on expertise and talent. It would seem that even the grandest workshops accepted relatively lowly glazing commissions.
It’s certainly possible that one of the people in the workshop had training as an easel artist.
56 Il Libro dell’Arte.
57 Glass-Painters, chapter 3.
Page 36 of 56 James D. Lee 1999 - 2015

Stained Glass in the Current Middle Ages
Panel for King Andreas I
The first project was a panel that was presented to King Andreas I of the East Kingdom atTwelfth Night in January 2001 by my household, The Silver Horde. This project didn’t start out as an exercise in glass-painting. It was supposed to be just cut glass. The client couldn’t afford a panel that was both cut glass and painted glass. The panel was King Andreas’ household (Haus Blutwache) device which is emblazoned
Per Pale sable and gules, a Maltese cross between four mullets of eight points all within a bordure of argent.
The panel just has the Maltese Cross charge with the field and border. It does not includethe mullets (this, too was a bugetary constraint of the client). The problem was that as I was selecting glass, I noticed that the black glass was so dense that no light was transmitted through it. I didn’t like the effect of the black glass being so opaque and the rest of the panel being somewhat translucent (clear, textured glass was used for the Maltese cross and the border). I realize that this is the nature of black glass, but I don’t have to like it. My alternatives were to use a different type of glass that was clear and black (called Baroque and expensive), use a dark grey colored glass (which might be taken for argent), try to get an antique glass in black (very expensive) or not do the panel at all (artist’s priviledge). Then it dawned on me. I could get a “semi-translucent” glass by taking clear glass and matting it black. This would let light coming from behind the panel to pass through it and retain the semblence of the black color and reflect light coming from the front. The clear glass was matted on the back. This satisfied my client’sbudgetary constraints because I painted on clear glass instead of using art glass.
The pattern was made as described by Theophilus (again using plywood for reasons previously stated, the panel is 16+” square). The glass was cut and the pieces fit using 12th century techniques and 20th century tools. Then I matted the clear glass pieces for theblack side of the panel and fired the glass in a propane powered kiln. The panel was leaded, cemented and framed.
Although this was a simple matting of a few pieces, this project shows that the effect of painting on glass can change the nature of the piece being made. I certainly could have used black glass, but the overall affect of using the painted clear glass is more appealing to the eye, at least it is to my eye. Also, the black portions of the panel are much softer intone than it would have been had I used black glass.
Figure 15 - Picture of Finished Panel for King Andreas I
James D. Lee 1999 - 2015 Page 37 of 56
Page 37

Stained Glass in the Current Middle Ages
Just for Kicks
For the second project for painting, I wanted to incorporate as many aspects of stained glass as possible. I also needed to keep the project simple enough to complete it and haveit conform to my schedule. It would have been nice to use techniques of the Middle Agesfor the entire project. However, for reasons of safety, expense and space, this was not practical.
The Pattern
As Cennini states, the stained glass craftsman obtained the services of an “easel” artist to create a full sized pattern (called a cartoon) on paper or parchment. I drew the cartoon for this project on paper.
Selecting the Glass
The glass used for this panel is what is known as cathedral glass. This is a smooth, singlecolor, transparent glass. I chose colors that were made in the 12th century, namely red, green, blue, purple and yellow.
The Pattern Board
As with the other projects, I was faced with the dilemma of getting a board wide enough to be used as a pattern board. However, this became moot because I actually worked on this project in two places and the pattern had to be portable. Therefore, I used a paper pattern instead of a pattern board.
The construction lines were drawn with different markers. An ultra fine marker with black ink was used to show the outside edges of the panel. This is called the “finished panel size”. A marker with a thicker point with black ink was used to show the heart of the lead. This is called the “glass size”. A third marker, with an ultra fine point but with red ink was used to draw the interior lead edges. This is called the “viewable size” or “viewable area”.
Cutting and Fitting the Glass
A piece of glass of the appropriate color was placed on the pattern in the desired location and the size and shape of the pattern piece was traced onto it. Instead of using a chalk and water mixture, applied with a natural hair brush, to trace the outline of the pattern piece, I used the same marker that I used on the pattern to indicate the lead heart lines. By tracing the pattern lines with this marker onto the glass and cutting on the inside edge of the line, the cut piece of glass would be the correct size.
Page 38 of 56 James D. Lee 1999 - 2015

Stained Glass in the Current Middle Ages
The glass was cut with a 20th century glasscutter and fit to the pattern by grozing with grozing pliers.
Painting on the Glass
After all the glass was cut, the designs were painted on the glass. Glass stainers’ colors were used for this project instead of the low-firing acrylics I used in the first project.
The panel for this project has two main sections. The top (head) section is 1/3 of the totalheight of the panel and has the Chinese character for love in a circle. The circle was cut glass and the Chinese character was painted. The glass of the circle is red and the glass surrounding the circle is blue. The outline of the strokes of the Chinese character is traced in black, as is a band around the edge of the circle. The glass of the circle has no matting. I wanted to retain the brilliance of the red glass behind and around the Chinese character. The blue glass surrounding the circle was matted using the flat matting technique. With the flat matting technique, the matting color is spread smoothly and evenly on the glass with the blender brush. Little to no texture is created with the blender. Shading (heavier coating of paint) was created on the side of the blue glass closest to the circle.
The bottom section consists of quarry glazing in a diamond pattern. No paint was appliedto this section of the panel. The upper portion of the bottom section contains an arched section with calligraphy on which I signed the panel. Under the arch is a Yin-Yang symbol.
The calligraphy was done with tracing instead of scriffito. This makes the letters stand out better. The arch was cut in yellow glass and was “back” stippled. That is, matted on the outside surface of the glass with the stippling technique.
The Yin-Yang symbol is cut glass. The black side is clear glass flat matted with black glass stainers’ color. The red side was matted with a thin coating of paint to reduce the brilliance of the red glass. Left un-matted, the color on the red side would have over-powered the color of the black side.
The glass above and below the arch is matted. This was done to emphasize the painted design elements of the calligraphied arch and the Yin-Yang symbol. Scriffito, using a scrub, was applied to the edges of the glass closest to the arch and the Yin-Yang symbol creating a “feathered” highlight.
Consideration for Painting
Aside from the technical considerations of proper proportions in the mixture of the pigment, correct consistency of the paint and proper brush techniques, there is one major consideration the glass painter should be aware of. If the same mixing agent, for examplewater, is used for both the tracing color and the matting color, there is a real possibility
James D. Lee 1999 - 2015 Page 39 of 56
Page 39

Stained Glass in the Current Middle Ages
that water in the mating color will dilute, dissolve and destroy the tracing color under it. There are two ways to reduce this risk.
The first method is to fire the tracing color first. Extra care in selecting the tracing pigment is required with this method because some glass stainers’ colors do not re-fire well.
The second method is to use a different mixing agent for each. Using turpentine or denatured alcohol with the matting color or acetic acid (vinegar) with the tracing color will help reduce the risk, but does not remove the risk completely.
There are advantages and disadvantages with each method. Firing the tracing color first will permanently secure it to the glass and therefore eliminate the risk of the matting coat destroying the tracing color, regardless of the mixing agent used. This is certainly an advantage, but is a mixed blessing. Extra care is required in selecting the pigment for tracing. When the matting coat is fired, the tracing color is actually being re-fired. Sometracing colors do not re-fire well, becoming pitted or actually frying up in the kiln. Also, firing the tracing and matting separately adds time to the overall project. Both of these are disadvantages, although the first could be catastrophic, while the second is merely inconvenient.
Using different mixing agents alleviates the need for two firings. This in turn removes the risk of destroying the tracing when the matting color is fired; a definite advantage. The disadvantages arise in the properties of the various mixing agents. For example, acetic acid (white vinegar) can be used instead of water as a mixing agent for tracing paints. The vinegar makes the tracing paint water-repellent and water based matting paint can be used. At first glance, this may seem to be an advantage. The disadvantage comes from ensuring that the correct amount of gum arabic is added to the mixture. An insufficient amount of gum arabic when vinegar is the mixing agent will result in the problem that using vinegar is trying to resolve. That is, the water in the matting paint willdissolve the tracing color causing the tracing paint to mix with and disappear into the matting color. Using alcohol as the mixing agent for matting paint requires that the blending be done quickly. This is because the alcohol in the pigment will evaporate quickly and cause brush streaks to appear as the matting coat is worked. The disadvantage of using turpentine (with oil of turpentine as a binder) for tracing paint is the length of time it takes to dry, which is typically overnight. This, like firing twice, adds time to the project.
I use vinegar as the mixing agent with my tracing paint and water with my matting paint. Whenever I can, I try to paint with a single firing in mind.
Leading, Soldering and Glazing the Panel
I used 2 sizes (face widths) of lead in this panel. The border, the lead lines between the head and the Yin-Yang section and the lead line between the Yin-Yang section and the quarry glazing is 3/8” flat “H” came. All other lead is 7/32” round “H” came.
Page 40 of 56 James D. Lee 1999 - 2015
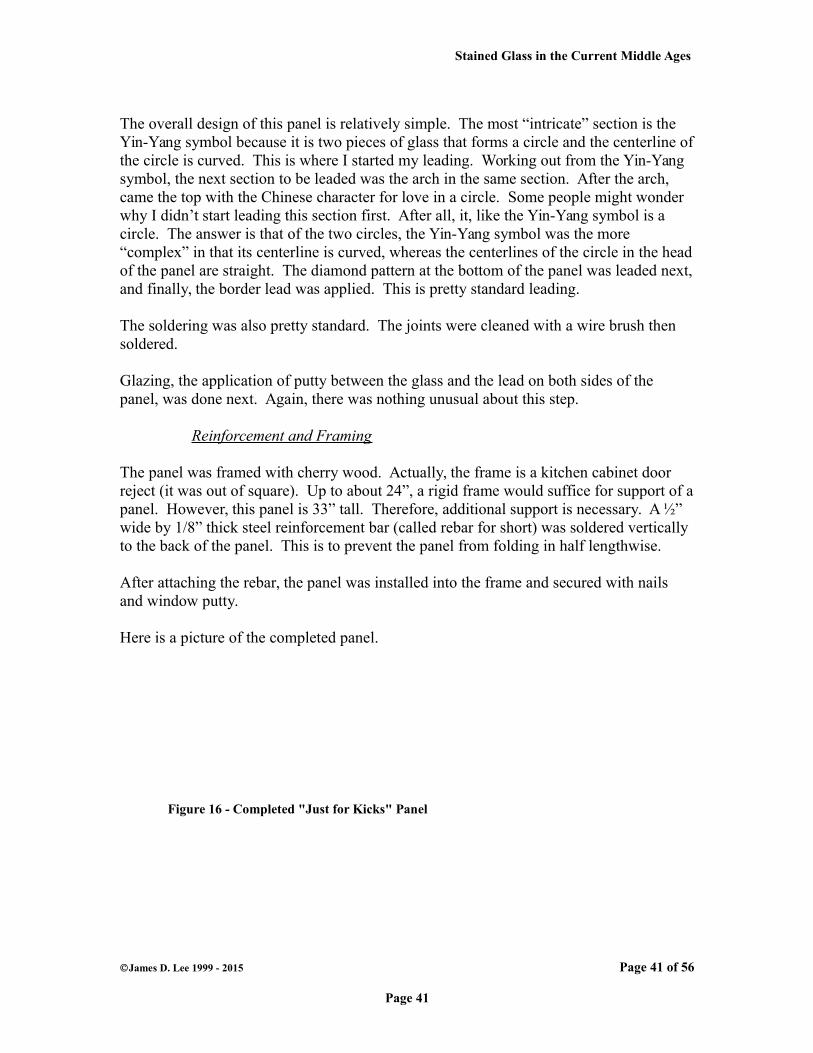
Stained Glass in the Current Middle Ages
The overall design of this panel is relatively simple. The most “intricate” section is the Yin-Yang symbol because it is two pieces of glass that forms a circle and the centerline ofthe circle is curved. This is where I started my leading. Working out from the Yin-Yang symbol, the next section to be leaded was the arch in the same section. After the arch, came the top with the Chinese character for love in a circle. Some people might wonder why I didn’t start leading this section first. After all, it, like the Yin-Yang symbol is a circle. The answer is that of the two circles, the Yin-Yang symbol was the more “complex” in that its centerline is curved, whereas the centerlines of the circle in the headof the panel are straight. The diamond pattern at the bottom of the panel was leaded next,and finally, the border lead was applied. This is pretty standard leading.
The soldering was also pretty standard. The joints were cleaned with a wire brush then soldered.
Glazing, the application of putty between the glass and the lead on both sides of the panel, was done next. Again, there was nothing unusual about this step.
Reinforcement and Framing
The panel was framed with cherry wood. Actually, the frame is a kitchen cabinet door reject (it was out of square). Up to about 24”, a rigid frame would suffice for support of apanel. However, this panel is 33” tall. Therefore, additional support is necessary. A ½” wide by 1/8” thick steel reinforcement bar (called rebar for short) was soldered vertically to the back of the panel. This is to prevent the panel from folding in half lengthwise.
After attaching the rebar, the panel was installed into the frame and secured with nails and window putty.
Here is a picture of the completed panel.
Figure 16 - Completed "Just for Kicks" Panel
James D. Lee 1999 - 2015 Page 41 of 56
Page 41
Stained Glass in the Current Middle Ages
Medieval Society and The Craft of Stained Glass
Social Status of the Glass Craftsman
In the early middle ages, it is hard to tell what social status the stained glass craftsman held. This is primarily due to the fact that it’s much easier to identify the patron of a window than it is to find its artist. 58
Artists received little public credit for their creativity and are only acknowledged in the prosaic documentation of financial transactions. In the relationship between the medieval artist and patron, it was the person who paid whose importance was paramount. Like the vast majority of medieval artists, the glass-painter tends to remain anonymous.
For every rule, there is an exception, and there are exceptions in this instance. For example, a panel dated around 1160 portraying Moses and the Burning Bush, from the Premonstratensian monastery of Arnstein (now in the Landesmuseum in Munster in Westphalia) contains the glass-painter, Gerlachus holding his brush and paint-pot and praying for the gift of light.59 In another case, a signature rather than a portrait can be seen in the Joseph window (around 1235) from the ambulatory of Rouen Cathedral, which refers to the otherwise unknown glass-painter Clement of Chartres.60
It was only in the late Middle Ages that the social status and economical prominence of glass-painter became more known. For example, in the 1380’s, the Oxford glass-painter Thomas Glazier is described dining in hall with the scholars of New College. New College glazing was just one of a number of commissions that Thomas undertook for the wealthy and powerful William of Wykeham, Bishop of Winchester (1366-1404) and Chancellor of England (1367-1371).61 To further support this prominence, a portrait of Thomas appears in the east window of Winchester College Chapel under a banner with the words Thomas operator vitrii istius (Thomas, maker of this glass).62
In the late Middle Ages, it became more popular for glass-painters to sign or initial their work. For example, the east window of York Minster (1403-1408) has the monogram of the glass-painter, John Thornton at its apex.63
58 Glass-Painters, chapter 3.
59 Glass-Painters, chapter 3.
60 Glass-Painters, chapter 3. The Joseph Window in Rouen Cathedral was a gift of the cloth merchants. The signature was scriffito’ed and reads Clemens Vitrearius Carnotensis M[e Fecit], Clement, glass-painter of Chartres made me.
61 Glass-Painters, chapter 3.
62 Glass-Painters, chapter 3.
63 Glass-Painters, chapter 3.
Page 42 of 56 James D. Lee 1999 - 2015

Stained Glass in the Current Middle Ages
There is documentary evidence of glass-painters and their activities. However, these records are in the form of financial accounts and, although many hundreds are named, very few of their windows can be identified. Also, the records indicate that many large English towns supported groups of glass-painters and, by the early 13th century were organized into an urban craft group.64
The records of the glass-painters for the city of York are amongst the most extensive and best studied of the English documents. Between 1313 and 1555 over one hundred glaziers and glass-painters cab be identified in the Freemen’s Registers, while over roughly the same period, more than fifty names appear in the Norwich records.
The “label” given to those working on window glass in Medieval documentation was the Latin vitriarius, French verrier or verrour and, from the 14th century, the English glazenwright of glazier. Glazier was also used initially for someone who actually manufactured glass. All of these terms emphasize the medium in which the artists worked and was meant to encompass all aspects of stained glass window making. Only rarely is the area of glass painting separated. For example, Magister Fridericus (Master Friedrich), vitriarius pictor, who worked at the Abbey of Klosterneuberg in Austria during the second half of the 13th century, was probably both a glazier (as we define this term today) and a painter, rather than a glass-painter.65
With the increasing divide between the craft and artistic elements in window production during the course of the 16th century, the word glazier became more specialized and was reserved for those making leaded lights, with its pejorative associations of being allied to plumbing (that is, working in lead), while terms like glass-painter and peintre-verrier were coined for those of more artistic bent who worked on stained glass windows.
These changes in terminology seem to coincide with the start of the decline of stained glass as a major art form. The interpretation of the terminology can be problematic at best. Does the man called “glazier”, who is paid a “few pence”, have the same role as themaster employed to paint and install a complete glazing scheme? During the Middle Ages, the names given to glass-painters and glaziers were used indiscriminately for both. The small amount of evidence there is indicates that there wasn’t a definitive separation of the simple glazier and the stained glass crafts. It’s only in the late Middle Ages that there seems to be any evidence of a “specialization” that split the role of the glazier and the glass-painter. This can be attributed to the increase in demand for domestic glazing.
64 Glass-Painters, chapter 3.
65 Glass-Painters, chapter 2.
James D. Lee 1999 - 2015 Page 43 of 56
Page 43

Stained Glass in the Current Middle Ages
For example, in 1533, twenty-one feet of ready-cut quarries were bought at Durham.66 This probably required relatively little special skill to install them.
The Guilds
In the Middle ages, crafts were regulated by guilds. The regulations of the guilds were upheld by civic authorities and served to protect the craftsman as well as the patron. Glass-painters’ Guilds are known to have existed in London, Chester, Norwich and York. The oldest surviving regulations are those from London, dating from 1364/65 and the York Ordinances surviving from about 1380 and 1463/64.67
These regulations can give us some insight into the organization of the craft as well as how its practitioners were trained. The York Ordinances decreed that 68 all work done above the value of a half a mark should be inspected by the Guild’s serchours69 before it left the city. This is clearly an attempt to protect the reputation of York craftsmanship. “Shady” practices like using unfired paint (quick and easy to do, but not permanent) would easily be spotted by the searchers. The Ordinances of York Glaziers of 1463/64 are very specific70
They shall emounges hem selfe every yere in the fest of Seint Luke71 chese hem two that shall be made in the said craft and to see that it be wele, truly and substancially wroght, and that therein be noo descyt unto the kynges peple.
Likewise the statutes of the Paris glaziers of 1467 and the Lyon glass-painters confirmed by King Charles VIII in 1496, were very precise about tasks to be undertaken and stress the quality of materials to be used and the craft skills of the glaziers. Severe penalties were stipulated for malpractice and sub-standard workmanship.
Guilds also regulated admission to the practice of the craft! The York Ordinances state that no one could72
66 Glass-Painters, chapter 3.
67 Glass-Painters, chapter 3.
68 Glass-Painters, chapter 3.
69 “Searchers”, master glaziers appointed by the guild to maintain standards.
70 Glass-Painters, chapter 3.
71 Saint Luke was believed to have been a painter and therefore a saint to whom medieval artists andparticularly painters were universally devoted and to whom many medieval painters’ guilds were dedicated.
72 Glass-Painters, chapter 3.
Page 44 of 56 James D. Lee 1999 - 2015
Stained Glass in the Current Middle Ages
Sett up a shop as a master unto suche tyme he aggre with the serchours of the said craft for a certain some.
Not all cities where stained glass windows were made had their own glass-painters’ guild.The glass-painters in Norwich, for example, belonged to the Guild of St. Luke, which also included bell-founders, braisers, painters, pewterers, and plumbers.73
Training
The guilds controlled training in the crafts. Training in the glass craft usually began around the age of 10 and was only given in the workshop. An apprenticeship lasted a number of years (four, seven and even ten). In England, where seven years of training was preferred, only one new apprentice could be taken at a time. A second apprentice could be taken only after the first had completed four years of training. To end his apprenticeship, and be considered a “master”, the apprentice was required to produce a special panel known as a “master-piece” to prove his proficiency. The 15th century Vienna Ordinances stipulated that for such a master-piece74
A glazier shall design and paint a panel of glass work.
By restricting the number of apprentices employed by a single master, the guilds could prevent the market from being flooded but half-trained craftsmen. One might also surmise that the workshops were on the small side; a master and one or two apprentices.
73 Glass-Painters, chapter 3.
74 Glass-Painters, chapter 3.
James D. Lee 1999 - 2015 Page 45 of 56
Page 45

Stained Glass in the Current Middle Ages
Restoration of Stained Glass Windows
A stained glass window, like any other window needs to be serviced. What does this mean? Take for example, a window in your house. Every time you pass this window in the winter, you feel a cold draft of air. In the summer, the room that this window is in is always warmer than the rest of the house. Why is this, you ask yourself? The answer is the window probably needs to be re-glazed. That is, the old putty removed and new puttyapplied. You get this done (or do it yourself) and you no longer feel the cold draft in the winter and the room is as cool as the rest of the house in summer. Why did this happen? Putty doesn’t last forever! After a few years, it hardens, starts to deteriorate and falls off the window. Everywhere the putty fell off, an air leak was created. In the winter, cold airgot in and in the summer air conditioning got out. There’s nothing you can do about this, it’s the nature of putty to harden and deteriorate.
It’s the same thing for stained glass windows, but on a broader scale. The glazing putty holding the window to the frame could be replaced with the window in place. However, if the glazing between the lead and the glass starts to deteriorate, the window should be removed from the building to be re-leaded. This is not a hard and fast rule; it’s just easierto re-lead the window when it’s flat on a workbench.
Overview of Restoring a Stained Glass Window
A stained glass window that was built and glazed correctly shouldn’t have to be re-leadedfor a quite some time. The exact time to failure of the lead depends on several factors, including care and maintenance of the windows, weather conditions in the area and pollution.
The first decision the stained glass preservationist must make is whether to perform an “in-place” repair or a full studio restoration. This decision is based on many factors including, but not limited to:
The condition of the window. The benefits of removal should outweigh the risks. Whether the client can afford to have all the necessary work done.
If, in his analysis, the stained glass preservationist determines that the windows can only be worked on in-place, a full restoration is not possible. In the case, the preservationist can only:
Ensure that the client has proper documentation (including pictures) for the windows.
Clean the windows (only if the paint on painted surfaces is stable). Make any “stopgap” repairs such as re-caulking to prevent inclement weather
from getting into the building.
Page 46 of 56 James D. Lee 1999 - 2015
Stained Glass in the Current Middle Ages
Things that shouldn’t be attempted in an in-place repair are:
Re-cementing the window. Flatten bulges in the window. Add any structure items like support bars to the window.
The single major concern of any restoration project, aside from the overall condition of the window, is the stability of the paint on painted pieces. Problems bay include on or more of the following:
Missing trace lines. Degradation of matting or scriffito. Lifting of enamels. Accumulation of dirt. Metalizing of the silver stain. Loss of paint due to under-firing or not firing (cold paint) at all.
The cause of these problems can be attributed to one or more of the following:75
Insufficient Firing of the Glass. Temperature controls and apprentices were not always accurate. If the glass was under-fired, the paint became unstable.
Incompatibility. This situation is most common with enamels. Enamels are fired at a lower temperature and usually adhere to themselves better than they do to glass. If the coefficients of expansion between the glass and the enamel differ significantly, they may become unstable and peel off the glass in sheets. This may occur on a smaller scale with trace and matted paints. The loss of enamel is common to Tiffany windows.
Composition of the Flux. It is said that certain late 19th century glass paintersadded borax to flux their paint. This may have resulted in a paint that dissolves in water, even after firing. All paint loss is further accelerated by theattack of water. Condensation, allowed to sit on the glass promotes corrosion. The glass and the paint absorb water causing the loss of free alkali ions. This contributes to the breakdown of the molecular matrix of the glass. If the paint is not composed of a durable glass base, it will quickly deteriorate.
A full studio restoration of a stained glass window can be likened to taking a jigsaw puzzle apart and putting it back together again, which implies a methodical approach to the task. Windows are cut up into sections. This is because they’re too big and too heavyto be worked on by one person. This is done as the windows are being removed from the
75 Included with permission of the Stained Glass Association of America from article, Paint Stability and Related Problems, by Arthur J. Femenella ( 1996 Stained Glass, Quarterly of the Stained Glass Association of America). The article may be viewed in its entirety, with pictures showing various paint stability problems at www.artglassworld.com/mag/sglass/paint. I didn’t include these picture because of poor resolution.
James D. Lee 1999 - 2015 Page 47 of 56
Page 47

Stained Glass in the Current Middle Ages
building. Each section is marked as to its position within the window and the window's location in the building.
Since the original patterns for the windows are not available, rubbings are taken of each section. At least two rubbings of section or each window are made. Rubbings are usuallymade by placing strong paper, like 70-lb craft paper, over the window section, securing the paper to the workbench and rubbing a crayon over the paper. This transfers the lead lines to the paper. However, this is not the only way to create a rubbing. A recent restoration job at Stained Glass Imagery required that the rubbing be created by rubbing graphite powder over the paper with the window section underneath. This caused a mess,especially when more graphite powder needed to be added to the paper! Then we realized that we could take a lesson from Theophilus. When we took the first few rubbings, we used our fingers to apply the graphite powder. Seeing this was too messy, we started using a rag. This too was messy. Theophilus instructs the 12th century glass craftsman in the making of the pattern board as follows:
Then take a piece of chalk, scrape it with a knife all over the board, sprinkle water on it everywhere, and rub it all over with a cloth.
Well, we scraped the graphite sticks with an Xacto knife over the paper (of course we didn’t wet it), then rubbed the graphite into the paper and voila, a nice neat rubbing.
The old lead is examined to determine the face width and the rubbings are marked accordingly. At Stained Glass Imagery, we use a color code to indicate the different widths of lead. The location of reinforcing (rebar) bars is also indicated on the rubbings. Lead on the perimeter of the section is gently pulled away from the glass in several placesand measurements are taken “glass-to-glass”. These measurements are also noted on all rubbings.
The section is then placed in a soaking tub that contains hot water and mild detergent (like dish washing liquid). This loosens the old lead and putty. After soaking for a few days, the section is taken apart and the glass cleaned of dirt, old putty and building paint. If the paint on the painted pieces has been determined as unstable, of these pieces is done “as best as possible”. Typically, this means that putty on the edge of the glass is removed,but anything on the face of the glass is untouched. This is especially critical with cold (unfired) paint. It’s better to leave dirt on a piece of glass with unstable paint than it is to risk losing the original paint in the cleaning process.
The pieces of the section are placed on one of the rubbings that were taken, the same waya glazier would lay out his pieces on a pattern for a new window. Broken pieces of unpainted glass are either repaired with copper foil or replaced.
Now the task of restoring the painted glass begins. If the paint is stable, then the glass was cleaned as described above and nothing else needs to be done to it. However, if the paint was not stable, then the deterioration needs to be arrested. This can be done in a
Page 48 of 56 James D. Lee 1999 - 2015

Stained Glass in the Current Middle Ages
number of ways, all of which should be performed by an experienced stained glass preservationist. These techniques include:76
Coverplates. One of the most successful techniques used to restore lost details is to apply a cover or back plate to the affected piece. Whether a front or back plate will be used depends upon which surface the original decoration was applied, and the type of original glass. The missing artwork is painted on a very thin, untextured, colorless piece of glass that has been cut to the shape of the piece over which it will be plated. The paint should be applied to the surface of the glass plate closest in proximity to the original, deteriorated paintsurface. This will diminish the parallax when the restored piece is viewed from an angle. Vitreous paint may be used and fired, because the historic glass is not altered. The cover plate is applied mechanically with foil or lead came, or is glazed into the same came as the historic glass, space permitting. This process is totally reversible. Only the missing detail that can clearly be determined to once have been part of the historic glass should be applied to the coverplate. Do not attempt to second guess Messrs. Connick, Cotfier, Tiffany and other masters.
Coverplates can also be used to protect fragile paint from further deterioration.Unpainted glass, mechanically applied to the inner surface of the window, is used for this purpose. It is important to conduct on-site monitoring of plated installations to insure that condensation does not form on the painted surface of the historic glass.
Consolidation. Consolidation of fragile paint is the process where loose and flaking paint is re-attached to the glass surface. This is achieved through one of the following ways:
1. The introduction of a chemical adhesive between the fragile paint and the glass surface.
2. The application of a cold (unfired) transparent coating to the damaged area.
3. Re-firing the glass.
All these techniques should be considered experimental. While some may be better than others, the jury is still out regarding which is the best method. Theconservator must be aware of the controversial nature of these procedures and make every effort to inform the steward [of the windows] of the objective regarding the choice of options.
Adhesives. The goal of this technique is to introduce a reversible adhesive between the fragile paint and the glass. In practice, this proves to be profoundly difficult. Microcystalline waxes have been used in the past, but
76 Paint Stability and Related Problems
James D. Lee 1999 - 2015 Page 49 of 56
Page 49

Stained Glass in the Current Middle Ages
they tend to flow and attract dirt. In my opinion [the article’s author], the best system to date is the epoxy/silane77 system developed by objects conservator Steven Weintraub in association with the Greenland Studio for the windows atSt. Ann and the Holy Trinity in Brooklyn, New York.
The areas of the glass with fragile paint are pre-treated with a dilute solution of silane that acts as a coupling agent, and maximizes the adhesion of the epoxy. The same area is then treated with a dilute solution of epoxy, specifically developed for the conservation of glass. Excess epoxy is carefullycleaned away from the surface with cotton swabs and acetone. The object is to apply the epoxy under the paint, not on top of it. If the paint retains its matte finish, or dull sheen, (most fragile paint has a matte finish) the process is successful. As stated before, and cannot be stated too often, do not hesitate to consult an expert who has had experience with this procedure if you do not have experience in the area.
Coatings. A coating is a chemical substance that encapsulates the entire pieceof glass, similar to the way varnish covers a wooden surface. Coatings shouldbe avoided at all times. There have been experiments with coatings in Europe,many with disastrous results. The primary problem with this approach is that moisture continues to migrate beneath the surface of the coating. Trapped against the glass, it accelerated the deterioration of the glass matrix. As the matrix releases alkalis, the adhesion of the coating is disturbed. Eventually, the coating lifts off in sheets, taking the fragile paint with it, and results in more permanent damage than benign neglect would have ever caused.
Re-firing the Old Glass. The over-fusion technique, referred to as the Zettlerprocess, involves firing on a low melting, fusible, glassy powder at 400C onto the deteriorated surface of the historic glass. The system can fail due to differences in the coefficients of expansion in the two glasses. Or, the glass can be re-fired to a temperature sufficient to re-fuse the loose paint back onto the historic glass.
Both of these processes have serious defects and should always be avoided. They are irreversible. Any dirt that is on the glass will be fired into the glass. The surface character of the glass will be dramatically, and permanently changed. Also, more paint may fire off in the kiln. The historic glass is put at a tremendous risk during the process. If one loses a kiln-full of glass on a newwork, the bank account diminishes and the hangover is intense. If a kiln-full of historic glass is lost, it can never be replaced. Until a firing process is proven to be suitable for historic glass, re-firing is an irresponsible approach for the restorer to take.
77 Silanes are any series of covalently bonded compounds containing only the elements silicon and hydrogen.
Page 50 of 56 James D. Lee 1999 - 2015
Stained Glass in the Current Middle Ages
After the entire section is cleaned, and the painted pieces addressed, it is re-leaded and re-glazed. This is the most pain-staking, yet most exhilarating step in the restoration process. Imagine re-leading a window that was originally leaded by Tiffany!
Finally, when all of the sections of all of the windows have been re-leaded and re-glazed, the windows are re-installed in the building.
The term “Restoration”, like the term “Stained Glass” is misleading and used to describe the full studio restoration as well as the in-place repair. Restoration implies that the window will be brought back to its original, undamaged condition, something that cannotbe done with an in-place repair. The client should realize that an in-place repair is just that, a repair. It is not as long-lasting as a full studio restoration and the in-place repair may fail in a relatively short time.
James D. Lee 1999 - 2015 Page 51 of 56
Page 51
Stained Glass in the Current Middle Ages
Bibliography
Brown, Sarah and O’Connor, David, Medieval Craftsmen Glass-Painters. ISBN 0-8020-6917-7
The Catholic Encyclopedia (www.newadvent.org/cauthen).
Cennini, Cennino d’Andrea, Il Libro dell’Arte (The Craftsman’s Handbook), translated by Daniel V. Thompson, Jr. ISBN 0-486-20054-X
Corning Museum of Glass, A Resource for Glass and Glossary of Glassmaking Terms.
Elskus, Albinus, The Art of Painting on Glass. ISBN 0-9629053-0-5
Encyclopedia Britannica (www.britannica.com).
Femenella, Arthur J., Paint Stability and Related Problems ( 1996 Stained Glass, Quarterly of the Stained Glass Association of America).
Femenella, Arthur J., Repairing Stained Glass In-Place (( 1996 Stained Glass, Quarterly of the Stained Glass Association of America).
Kokomo Opalescent Glass (Kokomo, IN), Man and Machine: A Legacy of Excellence.
Mathews, Jim, The Continuous Ribbon ( 2000 Spectrum Glass Co., Inc.) from The Score (#18), published by Spectrum Glass Company, Inc.
Mathews, Jim, A Bit About Glass ( 2000 Spectrum Glass Co., Inc.) from The Score (#40), published by Spectrum Glass Company, Inc.
Spectrum Glass Company, Inc (Woodinville, WA), A Guide to Commonly Used Terms in the Art Glass Field ( 1998 Spectrum Glass Co.)
Theophilus, De Diversis Artibus (On Divers Arts), translated by John G. Hawthorne and Cyril Stanley Smith. ISBN 0-486-23784-2
Page 52 of 56 James D. Lee 1999 - 2015

Stained Glass in the Current Middle Ages
Glossary
AnnealingCooling the formed glass product at a controlled rate of time and temperature change for the purpose of relieving thermal stress. The appropriate cooling curve varies with glass type and formed shape, especially thickness.
Cathedral GlassSingle color sheet glass, usually smooth on both sides, but it can have a texture.
CartoonA full-scale design for stained glass on parchment of paper.
Drapery GlassGlass sheets with multiple dramatic folds, likened to those of hanging drapes. Used in windows where the folds of robes need to be depicted.
ForehearthA shallow chamber through which molten glass passes on its way from a continuous melting furnace to the forming process. The purpose of this chamber is to allow the temperature of the glass to drop from the melting temperatures (about 2,700F) to forming temperatures (about 2,200F for 1/8” thick sheet glass).
FritGround glass ranging in size from gravel-like to fine powder. It’s sometimes usedas a raw material for making glass and sometimes as a coloring agent of for decorative effect in glass blowing and fusing.
Lehr (or Leer)Multi-chambered oven used for annealing (cooling) glass sheets in their manufacture.
MattingPainting technique of applying a translucent coat of paint to the surface of a large area of glass. This coat could have shading and/or highlighting or not.
MetalingA bluish or opaquish amber cast to glass with silver stain applied due to over-firing.
Porphyry StoneAny igneous rock used for grinding.
Quarry GlazingPieces of diamond- or square-shaped cut glass.
James D. Lee 1999 - 2015 Page 53 of 56
Page 53

Stained Glass in the Current Middle Ages
ScriffitoPainting technique where letters or designs are scratched out of the matting coat using the handle of the paintbrush. In addition to using the pointed handle of the brush, a needle or stylus could be used.
Silane
Any series of covalently bonded compounds that contains only the elements silicon and hydrogen, having the general formula SinH2n + 2, in which n equals 1, 2,3, and so on. The silanes are structural analogues of the saturated hydrocarbons but are much less stable. The term silane is extended to include compounds in which any or all of the hydrogen atoms have been replaced by other atoms or groups of atoms, as in tetrachlorosilane, SiCl4.78
StipplingMatting technique where instead of a “brushing” stroke, the glass artists dabs or stabs the paint onto the glass. The bristles of the stippling brush are stiffer to be able to get a light application of paint on the glass, using only the tips. Stippling can also be accomplished with the blender brush.
TracingThe actual painting of figures and designs on the glass from the pattern.
Vitreous PaintPaints used for painting on glass. These are a mixture of ground glass and pigment oxide or a mixture of metal oxides such as iron, copper, cobalt, manganese and others.79
78 From the Encyclopedia Britannica (www.britannica.com/seo/s/silane/).
79 The Art of Painting on Glass, chapter 1.
Page 54 of 56 James D. Lee 1999 - 2015

Stained Glass in the Current Middle Ages
Biography
Jimi Lee is a systems programmer (computer nerd), supporting mainframe operating systems and networks. He’s been a member of the SCA since 1990 and had been doing stained glass since 1993. In January of 1995 he became an apprentice to Robert Lennox, owner/operator of Stained Glass Imagery on Staten Island, NY.80 He splits his spare time between the SCA and working at Stained Glass Imagery, where he is learning the intricacies of stained glass restoration under the guidance of Mr. Lennox. Since beginning his apprenticeship, Jimi has worked on several major restoration projects, including:
St James African Methodist Episcopal Church (Newark, New Jersey). The windows were undocumented Tiffany designs and are over 100 years old. Thestudio was honored by the New Jersey Historic Preservation Society for its work on these windows
Panels of a dome from the U.S. Patent Office (Smithsonian Museum). Christ Church (Staten Island, New York). Windows in this church were made
by Nikolai D’Ascenzo. Windows from the US Military Academy at West Point. Our Lady Queen of Peace RC Church (Staten Island, New York). Larchmont Temple (Larchmont, New York).
Jimi is also an affiliate member of the Stained Glass Association of America (SGAA). Send questions and constructive comments via e-mail to [email protected]
Lord Conor O Ceallaigh (OSag, AoA, GrandMaster Bowman, Captain of Archers of the Crown Province of Ostgardr, East Kingdom) is the youngest son of an Irish Clan chief living with a Mongol tribe (The Silver Horde) in the Crown Province of Ostgardr (East Kingdom). Seeing no means of inheriting lands or titles from his father, except by committing fratricide, he took what small inheritance he would get and struck out on his own. A French merchant woman that traded in the Far East hired him as a bodyguard. On one excursion to the Orient, the group of bodyguards he hired to protect his employer mutinied. Hard pressed, Lord Conor was able to kill the 12 guards by virtue of his archery skills. As he was doing this, a patrol of The Silver Horde witnessed this feat and reported it to their Khan, Gulug-jab Tangghudai (Puppy Khan). The Khan of The Silver Horde, impressed by the report, ordered his men to bring Lord Conor and his employer tohim. After demonstrating that his prowess with the bow against the mutinying guards was no fluke, The Khan made Lord Conor a member of the Horde, naming him Subedei, after a famous general and bestowing on him the title of Qorchi. This title, literally
80 Robert Lennox owns and operates a stained glass studio, Stained Glass Imagery, on Staten Island, NY. Included in his over 25 years of experience is stained glass restoration work on The National Cathedral in Washington, DC, Trinity Church in New York City, The US Patent Office (Smithsonian Museum) in Washington, DC and St James AME Church in Newark, New Jersey. Stained Glass Imagery was awarded the New Jersey Historical Preservation Society’s for 2000. James D. Lee 1999 - 2015 Page 55 of 56
Page 55

Stained Glass in the Current Middle Ages
Quiver Bearer, is given to the best archer in the Horde who is responsible for all archery activities in the Horde.
Page 56 of 56 James D. Lee 1999 - 2015