ta363: time and attendance administration - … time and attendance administration instructor led...
TRANSCRIPT

TA363: Time and
Attendance Administration
Instructor Led Training
Rev 03/22/2017

Welcome
Welcome to Cardinal Training!
This training provides employees with the skills and information necessary to use Cardinal. It is not intended to replace
existing Commonwealth and/or agency policies.
This course provides information on the key procedures for creating, managing, and maintaining Time Reporters in Cardinal.
These training materials include diagrams, charts, screenshots, etc. that clarify various Cardinal tasks and processes. The
screenshots are taken from Cardinal and show pages that not all users can access. They are included here so you can see
how your specific responsibilities relate to the overall transaction or process being discussed. See your agency’s Cardinal
Security Handbook for a list of available roles and descriptions.
2

Course Objectives
After completing this course, you will be able to:
• Create and maintain position, personal, and job data
• Enroll and maintain Time Reporters and compensatory leave plans
• Manage work schedules
• Review and manage time after payroll processing
3

Course Topics
This course covers the following lessons:
• Lesson 1: Understanding Time and Attendance
• Lesson 2: Creating and Maintaining Position, Personal, and Job Data
• Lesson 3: Enrolling and Maintaining Time Reporters & Compensatory Leave Plans
• Lesson 4: Managing Work Schedules
• Lesson 5: Time and Attendance Administration Hands-On Practice
4

Lesson 1: Understanding Time and Attendance
This lesson covers the following topics:
• Time and Attendance Overview
• Key Concepts
• Time and Attendance Processes
• Integration and Interfaces
5

Time and Attendance Overview
The Time and Attendance functional area contains
two modules:
Time and Labor
Involves employee setup, input of time and
attendance, payroll integration, and cost allocation
Absence Management
Involves the processing and managing of employee
absences
6

Key Concepts
Key concepts in Time and Attendance Administration include:
• Cardinal displays time and absences using a weekly calendar format.
• SpeedTypes can be used to auto populate some ChartField values.
• Absence requests are available for approval immediately after submission.
• Absence requests, for accrued (e.g., vacation, sick) and frequency based (e.g. Employee Recognition Program –
ERL) absence types must be forecasted to determine absence availability.
• Cardinal captures and tracks contract hours, contract start date, and contract end date for hourly employees.
• The Time Administration process creates exceptions (warnings or errors) for time entered that does not meet defined
business rules.
7
Key Concepts (continued)
• Productive time is not routed for approval until it has been submitted and successfully processed through Time
Administration.
• Employees and Timekeepers can enter and adjust absences and productive time back to the beginning of the current
fiscal year or six prior pay periods back, whichever is less.
• In Employee Self Service, the employee enters time, selects a TRC (Time Reporting Code), and enters charge
distribution codes.
• Once time is entered and saved, the employee must submit their time for processing. The Time Administration
process then validates time reported and routes it for approval.
8
Key Concepts (continued)
• Position, personal, job data, and time reporter data are required for all employees to process time and absences.
• Time reporting effective date and status control the time periods available for entry on an employee’s timesheet.
• Workgroups determine the Time Reporting Codes available on an employee’s timesheet and the time reporting rules
that apply to the employee during processing.
• Work schedules apply to many of the time processing rules and exceptions and also determines the value of full or
half day absences.
• Timely review of timesheet entries and resolution of rule exceptions is critical for accurate payroll and allocation
processing.
9

Time and Attendance Process Flow
The Time and Attendance functional area includes five processes:
• Employee Setup
• Time and Attendance Capture
• Administer Time and Attendance Validation and Approval
• Absence Management Processing
• Payroll Integration and Interface Processing
10

Employee Setup
Most position, personal, and employee data is loaded into Cardinal from the Personnel Management Information System
(PMIS) daily.
The Personnel Management Information System (PMIS) is used when a new position is created or changed. PMIS then
sends the information to Cardinal to establish Position Data in Cardinal. When employees are added or updated, their
personnel data is first entered into PMIS. PMIS then sends the employee information (employee name, address, role,
hourly, salaried, etc.) to Cardinal to create an employee profile.
Errors from the PMIS upload must be reviewed and may require manual entry or correction to address the error. If position
or employee data is incorrect in PMIS, it must be corrected in both PMIS and Cardinal to keep the two systems in sync.
Other errors and warnings generated by the PMIS interface may be entered or corrected directly in Cardinal. Additional
manual entry is required as part of employee time and attendance setup for specific actions, such as new hires and
terminations.
11

Time and Attendance Capture, Validation and Approval,
and Absence Management Processing
Time and Attendance Capture - There are two ways to capture time:
• Employee Self Service: employees enter their own time and absence requests
• Manager Self Service: - a supervisor or Timekeeper enters time and absence requests for employees
Administer Time and Attendance Validation and Approval: Regardless of the method of entry (e.g., Self Service,
Timekeeper) once time is submitted, it is validated through the Time Administration process. Time Administration validates
all submitted time against time reporting rules, generates payable time, and routes time to the employee’s supervisor for
approval. It also identifies any errors related to the time reporting rules and generates exceptions.
Absence Management Processing: Most absences are entered by the employee or timekeeper on the Timesheet page.
Cardinal requires forecasting for entitlement absences (e.g. VAC, SCK) and frequency based absences (e.g. Employee
Recognition Leave – ERL) and then routes absence requests immediately to the employee’s supervisor for approval.
12

Integration
Time and Attendance sends employee profile information including employee’s Reports to information integrating with
Accounts Payable for employee travel reimbursement processed through Expenses. In addition, Procurement uses
employee information for Purchase Order workflow approvals
Cardinal uses time and charge distribution information from employee timesheets to allocate payroll costs according to the
distributions entered on timesheets. That allocated labor cost is shared with and posts to the General Ledger. Those labor
costs associated with projects also are sent to Project Accounting and used to bill participating projects.
13
Enter
hours
worked &
absences
Payline
Project
Accounting
CIPPSGeneral
LedgerProcurement Expenses
PMIS
Set up /
Update
Employee
Administer Time
& Attendance
Validation and
Approval
Absence
Management
Processing
Payroll
Integration
and Cost
Allocation
Maintain
Time &
Attendance
Rules
CIPPS

Interfaces
Time and Attendance also interacts with external systems such as PMIS, CIPPS (Commonwealth Integrated Payroll /
Personnel System), and Department of Account’s Payline system. The PMIS interface uploads most position, personal, and
job (employee) data into Cardinal. That interface updates Cardinal data and overwrites some updates keyed directly into
Cardinal. Make sure that personal, position, and job data updates are keyed directly in PMIS timely, so that interfaced data
is correct. The PMIS Interface also creates a daily error log for review and some data may need to be manually keyed into
Cardinal if the interface was unable to update the data.
Cardinal transmits overtime hours and rates for salaried employees and regular and overtime hours and rates for hourly
employees to CIPPS. Once the payroll is processed, CIPPS sends the Expanded Current Earnings data back to Cardinal.
Cardinal uses this data, along with the time and charge distribution information from employee timesheets, to allocate
payroll.
At the end of each semi-monthly pay cycle, Cardinal transmits salaried employees’ absence and leave information to
Payline.
14
Enter
hours
worked &
absences
Payline
Project
Accounting
CIPPSGeneral
LedgerProcurement Expenses
PMIS
Set up /
Update
Employee
Administer Time
& Attendance
Validation and
Approval
Absence
Management
Processing
Payroll
Integration
and Cost
Allocation
Maintain
Time &
Attendance
Rules
CIPPS
Lesson 1: Checkpoint
Now is your opportunity to check your understanding of the course material.
True or False?
• Hourly employees have a work schedule of zero hours.
• Every employee must be set up as a time reporter.
• Every employee must be assigned a schedule in Cardinal.
• Employee data is uploaded from CARS into Cardinal.
• Time and Attendance integrates Accounts Payable and Accounts Receivable.
15
Lesson 1: Summary
In this lesson, you learned:
• The PMIS inbound interface drives most of the position, personal, and job data in Cardinal. There is some data that
must be added or updated manually (e.g., Reports To, Work Schedule, Time Reporter).
• Every employee has a work schedule in Cardinal.
• Time and Attendance shares some employee information with Accounts Payable’s Expenses module and with the
Purchasing module to support employee travel and business expense reimbursement processing and Small PCard
Program use.
• Employee labor costs are posted in General Ledger when employee pay is distributed according to the time and
charge distribution information on employee timesheets. Any labor costs associated with projects are also sent to
Project Accounting.
16

Lesson 2: Creating and Maintaining Position, Personal,
and Job Data
This lesson covers the following topics:
• Relationship between Position, Personal, and Job Data
• Viewing Position, Personal, and Job Data
• Reviewing and Correcting PMIS Interface Updates and Errors
• Adding and Updating Position, Personal, and Job Data Manually
• Maintaining Reports To Approvers
• Enrolling and Maintaining Time Reporters and Compensatory Leave Plans
• Impacts and Actions for Specific Changes
17
Relationship between Position, Personal, and Job Data
Position Data allows Cardinal to track organizational values and reporting relationships independently of the employee in
the position assigned by Cardinal. Position Data values include title, department, job code, location, and Reports to
position number.
Personal Data includes biographical details for an employee, such as name and address. A person must have an
organizational relationship established to identify the person as an Employee and associate the Job Data information.
Job Data includes the organizational details for an employee. Every employee has a position number assigned on Job
Data. When a position is assigned to an employee on Job Data, Cardinal uses certain Position Data values to default
organizational values on the employee’s job record. Additional employee-specific job data values for the employee,
including payroll and absence groups and compensation, must be entered manually.
18

Viewing Position and Personal Data
Position Data includes information related to the employee’s position which includes: Position number, Job Code, Title,
Department, Location, Reports To (position number of approver), Standard Hours, and FLSA Status. You can view Position
data through the Add/Update Position Info page using the following path:
Cardinal FIN > Cardinal HCM > Main Menu > Organizational Development > Position Management > Maintain
Positions/Budgets > Add/Update Position Info
Personal Data includes information about the employee which includes: Person ID (matches Employee ID), Name (legal
name), Home Address, and Email Address (optional). To view Personal Data, navigate using the following path:
Cardinal FIN > Cardinal HCM > Main Menu > Workforce Administration > Personal Information > Modify a Person
19
Viewing Job Data
Job Data includes information related to the job which includes Action / Reason, HR / Payroll Status, Position Number,
Department, Location, Reports To, Absence and Payroll Groups, Compensation, Company, and Seniority Date. You can
view Job Data by accessing the Job Data page by using the following path:
Cardinal FIN > Cardinal HCM > Main Menu > Workforce Administration > Job Information> Job Data
There may be multiple effective dated rows for each position, person, or employee. To view all rows, use the Include
History button and arrows to navigate through the rows.
20
Reviewing and Correcting PMIS Interface Updates and
Errors
Most Personnel, Position, and Job (Employee) information is entered into PMIS and then interfaced to Cardinal.
Sometimes, the PMIS Interface is unable to update position, personal, or employee data in Cardinal and an error is
generated. There are reports and queries available to help you research errors such as the PMIS Error Report and
Employee Setup queries. To view the Timesheet Report, access the Cardinal Reports Catalog. The Cardinal Reports
Catalog is located on the Cardinal website in VDOT Toolbox > Job Aids, scroll down to the Navigation, Reporting, and
Approvals section.
The PMIS interface drives personnel, position, and job setup in Cardinal. That interface includes data that is new or has
changed due to various reasons which include:
• New hire
• Termination / Death
• Switching pay groups from salaried to hourly (or vice versa)
• Change in position
21

Reviewing and Correcting PMIS Interface Updates and
Errors (continued)
The PMIS interface runs each morning and processes data that was either entered in PMIS the previous day or became
effective on the day the interface is run. The interface only updates data in Cardinal that is necessary for time and
attendance reporting and processing.
The updates made by the PMIS interface should be reviewed in Cardinal for accuracy. If data is found to be incorrect,
research must be done to ensure that PMIS data is corrected and that the corrected data is subsequently loaded into
Cardinal.
There are some scenarios where the PMIS interface is unable to update Cardinal (i.e. due to missing or invalid data or
effective date issue). In these cases, the PMIS interface generates an error message that should be reviewed, and errors
corrected as needed.
There are two types of errors that can occur: Position Data errors and Profile Data errors.
22

Reviewing and Correcting PMIS Position Data
23
PMIS Interface error and warning messages for
Position Data can be reviewed on the PMIS Position
Errors page. You can navigate to this page using the
following path:
Cardinal FIN > Cardinal HCM > Main Menu >
Workforce Administration > PMIS Interface
Administration > PMIS Position Errors
Enter your search criteria which includes:
• Date Processed
• Business Unit
• Employee Type
• Location Code
The Employee Type field contains a drop-down box
and offers the options of Hourly, Not Applicable, and
Salary.
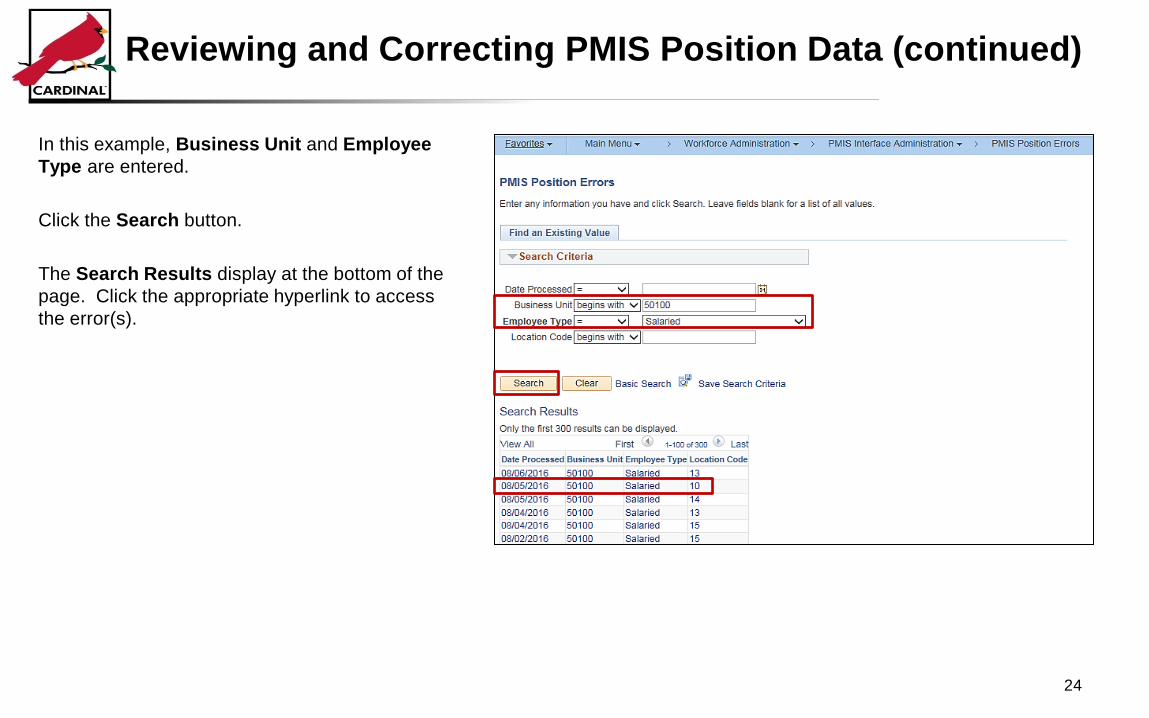
Reviewing and Correcting PMIS Position Data (continued)
In this example, Business Unit and Employee
Type are entered.
Click the Search button.
The Search Results display at the bottom of the
page. Click the appropriate hyperlink to access
the error(s).
24
Reviewing and Correcting PMIS Position Data (continued)
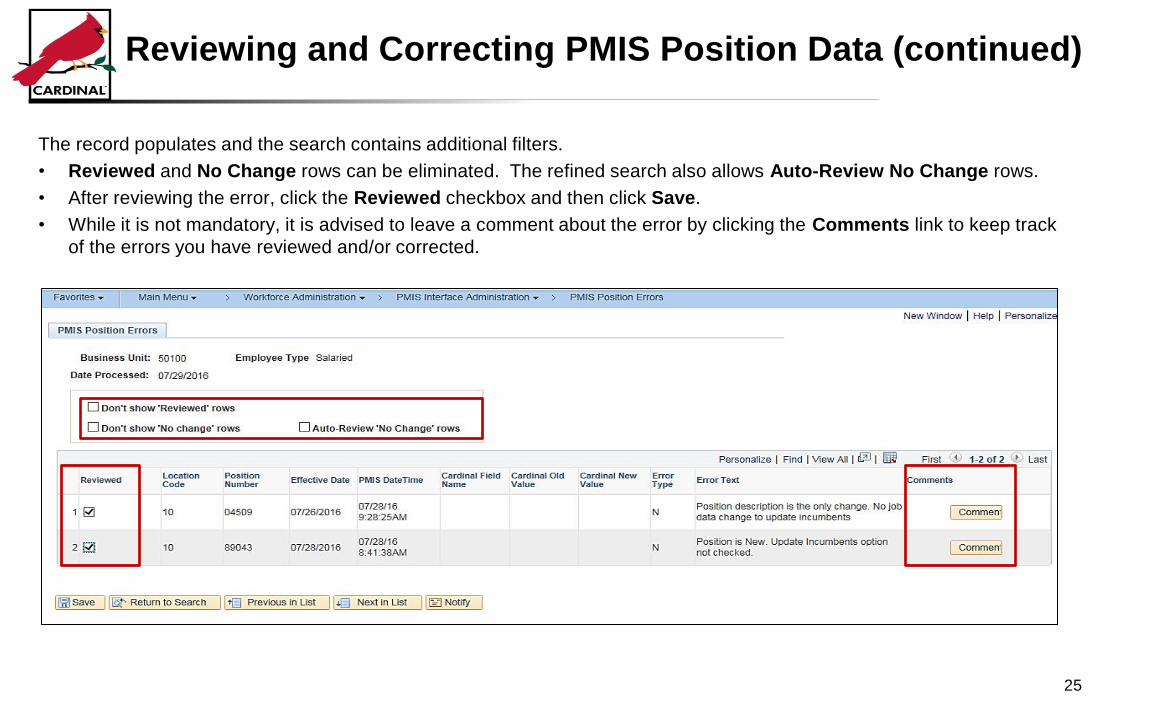
The record populates and the search contains additional filters.
• Reviewed and No Change rows can be eliminated. The refined search also allows Auto-Review No Change rows.
• After reviewing the error, click the Reviewed checkbox and then click Save.
• While it is not mandatory, it is advised to leave a comment about the error by clicking the Comments link to keep track
of the errors you have reviewed and/or corrected.
25

Reviewing and Correcting PMIS Profile Data
PMIS Interface error and warning messages for
Profile Errors (Personal and Job Data) can be
reviewed on the PMIS Profile Errors page. You can
navigate to this page using the following path:
Cardinal FIN > Cardinal HCM > Main Menu >
Workforce Administration > PMIS Interface
Administration > PMIS Profile Errors
Follow the same steps used to review Position Data.
To view errors:
• Enter your search criteria.
• Click the Search button.
Select the appropriate link.
26

Reviewing and Correcting PMIS Profile Data (continued)
Similar to Position Data:
• Review the error(s).
• Click the Reviewed checkbox.
• Add a Comment (not required, but recommended).
• Click the Save button.
27

Adding and Updating Position, Personal, and Job Data
Manually
If there is a need to add or update position data, personal data, or job data directly in Cardinal, use the same page(s) that
was used to view the data. Use the plus sign (+) to add a row and minus sign (-) to delete a row.
Remember that Cardinal has three types of effective dated information:
• Current: The record with an effective date less than or equal to the current date (today’s date).
• History: All records with effective dates prior to the date on the current row.
• Future: All records with effective dates greater than today’s date. Note: Future-dated position, personal, and job data
is not interfaced by DHRM (the Commonwealth’s Department of Human Resource Management) until the date it
becomes effective in PMIS.
Adding a row vs. using Correct History:
• To add or update data, enter a new record with an effective date. The effective date is the date that the new record
becomes active.
• If data effective prior to the most recent effective dated row needs to be corrected or added, use the Correct History
button to correct or insert older effective dated rows. In this case, you may also need to correct the data on other
rows.
• Use extreme caution when using the Correct History button as you may accidentally overwrite data that is correct for
an effective dated row.
28
Adding and Updating Position, Personal, and Job Data
Manually (continued)
Most positions and new hires (including rehires or transfers from other agencies not previously in Cardinal) should be
interfaced to Cardinal by the PMIS Interface. However, you can also enter a new position or employee, directly into
Cardinal, should the need arise.
To enter a new hire online, you will:
• Add a Position
• Add a Person
• Add Job Data
29

Add a Position
30
Navigate to the Add/Update Position Info page using the following path:
Cardinal FIN > Cardinal HCM > Main Menu > Organizational Development > Position Management > Maintain
Positions/Budgets > Add/Update Position Info
From the Add a New Value tab:
• Enter the position number in the Position Number field.
• Click the Add button.
Add a Position (continued)
31
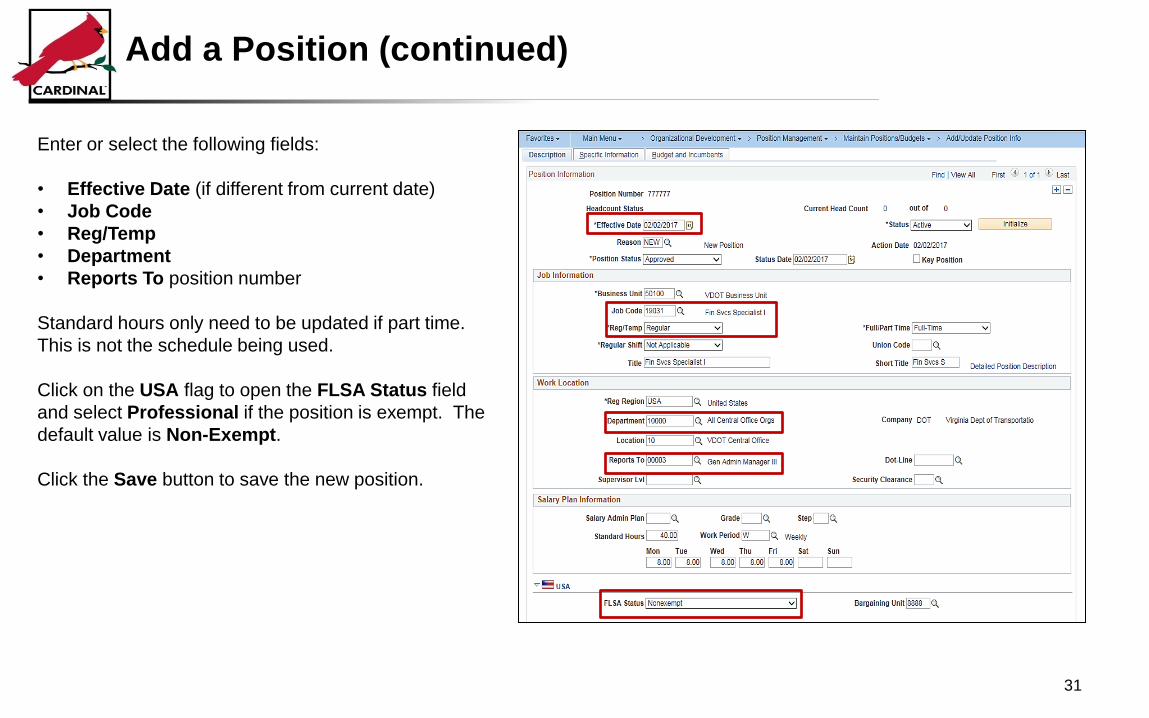
Enter or select the following fields:
• Effective Date (if different from current date)
• Job Code
• Reg/Temp
• Department
• Reports To position number
Standard hours only need to be updated if part time.
This is not the schedule being used.
Click on the USA flag to open the FLSA Status field
and select Professional if the position is exempt. The
default value is Non-Exempt.
Click the Save button to save the new position.

Add a Position (continued)
32

Add a Position (continued)
The Specific Information tab contains two important fields:
• Max Head Count: This field indicates the number of individuals that can be assigned to the position and can be adjusted
as appropriate. For agency 50100 (VDOT), this value should always be 1.
• Update Incumbents: This checkbox is checked once an employee is assigned to the position. Cardinal does not allow
you to check this box until then.
33
Add a Position (continued)
34
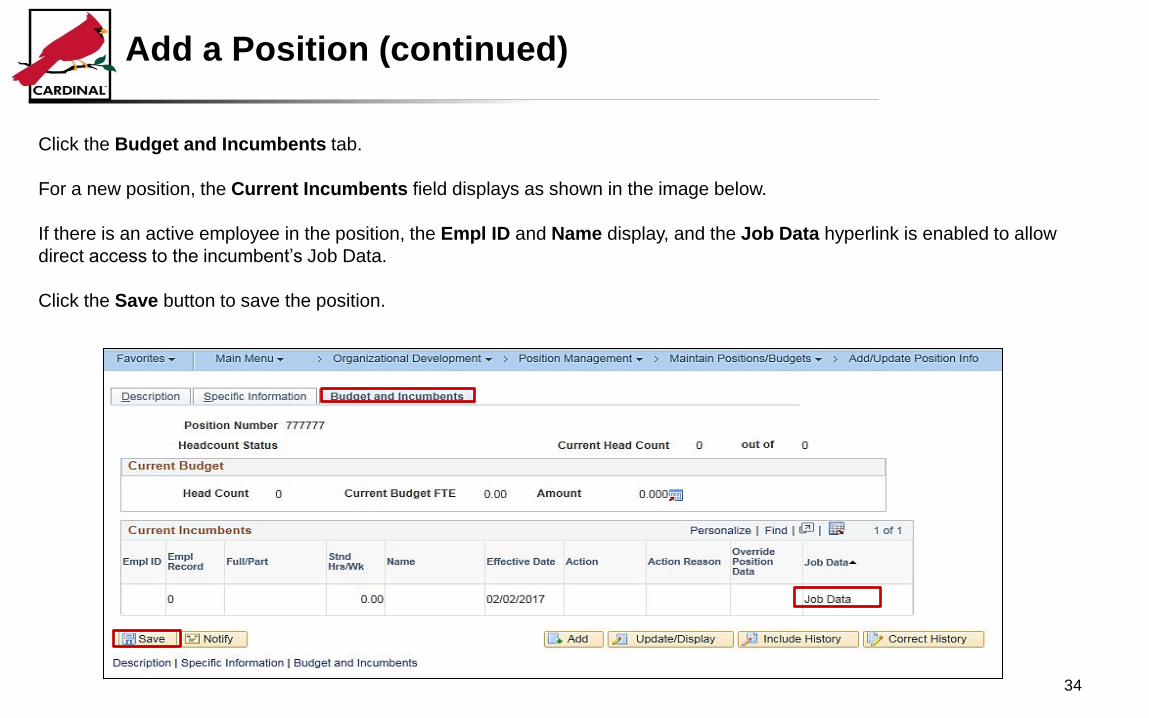
Click the Budget and Incumbents tab.
For a new position, the Current Incumbents field displays as shown in the image below.
If there is an active employee in the position, the Empl ID and Name display, and the Job Data hyperlink is enabled to allow
direct access to the incumbent’s Job Data.
Click the Save button to save the position.
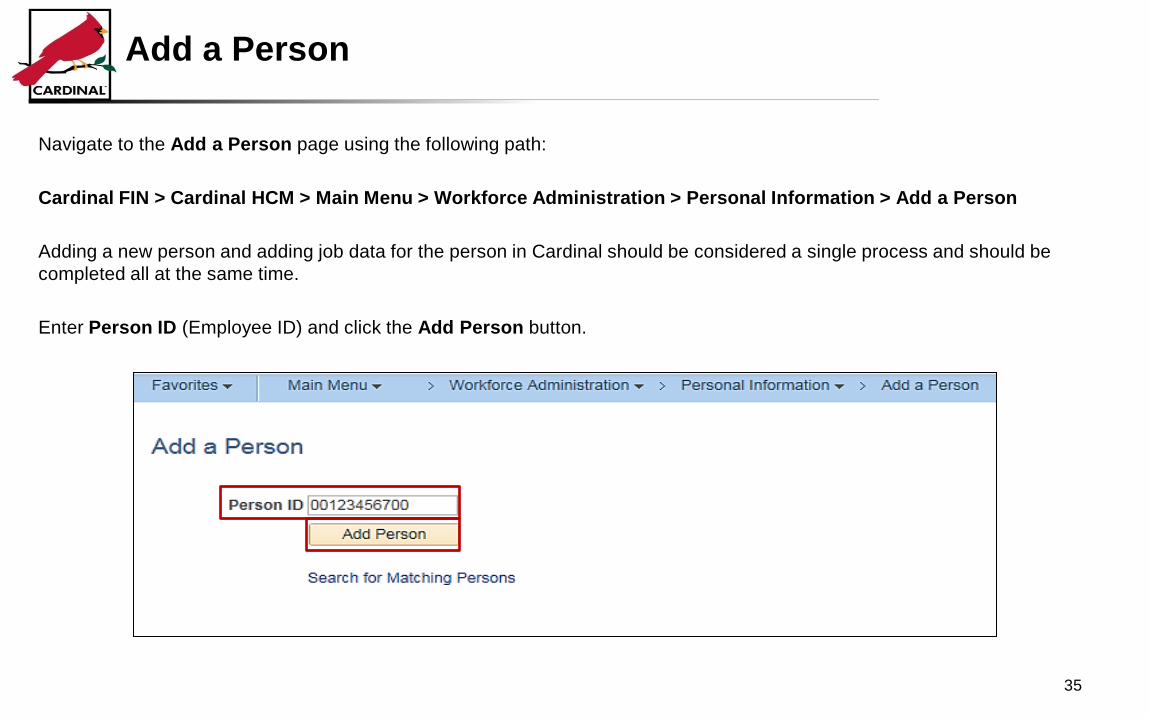
Add a Person
Navigate to the Add a Person page using the following path:
Cardinal FIN > Cardinal HCM > Main Menu > Workforce Administration > Personal Information > Add a Person
Adding a new person and adding job data for the person in Cardinal should be considered a single process and should be
completed all at the same time.
Enter Person ID (Employee ID) and click the Add Person button.
35

Add a Person (continued)
Enter or select the Effective Date for the
employee you are adding. This field
defaults to the current date and can be
changed.
Click the Add Name button.
36

Add a Person (continued)
The Name pop-up window displays.
• Enter the employee’s full legal name.
• Click the Refresh Name button to confirm the
name is correct. If not, you can make changes
and click the Refresh Name button again.
• Click the OK button to return to the
Biographical Details.
37

Add a Person (continued)
No additional date entry is required on the
Biographical Details tab.
Do not enter the employee’s Date of Birth or
Social Security Number.
Click the Contact Information tab.
38

Add a Person (continued)
• Click the Add Address Detail link.
39

Add a Person (continued)
• The Address History page displays. Click the
Add Address link.
• The Edit Address page displays. Enter home
address of the employee.
• Click the OK button.
• The Address History page returns. Click OK
again to return to the Contact Information page.
40

Add a Person (continued)
• Click the Organizational Relationships tab which links personal data and job data.
41

Add a Person (continued)
• Click the Employee checkbox.
• Click the Add Relationship button.
Note: the Empl Record box is grayed out and defaults to 0 since employees can currently only have one job at a time.
42

Add a Person (continued)
After you click the Add Relationships button:
• A message displays regarding a missing
birthdate. Click the OK button.
• A second message displays related to Social
Security Number. Click the OK button.
After clicking the OK button on the messages,
Cardinal opens the Job Data page.
43

Add Job Data: Work Location Tab
When entering a new hire manually, you MUST get
all the way through to the end of job data entry or you
will end up with a ‘ghost’ employee that exists in the
database but cannot be viewed online.
• On the Work Location tab, the effective date
auto-populates from the personal data.
• The Action defaults to New Hire and you should
select the Reason and can be changed if
appropriate.
• Enter or select the Position Number.
When you tab or click out of the field, the position
data fields populate with the values from the position.
DO NOT click the Override Position Data button.
44

Add Job Data: Work Location Tab (continued)
45

Add Job Data: Job Information Tab
• Click on the Job Information tab. Do not manually
enter anything here. The Reports To position
number is populated from Position Data. You can
view the approver’s title, employee ID, and name
here.
• If Reports To field does not display the supervisor
position number, employee ID, and name, you need
to research as appropriate to ensure the employee
has an active supervisor. If further action is needed,
you can leave and come back to the Job Data later.
46

Add Job Data: Job Information Tab (continued)
47

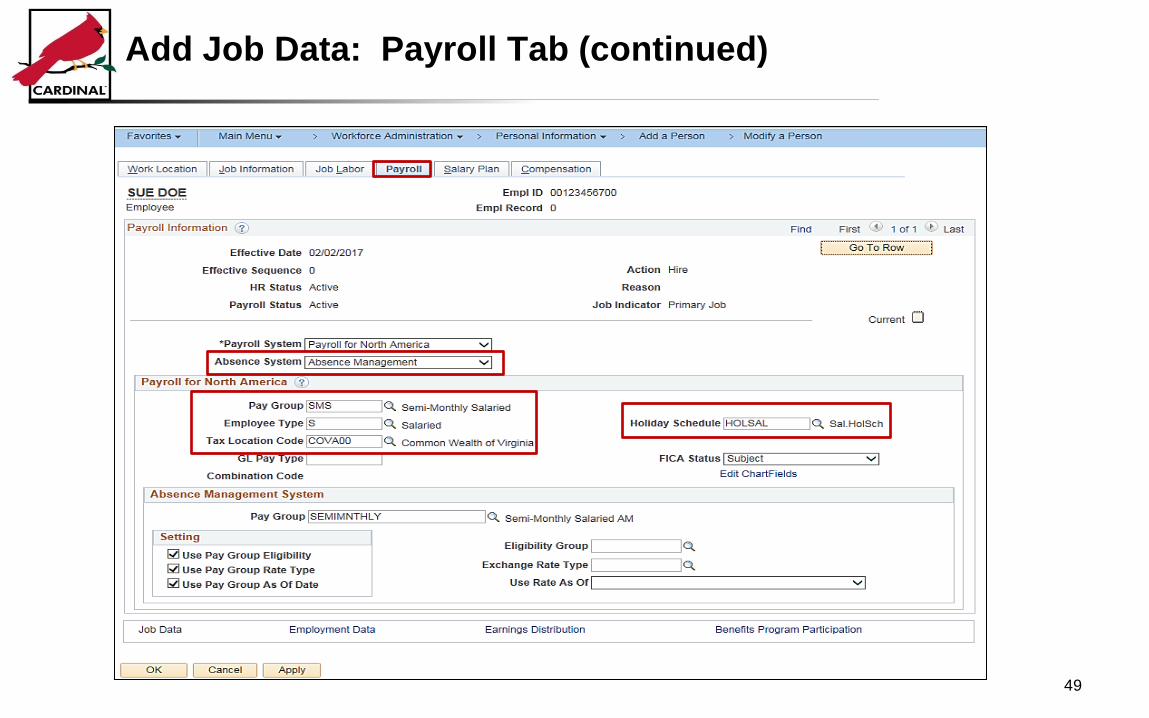
Add Job Data: Payroll Tab
The Job Labor tab can be skipped as no data there is used at
this time. Click the Payroll tab.
Select the appropriate Pay Group, Tax Location Code, and
Holiday Schedule.
For salaried employees, select the Absence Management
Absence System.
If absence eligibility group is VSDP (Virginia Sickness and
Disability Program), no further action is necessary.
If the employee is not in the VSDP eligibility group:
• Uncheck the Use Pay Group Eligibility checkbox.
• Select the appropriate Eligibility Group.
For this scenario, the employee is VSDP and thus no further
action is required in the Absence Management System
section of the page.
48
Add Job Data: Payroll Tab (continued)
49

Add Job Data: Compensation Tab
The Salary Plan tab can be skipped as no data
there is used at this time.
• Click on the Compensation tab.
• Select the Rate Code.
• Enter the Comp Rate in the appropriate
format (annual for salaried or hourly for
hourly).
• Click the Calculate Compensation button to
calculate the other rate formats.
• Click the Benefits Program Participation link
at the bottom of the page.
50

Add Job Data: Compensation Tab (continued)
51

Add Job Data (continued)
• Enter the Effective Date. This is the same as
the hire date.
• Select the Benefit Program.
• Click the Employment Data link.
52

Add Job Data (continued)
The Company Seniority Date defaults to the
hire date, but can be updated if the employee
has credit for prior years of service. To override
the Company Seniority Date, check the
Override checkbox next to the field and enter
the appropriate date as indicated by HR
(calculated based on various PMIS fields).
Click the OK button to save all the Job Data
information.
53

Add Job Data (continued)
A warning message like the one here displays.
Click the OK button.
Cardinal returns you to the Organizational
Relationships page. The employee has been
successfully added in Cardinal.
Remember, when entering a new hire manually,
you MUST get all the way through to the end of job
data entry or you will end up with a ‘ghost’
employee that exists in the database but cannot be
viewed online.
54

Verify Employee Information
The next step is to check the Position to verify
the employee is assigned to it and that the
Incumbent is checked.
Navigate to the Add/Update Position Info page
using the following path:
Main Menu > Organizational Development >
Position Management > Maintain
Positions/Budgets > Add/Update Position Info
On the Find an Existing Value tab, enter the
position number in the Position Number field.
Click the Search button.
55

Verify Employee Information (continued)
The Description page displays. Review the information for accuracy. If you need to make any additions or adjustments, you
must click the Correct History button prior to making any changes.
Click the Budget and Incumbents tab.
56

Verify Employee Information (continued)
Confirm the correct employee is in the position.
Click the Specific Information tab.
57

Update Incumbent
Click the Correct History button (if it was not clicked previously). The Correct History button is grayed out if it has been
clicked.
Click the Update Incumbents checkbox.
Click the Save button.
58

Maintaining Reports To Approvers
Most position data is entered in PMIS and then
interfaced into Cardinal. However, the Reports To field
information does not exist in PMIS, so you must enter
and maintain it manually in Cardinal. You cannot enter
the Reports To Position Number until the Position is
created in Cardinal.
Reports To defines the reporting relationship for the
position by identifying its related supervisory position
number. The incumbent in the Reports To field in
Cardinal is the person who will receive worklist items for
the employee via workflow.
To review / update the Reports To for an employee,
navigate to the Description tab using the following path:
Main Menu > Organizational Development > Position
Management > Maintain Position/Budgets >
Add/Update Position Info
59

Maintaining Reports To Approvers (continued)
60

Maintaining Reports To Approvers (continued)
To update the Reports To:
• Click the Correct History button.
• Update the Reports To field.
• Click the Save button.
A warning message displays asking if you wish to
use a batch process to update incumbent data.
Click the No button, which means the incumbent’s
Job Data will be updated online within a few
seconds.
61

Maintaining Reports To Approvers
62
Go to the employee / incumbent Job Data to ensure Reports To position number is updated on the Job Information page
and that supervisor ID and name is displayed.
Navigate to the employee’s Job Data using the following path:
Main Menu > Workforce Administration > Job Information > Job Data
Enter the Empl ID and click the Search button.

Maintaining Reports To Approvers (continued)
63
Click the Job Information tab to view the
Reports To information.
If the Job Data of the employee / incumbent was
not updated for any reason, you may need to
manually add a row on Job Data or you may need
to remove the position number, tab out of the
field, and reenter the position number.
Remember that you must click the Correct
History button to make any adjustments.
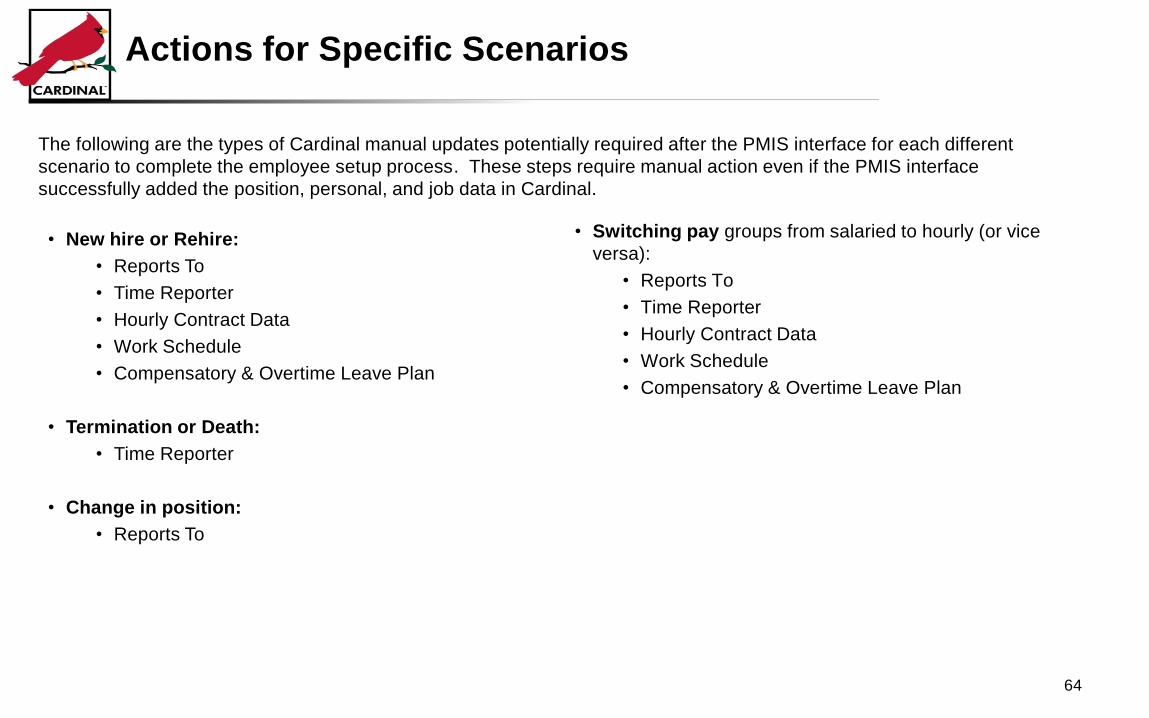
Actions for Specific Scenarios
The following are the types of Cardinal manual updates potentially required after the PMIS interface for each different
scenario to complete the employee setup process. These steps require manual action even if the PMIS interface
successfully added the position, personal, and job data in Cardinal.
64
• Switching pay groups from salaried to hourly (or vice
versa):
• Reports To
• Time Reporter
• Hourly Contract Data
• Work Schedule
• Compensatory & Overtime Leave Plan
• New hire or Rehire:
• Reports To
• Time Reporter
• Hourly Contract Data
• Work Schedule
• Compensatory & Overtime Leave Plan
• Termination or Death:
• Time Reporter
• Change in position:
• Reports To

Simulation: Creating and Maintaining Position and Job
Data
You are now about to view a simulation which shows how to create and maintain position, personal, and job data. Click on
the Cardinal logo below to start the simulation.
65

Lesson 2: Summary
In this lesson, you learned:
• Position, personal, and job (employee) data are entered into PMIS and then uploaded into Cardinal.
• Cardinal contains employee personal biographical data such as name and address. Cardinal does not include
information such as marital status, gender, and Social Security Number.
• A position must exist in Cardinal for any employee you add.
• If position, personal, and job (employee) data are manually entered into Cardinal, you must also ensure that this
information is entered into PMIS. Data in PMIS and Cardinal must match and the data entry into PMIS should be
done the same day.
• An employee is established in Cardinal by setting up the job (employee) data. Job data will include information
regarding work location (such as Department, Location), job information (such as Reports To), Payroll (such as Payroll
System, Absence System), and Compensation (such as Compensation Rate, Frequency).
66

Lesson 3: Enrolling and Maintaining Time Reporters and
Compensatory Leave Plans
This lesson covers the following topics:
• Enrolling and Maintaining Time Reporters
• Enrolling and Maintaining Compensatory and Overtime Leave Plans
67

Enrolling Time Reporters
In order for Cardinal to record and allocate labor costs, an employee must be set up as a Time Reporter. The Create Time
Reporter Data page is used to enroll employees as Time Reporters. You can navigate to the Create Time Reporter Data
page using the following path:
Cardinal FIN > Cardinal HCM > Main Menu > Time and Labor > Enroll Time Reporters > Create Time Reporter Data
Click in the Empl ID field, enter the Employee ID information and then click on the Search button.
68

Enrolling Time Reporters (continued)
Enter information on the Create Time Reporter Data
page:
• Payable Time Start Date: Same as Effective Date.
• Effective Date: Enter the date the employee should
begin reporting time.
• Status: Keep the default value of Active
• Time Reporter Type: Keep the default value of
Elapsed Time Reporter.
• Workgroup: Select the appropriate workgroup for
the employee.
• Taskgroup: Choose the only value available,
VDOTCOMREQ.
• Rule Element 1: Field is used to designate if an
employee pays commuter tax. If so, input
COMMUTER otherwise, should be left blank.
• Time Zone: Defaults to EST (Eastern Time).
• Send Time to Payroll: Checkbox should be
checked.
69

Enrolling Time Reporters (continued)
70
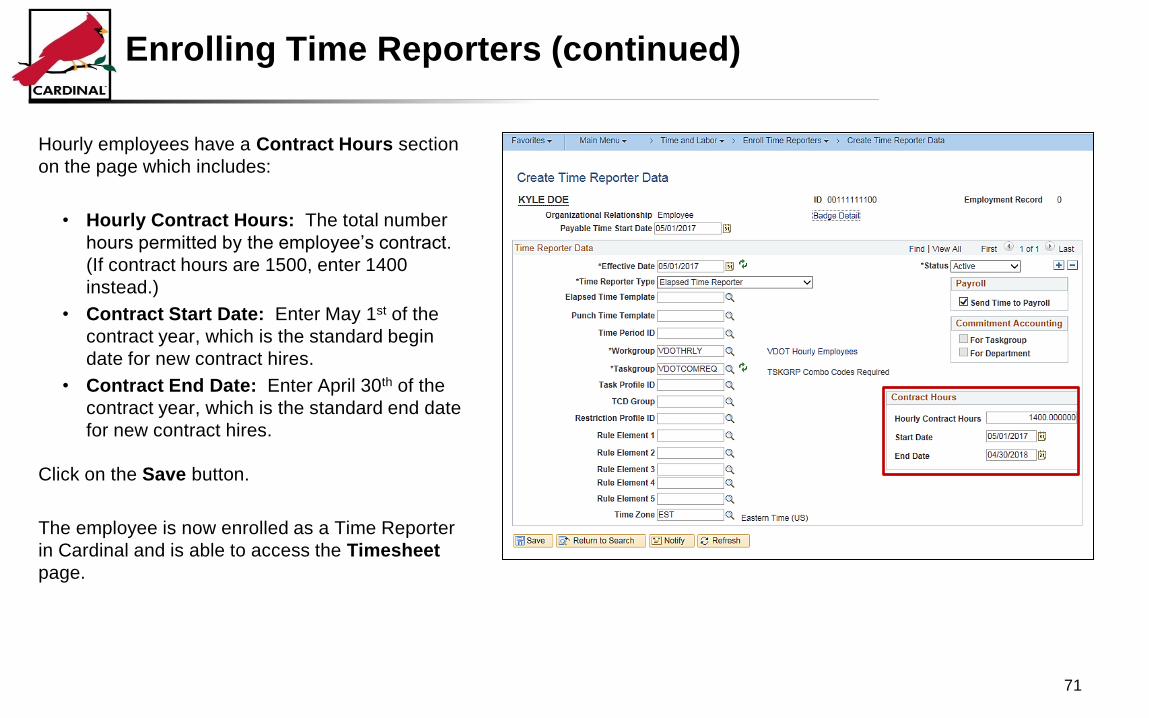
Enrolling Time Reporters (continued)
Hourly employees have a Contract Hours section
on the page which includes:
• Hourly Contract Hours: The total number
hours permitted by the employee’s contract.
(If contract hours are 1500, enter 1400
instead.)
• Contract Start Date: Enter May 1st of the
contract year, which is the standard begin
date for new contract hires.
• Contract End Date: Enter April 30th of the
contract year, which is the standard end date
for new contract hires.
Click on the Save button.
The employee is now enrolled as a Time Reporter
in Cardinal and is able to access the Timesheet
page.
71

Maintaining Time Reporters
When to update Time Reporter data:
Employee Job Data Updates
Employee changes may require updates to their information. Changes to employee job data can affect the Workgroup (e.g.,
an hourly employee moving to a salaried position). Pay attention to the effective date; in most cases, a new effective dated
row should be added to change an employee’s workgroup. You only want to correct the workgroup on the existing row if the
workgroup was previously incorrect and needs to be corrected for that effective date.
Inactive Employees
When PMIS terminates an employee on Job Data, the Job Data status automatically becomes inactive. There is no manual
update on Job Data required to process a terminated employee’s time. This is because they can continue to report /
process time if they are an active Time Reporter. When all time has been processed / paid out, Time Reporter status needs
to be inactivated.
Do not change the Time Reporter status to Inactive until the employee no longer needs to report time. Inactive employees
can only be paid for time worked prior to their status being changed to Inactive. They cannot enter or be paid for time
worked after the inactive effective date.
72

Maintaining Time Reporters (continued)
New Hourly Contract Year
A new effective dated row needs to be added to
each hourly employee’s Time Reporter data for
each new contract year to reflect the contract
hours for the new year.
To update Time Reporter data, go to the
Maintain Time Reporter Data page. You can
navigate to this page using the following path:
Cardinal FIN > Cardinal HCM > Main Menu >
Time & Labor > Enroll Time Reporters >
Maintain Time Reporter Data
73
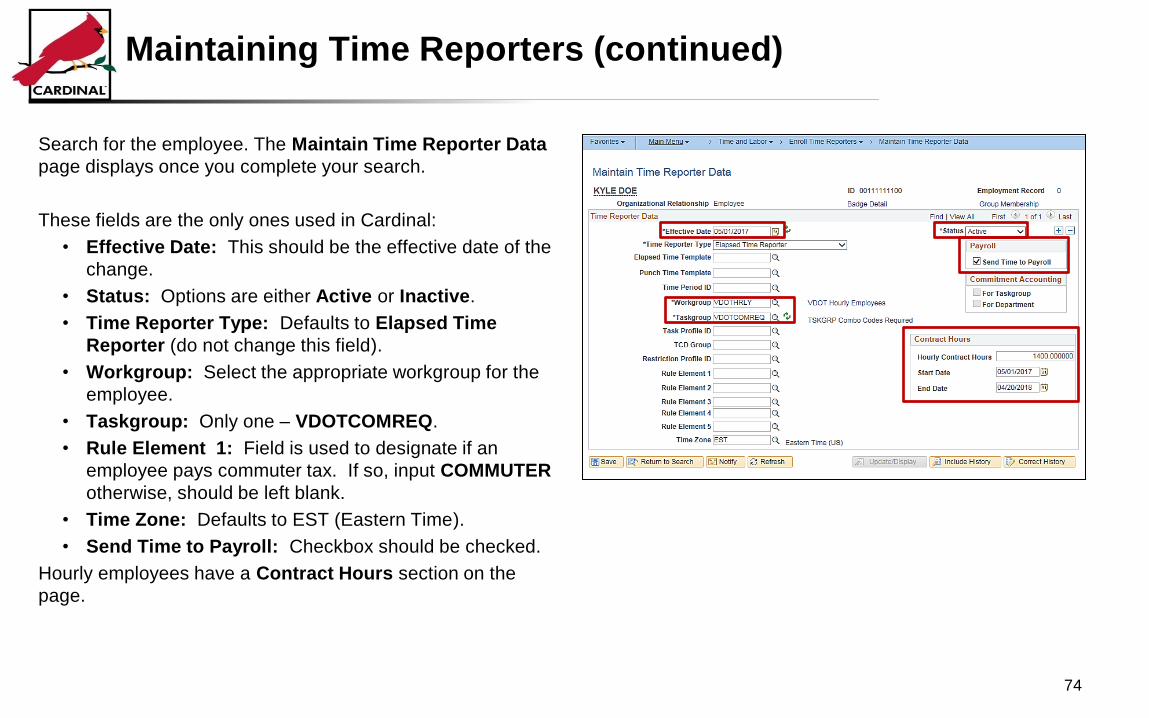
Maintaining Time Reporters (continued)
Search for the employee. The Maintain Time Reporter Data
page displays once you complete your search.
These fields are the only ones used in Cardinal:
• Effective Date: This should be the effective date of the
change.
• Status: Options are either Active or Inactive.
• Time Reporter Type: Defaults to Elapsed Time
Reporter (do not change this field).
• Workgroup: Select the appropriate workgroup for the
employee.
• Taskgroup: Only one – VDOTCOMREQ.
• Rule Element 1: Field is used to designate if an
employee pays commuter tax. If so, input COMMUTER
otherwise, should be left blank.
• Time Zone: Defaults to EST (Eastern Time).
• Send Time to Payroll: Checkbox should be checked.
Hourly employees have a Contract Hours section on the
page.
74

Maintaining Time Reporters (continued)
75
Maintaining Time Reporters (continued)
To update Time Reporter Data:
• Click + to add a new row.
• Update the Effective Date field.
• To update the Time Reporter’s Workgroup, click on the Lookup icon next to the Workgroup field and select the
appropriate group.
Hourly employees have a Contract Hours section on the Maintain Time Reporter Data page.
• Hourly Contract Hours: the total number hours permitted by the employee’s contract. (If contract hours are 1500,
enter 1400 instead.)
• Contract Start Date: Enter the standard May 1st of the contract year begin even for new hires.
• Contract End Date: Enter the standard April 30th of the contract year end even for new hires.
Enter the necessary changes and then click on the Save button. The Time Reporter Data is then successfully updated.
76

Enrolling in Compensatory and Overtime Leave Plans
Employees must be enrolled in the Compensatory Leave / Overtime Leave Plan in order to earn and take the specific type(s)
of leave. Hourly employees are not eligible for compensatory or overtime leave.
To access the Comp Plan Enrollment page, navigate to this page using the following path:
Cardinal FIN > Cardinal HCM > Main Menu > Time & Labor > Enroll Time Reporters > Comp Plan Enrollment
Enter the Employee ID in the Empl ID field and click the Search button.
77
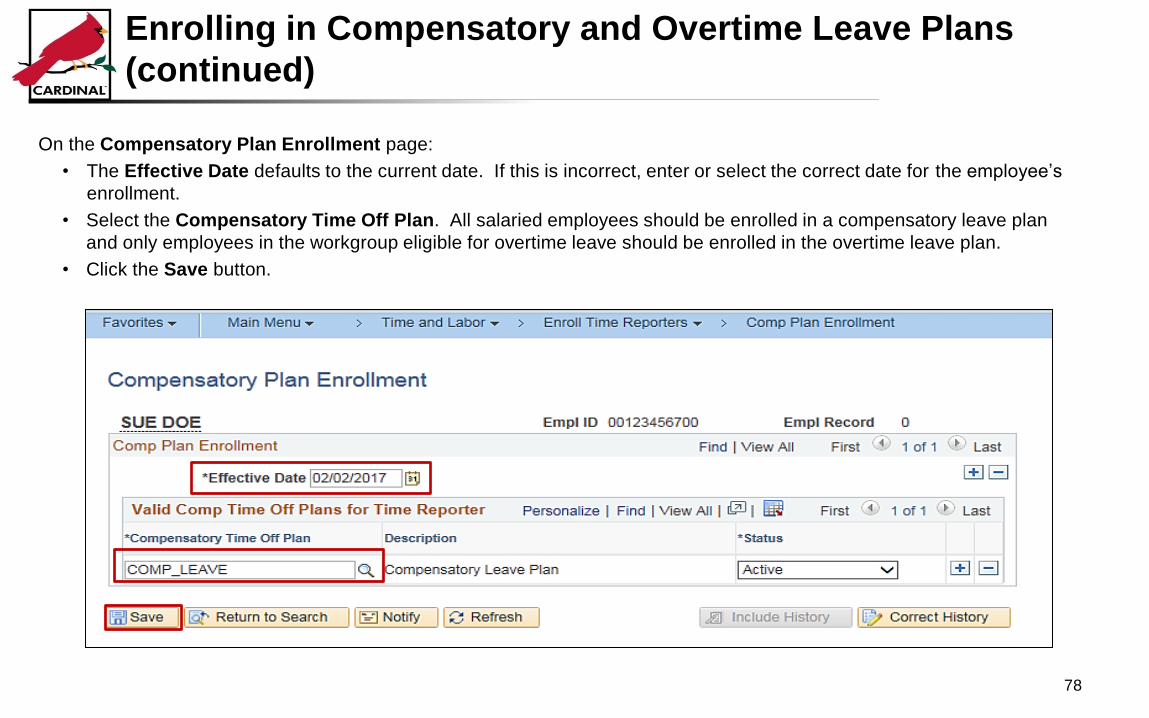
Enrolling in Compensatory and Overtime Leave Plans
(continued)
On the Compensatory Plan Enrollment page:
• The Effective Date defaults to the current date. If this is incorrect, enter or select the correct date for the employee’s
enrollment.
• Select the Compensatory Time Off Plan. All salaried employees should be enrolled in a compensatory leave plan
and only employees in the workgroup eligible for overtime leave should be enrolled in the overtime leave plan.
• Click the Save button.
78
Maintaining Compensatory and Overtime Leave Plans
When to update Compensatory and Overtime Leave Plans:
Employee Job Data Updates
Employee changes may require updates to their information. Changes to employee job data can affect the Workgroup (e.g.,
an hourly employee moving to a salaried position). If an employee is changed to a workgroup eligible for overtime leave,
you must enroll the employee in the overtime leave plan by adding a new effective dated row that includes both the
Overtime Leave and Compensatory Leave Plan (if compensatory leave is applicable). Even if the employee was
previously enrolled in only the Compensatory Leave Plan, that plan will not automatically carry forward to the new row. If an
employee moves out of a workgroup eligible for overtime leave, you must inactivate the overtime leave plan for the
employee by either adding a new effective dated row to inactivate the plans or add a new row that only includes the
Compensatory Leave Plan, if employee is still eligible.
Rehired Employees
When an employee is rehired, you should verify the compensatory and overtime leave plan enrollment is correct or enroll /
inactivate as needed if the employee is in a different workgroup than when they were previously employed.
To update Compensatory and Overtime Leave Plans, go to the Comp Plan Enrollment page. You can navigate to this
page using the following path:
Cardinal FIN> Cardinal HCM > Main Menu > Time & Labor > Enroll Time Reporters > Comp Plan Enrollment
79
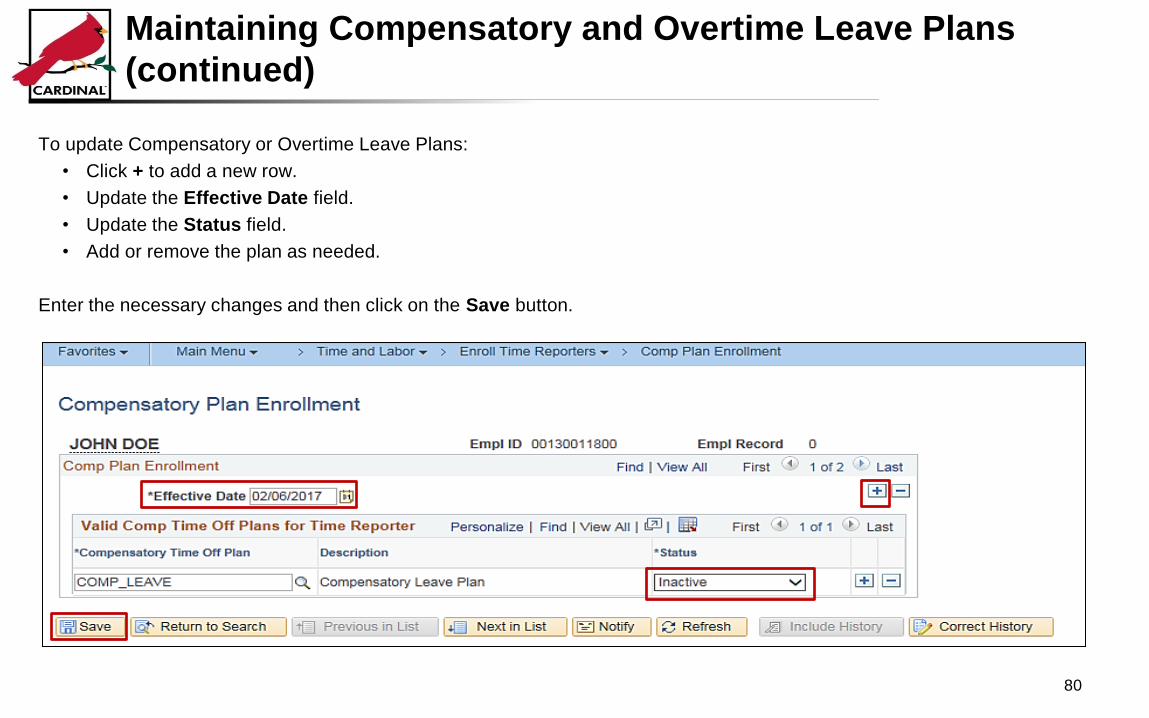
Maintaining Compensatory and Overtime Leave Plans
(continued)
To update Compensatory or Overtime Leave Plans:
• Click + to add a new row.
• Update the Effective Date field.
• Update the Status field.
• Add or remove the plan as needed.
Enter the necessary changes and then click on the Save button.
80
Simulation: Enrolling Time Reporters
You are now about to view a simulation that demonstrates how to enroll Time Reporters in Cardinal. Click on the Cardinal
logo below to start the simulation.
81
Lesson 3: Summary
In this lesson, you learned:
• In order for Cardinal to record and allocate payroll costs, an employee must be set up as a Time Reporter. The
Create Time Reporter Data page is used to enroll employees as Time Reporters.
• If an employee becomes inactive (e.g., retirement, separation, seasonal), the Time Reporter status is changed to
Inactive only after all time has been submitted for the employee and has been processed.
• You can search for the employee by name or Employee ID. However, searching by name may yield multiple
employees. Employee ID returns one employee.
• Hourly employees have a contract hours section on the Maintaining Time Reporter Data page.
• Employees must be enrolled in the Compensatory Leave Plan and Overtime Leave Plan in order to accrue and take
those leave types.
82

Lesson 4: Managing Work Schedules
This lesson covers the following topic:
• Assigning and Updating Work Schedules
83

Assigning and Updating Work Schedules
Each employee must have a work schedule that is effective dated in Cardinal. Assigning an employee to a work
schedule(s) is done manually.
Hourly employees are assigned a work schedule with zero hours. The name of the schedule is None.
Salaried employees are assigned a pre-defined work schedule that matches the days of the week and number of hours they
are scheduled to work.
Schedule Configuration
Schedules can be weekly, bi-weekly, rotating, and flexible. Supervisors and Administrators can add new work schedules for
employees. Only Payroll Administrators can correct the schedule.
84

Assigning and Updating Work Schedules (continued)
Manage Work Schedules
It is important that a salaried employee’s work schedule be accurate as it impacts the employee’s leave balances, time
processing, and overtime pay eligibility:
• Cardinal business rules validate hours reported on an employee’s timesheet against their schedule and identifies
exceptions if they do not match.
• When an absence request is entered for a full day or crosses multiple days, holidays, weekends, etc., an employee’s
schedule is used to calculate how many actual leave hours are being taken.
• Cardinal uses an employee’s work schedule to determine the eligibility for any overtime entered on a timesheet.
Updating Work Schedules
When an employee’s schedule changes:
• An Employee Setup Administrator or Time & Attendance Approver can update the employee’s schedule by adding a
new effective dated row.
• The schedule updates are normally entered by the employee’s supervisor.
• The employee schedule updates are effective dated to retain historical records.
85

Assigning and Updating Work Schedules (continued)
To add or change an employee’s schedule, navigate to the Assign Work Schedule (search) page.
You can navigate to this page using the following path:
Cardinal FIN > Cardinal HCM > Main Menu > Time & Labor > Enroll Time Reporters > Assign Work Schedule
Enter the Employee ID or Name and then click the Search button. Select the appropriate employee to make the schedule
change.
86

Assigning a Work Schedule for a New Employee
Enter the Effective Date, which should match the employee’s hire date.
For the Assignment Method from the drop-down list select the value Select Predefined Schedule.
Select the appropriate Schedule ID. In this scenario, the 5-DAY schedule is selected.
Click the Save button.
87

Updating Work Schedules
To update a schedule follow these steps:
• Click on the [+] button to add a new row.
• Click in the Effective Date field and insert the effective (start) date that the schedule was in effect (this can be past,
present, or future).
• The Assignment Method field defaults to Select Predefined Schedule. Do not change it.
• Click in the Schedule ID field and select the ID for the new schedule.
• Click the Save button to save your changes.
It is best practice to start a new schedule on a Monday’s date, since all schedules have their week defined as Monday to
Sunday.
88

Updating Work Schedules (continued)
89
Lesson 4 Summary
In this lesson you learned:
• How to enter an employee as a Time Reporter
• How to set up compensatory and overtime leave
• How to enter / update employee work schedules
90

Lesson 5: Time & Attendance Administration Hands-on
Practice
This lesson includes practice that will reinforce the lessons learned today. Your instructor will provide direction regarding
specific activities that are part of this lesson. Please ask your instructor if you have any questions.
91
Course Summary
In this course, you learned how to:
• Create and maintain position, personal, and job data
• Enroll and maintain Time Reporters and compensatory leave plans
• Manage work schedules
• Review and manage time after payroll processing
92

Course Evaluation
Congratulations! You have successfully completed the 501TA363: Time & Attendance Administration course. Please
use the evaluation link to assess this course.
93

Appendix
• Key Terms
• Flowchart Key
94
Key Terms: Employee Setup
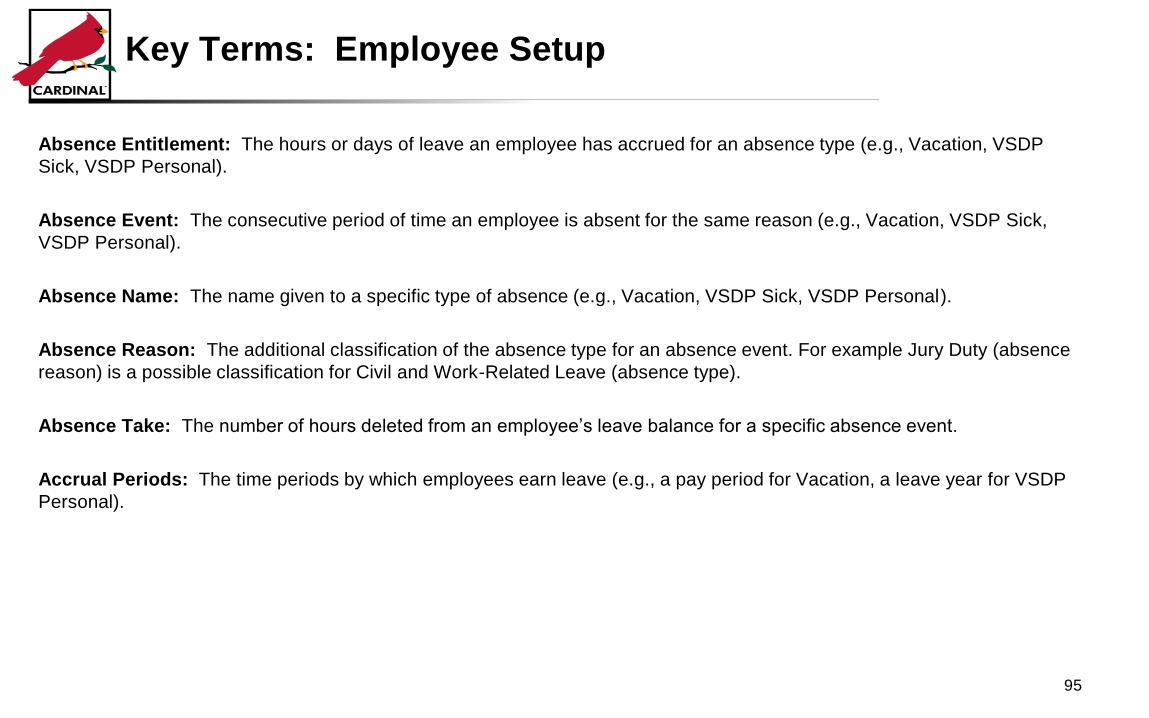
Absence Entitlement: The hours or days of leave an employee has accrued for an absence type (e.g., Vacation, VSDP
Sick, VSDP Personal).
Absence Event: The consecutive period of time an employee is absent for the same reason (e.g., Vacation, VSDP Sick,
VSDP Personal).
Absence Name: The name given to a specific type of absence (e.g., Vacation, VSDP Sick, VSDP Personal).
Absence Reason: The additional classification of the absence type for an absence event. For example Jury Duty (absence
reason) is a possible classification for Civil and Work-Related Leave (absence type).
Absence Take: The number of hours deleted from an employee’s leave balance for a specific absence event.
Accrual Periods: The time periods by which employees earn leave (e.g., a pay period for Vacation, a leave year for VSDP
Personal).
95

Key Terms: Timesheet Entry
Adjustment: A manually entered increase or decrease to an entitlement balance.
Business Unit: Identifies an operational subset of an organization. In Virginia, each state agency is an operational subset
(or business unit) of the Commonwealth. The business unit number identifies each operational subset or agency of the
Commonwealth. For example, VDOT is agency 50100.
ChartFields: A field on the Chart of Accounts represents one category of data (e.g., Business Unit,
Department, Account, Fund, Program) and uses various values to further define that data. A combination of ChartFields
defines an accounting distribution used in the creation of journal entries.
Compensatory Time Plan: Field that identifies employee eligibility for earned time off in lieu of paid overtime. This
includes Compensatory Leave Plan and Overtime Leave Plan.
Entitlement Balance: The number of hours of unused entitlement for a particular absence type (e.g., Vacation, VSDP Sick,
VSDP Personal).
Job Data: Information about the employee’s position, department, job code, and compensation.
Location: Field that defines the employee’s District or Central Office work location.
96

Key Terms: Timesheet Entry
Payable Time: In HCM, hours that are successfully processed through Time Administration and sent to the employee’s
supervisor for approval.
Personal Data: An employee’s biographical information such as name, address, Employee ID, etc. In Cardinal, it does not
include the employee’s Social Security Number.
Personnel Management Information System (PMIS): Used to create a new position or edit position information when first
entered into PMIS. PMIS then sends the information to Cardinal to establish Position Data in Cardinal Time & Attendance.
Position Data: Information about a position, including Department ID and Reports To information.
Reported Time: In HCM (Human Capital Management) application, hours recorded on a timesheet and either saved or
submitted, but not yet processed through the Time Administration batch process.
Reports To: Field that associates position to its supervisory position number.
Self Service User / Time Reporter: An employee who reports time on a Cardinal Timesheet.
SpeedTypes: Automatically populate some ChartFields on a transaction. Additional fields (e.g., Account) must be entered
manually to successfully submit time.
97
Key Terms: Timesheet Entry
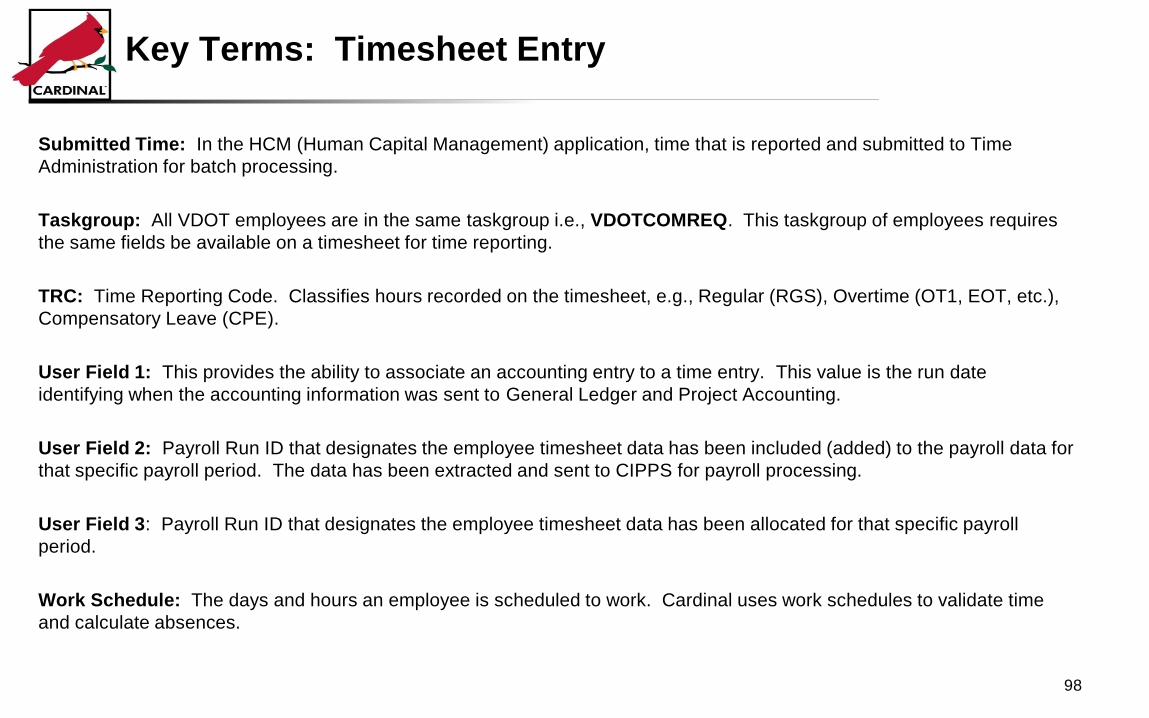
Submitted Time: In the HCM (Human Capital Management) application, time that is reported and submitted to Time
Administration for batch processing.
Taskgroup: All VDOT employees are in the same taskgroup i.e., VDOTCOMREQ. This taskgroup of employees requires
the same fields be available on a timesheet for time reporting.
TRC: Time Reporting Code. Classifies hours recorded on the timesheet, e.g., Regular (RGS), Overtime (OT1, EOT, etc.),
Compensatory Leave (CPE).
User Field 1: This provides the ability to associate an accounting entry to a time entry. This value is the run date
identifying when the accounting information was sent to General Ledger and Project Accounting.
User Field 2: Payroll Run ID that designates the employee timesheet data has been included (added) to the payroll data for
that specific payroll period. The data has been extracted and sent to CIPPS for payroll processing.
User Field 3: Payroll Run ID that designates the employee timesheet data has been allocated for that specific payroll
period.
Work Schedule: The days and hours an employee is scheduled to work. Cardinal uses work schedules to validate time
and calculate absences.
98

Key Terms: Absence Management
Workgroup: A group of Time Reporters who share the same Time Reporting Rules and Time Reporting Codes. All Time
Reporters must have a valid workgroup. VDOT’s Workgroups are:
• VAPEXCEPT: VDOT Executives – No Approval
• VAPEXTPB4: VDOT EXTPB4 – No Approval
• VAPEXTPB5: VDOT EXTPB5 – No Approval
• VDOTEMHRLY: VDOT Emergency Hourly
• VDOT EXCEPT: VDOT Executive
• VDOTEXTPB4: Salaried Exempt Pay Band 4
• VDOTEXTPB5: Salaried Exempt Pay Band 5 & above
• VDOTHRLY: VDOT Hourly Employees
• VDOTNOEXOT: VDOT Salaried Non Exempt OT Lv
• VDOTNONEXM : VDOT Salaried Non Exempt
99
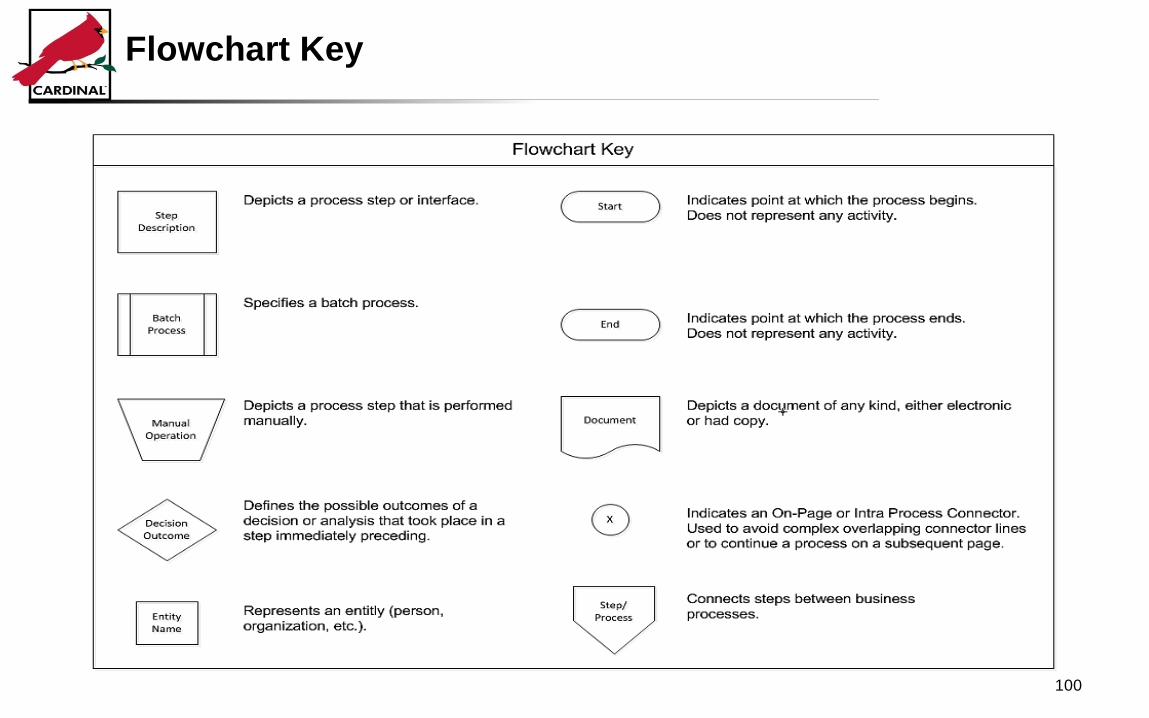
Flowchart Key
100