valspequsermanual-380
DESCRIPTION
Dresser ValveTRANSCRIPT

User Manual – ValSpeQ 3.80
1
ValSpeQ VVVeeerrrsssiiiooonnn 333...888000
USER MANUAL Version 1.0 Release: May 2008

User Manual – ValSpeQ 3.80
2
Table of Contents Topic No.
Topic Description
1 Overview 2 System Requirements – Hardware & Software 3 Technical Support 4 Getting Started With ValSpeQ Application 5 Navigation Section 5.1 Configuration Tab 5.2 Project Tab 5.2.1 Quote Number Folder/Node 5.2.2 Template Library Folder 6 Application Work Area 7 Application Menu Bar 7.1 Project 7.1.1 New Project 7.1.2 New Configuration 7.1.3 Open (Existing Project) 7.1.4 Save 7.1.5 Save As 7.1.6 Import 7.1.7 Export 7.1.8 Freeze Items 7.1.9 Unfreeze Items 7.1.10 Search Tag 7.1.11 XML File… 7.1.12 Project Preferences 7.1.13 Spreadsheet View 7.1.14 Print 7.1.15 Recently Used Projects Section 7.1.16 Exit 7.2 Template Library 7.2.1 Export Templates 7.2.2 Import Templates

User Manual – ValSpeQ 3.80
3
7.3 Item 7.3.1 Add 7.3.2 Copy 7.3.3 Copy Item to Library 7.3.4 Delete 7.3.5 Save 7.3.6 Freeze 7.3.7 Unfreeze 7.3.8 Cancel Item (New) 7.3.9 UnCancel (New) 7.3.9 General Info 7.4 Template 7.4.1 Add 7.4.2 Copy 7.4.3 Copy Template to Quote/ Project 7.4.4 Delete 7.4.5 Save 7.4.6 General Info 7.4.7 Overlay Template 7.5 Settings 7.5.1 Pricing 7.5.2 Factory Notes Library 7.5.2.1 Manage Factory Notes / Groups / Collections 7.5.2.2 Import Factory Notes 7.5.2.3 Export Factory Notes 7.5.3 User Preferences 7.5.4 Manage Customer Library 7.5.5 ITP 7.5.5.1 ITP Management 7.5.5.2 Import ITP (New) 7.5.5.3 Export ITP (New) 7.6 Tools 7.6.1 ANSI Calculator 7.6.2 Leakage Calculator 7.6.3 UOM Converter 7.6.4 PED Evaluation 7.6.5 PED Factory Documentation 7.6.6 Filter 7.6.7 Mass Change 7.7 Help Tag LODB Restrictor 8 ValSpeQ Messages

User Manual – ValSpeQ 3.80
4
Overview Welcome to ValSpeQ, a full function, Windows based multi-configurator for Valve & Level sizing, selection and specification tool. This version of ValSpeQ is intended for Masoneilan sales and sales support personnel as well as sales representatives and agents. ValSpeQ is designed to be an effective tool for quickly sizing a few valves to generating complete proposal documentation for large quotes. Now ValSpeQ supports configuring of Levels too. As a valve configurator ValSpeQ offers flexibility yet is consistent in its validation of valve, actuator and accessory selections. Indeed, the tool is structured so that user cannot select invalid combinations of components. Tool output reliability is also assured through sizing calculations and noise prediction methods that are entirely consistent with the latest ISA/IEC standards. Moreover, regular maintenance of the ValSpeQ product database and standardized formatting of output documents leads to tool accuracy and consistency. As a common platform for sales support worldwide, the ValSpeQ product database and output documents are intended to be Masoneilan corporate standards. By combining flexibility, ease of use and full functionality, ValSpeQ, effectively supports our selling efforts from identification of sales opportunity to submittal of quote. Features and functionality of ValSpeQ beyond Sizing, Selection & Specification include the capability to:
Maintain User-Editable Quote Numbers. Create configurations for Valves and Levels. Easily navigate between Items/Templates & various configurations detail information. Quickly calculate without actually adding an Item or Template & then at the user’s option
saving the same, if required, as an Item or a Template. Store every project separately, each project containing multiple Items/Templates. Now open the Project File (.vnx) directly from the Explorer, by just double clicking on the file. Import/Export selected Items/Templates including Factory Notes from one user to another. Generate a XML File with Factory Notes for the factory/facility MRP system. Create a Template or set of Templates within the Template Library allowing the user to create
an Item of similar configuration very quickly. Copy an Item within the Quote or to the Template Library as a Template. Copy a Template
within the Template Library or to Quote as an Item. Flag a Valid or Invalid configuration using a visual indicator adjacent to the Item/Template &
at each Configuration node. Also a flag an item/template indicating their type (either control valve-C or Level-L)
Search Items by Tag Number. Search tags for items by giving special conditions like Tag ‘Equals’/’Begins with’/’Contains’/’Ends with’.
Invalidate Items or Templates if configured using an older version, thus forcing the user to re-configure & re-validate using the current configurator.
Prohibit opening project files created using higher ValSpeQ application version than the current one.
Re-order Items. Freeze/Unfreeze all items in one click. Create criteria based Filters in Library and Project to quickly work with items/templates. Mass change for accessories for the filtered/non-filtered items. Use Freeze/Unfreeze, search tag, export, XML file, Mass change, Apply factory notes like
functionalities along with Filters. Generate envelope dimensioned drawings and various reports in multi-language including:
Specification Sheet, Calculation Sheet, Notes Sheet, Price Sheet, Valve Flow Curve, Technical Summary, Pricing Summary, Drawing Sheet.
Automatically price complete valve configurations: North American List Price, Canadian Price List, Alliance Price List

User Manual – ValSpeQ 3.80
5
Discounting via a 3 Tier Quote/Line/Accessory Discount Template Pricing of Quality Plans, Factory Notes and User Defined Adders Flags for Discount Authorization Create and Manage Groups, Factory Notes, note collections in library and project. Apply Note
collections to items/templates. Find and replace a note for items/templates. Import and Export the Factory Notes along with Groups and collections. Store the user defined Factory Notes along with Groups in the Library. Hence user can reuse
Factory Notes once created for different projects & associate them with the configuration. Automatically tag masking for items on accessories. A separate User preference screen to allow the user to set default values for new
configurations and for ValSpeQ general behavior. Open the Project from previous version like Release 3.0, 3.1, 3.2, 3.3, 3.4, 3.50,3.51,3.51.1, &
make them Release 3.60 compatible. Import an Item or Template from the export file created in Release 3.1, 3.2, 3.3, 3.4 and 3.50
& make those lines compatible with release 3.60. New Tools for the user to calculate ANSI Rating, Leakage and UOM converter. Supporting for PED Evaluation and factory documentation. Applying ITP (Inspection & Testing Plan) to Line Items. Spreadsheet View for Line Items in order to view or change the Line Items at one go. Cancel or Uncancel the Line Items.
ValSpeQ Editions ValSpeQ is distributed in 3 different editions. Full Edition Size & Selection Program Drawing Pricing or Quote Standard Edition Size & Selection Program Drawing Lite Edition Size & Selection Program

User Manual – ValSpeQ 3.80
6
System Requirements – Hardware & Software Hardware Requirements
Pentium II 333 MHz Processor 128 MB RAM Minimum 350-MB free Disk Space required on the system drive.
Software Requirements
Windows 98/NT Server/Workstation/2000 Server/XP

User Manual – ValSpeQ 3.80
7
Technical Support For any technical assistance, please contact Postal Address : Dresser, Masoneilan 85 Bodwell Street Avon, Massachusetts 02322 Email : [email protected] Telephone : (508) 586-4600 Tele Fax : (586) 941-5497 Kindly use the below mentioned format when recording any problems or errors. Client Name : Type Your Company Name User Name : Type Your Name Application : ValSpeQ 3.60 Error Description : Provide the following Information
1. Error Description or Message 2. Occurs Only On A Specific Event & steps to reproduce the event 3. Occurs Randomly 4. Data, in case any

User Manual – ValSpeQ 3.80
8
Getting Started with ValSpeQ Application To start the ValSpeQ application, follow the steps given below: - From the Windows taskbar click Start, Programs, ValSpeQ. On starting the application, a New Project named “Untitled.vnx” will be opened & the blank Sizing & Selection screen is being displayed in the application work area. The application will be ready to configure a New Configuration. With Pricing version will have the folder Quote Number in place of folder “Project”. The default value of the Quote Number will be “Quote” which is editable.
Navigation Section Application Work Area
Menu Bar Project File Name

User Manual – ValSpeQ 3.80
9
Navigation Section The Navigation section contains all the available Configured list of Items and Templates. The Navigation section facilitates the user to navigate or switch in between Items/Templates & its associated different configuration nodes/functions. The Navigation section is split into two 1. Configuration Tab 2. Project Tab Configuration Tab Functionality: Allows navigation through different functionalities of a configuration such as Size & Selection, Materials, Actuation etc.
Depending on the selected Configuration Node & the selected Item or Template, the data is displayed in the application work area.
Visual icons to indicate valid or invalid/incomplete data are displayed adjacent to each Configuration Node. Even if one Configuration Node is invalid/incomplete, the Item/Template Node is also marked as invalid/incomplete.
Configuration tab

User Manual – ValSpeQ 3.80
10
2. Project Tab
Functionality: Allows navigation through different Items/Templates in Quote Number & Template Library folder respectively.
Depending on the Item or Template selected & the selected Configuration Node, the data is displayed in the application work area.
Visual icons to indicate valid or invalid/incomplete data are displayed adjacent to each Item/Template node. Even if one Configuration Node is invalid/incomplete, the Item/Template Node is also marked as invalid/incomplete. Only when all the Configuration Nodes are valid, the Item/Template Node is marked as valid.
The Project Tab page is further split into 2 i.e. Quote Number Folder/Node & Template Library Folder/Node. All the Items reside under the Quote Number folder & all the Templates reside under the Template Library folder.
Project Tab

User Manual – ValSpeQ 3.80
11
Quote Number Folder/Node
The Quote Number folder on the Project Tab contains list of Items in the Quote. Note: The Quote Number folder is referred to as Quote hereafter in the document. By right clicking on the Quote Folder or Node, a popup menu is displayed by which some of the functionalities related to current Project can be invoked. The following screen shows the options available on the popup menu on the right click of Quote node.
The lists of functions available on right click of Quote Folder/Node are as follows: 1. Edit Quote Number 2. Add Item
2.1. Control Valve 2.2. Level 2.3. Accessory
2.3.1 Actuator 2.3.2 Positioner 2.3.3 Transducer 2.3.4 Booster 2.3.5 Switch 2.3.6 Solenoid 2.3.7 Airset
2.4. Regulator 3. Export 4. Import 5. Freeze Items
Right Click Menu

User Manual – ValSpeQ 3.80
12
6. Unfreeze Items 7. Filter
7.1. Add/Edit… 7.2. Activate 7.3. Refresh
8. Search Tag 9. XML File 10. New Configuration
10.1. Control Valve 10.2. Level 10.3. Accessory
10.3.1 Actuator 10.3.2 Positioner 10.3.3 Transducer 10.3.4 Booster 10.3.5 Switch 10.3.6 Solenoid 10.3.7 Airset
10.4. Regulator

User Manual – ValSpeQ 3.80
13
Template Library Folder/Node
The Template Library Folder on the Project Tab provides a list of Templates available in the project. By right clicking on the Template Library folder/node, a popup menu is displayed by which some of the functionalities related to Template Library can be invoked. The following screen shows the options available on the popup menu on the right click of Template Library node.
The lists of functions available on right click of Template Library folder/node is as follows: 1. Add Template
Control Valve Level Accessories
Right Click Menu

User Manual – ValSpeQ 3.80
14
Actuator Positioner Transducer Booster Switch Solenoid Airset Regulator
2. Export 3. Import
Application Work Area The application work area is the area where most of the configuration related data for the selected Item/Template & for the selected Configuration Node is displayed.
Application Work Area

User Manual – ValSpeQ 3.80
15
Application Menu Bar The Application Menu Bar in ValSpeQ provides various options for executing or invoking the different features/functionality of the application.
The following menus are available on the application menu bar 1. Project 2. Template Library 3. Item 4. Template 5. Settings 6. Tools 7. Help The following image shows the available options on the menu bar.

User Manual – ValSpeQ 3.80
16
Project The Project menu on the application menu bar allows the customer to perform/invoke various Project related functions. The list of functions is as follows: 1.1 New Project 1.2 New Configuration
Control Valve Level Accessories Actuator Positioner Transducer Booster Switch Solenoid Airset Regulator
1.3 Open (Existing Project) 1.4 Save 1.5 Save As 1.6 Import 1.7 Export 1.8 Freeze Items 1.9 Unfreeze Items 1.10 Search Tag 1.11 XML FIle 1.12 Project Preferences 1.13 Print 1.14 Recently Used Projects Section 1.15 Exit The following screen displays the above-mentioned options under the Project menu.

User Manual – ValSpeQ 3.80
17

User Manual – ValSpeQ 3.80
18
1.1 New Project This option facilitates the user to create a New Project, which can have a set of multiple Items and Templates. Steps : 1. Click on New Project option under Project menu or Alt+P & then N for New Project. 2. The application will prompt the user to save any unsaved data for the current project provided
it has not been saved before invoking the New Project option. 3. A new project with the default name as “untitled.vnx” will be opened. 4. A blank Sizing & Selection screen for Control Valve or blank Service & Level screen for Level
will be displayed in the application work area. The application will be ready to configure a new configuration.
Note: - On starting a New Project, associate a Price List in the Pricing option under Settings menu. The following screen is displayed on invoking the New Project option.
1.2 New Configuration The New Configuration now provides two options as:- 1] Control Valve – Click this option to create new configuration for Control Valve. 2] Level – Click this option to create new configuration for Level. 3] Accessory – Click this option to create new configuration for Accessory. 4] Regulator – Click this option to create new configuration for Regulator
Blank Size & Selection screen

User Manual – ValSpeQ 3.80
19
Steps : 1. Select Control Valve/Level/Accessory/Regulator option available under New Configuration
menu of Project Menu. 2. The New Configuration functionality can also be invoked by Right Clicking the mouse button
on the Quote folder/node & then selecting the Control Valve/Level/Accessory/Regulator sub menu available under New Configuration menu from the popup menu.
3. The application will prompt the user to save any unsaved data provided it has not been saved before invoking the New Configuration option.
4. A blank Sizing & Selection screen for Control Valve / Service & Level / Accessory / Regulator screen for Level will be displayed in the application work area.
How to Save New Configuration? A New Configuration is neither an Item nor a Template & hence no Item Node or Template Node is added under the Quote or Template Library node. The user has the choice to save it as an Item or as Template by selecting Save option from Item or Template menu. If the New Configuration is not saved & any other option is invoked, the application will prompt whether to Save the New Configuration as Item or Template. The following screen is displayed on invoking the New Configuration option for Control Valve.
Warning A warning message is prompted by the application on saving the New Configuration as a Template. Tag information or Quantity or Notes information on Item Data screen/node or Pricing data on the Pricing screen/node may be lost if the New Configuration is being stored as a Template.
Blank Size & Selection screen

User Manual – ValSpeQ 3.80
20
1.3 Open (Existing Project) This option facilitates the user to open & work with any existing projects. The user can open the project in different ways. Option 1 The user can double click in the Explorer View on the particular (.vnx) ValSpeQ Project File to get it open in the ValSpeQ Application.
Option 2 Steps:
1. Click on Open option under Project menu or Alt+P & then O for Open.
2. The application will prompt the user to save any unsaved data for the current project provided it has not been saved before invoking the Open Project option. The application will prompt the user to Save the current project if it has not been saved i.e. untitled.vnx.
3. The application will display an Open dialog box where existing projects would be listed.
4. Select the desired project & click Open. The Project Database Version of the selected
project will be checked. If the project file is created using previous version of ValSpeQ application then application will prompt the user to convert the project to make ValSpeQ 3.60 compatible.
5. On approval, a backup of the current selected project file is taken and the project database updated with the additional Fields, Tables, Positioner Parameters and Regional Settings Compatibility. Following screen will be displayed while upgrading the project.

User Manual – ValSpeQ 3.80
21
If user select “No” then the selected project will not be open & upgraded.
6. After successfully converting, the selected project will be opened & the Project General Information screen will be displayed in the application work area. The Quote node will be the selected node. General project information, customer information, general project related notes & details of Items within the project is the information provided.

User Manual – ValSpeQ 3.80
22
The following screen is displayed on invoking the Open option.
Note: - On upgrading, Size & Selection, Materials, Actuation & Pricing nodes for all the Items will be set to invalid & the Item nodes will be set to invalid. Similarly the Size & Selection, Materials & Actuation nodes for all the Templates will be set to invalid & the entire Template nodes will be set to invalid. If the project file selected is created using the same project database version, the application will perform the following validations for every Item & Template
1. Check the Configurator version that was used when the Item/Template was configured with current application Configurator version.
2. Check the Sizing control/OCX version that was used when the Item/Template was configured with current application Size control/OCX version.
3. Check the Sizing database version that was used when the Item/Template was configured with current application Size database version.
If difference is found in any one of the validations described above, the Sizing & Selection, Materials & Actuation nodes will be set to invalid & the Item/Template will be set to invalid. Similarly the following validations will be performed for all the Items - Check the Pricing control/OCX version with which the Item was configured with current application Pricing control/OCX version. - Check the Pricing database version with which the Item was configured with current application Pricing database version. - If difference is found in any one of the validations described above, the Pricing node will be set to invalid & the Item will be set to invalid. 1.4 Save
Project information

User Manual – ValSpeQ 3.80
23
This option facilitates the user to save the current project. Steps: 1. Click on Save option under Project menu option or Alt+P & then S for Save. 2. The application will prompt the user to save any unsaved data for the current project provided
it has not been saved before invoking the Save option. The application will prompt the user to save the current project if it has not been saved i.e. untitled.vnx refer to the screen displayed in the Save As option.
The following screen is displayed on invoking the Save option.

User Manual – ValSpeQ 3.80
24
1.5 Save As This option facilitates the user to Save the current project with a different project name. Steps : 1. Click on Save As option under Project menu option or Alt+P & then A for Save As. 2. The application will prompt the user to provide project name by opening the Save As dialog
box. 3. The application will prompt the user to save any unsaved data provided it has not been saved
before invoking the Save As. The data would then be saved to the new project & not to the old project.
The following screen shot is displayed to save the project with new file name.

User Manual – ValSpeQ 3.80
25
1.6 Import
This option facilitates the user to import Item data into the current Project & Quote from another project via the export file having “.vxp” extension.
The Import is split into two 1. Import Item 2. Import Template
Import Items Functionality: This utility facilitates the users to import Item data into the current Project from an export file with “vxp” extension. The user can import one or more selected Items from the export file. The Import option can be invoked by selecting the Import option from the Project menu on the application menu bar or Alt+P and then I for Import Items. The same can be invoked by right clicking on the Project / Quote node and then selecting the Import option from the popup menu. The following screen will be displayed for Import Item.
List of ItemsExport file name

User Manual – ValSpeQ 3.80
26
On selecting the export file, the application will display the Code and Name of the Project that has generated the export file. Similarly, it will display all Items from the export file. They are selected by default. The user has the option to de-select all and select a few. The user can either select the With Revision or Without Revision option. With Revision option will import the Item Revision data into current Project file. Click on the Import button or press Alt+I key to start the import process. The application will prompt the user that Data to be imported will be added to the current project. Before starting the import process, the application takes a backup of the current project and the user will be informed about the backup location. This helps the application to restore the database from the backup in case of an unsuccessful import operation. But if the application fails to restore the backup, the user will have to manually restore the backup. If items present in the VXP file and items in the Project has same item identifiers (GULI= Global Unique Line Identifier) then following message will be displayed.
If Yes option is sele1cted then items from Project will be replaced by items in the VXP file. If No option is selected then items from VXP file will be added at the end of existing items in the Project. If Cancel option is selected then control will return to Import Items Form.
As the utility starts, the progress bar will be displayed.
During Import process, the application will add some Positioner parameters and also check the Regional Settings Compatibility. As per the regional setting the values get stored. After successful completion of the import process, a message that “Import completed successfully” will be flashed by the application and the backup database will get deleted. After Import of items Pricing node for all items will be set to invalid irrespective of anything and the Item will be set to invalid. The status of all other configuration nodes remains unchanged.
User Manual – ValSpeQ 3.80
27
A set of validations is executed on starting the import process. The validations are as follows. 1. If the Price List does not exist on the workstation that is importing the data, the application will
provide a warning and will proceed further only on approval. 2. If the project database version that has created the export file differs from the project
database version into which the data is to be imported, a message that “Data being read is sent by Different Database Version” will be flashed by the application. The Sizing and Selection, Materials, Actuation and Pricing nodes are set to invalid for all the Items that are imported and the Items are set to invalid.
While inserting data if any field is not found, data for that field will be skipped and the import will proceed to insert data for the rest of the fields. If the project database version matches, the application proceeds to check the Configurator version, Sizing Control/OCX version, Sizing database version, Pricing Control/OCX version and Pricing database version form the export file with the current application versions. If difference is found in any one of these versions, a message that “Version Differences Found in Items in the selected import file” will be flashed by the application. The Sizing and Selection, Materials, Actuation and Pricing nodes for that Item will be set to invalid and the Item will be set to invalid. The status of all other configuration nodes remains unchanged. If version information is not available in the export file then the message “Version Information Missing” ” will be flashed by the application and it will proceed the import process for the selected Items. 3. For Pricing version, the Pricing node and all items imported are set to invalid. 4. If item has Factory Notes assigned to it while export then that item will import with same
Factory Notes. If the Project has same Factory Note as importing item’s Factory Note then new name will be generated for importing Factory Note.
Close Button
Click on the Close button or press the Alt+C keys to close the Import Item Form.

User Manual – ValSpeQ 3.80
28
Import Templates Functionality: This utility facilitates the users to import Template data into the current Project from an export file with “vxt” extension. The user can import one or more selected Templates from the export file. The Import option can be invoked by selecting the Import Template option from the Template Library menu on the application menu bar or Alt+L and then I for Import Templates. The same can be invoked by right clicking on the Template Library node and then selecting the Import Template option from the popup menu. The following screen will be displayed for Import Template.
On selecting the export file, application will display the Code and Name of the Project that has generated the export file. Similarly, it will display all Templates from the export file. They are selected by default. The user has the option to de-select all and select a few. Click on the Import button or press Alt+I key to start the import process The application will prompt the user that Data to be imported will be added to the current project
List of TemplatesExport file name

User Manual – ValSpeQ 3.80
29
Before starting the import process, the application takes a backup of the current project and the user will be informed about the backup location. This helps the application to restore the database from the backup in case of an unsuccessful import operation. But if the application fails to restore the backup, the user will have to manually restore the backup. As the utility starts, the progress bar will be displayed. During Import process, the application will add some Positioner parameters and also check the Regional Settings Compatibility. As per the regional setting the values get stored. After successful completion of the import process, a message that “Import completed successfully” will be flashed by the application and the backup database will get deleted. A set of validations is executed on starting the import process. The validations are as follows. 1. If the project database version that has created the export file differs from the project
database version into which the data is to be imported, a message that “Data being read is sent by Different Database Version” will be flashed by the application. The Sizing and Selection, Materials and Actuation nodes are set to invalid for all the Templates that are imported and the Templates are set to invalid. The status of all other configuration nodes remains unchanged.
While inserting data if any field is not found, data for that field will be skipped and the import will proceed to insert data for the rest of the fields. If the project database version matches, the application proceeds to check the Configurator version, Sizing Control/OCX version, and Sizing database version form the export file with the current application versions. If difference is found in any one of these versions, a message that “Version Differences Found in Templates in the selected import file” will be flashed by the application and the Sizing and Selection, Materials and Actuation nodes and the Template will be set to invalid. The Pricing Control/OCX version and Pricing database version check is not applicable for Template. The status of all other configuration nodes remains unchanged. If version information is not available in the export file then the message “Version Information Missing” ” will be flashed by the application and it will proceed the import process for the selected templates. 2. If Template has Factory Notes assigned to it while export then that Template will import with
same Factory Notes. If the Project has same Factory Note as importing Template’s Factory Note then new name will be generated for importing Factory Note.
Close Button
Click on the Close button or press the Alt+C keys to close the Import Template Form.

User Manual – ValSpeQ 3.80
30
1.7 Export Functionality: This utility facilitates the users to export the Items and Templates of current Project to other ValSpeQ user. The exported Items and Templates can then be imported in any other Project.
The Export is split into two 1. Export Item 2. Export Template
Export Item Functionality: This utility facilitates the users to select single, multiple or all Items from the current Project and export it other ValSpeQ user. The exported Items can then be imported in any other Project.
The Export option can be invoked by selecting the Export option from the Project menu on the application menu bar or Alt+P and then E for Export Items. The same can be invoked by right clicking on the Project / Quote node and then selecting the Export option from the popup menu. The following screen will be displayed for Export Item.

User Manual – ValSpeQ 3.80
31
After invoking this option, all the Items from the Project will be displayed. They are selected by default. The user has the option to de-select all and select a few. Provide a filename to export. The export file will have an ".vxp" extension. The default export file name is generated by the application with the project code number followed by an ".vxp" extension. Project Code, Project Name and Quote Number is displayed to user on the Export form. The user has choice to export the data with Revision or without Revision. The user can also export the data with pricing or without pricing and With Factory Note or Without Factory Note.
Export Type List of Items in Project
Revision optionsFactory Note Option Pricing Option

User Manual – ValSpeQ 3.80
32
The pricing, revision and Factory Note related information for the selected Items would be included in the export file only after selecting the With Pricing, With Revision and With Factory Note option.
Click on the Export button or press Alt+E key to start the export process As the utility starts, the progress bar will be displayed.
After successful completion of the export process, a message that “Export completed successfully” will be flashed by the application. In case the export operation is not successful or the export process encounters any error, a related message will be flashed by the application and then the user has to repeat export operation. Close
Click on the Close button or press the Alt+C keys to close the Export Item Form.

User Manual – ValSpeQ 3.80
33
Export Template Functionality: This utility facilitates the users to select single, multiple or all Templates from the current Project and export it other ValSpeQ user. The exported Templates can then be imported in any other Project. The Export option can be invoked by selecting the Export Template option from the Template Library menu on the application menu bar or Alt+L and then E for Export Templates. Right clicking on the Template Library node and then selecting the Export Template option from the popup menu can invoke the same. The following screen will be displayed for Export Template.
Export Type List of Templates in Template Library
Factory Note Option

User Manual – ValSpeQ 3.80
34
After invoking this option, all the Templates from the Project will be displayed. They are selected by default. The user has the option to de-select all and select a few. Provide a filename to export. The export file will have an ".vxt" extension. The default export file name is generated by the application with the project code number followed by an ".vxt" extension. Project Code, Project Name and Quote Number is displayed to user on the Export form. The user has the choice only to export data With Factory Note or Without Factory note. The Factory note related information for the selected Items would be included in the export file only after selecting the With Factory Note option.
Click on the Export button or press Alt+E key to start the export process As the utility starts, the progress bar will be displayed.
After successful completion of the export process, a message that “Export completed successfully” will be flashed by the application. In case the export operation is not successful or the export process encounters any error, a related message will be flashed by the application and then the user has to repeat export operation. Close
Click on the Close button or press the Alt+C keys to close the Export Template Form.

User Manual – ValSpeQ 3.80
35
Freeze/Unfreeze Items Freeze Items – This option is used to freeze all Valid Line items, which are currently displayed under the Project Node. Unfreeze Items – This option is used to Unfreeze all Freeze Line items which are currently displayed under the Project Node. If the Freeze Items option is selected when there is no line item under the Quote node or when there is no Unfreeze valid line item under the Quote node then the warning message is displayed as shown in the following screen snapshot.
If Unfreeze Items options is selected when there is no line item under the Quote node or when there is no freeze item under the Quote node then the warning message is displayed as shown in the following screen.

User Manual – ValSpeQ 3.80
36
To Use Freeze Items and Unfreeze Items open a project file having a collection of control valves and Levels as shown in following screen.

User Manual – ValSpeQ 3.80
37
After selecting Freeze Items option from the Project menu, confirmation message is displayed on the screen as shown below.
After selecting Yes from the message box All Unfreezed valid items are freezed. As shown in the following screen.
Invalid Line Items don’t get freezed.

User Manual – ValSpeQ 3.80
38
Similarly If the Unfreeze Items option is selected from the Project menu the confirmation message is displayed for unfreeze all freezed Items as shown in following screen.
After selecting Yes from the message box All freezed Line Items are Unfreezed. As shown in the following screen.

User Manual – ValSpeQ 3.80
39
1.10 Search Tag This option facilitates the user to search Item(s) based on tag value. Steps: 1. Click on Search Tag option under Project menu option or Alt+P & then G for Search Tag. The
Search Tag functionality can also be invoked by Right Click of the mouse button on the Project folder/node.
2. The application will prompt the user to save any unsaved data for the current project provided it has not been saved before invoking the Search Tag option.
After clicking on Search Tag option following screen will be displayed.
This screen allows you to enter a search string in the Tag field and select a Condition from the Condition Combo box. Depending upon the Search string and the Condition specified, the Search operation is performed
• Select Equals when you want to search tags, which have the string being searched as their tag description.
• Select Begins with to list all Items with the tags that contain the entered string at the beginning of their tag description.
• Select Contains to list all Items with tags that contain the entered string as a substring of their tag description.
• Select Ends With to list all items with the tags that contain the entered string at the end of their tag description.
After entering a search string and selecting search condition, Click on the Find Now button to display the Line Items with it’s Description into the List.

User Manual – ValSpeQ 3.80
40
It also displays the total Number of Line Items satisfying the search criteria above the List View.
To search all the Line Items on which at least one tag is added, clear the search string and click on Find Now button. Blank value in the search string indicates to search all Line Items having tag information irrespective of the search condition. To close the Search Tag Form click on the Close Button.
User Manual – ValSpeQ 3.80
41
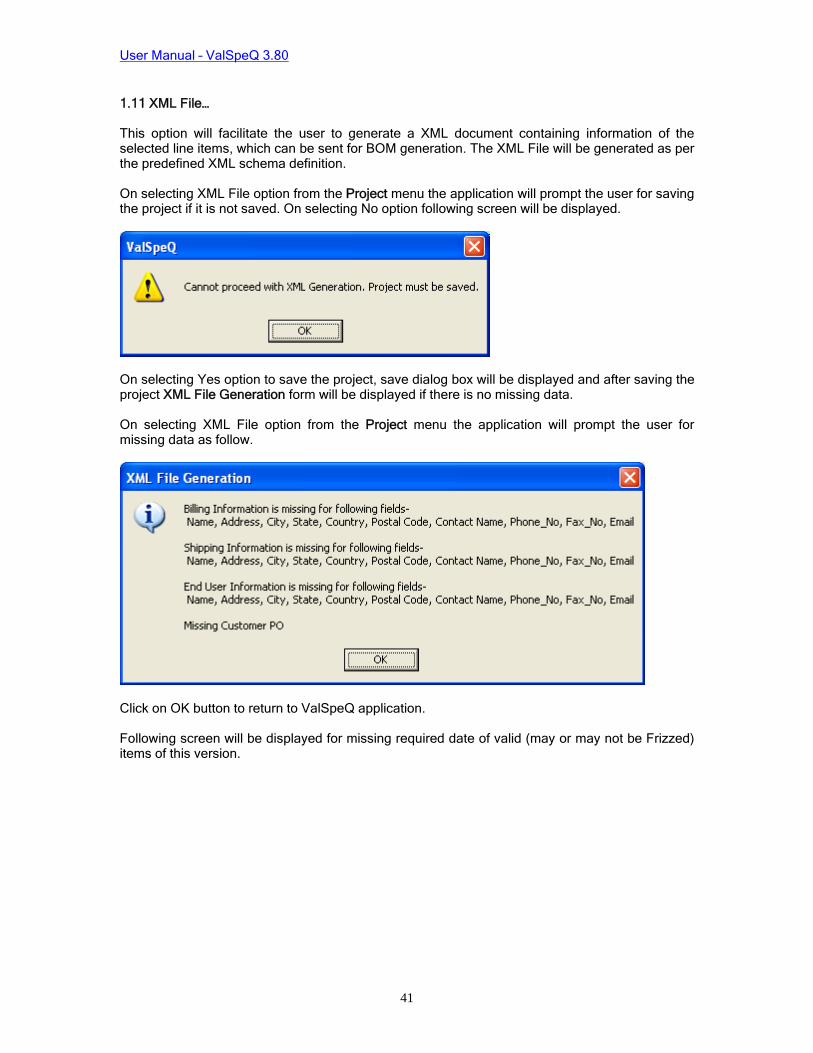
1.11 XML File… This option will facilitate the user to generate a XML document containing information of the selected line items, which can be sent for BOM generation. The XML File will be generated as per the predefined XML schema definition. On selecting XML File option from the Project menu the application will prompt the user for saving the project if it is not saved. On selecting No option following screen will be displayed.
On selecting Yes option to save the project, save dialog box will be displayed and after saving the project XML File Generation form will be displayed if there is no missing data. On selecting XML File option from the Project menu the application will prompt the user for missing data as follow.
Click on OK button to return to ValSpeQ application. Following screen will be displayed for missing required date of valid (may or may not be Frizzed) items of this version.

User Manual – ValSpeQ 3.80
42
The XML File option will be available only for Professional edition. The XML File option can be invoked by selecting the XML File option from the Project menu on the application menu bar or by the pressing Alt + P + X keys. The same can be invoked by right clicking Quote node and selecting XML File from option from the popup menu. Following screen will be displayed for XML File.

User Manual – ValSpeQ 3.80
43
All line items available in the current project are listed for XML File generation irrespective of the Filter status. Only valid line items will be available for selection. Press Alt + m to select all valid items. User has option to de-select all and select a few. In the following screen 2nd and 4th items are not selected because they are invalid items. As Item no. 7 is imported from old version it is not also available for selection.
The XML File will always be generated at the same location where the current project file resides and will have a filename as that of the project with a .xml extension. If a file with the same name already exists, the application will prompt for an Overwrite confirmation. Click on Generate XML File button or press Alt + G to start generating XML File. The application will flash appropriate message if the XML File Generation operation is not successful or if the process encounters any error. Click on the Close button or press the Alt +C keys to close the XML File Generation Form.

User Manual – ValSpeQ 3.80
44
1.12 Project Preferences After Selecting Project Preferences options, the Project Preferences form is get displayed on the screen as shown in the following screen.
On the project preferences form following tabs are displayed – 1. Calculation Variables 2. Unit of Measure 3. Service Condition 4. Actuation 5. Tubing 6. Tag 7. General 8. Factory Notes 9. Product Scope and Pricing 10. ITP/NACE/PED/ATEX 11. Generic Materials 12. Preferences for Air Groups By default Calculation Variables Tab is displayed. By default Save and Cancel buttons are disabled. If user makes any changes on the form then Save and Cancel buttons are Enabled. Click Save button to save the changes made. And to discard the changes made on the form click on the Cancel button.

User Manual – ValSpeQ 3.80
45
Calculation Variables After Selecting the Calculation Variables tab, the following screen will be displayed.
The default values for calculation variables are taken from the user preferences calculation variables after selecting new project option.
To change the default Calculation values, make entries in the corresponding textbox and save defaults by clicking on the Save button. After successfully saving the defaults, message box “Defaults saved successfully.” is displayed on the screen as shown in the following screen.

User Manual – ValSpeQ 3.80
46
After saving the Calculation Variables when the new item, template or new configuration is added in the project that line items or template will use these defaults for calculation and displayed on the User Defaults form as shown in the following screen.

User Manual – ValSpeQ 3.80
47
Unit of Measure Tab After Selecting the Unit of Measure tab, the following screen will be displayed.
This screen consist defaults Unit of Measure for Liquid Flow Rate, Gas Flow Rate, Steam Flow Rate, Two Phase Flow Rate, Two Phase Gas Density, inlet Pressure, Temperature, Liquid Velocity, Length and Calibration. The default values for Unit of Measures are taken from the user preferences Unit of Mesure after selecting new project option. To change the Default Units, select entries in the corresponding combo box and click on the Save Button. After Successfully saving the Defaults, a Message box “Defaults Saved successfully.” is displayed on the screen as shown in the following screen snapshot.

User Manual – ValSpeQ 3.80
48
After saving the Units of Measure when new item, template or configuration is added in the project those line items or template will use these units in calculation and displayed on the User Defaults form as shown in the following screen.

User Manual – ValSpeQ 3.80
49
Service Conditions Tab After selecting the Service Conditions tab, following screen will be displayed. This will display the Service conditions options available, Design Pressure and Design Temperature, as shown in following screen.
This screen includes the four service conditions headings used in the Size & Selection form. And Design pressure and temperature used in calculation. The default Values are initialized from the user preferences. To change the Service Conditions Headings and Design Pressure and Temperature for line Items and Templates, change the entries in the corresponding fields and click on the Save Button. After Successfully saving the Defaults a Message box “Defaults Saved successfully.” is displayed on the screen as shown in the following screen snapshot.

User Manual – ValSpeQ 3.80
50
After changing these defaults, when a new item/template/new configuration for Control Valve is added, these defaults are used and displayed on the Sizing & Selection screen as follows.

User Manual – ValSpeQ 3.80
51
Actuation Tab Actuation tab displays the Actuation defaults that are used in the Actuation form. These defaults include Fail Position and Air Action, as shown in the following screen.
The default Values are initialized from the user preferences after selecting new project option. To change the Actuation Defaults for line Items and Templates, select the entries in the corresponding combo box and click on the Save Button. After Successfully saving the Defaults a Message box “Defaults Saved successfully.” is displayed on the screen as shown in the following screen snapshot.

User Manual – ValSpeQ 3.80
52
After changing the defaults, when new item, template or configuration is added in the project, these defaults are used and displayed on the Actuation form as shown below after selecting none option.

User Manual – ValSpeQ 3.80
53
Tubing Tubing Tab displays the default Tubing Material, Fitting Size, Fitting Type and Material and Gauge Scale as shown in the following screen.
To change the Tubing Material, Fitting Size, Fitting Type and Material and Gauge Scale of all the line Items in the current project, select the entries in the corresponding combo boxes and click on the Save Button. After successfully saving the Defaults a Message box “Defaults Saved successfully.” is displayed on the screen as shown in the following screen snapshot.

User Manual – ValSpeQ 3.80
54

User Manual – ValSpeQ 3.80
55
Tag Tab After Selecting Tag tab following screen will be displayed.
Tags tab contains following options: Use Tag Mask on new items - When this option is checked, the selected Tag Masks are applied to new line items. Tag Mask – These fields values are used as the prefix for the auto generated tags for corresponding accessory. Initial Value – This field is used for specifying the start value for generating the default tags. Increment Value – This value decides the next auto-generated tag’s postfix value. The next tag’s postfix value is calculated as (Last Tags postfix Value + Increment Value) which is stored in the Next Value. Next Value – This field displays the number, which will be used for generating the next tag. This value will be updated after each default tag generation. This textbox will always be non-editable. If the “Use Tag Mask on new items” check box option is unchecked, all the text boxes on the Tag tab are disabled. When it is checked, all text boxes on the Tag tab are enabled except Next Value text box. To change Tag defaults check Use Tag Mask check box if it is unchecked and then make entries in Tag Mask fields and Initial and Increment values. If Initial Value is changed then the same value will be reflected in the Next Value field.

User Manual – ValSpeQ 3.80
56
The Increment value and Initial Value are mandatory. If these fields are not provided then it will give an error message as shown below. Tag Mask entries can be blank. After changing all information click on the Save button. This will save all the information. And the Message box “Defaults Saved Successfully.” Displayed on the screen as shown in the following screen.
If Use Tag Mask is checked the default Tags are generated for Valve, Positioner, Transducer, Booster, Switch, Solenoid as follows. In generated tag Left Part of the Tag is the Tag Mask of that corresponding accessory and the right part is the Next value from Project Preferences. Both these parts are separated by hyphen “-“. If Tag Mask is blank then the default tag consist only the Next value.

User Manual – ValSpeQ 3.80
57
When the Valve type is selected other than “Preliminary Calculation” or blank, and if Use Tag Mask option is selected the next Tag is generated and displayed in the Tag text box of Size and Selection form as shown in the following screen snapshot.
Similarly to generate tags for positioner, select positioner type other than blank or “None”. For transducer select transducer manufacturer other than blank or “None”. For booster, select booster manufacturer other than blank or “None”, for switch select switch manufacturer other than blank or “None”, for solenoid select solenoid type other than blank or “None”.

User Manual – ValSpeQ 3.80
58
General Tab After Selecting General tab following screen will be displayed.
This screen contains the options to display the default Language, Default Configuration and Number of Recently Used file list, which are disabled in project preferences. These values are displayed from the user library. This form is also contains text boxes to store Plant, Area, Unit Number information. These fields are editable. To change the values, make entries in the corresponding textbox and save defaults by clicking on the Save button. After successfully saving the defaults, message box “Defaults saved successfully.” is displayed on the screen as shown in the following screen.

User Manual – ValSpeQ 3.80
59
After changing the defaults, when new item, template or configuration is added in the project, these defaults are used and displayed on the Item Data form as shown below.

User Manual – ValSpeQ 3.80
60
Factory Notes Factory Notes tab displays the default Factory Notes for the Line Items/Templates.
This screen contains the Factory Notes added to Project in ‘Available Notes From Project’ tab, user can move these Factory Notes by selecting them to ‘Default Notes For Project’ tab. The Factory Notes added into this tab are assigned as default Factory Notes for Line Items/Templates. After Successfully saving the Defaults a Message box “Defaults Saved successfully.” is displayed on the screen as shown in the following screen snapshot.
After changing the defaults, when new item, template or configuration is added in the project, these defaults are used and displayed on the Technical Notes form as shown below.

User Manual – ValSpeQ 3.80
61

User Manual – ValSpeQ 3.80
62
Product Scope and Pricing Tab Product Scope and Pricing Tab displays the default Primary Source Facility and Price List as shown in the following screen.
Note – If ValSpeQ Standard or Lite edition is installed then the Price List Default frame is not displayed on the User Preferences form. To change the Product Scope and Price List Defaults of all the line Items in the current project, select the entries in the corresponding combo box and click on the Save Button. Price List combo box lists all the price list of the selected Facility in the Primary Facility. If the current project contains one or more than one line items and ValSpeQ Professional edition is installed then it will ask a confirmation message as shown below.

User Manual – ValSpeQ 3.80
63
And if ValSpeQ Lite or Standard edition is installed then following message is displayed.
If yes is selected and Primary Source Facility is changed then a warning message for Quality plans reset is displayed as shown in the following screen snapshot.
After clicking on OK button all unfreeze line items source facility and price list is changed to the selected. In case of ValSpeQ Standard and Lite edition only source facility is changed. If the Source Facility is changed then the Quality Plans of all unfreeze line items is reset and Pricing of all unfreeze line items is calculated by ValSpeQ. If ValSpeQ is unable to calculate the price of some line items then a message box which lists those line items is displayed as shown below.
The line items, which are listed in this message box, are invalidated on pricing. After Successfully saving the Defaults a Message box “Defaults Saved successfully.” is displayed on the screen as shown in the following screen snapshot.

User Manual – ValSpeQ 3.80
64
After changing these defaults, when new line item or template is added these defaults are used for that item or template and displayed on the User Defaults form as shown in the following screen.

User Manual – ValSpeQ 3.80
65
ITP/NACE/PED/ATEX Tab ITP/NACE/PED/ATEX Tab displays the default PED, ITP, NACE and ATEX values as shown in the following screen.
User can select default state of PED Required check box on Item Date form. Default ITP Type can be selected by selecting ITP type in ITP Types combo box. Defalt NACE Standard can be selected for Control Valve Line Item/Template. User can select default Zone Classification, Temperature Class, Ambient Temperature Min, Ambient Temperature Max in ATEX frame. If PED Required check box is selected than ‘Standard + European directive’ ITP should be selected in ITP Types combo box by default. If User tries to select another ITP except Standard + European directive + NACE while PED Required check box is selected then a message should be displayed as follows.

User Manual – ValSpeQ 3.80
66
If user selects ‘Standard + European directive’ or ‘Standard + European directive + NACE’ ITP while PED Required check box is unchecked then a message should be displayed as follows.
After clicking on on OK button the PED Required check box should get checked. If user selects Standard + NACE or Standard + European directive + NACE ITP in ITP Type combo box and tries to save the changes without selecting anything in NACE Standard combo box then a following message should be displayed.
After successfully saving the Defaults a Message box “Defaults Saved successfully.” is displayed on the screen as shown in the following screen snapshot.

User Manual – ValSpeQ 3.80
67
Generic Materials Tab After selecting the Generic Materials tab, the following screen will be displayed.
The default values for Generic Materials are taken from the user preferences Generic Materials after selecting new project option. To change the default Calculation values, check or uncheck the corresponding checkbox and save defaults by clicking on the Save button. After successfully saving the defaults, message box
“Defaults saved successfully.” is displayed on the screen as shown in the above screen. After saving the Generic Materials values, when the new item, template or new configuration is added in the project that line item or template will use these defaults on Generic Materials tab on the User Defaults form as shown in the following screen.

User Manual – ValSpeQ 3.80
68

User Manual – ValSpeQ 3.80
69
Preference for Air Groups tab After selecting the Preference for Air Groups tab, the following screen will be displayed
The default values for Preference for Air Groups are taken from the user preferences Preference for Air Groups after selecting new project option. To change the default Calculation values, check or uncheck the corresponding checkbox and save defaults by clicking on the Save button. After successfully saving the defaults, message box
“Defaults saved successfully.” is displayed on the screen as shown in the above screen. After saving the Preferences for air Groups values, when the new item, new template or new configuration is added in the project then that line item or template will use these defaults on Preferences for air Groups tab on the User Defaults form as shown in the following screen

User Manual – ValSpeQ 3.80
70

User Manual – ValSpeQ 3.80
71
1.13 Spreadsheet View
After Selecting Spreadsheet View option, the Spreadsheet View form gets displayed on the screen as shown in the following screen.
This utility facilitates the users to view and edit all the items in the Quote node at a single view. The changes made can then be applied to the items in Quote node. After invoking this option, all the Line Items from the Project will be displayed. The user can make changes to any unfreezed line item. By default some columns are editable and some are non-editable which are shown in grey colour, user cannot make changes in non-editable columns. By right clicking on column a pop-up menu is displayed as follows with Select Columns, Re-order Columns, Mass Change and Auto Fill/Find Replace… options. Re-order Columns and Mass Change menus of this pop-up menu are in disabled state.

User Manual – ValSpeQ 3.80
72
Select Columns option can be invoked by right clicking on any column heading of Spreadsheet View window. User can select and deselect the columns to be displayed on Spreadsheet View window as per his choice in Select Columns option.
User can fill the desired value or find and replace any value from any editable column with the help of Auto Fill/Find Replace… option. There are three types of Auto Fill/Find Replace… windows.
A) For the columns having Numeric data type.
User can fill the values automatically in the columns having Numeric data type. By clicking on Apply button, the values get applied to the selected column, user can close the window by clicking on Close button.

User Manual – ValSpeQ 3.80
73
B) For the columns having Text data type.
User can find and replace the text in the selected column having data type as text. By selecting All option, all the values in column get replaced with the string in Replace With text box, and by selecting Selective option only the string matching to the string in Find What text box gets replaced. User can find the entered string by clicking on Find button, Find Next button goes on next occurrence of the entered string in Find What text box. Replace button replaces the string found with the string entered in Replace With text box, Replace All button replaces all the occurrences of the string, Close button closes the Find & Replace window. C) For the Columns having Date data type.
User can find and replace the date in the selected column having date data type. After making changes in the order of the Line Items, if user tries to close the Spreadsheet View window the confirmation message is displayed as shown in the following screen with Yes and No buttons.

User Manual – ValSpeQ 3.80
74
On clicking on Yes button, the changes are applied to the Items in Quote node and on clicking on No button changes made are not applied to the Line Items. If user makes any changes in the data of the Line Items, while closing the Spreadsheet View window the confirmation message is displayed as shown below with Yes and No buttons.
On clicking on Yes button, the changes are applied to the Items in Quote node and on clicking on No button changes made are not applied to the Line Items.

User Manual – ValSpeQ 3.80
75
1.14 Print…
This option facilitates the user to generate the standard documentation associated with the quotation of Masoneilan control valves. The standard documentation describes the service conditions used to size the valve, valve selected and other options as specified by the customer. The Print option can be invoked by selecting the Print… option from the Project menu on the application menu bar or Alt+P & then P for Print. The following screen is displayed on invoking the Print option.
The current list of Items in the Project & the registered reports installed with the application are displayed. The Items are listed on the left list view of the screen & the reports are grouped & listed by category on the right tree view. The Toolbar buttons On clicking on ValSpeQ icon at the top left corner of the window, the quick menu for Open, Printer Setup, Print and Preferences will be displayed. The drop down menu at the top left corner of the window will show two options viz. Show Below the Ribbon and Minimize the Ribbon.
Toolbar

User Manual – ValSpeQ 3.80
76
Clicking on Show Below the Ribbon will display the drop down menu below the Project, Export and Setting tabs. Clicking on Minimize the Ribbon will hide the details of Project, Export and Setting tabs and these details will only be displayed when user clicks on these tabs. The upper part of the window displays three tabs viz. Project, Export and Settings. 1. Project Under this tab user can open a project file by clicking on Browse button, the path of the .vnx file being opened is displayed in the text box named Project File. User can insert the Project Name and Customer Name in the Project Name and Customer Name text boxes given in this category. 2. Export
Under this category user can select the Language of report, Dimensional Units and Factory Documentation, user can also export the VReports to any of the formats available at the right hand side of the window viz. PDF, Word and Excel. Language of the report can be selected by clicking on Language dropdown at the left hand side. Dimentional Units can be selected by clicking on Dimensional Units dropdown. Default reports to be generated can be selected by clicking on Factory Documentation check box. User can generate Print Preview by clicking on the magnigying glass. Reports can be printed by clicking on Print button next to Preview. Reports can be exported to PDF format by clicking on PDF Export button. Reports can be exported to Word format by clicking on Word Export button. Reports can be exported to Excel format by clicking on Excel Export button. 3. Settings
Under Settings tab user can setup printer and set Preferences for the Reports.

User Manual – ValSpeQ 3.80
77
Note: Printing can only be done against saved Items The list displays the Item’s logical line number in the project file & the description of the Item as configured. The Items can be selected individually or as ranges. Factory Documentation Checking Factory Documentation check box allows user to generate reports only for default factory documents. By unchecking Factory Documentation check box user can generate reports as per his choice. Language The user can preview /export the report in the 6 different language as listed under Language drop down. By default the English Language will be selected. Dimensional Units Dimensional Units can be set as ‘in’ or ‘mm’, the dimensions of drawing will be based on the selection made in Dimensional Units combo box. Available Reports Tree The report tree displays the currently available reports in ValSpeQ. These reports are grouped in three logic sections. Valves – These reports print once for every Line Item & represent valve related information. Drawings – These reports print once for every Line Item & represent drawing type information for the valve. Summary – These reports print once for every print run & represent summary reports associated with the Quote.

User Manual – ValSpeQ 3.80
78
Selection of reports & options can be done in one of two ways. Each report can be selected individually by clicking the report’s name within the tree. This has the effect of toggling the report as Checked to be printed or Unchecked to be ignored by the print run. Groups of reports can be selected by clicking the Group name they are listed under. This has the effect of toggling all reports under the group as Checked to be printed or Unchecked to be ignored by the print run. Once the Items & Reports are selected, the print screen is ready to print by clicking on either the Magnifying Glass button for preview or the Printer button for print to default printer. When any of the buttons on menu bar is clicked, the printing of selected reports starts, the progress of printing is displayed along with the name of the report that is being printed and the percentage completed, at the bottom of the VReports window as shown in above window.

User Manual – ValSpeQ 3.80
79
Reports There are twelve reports that can be generated by the ValSpeQ print feature. They are described in detail below 1. Specification Sheet
Specification Sheet is the primary sheet reflecting specification information. This sheet prints once for every Item selected for printing. It includes detailed information about the valve specified by the user. See sample in Appendix A.
2. Accessory Sheet
Accessory Sheet is non-selectable by the user & prints automatically with the Specification Sheet when accessories are selected for the configuration. This sheet prints once for every item selected for printing & will appear when any of the following accessories are selected. See sample in Appendix A
Booster Switch Solenoid Reducers Additional Standalone Airset
3. Item Impact
Item Impact report displays information about assigned Technical Notes, BOM Impact List, and Routing Impact List. This sheet prints once for every Item selected for printing.
4. Calculation Sheet
Calculation Sheet displays the sizing information used & calculated for the configuration. This sheet prints once for every Item selected for printing. See sample in Appendix A.
5. Price Sheet Price Sheet provides a detailed breakdown of component pricing for the configuration. This sheet prints once for every Item selected for printing. See sample in Appendix A
6. Revision Sheet Revision Sheet displays details about revision made to the Line Items. This sheet prints once for every Item selected for printing.
7. Certified Dimensional Drawing
Certified Dimensional Drawing displays a non-scale dimensional drawing of the standard valve configuration. No custom or special accessories are shown. This sheet prints once for every Item selected for printing. See sample in Appendix A
8. Certified Schematic Drawing Certified Schematic Drawing displays how the various accessories are piped together on the configuration. This sheet prints once for every Item selected for printing. See sample in Appendix A
9. Valve Flow Curve
Valve Flow Curve sheet displays the characteristic curve of the configuration & the intersecting lines of travel for each of the four service conditions. This sheet prints once for every Item selected for printing. See sample in Appendix A.
10. Notes Sheet Note summary displays any Quality Plans & user entered factory notes for the configuration. This sheet prints once for every Item selected for printing. See sample in Appendix A.

User Manual – ValSpeQ 3.80
80
11. Pricing Summary
Pricing Summary sheet displays summary pricing information for all the Items selected for printing. This sheet prints once for every print run. See sample in Appendix A.
12. Discount Authorization Sheet Discount Authorization Sheet is not selectable by the user & prints every time the Pricing Summary is selected. This sheet provides details on the discount structure used to arrive at the prices seen on the Price sheet & the Pricing Summary reports. This sheet is intended to be forwarded to Sales Management for review & approval. See sample in Appendix A.
13. ITP Sheet & ITP
ITP Sheet & ITP nodes display the information of the ITP that is assigned to the Line Item. ITP Sheet prints once for every Item selected for printing.

User Manual – ValSpeQ 3.80
81
1.15 Recently Used Projects Section This option provides a speedy alternative to open an existing project file, which has been recently used. By default, the application maintains list of 4 projects that were recently opened by the user. Hence by clicking on the project listed under this section opens that project instead of going via the Open option under the Project menu. Now user has the option to change the number for recent file list entry from User Preference screen. Steps: 1. Click on Project listed in the Recently Used Project section under Project menu option or
Alt+P & then the number associated to the project. 2. The application will prompt the user to save any unsaved data for the current project provided
it has not been saved before invoking the Recently Used Project. 3. Application will open the selected project. 4. For the newly opened project the Project General Form will be displayed by default. 1.16 Exit This option facilitates the user to exit from the ValSpeQ application. Steps: 1. Click on the Exit option under the Project menu or Press Alt+P & then X for Exit. 2. The application will prompt the user to save any unsaved data for the current project provided it
has not been saved before invoking the Open Project. The application will prompt the user to Save the current project if it has not been saved i.e. untitled.vnx.

User Manual – ValSpeQ 3.80
82
Template Library The Template Library menu on the application menu bar allows the user to export and import templates. It contains following sub menus: - Export Templates - Import Templates

User Manual – ValSpeQ 3.80
83
Item An Item is either a Valve configuration or Level configuration consisting of service conditions, valve/level selection, material selection, accessories, if any, & other configuration data. A project can consist of multiple Items. All the Items are listed under the Quote (Quote Number) folder/node on the Project Tab page. The Item menu on the application menu bar allows the user to perform various operations related to item of type Control Valve/Level. The following screen shows the options available on the popup menu on the right click of Item node.
Various functions associated to an Item are listed below. Most of these functions can be invoked either by right clicking on the Item node or from the Item menu on the application menu bar. 1. Add Control Valve Level Accessories Actuator Positioner Transducer Booster Switch Solenoid Airset Regulator 2. Copy
List of Items Right Click Menu

User Manual – ValSpeQ 3.80
84
3. Copy Item to Library 4. Delete 5. Save 6. General Info 7. Freeze or Unfreeze 8. Cancel or UnCancel Add Item This option will facilitate the user to add an Item either a Control Valve or Level to the Project. The user will be displayed a blank Sizing & Selection screen for Control Valve and a blank Service & Level screen for Level. A node is added under the Quote folder/node. Steps: 1. Select Add… Control Valve/Level/Accessories/Regulator menu option from the Item menu.
The Add option can also be invoked by right clicking on the Quote folder/node & then selecting the Add… Control Valve/Level/Accessories/Regulator option from the popup menu.
2. The blank Sizing & Selection screen / blank Service & Level /Accessory /Regulator screen will be displayed and a new node will be added under Quote folder/node.
User Manual – ValSpeQ 3.80
85
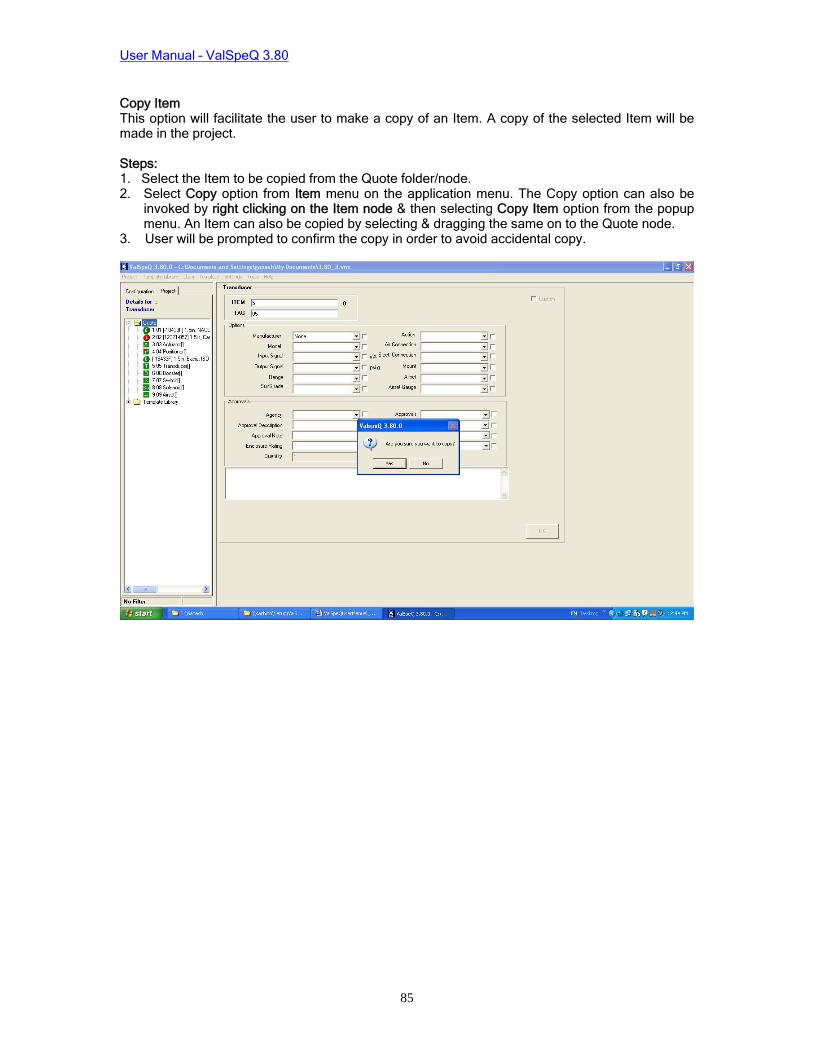
Copy Item This option will facilitate the user to make a copy of an Item. A copy of the selected Item will be made in the project. Steps: 1. Select the Item to be copied from the Quote folder/node. 2. Select Copy option from Item menu on the application menu. The Copy option can also be
invoked by right clicking on the Item node & then selecting Copy Item option from the popup menu. An Item can also be copied by selecting & dragging the same on to the Quote node.
3. User will be prompted to confirm the copy in order to avoid accidental copy.

User Manual – ValSpeQ 3.80
86
Copy Item to Library This option will facilitate the user to copy an Item to the Template Library folder. Steps: 1. Select the Item to be copied from the Quote folder/node. 2. Select Copy Item to Library option from Item menu on the application menu to Copy to
Library. The Copy Item to Library option can also be invoked by right clicking on the Item node & then selecting Copy Item to Library option from the popup menu. An Item can also be copied to the Template Library by selecting & dragging the Item on to the Template Library node.
3. User will be prompted to confirm the copy in order to avoid accidental copy. When an item is copied to Library, the Quantity, tags, notes & pricing information does not get copied to template. For this a warning message is displayed to the user along with confirmation of copy message.

User Manual – ValSpeQ 3.80
87
Delete Item This option will facilitate the user to delete an Item from the Quote folder/node. Steps: 1. Select the Item to be deleted from the Quote folder/node. 2. Select Delete Item option from Item menu on the application menu to Delete. The Delete
option can also be invoked by right clicking on the Item node & then selecting Delete Item option from the popup menu.
3. User will be prompted to confirm in order to avoid accidental delete. The following screen is captured after invoking the Delete option.

User Manual – ValSpeQ 3.80
88
Save Item This option will facilitate the user to save an Item in the Project. This option can be used after modifying an existing Item configuration or in order to save a New Configuration as an Item in the project. New Configuration – After clicking on Save option from Item menu following message box will be displayed to save the New configuration as Item.
Existing Item :
1. If an existing Item is modified & the changes are to be saved then select Save option from the Item menu on the application menu bar or Alt+I & then S to Save.
The Save option can also be invoked by right clicking on the Item whose configuration has been modified & then select the Save option from the popup menu. This method of saving an Item can be used only with an existing Item & cannot be used for saving a New Configuration. 2. User will be prompted to confirm saving of the Item either with a revision or without a
revision determined by the checking or unchecking of the checkbox provided on the Save Confirmation box.
The following screen is captured after invoking the Save Item option.

User Manual – ValSpeQ 3.80
89
3.If the “Save with Revision” checkbox is unchecked then on clicking the Yes button the Item is saved normally. 4.If the “Save with Revision” checkbox is checked then on clicking the Yes button a new screen displaying the Revision details is displayed. On clicking OK button present on the form, the item will be updated accordingly. The following screen is captured checking the checkbox:

User Manual – ValSpeQ 3.80
90

User Manual – ValSpeQ 3.80
91
Freeze Item This option is used to freeze selected Line item under the Project/Quote Node. Steps:
1. Select the Item from the Quote folder/node 2. Select Freeze option from the Item menu on the application menu bar or press Ctrl+F for
Freeze Items. The Freeze Item option can also be invoked by right clicking on the Item node & then selecting Freeze option from the popup menu
3. Following message will appear on the screen.
4. Click on Yes to freeze items. Otherwise click on No button. 5. If user clicks on Yes then selected item gets freezed and user cannot make any changes
in freezed item. Unfreeze Item This option is used to unfreeze selected freezed Line item under the Project/Quote Node. Steps:
1. Select the freezed Item from the Quote folder/node 2. Select Unfreeze option from the Item menu on the application menu bar or press Ctrl+F
for Freeze Items. The Freeze Item option can also be invoked by right clicking on the Item node & then selecting Unfreeze option from the popup menu
Following message will appear on the screen
3. Click on Yes to unfreeze items. Otherwise click on No button.
If user clicks on Yes then selected item gets unfreezed and user can make changes in the unfreezed item

User Manual – ValSpeQ 3.80
92
Cancel Item This option is used to cancel the selected Line Item under the Project/Quote node. Steps: 1. Select the Line Item from Quote/Project node 2. Select Cancel option from Item menu on the application menu bar. The Cancel Item option can also be invoked by right clicking on Item node & then selecting Cancel option from the popup menu. Following message will appear on the screen.
3. Click on Yes to cancel item. Otherwise click on No button. If user clicks on Yes then selected item gets canceled and user cannot make any changes to the canceled item. UnCancel Item This option is used to uncancel the canceled Line Item under the Project/Quote node. Steps: 1. Select the canceled Line Item from Quote/Project node 2. Select UnCancel option from Item menu on the application menu bar. The UnCancel Item option can be invoked by right clicking on Item node & then selecting UnCancel option from the popup menu. Following message will appear on the screen.
3. Click on Yes to uncancel item. Otherwise click on No button. If user clicks on Yes then the selected item gets uncanceled and user can make changes to uncanceled item. General Information This option will facilitate the user to view the Item Data screen where in the Item details & the related Tag details would be displayed. Steps: 1. Select the Item from the Quote folder/node.

User Manual – ValSpeQ 3.80
93
2. Select General Info option from the Item menu on the application menu bar or Alt+I & then G for General Information. The General Info option can also be invoked by right clicking on the Item node & then selecting General Info option from the popup menu.
3. The Item Data screen would be displayed. 4. The user has an option to set the default values for User and Plant information. The following screen is displayed after invoking the General Info option from the Item menu.

User Manual – ValSpeQ 3.80
94
Template A Template is a valve configuration consisting of service conditions, valve selection, material selection, accessories, if any, & other configuration data. The only information that is not applicable to a Template is Tag, Quantity, Notes & Pricing information. A Template is a configuration, which can be used directly by the user for adding similar configuration Items within the project & then only update or modify certain data or parameters. A project can have multiple Templates. All the Templates are listed under the Template Library folder/node on the Project Tab page.
Various functions associated to a Template are listed below. Most of these functions can be invoked either by right clicking on the Template node or from the Template menu on the application menu bar. The various options against each Template are as follows 1. Add 2. Copy 3. Copy Template To Quote 4. Delete 5. Save 6. General Info
List of Templates Right Click Menu

User Manual – ValSpeQ 3.80
95
7. Overlay Template Add Template This option will facilitate the user to add a Control Valve or Level Template to the Project. The user will be displayed a blank Sizing & Selection or Service & Level screen. A node is added under the Template Library folder/node. Steps: 1. Select Add option from the Template menu or Alt+T & then A to Add. The Add option can also
be invoked by right clicking on the Template Library node & then selecting the Add Template option from the popup menu. After invoking Add option the user can select Control Valve or Level or Accessories or Regulator option from the Add menu.
2. A blank Sizing & Selection screen will be displayed if the user selects Control Valve option, a blank Service and Level form will be displayed if the user selects Level option, a blank Accessory form will be displayed if the user selects any of the Accessory option, a blank Regulator form will be displayed if the user selects Regulator option & a new node under Template Library folder/node is added.
The following screen is displayed after adding a Template.
Copy Template

User Manual – ValSpeQ 3.80
96
This option will facilitate the user to make a copy of a Template. A copy of the selected Template will be made in the Template Library. Steps: 1. Select the Template to be copied from the Template Library folder/node. 2. Select Copy option from Template menu on the application menu or Alt+T & C to Copy. The
Copy option can also be invoked by right clicking on the Template node & then selecting Copy option from the popup menu. A template can also be copied by selecting & dragging the template on to the Template Library folder/node.
3. User will be prompted to confirm the copy in order to avoid accidental copy. This will be done only if such a setting is made under the User Preference.
The following screen is displayed on invoking the Copy option.

User Manual – ValSpeQ 3.80
97
Copy Template to Quote This option will facilitate the user to copy a Template to the Quote folder. Steps: 1. Select the Template to be copied from the Template Library folder/node. 2. Select Copy Template to Quote option from the Template menu on the application menu or
Alt+T & then T to Copy Template to Quote. The Copy Template to Quote option can also be invoked by right clicking on the Template node & then selecting Copy Template to Quote option from the popup menu. A Template can also be copied to the Quote by selecting & dragging the Template on to the Quote node.
3. User will be prompted to confirm the copy in order to avoid accidental copy. This will be done only if such a setting is made under the User Preference
The following screen is displayed on invoking the Copy to Quote option.

User Manual – ValSpeQ 3.80
98
Delete Template This option will facilitate the user to delete a Template from the Template Library folder/node. Steps: 1. Select the Template to be deleted from the Template Library folder/node. 2. Select Delete option from Template menu on the application menu or Alt+T & then D to
Delete. The Delete option can also be invoked by right clicking on the Template node & then selecting Delete option from the popup menu.
3. User will be prompted to confirm in order to avoid accidental delete. This will be done only if such a setting is made under the User Preference.
The following screen is displayed on invoking the Delete option from the Template menu.

User Manual – ValSpeQ 3.80
99
Save Template This option will facilitate the user to save a Template in the Project. This option can be used after modifying an existing Template configuration or in order to save a New Configuration as a Template in the Project. Steps: 1. If an existing Template is modified & the changes are to be saved then select Save option
from the Template menu on the application menu bar or Alt+T & then S to Save. 2. The Save option can also be invoked by right clicking on the Template whose configuration
has been modified & then select the Save option from the popup menu. This method of saving a Template can be used only with an existing Template & cannot be used for saving a New Configuration.
3. User will be prompted to confirm saving of the configuration. The following screen is displayed after the Save option from the Template menu is invoked.

User Manual – ValSpeQ 3.80
100
General Information This option will facilitate the user to view the Item Data screen where in the Template details would be displayed. This screen will not display the Tag information. Steps: 1. Select a Template from the Template Library. 2. Select General Info option from the Template menu on the application menu bar or Alt+T &
then G for General Information. The General Info option can also be invoked by right clicking on the Template node & then selecting General Info option from the popup menu.
3. The Item Data screen would be displayed. This screen will not contain data related to Tag & General Item Description.
The following screen is displayed after invoking the General Info option from the Template menu for the selected Template.

User Manual – ValSpeQ 3.80
101
Overlay Template
User can overlay a line item with a template using Overlay Template on Filtered as well as non-filtered items. The freeze line items cannot be overlaid by a template. To apply the Overlay Template invoke Overlay Template option available under Template menu or right click on the template. After invoking Overlay Template the following screen will be displayed.
It will display configuration and Project tabs. On configuration tab there will be forms and on Project tab there will be the available unfreeze items in the project. If overlay template is invoked on control valve line items then only the unfreeze Control Valve Line Items will be displayed on the Project tab and forms related to control valve will be displayed on the configuration tab. The sizing, selection, quality plans, factory notes and accessory forms will be displayed. Backup of the current project will be taken before continuing the overlay process. The backup will be saved in the location where the project is saved.
Configuration Tab Project Tab

User Manual – ValSpeQ 3.80
102
If a backup file is already available in the location then a message will be displayed whether to overwrite the file or not. When the overlay process is completed the following message is displayed.

User Manual – ValSpeQ 3.80
103
Settings The Settings menu on the application menu bar allows the customer to set values or parameters that would be used for the current project at various stages. 1. Pricing 2. Factory Notes Library 2.1 Manage Factory Notes / Groups / Collections 2.2 Import Factory Notes 2.3 Export Factory Notes 3. User Preferences 4. Manage Customer Library 5. ITP Management The following screen displays the above-mentioned options under the Settings menu. “Import Factory Notes” and “Export Factory Notes” menus are disabled and are unavailable in this version.

User Manual – ValSpeQ 3.80
104
Pricing
This option facilitates the user to provide Pricing related information that will be applicable for the current Quote. The Pricing screen displayed below is different from the screen displayed on selecting the Pricing node for an Item.
Price List Pricing for an Item is derived & dependent on the Price List that is selected. Select a Price List from the drop down list that should be used for deriving Item Price. Quote Discount Quote Discount is applied to all the Items in the Quote. Provide a Quote Level Discount Percentage (%). Range for Quote Level Discount Percentage value is from –100.00 to +100.00 (%). Note: - Line Level Discount & Component Level Discount overrides Quote Level Discount. Discount Template A Discount Template may consist of one or more Line or Component Level Discount definitions.

User Manual – ValSpeQ 3.80
105
Select Discount Template from the drop down list against the field labeled ‘Title’. Discount Templates are not available on Application Startup or New Project. Discount Templates created are applicable only to the current Project.
Add Discount Template To add a Discount Template provide a Discount Name in the Title field. Add one or more Line or Component Level discount definitions.
Add Line or Component Level Discount Definition To add Line or Component Level discount definition select one of the options from the Discount Level drop down list. If Line Level is selected, the Component drop down list is disabled & the Filter drop down list is populated from the current Items configured in the Project.
If Component Level is selected, the Component drop down list provides a list of different components. Select a component from the drop down list. The Filter drop down list is populated for the selected Component from the current Items configured in the Project.
Provide Line or Component Level Discount Percentage (%). Range for Discount % value is from –100.00 to +100.00 (%).
Click on the Add button to add the Line or Component Level discount definition. The definition will be displayed in the grid. The grid displays a list of Line or Component Level discount definitions for the selected Discount Template.
Delete a Line or Component Level Discount Definition To delete, double click the Line or Component Level Discount Definition displayed on the Grid.
Preview Enable the preview option to virtually compute Quote Total Price or Project Extended Net Total after applying the Discount Template to the current Project but without updating the database.
Apply Button On hitting the Apply button the Discount Template & its definitions are stored & individual Item prices are re-computed after applying the Quote Level Discount, which is overridden by Line Level Discount & is finally overridden by Component Level Discount. Discounts are not applied to all those components of the Items configured where component level discount locks are applied. Individual component level discount locks can be applied using the Pricing node on the Configuration tab page for the selected Item.
Finally the extended price for all valid Items is summed up to display Quote Total Price.
If the Preview option is disabled, the changes are applied to all the Items & the database is updated.
OK Button If a new Discount Template is created or any new definitions are added or deleted for a existing discount template & is applied with preview disabled, then hitting the OK button will close the Settings – Pricing screen.
If a new Discount Template is created or any new definitions are added or deleted for a existing discount template & is not applied, then hitting the OK button will prompt the user whether to apply the Discount Template. On approval, the discount template will be applied & the price for all the Items will be computed & the database will be updated. On rejecting the same, the Size & Select & Pricing node for all the Items will be set to invalid & the Item will also be set to invalid.

User Manual – ValSpeQ 3.80
106
Cancel Button If the Cancel button is hit prior to applying the Discount Template, the discount definitions will be lost & will close the Settings – Pricing screen. If the Cancel button is after applying the Discount Template, the discount definitions created after applying the Discount Template will be lost & will close the Settings – Pricing screen. The discount definitions set prior to applying will still exist. Manage Factory Notes / Groups / Collections

User Manual – ValSpeQ 3.80
107
To create Factory Notes, invoke Settings -> Factory Notes Library->Manage Factory Notes / Groups / Collections option.
After clicking on Manage Factory Notes / Groups / Collections option following screen will be displayed.

User Manual – ValSpeQ 3.80
108
This screen contains following tab options: • Assign Group to Project • Create Factory Notes • Assign Notes to Groups • Create Collections • Apply FN Collections • Find & Replace Factory Notes

User Manual – ValSpeQ 3.80
109
• Assign Group to Project tab After creating FN Group and FN Collections for the group, you can apply that FN Group to the Current Project. To Apply the FN Group to Current Project Click on “Assign Group to Project” tab. After Clicking on “Assign Group to Project” tab following screen will be displayed.
This screen contains following data elements: FN Group combo – This combo box contains the list of all the FN Group names from the Library. Applied FN Group Text Box – This combo box shows the FN Group Name, which is currently assigned to opened Project. Select the FN Group to apply and click on Assign to Project Button. An information message is displayed after assigning of Group to the project as shown below. Note: New Project contains a Standard group already assigned to it containing standard Factory Notes.

User Manual – ValSpeQ 3.80
110
After assigning FN Group to current Project, the Applied FN Group text box displays the applied group name. After applying FN Group to the current project, all Factory Notes and collections of that group are copied from Library to the project file i.e. vnx file. These Factory notes are listed in the “Selected Notes for Project” list along with Standard Factory Notes under the Create Factory Notes tab as shown below.

User Manual – ValSpeQ 3.80
111
• Create Factory Notes tab: User can create factory notes in library and project using this tab.
This screen contains following data elements: Available Notes From Library List – This list view lists all the factory notes from library along with its Reference, Title and List Price. Selected Notes for Projects List - This list view lists all the factory notes from the currently opened Project along with its Reference, Title and List Price. This list view contains the standard Factory Notes which cannot be deleted or edited. Note Reference Text box – Displays the Reference of the currently selected Factory Note. Title Text box – Displays the Title of the currently selected factory note. Net Price Text box – Displays the Net Price of the currently selected factory note. Category Combo box – Displays the Category of the currently selected factory note. Note Text Text box – Displays the Description of the currently selected factory note.

User Manual – ValSpeQ 3.80
112
Add Factory Note in Library The user can Add, Edit and Delete Factory Notes from the Library or Project. To create a new Factory Note, click on Add Button and Insert Factory Note Reference, Title, Net Price, Category and Note Text into corresponding Text boxes. The Note Reference, Title, Net Price (If version is Professional), Category and Note Text are mandatory fields and user must enter values in it.

User Manual – ValSpeQ 3.80
113
Now click on save button to save factory note. This will ask to select the location to store the factory note. This dialog box contains 2 options as Library and Project as shown below.
By default Library option is selected. Click on OK button to save the factory note in Library. Now the “Available Notes From Library” List contains the added note as shown in following screen.
Note: Duplicate Factory notes are allowed in Library.

User Manual – ValSpeQ 3.80
114
Add Factory Note in current Project Though the current Project has a Standard group applied to it, you can add Factory Notes in the current Project. To add a new Factory Note to the project, select the “Create Factory Notes” tab & click on Add Button, and insert factory note information in Text box.

User Manual – ValSpeQ 3.80
115
Then click on Save button. Select Project from the Library/Project window, as shown below.
Click on OK button to add Factory Note into Project. A message asking to save Factory Note in Library will be displayed as shown below:
After clicking on Yes button Factory Note will be saved in Library also, on clicking on No button the new Factory Note will be saved in Project only. After successful save added factory note is listed under the “Selected Notes For Project” list as shown in following screen.

User Manual – ValSpeQ 3.80
116
Edit Factory Notes To edit a particular factory note, select that factory note from the list. Both Library and Project factory notes can be edited. Edit Note from Library Select factory note from Library to edit and click on Edit button. All text boxes will be editable to make changes. Change the entries in the text box as shown in the following screen.

User Manual – ValSpeQ 3.80
117
After making changes click on Save button, to save changes. A confirmatory message box will be displayed, as shown below.
Click on Yes button to save the changes. If you don’t want to save changes click on No button. Selected Factory note is updated as shown in following screen.

User Manual – ValSpeQ 3.80
118
Edit Note from Project To edit the factory note from Project select factory note from Project to edit and click on Edit button, however the standard Factory Notes cannot be edited. All text boxes except the Reference text box will be editable to make changes. Change the entries in the text box as shown in the following screen.

User Manual – ValSpeQ 3.80
119
After making changes click on Save button, to save changes. A confirmatory message box will be displayed, as shown below.
Click on Yes button to save the changes. If you don’t want to save changes click on No button. Selected Factory note is updated in Selected Notes for Project list as shown in following screen.
If the Factory notes Price list is changed and if that note is applied to any of the line item then that items pricing is recalculated.

User Manual – ValSpeQ 3.80
120
Delete Factory Notes 1. Delete Factory Note from Library To delete a particular factory note from Library, select one or more factory notes from the “Available Notes From Library” and then click on the delete button. Appropriate message box for confirmation is displayed as shown below. If the selected factory note(s) are not associated with any Group or Collection in Library then the following message box is displayed.
If Yes button is clicked the selected factory note is deleted from the Library. If No button is clicked no factory note is deleted from the Library. If the selected factory note(s) are associated with any Group or Collection in Library then following confirmation message box is displayed.
If Yes button is clicked the selected factory notes are deleted from the Collections and Groups first and then it is deleted from the Library.

User Manual – ValSpeQ 3.80
121
2. Delete Note from Project To delete a particular factory note(s) from Project, select one or more factory notes from the “Selected Notes for Project” and then click on the delete button. Appropriate message box for confirmation is displayed as shown below. Standard Factory Notes cannot be deleted from Project. If the selected factory note(s) are not associated with any Group or Collection or if it is not applied to any line item or template with in Project then the following message box is displayed.
If Yes button is clicked the selected factory note is deleted from the Project and from Project Group. If No button is clicked no factory note is deleted from the Project. If the selected factory note(s) are associated with any Collection in Library then following confirmation message box is displayed along with the associated notes list.
If Yes button is clicked the selected factory notes are deleted from the Collections first and then it is deleted from the Project and from the Group. And if No button is selected the selected factory note(s) is not get deleted from anywhere. If the selected factory note(s) are applied to any line items or template then following confirmation message box is displayed along with the associated notes list.

User Manual – ValSpeQ 3.80
122
If Yes button is clicked then selected factory notes are deleted from the applied notes for Line item and template first and then it is deleted from the Project and from the Group. And if No button is selected the selected factory note(s) is not get deleted from anywhere. If the selected factory note(s) are applied to any line items or template and also it is associated with collection then following confirmation message box is displayed along with the associated notes list.
If Yes button is clicked then selected factory notes are deleted from the applied notes for Line item and template and from collections first and then it is deleted from the Project and from the Group. And if No button is selected the selected factory note(s) is not get deleted from anywhere. If the factory note which is deleted is associated with any line item(s) then pricing of those line item(s) to which factory note is associated is recalculated.

User Manual – ValSpeQ 3.80
123
Copy Factory Notes If FN Group is assigned to Project then, Factory note(s) can be copied from library to project and from project to library. 1. Copy FN from Library to Project To copy factory note(s) from library to project, select factory notes from “Available Notes from Library” list and click on >> button. More than one Factory Notes can be selected from the lists. If the selected factory note is not present in “Selected notes for Project” list, it will get copied as it is. If it is already present in the project list, then a dialog box appears that asks you to enter different reference for the factory note, as shown in the following screen.
Enter the Note reference in the dialog box and click on the OK button. the selected Factory note is inserted into Project, the reference field contains the entered reference as shown in following screen.

User Manual – ValSpeQ 3.80
124

User Manual – ValSpeQ 3.80
125
2. Copy FN from Project to Library To copy factory note(s) from library to project, select factory notes from “Selected Notes For Project” list and click on << button. The selected Factory Note is copied as it is in the library. As shown in following screen after copying FN#3 from Project to Library.

User Manual – ValSpeQ 3.80
126
3. Copy FN from Library to Library To copy Factory Notes from Library to Library, select one or more factory note from the “Available Notes from Library” list. Then right click, the copy menu is appeared on the screen as shown in the following screen.

User Manual – ValSpeQ 3.80
127
Click on Copy menu, Selected Factory note are copied into library as shown in the following screen.

User Manual – ValSpeQ 3.80
128
4. Copy FN from Project to Project To copy Factory Notes from Project to Project, select one or more factory note from the “Selected Notes For Project” list. Then right click, the copy menu is appeared on the screen. Click on the copy menu an input box is displayed on the screen asking to enter another Factory note reference as shown in the following screen.

User Manual – ValSpeQ 3.80
129
After entering different reference click on OK button. This will copy selected factory note into the Project only the reference field contains the entered reference. As shown in following screen.

User Manual – ValSpeQ 3.80
130
• Assign Notes to Group tab After creating factory notes in Library, select “Assign Notes to Groups” tab, to create groups for factory notes in Library. After Clicking on “Assigns Notes to Groups” tab following screen will be displayed.
This screen contains following data elements. FN Group Combo box – This combo box contains list of all the Group from the Library. FN Group Text box – This text box allows to enter the name of the group which is to be added. Available Factory notes in library – This list contains the list of factory notes from the Library which are not currently assigned to currently selected group. Notes Assigned to Group – This list contains the factory notes, which are assigned to currently selected FN Group.

User Manual – ValSpeQ 3.80
131
To create a new FN Group, click on Add Button, this will display a text box to enter FN Group name. Insert FN Group Name in that Text Box and then Select Factory Notes from “Available Factory Notes in Library” List and click on “>>” Button. You can select one or more factory notes from the list. Now the Selected Factory Note(s) will be inserted into “Notes Assigned to Group” List. After selecting Factory notes Screen will look as.
Now click on Save button to save FN Group. After saving a message is displayed as following.

User Manual – ValSpeQ 3.80
132
Edit FN Group To edit an existing FN Group select that Group in the FN Group combo. After selecting group factory notes assigned for that group are listed under the Notes Assigned to Group list and available factory notes from the library are listed under the Available Factory notes in library list. To add factory note in the group select the note from the available factory Notes in Library list and click on the “>>” button. this will insert the factory note in the Notes Assigned to Group list and removes that list from the available factory Notes in Library list. If the selected factory note is already exist in the available factory Notes in Library list then the following confirmation message is displayed.
If Yes button is clicked the group note is replaced with the selected Factory note. To remove Note from the Group select the notes from the Notes Assigned to Group list and click on the “<<” button. If the selected factory notes are not associated with any FN Collection in Library then that notes are removed from the Notes Assigned to Group list and added in the available factory Notes in Library list. If the selected factory notes are associated with any FN Collection in Library then the following confirmation message is displayed.
If yes button is clicked those notes are removed from the Collection first and then removed from the Notes Assigned to Group list and added in the available factory Notes in Library list.

User Manual – ValSpeQ 3.80
133
After adding or removing Notes from the Notes Assigned to Group list Save button is get enabled. Click on the save button to save changes made in the Group. After successful save Save button is get disabled.

User Manual – ValSpeQ 3.80
134
Delete FN Group To delete a Group from the library select that Group in the FN Group combo and click on the Delete button. Confirmation message box is displayed as shown below.
If Yes button is clicked the selected FN Group is deleted from the Library. And if No button is clicked No FN Group is deleted.

User Manual – ValSpeQ 3.80
135
• Create Collections tab After creating a FN Group, FN Collections can be created for that FN Group. To create FN Collection click on “Create Collections” Tab. The screen will look like:
This screen contains: From combo box – This combo box contains options to list the Collections and factory notes from the Project or from Library. FN Group combo box – This combo box contains list of all the groups from the Library. FN Collection combo box – This combo box contains list of all the Collection from the selected FN Group. Factory Notes in Group list – This list contains all the list of factory notes from the group along with check box, reference and title. if the factory note is assigned to current collection the check box in front of that note is checked else it is unchecked.

User Manual – ValSpeQ 3.80
136
To create a FN Collection in the project select the Project option from the From combo box or to create a FN Collection in the Library select the Library option from the From combo box. Then click on Add Button. Select the FN Group for which you want to create FN Collection. Select Factory Notes from “Factory notes in Group” List to be inserted in the FN Collection. After selecting each factory note FN Collection text box display the comma separated list of selected factory notes is displayed in FN Collection Text box.

User Manual – ValSpeQ 3.80
137
Now click on save button to save FN Collection. A successful save message is displayed as following.
Edit FN Collection To edit a collection from the Project select the Project option from the From combo box and to edit a collection from the Library select the Library option from the From combo box. After selecting the option FN Group combo box is filled with the available groups according to selections. To edit a FN Collection first select the group for which that FN Collection is created. After selecting Group select the Collection from the FN Collection combo. To add a note in the collection check that note from the Factory Notes in Group list. To remove a note from the collection uncheck that note from the Factory Notes in Group list. After changing the collection notes Save button is get enabled and Delete buttons caption is changed to Cancel. As shown in the following screen.

User Manual – ValSpeQ 3.80
138
To save changes made in the collection click on the Save button. After successful save, following confirmation message is get displayed on the screen.
To cancel changes made in that collection click on the Cancel button.

User Manual – ValSpeQ 3.80
139
Delete FN Collection To delete FN Collection from the Project select Project option from the From combo box and to delete FN collection from the Library select the Library option from the From combo box. To delete FN Collection from the group first select that group in the FN Group combo box. After selecting Group select the Collection from the FN Collection combo box. After selecting the FN Collection click on the Delete button. This will display a confirmation message as shown in the following screen.
Click on the Yes button to delete the selected FN Collection. After successful deletion of the FN Collection following message box is displayed.

User Manual – ValSpeQ 3.80
140
• Apply FN Collections To Apply FN Collections to Line Items/Templates select the Apply FN Collection tab. After Clicking on “Apply FN Collections” tab following screen will be displayed.
This screen contains: For combo box – This combo box contains options item and template. Select item to apply FN Collection to items. And select template option to apply FN Collection to templates. FN Collection combo box – This Combo box list all the FN Collections associated with the currently applied FN Group. These FN collection contains a comma separated References in the collection. Select All check box – This check box is used to select or deselect all the line items or templates listed under the listview. Line Items/Templates List View – This list view lists all the items or templates from the current project along with check box, Line No., Description and applied FN Collection.

User Manual – ValSpeQ 3.80
141
1. Apply FN Collection to Item To apply FN Collection to items select the item option from the for combo box. This will load all line items from the current project to the Line Items list view, which are not freeze. Select the FN Collection from the FN Collection combo box. Then select the line items from the list. For selection check the check box in front of that line item. To select all the line items from the list check the select all check box. After selection of line items Apply button gets enabled. As shown in following screen.
Click on Apply button. this will apply the selected FN Collection to the selected line items and message box is displayed as shown below.

User Manual – ValSpeQ 3.80
142
After clicking OK button, the applied FN Collections can be seen in the list view under the FN Collection column and Apply button gets disabled, as shown in the following screen.
After applying FN Collection to line items, the pricing of those line items is recalculated.

User Manual – ValSpeQ 3.80
143
2. Apply FN Collection to templates To apply FN Collection to Templates select the Template option from the For combo box. This will load all templates from the current project to the Templates list view. As shown in following screen.

User Manual – ValSpeQ 3.80
144
Then select the FN Collection and Templates, this will enables the Apply button as shown in following screen.

User Manual – ValSpeQ 3.80
145
Click on Apply button. This will apply the selected FN Collection to the selected templates and message box is displayed as shown below.
After clicking OK button, the applied FN Collections can be seen in the list view under the FN Collection column and Apply button gets disabled, as shown in the following screen.

User Manual – ValSpeQ 3.80
146
• Find & Replace Factory Notes To Find and Replace a particular Factory Note from applied FN Collection select the Find & Replace Factory Notes tab. Find & replace Screen is displayed as shown in following screen.
This screen contains: For combo box – This combo box contains options item and template. Select item to Find & Replace Factory Note in items. And select template option to Find & Replace Factory Note in templates. Find FN Ref combo box – This Combo box list the Factory note references, which are currently applied to line items/templates. Select All check box – This check box is used to select or deselect all the line items or templates listed under the list view. Line Items/Templates List View – This list view lists all the items or templates from the current project along with check box, Line No., Description and applied FN Collection, which contains the currently selected reference.

User Manual – ValSpeQ 3.80
147
Replace with FN Ref. combo box – This Combo box list of all the Factory note references available in the current project. Additional Nothing option is present to replace selected reference with nothing. 1. Find & Replace Factory note for Items To Find a particular Factory note in items select item option from the For combo box. To Find Line Items that contains a specific Factory Note Reference, Select that Reference in the Find FN Ref. combo box and then click on the Find button. After clicking on Find button all line items that has selected factory note applied are listed under the Line items list. Then Select the another Note reference into the Replace with FN Ref. combo box and select the line items for which notes are replaced. After the selection of line items, Replace buttons are enabled as shown in the following screen.
Then click on the Replace button. This will replace the find reference with the replace reference and message box is displayed as shown below.

User Manual – ValSpeQ 3.80
148
After clicking OK button, the list displays the updated FN Collections of Line items as shown below.
To remove the factory note reference from the applied FN Collections select the Nothing option in the Replace with FN ref combo box. After replacing Factory note for line items, those line items pricing is recalculated.

User Manual – ValSpeQ 3.80
149
2. Find & Replace Factory note for Templates To Find a particular Factory note in templates select Template option from the For combo box. To Find templates that contains a specific Factory Note Reference, Select that Reference in the Find FN Ref. combo box and then click on the Find button. After clicking on Find button all Templates that has selected factory note applied are listed under the Templates list. Then Select the another Note reference into the Replace with FN Ref. combo box and select the Templates for which notes are replaced. After the selection of line items, Replace buttons are enabled as shown in the following screen.

User Manual – ValSpeQ 3.80
150
Then click on the Replace button. This will replace the find reference with the replace reference and message box is displayed as shown below.
After clicking OK button, the list displays the updated FN Collections of Templates as shown below.
To remove the factory note reference from the applied FN Collections select the Nothing option in the Replace with FN ref combo box.
Export Factory Notes

User Manual – ValSpeQ 3.80
151
After clicking on Export Factory Notes option, following screen will be displayed.
User can export the factory notes/group either from Library or Project by selecting the Library or Project radio button respectively. The option for factory notes or group is available in the Export combo box. When group option is selected the available groups are displayed in the Group Name combo box and all the factory notes in that group are displayed in the list view. The check box before the factory notes is disabled. When factory notes option is selected all the factory notes in the project are displayed in the list view. The factory notes can be selected or deselected. By default the export file path will be in My Documents folder of the current user and the file name will be PRG00001.vun. However user can change the default path and file name. If PRG00001.vun already exists on the same path then a following message will be displayed after clicking on Export button.

User Manual – ValSpeQ 3.80
152
Click on Yes button will overwrite the existing file and clicking on No button will close the message box. After the file is exported successfully the following message will be displayed.
The Export Factory Notes window can be closed using the Close button or the cross button.

User Manual – ValSpeQ 3.80
153
Import Factory Notes
After clicking on Import Factory Notes option, the following screen will be displayed.
User can select an already exported .vun file using the open folder icon. The factory notes/group in the exported file can be imported either in the library or in the current project. If the file contains group then the group name will be displayed in the Group Name text box. If group is to be imported then the factory notes in the group cannot be deselected. If factory notes are to be imported then the factory notes can be selected or deselected. If the group with the same name exists in the Library then after clicking on Import button the following window will be displayed.

User Manual – ValSpeQ 3.80
154
User can Append the group to existing group or Rename the group with different name or Replace the existing group with the new group. If Project contains a group assigned to it the while importing the group with different name into Project the follow message will be displayed.
Click on Yes button will remove the existing group and clicking No button will cancel the process. If Project contains a group which has the same name as the group being imported then the following message will be displayed.
Clicking on Yes button will reapply the group and clicking on the No button will stop the process. After clicking on Ok/Yes button of the above tthree windows the backup of the current project is taken in the My Documents folder and the following message is displayed.
When the import is done successfully the following message is displayed.

User Manual – ValSpeQ 3.80
155
The Import Factory Notes window can be closed using the Close button or the cross button.

User Manual – ValSpeQ 3.80
156
User Preferences To Open User Preferences form, invoke the option available under Settings -> User Preferences.
After clicking on User Preferences option, following screen will be displayed with following Tabs – 1. Calculation Variables. 2. Unit of Measure. 3. Service Conditions. 4. Actuation. 5. Tubing 6. Tag. 7. General. 8. Confirmations. 9. Product Scope & Pricing. 10. PED/ITP 11. Generic Materials 12. Preferences for Air Group By default Calculation Variables Tab is displayed.

User Manual – ValSpeQ 3.80
157
Calculation Variables After Selecting the Calculation Variables tab, the following screen will be displayed.
By default calculation variables are initialized to their default values as listed below. Max. Velocity – Liquid - 33 Preliminary FL - 0.9 Cv Oversize Factor - 1 Min Sound Level - 70 Max Sound Level - 90 Sound Tolerance Level - IEC Print Information Messages - True By default Save and Cancel button is disabled. If user make any changes on the form then Save and Cancel button is Enabled. Click Save button to save the changes made. And to discard the changes made on the form click on the Cancel button.

User Manual – ValSpeQ 3.80
158
To change the default Calculation values, make entries in the corresponding textbox and save defaults by clicking on the Save button. After successfully saving the defaults, message box “Defaults saved successfully.” is displayed on the screen as shown in the following screen.
After saving the Calculation Defaults when the new project is created these defaults are copied from user library to new project and applied to added line items and templates in that project.

User Manual – ValSpeQ 3.80
159
Unit of Measure Tab After Selecting the Unit of Measure tab, the following screen will be displayed.
This screen consist defaults Unit of Measure for Liquid Flow Rate, Gas Flow Rate, Steam Flow Rate, Two Phase Flow Rate, Two Phase Gas Density, inlet Pressure, Temperature, Liquid Velocity, Length and Calibration. By default unit of measures are initialized to their default values as listed below. Unit of Measure Liquid Flow Rate - gpm Gas Flow Rate - scfh Steam Flow Rate - lb/h Two Phase Flow Rate - lb/h Inlet Pressure - psi a Temperature - deg F Liquid Velocity - ft/s Length - in Two Phase Gas Density - lb/ft3 14.73 psi a, 60 F Calibration - psi g

User Manual – ValSpeQ 3.80
160
To change the Default Units, select entries in the corresponding combo box and click on the Save Button. After Successfully saving the Defaults, a Message box “Defaults Saved successfully.” is displayed on the screen as shown in the following screen snapshot.
After saving the Units of Measure when the new project is created these units defaults are copied from the user library to new project and applied to added line items and templates in that project.

User Manual – ValSpeQ 3.80
161
Service Conditions Tab After selecting the tab, following screen will be displayed. This will display the Service conditions options available, as shown in following screen.
This screen includes the four service conditions headings used in the Size & Selection form. The default Values for the Service condition headings are
First heading - “Min” Second Heading - “Norm” Third Heading - “Max” Fourth Heading - “Other”.
Design Pressure - 0 Design Temperature - 100

User Manual – ValSpeQ 3.80
162
To change the Service Conditions Headings and Design Pressure and Temperature for line Items and Templates, change the entries in the corresponding fields and click on the Save Button. After successfully saving the Defaults a Message box “Defaults Saved successfully.” is displayed on the screen.
After saving the Service Conditions when the new project is created these Service Conditions are copied from the user library to new project and applied to added line items and templates in that project.

User Manual – ValSpeQ 3.80
163
Actuation Tab Actuation tab displays the Actuation defaults that are used in the Actuation form. These defaults include Fail Position and Air Action, as shown in the following screen.
The default values for these defaults are
Fail Position - “Closed” Air Action - “Air to Open”

User Manual – ValSpeQ 3.80
164
To change the Actuation Defaults, select the entries in the corresponding combo box and click on the Save Button. After Successfully saving the Defaults a Message box “Defaults Saved successfully.” is displayed on the screen.
After saving the Actuation defaults when the new project is created these defaults are copied from the user library to new project and applied to added line items and templates in that project.
Tubing
After selecting the tab, following screen will be displayed. This will display the Tubing options available, as shown in following screen.
The default values for above fields are: Tubing Material: stainless steel Fitting Size: 0.25 inch Fitting Type and Material: st. st. double Ferrule Gauge Scale: psi-kPa-bar-kg/cm2

User Manual – ValSpeQ 3.80
165
To change the Tubing values on Tubing & Airset accessory of Control Valve select the entries in corresponding combo boxes and click on Save button. After saving the changes the following message is displayed
After saving the Tubing defaults, when the new Project is created these defaults are copied from Library to New Project and applied to newly added Control Valve Line Items/Templates. Product Scope and Pricing Tab Product Scope and Pricing Tab displays the default Primary Source Facility and Price List as shown in the following screen.
Price List combo box lists all the price list of the selected Product Facility in the Primary source facility. Note – If ValSpeQ Standard or Lite edition is installed then the Price List Default frame is not displayed on the User Preferences form.

User Manual – ValSpeQ 3.80
166
To change the Product Scope and Price List Defaults for new projects, select the entries in the corresponding combo box and click on the Save Button. After Successfully saving the Defaults a Message box “Defaults Saved successfully.” is displayed on the screen.
After saving the Product Scope and Pricing defaults when the new project is created these defaults are copied from the user library to new project and applied to added line items and templates in that project.

User Manual – ValSpeQ 3.80
167
Tag Tab After Selecting Tags following screen will be displayed.
Tags tab contains following options: Use Tag Mask on new Project - When this option is checked, the selected Tag Masks are applied to New Project. Tag Mask – These fields values are used as the prefix for the auto generated tags for corresponding accessory. Initial Value – This field value is used as the Postfix in auto generated tags for all tag masks. Increment Value – This value decides the next auto-generated tag’s postfix value. The next tag’s postfix value is calculated as (Initial Value + Increment Value).

User Manual – ValSpeQ 3.80
168
If the “Use Tag Mask on New Project” Check box option is unchecked, all the text boxes on the Tag tab are disabled. When it is checked, all text boxes on the Tag tab are enabled. If the User Preferences screen is opened for the first time, by default Use Tag Mask on New Project check box is unchecked. To change Tag defaults first check Use Tag Mask check box and then make entries in Tag Mask fields and Initial and Increment values.

User Manual – ValSpeQ 3.80
169
The Increment value and Initial Value are mandatory. Tag Mask entries can be blank. If these fields are not provided then it will give an error message as shown below.
After changing all information click on the Save button. This will save all the information in the database. And the Message box “Defaults Saved Successfully.” Displayed on the screen as shown in the following screen.
After saving the Tag defaults when the new project is created these defaults are copied from the user library to new project and applied to added line items in that project. If Use Tag Mask option is checked then default tags is generated for new added line items and configurations in new project.

User Manual – ValSpeQ 3.80
170
General Tab To change the ValSpeQ general options select the General Tab, the following screen will be displayed.
This screen contains the options to select the default Language, Default Configuration and Number of Recently Used files. Default language is English and currently this is the only available language. By default, values for Default Configurator is Control valve and for recently used file list is 4. When the ValSpeQ application is started or when New Project is selected the New Configuration will be created as per the value set in the Default Configurator in the User Preference screen. When Recently Used Files number is changed from the User Preferences screen, the number of Recently Used Files displayed under Project menu is also changed.

User Manual – ValSpeQ 3.80
171
This screen also contains Four text boxes to store user information - User Name, User Location, User Phone and User Email. These defaults are used in new added line items, template and configuration. User Name, User Location and User Phone is displayed on the Item Data form as shown in the following screen.
User can select Serial Plate Language and Contractual Language from Serial Plate Language and Contractual Language combo boxes.

User Manual – ValSpeQ 3.80
172
Confirmation Tab Confirmation tab contains the options which decides whether to display the Confirmation message box or not on the selected conditions.

User Manual – ValSpeQ 3.80
173
Options available are:
• Confirm on deletion of Item/Template: If this option is selected/checked the confirmation message "Are you sure you want to delete the selected Item?" is displayed on deletion of Item or Template. And if this option is deselected no confirmation message is displayed while deleting Line Item or Template.
• Confirm on Freeze/Unfreeze of Item: If this option is selected/checked the confirmation messages "Do you want to freeze the selected Item" or "Do you want to unfreeze the selected Item" is displayed after selecting Freeze or Unfreeze option. And if this option is deselected no confirmation message is displayed while selecting Freeze or Unfreeze option.
• Confirm on Copy of Item/Template: If this option is selected/checked the confirmation messages like "Are you sure you want to copy?" is displayed after selecting copy options. And if this option is deselected no confirmation message is displayed while copying between Item and Template.
• Allow ValSpeQ to select singular drop down entries: If the Allow ValSpeQ to select singular drop down entries checkbox is checked and the user tries to edit any existing item or template configuration then while populating the values ValSpeQ will select the values for all invalidated combo boxes having single dropdown entry. If the Allow ValSpeQ to select singular drop down entries checkbox is unchecked and the user tries to edit any existing item or template configuration then while populating the values ValSpeQ will indicate the invalidated combo boxes with red color without making any selection.
• Allow ValSpeQ to select first of multiple drop down entries: If the Allow ValSpeQ to select first of multiple drop down entries checkbox is checked and the user tries to edit any existing item or template configuration then while populating the values ValSpeQ will select the first drop down entry for all invalidated combo boxes having multiple dropdown entries. If the Allow ValSpeQ to select first of multiple drop down entries checkbox is unchecked and the user tries to edit any existing item or template configuration then while populating the values ValSpeQ will indicate the invalidated combo boxes with red color without making any selection.
PED/ ITP Tab
After clicking on tab the following screen is displayed.

User Manual – ValSpeQ 3.80
174
This tab contains the ‘PED Required’ check box and ‘ITP Types’ combo box. By default check box is unchecked and the default value of ITP Types combo box is Standard ITP. After saving the changes the following message is displayed.
After saving the changes when New Project is created the values from Library are copied to New Project and applied to newly added Control Valves/Level/Accessories.
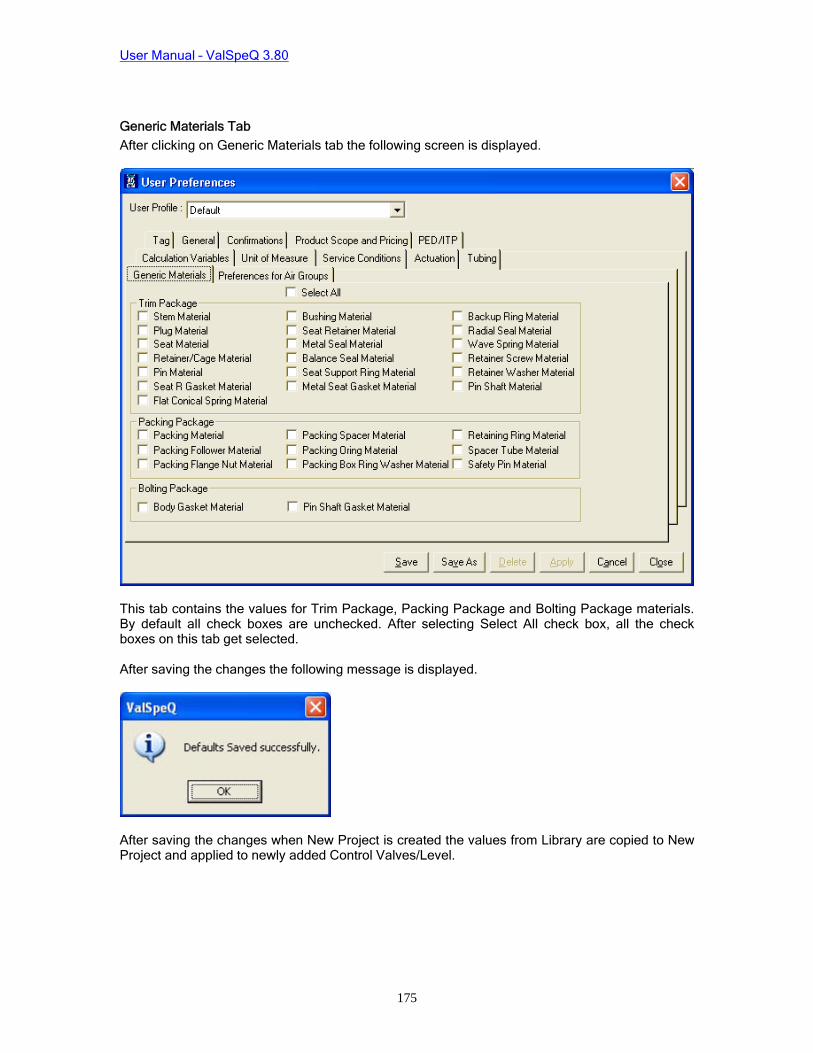
User Manual – ValSpeQ 3.80
175
Generic Materials Tab
After clicking on Generic Materials tab the following screen is displayed.
This tab contains the values for Trim Package, Packing Package and Bolting Package materials. By default all check boxes are unchecked. After selecting Select All check box, all the check boxes on this tab get selected. After saving the changes the following message is displayed.
After saving the changes when New Project is created the values from Library are copied to New Project and applied to newly added Control Valves/Level.

User Manual – ValSpeQ 3.80
176
Preference for Air Groups Tab After clicking on Preference for Air Groups tab the following screen is displayed
This tab contains values for Air Groups for Automation Selection. By default ‘None’ value is kept, however, user can change it from the options present in the corresponding drop boxes and save it by clicking on the Save button. After saving changes the following message is displayed.
After saving the changes when New Project is created the values from Library are copied to New Project and applied to newly added Control Valves/Level.

User Manual – ValSpeQ 3.80
177
Manage Customer Library
After clicking on Manage Customer Library option the following screen is displayed.
Name: Name of the customer can be entered in Name text box Address: Address of the customer can be entered in Address text box City: City of the customer can be entered in City text box Country: Country of the customer can be selected from Country Combo box State/Province: State of the customer can be selected from State/Province combo box Postal code: Postal code of the customer can be entered in Postal code text box Name: Name of the contact person can be entered in Name text box in Contacts frame

User Manual – ValSpeQ 3.80
178
Telephone: Telephone number of the contact person can be entered in Telephone text box Fax: Fax number of the contact person can be entered in Fax text box Email: Email of the contact person can be entered in Email text box Add: Details for new customer can be added by clicking on Add button Edit: Details of existing customer can be edited by clicking on Edit button Delete: Details of existing customer can be deleted by clicking on Delete button Save: Details of customer after adding/editing can be saved be clicking on Save button Discard: Details being added/edited can be discarded by clicking on Discard button. Name, Address, Country, Postal code and Email are mandatory fields for adding a new customer. If user tries to omit any of these fields a message is given as follows for each missing field.

User Manual – ValSpeQ 3.80
179
If values in all the fields are being entered/edited and if user clicks on Ok button then the details get saved, but if user has omitted any of the mandatory field then a corresponding message is displayed for the field which has been omitted. While adding/editing if user clicks on Cancel button then a following message is displayed.
Else the Customer Library window gets closed. Customer Library window can also be invoked by clicking on Browse button on Customer/Salesperson tab on Project General Information tab as shown below.

User Manual – ValSpeQ 3.80
180
Functionality of all the fields and buttons will be same except for Ok button of Customer Library, after clicking on Ok button the following message will be displayed.

User Manual – ValSpeQ 3.80
181
Clicking on Yes button will copy the details of selected customer to the tab on which the Customer Library window is invoked. Clicking on No button will close the Customer Library window without copying information.

User Manual – ValSpeQ 3.80
182
ITP Management
This option facilitates the user to assign ITP (Inspection & Test Procedure) to Line Item or Template. To create ITP, invoke Settings -> ITP Management option or press ALT+S+I.
After clicking on ITP Management option following screen will be displayed.
The status of filter along with filtered Line Items is displayed on Title bar of the above window. This screen contains following controls – Existing ITPs From combo box This combo box contains two options viz. to list the existing ITP from the Project or from Library. By default ‘Project’ option is selected and all ITPs from Project are displayed in the list view.

User Manual – ValSpeQ 3.80
183
Create toolbar This toolbar button contains two options viz. i) Create ITP and Create ITP From Library options when Project option is selected in the Existing ITPs From combo box. ii) Create ITP and Create ITP From Project options when Library option is selected in the Existing ITPs From combo box. By default this toolbar is in enabled state.
Create ITP To add a new ITP user should click on Create ITP button, the following window will be displayed.

User Manual – ValSpeQ 3.80
184
The next incremented reference number appears in Reference text box, user can edit the digit in Reference text box. ITP Type combo box This combo box contains eight options and user can selected any one of them for Control Valve type.
Where as three options are displayed for Level as shown below..
ITP For combo box This combo box contains two options viz. Control Valve or Level. ITP Title textbox This textbox is for entering title of ITP. It can be blank as it is not mandatory and can be filled later from ITP General Information tab.

User Manual – ValSpeQ 3.80
185
Add button Clicking on Add button will add new ITP. Cancel button Clicking on Cancel button will close the New ITP… window without adding new ITP. Create ITP From Library By clicking on Create ITP From Library option user can add a new ITP in project having general information as that of existing ITP from Library as displayed in following window.
Functionality of Reference textbox, ITP Type combo box, ITP For combo box and ITP Title textbox, Add/Cancel buttons is same as that for the Create ITP option. Get ITP General Information From Library This frame has two fields Reference combo box and ITP Title text box. Create ITP From Project By clicking on Create ITP From Project option user can add a new ITP in Library having General Information as that of existing ITP from Project as displayed in following window.

User Manual – ValSpeQ 3.80
186
Functionality of Reference, ITP Type, ITP For, ITP Title, Reference, ITP Title is same as that of Create ITP From Library. The general information of ITP from Project will be copied to the ITP that is being newly created in the Library. Copy toolbar This toolbar contains two options viz. i) Copy and Copy to Project when Library option is selected in the Existing ITPs From combo box. ii) Copy and Copy to Library when Project option is selected in the Existing ITPs From combo box. By default this toolbar is in enabled state.

User Manual – ValSpeQ 3.80
187
Copy After clicking on Copy option a following message will be displayed.
Clicking on Yes button will copy the selected ITP, clicking on No button will not copy the selected ITP. Copy to Library After clicking on Copy to Library option a following message will be displayed.

User Manual – ValSpeQ 3.80
188
Clicking on Yes button will copy the selected ITP to Library, clicking on No button will not copy the selected ITP to Library. Copy to Project After clicking on Copy to Project option a following message will be displayed.
Clicking on Yes button will copy the selected ITP to Project, clicking on No button will not copy the selected ITP to Project. Save ITP button By clicking on Save button user can save new/updated ITP, following message is displayed on clicking on Save button after making changes to the existing ITP.
Clicking on Yes button will auto increment the revision number and save the changes, clicking on No button will display the following message.

User Manual – ValSpeQ 3.80
189
After clicking on Yes button of above message, user will be required to manually enter the revision number, clicking on No button will save the changes to ITP without incrementing revision number. After manually entering the revision number when user clicks on Save ITP button, a following message is displayed.
Clicking on OK button will close the above message window. View ITP By clicking on View ITP button, a following window will be invoked.
All the options selected for the ITP are displayed on this window, user can navigate through the ITPs by clicking on Previous ITP, Next ITP buttons given at the top of the window. However this window is non-editable. By clicking on Close button, user can close this window. Delete button On clicking on Delete button, the following message is displayed.

User Manual – ValSpeQ 3.80
190
Clicking on Yes button will delete the selected ITP, clicking on No button will not delete the ITP. If the selected ITP for deletion is associated with freezed Line Item then the following message is displayed.
If the selected ITP is associated with Line Item then the following message is displayed.
If the selected ITP is associated with Template then the following message is displayed.
If the selected ITP is associated with both Line Items and Templates then the following message will be displayed. Close button On clicking Close button the ITP Management window gets closed. If all the Line Items in Project do not have an ITP associated with them or there is at least one ITP in the Project which is not assigned to any Line Item then the following informative message is displayed while closing the ITP window.

User Manual – ValSpeQ 3.80
191
ITP General Information tab To enter the general information for the selected ITP user should click on ITP General Information tab. This tab has ITP Title textbox, Rev text box, Copy General Information button, Organizational Information list view, Comments textbox, check boxes for Partial Final Inspection authorized, Final Inspection Released Note, and Release Note for Packaging, labels for Contractual Language and Name Plate Language.
ITP Title textbox Title of the ITP can be entered in this textbox. Rev textbox

User Manual – ValSpeQ 3.80
192
The revision number for selected ITP is displayed in this text box. If user tries to enter the revision number that is less than the current revision number then the following message is displayed.
On clicking the OK button, the message is closed and the previous revision number is displayed in the revision box and the ITP remains in edit mode. Copy General Information button The general information of the selected ITP except ITP Title and revision number can be copied to all the available ITPs in the Project by clicking on the Copy General Information button. Organizational Information list view General information related to organization like organization name in Organization column, contact name, phone and e-mail in Contact Name, Phone or E-Mail column, Notification Schedule can be filled in respective columns by clicking on in the text box. By default in all three rows of Organizational column has ‘None’ in it. User can select the check boxes for Partial Final Inspection authorized, Final Inspection Released Note and Release Note for Packaging options, they are reflected on VReports. By default the check boxes are unchecked. Contractual language and Name Plate language labels display Contractual and Name Plate language from Project Preferences. Comment text field User can enter comments into this text field. ITP Options tab After clicking on ITP Options tab the following screen is displayed.

User Manual – ValSpeQ 3.80
193
There are seven sub tabs viz. Regulation & Design Code, Raw part testing/NDT & mat’l certification, Finished part/product NDT & Testing, Cleaning, Painting, Packaging and Certification under this tab. Every sub tab has a different set of options. User can select/de-select the options for the selected ITP by clicking their corresponding check boxes. By default all the sub tabs are displayed in green tick mark. When Standard+NACE or Standard+PMI ITP is created the 'Raw part testing/NDT & mat'l certification' tab is displayed in red cross mark, user has to click on this tab in order to turn it to green tick mark. User can enter information in Testing Plan and Procedure columns, Doc checkbox can be checked or unchecked and percentage can be either entered manually or selected from the drop down menu of % to be inspected column. User can either manually type W, H or R or select an option from the drop down menu in the ORG1, ORG2 and ORG3 columns. User can manually enter revision number in the Revision column or it is auto incremented while saving the changes.

User Manual – ValSpeQ 3.80
194
There are two buttons Add Option and Delete Option at the top of ITP Options tab. Additional option can be added into the selected ITP by clicking on Add Option button, after clicking on this button, the following window is invoked.
The Add ITP Options window will have Category Label, combo boxes form Sub Category, Sub Sub Category, Requirement, Standard, and Acceptance Criteria, text box for Procedure, buttons for Add and Cancel. Add button By clicking on Add button the additional option gets added. If user clicks on Add button without entering anything in Requirement field then following message is displayed.
Cancel button By clicking on Cancel button, additional option is not added and Add ITP Options window gets closed. Delete Option button User can delete the newly added additional option by clicking on Delete button on ITP Options tab.

User Manual – ValSpeQ 3.80
195
By default Delete button is in disabled state, it turns to enabled state only when a newly added additional option is selected. After clicking on Delete button the following message is displayed.
On Finished part/product NDT & Testing sub tab if the Hydrostatic test Requirement under Basic Sub Sub Category of Testing Sub Category has W or H point in any of the ORG columns then the following note is displayed on ITP General Information tab.
This note is displayed above the Comments text box. ITP to Item Assignments tab After clicking on ITP to Item Assignments tab the following screen is displayed.

User Manual – ValSpeQ 3.80
196
User can assign ITPs to Line Items/Templates on this tab. Default focus is always on Items radio button. Item radio button On clicking on Item radio button, all the Line Items in the Project are displayed in the list view. If Project doesn’t contain any Line Item then this radio button is in disabled state and focus is on Template radio button. If filter is applied to the Project then only filtered Line Items are displayed on this tab. If the ITP associated with particular Line Item is selected than that Line Item is displayed in dark blue colour. If the ITP selected is for Control Valve then the check boxes of Level Line Items are in disabled state and vice versa. Check boxes of Accessory Line Items are always in disabled state. Template radio button On clicking on Template radio button, all the Templates in the Project are displayed in the list view. If Project doesn’t contain any Template then this radio button is in disabled state. If the ITP associated with particular Template is selected than that Template is displayed in dark blue colour. If the ITP selected is for Control Valve then the check boxes of Level Line Items are in disabled state and vice versa. Check boxes of Accessory Templates are always in disabled state. Select All checkbox

User Manual – ValSpeQ 3.80
197
User can select all the Line Items/Templates by selecting Select All check box available on this tab. Save Item Assignment button On clicking on Save Item Assignment button the following message is displayed.
By default Save Item Assignment button is in disabled state, it turns to enabled state only when the Line Item/Template and an ITP are selected. If the selected Line Item/ Template already has an ITP associated with it and if user tries to apply a different ITP to it then the following message is displayed.
Clicking on Yes button will disassociate the previous ITP and associate the new ITP, clicking on No button will no assign new ITP. If the selected ITP is not appropriate for the selected Line Item/ Template then the following message is displayed.
User can disassociate an ITP from Line Item or Template by selecting the ITP associated with it and deselecting the Line Item/Template and clicking on Save Item Assignment button, after clicking on Save Item Assignment button the following message is displayed.

User Manual – ValSpeQ 3.80
198
Import ITP This option facilitates the user to import ITPs into the current Project / Quote from another project via previously exported file having “.vin “extension. This option is available under ITP sub menu of Settings menu. The same option should be invoked using the shortcut keys- Alt+S+I+M. After clicking on Import ITP option, the following screen will be displayed.
Select the already exported .vin file by clicking on the (Open Folder) button. User can import ITP either into project or library by selecting the Project or Library radio button respectively, by default Import Into Project is selected.

User Manual – ValSpeQ 3.80
199
All the ITPs in the Project will be displayed in the list view & selected by default. The user has the option to de-select all and select a few. When Library option is selected, all the ITPs in the Library are displayed in the list view. The ITPs can be selected or deselected Click on the Import button or press Alt+I key to start the import process. Before starting the import process, the application takes a backup of the current project and the user will be informed about the backup location. This helps the application to restore the database from the backup in case of an unsuccessful import operation. But if the application fails to restore the backup, the user will have to manually restore the backup. The backup of the current project is taken in the same folder from where project file is opened and the following message is displayed
As the utility starts, the progress bar will be displayed. When the import is done successfully the following message is displayed
Close Click on the Close button or press the Alt+C keys to close the Import Form.

User Manual – ValSpeQ 3.80
200
Export ITP This utility facilitates the users to export the ITPs of current Project to other ValSpeQ user. The exported ITPs can then be imported in any other Project. This option is available under ITP option of Settings menu. The same option should be invoked using the shortcut keys- Alt+S+I+X. After clicking on Export ITP option, following screen will be displayed.
User can export the ITP either from project or library by selecting the Project or Library radio button respectively, by default Export From- Project is selected. All the ITPs from the Project will be displayed in the list view & selected by default. The user has the option to de-select all and select a few. When Library option is selected all the ITPs in the Library are displayed in the list view. The ITPs can be selected or deselected. By default the export file path will be in My Documents folder of the current user and the file name will be PRG00001.vin. However user can change the default path and file name by clicking on the
(open folder) button. Click on the Export button or press Alt+E key to start the export process

User Manual – ValSpeQ 3.80
201
If PRG00001.vin already exists on the same path then the following message will be displayed after clicking on Export button.
Clicking on Yes button will overwrite the existing file and clicking on No button will close the message box. As the utility starts, the progress bar will be displayed. After the file is exported successfully the following message will be displayed
Close Click on the Close button or press the Alt+C keys to close the Export Form.

User Manual – ValSpeQ 3.80
202
Tools
The Tools menu on the application menu bar allows the customer to perform/invoke various ValSpeQ related utilities. Following are the different options available under Tools Menu.
In tools Import - This is the only option currently listed but still not available under Tools menu. ANSI Calculator This tool allow the user to determine The minimum ANSI rating for a given body material, pressure and temperature. Allowable working pressure for a given body material, rating and temperature. Hydrostatic test pressure for a given Valve size, body material and rating.

User Manual – ValSpeQ 3.80
203

User Manual – ValSpeQ 3.80
204
Leakage Calculator Allow the user to calculate the Allowable Leakage for a given Line, Valve Size, Rating, Trim Type, Plug Type and Flow Direction, Rated CV and Leakage Class. The user can also derive the allowable leakage value by specifying Manual specifications like Rated CV, Leakage Class and Test pressure.

User Manual – ValSpeQ 3.80
205
UOM Converter Allow the user to convert One Unit value to different Unit.

User Manual – ValSpeQ 3.80
206
PED Evaluation With the desired record displayed in Valspeq PED evaluation is selected. The data for the input fields is populated from the sizing/selection screen data. If the valve definition is incomplete or if at least one service condition/design condition is not present a warning message is shown. The subroutine will translate the specification data into the format used by the underlying spreadsheet, which remains hidden during the entire process. The data will then be entered in the required spreadsheet cells. A screen that cannot be edited displays the converted input variables, calculation data and evaluation. Sample Valspeq and PED Evaluation screens are shown below:

User Manual – ValSpeQ 3.80
207
Note that the PED screen cannot be edited with the exception of the Order No.. Two selections are available from the File menu: Selecting “Print” will print a Design check report using a underlying spreadsheet macro. An intermediate screen allows choices for printing language and paper size.

User Manual – ValSpeQ 3.80
208
The second selection from the “File” menu is “Exit”. Selecting this option will dismiss the PED screen, save the evaluation result to ValSpeQ memory, and return focus to ValSpeQ.

User Manual – ValSpeQ 3.80
209
PED Factory Documentation The second functionality, which is available from the ValSpeQ “Tools” menu, is “PED factory documentation”. This selection populates the Conde designed spreadsheet with translated data from ValSpeQ then makes it visible which enables all it’s built in functionality. Local variations of the spreadsheet are required since Conde and Avon save archive copies of the spreadsheet to different local network drives. The ValSpeQ interface will work as long as the spreadsheet file name is not changed. The spreadsheet user is required to close Excel in order to return to ValSpeQ.

User Manual – ValSpeQ 3.80
210

User Manual – ValSpeQ 3.80
211
Filter Invoking Quote Item Filter (QIF) The user can invoke the Filter functionality by clicking on the Tools…Filter…Add/Edit Filter Or by right clicking on the Project/Quote node. A message will be flashed if no line items exist for the project & will not proceed further.
Invoking QIF: -
QIF 1 - Tools Menu. QIF 2 - Right click on Project/Quote node. To create a new filter, user will be able to select Add/Edit option available under Filter option from Tools menu as shown in figure QIF 1. User will be able to invoke the same by right clicking on the Project/Quote node & then selecting Filter & Add/Edit option as shown in figure QIF 2. On invoking this option, following screen will be displayed to the user.

User Manual – ValSpeQ 3.80
212
QIF 3 Data elements of QIF form: - The filter screen will display following data elements. Available Filter From Library – This contains a list of all filters in User Library (VUL). Filters that exist in the active Project will be displayed in Red color. User can see filter details (filter criteria) by selecting the filter from the list. Available Filter From Project – This contains a list of all filters in project file (VNX). Filters that exist in Library will be displayed in Red color. User can see filter details (filter criteria) by selecting the filter from the list. Copying Filter –
Using this copy button user can copy one or more selected filters from User Library to Project. When the filter is copied from Library to Project, it will be displayed in Red colour in Library and Project Filter lists. If the filter with same name is present in project it flashes a message “TestFilter already present in project. Would you like to replace it?” If user clicks on yes, the previous filter is replaced with current filter definition.
Using this copy button user can copy one or more selected filters from Project to User Library. When the filter is copied from Project to Library, it will be displayed in Red colour in Library and Project Filter lists. If the filter with same name is present in library it flashes a message “TestFilter already present in library. Would you like to replace it?” If user clicks on yes, the previous filter is replaced with current filter definition.

User Manual – ValSpeQ 3.80
213
After copying a filter from Project to User Library or Vice-Versa the source filter remains selected and user can see its details in area titled Filter Definition. If multiple filters are selected, details of the last selected filter in multiple selections will be displayed. Filter Definition – This area displays the Filter information like - Filter Name, Filter for (Configurator Type), Saved in i.e. filter source (Project/Library) and the filter grid, which will contain filter conditions. Filter condition has following fields, Topic Area, Attribute, Condition, Value and Operator (‘OR’ operator is default). Ref. FilterGrid. The selected filter can be edited. Filter Name – The name of a selected filter will be displayed. This will be an editable text box. The Maximum length will be 50 characters. The Filter name will be mandatory. The user can add as well as update the same. Filter for – This dropdown will specify Configurator type. The user can create filters for Control Valves/Levels/Accessories/Regulator. This list will be populated from PRODUCT field of CO_LINE table and will contain distinct values for Configurator Type. This dropdown will be non-editable. Default value will be ‘Control valve’. Saved in – This dropdown will contain values as Project and Library. This will indicate filter source database. Default value will be ‘Project’. Filter Grid – This Filter grid is nothing but True DBGrid. It has following columns, Topic Area, Attribute, Cond (Condition), Value and Operat (Operator ‘OR’ is default). As user clicks on the cell the dropdown associated with the cell appears. The dropdown will have all corresponding values populated. So that user can select value from the list. Also after the cell looses the focus the selected value appears into the cell. Each row of the grid contains one filter condition. Two or more filter conditions can grouped by ‘OR’ operator. The AND operator is placed on the Tab. Each Tab page has one group of filter conditions. The result of each tab page will logically AND’ ed to get final result. As there are five tab pages, one filter can have maximum of five filter condition group. Also there can be maximum five filter conditions can be grouped. Columns of filter grid - 1. TopicArea – This dropdown will specify Topic areas for filter. The values for this dropdown will be listed from VALSPEQNX_FORM, IS_FORCV,IS_FORLV,IS_REVISIONABLE fields of BTL_PARAM table. Columns IS_FORCV,IS_FORLV,IS_REVISIONABLE are not visible. Only this list will be populated based on the Configurator type, i.e. value selected from Filter For dropdown. This dropdown will be non-editable. Attribute – This dropdown will be populated after selection of Topic area. Attribute values will be populated from VALSPEQNX_LABEL field of BTL_PARAM table for the selected Topic Area. This dropdown will be non-editable.

User Manual – ValSpeQ 3.80
214
Condition – This dropdown will contain values as “Equals”, “Not Equals” and “Contains”. By default “Equals” will be displayed. This dropdown will be non-editable. a. Equals –
Using Equals condition the user can filter those items, wherein the Attribute value equals to the selected Value. E.g. In the above filter screen fig. QIF 3, user can filter all items which have it’s Valve Type equals to ‘Globe Rotary’. b. Not Equals –
Using Not Equals condition the user can filter those items, where in the Attribute value does not equals to the selected Value. E.g. user can filter all items that have its Valve Type not equal to ‘Globe Rotary’. c. Contains –
• Using Contains condition the user can filter those items, wherein the Attribute value contains the selected Value. E.g. In the above filter screen, user can filter all items where ‘Valve Tag’ contains ‘Tel’ value.
As the user adds new row into the filter grid OR operator will be automatically added into the last cell of previous row. This means two filter conditions will be OR’ ed automatically. Same cell of last row will not be blank. As there will be no filter condition next to it, which can be OR’ ed. OR Operator – The last cell will have default OR operator. For the last cell this cell will be blank. OR operator is used when the user wants to satisfy any one of the filter conditions concatenated with the OR operator. E.g. in the above QIF 3 screen There are two filter conditions
1. Valve Type =”Globe Rotary” and 2. Valve Tag contains “FV” Assume that both filter conditions are concatenated with OR operator. So the filter should
result all items from the project that are either satisfying 1st or 2nd filter condition. Value – This drop down will contain all distinct values for the selected Attribute and will be populated from CONFIG table’s PARAMVALUE field. This dropdown will be editable. The user can either select or enter value in the dropdown. AND Tab – Each AND tab has one filter grid. Result of each filter grid will be logically AND’ ed. Delete a filter condition from Grid –
User can delete a particular filter condition by clicking on a delete button (a red cross
image button ) placed near filter grid. This button will be disabled when there are no filter conditions present into the Filter Grid of current AND tab. Before deleting the condition row a warning message will pop up. The message will specify which filter condition will be deleted as shown in figure QIF 4.

User Manual – ValSpeQ 3.80
215
QIF 4
If the user clicks Yes then the selected filter condition will be deleted. If the user clicks No the filter condition will not be deleted.
After deleting the condition, the user will have to click on “Save” button to update the
database. Create button – This button will be available to create a new filter to be saved in Project or Library. This button will be enabled by default. Delete button – This button will be available to delete a selected filter from Project or Library. This button will be enabled by default. Save button – This button will be available to save a filter. This button will be disabled by default. Cancel button – This button will be available to cancel Create Filter operation or any changes to existing filter. It will be disabled by default. Apply button – This button will be available to activate a selected filter. This button will be enabled only when the Filter is selected from Project & it will be disabled if an active filter is selected and if a filter from User Library is selected. Close button – This button will be available to close a filter window. If no filter is Active and the user has invoked this form then the first filter from Project will be displayed as selected. If any filter is Active then the same will be displayed as selected. The selected filter details will be displayed in corresponding controls (the grid). If filter is not Active & the user has invoked the above filter form, focus will be on the first filter of Library. If there are no filters available in the Project, then the first filter from User Library will be selected. If there are no filters available in the User Library, then all the controls will display blank data. If no filter is available in the project, then the first filter from User Library will be selected & if no filter is available in the User Library, then it will display blank grids.

User Manual – ValSpeQ 3.80
216
Creating a New Filter: - To create a new Filter click on the “Create” button. Upon clicking this button, Filter grid and Filter Name will be cleared. ‘Saved in’, ‘Filter For’ dropdown will be initialized to default values. (See QIF 5 below). Create, Delete, Apply and Copy, Red Cross button will be disabled. Save, Cancel button will be enabled. After clicking on this button, focus will be on the Filter name text box with blank grids & with the default values in ‘Saved in’ & ‘Filter For’ drop down box. The focus will be set to Filter Name text box and the textbox will be blank.
QIF 5 After filling in the values for Filter Name, Filter For, Saved in and values from Filter Grid such as Topic Area, Attribute, Condition, Value, Operator, the user will have to click on Save button to save the filter grid. Enter the values in Filter Name & in the filter grid. Also select values for ‘Filter For’ & ‘Saved In’ from drop down box & click on save button to save the filter. Following Validations will be made on each row of filter grid: - The Value in the cell cannot be blank. The length of value entered in the cell will not be
greater than 250 characters.
User Manual – ValSpeQ 3.80
217
The value in the cell should not be blank & maximum allowable character length is 256 characters.
The total number of filter conditions into one group cannot (Should not be) be greater than 5.
Red Cross delete button will be disabled if there is no filter conditions on AND tab. For the last filter condition operator column value will be blank.
Before Saving a Filter following validations will be made: - Filter Name will not be blank and will not accept more than 50 characters. Duplicate Filter Name for the same Configurator Type will not be allowed.
To cancel the Create Filter process user will have to click on Cancel button. Editing an Existing Filter: -

User Manual – ValSpeQ 3.80
218
• To edit a Filter from the Library/Project, the user will have to click on the name from the list
titled Available Filters From Library/Available Filters From Project. • After clicking on the name, its data will be displayed in the corresponding controls in Filter
Definition frame. Filter Grid will have its filter conditions. By default all controls will be in edit mode. If the user makes any changes to the filter definition, a form will be made dirty. The Save, Cancel button will be enabled. The Create, Delete, Apply and Navigation button will be disabled. By default Filter Grid will be in edit mode. If user makes any changes in the filter grid, a form will be made dirty with enabling Save & Cancel buttons & disabling the Create, Delete, Apply & navigate buttons. Saved In drop down box is disabled in edit mode of filter To save the Filter user will have to click on Save button. To cancel the Edit Filter process user will have to click on Cancel button.
Save Filter: -

User Manual – ValSpeQ 3.80
219
When clicked on the Save button, following validations will be done: - • Filter Name cannot be blank and cannot be greater than 50 characters. • Filter name & Configurator Type cannot be duplicate.
If the user is creating a new Filter then, the duplicate filter name will be checked into the database as per the value selected in Save In drop down. I.e. if the user has selected Project from Save In dropdown, then the duplicate value will be checked in VNX file else in VUL file.
• The number of rows in the Filter grid cannot be equal to zero. • At least one condition should be present in the grid. After clicking the Save button, all the values will be inserted/updated into the database. After saving the filter, the Available Filter From Library/Available Filter From Project lists will be refreshed. If the user has edited and saved an Active Filter, then a message will be flashed as “You have updated an Active Filter. Do you want to re-apply the same?” If the user selects Yes then the updated filter will be reapplied. If the user selects No then current applied filter will be de-activated and the project will be populate all the items.
Deleting a Filter: -

User Manual – ValSpeQ 3.80
220
User can delete selected filter from User Library/Project. After clicking Delete button following warning message will appear.
QIF 6
The message will have filter name (in above figure it is Filter1) to be deleted. If User clicks on Yes button the selected filter will be deleted from the database. If User click on NO button filter will not be deleted. If the user is trying to delete the Active Filter, a warning message will be displayed as “The selected Filter is currently applied to the Project. Deleting the same will de-activate from the project. Do you still want to delete this Filter?”
If User clicks on Yes button the selected filter will be deleted from the database and will be de-activated from the project. If User clicks on No button filter will not be deleted.
Applying a Filter to current Project: –

User Manual – ValSpeQ 3.80
221
On clicking Apply button user can apply selected filter to the project items. If the number of items filtered is zero (0) then a message will be flashed as to “No results for the Filter. Filter cannot be applied”. If the number of items filtered is greater than zero (0), the Activate/De-activate option from the menu is enabled immediately. If an active filter is selected then Apply button will be disabled. Close button – To close the filter window user can click on Close button.
Filter effect on ValSpeQ Main Form: -

User Manual – ValSpeQ 3.80
222
If any filter is set, it will be reflected on the ValSpeQ Main form and the Quote/Project folder icon on the Project Tab will be replaced with New Filter Icon, Which will specify that project has filter active. See following figure.
QIF 7 The above image displays the Project node when filter is active. The status bar will display Filter status Filter ON if filter is ON other wise Filter OFF if filter is OFF. If Filter is on then, the tool tip will display Filter Name with number of filtered items out of total number of items from the project. Activate/Deactivate option –
Once a filter is defined & applied, the Deactivate option is enabled from Filter option under Tools menu as well as under right click popup menu on Quote/Project menu. This option toggles from Activate to Deactivate on selection. If the filter is applied the Deactivate option is enabled. On selecting Deactivate option, the same is toggled to Activate. On selecting the Activate option, the same is toggled back to Deactivate. On clicking Activate menu the filter that is present currently in the memory will be activated. The last filter that was applied from the filter screen will be stored into the memory. If no filter is present in the memory then Activate option should be disabled.
QIF 8 From Tools Menu QIF 9 From Quote right click menu

User Manual – ValSpeQ 3.80
223
QIF 10 From Tools Menu QIF 11 From Quote right click menu Refreshing a Filter: – Apply filter to current project .Add a new line item to current project. Save the newly added line item. If the new item does not satisfy the filter condition, filter will become inconsistent. The line item, which does not satisfy the filter condition, will appear in red color. When filter becomes inconsistent user can reactivate filter using refresh filter option.
QIF 12 The above image displays the Project node when filter is inconsistent. The status bar will display Filter status Filter Inconsistent. If Filter is inconsistent then, the tool tip will display Filter is Inconsistent Use Refresh Filter Option. When filter becomes inconsistent, Refresh option is enabled from Filter option under Tools menu as well as right click popup menu on Quote/Project menu.

User Manual – ValSpeQ 3.80
224
QIF 13 From Tools Menu QIF 14 From Quote right click menu
Mass Change
The user can make a mass change onto the current project on Filtered as well as non-filtered items. The changes are not made for frozen items. To apply the Mass Change invoke Mass Change option available under Tools menu.
After clicking on Mass Change option a screen will be displayed. It will display information like Project Name, Filter Name, and Number of target items for Mass Change. The user can apply Mass Change for the following forms. • Positioner • Transducer • Booster • Switch • Solenoid • Tubing & Airset

User Manual – ValSpeQ 3.80
225
To make any changes to the any of the accessories, user will have to check the node correspond to the screen name.
Once the changes are finalized, the user can click on the Apply button. Before starting the Mass Change process Backup of the current project will be taken at user’s personal folder and it will have extension as .RCV. The backup file will exist even after the Mass Change process is completed in case to recover the original project file.

User Manual – ValSpeQ 3.80
226
After clicking on the Ok button, the Mass Change process will start.
When the Mass Change is in Process the progress will be displayed in the Status Bar.

User Manual – ValSpeQ 3.80
227
After updating all the items, ValSpeQ will verify whether Pricing needs to be recalculated for all updated items. If so it will flash the following message if the Auto Update Price checkbox is unchecked. If this checkbox is checked then ValSpeQ will auto-update price for all updated items.
If the user clicks on Yes button, pricing will be recalculated for all updated items. During recalculation if ValSpeQ is unable to recalculate the pricing for some or all of the items then its details will be displayed to the user.
After successful completion of the process following message will be displayed.

User Manual – ValSpeQ 3.80
228
Help The options that would be available under this menu are: - Contents… Search for help on… About ValSpeQ… The following screen displays the above-mentioned options under the Help menu.
Contents… / Search for help on… Use these 2 menus to invoke the ValSpeQ help file.
About ValSpeQ Functionality
Select this option to view versions of existing components on the machine.
The About ValSpeQ option can be invoked by selecting the Help option from the application menu bar or Alt+H and then A for About ValSpeQ. Following screen will be displayed

User Manual – ValSpeQ 3.80
229
LODB Restrictors If the fluid type in the “Sizing and Selection” form is “Steam” or “Gas” the Restrictor Button is displayed on the Configuration Tab. The Following figure shows the Restrictor Button: On clicking the Restrictor button the Restrictor form is displayed.

User Manual – ValSpeQ 3.80
230
The following is the screen shot of the Restrictor form On the Restrictor Form the “qty” field is initially 0 so no restrictor are seen .If the value of the qty field is set to either 1,2,3 then those many restrictors are seen in the diagram If the “Calculate System” button is clicked the required calculations are performed and the results are displayed on the Restrictor form. The following figure is when the qty value is 2 and the “Calculate System “ Button is clicked:

User Manual – ValSpeQ 3.80
231
On clicking the “Accept system” button the restrictor calculation details are applied for the corresponding Item or Template on the “Sizing and Selection” form and the Sizing & Selection form is disabled. On clicking the “Cancel system” button the restrictor calculation details are discarded and previous Item configuration values are recalculated for the corresponding Item or template. Sizing & Selection form is enabled.
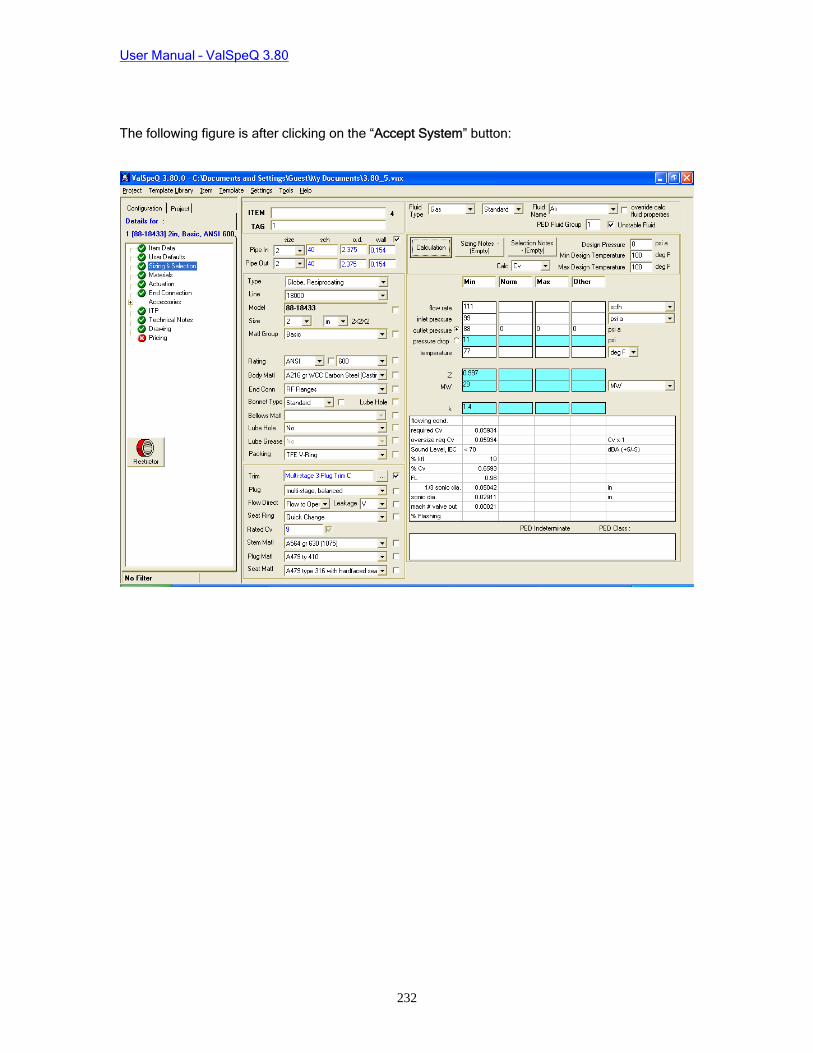
User Manual – ValSpeQ 3.80
232
The following figure is after clicking on the “Accept System” button:

User Manual – ValSpeQ 3.80
233
ValSpeQ Messages
ValSpeQ Message Reason for occurrence How to Resolve Export No Items Available. when the export option is
invoked & the current Project does not contain any Item(s).
Invoke the option when Items exist in the current Project.
No Templates Available. when the export option is invoked & the current Project does not contain any Template(s).
Invoke the option when Templates exist in the current Project.
Directory [DIRECTORY NAME/PATH]' does not exists.
The directory/folder path specified in the “Save As” dialog box does not exists.
Create the specified directory/folder or specify the directory/folder path that already exists.
Invalid file extension. Project Export Files should have ".vxp" extension.
When exporting Items the export file extension specified is other than “.vxp”.
Provide a filename with a “.vxp” extension or do not provide any file extension, the same would be appended automatically by the application.
Invalid file extension. Template Export Files should have ".vxt" extension.
When exporting Templates the export file extension specified is other than “.vxt”.
Provide a filename with a “.vxt” extension or do not provide any file extension, the same would be appended automatically by the application..
Project to Export is not found. Project Code is missing. Project Code i.e. CO_NUM field from CO table is blank.
PRG00001 is the default project code that is inserted when a new project is opened. Contact ValSpeQ Support to make necessary modifications in the project file.
Select Item/s to Export. No Item/s is/are selected when user click on the Export button
Minimum one Item should be selected before clicking on the Export button.
Select Template/s to Export. No Template/s is/are selected when user click on the Export button.
Minimum one Template should be selected before clicking on the Export button.
Please provide file name. Export button is clicked without specifying file name.
Specify export file name & then click on Export button
An error occurred while exporting Project PRG00001 to File C:\TEST.VXP. Export file will be Deleted.
The export process failed due to some error.
Try Re-generating the export file. If the problem still persists contact ValSpeQ Support.
Invalid File Name. If specified file name is invalid. Specify a valid file name. Failed to create file C:\TEST.VXP.
The export operation is failed to create the file.
Specify another file name or Check for available disk space.

User Manual – ValSpeQ 3.80
234
Import An error occurred in the application.
The import process is unsuccessful.
Try importing file once again or get the selected export file again from the other ValSpeQ user.
Invalid file selected. Select a file having ".vxp" or ".vxt" extension.
The selected file’s extension is other than .vxp or .vxt.
Select the file with valid extension i.e. .vxp or .vxt.
Invalid Project header information. Parity Check failed.
The data in the header section of the export file is corrupted or not as per the expected format.
Generate the export file again.
Select File to Import. User has clicked on the Import button without selecting the import file.
Select an export file that is to be imported & then click on the Import button.
Select Item(s) to Import. If item is not selected for import.
Select at least one Item & then click on the Import button
Select Template(s) to Import. If template is not selected for import.
Select at least one template and then click on the Import button
Type information missing in header section.
The data in the header section of the export file is corrupted or not as per the expected format.
Generate the export file again.
Invalid Quote header information. Parity check failed.
If import files HEADER section contain invalid information.
Generate the export file again.
Unknown section UNKNOWN found in Import File C:\TEST.VXP. Import process will be aborted...
The import file contains an unidentified section.
Check recover.ini file for more information and correct the file if possible & try importing it again.
The associated Price List ‘PRICELIST' does not exist. Do you still want to continue?
When the price list is used while configuring the Item from the import file does not exists on the workstation that is importing the data.
User can abort the import process or proceed with import process.
Import Completed. Error(s) occurred while importing following factory note(s) for some of the Items.
This message is displayed when length of new name generated for importing factory note is greater than 50.
There is no problem in import process except displayed factory notes can not be imported.
Filter Filter name cannot be blank If filter name is not specified &
user click on the save button of filter.
while saving the filter, Specify the filter name.
Filter for combo box cannot be blank
If filter for combo box is blank. Select Control Valve or Level from Filter for combo while saving filter.
Save In combo box cannot be blank
If Save In combo box is blank while saving filter Select Project or Library from Save In combo.
Are you sure you want to delete When user has selected Click on “Yes” to delete

User Manual – ValSpeQ 3.80
235
selected filter condition(s)? condition(s) and clicked on red cross button, message is displayed to avoid accidental deletion of filter condition(s).
selected filter condition(s) and “No” to avoid accidental deletion.
No filter condition selected. When user clicks on red cross button without selecting any condition.
Select filter condition.
Are you sure you want to delete following filter(s) from library? Filter1,Filter2
when user has selected filter(s) from library and trying to delete them, message is displayed to avoid accidental deletion of filter(s).
Click on “Yes” to delete selected filter(s) from library and “No” to avoid accidental deletion.
Are you sure you want to delete following filter(s) from project? Filter1,Filter2
when user has selected filter(s) from project and trying to delete them, message is displayed to avoid accidental deletion of filter(s).
Click on “Yes” to delete selected filter(s) from project and “No” to avoid accidental deletion.
Filter1 already exists in Project. Would you like to replace it?
when the user has selected filter from library and copying it to project and project consists of filter with the same name, message is displayed to avoid accidental replacement of filter(s) in project,
Click on “Yes” if want to replace the existing filter from project with the selected filter in library. Otherwise click on “No”.
Filter1 already exists in Library. Would you like to replace it?
When the user has selected filter in project and trying to copy in library and library consists of filter with the same name a message is displayed to avoid accidental replacement of filter(s) in library.
Click on “Yes” if want to replace the existing filter in library with the selected filter in project. Otherwise click on “No”.
Invalid Filter Condition. Check the input
When user has entered invalid filter condition and trying to save it or trying to move to next “AND” tab.
Check the input and make the condition(s) valid.
Do you want to save filter Filter1?
When user has edited current filter and without saving it tries to close the filter screen.
Click on “Yes” to save the filter. Otherwise click “No”
Create Factory Notes Entry required in Note Reference field.
Note Reference text box contains blank data while saving.
Enter reference into the Note Reference text box.
Entry required in Note Title field.
Note Title text box contains blank data while saving.
Enter Title into the Title text box.
Entry required in Note Text field.
Note Text text box contains blank data while saving.
Enter description into the Note Text text box.
A numeric entry is required for price.
Net Price text box contains blank or non-numeric data while saving.
Enter numeric value into the Net Price text box.
Select Category. No Category is selected from the Category combo box while saving note.
Select category from the Category combo box.
Factory Note Reference Exists in Project.
Try to save note with the reference, which is already exist in Project.
Enter another reference, which is not exist in Project.

User Manual – ValSpeQ 3.80
236
FN Group Atleast one item should exist in Notes Assigned to Group Listview.
When no factory note/s exist in Assigned to group list while saving group.
Move one or more Factory notes form Available Factory notes in library list to Notes Assigned to group.
FNGroup Name cannot be blank.
While saving group FN Group Name Text box contain blank data.
Enter Group name into the FN Group text box.
Add FN Group First. If no Group is exist and we try to move factory note from Available Factory notes in library list to Notes Assigned to group.
Click on Add button first & then transfer factory note from library to group.
FN Group Name already exist. Try to save FN Group with the existing FN Group name.
Enter different Group name into the FN Group text box
Create Collections FN Collection string already exists. Please create another FN Collection.
Try to save the collection, which is already, exist for that group.
Change the notes in the collection.
FN Collection string is already exists.
While editing collection is selected that is already exist in that group.
Change the notes in the collection.
At least one Factory Note should be checked. Please select Factory Notes.
If no factory note is checked and try to save collection.
Select at least on factory note.
Please select FN Group. No FN Group is selected while Click on Add or Edit button.
Select FN Group from the FN Group combo box.
Please select FN Collection. No FN Collection is selected while click on the Edit button.
Select FN Collection from the FN Collection combo box.
Please select atleast one Factory Note.
While saving, No Note from the list is checked.
Select at least one note from the list.
Apply FN Collection Select atleast one Collection. When no collection is selected
from the FN Collection combo box.
Select a collection from the FN Collection combo box.
Find & Replace Factory Note Find and replace factory note reference are same.
When Find Note Reference and Replace Note Reference are equal.
Select different Note References in Find and Replace combo boxes.
User Preference Max Sound Level must be greater than Min Sound Level.
When Min Sound Level is entered greater than Max Sound level Value.
Enter Min Sound Level less than Max Sound Level.
Min Sound Level must be less than Max Sound Level.
When Max Sound Level is entered less than Min Sound Level Value.
Enter Max Sound Level greater than Min Sound Level.
Please Enter Initial/Increment Tag Value.
When Use Tag Mask Check option is checked and if no
Enter Initial and Increment Values in corresponding

User Manual – ValSpeQ 3.80
237
value or zero value are entered in Initial and Increment text boxes.
text boxes for tag.
Please Select Default Price List Fist.
When no Price List is selected in Price List Default combo box when saving changes.
Select Price List from Price List Default Combo box.
Please select a Primary Source Facility.
When no Primary Source Facility is selected in Primary Source Facility combo box.
Select Primary Source facility from Primary Source Facility Combo box.
Project Defaults
Please Enter Initial/Increment Tag Value.
When Use Tag Mask Check option is checked and no values are entered in Initial and Increment text boxes.
Enter Initial and Increment Values in corresponding text boxes for tag.
Freeze Item
Item cannot be freeze. If the process of freeze Item fails due to some error.
Validate the line item and invoke freeze option again.
Freeze All
No Items to Freeze. Cannot Proceed.
Freeze All Option is invoked when no valid unfreeze line item is present in the project.
Invoke Freeze All option when there is at least one valid unfreeze item present in project.
Unfreeze Item Item cannot be unfreeze If the process of Unfreeze Item
fails due to some error. Select Item and invoke unfreeze option again.
Unfreeze All No Items to Unfreeze. Cannot Proceed.
Unfreeze All option is invoked when no valid freeze line item is present in the project.
Invoke Unfreeze All option when there is at least one valid freeze line item present in project.
Mass Change
Failed to take backup. Aborting Mass change process...
If the process of taking backup is failed due to some error.
Try to apply mass change again.
No lines for mass change. Cannot proceed for mass change.
Mass Change option is invoked when there is no unfreeze line item present in current project.
Invoke Mass Change option when there is at least one unfreeze line item present in current project
Records are frozen. Cannot proceed for mass change.
Mass Change option is invoked when only freeze line items are present in the current project
Invoke Mass Change option when there is at least one unfreeze line item present in current project
Please select atleast one accessory for Mass Change.
If Apply Mass Change button is clicked without selecting any accessory from the list.
Select and change at least one accessory for Mass Change.
No changes for Mass update. Please make sure you have changed Accessory information.
If without changing any accessory Mass Change option is invoked.
Change at least one accessory and click Apply Mass change again.
Others

User Manual – ValSpeQ 3.80
238
Application already running! The application is already open.
Check whether the 2nd instance of the application is running.
Cannot open Database. Check Database files.
1. The Application tries to copy the ValspeQNx.vnt file with a new name.
2. While trying to open the file from recently used locations and the file does not exist
Reinstall the software