vintage computer design and repair with 3d printing
TRANSCRIPT

VINTAGE COMPUTER DESIGN AND REPAIR WITH 3D PRINTING
J. ALEXANDER JACOCKS

INTRODUCTION

A BRIEF HISTORY OF 3D PRINTING
• 1981: Hideo Kodama, from Nagoya Municipal Industrial Research Institute, describes
a rapid protoyping system, which uses photopolymer
• 1984: Charles Hull (founder of 3D Systems) invents stereolithography, and with it, the
STL file format
• 1988: S. Scott Crump (founder of Stratasys) invents fused deposition modeling (FDM)
• 1992: 3D Systems creates the first practical stereolithography (SLA) machine and Dr.
Carl Deckard and Dr. Joe Beaman launch DTM, which makes selective laser sintering
(SLS) practical

3D PRINTING TECHNOLOGIES
STEREOLITHOGRAPHY (SLA)
• Stereolithography is the process in which a photopolymer is activated by a
focused laser beam, to form, layer by layer, a solid object from a fluid base
• SLA printing produces very detailed parts fairly quickly, but the cost is fairly
high, since the raw liquid plastic is manufacturer-specific, and a significant
amount is wasted during the printing process
• SLA is most often used to create models with fine details that do not require
significant physical durability, in the finished product

SELECTIVE LASER SINTERING (SLS)
• In selective laser sintering (SLS), a laser is focused on powdered material, causing it
to fuse together
• SLS requires a fairly high-powered laser, causing the cost for printers to be high
• In addition, there is significant waste, as most of the unfused powder must be
disposed of
• In comparison to other 3D printing technologies, SLS-created models can be made
from a much wider selection of materials (metals, glass, ceramics), and finished
products are very durable, and are suitable for use in demanding environments

FUSED DEPOSITION MODELING (FDM)
• FDM is almost always the technology being described, by those outside of the
hobby, when they say “3d printing”
• In FDM printing, a solid plastic filament (PLA, PET, ABS, to name a few) is
heated to melting temperature, and extruded by pressure on the filament,
above the heating element
• The filament is unwound from a spool, and either pulled or pushed into the
printer

HARDWARE

TOOLS
• A good pair of calipers is an absolute must. I suggest these, for ~$40 USD
• Get yourself a ruler that has both inches (1/32”) and millimeters
• Blue painter’s tape. Get some that is at least a 2 inches wide
• PVA glue stick. Elmer’s is fine
• Tweezers
• Putty knife. Get one with as thin an edge as possible
• Patience. You will mis-measure, create unprintable objects, have printer problems,
and break parts. At least, I do!

PRINTER SUGGESTIONS
• This is definitely not an exhaustive list!
• Prusa i3 MK2/2S/3. The MK2S is available here, for $599 USD, in kit form. 250x210x200mm.
• Creality CR-10. Slightly larger 300x300x400mm build area, and very popular. Available widely,
GearBest often has the best prices, currently ~$400 USD.
• Cetus 3D Printer, MKII. Linear rail-based 3D printer which produces very high quality small objects. The
manufacturer’s website lists it for ~$359 USD. 180x180x180mm.
• Monoprice MP Select Mini V2. Another linear raid printer, good for beginners. 120x120x120mm.
Available here for ~$200 USD.
• Note that I am only suggesting cartesian printers. They are the easiest for new users to get
good results from

CAD PROGRAMS

OPENSCAD
• OpenSCAD is often referred to as “the programmer’s CAD package”
• Objects are defined by their position and size, in text
• OpenSCAD is very powerful, in that techniques most often used for
programming can be applied to modeling:
• Variables
• Functions
• Loops


FUSION 360
• Fusion 360 is a closed-source 3D CAD/CAM package, by Autodesk
• Most modeling in Fusion is done by creating a two-dimensional sketch, and
then extruding it into the third dimension
• Fusion is a very powerful package, even in its free version. It includes both
advanced modeling and slicing (CAM) capabilities, and can generate output
suitable for a milling machine or laser cutter, in addition to 3D printers


OTHERS
• FreeCAD. https://www.freecadweb.org/
• Open source, powerful, has Linux, Mac OS X, and Windows versions
• SketchUp. https://www.sketchup.com/
• Popular closed-source package, created by Google, runs on Mac OS X and Windows
• TinkerCAD. https://www.tinkercad.com/
• Another Autodesk product, simple to use, but limited to 200x200x200mm objects. Web-
based

SLICER (CAM) PROGRAMS

SLICING SOFTWARE OVERVIEW
• Slic3r
• Popular and fairly easy to use. Open-source, backed by Prusa Research
• Cura
• Another Open Source alternative, backed by Ultimaker
• Simplify 3D
• Closed source, but very powerful, especially useful for custom supports. Learning curve, ~$150 USD
• Repetier
• Open source, but not as popular as it was in years past. Moderately easy to use
• Octoprint
• Printing front end specifically designed to provide a web front-end for printers lacking one. Open source

SLIC3R PRUSA EDITION
• This is Slic3r Prusa Edition, v1.40.1
• You can see the ISA riser for my
micro 386 case, on the virtual
build plate, showing a preview of
how it will be printed

CURA
• This is Cura 3.4.1
• I have placed the back half of my
Nishida Radio Iic VGA adapter
case on the virtual build plate

SIMPLIFY 3D
• This is Simplify 3D, v4
• You can see several model car
parts, placed on the virtual build
plate, and a highlighted parts of
the user interface

DESIGN SUGGESTIONS

DESIGNING FOR SUCCESSFUL PRINTING (FDM)
• Avoid warping!
• Warping is caused by the failure of the printed object to adhere to the bed
• All FDM-printed objects need at least one large flat surface, to successfully adhere
• If your object does not natively have such a surface, you can create a raft, in your slicer
• Rafts do affect the surface finish of the object, but if you need one to get your object to stick, don't
hesitate
• Make sure that your heated bed (if you have one) is set to the right temperature for your
filament!
• PVA glue and blue tape can also make the object stick better to your bed
• Warping is particularly a problem with ABS, and to a lesser extent PET, printing

DESIGNING FOR SUCCESSFUL PRINTING (FDM)
• Avoid unnecessary overhangs!
• Overhangs are portions of a 3D model that have no plastic below them, and don't sit
directly on the build plate
• Overhangs with angles of up to ~45° are usually fine
• Arches can help your overhangs to droop less
• Most slicers have automatic bridging (overhang between two supporting members)
detection, and will automatically slow down to help avoid droop
• Consider rotating your object, to turn overhangs into easier to print vertical objects
• Use supports, if large overhangs are unavoidable
DESIGNING FOR SUCCESSFUL PRINTING (FDM)
• Understand and properly set up your printer!
• Every different printer has different strengths and weaknesses
• When in doubt, print slower, at a larger layer height
• Layer heights of < 0.2mm are usually only needed for fine details
• You can mitigate weaknesses through good model design, and by using materials
like PVA glue, blue tape, or a variety of build plate surfaces
• Buildtak
• PEI

DESIGNING FOR SUCCESSFUL PRINTING (FDM)
• When in doubt, steal!
• Of course, I mean to re-use work, rather than to roll your own
• Thingiverse is a wonderful source of pre-created objects that you can modify
and re-use
• Many creators post OpenSCAD or Fusion 360 models of the objects that they
share
• STLs can be edited in TinkerCAD
• Netfabb online is great for repairing broken mesh

EXAMPLE PROJECTS

VCF MIDWEST 6502 BADGE
• This project illustrates the workflow of
OpenSCAD fairly well
• Well-designed OpenSCAD projects
make great use of variables and
functions, though neither is required
• Initially, all of the functions were code
in the main section, but were separated
out to simplify the design
VCF MIDWEST 6502 BADGE
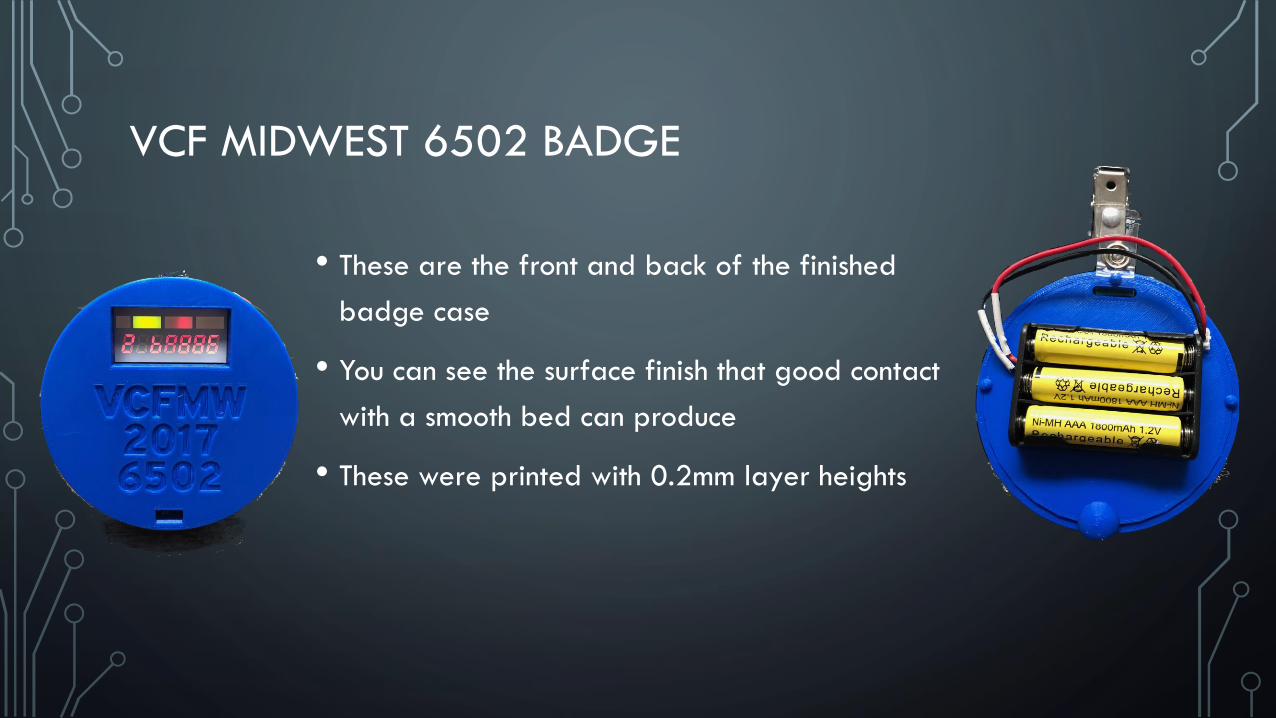
• These are the front and back of the finished
badge case
• You can see the surface finish that good contact
with a smooth bed can produce
• These were printed with 0.2mm layer heights

IIC VGA ADAPTER (NISHIDA RADIO) CASE
• I created this project to learn Fusion
360 better
• It was completed over two days
• There is nothing at all complex being
done, but it does illustrate how much
easier it is to apply operations like
chamfers or round-overs to an object in
Fusion, as compared to OpenSCAD

IIC VGA ADAPTER (NISHIDA RADIO) CASE
• I created this project to learn Fusion 360 better
• It was completed over two days
• There is nothing at all complex being done, but it
does illustrate how much easier it is to apply
operations like chamfers or round-overs to an object
in Fusion, as compared to OpenSCAD

MICRO 386 CASE
• This project was created in TinkerCAD
• I split it up into multiple files in order to make it easier
to print
• There were many iterations required to produce the
final object
• I find TinkerCAD to be fairly easy to use, because it
reminds me of a number of vector drawing programs,
like MacDraw, with the addition of 3D objects

MICRO 386 CASE
•
• The final product fits quite well
• Unfortunately, the Amazon-special power brick failed
to regulate the voltage properly, and killed the
motherboard, during initial testing
• I plan to finish the project, some time later this year

CONCLUSION

BIBLIOGRAPHY
• “3D printing.” Wikipedia, 11 July 2018, en.wikipedia.org/wiki/3D_printing.
• Goldberg, Dana. “History of 3D Printing: It’s Older Than You Are (That Is, If
You’re Under 30).” Redshift by Autodesk, 13 April 2018,
www.autodesk.com/redshift/history-of-3d-printing/.
• “What’s New | Simplify3D Software.” Simplify 3D, 2018,
www.simplify3d.com/software/release-notes/version-4-0-0/