cataloging: edit bibliographic records - oclc · editing tools: constant data, text strings,...
TRANSCRIPT
OCLC Connexion Client Guides
Cataloging:
Edit Bibliographic Records Last updated: July 2016
OCLC Online Computer Library Center, Inc.
6565 Kilgour Place Dublin, OH 43017-3395
Revision History
Date Section title Description of changes
January 2008 1 Edit bibliographic records
Added enhancement to “lock linked authority record function: If you lock an authority record in a field that contains more than one controlled heading, the client opens the Lock Linked Authority Record window to let you choose the heading you want to open and edit (formerly, the client opened the first heading in a multi-controlled heading field)
5 Check spelling Removed reference to importing spellchecker customizations from long defunct OCLC Passport and CatME software
September 2011 1 Edit bibliographic records
Added RDA Toolkit field descriptions to the list of available editing tools.
Added RDA Toolkit command to the list of right-click menu commands.
March 2012 1 Edit bibliographic records
Added Edit > Classify to the list of editing tools
7 Get a classification number for a record
New section about how to use the new feature Edit > Classify
April 2013 All Removed references to Heritage Printed Book
August 2013 1 Edit bibliographic records
Added text that states that the application supports Armenian, Ethiopic, and Syriac scripts.
July 2016 1 Edit bibliographic records
Removed references to institution records
3 Validate records online or offline
© 2016 OCLC
The following OCLC product, service and business names are trademarks or service marks of OCLC, Inc.: Connexion, OCLC,
WorldCat, and "The world's libraries. Connected."
In addition, the WorldCat symbol and OCLC symbol are service marks of OCLC. Third-party product and service names are
trademarks or service marks of their respective owners.
OCLC grants permission to photocopy this publication as needed.
Contents 1. Edit bibliographic records ............................................................................................................................. 5
Non-Latin scripts .......................................................................................................................................... 5
Edit record in MARC template view .............................................................................................................. 5
Editing tools: constant data, text strings, authority control, MARC field Help, RDA Toolkit, spell checker,
ALA character entry, and more..................................................................................................................... 6
Cut Copy Paste text editing commands ........................................................................................................ 7
Right-click shortcut menus ......................................................................................................................... 10
Move to next record ................................................................................................................................... 11
Change the position of the fixed field or display as variable fields .............................................................. 12
Change the fixed field to another MARC format ......................................................................................... 12
Use fixed field drop-down lists .................................................................................................................... 12
Copy control number .................................................................................................................................. 13
Find and replace text .................................................................................................................................. 13
View institution name for OCLC symbol in 040 ........................................................................................... 14
Open and view multiple record and list windows: When to pin ................................................................... 14
Prompts to save edited records .................................................................................................................. 16
Entering LCCNs in records (field 010) ........................................................................................................ 17
Build fields that cite related records (760 – 787, 800, 810, 811, 830) ......................................................... 19
Notes on ISBN and OCLC number expansion ............................................................................................ 20
OCLC Terminologies Service ..................................................................................................................... 21
2. Reformat records ....................................................................................................................................... 22
About reformatting records ......................................................................................................................... 22
Reformat a record by command ................................................................................................................. 22
Errors corrected automatically .................................................................................................................... 22
3. Validate records online or offline ................................................................................................................ 24
About validation ......................................................................................................................................... 24
Validate record(s) manually by command .................................................................................................. 25
Automatic validation on final actions .......................................................................................................... 26
Set validation level for record actions ......................................................................................................... 28
Errors detected during online or offline validation ....................................................................................... 28
Automatic correction of minor data errors (bibliographic records only) ....................................................... 29
Expanded editing capabilities: no validation errors ..................................................................................... 29
4. Create or edit 006, 541, or 583 fields using guided entry ........................................................................... 31
What is guided entry? ................................................................................................................................ 31
How to use guided entry – general procedures .......................................................................................... 31
Why use the 006 field? ............................................................................................................................... 32
Create an 006 field ..................................................................................................................................... 32

Edit an 006 field ......................................................................................................................................... 33
Why use a 541 or 583 field? ....................................................................................................................... 33
Create a 541 or 583 field ............................................................................................................................ 34
Edit a 541 or 583 field ................................................................................................................................ 35
Customize the list of subfields for 541 and 583 guided entry ...................................................................... 36
5. Check spelling in records ........................................................................................................................... 37
Check spelling ............................................................................................................................................ 37
Notes on spell checking ............................................................................................................................. 37
6. Maintain URLs in bibliographic records ...................................................................................................... 39
When you can correct or add a URL .......................................................................................................... 39
Correct or add a URL: basic steps ............................................................................................................. 39
Record fields that may contain URLs ......................................................................................................... 39
7. Get a classification number for a bibliographic number .............................................................................. 40
Get a Dewey or Library of Congress classification number ........................................................................ 40
Set a classification scheme and variable field for using the prototype OCLC Classify Web service ............ 40
Get a class number .................................................................................................................................... 41
How the Classify Web service matches records ......................................................................................... 41
8. Default keystroke shortcuts for navigating and editing records................................................................... 43
9. Insert diacritics and special characters ...................................................................................................... 47
Character set and font ................................................................................................................................ 47
Insert diacritics and characters in records using the client graphical chart or list of names ......................... 47
Alternative: Insert diacritics and characters in records using keystroke shortcuts ....................................... 48
Insert diacritics and characters in searches, labels, or find/replace text ...................................................... 48
RLIN21 Latin keyboard alternative – bibliographic records only ................................................................. 49
10. Default keystroke shortcuts for diacritics and special characters .............................................................. 50
About diacritics and special characters ...................................................................................................... 50
Keystroke shortcuts .................................................................................................................................... 50
Keystroke shortcuts for RLIN21 Latin keyboard – bibliographic records only.............................................. 53
Cataloging: Edit Bibliographic Records
20160706
5
1. Edit bibliographic records
Non-Latin scripts
The Connexion client supports using these non-Latin scripts for cataloging: Arabic, Armenian, Bengali,
Chinese, Cyrillic, Devanagari, Ethiopic, Greek, Hebrew, Japanese, Korean, Syriac, Tamil, and Thai.
See the Connexion client International Cataloging document on the Web or in client Help for more
information.
Edit record in MARC template view
The Connexion client displays records in one view only: MARC template. The following list describes how to
use the template view for editing.
The template displays data in cells that enclose field number, each indicator, and field data separately.
When you enter data in a field, the cursor automatically moves from the tag cell to the first indicator cell,
to the second indicator cell, and then to the field data cell as you enter data in each. You do not enter
spaces between each cell, and you do not need to <Tab> from cell to cell unless you want to skip to the
next cell without entering data.
When you click to place the cursor in a cell that has a set number of characters (tag, indicator, or fixed
field element), the client automatically highlights the entire contents of the cell if it contains data, since
you cannot enter additional characters without deleting existing characters.
If you want to change only one character of several in one of these cells (for example, you want to
change one number in the tag), click to highlight the contents of the tag cell, then click again to place
the cursor before or after the particular number you want to replace, and then edit.
When you click to place the cursor in a variable field cell, the client does not highlight data. You can
double-click a word to highlight it or triple-click to highlight all data in the field, just as you do in a word-
processing program.
Caution: Highlighting with the mouse from right to left to delete a field may shift data in next
field.
If you highlight an entire field in a record using the mouse moving right to left and then delete the text,
data in the next field may shift to incorrect cells. Use the shortcut keystroke <Alt><Delete> to delete
the entire field without highlighting, or highlight the field from left to right.
Otherwise, you edit the data as though it is continuous text. For example, if you copy an entire
field and paste it into a blank field, the client formats the data correctly, putting the tag number,
indicator values, and field data in the appropriate cells. You do not have to copy and paste the data
one cell at a time.
Edit using the mouse; that is, by clicking commands on menus or by clicking buttons on the toolbar. Or
you can edit using keystrokes.
For information about the kinds of changes you can make to records depending on your cataloging
authorization, see OCLC Bibliographic Formats and Standards, chapter 5, Quality Assurance. See also the
OCLC Cataloging Authorization Levels for Record Actions and Upgrades reference card.
Cataloging: Edit Bibliographic Records
20160706
6
For more details about working with records–for example, about how records display when you edit them or
how to change the way records display–see Basics, Use Client Interface, “Records.”
Tip: To compare the original record to your edited copy:
Save your edited record to the local save file and then search for the original record again.
Or
Open another copy of the client and search for the original record in the second client window.
Editing tools: constant data, text strings, authority control, MARC field Help,
RDA Toolkit, spell checker, ALA character entry, and more
The Connexion client provides the following tools for editing:
Constant data
Create (Cataloging > Create > Constant Data) and apply constant data records (Edit > Constant
Data > Online > [Apply Default or Apply from List]) to avoid rekeying data you use frequently in
records.
See “Apply constant data” in Cataloging/Use Constant Data for more information.
Text strings
Create and enter text strings for data you use frequently (shorter form of constant data) (Tools > Text
Strings or use the text strings quick tool on the toolbar:).
See Basics, Set Options and Customize, “Create custom text strings” for more information.
Authority control
Use automated authority control (Edit > Control Heading > [All, Single, or Uncontrol]) to keep
headings in records consistent with Library of Congress headings.
See Authorities, Use Authority Control, “Control headings in bibliographic records” for more
information.
MARC field Help
Look up a specific MARC field description for any field you are working on, via a command that links
to Web-based MARC documentation(Help > MARC Field Help or or <Shift><F1>).
See “Use Help” in Basics/Set Options and Customize for more information.
RDA Toolkit field descriptions
Set up and open RDA Toolkit field descriptions for variable fields (RDA = Resource Description and
Access).
Note: You must be a subscriber. See the RDA Toolkit Web site for more details.
Spell checker
See “Check spelling in records” and Basics/Set Options and Customize, “Customize the spell
checker.”
Cataloging: Edit Bibliographic Records
20160706
7
ALA diacritic and special character entry
See “Insert diacritics and special characters” and “Default keystroke shortcuts for diacritics and special
characters.”
Example: To enter a subfield delimiter, press <Ctrl><D>.
See instructions for these additional editing tools below:
o Copy OCLC control number (without having to select it first)
o Find/replace text
See instructions for these editing tools in separate topics in this booklet:
o Reformat records
o Validate records
o Create or edit fields 006, 541, and 583 using guided entry
o Get a classification number (uses the prototype OCLC Classify Web service
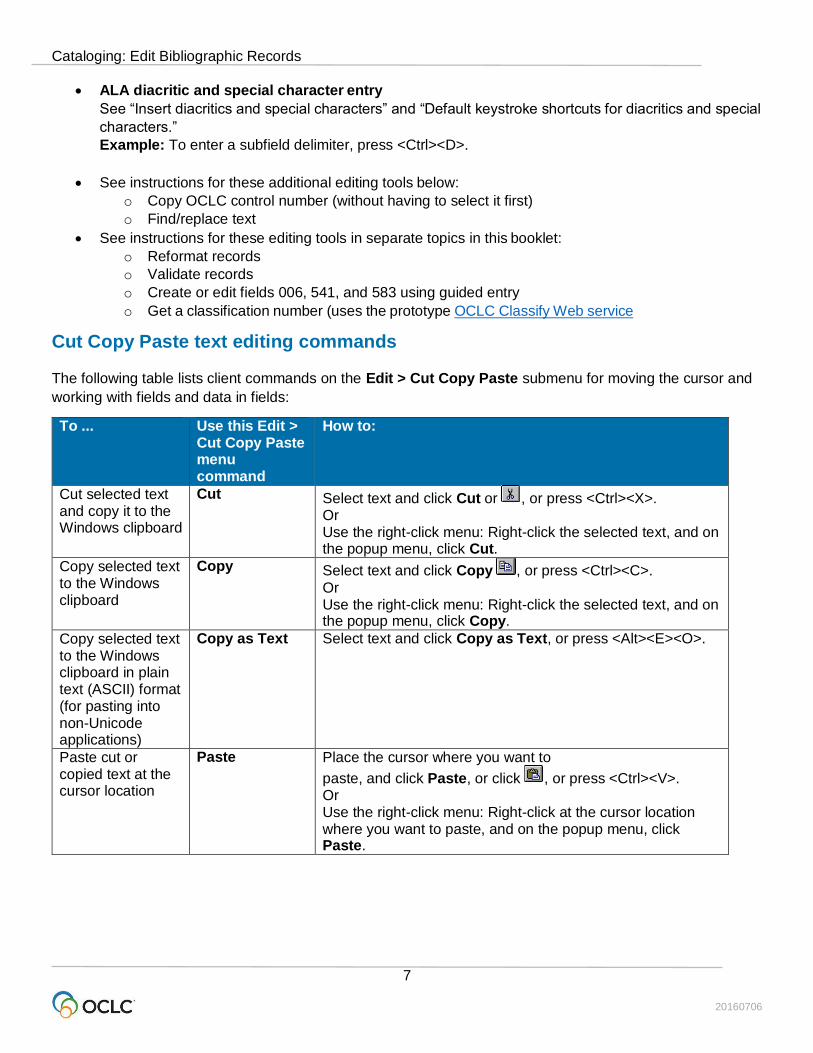
Cut Copy Paste text editing commands
The following table lists client commands on the Edit > Cut Copy Paste submenu for moving the cursor and
working with fields and data in fields:
To ... Use this Edit > Cut Copy Paste menu command
How to:
Cut selected text and copy it to the Windows clipboard
Cut Select text and click Cut or , or press <Ctrl><X>. Or Use the right-click menu: Right-click the selected text, and on the popup menu, click Cut.
Copy selected text to the Windows clipboard
Copy Select text and click Copy , or press <Ctrl><C>.
Or Use the right-click menu: Right-click the selected text, and on the popup menu, click Copy.
Copy selected text to the Windows clipboard in plain text (ASCII) format (for pasting into non-Unicode applications)
Copy as Text Select text and click Copy as Text, or press <Alt><E><O>.
Paste cut or copied text at the cursor location
Paste Place the cursor where you want to
paste, and click Paste, or click , or press <Ctrl><V>. Or Use the right-click menu: Right-click at the cursor location where you want to paste, and on the popup menu, click Paste.
Cataloging: Edit Bibliographic Records
20160706
8
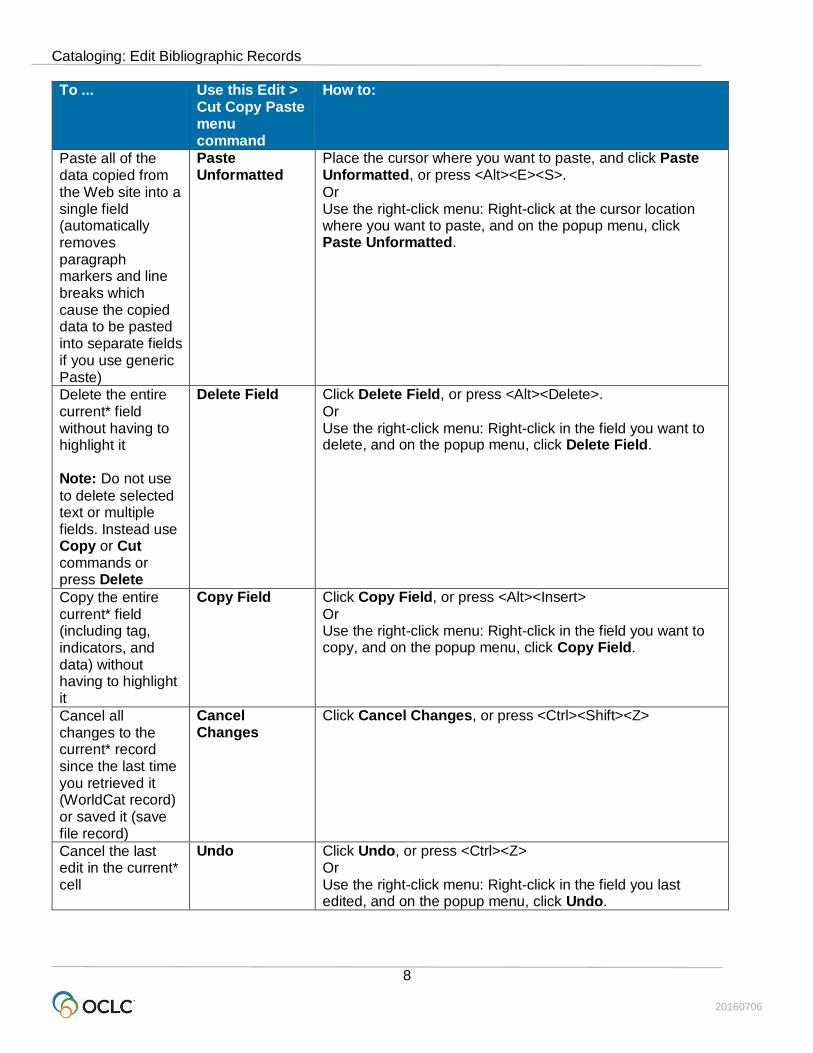
To ... Use this Edit > Cut Copy Paste menu command
How to:
Paste all of the data copied from the Web site into a single field (automatically removes paragraph markers and line breaks which cause the copied data to be pasted into separate fields if you use generic Paste)
Paste Unformatted
Place the cursor where you want to paste, and click Paste Unformatted, or press <Alt><E><S>.
Or Use the right-click menu: Right-click at the cursor location where you want to paste, and on the popup menu, click Paste Unformatted.
Delete the entire current* field without having to highlight it Note: Do not use
to delete selected text or multiple fields. Instead use Copy or Cut commands or press Delete
Delete Field Click Delete Field, or press <Alt><Delete>.
Or Use the right-click menu: Right-click in the field you want to delete, and on the popup menu, click Delete Field.
Copy the entire current* field (including tag, indicators, and data) without having to highlight it
Copy Field Click Copy Field, or press <Alt><Insert>
Or Use the right-click menu: Right-click in the field you want to copy, and on the popup menu, click Copy Field.
Cancel all changes to the current* record since the last time you retrieved it (WorldCat record) or saved it (save file record)
Cancel Changes
Click Cancel Changes, or press <Ctrl><Shift><Z>
Cancel the last edit in the current* cell
Undo
Click Undo, or press <Ctrl><Z> Or Use the right-click menu: Right-click in the field you last edited, and on the popup menu, click Undo.

Cataloging: Edit Bibliographic Records
20160706
9
To ... Use this Edit > Cut Copy Paste menu command
How to:
Insert a blank field above the current* field
Insert Blank Field > Above Current Field
Click Insert Blank Field > Above Current Field, or press
<Shift><Enter>
Insert a blank field below the current* field
Insert Blank Field > Below Current Field
Click Insert Blank Field > Below Current Field, or press <Enter>
Move the current* field up one position
Move Field > Up
Click Move Field > Up, or press <Alt><Up arrow>
Move the current* field down one position
Move Field > Down
Click Move Field > Down, or press <Alt><Down arrow>
Move the cursor to the previous record area
Previous Record Area
Click Previous Record Area, or press <Shift><F6>
Move the cursor to the next record area
Next Record Area
Click Next Record Area, or press <F6>.
Note: The terms "current field" or "current cell" refer to the field or cell where the cursor is located. The term "current record" refers to the active or topmost record.
For a complete list of editing keystroke shortcuts, including the above Edit menu commands, see “Default
keystroke shortcuts for editing records.”
Editing markers:
The client shows which field is current with a current field indicator box.
The client marks each variable field you edit with a symbol or adds the symbol to the fixed field if
you edit one or more elements (only if the fixed field is displayed on top or bottom in View > OCLC
Fixed Field > Top or Bottom).
The client marks with a symbol:
o Autotransliterated Arabic data fields (an option in Tools > Options > International)
o "Best guess" data generated from an analysis of text when you extract metadata to create
records for electronic files (Cataloging > Create > Extract Metadata). Data extracted exactly
as found in metadata coded tags or properties of a file are not marked as edited.
o If you edit a field marked , the symbol changes to .
The editing symbols remain displayed until you take final actions or perform the Control All Headings
function on the records. Note that editing marks are not retained after you replace a master record.
See Use Client Interface, “Records,” “Record display features” for more details.
Controlled heading fields:
If a record contains a controlled heading, the heading is a link. When you click the field, the associated
authority record opens. If you need to place the cursor in a controlled heading field, for example, to
copy text or add a line, to keep from activating the link, click in the tag cell. (You cannot edit the
Cataloging: Edit Bibliographic Records
20160706
10
controlled heading itself unless you first uncontrol it using Edit > Control Headings > Uncontrol
Single.)
You must be logged on to open an authority record from a controlled heading link. If you click a
controlled heading in a local file record while offline, the client prompts you to log on.
For NACO participants, when you work with bibliographic records online and find mistakes in controlled
headings, you can open and lock the master authority record directly from the name heading field to
edit and replace:
With the cursor in the controlled name heading field (see second bullet point above), click Action >
Lock Linked Authority Record, or press <Alt><A><I>. The linked authority record opens for editing
(see Authorities, Use Authority Control for Bibliographic Records).
If the field contains more than one controlled heading, the client opens the Lock Linked Authority
Record window to let you choose the heading linked to the authority record you want to open and edit.
Note: If you control a heading and the text of the heading remains unchanged, the field is not marked
with the symbol.
Right-click shortcut menus
Right-click in a record to open a popup shortcut menu to do any of the following actions:
Undo
Cut
Copy
Paste
Paste Unformatted
Delete Field
Copy Field
Copy Control Number
Control Single Heading*
Uncontrol Single*
Transliterate > Arabic [or Persian]*
Right-to-left reading order [for Arabic or Hebrew data]*
Insert from Cited Record*
Edit with Guided Entry*
Insert Unicode Control Characters > [submenu of available characters]**
Link fields*
Unlink fields*
MARC Field Help
RDA Toolkit
(To open variable field descriptions in RDA Toolkit, you must be a subscriber, and you must set up in Tools >
Options > RDA Toolkit. See the RDA Toolkit Web site for details. on the RDA Toolkit Web.
*Commands marked with asterisks are available for bibliographic records only.
Cataloging: Edit Bibliographic Records
20160706
11
**The Insert Unicode Control Characters submenu, available only on the right- click menu, contains
characters used to control display of bidirectional (mixed right-to-left and left-to-right) text in Arabic, Persian,
and Hebrew records. See details in Cataloging, International Cataloging, “Use Arabic scripts for cataloging.”
Characters available are:
LRM Left-to-Right Mark
RLM Right-to-Left Mark
ZWJ Zero Width Joiner
ZWNJ Zero Width Non-Joiner
LRE Start of Left-to-Right Embedding
RLE Start of Right-to-Left Embedding
LRO Start of Left-to-Right Override
RLO Start of Right-to-Left Override
PDF Pop Directional Formatting
Except for the Insert Unicode Control Characters submenu commands, commands on the right-click menu
are also on standard client menus. See a complete list of client commands in Use Client Interface, “Menus
(commands, keystroke shortcuts, and toolbar buttons).”
Right-click in a list to open a popup menu to do the following:
Copy [copies the text from the selected entry, with columns separated by tabs and rows starting on
new lines]
Select All
List Settings [opens a list of columns to re-order or show/hide]
Reset List Sizes [to default]
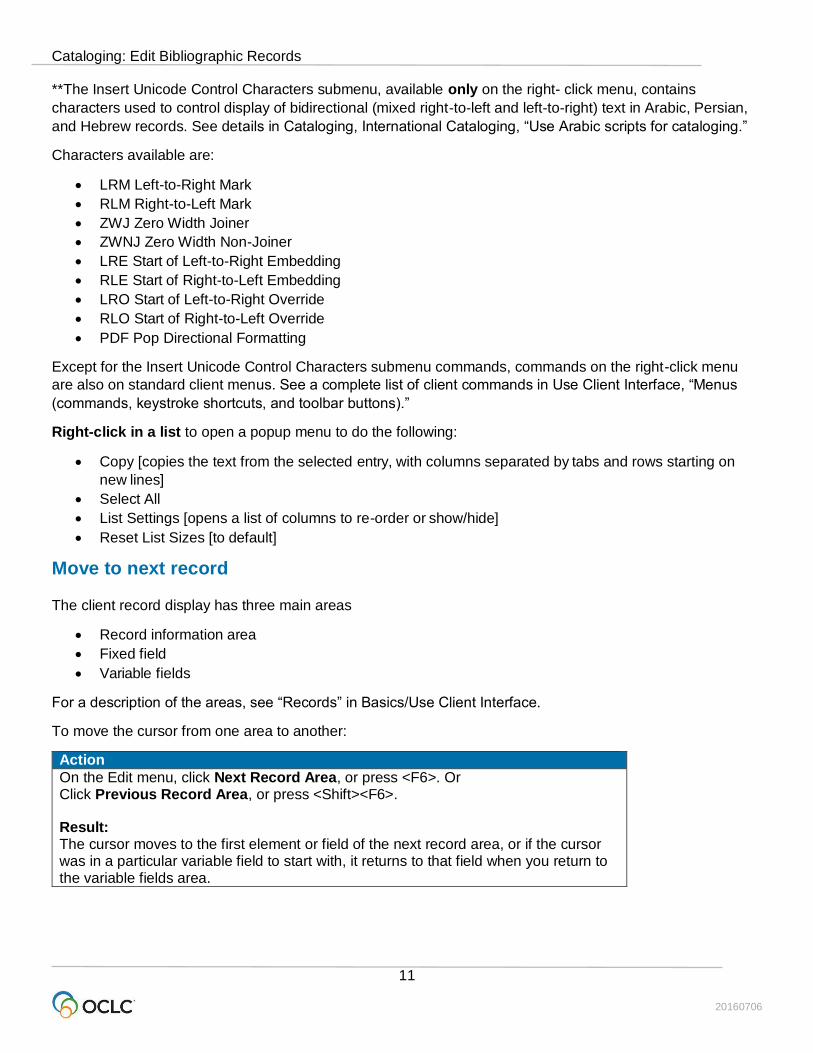
Move to next record
The client record display has three main areas
Record information area
Fixed field
Variable fields
For a description of the areas, see “Records” in Basics/Use Client Interface.
To move the cursor from one area to another:
Action
On the Edit menu, click Next Record Area, or press <F6>. Or Click Previous Record Area, or press <Shift><F6>.
Result: The cursor moves to the first element or field of the next record area, or if the cursor was in a particular variable field to start with, it returns to that field when you return to the variable fields area.
Cataloging: Edit Bibliographic Records
20160706
12
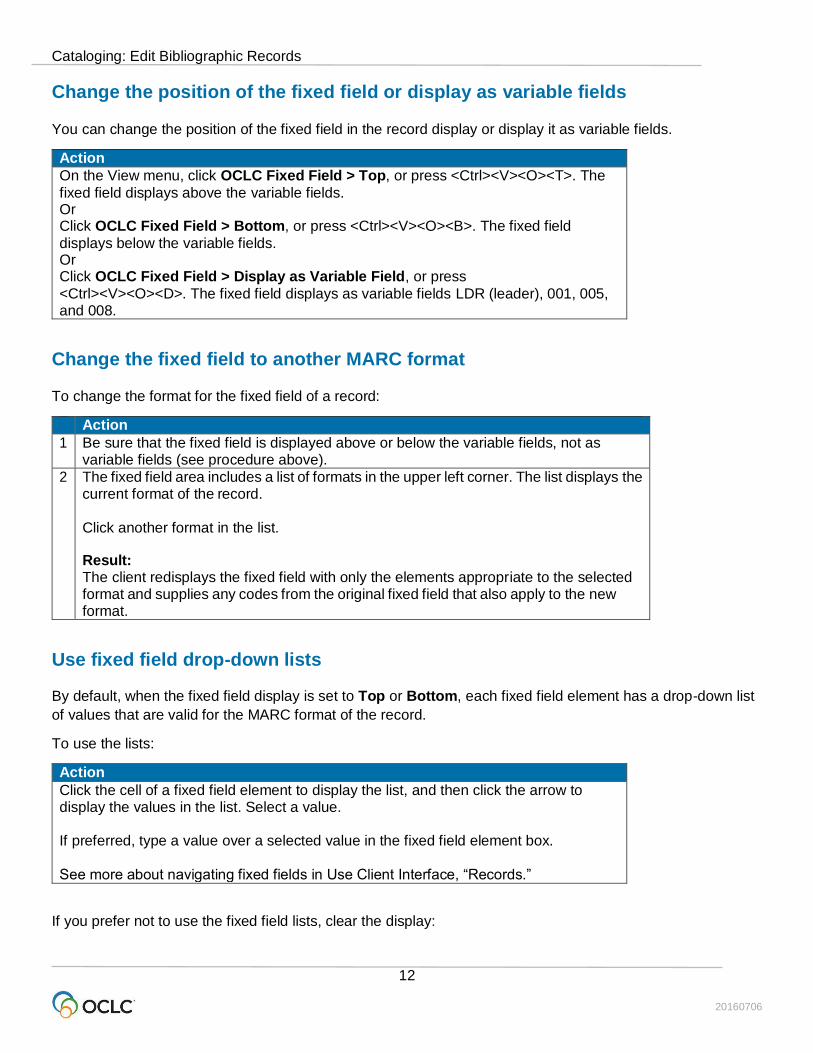
Change the position of the fixed field or display as variable fields
You can change the position of the fixed field in the record display or display it as variable fields.
Action
On the View menu, click OCLC Fixed Field > Top, or press <Ctrl><V><O><T>. The
fixed field displays above the variable fields. Or Click OCLC Fixed Field > Bottom, or press <Ctrl><V><O><B>. The fixed field
displays below the variable fields. Or Click OCLC Fixed Field > Display as Variable Field, or press
<Ctrl><V><O><D>. The fixed field displays as variable fields LDR (leader), 001, 005, and 008.
Change the fixed field to another MARC format
To change the format for the fixed field of a record:
Action
1 Be sure that the fixed field is displayed above or below the variable fields, not as variable fields (see procedure above).
2 The fixed field area includes a list of formats in the upper left corner. The list displays the current format of the record. Click another format in the list.
Result: The client redisplays the fixed field with only the elements appropriate to the selected format and supplies any codes from the original fixed field that also apply to the new format.
Use fixed field drop-down lists
By default, when the fixed field display is set to Top or Bottom, each fixed field element has a drop-down list
of values that are valid for the MARC format of the record.
To use the lists:
Action
Click the cell of a fixed field element to display the list, and then click the arrow to display the values in the list. Select a value. If preferred, type a value over a selected value in the fixed field element box. See more about navigating fixed fields in Use Client Interface, “Records.”
If you prefer not to use the fixed field lists, clear the display:
Cataloging: Edit Bibliographic Records
20160706
13
Action
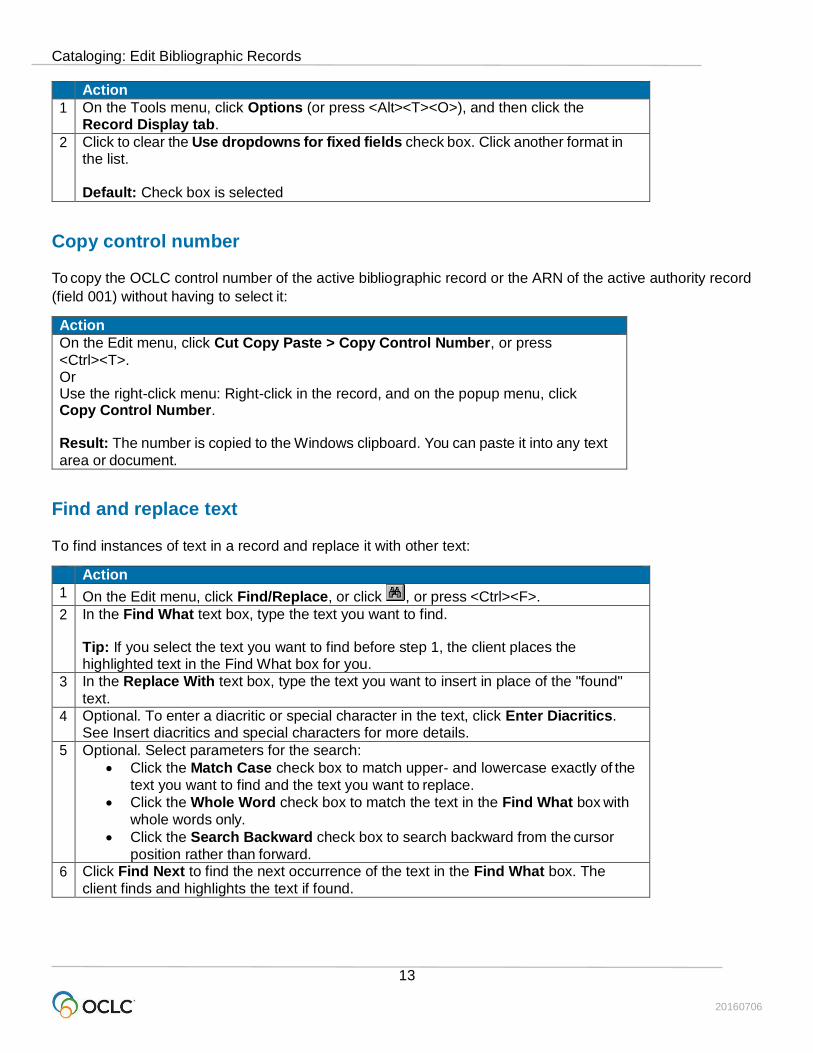
1 On the Tools menu, click Options (or press <Alt><T><O>), and then click the Record Display tab.
2 Click to clear the Use dropdowns for fixed fields check box. Click another format in the list. Default: Check box is selected
Copy control number
To copy the OCLC control number of the active bibliographic record or the ARN of the active authority record
(field 001) without having to select it:
Action
On the Edit menu, click Cut Copy Paste > Copy Control Number, or press
<Ctrl><T>. Or Use the right-click menu: Right-click in the record, and on the popup menu, click Copy Control Number. Result: The number is copied to the Windows clipboard. You can paste it into any text
area or document.
Find and replace text
To find instances of text in a record and replace it with other text:
Action
1 On the Edit menu, click Find/Replace, or click , or press <Ctrl><F>.
2 In the Find What text box, type the text you want to find.
Tip: If you select the text you want to find before step 1, the client places the highlighted text in the Find What box for you.
3 In the Replace With text box, type the text you want to insert in place of the "found"
text.
4 Optional. To enter a diacritic or special character in the text, click Enter Diacritics. See Insert diacritics and special characters for more details.
5 Optional. Select parameters for the search:
Click the Match Case check box to match upper- and lowercase exactly of the
text you want to find and the text you want to replace.
Click the Whole Word check box to match the text in the Find What box with
whole words only.
Click the Search Backward check box to search backward from the cursor
position rather than forward.
6 Click Find Next to find the next occurrence of the text in the Find What box. The
client finds and highlights the text if found.
Cataloging: Edit Bibliographic Records
20160706
14
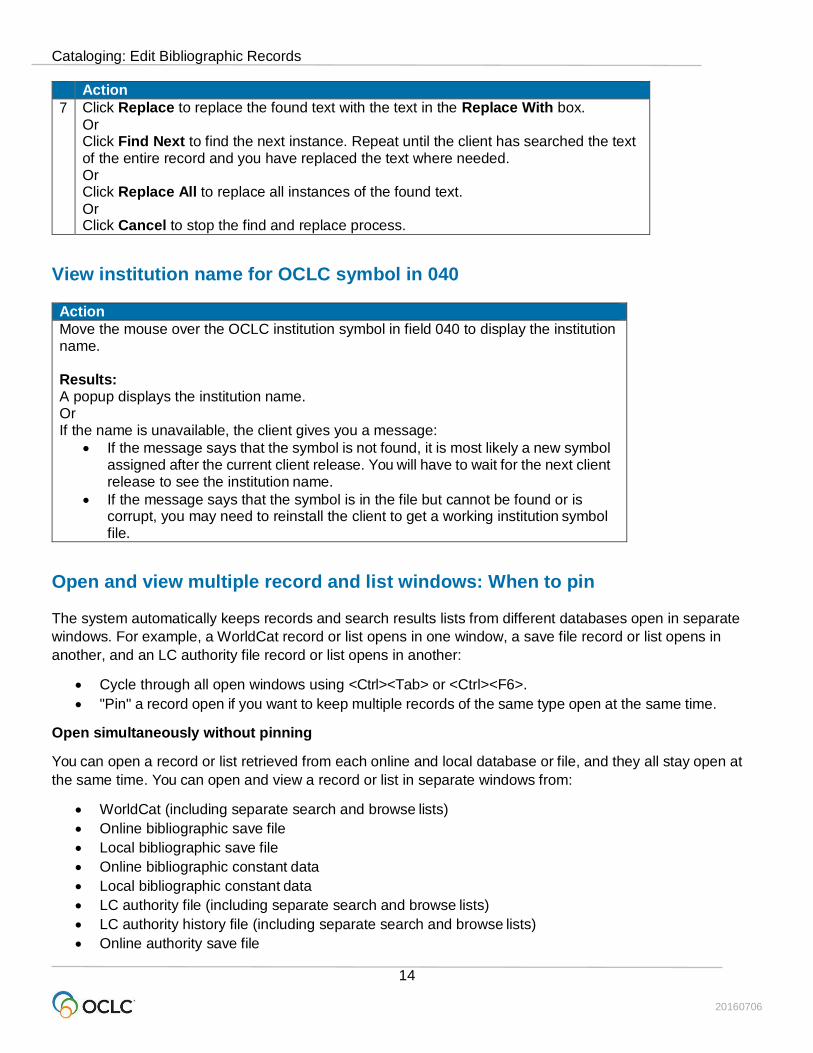
Action
7 Click Replace to replace the found text with the text in the Replace With box.
Or Click Find Next to find the next instance. Repeat until the client has searched the text of the entire record and you have replaced the text where needed. Or Click Replace All to replace all instances of the found text.
Or Click Cancel to stop the find and replace process.
View institution name for OCLC symbol in 040
Action
Move the mouse over the OCLC institution symbol in field 040 to display the institution name. Results: A popup displays the institution name. Or If the name is unavailable, the client gives you a message:
If the message says that the symbol is not found, it is most likely a new symbol assigned after the current client release. You will have to wait for the next client release to see the institution name.
If the message says that the symbol is in the file but cannot be found or is corrupt, you may need to reinstall the client to get a working institution symbol file.
Open and view multiple record and list windows: When to pin
The system automatically keeps records and search results lists from different databases open in separate
windows. For example, a WorldCat record or list opens in one window, a save file record or list opens in
another, and an LC authority file record or list opens in another:
Cycle through all open windows using <Ctrl><Tab> or <Ctrl><F6>.
"Pin" a record open if you want to keep multiple records of the same type open at the same time.
Open simultaneously without pinning
You can open a record or list retrieved from each online and local database or file, and they all stay open at
the same time. You can open and view a record or list in separate windows from:
WorldCat (including separate search and browse lists)
Online bibliographic save file
Local bibliographic save file
Online bibliographic constant data
Local bibliographic constant data
LC authority file (including separate search and browse lists)
LC authority history file (including separate search and browse lists)
Online authority save file

Cataloging: Edit Bibliographic Records
20160706
15
Local authority save file
Online authority constant data
Local authority constant data
In addition, the following workforms can be open simultaneously:
Bibliographic workform
Bibliographic constant data workform
Authority workform
Authority constant data workform
Pin records to open more of the same type
If you open a second record from the same file or database or a second workform of the same type, the first
closes (it is replaced in the open window). If you edited the first record or the record is a workform, the client
prompts you to save the changes before closing it.
To keep more than one record or workform of the same type open, first "pin" the current record or workform
open, and then open the second:
Action
1 Click the record or workform window you want to pin to make it the active window, if necessary.
2 On the View menu click Pinned, or press <Shift><F4>. Notes:
The record's title bar contains the icon and the word [pinned] to indicate that it is pinned.
When a pinned record is the active record, the command Pinned on the View menu is marked with a check mark.
The record remains pinned open until you close it.
You can open another record from the same online database or file or another workform of the same type. The newly opened record's title bar does not
contain the word [pinned]. The title bar contains the icon to indicate that the
record is unpinned.
For more information about the options for viewing records and lists, see also, Basics, Use Client Interface,
“Records” and “Record lists.”
Cataloging: Edit Bibliographic Records
20160706
16
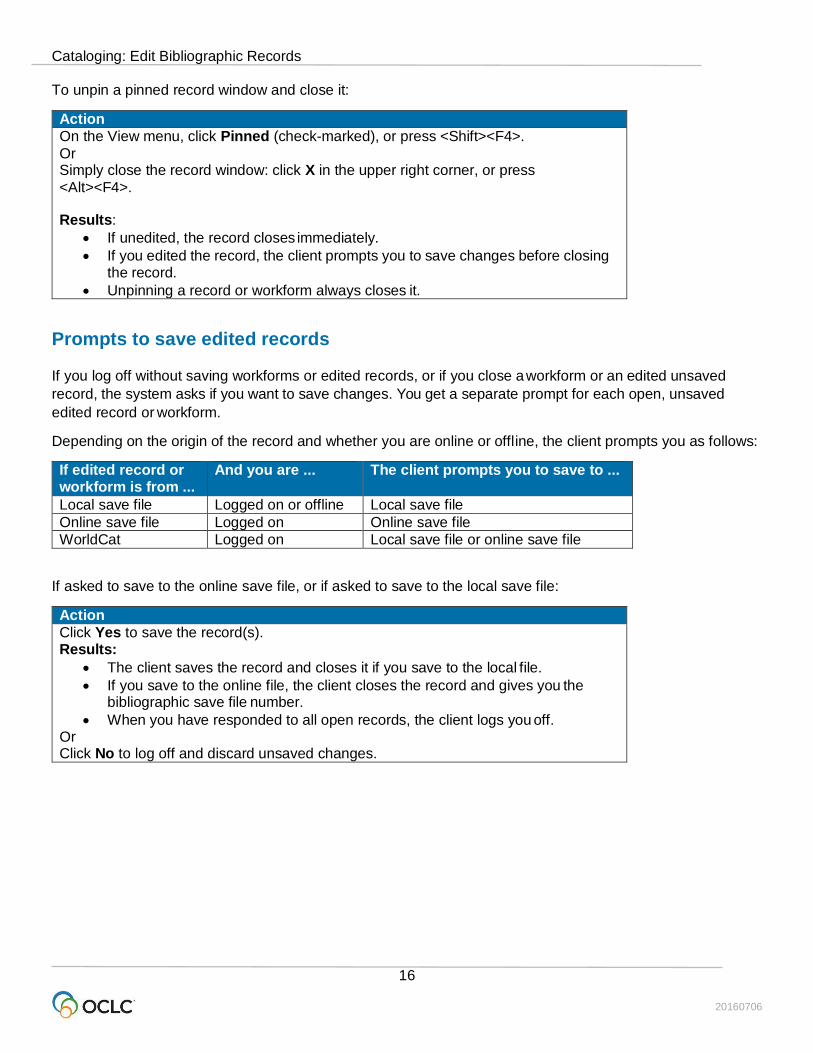
To unpin a pinned record window and close it:
Action
On the View menu, click Pinned (check-marked), or press <Shift><F4>.
Or Simply close the record window: click X in the upper right corner, or press
<Alt><F4>.
Results:
If unedited, the record closes immediately.
If you edited the record, the client prompts you to save changes before closing the record.
Unpinning a record or workform always closes it.
Prompts to save edited records
If you log off without saving workforms or edited records, or if you close a workform or an edited unsaved
record, the system asks if you want to save changes. You get a separate prompt for each open, unsaved
edited record or workform.
Depending on the origin of the record and whether you are online or offline, the client prompts you as follows:
If edited record or workform is from ...
And you are ... The client prompts you to save to ...
Local save file Logged on or offline Local save file
Online save file Logged on Online save file
WorldCat Logged on Local save file or online save file
If asked to save to the online save file, or if asked to save to the local save file:
Action
Click Yes to save the record(s). Results:
The client saves the record and closes it if you save to the local file.
If you save to the online file, the client closes the record and gives you the bibliographic save file number.
When you have responded to all open records, the client logs you off. Or Click No to log off and discard unsaved changes.
Cataloging: Edit Bibliographic Records
20160706
17
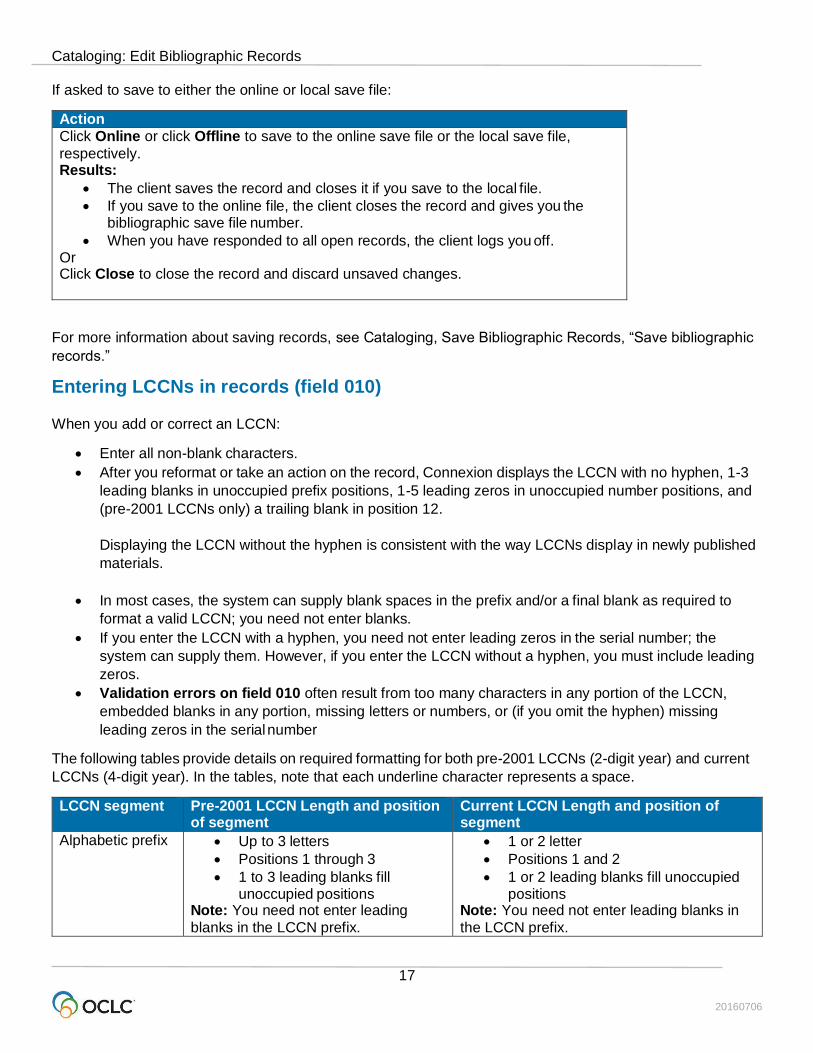
If asked to save to either the online or local save file:
Action
Click Online or click Offline to save to the online save file or the local save file,
respectively. Results:
The client saves the record and closes it if you save to the local file.
If you save to the online file, the client closes the record and gives you the bibliographic save file number.
When you have responded to all open records, the client logs you off. Or Click Close to close the record and discard unsaved changes.
For more information about saving records, see Cataloging, Save Bibliographic Records, “Save bibliographic
records.”
Entering LCCNs in records (field 010)
When you add or correct an LCCN:
Enter all non-blank characters.
After you reformat or take an action on the record, Connexion displays the LCCN with no hyphen, 1-3
leading blanks in unoccupied prefix positions, 1-5 leading zeros in unoccupied number positions, and
(pre-2001 LCCNs only) a trailing blank in position 12.
Displaying the LCCN without the hyphen is consistent with the way LCCNs display in newly published
materials.
In most cases, the system can supply blank spaces in the prefix and/or a final blank as required to
format a valid LCCN; you need not enter blanks.
If you enter the LCCN with a hyphen, you need not enter leading zeros in the serial number; the
system can supply them. However, if you enter the LCCN without a hyphen, you must include leading
zeros.
Validation errors on field 010 often result from too many characters in any portion of the LCCN,
embedded blanks in any portion, missing letters or numbers, or (if you omit the hyphen) missing
leading zeros in the serial number
The following tables provide details on required formatting for both pre-2001 LCCNs (2-digit year) and current
LCCNs (4-digit year). In the tables, note that each underline character represents a space.
LCCN segment Pre-2001 LCCN Length and position of segment
Current LCCN Length and position of segment
Alphabetic prefix Up to 3 letters
Positions 1 through 3
1 to 3 leading blanks fill unoccupied positions
Note: You need not enter leading
blanks in the LCCN prefix.
1 or 2 letter
Positions 1 and 2
1 or 2 leading blanks fill unoccupied positions
Note: You need not enter leading blanks in
the LCCN prefix.
Cataloging: Edit Bibliographic Records
20160706
18
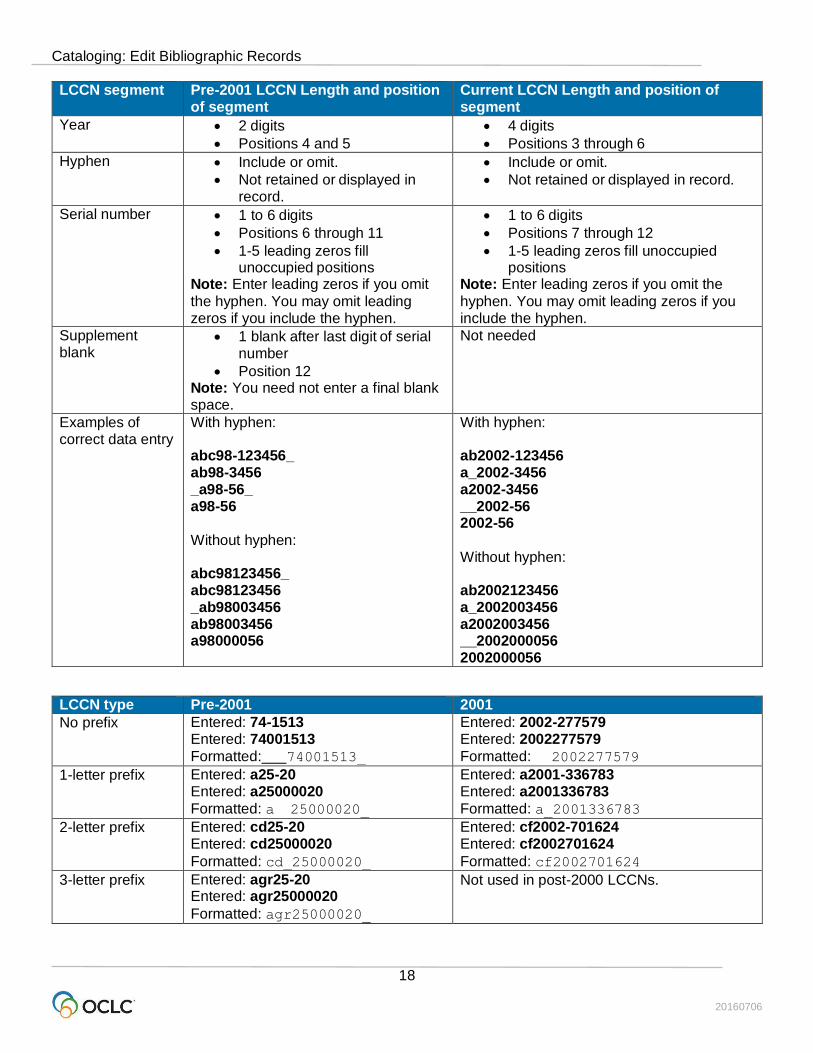
LCCN segment Pre-2001 LCCN Length and position of segment
Current LCCN Length and position of segment
Year 2 digits
Positions 4 and 5
4 digits
Positions 3 through 6
Hyphen Include or omit.
Not retained or displayed in record.
Include or omit.
Not retained or displayed in record.
Serial number 1 to 6 digits
Positions 6 through 11
1-5 leading zeros fill unoccupied positions
Note: Enter leading zeros if you omit
the hyphen. You may omit leading zeros if you include the hyphen.
1 to 6 digits
Positions 7 through 12
1-5 leading zeros fill unoccupied positions
Note: Enter leading zeros if you omit the
hyphen. You may omit leading zeros if you include the hyphen.
Supplement blank
1 blank after last digit of serial number
Position 12 Note: You need not enter a final blank space.
Not needed
Examples of correct data entry
With hyphen: abc98-123456_ ab98-3456 _a98-56_ a98-56
Without hyphen: abc98123456_ abc98123456 _ab98003456 ab98003456 a98000056
With hyphen: ab2002-123456 a_2002-3456 a2002-3456 __2002-56 2002-56
Without hyphen: ab2002123456 a_2002003456 a2002003456 __2002000056 2002000056
LCCN type Pre-2001 2001
No prefix Entered: 74-1513 Entered: 74001513
Formatted: 74001513_
Entered: 2002-277579 Entered: 2002277579
Formatted: 2002277579
1-letter prefix Entered: a25-20 Entered: a25000020
Formatted: a 25000020_
Entered: a2001-336783 Entered: a2001336783
Formatted: a_2001336783
2-letter prefix Entered: cd25-20 Entered: cd25000020
Formatted: cd_25000020_
Entered: cf2002-701624 Entered: cf2002701624
Formatted: cf2002701624
3-letter prefix Entered: agr25-20 Entered: agr25000020
Formatted: agr25000020_
Not used in post-2000 LCCNs.
Cataloging: Edit Bibliographic Records
20160706
19
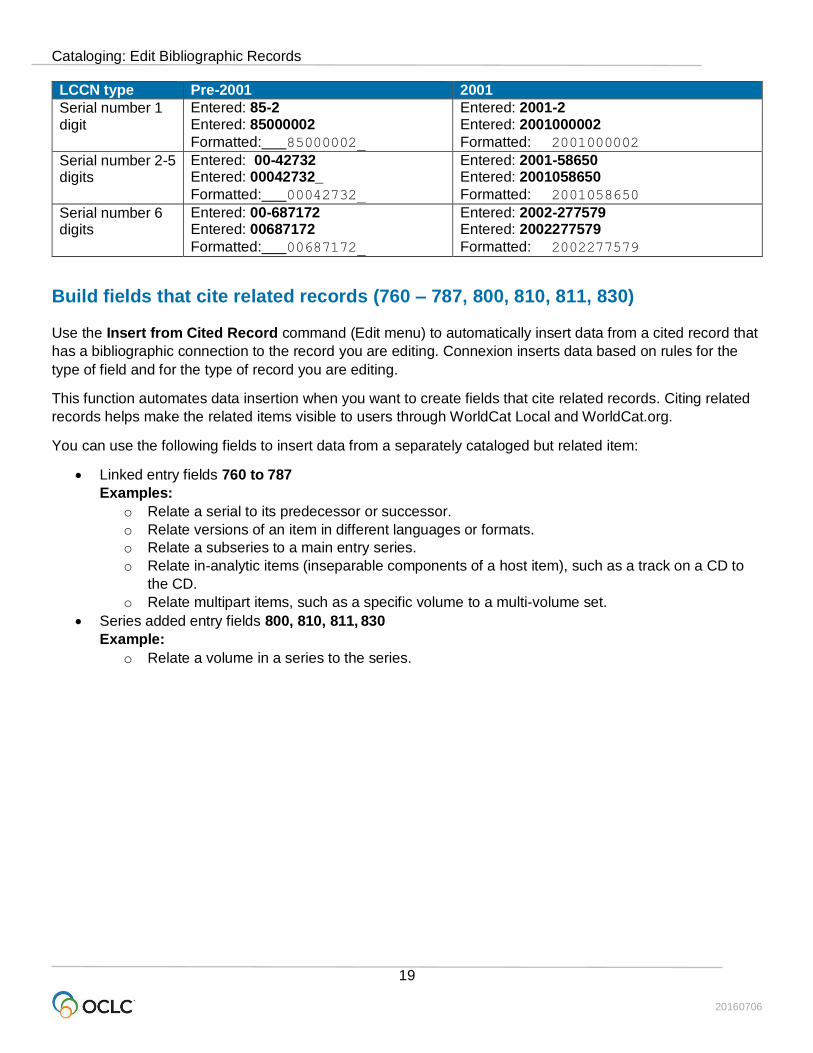
LCCN type Pre-2001 2001
Serial number 1 digit
Entered: 85-2 Entered: 85000002
Formatted: 85000002_
Entered: 2001-2 Entered: 2001000002
Formatted: 2001000002
Serial number 2-5 digits
Entered: 00-42732 Entered: 00042732_
Formatted: 00042732_
Entered: 2001-58650 Entered: 2001058650
Formatted: 2001058650
Serial number 6 digits
Entered: 00-687172 Entered: 00687172
Formatted: 00687172_
Entered: 2002-277579 Entered: 2002277579
Formatted: 2002277579
Build fields that cite related records (760 – 787, 800, 810, 811, 830)
Use the Insert from Cited Record command (Edit menu) to automatically insert data from a cited record that
has a bibliographic connection to the record you are editing. Connexion inserts data based on rules for the
type of field and for the type of record you are editing.
This function automates data insertion when you want to create fields that cite related records. Citing related
records helps make the related items visible to users through WorldCat Local and WorldCat.org.
You can use the following fields to insert data from a separately cataloged but related item:
Linked entry fields 760 to 787
Examples:
o Relate a serial to its predecessor or successor.
o Relate versions of an item in different languages or formats.
o Relate a subseries to a main entry series.
o Relate in-analytic items (inseparable components of a host item), such as a track on a CD to
the CD.
o Relate multipart items, such as a specific volume to a multi-volume set.
Series added entry fields 800, 810, 811, 830
Example:
o Relate a volume in a series to the series.
Cataloging: Edit Bibliographic Records
20160706
20
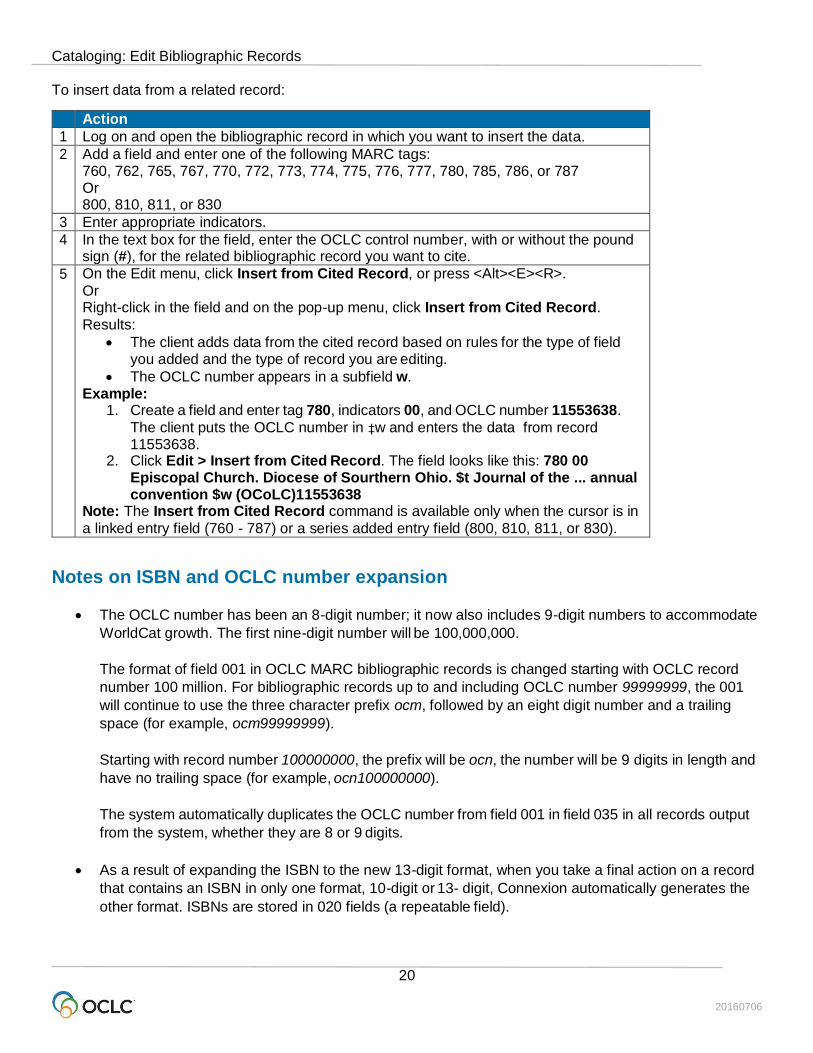
To insert data from a related record:
Action
1 Log on and open the bibliographic record in which you want to insert the data.
2 Add a field and enter one of the following MARC tags: 760, 762, 765, 767, 770, 772, 773, 774, 775, 776, 777, 780, 785, 786, or 787 Or 800, 810, 811, or 830
3 Enter appropriate indicators.
4 In the text box for the field, enter the OCLC control number, with or without the pound sign (#), for the related bibliographic record you want to cite.
5 On the Edit menu, click Insert from Cited Record, or press <Alt><E><R>.
Or Right-click in the field and on the pop-up menu, click Insert from Cited Record.
Results:
The client adds data from the cited record based on rules for the type of field you added and the type of record you are editing.
The OCLC number appears in a subfield w. Example:
1. Create a field and enter tag 780, indicators 00, and OCLC number 11553638.
The client puts the OCLC number in ‡w and enters the data from record 11553638.
2. Click Edit > Insert from Cited Record. The field looks like this: 780 00 Episcopal Church. Diocese of Sourthern Ohio. $t Journal of the ... annual convention $w (OCoLC)11553638
Note: The Insert from Cited Record command is available only when the cursor is in
a linked entry field (760 - 787) or a series added entry field (800, 810, 811, or 830).
Notes on ISBN and OCLC number expansion
The OCLC number has been an 8-digit number; it now also includes 9-digit numbers to accommodate
WorldCat growth. The first nine-digit number will be 100,000,000.
The format of field 001 in OCLC MARC bibliographic records is changed starting with OCLC record
number 100 million. For bibliographic records up to and including OCLC number 99999999, the 001
will continue to use the three character prefix ocm, followed by an eight digit number and a trailing
space (for example, ocm99999999).
Starting with record number 100000000, the prefix will be ocn, the number will be 9 digits in length and
have no trailing space (for example, ocn100000000).
The system automatically duplicates the OCLC number from field 001 in field 035 in all records output
from the system, whether they are 8 or 9 digits.
As a result of expanding the ISBN to the new 13-digit format, when you take a final action on a record
that contains an ISBN in only one format, 10-digit or 13- digit, Connexion automatically generates the
other format. ISBNs are stored in 020 fields (a repeatable field).

Cataloging: Edit Bibliographic Records
20160706
21
To have the 10- or 13-digit number, whichever is not in the record, generated automatically for exported
records, you must take a final action before you export; otherwise, the export retains only ISBN(s) already in
the record.
A search for either the 10- or 13-digit number retrieves the record. See Technical Bulletin 253: ISBN and
OCLC Number Changes for details.
OCLC Terminologies Service
OCLC provides a Terminologies Service for access to multiple controlled vocabularies to help you create
consistent metadata in records for your library collections, including digital collections. You have access to
these thesauri, with more to come:
Medical Subject Headings (MeSH)
Guidelines on Subject Access to Individual Works of Fiction, Drama, etc.
Newspaper Genre List
Thesaurus for graphic materials: TGM I, Subject terms
Thesaurus for graphic materials: TGM II, Genre and physical characteristic terms
Open and use the Terminologies Service with Connexion as you edit and create records. See more
information and procedures at http://www.oclc.org/terminologies/default.htm.

Cataloging: Edit Bibliographic Records
20160706
22
2. Reformat records
About reformatting records
The Connexion client displays records in one view only: MARC template.
Use the Reformat command (Edit menu) as you edit online or local records to automatically re-sort the
variable fields in correct numeric order and correct minor errors. Reformat records as a separate step (Edit >
Reformat) while logged on or offline, or let the system reformat the record automatically when you take a final
action interactively or batch process final actions.
No minimum authorization level is required to reformat records. Reformat the following types of records:
WorldCat
Bibliographic save file (online or local)
Bibliographic constant data (online or local)
Library of Congress (LC) authority file records
Authority save file (online or local)
Authority constant data (online or local)
Note: Reformatting does not reset the automatic logoff timer when you are logged on, since the function is
performed locally within the client and not by the online system.
Reformat a record by command
Action
On the Edit menu, click Reformat, or click , or press <Ctrl><R>.
Result:
After reformatting, the client retains the symbol to mark the fields you edited. The symbol is retained until you take a final action or do a Control All Headings function on a record.
Errors corrected automatically
Whether you reformat records as a separate step (Edit > Reformat) or let the system reformat records
automatically when you take final actions, Connexion makes the following minor corrections::
For bibliographic and authority records:
o The "pipe" character ( | ) in URLs is automatically converted to code %7C, since it is not part of
the set of ALA diacritics and special characters that are valid in the client.
o If you enter subfield codes in uppercase, Connexion changes them to lowercase.
For bibliographic records only:
o If you enter fixed field values in the wrong case, upper- vs. lowercase, Connexion changes
them to the correct case.
o If the last character (check digit) in the ISBN or ISSN is a lowercase x, Connexion changes it
to uppercase.
o If you enter dlc in lowercase in field 040 ‡a, Connexion changes to uppercase DLC.

Cataloging: Edit Bibliographic Records
20160706
23
o If field 260 ‡c contains a date and fixed field element Date1 is blank, Connexion adds the date
to Date1.
o Connexion deletes leading blanks or blanks between values in fixed field elements.Trailing
blanks remain.
Non-ALA character in URLs
To retain the vertical bar or pipe in URLs, the character is automatically converted to the hex value of %7C,
since it is not part of the set of ALA diacritics and special characters that are valid for use in the client.
Cataloging: Edit Bibliographic Records
20160706
24
3. Validate records online or offline
About validation
Validation checks the quality of bibliographic and authority records and prevents records with errors from
being added to or replaced in WorldCat or the Library of Congress (LC) name and subject authority file.
Minimum authorization level: Validating records requires a Limited or higher authorization.
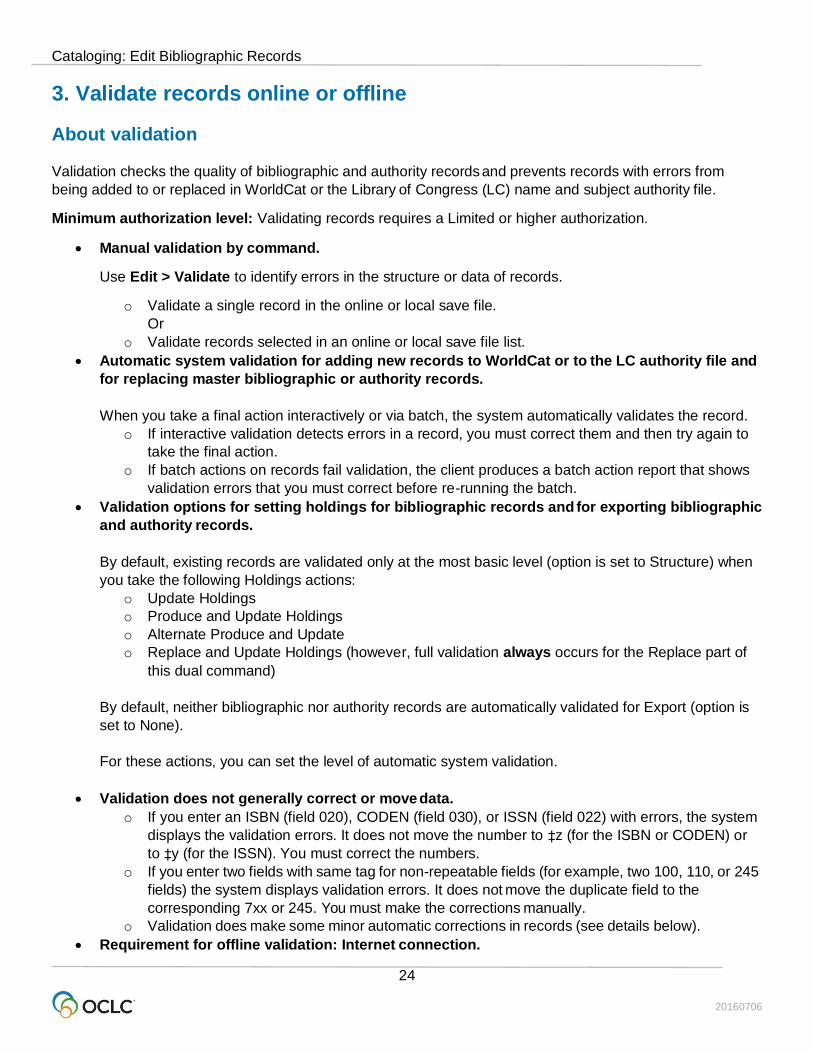
Manual validation by command.
Use Edit > Validate to identify errors in the structure or data of records.
o Validate a single record in the online or local save file.
Or
o Validate records selected in an online or local save file list.
Automatic system validation for adding new records to WorldCat or to the LC authority file and
for replacing master bibliographic or authority records.
When you take a final action interactively or via batch, the system automatically validates the record.
o If interactive validation detects errors in a record, you must correct them and then try again to
take the final action.
o If batch actions on records fail validation, the client produces a batch action report that shows
validation errors that you must correct before re-running the batch.
Validation options for setting holdings for bibliographic records and for exporting bibliographic
and authority records.
By default, existing records are validated only at the most basic level (option is set to Structure) when
you take the following Holdings actions:
o Update Holdings
o Produce and Update Holdings
o Alternate Produce and Update
o Replace and Update Holdings (however, full validation always occurs for the Replace part of
this dual command)
By default, neither bibliographic nor authority records are automatically validated for Export (option is
set to None).
For these actions, you can set the level of automatic system validation.
Validation does not generally correct or move data.
o If you enter an ISBN (field 020), CODEN (field 030), or ISSN (field 022) with errors, the system
displays the validation errors. It does not move the number to ‡z (for the ISBN or CODEN) or
to ‡y (for the ISSN). You must correct the numbers.
o If you enter two fields with same tag for non-repeatable fields (for example, two 100, 110, or 245
fields) the system displays validation errors. It does not move the duplicate field to the
corresponding 7xx or 245. You must make the corrections manually.
o Validation does make some minor automatic corrections in records (see details below).
Requirement for offline validation: Internet connection.
Cataloging: Edit Bibliographic Records
20160706
25
Even though you are not required to log on to do manual validation offline using Edit > Validate, you
must have an Internet connection on your workstation. The client uses the Internet during its internal
process.
No validation for constant data.
You cannot manually validate constant data records using Edit > Validate, nor does Connexion run
any automatic validation for constant data records.
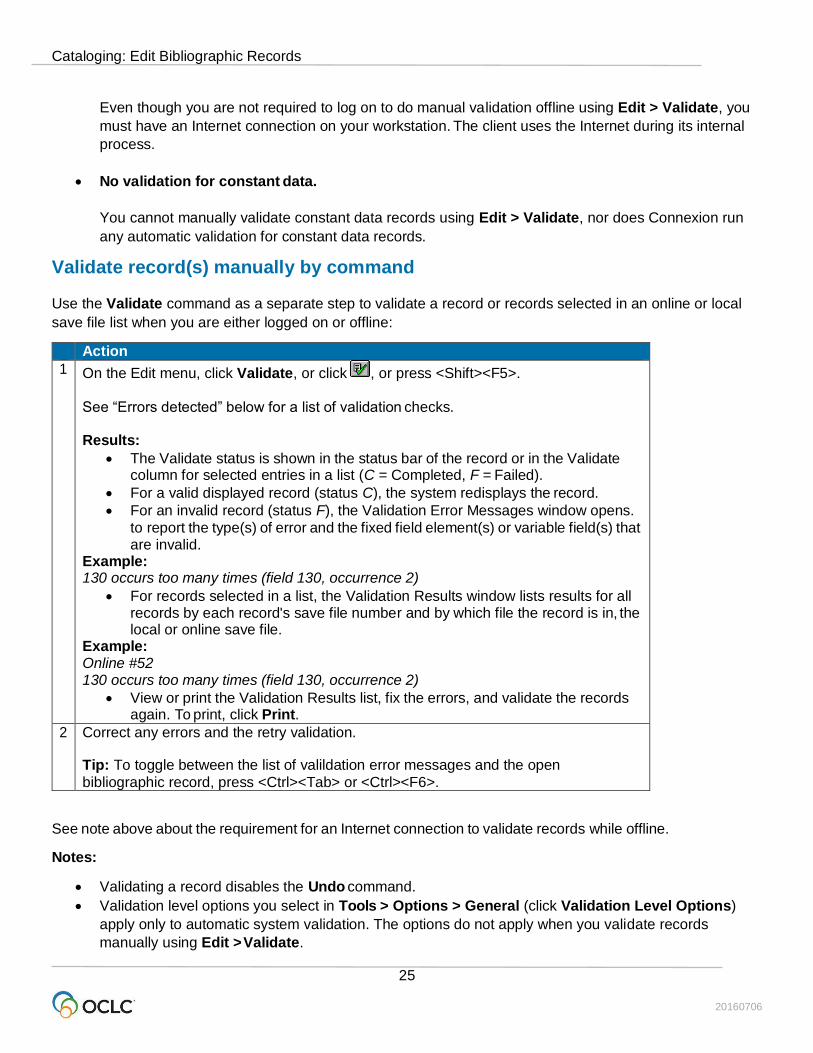
Validate record(s) manually by command
Use the Validate command as a separate step to validate a record or records selected in an online or local
save file list when you are either logged on or offline:
Action
1 On the Edit menu, click Validate, or click , or press <Shift><F5>. See “Errors detected” below for a list of validation checks. Results:
The Validate status is shown in the status bar of the record or in the Validate column for selected entries in a list (C = Completed, F = Failed).
For a valid displayed record (status C), the system redisplays the record.
For an invalid record (status F), the Validation Error Messages window opens.
to report the type(s) of error and the fixed field element(s) or variable field(s) that are invalid.
Example: 130 occurs too many times (field 130, occurrence 2)
For records selected in a list, the Validation Results window lists results for all records by each record's save file number and by which file the record is in, the local or online save file.
Example: Online #52 130 occurs too many times (field 130, occurrence 2)
View or print the Validation Results list, fix the errors, and validate the records again. To print, click Print.
2 Correct any errors and the retry validation. Tip: To toggle between the list of valildation error messages and the open
bibliographic record, press <Ctrl><Tab> or <Ctrl><F6>.
See note above about the requirement for an Internet connection to validate records while offline.
Notes:
Validating a record disables the Undo command.
Validation level options you select in Tools > Options > General (click Validation Level Options)
apply only to automatic system validation. The options do not apply when you validate records
manually using Edit > Validate.
Cataloging: Edit Bibliographic Records
20160706
26
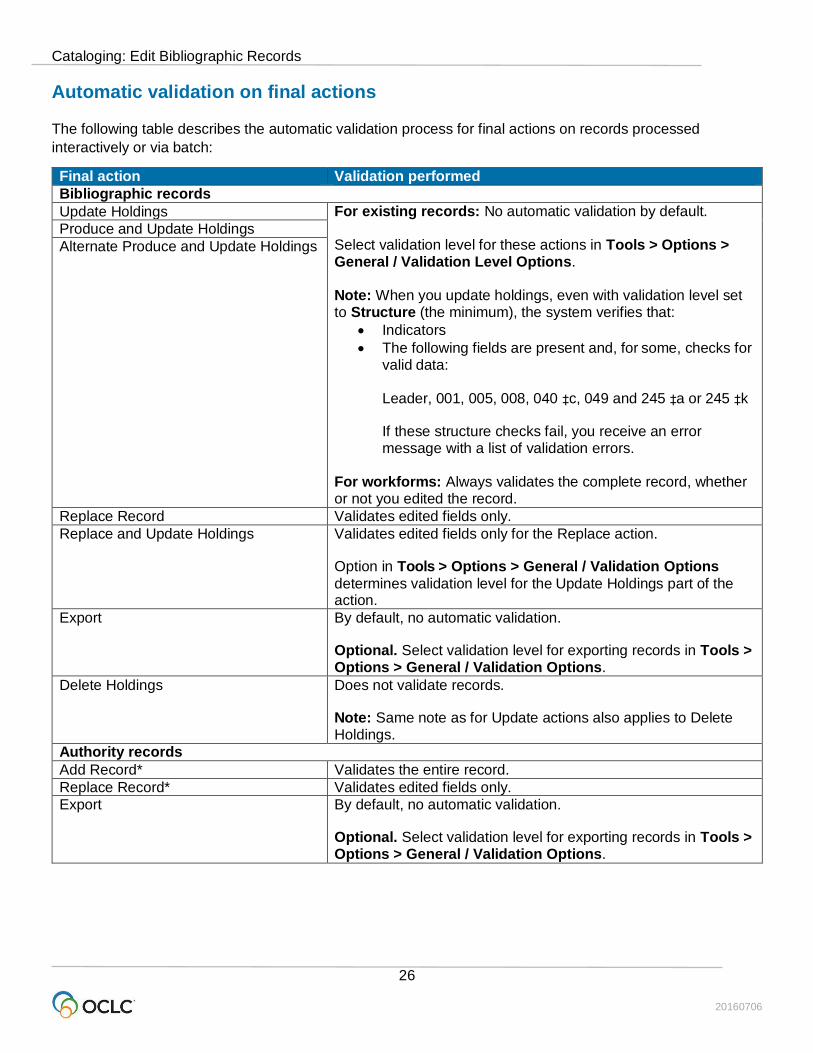
Automatic validation on final actions
The following table describes the automatic validation process for final actions on records processed
interactively or via batch:
Final action Validation performed
Bibliographic records
Update Holdings For existing records: No automatic validation by default. Select validation level for these actions in Tools > Options > General / Validation Level Options. Note: When you update holdings, even with validation level set to Structure (the minimum), the system verifies that:
Indicators
The following fields are present and, for some, checks for valid data:
Leader, 001, 005, 008, 040 ‡c, 049 and 245 ‡a or 245 ‡k
If these structure checks fail, you receive an error message with a list of validation errors.
For workforms: Always validates the complete record, whether or not you edited the record.
Produce and Update Holdings
Alternate Produce and Update Holdings
Replace Record Validates edited fields only.
Replace and Update Holdings Validates edited fields only for the Replace action. Option in Tools > Options > General / Validation Options
determines validation level for the Update Holdings part of the action.
Export By default, no automatic validation. Optional. Select validation level for exporting records in Tools > Options > General / Validation Options.
Delete Holdings Does not validate records.
Note: Same note as for Update actions also applies to Delete Holdings.
Authority records
Add Record* Validates the entire record.
Replace Record* Validates edited fields only.
Export By default, no automatic validation. Optional. Select validation level for exporting records in Tools > Options > General / Validation Options.
Cataloging: Edit Bibliographic Records
20160706
27
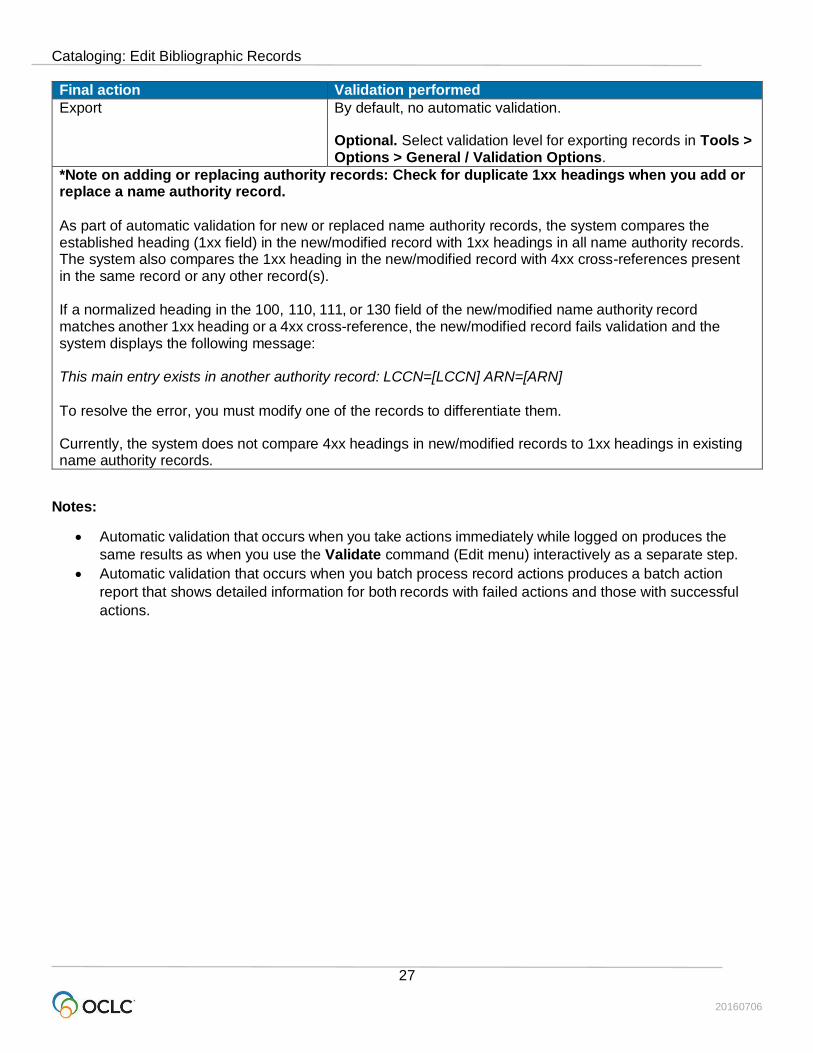
Final action Validation performed
Export By default, no automatic validation. Optional. Select validation level for exporting records in Tools > Options > General / Validation Options.
*Note on adding or replacing authority records: Check for duplicate 1xx headings when you add or replace a name authority record.
As part of automatic validation for new or replaced name authority records, the system compares the established heading (1xx field) in the new/modified record with 1xx headings in all name authority records. The system also compares the 1xx heading in the new/modified record with 4xx cross-references present in the same record or any other record(s). If a normalized heading in the 100, 110, 111, or 130 field of the new/modified name authority record matches another 1xx heading or a 4xx cross-reference, the new/modified record fails validation and the system displays the following message: This main entry exists in another authority record: LCCN=[LCCN] ARN=[ARN]
To resolve the error, you must modify one of the records to differentiate them.
Currently, the system does not compare 4xx headings in new/modified records to 1xx headings in existing name authority records.
Notes:
Automatic validation that occurs when you take actions immediately while logged on produces the
same results as when you use the Validate command (Edit menu) interactively as a separate step.
Automatic validation that occurs when you batch process record actions produces a batch action
report that shows detailed information for both records with failed actions and those with successful
actions.
Cataloging: Edit Bibliographic Records
20160706
28
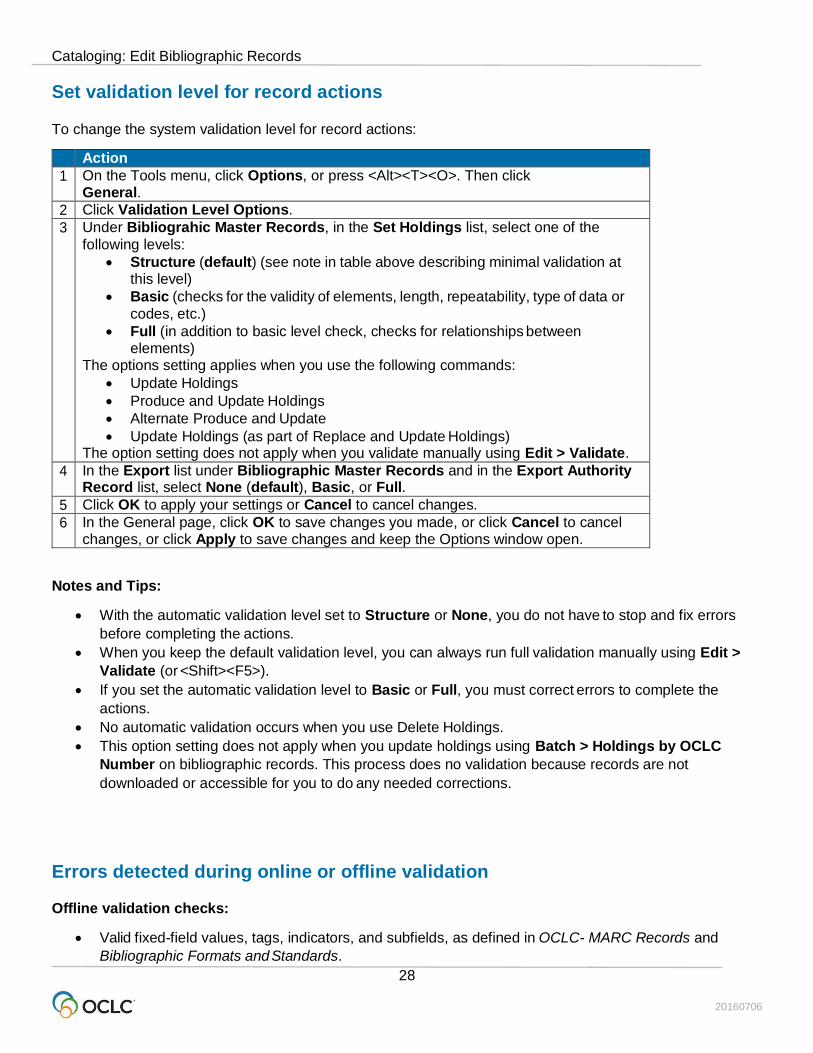
Set validation level for record actions
To change the system validation level for record actions:
Action
1 On the Tools menu, click Options, or press <Alt><T><O>. Then click General.
2 Click Validation Level Options.
3 Under Bibliograhic Master Records, in the Set Holdings list, select one of the
following levels:
Structure (default) (see note in table above describing minimal validation at this level)
Basic (checks for the validity of elements, length, repeatability, type of data or
codes, etc.)
Full (in addition to basic level check, checks for relationships between elements)
The options setting applies when you use the following commands:
Update Holdings
Produce and Update Holdings
Alternate Produce and Update
Update Holdings (as part of Replace and Update Holdings) The option setting does not apply when you validate manually using Edit > Validate.
4 In the Export list under Bibliographic Master Records and in the Export Authority Record list, select None (default), Basic, or Full.
5 Click OK to apply your settings or Cancel to cancel changes.
6 In the General page, click OK to save changes you made, or click Cancel to cancel changes, or click Apply to save changes and keep the Options window open.
Notes and Tips:
With the automatic validation level set to Structure or None, you do not have to stop and fix errors
before completing the actions.
When you keep the default validation level, you can always run full validation manually using Edit >
Validate (or <Shift><F5>).
If you set the automatic validation level to Basic or Full, you must correct errors to complete the
actions.
No automatic validation occurs when you use Delete Holdings.
This option setting does not apply when you update holdings using Batch > Holdings by OCLC
Number on bibliographic records. This process does no validation because records are not
downloaded or accessible for you to do any needed corrections.
Errors detected during online or offline validation
Offline validation checks:
Valid fixed-field values, tags, indicators, and subfields, as defined in OCLC- MARC Records and
Bibliographic Formats and Standards.
Cataloging: Edit Bibliographic Records
20160706
29
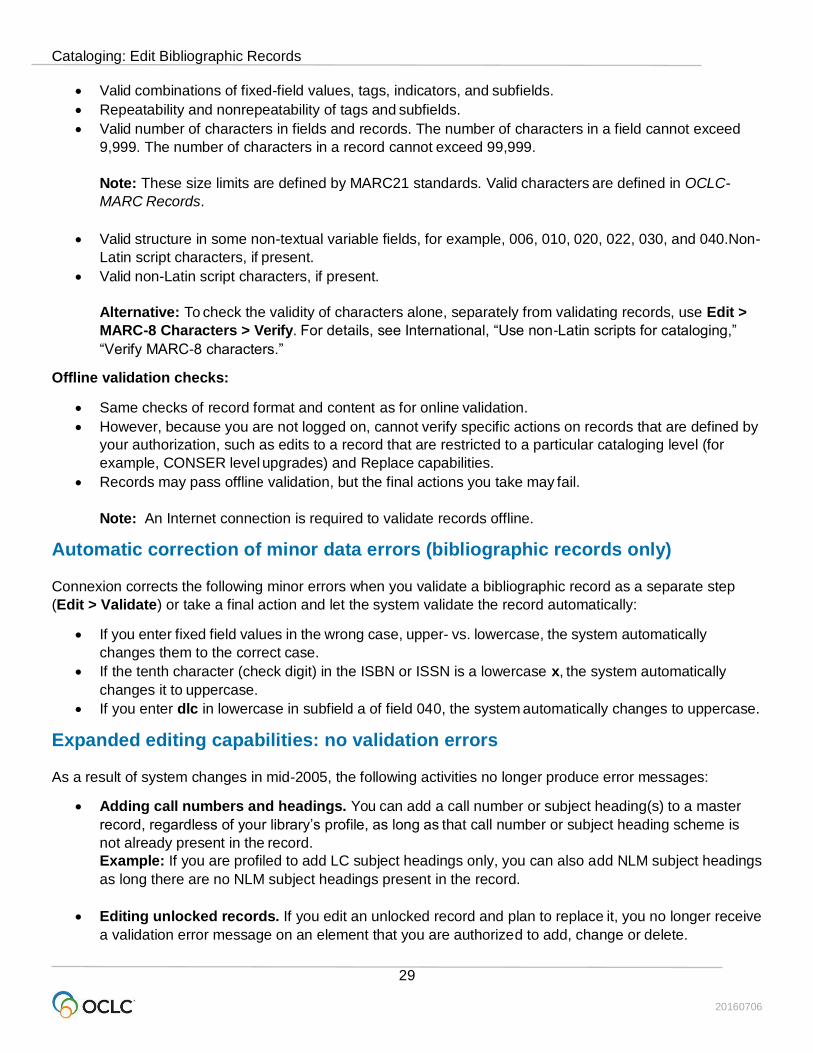
Valid combinations of fixed-field values, tags, indicators, and subfields.
Repeatability and nonrepeatability of tags and subfields.
Valid number of characters in fields and records. The number of characters in a field cannot exceed
9,999. The number of characters in a record cannot exceed 99,999.
Note: These size limits are defined by MARC21 standards. Valid characters are defined in OCLC-
MARC Records.
Valid structure in some non-textual variable fields, for example, 006, 010, 020, 022, 030, and 040.Non-
Latin script characters, if present.
Valid non-Latin script characters, if present.
Alternative: To check the validity of characters alone, separately from validating records, use Edit >
MARC-8 Characters > Verify. For details, see International, “Use non-Latin scripts for cataloging,”
“Verify MARC-8 characters.”
Offline validation checks:
Same checks of record format and content as for online validation.
However, because you are not logged on, cannot verify specific actions on records that are defined by
your authorization, such as edits to a record that are restricted to a particular cataloging level (for
example, CONSER level upgrades) and Replace capabilities.
Records may pass offline validation, but the final actions you take may fail.
Note: An Internet connection is required to validate records offline.
Automatic correction of minor data errors (bibliographic records only)
Connexion corrects the following minor errors when you validate a bibliographic record as a separate step
(Edit > Validate) or take a final action and let the system validate the record automatically:
If you enter fixed field values in the wrong case, upper- vs. lowercase, the system automatically
changes them to the correct case.
If the tenth character (check digit) in the ISBN or ISSN is a lowercase x, the system automatically
changes it to uppercase.
If you enter dlc in lowercase in subfield a of field 040, the system automatically changes to uppercase.
Expanded editing capabilities: no validation errors
As a result of system changes in mid-2005, the following activities no longer produce error messages:
Adding call numbers and headings. You can add a call number or subject heading(s) to a master
record, regardless of your library’s profile, as long as that call number or subject heading scheme is
not already present in the record.
Example: If you are profiled to add LC subject headings only, you can also add NLM subject headings
as long there are no NLM subject headings present in the record.
Editing unlocked records. If you edit an unlocked record and plan to replace it, you no longer receive
a validation error message on an element that you are authorized to add, change or delete.

Cataloging: Edit Bibliographic Records
20160706
30
Example: If you have a CONSER or National Enhance authorization, you can now add, change or
delete field 042 and validate without receiving a validation error on the record
Cataloging: Edit Bibliographic Records
20160706
31
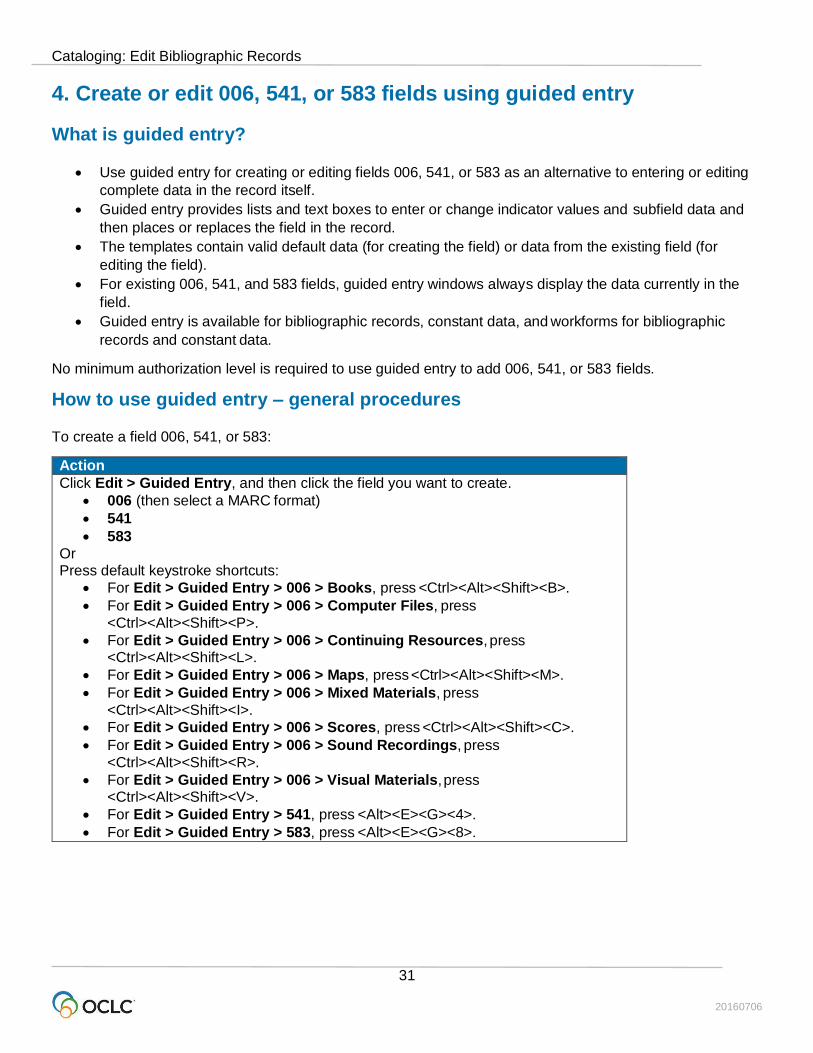
4. Create or edit 006, 541, or 583 fields using guided entry
What is guided entry?
Use guided entry for creating or editing fields 006, 541, or 583 as an alternative to entering or editing
complete data in the record itself.
Guided entry provides lists and text boxes to enter or change indicator values and subfield data and
then places or replaces the field in the record.
The templates contain valid default data (for creating the field) or data from the existing field (for
editing the field).
For existing 006, 541, and 583 fields, guided entry windows always display the data currently in the
field.
Guided entry is available for bibliographic records, constant data, and workforms for bibliographic
records and constant data.
No minimum authorization level is required to use guided entry to add 006, 541, or 583 fields.
How to use guided entry – general procedures
To create a field 006, 541, or 583:
Action
Click Edit > Guided Entry, and then click the field you want to create.
006 (then select a MARC format)
541
583
Or Press default keystroke shortcuts:
For Edit > Guided Entry > 006 > Books, press <Ctrl><Alt><Shift><B>.
For Edit > Guided Entry > 006 > Computer Files, press
<Ctrl><Alt><Shift><P>.
For Edit > Guided Entry > 006 > Continuing Resources, press <Ctrl><Alt><Shift><L>.
For Edit > Guided Entry > 006 > Maps, press <Ctrl><Alt><Shift><M>.
For Edit > Guided Entry > 006 > Mixed Materials, press
<Ctrl><Alt><Shift><I>.
For Edit > Guided Entry > 006 > Scores, press <Ctrl><Alt><Shift><C>.
For Edit > Guided Entry > 006 > Sound Recordings, press
<Ctrl><Alt><Shift><R>.
For Edit > Guided Entry > 006 > Visual Materials, press <Ctrl><Alt><Shift><V>.
For Edit > Guided Entry > 541, press <Alt><E><G><4>.
For Edit > Guided Entry > 583, press <Alt><E><G><8>.
Cataloging: Edit Bibliographic Records
20160706
32
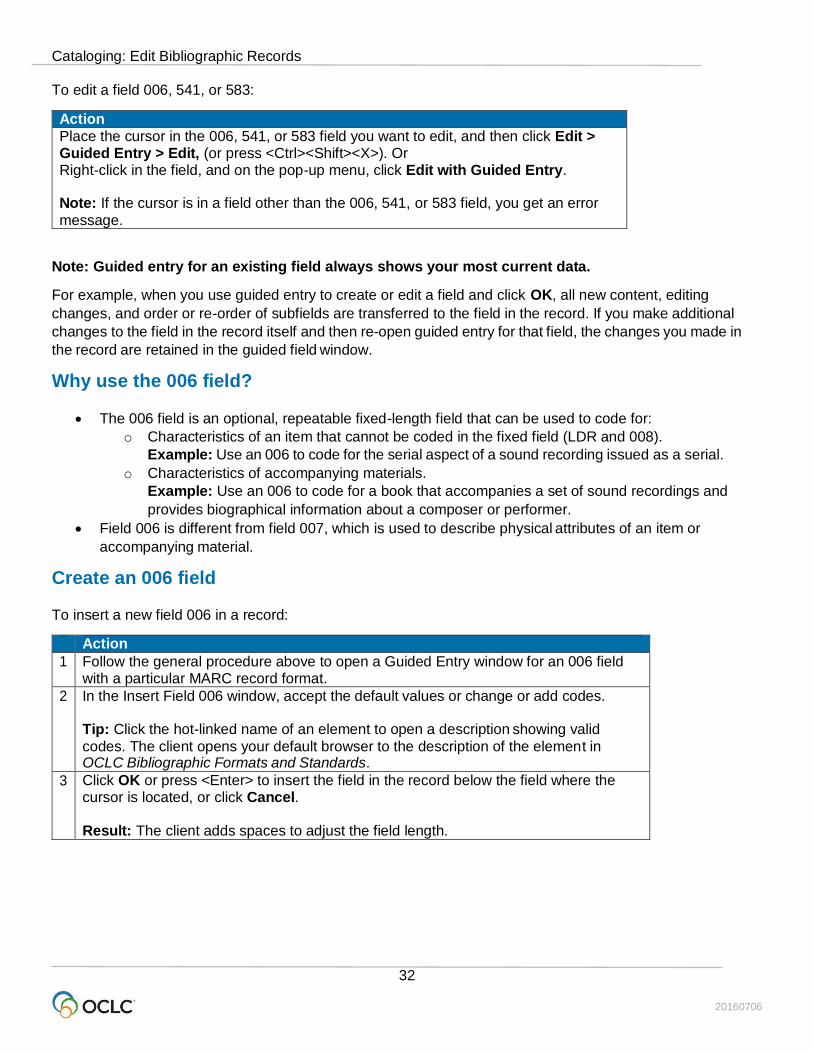
To edit a field 006, 541, or 583:
Action
Place the cursor in the 006, 541, or 583 field you want to edit, and then click Edit > Guided Entry > Edit, (or press <Ctrl><Shift><X>). Or Right-click in the field, and on the pop-up menu, click Edit with Guided Entry. Note: If the cursor is in a field other than the 006, 541, or 583 field, you get an error
message.
Note: Guided entry for an existing field always shows your most current data.
For example, when you use guided entry to create or edit a field and click OK, all new content, editing
changes, and order or re-order of subfields are transferred to the field in the record. If you make additional
changes to the field in the record itself and then re-open guided entry for that field, the changes you made in
the record are retained in the guided field window.
Why use the 006 field?
The 006 field is an optional, repeatable fixed-length field that can be used to code for:
o Characteristics of an item that cannot be coded in the fixed field (LDR and 008).
Example: Use an 006 to code for the serial aspect of a sound recording issued as a serial.
o Characteristics of accompanying materials.
Example: Use an 006 to code for a book that accompanies a set of sound recordings and
provides biographical information about a composer or performer.
Field 006 is different from field 007, which is used to describe physical attributes of an item or
accompanying material.
Create an 006 field
To insert a new field 006 in a record:
Action
1 Follow the general procedure above to open a Guided Entry window for an 006 field with a particular MARC record format.
2 In the Insert Field 006 window, accept the default values or change or add codes. Tip: Click the hot-linked name of an element to open a description showing valid
codes. The client opens your default browser to the description of the element in OCLC Bibliographic Formats and Standards.
3 Click OK or press <Enter> to insert the field in the record below the field where the cursor is located, or click Cancel.
Result: The client adds spaces to adjust the field length.

Cataloging: Edit Bibliographic Records
20160706
33
Edit an 006 field
To edit an existing 006 field in a record:
Action
1 Place the cursor in the 006 field you want to edit, and follow the general procedure above to open a Guided Entry window for that field, showing the existing MARC format elements and any existing values.
2 Change or add values as needed. See the Tip in step 2 of the preceding instruction table.
3 Optional. If the record contains more than one 006 field, and you want to edit others, click Next or Back to edit the next or previous 006 field.
4 When finished, click OK to replace the existing data in the record with the edited data, or click Cancel to keep the existing data.
Note: If you edit the data again, in the record itself, and then re-open the Guided Entry
window for that field, the changes you made in the record are retained in the window.
Caution: The type code in the 006 field must be valid. It is the first element of an 006 field. If it is invalid, the
client cannot determine which format the field describes.
Why use a 541 or 583 field?
Field 541 (Immediate Source of Acquisition Note) and field 583 (Action Note) are used primarily, but not
exclusively, for original or historical items or items in archival collections.
Field 541 is used for notes about the source of an acquisition.
Example: Code for a person or organization name, address, terms of acquisition, etc.
Field 583 is used for notes about actions surrounding the acquisition.
Example: Code for various preservation activities.
Valid subfields are:
o For field 541: a, b, c, d, e, f, h, n, o, 3, and 5
o For field 583: a, b, c, d, e, f, h, i, j, k, l, n, o, u, x, z, 2, 3, 5, and 8
Brief descriptions of each subfield are included in the Subfield drop-down list when you open a guided
entry window.
Cataloging: Edit Bibliographic Records
20160706
34
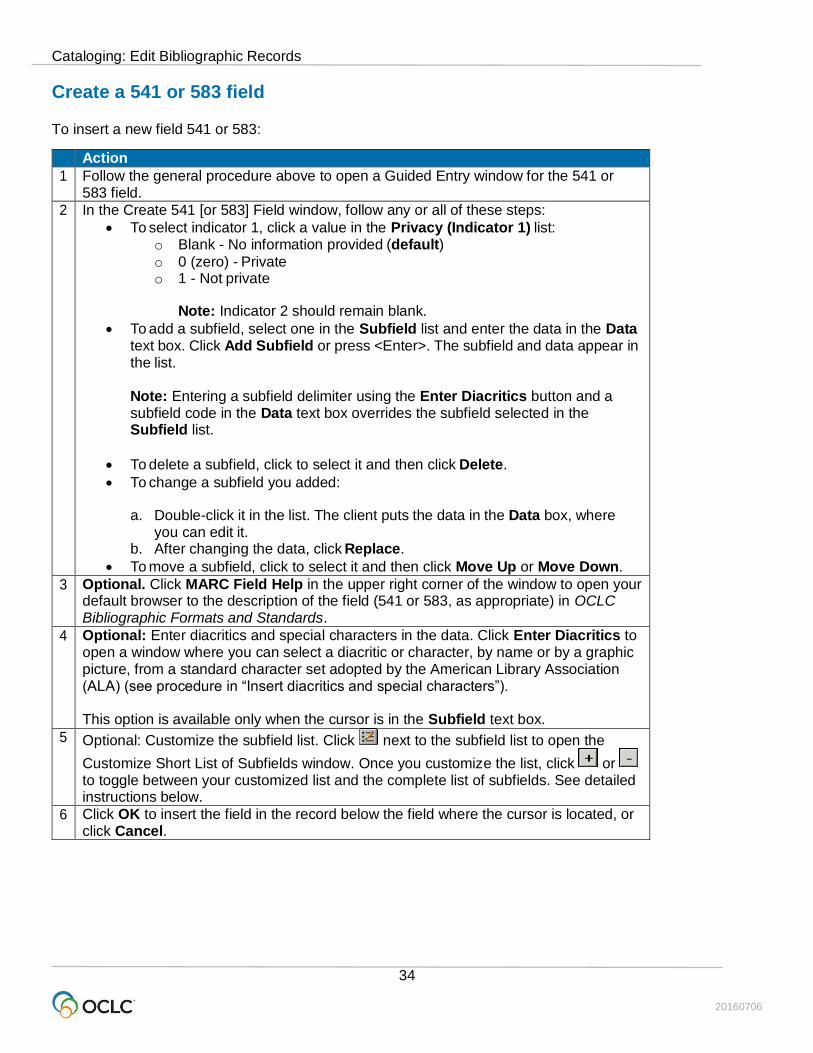
Create a 541 or 583 field
To insert a new field 541 or 583:
Action
1 Follow the general procedure above to open a Guided Entry window for the 541 or 583 field.
2 In the Create 541 [or 583] Field window, follow any or all of these steps:
To select indicator 1, click a value in the Privacy (Indicator 1) list: o Blank - No information provided (default)
o 0 (zero) - Private o 1 - Not private
Note: Indicator 2 should remain blank.
To add a subfield, select one in the Subfield list and enter the data in the Data text box. Click Add Subfield or press <Enter>. The subfield and data appear in the list.
Note: Entering a subfield delimiter using the Enter Diacritics button and a subfield code in the Data text box overrides the subfield selected in the Subfield list.
To delete a subfield, click to select it and then click Delete.
To change a subfield you added:
a. Double-click it in the list. The client puts the data in the Data box, where you can edit it.
b. After changing the data, click Replace.
To move a subfield, click to select it and then click Move Up or Move Down.
3 Optional. Click MARC Field Help in the upper right corner of the window to open your default browser to the description of the field (541 or 583, as appropriate) in OCLC Bibliographic Formats and Standards.
4 Optional: Enter diacritics and special characters in the data. Click Enter Diacritics to open a window where you can select a diacritic or character, by name or by a graphic picture, from a standard character set adopted by the American Library Association (ALA) (see procedure in “Insert diacritics and special characters”). This option is available only when the cursor is in the Subfield text box.
5 Optional: Customize the subfield list. Click next to the subfield list to open the
Customize Short List of Subfields window. Once you customize the list, click or to toggle between your customized list and the complete list of subfields. See detailed instructions below.
6 Click OK to insert the field in the record below the field where the cursor is located, or click Cancel.

Cataloging: Edit Bibliographic Records
20160706
35
Edit a 541 or 583 field
To edit an existing 541 or 583:
Action
1 Place the cursor in the 541 or 583 field you want to edit, and follow the general procedure above to open a Guided Entry window for that field, showing the existing data.
2 To edit, follow any or all of these steps:
To change indicator 1, click a value in the Privacy (Indicator 1) list: o Blank - No information provided (default) o 0 (zero) - Private o 1 - Not private
Note: Indicator 2 should remain blank.
To add a subfield, select one in the Subfield list and enter the data in the Data text box. Click Add Subfield or press <Enter>. The subfield and data appear in
the list.
Note: Entering a subfield delimiter using the Enter Diacritics button and a subfield code in the Data text box overrides the subfield selected in the Subfield list.
To delete a subfield, click to select it and then click Delete.
To change a subfield you added:
a. Double-click it in the list. The client puts the data in the Data box, where
you can edit it. b. After changing the data, click Replace.
To move a subfield, click to select it and then click Move Up or Move Down.
3 See steps 3 to 5 in the table above for more about viewing MARC Field Help,
inserting diacritics or special characters, or customizing the list of subfields.
4 When finished editing a 541 or 583 field, click OK to replace the existing data with the edited data, or click Cancel to keep the existing data.
Note: If you change the data again in the record itself and then re-open the Guided
Entry window for that field, the changes you made in the record are retained in the window.
Cataloging: Edit Bibliographic Records
20160706
36
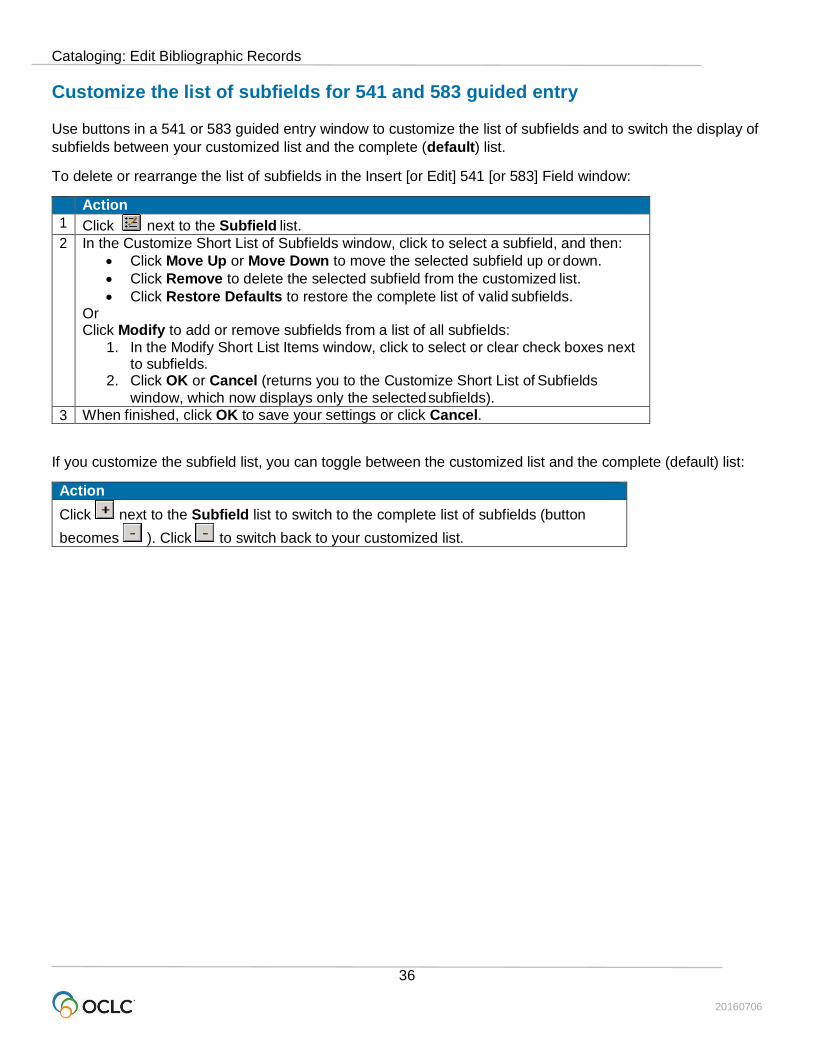
Customize the list of subfields for 541 and 583 guided entry
Use buttons in a 541 or 583 guided entry window to customize the list of subfields and to switch the display of
subfields between your customized list and the complete (default) list.
To delete or rearrange the list of subfields in the Insert [or Edit] 541 [or 583] Field window:
Action
1 Click next to the Subfield list.
2 In the Customize Short List of Subfields window, click to select a subfield, and then:
Click Move Up or Move Down to move the selected subfield up or down.
Click Remove to delete the selected subfield from the customized list.
Click Restore Defaults to restore the complete list of valid subfields. Or Click Modify to add or remove subfields from a list of all subfields:
1. In the Modify Short List Items window, click to select or clear check boxes next to subfields.
2. Click OK or Cancel (returns you to the Customize Short List of Subfields
window, which now displays only the selected subfields).
3 When finished, click OK to save your settings or click Cancel.
If you customize the subfield list, you can toggle between the customized list and the complete (default) list:
Action
Click next to the Subfield list to switch to the complete list of subfields (button
becomes ). Click to switch back to your customized list.
Cataloging: Edit Bibliographic Records
20160706
37
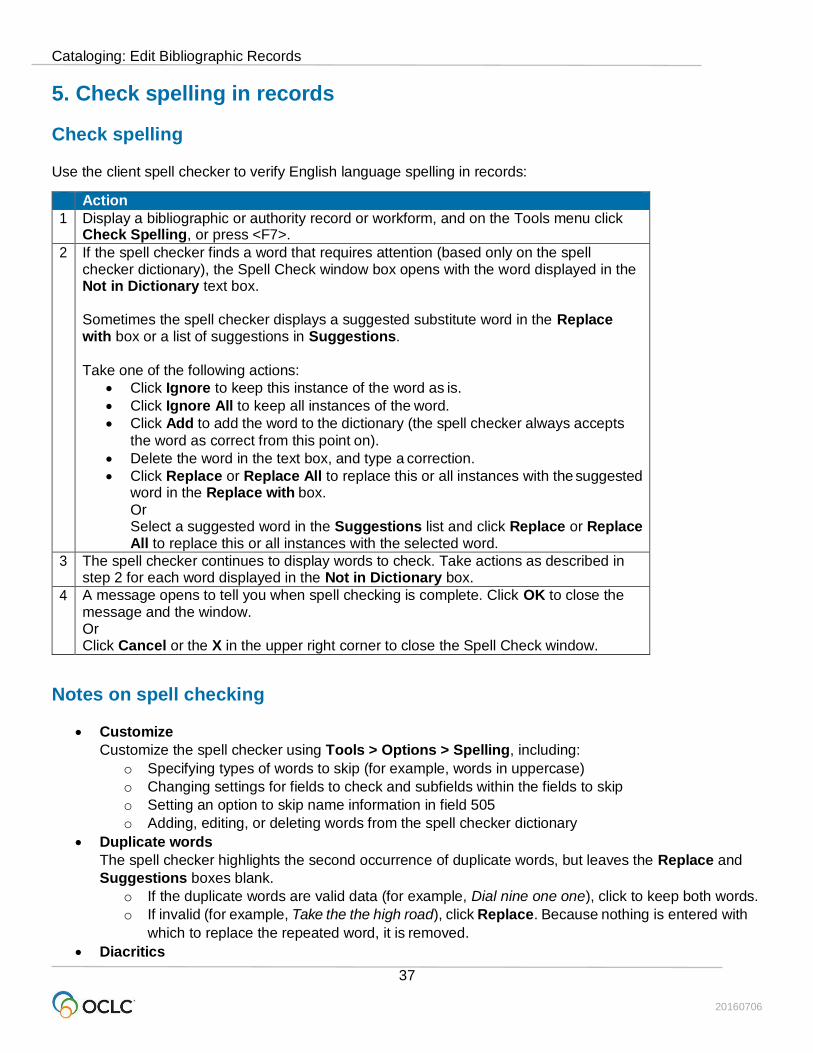
5. Check spelling in records
Check spelling
Use the client spell checker to verify English language spelling in records:
Action
1 Display a bibliographic or authority record or workform, and on the Tools menu click Check Spelling, or press <F7>.
2 If the spell checker finds a word that requires attention (based only on the spell checker dictionary), the Spell Check window box opens with the word displayed in the Not in Dictionary text box. Sometimes the spell checker displays a suggested substitute word in the Replace with box or a list of suggestions in Suggestions. Take one of the following actions:
Click Ignore to keep this instance of the word as is.
Click Ignore All to keep all instances of the word.
Click Add to add the word to the dictionary (the spell checker always accepts
the word as correct from this point on).
Delete the word in the text box, and type a correction.
Click Replace or Replace All to replace this or all instances with the suggested word in the Replace with box.
Or Select a suggested word in the Suggestions list and click Replace or Replace All to replace this or all instances with the selected word.
3 The spell checker continues to display words to check. Take actions as described in step 2 for each word displayed in the Not in Dictionary box.
4 A message opens to tell you when spell checking is complete. Click OK to close the message and the window. Or Click Cancel or the X in the upper right corner to close the Spell Check window.
Notes on spell checking
Customize
Customize the spell checker using Tools > Options > Spelling, including:
o Specifying types of words to skip (for example, words in uppercase)
o Changing settings for fields to check and subfields within the fields to skip
o Setting an option to skip name information in field 505
o Adding, editing, or deleting words from the spell checker dictionary
Duplicate words
The spell checker highlights the second occurrence of duplicate words, but leaves the Replace and
Suggestions boxes blank.
o If the duplicate words are valid data (for example, Dial nine one one), click to keep both words.
o If invalid (for example, Take the the high road), click Replace. Because nothing is entered with
which to replace the repeated word, it is removed.
Diacritics

Cataloging: Edit Bibliographic Records
20160706
38
The spell checker skips (accepts as correct) diacritics and special characters in the ALA character set
that the client supports.
Non-Latin scripts
The spell checker skips (accepts as correct) non-Latin script data.

Cataloging: Edit Bibliographic Records
20160706
39
6. Maintain URLs in bibliographic records
When you can correct or add a URL
Authorization level required
You qualify for a database enrichment credit when you correct a URL (universal resource locator, or
Internet address) and replace the master record.
To correct URLs and replace records, you need at least a Full level or higher authorization.
With a Full authorization, you can replace records created by any institution to correct URLs in the
following fields: 505, 506, 520, 530, 583 and 856. In addition, you can replace records to correct any
other fields if you contributed the records and they are held only by your library.
Authorization levels required for specific record types
For CONSER records (serials that have field 042), you must have a CONSER level authorization to
change the URL in field 856 or to add field 856 in the master record.
For minimal-level records (also called "less-than full" level), any cataloging user with a Full
authorization may edit and replace most of the data in the record. (CONSER records are again an
exception; you must have a CONSER authorization to replace a master record.)
An Enhance level authorization allows selected users to edit master records based on the format of
the record (sound recording, computer file, etc.).
Additional information is available in chapter 5 of OCLC Bibliographic Formats and Standards.
Correct or add a URL: basic steps
Action
1 Open the record for editing.
2 On the Action menu, click Lock Master Record, or press <Ctrl><F8>.
3 Change the URL in one of the fields specified in the next section, or add one of these fields.
4 Take the appropriate action: Replace Record or Replace and Update Holdings:
5 After completing the Replace action, edit the record for your own use.
Record fields that may contain URLs
The following fields and subfields may contain a URL:
505 ‡u 530 ‡u 552 ‡u 856 ‡u 506 ‡u 538 ‡u 555 ‡u 514 ‡u 540 ‡u 563 ‡u 520 ‡u 545 ‡u 583 ‡u
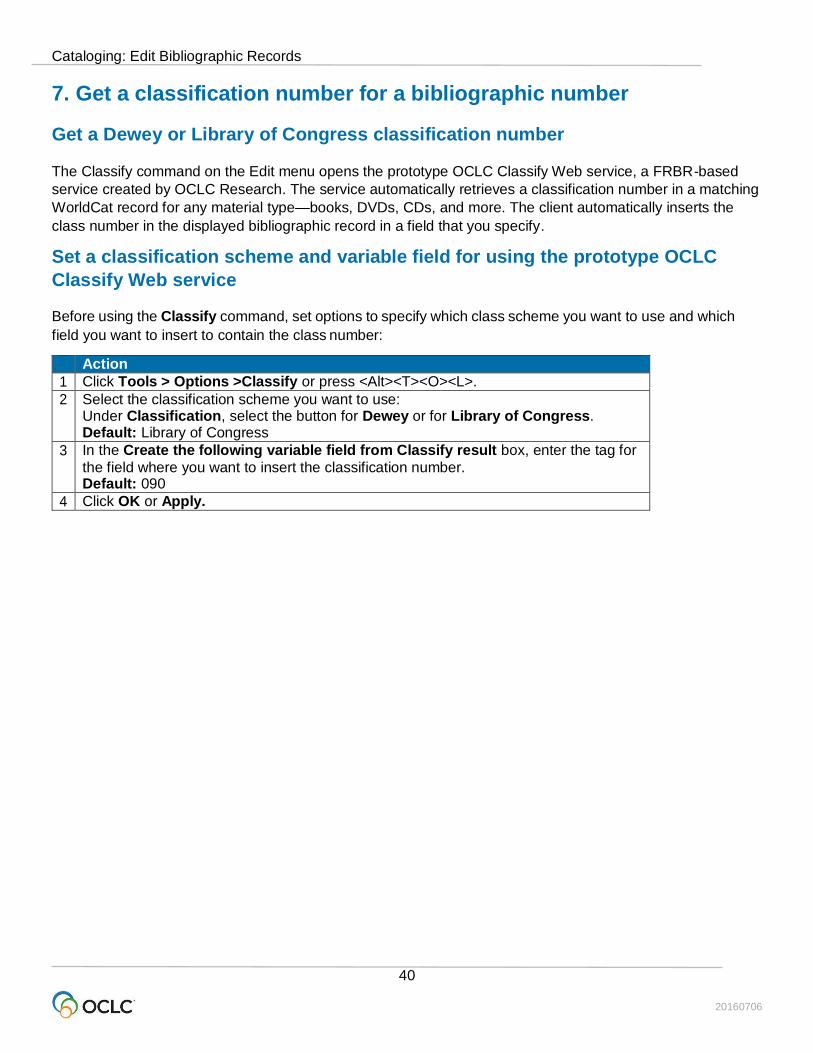
Cataloging: Edit Bibliographic Records
20160706
40
7. Get a classification number for a bibliographic number
Get a Dewey or Library of Congress classification number
The Classify command on the Edit menu opens the prototype OCLC Classify Web service, a FRBR-based
service created by OCLC Research. The service automatically retrieves a classification number in a matching
WorldCat record for any material type—books, DVDs, CDs, and more. The client automatically inserts the
class number in the displayed bibliographic record in a field that you specify.
Set a classification scheme and variable field for using the prototype OCLC
Classify Web service
Before using the Classify command, set options to specify which class scheme you want to use and which
field you want to insert to contain the class number:
Action
1 Click Tools > Options >Classify or press <Alt><T><O><L>.
2 Select the classification scheme you want to use: Under Classification, select the button for Dewey or for Library of Congress. Default: Library of Congress
3 In the Create the following variable field from Classify result box, enter the tag for
the field where you want to insert the classification number. Default: 090
4 Click OK or Apply.
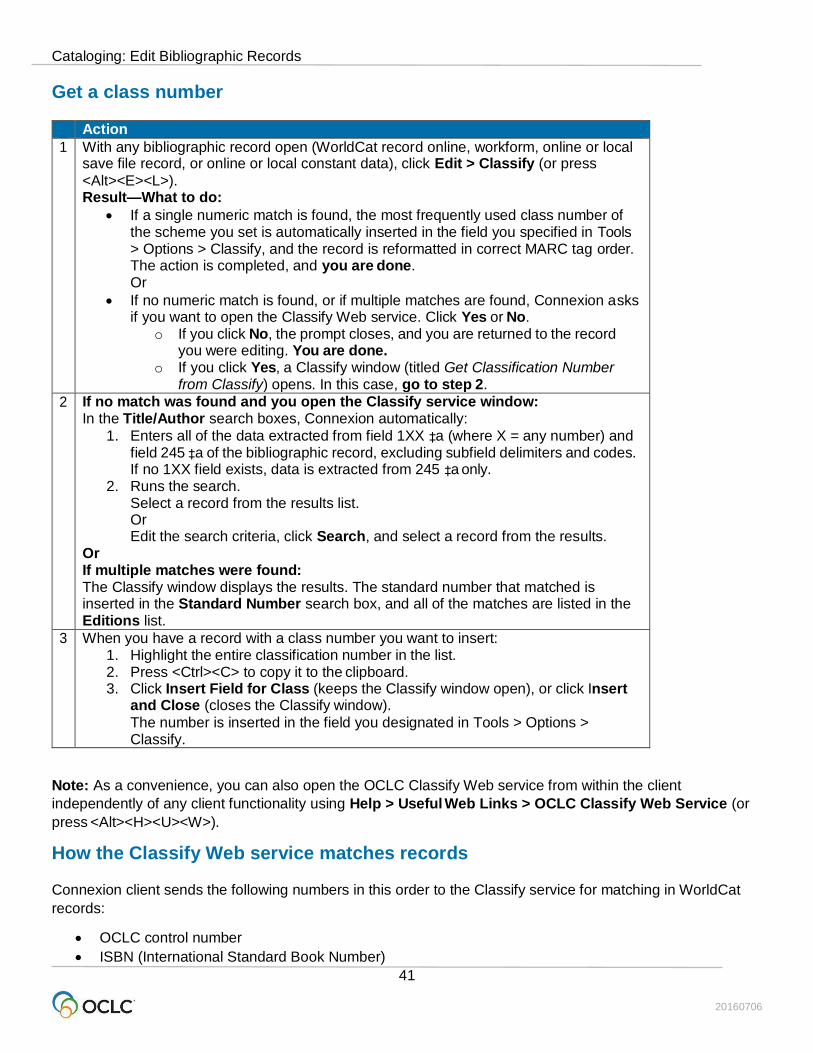
Cataloging: Edit Bibliographic Records
20160706
41
Get a class number
Action
1 With any bibliographic record open (WorldCat record online, workform, online or local save file record, or online or local constant data), click Edit > Classify (or press
<Alt><E><L>). Result—What to do:
If a single numeric match is found, the most frequently used class number of the scheme you set is automatically inserted in the field you specified in Tools > Options > Classify, and the record is reformatted in correct MARC tag order. The action is completed, and you are done. Or
If no numeric match is found, or if multiple matches are found, Connexion asks if you want to open the Classify Web service. Click Yes or No.
o If you click No, the prompt closes, and you are returned to the record you were editing. You are done.
o If you click Yes, a Classify window (titled Get Classification Number from Classify) opens. In this case, go to step 2.
2 If no match was found and you open the Classify service window: In the Title/Author search boxes, Connexion automatically:
1. Enters all of the data extracted from field 1XX ‡a (where X = any number) and field 245 ‡a of the bibliographic record, excluding subfield delimiters and codes. If no 1XX field exists, data is extracted from 245 ‡a only.
2. Runs the search. Select a record from the results list. Or Edit the search criteria, click Search, and select a record from the results.
Or If multiple matches were found: The Classify window displays the results. The standard number that matched is inserted in the Standard Number search box, and all of the matches are listed in the Editions list.
3 When you have a record with a class number you want to insert: 1. Highlight the entire classification number in the list. 2. Press <Ctrl><C> to copy it to the clipboard. 3. Click Insert Field for Class (keeps the Classify window open), or click Insert
and Close (closes the Classify window).
The number is inserted in the field you designated in Tools > Options > Classify.
Note: As a convenience, you can also open the OCLC Classify Web service from within the client
independently of any client functionality using Help > Useful Web Links > OCLC Classify Web Service (or
press <Alt><H><U><W>).
How the Classify Web service matches records
Connexion client sends the following numbers in this order to the Classify service for matching in WorldCat
records:
OCLC control number
ISBN (International Standard Book Number)
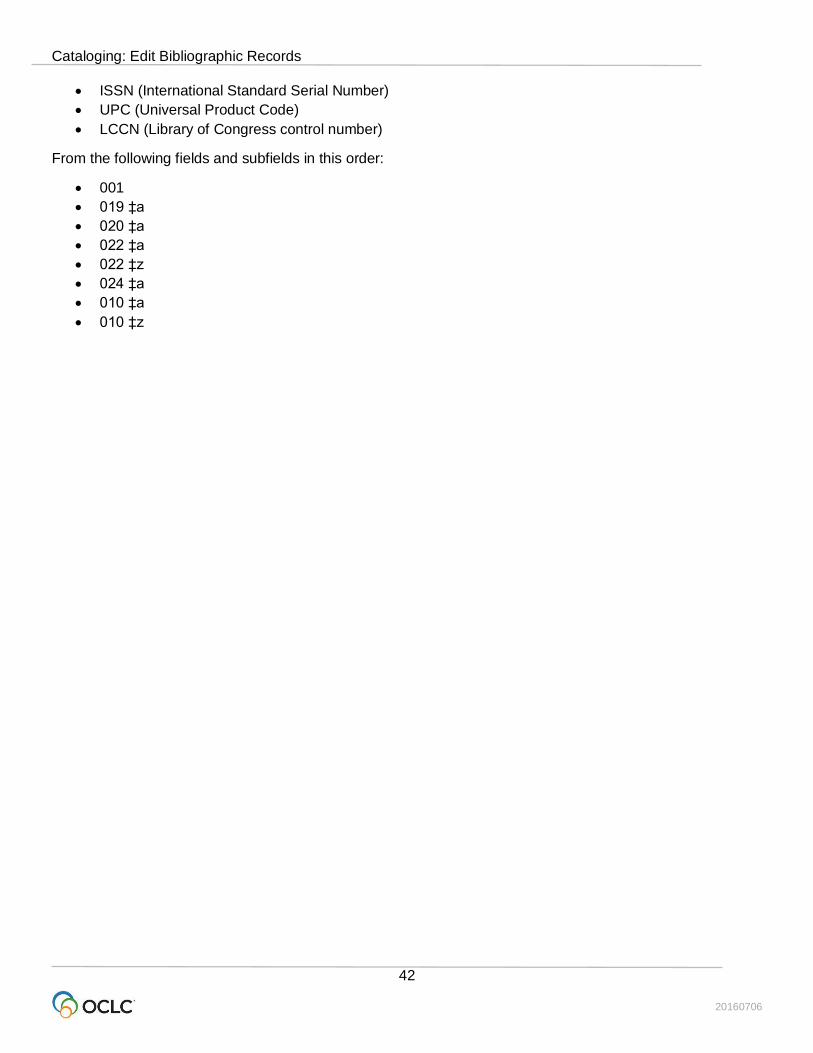
Cataloging: Edit Bibliographic Records
20160706
42
ISSN (International Standard Serial Number)
UPC (Universal Product Code)
LCCN (Library of Congress control number)
From the following fields and subfields in this order:
001
019 ‡a
020 ‡a
022 ‡a
022 ‡z
024 ‡a
010 ‡a
010 ‡z

Cataloging: Edit Bibliographic Records
20160706
43
8. Default keystroke shortcuts for navigating and editing records
If you prefer, use the keyboard rather than the mouse for editing records.
The following table describes default keystroke shortcuts and gives equivalent menu commands and access
keys for moving the cursor and working with fields and data in fields.
For more editing commands and keystroke shortcuts, see “Edit bibliographic records.”
Note on navigating and editing fixed field elements:
Keystroke functions in the fixed field may work differently when the fixed field is displayed at the Top or
Bottom of the record in View > OCLC Fixed Field.
Arrow and tab keys may work differently, as noted in the table, when fixed field drop-down lists are
displayed.
The setting to show or hide fixed field lists is in Tools > Options > Record Display. By default, the
drop-down lists display.
Press keystroke shortcut ...
To do this ... Or click Menu > Command or press access keys (if available)
<Enter> Insert a new field below the field where the cursor is located
Edit > Cut Copy Paste > Insert Blank Field > Below Current Field
Or <Alt><E><C><B><B>
<Shift><Enter> Insert a new field above the field where the cursor is located
Edit >Cut Copy Paste > Insert Blank Field > Above Current Field
Or <Alt><E><C><B><A>)
<Up arrow> Move the cursor to the same position in the previous line In the fixed field with drop-down lists displayed: Move the cursor up within the
current drop-down list only, without showing the entire list
None
<Down arrow> Move the cursor to the same position in the next line In the fixed field with drop-down lists displayed: Move the cursor down within the current drop-down list only, without showing the entire list
None
<Shift><Up arrow>
In the fixed field: Moves cursor up to the fixed field element immediately above
None
<Shift><Down arrow>
In the fixed field: Moves cursor down to the
fixed field element immediately below None
<Alt><Up arrow> Move the current field up one position
In the fixed field with drop-down lists displayed: Displays the current drop-down list
so that you can use arrow keys to scroll the list
Edit > Cut Copy Paste > Move Field > Up
Or <Alt><E><C><M><D>
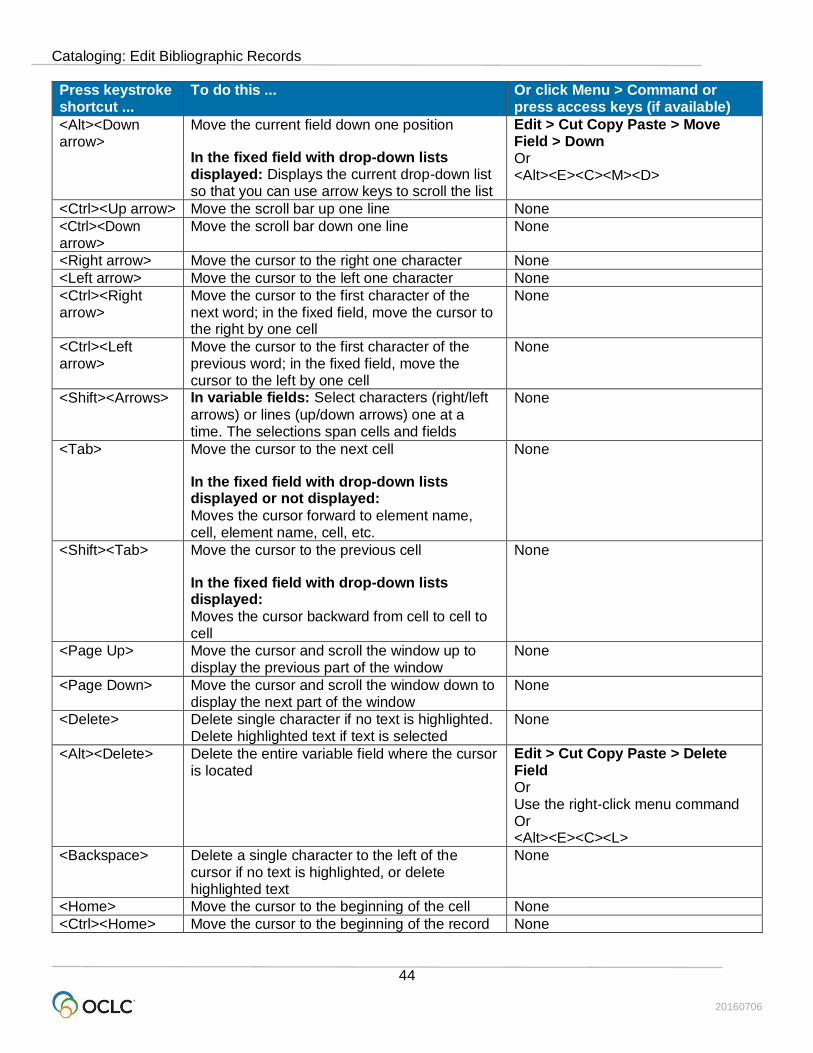
Cataloging: Edit Bibliographic Records
20160706
44
Press keystroke shortcut ...
To do this ... Or click Menu > Command or press access keys (if available)
<Alt><Down arrow>
Move the current field down one position
In the fixed field with drop-down lists displayed: Displays the current drop-down list so that you can use arrow keys to scroll the list
Edit > Cut Copy Paste > Move Field > Down Or <Alt><E><C><M><D>
<Ctrl><Up arrow> Move the scroll bar up one line None
<Ctrl><Down arrow>
Move the scroll bar down one line None
<Right arrow> Move the cursor to the right one character None
<Left arrow> Move the cursor to the left one character None
<Ctrl><Right arrow>
Move the cursor to the first character of the next word; in the fixed field, move the cursor to the right by one cell
None
<Ctrl><Left arrow>
Move the cursor to the first character of the previous word; in the fixed field, move the cursor to the left by one cell
None
<Shift><Arrows> In variable fields: Select characters (right/left
arrows) or lines (up/down arrows) one at a time. The selections span cells and fields
None
<Tab> Move the cursor to the next cell
In the fixed field with drop-down lists displayed or not displayed:
Moves the cursor forward to element name, cell, element name, cell, etc.
None
<Shift><Tab> Move the cursor to the previous cell
In the fixed field with drop-down lists displayed:
Moves the cursor backward from cell to cell to cell
None
<Page Up> Move the cursor and scroll the window up to display the previous part of the window
None
<Page Down> Move the cursor and scroll the window down to display the next part of the window
None
<Delete> Delete single character if no text is highlighted. Delete highlighted text if text is selected
None
<Alt><Delete> Delete the entire variable field where the cursor is located
Edit > Cut Copy Paste > Delete Field Or Use the right-click menu command Or <Alt><E><C><L>
<Backspace> Delete a single character to the left of the cursor if no text is highlighted, or delete highlighted text
None
<Home> Move the cursor to the beginning of the cell None
<Ctrl><Home> Move the cursor to the beginning of the record None
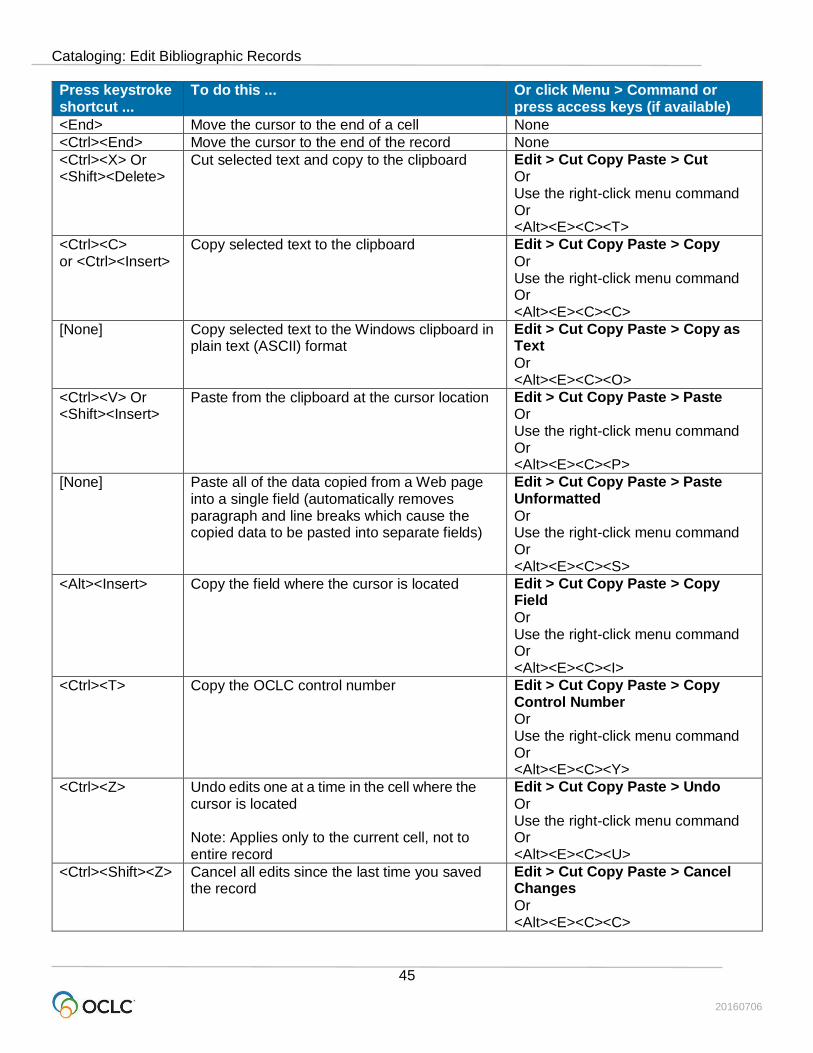
Cataloging: Edit Bibliographic Records
20160706
45
Press keystroke shortcut ...
To do this ... Or click Menu > Command or press access keys (if available)
<End> Move the cursor to the end of a cell None
<Ctrl><End> Move the cursor to the end of the record None
<Ctrl><X> Or <Shift><Delete>
Cut selected text and copy to the clipboard Edit > Cut Copy Paste > Cut Or Use the right-click menu command Or <Alt><E><C><T>
<Ctrl><C> or <Ctrl><Insert>
Copy selected text to the clipboard Edit > Cut Copy Paste > Copy
Or Use the right-click menu command Or <Alt><E><C><C>
[None] Copy selected text to the Windows clipboard in plain text (ASCII) format
Edit > Cut Copy Paste > Copy as Text
Or <Alt><E><C><O>
<Ctrl><V> Or <Shift><Insert>
Paste from the clipboard at the cursor location Edit > Cut Copy Paste > Paste Or Use the right-click menu command Or <Alt><E><C><P>
[None] Paste all of the data copied from a Web page into a single field (automatically removes paragraph and line breaks which cause the copied data to be pasted into separate fields)
Edit > Cut Copy Paste > Paste Unformatted
Or Use the right-click menu command Or <Alt><E><C><S>
<Alt><Insert> Copy the field where the cursor is located Edit > Cut Copy Paste > Copy Field
Or Use the right-click menu command Or <Alt><E><C><I>
<Ctrl><T> Copy the OCLC control number Edit > Cut Copy Paste > Copy Control Number Or Use the right-click menu command Or <Alt><E><C><Y>
<Ctrl><Z> Undo edits one at a time in the cell where the cursor is located
Note: Applies only to the current cell, not to entire record
Edit > Cut Copy Paste > Undo
Or Use the right-click menu command Or <Alt><E><C><U>
<Ctrl><Shift><Z> Cancel all edits since the last time you saved the record
Edit > Cut Copy Paste > Cancel Changes
Or <Alt><E><C><C>
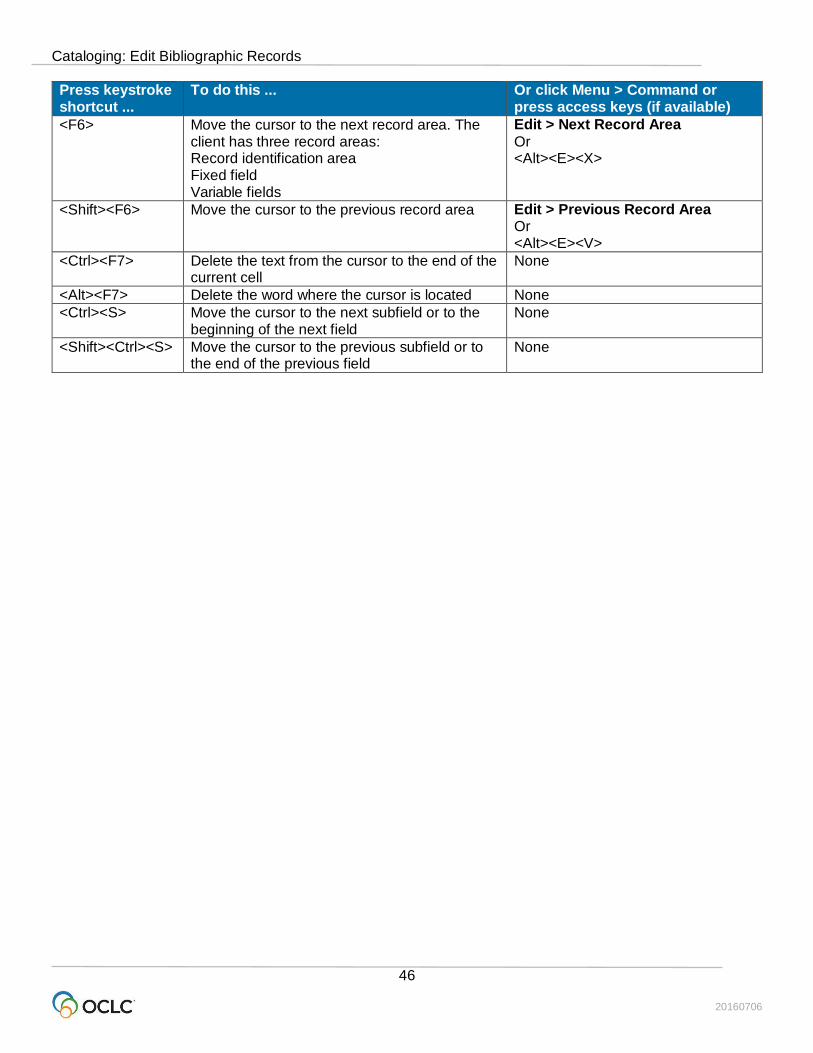
Cataloging: Edit Bibliographic Records
20160706
46
Press keystroke shortcut ...
To do this ... Or click Menu > Command or press access keys (if available)
<F6> Move the cursor to the next record area. The client has three record areas: Record identification area Fixed field Variable fields
Edit > Next Record Area
Or <Alt><E><X>
<Shift><F6> Move the cursor to the previous record area Edit > Previous Record Area Or <Alt><E><V>
<Ctrl><F7> Delete the text from the cursor to the end of the current cell
None
<Alt><F7> Delete the word where the cursor is located None
<Ctrl><S> Move the cursor to the next subfield or to the beginning of the next field
None
<Shift><Ctrl><S> Move the cursor to the previous subfield or to the end of the previous field
None
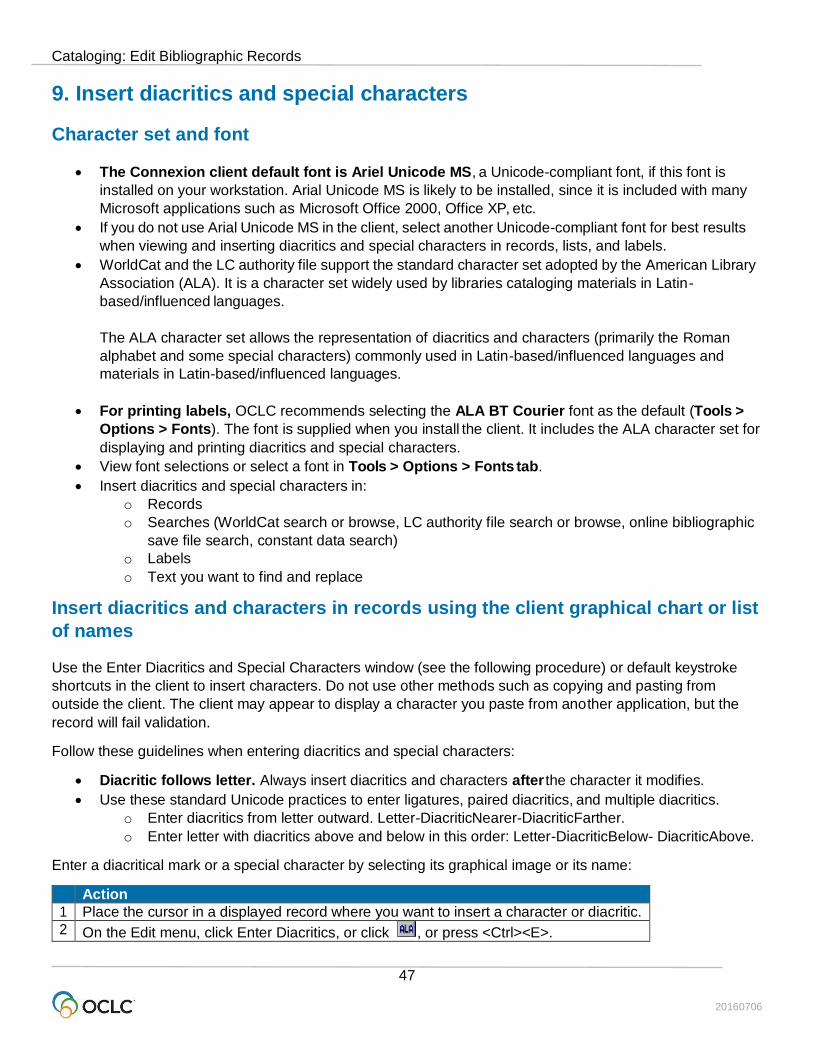
Cataloging: Edit Bibliographic Records
20160706
47
9. Insert diacritics and special characters
Character set and font
The Connexion client default font is Ariel Unicode MS, a Unicode-compliant font, if this font is
installed on your workstation. Arial Unicode MS is likely to be installed, since it is included with many
Microsoft applications such as Microsoft Office 2000, Office XP, etc.
If you do not use Arial Unicode MS in the client, select another Unicode-compliant font for best results
when viewing and inserting diacritics and special characters in records, lists, and labels.
WorldCat and the LC authority file support the standard character set adopted by the American Library
Association (ALA). It is a character set widely used by libraries cataloging materials in Latin-
based/influenced languages.
The ALA character set allows the representation of diacritics and characters (primarily the Roman
alphabet and some special characters) commonly used in Latin-based/influenced languages and
materials in Latin-based/influenced languages.
For printing labels, OCLC recommends selecting the ALA BT Courier font as the default (Tools >
Options > Fonts). The font is supplied when you install the client. It includes the ALA character set for
displaying and printing diacritics and special characters.
View font selections or select a font in Tools > Options > Fonts tab.
Insert diacritics and special characters in:
o Records
o Searches (WorldCat search or browse, LC authority file search or browse, online bibliographic
save file search, constant data search)
o Labels
o Text you want to find and replace
Insert diacritics and characters in records using the client graphical chart or list
of names
Use the Enter Diacritics and Special Characters window (see the following procedure) or default keystroke
shortcuts in the client to insert characters. Do not use other methods such as copying and pasting from
outside the client. The client may appear to display a character you paste from another application, but the
record will fail validation.
Follow these guidelines when entering diacritics and special characters:
Diacritic follows letter. Always insert diacritics and characters after the character it modifies.
Use these standard Unicode practices to enter ligatures, paired diacritics, and multiple diacritics.
o Enter diacritics from letter outward. Letter-DiacriticNearer-DiacriticFarther.
o Enter letter with diacritics above and below in this order: Letter-DiacriticBelow- DiacriticAbove.
Enter a diacritical mark or a special character by selecting its graphical image or its name:
Action
1 Place the cursor in a displayed record where you want to insert a character or diacritic.
2 On the Edit menu, click Enter Diacritics, or click , or press <Ctrl><E>.
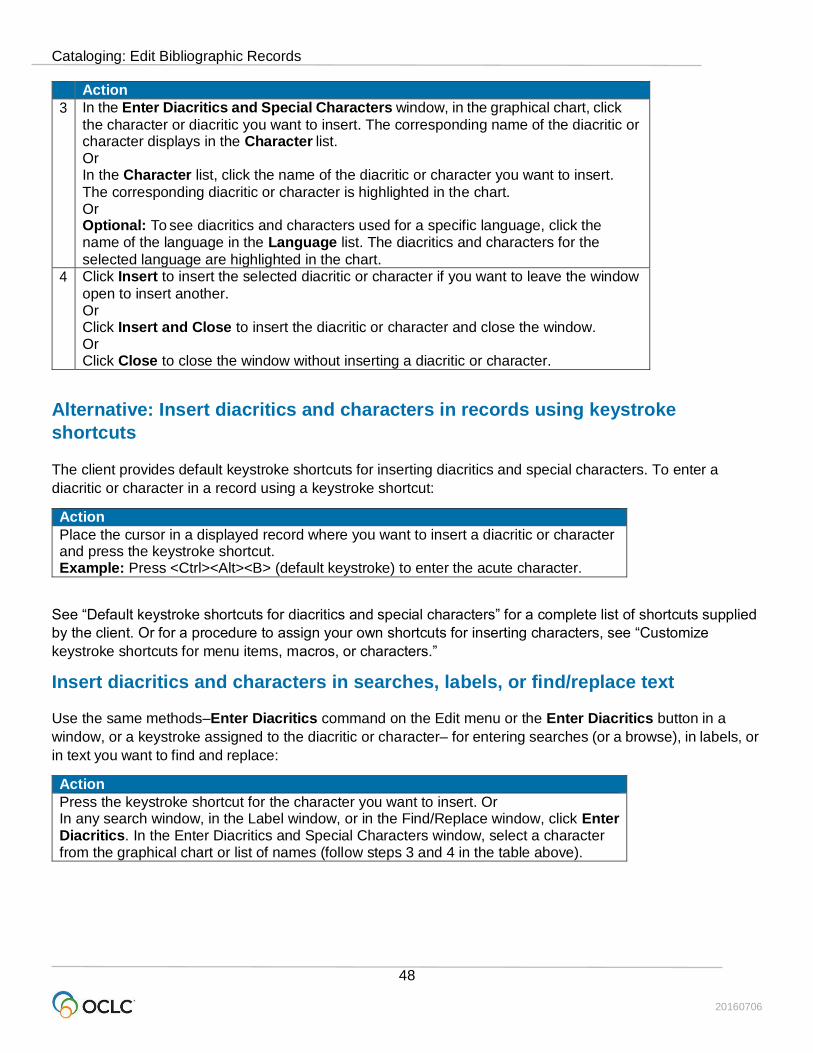
Cataloging: Edit Bibliographic Records
20160706
48
Action
3 In the Enter Diacritics and Special Characters window, in the graphical chart, click
the character or diacritic you want to insert. The corresponding name of the diacritic or character displays in the Character list. Or In the Character list, click the name of the diacritic or character you want to insert.
The corresponding diacritic or character is highlighted in the chart. Or Optional: To see diacritics and characters used for a specific language, click the name of the language in the Language list. The diacritics and characters for the
selected language are highlighted in the chart.
4 Click Insert to insert the selected diacritic or character if you want to leave the window
open to insert another. Or Click Insert and Close to insert the diacritic or character and close the window. Or Click Close to close the window without inserting a diacritic or character.
Alternative: Insert diacritics and characters in records using keystroke
shortcuts
The client provides default keystroke shortcuts for inserting diacritics and special characters. To enter a
diacritic or character in a record using a keystroke shortcut:
Action
Place the cursor in a displayed record where you want to insert a diacritic or character and press the keystroke shortcut. Example: Press <Ctrl><Alt><B> (default keystroke) to enter the acute character.
See “Default keystroke shortcuts for diacritics and special characters” for a complete list of shortcuts supplied
by the client. Or for a procedure to assign your own shortcuts for inserting characters, see “Customize
keystroke shortcuts for menu items, macros, or characters.”
Insert diacritics and characters in searches, labels, or find/replace text
Use the same methods–Enter Diacritics command on the Edit menu or the Enter Diacritics button in a
window, or a keystroke assigned to the diacritic or character– for entering searches (or a browse), in labels, or
in text you want to find and replace:
Action
Press the keystroke shortcut for the character you want to insert. Or In any search window, in the Label window, or in the Find/Replace window, click Enter Diacritics. In the Enter Diacritics and Special Characters window, select a character from the graphical chart or list of names (follow steps 3 and 4 in the table above).
Cataloging: Edit Bibliographic Records
20160706
49
RLIN21 Latin keyboard alternative – bibliographic records only
For RLIN21 catalogers making the transition to Connexion client, OCLC makes available the same Latin
keyboard for entering diacritics and special characters in the Connexion client that was used with RLIN21
software.
For more information and instructions, see:
Download and installation instructions for the keyboards in Getting Started with OCLC Connexion
Client
RLIN21 Keyboards – shows graphics of all RLIN21 keyboards (keyboards are also available for
entering Arabic, Cyrillic, and Hebrew scripts)
RLIN21 Latin Character Keystroke Alternatives – a list of keystroke shortcuts for entering diacritics
and special characters that are included in the RLIN21 Latin keyboard at:
Note: See the last section of “Default keystroke shortcuts for entering diacritics and special characters” in this
booklet for information on conflicts between keystroke shortcuts for the RLIN21 keyboard and default
keystrokes in the client that include <Alt>, <Ctrl><Alt>, and <Ctrl><Alt><Shift>.
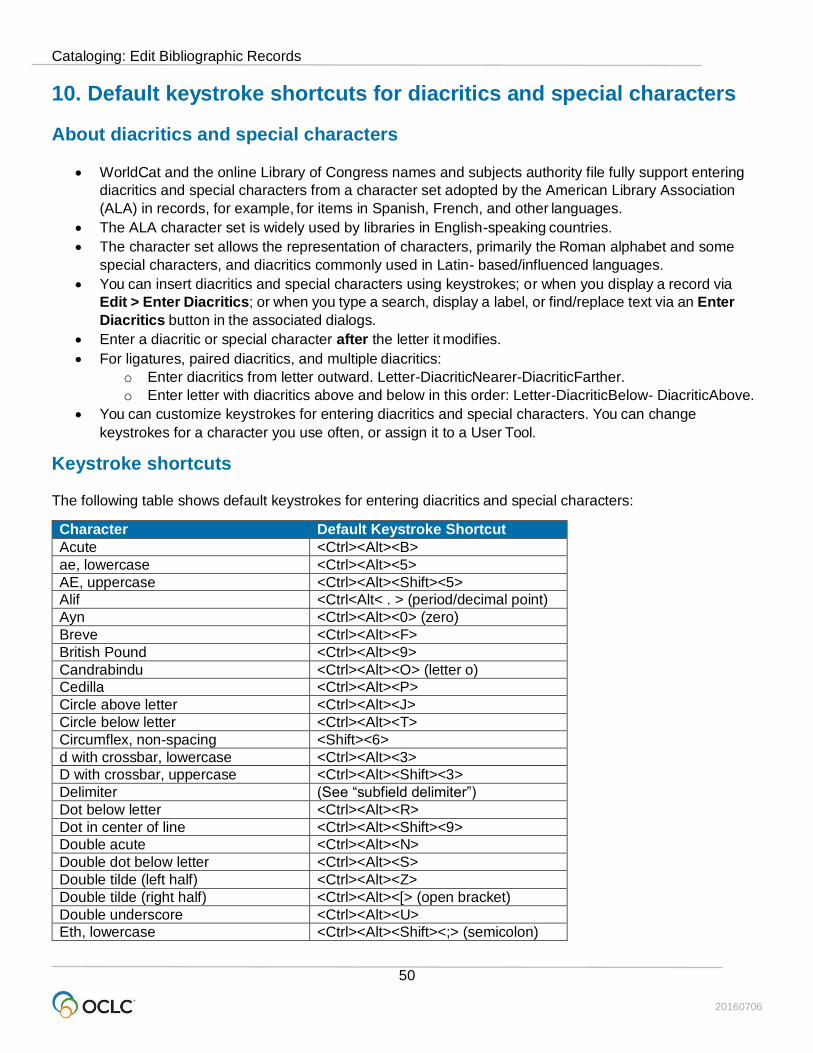
Cataloging: Edit Bibliographic Records
20160706
50
10. Default keystroke shortcuts for diacritics and special characters
About diacritics and special characters
WorldCat and the online Library of Congress names and subjects authority file fully support entering
diacritics and special characters from a character set adopted by the American Library Association
(ALA) in records, for example, for items in Spanish, French, and other languages.
The ALA character set is widely used by libraries in English-speaking countries.
The character set allows the representation of characters, primarily the Roman alphabet and some
special characters, and diacritics commonly used in Latin- based/influenced languages.
You can insert diacritics and special characters using keystrokes; or when you display a record via
Edit > Enter Diacritics; or when you type a search, display a label, or find/replace text via an Enter
Diacritics button in the associated dialogs.
Enter a diacritic or special character after the letter it modifies.
For ligatures, paired diacritics, and multiple diacritics:
o Enter diacritics from letter outward. Letter-DiacriticNearer-DiacriticFarther.
o Enter letter with diacritics above and below in this order: Letter-DiacriticBelow- DiacriticAbove.
You can customize keystrokes for entering diacritics and special characters. You can change
keystrokes for a character you use often, or assign it to a User Tool.
Keystroke shortcuts
The following table shows default keystrokes for entering diacritics and special characters:
Character Default Keystroke Shortcut
Acute <Ctrl><Alt><B>
ae, lowercase <Ctrl><Alt><5>
AE, uppercase <Ctrl><Alt><Shift><5>
Alif <Ctrl<Alt< . > (period/decimal point)
Ayn <Ctrl><Alt><0> (zero)
Breve <Ctrl><Alt><F>
British Pound <Ctrl><Alt><9>
Candrabindu <Ctrl><Alt><O> (letter o)
Cedilla <Ctrl><Alt><P>
Circle above letter <Ctrl><Alt><J>
Circle below letter <Ctrl><Alt><T>
Circumflex, non-spacing <Shift><6>
d with crossbar, lowercase <Ctrl><Alt><3>
D with crossbar, uppercase <Ctrl><Alt><Shift><3>
Delimiter (See “subfield delimiter”)
Dot below letter <Ctrl><Alt><R>
Dot in center of line <Ctrl><Alt><Shift><9>
Double acute <Ctrl><Alt><N>
Double dot below letter <Ctrl><Alt><S>
Double tilde (left half) <Ctrl><Alt><Z>
Double tilde (right half) <Ctrl><Alt><[> (open bracket)
Double underscore <Ctrl><Alt><U>
Eth, lowercase <Ctrl><Alt><Shift><;> (semicolon)
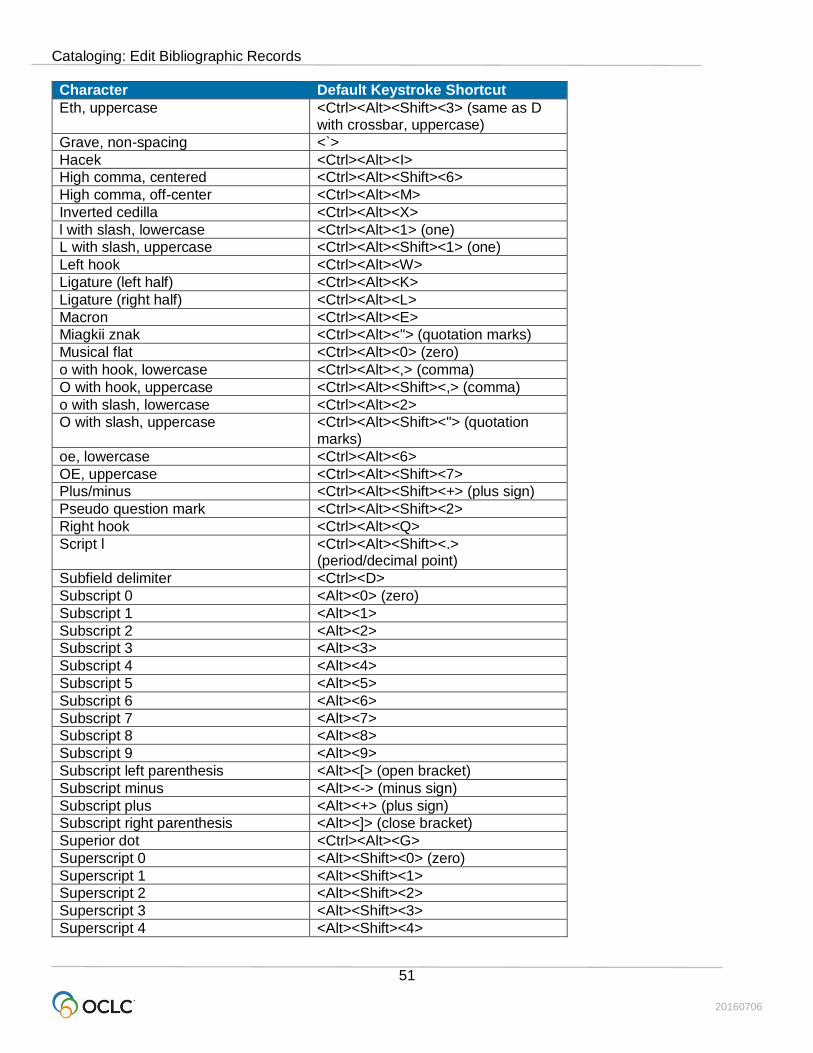
Cataloging: Edit Bibliographic Records
20160706
51
Character Default Keystroke Shortcut
Eth, uppercase <Ctrl><Alt><Shift><3> (same as D with crossbar, uppercase)
Grave, non-spacing <`>
Hacek <Ctrl><Alt><I>
High comma, centered <Ctrl><Alt><Shift><6>
High comma, off-center <Ctrl><Alt><M>
Inverted cedilla <Ctrl><Alt><X>
l with slash, lowercase <Ctrl><Alt><1> (one)
L with slash, uppercase <Ctrl><Alt><Shift><1> (one)
Left hook <Ctrl><Alt><W>
Ligature (left half) <Ctrl><Alt><K>
Ligature (right half) <Ctrl><Alt><L>
Macron <Ctrl><Alt><E>
Miagkii znak <Ctrl><Alt><"> (quotation marks)
Musical flat <Ctrl><Alt><0> (zero)
o with hook, lowercase <Ctrl><Alt><,> (comma)
O with hook, uppercase <Ctrl><Alt><Shift><,> (comma)
o with slash, lowercase <Ctrl><Alt><2>
O with slash, uppercase <Ctrl><Alt><Shift><"> (quotation marks)
oe, lowercase <Ctrl><Alt><6>
OE, uppercase <Ctrl><Alt><Shift><7>
Plus/minus <Ctrl><Alt><Shift><+> (plus sign)
Pseudo question mark <Ctrl><Alt><Shift><2>
Right hook <Ctrl><Alt><Q>
Script l <Ctrl><Alt><Shift><.> (period/decimal point)
Subfield delimiter <Ctrl><D>
Subscript 0 <Alt><0> (zero)
Subscript 1 <Alt><1>
Subscript 2 <Alt><2>
Subscript 3 <Alt><3>
Subscript 4 <Alt><4>
Subscript 5 <Alt><5>
Subscript 6 <Alt><6>
Subscript 7 <Alt><7>
Subscript 8 <Alt><8>
Subscript 9 <Alt><9>
Subscript left parenthesis <Alt><[> (open bracket)
Subscript minus <Alt><-> (minus sign)
Subscript plus <Alt><+> (plus sign)
Subscript right parenthesis <Alt><]> (close bracket)
Superior dot <Ctrl><Alt><G>
Superscript 0 <Alt><Shift><0> (zero)
Superscript 1 <Alt><Shift><1>
Superscript 2 <Alt><Shift><2>
Superscript 3 <Alt><Shift><3>
Superscript 4 <Alt><Shift><4>
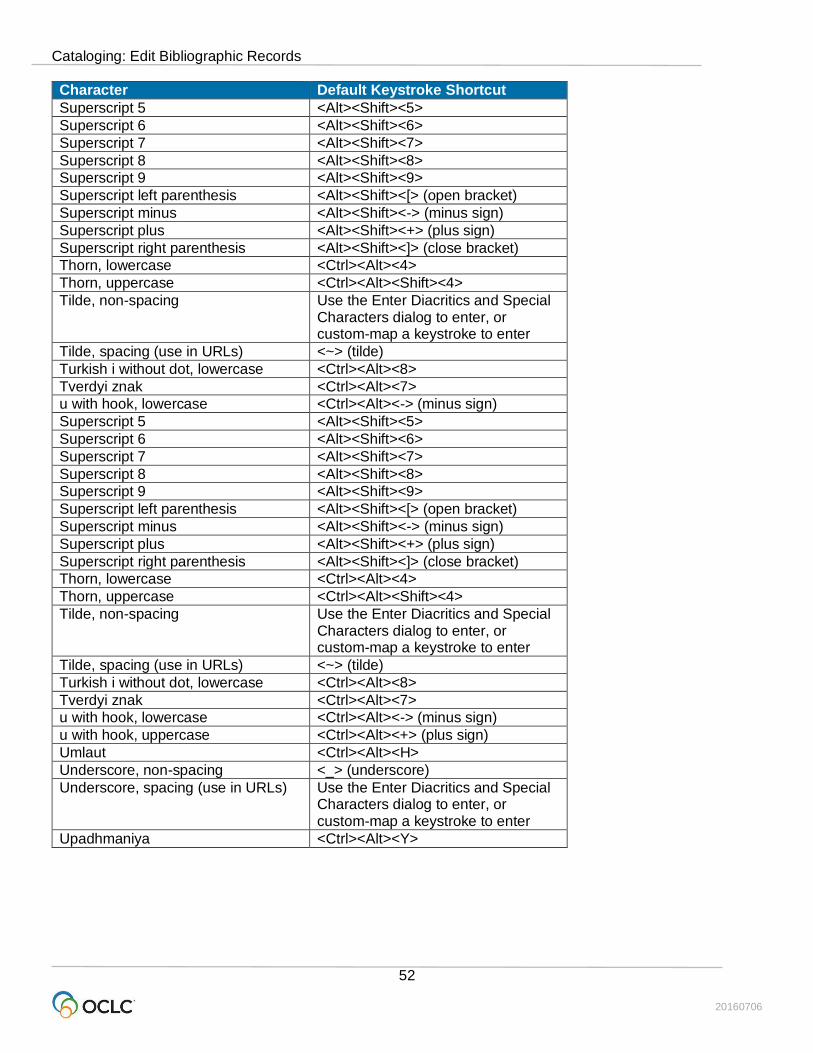
Cataloging: Edit Bibliographic Records
20160706
52
Character Default Keystroke Shortcut
Superscript 5 <Alt><Shift><5>
Superscript 6 <Alt><Shift><6>
Superscript 7 <Alt><Shift><7>
Superscript 8 <Alt><Shift><8>
Superscript 9 <Alt><Shift><9>
Superscript left parenthesis <Alt><Shift><[> (open bracket)
Superscript minus <Alt><Shift><-> (minus sign)
Superscript plus <Alt><Shift><+> (plus sign)
Superscript right parenthesis <Alt><Shift><]> (close bracket)
Thorn, lowercase <Ctrl><Alt><4>
Thorn, uppercase <Ctrl><Alt><Shift><4>
Tilde, non-spacing Use the Enter Diacritics and Special Characters dialog to enter, or custom-map a keystroke to enter
Tilde, spacing (use in URLs) <~> (tilde)
Turkish i without dot, lowercase <Ctrl><Alt><8>
Tverdyi znak <Ctrl><Alt><7>
u with hook, lowercase <Ctrl><Alt><-> (minus sign)
u with hook, uppercase <Ctrl><Alt><+> (plus sign)
Umlaut <Ctrl><Alt><H>
Underscore, non-spacing <_> (underscore)
Underscore, spacing (use in URLs) Use the Enter Diacritics and Special Characters dialog to enter, or custom-map a keystroke to enter
Upadhmaniya <Ctrl><Alt><Y>
Cataloging: Edit Bibliographic Records
20160706
53
Keystroke shortcuts for RLIN21 Latin keyboard – bibliographic records only
For those who choose to use the RLIN21 Latin keyboard for entering diacritics and special characters instead
of the client’s built-in Edit > Enter Diacritics function, see a list of keystroke shortcuts for entering diacritics
and special characters that are included in the RLIN21 Latin keyboard in RLIN21 Latin Character Keystroke
Alternatives.
Caution:
While using the RLIN21 keyboards (also available: Arabic, Cyrillic, and Latin keyboards), you cannot
use Connexion client default keystrokes mapped to alpha-numeric characters that include the Alt,
Ctrl+Alt, or Ctrl+Alt+Shift keys.
These combinations are used with the RLIN21 keyboards and override the Connexion client
keystrokes when you use an RLIN21 keyboard.
However, Connexion client function keys and keystrokes assigned to alpha/ numeric characters that
include the Ctrl, Alt+Shift and Ctrl+Shift keys are available.
Examples:
The default keystroke for Action > Delete Record, mapped to <Ctrl><Alt><D>, conflicts with the
RLIN21 keyboards and cannot be used; you must re-map the Delete Record action to another
keyboard shortcut if you want to use it while also using the RLIN21 keyboards.
However, you can continue to use the default keystroke for entering the delimiter character
(<Ctrl><D>) and the default keystroke for Action > Export (<F5>), since they do not conflict with
RLIN21 keyboards.