course training guide ad astra
TRANSCRIPT
Course Training Guide Ad Astra
2
Upper Toolbar
The upper tool bar is located at the top of the main user interface window, directly below the drop down menus. The buttons in the upper toolbar are shortcuts to often-used functions that may also be accessed through the drop-down menus.
The following buttons make up the upper toolbar:
Rollover Hint What it looks like
Use it to…
Select a date range/term to view
Select a term and/or date range of data to view. you may choose to view one term at a time OR a date range that encompasses one or more terms.
Run Optimizer Configure and run the Optimizer/Bulk Scheduler.
Event Wizard Create a new event using the Event Wizard.
Database Layout Tool Define which fields are visible in the active tab.
Search Table Perform complex, multi-field searches.
Search Off Turn off a current search so that all records in a table are visible.
Filter Preferences On Activate a filter that will allow you to view only those sections without preferences.
Filter Preferences Off Deactivate the "Filter Preferences On" feature.
Daily Room Grid View the daily room grid – an overall view of room bookings in the entire system for one day.
Weekly Room Grid View the weekly room grid – a view of bookings for a selected room for one week.
Events by the Month
View the monthly event calendar- a view of all events and related resource notifications for one month at a time.
Faculty Grid View the faculty grid – a view of a selected faculty member’s schedule for one week.
Resources Grid View the resources grid – a view of resource inventory and bookings.
Astra Mail Access your Astra Mail.
Page 3
Lower Toolbar
The lower toolbar is located at the top of the active tab.
The following buttons make up the lower toolbar:
Rollover Hint What it looks like
Use it to…
Go to First Record Go to the first record in the active tab.
Previous Record Go to the previous record in the active tab.
Next Record Go to the next record in the active tab.
Go to Last Record Go to the last record in the active tab.
New Record
Create a new record in the active tab. Note: This feature does not appear in the Events tab.
Delete Record Delete the highlighted record in the active tab.
Refresh Data Refresh the data in the active tab.
Print Print the visible data in the active tab.
Clear Column Sorts Clear sorts from all columns in the active tab.
Note: Some of these features may not be available to you, depending on your user security settings.
Why do the buttons in the toolbars change?
Depending on whether you are viewing a production or scenario schedule, you may see fewer buttons in the toolbar. Also, your user security may affect which tools (buttons) to which you have access.
Page 4
Customizing your Astra Schedule View Astra Schedule provides many tools that allow you to personalize the "look and feel" of the application. Database Layout Tool
The way the data in the active tab appears on your screen can be customized to meet your needs. Follow the steps below to use the Database Layout tool:
1. Click the Database Layout icon in the upper toolbar (you may also select Database|Database Layout). The Database Layout dialog box will appear.
2. Highlight fields in either panel you wish to move. 3. Click the right arrow to move fields from the "Fields Not Displayed" panel to the "Fields
Displayed" panel. Click the left arrow to move fields from the "Fields Displayed" panel to the "Fields Not Displayed" panel.
Note: You may also drag and drop the fields. Hold the "Ctrl" key while highlighting fields to select more than one field at a time.
4. To view your fields in a certain order, click and drag any field (up or down) to the desired position. 5. To edit a field’s display label, highlight the field and click the Edit button.
Note: This option may be turned off by your System Administrator.
6. Click OK.
Note: A custom layout can be set up for each tab (Sections, Rooms and Events.) Column Width
Follow the steps below to change the column width of any column:
1. Place your mouse between the column headings until you see a double line with arrows pointing left and right.
2. Click and drag until the column is the desired width.
Note: Columns may only be as narrow as the column heading.

Page 5
Column Order
Follow the steps below to change the column order:
1. Place your mouse on the column heading of the column you wish to move. 2. Click and drag it to the desired position.
Note: Use the blue double arrows as a guide to where your column will be inserted. Choosing a Date Range or Term
Section data can be viewed by academic term. you may also choose to view only a portion of a term or multiple terms by setting a date range. Follow the steps below to choose a date range:
1. Click the Select a date range/term to view icon in the upper toolbar (you may also select File|Select Dates).
2. Choose the term or date range of information you would like to view. 3. Click OK.
Note: If the viewable date range encompasses two or more terms, another set of tabs
will be generated directly below the lower toolbar. These tabs are divided by terms.
Group By
Drop down menus at the top-right corner of the section and event tabs allow you to view data in various ways. "Grouping by" will create a second set of tabs (and possibly a third, if you select a two-tier group by, e.g. building/room) at the bottom of the main user interface window. Follow the steps below to "group by":
1. From the Group By drop down menu, select the field(s) by which you wish to group the data.
You should notice a second, and possibly a third, set of tabs at the bottom of the main user interface window.
Note: If you have too many tabs to be viewed on the screen, you may scroll through them using the arrow keys to the left of the tabs.
Page 6
2. Select a value from the Jump To drop down menu to go to a specific value set in your grouped data.
Note: These menus are not available in the Rooms tab.
Page 7
INITIAL SETUP 1. Import rooms from SIS
Prior to creating a room type list, certain room types had to be imported from SIS. In order to limit the quantity of facilities imported (20,000+ vs. 2,000), only certain types were brought over during the batch load. Although these were the only types loaded initially, other individual rooms can be loaded as needed. The room types that were loaded initially were chosen from the Bureau of Facilities list of classroom types. They include: 110A – Lecture Hall 110B – General Classroom 110C – Seminar Room 110D – Distance Education Teaching Room 210 – Class Laboratory 220 – Special Group/Open Laboratory These types cover the majority of Registrar controlled rooms, but leave out many that are not registrar controlled. The decision not to include types like Individual Study and other small rooms was made because only a small percentage of the total population are actually scheduled on a regular basis. Adding all Individual Study rooms would add thousands more rooms to the room file when only a small percentage of those are actually scheduled every term.
ON THE ROOMS TAB
Creating Individual Room Records Each schedulable space at your institution must have its own unique room record. You may configure partitioned rooms so that each part of the room that can be independently scheduled and has its own record. Creating the Room Record
Follow these steps to create a room record:
1. In Astra Schedule, click on the Rooms tab to access the room file.
2. Click the New Record icon on the tool bar located under the Rooms Tab. This will display a blank Edit Room Record dialog box. This dialog box will automatically open with the Information tab selected. The information tab is located at the bottom of the dialog box.

Page 8
3. Enter descriptive data in the Information tab of the Edit Room Record dialog, and (optionally) the
remaining three tabs and/or Details button. The Information Tab
The Information tab, located at the bottom of the Edit Room Record dialog box, contains all general information about the selected room.
1. Enter values into the Building, Room, Campus, Square Feet (optional) Normal Seats, Seats (the number that the system uses for scheduling), and Room Type fields.
Note: The Normal Seats field refers to actual room capacity while the Seats field refers to the scheduled capacity. By having a separate field for scheduled capacity, the system allows users to place events and/or sections into rooms that have slightly fewer actual seats than required.
2. To take this room out of scheduling consideration, check the box labeled May not schedule this room.
3. Optionally, check the box labeled Arranged section room. The room will no longer show up in
the room utilization grids and will only be a scheduling choice for sections marked as Arranged (also called TBA.)
4. Add any special features to the room by clicking the New button located just to the right of the "Room Special Features" portion of the window. This will display the Features dialog box.
Select the room feature you wish to add to the specified room from the drop down list. If this feature allows quantities, select the correct number of features for the room. Click OK. That feature will now appear in the "Room Special Features" portion of the window.
Page 9
To edit a room feature, highlight the feature you would like to edit and click on the Edit icon . To delete room features, highlight the room feature that you would like to delete and click on the
Delete icon .
5. Select the region(s) in which the room is included from the "Regions" portion of the window by checking the box next to the appropriate region(s).
The Control Tab
The Control tab allows you to control room use by limiting scheduling access by day/time. These settings can only be used to limit existing user privileges, not grant new privileges. For example, a room may be set up to only allow section scheduling during weekday mornings. If users have access to schedule events into this room, they will now be restricted to scheduling events during the afternoons, evenings, and weekends.
1. In the Edit Room Record dialog box, click on the Control tab at the bottom of the window. The
Room Control grid will appear.
2. Highlight the period of time for which you would like to define room control, by clicking and dragging on the grid. The Select dialog box will appear.

Page 10
3. Click the radio button next to the provision that you would like to make on the room. You will notice that the color of the time block you selected will have changed to correspond with the selection you made.
4. Click the Users With No Request button if there are users who cannot request this room. The
Users With No Request dialog box will appear. Check the names of those people who may not request this room for events or sections (all days/times.)
The Blocking Tab
The Blocking Tab allows you to block a room from use for multiple date ranges and/or set event scheduling rights beyond the Event Cutoff Date.
1. In the Edit Room Record dialog box, select the Blocking tab located at the bottom of the window.
2. Click the New button at the top of the window. The Room Blocking dialog box will appear.

Page 11
3. Enter the start and end dates of the room block by clicking on the corresponding calendars and the start and end times by clicking on the corresponding clocks.
Then, specify if the room will be blocked from scheduling events, sections, or both. If the entire building will be blocked, check the box labeled Block Whole Building. Click OK to return to the Edit Room Record dialog box.
4. Check the box labeled Event scheduling only allowed up to Event Cutoff Date to limit event scheduling accordingly.
5. Click OK to save changes.
Search for Available Room Tools
Accessing the Search for Available Room Tools
The Search for Available Room Tools allow you to view reports and grids that show room availability for sections and events during specific times and meeting patterns. To access this tool, go to the Assignment drop down menu and select Search for Available Room. This will display the Find Available Rooms window.
This window allows you to choose from four tools:
• Event Tool – Used to view all available rooms for single/multiple meeting patterns • Section Tool – Used to view or print a list of available rooms for a section meeting pattern
Page 12
• Room Grid – Used to view or print collapsed room grid by date range for available times • Report By Standard Days and Times – Used to view or print all available rooms by Standard Day
and Time Section Tool
The Section Tool allows you to view or print a list of available rooms for a section meeting pattern. Follow the steps below to use the Section Tool:
1. Go to the Assignment drop down menu and select Search for Available Room. This will display
the Find Available Rooms window. 2. Place the radio button next to Section Tool and click the Next button. This will display the
Section/Available Rooms window.
3. Fill out the fields in the upper portion of the window to refine your search:
• Enrollment • Campus • Start and End Date • Start and End Times • Days Met
4. You must select a Room Type preference before you search. Click in the RoomType box in the Room Preferences area.
This will display the Room Type Selection window.
Page 13
5. Select your Room Type(s) in the drop down menu(s) and weight them with the slide bar
if appropriate. Click OK to return to the Section/Available Rooms window.
6. Set preferences at the Feature, Region, Building, or Building and Room level if appropriate. 7. After setting up all your preferences, click on the Print button. This will display the Report Setup
window.
8. Pick your report destination: Printer, Print Preview, or Save to File. Click OK.
Note: It is recommended that you preview the report before printing a hard copy, as these reports can be very large.
Room Grid
The Room Grid allows you to view room availability in grid format by date and time. Follow the steps below to use the room grid:
Page 14
1. Go to the Assignment drop down menu and select Search for Available Room. This will display the Find Available Rooms window.
2. Place the radio button next to Room Grid and click the Next button. This will display the Room
Report window.
3. Select the room(s) for which you want to check availability in the left hand side of the window. To select all the rooms, select the box next to ALL.
4. If you want to check room availability for an entire term, select it in the Term drop down menu. Or you may select a date range to view by using the Start Date and End Date boxes.
5. Select a start time for the grid display. 6. If you want the report to generate a list of events and sections assigned to the room after the grid
view, select the box next to Print Details.
7. Click on the Print button. This will display the Report Setup window.

Page 15
Page 16
Understanding Preferences User-defined scheduling preferences allow important subjective factors to influence room selection. They are central to section scheduling.
Weighting
Weights on preferences define the strength of a preference for (or desire to avoid) an attribute. Weights are used in the Optimizer as part of the calculation that determines the best room(s) available. All scheduling preferences except Room Type allow weights from –10 to 10. Room Type only allows weights from 1 to 10 because any Room Types not selected are automatically not considered (and therefore do not need to be avoided). Higher weights (or in the case of the negative weights, lower) mean stronger preferences. A "10" weight means that the selection is ideal. A "5" is half as desirable as a "10". A "-10" means that the selection will never be considered. Weights from –9 to –1 are considered, but avoided. Selecting "limit search to list" on Region, Building, and Building and Room preferences will prompt Astra Schedule to only consider the selected attributes. If you select Room Features with quantities (e.g., computers), you must also select the desired number of that feature. If the number selected is required (as a minimum), then put the weight for that feature at "10" and check the Minimum Quantity Required? box.
Room Type
The room type is the actual configuration of the room. Room types should be specific enough to handle the majority of sections/events without having to request room features, and general enough to typically encompass several rooms. Room type preferences correspond to room types defined in the room file and weights (importance) may be set from 1 to 10.
What room is used for How to define its room type Example Single, specific purpose Strictly Microbiology lab
Variety of sections and events Generally Lecture hall, conference room
Note: At least one room type preference must be selected in order to schedule a section. Only room types selected in the preference dialog will be considered by Astra Schedule.
Room Feature
Room features are special room attributes that are a permanent part of the room. Only those features that are important in room selection should be defined and selected. Weights can be set from –10 (avoid) to 10 (strongly prefer). For features that allow quantities, select a desired number of that feature. If this number is required (a minimum) enter a weight of "10" and check the Minimum Quantity Required? box.
Examples of room features:
• Projection screen • Whiteboard • Wheelchair access • Special A/V equipment
Note: Excessive use of room features can limit room selection to the point of virtually pre-assigning a section to a room or small group of rooms.
Page 17
Region
A user-defined block of rooms and buildings on your campus that may overlap two or more buildings. Each room in your room table can be assigned to one region or several regions. Ideally, regions should be set up to define preferred groups of rooms or to limit users’ access to a group of rooms, not to divide the campus into several "mini" campuses or departmental "turf." Weights can be set from –10 (avoid) to 10 (strongly prefer). Regions are set up for many reasons:
Type of region When to use it Departmental region If different departments prefer certain parts of your campus Scheduling region If certain parts of your campus are used for certain types of activities (e.g. event
region, course region) Geographic region If your campus is divided into logical geographic locations (e.g., North, South)
Note: User security can be set up to allow or deny scheduling access to regions. Once a campus is divided into regions, schedulers and viewers can be set up to see only the rooms in a desired region(s).
Building
You may request certain preferred buildings. Weights can be set from –10 (avoid) to 10 (strongly prefer).
Room
You may request certain preferred rooms. Weights can be set from –10 (avoid) to 10 (strongly prefer). How often do I configure my Scheduling Preferences?
Default preference tables are system-level tables that only have to be set up once (not every academic term.) They may be modified or added to at any time as preferences change. Keep in mind that you may also modify the default order of applying scheduling preferences.
Configuring Preferences at the Meeting Type level
Meeting type preferences should be used if the majority of course sections of a particular meeting type (e.g. lecture) are to be scheduled into the same room type (e.g. lecture-auditorium, lecture-table/chair, lecture-tablet/armchair, etc.). Follow the steps below to configure preferences at the meeting type level:
1. Select Configure/Meeting Type Preferences. The Meeting Types dialog box will appear.

Page 18
2. Select the New button or highlight a meeting type and select Edit. The Meeting Type dialog box will appear.
3. Name the meeting type. 4. Click once in the "Room Type Preferences" box. The Room Type Selection dialog box will
appear.
5. Select up to 10 preferred Room Types and assign a ranking from 1 – 10. 6. Click OK.
Page 19
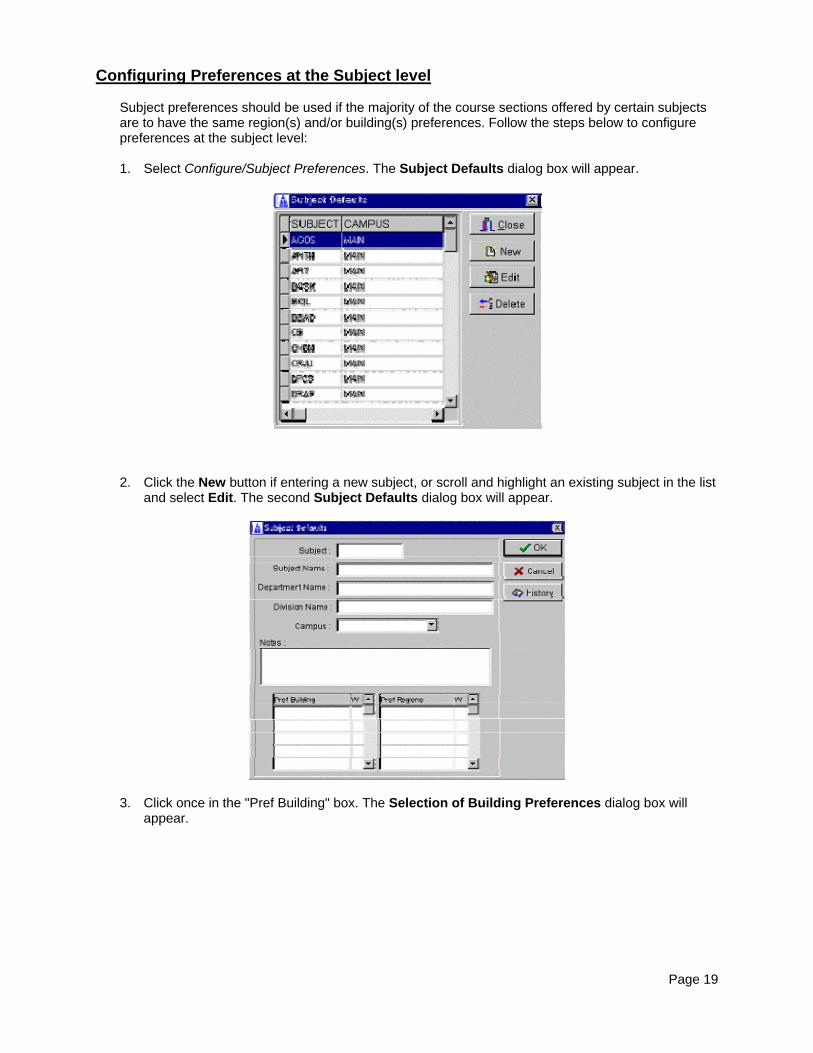
Configuring Preferences at the Subject level
Subject preferences should be used if the majority of the course sections offered by certain subjects are to have the same region(s) and/or building(s) preferences. Follow the steps below to configure preferences at the subject level:
1. Select Configure/Subject Preferences. The Subject Defaults dialog box will appear.
2. Click the New button if entering a new subject, or scroll and highlight an existing subject in the list and select Edit. The second Subject Defaults dialog box will appear.
3. Click once in the "Pref Building" box. The Selection of Building Preferences dialog box will appear.
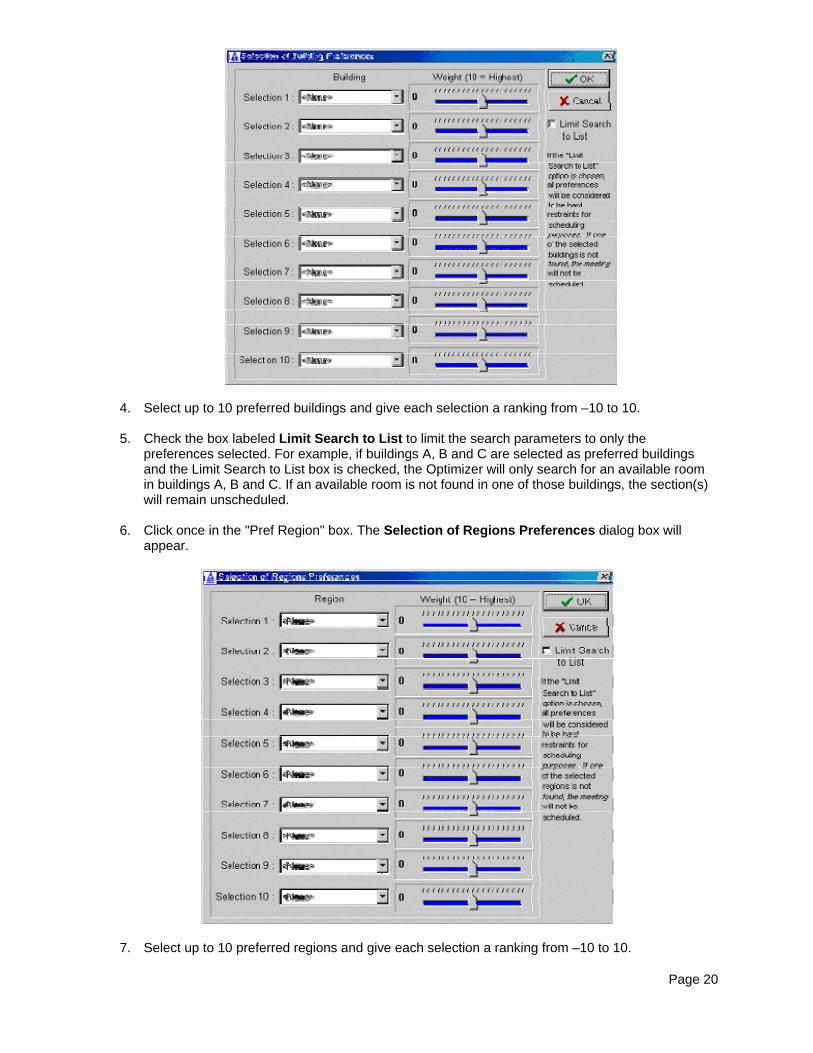
Page 20
4. Select up to 10 preferred buildings and give each selection a ranking from –10 to 10. 5. Check the box labeled Limit Search to List to limit the search parameters to only the
preferences selected. For example, if buildings A, B and C are selected as preferred buildings and the Limit Search to List box is checked, the Optimizer will only search for an available room in buildings A, B and C. If an available room is not found in one of those buildings, the section(s) will remain unscheduled.
6. Click once in the "Pref Region" box. The Selection of Regions Preferences dialog box will
appear.
7. Select up to 10 preferred regions and give each selection a ranking from –10 to 10.

Page 21
8. Check the box labeled Limit Search to List to limit the search parameters to only the preferences selected. For example, if regions X, Y and Z are selected as preferred regions and the Limit Search to List box is checked, the Optimizer will only search for an available room in regions X, Y and Z. If an available room is not found in one of those regions, the section(s) will remain unscheduled.
9. Click OK.
Configuring Preferences at the Course level
Course preferences should be used if the sections of certain courses have preferences that are not adequately reflected in meeting type or subject preferences. Room type(s), room feature(s), region(s), building(s) and room(s) can be requested at the course level. Follow the steps below to configure preferences at the course level:
1. Select Configure/Course Preferences. The Course Information dialog box will appear.
2. Click the New button or highlight a course and select Edit. The Edit Course Information dialog box will appear.
3. If you want to record if the course has a prerequisite, is a graduation requirement, is pass/fail, or the number of credit hours it is worth, enter that information in the appropriate areas. Additionally, notes can be added in the Notes field.
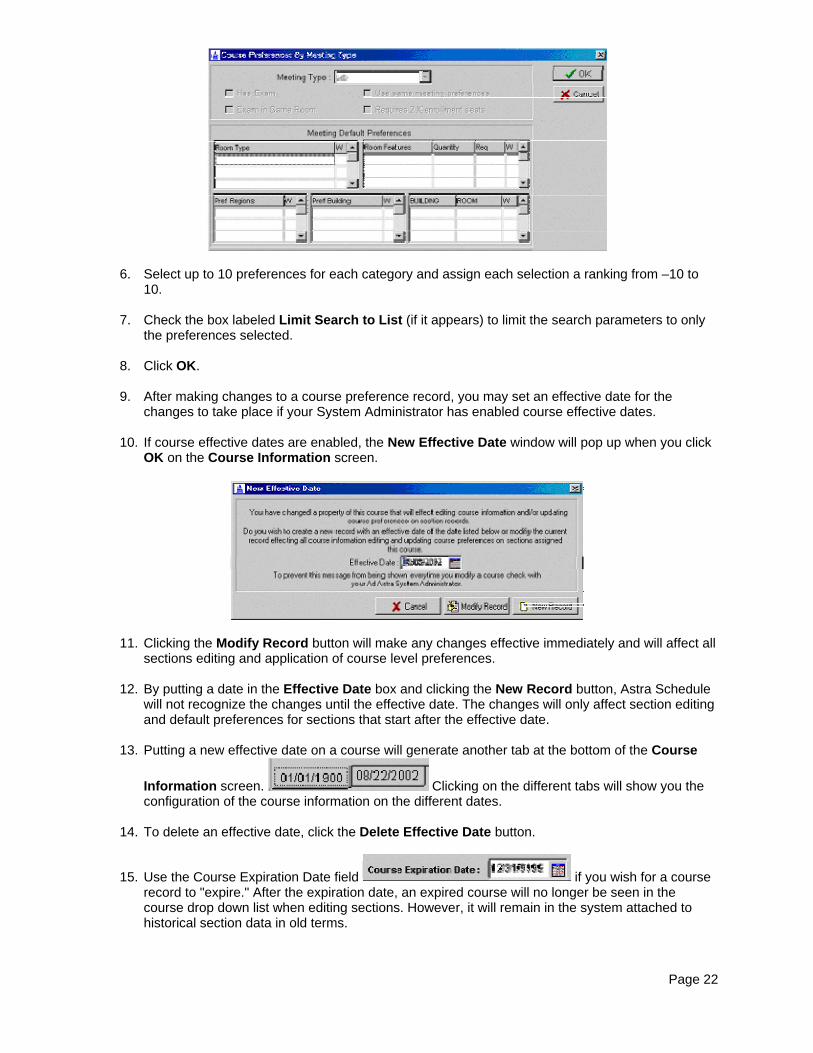
4. You may edit or add an additional title to the course. 5. If editing a course, select a meeting type or select New to create a new meeting type. The
Course Preferences By Meeting Type dialog box will appear.
Page 22
6. Select up to 10 preferences for each category and assign each selection a ranking from –10 to 10.
7. Check the box labeled Limit Search to List (if it appears) to limit the search parameters to only
the preferences selected. 8. Click OK. 9. After making changes to a course preference record, you may set an effective date for the
changes to take place if your System Administrator has enabled course effective dates. 10. If course effective dates are enabled, the New Effective Date window will pop up when you click
OK on the Course Information screen.
11. Clicking the Modify Record button will make any changes effective immediately and will affect all sections editing and application of course level preferences.
12. By putting a date in the Effective Date box and clicking the New Record button, Astra Schedule
will not recognize the changes until the effective date. The changes will only affect section editing and default preferences for sections that start after the effective date.
13. Putting a new effective date on a course will generate another tab at the bottom of the Course
Information screen. Clicking on the different tabs will show you the configuration of the course information on the different dates.
14. To delete an effective date, click the Delete Effective Date button.
15. Use the Course Expiration Date field if you wish for a course record to "expire." After the expiration date, an expired course will no longer be seen in the course drop down list when editing sections. However, it will remain in the system attached to historical section data in old terms.
Page 23
Configuring Preferences at the Section level
Section-level preferences should only be used if specific section(s) must have preferences that differ significantly from the previously listed default settings. This method of setting up preferences is the most time consuming and will not roll over to the next term. Ad Astra recommends using the default preferences, particularly meeting type and subject preferences, whenever possible.
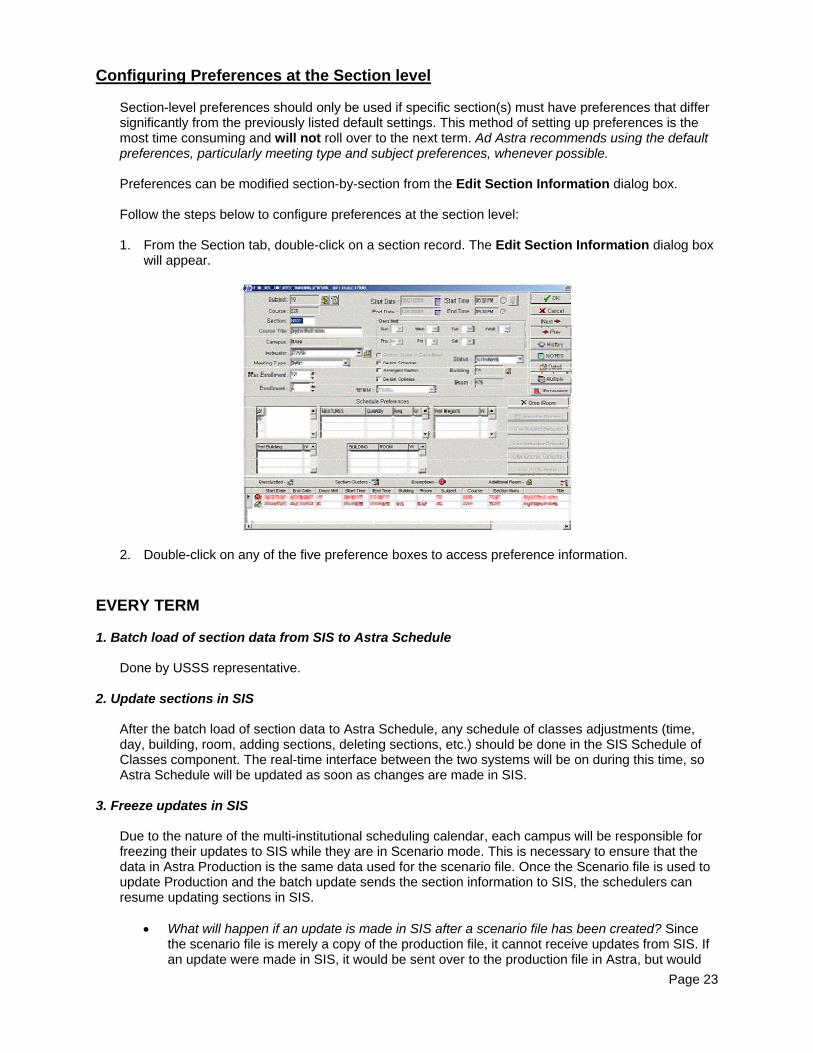
Preferences can be modified section-by-section from the Edit Section Information dialog box. Follow the steps below to configure preferences at the section level:
1. From the Section tab, double-click on a section record. The Edit Section Information dialog box
will appear.
2. Double-click on any of the five preference boxes to access preference information. EVERY TERM 1. Batch load of section data from SIS to Astra Schedule
Done by USSS representative. 2. Update sections in SIS
After the batch load of section data to Astra Schedule, any schedule of classes adjustments (time, day, building, room, adding sections, deleting sections, etc.) should be done in the SIS Schedule of Classes component. The real-time interface between the two systems will be on during this time, so Astra Schedule will be updated as soon as changes are made in SIS.
3. Freeze updates in SIS
Due to the nature of the multi-institutional scheduling calendar, each campus will be responsible for freezing their updates to SIS while they are in Scenario mode. This is necessary to ensure that the data in Astra Production is the same data used for the scenario file. Once the Scenario file is used to update Production and the batch update sends the section information to SIS, the schedulers can resume updating sections in SIS.
• What will happen if an update is made in SIS after a scenario file has been created? Since
the scenario file is merely a copy of the production file, it cannot receive updates from SIS. If an update were made in SIS, it would be sent over to the production file in Astra, but would
Page 24
not reach any scenario files. Therefore, if the scenario file is used to update production, any changes made to the production file would be overwritten with old data. Freezing any updates to SIS after a scenario file is created will eliminate the risk of overwriting “good” data with “bad” data.
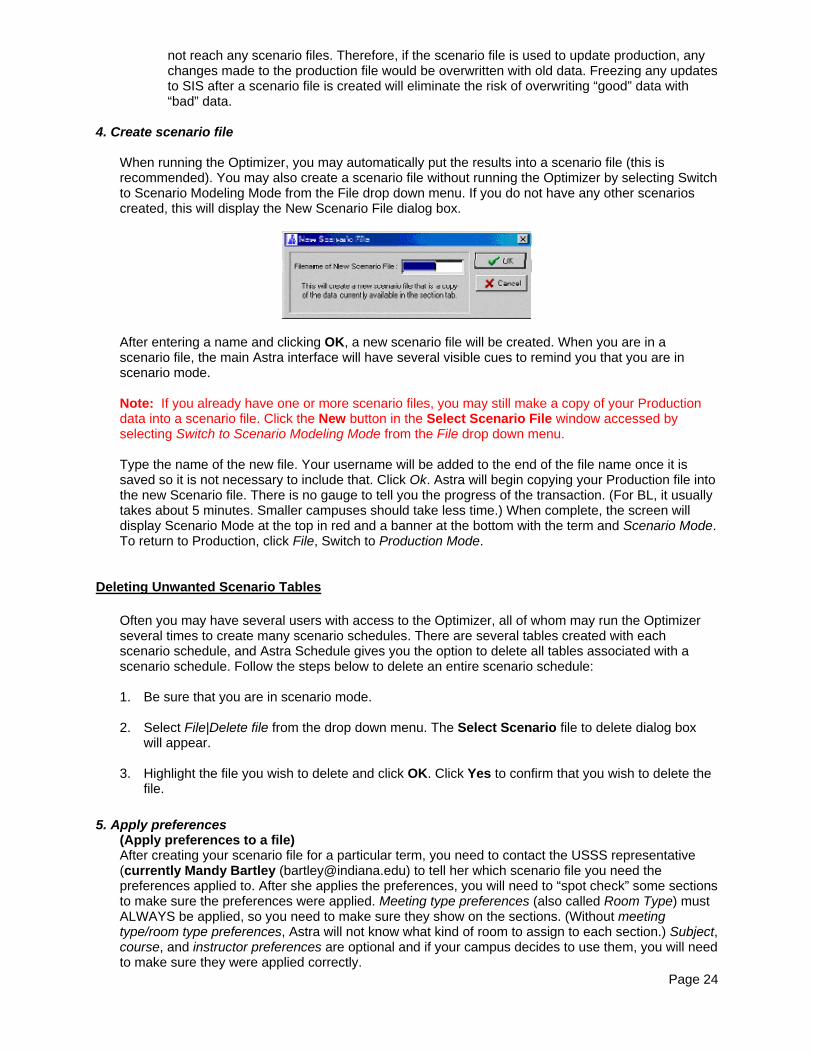
4. Create scenario file
When running the Optimizer, you may automatically put the results into a scenario file (this is recommended). You may also create a scenario file without running the Optimizer by selecting Switch to Scenario Modeling Mode from the File drop down menu. If you do not have any other scenarios created, this will display the New Scenario File dialog box.
After entering a name and clicking OK, a new scenario file will be created. When you are in a scenario file, the main Astra interface will have several visible cues to remind you that you are in scenario mode.
Note: If you already have one or more scenario files, you may still make a copy of your Production data into a scenario file. Click the New button in the Select Scenario File window accessed by selecting Switch to Scenario Modeling Mode from the File drop down menu.
Type the name of the new file. Your username will be added to the end of the file name once it is saved so it is not necessary to include that. Click Ok. Astra will begin copying your Production file into the new Scenario file. There is no gauge to tell you the progress of the transaction. (For BL, it usually takes about 5 minutes. Smaller campuses should take less time.) When complete, the screen will display Scenario Mode at the top in red and a banner at the bottom with the term and Scenario Mode. To return to Production, click File, Switch to Production Mode.
Deleting Unwanted Scenario Tables
Often you may have several users with access to the Optimizer, all of whom may run the Optimizer several times to create many scenario schedules. There are several tables created with each scenario schedule, and Astra Schedule gives you the option to delete all tables associated with a scenario schedule. Follow the steps below to delete an entire scenario schedule:
1. Be sure that you are in scenario mode. 2. Select File|Delete file from the drop down menu. The Select Scenario file to delete dialog box
will appear. 3. Highlight the file you wish to delete and click OK. Click Yes to confirm that you wish to delete the
file. 5. Apply preferences
(Apply preferences to a file) After creating your scenario file for a particular term, you need to contact the USSS representative (currently Mandy Bartley ([email protected]) to tell her which scenario file you need the preferences applied to. After she applies the preferences, you will need to “spot check” some sections to make sure the preferences were applied. Meeting type preferences (also called Room Type) must ALWAYS be applied, so you need to make sure they show on the sections. (Without meeting type/room type preferences, Astra will not know what kind of room to assign to each section.) Subject, course, and instructor preferences are optional and if your campus decides to use them, you will need to make sure they were applied correctly.
Page 25
FOR REFERENCE ONLY
To apply preferences, USSS will go into the Data Monitor. Click File, Apply Scheduling Preferences. Click Configure to determine which preferences need to be applied. The options are: Meeting Type, Subject, Course, and Instructor. For each type of preference, there are four different options for how to apply them: Apply Only if Blank (preferences only applied if nothing exists in that field), Append to Others (add to existing values in that field), Replace (except Limit Search to List) (will replace values in that field unless Limit Search to List has been selected), and Replace All. These options are crucial to the success of this system because any preferences applied to Production, affect all campus’ information. (If preferences are applied to a Scenario file, they only affect that campus.) For now, the decision has been made to only apply preferences to Production. After the configuration has been determined, click Ok. Select the correct term from the drop-down menu. Click Ok. This takes a few minutes and will display a gauge to notify the user of the percentage complete. (Apply preferences to individual sections) Preferences can also be applied to individual sections, when necessary. For instance, when a new section is added, the preferences will need to be applied to that individual section. To do this, double click on that section and then click the appropriate button to apply the defaults. The user can choose to Use Subject Defaults, Use Course Defaults, Use Instructor Defaults, or Use All Defaults. After clicking one of these buttons, a message will appear instructing the user that the defaults have been applied. The subject preference fields should also now be populated with the appropriate values. Preferences must also be applied when changes have been made to the configuration. For example, if you decide to change the subject preferences for ENG-W and HIST-H, the changes need to be applied to the sections for them to take effect. If there are only a few sections that changed, it would be easiest to apply them individually (using the method for applying preferences to individual sections). If there were many changes made and it would be too laborious to apply them individually, you would need to contact Mandy to have her apply the preferences to the appropriate file (using the method for applying preference to a file). ***Once preferences have been applied, there is no way to “blank them out” and start over. You would have to create a new scenario file and re -apply them, if necessary.
6. Section Preferences
Section preferences can also be added to sections one at a time. Room Features (a.k.a. Room Characteristics in PS) must be added through this procedure. Section preferences should only be done in the Scenario file, NOT the Production file. Since they are section specific, they do NOT roll forward and cannot be applied in batch for future terms. To apply a section preference, click on the Sections tab in your Scenario file. Then, double-click on the section you would like to modify. The most important one is the Features field. This is where you specify which Room Features (a.k.a. Room Characteristics) this section needs/wants in the room. Like other preferences, you must weight each item. A weighting of ‘10’ for a Room Feature means that it is a “must have.” Astra will not place the section in the room unless it has that feature. This should be carefully considered because it will limit the room availability and make it more difficult for the system to schedule sections.
7. Run the Optimizer (Bulk Scheduling)
The Optimizer is the tool within Astra Schedule to schedule as many sections as are possible using pre-defined Scheduling Preferences and Scheduling Priorities. Click the yellow lightening bolt icon or Assignment, Run Bulk Scheduler to open the Optimizer. The Optimizer uses the Scheduling Preferences (Meeting Type, Subject, Course, Instructor, and Section) in coordination with the Scheduling Priorities (Seat Fill and Scheduling Preferences) to get as many sections as possible into the best size room, according to their preferences. Scheduling Priorities allow the users to tell the system whether they would like more emphasis on (Seat) Fill or Scheduling Preferences.
There are many different ways to run the Optimizer. It must be determined by each office which business processes would work best for them.
Page 26
• Results to a New Scenario Table is an option that should always be utilized. This gives the
user the option to keep the original data intact and send the results of this run to a new file for evaluation. To enable this option, the user must check the box and type in the new file name.
• Keep Existing Buildings and Rooms is another option. This is crucial when scheduling rooms
after other rooms have already been scheduled. This box is checked by default and it is not recommended that it be cleared.
• Preprocess Hard Constraints is an option available so that the Optimizer will place sections
with preferences weighted at ’10.’ These are called Hard Constraints. This defaults to blank. • Preprocess Back to Back Instructors is an option available so that the Optimizer will try to
place instructors with classes back to back before other instructors. This defaults to blank.
8. Update Production file in Astra Schedule
Once the user is satisfied with the final scenario file, the Astra -> SIS real-time interface will be turned off so that the production file can be updated. Done by USSS.
9. Run batch update (USSS)
The USSS representative will initiate the batch update of information from Astra -> SIS so that the Schedule of Classes information in SIS will be up-to-date.
10. Resume updating SIS
Once the batch update has been finalized and the information is in both SIS and Astra, users can resume updating Schedule of Classes information in SIS. Any updates that were held while the scenario file was being used can now be done in SIS via the Schedule of Classes.
Creating a New Scenario File
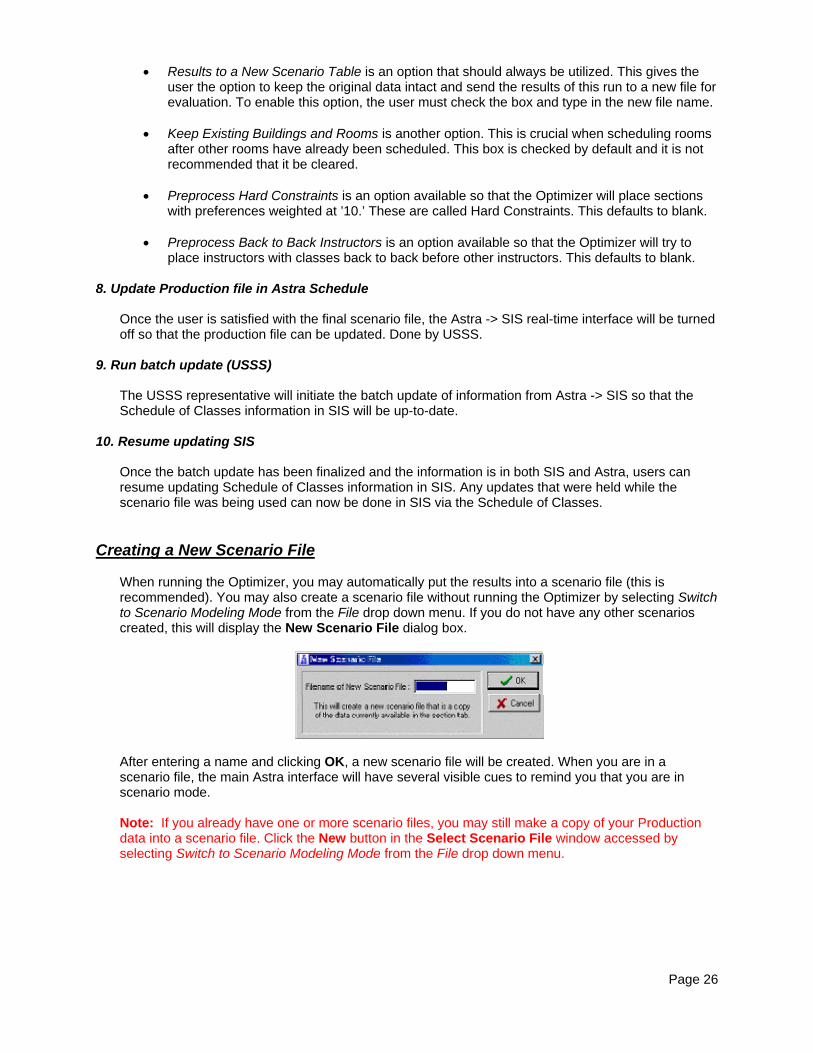
When running the Optimizer, you may automatically put the results into a scenario file (this is recommended). You may also create a scenario file without running the Optimizer by selecting Switch to Scenario Modeling Mode from the File drop down menu. If you do not have any other scenarios created, this will display the New Scenario File dialog box.
After entering a name and clicking OK, a new scenario file will be created. When you are in a scenario file, the main Astra interface will have several visible cues to remind you that you are in scenario mode. Note: If you already have one or more scenario files, you may still make a copy of your Production data into a scenario file. Click the New button in the Select Scenario File window accessed by selecting Switch to Scenario Modeling Mode from the File drop down menu.

Page 27
Switching back to Production
To leave your scenario file and begin working in Production mode again, choose Switch to Production Mode from the File drop down menu. To switch back to one of your scenario files, choose Switch to Scenario Modeling Mode from the File drop down menu. This will display the Select Scenario File window.
OPTIMIZER
Running the Optimizer
Before You Start
Before you may run the Optimizer, you must complete the following:
• Import/enter your section and room data • Configure and apply your scheduling preferences – Email to Mandy Bartley • Set your scheduling priorities
What is considered when placing sections?
Course sections that are "open scheduled" (not pre-assigned) in Astra Schedule are placed using "seat fill" and "schedule preference" considerations. See the table below for definitions:
Consideration Definition Seat Fill The ratio of course section maximum enrollment to room
seating capacity. Schedule Preferences More subjective scheduling considerations including
preferred: • Room type(s) • Room feature(s) • Region(s) • Building(s) • Room(s)
Percentage Decisions
The following chart shows examples of how to set your scheduling priority percentages:

Page 28
If. . . Then. . . Filling seats in every room is your institution’s main priority
Increase the seat fill percentage so that it is greater than the preferences percentage
Placing sections into preferred buildings and/or rooms is your institution’s priority
Increase the preferences percentage so that it is greater than the seat fill percentage
Scheduling priorities can be set for each user with access to the Optimizer. These settings affect all Optimizer runs for that user, but may be modified between Optimizer runs.
Setting your Scheduling Priorities
Follow the steps below to set your scheduling priorities:
1. Select Configure|Scheduling Priorities. The Schedule Options dialog box will appear.
2. Move the lever in the Fill bar to select the percentage you would like to place on seat fill optimization when running the Optimizer.
3. Move the lever in the Preferences bar to select the percentage you would like to place on
subjective scheduling preferences when running the Optimizer. IUPUI - preferred preferences are: Course = replace all
Subject = apply only if blank Meeting Type = apply only if blank
IUPUI - Sets Underbook % = 40% (this will be a 60% room fill, on the last run I change to 50%). IUPUI – Sets Pie chart 80% fill and 20% Preferences.
4. Adjust the underbook percentage. Underbook percentage allows you to choose a percentage of
seats to leave unfilled when scheduling rooms with the optimizer. Example: Setting the underbook at 20% would not allow the optimizer to place a class of 16 in a room with less than 20 seats.
5. If you have placed any percentage on Preferences, you may also individually weight the five
preferences: room type, room features, regions, buildings and rooms. Their individual settings reflect a percentage of the total Preferences percentage.
Page 29
6. Click the Example button to test your preferences by creating fictional section(s) and viewing possible scheduling placements and costs (see the Glossary for definition) using the scheduling options you have selected.
7. Return to the Scheduling Options dialog box to see the effect of the scheduling options on
placement. 8. Click OK.
The Procedure
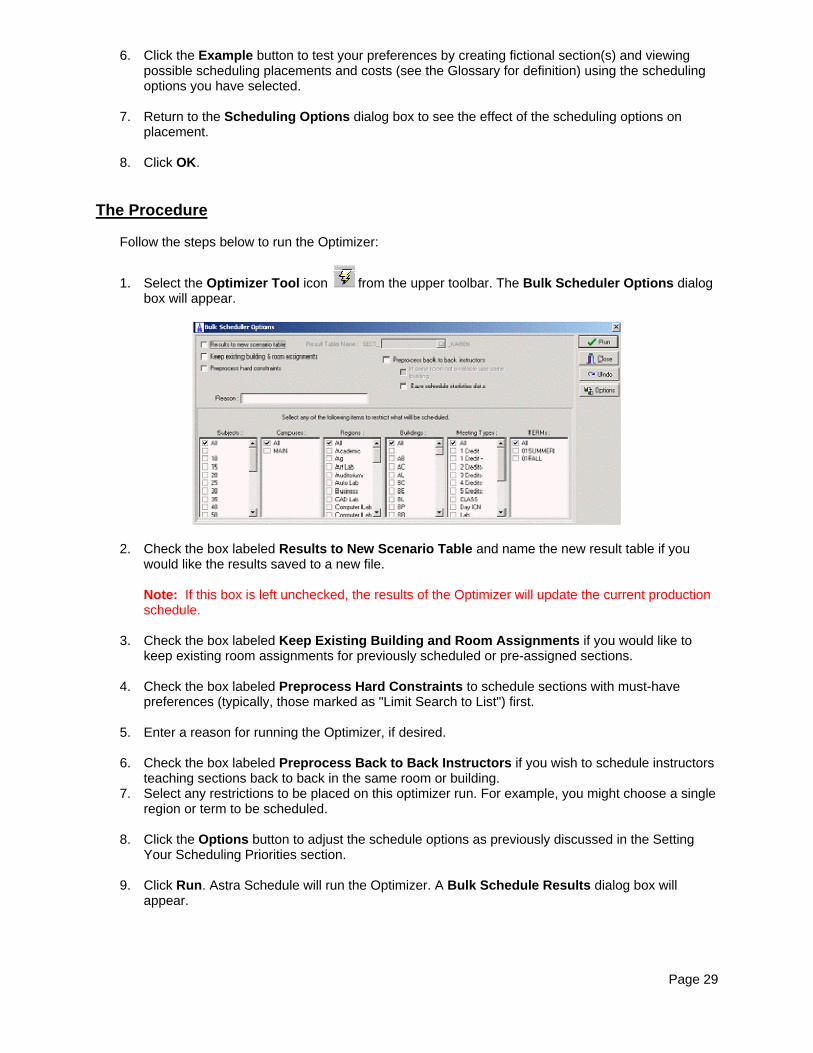
Follow the steps below to run the Optimizer:
1. Select the Optimizer Tool icon from the upper toolbar. The Bulk Scheduler Options dialog box will appear.
2. Check the box labeled Results to New Scenario Table and name the new result table if you would like the results saved to a new file.
Note: If this box is left unchecked, the results of the Optimizer will update the current production schedule.
3. Check the box labeled Keep Existing Building and Room Assignments if you would like to keep existing room assignments for previously scheduled or pre-assigned sections.
4. Check the box labeled Preprocess Hard Constraints to schedule sections with must-have
preferences (typically, those marked as "Limit Search to List") first. 5. Enter a reason for running the Optimizer, if desired. 6. Check the box labeled Preprocess Back to Back Instructors if you wish to schedule instructors
teaching sections back to back in the same room or building. 7. Select any restrictions to be placed on this optimizer run. For example, you might choose a single
region or term to be scheduled. 8. Click the Options button to adjust the schedule options as previously discussed in the Setting
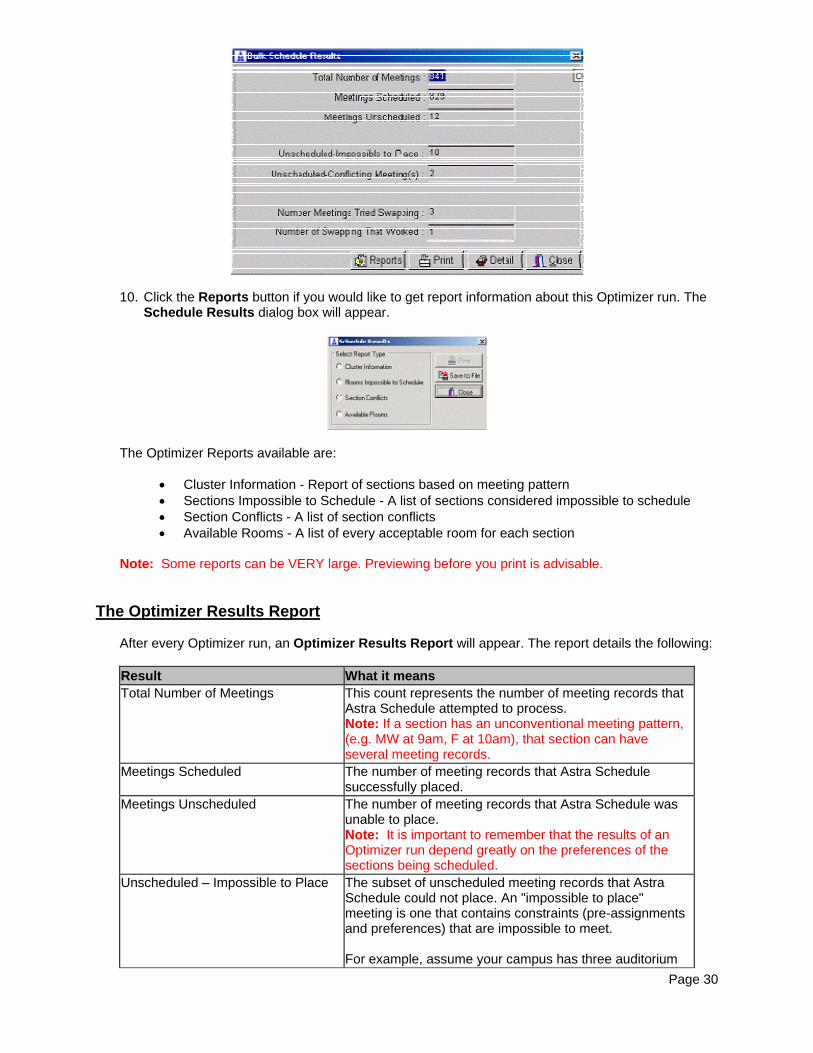
Your Scheduling Priorities section. 9. Click Run. Astra Schedule will run the Optimizer. A Bulk Schedule Results dialog box will
appear.
Page 30
10. Click the Reports button if you would like to get report information about this Optimizer run. The Schedule Results dialog box will appear.
The Optimizer Reports available are:
• Cluster Information - Report of sections based on meeting pattern • Sections Impossible to Schedule - A list of sections considered impossible to schedule • Section Conflicts - A list of section conflicts • Available Rooms - A list of every acceptable room for each section
Note: Some reports can be VERY large. Previewing before you print is advisable. The Optimizer Results Report
After every Optimizer run, an Optimizer Results Report will appear. The report details the following:
Result What it means Total Number of Meetings This count represents the number of meeting records that
Astra Schedule attempted to process. Note: If a section has an unconventional meeting pattern, (e.g. MW at 9am, F at 10am), that section can have several meeting records.
Meetings Scheduled The number of meeting records that Astra Schedule successfully placed.
Meetings Unscheduled The number of meeting records that Astra Schedule was unable to place. Note: It is important to remember that the results of an Optimizer run depend greatly on the preferences of the sections being scheduled.
Unscheduled – Impossible to Place The subset of unscheduled meeting records that Astra Schedule could not place. An "impossible to place" meeting is one that contains constraints (pre-assignments and preferences) that are impossible to meet. For example, assume your campus has three auditorium
Page 31
rooms with seating capacities of 250, 500 and 600, respectively. A section meeting requesting an auditorium with 700 seats is "impossible to schedule."
Unscheduled – Conflicting Meeting(s) Unscheduled meeting records that Astra Schedule could have placed except for time conflicts with other meetings. In this situation, too many meetings want the same room(s) and the same time.
Search Extended for Meeting(s) The room search for meetings that initially fall in the "Unscheduled-Conflicting Meeting(s)" category is expanded. This allows Astra Schedule to consider more than the default number (top 50) of rooms to place a meeting.
Number of Meetings Tried Swapping Astra Schedule tries to "swap" room assignments to increase the number of scheduled meetings.
Number of Swappings that Worked Any meetings that were successfully swapped (placed by backtracking) are included in this count.
Common Problems Contributing to Unscheduled Meetings
When running the Optimizer, there are some common problems you may avoid:
Problem Repercussion Solution High number of pre-assignments
Greatly limits the optimization capabilities of Astra Schedule
Only request specific rooms/buildings/regions when necessary
High number of requests for room features
Higher number of "impossible to place" meetings
Only request specific room features when necessary
Incomplete or incorrect information in the room type, room features, or region (when applicable) fields and preferences
Impossible for Astra Schedule to know how to properly place each meeting
Run the Optimizer only when your room information and preferences are complete
A. Steps of the Optimizer
• In the first phase, we break the problem down into manageable blocks by clustering the
meetings that have the same times/days. While the meetings are being clustered, the algorithm finds all the possible rooms that each meeting could go into and applies a cost factor to the rooms to determine how well they fit the parameters selected for the meeting (such as size, features, regions, hard constraints, etc.). The room costing (scoring) options in Astra Schedule are very flexible, allowing schedulers to change the relative importance of any scoring issue (room fill, building preference, room type preference, etc.) in seconds and run a different assignment scenario. This allows schedulers to uniquely manage the critical trade -off between space management (seat fill) and political concerns (building preferences, feature preferences, etc.).
• In the second phase, we check for time conflicts between all of the times/days clusters and
group the ones that would conflict with each other. Optionally, we can give standard meeting patterns (that follow institution-approved scheduling conventions listed in the Standard Days and Times area of the Data Monitor) priority over non-standard meetings.
Page 32
• In the third phase, we prioritize the groups based on how difficult it will be to schedule that group (number of meetings in the group, number of available rooms for each meeting, and if the meeting is in a standard time and day block).
• In the fourth phase, we (optionally) "pre-process" pre-assignments first and then schedule
any sections that have hard assignment constraints ("must haves"). • In the fifth step, we (optionally) "pre-process" meetings with instructors scheduled in time
slots that are back-to-back, attempting to assign them into the same room (or the same building).
• In the sixth step, we assign any meetings not scheduled in the previous steps by going
through each group of meetings. The sections that are hardest to schedule in that group (for example, the sections with the smallest number of available rooms) are scheduled first.
• In the seventh step, we perform backtracking and move meetings around trying to free up a
room for the unscheduled meetings. TO SET FILTERS ON ROOMS:
Click on Weekly or Daily Room Grid. Click on the word Filter at top of page, click on Create Filter, fill in fields to filter. Example: FILTER 1: Room Field Building , operation equals Value INES. FILTER 2: Room field Features, Operation equals, Value General Inventory Classroom. Click on Set Filter and all rooms that fall into those categories should appear, then click on Filter again and click on Save Filter, give that filter a name ( ES Bldg) and click save. So every time you bring up that building, only the rooms you schedule will appear.
Using the Event Wizard
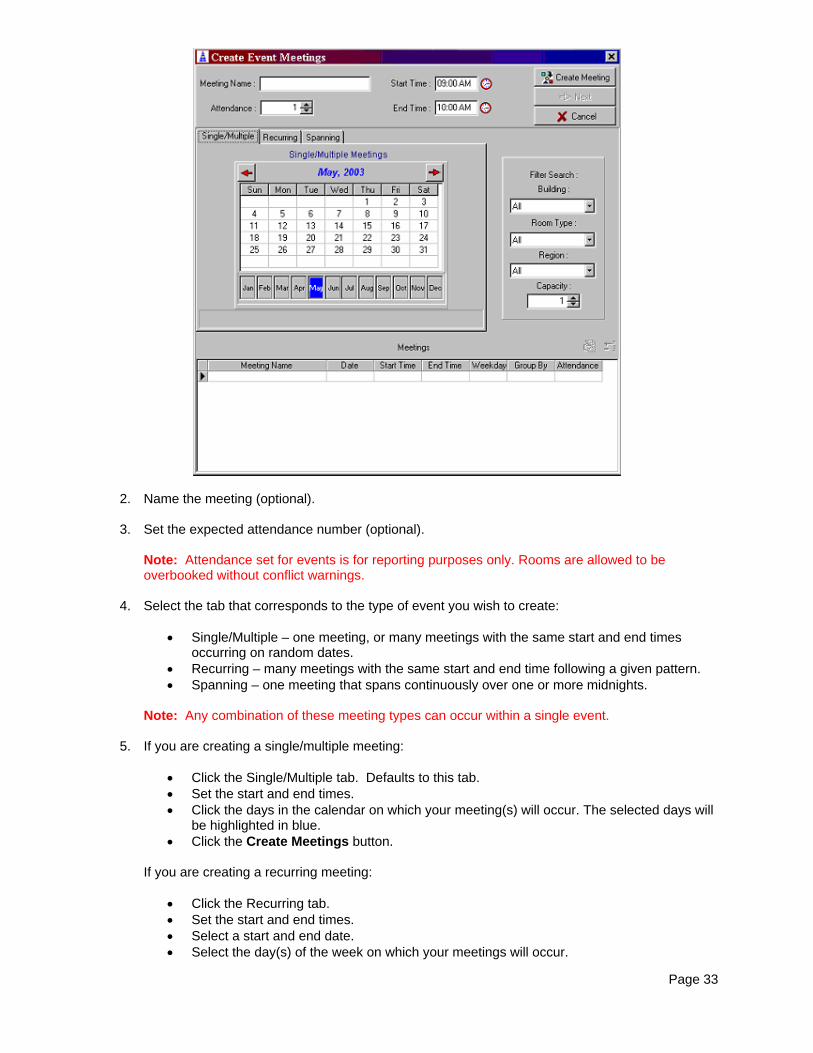
Follow the steps below to create an event with the Event Wizard:
1. Select the Event Wizard icon in the upper toolbar.
Page 33
2. Name the meeting (optional). 3. Set the expected attendance number (optional).
Note: Attendance set for events is for reporting purposes only. Rooms are allowed to be overbooked without conflict warnings.
4. Select the tab that corresponds to the type of event you wish to create:
• Single/Multiple – one meeting, or many meetings with the same start and end times occurring on random dates.
• Recurring – many meetings with the same start and end time following a given pattern. • Spanning – one meeting that spans continuously over one or more midnights.
Note: Any combination of these meeting types can occur within a single event.
5. If you are creating a single/multiple meeting:
• Click the Single/Multiple tab. Defaults to this tab. • Set the start and end times. • Click the days in the calendar on which your meeting(s) will occur. The selected days will
be highlighted in blue. • Click the Create Meetings button.
If you are creating a recurring meeting:
• Click the Recurring tab. • Set the start and end times. • Select a start and end date. • Select the day(s) of the week on which your meetings will occur.

Page 34
• Select the occurrences (week pattern) for your meetings. • Click the Create Meetings button.
If you are creating a spanning meeting:
• Click the Spanning tab. • Set the start and end times. • Select a start and end date. • Click the Create Meetings button.
6. If necessary, create more meetings (of any meeting type) within the same event. 7. Once you have created all your meetings, you may filter the list of rooms to choose from by using
the Filter Search drop down boxes.
Enter in a building, room type, region, or capacity in the filter boxes and click Next.
8. The Select Rooms for Meetings window will appear. It will contain a list of all rooms that met your filter criteria on the previous screen. If you did not set a filter, the window will contain a list of all rooms on campus.
Click on the room grid to select rooms for your meetings. You may select one or more rooms for each meeting (column).
9. Optionally, click the Clock icon at the top of the page to select a global setup and teardown time for the meetings.
Page 35
10. Click Next once you have selected a room for each meeting. 11. Enter the event name, event type, customer name, contact name, price plan and security level. If
you wish to assign resources to any meeting, click Resources.
Note: Booking resources is discussed in further detail in the Booking Resources with Events topic in this help file.
12. If desired, click the Details button to see a printable version of the meeting information. Otherwise, click the Finished button to create your event.
Note: If you check the box labeled Open event on completion, the event record will immediately open on your screen when Astra Schedule has finished creating your event. This is recommended.
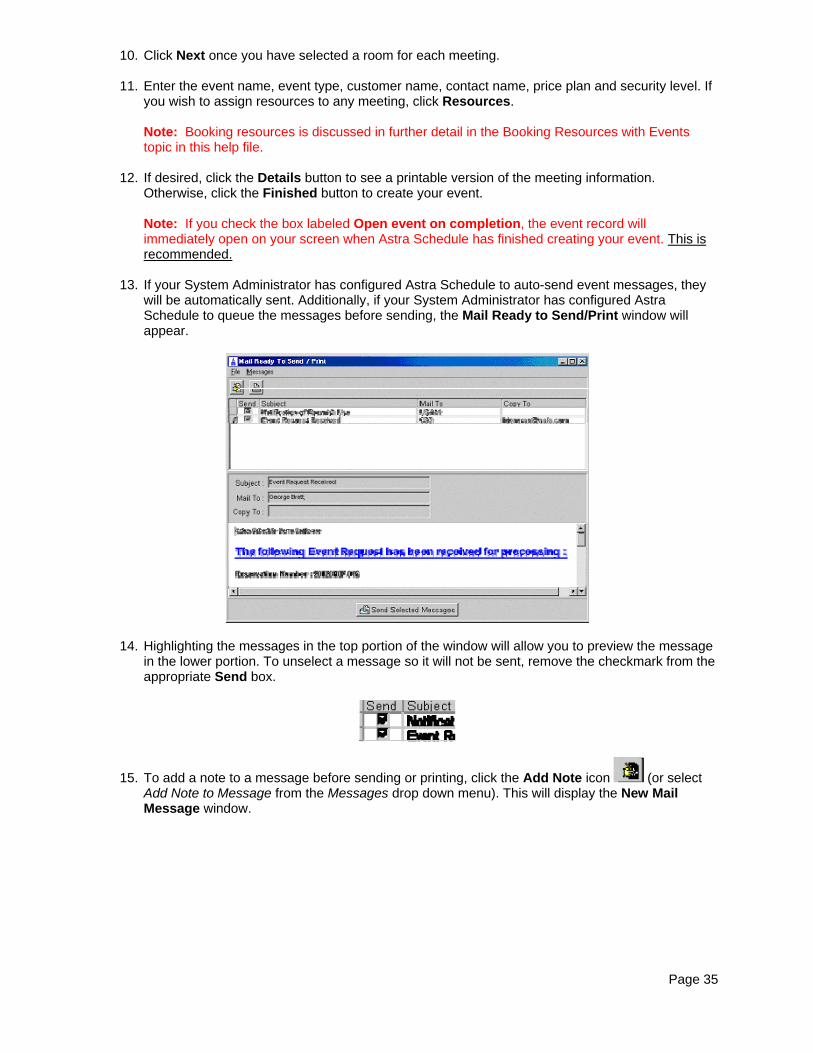
13. If your System Administrator has configured Astra Schedule to auto-send event messages, they will be automatically sent. Additionally, if your System Administrator has configured Astra Schedule to queue the messages before sending, the Mail Ready to Send/Print window will appear.
14. Highlighting the messages in the top portion of the window will allow you to preview the message in the lower portion. To unselect a message so it will not be sent, remove the checkmark from the appropriate Send box.
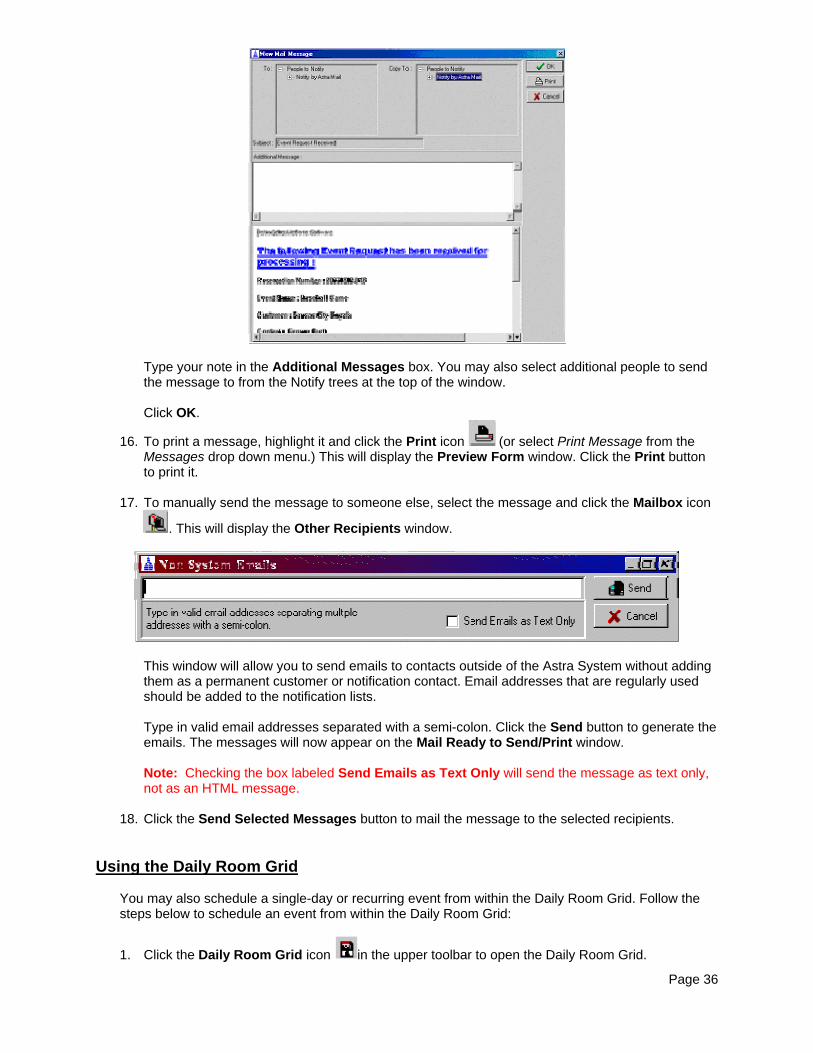
15. To add a note to a message before sending or printing, click the Add Note icon (or select Add Note to Message from the Messages drop down menu). This will display the New Mail Message window.
Page 36
Type your note in the Additional Messages box. You may also select additional people to send the message to from the Notify trees at the top of the window. Click OK.
16. To print a message, highlight it and click the Print icon (or select Print Message from the Messages drop down menu.) This will display the Preview Form window. Click the Print button to print it.
17. To manually send the message to someone else, select the message and click the Mailbox icon
. This will display the Other Recipients window.
This window will allow you to send emails to contacts outside of the Astra System without adding them as a permanent customer or notification contact. Email addresses that are regularly used should be added to the notification lists. Type in valid email addresses separated with a semi-colon. Click the Send button to generate the emails. The messages will now appear on the Mail Ready to Send/Print window.
Note: Checking the box labeled Send Emails as Text Only will send the message as text only, not as an HTML message.
18. Click the Send Selected Messages button to mail the message to the selected recipients. Using the Daily Room Grid
You may also schedule a single-day or recurring event from within the Daily Room Grid. Follow the steps below to schedule an event from within the Daily Room Grid:
1. Click the Daily Room Grid icon in the upper toolbar to open the Daily Room Grid.
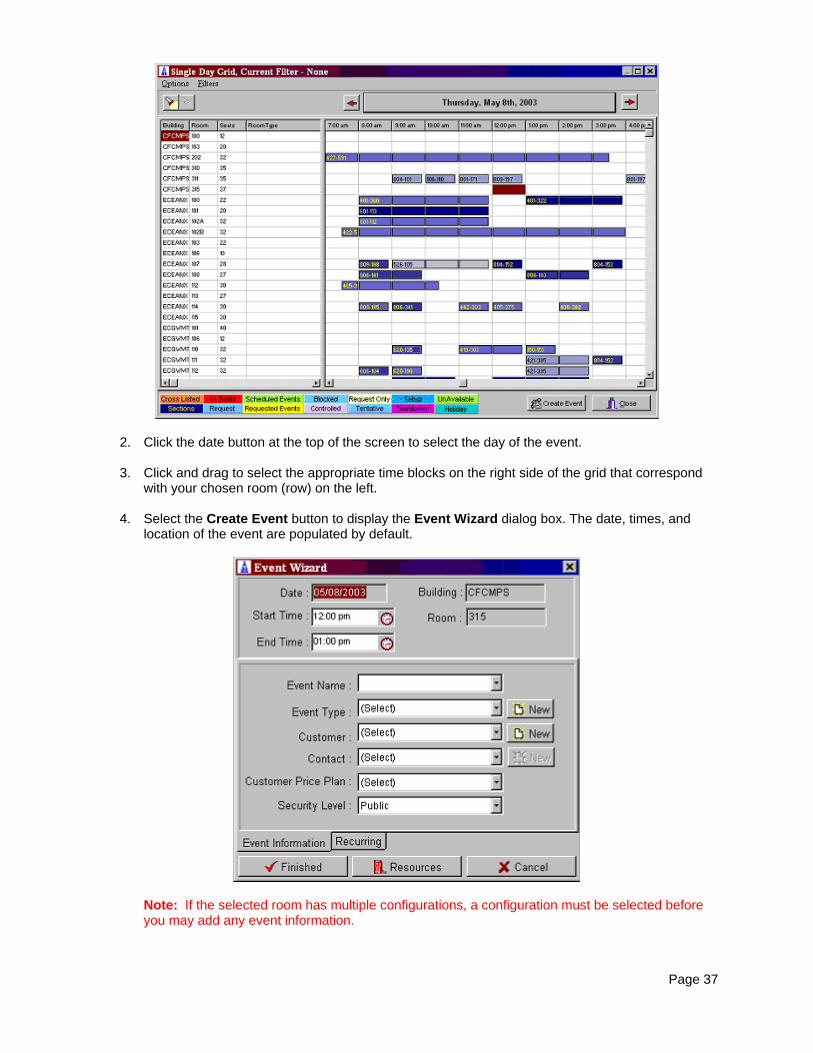
Page 37
2. Click the date button at the top of the screen to select the day of the event. 3. Click and drag to select the appropriate time blocks on the right side of the grid that correspond
with your chosen room (row) on the left. 4. Select the Create Event button to display the Event Wizard dialog box. The date, times, and
location of the event are populated by default.
Note: If the selected room has multiple configurations, a configuration must be selected before you may add any event information.

Page 38
5. In the Event Information tab, enter the event name, event type, customer name, contact name, price plan and security level.
6. If you are creating a recurring event, click on the Recurring tab to display additional event options.
• Change the end date value to the last meeting of the event. • Select the days of the week and the occurrence pattern for the event. • To confirm that the room is available for all recurring meetings, click the Preview
Availability button.
Standard Reports
Standard Reports
Generally, standard reports are section, event, room, and resource lists. The following tables list the basic standard reports that are shipped with Astra Schedule:
Event Reports
Report Name What it Details Events by Building, Room and Date Range
A list of events meeting during a selected date range, sorted by building and room
Events by Customer A list of events sorted by customer name and filtered by date range
Events by Date and Time A list of events for a date and time range Events by Date Range with Setup & Notes
A list of events by date range with setup and teardown times and notes included
Events by Date, Building and Room A list of events for a selected day, sorted by building and room
Events by Selected Customer A list of events by date for a selected customer
Events by Event Status and Date Range
A list of events sorted by the event status and date range
Events by Selected Event Type A list of events by a selected, user-defined event type
Events by Event Type A list of events sorted by the user-defined event type
Events with Resources by Date A list of events with resource bookings,
Page 39
sorted by date range Events with Resources by Resource Name
A list of events with resource bookings, sorted by the resource name
Room Reports
Report Name What it Details Room List by Building A room inventory grouped by building Room List by Region A room inventory grouped by region Room List by Room Type A room inventory grouped by room type Room List by Selected Building A room inventory for a selected building
Viewing a Standard Report
Follow the steps below to view and print a standard report:
1. Select File|Standard Reports from the drop down menu. The Select Standard Report dialog box will appear.
2. Select a standard report from the tree and click Print or Save to File. 3. Selecting Print will give you the option to print or see a preview. 4. Selecting Save to File will display the Save Report To window. 5. Select either the RTF or HTML format, enter a filename, and click the browse button to select a
location. 6. Click OK.
Reporting Tool In addition to the 34 Standard reports provided with Astra Schedule, you may create your own User reports by using the reporting tool. User reports may be created from scratch, by cloning any of the existing Standard reports, or by importing reports created by other Astra partners. A Preview button in the Report Builder makes it easy to see your report results as you make changes. Any User reports that you create will be visible to other Astra Schedule users on your campus who have appropriate user account permissions. Since User reports may be viewed by other Astra users, it may be good practice to organize any reports that you create into a report group bearing your name. Additionally, all reports must have unique names, so adding your initials or first name to the name of each report you create may also be helpful.
Creating/Editing a Report
Follow the steps below to create a new standard report:
1. To open the reporting tool, select Configure|Standard Reports from the drop down menu. The Select Report dialog box will appear.

Page 40
Two tabs at the top of the Select Report dialog box allow you to toggle between the Standard reports provided by Astra Schedule and any User reports you or other users may have created.
2. To create a new report, you may clone one of the Standard reports, edit and rename an existing User report, or create a brand new report.
• To clone a Standard report, toggle to the Standard Reports tab in the Select Report
dialog box. You may either double-click on the report you wish to clone or highlight the report and select the Clone button. The Report Builder dialog box will open with the settings of the Standard report listed by default. The report name will include the phrase "Copy of" to indicate that you are cloning a report. At this point you may continue to edit the report using the steps listed below.
• To edit an existing User report, toggle to the User Reports tab in the Select Report dialog box. You may either double-click on the report you wish to edit or highlight the report and select the Edit button. The Report Builder dialog box will open with the settings of the User report listed by default. Because each report must have a unique name, the report name will need to be changed before the new report may be saved. At this point you may continue to edit the report using the steps listed below.
• To create a brand new report, toggle to the User Reports tab in the Select Report dialog box and Select the New button. The New Report dialog box will appear.
There are five report templates that may be used to create a new report - Event Meetings, Event Meetings w/Resources, Event Meetings w/Contact Information, Section Meetings, and Sections Meetings w/Exceptions. The Use a Report Template option makes the report creation process easier, as tables, table joins, and fields to be used in the report are pre-defined. Of course, any template defaults may be changed. Alternately, a report may be created from scratch, with no predefined defaults, by selecting the Create an Advanced Report option. Click OK to display a blank Report Builder dialog box. At this point you may continue to edit the report using the steps listed below.
Page 41
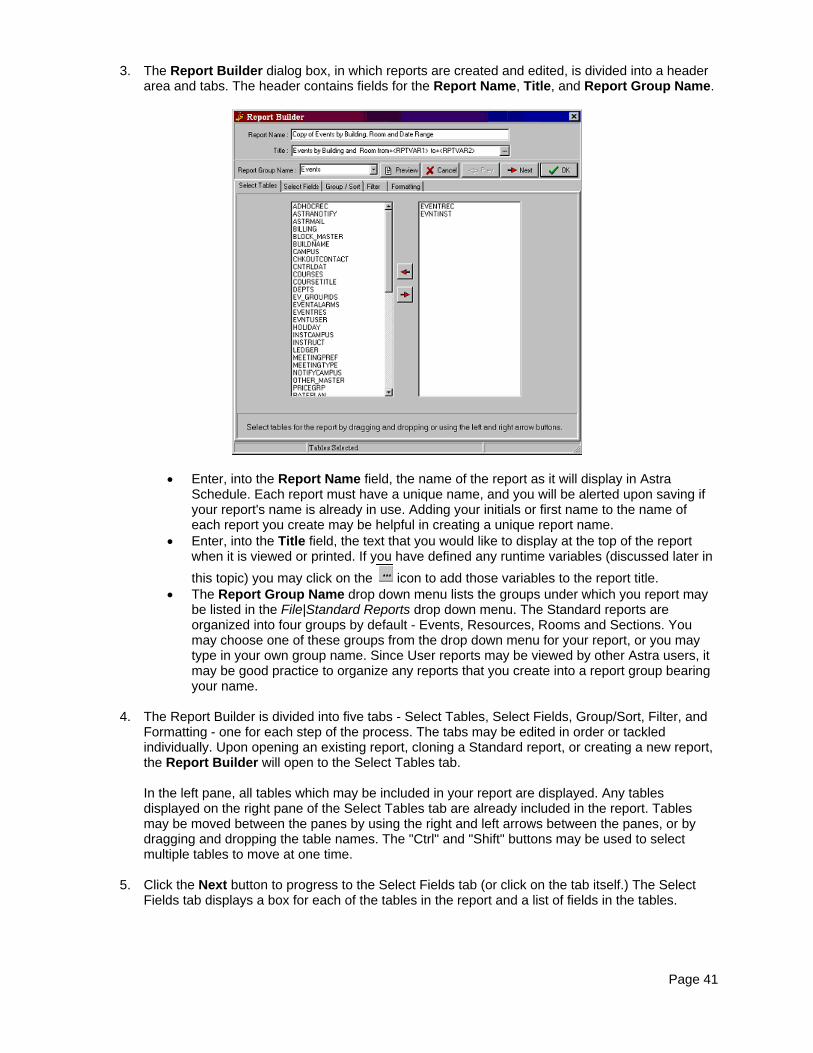
3. The Report Builder dialog box, in which reports are created and edited, is divided into a header
area and tabs. The header contains fields for the Report Name, Title, and Report Group Name.
• Enter, into the Report Name field, the name of the report as it will display in Astra Schedule. Each report must have a unique name, and you will be alerted upon saving if your report's name is already in use. Adding your initials or first name to the name of each report you create may be helpful in creating a unique report name.
• Enter, into the Title field, the text that you would like to display at the top of the report when it is viewed or printed. If you have defined any runtime variables (discussed later in this topic) you may click on the icon to add those variables to the report title.
• The Report Group Name drop down menu lists the groups under which you report may be listed in the File|Standard Reports drop down menu. The Standard reports are organized into four groups by default - Events, Resources, Rooms and Sections. You may choose one of these groups from the drop down menu for your report, or you may type in your own group name. Since User reports may be viewed by other Astra users, it may be good practice to organize any reports that you create into a report group bearing your name.
4. The Report Builder is divided into five tabs - Select Tables, Select Fields, Group/Sort, Filter, and
Formatting - one for each step of the process. The tabs may be edited in order or tackled individually. Upon opening an existing report, cloning a Standard report, or creating a new report, the Report Builder will open to the Select Tables tab.
In the left pane, all tables which may be included in your report are displayed. Any tables displayed on the right pane of the Select Tables tab are already included in the report. Tables may be moved between the panes by using the right and left arrows between the panes, or by dragging and dropping the table names. The "Ctrl" and "Shift" buttons may be used to select multiple tables to move at one time.
5. Click the Next button to progress to the Select Fields tab (or click on the tab itself.) The Select
Fields tab displays a box for each of the tables in the report and a list of fields in the tables.
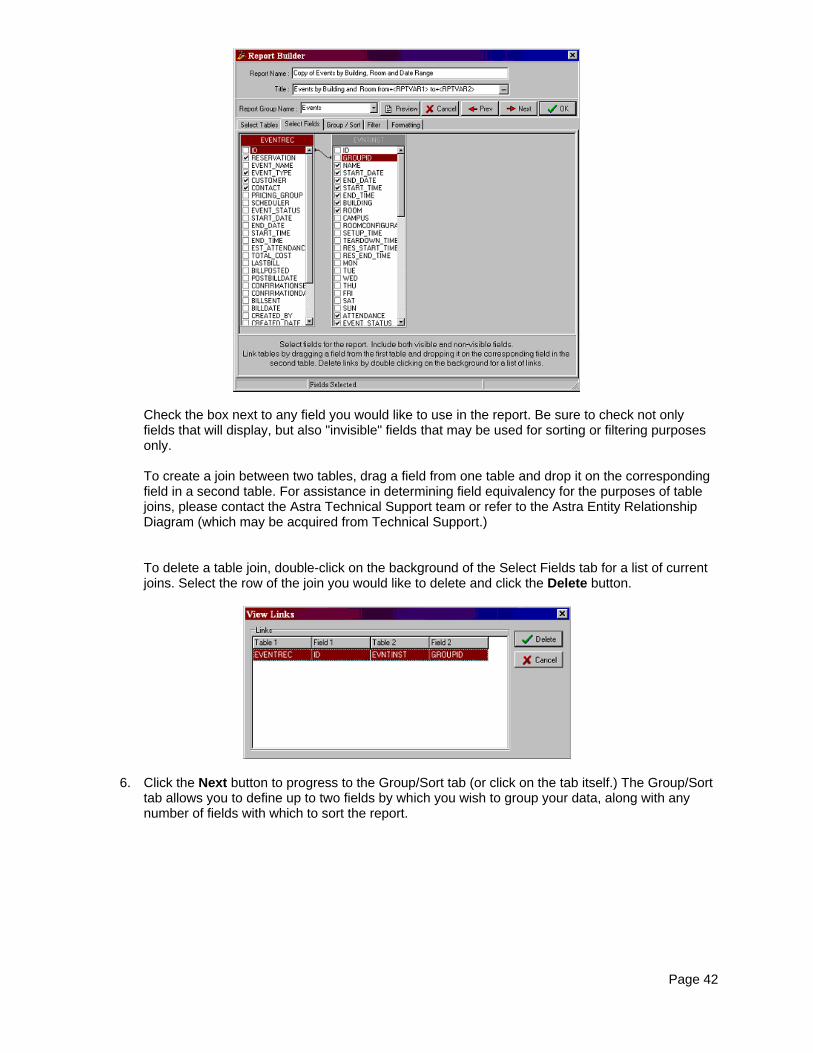
Page 42
Check the box next to any field you would like to use in the report. Be sure to check not only fields that will display, but also "invisible" fields that may be used for sorting or filtering purposes only. To create a join between two tables, drag a field from one table and drop it on the corresponding field in a second table. For assistance in determining field equivalency for the purposes of table joins, please contact the Astra Technical Support team or refer to the Astra Entity Relationship Diagram (which may be acquired from Technical Support.) To delete a table join, double-click on the background of the Select Fields tab for a list of current joins. Select the row of the join you would like to delete and click the Delete button.
6. Click the Next button to progress to the Group/Sort tab (or click on the tab itself.) The Group/Sort tab allows you to define up to two fields by which you wish to group your data, along with any number of fields with which to sort the report.

Page 43
• Grouping and Subgrouping - Use the drop down menus to select a group and, optionally, a subgroup field.
• If you would like the group label to display, check the box labeled Show Group Header. If
you display the group header, you may click the icon next to the Header Font field to change the font characteristics of the header. Enter a header indent, if desired, in number of inches. For many fields, you will have the option of enabling a footer for the group. For example, a footer with the operation of "Count" will total all items in a group on the report. To enable a footer, check the box labeled Show Group Footer, choose the type of footer in the Operation field (if multiple operations are available) and configure the font characteristics and indent as you did for the header. Check the box labeled Page Break Between Groups to start each group on a new page in the report. If you select a field by which to subgroup the data in the report, you may configure it in the same way you did the grouping field.
• Sorting - You may select multiple fields by which you would like to sort the data as it
displays in your report. The lower portion of the Group/Sort tab contains two panes, labeled Available Fields for Sorting and Sort Order. All fields used in the report are listed in the Available Fields for Sorting pane. The fields by which the data will be sorted are listed in the Sort Order pane. Fields may be moved between the panes by using the right and left arrows between the panes, or by dragging and dropping the field names. By default, the two fields that you have chosen for grouping and subgrouping will be the first two fields listed in the Sort Order pane. You may reorder the remaining fields by using the up and down arrows next to the Sort Order pane. All sorts may be performed in either ascending or descending order. To change a sort from ascending to descending, click on the word "Ascending" next to the field name and select "Descending" from the drop down box that appears.
7. Click the Next button to progress to the Filter tab (or click on the tab itself.) The Filter tab is the location for defining static and runtime variables for the report.
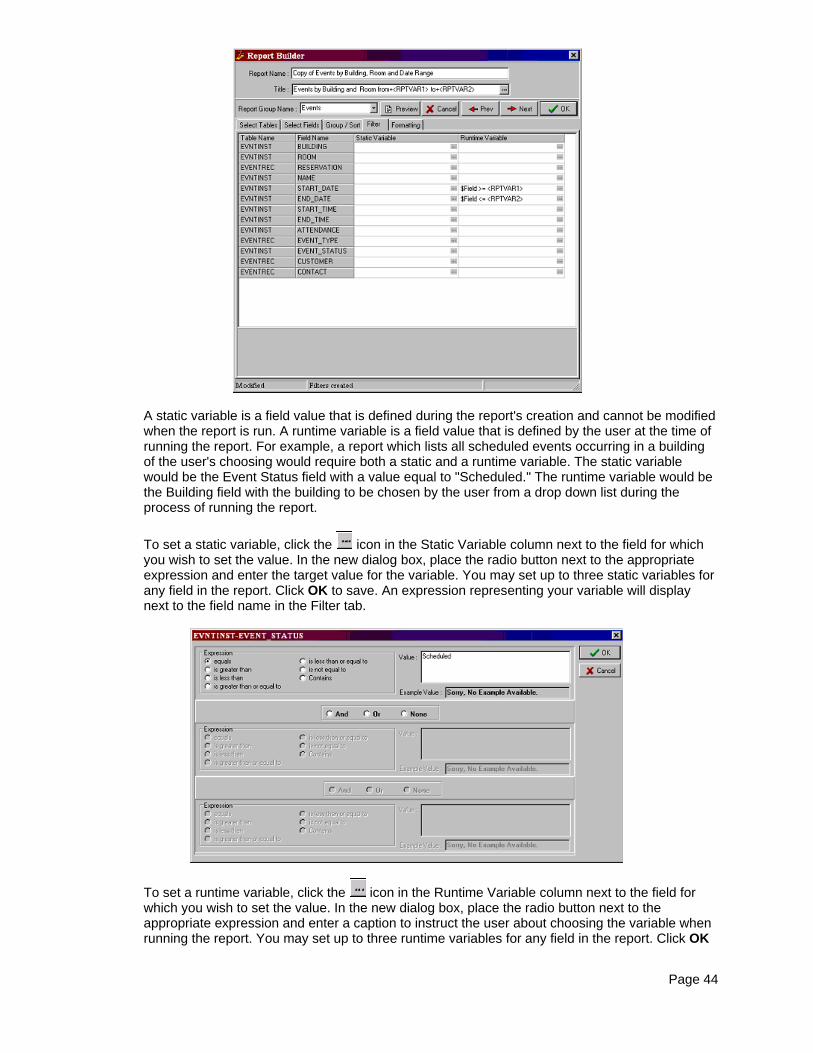
Page 44
A static variable is a field value that is defined during the report's creation and cannot be modified when the report is run. A runtime variable is a field value that is defined by the user at the time of running the report. For example, a report which lists all scheduled events occurring in a building of the user's choosing would require both a static and a runtime variable. The static variable would be the Event Status field with a value equal to "Scheduled." The runtime variable would be the Building field with the building to be chosen by the user from a drop down list during the process of running the report. To set a static variable, click the icon in the Static Variable column next to the field for which you wish to set the value. In the new dialog box, place the radio button next to the appropriate expression and enter the target value for the variable. You may set up to three static variables for any field in the report. Click OK to save. An expression representing your variable will display next to the field name in the Filter tab.
To set a runtime variable, click the icon in the Runtime Variable column next to the field for which you wish to set the value. In the new dialog box, place the radio button next to the appropriate expression and enter a caption to instruct the user about choosing the variable when running the report. You may set up to three runtime variables for any field in the report. Click OK

Page 45
to save. An expression representing your variable will display next to the field name in the Filter tab.
8. Click the Next button to progress to the Formatting tab (or click on the tab itself.) The upper half of the Formatting tab allows you to configure the fonts, spacing, layout, and other cosmetic report features. The lower half allows you to alter the order and layout of the fields displayed in the report.
• Various options to change the look of your report can be adjusted in the upper half of the Formatting tab. To change the font characteristics of the column title, or column data, click the icon next to the Title Font, Column Title Font, or Column Font fields. Three types of borders are available for the column titles and the column information - No Lines, Top and Bottom Lines, and Full Box. Place a check in the box next to the desired look in both the Column Title Box and Column Box areas. In the Report Access Level box, place the radio button next to the privacy level of the report. The following three security levels can be assigned to reports: public, semi-private,
Page 46
and private. Users, in turn, are given access to view reports based upon these same levels. Users are allowed to view events and reports marked at their security level or lower (e.g., users with private level viewing privileges can view every private, semi-private and public report). The following table describes the remaining options in the upper half of the Formatting tab:
Option Result Print Report Heading Check this box to print the report heading, if configured, above the
title of the report. Print Title Every Page Check this box to print the report title (and heading, if enabled) on
each page of the report. Print Page Numbers Check this box to print page numbers on the report. Print Today's Date Check this box to print the date the report was run on the report. Landscape Check this box to print the report in the landscape (11 x 8.5 inch),
rather than portrait (8.5 x 11 inch), orientation. Column Indent Enter the amount of column indent in number of inches. Total Width The width of the report, including all indents and fields, in number of
inches. Ideally, this value should not exceed 8.5 inches for printing in the portrait orientation, or 11 inches for printing in the landscape orientation.
• The lower half of the Formatting tab allows you to configure various settings related to the fields displayed in the report. Each field represents a column of data on the report. The fields may be reorganized by dragging and dropping one or more fields to a different location in the order.
The following table describes the remaining options in the lower half of the Formatting tab:
Option Result Show Check this box to display this field on the report. In Grp 1 Header Check this box (in conjunction with the Show checkbox) to
display this field not as a column, but under the Group By header.
In Grp 2 Header Check this box (in conjunction with the Show checkbox) to display this field not as a column, but under the SubGroup By header.
Display Name The name of the field as it will appear in the column title of the report; defaults to the field label in the table.
Column Width Width, in inches, of the column on the report. Title Justify Justification of the column title. Column Justify Justification of the column data. GroupBy View only; a "1" indicates the primary grouping field, a "2"
indicates the subgrouping field, and a "0" marks fields not used for grouping.
Sort View only; displays whether this field is used as an ascending or descending sort field.
Static Filter View only; displays the static filter expressions that exist for each field in the report.
Runtime Filter View only; displays the runtime filter expressions that exist for each field in the report.
Page 47
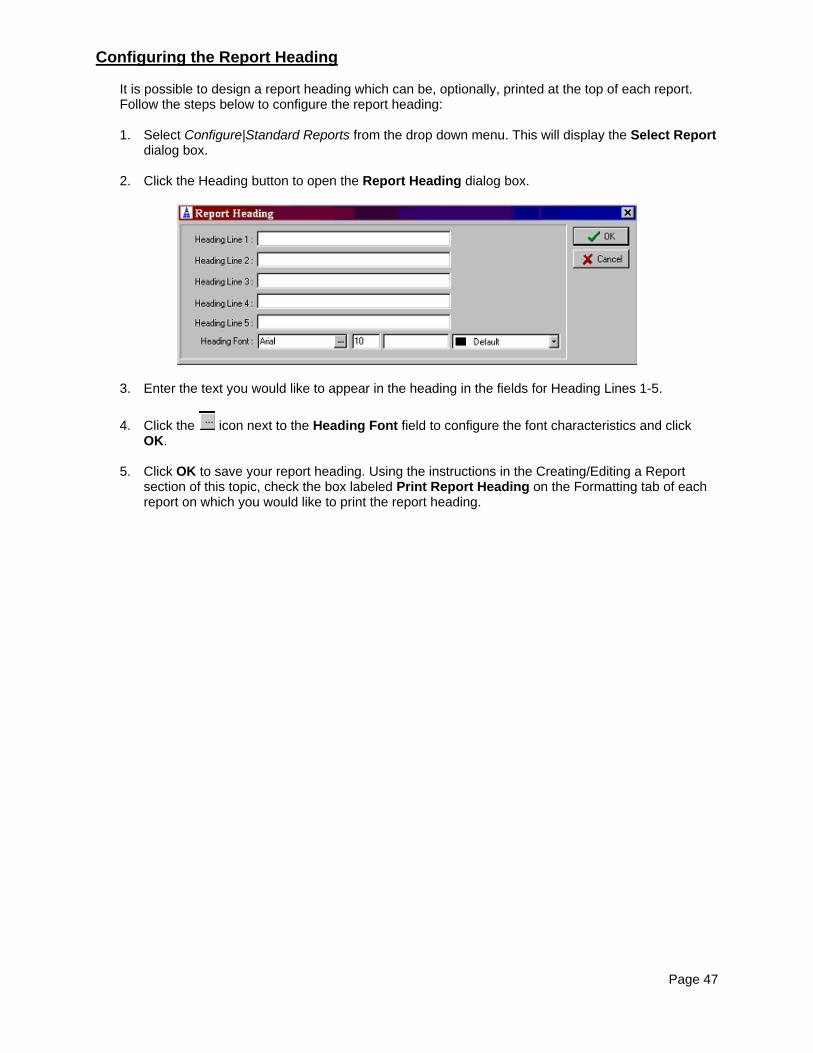
Configuring the Report Heading
It is possible to design a report heading which can be, optionally, printed at the top of each report. Follow the steps below to configure the report heading:
1. Select Configure|Standard Reports from the drop down menu. This will display the Select Report
dialog box. 2. Click the Heading button to open the Report Heading dialog box.
3. Enter the text you would like to appear in the heading in the fields for Heading Lines 1-5. 4. Click the icon next to the Heading Font field to configure the font characteristics and click
OK. 5. Click OK to save your report heading. Using the instructions in the Creating/Editing a Report
section of this topic, check the box labeled Print Report Heading on the Formatting tab of each report on which you would like to print the report heading.