ford galaxy / s-max quick reference guide this quick reference guide thank you for choosing ford. we...
TRANSCRIPT

FORD GALAXY / S-MAX Quick ReferenceGuide

The information contained in this publication was correct at the time of going to print. In the interest ofcontinuous development, we reserve the right to change specifications, design or equipment at any timewithout notice or obligation. No part of this publication may be reproduced, transmitted, stored in aretrieval system or translated into any language in any form by any means without our written permission.Errors and omissions excepted.© Ford Motor Company 2011
All rights reserved.Part Number: CG3561en 10/2011 20110826135609

ABOUT THIS QUICKREFERENCE GUIDEThank you for choosing Ford. Werecommend that you take some time to getto know your vehicle better by reading thisQuick Reference Guide, which summarisessome important aspects of your Owner'sManual. The more that you know aboutyour vehicle, the greater the safety andpleasure you will get from driving it.
This Quick Reference Guide must beread in conjunction with the Owner'sManual.
WARNINGAlways drive with due care andattention when using and operatingthe controls and features on your
vehicle.
AT A GLANCEInstrument panel overview - left-hand drive
A
W TU Q PS R OV
B EC F G IH J K L M ND
E74123
1

Instrument panel overview - right-hand drive
QP RSTUWO V
LKM ABE GDCHN I J F
E75798
Lighting controls.AAir vents.BDirection indicators. Telephone control buttons. Voice control buttons. Lanedeparture warning control buttons.
C
Audio controls.DInstrument cluster.EInformation display controls.FWiper lever.GAudio or navigation unit.HStability control (ESP) switch. Start-stop switch.IParking aid switch.JHazard warning flasher switch.KPassenger airbag deactivation warning lamp.L
2

Storage compartment.MHeated windscreen and heated rear window switches.NClimate controls.OCigar lighter.PStart Button.QIgnition switch.RCruise control and speed limiter switches. Adaptive cruise control (ACC) switches.Speed limiter switches.
S
Steering wheel adjustment lever.TDriver Knee airbag.UHorn.VCruise control and speed limiter switches. Adaptive cruise control (ACC) switches.Speed limiter switches.
W
FASTENING THE SEAT BELTS
WARNINGInsert the tongue into the buckle untilyou hear a distinct click. You have notfastened the seat belt properly if you
do not hear a click.
Note: The seat belt tongues are designedso that you can only insert them into thecorrect buckle.
Second row centre seat belt
E74125
2
1
3
The retractor for the rear centre seat beltis located in the roof.To fasten the seat belt:1. Pull the belt out steadily. It may lock if
you pull it sharply or if the vehicle is ona slope.
2. Insert the smaller tongue into the blackbuckle to the right of the centre seat.
3. Pull the larger tongue across the lap andinsert it into the buckle to the left of thecentre seat.
3

E74128
Press the red button on the left buckle torelease the belt. Let it retract.Press the button on the side of the blackbuckle to release the belt. Let it retractcompletely and smoothly to the retractorin the roof.
KEYLESS ENTRY
WARNINGSFor all warnings and cautions, referto your Owner's handbook.The keyless entry system may notfunction if the key is close to metalobjects or electronic devices such as
mobile phones.
E78276
Passive locking and unlocking requires avalid passive key to be located within oneof the three external detection ranges.
Locking the vehicleNote: Once activated, the vehicle will remainlocked for approximately three seconds. Thisis to allow you to pull a door handle andcheck if the vehicle is locked.
E87384
Locking buttons are located on each of thefront doors.Press a locking button once.
Unlocking the vehicle
E78278
Pull one of the door handles.
Locking and unlocking the doorswith the key blade
1
2
1
E87964
1. Carefully remove the cover.2. Remove the key blade and insert it into
the lock.
4

AUTOWIPERS
WARNINGFor all warnings and cautions, referto your Owner's handbook.
E70315
BA
C
High sensitivityAOnBLow sensitivityC
The rain sensor will continuously measurethe amount of water on the windscreen andadjust the speed of the front wipersautomatically.Adjust the sensitivity of the rain sensorusing the rotary control.
CHANGING THE WIPER BLADES
WARNINGFor all warnings and cautions, referto your Owner's handbook.
Windscreen wiper bladesCAUTION
Set the windscreen wipers in theservice position to change the wiperblades.
Service position
E75184
AE75188
Switch off the ignition and move the wiperlever to position A within three seconds.Release the lever when the windscreenwipers have moved to the service position.
AUTOMATIC MAIN BEAMCONTROL
WARNINGFor all warnings and cautions, referto your Owner's handbook.
The system will automatically switch onmain beam if it is dark enough and no othertraffic is present. If it detects anapproaching vehicle’s headlamps or taillamps, or street lighting ahead the systemwill switch off main beam before it candistract other road users.Once the system is active the main beamwill switch on if:• it is dark enough to require the use of
main beams and• there is no traffic or street lighting
ahead and• vehicle speed is greater than 40 km/h
(25 mph).The main beam will switch off if:
5
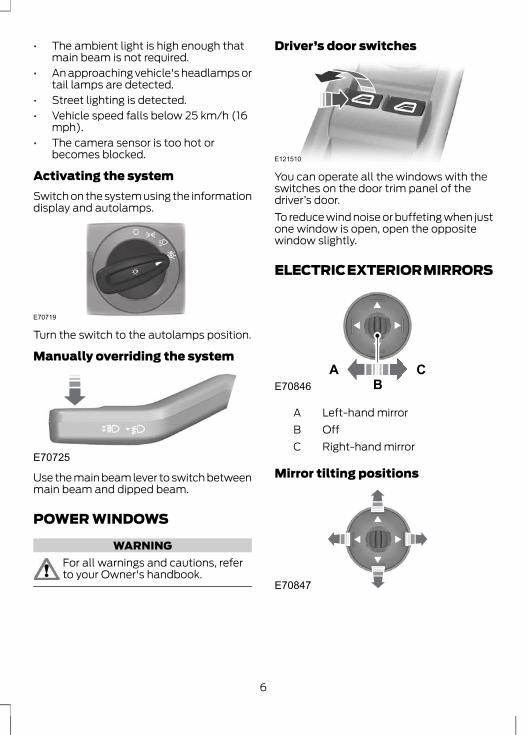
• The ambient light is high enough thatmain beam is not required.
• An approaching vehicle's headlamps ortail lamps are detected.
• Street lighting is detected.• Vehicle speed falls below 25 km/h (16
mph).• The camera sensor is too hot or
becomes blocked.
Activating the systemSwitch on the system using the informationdisplay and autolamps.
E70719
Turn the switch to the autolamps position.
Manually overriding the system
E70725
Use the main beam lever to switch betweenmain beam and dipped beam.
POWER WINDOWS
WARNINGFor all warnings and cautions, referto your Owner's handbook.
Driver’s door switches
E121510
You can operate all the windows with theswitches on the door trim panel of thedriver’s door.To reduce wind noise or buffeting when justone window is open, open the oppositewindow slightly.
ELECTRIC EXTERIOR MIRRORS
A CBE70846
Left-hand mirrorAOffBRight-hand mirrorC
Mirror tilting positions
E70847
6

Reverse mirror dippingDepending on the switch position (A or C),the relevant exterior mirror will dipwhenever you select reverse gear, givingyou a view of the kerb.Note: You can disable this feature by leavingthe switch in position B.The exterior mirror will return to the originalposition:• If the vehicle speed exceeds 10 km/h (6
mph).• Approximately 10 seconds after reverse
gear has been disengaged.• If the switch is returned to position B.
BLIND SPOT MONITOR
WARNINGFor all warnings and cautions, referto your Owner's handbook.
Blind spot information system(BLIS)The system is a convenience feature thataids the driver in detecting vehicles thatmay have entered the blind spot zone (A).The system will alert you if certain vehiclesenter the blind spot zone whilst driving.
A
A
E124788
Using the systemThe system displays a yellow indicatorlocated in the exterior mirrors.
E124736
Detection limitationsThere may be certain instances wherevehicles entering and exiting the blind spotzones may not be detected.
Turning the system on and offYou can turn the system on and off usingthe information display.
MANUAL CLIMATE CONTROLCooling the interior quickly
E71381
Heating the interior quickly
E71377
Recommended settings for cooling
E131534
7

Open the centre and side air vents.Direct the air vents toward your face.
Recommended settings for heating
E131535
Open the centre and side air vents.Direct the side air vents toward the sidewindows.
Defrosting and demisting thewindscreenNote: Turn the air conditioning on to assistwindscreen and side window demisting.Note: Turn the heater control to maximumheat to assist windscreen and side windowdefrosting.
E71382
Make sure that the blower and A/C is on.The indicator in the switch will illuminateduring defrosting and demisting.If you move the air distribution control to aposition other than windscreen, the A/Cwill remain on.You can switch the air conditioning andrecirculated air on and off while the airdistribution control is set to windscreen.
AUTOMATIC CLIMATECONTROLNote: Turn the air conditioning on to assistwindscreen and side window demisting.
Note: Turn the heater control to maximumheat to assist windscreen and side windowdefrosting.
E131606 D
A CB
Toggle mono mode on and offAWindscreen defrosting anddemisting
B
Recirculated airCAir conditioning ON and OFFD
Recommended settings: AUTO, 22ºC
Mono modeIn mono mode, the temperature settingsfor both the driver’s and passenger’s sideare linked. If you adjust the temperatureusing the rotary control on the driver’s side,the settings will be adjusted to the samesetting on the passenger’s side.
AUXILIARY HEATER
WARNINGFor all warnings and cautions, referto your Owner's handbook.
Parking heaterNote: The parking heater will only operateif there is at least 7.5 litres (1.6 gallons) offuel in the fuel tank and the ambienttemperature is below 15°C (59°F). Theheater will not operate if the battery is low.
8

Remote starting
E114360
StartingHold the transmitter with the antennaupwards and press the ON button for atleast two seconds.
Fuel operated heater (dependingon country)The fuel operated heater aids in warmingthe engine and the vehicle interior onvehicles with a diesel engine. It is switchedon or off automatically depending on theoutside air temperature and the coolanttemperature, unless you have deactivatedit.
Diesel auxiliary heater (dependingon country)The diesel auxiliary heater (PTC electricalheater) aids in warming the vehicle interioron vehicles with a diesel engine. It isswitched on or off automatically dependingon the outside air temperature, the coolanttemperature and the alternator load.
SUN SHADESSun blind relearning
WARNINGThe anti-trap function is not activeduring this procedure. Make sure thatthere are no obstacles in the way of
the moving blind.
Note: The relearning process must bestarted no later than 30 seconds after turningthe ignition on.
In case the blind no longer opens or closesproperly, follow this relearning procedure:
E125146
A
B
1. Press switch B to the first action pointtwice and release it within two seconds.
2. Press switch A to the first action pointtwice and release it within two seconds.
3. Press and hold switch B to the firstaction point, until the blind fully opens.
4. Press and hold switch A to the firstaction point, until the blind fully closes.
If step 2 is not completed within 15 seconds,the relearning function will be interrupted.Turn the ignition off, wait for another 30seconds and then turn the ignition back onagain. Start the procedure once more fromthe beginning.Confirm that relearning has beencompleted by using automatic opening andclosing.
MEMORY FUNCTION
WARNINGSBefore activating the seat memory,make sure that the area immediatelysurrounding the seat is clear of
obstructions and that all occupants areclear of moving parts.
The memory store function cannotbe used when the vehicle is moving.
9

A
BE86768
Seat adjustment controlsAMemory pre-set buttonsB
Up to four different driver's seat andexterior mirror positions can be stored inthe memory. Your preferred setting for thereverse mirror dipping feature can also bestored.
Setting a memory pre-setPassive settingThe vehicle stores the seating and mirrorpositions for up to four remote controls orpassive keys. Next time the vehicle isunlocked, the position of the seat andmirrors will adjust to the last used position.Each time you turn the ignition off, thecurrent seat and mirror settings are storedon the remote control or passive key used.
Active setting1. Turn the ignition on.2. Adjust the seat and exterior mirrors to
the desired position.3. Press and hold the desired pre-set
button B until a single chime sounds toconfirm.
Recalling a stored seat positionNote: To stop seat movement during arecall, press any driver seat adjustmentcontrol, any of the memory buttons or anymirror control switch. Seat movement willalso stop if you move the vehicle.
Passive recallNote: If more than one passive key is inrange, the memory function will move to thesettings of the first key stored.When you unlock the vehicle with theremote control or pull the driver door handlewith a passive key in range, the seat andmirrors will move to the position stored onthat remote control or passive key.
Active recallPress the pre-set button associated withthe desired driving position. The seat andmirrors will move to the position stored onthat pre-set.
Resetting the memoryIf any seat position travel is interrupted (e.g.an obstacle in the way or loss of powersupply), you will need to reset the memory.Note: Make sure all electrical accessoriesare switched off.1. Turn the ignition to position II.2. Operate the seat adjustment control to
move the seat in the required directionuntil it stops. A click will be heard.
3. Release the seat adjustment controland immediately press and hold theswitch in the same direction for at least3 seconds. Keep it held until the seatstops at the mechanical end of its traveland a click is heard.
4. Release the seat adjustment control.5. Operate the same seat adjustment
control in the opposite direction for atleast 3 seconds. Keep it held until theseat stops at the mechanical end of itstravel and a click is heard.
KEYLESS STARTING
WARNINGSFor all warnings and cautions, referto your Owner's handbook.
10
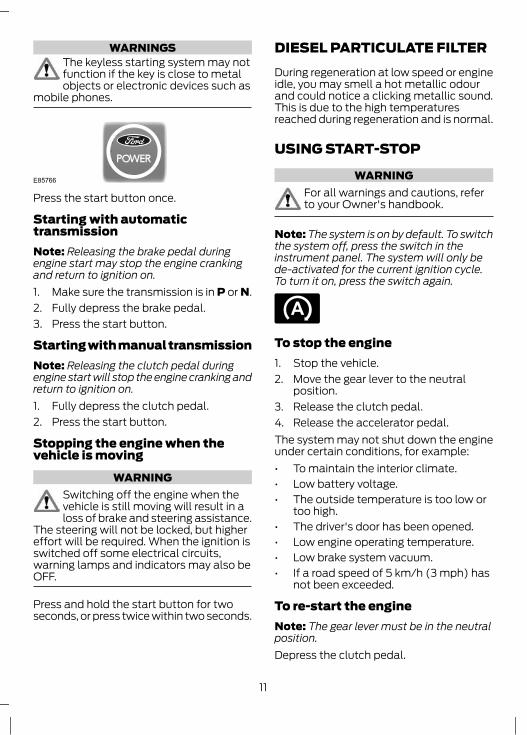
WARNINGSThe keyless starting system may notfunction if the key is close to metalobjects or electronic devices such as
mobile phones.
E85766
Press the start button once.
Starting with automatictransmissionNote: Releasing the brake pedal duringengine start may stop the engine crankingand return to ignition on.1. Make sure the transmission is in P or N.2. Fully depress the brake pedal.3. Press the start button.
Starting with manual transmissionNote: Releasing the clutch pedal duringengine start will stop the engine cranking andreturn to ignition on.1. Fully depress the clutch pedal.2. Press the start button.
Stopping the engine when thevehicle is moving
WARNINGSwitching off the engine when thevehicle is still moving will result in aloss of brake and steering assistance.
The steering will not be locked, but highereffort will be required. When the ignition isswitched off some electrical circuits,warning lamps and indicators may also beOFF.
Press and hold the start button for twoseconds, or press twice within two seconds.
DIESEL PARTICULATE FILTERDuring regeneration at low speed or engineidle, you may smell a hot metallic odourand could notice a clicking metallic sound.This is due to the high temperaturesreached during regeneration and is normal.
USING START-STOP
WARNINGFor all warnings and cautions, referto your Owner's handbook.
Note: The system is on by default. To switchthe system off, press the switch in theinstrument panel. The system will only bede-activated for the current ignition cycle.To turn it on, press the switch again.
To stop the engine1. Stop the vehicle.2. Move the gear lever to the neutral
position.3. Release the clutch pedal.4. Release the accelerator pedal.The system may not shut down the engineunder certain conditions, for example:• To maintain the interior climate.• Low battery voltage.• The outside temperature is too low or
too high.• The driver's door has been opened.• Low engine operating temperature.• Low brake system vacuum.• If a road speed of 5 km/h (3 mph) has
not been exceeded.
To re-start the engineNote: The gear lever must be in the neutralposition.Depress the clutch pedal.
11
The system may automatically restart theengine under certain conditions, forexample:• Low battery voltage.• To maintain the interior climate.
ECO MODEThe system assists the driver to drive moreefficiently by constantly monitoringcharacteristics of gear changing,anticipation of traffic conditions and speedson motorways and open roads.
Type 1
E121813 CBA
Gear shiftingAAnticipationBEfficient speedC
Type 2 and 3The relevant information will be shown inthe display.
Gear shiftingUsing the highest drivable gear appropriatefor the road conditions will improve fuelconsumption.
AnticipationAdjusting your vehicle speed and thedistance to other vehicles without the needfor heavy braking or acceleration willimprove fuel consumption.
Efficient speedHigher speeds use more fuel. Reducing yourcruising speed on open roads will improvefuel consumption.
USING ECO MODEThe system is accessed using the relevantinformation display menu.
Resetting Eco modeReset the average fuel consumption.Note: New values may take a short time tocalculate.
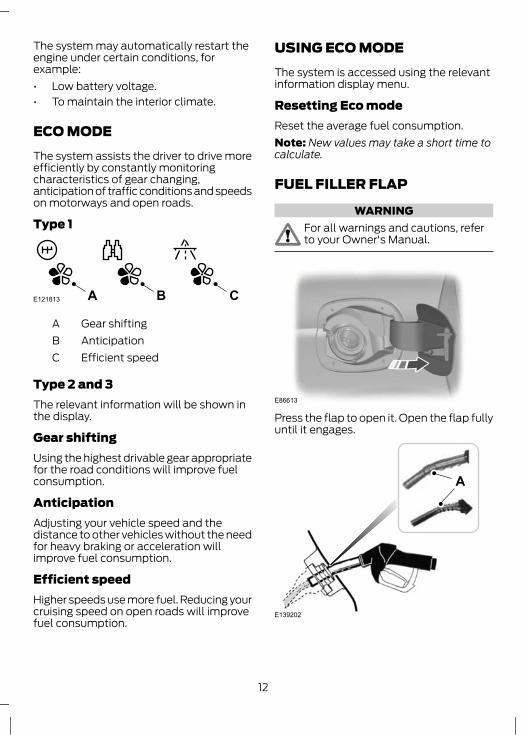
FUEL FILLER FLAP
WARNINGFor all warnings and cautions, referto your Owner's Manual.
E86613
Press the flap to open it. Open the flap fullyuntil it engages.
E139202
A
12

Insert the fuel nozzle up to and includingthe first notch on the nozzle A. Keep itresting on the cover of the fuel pipeopening.
WARNINGWe recommend that you remove thefuel nozzle slowly to allow anyresidual fuel to drain into the fuel
tank. Alternatively you can wait 10 secondsbefore removing the fuel nozzle.
E119081
Slightly raise the fuel nozzle to remove it.
FUEL CONSUMPTIONCheck your tyre pressures regularly tooptimise fuel economy.
HINTS ON DRIVING WITH ANTI-LOCK BRAKESNote: When the system is operating, thebrake pedal will pulse and may travel further.Maintain pressure on the brake pedal. Youmay also hear a noise from the system. Thisis normal.The ABS will not eliminate the risks when:• you drive too close to the vehicle in front
of you• the vehicle is aquaplaning• you take corners too fast• the road surface is poor.
ELECTRIC PARKING BRAKE
WARNINGFor all warnings and cautions, referto your Owner's handbook.
The electric parking brake (EPB) replacesthe conventional handbrake. It is operatedby a switch located in the centre console.
Manual releaseNote: To release the EPB, the ignition mustbe in position II.
E70529
Hold the brake pedal depressed and pressdown the switch.
Automatic release - Drive awayrelease (DAR)Note: On vehicles with automatictransmission, the driver's door must beclosed and the driver's seatbelt must befastened before the DAR will operate.Note: On vehicles with manual transmission,if the gear lever is in neutral when you releasethe clutch pedal and depress the acceleratorpedal, the EPB will be releasedautomatically.Note: The clutch pedal must be fullydepressed before the DAR will operate.Engage first or reverse gear, move off asnormal using the accelerator and clutchpedals and the EPB will be automaticallyreleased.
USING THE PARKING AID
WARNINGFor all warnings and cautions, referto your Owner's handbook.
13

Switching the parking aid on andoffNote: The parking aid switches offautomatically when you start the engine orwhen you exceed 16 km/h (10 mph).Note: The front and rear sensors are alwaysactivated or deactivated together.The parking aid is per default off. To switchthe parking aid on, press the switch in theinstrument panel or select reverse gear.The light in the switch illuminates when theparking aid is activated.To turn it off, press the switch again.
DRIVER ALERT
WARNINGFor all warnings and cautions, referto your Owner's handbook.
The system automatically monitors yourdriving behaviour using various inputsincluding the front camera sensor.If the system detects that you are becomingdrowsy or there is a deterioration in yourdriving, the system will alert you.
USING DRIVER ALERTSwitching the system on and offActivate the system using the informationdisplay.
System displayWhen active the system will runautomatically in the background and onlyissue warnings if required. You can view thestatus at any time using the informationdisplay.The alertness level is shown by six steps asa coloured bar.
E131358
The status bar will travel from left to rightas the calculated alertness level decreases.• Green - No rest required.• Yellow - First (temporary) warning.• Red - Second warning.
LANE DEPARTURE WARNING
WARNINGFor all warnings and cautions, referto your Owner's handbook.
The system will automatically detect andtrack the lane markings on the road. If itdetects that the vehicle is unintentionallydrifting towards the lane boundaries thena visual warning will be displayed in theinformation display. There is also a warninggiven in the form of a vibration felt throughthe steering wheel.
USING LANE DEPARTUREWARNINGSwitching the system on and off
E131360
A
B
System onASystem offB
14

System warnings
E131363
A column of lane markings is displayedeither side of the vehicle graphic.The lane markings are colour coded asfollows:• Green - The system is ready to warn you
of any unintentional lane departure.• Red - The vehicle is approaching or is
too close to the detected laneboundary. Take immediate safe actionto reposition the vehicle.
• Grey - The relevant lane boundary willbe suppressed.
Instances where a lane boundary may besuppressed:• Lane markings on the road may not be
detected by the sensor.• The direction indicator for that side of
the vehicle is on.• During hard acceleration and braking,
or if direct steering is applied.• Vehicle speed is outside the operating
limits• If there is an ABS or Stability Control
(ESP) intervention.• Narrow lane width.If the lane markings turn red or a vibrationis felt through the steering wheel you musttake immediate and safe action to align thevehicle and correct any unintended lanedrift.
BLUETOOTH SETUPThe Bluetooth mobile phone part of thesystem provides interaction with the audiosystem and your mobile phone. It allowsyou to use the audio system to make andreceive calls without having to hold yourmobile phone.During bonding, if your mobile phone asksyou to authorize the automatic connection,select YES.Refer to your Owner's Manual and alsowww.ford-mobile-connectivity.com fordetails.
15