g60/g676. be sure to use the right charger and follow the instruction of g60/g67 manual with the...
TRANSCRIPT
G60/G67
Mobile Inspection Assistant
User Manual

2
SpecificationRating Voltage: D.C. 9VRating Current: 2.0AOperating Temp.: -20 ~ 50℃Water and Dust Proof: IP67Battery Capacity: 5100 mAh
Caution:1. Please Use the battery coming with G60 device to avoid the risk of explosion.2. Dispose of used batteries according to local government requirements.3. Do not disassemble, open, short or destroy the battery.4. Do not expose a battery or battery pack to heat or fire. Avoid storing under
direct sunlight.5. When a battery leaks, do not allow the liquid electrolyte to touch the skin or
eyes.If inadvertently touching, rinse the affected area with plenty of water and seek for medical assistance.
6. Be sure to use the right charger and follow the instruction of G60/G67 manual with the correct procedure to charge.
7. Do not expose the laser radiation to the eyes, so as not to hurt the eyes.
3
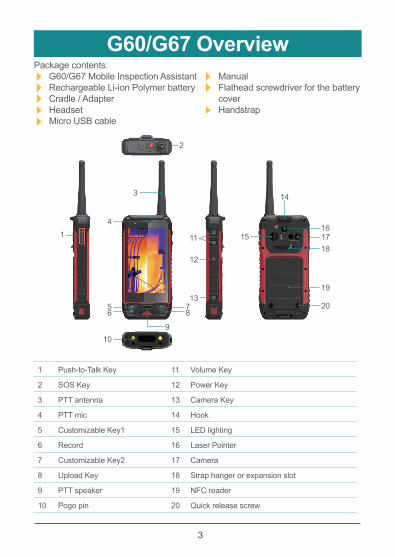
G60/G67 OverviewPackage contents:
� G60/G67 Mobile Inspection Assistant � Rechargeable Li-ion Polymer battery � Cradle / Adapter � Headset � Micro USB cable
1 Push-to-Talk Key 11 Volume Key
2 SOS Key 12 Power Key
3 PTT antenna 13 Camera Key
4 PTT mic 14 Hook
5 Customizable Key1 15 LED lighting
6 Record 16 Laser Pointer
7 Customizable Key2 17 Camera
8 Upload Key 18 Strap hanger or expansion slot
9 PTT speaker 19 NFC reader
10 Pogo pin 20 Quick release screw
1
2
3
4
5 76 8
910
11
12
13
15 1716
18
19
20
14
� Manual � Flathead screwdriver for the battery
cover � Handstrap

4
Strap InstallationStep 1:Use a cross screwdriver to unscrew the strap hanger, hang the strap, and tighten the screws.
The strap contains a flathead screwdriver which is to open the battery cover.

5
SIM Card and mSD Card Installation
Step 3:Push the battery as the direction shown to remove the battery.
Step 4:As the diagram shown, insert SIM card, and micro SD card.
Step 2:Use a flathead screwdriver to unscrew and open up the battery cover from the bottom groove with your thumb.
SIM Slot 2: 2G/3G/4G
Insert SIM Card:There are two SIM card slots. SIM slot 1 supports 4G private network, and SIM slot 2 supports 2G, 3G, 4G Network. Please make sure to insert your card in the right slot.
Insert mSD Card:Follow the direction as shown to insert the micro SD card, put down the cover, and lock it.
SIM Slot 1: 4G Private Network

6
Battery InstallationStep 1:Put the battery back to the slot and make it fixed.
Step 2:Put the cover back and make sure that it is closed.
Step 3:Use the flathead screwdriver to tighten the two screws to ensure the waterproof performance.

7
Charge & Data TransmissionTo Charge G60/G67, utilize desktop cradle with adapter. For data transfer, utilize both desktop and USB cable for transferring data.
Charge:Plug the adapter in both of the cradle and socket for charging.
Data Transmission: Plug the USB cable in both of the cradle and computer for transferring data.
2. Please insert the device smoothly into the cradle slot from right direction.
1. Please make sure that the device and cradle are clean without stained with grease to charge successfully.
Pogo pin

8
Charge & Data Transmission
Warning:Use only the power adapter that comes with your device. Using a different power adapter may damage your device and may result in poor performance. It may also invalidate warranty applying to the device.
3. The LED light indicates the status during charging:(1) G60/G67 Device• Charging: The LED light indicates green
with flash.• Fully Charged: The light remains green. (2) The Battery• Charging: The LED light indicates green
with flash.• Fully Charged: The light remains green.
LED Indicator
The red area on the screen as shown displays the status during charging as well.

9
Remark:1. The file storage location for Snapshot at file manager/phone storage/pictures2. Do not touch the buttons of "SET" or "Cali"
Thermal Imaging Usage
Step 1:Touch the App of "Thermal"
Step 3:Touch the "Stop" when finishing
Step 2:Touch the "Start" for referring the temperature of the object being observed

10
Push-to-Talk of Analog Mode Usage
Step 1:Touch the App of "WalkieTalkie"
Step 2:Touch the "OFF" to turn into "ON"
Step 3:Touch the "Channel Switch"

11
Push-to-Talk of Analog Mode Usage
Step 4:Select the "Analog" from the "Mode"
Step 5:Select the channel frequency which must be same as the party's device you would like to talk
Step 6:Touch the "SET" to finish and to go back
1
2
12
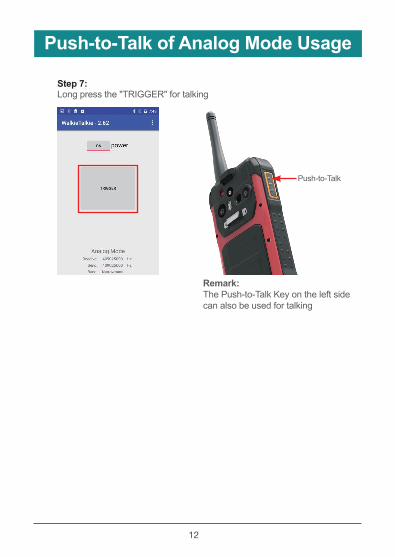
Push-to-Talk of Analog Mode Usage
Step 7:Long press the "TRIGGER" for talking
Remark:The Push-to-Talk Key on the left side can also be used for talking
Push-to-Talk

13
Push-to-Talk of Digital Mode Usage
Step 1:Touch the App of "WalkieTalkie"
Step 2:Touch the "OFF" to turn into "ON"
Step 3:Touch the "Channel Switch"

14
Push-to-Talk of Digital Mode Usage
Step 4:Select the "Digital" from the "Mode"
Step 6:Touch the "SET" to finish and to go back
1
2
Step 5:Select the channel frequency which must be same as the party's device you would like talk

15
Push-to-Talk of Digital Mode Usage
Step 7:Touch the "Digital Mode ID Settings"

16
Push-to-Talk of Digital Mode Usage
(a) For group talking, select an ID (from 1 to 32) and key in any 3 digit numbers and press the "SET" to finish setting.
(b) For point-to-point talking, please key in any 3 digit numbers next to the "Phone number" and press the "SET" to finish setting.
(c) For encryption,you can key-in 1 digit number next to the "Color code" and press the "SET" to finish setting. The party to talk must have the same color code as yours.
Key in any 3 digit numbers
Select an ID (from 1 to 32)
key in any 3 digit number
key-in 1 digit number
Step 8:

17
Push-to-Talk of Digital Mode Usage
Key in the party's number
Step 9:Touch to go back
Step 10:Key in the party's number you would like to talk, and long press the "TRIGGER" for talking
Push-to-Talk
Remark:The Push-to-Talk Key on the left side can also be used for talking

18
FAQ
For more information, please visit the FAQ section at http://www.amobile.com.tw/faq/faq/