itop 1-0 admin guide
TRANSCRIPT
ITop 1.0 Administrator guide
(Draft)
© 2010 Combdo. All rights reserved

iTop 1.0 Administrator's Guide
2
Table of content Table of content .......................................................................................................................... 2 About iTop ................................................................................................................................... 3 Licensing ..................................................................................................................................... 3 Known limitations ....................................................................................................................... 4 Other documentation .................................................................................................................. 4 Installing iTop .............................................................................................................................. 4
Software requirement ............................................................................................................. 4 Hardware requirement ............................................................................................................ 5 Download iTop package .......................................................................................................... 5 Install iTop .............................................................................................................................. 5 Changing configuration option .............................................................................................. 10
Configuring short list display ............................................................................................ 10 Configuring size of document upload ............................................................................... 10 Reload interval for list of item .......................................................................................... 10
Migrating from previous version 0.9 ......................................................................................... 10 iTop common usage .................................................................................................................. 10
Starting iTop .......................................................................................................................... 10 Managing users ......................................................................................................................... 12
Viewing Profiles .................................................................................................................... 12 Viewing users ........................................................................................................................ 14 Creating a user ...................................................................................................................... 14 Changing user password ....................................................................................................... 16
Managing Organization ............................................................................................................. 16 Viewing data model .................................................................................................................. 18 Running Object queries ............................................................................................................. 20 Enter OQL expression in the text area, and click on “Evaluate” to get the result. .................. 20 Managing Notification ............................................................................................................... 20
Creating an action ................................................................................................................. 21 Creating a trigger .................................................................................................................. 22
Managing Audit ......................................................................................................................... 25 Audit Category....................................................................................................................... 25 Audit Rule ............................................................................................................................. 25
iTop localization ........................................................................................................................ 26 Managing DB backup ................................................................................................................ 26 SLA check .................................................................................................................................. 26 Integrating with other application ............................................................................................ 27
How to export data out of iTop ............................................................................................. 27 How to import data in iTop ................................................................................................... 27
Example of script for importing CSV data ........................................................................ 29 Soap web service for incident ticket creation ...................................................................... 30
Example of script for creating an Incident: ...................................................................... 30
iTop 1.0 Administrator's Guide
3
About iTop This document describes release 0.9 of iTop. iTop is a robust Open Source web 2.0 application that will help you to better support your IT. Development of iTop started in March 2006 in order to publish on the internet a completely open solution that would help enterprise to drive ITIL best practices implementation. Goal of the iTop community was to provide an alternative solution to very expensive solutions sold by standard software vendors. At the early beginning of the project, the development team was focus on building the most complete CMDB (Configuration Management Data Base). One key objective was to make it as flexible as flexible in order to allow administrator to add and remove configuration items from the data model and manage as many relationships as they want. The development team also designed a powerful state machine that allows defining life cycle for whatever configuration items in the CMDB. Realizing that all concepts developed within the CMDB can be applied to all other ITIL best practices, the iTop community decided to extend them to Incident Management, Change Management and Service Management modules. Then iTop became an IT operational portal that helps all IT management team to support their environment by:
Documenting IT infrastructures and their relationships (servers, application, network …) Documenting IT incident and planned outages, as well as a known error database Documenting all IT services and contracts with external providers
iTop application can be used by different type of profiles: Help Desk IT support engineers (1st level, 2nd level, 3rd level …) IT service managers IT managers
iTop application is relying on Apache, MySQL and PHP, so it can run on whatever operating system supporting those applications. It had been tested already on Windows, Linux Debian and Redhat. As it is a web based application you don’t need to install client on user PC. A simple web browser is enough to use it.
Licensing iTop is licensed under the terms of the GNU General Public License Version 3 as published by the Free Software Foundation. This gives you legal permission to copy, distribute and/or modify iTop under certain conditions. Read the ’license.txt’ file in the iTop distribution. iTop is provided AS IS with NO WARRANTY OF ANY KIND, INCLUDING THE WARRANTY OF DESIGN, MERCHANTABILITY, AND FITNESS FOR A PARTICULAR PURPOSE.
iTop 1.0 Administrator's Guide
4
Known limitations
• Trac #71 The same MySQL credentials are used during the setup and for running the application.
• Trac #246 Massive data load requiring to setup specific HTTP sessions with higher timeouts and memory limits.
• Trac #257 Could not delete more than 997 items when SUHOSIN is installed with its default settings.
Other documentation All related documentations are available on http://www.combodo.com/itopdocumentation
• “How to Setup Authentication with iTop” • “iTop Implementation Guide “ • “Localizing iTop” • “Customizing iTop 1.0” • “OQL Reference” • “iTop 1.0 user guide” • “How to migrate from 0.9 to 1.0”
Installing iTop
Software requirement iTop is based on the AMP (Apache / MySQL / PHP) platform and requires PHP 5.2 and MySQL 5. To avoid timeout issue during installation, we recommend to change innoDB configuration in you MySQL configuration (/etc/mysql/my.cnf): innodb_flush_method = O_DSYNC Optional requirements: For LDAP authentication iTop requires the PHP LDAP module. For strong encryption for password iTop requires PHP mcrypt module. Getting required software on Debian:
Apt-get install apache Apt-get install mysql Apt-get install php
Getting required software on Redhat:
Yum install apache Yum install mysql Yum install php
iTop 1.0 Administrator's Guide
5
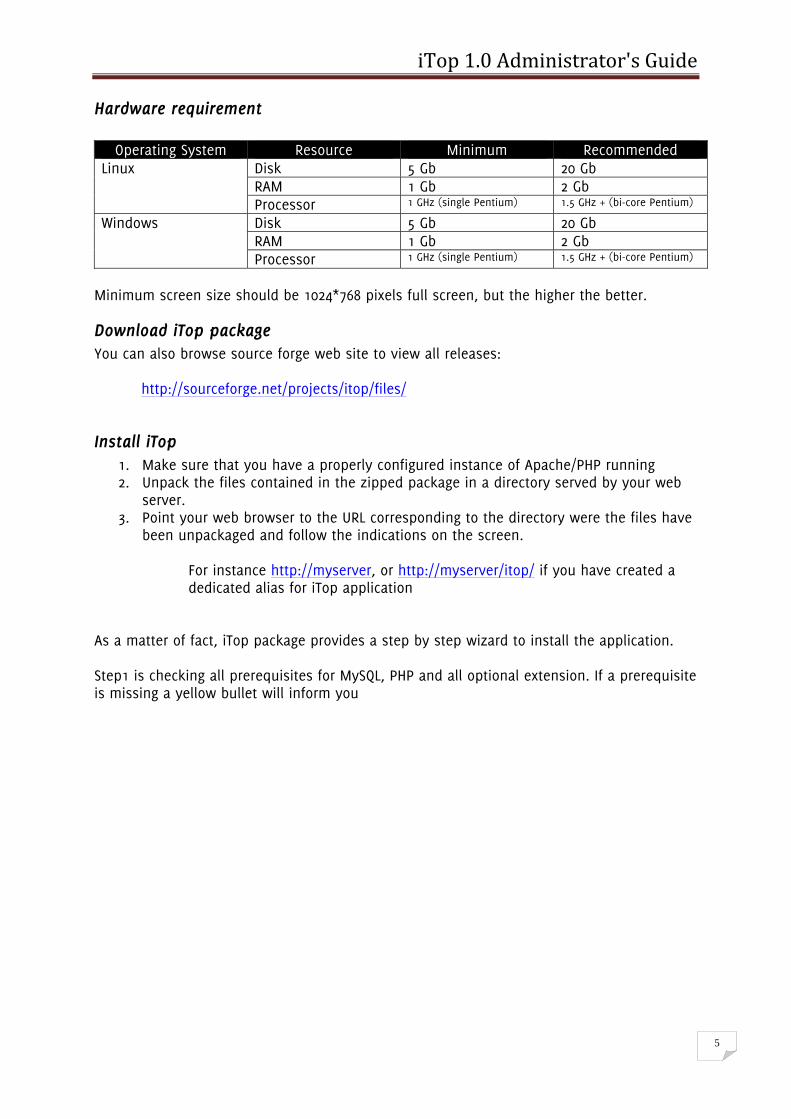
Hardware requirement
Operating System Resource Minimum RecommendedLinux Disk 5 Gb 20 Gb
RAM 1 Gb 2 Gb Processor 1 GHz (single Pentium) 1.5 GHz + (bi-core Pentium)
Windows Disk 5 Gb 20 Gb RAM 1 Gb 2 Gb Processor 1 GHz (single Pentium) 1.5 GHz + (bi-core Pentium)
Minimum screen size should be 1024*768 pixels full screen, but the higher the better.
Download iTop package You can also browse source forge web site to view all releases:
http://sourceforge.net/projects/itop/files/
Install iTop 1. Make sure that you have a properly configured instance of Apache/PHP running 2. Unpack the files contained in the zipped package in a directory served by your web
server. 3. Point your web browser to the URL corresponding to the directory were the files have
been unpackaged and follow the indications on the screen. For instance http://myserver, or http://myserver/itop/ if you have created a dedicated alias for iTop application
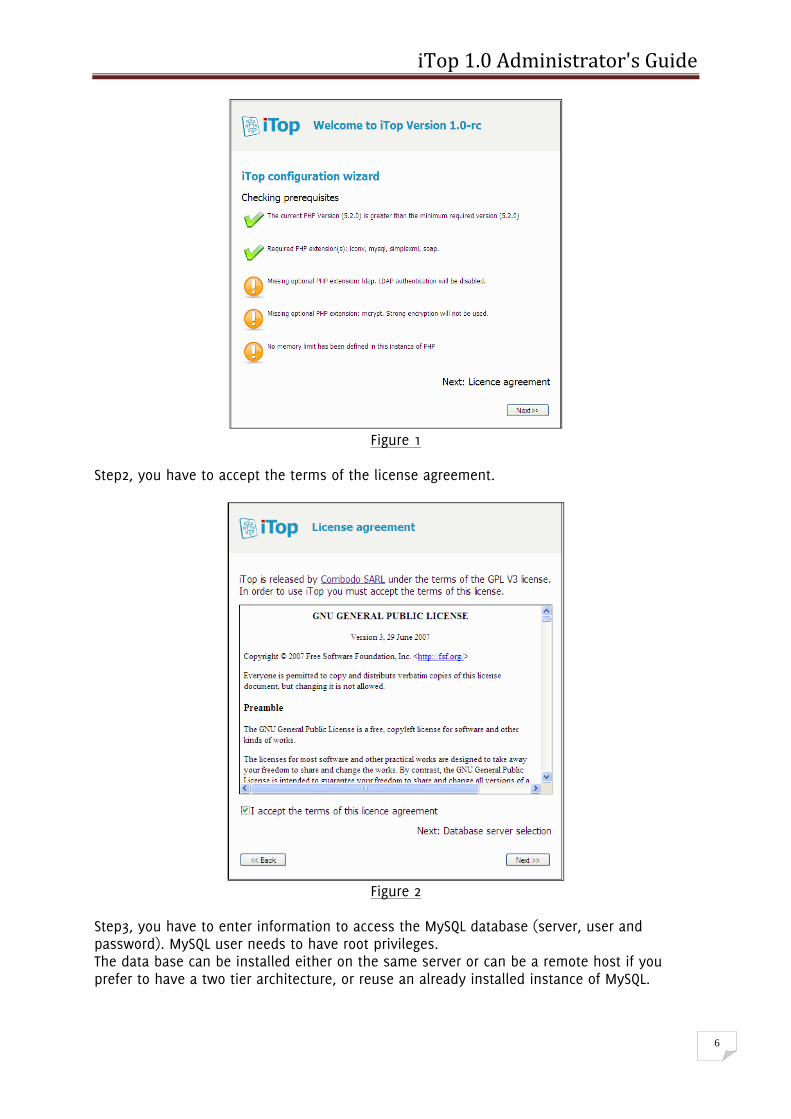
As a matter of fact, iTop package provides a step by step wizard to install the application. Step1 is checking all prerequisites for MySQL, PHP and all optional extension. If a prerequisite is missing a yellow bullet will inform you
iTop 1.0 Administrator's Guide
6
Figure 1
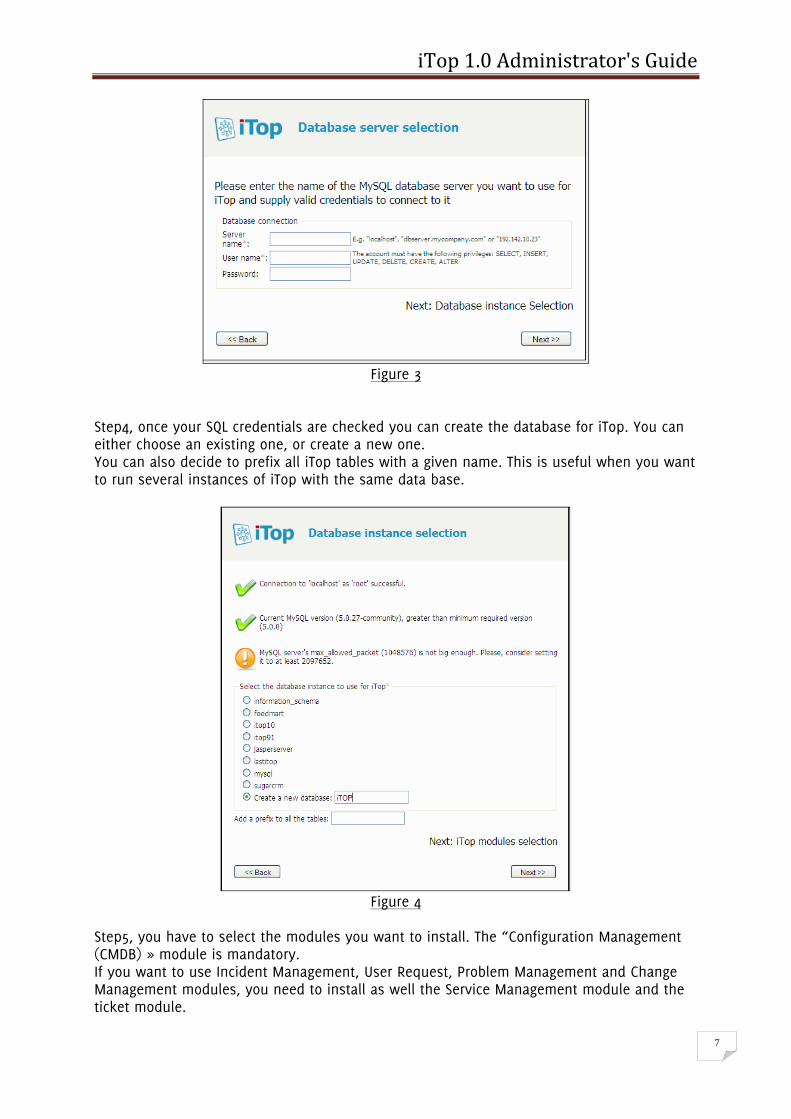
Step2, you have to accept the terms of the license agreement.
Figure 2
Step3, you have to enter information to access the MySQL database (server, user and password). MySQL user needs to have root privileges. The data base can be installed either on the same server or can be a remote host if you prefer to have a two tier architecture, or reuse an already installed instance of MySQL.
iTop 1.0 Administrator's Guide
7
Figure 3
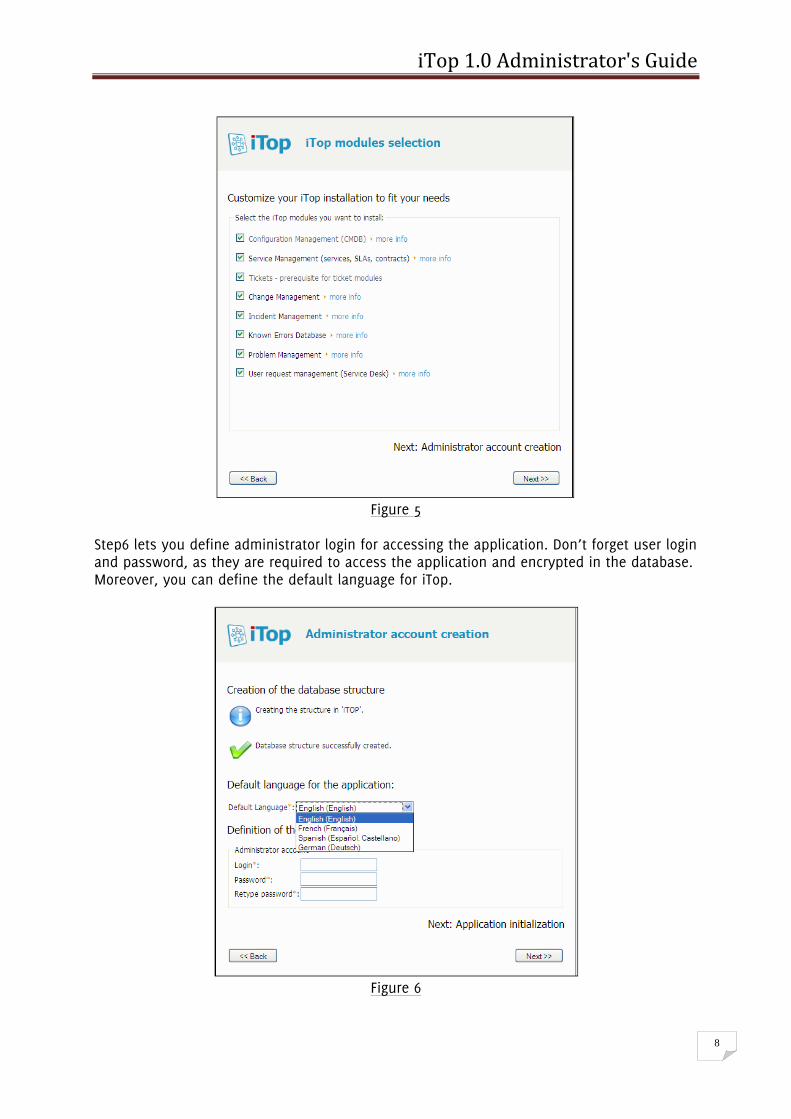
Step4, once your SQL credentials are checked you can create the database for iTop. You can either choose an existing one, or create a new one. You can also decide to prefix all iTop tables with a given name. This is useful when you want to run several instances of iTop with the same data base.
Figure 4
Step5, you have to select the modules you want to install. The “Configuration Management (CMDB) » module is mandatory. If you want to use Incident Management, User Request, Problem Management and Change Management modules, you need to install as well the Service Management module and the ticket module.
iTop 1.0 Administrator's Guide
8
Figure 5
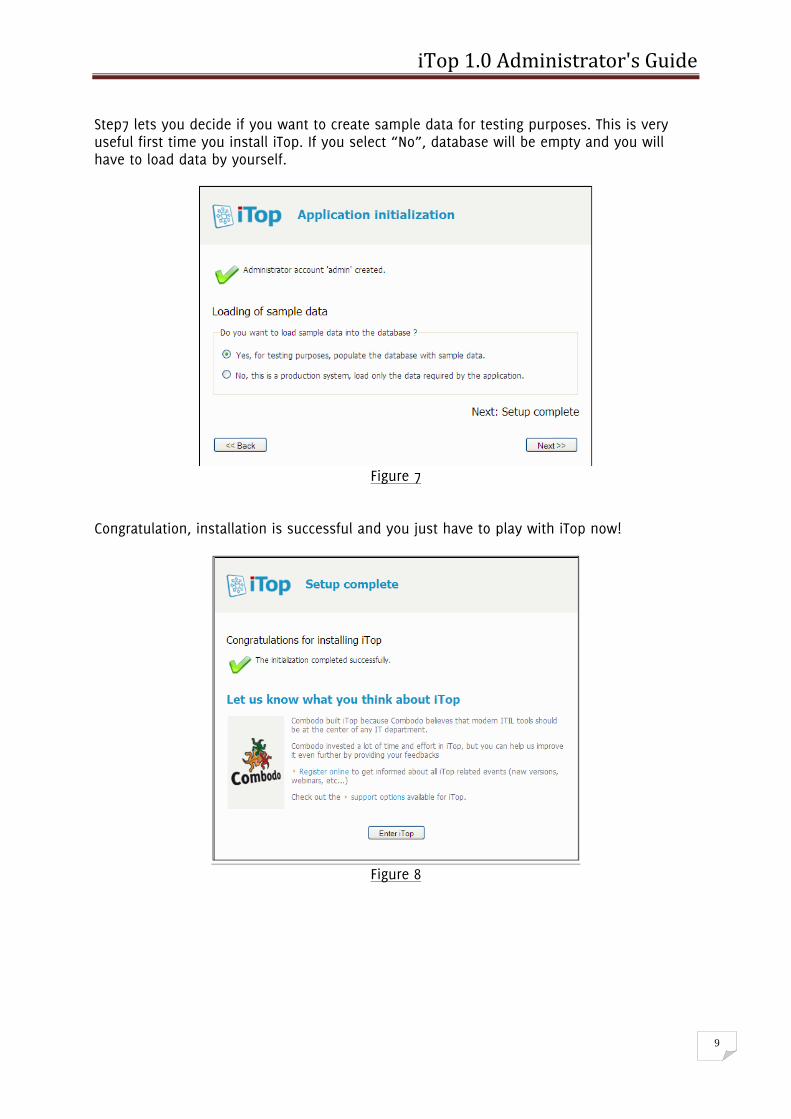
Step6 lets you define administrator login for accessing the application. Don’t forget user login and password, as they are required to access the application and encrypted in the database. Moreover, you can define the default language for iTop.
Figure 6
iTop 1.0 Administrator's Guide
9
Step7 lets you decide if you want to create sample data for testing purposes. This is very useful first time you install iTop. If you select “No”, database will be empty and you will have to load data by yourself.
Figure 7
Congratulation, installation is successful and you just have to play with iTop now!
Figure 8
iTop 1.0 Administrator's Guide
10
Changing configuration option
Configuring short list display Short lists are used to limit number of item displayed in a list when it is too long. By default a short list is displayed as soon as there are more than 15 objects. This value can be changed by modifying “max_display_limit” in config-itop.php. The number of object displayed in a short list is defined by another variable in config-itop.php “min_display_limit”. Be careful to not set a too high value.
Configuring size of document upload The maximum size of document you can upload is limited by “upload_max_filesize” in php.ini and “max_allowed_packet” in mysql.conf. This latest value has to be a little bit biger than upload_max_filesize. During installation, setup script checks both variables and raise warning in case there is an issue. If you want to change the maximum size of document you have to modify both and make sure they are coherent. Once done you have to restart your web server and mysql.
Reload interval for list of item In order to refresh list of Incident or User Request ticket, iTop is using two parameters defined in config-itop.php. The unit is second. By default the standard reload interval is 300 seconds and the fast reload interval is 60 seconds.
'standard_reload_interval' => 300, 'fast_reload_interval' => 60,
Migrating from previous version 0.9 The release 1.0 data model is not compatible with former one. Please read the document “How to migrate from 0.9 to 1.0”.
iTop common usage
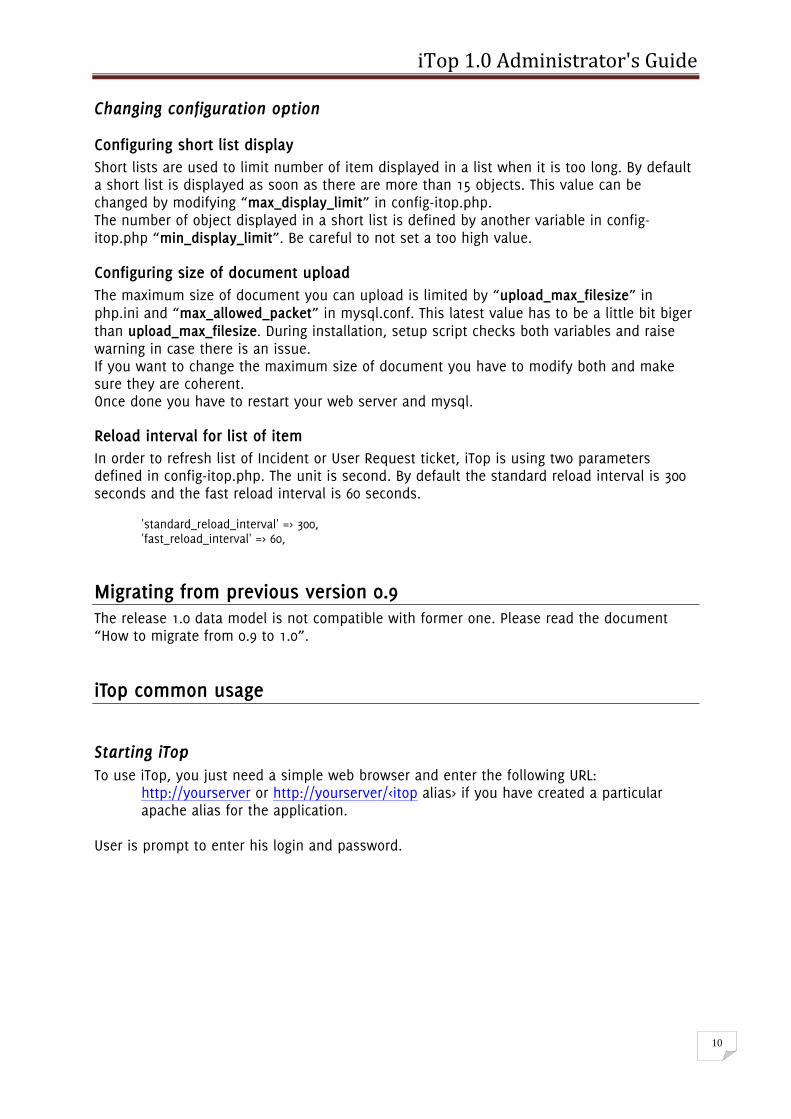
Starting iTop To use iTop, you just need a simple web browser and enter the following URL:
http://yourserver or http://yourserver/<itop alias> if you have created a particular apache alias for the application.
User is prompt to enter his login and password.
iTop 1.0 Administrator's Guide
11
Figure 9
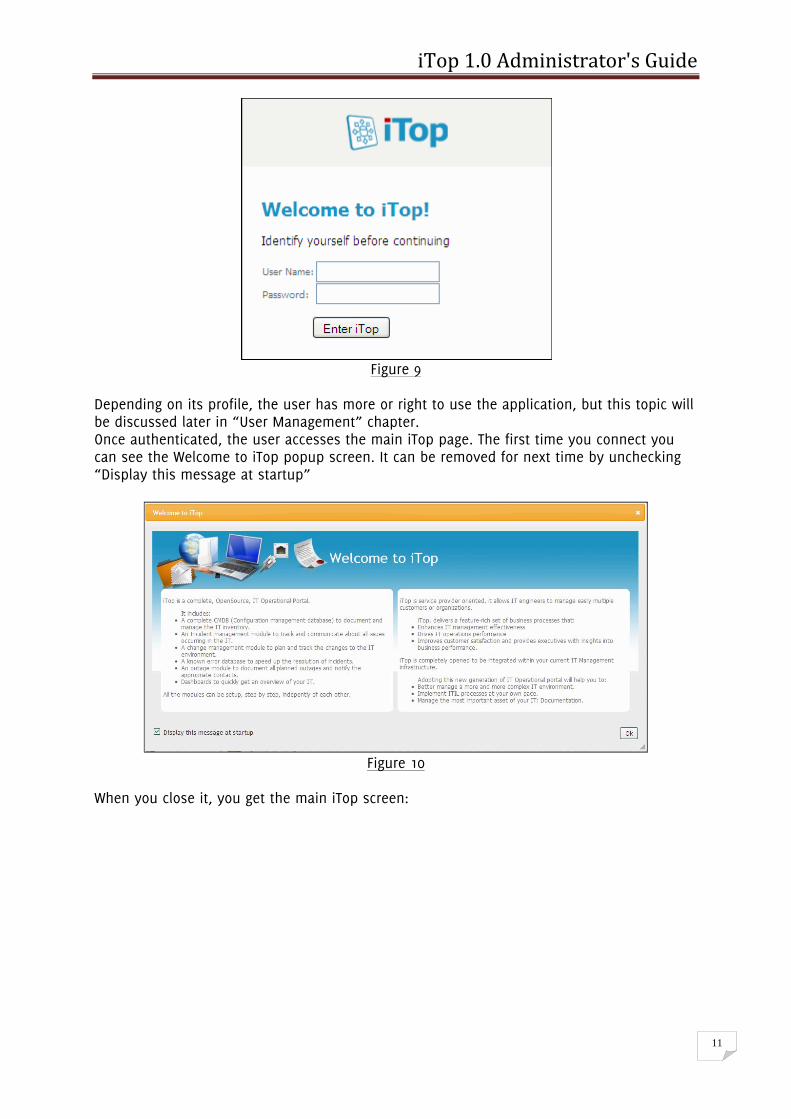
Depending on its profile, the user has more or right to use the application, but this topic will be discussed later in “User Management” chapter. Once authenticated, the user accesses the main iTop page. The first time you connect you can see the Welcome to iTop popup screen. It can be removed for next time by unchecking “Display this message at startup”
Figure 10
When you close it, you get the main iTop screen:
iTop 1.0 Administrator's Guide
12
Figure 11
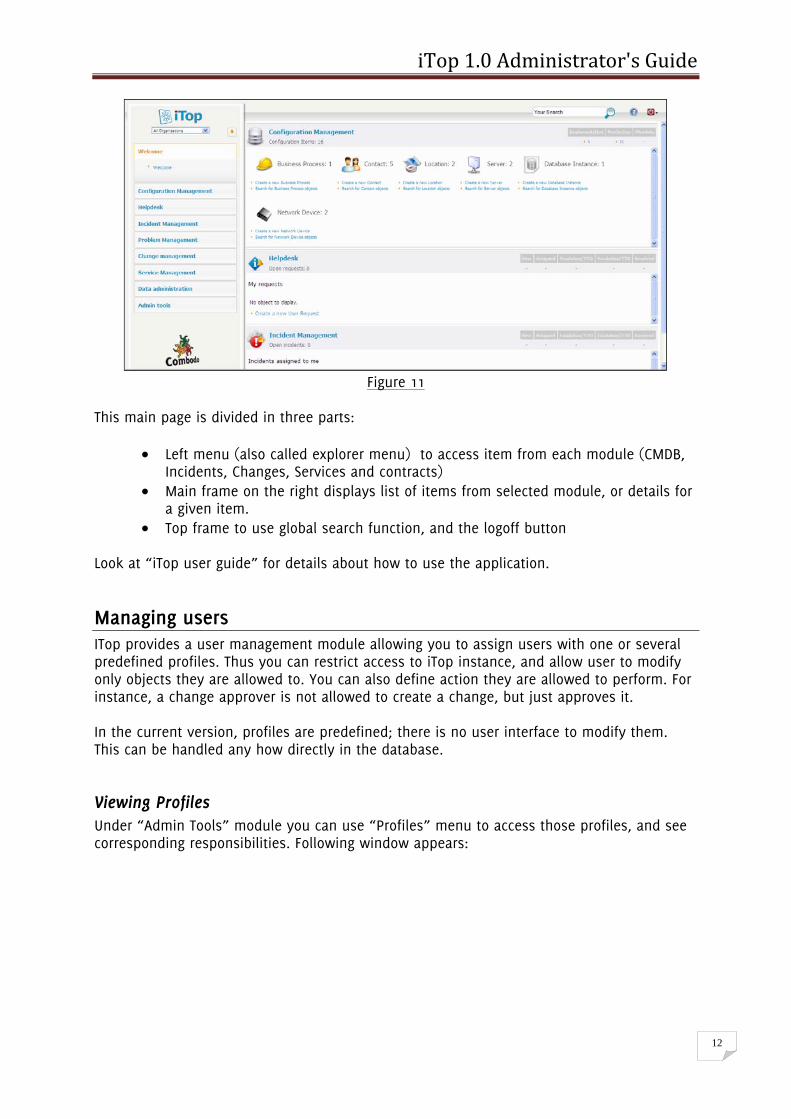
This main page is divided in three parts:
• Left menu (also called explorer menu) to access item from each module (CMDB,
Incidents, Changes, Services and contracts) • Main frame on the right displays list of items from selected module, or details for
a given item. • Top frame to use global search function, and the logoff button
Look at “iTop user guide” for details about how to use the application.
Managing users ITop provides a user management module allowing you to assign users with one or several predefined profiles. Thus you can restrict access to iTop instance, and allow user to modify only objects they are allowed to. You can also define action they are allowed to perform. For instance, a change approver is not allowed to create a change, but just approves it. In the current version, profiles are predefined; there is no user interface to modify them. This can be handled any how directly in the database.
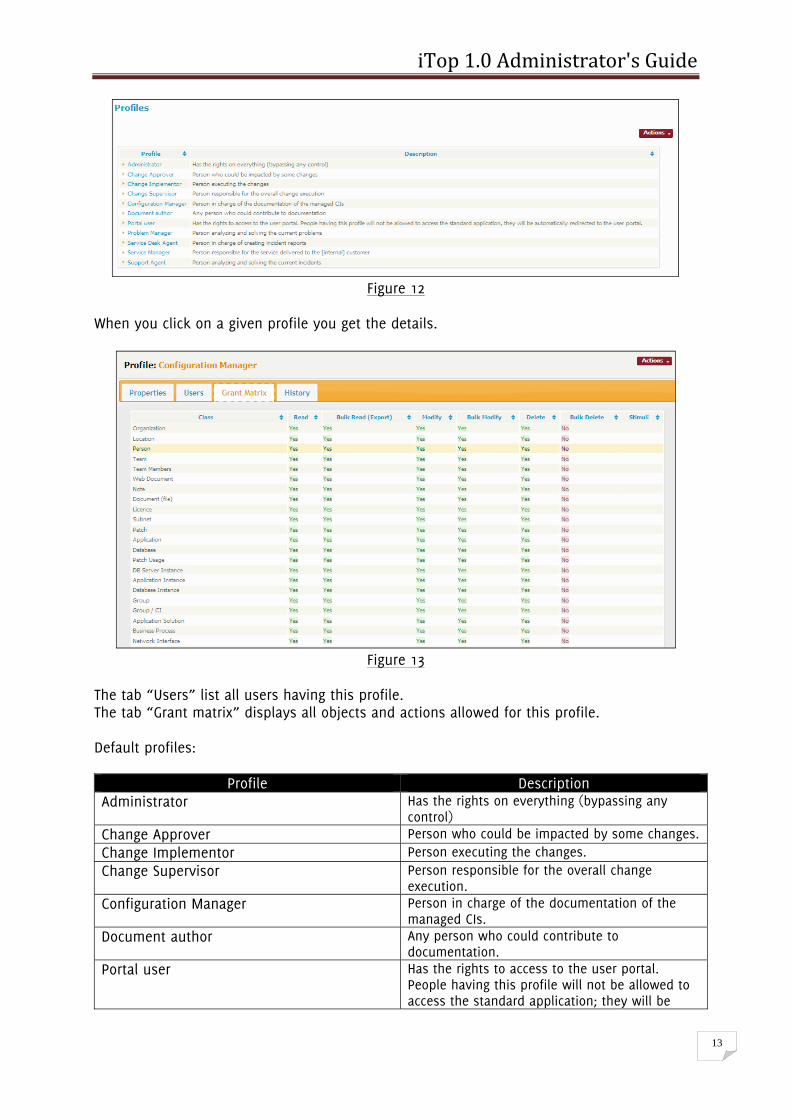
Viewing Profiles Under “Admin Tools” module you can use “Profiles” menu to access those profiles, and see corresponding responsibilities. Following window appears:
iTop 1.0 Administrator's Guide
13
Figure 12
When you click on a given profile you get the details.
Figure 13
The tab “Users” list all users having this profile. The tab “Grant matrix” displays all objects and actions allowed for this profile. Default profiles:
Profile Description Administrator Has the rights on everything (bypassing any
control) Change Approver Person who could be impacted by some changes.Change Implementor Person executing the changes. Change Supervisor Person responsible for the overall change
execution. Configuration Manager Person in charge of the documentation of the
managed CIs. Document author Any person who could contribute to
documentation. Portal user Has the rights to access to the user portal.
People having this profile will not be allowed to access the standard application; they will be
iTop 1.0 Administrator's Guide
14
automatically redirected to the user portal.
Problem Manager Person analyzing and solving the current problems.
Service Desk Agent Person in charge of creating incident reports. Service Manager Person responsible for the service delivered to
the [internal] customer. Support Agent Person analyzing and solving the current
incidents.
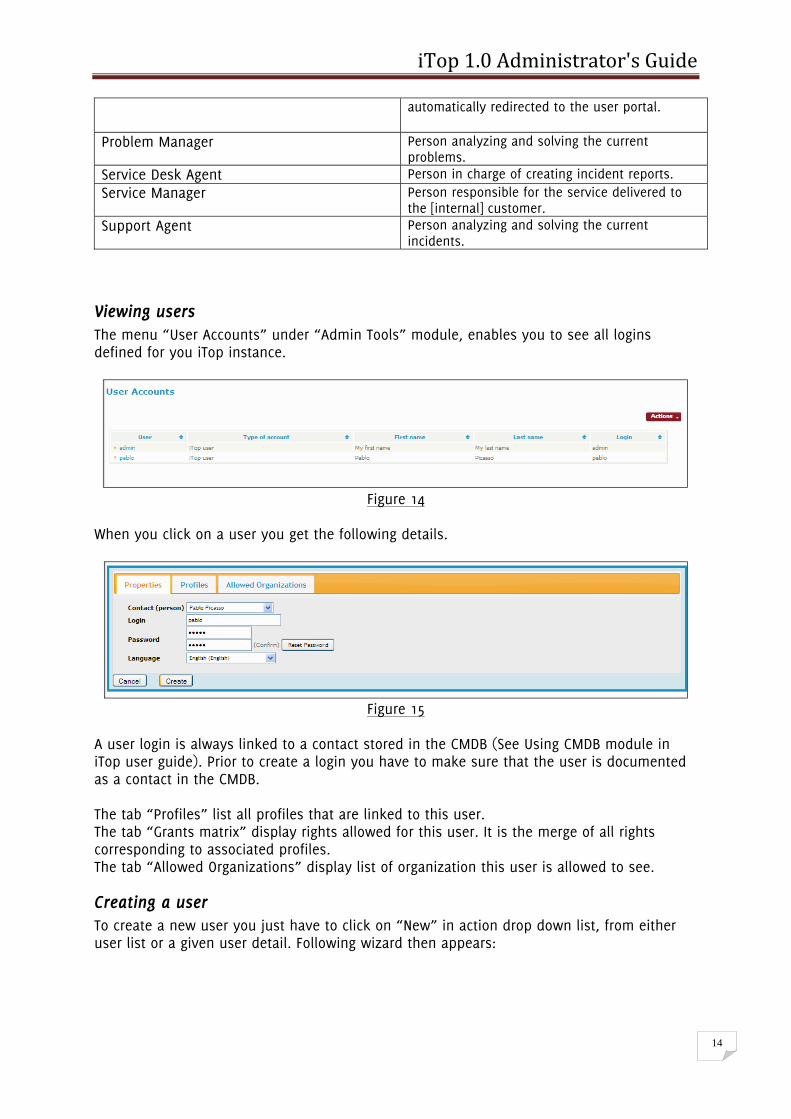
Viewing users The menu “User Accounts” under “Admin Tools” module, enables you to see all logins defined for you iTop instance.
Figure 14
When you click on a user you get the following details.
Figure 15
A user login is always linked to a contact stored in the CMDB (See Using CMDB module in iTop user guide). Prior to create a login you have to make sure that the user is documented as a contact in the CMDB. The tab “Profiles” list all profiles that are linked to this user. The tab “Grants matrix” display rights allowed for this user. It is the merge of all rights corresponding to associated profiles. The tab “Allowed Organizations” display list of organization this user is allowed to see.
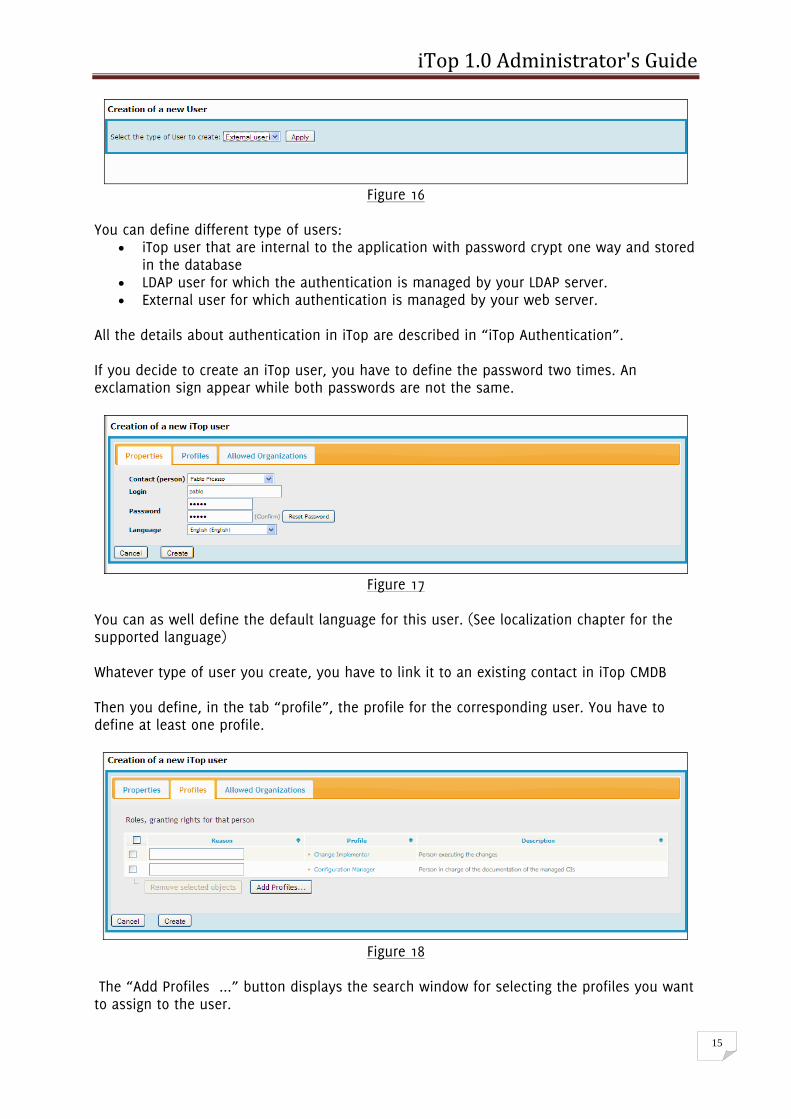
Creating a user To create a new user you just have to click on “New” in action drop down list, from either user list or a given user detail. Following wizard then appears:
iTop 1.0 Administrator's Guide
15
Figure 16
You can define different type of users:
• iTop user that are internal to the application with password crypt one way and stored in the database
• LDAP user for which the authentication is managed by your LDAP server. • External user for which authentication is managed by your web server.
All the details about authentication in iTop are described in “iTop Authentication”. If you decide to create an iTop user, you have to define the password two times. An exclamation sign appear while both passwords are not the same.
Figure 17
You can as well define the default language for this user. (See localization chapter for the supported language) Whatever type of user you create, you have to link it to an existing contact in iTop CMDB Then you define, in the tab “profile”, the profile for the corresponding user. You have to define at least one profile.
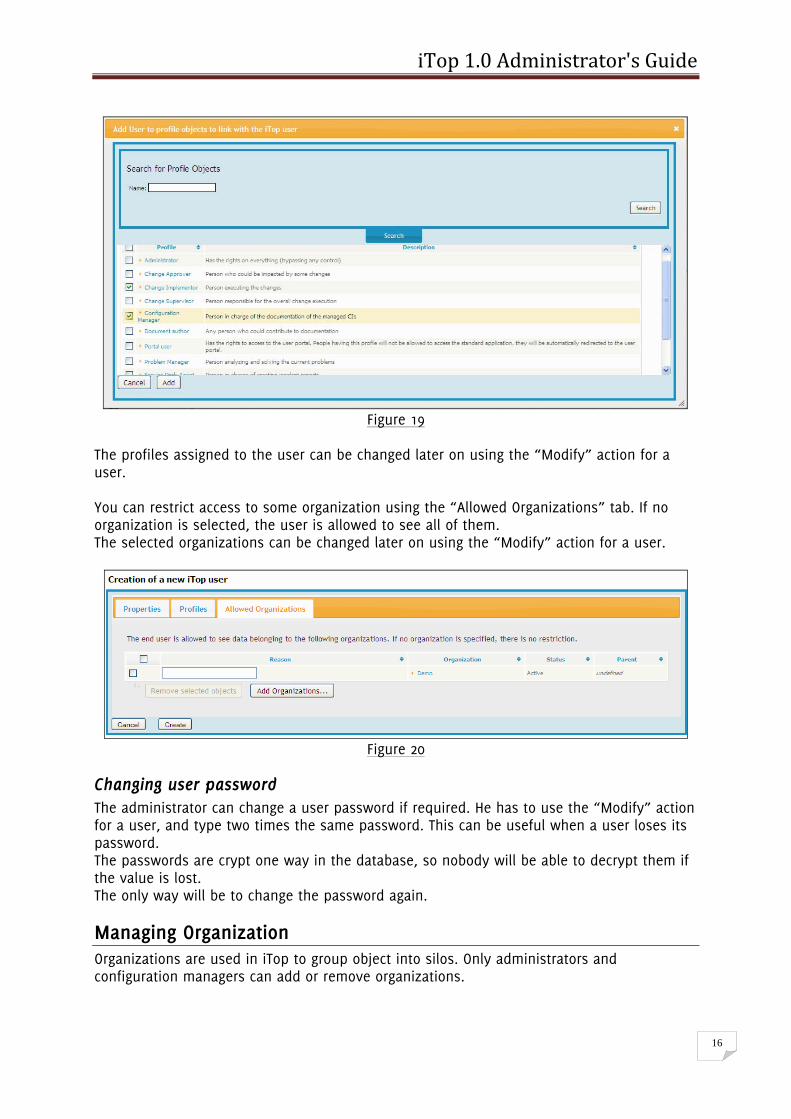
Figure 18
The “Add Profiles ...” button displays the search window for selecting the profiles you want to assign to the user.
iTop 1.0 Administrator's Guide
16
Figure 19
The profiles assigned to the user can be changed later on using the “Modify” action for a user. You can restrict access to some organization using the “Allowed Organizations” tab. If no organization is selected, the user is allowed to see all of them. The selected organizations can be changed later on using the “Modify” action for a user.
Figure 20
Changing user password The administrator can change a user password if required. He has to use the “Modify” action for a user, and type two times the same password. This can be useful when a user loses its password. The passwords are crypt one way in the database, so nobody will be able to decrypt them if the value is lost. The only way will be to change the password again.
Managing Organization Organizations are used in iTop to group object into silos. Only administrators and configuration managers can add or remove organizations.
iTop 1.0 Administrator's Guide
17
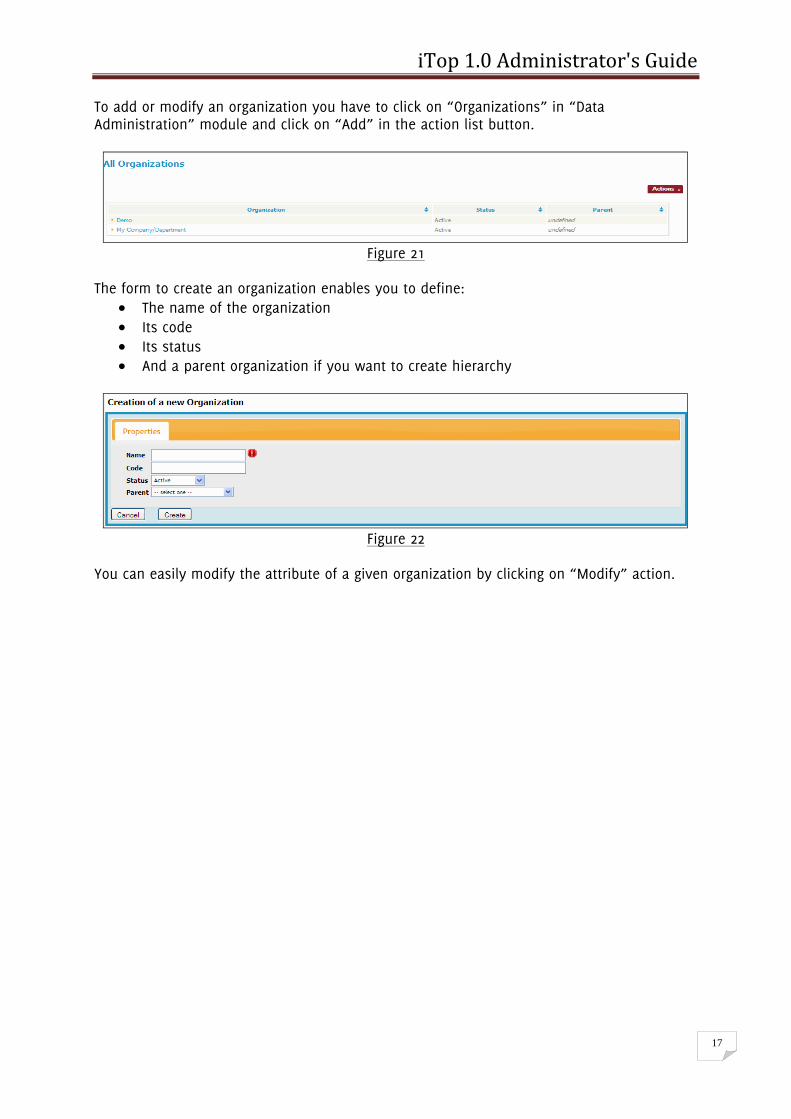
To add or modify an organization you have to click on “Organizations” in “Data Administration” module and click on “Add” in the action list button.
Figure 21
The form to create an organization enables you to define:
• The name of the organization • Its code • Its status • And a parent organization if you want to create hierarchy
Figure 22
You can easily modify the attribute of a given organization by clicking on “Modify” action.
iTop 1.0 Administrator's Guide
18
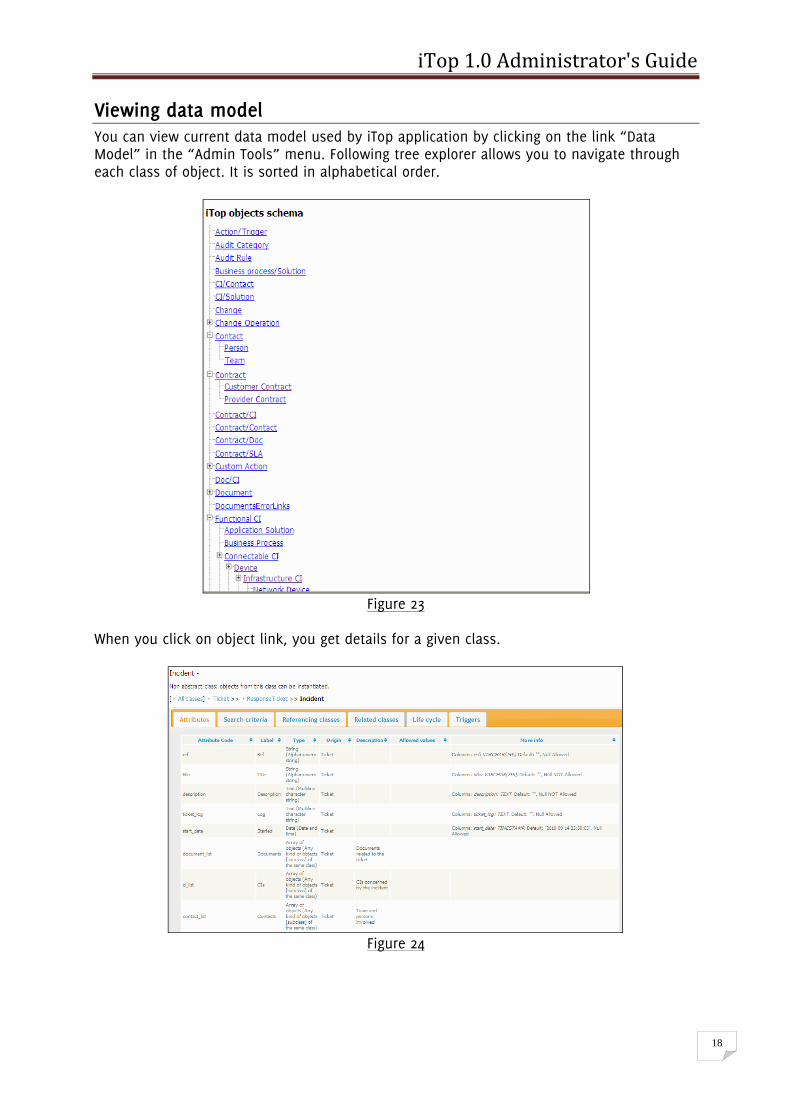
Viewing data model You can view current data model used by iTop application by clicking on the link “Data Model” in the “Admin Tools” menu. Following tree explorer allows you to navigate through each class of object. It is sorted in alphabetical order.
Figure 23
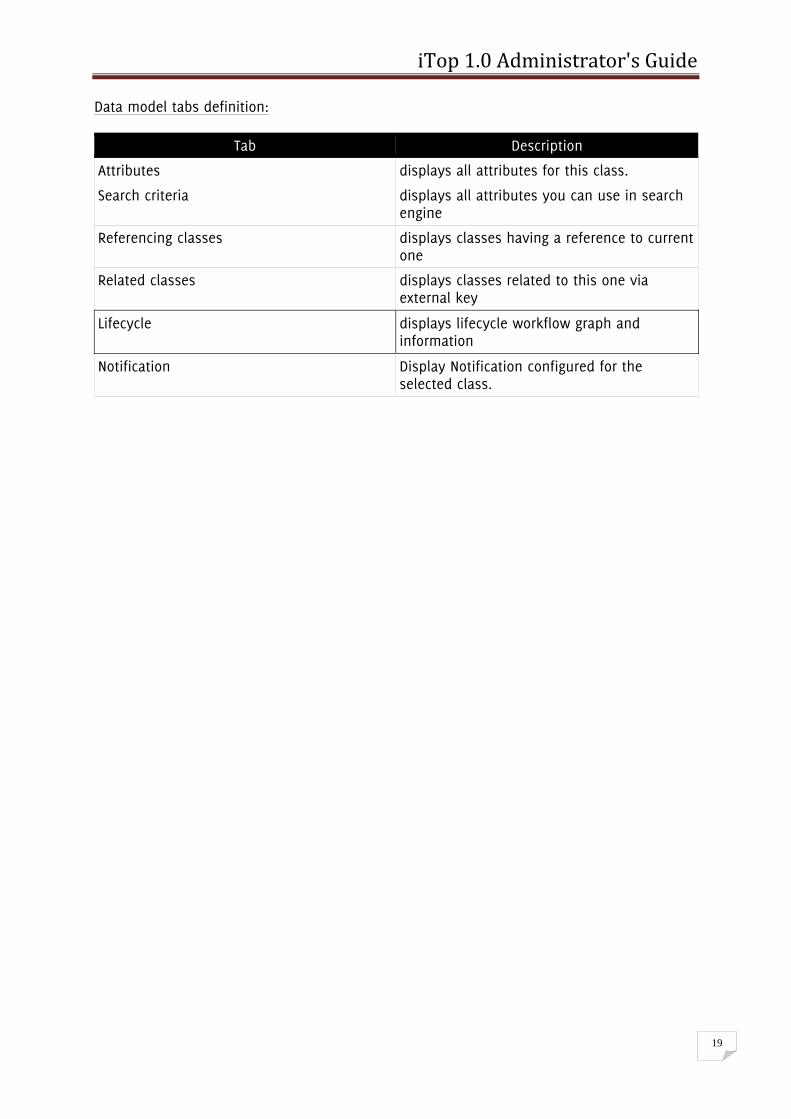
When you click on object link, you get details for a given class.
Figure 24
iTop 1.0 Administrator's Guide
19
Data model tabs definition:
Tab Description
Attributes displays all attributes for this class.
Search criteria displays all attributes you can use in search engine
Referencing classes displays classes having a reference to current one
Related classes displays classes related to this one via external key
Lifecycle displays lifecycle workflow graph and information
Notification Display Notification configured for the selected class.
iTop 1.0 Administrator's Guide
20
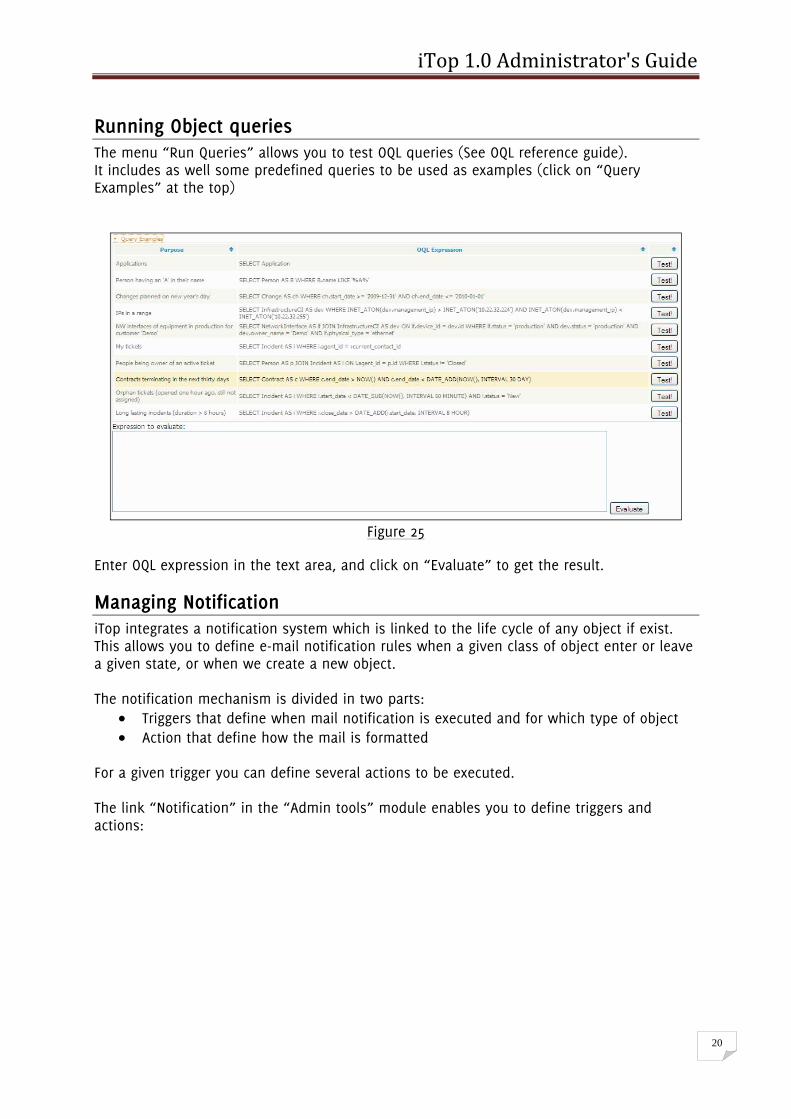
Running Object queries The menu “Run Queries” allows you to test OQL queries (See OQL reference guide). It includes as well some predefined queries to be used as examples (click on “Query Examples” at the top)
Figure 25
Enter OQL expression in the text area, and click on “Evaluate” to get the result.
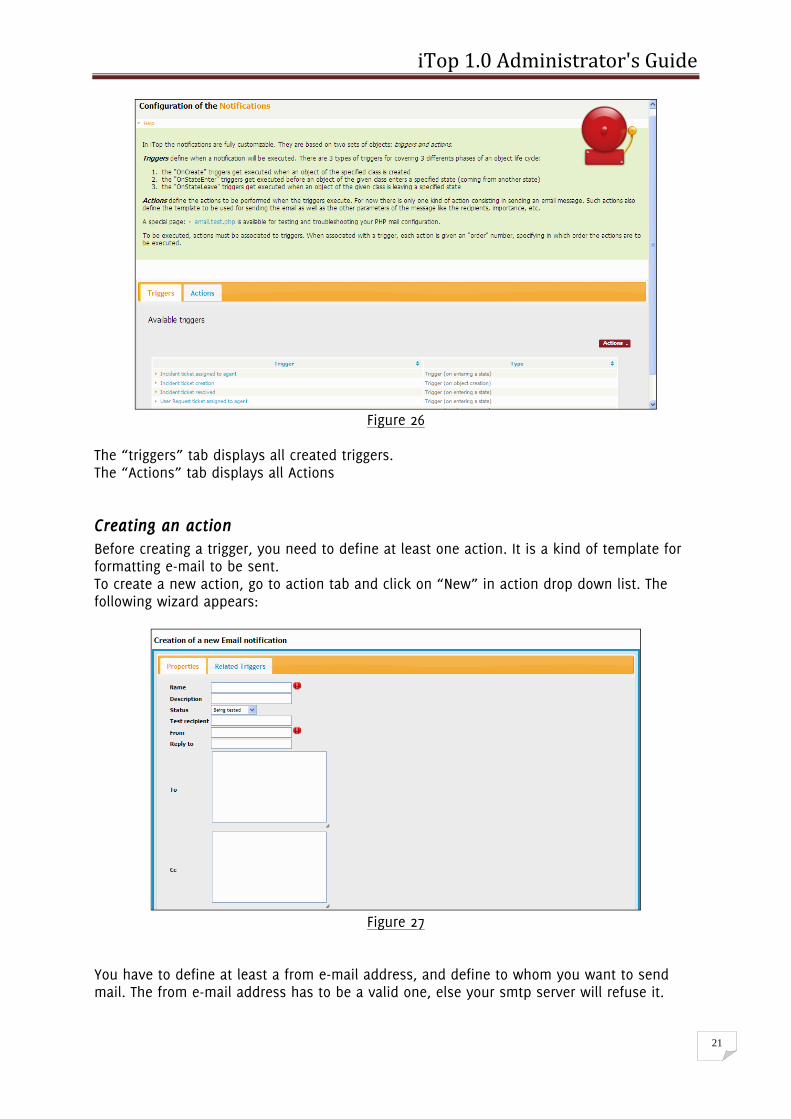
Managing Notification iTop integrates a notification system which is linked to the life cycle of any object if exist. This allows you to define e-mail notification rules when a given class of object enter or leave a given state, or when we create a new object. The notification mechanism is divided in two parts:
• Triggers that define when mail notification is executed and for which type of object • Action that define how the mail is formatted
For a given trigger you can define several actions to be executed. The link “Notification” in the “Admin tools” module enables you to define triggers and actions:
iTop 1.0 Administrator's Guide
21
Figure 26
The “triggers” tab displays all created triggers. The “Actions” tab displays all Actions
Creating an action Before creating a trigger, you need to define at least one action. It is a kind of template for formatting e-mail to be sent. To create a new action, go to action tab and click on “New” in action drop down list. The following wizard appears:
Figure 27
You have to define at least a from e-mail address, and define to whom you want to send mail. The from e-mail address has to be a valid one, else your smtp server will refuse it.

iTop 1.0 Administrator's Guide
22
In To”, “Cc”, and “Bcc” field you can use OQL query to define a list of target e-mail.(Look at the OQL Reference guide for more information about OQL queries) This list as to return a list of object containing an e-mail attribute:
• Contact • Person • Team
For instance To: SELECT Person WHERE name LIKE ‘John’ If the return list is empty no mail is sent. The subject field is as well mandatory. The body is the text sent. It can use HTML tag for formatting. You can also use attributes of the object that will trigger the action. The syntax to be used is $this->attribute$. There is as well to specific attributes:
$this->name()$ is the name of the concern object $this->hyperlink()$ is a url to access the concern object
By Default importance of the mail is “normal”. To test a new action, you can use the status “Being tested” and “Test recipient” with a test address. In that case notification will be sent to this later address. Once validated don’t forget to change the status to “In Production”. If you want to de-activate an action, just set the status to “Inactive”.
Creating a trigger Once you have actions defined, you can create triggers. You can define three types of triggers:
• When a new object is created • When an object enters in a given state • When an object leaves a given state
To create a new trigger, click on “New” in action drop down list for the given category in “Trigger” tab. The following wizard open:
Figure 28
You have to select which type of trigger you want to create:
• Trigger (on entering a state) • Trigger (on leaving a state) • Trigger (on object created)
iTop 1.0 Administrator's Guide
23
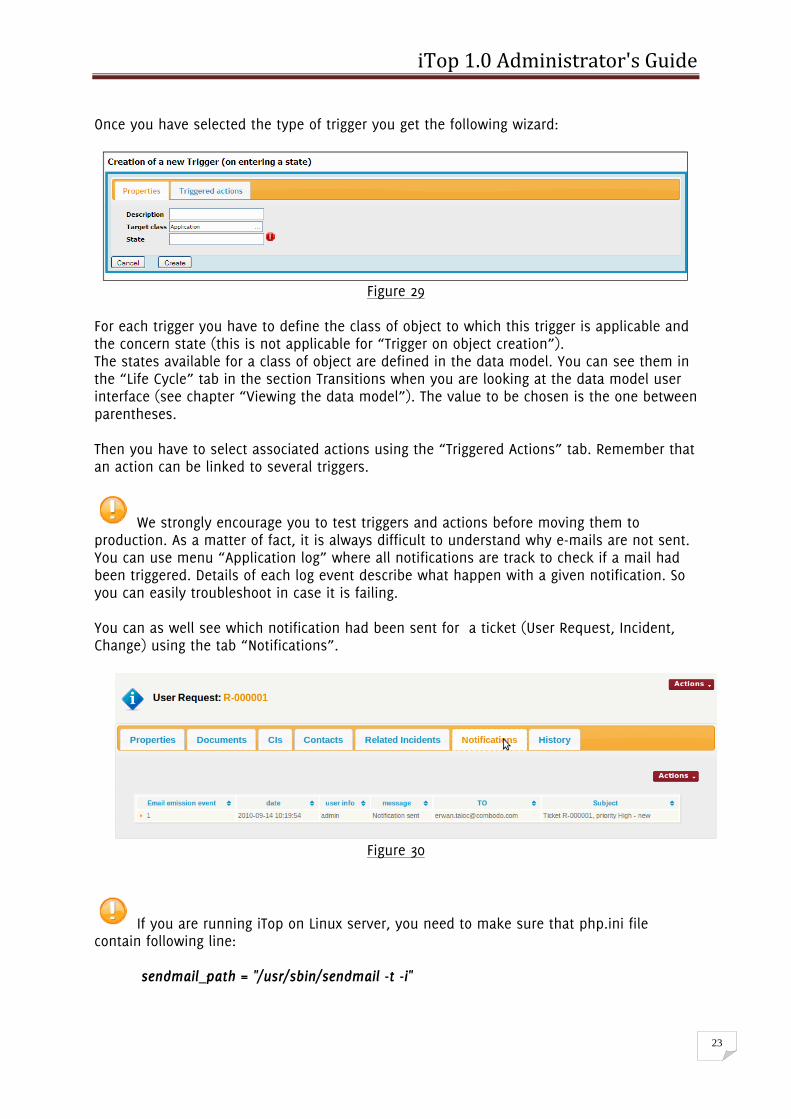
Once you have selected the type of trigger you get the following wizard:
Figure 29
For each trigger you have to define the class of object to which this trigger is applicable and the concern state (this is not applicable for “Trigger on object creation”). The states available for a class of object are defined in the data model. You can see them in the “Life Cycle” tab in the section Transitions when you are looking at the data model user interface (see chapter “Viewing the data model”). The value to be chosen is the one between parentheses. Then you have to select associated actions using the “Triggered Actions” tab. Remember that an action can be linked to several triggers.
We strongly encourage you to test triggers and actions before moving them to production. As a matter of fact, it is always difficult to understand why e-mails are not sent. You can use menu “Application log” where all notifications are track to check if a mail had been triggered. Details of each log event describe what happen with a given notification. So you can easily troubleshoot in case it is failing. You can as well see which notification had been sent for a ticket (User Request, Incident, Change) using the tab “Notifications”.
Figure 30
If you are running iTop on Linux server, you need to make sure that php.ini file contain following line:
sendmail_path = "/usr/sbin/sendmail -t -i"
iTop 1.0 Administrator's Guide
24
We have tested as well SSMTP tool that allow you to send mails instead of sendmail. Following web link provides all information to configure it with PHP: http://tombuntu.com/index.php/2008/10/21/sending-email-from-your-system-with-ssmtp/
If you are running iTop on Windows server, you need to make sure that php.ini file contain following line:
SMTP = <smtp server> smtp_port = 25
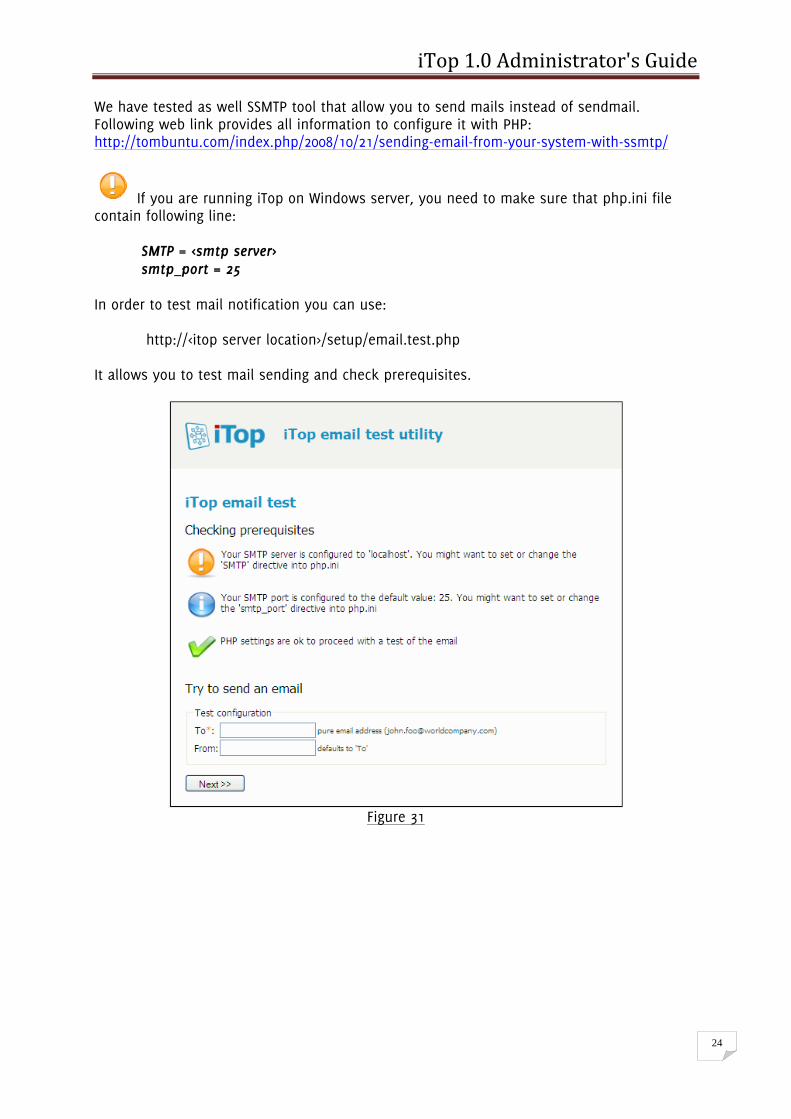
In order to test mail notification you can use:
http://<itop server location>/setup/email.test.php It allows you to test mail sending and check prerequisites.
Figure 31
iTop 1.0 Administrator's Guide
25
Managing Audit Audit is a really important feature in iTop that enables you to check the consistency of information stored. For instance, do I have hardware contracts links to all my devices? Do I have my devices monitored? … The Audit Category defines rule categories. A rule category defines a list of objects that are concerned by the associated rules. For instance all devices that are on production. The Audit Rule defines the rule that need to be check for a given category. For instance “We don’t want to have devices on production located on a Site in implementation”. To add or modify an audit category or an audit rule, click on “Audit Categories” in the “Admin tools” module.
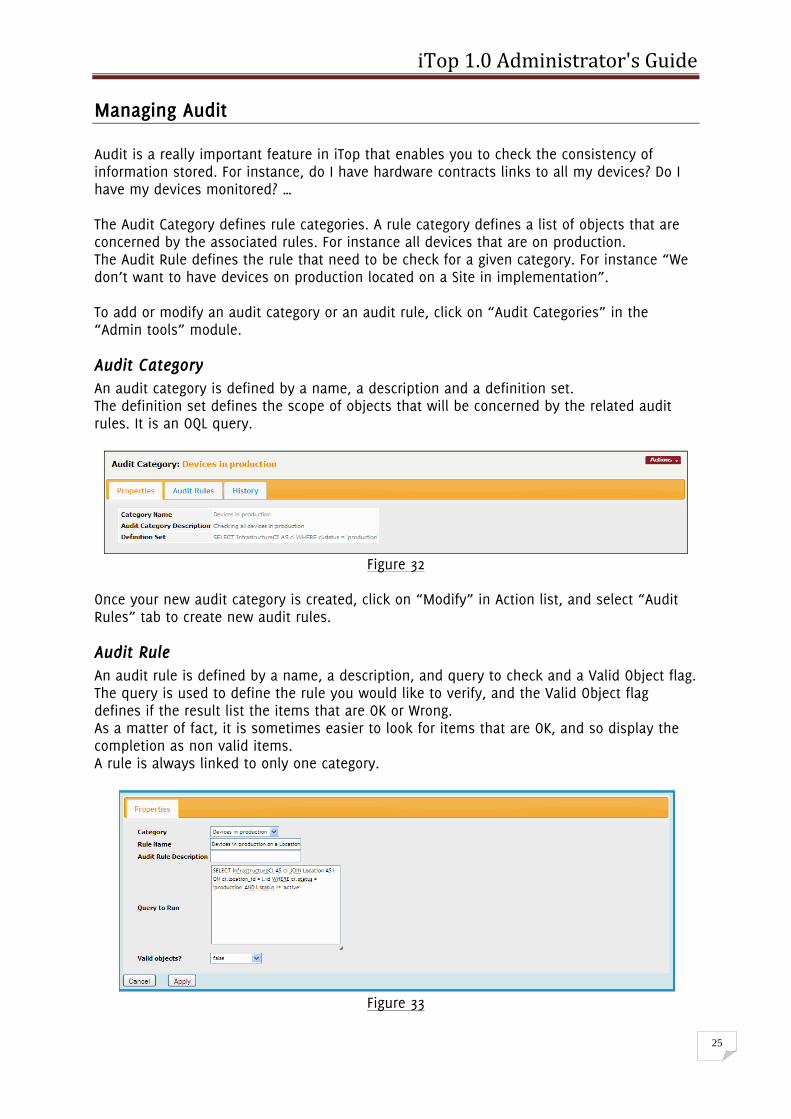
Audit Category An audit category is defined by a name, a description and a definition set. The definition set defines the scope of objects that will be concerned by the related audit rules. It is an OQL query.
Figure 32
Once your new audit category is created, click on “Modify” in Action list, and select “Audit Rules” tab to create new audit rules.
Audit Rule An audit rule is defined by a name, a description, and query to check and a Valid Object flag. The query is used to define the rule you would like to verify, and the Valid Object flag defines if the result list the items that are OK or Wrong. As a matter of fact, it is sometimes easier to look for items that are OK, and so display the completion as non valid items. A rule is always linked to only one category.
Figure 33
iTop 1.0 Administrator's Guide
26
iTop localization Since release 1.0 iTop is designed to support multi-localization. This means that – provided the right localization is available in iTop – each user can see the iTop user interface in her/his own language. The language setting is defined when a user is created. The localization of iTop consists mainly in translating a set of predefined PHP files, called “Dictionaries”. The supported languages in the current release are:
• English (code EN US) • French (code FR FR) • Spanish (code ES CR) • German (code DE DE)
The default language in iTop is defined during the setup. If you want to change it after all you just have to modify the parameter 'default_language' in config-itop.php All the details about translating iTop into a new language are documented in “Localizing iTop”.
Managing DB backup All iTop data are stored in MySql database. So we recommend you to set up backup policy for your database. You can use for instance phpMyAdmin to do so or mysqldump command: /usr/bin/mysqldump --opt --add-drop-database –user=<mysql user> --password=<mysql password> <itop DB> | gzip > <file>
We recommend you to do it frequently in order to not loose data modified by iTop users.
SLA check There is in iTop a web service that is responsible for checking SLA defined for User Request and Incident: http://<web server path>/webservices/check_sla_for_tickets.php It is checking for each Incident and User Request ticket that the time to own (TTO) and the time to respond (TTR) are well respected according to SLT defined for a given organization. If you want this to be checked frequently you need to make sure that this web service is called frequently. On UNIX based system you can use the crontab to do so. * * * * * /usr/bin/wget --http-user=admin --http-password=admin -a /var/log/check_sla.log -O - "http://localhost/itop/webservices/check_sla_for_tickets.php?loginop=login&login_mode=basic" >> /var/log/check_sla.log
iTop 1.0 Administrator's Guide
27
We hardly recommend to create a script to call the web service in order to avoid to have login and password visible in the crontab.
Integrating with other application
How to export data out of iTop A set of objects can be exported by the mean of a web service (could be scripted) Simply call /pages/export.php?format=xml&expression=OQL Supported format:
• html : format=html • csv : format=csv • xml : format=XML
Using wget, this would give the following command line: wget --header="Content-Type:application/x-www-form-urlencoded" --post-file=./login.txt -O "export.txt" http://<server>/webservices/export.php?format=csv&expression=...
Option –O return result in file export.txt Format for file login.txt should be: loginop=login&auth_user=<your user>&auth_pwd=<your password>&foo=1 The set of objects to be exported is defined in an OQL query (see “OQL Reference guide” for details about OQL) OQL Examples: Get all the contacts SELECT Contact Get all the persons (note that a person is contact also, but it has more attributes to be exported: first_name and employee_number) SELECT Person
How to import data in iTop A web service allows you to write a script to enter new data, or refresh existing data. This can be helpful for the initial load or to schedule a daily synchronization of the data coming from an external data source - could be another application, an automated data collector, etc. /webservices/import.php?class=Organization&csvdata=<multine-csv>[&separator=<char>] Note that this service emulates the functionality provided by the interactive bulk load: /pages/import.php csvdata must be posted, the first line will contain the codes of the attributes
iTop 1.0 Administrator's Guide
28
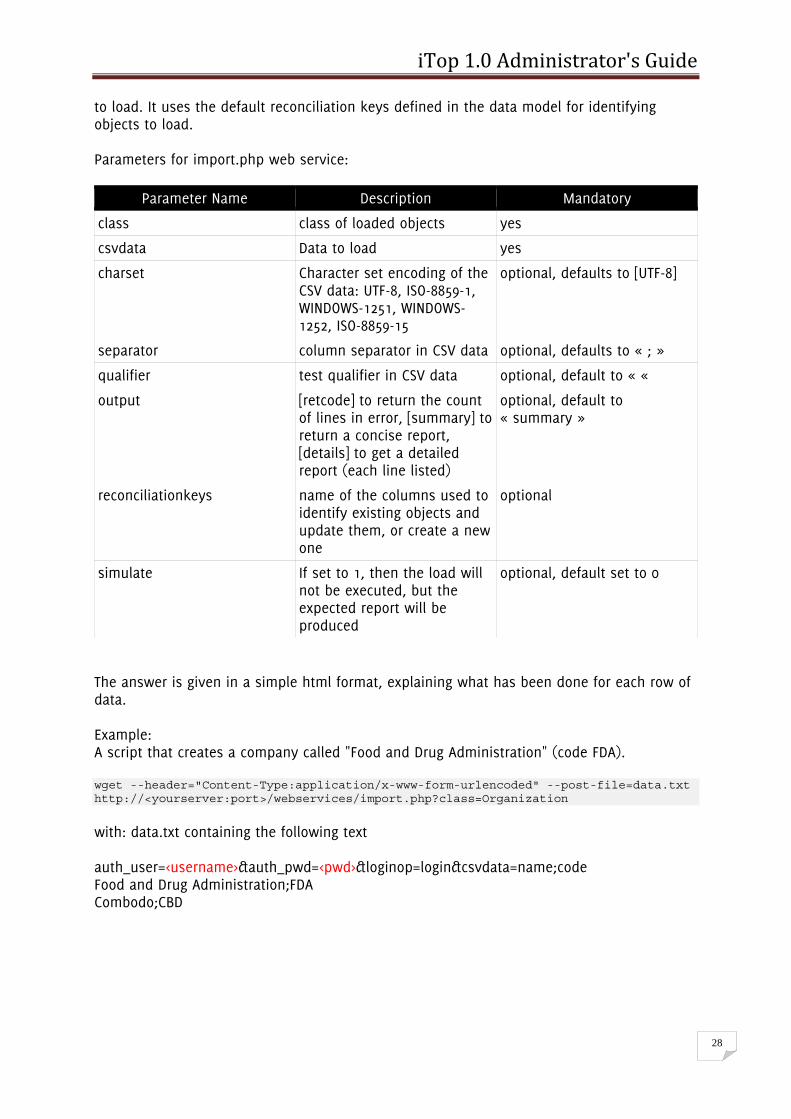
to load. It uses the default reconciliation keys defined in the data model for identifying objects to load. Parameters for import.php web service:
Parameter Name Description Mandatory
class class of loaded objects yes
csvdata Data to load yes
charset Character set encoding of the CSV data: UTF-8, ISO-8859-1, WINDOWS-1251, WINDOWS-1252, ISO-8859-15
optional, defaults to [UTF-8]
separator column separator in CSV data optional, defaults to « ; »
qualifier test qualifier in CSV data optional, default to « «
output [retcode] to return the count of lines in error, [summary] to return a concise report, [details] to get a detailed report (each line listed)
optional, default to « summary »
reconciliationkeys name of the columns used to identify existing objects and update them, or create a new one
optional
simulate If set to 1, then the load will not be executed, but the expected report will be produced
optional, default set to 0
The answer is given in a simple html format, explaining what has been done for each row of data. Example: A script that creates a company called "Food and Drug Administration" (code FDA). wget --header="Content-Type:application/x-www-form-urlencoded" --post-file=data.txt http://<yourserver:port>/webservices/import.php?class=Organization
with: data.txt containing the following text auth_user=<username>&auth_pwd=<pwd>&loginop=login&csvdata=name;code Food and Drug Administration;FDA Combodo;CBD
iTop 1.0 Administrator's Guide
29
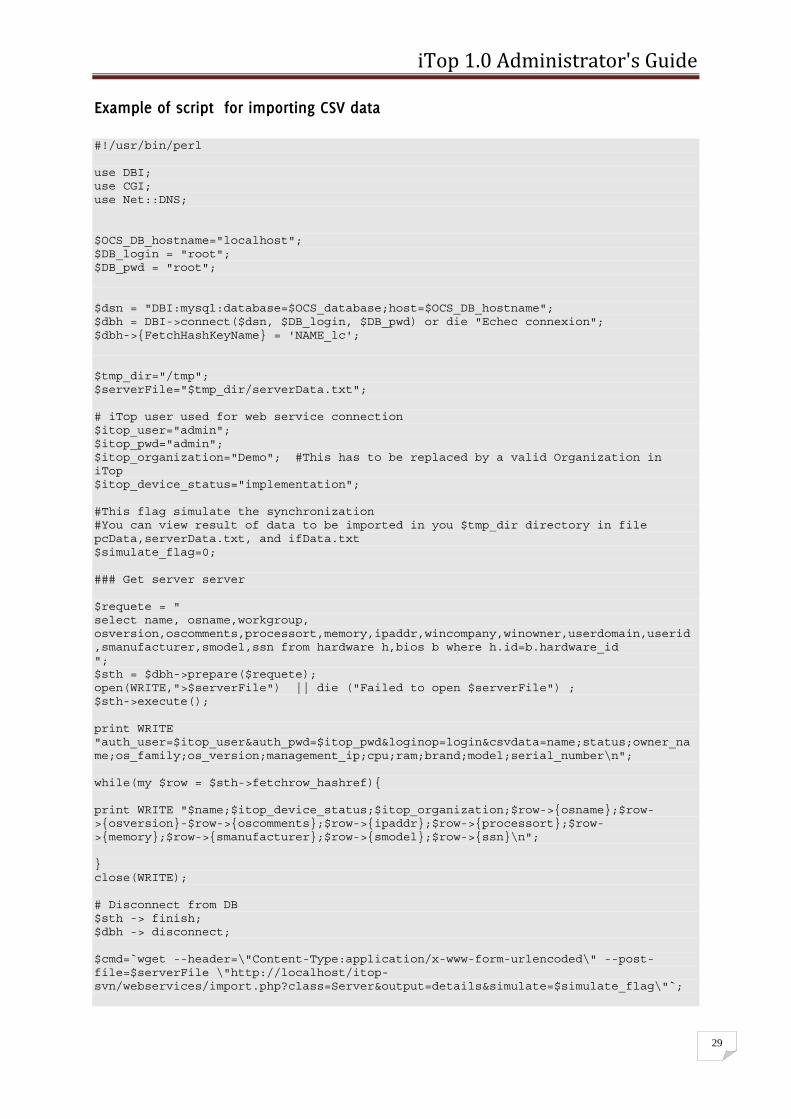
Example of script for importing CSV data #!/usr/bin/perl use DBI; use CGI; use Net::DNS; $OCS_DB_hostname="localhost"; $DB_login = "root"; $DB_pwd = "root"; $dsn = "DBI:mysql:database=$OCS_database;host=$OCS_DB_hostname"; $dbh = DBI->connect($dsn, $DB_login, $DB_pwd) or die "Echec connexion"; $dbh->{FetchHashKeyName} = 'NAME_lc'; $tmp_dir="/tmp"; $serverFile="$tmp_dir/serverData.txt"; # iTop user used for web service connection $itop_user="admin"; $itop_pwd="admin"; $itop_organization="Demo"; #This has to be replaced by a valid Organization in iTop $itop_device_status="implementation"; #This flag simulate the synchronization #You can view result of data to be imported in you $tmp_dir directory in file pcData,serverData.txt, and ifData.txt $simulate_flag=0; ### Get server server $requete = " select name, osname,workgroup, osversion,oscomments,processort,memory,ipaddr,wincompany,winowner,userdomain,userid,smanufacturer,smodel,ssn from hardware h,bios b where h.id=b.hardware_id "; $sth = $dbh->prepare($requete); open(WRITE,">$serverFile") || die ("Failed to open $serverFile") ; $sth->execute(); print WRITE "auth_user=$itop_user&auth_pwd=$itop_pwd&loginop=login&csvdata=name;status;owner_name;os_family;os_version;management_ip;cpu;ram;brand;model;serial_number\n"; while(my $row = $sth->fetchrow_hashref){ print WRITE "$name;$itop_device_status;$itop_organization;$row->{osname};$row->{osversion}-$row->{oscomments};$row->{ipaddr};$row->{processort};$row->{memory};$row->{smanufacturer};$row->{smodel};$row->{ssn}\n"; } close(WRITE); # Disconnect from DB $sth -> finish; $dbh -> disconnect; $cmd=`wget --header=\"Content-Type:application/x-www-form-urlencoded\" --post-file=$serverFile \"http://localhost/itop-svn/webservices/import.php?class=Server&output=details&simulate=$simulate_flag\"`;
iTop 1.0 Administrator's Guide
30
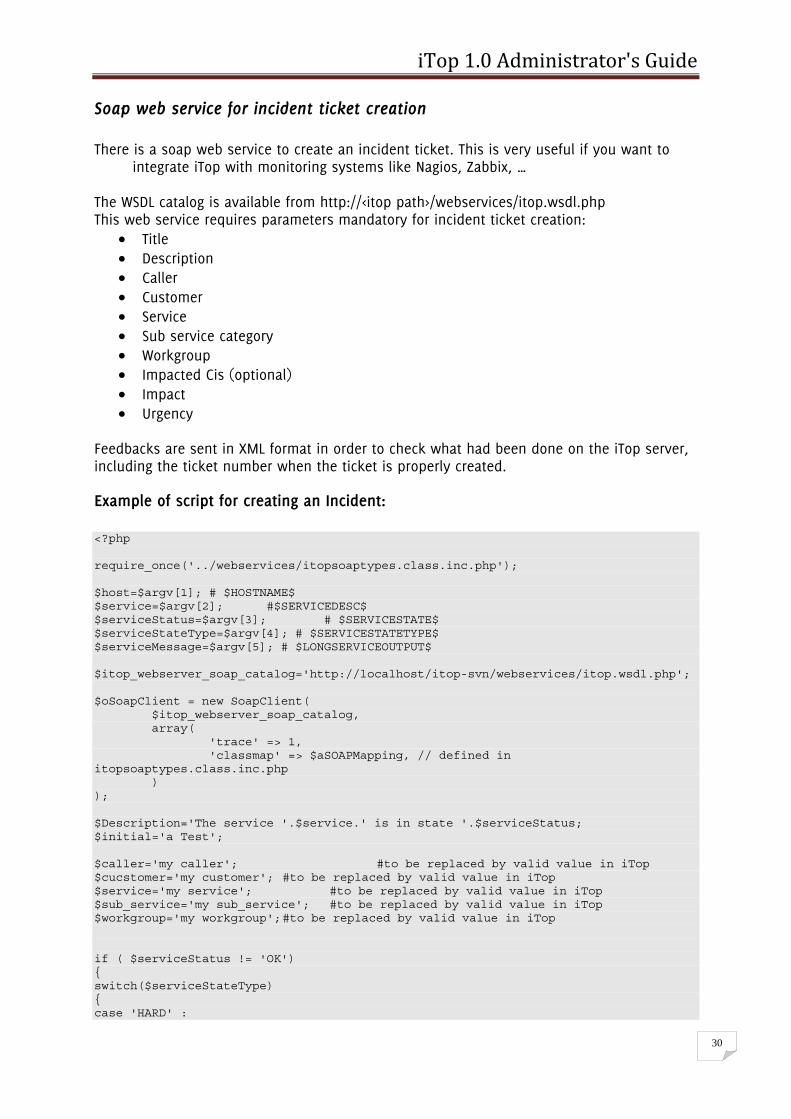
Soap web service for incident ticket creation There is a soap web service to create an incident ticket. This is very useful if you want to
integrate iTop with monitoring systems like Nagios, Zabbix, … The WSDL catalog is available from http://<itop path>/webservices/itop.wsdl.php This web service requires parameters mandatory for incident ticket creation:
• Title • Description • Caller • Customer • Service • Sub service category • Workgroup • Impacted Cis (optional) • Impact • Urgency
Feedbacks are sent in XML format in order to check what had been done on the iTop server, including the ticket number when the ticket is properly created.
Example of script for creating an Incident: <?php require_once('../webservices/itopsoaptypes.class.inc.php'); $host=$argv[1]; # $HOSTNAME$ $service=$argv[2]; #$SERVICEDESC$ $serviceStatus=$argv[3]; # $SERVICESTATE$ $serviceStateType=$argv[4]; # $SERVICESTATETYPE$ $serviceMessage=$argv[5]; # $LONGSERVICEOUTPUT$ $itop_webserver_soap_catalog='http://localhost/itop-svn/webservices/itop.wsdl.php'; $oSoapClient = new SoapClient( $itop_webserver_soap_catalog, array( 'trace' => 1, 'classmap' => $aSOAPMapping, // defined in itopsoaptypes.class.inc.php ) ); $Description='The service '.$service.' is in state '.$serviceStatus; $initial='a Test'; $caller='my caller'; #to be replaced by valid value in iTop $cucstomer='my customer'; #to be replaced by valid value in iTop $service='my service'; #to be replaced by valid value in iTop $sub_service='my sub_service'; #to be replaced by valid value in iTop $workgroup='my workgroup'; #to be replaced by valid value in iTop if ( $serviceStatus != 'OK') { switch($serviceStateType) { case 'HARD' :
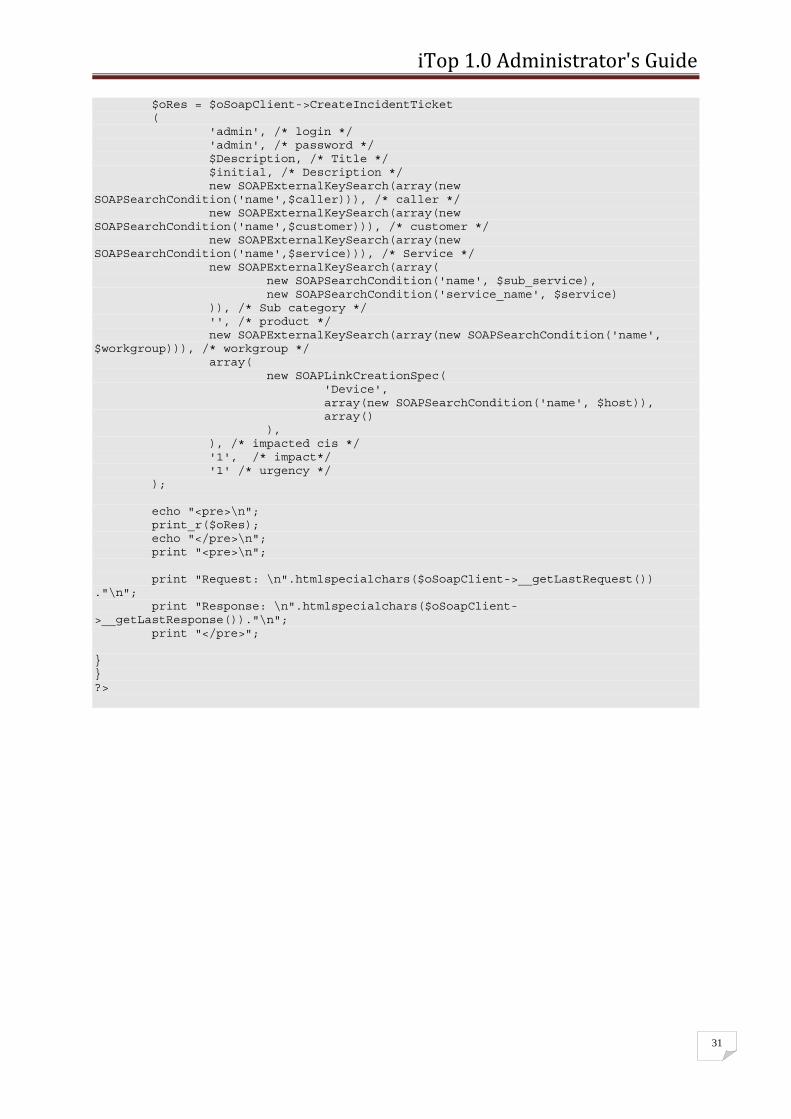
iTop 1.0 Administrator's Guide
31
$oRes = $oSoapClient->CreateIncidentTicket ( 'admin', /* login */ 'admin', /* password */ $Description, /* Title */ $initial, /* Description */ new SOAPExternalKeySearch(array(new SOAPSearchCondition('name',$caller))), /* caller */ new SOAPExternalKeySearch(array(new SOAPSearchCondition('name',$customer))), /* customer */ new SOAPExternalKeySearch(array(new SOAPSearchCondition('name',$service))), /* Service */ new SOAPExternalKeySearch(array( new SOAPSearchCondition('name', $sub_service), new SOAPSearchCondition('service_name', $service) )), /* Sub category */ '', /* product */ new SOAPExternalKeySearch(array(new SOAPSearchCondition('name', $workgroup))), /* workgroup */ array( new SOAPLinkCreationSpec( 'Device', array(new SOAPSearchCondition('name', $host)), array() ), ), /* impacted cis */ '1', /* impact*/ '1' /* urgency */ ); echo "<pre>\n"; print_r($oRes); echo "</pre>\n"; print "<pre>\n"; print "Request: \n".htmlspecialchars($oSoapClient->__getLastRequest()) ."\n"; print "Response: \n".htmlspecialchars($oSoapClient->__getLastResponse())."\n"; print "</pre>"; } } ?>