microsoft office sharepoint - towson university · microsoft office ® sharepoint . reference guide...
TRANSCRIPT

Microsoft Office®
SharePoint Reference Guide for Site Owners
SharePoint: Reference Guide for Site Owners
OTS Publication: SP1301 • 11/20/17• [email protected] • Office of Technology Services © 2017 Towson University This work is licensed under the Creative Commons Attribution-NonCommercial-NoDerivs License.
Details available at http://www.towson.edu/OTStraining
Table of Contents INTRODUCTION .......................................................................................................................................3
REQUESTING A NEW SITE .........................................................................................................................3 FOLLOWING A SITE...................................................................................................................................4
NAVIGATION ...........................................................................................................................................5 LISTS AND LIBRARIES ................................................................................................................................6
ADDING PEOPLE TO A SITE .......................................................................................................................6
REMOVING PEOPLE FROM A SITE .............................................................................................................7 MANAGING SITE CONTENT .......................................................................................................................8
ADDING A NEW ANNOUNCEMENT ...........................................................................................................................8 ADDING A NEW CALENDAR ENTRY ...........................................................................................................................9
Naming a SharePoint Calendar ................................................................................................................. 10 Syncing a SharePoint Calendar with Outlook ............................................................................................ 12
ADDING A TASK ................................................................................................................................................. 13 WORKING WITH FILES ............................................................................................................................ 14
CREATING A NEW FILE IN SHAREPOINT.................................................................................................................. 14
UPLOADING FILES TO SHAREPOINT ....................................................................................................................... 15 Uploading a File......................................................................................................................................... 15
Uploading a Folder .................................................................................................................................... 16 DELETING A FILE ................................................................................................................................................ 17
USING THE RECYCLE BIN ..................................................................................................................................... 18 SHARING ............................................................................................................................................... 19
SHARING FILES .................................................................................................................................................. 19
MANAGING SHARED FILES .................................................................................................................................. 20 CREATING AN ALERT .............................................................................................................................. 21
CREATING ALERTS FOR PAGES .............................................................................................................................. 21 CREATING ALERTS FOR LISTS ................................................................................................................................ 23
CREATING ALERTS FOR LIST ITEMS ........................................................................................................................ 24 Alerts for Announcements or Tasks ........................................................................................................... 24
Alerts for Calendar Entries ........................................................................................................................ 25 CREATING ALERTS FOR LIBRARIES ......................................................................................................................... 25
CREATING ALERTS FOR LIBRARY ITEMS .................................................................................................................. 26
CREATING ALERTS FOR SHAREPOINT ONENOTE NOTEBOOKS .................................................................................... 26

SharePoint: Reference Guide for Site Owners
3
Introduction SharePoint is a web-based program tied into Office 365 that serves as a hub for sharing information, storing files and group collaboration. This reference guide will assist site owners in establishing their site, adding site content and managing site documents.
Requesting a New Site All SharePoint site requests begin with a TechHelp service request. 1. From your favorite browser, type techhelp.towson.edu.
2. From the Request Type drop-down, select Employee Role (Faculty, Staff, Student Workers, etc.).
3. At the next drop-down menu, select Collaboration, Video Conferencing, Skype/Lync, SharePoint.
4. At the next drop-down menu, select SharePoint.
5. At the final drop-down menu, select New Site Request.
Figure 1
6. In the Request Detail box, provide the following information:
a. Site Owner’s Name
b. Site Owner's NetID
c. Desired Site Name
d. Desired Site Web Address e.g.: https://tu.sharepoint.com/sites/sitename
e. Type of Site: Department, Project/Team, OTS Project Site, OTS Construction Project Site
Note: Project/Team is only for sanctioned PMO projects, not projects for departments. Most SharePoint site requests are going to be the Department type. The other types are utilized for the Project Management Office directly.
SharePoint: Reference Guide for Site Owners
4
7. Click Save. Your site request will be reviewed and then approved.
8. Once approved, you will receive an email indicating the site has been setup along with the site web address.
Following a Site The best way to view all of the sites that you are a member or owner of is to follow them via the SharePoint tile located in the Office 365 portal. A site must be followed in order to be added to the SharePoint tile in Office 365. 1. In the address bar of your favorite browser, enter the SharePoint site you wish to follow. Note: Site
URL’s look like this: http://tu.sharepoint.com/sites/SITENAME.
2. Login with your Towson email address and password.
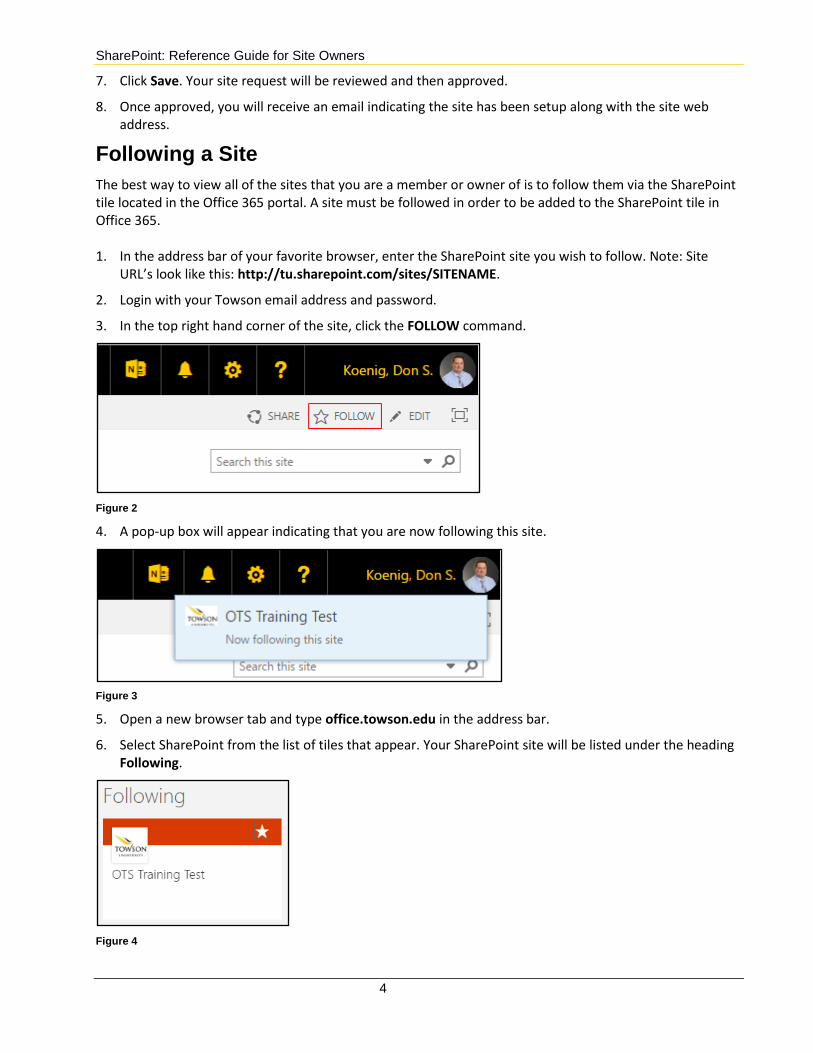
3. In the top right hand corner of the site, click the FOLLOW command.
Figure 2
4. A pop-up box will appear indicating that you are now following this site.
Figure 3
5. Open a new browser tab and type office.towson.edu in the address bar.
6. Select SharePoint from the list of tiles that appear. Your SharePoint site will be listed under the heading Following.
Figure 4
SharePoint: Reference Guide for Site Owners
5
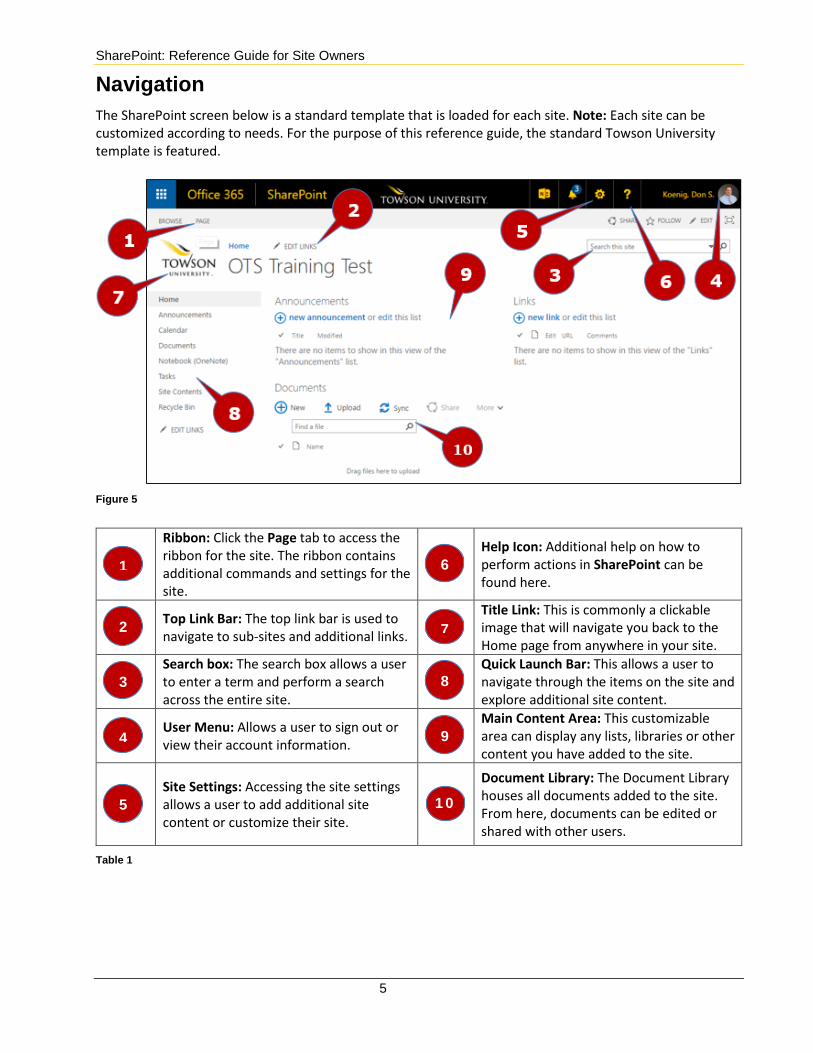
Navigation The SharePoint screen below is a standard template that is loaded for each site. Note: Each site can be customized according to needs. For the purpose of this reference guide, the standard Towson University template is featured.
Figure 5
Ribbon: Click the Page tab to access the ribbon for the site. The ribbon contains additional commands and settings for the site.
Help Icon: Additional help on how to perform actions in SharePoint can be found here.
Top Link Bar: The top link bar is used to navigate to sub-sites and additional links.
Title Link: This is commonly a clickable image that will navigate you back to the Home page from anywhere in your site.
Search box: The search box allows a user to enter a term and perform a search across the entire site.
Quick Launch Bar: This allows a user to navigate through the items on the site and explore additional site content.
User Menu: Allows a user to sign out or view their account information.
Main Content Area: This customizable area can display any lists, libraries or other content you have added to the site.
Site Settings: Accessing the site settings allows a user to add additional site content or customize their site.
Document Library: The Document Library houses all documents added to the site. From here, documents can be edited or shared with other users.
Table 1
1 6
2 7
3 8
4 9
5 10
SharePoint: Reference Guide for Site Owners
6
Lists and Libraries Lists and Libraries are the foundation of your SharePoint site’s organization. Most everything in SharePoint is either a List or a Library. Lists house data in tables, much like an Excel spreadsheet. There are rows and columns. The information in your lists can be sorted, searched and filtered. Examples of lists in SharePoint are Announcements, Contacts, Links, Calendar and Tasks. Custom lists can also be created. Libraries have a similar function as lists, however, libraries are repositories for site users to create, upload, collaborate and edit files. Think of it as a network share in the cloud that can be accessed anywhere with an internet connection without the need for a VPN. With 10 GB of storage and extensive permission controls, libraries can be created in SharePoint to store documents, forms, pictures and more.
Adding People to a Site Adding people to a site is accomplished by sharing the site with others. There are three default permission levels:
• Members – Members are able to view, add, edit and update lists and libraries. This is the default permission group when sharing.
• Owners – Owners have full control of all available SharePoint permissions. • Visitors – Visitors can view items in lists and libraries and download files.
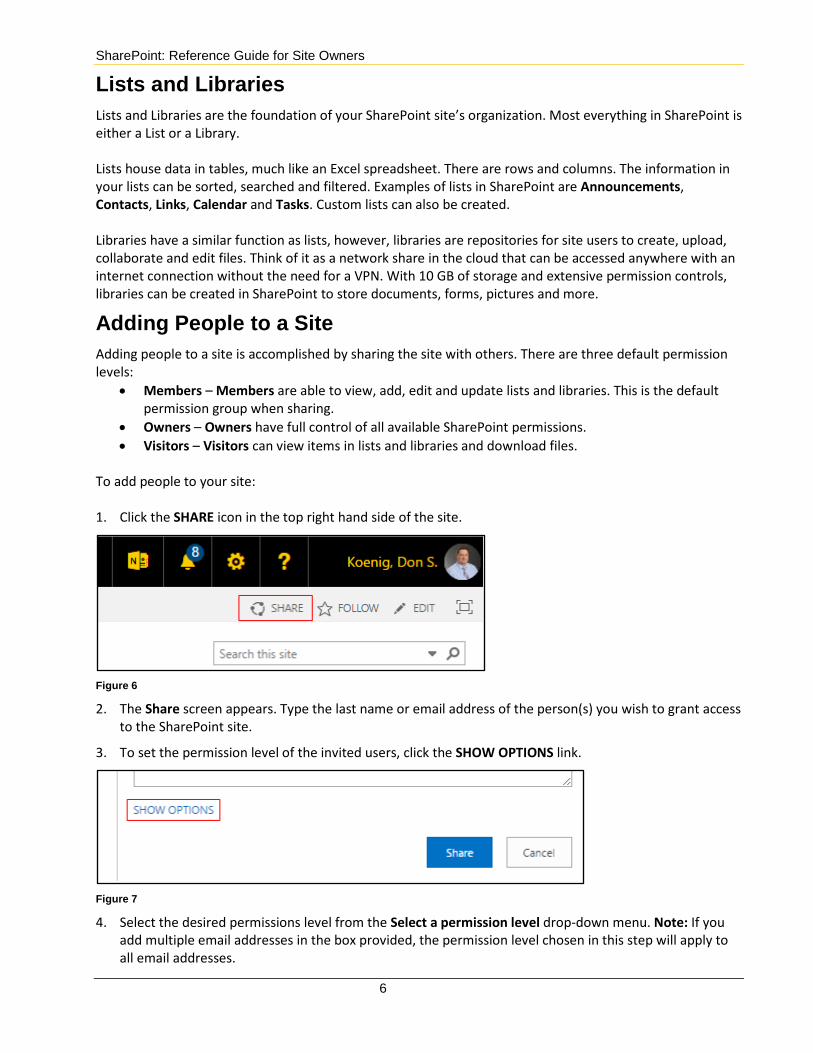
To add people to your site: 1. Click the SHARE icon in the top right hand side of the site.
Figure 6
2. The Share screen appears. Type the last name or email address of the person(s) you wish to grant access to the SharePoint site.
3. To set the permission level of the invited users, click the SHOW OPTIONS link.
Figure 7
4. Select the desired permissions level from the Select a permission level drop-down menu. Note: If you add multiple email addresses in the box provided, the permission level chosen in this step will apply to all email addresses.

SharePoint: Reference Guide for Site Owners
7
5. Click the Share button.
Figure 8
Removing People from a Site If you need to remove a person from a site, you can do that from the Site Settings screen. 1. From the main SharePoint screen, click the Site Settings gear icon and then select Site Settings from the
drop-down menu.
Figure 9
2. Under the Users and Permissions heading, select People and groups.
Figure 10
3. Place a checkmark next to the name(s) of the person(s) you wish to remove from the site.
4. From the Actions drop-down, select Remove Users from Group.
Figure 11
SharePoint: Reference Guide for Site Owners
8
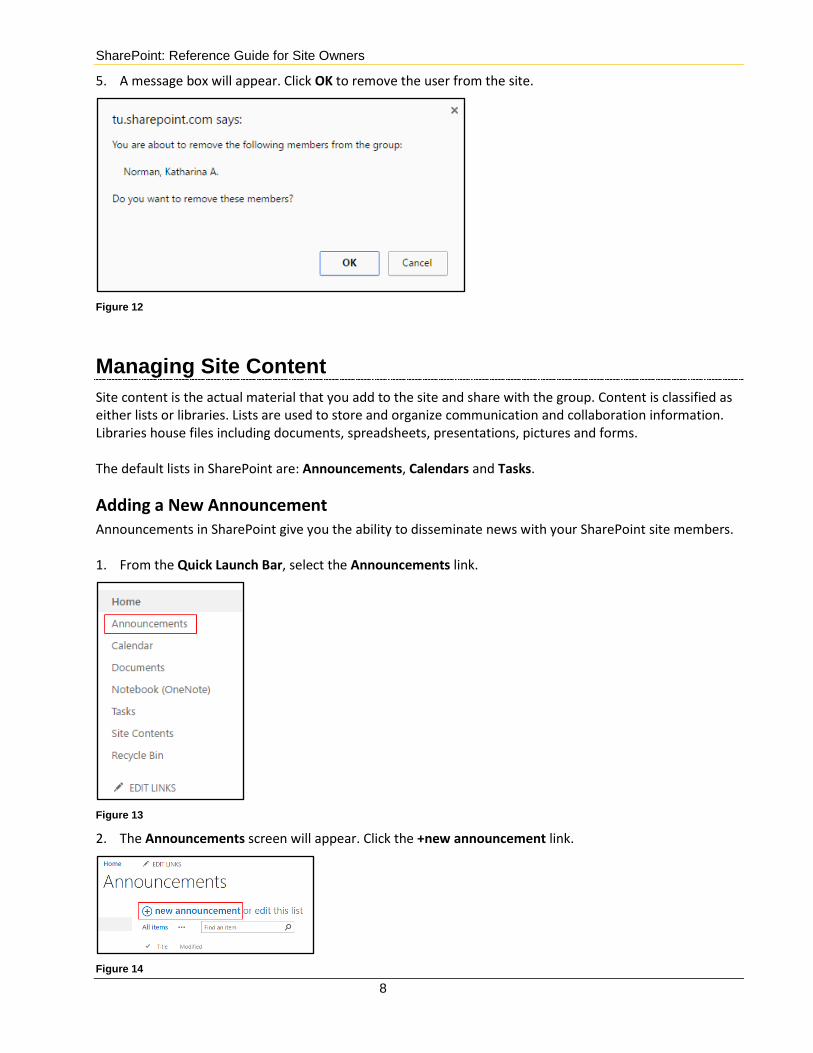
5. A message box will appear. Click OK to remove the user from the site.
Figure 12
Managing Site Content Site content is the actual material that you add to the site and share with the group. Content is classified as either lists or libraries. Lists are used to store and organize communication and collaboration information. Libraries house files including documents, spreadsheets, presentations, pictures and forms. The default lists in SharePoint are: Announcements, Calendars and Tasks.
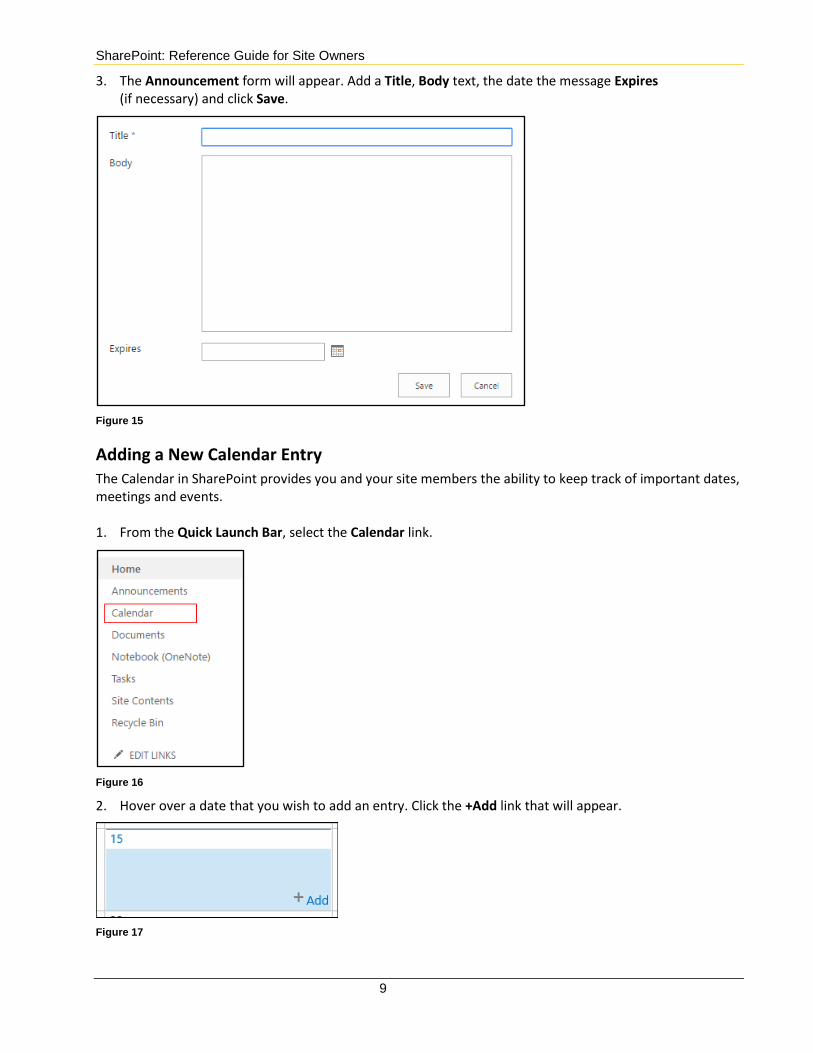
Adding a New Announcement Announcements in SharePoint give you the ability to disseminate news with your SharePoint site members. 1. From the Quick Launch Bar, select the Announcements link.
Figure 13
2. The Announcements screen will appear. Click the +new announcement link.
Figure 14
SharePoint: Reference Guide for Site Owners
9
3. The Announcement form will appear. Add a Title, Body text, the date the message Expires (if necessary) and click Save.
Figure 15
Adding a New Calendar Entry The Calendar in SharePoint provides you and your site members the ability to keep track of important dates, meetings and events. 1. From the Quick Launch Bar, select the Calendar link.
Figure 16
2. Hover over a date that you wish to add an entry. Click the +Add link that will appear.
Figure 17
SharePoint: Reference Guide for Site Owners
10
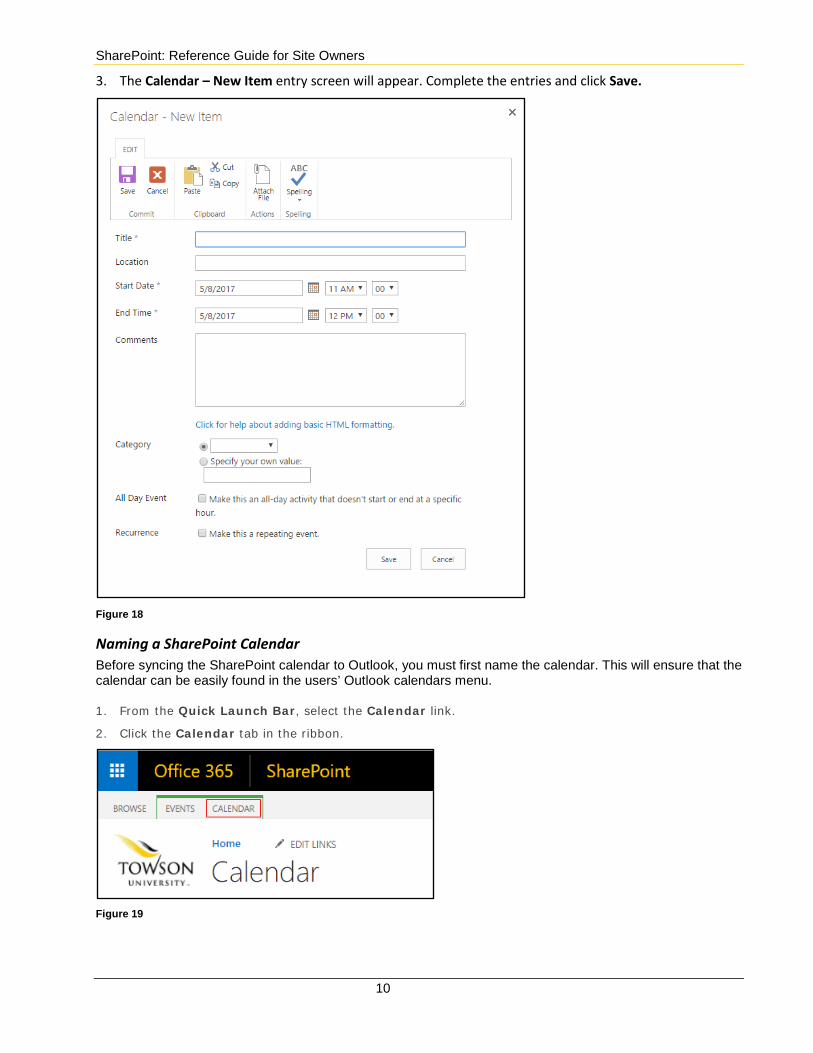
3. The Calendar – New Item entry screen will appear. Complete the entries and click Save.
Figure 18
Naming a SharePoint Calendar Before syncing the SharePoint calendar to Outlook, you must first name the calendar. This will ensure that the calendar can be easily found in the users’ Outlook calendars menu. 1. From the Quick Launch Bar, select the Calendar link.
2. Click the Calendar tab in the ribbon.
Figure 19

SharePoint: Reference Guide for Site Owners
11
3. In the Settings group, click the List Settings icon.
Figure 20
4. In the Calendar Settings screen, click the List name, description and navigation link.
Figure 21
5. In the General Settings screen, type the name of your calendar in the Name: text box.
Figure 22
6. Click the Save button.
Figure 23
SharePoint: Reference Guide for Site Owners
12
Syncing a SharePoint Calendar with Outlook SharePoint calendars can be connected to Outlook. Adding or removing calendar entries via Outlook will sync to the SharePoint calendar.
1. From the Quick Launch Bar, select the Calendar link.
2. Click the Calendar tab in the ribbon.
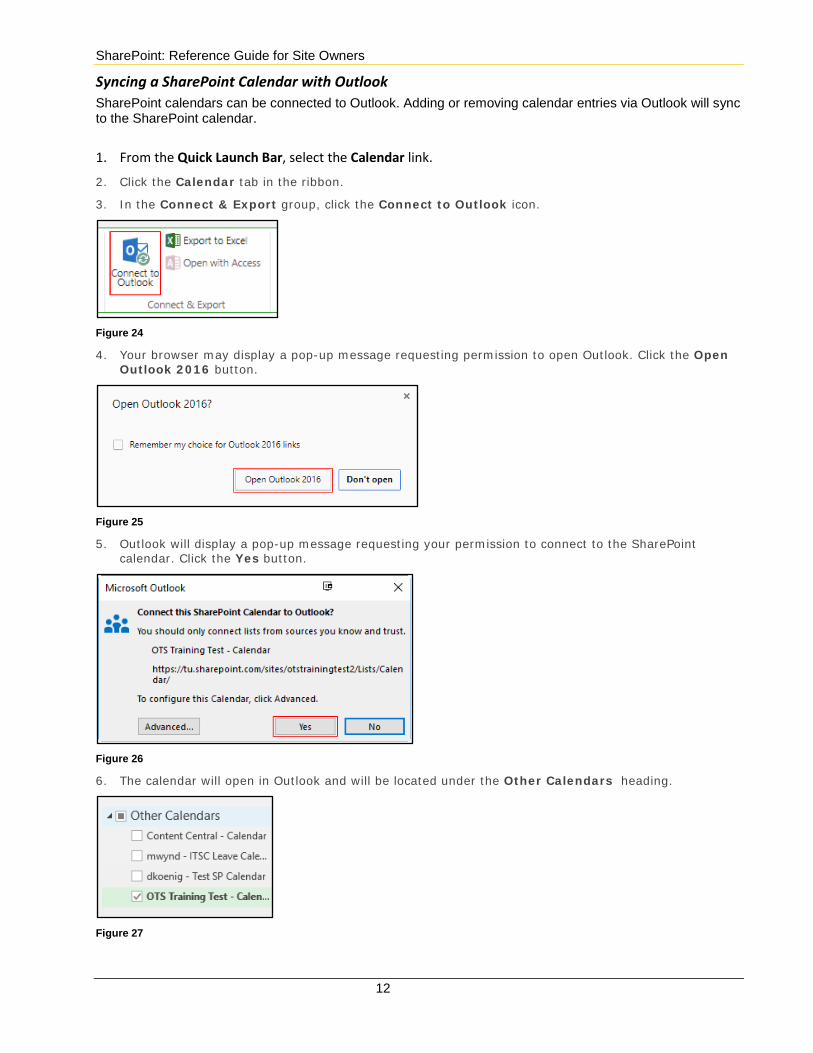
3. In the Connect & Export group, click the Connect to Outlook icon.
Figure 24
4. Your browser may display a pop-up message requesting permission to open Outlook. Click the Open Outlook 2016 button.
Figure 25
5. Outlook will display a pop-up message requesting your permission to connect to the SharePoint calendar. Click the Yes button.
Figure 26
6. The calendar will open in Outlook and will be located under the Other Calendars heading.
Figure 27

SharePoint: Reference Guide for Site Owners
13
Adding a Task Tasks in SharePoint are items that can be assigned to specific members of the site. The members that are assigned tasks can update the progress. Tasks provide a great way to keep track of projects. 1. From the Quick Launch Bar, select the Tasks link.
Figure 28
2. The Tasks screen appears. Click +new task to add a new task to the task list.
Figure 29
3. Complete the task entry form and click Save to create the task.
Figure 30
SharePoint: Reference Guide for Site Owners
14
Working with Files The Documents library is the central location from which users can update and manage files. SharePoint is integrated with the Office365 suite of programs. Documents can be created from within SharePoint, uploaded to SharePoint or saved from Office to SharePoint.
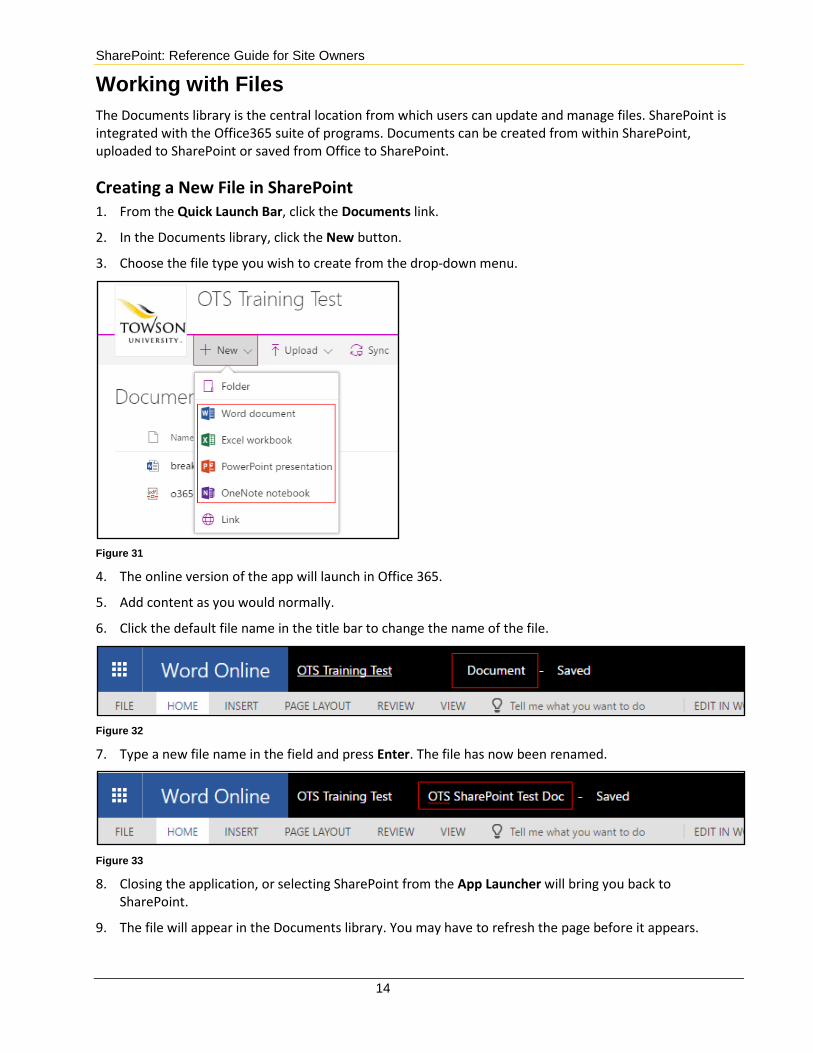
Creating a New File in SharePoint 1. From the Quick Launch Bar, click the Documents link.
2. In the Documents library, click the New button.
3. Choose the file type you wish to create from the drop-down menu.
Figure 31
4. The online version of the app will launch in Office 365.
5. Add content as you would normally.
6. Click the default file name in the title bar to change the name of the file.
Figure 32
7. Type a new file name in the field and press Enter. The file has now been renamed.
Figure 33
8. Closing the application, or selecting SharePoint from the App Launcher will bring you back to SharePoint.
9. The file will appear in the Documents library. You may have to refresh the page before it appears.
SharePoint: Reference Guide for Site Owners
15
Uploading Files to SharePoint Folders, documents and other Microsoft Office files that are on your computer can be uploaded and stored in SharePoint. There are two choices for uploading to your SharePoint site:
• Files – Upload a single file or multiple files via a file browser.
• Folder – Upload an entire folder from your computer to SharePoint via a folder browser.
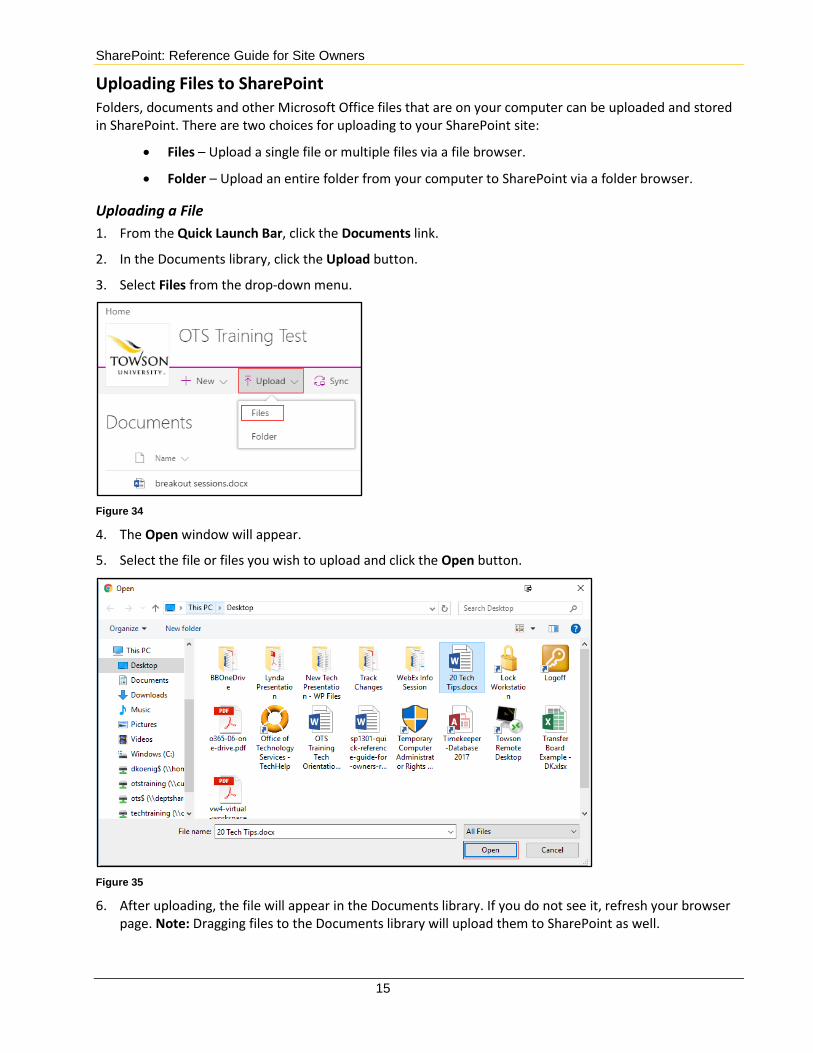
Uploading a File 1. From the Quick Launch Bar, click the Documents link.
2. In the Documents library, click the Upload button.
3. Select Files from the drop-down menu.
Figure 34
4. The Open window will appear.
5. Select the file or files you wish to upload and click the Open button.
Figure 35
6. After uploading, the file will appear in the Documents library. If you do not see it, refresh your browser page. Note: Dragging files to the Documents library will upload them to SharePoint as well.

SharePoint: Reference Guide for Site Owners
16
Uploading a Folder 1. From the Quick Launch Bar, click the Documents link.
2. In the Documents library, click the Upload button.
3. Select Folder from the drop-down menu.
Figure 36
4. The Browse For Folder window will appear.
5. Navigate to and select the folder you wish to upload and click the OK button.
Figure 37
6. You will receive a notification in your Documents library when the files have finished uploading.
Figure 38
7. After uploading, the folder will appear in the Documents library. If you do not see it, refresh your browser page. Note: Dragging folders to the Documents library will upload them to SharePoint as well.
SharePoint: Reference Guide for Site Owners
17
Deleting a File Files can be deleted from SharePoint. Deleted files are moved to the Recycle Bin. 1. From the Quick Launch Bar, click the Documents link.
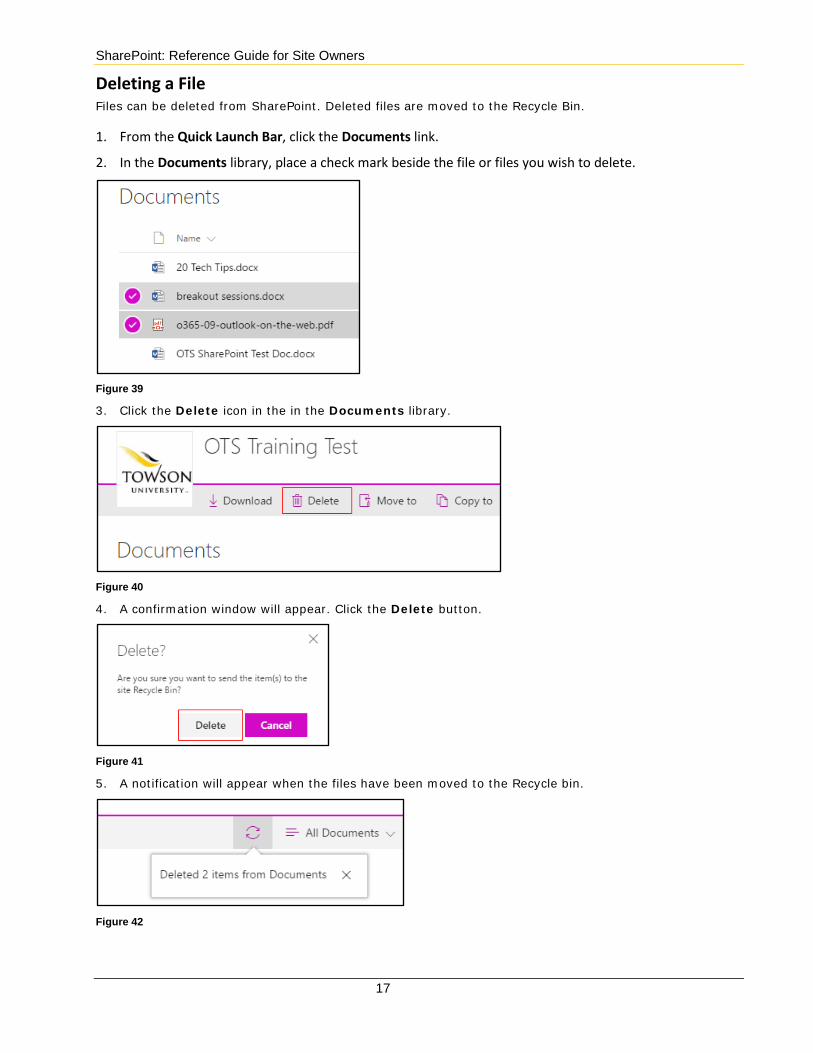
2. In the Documents library, place a check mark beside the file or files you wish to delete.
Figure 39 3. Click the Delete icon in the in the Documents library.
Figure 40
4. A confirmation window will appear. Click the Delete button.
Figure 41
5. A notification will appear when the files have been moved to the Recycle bin.
Figure 42
SharePoint: Reference Guide for Site Owners
18
Using the Recycle Bin By default, items are kept in the Recycle Bin for 93 days before they are automatically moved to the Second-Stage Recycle Bin. Once the files are in the Second-Stage Recycle Bin, they are kept for an additional 93 days before they are permanently deleted. Site owners can access the Second-Stage Recycle Bin. All other site members only have access to the initial Recycle Bin. Note: There is no automatic backup of SharePoint sites so pay close attention to deleted files. 1. To view the Recycle Bin, click Recycle Bin from the Quick Launch Bar.
Figure 43
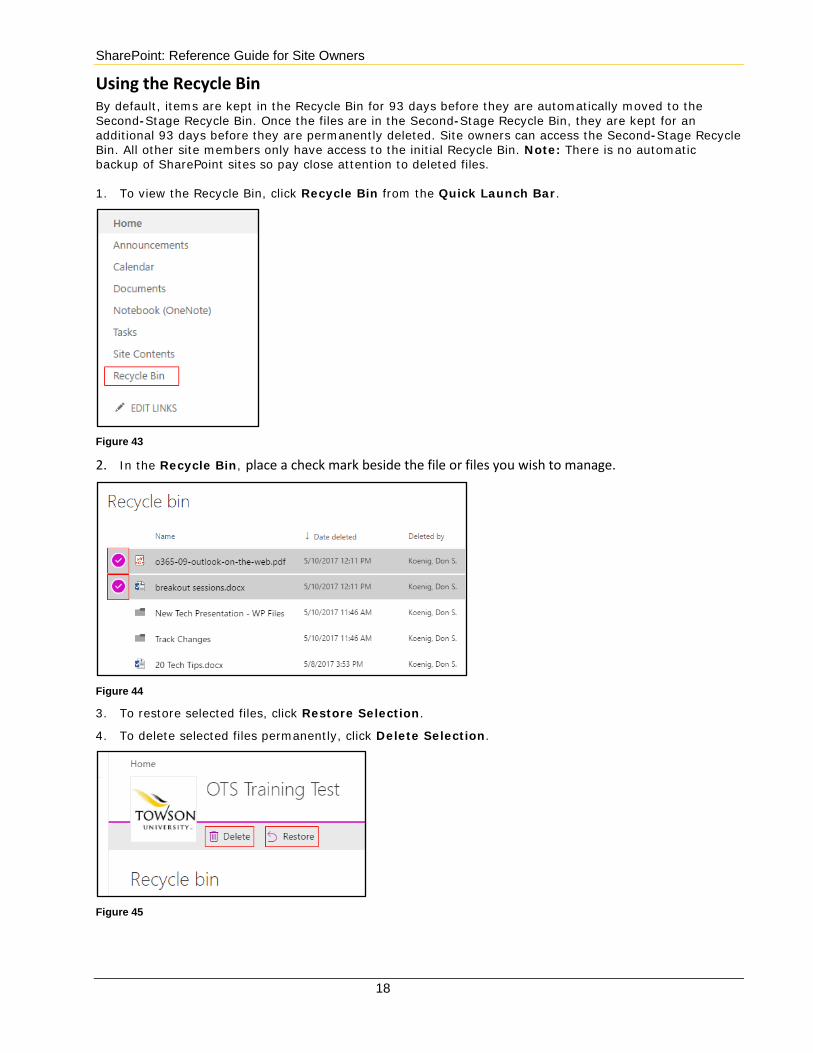
2. In the Recycle Bin, place a check mark beside the file or files you wish to manage.
Figure 44
3. To restore selected files, click Restore Selection.
4. To delete selected files permanently, click Delete Selection.
Figure 45

SharePoint: Reference Guide for Site Owners
19
Sharing Files housed in SharePoint can be shared only with people inside Towson University using the Share screen. Note: Only Site Owners can remove users from a shared file or folder.
Sharing Files 1. From the Quick Launch Bar, click the Documents link.
2. In the Documents library, click the corresponding More button for the file you wish to share.
Figure 46
3. From the More menu, click Share.
Figure 47 4. The Share screen appears. Type the email address of the person(s) you wish to share the document
with, select their permission level, include a personal message (if needed) and click Share.
Figure 48
SharePoint: Reference Guide for Site Owners
20
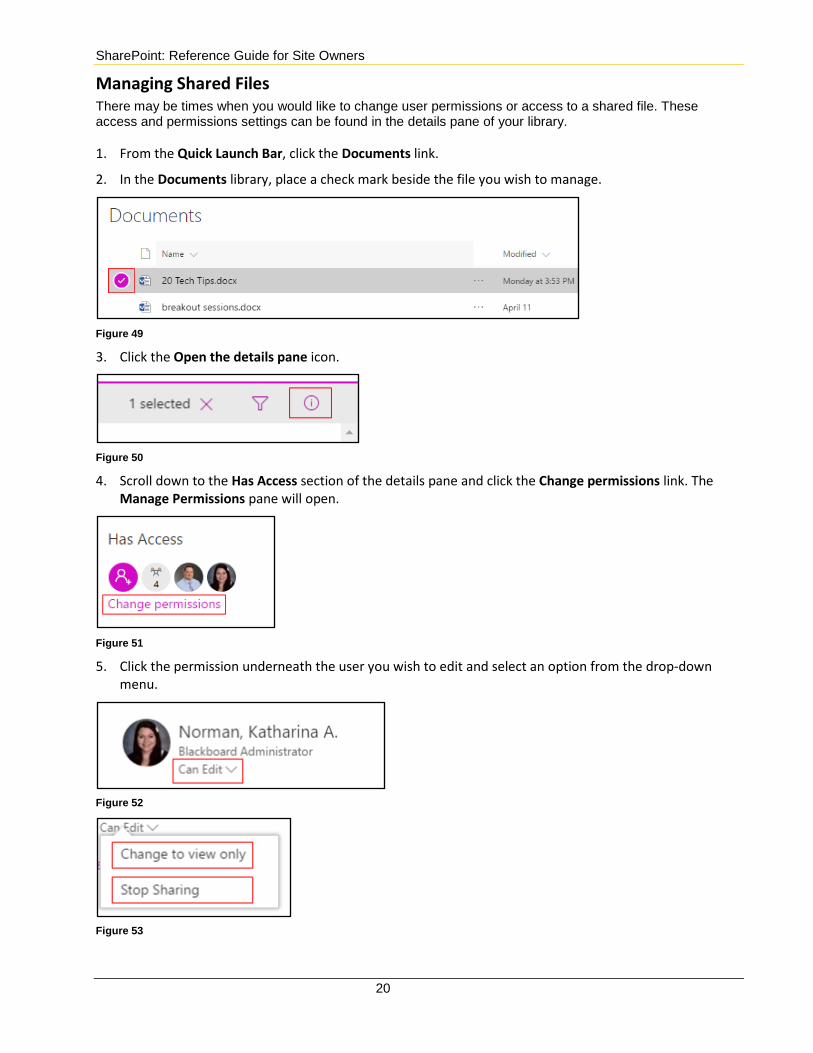
Managing Shared Files There may be times when you would like to change user permissions or access to a shared file. These access and permissions settings can be found in the details pane of your library. 1. From the Quick Launch Bar, click the Documents link.
2. In the Documents library, place a check mark beside the file you wish to manage.
Figure 49
3. Click the Open the details pane icon.
Figure 50
4. Scroll down to the Has Access section of the details pane and click the Change permissions link. The Manage Permissions pane will open.
Figure 51
5. Click the permission underneath the user you wish to edit and select an option from the drop-down menu.
Figure 52
Figure 53
SharePoint: Reference Guide for Site Owners
21
Creating an Alert An alert allows a user to track items in SharePoint. Once an alert is created, the user will receive an email notification whenever that item in SharePoint is updated or deleted. Alerts can be created for pages, lists, list items libraries, files and OneNote notebooks.
Note: Alerts cannot be sent via text message.
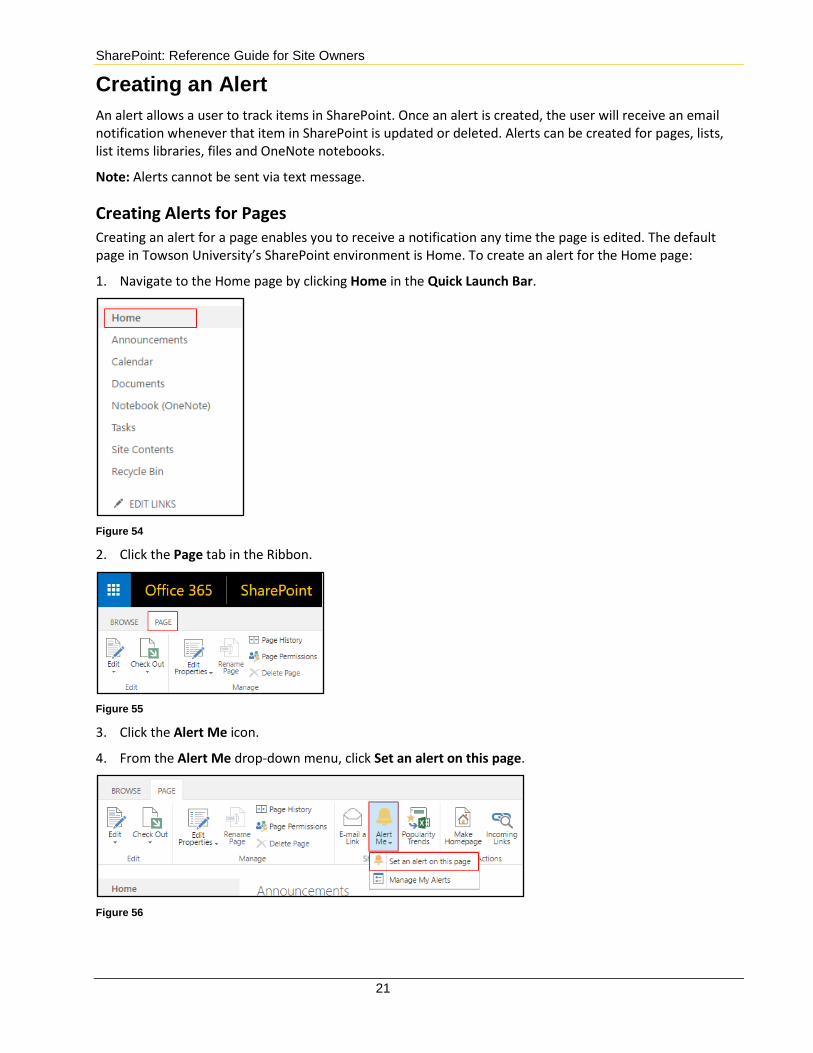
Creating Alerts for Pages Creating an alert for a page enables you to receive a notification any time the page is edited. The default page in Towson University’s SharePoint environment is Home. To create an alert for the Home page:
1. Navigate to the Home page by clicking Home in the Quick Launch Bar.
Figure 54
2. Click the Page tab in the Ribbon.
Figure 55
3. Click the Alert Me icon.
4. From the Alert Me drop-down menu, click Set an alert on this page.
Figure 56
SharePoint: Reference Guide for Site Owners
22
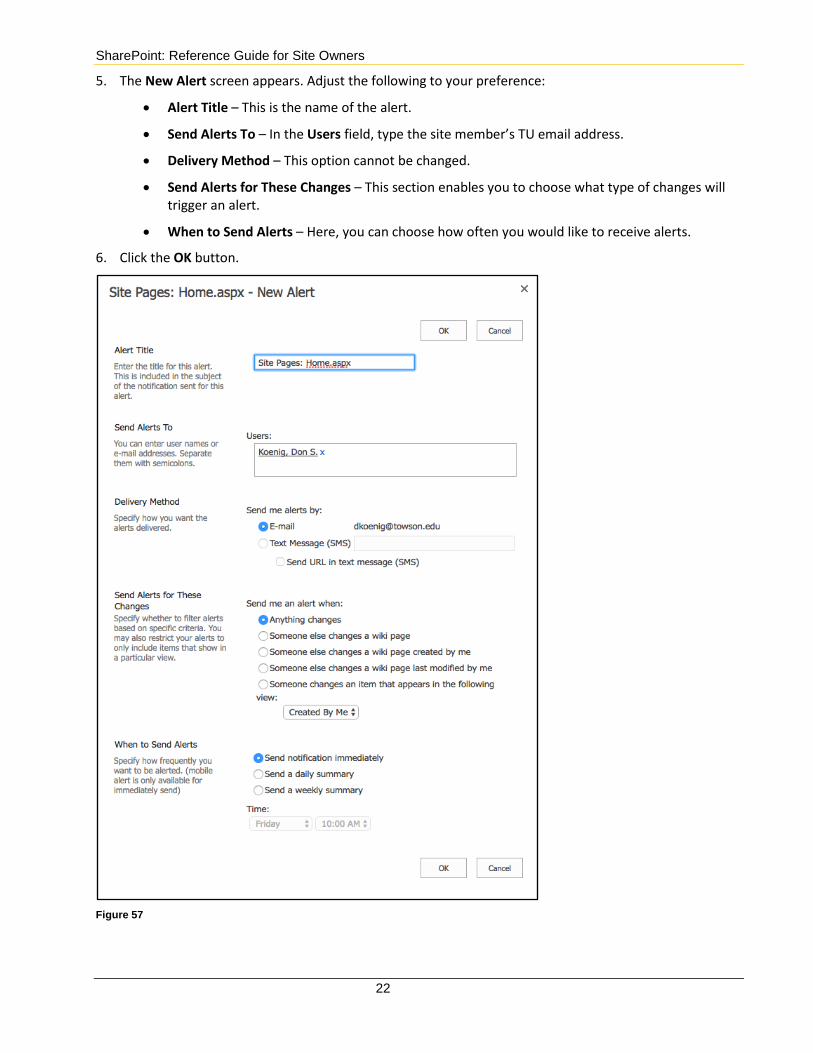
5. The New Alert screen appears. Adjust the following to your preference:
• Alert Title – This is the name of the alert.
• Send Alerts To – In the Users field, type the site member’s TU email address.
• Delivery Method – This option cannot be changed.
• Send Alerts for These Changes – This section enables you to choose what type of changes will trigger an alert.
• When to Send Alerts – Here, you can choose how often you would like to receive alerts.
6. Click the OK button.
Figure 57
SharePoint: Reference Guide for Site Owners
23
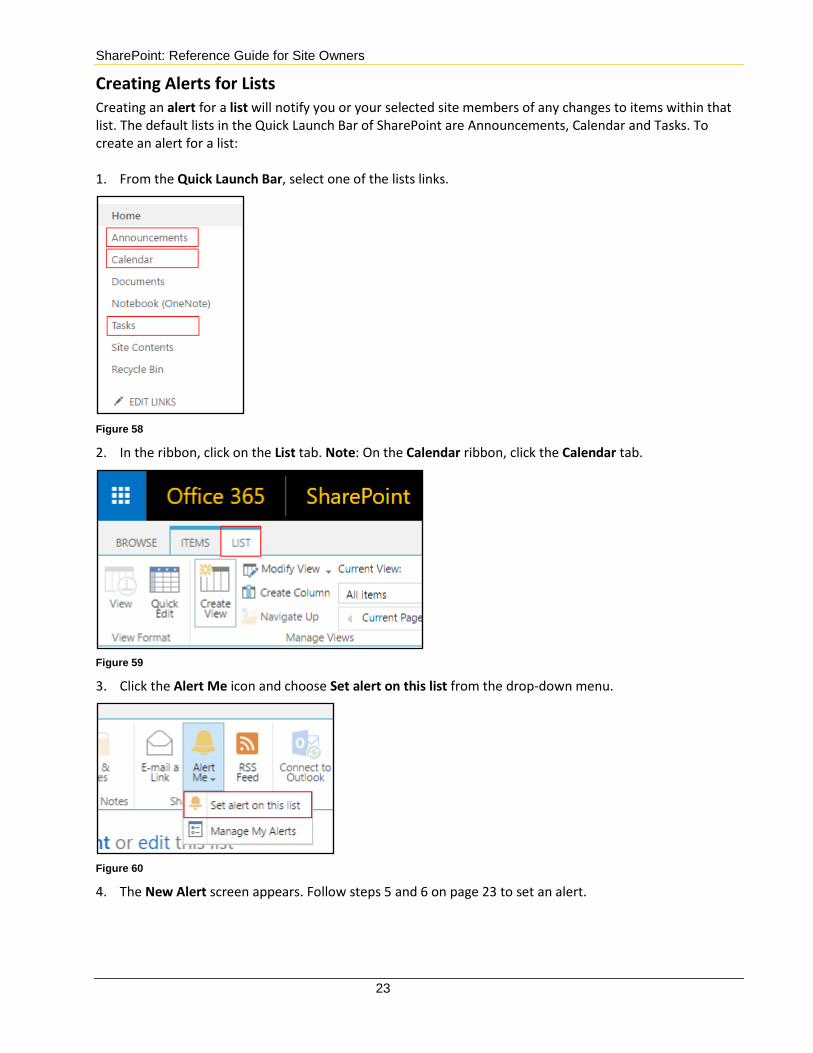
Creating Alerts for Lists Creating an alert for a list will notify you or your selected site members of any changes to items within that list. The default lists in the Quick Launch Bar of SharePoint are Announcements, Calendar and Tasks. To create an alert for a list: 1. From the Quick Launch Bar, select one of the lists links.
Figure 58
2. In the ribbon, click on the List tab. Note: On the Calendar ribbon, click the Calendar tab.
Figure 59
3. Click the Alert Me icon and choose Set alert on this list from the drop-down menu.
Figure 60
4. The New Alert screen appears. Follow steps 5 and 6 on page 23 to set an alert.
SharePoint: Reference Guide for Site Owners
24
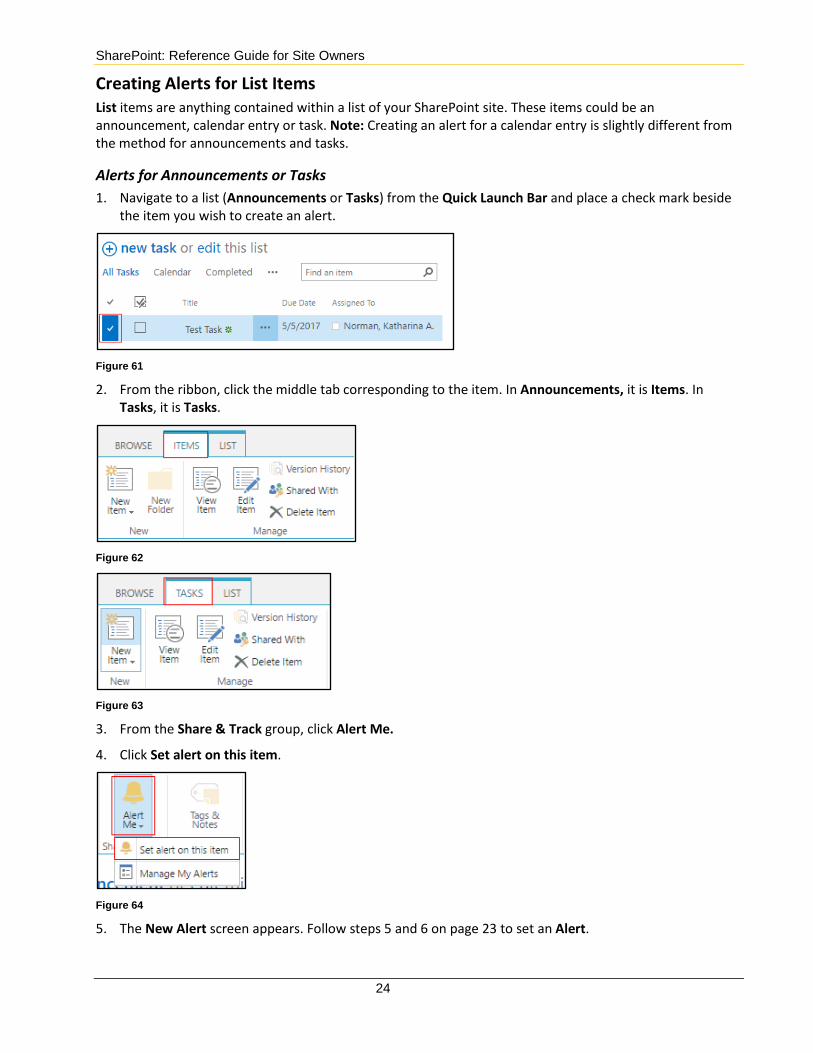
Creating Alerts for List Items List items are anything contained within a list of your SharePoint site. These items could be an announcement, calendar entry or task. Note: Creating an alert for a calendar entry is slightly different from the method for announcements and tasks.
Alerts for Announcements or Tasks 1. Navigate to a list (Announcements or Tasks) from the Quick Launch Bar and place a check mark beside
the item you wish to create an alert.
Figure 61
2. From the ribbon, click the middle tab corresponding to the item. In Announcements, it is Items. In Tasks, it is Tasks.
Figure 62
Figure 63
3. From the Share & Track group, click Alert Me.
4. Click Set alert on this item.
Figure 64
5. The New Alert screen appears. Follow steps 5 and 6 on page 23 to set an Alert.

SharePoint: Reference Guide for Site Owners
25
Alerts for Calendar Entries 1. Click on Calendar in the Quick Launch Bar.
2. Navigate to the desired Calendar entry and click on the entry’s title.
Figure 65
3. In the ribbon, click the View tab.
4. Click the Alert Me icon.
Figure 66
5. The New Alert screen appears. Follow steps 5 and 6 on page 23 to set an alert.
Creating Alerts for Libraries Creating an alert for a library will notify you or your selected site members of any additions or changes to items within that library. The default library in the Quick Launch Bar of SharePoint is Documents. To create an alert for the Documents library: 1. From the Quick Launch Bar, click the Documents link.
2. Click on the More button in the Documents library, then click Alert me.
Figure 67
3. The New Alert screen appears. Follow steps 5 and 6 on page 23 to set an alert.
SharePoint: Reference Guide for Site Owners
26
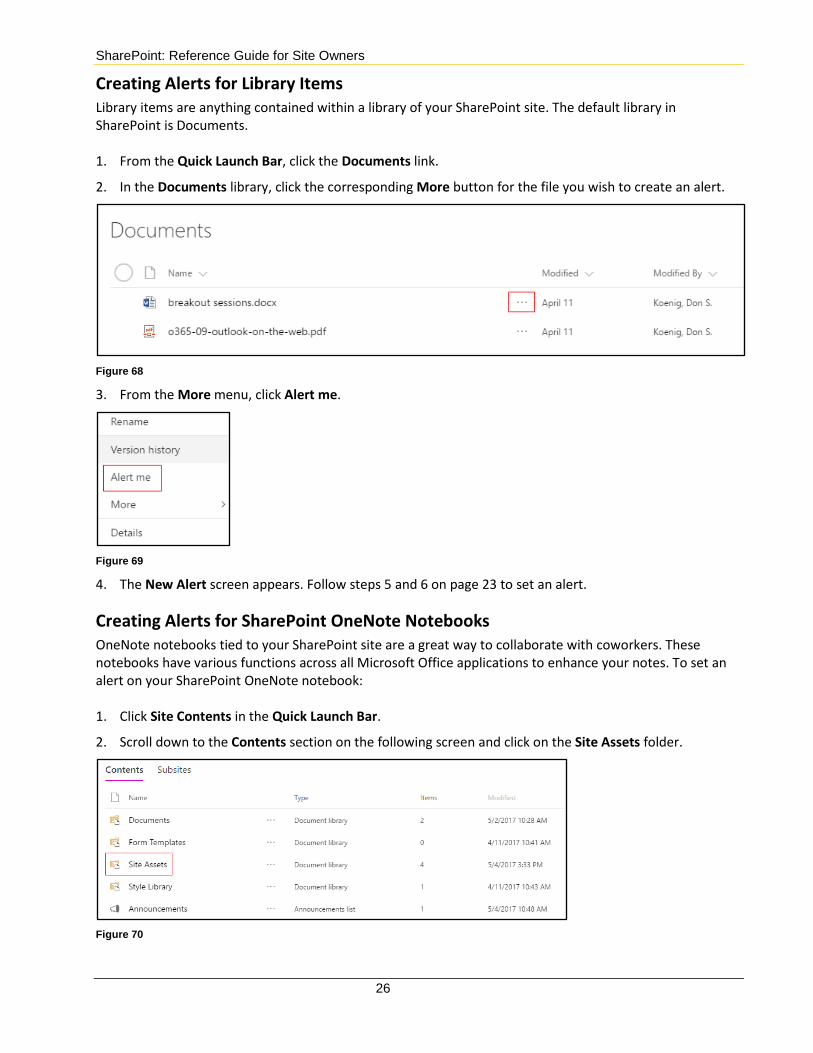
Creating Alerts for Library Items Library items are anything contained within a library of your SharePoint site. The default library in SharePoint is Documents. 1. From the Quick Launch Bar, click the Documents link.
2. In the Documents library, click the corresponding More button for the file you wish to create an alert.
Figure 68
3. From the More menu, click Alert me.
Figure 69
4. The New Alert screen appears. Follow steps 5 and 6 on page 23 to set an alert.
Creating Alerts for SharePoint OneNote Notebooks OneNote notebooks tied to your SharePoint site are a great way to collaborate with coworkers. These notebooks have various functions across all Microsoft Office applications to enhance your notes. To set an alert on your SharePoint OneNote notebook: 1. Click Site Contents in the Quick Launch Bar.
2. Scroll down to the Contents section on the following screen and click on the Site Assets folder.
Figure 70

SharePoint: Reference Guide for Site Owners
27
3. Click the corresponding More button for the OneNote notebook you wish to create an alert.
Figure 71
4. From the More menu, click Alert me.
Figure 72
5. The New Alert screen appears. Follow steps 5 and 6 on page 23 to set an alert.
6. Click the OK button.