mt - parts towndownload.partstown.com/is-bin/intershop.static/wfs/reedy-partstown...table of...
TRANSCRIPT
Pos: 2 /9 53-Elo ma/D eckbla tt/Deck blatt _BET_ Titelbild _Ge niusT_Ge nius Co mp act @ 9\m od_ 138 0200 995 802 _6.d oc @ 895 06 @ @ 1
=== E nde der Liste für Tex tma rke I nhal t = ==
Pos: 4 /9 53-Elo ma/D eckbla tt/Deck blatt _Prod uktn ame : Ge niusT un d Ge nius Co mp act @ 9\m od_ 1379 664 662 841 _6.d oc @ 883 75 @ @ 1
GeniusMT
=== E nde der Liste für Tex tma rke I nhal t1 = == Pos: 6 /9 53-Elo ma/D eckbla tt/Deck blatt _Gr öße n_Ene rgie art @ 9\ mod _13 795 962 624 31_6 .doc @ 8 8231 @ @ 1
Sizes: 6-11, 10-11, 20-11, 12-21, 20-21
Type of energy: Gas and electric
=== E nde der Liste für Tex tma rke I nhal t2 = == Pos: 8 /9 53-Elo ma/D eckbla tt/Deck blatt _Betri ebsa nleitu ng @ 9\m od_ 137 9662 625 820 _6.d oc @ 883 04 @ @ 1
Original operating instructions === E nde der Liste für Tex tma rke I nhal t3 = ==
Pos: 10 / 953 -Elom a/Stan dar dtext e Dok ume nta rt un abh ängi gIm press um @ 10 \mo d_1 384 361 5300 20_ 6.d oc @ 1 012 34 @ 44 4 @ 1
Imprint
Eloma GmbH . Innovative cooking and baking technology
Otto-Hahn-Str. 10
82216 Maisach
Germany
Phone: +49 (0) 8141 395-0
Fax: +49 (0) 8141 395-130
Cooking forum and user tips
Website: www.eloma.com
User hotline: +49 (0) 35023 63887
Service
Service hotline: +49 (0) 35023 63888
Appliance type: ……………
Appliance no.: …………….
Dealer: Installer:
Date: …………… Installed on: ……………
=== E nde der Liste für Tex tma rke I nhal t4 = ==
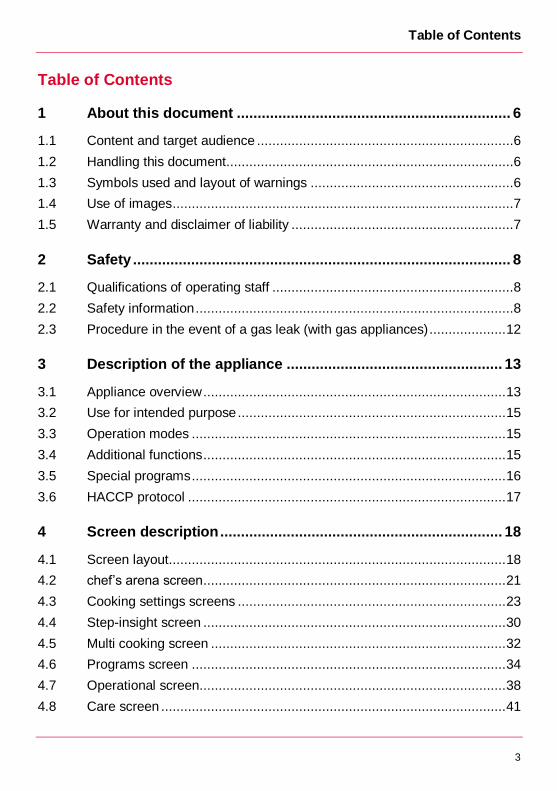
Table of Contents
3
Pos: 12 / 953 -Elom a/Stan dar dtext e Dok ume nta rt un abh ängi g/IHZ @ 1 0\m od_ 138 9601 392 776 _6.d oc @ 113 662 @ @ 1
Table of Contents
1 About this document .................................................................. 6
1.1 Content and target audience ...................................................................6
1.2 Handling this document ...........................................................................6
1.3 Symbols used and layout of warnings .....................................................6
1.4 Use of images .........................................................................................7
1.5 Warranty and disclaimer of liability ..........................................................7
2 Safety ........................................................................................... 8
2.1 Qualifications of operating staff ...............................................................8
2.2 Safety information ...................................................................................8
2.3 Procedure in the event of a gas leak (with gas appliances) .................... 12
3 Description of the appliance .................................................... 13
3.1 Appliance overview ............................................................................... 13
3.2 Use for intended purpose ...................................................................... 15
3.3 Operation modes .................................................................................. 15
3.4 Additional functions ............................................................................... 15
3.5 Special programs .................................................................................. 16
3.6 HACCP protocol ................................................................................... 17
4 Screen description .................................................................... 18
4.1 Screen layout ........................................................................................ 18
4.2 chef’s arena screen............................................................................... 21
4.3 Cooking settings screens ...................................................................... 23
4.4 Step-insight screen ............................................................................... 30
4.5 Multi cooking screen ............................................................................. 32
4.6 Programs screen .................................................................................. 34
4.7 Operational screen................................................................................ 38
4.8 Care screen .......................................................................................... 41
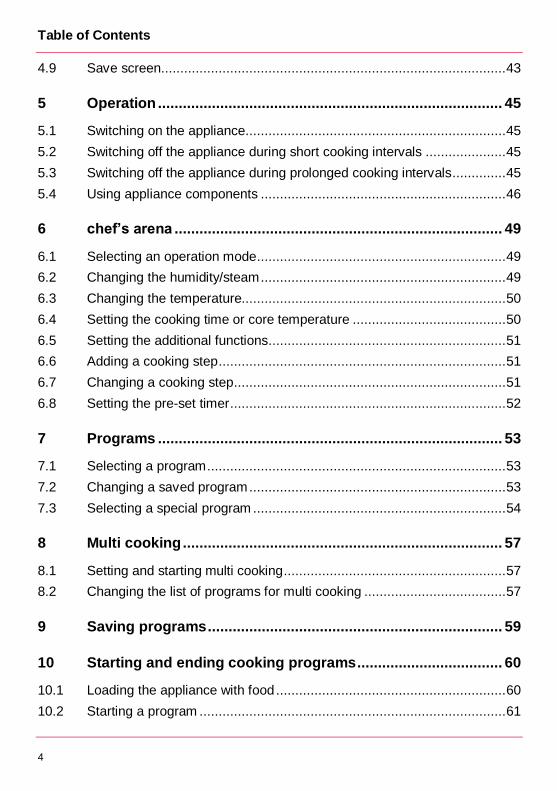
Table of Contents
4
4.9 Save screen.......................................................................................... 43
5 Operation ................................................................................... 45
5.1 Switching on the appliance.................................................................... 45
5.2 Switching off the appliance during short cooking intervals ..................... 45
5.3 Switching off the appliance during prolonged cooking intervals .............. 45
5.4 Using appliance components ................................................................ 46
6 chef’s arena ............................................................................... 49
6.1 Selecting an operation mode ................................................................. 49
6.2 Changing the humidity/steam ................................................................ 49
6.3 Changing the temperature..................................................................... 50
6.4 Setting the cooking time or core temperature ........................................ 50
6.5 Setting the additional functions .............................................................. 51
6.6 Adding a cooking step ........................................................................... 51
6.7 Changing a cooking step ....................................................................... 51
6.8 Setting the pre-set timer ........................................................................ 52
7 Programs ................................................................................... 53
7.1 Selecting a program .............................................................................. 53
7.2 Changing a saved program ................................................................... 53
7.3 Selecting a special program .................................................................. 54
8 Multi cooking ............................................................................. 57
8.1 Setting and starting multi cooking .......................................................... 57
8.2 Changing the list of programs for multi cooking ..................................... 57
9 Saving programs ....................................................................... 59
10 Starting and ending cooking programs ................................... 60
10.1 Loading the appliance with food ............................................................ 60
10.2 Starting a program ................................................................................ 61

Table of Contents
5
10.3 Changing a program during operation ................................................... 61
10.4 Ending a program ................................................................................. 63
10.5 Removing the foodstuff ......................................................................... 64
11 Cleaning and care ..................................................................... 65
11.1 Notes on manual cleaning ..................................................................... 65
11.2 Cleaning intervals ................................................................................. 66
11.3 Prescribed cleaner and rinse agent ....................................................... 66
11.4 Cleaning the chamber with a manual sprayer pump (manual method) ... 66
11.5 Cleaning the chamber with the autoclean program ................................ 68
11.6 Cleaning the drip channel on the chamber door..................................... 70
11.7 Cleaning the door seal .......................................................................... 71
11.8 Cleaning the glass parts of the door ...................................................... 71
11.9 Changing the water softening unit ......................................................... 72
11.10 Maintenance intervals ........................................................................... 72
12 Unit Settings .............................................................................. 73
13 Trouble Shooting ...................................................................... 75
13.1 Causes of errors and action to take ....................................................... 75
13.2 Error messages .................................................................................... 76
14 Disposal ..................................................................................... 79
=== E nde der Liste für Tex tma rke I nhal t5 = ==
About this document
6
Pos: 14 / 953 -Elom a/Stan dar dtext e Dok ume nta rt un abh ängi g/Zu Diese m Dok um ent_ [Titel ] @ 9 \mo d_1 374 831 6104 05_ 6.d oc @ 7814 1 @ 1 @ 1
1 About this document
Pos: 15 / 953 -Elom a/Stan dar dtext e Betri ebsa nleitu nge n/01 _ZuDiese mDoku me nt/Zu_Dok um ent_ Inhal t un d Zi elgr upp e @ 9 \mo d_1 374 832 1367 15_ 6.d oc @ 7 824 3 @ 2 @ 1
1.1 Content and target audience
These original operating instructions describe how to safely operate,
clean and care for the appliance, along with measures for trouble
shooting. The operating instructions are aimed at people who will
operate, clean and care for the appliance. Pos: 16 / 953 -Elom a/Stan dar dtext e Betri ebsa nleitu nge n/01 _ZuDiese mDoku me nt/Zu_Dok um ent_U mg ang mit di esem Doku men t @ 9 \mo d_1 374 847 406 928_ 6.d oc @ 7828 3 @ 2 @ 1
1.2 Handling this document
Keep these operating instructions accessible for operating and
cleaning staff.
Keep these operating instructions throughout the appliance's entire
life cycle.
Pass these operating instructions on to subsequent owners. Pos: 17 / 953 -Elom a/Stan dar dtext e Dok ume nta rt un abh ängi g/Zu_Dok ume nt_Ve rwen det e Symb ole @ 9\m od_ 137 484 6264 619 _6. doc @ 782 03 @ 2 @ 1
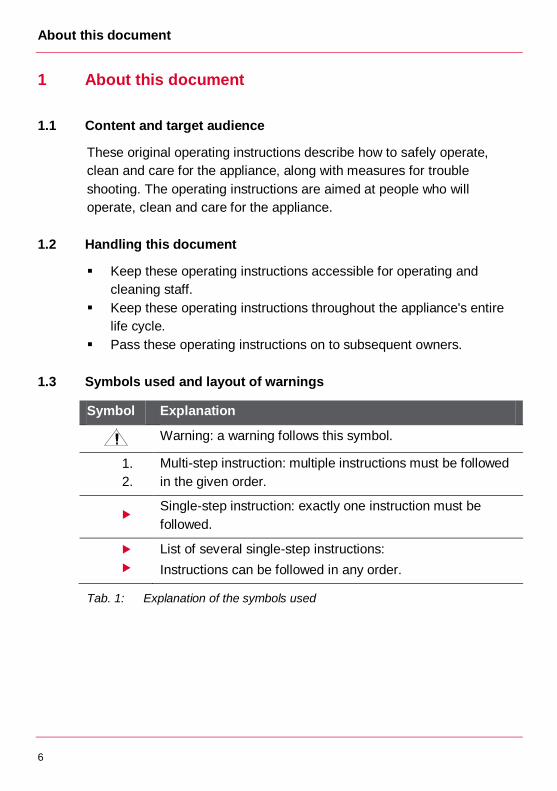
1.3 Symbols used and layout of warnings
Symbol Explanation
Warning: a warning follows this symbol.
1.
2.
Multi-step instruction: multiple instructions must be followed
in the given order.
Single-step instruction: exactly one instruction must be
followed.
List of several single-step instructions:
Instructions can be followed in any order.
Tab. 1: Explanation of the symbols used

About this document
7
DANGER!
Type and source of the danger!
Consequence: non-compliance will result in death.
Action to avoid the danger.
WARNING!
Type and source of the danger!
Consequence: non-compliance will result in serious injury.
Action to avoid the danger.
CAUTION!
Type and source of the danger!
Consequence: non-compliance will result in minor injury.
Action to avoid the danger.
NOTE!
Type and source of the danger!
Consequence: non-compliance will result in material damage.
Action to avoid the danger.
Information
Technical note or tip for operation.
Pos: 18 / 953 -Elom a/Stan dar dtext e Dok ume nta rt un abh ängi g/Zu_Dok ume nt_Vew end ung von Ab bildu ngen @ 9\ mo d_1 3812 997 700 30_ 6.do c @ 9 009 1 @ 2 @ 1
1.4 Use of images
Images are provided as examples only and may differ from the appliance
supplied. Pos: 19 / 953 -Elom a/Stan dar dtext e Dok ume nta rt un abh ängi g/Zu_Dok ume nt_ Gewäh rleist ung und H aftu ngsa uschl uss @ 9\mo d_1 374 846 116 382 _6.d oc @ 781 83 @ 2 @ 1
1.5 Warranty and disclaimer of liability
You will find information on liability for material defects and warranty
conditions in our general terms and conditions of business (T&C). Pos: 20 / 953 -Elom a/Stan dar dtext e Dok ume nta rt un abh ängi g/Siche rheit _[Tit el] @ 9\m od_ 137 4846 566 048 _6.d oc @ 782 23 @ 1 @ 1
Safety
8
2 Safety
Pos: 21 / 953 -Elom a/Stan dar dtext e Betri ebsa nleitu nge n/02 _Siche rheit/Sic her heit_ Qualifik ation des Be dien pers onals @ 9\ mod _13 748 476 823 53_6 .doc @ 7 8344 @ 2 @ 1
2.1 Qualifications of operating staff
Make sure that this appliance is only operated and cleaned by
persons who have received instruction, regular training and a health
and safety briefing.
Make sure that this appliance is only operated and cleaned by
persons who have read the entire operating instructions carefully and
have understood the safety information.
Make sure that the following persons only operate the appliance if a
person with the above-named qualifications is supervising or giving
instruction:
– Children
– Persons with impaired physical, sensory or mental abilities
– Persons who do not have the above-named qualifications
Make sure that only an Eloma service partner carries out repairs or
maintenance work on the appliance. Pos: 22 / 953 -Elom a/Stan dar dtext e Dok ume nta rt un abh ängi g/Siche rheit _Sicher heits hinweise _[Ti tel] @ 9\m od_ 137 542 765 250 6_6. doc @ 81 001 @ 2 @ 1
2.2 Safety information Pos: 23 / 953 -Elom a/BET_Ko mbid ämp fer/Sic her heit/Sich erh eit_Vor _Betri eb @ 9\m od_ 137 570 202 3671 _6. doc @ 81 252 @ 3 @ 4
2.2.1 Prior to operation
Personal injury from electric shock
Only start up fully functional, undamaged appliances.
Do not open the housing.
If a malfunction occurs, disconnect the appliance and close the on-
site water tap.
Make sure that only an Eloma service partner carries out repairs.
Risk of injury from parts falling out
Remove loose parts from the chamber. Pos: 24 / 953 -Elom a/BET_Ko mbid ämp fer/Sic her heit/Sich erh eit_Wä hre nd_Bet rieb @ 9\ mod _13 757 043 235 21_ 6.doc @ 8 130 2 @ 3 @ 1
Safety
9
2.2.2 During cooking
Risk of bruising from opening and closing the chamber door
Make sure that no persons are within the chamber door's rotation
radius.
Close the chamber door carefully.
Risk of burns from hot surfaces
Wear protective clothing (e.g. long-sleeved clothing and protective
gloves).
Lock the mobile tray rack in place.
Do not touch the hanging rack or mobile tray rack when removing
foodstuffs.
Do not touch the door glass or housing.
Do not touch the pipes for exhaust air and waste water.
For gas appliances: Do not touch the exhaust stack, the gas exhaust
pipe or its cover.
Risk of scalding from hot liquids
Wear protective clothing (e.g. long-sleeved clothing and protective
gloves).
Do not load the appliance above head height.
Close the chamber door carefully so hot water does not escape if the
siphon overflows.
Risk of scalding from hot steam
Wear protective clothing (e.g. long-sleeved clothing and protective
gloves).
Open the chamber door carefully.
Risk of tipping due to top-heavy loading of the appliance
Load the hanging rack or mobile tray rack evenly, working from
bottom to top.
Risk of fire from flammable materials
Do not load the appliance with food containing highly flammable
ingredients (e.g. alcohol).
Do not place any highly flammable materials over the appliance.
Clean the appliance regularly.

Safety
10
Do not operate the appliance in toxic or potentially explosive
atmospheres.
If the appliance has been installed under a hood: turn the hood on
during operation.
If the appliance has been installed outdoors: only operate the
appliance in an area protected from the wind.
If the appliance has been connected to a chimney with flow
protection: clean the exhaust line regularly in accordance with
country-specific regulations.
Material damage from improper use
Use accessories correctly in the chamber to prevent the door glass
from cracking.
Make sure that no objects are within the chamber door's radius of
rotation.
Material damage from overheating
Make sure that the supply air opening and the ventilation slots are
unobstructed and not covered.
Keep the area between the appliance feet unobstructed to ensure
sufficient ventilation below the appliance. Pos: 25 / 953 -Elom a/BET_Ko mbid ämp fer/Sic her heit/Sich erh eit_Rei nigun g @ 9\m od_1 375 707 412 406 _6.d oc @ 813 42 @ 3 @ 4
2.2.3 Cleaning
Risk of burns from hot surfaces
Allow the appliance to cool before cleaning it.
Risk of chemical burns from cleaner and rinse agent
Observe the safety information for the prescribed cleaner and rinse
agent (see section 11.3).
For manual cleaning:
Wear protective clothing (e.g. long-sleeved clothing, protective gloves
and glasses).
Allow the appliance to cool before cleaning it.
Do not inhale spray mist from the cleaner and rinse agent.
For appliances with an autoclean program:
Keep the chamber door closed whilst the autoclean program is
running.

Safety
11
When changing the canisters for cleaner or rinse agent:
Wear protective clothing (e.g. long-sleeved clothing, protective gloves
and glasses).
Risk of burns from hot fat
Only install deep fat fryers, portable stoves or similar vessels
containing hot fat outside the radius of action of the hand shower.
Material damage from improper cleaning
Do not clean the housing with the hand shower, water jets, steam
cleaners or high-pressure cleaners.
Only use the prescribed cleaner and rinse agent (see section 11.3).
Observe the cleaning intervals. Pos: 26 / 953 -Elom a/BET_Ko mbid ämp fer/Sic her heit/Sich erh eit_Hygi ene @ 9\ mod _13 757 058 5347 8_6 .doc @ 81 322 @ 3 @ 1
2.2.4 Hygiene
Health hazard from insufficient hygiene
Observe the cleaning intervals (see section 11.2).
Clean the core probe before use. Pos: 27 / 953 -Elom a/BET_Ko mbid ämp fer/Sic her heit/Sich erh eit_Ga saust ritt @ 9\ mod _137 570 878 482 7_6. doc @ 81 382 @ 3 @ 1
2.2.5 Gas leaks (with gas appliances)
Risk of suffocation in the event of a gas leak
Observe the rules of procedure in the event of a gas leak (see
section 2.3).
Observe the maintenance intervals (see section 11.10). Pos: 28 / 953 -Elom a/BET_Ko mbid ämp fer/Sic her heit/Sich erh eit_Ge rät e_Rolle n @ 9\m od_ 137 5702 633 401 _6.d oc @ 812 72 @ 3 @ 1
2.2.6 Appliances on castors
Risk of injury from electric shock
Do not move the appliance over electric cables.
Risk of tipping and uncontrolled movements of appliances on
castors due to uneven floors
Only move the appliance on an even floor (max. 10° inclination).
Move the appliance carefully.
Once the appliance has been transported, secure its castors with the
immobilisation brake. Pos: 29 / 953 -Elom a/BET_Ko mbid ämp fer/Sic her heit/Sich erh eit_Wa rtun g @ 9\mo d_1 375 708 031 840 _6.d oc @ 813 62 @ 3 @ 1
Safety
12
2.2.7 Maintenance
Risk of fire from improper maintenance
Make sure that only an Eloma service partner carries out
maintenance work.
Observe the maintenance intervals (see section 11.10). Pos: 30 / 953 -Elom a/Stan dar dtext e Dok ume nta rt un abh ängi g/Siche rheit _Verh alten sre geln_ Gasa ustrit t @ 9 \mo d_1 375 709 071 611_ 6.d oc @ 8140 2 @ 2 @ 1
2.3 Procedure in the event of a gas leak (with gas appliances)
1. Shut off the gas supply on site.
2. Do not touch any electrical switches.
3. Ventilate the room well.
4. Avoid creating open flames or sparks.
5. Leave the room.
6. Contact the gas supply company. Pos: 31 / 953 -Elom a/Stan dar dtext e Dok ume nta rt un abh ängi g/Ge rät ebesc hrei bun g_[ Titel] @ 9\ mod_ 137 484 975 249 8_6. doc @ 78 411 @ 1 @ 1
Description of the appliance
13
3 Description of the appliance
Pos: 32 / 953 -Elom a/BET_Ko mbid ämp fer/ Ger äteb esch reib ung/ Ger äteb esch reibu ng_ Ger äteü ber sicht_ [Titel ] @ 1 0\m od_ 138 442 1424 327 _6. doc @ 101 396 @ 2 @ 1
3.1 Appliance overview Pos: 33 / 953 -Elom a/BET_Ko mbid ämp fer/ Ger äteb esch reib ung/ Ger äteb esch reibu ng_ Ger äteü ber sicht_ Tisch ger ät @ 10\ mod _13 8442 106 588 5_6. doc @ 10 137 2 @ 3 @ 1
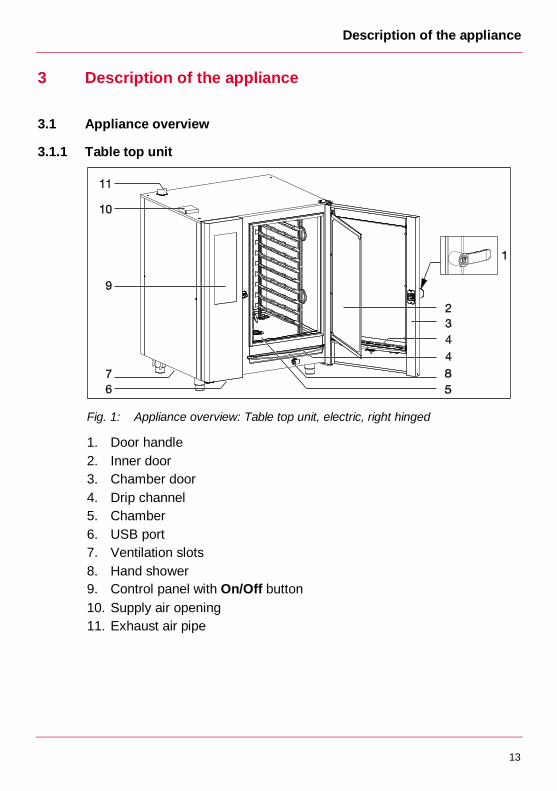
3.1.1 Table top unit
Fig. 1: Appliance overview: Table top unit, electric, right hinged
1. Door handle
2. Inner door
3. Chamber door
4. Drip channel
5. Chamber
6. USB port
7. Ventilation slots
8. Hand shower
9. Control panel with On/Off button
10. Supply air opening
11. Exhaust air pipe
Pos: 34 / 953 -Elom a/BET_Ko mbid ämp fer/ Ger äteb esch reib ung/ Ger äteb esch reibu ng_ Ger äteü ber sicht_St and ger ät @ 9\m od_1 375 285 321 059 _6.d oc @ 803 91 @ 3 @ 1

Description of the appliance
14
3.1.2 Floor model
Fig. 2: Appliance overview: Floor model, gas, right hinged
1 Door handle
2 Inner door
3 Chamber door
4 Drip channel
5 Chamber
6 USB port
7 Ventilation slots
8 Hand shower
9 Control panel with On/Off button
10 Supply air opening
11 Exhaust air pipe
12 Exhaust gas pipe draught damper (on gas appliances)
13 Emergency opening handle
14 Mobile tray rack
Pos: 35 / 953 -Elom a/BET_Ko mbid ämp fer/ Ger äteb esch reib ung/ Ger äteb esch reibu ng_Be stim mun gsge mä ße_Ve rwen dun g @ 9 \mo d_1 375 285 167 313_ 6.d oc @ 8037 1 @ 2 @ 1
Description of the appliance
15
3.2 Use for intended purpose
The appliance shall only be used for the thermal preparation of food, with
the exception of food containing highly flammable ingredients (e.g.
alcohol).
The appliance must not be operated without supervision.
The appliance is designed for use in commercial environments. Pos: 36 / 953 -Elom a/BET_Ko mbid ämp fer/ Ger äteb esch reib ung/ Ger äteb esch reibu ng_Be trie bsar ten_ [Tit el] @ 9\mo d_1 375 276 935 399 _6.d oc @ 800 25 @ 2 @ 1
3.3 Operation modes Pos: 37 / 953 -Elom a/BET_Ko mbid ämp fer/ Ger äteb esch reib ung/ Ger äteb esch reibu ng_Be trie bsar ten_D am pf @ 9\m od_ 1375 277 060 763 _6.d oc @ 800 46 @ 3 @ 1
3.3.1 Steam
In steam operation mode, food is cooked at a constant temperature in a
high-humidity environment (water vapour). Pos: 38 / 953 -Elom a/BET_Ko mbid ämp fer/ Ger äteb esch reib ung/ Ger äteb esch reibu ng_Be trie bsar ten_H eißl uft @ 9\m od_ 137 5277 235 921 _6. doc @ 800 86 @ 3 @ 1
3.3.2 Convection
In convection operation mode, dry air is used to roast and bake food. This
operation mode is suitable for all foods which should be crispy and
browned. Pos: 39 / 953 -Elom a/BET_Ko mbid ämp fer/ Ger äteb esch reib ung/ Ger äteb esch reibu ng_Be trie bsar ten_K ombi däm pfe n @ 9 \mo d_1 375 2771 669 26_ 6.do c @ 8 006 6 @ 3 @ 1
3.3.3 Combi steam
In combi steam operation mode, the combination of humidity and
temperature creates an atmosphere in the chamber which prevents the
surface of the foodstuff from drying out and speeds up the passage of
heat through the foodstuff. Pos: 40 / 953 -Elom a/BET_Ko mbid ämp fer/ Ger äteb esch reib ung/ Ger äteb esch reibu ng_Be trie bsar ten_B acken @ 9\ mo d_13 752 772 910 93_ 6.doc @ 8 010 6 @ 3 @ 1
3.3.4 Bake
In baking operation mode, the foodstuff is baked using hot air. The dry air
can be humidified through the periodic injection of steam. Pos: 41 / 953 -Elom a/BET_Ko mbid ämp fer/ Ger äteb esch reib ung/ Ger äteb esch reibu ng_ Zus atzfu nktion en_ [Tit el] @ 9 \mo d_1 375 277 413 865_ 6.d oc @ 8012 6 @ 2 @ 1
3.4 Additional functions Pos: 42 / 953 -Elom a/BET_Ko mbid ämp fer/ Ger äteb esch reib ung/ Ger äteb esch reibu ng_ Zus atzfu nktion en_V orh eizenC oolDown @ 9\ mo d_13 752 776 419 56_ 6.doc @ 8 016 6 @ 3 @ 1
3.4.1 Preheating/cool down
The preheating/cool down function is used to heat the chamber
temperature up or cool it down to the set nominal temperature.
For appliances with an autoclean function: the cool down function sprays
water into the chamber at certain temperatures in order to cool it down.
Available in all operation modes. Pos: 43 / 953 -Elom a/BET_Ko mbid ämp fer/ Ger äteb esch reib ung/ Ger äteb esch reibu ng_ Zus atzfu nktion en_ Lüft erg eschwin digkeit @ 9 \mo d_1 375 2774 880 12_ 6.do c @ 8 014 6 @ 3 @ 1

Description of the appliance
16
3.4.2 Fan speed
The fan speed function is used to increase or decrease the speed of the
fan.
Available in all operation modes except steam and baking. Pos: 44 / 953 -Elom a/BET_Ko mbid ämp fer/ Ger äteb esch reib ung/ Ger äteb esch reibu ng_ Zus atzfu nktion en_H alten @ 9\ mo d_1 375 2785 071 17_ 6.do c @ 8 018 6 @ 3 @ 1
3.4.3 Holding
The holding function can be used to keep cooked food at a specified
chamber temperature.
Once the other steps have been selected, the holding function is added
as the final cooking step.
Available in all operation modes except baking, if the nominal
temperature of the final cooking step is <140 °C (<284 °F). Pos: 45 / 953 -Elom a/BET_Ko mbid ämp fer/ Ger äteb esch reib ung/ Ger äteb esch reibu ng_ Zus atzfu nktion _Ene rgies par mod us @ 9\m od_ 1375 279 289 755 _6.d oc @ 802 06 @ 3 @ 1
3.4.4 Energy saving function
The energy saving function is used to operate the appliance in an energy-
saving mode at half the heating power.
Available in all operation modes except steam. Pos: 46 / 953 -Elom a/BET_Ko mbi_ Tou ch/0 3_G erät ebes chr eibun g/Ge rät ebesc hrei bun g_Zusatz funkti on_ Zeitv orwa hl @ 9\mo d_1 375 285 214 480 _6.d oc @ 803 51 @ 3 @ 1
3.4.5 Pre-set timer
The pre-set timer function can be used to specify a time when the
program should start or end. An end time cannot be set if a cooking step
is controlled via the core temperature.
Available in all operation modes. Pos: 47 / 953 -Elom a/BET_Ko mbid ämp fer/ Ger äteb esch reib ung/ Ger äteb esch reibu ng_ Zus atzfu nktion _SPS @ 9\ mod _13 7528 075 518 9_6. doc @ 80 226 @ 3 @ 1
3.4.6 Steam protection system
The steam protection system (SPS®) function is used to extract the
steam present in the appliance shortly before the end of the program, so
that only a small amount of steam escapes when the chamber door is
opened.
Available in "steam" operation mode. Pos: 48 / 953 -Elom a/BET_Ko mbid ämp fer/ Ger äteb esch reib ung/ Ger äteb esch reibu ng_So nde rp rog ram mm e (De finitio n) @ 9\m od_ 137 528 093 1609 _6. doc @ 802 46 @ 2 @ 1
3.5 Special programs
Special programs are semi-automatic programs with pre-set
recommended cooking settings which can be changed. Pos: 49 / 953 -Elom a/BET_Ko mbid ämp fer/ Ger äteb esch reib ung/ Ger äteb esch reibu ng_So nde rpo rg ram m_Del ta_ T_G are n @ 9 \mo d_1 375 281 308 122_ 6.d oc @ 8028 6 @ 3 @ 1

Description of the appliance
17
3.5.1 Delta-T-cooking
The Delta-T-cooking special program is a particular form of low
temperature cooking. Throughout the entire cooking step, the appliance
maintains a set temperature difference (delta T) between the current
actual core temperature and the current actual temperature in the
chamber.
The cooking step ends as soon as the set nominal core temperature is
reached. Pos: 50 / 953 -Elom a/BET_Ko mbid ämp fer/ Ger äteb esch reib ung/ Ger äteb esch reibu ng_So nde rp rog ram m_Nie der tem per atu rga ren @ 9\ mod _13 752 8198 000 2_6 .doc @ 80 306 @ 3 @ 1
3.5.2 Low temperature cooking (LT cooking)
The low temperature cooking special program is used to cook food gently
in a low temperature range with reduced fan power. Pos: 51 / 953 -Elom a/BET_Ko mbid ämp fer/ Ger äteb esch reib ung/ Ger äteb esch reibu ng_So nde rp rog ram me_C ooka ndHol d @ 9\mo d_1 375 281 084 113 _6.d oc @ 802 66 @ 3 @ 1
3.5.3 Cook and hold
The cook and hold special program is used to add the holding function as
the final cooking step once the other steps have been selected. The
holding function can be used to keep cooked food at a specified chamber
temperature. Pos: 52 / 953 -Elom a/BET_Ko mbid ämp fer/ Ger äteb esch reib ung/ Ger äteb esch reibu ng_So nde rp rog ram me_R ege neri ere n @ 9\mo d_1 375 282 116 390 _6.d oc @ 803 26 @ 3 @ 1
3.5.4 Regeneration
The regeneration special program can be used to gently reheat food that
has been fully cooked and cooled down. Pos: 53 / 953 -Elom a/BET_Ko mbid ämp fer/ Ger äteb esch reib ung/ Ger äteb esch reibu ng_HACCP @ 9\m od_ 137 542 777 328 2_6. doc @ 81 021 @ 2 @ 1
3.6 HACCP protocol
During operation, all the cooking data of a program and cleaning program
are saved as an HACCP protocol. The HACCP protocol can be
transferred to a computer via a USB connection. Pos: 54 / 953 -Elom a/BET_Ko mbi_ Tou ch/Bildschi rm besch reib ung/Bilds chir mbesc hrei bun g_ Titel @ 9\m od_ 137 5367 589 674 _6.d oc @ 809 33 @ 1 @ 1

Screen description
18
4 Screen description
Pos: 55 / 953 -Elom a/BET_Ko mbi_ Tou ch/Bildschi rm besch reib ung/Bilds chir mbesc hrei bun g_Bildschi rma ufb au @ 9\m od_ 137 509 678 5217 _6. doc @ 786 83 @ 23 444 44 @ 1
4.1 Screen layout
Fig. 3: Screen layout
Item Symbol Name and function
1
Main menu
chef’s arena field
Switch to the chef’s arena screen
Care field
Switch to the Care screen
Settings field
Switch to the Settings screen
Manual field
Switch to the integrated manual

Screen description
19
Item Symbol Name and function
Return field
Switch to the previous screen
1a – Shows the current time
1b For
example
Status overview field
Shows error messages
2 Functions area
3 Additional menu
Tab. 2: Description of the screen layout
4.1.1 Screen elements
Toogle keys
Toggle keys can be in On or Off state.
Touch the toggle key to switch a function on or off.
Sliders
Sliders can be moved horizontally and, on the Climatic® MT
screen, in all directions.
Move the slider to adjust values.
Fields
Example: Settings field
Fields are areas which contain a symbol and call up an
action when touched. Fields are used for navigation, for
setting values or for activating functions. Highlighted fields
indicate which area or function is active.
Highlighted fields indicate which area or function is active.
Greyed-out fields cannot be activated.
Screen description
20
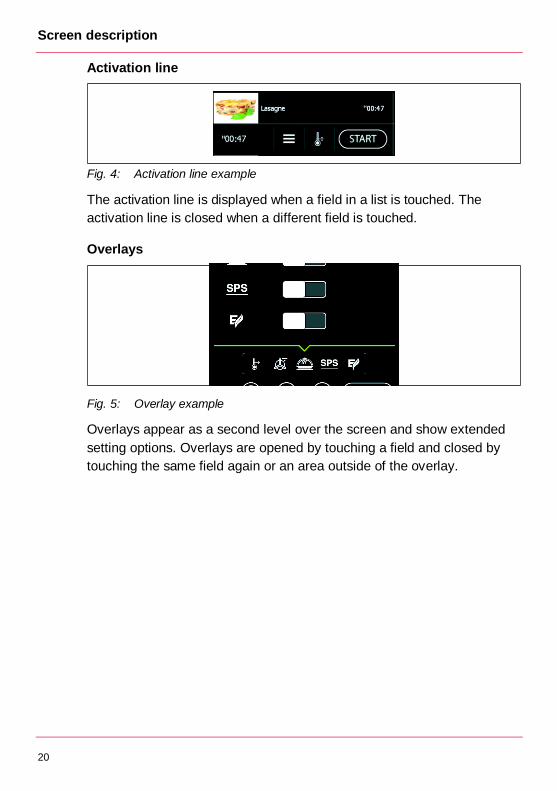
Activation line
Fig. 4: Activation line example
The activation line is displayed when a field in a list is touched. The
activation line is closed when a different field is touched.
Overlays
Fig. 5: Overlay example
Overlays appear as a second level over the screen and show extended
setting options. Overlays are opened by touching a field and closed by
touching the same field again or an area outside of the overlay. Pos: 56 / 953 -Elom a/BET_Ko mbi_ Tou ch/Bildschi rm besch reib ung/Bilds chir mbesc hrei bun g_G arm odus @ 9\ mo d_13 750 991 044 94_ 6.doc @ 7 870 3 @ 2 @ 1 see sec tion 4.1

Screen description
21
4.2 chef’s arena screen
Fig. 6: chef’s arena screen
Item Symbol Name and function
1 Main menu, see section 4.6
2 Modes of operation
Steam field
Switch to steam operation mode
Combi steam field
Switch to combi steam operation mode
Convection field
Switch to convection operation mode
Baking field
Switch to baking operation modes
3
Last20 list
Shows the last 20 programs selected
Screen description
22
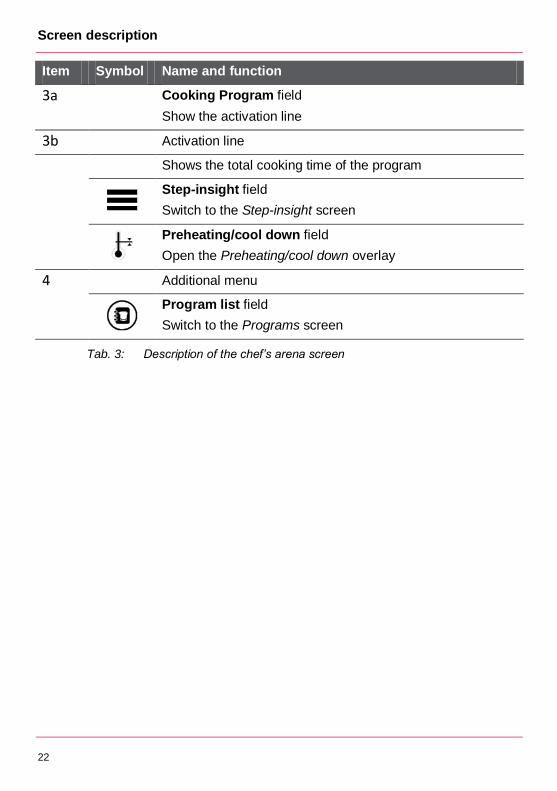
Item Symbol Name and function
3a
Cooking Program field
Show the activation line
3b Activation line
Shows the total cooking time of the program
Step-insight field
Switch to the Step-insight screen
Preheating/cool down field
Open the Preheating/cool down overlay
4 Additional menu
Program list field
Switch to the Programs screen
Tab. 3: Description of the chef’s arena screen
Pos: 57 / 953 -Elom a/BET_Ko mbi_ Tou ch/Bildschi rm besch reib ung/Bilds chir mbesc hrei bun g_G arein stellu ngen _[Ti tel] @ 10\ mod _13 838 177 163 66_6 .doc @ 1 0035 1 @ 2 @ 1
Screen description
23
4.3 Cooking settings screens Pos: 58 / 953 -Elom a/BET_Ko mbi_ Tou ch/Bildschi rm besch reib ung/Bilds chir mbesc hrei bun g_G arein stellu ngen _Da mpf_Ko mbid am pf_Hei ßluft @ 9\ mo d_13 751 011 961 57_ 6.doc @ 7 872 3 @ 3 @ 1
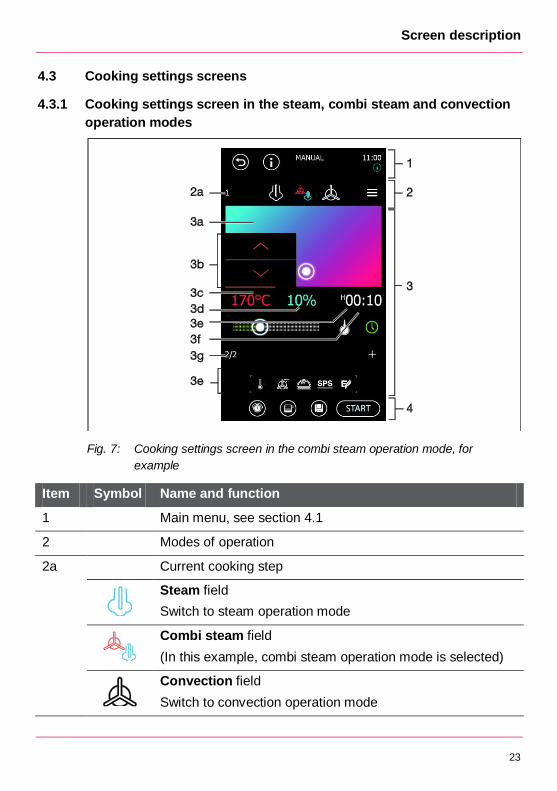
4.3.1 Cooking settings screen in the steam, combi steam and convection
operation modes
Fig. 7: Cooking settings screen in the combi steam operation mode, for
example
Item Symbol Name and function
1 Main menu, see section 4.1
2 Modes of operation
2a Current cooking step
Steam field
Switch to steam operation mode
Combi steam field
(In this example, combi steam operation mode is selected)
Convection field
Switch to convection operation mode
Screen description
24
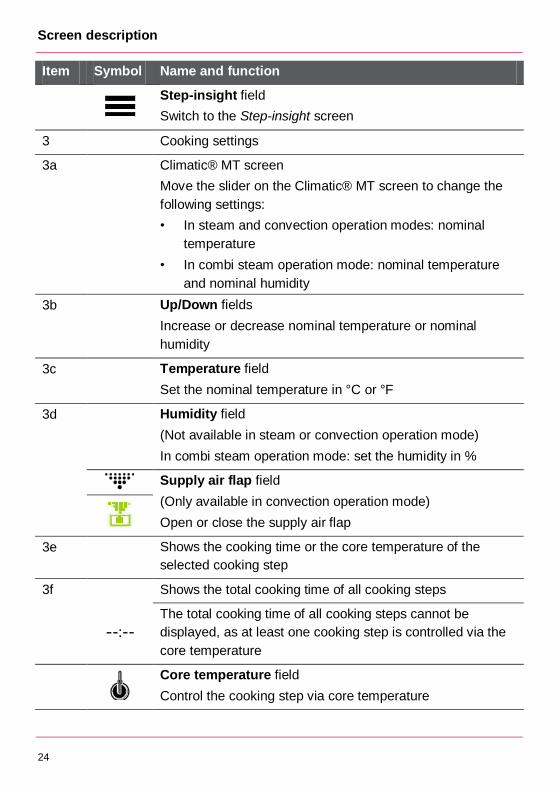
Item Symbol Name and function
Step-insight field
Switch to the Step-insight screen
3 Cooking settings
3a
Climatic® MT screen
Move the slider on the Climatic® MT screen to change the
following settings:
• In steam and convection operation modes: nominal
temperature
• In combi steam operation mode: nominal temperature
and nominal humidity
3b
Up/Down fields
Increase or decrease nominal temperature or nominal
humidity
3c
Temperature field
Set the nominal temperature in °C or °F
3d
Humidity field
(Not available in steam or convection operation mode)
In combi steam operation mode: set the humidity in %
Supply air flap field
(Only available in convection operation mode)
Open or close the supply air flap
3e
Shows the cooking time or the core temperature of the
selected cooking step
3f Shows the total cooking time of all cooking steps
The total cooking time of all cooking steps cannot be
displayed, as at least one cooking step is controlled via the
core temperature
Core temperature field
Control the cooking step via core temperature

Screen description
25
Item Symbol Name and function
Cooking time field
Control the cooking step via cooking time
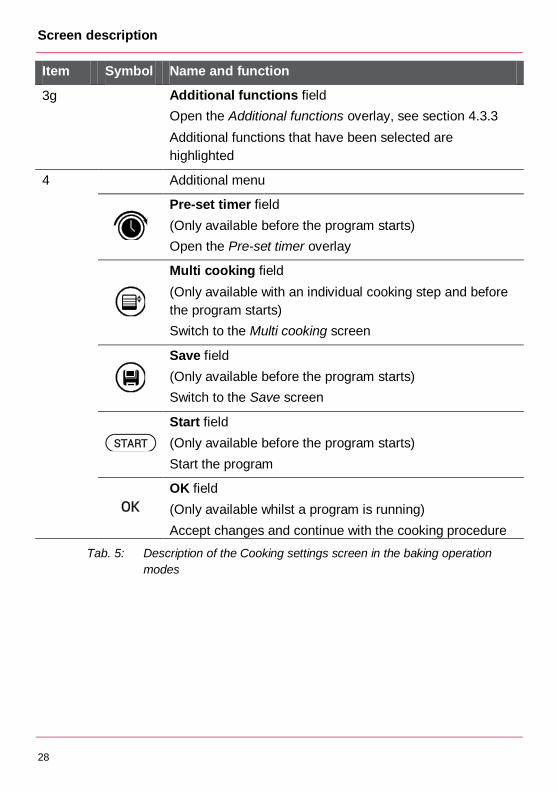
3g Next cooking step/total number of cooking steps
Add field
Add a cooking step after the one currently displayed
3h
Additional functions field
Open the Additional functions overlay, see section 4.3.3
Additional functions that have been selected are highlighted
4 Additional menu
Pre-set timer field
(Only available before the program starts)
Open the Pre-set timer overlay
Multi cooking field
(Only available with a single-step program and before the
program starts)
Switch to the Multi cooking screen
Save field
(Only available before the program starts)
Switch to the Save screen
Start field
(Only available before the program starts)
Start the program
OK field
(Only available whilst a program is running)
Accept changes and continue with the cooking procedure
Tab. 4: Description of the Cooking settings screen in the steam, combi steam
and convection operation modes
Pos: 59 / 953 -Elom a/BET_Ko mbi_ Tou ch/Bildschi rm besch reib ung/Bilds chir mbesc hrei bun g_G arein stellu ngen _Backe n @ 9\mo d_1 381 847 078 274 _6.d oc @ 933 81 @ 3 @ 1

Screen description
26
4.3.2 Cooking settings screen in the baking operation modes
Fig. 8: Cooking settings screen in the bake with steam operation mode, for
example
Item Symbol Name and function
1 Main menu, see section 4.1
2 Modes of operation
2a Current cooking step
Bake with steam field
(In this example, bake with steam operation mode is
selected)
Bake without steam field
Switch to bake without steam operation mode
Step-insight field
Switch to the Step-insight screen

Screen description
27
Item Symbol Name and function
3 Cooking settings
3a
Climatic® MT screen
Move the slider on the Climatic® MT screen to change the
following settings:
• In bake with steam operation mode: nominal
temperature and steam
• In bake without steam operation mode: nominal
temperature
3b
Temperature field
Set the nominal temperature in °C or °F
3c
Steam field
(Only available in bake with steam operation mode)
Set the steam in millilitres (ml) or seconds (sec)
Supply air flap field
(Only available in bake without steam operation mode)
Open or close the supply air flap
3d Shows the cooking time of the selected cooking step
3e
In bake with steam operation mode: shows the rest period
In bake without steam operation mode: shows the total
cooking time of all cooking steps
Rest period field
Set the rest period in seconds
Cooking time field
Control the cooking step via cooking time
3f Next cooking step/total number of cooking steps
Add field
Add a cooking step after the one currently displayed
Screen description
28
Item Symbol Name and function
3g
Additional functions field
Open the Additional functions overlay, see section 4.3.3
Additional functions that have been selected are
highlighted
4 Additional menu
Pre-set timer field
(Only available before the program starts)
Open the Pre-set timer overlay
Multi cooking field
(Only available with an individual cooking step and before
the program starts)
Switch to the Multi cooking screen
Save field
(Only available before the program starts)
Switch to the Save screen
Start field
(Only available before the program starts)
Start the program
OK field
(Only available whilst a program is running)
Accept changes and continue with the cooking procedure
Tab. 5: Description of the Cooking settings screen in the baking operation
modes
Pos: 60 / 953 -Elom a/BET_Ko mbi_ Tou ch/Bildschi rm besch reib ung/Bilds chir mbesc hrei bun g_ Fenst er_ Zus atzfu nktion @ 9 \mo d_1 375 1055 041 34_ 6.do c @ 7 879 4 @ 3 @ 1
Screen description
29
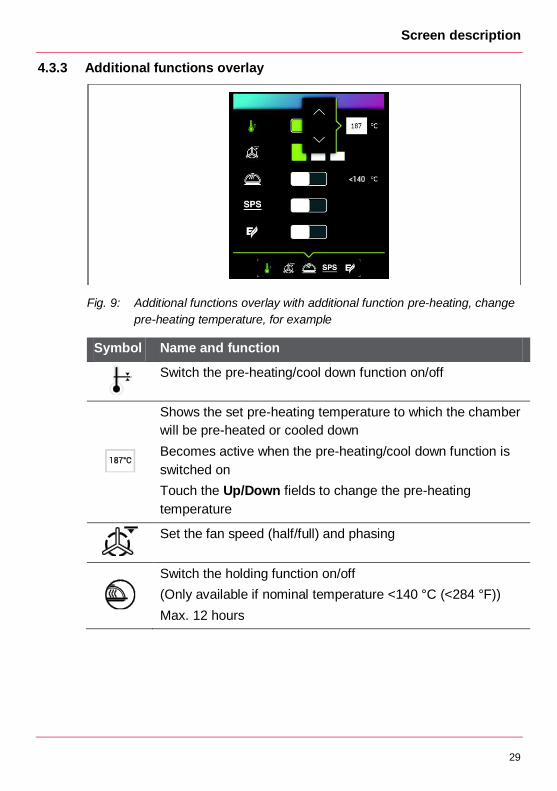
4.3.3 Additional functions overlay
Fig. 9: Additional functions overlay with additional function pre-heating, change
pre-heating temperature, for example
Symbol Name and function
Switch the pre-heating/cool down function on/off
Shows the set pre-heating temperature to which the chamber
will be pre-heated or cooled down
Becomes active when the pre-heating/cool down function is
switched on
Touch the Up/Down fields to change the pre-heating
temperature
Set the fan speed (half/full) and phasing
Switch the holding function on/off
(Only available if nominal temperature <140 °C (<284 °F))
Max. 12 hours
Screen description
30
Symbol Name and function
Switch the energy saving function on/off
Switch the steam protection system function on/off
Tab. 6: Description of the Additional functions overlay
Pos: 61 / 953 -Elom a/BET_Ko mbi_ Tou ch/Bildschi rm besch reib ung/Bilds chir mbesc hrei bun g_Üb ersich t @ 9 \mo d_1 381 848 2629 68_ 6.d oc @ 9 340 4 @ 2 @ 1
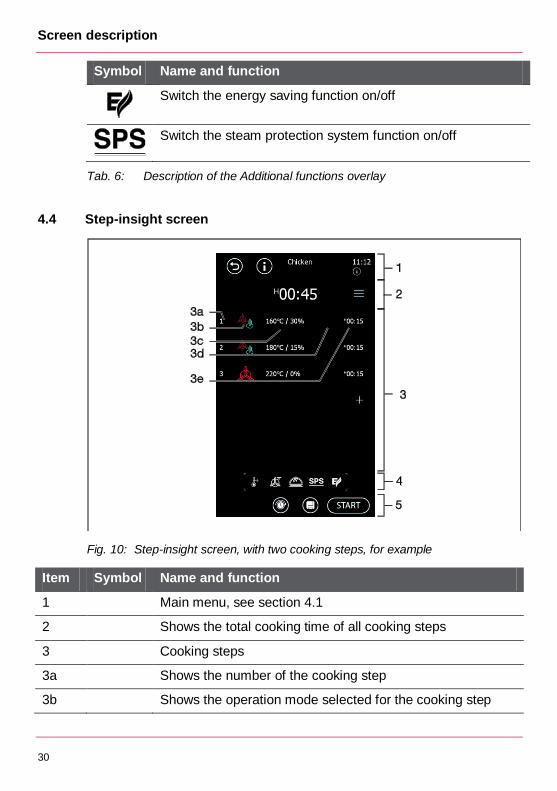
4.4 Step-insight screen
Fig. 10: Step-insight screen, with two cooking steps, for example
Item Symbol Name and function
1 Main menu, see section 4.1
2 Shows the total cooking time of all cooking steps
3 Cooking steps
3a Shows the number of the cooking step
3b Shows the operation mode selected for the cooking step
Screen description
31
Item Symbol Name and function
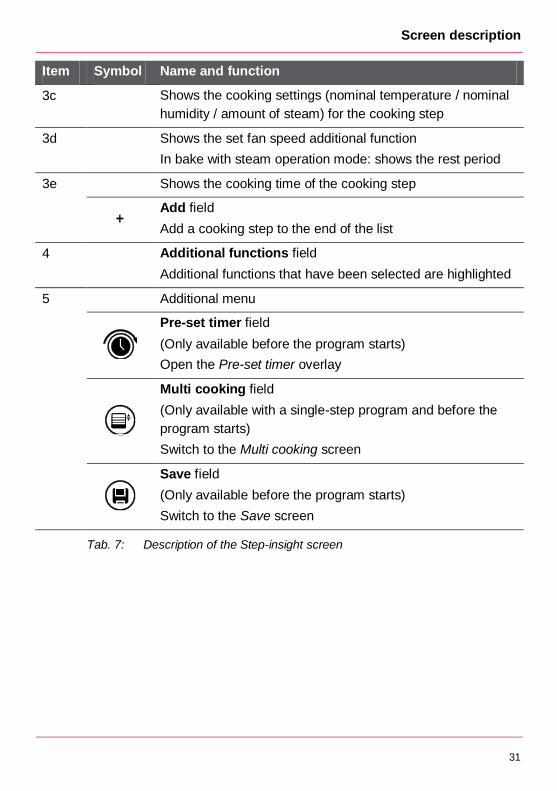
3c
Shows the cooking settings (nominal temperature / nominal
humidity / amount of steam) for the cooking step
3d
Shows the set fan speed additional function
In bake with steam operation mode: shows the rest period
3e Shows the cooking time of the cooking step
Add field
Add a cooking step to the end of the list
4
Additional functions field
Additional functions that have been selected are highlighted
5 Additional menu
Pre-set timer field
(Only available before the program starts)
Open the Pre-set timer overlay
Multi cooking field
(Only available with a single-step program and before the
program starts)
Switch to the Multi cooking screen
Save field
(Only available before the program starts)
Switch to the Save screen
Tab. 7: Description of the Step-insight screen
Pos: 62 / 953 -Elom a/BET_Ko mbi_ Tou ch/Bildschi rm besch reib ung/Bilds chir mbesc hrei bun g_M ulti-Co oking @ 9\ mo d_13 751 082 296 95_ 6.doc @ 7 883 4 @ 2 @ 1
Screen description
32
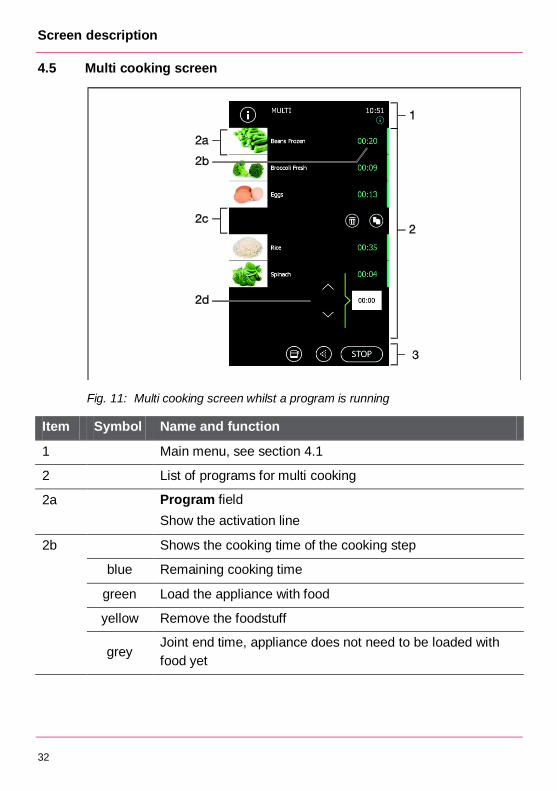
4.5 Multi cooking screen
Fig. 11: Multi cooking screen whilst a program is running
Item Symbol Name and function
1 Main menu, see section 4.1
2 List of programs for multi cooking
2a
Program field
Show the activation line
2b Shows the cooking time of the cooking step
blue Remaining cooking time
green Load the appliance with food
yellow Remove the foodstuff
grey Joint end time, appliance does not need to be loaded with
food yet
Screen description
33
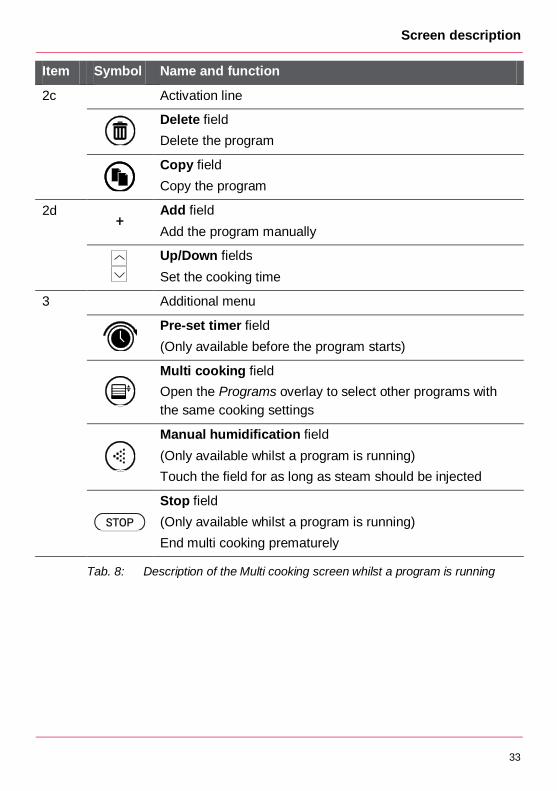
Item Symbol Name and function
2c Activation line
Delete field
Delete the program
Copy field
Copy the program
2d
Add field
Add the program manually
Up/Down fields
Set the cooking time
3 Additional menu
Pre-set timer field
(Only available before the program starts)
Multi cooking field
Open the Programs overlay to select other programs with
the same cooking settings
Manual humidification field
(Only available whilst a program is running)
Touch the field for as long as steam should be injected
Stop field
(Only available whilst a program is running)
End multi cooking prematurely
Tab. 8: Description of the Multi cooking screen whilst a program is running
Pos: 63 / 953 -Elom a/BET_Ko mbi_ Tou ch/Bildschi rm besch reib ung/Bilds chir mbesc hrei bun g_Pro gra mm -M odus @ 9\ mod _13 751 094 554 77_6 .doc @ 7 8854 @ 2 @ 1
Screen description
34
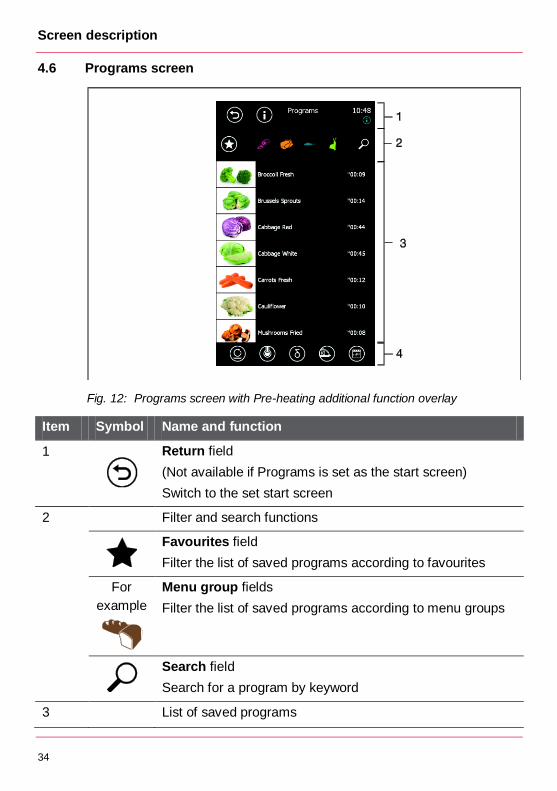
4.6 Programs screen
Fig. 12: Programs screen with Pre-heating additional function overlay
Item Symbol Name and function
1
Return field
(Not available if Programs is set as the start screen)
Switch to the set start screen
2 Filter and search functions
Favourites field
Filter the list of saved programs according to favourites
For
example
Menu group fields
Filter the list of saved programs according to menu groups
Search field
Search for a program by keyword
3 List of saved programs

Screen description
35
Item Symbol Name and function
4 Special programs
Regeneration field
Open the Regeneration overlay, see section 4.6.1
Delta-T-cooking field
Open the Delta-T-cooking overlay, see section 4.6.2
Low temperature cooking (LT cooking) field
Open the LT cooking overlay, see section 4.6.3
Cook and hold field
Open the Cook and hold overlay, see section 4.6.4
Weekly pre-scheduled program field
Open the Weekly pre-scheduled program overlay, see
section 4.6.5
Tab. 9: Description of the Programs screen
Pos: 64 / 953 -Elom a/BET_Ko mbi_ Tou ch/Bildschi rm besch reib ung/S onde rp rog ram me/Bildsc hir mbesc hrei bun g_Fenst er_R ege neri ere n @ 9 \mo d_1 375 110 4321 06_ 6.d oc @ 7 887 4 @ 3 @ 1
4.6.1 Regeneration overlay
Symbol Name and function
Banquet field
Regenerate the plates in the mobile tray rack
Batches field
Regenerate pans
Plates field
Regenerate the plates on the grid
Tab. 10: Description of the Regeneration overlay
Pos: 65 / 953 -Elom a/BET_Ko mbi_ Tou ch/Bildschi rm besch reib ung/S onde rp rog ram me/Bildsc hir mbesc hrei bun g_Fenst er_D elta T @ 9 \mo d_1 375 111 0479 45_ 6.d oc @ 7 889 4 @ 3 @ 1
Screen description
36
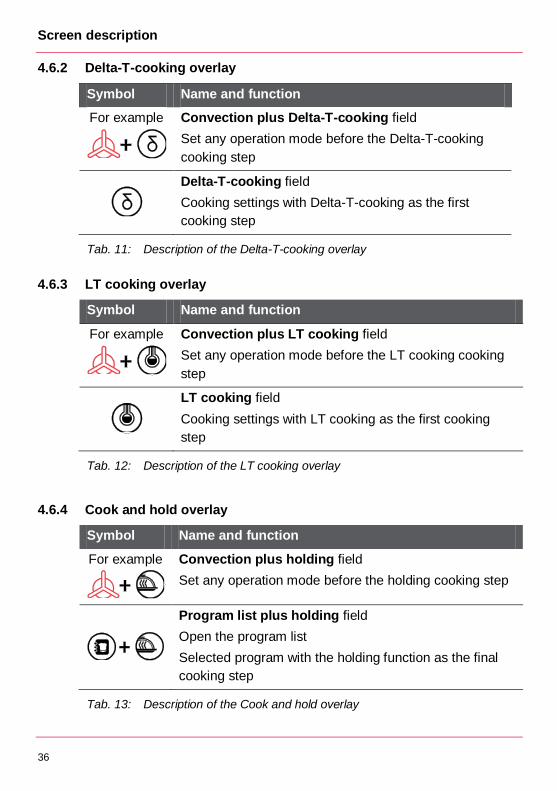
4.6.2 Delta-T-cooking overlay
Symbol Name and function
For example
Convection plus Delta-T-cooking field
Set any operation mode before the Delta-T-cooking
cooking step
Delta-T-cooking field
Cooking settings with Delta-T-cooking as the first
cooking step
Tab. 11: Description of the Delta-T-cooking overlay
Pos: 66 / 953 -Elom a/BET_Ko mbi_ Tou ch/Bildschi rm besch reib ung/S onde rp rog ram me/Bildsc hir mbesc hrei bun g_Fenst er_Ni ede rte mpe ratu r_G are n @ 9 \mo d_1 375 111 324 049_ 6.d oc @ 7891 4 @ 3 @ 1
4.6.3 LT cooking overlay
Symbol Name and function
For example
Convection plus LT cooking field
Set any operation mode before the LT cooking cooking
step
LT cooking field
Cooking settings with LT cooking as the first cooking
step
Tab. 12: Description of the LT cooking overlay
Pos: 67 / 953 -Elom a/BET_Ko mbi_ Tou ch/Bildschi rm besch reib ung/S onde rp rog ram me/Bildsc hir mbesc hrei bun g_Fenst er_C ooka ndHol d @ 9 \mo d_1 375 112 7739 74_ 6.d oc @ 7 893 4 @ 3 @ 1
4.6.4 Cook and hold overlay
Symbol Name and function
For example
Convection plus holding field
Set any operation mode before the holding cooking step
Program list plus holding field
Open the program list
Selected program with the holding function as the final
cooking step
Tab. 13: Description of the Cook and hold overlay
Screen description
37
Pos: 68 / 953 -Elom a/BET_Ko mbi_ Tou ch/Bildschi rm besch reib ung/S onde rp rog ram me/Bildsc hir mbesc hrei bun g_Fenst er_W oche npr ogr am m @ 9 \mo d_1 375 113 2679 44_ 6.d oc @ 7 895 4 @ 3 @ 1
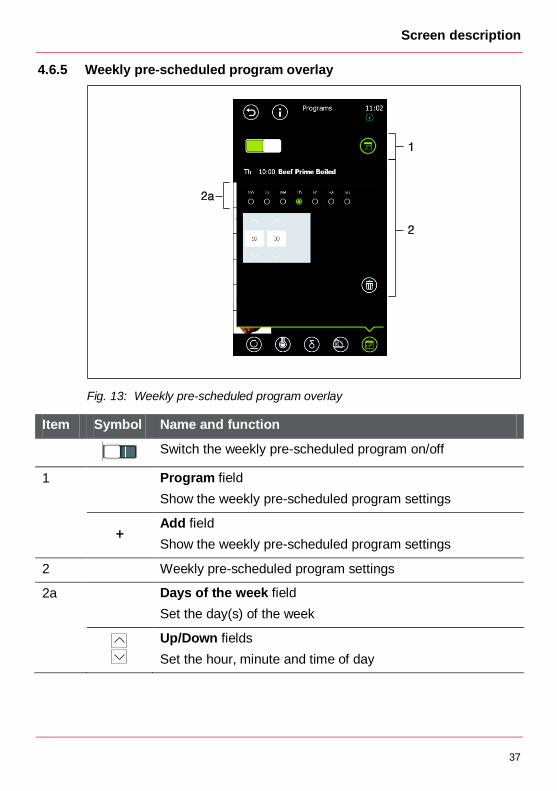
4.6.5 Weekly pre-scheduled program overlay
Fig. 13: Weekly pre-scheduled program overlay
Item Symbol Name and function
Switch the weekly pre-scheduled program on/off
1
Program field
Show the weekly pre-scheduled program settings
Add field
Show the weekly pre-scheduled program settings
2 Weekly pre-scheduled program settings
2a
Days of the week field
Set the day(s) of the week
Up/Down fields
Set the hour, minute and time of day
Screen description
38
Item Symbol Name and function
Program list field
(Only available if no program has been selected)
Show the list of saved programs in order to select one as
the weekly pre-scheduled program
Delete field
(Only available if a program has already been selected)
Delete the program from the weekly pre-scheduled program
Tab. 14: Description of the Weekly pre-scheduled program overlay
Pos: 69 / 953 -Elom a/BET_Ko mbi_ Tou ch/Bildschi rm besch reib ung/Bilds chir mbesc hrei bun g_Bildschi rm_ Lau fen der _Betrie b @ 9\m od_ 1375 106 586 189 _6.d oc @ 788 14 @ 2 @ 1
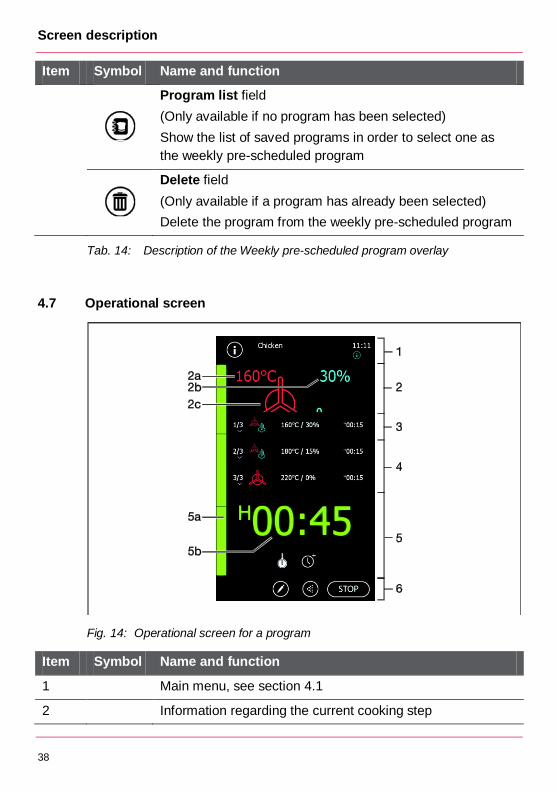
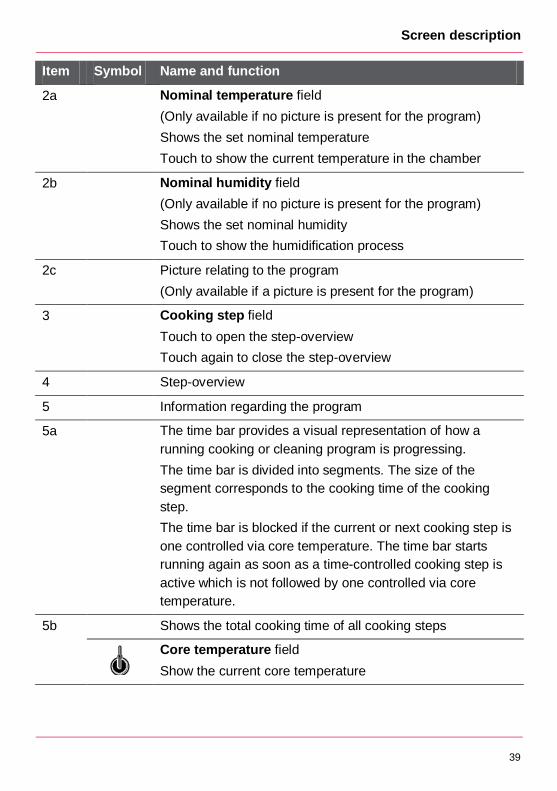
4.7 Operational screen
Fig. 14: Operational screen for a program
Item Symbol Name and function
1 Main menu, see section 4.1
2 Information regarding the current cooking step
Screen description
39
Item Symbol Name and function
2a Nominal temperature field
(Only available if no picture is present for the program)
Shows the set nominal temperature
Touch to show the current temperature in the chamber
2b Nominal humidity field
(Only available if no picture is present for the program)
Shows the set nominal humidity
Touch to show the humidification process
2c Picture relating to the program
(Only available if a picture is present for the program)
3 Cooking step field
Touch to open the step-overview
Touch again to close the step-overview
4 Step-overview
5 Information regarding the program
5a The time bar provides a visual representation of how a
running cooking or cleaning program is progressing.
The time bar is divided into segments. The size of the
segment corresponds to the cooking time of the cooking
step.
The time bar is blocked if the current or next cooking step is
one controlled via core temperature. The time bar starts
running again as soon as a time-controlled cooking step is
active which is not followed by one controlled via core
temperature.
5b Shows the total cooking time of all cooking steps
Core temperature field
Show the current core temperature
Screen description
40
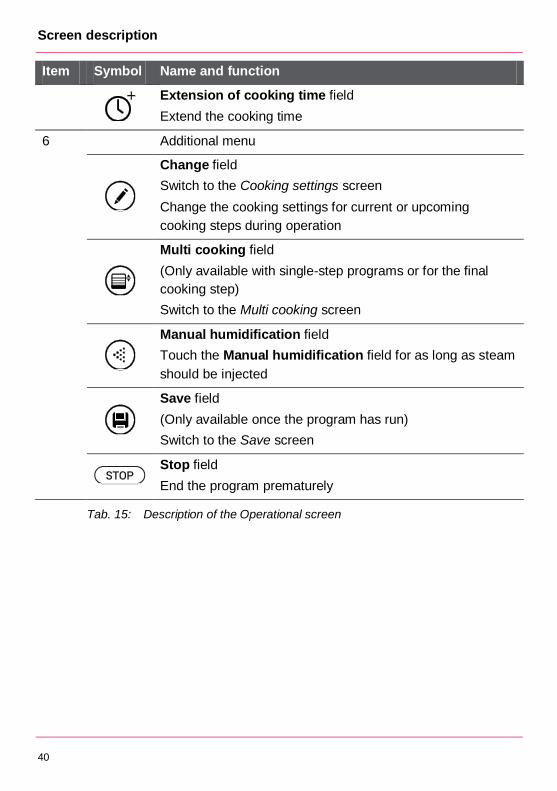
Item Symbol Name and function
Extension of cooking time field
Extend the cooking time
6 Additional menu
Change field
Switch to the Cooking settings screen
Change the cooking settings for current or upcoming
cooking steps during operation
Multi cooking field
(Only available with single-step programs or for the final
cooking step)
Switch to the Multi cooking screen
Manual humidification field
Touch the Manual humidification field for as long as steam
should be injected
Save field
(Only available once the program has run)
Switch to the Save screen
Stop field
End the program prematurely
Tab. 15: Description of the Operational screen
Pos: 70 / 953 -Elom a/BET_Ko mbi_ Tou ch/Bildschi rm besch reib ung/Bilds chir mbesc hrei bun g_Bildschi rm_R einig ung @ 9\ mod _13 751 151 1152 6_6 .doc @ 78 994 @ 2 @ 1
Screen description
41
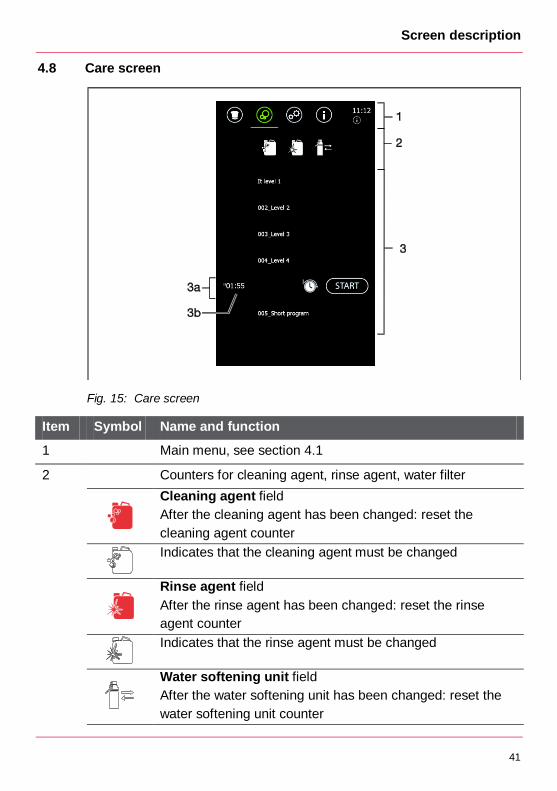
4.8 Care screen
Fig. 15: Care screen
Item Symbol Name and function
1 Main menu, see section 4.1
2 Counters for cleaning agent, rinse agent, water filter
Cleaning agent field
After the cleaning agent has been changed: reset the
cleaning agent counter
Indicates that the cleaning agent must be changed
Rinse agent field
After the rinse agent has been changed: reset the rinse
agent counter
Indicates that the rinse agent must be changed
Water softening unit field
After the water softening unit has been changed: reset the
water softening unit counter
Screen description
42
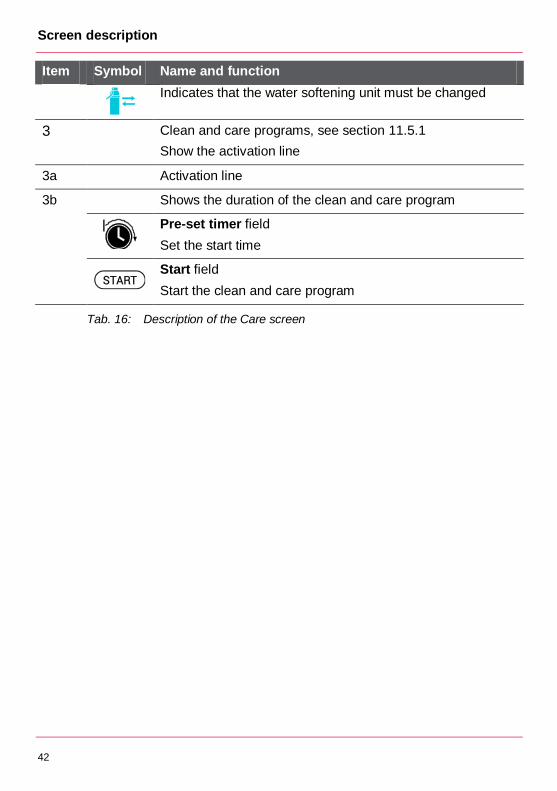
Item Symbol Name and function
Indicates that the water softening unit must be changed
3
Clean and care programs, see section 11.5.1
Show the activation line
3a Activation line
3b Shows the duration of the clean and care program
Pre-set timer field
Set the start time
Start field
Start the clean and care program
Tab. 16: Description of the Care screen
Pos: 71 / 953 -Elom a/BET_Ko mbi_ Tou ch/Bildschi rm besch reib ung/Bilds chir mbesc hrei bun g_Bildschi rm_S peich ern @ 10 \mo d_1 383 750 9555 85_ 6.d oc @ 1 003 21 @ 2 @ 1
Screen description
43
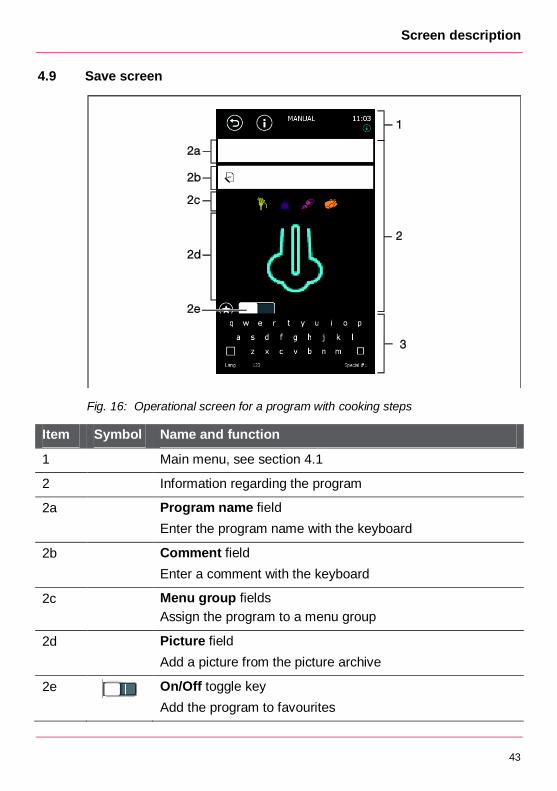
4.9 Save screen
Fig. 16: Operational screen for a program with cooking steps
Item Symbol Name and function
1 Main menu, see section 4.1
2 Information regarding the program
2a Program name field
Enter the program name with the keyboard
2b Comment field
Enter a comment with the keyboard
2c Menu group fields
Assign the program to a menu group
2d Picture field
Add a picture from the picture archive
2e
On/Off toggle key
Add the program to favourites
Screen description
44
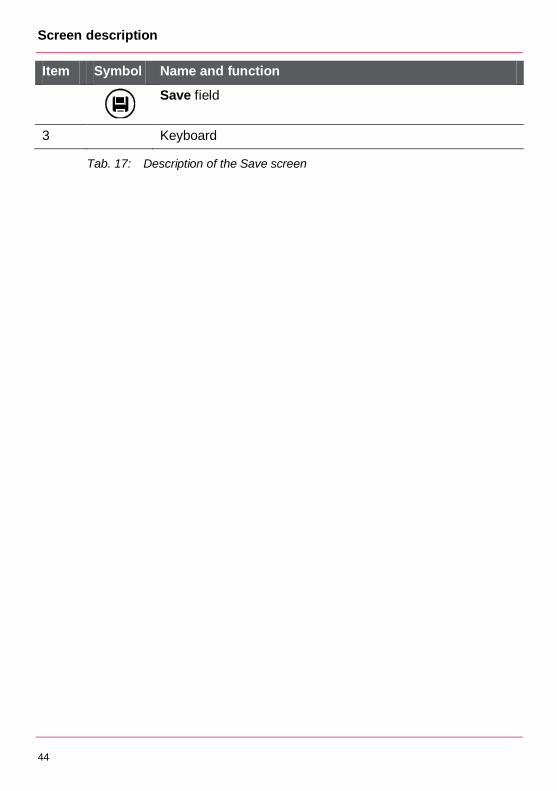
Item Symbol Name and function
Save field
3 Keyboard
Tab. 17: Description of the Save screen
Pos: 72 / 953 -Elom a/Stan dar dtext e Betri ebsa nleitu nge n/Ge rät _in_Bet rieb _ne hme n/Ge rät _in_Bet rieb _ne hme n_[ Titel} @ 9\ mo d_1 3752 862 580 03_ 6.do c @ 8 045 2 @ 1 @ 1
Operation
45
5 Operation
Pos: 73 / 953 -Elom a/BET_Ko mbi_ Tou ch/G erät in Bet rieb neh men /Ge rät_i n_Bet rieb_ neh men _Ge rät_Ei nschalt en @ 9\ mod_ 137 516 939 474 6_6. doc @ 79 154 @ 2 @ 1
5.1 Switching on the appliance
NOTE!
Condensation forms due to the change in ambient temperature!
Damage to the control module
Make sure that the appliance's ambient temperature is above +4 °C
(+39 °F).
1. Open the on-site water tap.
2. Press the On/Off button.
The start screen appears.
The appliance is ready to use. Pos: 74 / 953 -Elom a/BET_Ko mbi_ Tou ch/G erät in Bet rieb neh men /Ge rät_i n_Bet rieb_ neh men _Aussch alten _ku rze_Pa usen @ 9\ mo d_13 751 696 606 26_ 6.doc @ 7 918 4 @ 2 @ 1
5.2 Switching off the appliance during short cooking intervals
1. Press the On/Off button.
The screen turns off.
2. Close the chamber door in the ventilation position. Pos: 75 / 953 -Elom a/BET_Ko mbi_ Tou ch/G erät in Bet rieb neh men /Ge rät_i n_Bet rieb_ neh men _Lä nge re_Be trie bspa usen @ 9\ mod _13 754 258 549 76_ 6.doc @ 8 096 1 @ 2 @ 1
5.3 Switching off the appliance during prolonged cooking intervals
1. Press the On/Off button.
The screen turns off.
2. Close the on-site water tap.
3. Open the chamber door. Pos: 76 / 953 -Elom a/BET_Ko mbid ämp fer/ Ger ät in Be trie b ne hme n/Bet rieb_ Ger ätek omp one nten _ve rwen den @ 9\ mod _13 7528 677 288 9_6 .doc @ 80 532 @ 2 @ 1
Operation
46
5.4 Using appliance components Pos: 77 / 953 -Elom a/BET_Ko mbid ämp fer/ Ger ät in Be trie b ne hme n/G erät _in_Be trieb _ne hm en_U mga ng_Schl auch bra use @ 9\ mod _137 528 632 645 2_6. doc @ 80 472 @ 3 @ 1
5.4.1 Hand shower
WARNING!
Hot steam created by spraying water into the hot chamber!
Scalding
Allow the chamber to cool down before cleaning it with the hand
shower.
Only use the hand shower to clean the chamber.
1. Pull out the hand shower.
2. Hold the hand shower firmly during use.
3. To retract, allow the hand shower to slide back into its resting position
slowly. Pos: 78 / 953 -Elom a/BET_Ko mbid ämp fer/ Ger ät in Be trie b ne hme n/G erät _in_Be trieb _ne hm en_U mga ng_ Te mpe ratu rfü hler @ 9\ mod _13 752 8639 893 3_6 .doc @ 80 492 @ 3 @ 1
5.4.2 Core probe
CAUTION!
Risk of burns from hot core probe!
Minor burns on the skin
Wear protective gloves.
CAUTION!
Risk of injury from the point of the core probe!
Stab wound
Be careful not to injure yourself or other persons in the immediate
vicinity.
Do not make fast movements whilst holding the core probe.
1. Clean the core probe before use.
2. Remove the core probe before taking out the foodstuff wearing
protective gloves.
3. Hang up the core probe in the designated place after use. Pos: 79 / 953 -Elom a/BET_Ko mbid ämp fer/ Ger ät in Be trie b ne hme n/G erät _in_Be trieb _ne hm en_U mga ng_H ord eng estellwa geg en_Hinw eise @ 9\ mod_ 137 528 656 263 0_6. doc @ 80 512 @ 34 @ 1

Operation
47
5.4.3 Mobile tray rack and transport trolley
WARNING!
Risk of tipping and uncontrolled movement of the mobile tray rack
and the transport trolley!
Bruising
Only use the mobile tray rack and the transport trolley on level
ground.
During loading and removing, and when in the resting position,
secure the castors with the immobilisation brake.
WARNING!
Risk of tipping due to top-heavy loading of the mobile tray rack!
Bruising, burns on the skin
Load the mobile tray rack evenly, working from bottom to top.
Observe the maximum load.
Maximum load for mobile tray rack
Size Maximum load
6-11 30 kg (66 lb) (max. 15 kg (33 lb) per level)
10-11 50 kg (110 lb) (max. 15 kg (33 lb) per level)
20-11 150 kg (330 lb) (max. 15 kg (33 lb) per level)
12-21 150 kg (330 lb) (max. 20 kg (44 lb) per level)
20-21 200 kg (441 lb) (max. 20 kg (44 lb) per level)
Tab. 18: Maximum load for mobile tray rack
Pos: 80 / 953 -Elom a/BET_Ko mbid ämp fer/ Ger ät in Be trie b ne hme n/G erät _in_Be trieb _ne hm en_U mga ng_H ord eng estellwa gen _Griff _mo ntie ren @ 9\ mod _13 752 869 2459 8_6 .doc @ 80 552 @ 4 @ 1
Mounting the handle on the mobile tray rack for floor models
WARNING!
Risk of tipping due to incorrectly mounted handle!
Bruising, burns on the skin
Observe the direction of the arrow on the rack and the handle.
Only use the handle supplied.
Operation
48
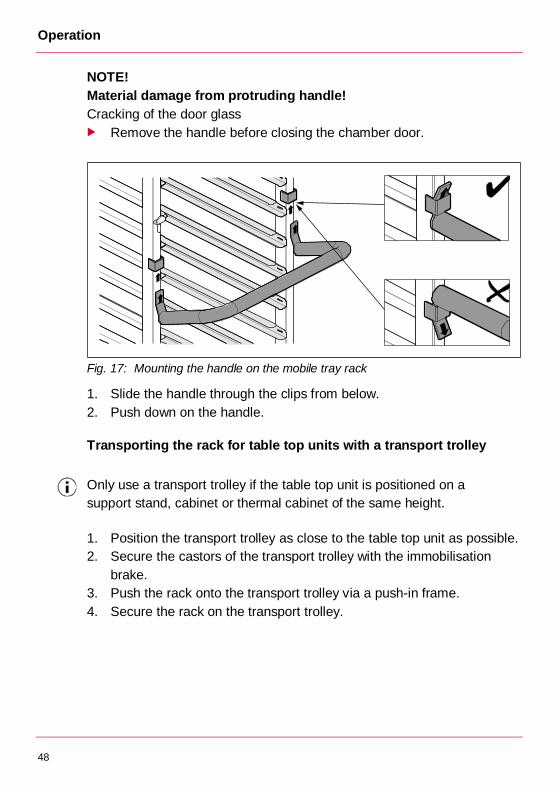
NOTE!
Material damage from protruding handle!
Cracking of the door glass
Remove the handle before closing the chamber door.
Fig. 17: Mounting the handle on the mobile tray rack
1. Slide the handle through the clips from below.
2. Push down on the handle. Pos: 81 / 953 -Elom a/BET_Ko mbid ämp fer/ Ger ät in Be trie b ne hme n/G erät _in_Be trieb _ne hm en_U mga ng_ Tra nspo rtwa gen @ 10 \mo d_1 383 825 119 225 _6.d oc @ 100 381 @ 4 @ 1
Transporting the rack for table top units with a transport trolley
Only use a transport trolley if the table top unit is positioned on a
support stand, cabinet or thermal cabinet of the same height.
1. Position the transport trolley as close to the table top unit as possible.
2. Secure the castors of the transport trolley with the immobilisation
brake.
3. Push the rack onto the transport trolley via a push-in frame.
4. Secure the rack on the transport trolley. Pos: 82 / 953 -Elom a/BET_Ko mbi_ Tou ch/0 5_M anu eller Mo dus/ Man ueller Betrie bsm odus _Tit el @ 9 \mo d_1 375 2894 490 26_ 6.d oc @ 8 073 2 @ 1 @ 1
chef’s arena
49
6 chef’s arena
Pos: 83 / 953 -Elom a/BET_Ko mbi_ Tou ch/0 5_M anu eller Mo dus/ Man ueller _Mo dus _Betrie bsa rt_wä hlen @ 9\ mod _13 751 7610 400 9_6 .doc @ 79 305 @ 2 @ 1
6.1 Selecting an operation mode
Prerequisite
The chef’s arena screen is displayed.
Touch one of the following fields:
– Steam field
– Combi steam field
– Convection field
– Baking field
The Cooking settings screen appears. Pos: 84 / 953 -Elom a/BET_Ko mbi_ Tou ch/0 5_M anu eller Mo dus/ Man ueller _Mo dus _Fe uchti gkeit_ einstell en @ 9\m od_ 137 517 770 4533 _6. doc @ 793 45 @ 23 3 @ 1
6.2 Changing the humidity/steam
Prerequisite
The Cooking settings screen is displayed.
Humidity is not available in the steam and convection operation modes.
Steam is not available in the bake without steam operation mode.
Humidity is set as a percentage.
Steam can be set in millilitres (ml) or seconds (sec).
6.2.1 Changing the humidity/steam using the Climatic® MT screen
Pull the slider on the Climatic® MT screen up or down to change the
humidity/steam.
6.2.2 Changing the humidity/steam using the Humidity field
1. Touch the Humidity field or the Steam field.
The Up/Down fields appear.
2. Touch the Up/Down fields to change the humidity/steam. Pos: 85 / 953 -Elom a/BET_Ko mbi_ Tou ch/0 5_M anu eller Mo dus/ Man ueller _Mo dus _Te mpe rat ur_ einstell en @ 9\m od_ 137 517 641 721 9_6. doc @ 79 325 @ 23 3 @ 1
chef’s arena
50
6.3 Changing the temperature
Prerequisite
The Cooking settings screen is displayed.
6.3.1 Changing the temperature using the Climatic® MT screen
Pull the slider on the Climatic® MT screen left or right to change the
nominal temperature.
6.3.2 Changing the temperature using the Temperature field
1. Touch the Temperature field.
2. Touch the Up/Down fields to change the nominal temperature. Pos: 86 / 953 -Elom a/BET_Ko mbi_ Tou ch/0 5_M anu eller Mo dus/ Man ueller _Mo dus _Gar zeit_ einstell en @ 9\m od_ 137 517 8664 667 _6. doc @ 793 65 @ 23 3 @ 1
6.4 Setting the cooking time or core temperature
Prerequisite
The Cooking settings screen is displayed.
The cooking step can be controlled via the cooking time or nominal core
temperature.
6.4.1 Controlling the cooking step via the cooking time
1. Touch the Cooking time field.
2. Pull the slider left or right to adjust the cooking time.
6.4.2 Controlling the cooking step via the core temperature
Prerequisite
The core probe has been inserted into the foodstuff.
1. Touch the Core temperature field.
2. Pull the slider left or right to adjust the nominal core temperature. Pos: 87 / 953 -Elom a/BET_Ko mbi_ Tou ch/0 5_M anu eller Mo dus/ Man ueller _Mo dus _Zus atzfu nktio nen _einst ellen @ 9\ mod _13 751 7977 404 1_6 .doc @ 79 386 @ 2 @ 1
chef’s arena
51
6.5 Setting the additional functions
Prerequisite
The Cooking settings screen is displayed.
1. Touch the Additional functions field.
The Additional functions overlay opens (see section 4.3.3).
2. Activate the additional function with the On/Off toggle key or change
its values.
Additional functions which have been activated or changed are
highlighted in the Additional functions field. Pos: 88 / 953 -Elom a/BET_Ko mbi_ Tou ch/0 5_M anu eller Mo dus/ Man ueller _Mo dus _Gar schrit t_hin zufü gen @ 9\ mod _13 751 819 823 99_6 .doc @ 7 9446 @ 2 @ 1
6.6 Adding a cooking step
Prerequisite
The Cooking settings screen is displayed.
A maximum of 20 cooking steps can be defined.
1. Touch the Add field.
The Cooking settings screen for the new cooking step appears.
The total number of cooking steps increases.
2. Select the operation mode and cooking settings. Pos: 89 / 953 -Elom a/BET_Ko mbi_ Tou ch/0 5_M anu eller Mo dus/ Man ueller _Mo dus _Gar schrit t_ä nde rn @ 9\m od_ 137 518 2533 271 _6. doc @ 794 66 @ 23 3 @ 1
6.7 Changing a cooking step
Prerequisite
The Cooking settings screen is displayed.
6.7.1 Changing cooking settings
1. Touch the Step-insight field.
The Step-insight screen appears.
2. Touch the cooking step you wish to change.
The Cooking settings screen appears.
3. Change the cooking settings.
chef’s arena
52
6.7.2 Changing the operation mode
The cooking settings made for a cooking step are lost when the
operation mode is changed.
It is only possible to switch from the steam, combi steam or convection
operation modes to the baking operation modes, or vice versa, using the
chef’s arena screen. When such a change is made, all previously set
cooking steps are lost.
Touch the corresponding operation mode field in order to select it.
If the operation mode is not available:
Touch the Return field to switch to the chef’s arena screen.
Touch the Operation mode field. Pos: 90 / 953 -Elom a/BET_Ko mbi_ Tou ch/0 5_M anu eller Mo dus/ Man ueller _Mo dus _Zeit vorw ahl_ei nstelle n_a bfr age n @ 9 \mo d_1 375 1860 859 08_ 6.do c @ 7 950 6 @ 2 @ 1
6.8 Setting the pre-set timer
Prerequisite
The Cooking settings screen is displayed.
1. Touch the Pre-set timer field.
The Pre-set timer overlay opens.
2. Touch the On/Off toggle key to set the start time or the end time.
The Pre-set timer field is highlighted.
An end time cannot be set if a cooking step is controlled via the core
temperature.
3. Touch the Up/Down field to set the start time or the end time. Pos: 91 / 953 -Elom a/BET_Ko mbi_ Tou ch/0 6_Aut omati sche r Pro gra mm Mod us/Aut oma tische r Pro gra mm Mo dus @ 9\m od_ 137 528 957 0714 _6. doc @ 807 52 @ 1 @ 1
Programs
53
7 Programs
Pos: 92 / 953 -Elom a/BET_Ko mbi_ Tou ch/0 6_Aut omati sche r Pro gra mm Mod us/Aut oma tikmo dus_ Gar pro gra mm _wähl en @ 9\m od_ 137 5427 031 364 _6.d oc @ 809 81 @ 2 @ 1
7.1 Selecting a program
Prerequisite
The Programs screen is displayed. Pos: 93 / 953 -Elom a/BET_Ko mbi_ Tou ch/0 6_Aut omati sche r Pro gra mm Mod us/Aut oma tikmo dus_Su che _Filte r @ 9\m od_ 1375 190 165 328 _6.d oc @ 796 47 @ 3 @ 1
7.1.1 Searching for a program using the filter function
1. Touch the Favourites field or the Menu group fields.
The list of programs is reduced in accordance with the selected filter.
2. Select the program you were searching for: touch the Program field.
Or
Change the filter. Pos: 94 / 953 -Elom a/BET_Ko mbi_ Tou ch/0 6_Aut omati sche r Pro gra mm Mod us/Aut oma tikmo dus_Stic hwor t @ 9 \mo d_1 375 1897 562 48_ 6.do c @ 7 956 7 @ 3 @ 1
7.1.2 Searching for a program by entering a keyword
1. Touch the Search field.
The keyboard appears.
2. Enter a keyword with the keyboard.
The list of programs is reduced in accordance with the entered
keyword.
3. Select the program you were searching for: touch the Program field.
Or
Enter a different keyword. Pos: 95 / 953 -Elom a/BET_Ko mbi_ Tou ch/0 6_Aut omati sche r Pro gra mm Mod us/Aut oma tikmo dus_ Gar pro gra mm _Ände rn @ 9\ mod_ 137 519 520 138 9_6. doc @ 79 607 @ 23 3 @ 1
7.2 Changing a saved program
Prerequisite
The Programs screen is displayed.
Touch the Program field.
The activation line appears.
Programs
54
7.2.1 Changing the pre-heating/cool down function
1. Touch the Pre-heating field in the activation line.
2. If the pre-heating/cool down function is activated:
– Use the slider to adjust the temperature in increments of 1 °C or
1 °F.
Or
– Use the On/Off toggle key to deactivate the pre-heating/cool
down function.
3. If the pre-heating/cool down function is deactivated:
– Use the On/Off toggle key to activate the pre-heating/cool down
function and adjust the temperature in increments of 1 °C or 1 °F
with the slider.
7.2.2 Changing cooking settings
1. Touch the Step-insight field.
The Step-insight screen appears.
2. Touch the cooking step.
The Cooking settings screen appears.
3. Change the cooking settings.
Changed cooking settings can be saved before or after the program has
been executed.
Touch the Save field to save changes (see section 9).
Pos: 96 / 953 -Elom a/BET_Ko mbi_ Tou ch/0 6_Aut omati sche r Pro gra mm Mod us/Aut oma tikmo dus_So nde rp rog ram m_wä hlen @ 9\ mod _13 751 955 555 47_ 6.doc @ 7 962 7 @ 2 @ 1
7.3 Selecting a special program Pos: 97 / 953 -Elom a/BET_Ko mbi_ Tou ch/0 6_Aut omati sche r Pro gra mm Mod us/Aut oma tikmo dus_So nde rp rog ram m_Re gen erie ren _NTG are n_Del taTGar en @ 9\m od_ 137 519 562 166 9_6. doc @ 79 667 @ 3 @ 1
7.3.1 Starting the regeneration, LT cooking or Delta-T-cooking special
programs
Prerequisite
The Programs screen is displayed.
1. Touch the special program field.
The overlay opens.
2. Touch the required option.
The Cooking settings screen appears with recommended cooking
settings.
Programs
55
3. Change the cooking settings if necessary.
4. Touch the Start field.
The special program runs.
5. End the special program prematurely: touch the Stop field.
6. Save the special program if necessary: touch the Save field. Pos: 98 / 953 -Elom a/BET_Ko mbi_ Tou ch/0 6_Aut omati sche r Pro gra mm Mod us/Aut oma tikmo dus_So nde rp rog ram me_C ook_ and _Hold @ 9\ mod _13 752 006 810 42_6 .doc @ 7 9757 @ 3 @ 1
7.3.2 Starting the cook and hold special program
Prerequisite
The Programs screen is displayed.
1. Touch the Cook and hold field.
The Cook and hold overlay opens.
2. Touch the required option.
For an operation mode plus holding: the Cooking settings screen
appears.
For a program plus holding: the list of programs appears.
3. Change the cooking settings or touch the program.
The holding function has been activated.
4. Touch the Start field.
The special program runs.
5. End the special program prematurely: touch the Stop field. Pos: 99 / 953 -Elom a/BET_Ko mbi_ Tou ch/0 6_Aut omati sche r Pro gra mm Mod us/Aut oma tikmo dus_So nde rp rog ram m_Woc hen pro gra mm @ 9\ mod _13 752 010 437 95_ 6.doc @ 7 977 7 @ 3 444 @ 1
7.3.3 Weekly pre-scheduled special program
Prerequisite
The Programs screen is displayed.
Touch the Weekly pre-scheduled program field.
The Weekly pre-scheduled program overlay opens.
The programs which have already been set appear.
Programs
56
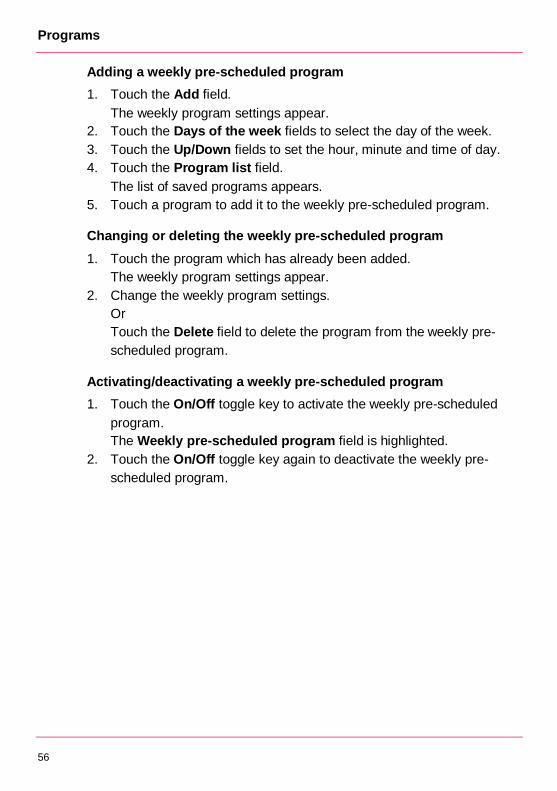
Adding a weekly pre-scheduled program
1. Touch the Add field.
The weekly program settings appear.
2. Touch the Days of the week fields to select the day of the week.
3. Touch the Up/Down fields to set the hour, minute and time of day.
4. Touch the Program list field.
The list of saved programs appears.
5. Touch a program to add it to the weekly pre-scheduled program.
Changing or deleting the weekly pre-scheduled program
1. Touch the program which has already been added.
The weekly program settings appear.
2. Change the weekly program settings.
Or
Touch the Delete field to delete the program from the weekly pre-
scheduled program.
Activating/deactivating a weekly pre-scheduled program
1. Touch the On/Off toggle key to activate the weekly pre-scheduled
program.
The Weekly pre-scheduled program field is highlighted.
2. Touch the On/Off toggle key again to deactivate the weekly pre-
scheduled program. Pos: 100 /95 3-Elo ma/BET_K ombi _To uch/ Multi -cooki ng/ Muliti_Co oking _[Tit el] @ 9\m od_ 138 184 9978 519 _6. doc @ 934 31 @ 1 @ 1
Multi cooking
57
8 Multi cooking
Pos: 101 /95 3-Elo ma/BET_K ombi _To uch/ Multi -cooki ng/ Manu eller _Mo dus_ MultiBe trieb _eins tellen @ 9\ mo d_13 751 868 079 61_ 6.doc @ 7 952 6 @ 2 @ 1
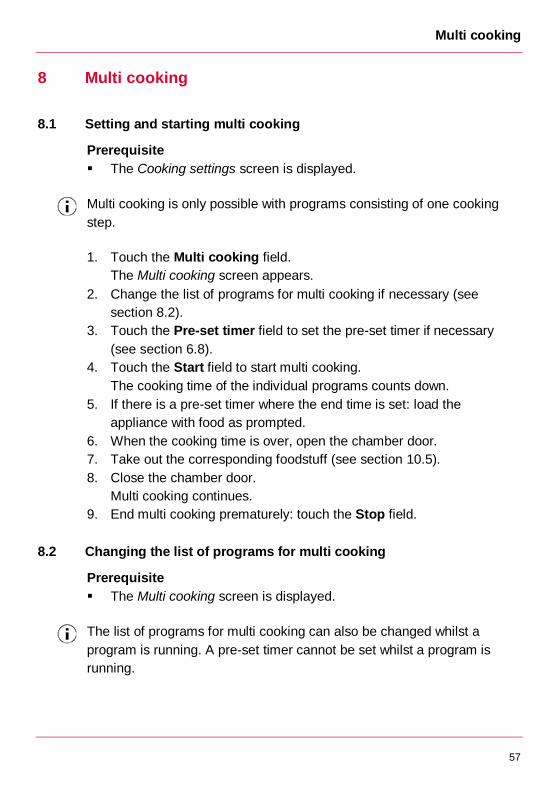
8.1 Setting and starting multi cooking
Prerequisite
The Cooking settings screen is displayed.
Multi cooking is only possible with programs consisting of one cooking
step.
1. Touch the Multi cooking field.
The Multi cooking screen appears.
2. Change the list of programs for multi cooking if necessary (see
section 8.2).
3. Touch the Pre-set timer field to set the pre-set timer if necessary
(see section 6.8).
4. Touch the Start field to start multi cooking.
The cooking time of the individual programs counts down.
5. If there is a pre-set timer where the end time is set: load the
appliance with food as prompted.
6. When the cooking time is over, open the chamber door.
7. Take out the corresponding foodstuff (see section 10.5).
8. Close the chamber door.
Multi cooking continues.
9. End multi cooking prematurely: touch the Stop field. Pos: 102 /95 3-Elo ma/BET_K ombi _To uch/ Multi -cooki ng/ Manu eller _Mo dus_ Liste _Multi _Betri eb_ ände rn @ 9\ mod _13 751 8837 033 2_6 .doc @ 79 546 @ 2 444 44 @ 1
8.2 Changing the list of programs for multi cooking
Prerequisite
The Multi cooking screen is displayed.
The list of programs for multi cooking can also be changed whilst a
program is running. A pre-set timer cannot be set whilst a program is
running.
Multi cooking
58
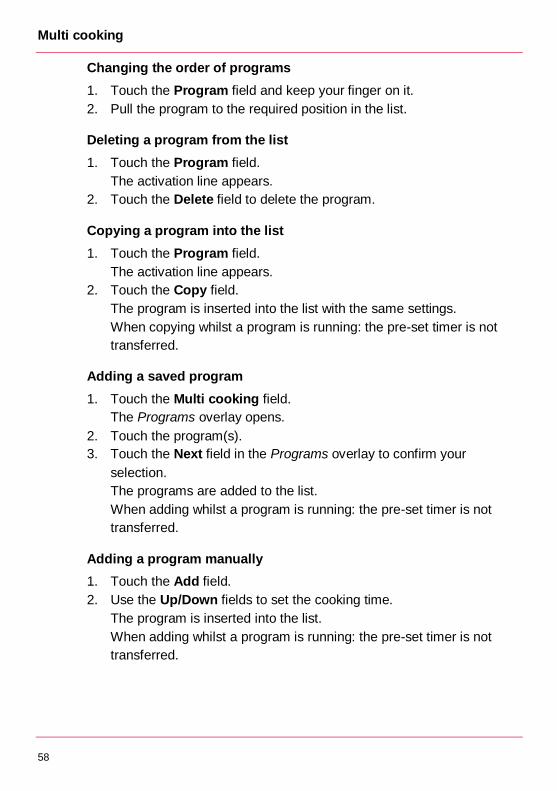
Changing the order of programs
1. Touch the Program field and keep your finger on it.
2. Pull the program to the required position in the list.
Deleting a program from the list
1. Touch the Program field.
The activation line appears.
2. Touch the Delete field to delete the program.
Copying a program into the list
1. Touch the Program field.
The activation line appears.
2. Touch the Copy field.
The program is inserted into the list with the same settings.
When copying whilst a program is running: the pre-set timer is not
transferred.
Adding a saved program
1. Touch the Multi cooking field.
The Programs overlay opens.
2. Touch the program(s).
3. Touch the Next field in the Programs overlay to confirm your
selection.
The programs are added to the list.
When adding whilst a program is running: the pre-set timer is not
transferred.
Adding a program manually
1. Touch the Add field.
2. Use the Up/Down fields to set the cooking time.
The program is inserted into the list.
When adding whilst a program is running: the pre-set timer is not
transferred. Pos: 103 /95 3-Elo ma/BET_K ombi _To uch/ Gar pro gra mm star ten und verw alten/ Gar pro gra mm _speic her n @ 9\m od_1 381 238 876 230 _6.d oc @ 900 62 @ 1 @ 1

Saving programs
59
9 Saving programs
Prerequisite
Before a program starts:
The Cooking settings screen is displayed.
The cooking settings for one or more cooking steps have been made.
Whilst a program is running:
The program has been executed.
The Stop field has not yet been touched.
1. Touch the Save field.
The Save screen appears.
2. Touch the Program name field.
The keyboard appears.
3. Enter the program name with the keyboard.
4. Touch the Comment field if necessary to add notes regarding the
program, e.g. "dice vegetables".
The comment is displayed on the Step-insight screen.
5. Touch one of the Menu group fields to assign the program to a menu
group.
6. Touch the Picture field if necessary to add a picture from the picture
archive.
7. Touch the On/Off toggle key if necessary to add the program to
favourites.
8. Touch the Save field.
The program is added to the list of programs.
The Programs screen appears. Pos: 104 /95 3-Elo ma/BET_K ombi _To uch/Akti one n wäh ren d ein es G arp rog ram ms/Wä hre nd eines l aufe nde n Ga rpo rgr am ms_ Titel_[Pla tzhalt er] @ 9\ mod _13 754 284 031 69_6 .doc @ 8 1062 @ 1 @ 1

Starting and ending cooking programs
60
10 Starting and ending cooking programs
Pos: 105 /95 3-Elo ma/BET_K ombi däm pfe r/Ge rät i n Betri eb n ehm en/Be trieb _ne hm en_b eschick en @ 9\m od_ 137 941 949 848 3_6. doc @ 87 747 @ 2 @ 1
10.1 Loading the appliance with food
Prerequisite
If the pre-heating function is set: the pre-heating function has
finished.
CAUTION!
Risk of burns from hot surfaces!
Minor burns on the skin
Wear protective gloves.
Only open the chamber door with the handle.
CAUTION!
Risk of crushing from opening and closing the chamber door!
Crushing and bruising of upper body parts
Make sure that no persons are within the chamber door's radius of
rotation.
Open and close the chamber door carefully.
CAUTION!
Risk of fire from highly flammable ingredients!
Burns on the skin
Do not load the appliance with food containing highly flammable
ingredients (e.g. alcohol).
1. Open the chamber door to the ventilation position to allow steam to
escape before opening it fully.
2. Do not load the appliance above head height.
If using tall pans, only load every second level in order to ensure a
sufficient gap is maintained.
3. Close the chamber door fully. Pos: 106 /95 3-Elo ma/BET_K ombi _To uch/ 05_ Man uelle r M odus/ Ma nuelle r_M odu s_Ga rpr og ram m_st art en_b een den @ 9\ mod _13 751 801 713 61_ 6.doc @ 7 940 6 @ 2 @ 1
Starting and ending cooking programs
61
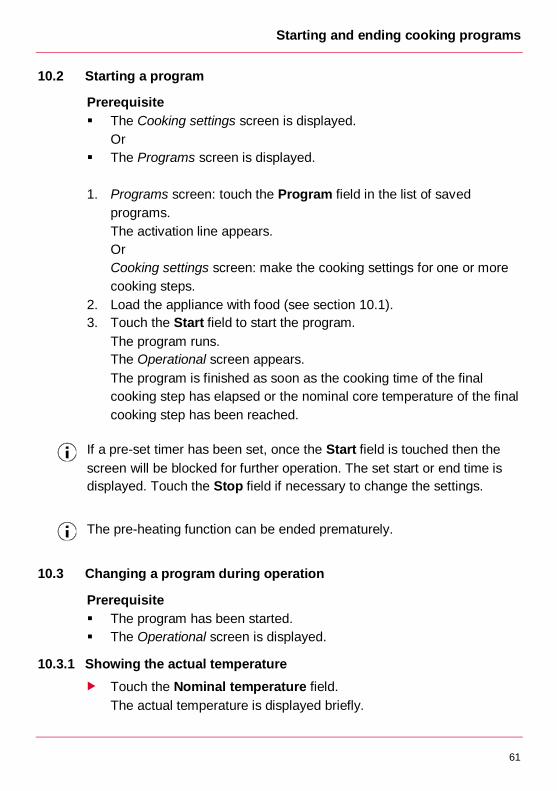
10.2 Starting a program
Prerequisite
The Cooking settings screen is displayed.
Or
The Programs screen is displayed.
1. Programs screen: touch the Program field in the list of saved
programs.
The activation line appears.
Or
Cooking settings screen: make the cooking settings for one or more
cooking steps.
2. Load the appliance with food (see section 10.1).
3. Touch the Start field to start the program.
The program runs.
The Operational screen appears.
The program is finished as soon as the cooking time of the final
cooking step has elapsed or the nominal core temperature of the final
cooking step has been reached.
If a pre-set timer has been set, once the Start field is touched then the
screen will be blocked for further operation. The set start or end time is
displayed. Touch the Stop field if necessary to change the settings.
The pre-heating function can be ended prematurely.
Pos: 107 /95 3-Elo ma/BET_K ombi _To uch/Akti one n wäh ren d ein es G arp rog ram ms/Wä hre nd_Be trie b_Ist -Temp erat ur _anz eigen @ 9\ mo d_13 775 325 454 06_ 6.doc @ 8 323 1 @ 2 3 @ 1
10.3 Changing a program during operation
Prerequisite
The program has been started.
The Operational screen is displayed.
10.3.1 Showing the actual temperature
Touch the Nominal temperature field.
The actual temperature is displayed briefly. Pos: 108 /95 3-Elo ma/BET_K ombi _To uch/Akti one n wäh ren d ein es G arp rog ram ms/Wä hre nd_Be trie b_Aktu elle_ Feuc htigkeit svor gan g_a nzeig en @ 9\m od_ 137 7532 609 361 _6. doc @ 832 51 @ 3 @ 1
Starting and ending cooking programs
62
10.3.2 Showing the actual humidity
Touch the Nominal humidity field.
The arrow is displayed briefly.
Arrow pointing up: the chamber is currently being humidified.
Arrow pointing down: the chamber is currently being de-humidified.
Arrow pointing right: the nominal humidity corresponds to the actual
humidity. Pos: 109 /95 3-Elo ma/BET_K ombi _To uch/Akti one n wäh ren d ein es G arp rog ram ms/Wä hre nd_Be trie b_Aktu elle_Ker nte mpe rat ur_ anzei gen @ 9\ mod _13 775 3267 340 9_6 .doc @ 83 271 @ 3 @ 1
10.3.3 Showing the actual core temperature
The actual core temperature of the foodstuff can be displayed too, as
long as the cooking step is not controlled via the core temperature. The
core probe must be used correctly in order to display the actual core
temperature accurately (see section 5.4.2).
Touch the Core temperature field.
The actual core temperature is displayed briefly. Pos: 110 /95 3-Elo ma/BET_K ombi _To uch/Akti one n wäh ren d ein es G arp rog ram ms/Wä hre nd_Be trie b_Ga rzeit _verl äng ern @ 9\ mod _13 775 842 473 81_6 .doc @ 8 348 1 @ 3 @ 1
10.3.4 Extending the cooking time
The cooking time of the final cooking step is extended in increments of
1 minute by default. The size of the increment can be changed on the
Settings screen.
The cooking time can be extended a maximum of 5 times.
Touch the Extension to cooking time field to extend the cooking
time for the final cooking step. Pos: 111 /95 3-Elo ma/BET_K ombi _To uch/Akti one n wäh ren d ein es G arp rog ram ms/Wä hre nd_Be trie b_Ga reins tellun gen _än der n @ 9\mo d_1 377 584 071 084 _6.d oc @ 834 21 @ 3 @ 1
Starting and ending cooking programs
63
10.3.5 Changing cooking settings
Whilst a program is running, cooking settings can only be changed for a
cooking step which is already running or has not yet run.
1. Touch the Change field.
The Cooking settings screen appears.
The program continues to run.
2. Change the cooking settings.
3. Touch the OK field to confirm the change.
The change is adopted. Pos: 112 /95 3-Elo ma/BET_K ombi _To uch/Akti one n wäh ren d ein es G arp rog ram ms/Wä hre nd_Be trie b_Ga rgu t_b eschwa den @ 9\ mod _13 775 841 236 90_ 6.doc @ 8 344 1 @ 3 @ 1
10.3.6 Setting the humidifying function
Touch the Manual humidification field for as long as steam should
be injected. Pos: 113 /95 3-Elo ma/BET_K ombi _To uch/Akti one n wäh ren d ein es G arp rog ram ms/Wä hre nd_Be trie b_M ulti-Co oking _hinz ufüg en @ 9\ mod_ 137 758 416 884 7_6. doc @ 83 461 @ 3 @ 1
10.3.7 Starting multi cooking
Multi cooking can only be started for single-step programs or in the final
cooking step.
1. Touch the Multi cooking field.
A list of similar programs appears.
2. Select the program(s).
The Multi cooking screen appears.
3. Change the list of programs for multi cooking (see section 8.2). Pos: 114 /95 3-Elo ma/BET_K ombi _To uch/Akti one n wäh ren d ein es G arp rog ram ms/Wä hre nd_Be trie b_Ga rp rog ram m_b een den @ 1 0\mo d_1 383 827 056 963 _6.d oc @ 100 405 @ 2 @ 1
10.4 Ending a program
If the holding function has been set, an audible signal rings once the
final cooking step is over and the holding function starts. The screen is
blocked for further operation whilst the holding function is running.
The holding function can be ended prematurely.

Starting and ending cooking programs
64
End the program prematurely: touch the Stop field.
Once the program has been executed:
– Touch the Stop field.
– Take out the foodstuff (see section 10.5). Pos: 115 /95 3-Elo ma/BET_K ombi däm pfe r/Ge rät i n Betri eb n ehm en/Be trieb _Ga rgu t_en tne hme n @ 10\m od_ 138 417 254 130 1_6. doc @ 10 052 1 @ 2 @ 1
10.5 Removing the foodstuff
CAUTION!
Risk of burns from hot surfaces!
Minor burns on the skin
Wear protective gloves.
Only open the chamber door with the handle.
CAUTION!
Risk of crushing from opening and closing the chamber door!
Crushing and bruising of upper body parts
Make sure that no persons are within the chamber door's radius of
rotation.
Open and close the chamber door carefully.
1. Open the chamber door to the ventilation position to allow steam to
escape before opening it fully.
2. Remove the rack or mobile tray rack (see section 5.4.3).
3. After removing the foodstuff: close the chamber door in the ventilation
position. Pos: 116 /95 3-Elo ma/Sta nda rdte xte Bet riebs anleit ung en/G erä t_r einige n/Ge rät _rei nigen _pfle gen _Tit el @ 9 \mo d_1 375 202 343 882_ 6.d oc @ 7980 1 @ 1 @ 1
Cleaning and care
65
11 Cleaning and care
Pos: 117 /95 3-Elo ma/BET_K ombi däm pfe r/Reini gung /Ge rät_ reini gen _Reinig ung _Hinweis e_Reini gun g @ 9 \mo d_1 375 287 305 962_ 6.d oc @ 8057 2 @ 2 @ 1
11.1 Notes on manual cleaning
CAUTION!
Risk of burns from hot surfaces!
Burns on the skin
Allow the appliance to cool before cleaning it.
CAUTION!
Risk of scalding from hot steam!
Burns on the skin
Allow the appliance to cool before cleaning it.
CAUTION!
Risk of chemical burns from cleaner and rinse agent!
Chemical burns to the skin and eyes
Allow the appliance to cool before cleaning it.
Wear protective clothing (e.g. long-sleeved clothing, protective gloves
and glasses).
Observe the safety information for the prescribed cleaner and rinse
agent (see section 11.3).
Do not inhale spray mist from the cleaner and rinse agent.
NOTE!
Material damage from incorrect cleaner!
Stains in the chamber
Only use the prescribed cleaner and rinse agent (see section 11.3). Pos: 118 /95 3-Elo ma/BET_K ombi däm pfe r/Reini gung /Ge rät_ reini gen _Reinig ungsi nter valle @ 9\ mod_ 137 528 751 243 9_6. doc @ 80 592 @ 2 @ 1
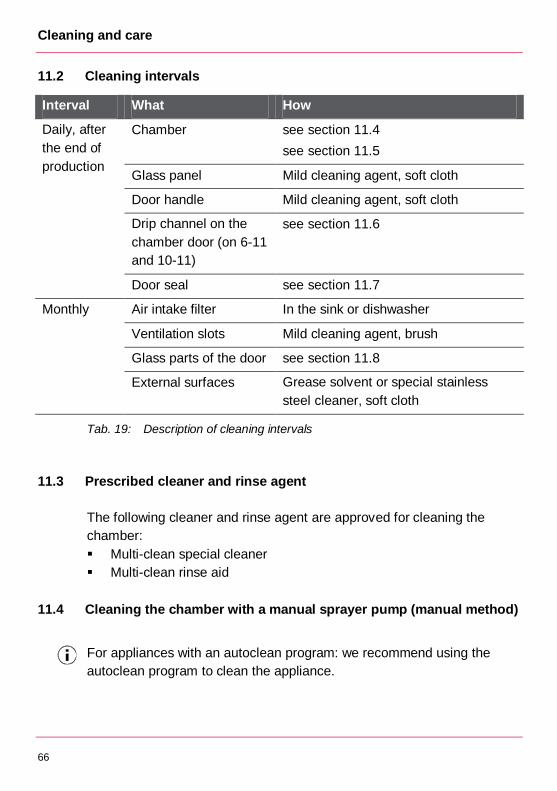
Cleaning and care
66
11.2 Cleaning intervals
Interval What How
Daily, after
the end of
production
Chamber see section 11.4
see section 11.5
Glass panel Mild cleaning agent, soft cloth
Door handle Mild cleaning agent, soft cloth
Drip channel on the
chamber door (on 6-11
and 10-11)
see section 11.6
Door seal see section 11.7
Monthly Air intake filter In the sink or dishwasher
Ventilation slots Mild cleaning agent, brush
Glass parts of the door see section 11.8
External surfaces Grease solvent or special stainless
steel cleaner, soft cloth
Tab. 19: Description of cleaning intervals
Pos: 119 /95 3-Elo ma/Sta nda rdte xte Bet riebs anleit ung en/G erä t_r einige n/Ge rät _rei nigen _Vor gesch rieb ene R einig er @ 10\ mod _13 841 748 6065 8_6 .doc @ 10 054 5 @ 2 @ 1
11.3 Prescribed cleaner and rinse agent
The following cleaner and rinse agent are approved for cleaning the
chamber:
Multi-clean special cleaner
Multi-clean rinse aid Pos: 120 /95 3-Elo ma/Sta nda rdte xte Bet riebs anleit ung en/G erä t_r einige n/Ge rät _rei nigen _M anuell e_Rei nigun g @ 9\m od_1 379 429 478 304 _6.d oc @ 877 78 @ 2 @ 1
11.4 Cleaning the chamber with a manual sprayer pump (manual method)
For appliances with an autoclean program: we recommend using the
autoclean program to clean the appliance.
Cleaning and care
67
Prerequisite
The foodstuff has been removed.
Accessories (e.g. pans) have been removed.
The fat filter has been removed.
For floor models: the mobile tray rack is in the chamber.
The appliance has cooled down.
1. Remove large particles of food and fat residue.
2. Start a program with the following cooking settings to soften any
residue:
– Nominal temperature: 60 °C (140 °F)
– Nominal humidity: 100 %
– Cooking time: 10 minutes
3. Mix the prescribed cleaner with water in the ratio 1:10 in the manual
sprayer pump (see section 11.3).
4. Close the chamber door.
5. Leave the cleaner to work for a maximum of 20 minutes.
6. Flush the chamber thoroughly with the hand shower.
7. Start a program with the following cooking settings to dry the
chamber:
– Nominal temperature: 120 °C (248 °F)
– Nominal humidity: 0 %
– Cooking time: 10 minutes
8. Open the chamber door. Pos: 121 /95 3-Elo ma/BET_K ombi _To uch/R einigu ng/ Ger ät_r einig en_Rei nigu ngsp rog ram m_ autocl ean _titel @ 9\ mod _13 7578 663 069 4_6 .doc @ 81 462 @ 2 @ 1
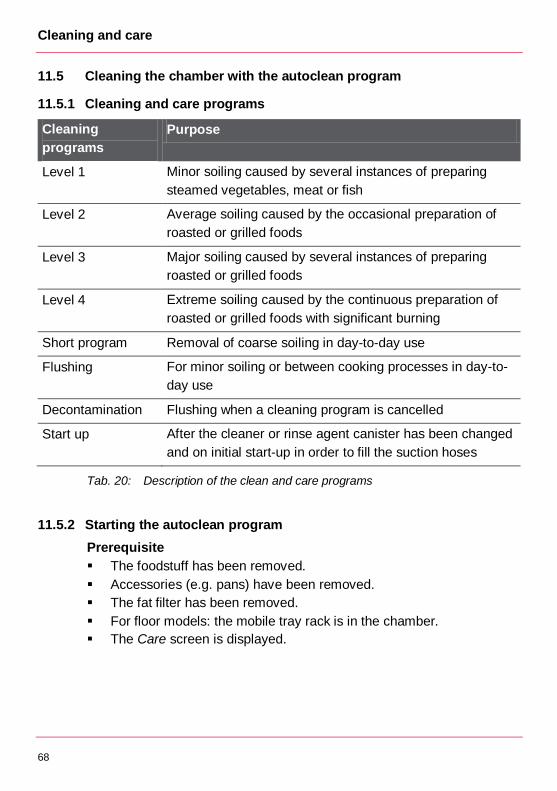
Cleaning and care
68
11.5 Cleaning the chamber with the autoclean program Pos: 122 /95 3-Elo ma/BET_K ombi _To uch/R einigu ng/ Ger ät_r einig en_Rei nigu ngsst ufen @ 9\ mod _13 757 867 225 59_ 6.doc @ 8 148 2 @ 3 @ 1
11.5.1 Cleaning and care programs
Cleaning
programs
Purpose
Level 1 Minor soiling caused by several instances of preparing
steamed vegetables, meat or fish
Level 2 Average soiling caused by the occasional preparation of
roasted or grilled foods
Level 3 Major soiling caused by several instances of preparing
roasted or grilled foods
Level 4 Extreme soiling caused by the continuous preparation of
roasted or grilled foods with significant burning
Short program Removal of coarse soiling in day-to-day use
Flushing For minor soiling or between cooking processes in day-to-
day use
Decontamination Flushing when a cleaning program is cancelled
Start up After the cleaner or rinse agent canister has been changed
and on initial start-up in order to fill the suction hoses
Tab. 20: Description of the clean and care programs
Pos: 123 /95 3-Elo ma/BET_K ombi _To uch/R einigu ng/ Ger ät_r einig en_Rei nigu ngsp rog ram m_s tart en @ 9\ mod_ 137 578 765 702 4_6. doc @ 81 512 @ 3 @ 1
11.5.2 Starting the autoclean program
Prerequisite
The foodstuff has been removed.
Accessories (e.g. pans) have been removed.
The fat filter has been removed.
For floor models: the mobile tray rack is in the chamber.
The Care screen is displayed.
Cleaning and care
69
WARNING!
Risk of chemical burns from cleaner!
Chemical burns to the skin and eyes
Do not open the chamber door whilst the autoclean program is
running.
1. Touch the cleaning stage (see section 11.5.1).
The activation line appears.
2. Touch the Pre-set timer field if necessary to set the start time.
3. Touch the Start field.
4. End the cleaning program prematurely: touch the Stop field.
The Care screen appears.
If the cleaning program is ended prematurely before the "Drying"
cleaning step, the "Flushing" cleaning program must run before a
cooking process can be started again.
Pos: 124 /95 3-Elo ma/BET_K ombi däm pfe r/Reini gung /Ge rät_ reini gen _Reinig erAust ausch en @ 9\ mod _13 7579 489 352 5_6. doc @ 81 591 @ 3 @ 1
11.5.3 Changing the canisters for cleaner and rinse agent
WARNING!
Risk of chemical burns from cleaner!
Chemical burns to the skin and eyes
Wear protective clothing (e.g. long-sleeved clothing, protective gloves
and glasses).
Observe the safety information for the cleaner and rinse agent (see
section 11.3).
NOTE!
Material damage from mixing up cleaner and rinse agent!
Observe the connection labels on the appliance.
Attach the cleaner to the red canister connection.
Attach the rinse agent to the blue canister connection.
NOTE!
Material damage from incorrect cleaner and rinse agent!
Only use the prescribed cleaner and rinse agent (see section 11.3).
Cleaning and care
70
The connections for the cleaner and rinse agent are labelled on the
appliance.
1. Switch off the appliance.
2. Detach the hoses from the canisters for the cleaner and/or rinse
agent.
3. Place new canisters below the appliance.
4. Observe the connection labels on the appliance:
– Attach the cleaner to the red canister connection.
– Attach the rinse agent to the blue canister connection.
5. Switch on the appliance.
6. Start the "Start up" cleaning program (see section 11.5.4). Pos: 125 /95 3-Elo ma/BET_K ombi _To uch/R einigu ng/ Ger ät_r einig en_Rei nigu ngsp rog ram m_I nbe trieb nah me @ 9\ mod _13 801 872 8475 8_6 .doc @ 89 329 @ 3 @ 1
11.5.4 Starting the "Start up" cleaning program
Prerequisite
The appliance is switched on.
The cleaner and/or rinse agent have been changed.
1. Navigate to the Care screen.
2. Touch "Start up".
3. Touch the Start field.
4. Once the "Start up" cleaning program has run:
– Reset the cleaner counter: touch the Cleaner field.
– Reset the rinse agent counter: touch the Rinse agent field. Pos: 126 /95 3-Elo ma/BET_K ombi däm pfe r/Reini gung /Ge rät_ reini gen _Abtro pfri nne @ 9\ mod _13 752 890 7643 8_6 .doc @ 80 652 @ 2 @ 1
11.6 Cleaning the drip channel on the chamber door
Prerequisite
The appliance is switched off.
The appliance has cooled down.
1. Push the fastening clip underneath the drip channel down.
2. Pull the drip channel forwards out of the holder.
3. Clean the drip channel.
4. Press the drip channel into the holder.
5. Push the fastening clip up. Pos: 127 /95 3-Elo ma/BET_K ombi däm pfe r/Reini gung /Ge rät_ reini gen _Tü rdich tun g @ 9 \mo d_1 375 288 7780 15_ 6.d oc @ 8 061 2 @ 2 @ 1

Cleaning and care
71
11.7 Cleaning the door seal
Prerequisite
The appliance is switched off.
The appliance has cooled down.
Check the door seal for damage on a regular basis.
Replace damaged door seals.
1. Clean the door seal by hand using a cloth and a mild grease solvent.
2. Remove the cleaning agent with fresh water. Pos: 128 /95 3-Elo ma/BET_K ombi däm pfe r/Reini gung /Ge rät_ reini gen _Tü rgläs er @ 9\ mod _13 7528 895 306 3_6. doc @ 80 632 @ 2 @ 1
11.8 Cleaning the glass parts of the door
Prerequisite
The appliance is switched off.
The appliance has cooled down.
NOTE!
Damage from opening the inner door incorrectly!
Damage to the door hinges
Do not open the inner door wider than 90°.
Hold the inner door firmly during cleaning.
Check the door hinges on a regular basis. Have the door hinges
repaired if necessary.
Fig. 18: Opening the inner door
Cleaning and care
72
Hold the inner door firmly during cleaning.
Clean the panes of glass using a grease solvent and a soft cloth.
Clean stainless steel using a special stainless steel cleaner or a mild
cleaning agent and a soft cloth. Pos: 129 /95 3-Elo ma/BET_K ombi däm pfe r/Reini gung /Ge rät_ reini gen _Wasse rfilte r_ta usche n @ 9\m od_1 375 795 171 084 _6.d oc @ 816 11 @ 2 @ 1
11.9 Changing the water softening unit
1. Switch off the appliance.
2. Close the on-site water tap.
3. Change the water softening unit.
4. Open the on-site water tap.
5. Switch on the appliance.
6. Touch the Care field.
The Care screen appears.
7. Touch the Water softening unit field to reset the counter for the
water softening unit. Pos: 130 /95 3-Elo ma/BET_K ombi däm pfe r/Ge rät_ reini gen _Wart ungsi nte rvalle @ 9\ mod _138 028 065 375 9_6. doc @ 89 741 @ 2 @ 1
11.10 Maintenance intervals
WARNING!
Risk of fire from improper maintenance!
Burns
Make sure that only an Eloma service partner carries out
maintenance work.
Maintain the maintenance intervals.
We recommend that you close a maintenance contract.
Have an Eloma service partner perform maintenance at least once a
year. Pos: 131 /95 3-Elo ma/BET_K ombi _To uch/ 08_ Ger ät ko nfigu rier en/G erä t_ko nfigu rier en_ Men üba um_ neu @ 9\ mod _13 754 288 140 37_ 6.doc @ 8 113 2 @ 1 @ 1
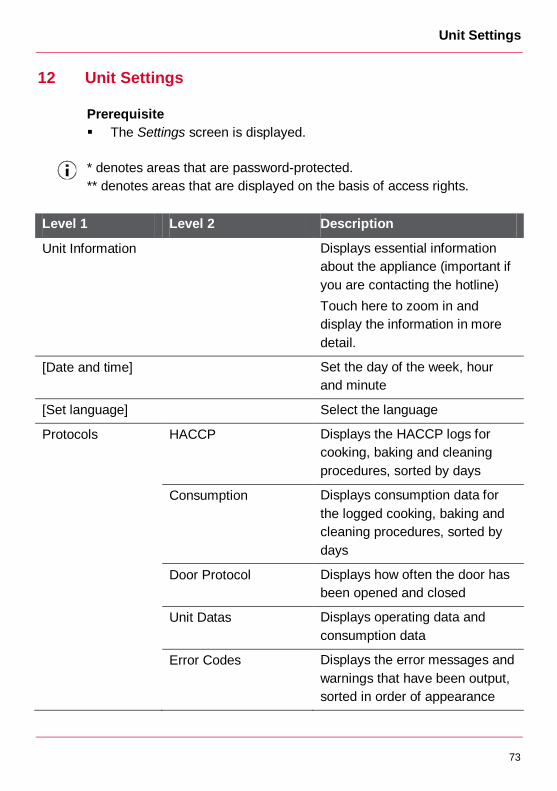
Unit Settings
73
12 Unit Settings
Prerequisite
The Settings screen is displayed.
* denotes areas that are password-protected.
** denotes areas that are displayed on the basis of access rights.
Level 1 Level 2 Description
Unit Information Displays essential information
about the appliance (important if
you are contacting the hotline)
Touch here to zoom in and
display the information in more
detail.
[Date and time] Set the day of the week, hour
and minute
[Set language] Select the language
Protocols HACCP Displays the HACCP logs for
cooking, baking and cleaning
procedures, sorted by days
Consumption Displays consumption data for
the logged cooking, baking and
cleaning procedures, sorted by
days
Door Protocol Displays how often the door has
been opened and closed
Unit Datas Displays operating data and
consumption data
Error Codes Displays the error messages and
warnings that have been output,
sorted in order of appearance
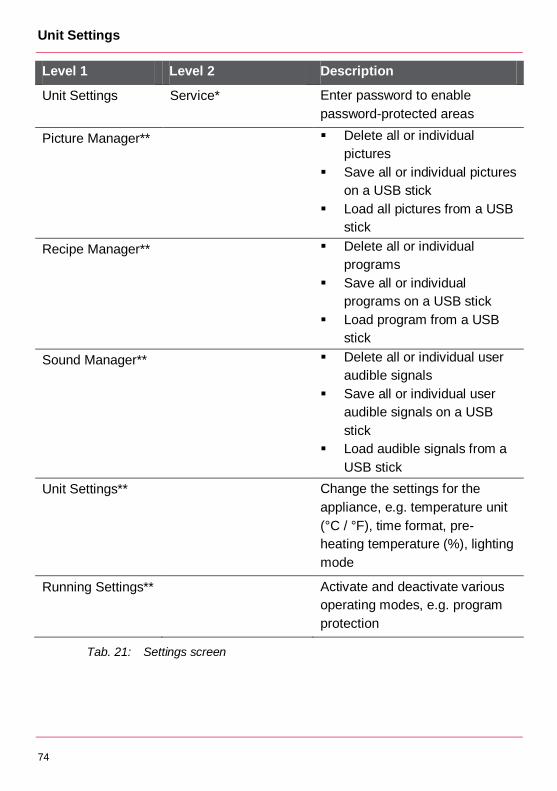
Unit Settings
74
Level 1 Level 2 Description
Unit Settings Service* Enter password to enable
password-protected areas
Picture Manager** Delete all or individual
pictures
Save all or individual pictures
on a USB stick
Load all pictures from a USB
stick
Recipe Manager** Delete all or individual
programs
Save all or individual
programs on a USB stick
Load program from a USB
stick
Sound Manager** Delete all or individual user
audible signals
Save all or individual user
audible signals on a USB
stick
Load audible signals from a
USB stick
Unit Settings** Change the settings for the
appliance, e.g. temperature unit
(°C / °F), time format, pre-
heating temperature (%), lighting
mode
Running Settings** Activate and deactivate various
operating modes, e.g. program
protection
Tab. 21: Settings screen
Pos: 132 /95 3-Elo ma/Sta nda rdte xte Bet riebs anleit ung en/ Fehl er b ehe ben @ 9\ mod _13 794 081 829 49_ 6.doc @ 8 768 1 @ 1 @ 1
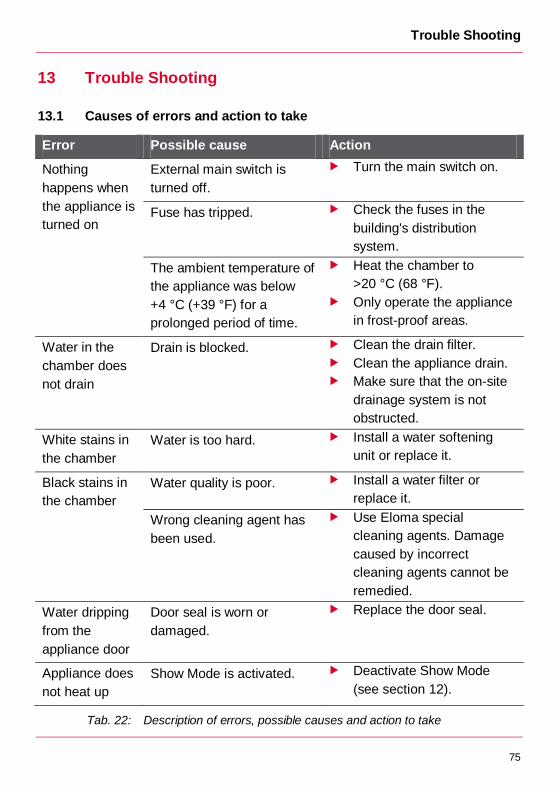
Trouble Shooting
75
13 Trouble Shooting
Pos: 133 /95 3-Elo ma/BET_K ombi däm pfe r/Fehle r be heb en/ Fehle ru rsach en u nd Ma ßna hme n @ 9\mo d_1 379 408 288 284 _6.d oc @ 877 02 @ 2 @ 1
13.1 Causes of errors and action to take
Error Possible cause Action
Nothing
happens when
the appliance is
turned on
External main switch is
turned off.
Turn the main switch on.
Fuse has tripped. Check the fuses in the
building's distribution
system.
The ambient temperature of
the appliance was below
+4 °C (+39 °F) for a
prolonged period of time.
Heat the chamber to
>20 °C (68 °F).
Only operate the appliance
in frost-proof areas.
Water in the
chamber does
not drain
Drain is blocked. Clean the drain filter.
Clean the appliance drain.
Make sure that the on-site
drainage system is not
obstructed.
White stains in
the chamber
Water is too hard. Install a water softening
unit or replace it.
Black stains in
the chamber
Water quality is poor. Install a water filter or
replace it.
Wrong cleaning agent has
been used.
Use Eloma special
cleaning agents. Damage
caused by incorrect
cleaning agents cannot be
remedied.
Water dripping
from the
appliance door
Door seal is worn or
damaged.
Replace the door seal.
Appliance does
not heat up
Show Mode is activated. Deactivate Show Mode
(see section 12).
Tab. 22: Description of errors, possible causes and action to take
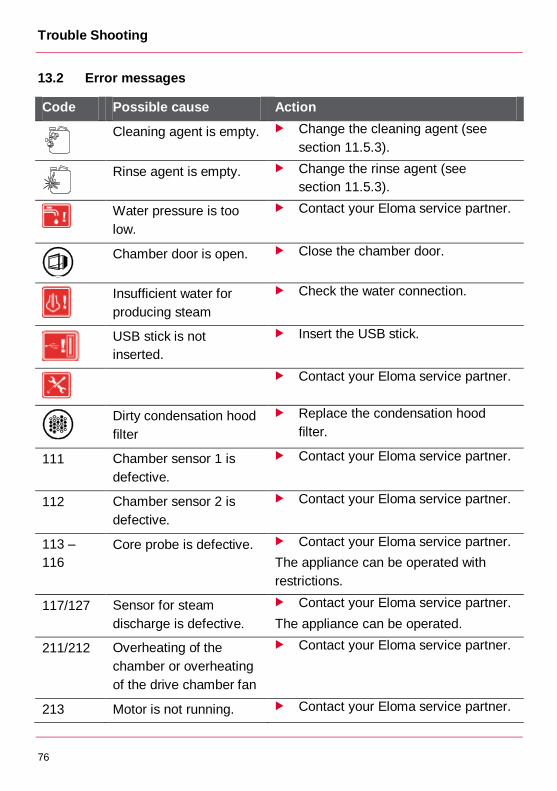
Trouble Shooting
76
Pos: 134 /95 3-Elo ma/BET_K ombi _To uch/ Fe hler beh ebe n/Fehler _Stör ungs mel dung en @ 9\ mod _138 019 866 935 5_6. doc @ 89 483 @ 2 @ 1
13.2 Error messages
Code Possible cause Action
Cleaning agent is empty. Change the cleaning agent (see
section 11.5.3).
Rinse agent is empty. Change the rinse agent (see
section 11.5.3).
Water pressure is too
low.
Contact your Eloma service partner.
Chamber door is open. Close the chamber door.
Insufficient water for
producing steam
Check the water connection.
USB stick is not
inserted.
Insert the USB stick.
Contact your Eloma service partner.
Dirty condensation hood
filter
Replace the condensation hood
filter.
111 Chamber sensor 1 is
defective.
Contact your Eloma service partner.
112 Chamber sensor 2 is
defective.
Contact your Eloma service partner.
113 –
116
Core probe is defective. Contact your Eloma service partner.
The appliance can be operated with
restrictions.
117/127 Sensor for steam
discharge is defective.
Contact your Eloma service partner.
The appliance can be operated.
211/212 Overheating of the
chamber or overheating
of the drive chamber fan
Contact your Eloma service partner.
213 Motor is not running. Contact your Eloma service partner.
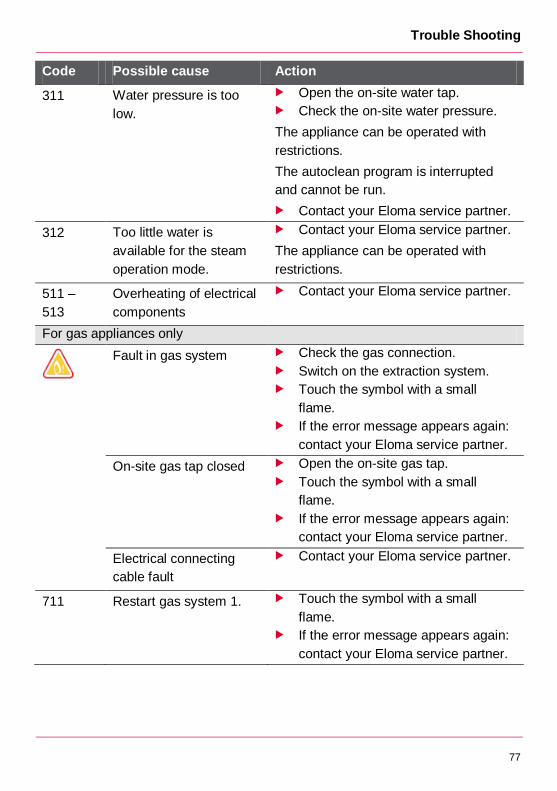
Trouble Shooting
77
Code Possible cause Action
311 Water pressure is too
low.
Open the on-site water tap.
Check the on-site water pressure.
The appliance can be operated with
restrictions.
The autoclean program is interrupted
and cannot be run.
Contact your Eloma service partner.
312 Too little water is
available for the steam
operation mode.
Contact your Eloma service partner.
The appliance can be operated with
restrictions.
511 –
513
Overheating of electrical
components
Contact your Eloma service partner.
For gas appliances only
Fault in gas system Check the gas connection.
Switch on the extraction system.
Touch the symbol with a small
flame.
If the error message appears again:
contact your Eloma service partner.
On-site gas tap closed Open the on-site gas tap.
Touch the symbol with a small
flame.
If the error message appears again:
contact your Eloma service partner.
Electrical connecting
cable fault
Contact your Eloma service partner.
711 Restart gas system 1. Touch the symbol with a small
flame.
If the error message appears again:
contact your Eloma service partner.

Trouble Shooting
78
Code Possible cause Action
712 Restart gas system 2. Touch the symbol with a small
flame.
If the error message appears again:
contact your Eloma service partner.
Tab. 23: Description of error messages, possible causes and action to take for
gas and electric appliances
Pos: 135 /95 3-Elo ma/Sta nda rdte xte Bet riebs anleit ung en/G erä t en tsor gen @ 9\ mod _13 752 892 2839 4_6 .doc @ 80 692 @ 1 @ 1
Disposal
79
14 Disposal
Do not dispose of the appliance with
residual waste.
Dispose of the appliance in
accordance with the applicable local
regulations for waste equipment.
Contact the local authorities for
further information. === E nde der Liste für Tex tma rke I nhal t6 = ==
Eloma GmbH . Innovative Koch- & Backtechnik
Eng
lisch:
bet_
EL
20
00
88
7_
ge
_v0
0_
en
| 0
3/2
01
4