royale freestanding etr · royale - freestanding - etr - 4 - ©rinnai remote control the remote...
TRANSCRIPT

FREESTANDING ROYALE ETR - FS35ETRFLAME FIRE
Customer Operation & Installation Manual
This appliance shall be installed in accordance with:
• Manufacturers Installation Instructions• Local Gas Fitting Regulations• Municipal Building Codes• Installation code AS/NZS 5601 ‘Gas Installations’• Any other local relevant Statutory Regulation
Installation & Service must be performed by an authorised person.
This heater is NOT designed to be inbuilt. This heater is not designed for use with Flexible Flueing.
INSTALLER: PLEASE LEAVE THIS MANUAL WITH THE END USER AFTER INSTALLATIONEND USER: RETAIN THIS MANUAL FOR FUTURE REFERENCE
All Rinnai gas products areA.G.A. certified

Royale - Freestanding ETR - ii - ©Rinnai
WARNING
IMPROPER INSTALLATION, ADJUSTMENT, ALTERATION, SERVICE ORMAINTENANCE CAN CAUSE PROPERTY DAMAGE, PERSONAL INJURY OR LOSS OF LIFE.
INSTALLATION AND SERVICE MUST BE PERFORMED BY AN AUTHORISED PERSON.
This manual applies to the FS35 ETR Freestanding Royale - NG/LPG
Table of ContentsINSTALLATION REQUIREMENTS............................................................................. 1
CERTIFICATION......................................................................................................... 1
CARTON CONTENTS / ITEM CHECKLIST ............................................................... 1
CUSTOMER INFORMATION - ABOUT.......................................................................1
CUSTOMER INFORMATION - CONTROL PANEL.....................................................2
CUSTOMER INFORMATION - OPERATION .............................................................3
CUSTOMER INFORMATION - SETTING THE CLOCK .............................................5
OPERATING THE TIMERS .........................................................................................6
CUSTOMER INFORMATION - SAFETY POINTS.......................................................7
CUSTOMER INFORMATION - TROUBLE SHOOTING ............................................11
CUSTOMER INFORMATION - ERROR CODES.......................................................12
INSTALLER INFORMATION - IMPORTANT POINTS...............................................13
INSTALLERS INFORMATION - LOCATION .............................................................14
INSTALLERS INFORMATION - SPECIFICATIONS..................................................15
INSTALLERS INFORMATION - DIMENSIONS ........................................................ 16
INSTALLERS INFORMATION - FLUEING ................................................................17
INSTALLERS INFORMATION - LOG INSTALLATION..............................................18
INSTALLERS INFORMATION - TESTING & COMMISSIONING .............................19
INSTALLERS INFORMATION - WIRING DIAGRAM.................................................20
INSTALLATION / COMMISSIONING CHECKLIST ...................................................21
INSTALLERS / GAS FITTER DETAILS .................................................................... 21
CUSTOMER INFORMATION - CONTACTS..............................................................22

Royale - Freestanding ETR - 1 - ©Rinnai
INSTALLATION REQUIREMENTS
This heater must be installed by an authorised person. The installation must conform to localregulations.
The installation must also comply with the instructions supplied by Rinnai.
Service and removal must be carried out by an authorised person.
CERTIFICATION
The Rinnai IB35ETR / FS35ETR heaters have been certified by the Australian Gas Association.
The AGA Certification Number is shown on the appliance dataplate.
No parts or functions should be modified or permanently removed from the heater.
Please keep this information in a safe place for future reference.
CARTON CONTENTS / ITEM CHECKLIST
The components for IB35ETR / FS35ETR heaters are supplied in one carton, the following tables liststhe components that are in this carton. Ensure that the components listed for the installation methodbeing installed are present before proceeding with the installation.
• Dot denotes which items are supplied with which heater type.
Component Descriptions IB35ETR FS35ETRRinnai IB35ETR or FS35ETR Engine.
Artificial log set / burn media, Satchel burner granules (packed inside of the engine).
Operation and Installation manual.
Remote Control
Adhesive backed foam sealing strip 19mm x12mm (2m).
Screw 8G x 3/8” Black (x2)
Reducing Flare 3/8” x1/2”
Flexi Tube 3/8”
Wall mounting bracket (x2)
3
5
11
52
8 7
6
9
4
IB35ETR
FS35ETR
1
2
3
4
5
6
7
8
9
CUSTOMER INFORMATION - ABOUT

Royale - Freestanding ETR - 2 - ©Rinnai
LOCK Button
Indicates lock
function
TIMER Indicator
Indicates that TIMER 1
or TIMER 2 has beenselected to operate.
TIME / TEMP AdjustmentIncreases or decreases the temperature
setting as well as changing
hours or minutes.
ON/OFF Button
Main Switch forturning ON/OFF.
TIME/TEMP DisplayShows either the time of day,
temperatures or coded error
messages.
CLOCK ADJUSTMENT AND
TIMER INDICATORSIndicates that clock or dual timer
programme is being set.
OVERRIDE
Temporarily changes operation from
ON to OFF or OFF to ON, until nextprogrammed setting is reached.
AUTO OFF
When ON, Thermostat
turns heat down to OFF.
When OFF, Thermostatturns heat down to LOW.
Flame Function
Med /High heat setting
and overides thermostat
(Pilot only)
CUSTOMER INFORMATION - CONTROL PANEL
CUSTOMER INFORMATION - OPERATION
IMPORTANT: You must read andunderstand these instructions fullybefore operating the heater.
• To Open the Control PanelLift lightly in the centre of the lid. The control panellid will then open backward to an angle.
• To turn the unit ‘ON’Press the ON/OFF button to operate the heater.The ON indicator will glow green. The sparkgenerator will be heard before the burner ignitesand the ON indicator glows red, indicating that theheater is alight.
When the heater warms up, the fan willautomatically start.
Note: Initially at turning ‘ON’ only thefront and middle burner, low, will ignite.After 8 minutes middle burner, high andrear burner, high will ignite. This willoccur each time the appliance isswitched on.
If the heater does not ignite on initial use,this may be due to air remaining in thegas supply line. The spark generator willonly continue for 15 seconds. After this itwill be necessary to press the ON/OFFbutton OFF, then ON again.
If the appliance fails to ignite after 4 attempts,contact Rinnai as a service call may be required.
• To turn the unit ‘OFF’Simply press the ON/OFF button to switch off theheater. The ON indicator light will go out. The Fanwill continue to operate for several minutes afterthe burner has gone out in order to cool theappliance. Do not unplug the appliance while thefan is running.
• Room Temperature AdjustmentThe room temperature and pre-set temperaturescan only be displayed and adjusted when theheater is running.
Press the “” button to increase the temperaturesetting or “” button to decrease the temperaturesetting.
The temperatures can be preset to:
a) [L] low (about 10°C)b) [16°C] to [26°C] in 1°C stepsc) [H] (continuously high)
When the 'Set' temperature is lower thanthe current room temperature at time ofignition, only the front burner will igniteon the low setting. If the 'Auto Off'function has been selected, the heaterwill revert to pilots only operation after ashort time period. When ever the pilotsare lit the ON indicator will glow red.
• LockThe lock function will help to prevent accidentaloperation as well as small children from altering
the controls. To operate the lock simply press theLOCK button. The function is activatedimmediately and the LOCK indicator will glow.
To Deactivate the LOCK simply press the LOCKbutton for 3 seconds and the LOCK indicator willgo out. The LOCK can be deactivated at any timein this way.
During normal operation the LOCK may beactivated and all controls, other than the OFFswitch, will be locked. Deactivating the LOCKreleases the controls. If the LOCK is activatedwhilst the heater is turned OFF, then all functionswill be locked. If the heater is turned OFF while theLOCK is activated, it cannot be turned ON againuntil the LOCK is deactivated.
• FlameTo operate the Flame function, simply press theFLAME button. This function will automaticallyoverride the thermostat and set the heater to adefault Medium / High heat setting for full visualflame effect.
• Auto OffTo operate the AUTO OFF function, simply pressthe AUTO OFF button.
When the AUTO OFF function is selected, theindicator light will illuminate and the thermostatwill turn the burners down to the OFF heat settingwhen the selected temperature is reached.
When the AUTO OFF function is not selected, theindicator light will go OFF and the thermostat willturn the burners down to the LOW heat settingwhen the selected temperature is reached.
• OverrideThis function is intended to be used to manuallyoverride the current operation of the heater. Forexample; if the heater is in standby mode (i.e.between finishing time and starting time of aTimer) and the OVERRIDE button is selected,then the heater will begin to operate and heat theroom.
To operate the OVERRIDE simply press theOVERRIDE button. The OVERRIDE indictor willflash.
To manually deactivate the OVERRIDE simplypress the OVERRIDE button again. TheOVERRIDE indicator will go out, and the heaterwill return to standby mode.
The heater will continue to operate on OVERRIDEuntil the OVERRIDE button is pressed again, orone of the Timers takes over the operation of theappliance. This means that the OVERRIDE modewill automatically drop out if a programmedstarting time is reached.
The appliance will then return to operating attimes programmed into the Timer(s).
Royale - Freestanding - ETR - 3 - ©Rinnai
CUSTOMER INFORMATION - OPERATION
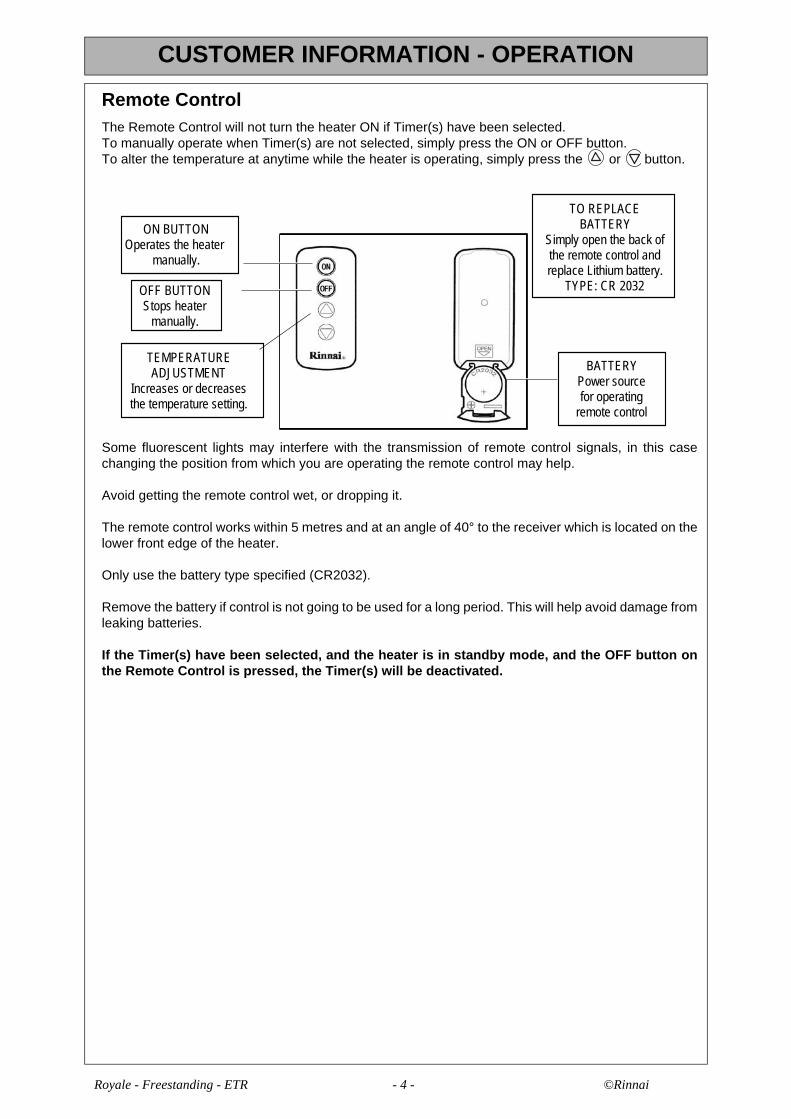
Remote ControlThe Remote Control will not turn the heater ON if Timer(s) have been selected.To manually operate when Timer(s) are not selected, simply press the ON or OFF button.To alter the temperature at anytime while the heater is operating, simply press the or button.
Some fluorescent lights may interfere with the transmission of remote control signals, in this casechanging the position from which you are operating the remote control may help.
Avoid getting the remote control wet, or dropping it.
The remote control works within 5 metres and at an angle of 40° to the receiver which is located on thelower front edge of the heater.
Only use the battery type specified (CR2032).
Remove the battery if control is not going to be used for a long period. This will help avoid damage fromleaking batteries.
If the Timer(s) have been selected, and the heater is in standby mode, and the OFF button onthe Remote Control is pressed, the Timer(s) will be deactivated.
ON BUTTONOperates the heater
manually.
TO REPLACEBATTERY
Simply open the back ofthe remote control andreplace Lithium battery.
TYPE: CR 2032
BATTERYPower sourcefor operating
remote control
OFF BUTTONStops heater
manually.
TEMPERATUREADJUSTMENT
Increases or decreasesthe temperature setting.
Royale - Freestanding - ETR - 4 - ©Rinnai

Royale - Freestanding ETR - 5 - ©Rinnai
Setting the Clock
When the appliance is first plugged in or after a power failure, the digital display with show --:--
As an example, let’s set the clock to 10:35 am;
Press the SET TIMES button once, the Clock indicator will flash.
Press and hold the “” button; the minutes will begin to change first then the time will changeby whole hours.
Release the button when AM 10:00 shows on the Digital Display. Confirm that you haveselected AM, a small indicator on the left hand side of the Digital Display indicates the AMsetting.
Press and hold the “” button again, release the button when AM 10:35 shows. If you go pastAM 10:35, then the “” button can be used to change the time settings in reverse.
Press the Timer Set button five times to lock in and complete setting the time. The Clock andTimer indicators will go out. A small indicator on the Digital Display will flash to show that theClock is operating.
Programming the ON / OFF Timers
Before programming the Timers you must ensure that the clock has been set to thecorrect time.
As an example, let’s program Timer 1 to heat the room by 7:10 am and finish at 9:00 am.
Press the Set Times button twice. The Digital Display will show AM 6:00. Timer 1 indicator willflash.
Press the “” button until AM 7:00 appears, release the button, then press it again until AM7:10 appears. (Press the “” button if you go past AM 9:00).
Press the Set Times button three times to lock in the program time. The Digital Display willshow the current time. A small indicator on the Digital Display will flash to shown that thedisplay has returned to the clock.
Timer 2 is programmed in the same way, remember to ensure that the Timer 2 indicator isflashing when you program in the desired setting. The Timers can be programmed to operatefor any two periods in any 24 hours.Turn to the next page to operate the dual timer. The programmed time must be selected andlocked-in within one minute of the On Timer indicators flashing otherwise the programmedtimes will not be retained in the system memory.
CUSTOMER INFORMATION - SETTING THE CLOCK
Royale - Freestanding ETR - 6 - ©Rinnai
Operating the Timers
Before operating the Timer(s), the clock time must be correct and a starting time and finishingtime for the Timer(s) must be programmed. See page 4. The two Timers operate in the sameway. This heater does not commence operation at the programmed starting time. It willattempt to heat a room by the programmed starting time. See Pre-heat, for furtherexplanation.
To select the Timer(s) to commence heating:
• Check the time shown on the Digital Display is correct.
• Check the ON and OFF times, for both Timers if necessary.
• Press the ON/OFF button to operate the heater. The ON indicator will glow green and the heater will being to operate.
• Select the desired temperature setting.
Press the Timer 1 and/or Timer 2 button(s). The timer indicator(s) will glow and the heater willremain on standby until up to one hour prior to the time programmed into the selected Timer(s)is reached. When this time is reached, the Timer indicator will flash and the heater willoperate. The ON indicator glows red when the heater commences operation. Actual start timewill depend on temperature selected and current room temperature. (See Pre-heat section forfurther details).
Set and Forget Operation
Your heater can be operated to alternate between Timers automatically during cold weatherby selecting Timer 1 and Timer 2 together. Both Timer indicators will glow. The appliance willremain on standby at intervals between the programmed finishing and starting times of eachTimer. While the heater is operating during programmed intervals the Timer indicator willflash.
If there is a power failure, the system memory will retain the Timer programs, and theclock will stop at the time the power goes off. The clock will start again when the powercomes back on, but the time will be slow by the duration of the power failure. To set theclock to the correct time after the power has come back on, simply follow theinstructions on page 4.
Preheat
This function operates automatically in conjunction with either of the timers. When a timer isselected, the heater may operate anywhere within an hour prior to the programmed startingtime of the timer.
The preheat function will attempt to preheat the room to the preset temperature by theprogrammed ON time
This function is called pre-heat due to the way it operates. The room temperature is sensedone hour before reaching the programmed time of either timer.The temperature differential at the time of sensing the room governs how long before theprogram ON time the microcomputer will operate the heater and ignite the burner.
OPERATING THE TIMERS

CUSTOMER INFORMATION - SAFETY POINTS
This appliance must not be built-in. Clearances must be maintained.
Do not restrict the warm air discharge by placing articles in front of the heater.
Do not spray aerosols whilst the heater is operating. Most aerosols contain butane gas, which can be a fire hazard if used near the heater when it is in use.
Royale - Freestanding ETR - 7 - ©Rinnai

CUSTOMER INFORMATION - SAFETY POINTS
Do not allow curtains or other flammable or combustible materials to come into contact with the heater.
This appliance must not be used for any purpose other than heating.
Do not allow anyone to post articles through the louvres.
Do not allow young children or the infirm to sleep directly in front of the heater.
Royale - Freestanding ETR - 8 - ©Rinnai

CUSTOMER INFORMATION - SAFETY POINTS
Young children should be supervised at all times. Hand or body contact with the louvres must be avoided.
Do not allow anyone to sit on or lean against the appliance.
Do not unplug the heater while it is in operation or while the fans are still cycling.Do not turn the heater off by unplugging it from the wall.
Do not place containers of liquid on top of the heater. Liquid spillage can cause extensive damage to the appliance.
Royale - Freestanding ETR - 9 - ©Rinnai

CUSTOMER INFORMATION - SAFETY POINTS
Do not remove the Dress Guard.
The dress guard is fitted to this appliance to reduce the risk of fire or injury from burns and no part of it should be permanently removed.
For protection of children or the infirm, a secondary guard is recommended.
DO NOT CONNECT TO AN LPG GAS CYLINDER INDOORS.
DO NOT PLACE ARTICLES ON OR AGAINST THIS APPLIANCE.
DO NOT USE OR STORE FLAMMABLE MATERIALS NEAR THIS APPLIANCE.
DO NOT SPRAY AEROSOLS IN THE VICINITY OF THIS APPLIANCE WHILE IT IS IN OPERATION.
THIS APPLIANCE MUST BE INSTALLED, SERVICED
AND REPAIRED BY AN AUTHORISED PERSON.
The wire mesh guard supplied with this appliance must not be permanently removed as it fulfils an operational
safety function.
Additional dress guards including free standing types may be used in conjunction with, but not replace, the
dress guard supplied with this appliance.
WARNING WARNING
WARNINGWARNING
Royale - Freestanding ETR - 10 - ©Rinnai

Royale - Freestanding ETR - 11 - ©Rinnai
• NOTE:
If you have any other faults or problems, please refer to your installer or a Rinnai National CallCentre on 1300 555 545.
• IMPORTANT:
Do not remove any panels or attempt to carry out any service work other than that mentionedin the trouble shooting chart.
• SERVICE:
Rinnai has a service and spare parts network with personnel who are fully trained and equippedto give the best service on your Rinnai appliance.
If your appliance needs service, please ring one of the service contact numbers located on theback of this instruction booklet.
Rinnai recommends that this appliance should be serviced annually by a qualified servicetechnician, including inspection of the flue system.
SYMPTOM POSSIBLE CAUSES SOLUTION
Burner will not light • No power present
• No gas present• Power cut
• Ignition failure
• Ensure power cord is plugged in and turned on.
• Ensure gas supply is turned on.• Re-ignite when power has been
restored.• Repeat lighting procedure (refer
page 2).
Smell of gas • Leaking gas • Turn off gas at meter and call installer.
Fan not working • Heat Switch not activated • Allow heater to run on ‘HIGH’ for about 15 minutes.
Small soot deposit • Normal operation • No action required.
Severe soot deposits forming on Glass or Logs
• Inadequate flue system• Incorrect gas pressure• Log misalignment
• Call Rinnai Service Department / Agent.
Condensation on glass • Normal operation • Allow heater to warm up.
Streaky lines on glass • Normal operation • For cleaning call Rinnai Service Dept. / Agent.
Digital Error Message onControl Panel
• Electronic fault detected • See Error Messages on Page 10.
Service calls for general cleaning, maintenance and wear and tear are not necessarilycovered under the warranty. Service calls of this nature may be chargeable.Faults caused by insufficient gas supply, gas quality, installation errors or operationerrors are not covered by the Rinnai warranty. Refer to Warranty Card in this manual.
NOTE
CUSTOMER INFORMATION - TROUBLE SHOOTING

Royale - Freestanding ETR - 12 - ©Rinnai
CUSTOMER INFORMATION - ERROR CODES
ERROR CODE MESSAGEThe Flame Fire ETR has the ability to check its own operation continuously. If a fault occurs,an Error Message will flash on the Digital Display of the control panel. This assists withdiagnosing the fault, and may enable you to overcome a problem without a service call. Pleasequote the code displayed when enquiring about service.
In all cases, you may be able to clear the Error Message simply by turning the heater OFF, thenON again. If the Error Message still remains or returns on the next operation, please contactyour nearest service contact and arrange for a service call.
Error Code Probable Cause Comments
• Ignition Failure • Check gas is turned on.• Service call if repeated
• Flame Failure • Check gas is turned on.• Service call if repeated
• Overheat • Service call
• Room Overheat • Lower room temperature to less than 40°C.
• Room temperature• Sensor Faulty
• Service call
• Room temperature • Service call
• Overheat temperature• Sensor faulty
• Service call
• Faulty ON / OFF switch • Service call•
• Faulty Solenoids • Service call
• Faulty Flame Rod • Service call
• Communication error • Turn heater OFF, then ON again
• Flue Block • Service call
--:-- • Power Failure • Turn heater OFF, then ON again

Royale - Freestanding ETR - 13 - ©Rinnai
Before installing this product, please read this manual carefully.
Unpack the heater and check for damage. DO NOT INSTALL DAMAGED HEATER. If theheater is damaged, contact your supplier for advice. Before installing the heater, check thelabel for the correct gas type (see rating plate, bottom right hand side on the back of the unit).Refer to local gas authority for confirmation of the gas type if you are in doubt.
Included in the carton
Customer Operation/Installation Manual, ceramic log set and granules.
IMPORTANT
1. This heater is not designed to be inbuilt.
2. This heater is not designed for use with Flexible Flueing..3. The appliance must be installed in accordance with the local gas and electrical
authority regulations.
4. For information on gas consumption, see data plate on the appliance.
5. Ensure that the area in which the appliance is installed has adequate fixed ventilation, this fixed ventilation must be provided as detailed in AS/NZS 5601.
6. This appliance must not be installed where curtains or other combustible materials could come into contact with it. In some cases curtains may need restraining.
7. This appliance is not designed to be built directly into a combustible opening.
8. Appliance must not be located below a power socket-outlet.
9. The local gas and electrical authorities will be able to advise on local regulations.
10.Rinnai appliance warranty conditions will be voided if non Rinnai flue components are fitted. Rinnai appliances are NOT CERTIFIED for use with non Rinnai flueing components.
11.The heater may emit smoke for approx. 2 hours when first operated. This is part of the burning in process and normal. Ensure adequate ventilation during this period.
12.The guard is fitted to this appliance to reduce the risk of fire or injury from burns and no part of it should be permanently removed. For protection of young children or the infirm, a secondary guard is recommended. Refer to AS4553.
INSTALLER INFORMATION - IMPORTANT POINTS

Royale - Freestanding ETR - 14 - ©Rinnai
The following pages contain information relating to Installation and Service. Installation and Service must be carried out by an authorised person only.
When positioning the heater, the main points to consider are:
1. Flue connection and terminal to comply with AS/NZS 5601. Only Rinnai flueing components to be used.
2. Warm air distribution.
3. Ensuring that the area in which the appliance is installed has adequate fixed ventilation, this fixed ventilation must be provided as per AS/NZS 5601.
4. The heater must not be installed where curtains or other combustible materials could come into contact with it. In some cases, curtains may need restraining. See below for minimum clearances required.
5. This heater is not designed to be inbuilt.
6. Electrical requirements
The heater has a power cord with a three pin plug supplied. The power cord passes through the rear right hand side of the heater front assembly. Rinnai recommends the heater be plugged into a 240V, 10A earthed power point. The power point must be a minimum of 300 mm to the side of the heater (it must not be above the heater). Alternatively - unit can be direct wired if the power supply is to be concealed.
Consult a qualified electrician if direct wiring is required as it must comply with AS/NZS 5601 and AS3000.
INSTALLERS INFORMATION - LOCATION

INSTALLERS INFORMATION - SPECIFICATIONS
The manufacturer reserves the right to change or modify specifications without notice.
Model: Freestanding Royale Flame Fire ETR FS35ETR
Description: Rinnai Freestanding Radiant/Convector, glass fronted, ceramic log space heater with forced convection and natural draft flue system.
Gas input rate: Natural Gas Propane
Pilot and ‘Low’: 8 MJ/hr 8 MJ/hr
High: 35 MJ/hr 35 MJ/hr
Gas Control: Solenoid Electronic Control
Gas Connection: 1/2” BSPF male flare to barrel union
Test Point Pressure: 0.93 kPa 2.35 kPa
Flue terminal: 100 mm dia. top discharge
Flue: An approved Rinnai Flue kit is mandatory for this appliance, and it is to be installed in acccordance with AS/NZS 5601. Use FLFKIT05 / FLFTWKIT minimum of 3 metres of flue to be installed.Rinnai appliance warranty conditions will be voided if non Rinnai flue components are fitted. Rinnai appliances are NOT CERTIFIED for use with non Rinnai flueing components.
Fan: Tangential 2 speed, power rating 90 Watts
Combustion system: Multi port burner
Logs: Ceramic
Ignition system: Automatic electronic ignition
Operation: Touch pad control.Thermostatically controlled to light pilot and burners. Able to select the following features:- Timer- Auto Off function- Flame function- Child lock
Safety Devices: Flame failure thermocoupleOverheat via. ThermistorFan delay via. PCB
Power Supply: 240V 50 Hz. Unit is supplied with 3 pin plug and supply lead.
Combustion method: Naturally aspirated burner
Rating Plate location: Right hand side bottom edge
Weight: 64 Kgs.
Installation type: Freestanding with Timer Remote unit
Royale - Freestanding ETR - 15 - ©Rinnai

INSTALLERS INFORMATION - DIMENSIONS
Royale - Freestanding ETR - 16 - ©Rinnai

Royale - Freestanding ETR - 17 - ©Rinnai
Available Flueing Options as follows:
1. Position heater taking into consideration the Information under “Location”.
2. Assemble and connect flue in accordance with the Rinnai Flueing Installation manual for Rinnai Flame Fire heaters.
3. For pipe sizing, refer to your local gas installation codes. Copper supply should be run leaving a 1/2” flared connection at the position shown.
4. Run Gas Supply.
Secure the heater
1. Secure the heater to the floor with 2 suitable fixings through the holes located on the rear of the base plate.
2. Attach gas supply Note: to the supplied fitting union.
All foreign materials such as fillings must be purged from the gas supply, before connection damage as they may damage the gas controls.
NOTE: On completion of work a gas leak test mustbe carried out. Use a soapy solution on all gas connections.Leaks will be visible when the soapy solutionforms bubbles. When finished, wipe soapy solution with a rag toremove residue.
HEATERHEATER
OBSTRUCTION
A B C
HEATER
INSTALLERS INFORMATION - FLUEING

Royale - Freestanding - 18 - ©Rinnai
1. The log set is packed inside the heater andthe packaging must be removed prior toinstalling the log set in its correct position
• Open both side panels. (1 screw on lower edge of each side panel).
• Remove fastenings on both sides of the top glass retainer.
• Lift retainer away from heater.• Loosen screws on bottom glass retainer.• Carefully lift glass out of bottom channel.• Carefully remove log packaging.
The log is supplied in one piece with two holes underneath for location onto the pins inside theheater.
2. Place the log set into the heater ensuring that the locating pins enter the two locating holeson the bottom face of the logset.
3. Gently place loose ember bed material in front of the Front Log. Do not pour as dustparticles from the plastic bag as it may block the burner ports.Level it with a pencil or screw driver and remove excess material. Note: The ember bed material mustbe placed after the logs are fitted. If the logs are to be removed for any reason, the ember bedmaterial must be removed first and replaced after the logs are refitted. Any material that prevents thelogs sitting flat on the burner top can upset the burning pattern and performance of the heater.
4. Replace glass and top glass retainer, tighten bottom glass retainer screws.• Note: Fit glass so that the join/gap in the glass seal is at the bottom.• Take care not to damage seals.• Reinstall side panels.
• Note: When first lighting the heater, the logs need to be burnt in, which may take approximately 2 hours. The flame colour may change after the initial burning in period.
INSTALLERS INFORMATION - LOG INSTALLATION

Royale - Freestanding ETR - 19 - ©Rinnai
1. To check burner pressure
• Turn OFF and disconnect the 240V power supply connection.
• Turn ON Gas supply.
• Refer to Data Plate or the Technical Specification section in this manual for burner pressures.
• Open right hand side front cover panel (Remove 1-screw located under the front of the panel).
• Remove 240V electrical cover.
• Remove test point screw and attach manometer to test point, the test point is on the lower right hand side of the valve assembly.
• Connect the 240V power supply. Caution with the electrical panel open 240V terminals will be exposed.
• Light heater, turn to High heat setting, wait 8 minutes and check pressure.
• If adjustments are necessary, the regulator is situated on the lower right hand corner and should be set to the pressures on the data-plate.
• Disconnect the 240V power supply.
• Remove manometer and replace test point screw, check for gas escapes at test point screw.
• Replace electrical cover and secure side panel.
• Reconnect the power supply.
• Turn the heater on and off a few times to check ignition.
• All burner aerations are factory preset and cannot be adjusted.
• If you are unable to get the unit to operate correctly, refer to Trouble Shooting on Page 9 before contacting your local service contacts listed on the back page of this booklet.
• It may take approximately 2 hours of operation for the logs to achieve their full flame pattern and glow.
It is the responsibility of the installer tocheck that under normal operatingconditions of the appliance, all flue gasesare exhausted to the outside atmosphereand that there is no spillage ofcombustion gases into the room. Refer toAS/NZS 5601.
2. Commissioning
Installation and Commissioning ChecklistComplete the Installation Checklist and theInstaller details on page 20 and make surethat this instruction book is left with thecustomer.
Instruct Customer Make sure the customer understands theinstructions and the operation of theappliance.
Advise that :
• The guard on this appliance conformsto A.G.A. requirements. It is designedto prevent the risk of injury from burnsand no part of it should be permanentlyremoved. IT DOES NOT GIVE FULLPROTECTION TO YOUNG CHILDRENOR THE INFIRM.
• For protection of young children or theinfirm, a secondary guard isrecommended.
• This appliance is designed to operatewith luminous flames and may exhibitslight carbon deposits.
• During the initial burning in period,(approx. 2 hours) some smoke andsmell may be experienced during thisperiod, the heater should be run on theHigh position in a well ventilated room.
INSTALLERS INFORMATION - TESTING & COMMISSIONING

Royale - Freestanding ETR - 20 - ©Rinnai
If the supply cord is damaged or requires replacing, it must be replaced by themanufacturer or the manufacturers agent or similarly qualified person in order to avoida hazard. The supply cord must only be replaced with a genuine Rinnai spare part. PartNo. 90182065.
TIMER
CONTROL
(BR)
XLP-02V(JST)
(R)
2
AC 220V/240V
1
1
212
3
(RW)
23
123
(FRONT)
56
654321
121110987
YLP-03V(JST) XLP-03V(JST)
179862
XLP-12V(JST)
2
234FAN MOTOR LO
123
THERMAL FUSE
1
= RED
BW
4
3
RECEIVER
TRANSFORMER
654
1
1
3ROOM TEMP THERMISTER
XLP-04V
XMP-03V
OVER HEAT THERMISTER (BK)
23REMOTE
UNIT
10P
8P
917694-1
917692-1
YLR-03V
(BR)(BL)
(BK)
(BK)
(BL)(BL)(R)
(BK)
(R)
(R)
(BL)
(BL)
1
1
10
8
10KR-8M
(Y)
SV3
SV2
SV1
(NT)4820X6
(BW)
08KR-8M
(R)
(W)
4
(REAR)FLAME RODS
(BK)(FRONT)
MIDDLE BURNER HIGH
SV6
SV4
SV5(BW)(BL)
(BW)
(BW)
(BW)
(REAR)
ELECTRODES
or(AMP)176948-1X1SPARKER (NT)4820-4001X2
(GY)(GY)
(BK)
CN1
CN2
CN4
CN5
CN6
CN8
CN11
CN10
CN9
MIDDLE BURNER LOW
REAR BURNER
FRONT BURNER 23 1
917687-1
CO
NTR
OL
220V/230V (1,2) (BK/W)
HI
C
CN3
GYRWRBLBR
917690-1
FLUE BLOCK THERMISTER (W)
DISP
LAY
1
WITH DELAY CIRCUIT
BK
WIRING DIAGRAM ETR
W
= RED/WHITE
240V (1,3) (BR/BL)* *
(W)
(R)(BL)
= GREY
= BLACK= WHITE= BLACK/WHITE= BROWN= BLUE
8 min DELAY
(BW)
INSTALLERS INFORMATION - WIRING DIAGRAM

Royale - Freestanding ETR - 21 - ©Rinnai
(To be completed by certified Gas Installer)NO YES
Model: _______________________________
1. Was a Rinnai Flue system installed in accordance with the instructions?
2. Have specified gas pressures been checked and set?
3. Are decorative logs located correctly?
4. Have ember granules been placed and free of dust and powder?
5. Has the appliance been test fired for correct operation?(All Burners light without delay)
6. Is the end-user fully aware of operating procedure?
Company name: ____________________________________________________
Installers name: ____________________________________________________
Address: ____________________________________________________
____________________________________________________
____________________________________________________
Phone: __________________ Mobile: __________________________
Certificate of Compliance / Certification Number:___________________________ (*where applicable)
Authorised Persons – Licence Number: _______________________________
Signed:________________________ Date:___________________
INSTALLATION / COMMISSIONING CHECKLIST
INSTALLERS / GAS FITTER DETAILS

Royale - Freestanding ETR - 22 - E&TG03-116 Issue 6- 16/2/16 (7567-G)
Head Office100 Atlantic Drive,Keysborough, Victoria 3173P.O. Box 460Braeside, Victoria 3195Tel: (03) 9271 6625Fax: (03) 9271 6622
National Help Line
Tel: 1300 555 545*Fax: 1300 555 655**Cost of a local call Higher from mobile or public phones.
Australia Pty. Ltd. ABN 74 005 138 769
Internet: www.rinnai.com.au E-mail: [email protected]
Internet: www.rinnai.co.nz E-mail: [email protected] Office, New Zealand105 Pavillion Drive,Airport Oaks, MangereP.O. Box 53177Auckland AirportManukau, 2150Tel: (09) 2573800Fax: (09) 2573899
24 Hour Service
Tel: 0800 746624 (0800 Rinnai)
Inbuilt Royale
IB35 / IB35ETR
Freestanding Royale
FS35 / FS35ETR
The Rinnai Flame Fire Heater Family
Inbuilt Slimfire
IB25
CUSTOMER INFORMATION - CONTACTS