september 13th & 14th, 2008 wire construction
TRANSCRIPT
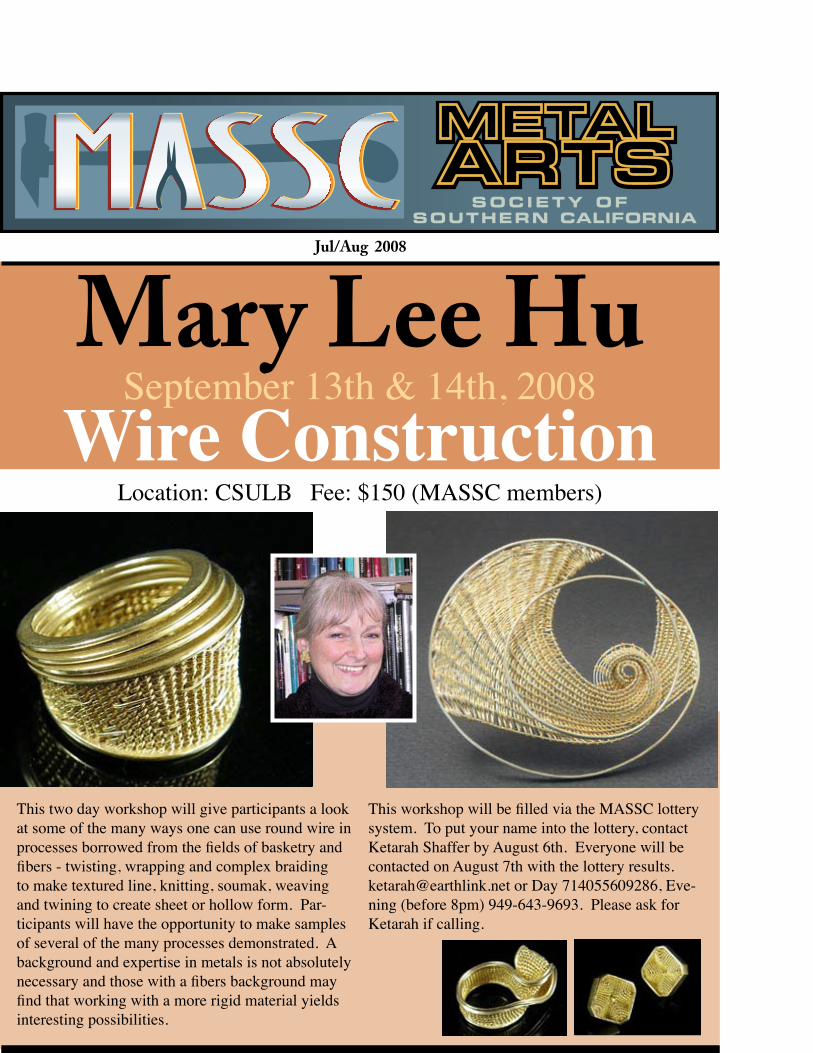
Jul/Aug 2008
SOCIETY OF SOUTHERN CALIFORNIA
METALARTSMETALARTS
This two day workshop will give participants a look at some of the many ways one can use round wire in processes borrowed from the fields of basketry and fibers - twisting, wrapping and complex braiding to make textured line, knitting, soumak, weaving and twining to create sheet or hollow form. Par-ticipants will have the opportunity to make samples of several of the many processes demonstrated. A background and expertise in metals is not absolutely necessary and those with a fibers background may find that working with a more rigid material yields interesting possibilities.
This workshop will be filled via the MASSC lottery system. To put your name into the lottery, contact Ketarah Shaffer by August 6th. Everyone will be contacted on August 7th with the lottery results. [email protected] or Day 714055609286, Eve-ning (before 8pm) 949-643-9693. Please ask for Ketarah if calling.
Location: CSULB Fee: $150 (MASSC members)
Mary Lee HuSeptember 13th & 14th, 2008
Wire Construction

Jul/Aug 2008 Metal Arts Society of Southern California
MASSC Board of DirectorsPresident Corliss Rose714 778 5336 [email protected] Vice Pres., Pgms. Ketarah Shaffer949 643 9693 [email protected] Secy Dianne Ravin949-854-8004 [email protected] Corresp. Secy Diane Weimer562-596-5841 [email protected]. Treasurer La Verne Christenson 714 531 4041 [email protected] Membership Chair Pat Wierman LA & OC Pat Wierman949 951 2118 [email protected] Diego Rep Carol Sivets619 281 6447 [email protected] Barbara Rep Janice Lorber 805 963 5693 [email protected] Chair Doreen Endo
Video Chair Nancy MonkmanVideo Archives Deborah Smyth818 956 3898 [email protected] Guy Duke Sprue [email protected] Group Ketarah Shaffer949 643 9693 [email protected] Members at LargeRandi Newbill [email protected] Schloss [email protected] McAleer [email protected] Nielsen [email protected]
MASSC web site: www.massconline.comMASSC Newsgroup:[email protected] serves the needs and interests of artists working in metals and provides an environment for the exchange of information, instructional workshops, demonstrations, lectures, and panel discussions. Annual dues Sept 1-Aug 31); Regular Member, $30; Family, $45; Full-time Student $20. Please add $5 to your annual dues if you would like to recieve a printed copy of the MASSC newsletter. All others will recieve the newsletter via email. Membership forms are available at MASConline.com
MASSC Barter Town BashSaturday August 23, 2008
9 AM- 2 PMset up starts 8:30 AM
at Media Enterprises, 1644 S Clementine StAnaheim CA 92802
All traders and attendees can register for this FREE event at www.massconline.com
MASSC’s traditional tool swap just got better! This is your opportunity to clean up your bench and TRADE-SWAP-SELL those treasures. To make it more interesting, we’ve expanded your trading horizons, Bring tools, metal arts books, pieces of your hand-made finished jewelry, natural materials (such as bone - shell - rough semi-precious stone - fossil material), as well as stock, found objects, art to wear items, cut stones and more. In short, bring anything you think another metal artist might want to trade or buy.Your only limitations are a 3’ card table for your items (traders provide their own 3-foot table, chairs & um-brella etc.) and your imagination. If you don’t have a table’s full of stuff, put it in a bag and bring it to trade with. Don’t have anything to trade? Don’t worry. Bring cash! This event is being held in an outdoor (park-ing) lot during August. It will be hot so please bring sunscreen and a hat. Most of the event will take place during the morning hours but do come prepared for some sun. MASSC will provide lots of icy cold water. Traders and attendees are asked to bring something refreshing for the pot luck snack table.
2

3Metal Arts Society of Southern CaliforniaJul/Aug 2008
The tintype, also known as the melai-notype or ferrotype, was a memoir, a retained mental impression. Truly, it was the first instant photograph. It was ready in a few minutes. In looking at tintypes, it is no wonder that the stoic look on faces, young and old was so prevalent. They had to endure head and neck clamps to keep them expression-less and motionless up to thirty seconds. The tintype was inexpensive, about ten to twenty-five cents for a playing card size. From about 1856 to 1930 tintypes were chosen as the favorite way to memorialize your family. This was the first time that the common folk were able to afford pictures. The itinerant photogra-phers would load up their wagon with the new camera equipment which was portable, sky-light paneled tents, rolldown back-drops and cases with supplies to last for about a week and trek off to the nearest fair or carnival. Hence, the Carnival Period was born and stretched from 1875 to about 1930. You would often find the tintypists photographers in vacationing areas, like Asbury Park, Niagara Falls or Atlantic City. At the time, the tintype was noted for its’ durability. Today many are dented and scratched.
When I get a new tintype, I look and wonder about the events in the lives of these people. I feel passionate about preserving the image of the person inside a piece of jewelry. I am so intrigued by the dress, age, hair styles and expression of the subject.
When I looked around to see who else was including tintypes in their work on a consistent basis, I found Bettina Speckner. Born in 1962 in Offenburg, Germany she uses pastoral scenes, gardens, and everyday items to picture. She began her studies in painting, but in a few years she moved to jewelry. She has received many awards and accolades for her work. She can be seen at Sienna Gallery online. I purchased many of my tintypes from ebay.com. I also frequent the Antique Market at Vet’s Stadium ( Clark and Conant in Long Beach) once a month. I pay between $5 and $15 for my tintypes.
When using photos I decide if I want to print on semigloss photo paper or cloth. I get the cloth from The Electric Quilt online. It is called Premium Cotton Satin Inkjet Fabric Sheets. They measure 8.5” X 11” and there are 6 sheets in the package for $18.95.
I like using enhancements like dried baby roses from Michael’s or often I use pearls on a post. I pierce the work around the tintype and often use gallery wire in the bezel cup. The final touch is a vintage watch crystal that I buy from Otto Frei (ofrei.com)The
complete title is VTFGLASS WATCH CRTSTALS 100 DIFFERENT SIZES (5 12/16 TO 20 13/16. You can also buy them individually.
Since I love to saw, I pierce around the tintype. I use the Smart Vise that I pur-chased from Rio Grande. It is located on p.136 2008 Tools & Equipment catalog, #112-187 for $54. It is a metal bench pin with a clamp, so you can saw then move the metal and saw and move the metal. It is wonderful! No cramping in my left hand, as I hold the metal down.
Since bezel wire (thin, fine silver wire) is “not my friend”, I use 20g sheet, cut to size. I form it into a circle and solder. Attach the back plate, which usually has the pierce work and solder. Place the tintype in the bezel cup, next any enhance-ments, the watch crystal on top of
that and prepare a square ring to slip over the crystal. Previously, I have cut tabs in four places in the top of the bezel cup and just push the tabs over the square wire holding the watch crystal in as a final step. There are many little nooks and crannies in the pierce work. I use Diamond Micro Files from Rio Grande. There are 3 pencil lead thin files. They come in a set of 3 round or square of different length and width sizes. (Micro file, Set/3, Diamond, Round, 400m, 114860 or Micro file, Set/3 Diamond, Square, 400m, 114861) Rio no longer carries them, but they will order them for you. They are expensive, so for a set of three it is $104. They come from the UK. The escapement files (#8) work very well to remove the tool marks, but I use them after the diamond micro files. I also use a polisher pin set (Polisher Pin 332702-705 in hard, medium and fine pack of 10; Mandrel/Polisher Pin, 333125 from Germany). The flex shaft is used for the polishers.
Previously, I have used rivets to connect the layers. I have found something I like better. They are silver screws, washers and nuts from Reactive Metals Studio Inc. 1-800-876-3434. I bought 100 of them. (100, 3/8” SP Hex, 0-80; 100 SP Washers, 0-80; 100 SP Nuts, 0-80; 2 0-80 Wrench) They also come in black and brass.
Hex screw
Some books I have used are Forget Me Not Pho-tography & Remembrance (ISBN-978-56898-619-7) by Geoffrey Batchen or for dating photos you can use Unlocking The Secrets in Old Photographs (ISBN-0-916489-50-7) by Karen Frish-Ripley.
Capturing the Past Using Tintypes and Photos
in Jewelryby Diane Weimer

4Metal Arts Society of Southern CaliforniaJul/Aug 2008
By Corliss Rose
The following will show you how to make a very comfortable fitting ring that is bold and sleek in ap-pearance.
Belle uses 18 gauge sterling for her rings. The stout material stands up to the stone setting and also en-hances the monolithic look of her design.
Forming the ring shankBegin with a strip of sterling 7mm wide and 1 foot in length. You’ll be using this strip to cut the shank, the sides, top and bottom of your ring.• cut the length you’ll need from the 7mm strip for your ring size.• file both cut ends flat, you want them to be flush when you solder them
• with a chain nose pliers, form the filed band into a circle, making the ends flush. Ill. 01• dip your formed strip in a solution of boric acid and denatured alcohol to prevent fire scale.• then add flux to your seam (Brooke uses flux on top of the boric acid solution)• solder your seam shut with hard solder, making sure the join is very strong with no gaps• pickle and clean
Once your band is soldered, proceed to make the sides of the ring.
Forming the sides of the ring• From your 7mm wide strip of sterling silver, cut two lengths that are 35mm long.
304.
8mm
(125
in.)
7mm (.275in.)
Illustration 01
Belle Brooke Barr WorkshopMaking a Sculptural
Hollow Ring

5 Jul/Aug 2008Metal Arts Society of Southern California
• anneal the strips for easier forming• bend the strips over the larg-est part of a bracelet mandrel to form a slight curve. Ill.02• position the formed strips on either side of the ring shank. Ill. 03. The shank is placed approximately 1/3 the distance from the bottom of the side strips.• brush with boric acid-denatured alcohol solution• apply flux to the sol-der areas• solder the joins using hard solder• pickle and clean
With that completed, the ring now needs a top and bottom.
Forming the top and bottom of the ring• From your 7mm wide strip of sterling silver, cut a 31mm length (for the bottom) and a 29mm length (for the top)• anneal the strips for easier forming• bend the strips over the largest part of a bracelet mandrel to form a slight curve Ill. 04.• File the ends of the sides of the ring to be at 90º. You want a flush fitting for your top and bottom strips.• position the formed strips on the top and bottom of the ring. Ill. 05 • brush with boric acid-denatured alco-hol solution• apply flux to the solder areas• solder the joins us-ing hard solder
• pickle and clean• trim the top and bottom edges and file smooth
At this point you’ll be preparing your ring for its front and back.• put your skeletal ring flat on a piece of sandpaper and sand using a figure-eight movement on the sand paper until the surface is perfectly flat. Do the same with the other side.
Making the ring’s front and back sides-Soldering the Front• cut two squares of 18 gauge sterling silver that are just slightly larger than your ring’s skeleton outline. Ill. 06• take one piece of the cut sheet and coat it in the boric acid/denatured alcohol
solution• take your skeletal ring and coat it in the boric acid/denatured alcohol solution• position the skeletal ring on top of the cut sheet• apply flux to the join areas• solder the joins using medium solder• pickle and clean• drill a small hole in the inside of the shank area and using
a jeweler’s saw, cut out a finger hole. Ill 07 Brooke uses a 2/0 blade for the 18 gauge sterling.• saw around the perimeter of the ring as close to the sides as possible.
-Soldering the backBefore you go and solder the back of your ring, con-sider where you are going to want to put your stones.
304.
8mm
(125
in.)
7mm (.275in.)
Illustration 04
304.
8mm
(125
in.)
7mm (.275in.)
Illustration 05
304.
8mm
(125
in.)
7mm (.275in.)
Illustration 06
304.
8mm
(125
in.)
7mm (.275in.)
Illustration 07
304.
8mm
(125
in.)
7mm (.275in.)
Illustration 02
304.
8mm
(125
in.)
7mm (.275in.)
Illustration 03

6Metal Arts Society of Southern CaliforniaJul/Aug 2008
Brooke places hers in flush settings on the top and sides of her ring. Why are we considering this now? Because you really don’t want to solder the back of your ring without allowing for a few air holes.
• consider the size of the stones you will be setting. If they are 2mm, then drill 1mm holes. You will enlarge them later on.• if you are not setting stones, consider drilling a few small decora-tive holes in the lower portion of the sides of your ring. A repetitive pattern of small holes in the shank will also work. Ill.08
Once your holes are drilled, follow the above steps for soldering the front of the ring.
Now it’s time for clean up.Brooke uses a rotary file for removing large burrs and nubs of material. This is a rather formidable tool and it’s not for the faint hearted. You can really hurt your fingers, knuckles and hands with one so use it with care. Another alternative to a rotary file is a coarse Dremel sanding cylinder. These Dremel bits fit into a Flex Shaft hand piece and will aggressively remove material. A half round file will also work on the curves of your ring.
• file your ring clean of burs and rough spots• sand all surfaces and edges. Brooke uses a sanding mandrel to finish the curved areas and the shank. A slit grinder will also work well.
Once you have sanded everything smooth, you’ll make what Brooke calls a “comfort grip” for your ring shank.
• Using a rotary file or a Dremel sanding cylinder, slightly bevel the two outside edges of the ring shank. • sand the beveled edges smooth
Polishing and FinishingBrooke finishes her rings to a glossy, reflective sur-face. She suggested finishing the ring before you set the stones. Use what ever technique you desire for finishing. Brooke had another hint: she uses a mini burnisher in a Flex Shaft to pound out any seams. A pit pounder (used in casting) will get the same results.
Setting Stones ‘ala Brooke’Brooke set 2 mm stones as part of her demonstration. She makes her initially drilled holes one half of the diameter of the stone’s diameter. So her initial sink holes were 1mm each. She drilled these holes before the back of the ring was soldered.
Here are some hints from Brooke on stone setting:• use a waxed tipped toothpick to pick up and place your stones• use stones that have a girdle, Ill 09. The girdle becomes the an-chor point for the flush setting.• determine how fat and how even the girdle of your stone is. You want your stone to lie evenly in the setting.
Steps for setting a 2mm stone• increase your ini-tial drill hole from 1mm to 1.5mm• test fit your stone• Use a 2.1mm ball burr for increas-ing the size of the hole. When using this burr, do not be aggressive. Sink is just a little at a time. Then test the stone. You want the stone to be ever so slightly smaller than the hole.• when you get where the stone is just barely smaller than the hole, take a heart burr and cut a groove in the hole just slightly below the surface. Ill 10. The
304.
8mm
(125
in.)
7mm (.275in.)
Illustration 10
304.
8mm
(125
in.)
7mm (.275in.)
Illustration 08
Illustration 09
304.
8mm
(125
in.)
7mm (.275in.)

7 Jul/Aug 2008Metal Arts Society of Southern California
distance should be just about where the girdle of the stone will lie in the setting. The top portion of the stone will lie either flush or just ever so slightly raised from the surface of the ring. This is a delicate opera-tion so take it slow.• Now set your stone in the hole. You’ll need to tap it in the groove you just cut. Brooke takes a piece of hard wood (a 1” cube) and places it over the stone. She then taps the wood slightly with a hammer. This snugly pops the stone in the hole. To finish, Brooke burnishes the surrounding metal over the stone. See illustration 13.• Do the same procedure for the rest of the stones.• Clean up with a final polishing and your ring is com-pleted.
Brooke’s sources for supplies:Rio Grande for:Rotary filesSaw BladesDrill bitsHeart BurrsFinger covers
Home Depot and Hardware Stores for:Roach PrufeThat’s right, Roach Prufe, a 99% boric acid compound for killing cockroaches with 1% inert material.
This product was Brooke’s choice for the boric acid component used with denatured alcohol for prevent-ing fire scale. Roach Prufe is a blue powdery concoc-tion that is 99% boric acid and 1% something else. Apparently, it’s far cheaper than regular boric acid from the local drug store but that “1% something else” captivated everyone’s interest and rattled a few cages. However, everyone went “blue” and used the Roach Prufe. Being curious, I researched the Orchid files on using Roach Prufe as a preventative for fire scale. Quite frankly, more blog contributors balked about exposure to alcohol and no one got any MSDS sheet info on the Roach Prufe. However, I did find MSDS (material safety data sheet) information on the product and it lists Roach Prufe as a non-irritant to the eyes and skin. The mysterious 1% was listed as inert (could be the blue dye.) The general Orchid consensus was to use common sense. So don’t go sticking your nose in the jar, keep it away from a breeze and wash your hands well after using any type of chemistry.
304.
8mm
(125
in.)
7mm (.275in.)
Illustration 10
Member NewsCheryl Lommatsch’s sculp-ture “The Goddess of a Thousand Souls”, made from vintage pot iron grill, fir and pine, plywood, reeds, keys, waxed linen. is being featured at The Mingei International Museum at Balboa Park in San Diego. Forms in Wood and Fiber, from June 7, 2008 - January 4, 2009.
2Roses were featured in recent editions of “W” magazine and Vogue. The San Diego County Fair hosts the largest jewelry and gemological exhibition in the U.S. 2Roses and Edna & Chris Kuhta were selected as the judges for this years event. 2Roses also an-nounced that they are starting a web development venture tailored to the specific needs of jewelry artists.

1644 S. Clementine St. Anaheim CA 92802
Upcoming WorkshopsFiligree Dec 6-7, 2008Enameling Oct 18-19
SOCIETY OF SOUTHERN CALIFORNIA
METALARTSMETALARTS
Its Time to RenewYour MASSC Membership.
Register and pay annual dues directly on-line at
www.masconline.com(snail-mail option available online too)
phone 800.545.6566 www.riogrande.com
“Millefiore in Metal”Second Place, Beads
2007 Saul Bell Design Awardwww.saulbellaward.com
Patricia Tschetterwww.tschetterstudio.com
Design knows no limits. Freely explore the expanse of your creativity,
and discover with confidence, knowing that Rio is solidly behind you—
with tools, supplies, raw materials, and ready expertise
on anything and everything jewelry.
“I discover a world of opportinities with Rio.”
source code: ADMAS
Call today for your free catalogs.
This Could Be You!2009 Saul Bell Design Award
entries due 9/21/08
www.saulbellaward.com