chapter 3 formatting documents - millersvilledhutchens/cs101/labs/office2007/mswordch3.pdf ·...
TRANSCRIPT

SAMPLE
Chapter 3 Formatting Documents 85
Formatting a Document The formatting applied to a document can affect how the reader inter-prets the document, how easily the document is read, and the overall impression of the document. For example, if the text is very small and covers the entire page from edge to edge, it will be very difficult to read the text. If the text is too large and there is quite a bit of space between each line of text, the document could appear childish. Proper formatting is crucial in creating a professional-looking document.
Margins
Margins are the white regions around the text on a page. Margin size affects the amount of text that a page can contain. Smaller margins leave more room for text. Wider margins mean less text. For example, widening the left and right margins decreases the number of characters that fit on a line. Narrowing the same margins increases the amount of text in a line. Similarly, larger top and bottom margins decrease the number of lines of text a page can contain and smaller top and bottom margins increase the amount of text on a page. The following examples contain the same text, but have different margins:
Common Paper SizesTo change the paper size, click Page Layout j Size.
Letter 8.5" x 11"Legal 8.5" x 14"A3 297mm x 420mmA4 210mm x 297mm Tabloid 11" x 17"
Key ConceptsSetting margins and indentsCreating listsChanging line and paragraph spacingSetting tab stopsAdding headers, footers, and page numbersInserting and manipulating graphicsInserting footnotes and endnotesCreating templates and HTML filesPortfolio creation (Exercise 1)Scannable and basic resume (Exercises 20, 21)Creating return address labels (Exercise 23)
Practice Data FilesTRAINING, GADGETS MAP
Exercise Data FilesINVENTORY, LEARNING JOURNAL, OPENINGS, WELCOME, BARBELL, TELECOMMUTING, U.S. PRESIDENTS, PROPOSAL, SCREENPLAY RUBRIC, CAMPING TIPS, SCIENCE MUSEUM, SUNPORT CAMPING, LOGO
Chapter 3Formatting Documents

SAMPLE
86 Chapter 3 Formatting Documents
The default margins in Word are 1 inch for the left, right, top, and bottom. Click Page Layout j Margins to display options for changing the margins. To format a document with margins that are not listed, click Page Layout j Margins j Custom Margins. The Page Setup dialog box with the Margins tab selected is displayed, and individual margins can be set.
Indenting Paragraphs
Margin settings apply to an entire document and cannot be different from paragraph to paragraph. Indents decrease the width of lines of text in a paragraph. Indents are often used to set off paragraphs such as a quotation.
The default indents are 0 inches, meaning that lines of text extend from the left margin to the right margin. Specify left and right indents to give a paragraph shorter line lengths:
The scien�fic classifica�on of the zebras are as follows: mountain zebra is Equus zebra, Burchell’s zebra is Equus burchelli, and Grevy’s zebra is Equus grevyi.
The scien�fic classifica�on of the zebras are as follows: mountain zebra is Equus zebra, Burchell’s zebra is Equus burchelli, and Grevy’s zebra is Equus grevyi.
The scien�fic classifica�on of the zebras are as follows: mountain zebra is Equus zebra, Burchell’s zebra is Equus burchelli, and Grevy’s zebra is Equus grevyi.
To format a paragraph with indents, use Page Layout j Indent Left and Page Layout j Indent Right . The amount of indent is measured in inches. Setting indents affects only the paragraph that contains the inser-tion point, or multiple paragraphs selected together.
Alternative Click the Page Setup group Dialog Box Launcher to display the Page Setup dialog box.
TIP To change units of measurement, click j Word Options. In the Advanced options change the Show measurements in units of option.
Alternative Click the Paragraph group Dialog Box Launcher and then use the Indents and Spacing tab to set indents.
TIP To change only the left indent by 0.5", click Home j Increase Indent or Home j
Decrease Indent .

SAMPLE
Chapter 3 Formatting Documents 87
Indents can also be set by dragging markers on the ruler:
When an indent marker is dragged, a dotted line appears that helps line up text.
Practice: TRAINING – part 1 of 6
!! OPEN TRAININGa. Start Word.
b. Open TRAINING, which is a Word data file for this text.
@@ CHANGE THE MARGINSa. Click Page Layout j Margins. Options for changing the margins are displayed.
b. Click Wide. The left and right margins are now 2 inches. Scroll through the docu-ment and see the effect.
c. Click Page Layout j Margins j Narrow. All the margins are now 0.5 inches. Scroll through the document and see the effect.
d. Click Page Layout j Margins j Custom Margins. The Page Setup dialog box is displayed.
e. Change the margin options as shown:
f. Select OK. Scroll through the document and see the effect.
g. Save the modified TRAINING.
TIP Click View Ruler above the vertical scroll bar to display the rulers.

SAMPLE
88 Chapter 3 Formatting Documents
## INDENT A PARAGRAPHa. In the “Session Descriptions” section, which starts on page 1 and ends on page 2,
place the insertion point in the paragraph that begins “Learn the difference….”
b. On the Page Layout tab, change the Indent Left and Indent Right options to 0.5. The left and right sides of the paragraph are indented 0.5 inches.
$$ INDENT OTHER PARAGRAPHSa. In the “Sessions Descriptions” section, place the insertion point in the paragraph
that begins “Learn specific techniques….”
b. On the ruler, drag the Left Indent marker to the 0.5" mark:
The left side of the paragraph is indented.
c. On the ruler, drag the Right Indent marker to the 5" mark:
The right side of the paragraph is indented.
d. In the “Session Descriptions” section, place the insertion point in the paragraph that begins “Develop awareness….”
e. Format the paragraph with 0.5" left and right indents.
%% SAVE THE MODIFIED TRAINING
Space Before and After a Paragraph
Space between paragraphs makes the text easier to read and helps dis-tinguish where paragraphs begin and end. The default formatting for a paragraph is no space before (above) the paragraph and 10 points of space after (below) the paragraph. Paragraphs of body text, such as in the body of a letter, are typically formatted in this manner. Headings are typically formatted with space before and some space after, which helps set the heading closer to the text that it is associated with:

SAMPLE
Chapter 3 Formatting Documents 89
The scien�fic classifica�on of the zebras are as follows: mountain zebra is Equus zebra, Burchell’s zebra is Equus burchelli, and Grevy’s zebra is Equus grevyi.
Mountain Zebra
The mountain zebra is very rare. The stripes on the mountain zebra stop at the underside of the belly, which is mostly white. Mountain zebras do not form large herds.
Burchell’s Zebra
The Burchell zebra has stripes all over its body, around the belly and all the way to the hooves During rainy seasons the Burchell zebras can form
To change the space before or after a paragraph, use Page Layout j Before and Page Layout j After . The amount of space is measured in points. Setting space before or after affects only the paragraph that contains the insertion point, or multiple paragraphs selected together.
Line Spacing
The space between lines of text in a paragraph can be changed. The default formatting for a paragraph is 1.15 lines of space. Text that is double spaced adds more space between lines of text for notes or comments and can make a document easier to read:
Click Home j Line spacing to display options for changing the amount of space between lines of text in a paragraph:
Alternative Click the Paragraph group Dialog Box Launcher and then use the Indents and Spacing tab to set space before or space after.
double spaced

SAMPLE
90 Chapter 3 Formatting Documents
Select 2.0 to format a paragraph with double spacing. For additional spac-ing options, click Line Spacing Options to display the Paragraph dialog box. Setting line spacing affects only the paragraph that contains the insertion point, or multiple paragraphs selected together.
Practice: TRAINING – part 2 of 6Word should already be started with TRAINING displayed from the last practice.
!! CHANGE SPACE AFTER A PARAGRAPHa. At top of page 1, place the insertion point in the heading “Life-Long Learning
Program.”
b. On the Page Layout tab, set After to 24 pt. More space is added below the “Life-Long Learning Program” heading.
@@ CHANGE SPACE BEFORE PARAGRAPHSa. In the “Session Descriptions” section, place the insertion point in the paragraph
that begins “Learn the difference….”
b. On the Page Layout tab, set Before to 6 pt. More space is added above the para-graph.
c. In the “Session Descriptions” section, place the insertion point in the paragraph that begins “Learn specific techniques….”
d. On the Page Layout tab, set Before to 6 pt.
e. In the “Session Descriptions” section, place the insertion point in the paragraph that begins “Develop awareness…” and format the paragraph with 6 pts of space before.
## CHANGE PARAGRAPH LINE SPACINGa. Near the top of the document, place the insertion point in the paragraph of text
that begins “Gadgets, Inc. is committed….”
b. Click Home j Line spacing j 2.0. The paragraph of text is double spaced:
$$ SAVE THE MODIFIED TRAINING

SAMPLE
Chapter 3 Formatting Documents 91
Tabs and Tab Stops Tabs are used to position text within a line. Press the Tab key to insert a tab and move any text to the right of the insertion point over to the position of the next tab stop. Delete a tab by placing the insertion point to the left of the tab and pressing the Delete key. Any text is automatically moved to the left to fill the space previously created by the tab.
A tab stop specifies a location within the line of text. In Word, tab stops are displayed on the ruler above the document. A set of default tab stops are located at every half inch, but they do not appear on the ruler.
Tabs can be used to align text into columns of data. New tab stops are created at the appropriate intervals to align the data in columns:
A tab stop can be set at any position on the ruler within the margins. When a tab stop is set, Word automatically removes the default tab stops to the left. For example, a tab stop set at 1.4 inches automatically removes the default tab stops at 0.5 and 1.0 inches. The default stop at 1.5 inches is not affected.
Text is aligned to a tab stop according to the type of tab stop:
• Left Tab aligns the beginning of the text at the stop.
• Right Tab aligns the end of the text at the stop.
• Center Tab centers the text equidistant over the stop.
• Decimal Tab aligns the decimal point (a period) at the stop.
Each type of tab stop is used in the text shown below. Note the markers on the ruler:
Tab stops are applied to the paragraph that contains the insertion point or to multiple paragraphs selected together. When the insertion point is moved through the text, the ruler changes to show the tab stops for the current paragraph.
Set a tab stop by first clicking the tab selector on the ruler until the type of tab stop to be created is displayed:
formatting text into columns
setting a tab stop

SAMPLE
92 Chapter 3 Formatting Documents
Click the white area of the ruler above the document to place a tab stop. The tab stop can be dragged to a new location if needed. For example, click the tab selector until Right Tab is displayed and then click the ruler to create a right tab stop at that location.
To remove a tab stop, drag its marker downward, off the ruler. Any text that was aligned at a deleted stop is then aligned to the next tab stop.
The Tabs dialog box is useful for changing, editing, and deleting tab stops. Double-click a tab stop on the ruler to display the Tabs dialog box. In the dialog box, type the Tab stop position, select the appropriate Alignment, and then select Set to create a tab stop at that position. Repeat this proce-dure to create as many tab stops as needed. To remove a tab stop, select it from the Tab stop position list and then select Clear. Select Clear All to remove all the tab stops.
Selecting a Vertical Block of Text Data formatted into columns often have different formatting applied to individual columns of data. To select a vertical block of text, hold down the Alt key and drag:
Formatting can then be applied to the selected text. For example, click Home j Bold to format selected data as bold:
Practice: TRAINING – part 3 of 6Word should already be started with TRAINING displayed from the last practice.
!! SELECT TEXT FOR FORMATTINGa. Display formatting marks if they are not already showing.
b. Scroll to the “Schedule” section. The paragraphs in this section have a single tab between each column: one tab after “Session,” “Day,” and “Time.” The information is difficult to read because tab stops have not been set.
c. Select all the paragraphs in the “Schedule” section:
Tab LeadersA tab leader is a character that is repeated to fill the space spanned by a tab. Examples of tab leaders are ...., ----, and ___. The dotted leader is often used in a table of contents. The solid line is used to represent a blank on a form. Select a tab leader in the Leader options in the Tabs dialog box.
SAMPLE
Chapter 3 Formatting Documents 93
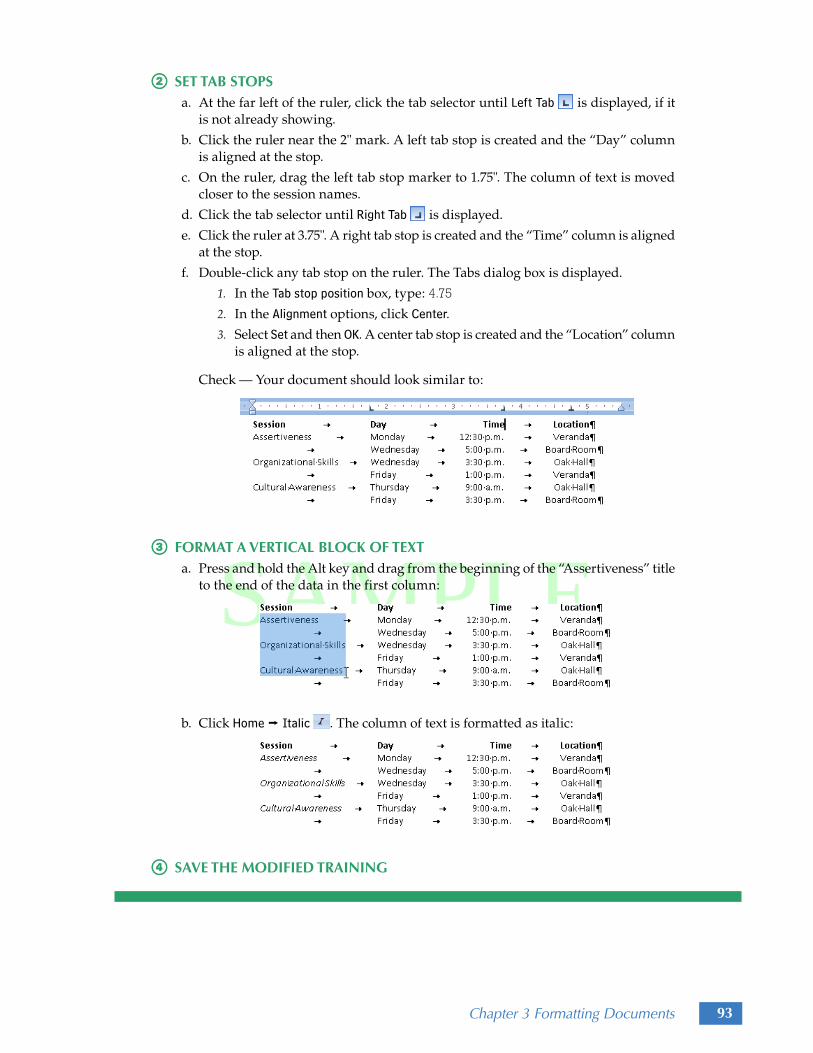
@@ SET TAB STOPSa. At the far left of the ruler, click the tab selector until Left Tab is displayed, if it
is not already showing.
b. Click the ruler near the 2" mark. A left tab stop is created and the “Day” column is aligned at the stop.
c. On the ruler, drag the left tab stop marker to 1.75". The column of text is moved closer to the session names.
d. Click the tab selector until Right Tab is displayed.
e. Click the ruler at 3.75". A right tab stop is created and the “Time” column is aligned at the stop.
f. Double-click any tab stop on the ruler. The Tabs dialog box is displayed.
1. In the Tab stop position box, type: 4.75
2. In the Alignment options, click Center.
3. Select Set and then OK. A center tab stop is created and the “Location” column is aligned at the stop.
Check — Your document should look similar to:
## FORMAT A VERTICAL BLOCK OF TEXTa. Press and hold the Alt key and drag from the beginning of the “Assertiveness” title
to the end of the data in the first column:
b. Click Home j Italic . The column of text is formatted as italic:
$$ SAVE THE MODIFIED TRAINING

SAMPLE
94 Chapter 3 Formatting Documents
Hanging and First Line Indents A paragraph can be formatted so that the first line is indented differ-ently from the rest of the paragraph. When the first line of a paragraph is farther to the left than the rest of the paragraph, it is formatted with a hanging indent. A hanging indent is often used for lists, outlines, or for a bibliography entry:
Levy, Kristin. The Complete Guide to Selling Inner-Spring Mattresses. Chicago: Buffet Press, 1993.
To create a hanging indent, drag the Hanging Indent marker on the ruler:
A hanging indent can also be created using the Paragraph dialog box. Click the Paragraph group Dialog Box Launcher , then in the dialog box click the Indents and Spacing tab. Select Hanging in the Special list and specify the indent amount in the By box.
Another paragraph format is the first line indent, which indents the first line of the paragraph farther to the right than the rest of the paragraph. A first line indent is often used for text in a published book or paper. For example, this paragraph is formatted with a first line indent.
To create a first line indent, drag the First Line Indent marker on the ruler:
A first line indent can also be created using options in the Indents and Spacing tab in the Paragraph dialog box. Select First line in the Special list and specify the indent amount in the By box.
Setting hanging or first line indents affects only the paragraph that contains the insertion point, or multiple paragraphs selected together.
TIP Creating a bibliography is discussed in Chapter 4.
SAMPLE
Chapter 3 Formatting Documents 95
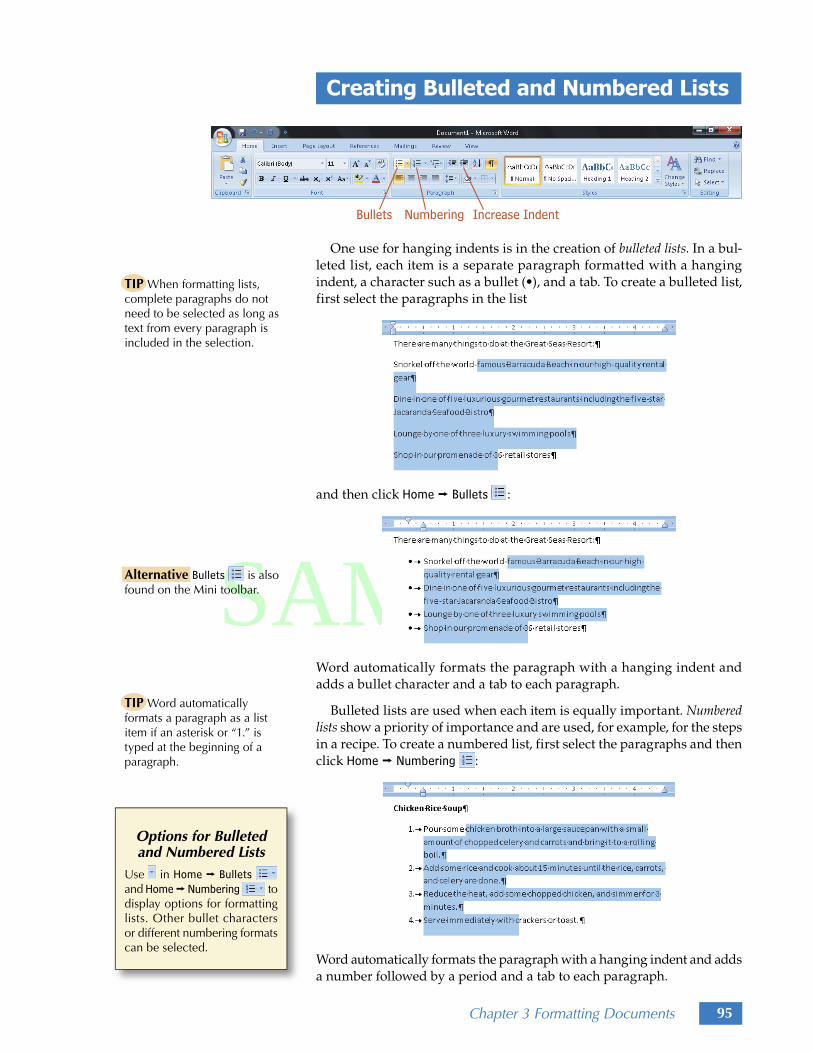
Creating Bulleted and Numbered Lists
One use for hanging indents is in the creation of bulleted lists. In a bul-leted list, each item is a separate paragraph formatted with a hanging indent, a character such as a bullet (•), and a tab. To create a bulleted list, first select the paragraphs in the list
and then click Home j Bullets :
Word automatically formats the paragraph with a hanging indent and adds a bullet character and a tab to each paragraph.
Bulleted lists are used when each item is equally important. Numbered lists show a priority of importance and are used, for example, for the steps in a recipe. To create a numbered list, first select the paragraphs and then click Home j Numbering :
Word automatically formats the paragraph with a hanging indent and adds a number followed by a period and a tab to each paragraph.
Options for Bulleted and Numbered Lists
Use in Home j Bullets and Home j Numbering to display options for formatting lists. Other bullet characters or different numbering formats can be selected.
TIP Word automatically formats a paragraph as a list item if an asterisk or “1.” is typed at the beginning of a paragraph.
Alternative Bullets is also found on the Mini toolbar.
TIP When formatting lists, complete paragraphs do not need to be selected as long as text from every paragraph is included in the selection.

SAMPLE
96 Chapter 3 Formatting Documents
Click Home j Increase Indent to increase the indent of bulleted or numbered items. To remove the bullets or numbering list formats, select the formatted paragraphs and then click Home j Bullets or Home j Numbering again.
Practice: TRAINING – part 4 of 6Word should already be started with TRAINING displayed from the last practice.
!! FORMAT A HANGING INDENTa. Scroll to the “Instructors” section on page 2 and then select the two paragraphs
about the instructors:
b. On the ruler, drag the Hanging Indent marker to the 1" mark.
c. The paragraphs have hanging indents, but are still not formatted properly. Place the insertion point just after “Merlin” in the first instructor paragraph.
d. Delete the space and then press the Tab key.
e. Replace the space after the second instructor’s last name with a tab.
Check – Your document should look similar to:
@@ FORMAT A NUMBERED LISTa. Scroll to the “Program Objectives” section on page 1.
b. Select the three paragraphs about program objectives:
c. Click Home j Numbering . The paragraphs are formatted with numbers and a hanging indent. Click anywhere in the document to remove the selection:

SAMPLE
Chapter 3 Formatting Documents 97
## FORMAT A BULLETED LISTa. Scroll to the “Registration” section.
b. Select the four paragraphs about registration.
c. Click Home j Bullets . The items in the list are formatted with bullets and a hanging indent:
$$ SAVE THE MODIFIED TRAINING
Headers and Footers
A header is an area at the top of a page and a footer is an area at the bottom of the page. A header or footer is typically used to include the page number, file name, author’s name, and the date on each page. To create a header or footer, click Insert j Header or Insert j Footer. A gallery of built-in designs is displayed. Click a built-in design and the document text dims, the header or footer is added, and the Design tab is displayed on the Ribbon:
Type text to replace the blue placeholder and then format the text as needed. Use the Design tab to further customize the header or footer:
TIP Header and Footer are found on both the Insert tab and the Design tab.
Building BlocksBuilt-in designs such as headers and footers are called building blocks. Building blocks help keep formatting consistent. Custom building blocks can be created and reused in many documents.
Alternative To add a blank header or footer, click Insert j Header j Edit Header or Insert j Footer j Edit Footer.
SAMPLE
98 Chapter 3 Formatting Documents
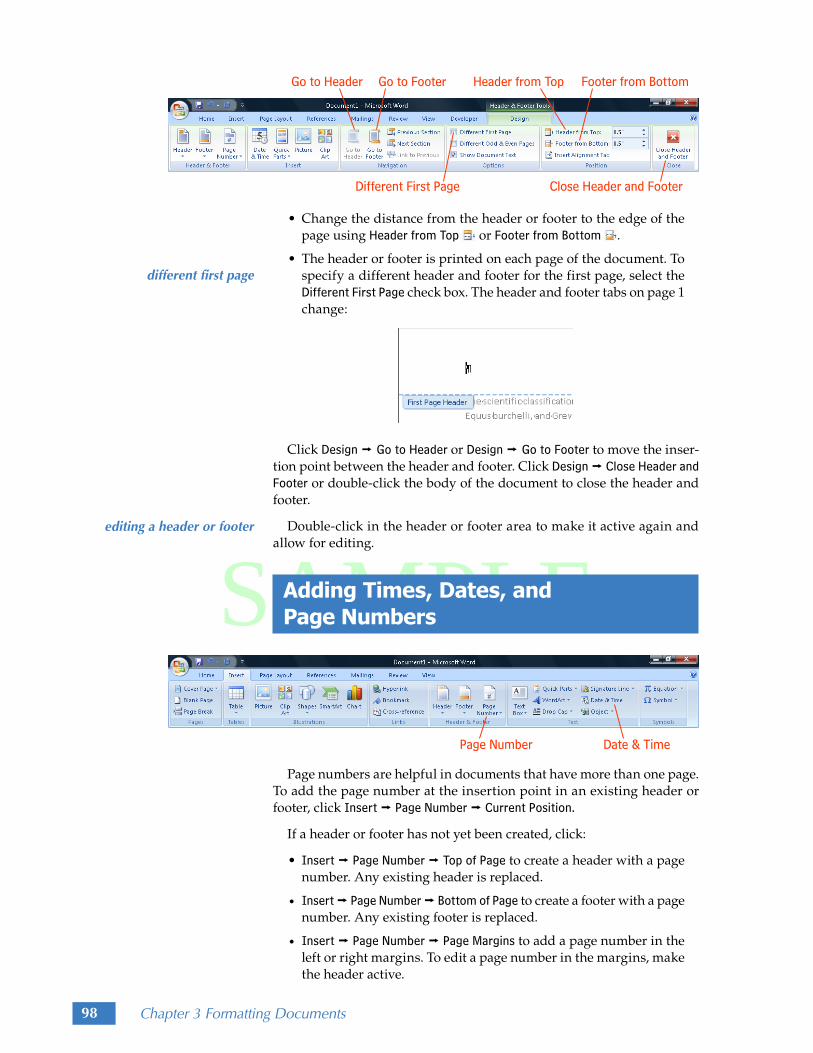
• Change the distance from the header or footer to the edge of the page using Header from Top or Footer from Bottom .
• The header or footer is printed on each page of the document. To specify a different header and footer for the first page, select the Different First Page check box. The header and footer tabs on page 1 change:
Click Design j Go to Header or Design j Go to Footer to move the inser-tion point between the header and footer. Click Design j Close Header and Footer or double-click the body of the document to close the header and footer.
Double-click in the header or footer area to make it active again and allow for editing.
Adding Times, Dates, and Page Numbers
Page numbers are helpful in documents that have more than one page. To add the page number at the insertion point in an existing header or footer, click Insert j Page Number j Current Position.
If a header or footer has not yet been created, click:
• Insert j Page Number j Top of Page to create a header with a page number. Any existing header is replaced.
• Insert j Page Number j Bottom of Page to create a footer with a page number. Any existing footer is replaced.
• Insert j Page Number j Page Margins to add a page number in the left or right margins. To edit a page number in the margins, make the header active.
different first page
editing a header or footer

SAMPLE
Chapter 3 Formatting Documents 99
The page number can then be formatted as needed. When the document is printed, the appropriate page number will print on each page. To change the numbering style, click Insert j Page Number j Format Page Numbers. To delete a page number, click Insert j Page Number j Remove Page Numbersor select the page number and press the Delete key.
It is easier to keep track of document revisions when printouts include the date and time they were printed. To add the date or time at the insertion point, click Insert j Date & Time which displays a dialog box. Select a format and then OK to insert the date or time. Select the Update automatically check box in the dialog box to have the date and time automatically updated when a document is printed or opened. To delete the date or time, select it and press the Delete key.
To update the date and time in the document, move the pointer over the date or time until Update appears, then click Update:
Adding Graphics
Graphics can be used to make a document more interesting and infor-mative. Graphics in digital format come from various sources, including scanned artwork, digital camera pictures, screen captures, and illustration software. Click Insert j Picture to display the Insert Picture dialog box with a list of graphic files.
Clip art are files of general-purpose graphics created by an artist using illustration software. Click Insert j Clip Art to display a task pane for finding clip art. Type a word or phrase in the Search for box and select Goto find all clip art that have the keywords in their description. To narrow a search, use the Search in list, which contains clip art collection names, and the Results should be list, which contains file formats. For example, type car in the Search for box and then select Go to display clip art similar to:
keeping track of revisions
Graphic File FormatsSome of the most commonly-used graphic file formats are:
GIF (pronounced either “giff” with a hard g or “jiff”)
JPG (pronounced “jay-peg”)
PNG (pronounced “ping”)
TIF (pronounced “tiff”)
CGM, FPX, MIX, PCD and PCT.
TIP To change the format of a date or time, right-click the date or time and then select Edit Field from the menu.
Alternative Press the F9 key to update a date or time.
TIP Page Number and Date & Time are found on both the Insert tab and the Design tab.

SAMPLE
100 Chapter 3 Formatting Documents
To place a clip art graphic into the document, click the arrow to the right of the graphic and select Insert from the menu. To remove the task pane, click Close in the upper-right corner.
Once placed in a document, a graphic may need to be sized. Click a graphic to select it and display handles:
Point to a corner handle, which changes the pointer to and then drag to size the graphic.
To move a graphic, drag the center of it (not a handle). Wherever a graphic is moved, text moves to make room. Cut, Copy, and Paste on the Home tab can be used to create copies or move a selected graphic. Press the Delete key to delete the selected graphic. Click anywhere in the document other than on the graphic to remove the handles.
ClipsClip art is a type of clip. A clip is a single media file, which can be a picture, a sound, an animation, or a movie. The Clip Art task pane is used to search for clips.
The small globe in the cor-ner of clips in the task pane shown to the right indicates that the clips were found at a source on the Web. If the computer is not connected to the Internet, only the first three clips would be found.
TIP Dragging a center handle causes distortion. Drag a corner handle to size a graphic without distorting it.

SAMPLE
Chapter 3 Formatting Documents 101
When a graphic is inserted, the Format tab is added to the Ribbon and is used to change the look of a selected graphic:
• Recolor changes the colors.
• Brightness adjusts the relative lightness.
• Contrast adjusts the difference between the lightest and darkest areas.
• Picture Shape changes the shape.
• Picture Border adds a border.
• Picture Effects adds effects such as bevels and shadows.
• Picture Styles apply several picture formats in one click.
• Crop trims away areas of the graphic that are not needed.
• Reset Picture removes the formatting.
Positioning a Graphic
A graphic inserted into a document is placed at the insertion point. Formats can then be applied to the paragraph and will affect the position of the graphic. For example, to center a graphic, place the insertion point in the paragraph that contains the graphic and click Home j Center . The graphic can be moved to another location within text by dragging.
To move a selected graphic around the page freely, click Format j Text Wrapping j Square. The text on the page will move, or wrap, around the graphic as it is moved around the page. Other options in Format j Text Wrapping allow for other effects such as text showing over the graphic or the graphic covering the text. As text is edited, the graphic will remain with the text it is near.
To format the graphic to again stay in the text at the insertion point, select Format j Text Wrapping j In Line with Text.
To quickly line up a selected graphic in a specific position on a page, click Format j Position and select a position. As text is edited, text will flow and the graphic will remain in the position relative to the page.
TIP Click Format j Bring to Front or Format j Send to Back to move overlapping graphics on top of each other or behind.

SAMPLE
102 Chapter 3 Formatting Documents
Practice: TRAINING – part 5 of 6Word should already be started with TRAINING displayed from the last practice.
!! CREATE A HEADER WITH THE PAGE NUMBERa. Click Insert j Page Number j Top of Page. A gallery is displayed.
b. Scroll the gallery and click the Bold Numbers 2 built-in design. The header is created with a centered page number “Page 1 of 3” and the Design tab is displayed on the Ribbon.
c. Type your name followed by a space:
@@ ADD THE DATE IN THE FOOTERa. Click Design j Go To Footer. The insertion point is moved to the footer.
b. Click Design j Date & Time. A dialog box is displayed.
1. Select a format similar to 10/31/2009 5:22:48 PM.
2. Select the Update automatically check box.
3. Select OK. A date and time that will automatically update are added.
c. Click in the footer, and then drag to select the date and time.
d. Click Home j Bold . The date and time are formatted as bold.
e. Click Design j Close Header and Footer. The header and footer are dimmed.
## INSERT A GRAPHIC AND FORMAT ITa. Scroll to page 2 to the “Session Locations” section and place the insertion point at
the beginning of the paragraph that begins “The walls of….“.
b. Click Insert j Picture. A dialog box is displayed.
1. Navigate to GADGETS MAP, which is a data file for this text.
2. Select Insert. The picture is displayed at the insertion point.
c. Click Format j Recolor j Accent color 1 Light. The lines in the map are now blue.
$$ POSITION THE GRAPHICa. Click Format j Text Wrapping j Square. The text wraps around the graphic.
b. Drag the map so that the top of the map is even with the first line of text in the “Session Locations” section and the right side of the map is about even with the right margin:

SAMPLE
Chapter 3 Formatting Documents 103
%% SAVE THE DOCUMENT
Pagination
Pagination is how a document is divided into pages. Word automatically determines how much text will fit on a page based on the amount of text and the document formatting. As a document is edited, Word automati-cally updates the pagination. To change pagination, insert a page break. Inserting a page break moves the text after the insertion point to the next page. To insert a break, press Ctrl+Enter or click Insert j Page Break.
To delete a page break, place the insertion point to the left of the page break and press the Delete key. The document repaginates and text from the next page moves up to fill the current page.
Creating Footnotes and Endnotes
Research papers and reports often include footnotes to cite sources. To add a footnote, place the insertion point in the text where the footnote number should appear and click References j Insert Footnote. A number is placed in the text and the insertion point is moved to a new footnote at the end of the document:
Manual and Automatic Page Breaks
An inserted page break is called a “manual” or “hard” page break. Where Word ends one page and begins another is sometimes called an “auto-matic” page break.

SAMPLE
104 Chapter 3 Formatting Documents
A separator line indicates the footnotes
In a new footnote, the insertion point is placed to the right of the foot-note number at the bottom of the page so that the footnote information can be typed and formatting applied.
By default, Word numbers footnotes with Arabic numerals such as 1 and 2. To change the number format, click the Footnotes group Dialog Box Launcher to display the Footnote and Endnote dialog box. Options in this dialog box affect the number format, the starting number, and the location of the footnotes.
Word sequentially numbers footnotes, and automatically renumbers footnotes when one is moved, inserted, copied, or deleted. To delete a foot-note, delete the footnote number in the text, which automatically removes the reference from the bottom of the page.
Endnotes appear on the last page of a document and are a common method of references for a research paper. To create an endnote, place the insertion point in the text where the endnote number should appear and click References j Insert Endnote . A number is placed in the text and the insertion point is moved to the end of the document. By default, Word numbers endnotes with lowercase Roman numerals such as i and ii. Change the number format in the Footnote and Endnote dialog box.
Practice: TRAINING – part 6 of 6The footnotes in this practice have the standard format as defined in The Gregg Reference Manual Tenth Edition by William Sabin (© 2005 McGraw-Hill Companies, Inc.). Word should already be started with TRAINING displayed from the last practice.
!! CREATE A FOOTNOTEa. In the first paragraph of the document, place the insertion point after the period
after the last word, which reads “…harmony.”
b. Click References j Insert Footnote. Word inserts a 1 and the insertion point is moved to the bottom of the page where the footnote text can be typed. Note the separator line between the body of the document and the footnote.
@@ ENTER THE FOOTNOTE TEXTa. Type the following text, allowing Word to wrap the text:
Chris Kemperstein, Working in Harmony: The Gadgets Philosophy (Atlanta: Caliper Press, 2005), p. 110.
b. Move the insertion point to the left of the footnote number and then press Enter.
endnotes
TIP Double-click the footnote number in the text to move the insertion point to the footnote at the bottom of the page.
TIP Creating a bibliography is discussed in Chapter 4.
TIP The standard format for footnotes is a 0.5 inch first line indent and a blank line above each footnote.

SAMPLE
Chapter 3 Formatting Documents 105
## FORMAT THE FOOTNOTE TEXTa. Select the book title, “Working in Harmony: The Gadgets Philosophy.”
b. Click Home j Italic . The book title is now italic.
c. Click anywhere in the footnote text. The book title is no longer selected and the insertion point is placed in the footnote.
d. With the insertion point in the footnote text, drag the first line indent marker on the ruler to 0.5". The footnote now has a first line indent of 0.5 inches:
$$ CHANGE THE PAGINATIONa. Place the insertion point just to the left of the “S” in “Session Descriptions.”
b. Click Insert j Page Break. A page break is inserted, and text after the break is moved to the next page.
c. Scroll to the “Instructors” heading on page 2 and place the insertion point just to the left of the “I” in “Instructors.”
d. Press Ctrl+Enter. A page break is inserted, and text after the break is moved to the next page.
e. Scroll up and place the insertion point to the left of the page break:
f. Press the Delete key. The page break is deleted.
g. Press the Delete key again to delete the extra paragraph.
%% SAVE THE MODIFIED TRAINING, PRINT A COPY, AND CLOSE THE DOCUMENT
Templates A template is a master document that includes the basic elements for particular types of documents. Templates are used again and again when-ever a document of that type is needed. For example, office memos usually contain the same layout (To:, From:, Subject:, company logo, and so on), with only the topic changing for each new memo. Instead of typing the text, setting tab stops, and applying the formatting every time, a more effi-cient approach would be to create a template that contains the unchanging elements and then use this template each time a new memo is needed.
To create a template, type and format text in a new document. Select j Save As to display a dialog box. Type a file name in the File name box, and select Word Template in the Save as type list. In the Favorite Links list, click Templates, and then select Save.
TIP A Word template is saved with a .dotx extension. Word templates containing macros have a .dotm extension.

SAMPLE
106 Chapter 3 Formatting Documents
To create a new document from a template, select j New, then click My templates to display a dialog box of templates.
When a template is used, Word creates a new, blank, untitled document that contains the same formatting and text as the template. This prevents accidentally saving over and changing the original template.
A variety of pre-created templates are accessible through Word. Select j New to display the New Document dialog box and then click Installed
Templates:
Click options in the Templates list to view and select local templates, which are stored on the computer. If the computer has an Internet connection, click options in the Microsoft Office Online list to view and download tem-plates from Microsoft.
Practice: Generic MemoThe document created in this practice is a memo as defined in The Gregg Reference Manual Tenth Edition by William Sabin (© 2005 McGraw-Hill Companies, Inc.).
!! CREATE A NEW BLANK WORD DOCUMENT
@@ TYPE TEXT AND FORMAT THE DOCUMENTa. Press the Enter key twice to move the insertion point down about 1 inch (2.54 cm)
from the top margin.
b. Type the following text, pressing the Tab key after each colon. Include two blank lines after the “SUBJECT” line:

SAMPLE
Chapter 3 Formatting Documents 107
c. Format each word as bold. Do not format the tab or the colon as bold.
d. Select the paragraphs that contain text, and then set a left-aligned tab stop at 1".
e. Click anywhere to remove the selection.
## SAVE THE TEMPLATE On the Quick Access Toolbar, click Save . The Save As dialog box is displayed.
1. Navigate to the appropriate location for the file to be saved.
2. In the File name box, type: Generic Memo
3. In the Save as type list, select Word Template.
4. In the Favorite Links list, click Templates.
5. Select Save. The document is saved as a template.
$$ CLOSE THE TEMPLATE
%% CREATE A NEW DOCUMENT USING THE TEMPLATEa. Select j New. The New Document dialog box is displayed.
b. In the Templates list, click My templates. The New dialog box is displayed.
c. Click the Generic Memo template and then select OK. A new document with the Generic Memo template text is displayed.
^̂ CREATE A MEMO USING THE TEMPLATEa. Type the following information into the memo headings, replacing Name with
your name:
b. Place the insertion point in the last blank paragraph of the document.

SAMPLE
108 Chapter 3 Formatting Documents
c. Complete the memo by typing the following text for the body of the memo:
&& SAVE, PRINT, AND THEN CLOSE THE DOCUMENTa. On the Quick Access Toolbar, click Save . The Save As dialog box is displayed.
1. Navigate to the appropriate location for the file to be saved.
2. In the File name box, replace the existing text with Vacation Days Memo and then select Save.
b. Print a copy of the memo and then close the document.
Creating an HTML File HTML is the file format for documents viewed using a browser, such as documents on the Web. A document in HTML format is more versatile because Word is not needed to view it, just a browser, such as Internet Explorer. HTML documents can be viewed in Word, and are best viewed in Web Layout view.
To save a document as an HTML file, select j Save As and then select a Web page type in the Save as type list. Click the Change Title button to give the Web page a descriptive title, which is text displayed in the title bar of the browser window.
Saving a document as a Web Page creates an .htm file and a folder with the same name to store any supporting files associated with the document, such as graphics. Saving a document as a Single File Web Page creates an .mht file that contains all supporting information.
To view the file in a Web browser, open a browser, such as Internet Explorer and select File j Open.
An HTML document opened in Word is displayed in Web Layout view.
Practice: Contini PicnicThis practice requires browser software. Internet access is not required.
!! CREATE A NEW WORD DOCUMENTa. In a new document, type the following text, replacing Name with your name:
TIP The MHTML ( MIME HTML) format means that all the information for the document, including pictures, is saved within one single file.
TIP In Internet Explorer version 7, press the Alt key to display the File menu.
title

SAMPLE
Chapter 3 Formatting Documents 109
b. Bold the title “Contini’s Cookies Annual Picnic” and make it 24 points in size.
c. Format the four paragraphs of “Picnic menu” items as a bulleted list.
@@ INSERT CLIP ARTa. Add three blank paragraphs after the “…have any questions.” paragraph.
b. With the insertion point in the last blank paragraph, click Insert j Clip Art. The Clip Art task pane is displayed.
1. In the Search for box, type picnic and then click Go. Clip art is displayed.
2. Point to an appropriate clip art graphic and then click the arrow that appears beside the graphic.
3. In the menu, select Insert. The clip art is placed at the insertion point.
c. If the graphic is too large, drag a corner handle to size the graphic smaller. The entire document should fit onto one page.
d. Center align the paragraph containing the graphic.
## SAVE THE DOCUMENT AND PRINT A COPYa. Save the document naming it: Contini Picnic
b. Print a copy.
$$ SAVE THE DOCUMENT AS AN HTML FILEa. Select j Save As. A dialog box is displayed.
1. In the Save as type list, select Single File Web Page.
2. Click Change Title. A dialog box is displayed.
3. Type a title as shown:
4. Select OK.
5. Select Save. The dialog box is removed and the document is displayed in Web Layout view.

SAMPLE
110 Chapter 3 Formatting Documents
%% OPEN THE HTML DOCUMENT IN A BROWSERa. Start Internet Explorer.
b. Select File j Open. A dialog box is displayed. If the File menu is not visible, such as in Internet Explorer version 7, press the Alt key to display the menu bar.
c. Navigate to the file and select Open.
d. Select OK. The Web page document is displayed.
e. Expand the window, if necessary, to view the entire document. Note the title in the title bar.
f. Close the browser window.
^̂ CLOSE CONTINI PICNIC AND QUIT WORD
Chapter Summary This chapter discussed formatting documents to improve appearance and readability. Proper formatting is crucial in creating a professional-looking document.
Margins are the white region around text on a page. They affect the amount of text a page can contain. Margins are set using the Page Layout tab.
Left and right indents affect the width of lines of text in a paragraph. Indents are set using the Page Layout tab or by dragging markers on the ruler.
By default, text is formatted with space after a paragraph. Space before and after paragraphs can be changed using the Page Layout tab. The line spacing of text in a paragraph is changed using the Home tab or the Paragraph dialog box.
Tabs are used to position text within a line. A tab stop specifies a location within a line of text and is displayed on the ruler above a document. The tab selector is used to set a tab stop. Tabs are also used to align multiple paragraphs of text into columns.
A vertical block of text is selected by holding down the Alt key and drag-ging. Once selected, formatting can be applied to the entire column.
Hanging indents and first line indents affect the width of the first line of text in a paragraph. These indents are set by dragging markers on the ruler or using options in the Paragraph dialog box.
Bulleted and numbered lists are paragraphs with a number or bullet, a tab, and formatted with a hanging indent. The Home tab is used to format lists.
A header is an area at the top of a page and the footer is an area at the bottom of the page. The Insert tab is used to display the header and footer. Page numbers and the date and time are added using the Insert tab.

SAMPLE
Chapter 3 Formatting Documents 111
Graphics from a file or clip art are added to a document using the Insert tab. Graphics can be resized by dragging a corner handle. Dragging the center of a graphic moves it. The Format tab is used to change the look of a selected graphic.
Pagination is how a document is divided into pages. Page breaks are added using the Insert tab or by pressing Ctrl+Enter.
Footnotes and endnotes used in research papers are created on the References tab. Remove a footnote or endnote by deleting its number from the text.
A template contains the basic elements for a particular type of document. A template is created by saving a document to the Templates folder as a Word Template type. To create a new document based on a template, click My templates in the New Document dialog box.
HTML documents are used for Web sites and for distributing docu-ments to individuals that have browser software but do not have Microsoft Word. Use the Single File Web Page type to convert a document to a Web page.
Vocabulary
Bulleted list List created with each item as a sepa-rate paragraph formatted with a hanging indent, a character such as a bullet (•), and a tab.
Clip art A general-purpose graphic created by an artist using illustration software.
Double spaced Paragraph format that adds more space between each line of text.
Endnote Used to document a source. Found on the last page of a document.
First line indent First line of a paragraph that is farther to the right than the rest of the paragraph.
Footer Text that is printed at the bottom of each page.
Footnote Used to document a source. Usually located at the bottom of the page that contains the footnoted material.
Hanging indent First line of a paragraph that is farther to the left than the rest of the paragraph.
Header Text that is printed at the top of each page.
HTML The file format for documents viewed using a browser.
Indent Paragraph format that decreases the width of lines of text in a specific paragraph.
Margins The white region around the text on a page.
Numbered list List created with each item as a separate paragraph formatted with a hanging indent, a number, and a tab. Each number indicates an item’s priority in the list.
Page break Changes where one page ends and another begins.
Pagination How a document is divided into pages.
Tab Used to position text within a line.
Tab stop Specifies a location within a line of text.
Template A master document that includes the basic elements for a particular type of document.
Title Text displayed in the title bar of a Web browser.

SAMPLE
112 Chapter 3 Formatting Documents
Word Commands
After Changes the amount of space after a paragraph. Found on the Page Layout tab.
Before Changes the amount of space before a paragraph. Found on the Page Layout tab.
Bottom of Page Creates a footer with a page number. Found in Insert j Page Number.
Brightness Adjusts the relative lightness in a selected graphic. Found on the Format tab.
Bullets Formats a paragraph with a hanging indent and inserts a bullet and a tab to create a bul-leted item in a list. Found on the Home tab.
Clip Art Displays the Clip Art task pane, which is used to insert clip art at the insertion point. Found on the Insert tab.
Close Header and Footer Closes the header and footer. Found on the Design tab.
Contrast Adjusts the difference between the lightest and darkest areas in a selected graphic. Found on the Format tab.
Crop Trims away areas of the graphic that are not needed in a selected graphic. Found on the Format tab.
Current Position Adds a page number at the insertion point. Found in Insert j Page Number.
Date & Time Displays a dialog box used to insert the current date or time at the insertion point. Found on the Insert tab.
Footer Displays a gallery of footers. Found on the Insert tab.
Footer from Top Changes the distance from the footer to the edge of the page. Found on the Design tab.
Format Page Numbers Displays a dialog box used to change the page numbering style. Found in Insert j Page Number.
Go to Footer Moves the insertion point to the footer. Found on the Design tab.
Go to Header Moves the insertion point to the header. Found on the Design tab.
Header Displays a gallery of headers. Found on the Insert tab.
Header from Top Changes the distance from the header to the edge of the page. Found on the Design tab.
Increase Indent Increases the indent of bulleted or numbered items. Found on the Home tab.
Indent Left Indents the left side of a paragraph. Found on the Page Layout tab.
Indent Right Indents the right side of a paragraph. Found on the Page Layout tab.
In Line with Text Formats a graphic to stay within the text. Found in Format j Text Wrapping.
Insert Endnote Places a number in the text and moves the insertion point to the end of the document. Found on the References tab.
Insert Footnote Places a number in the text and moves the insertion point to the bottom of the page. Found on the References tab.
Line spacing Used to change the amount of space between lines of text in a paragraph. Found on the Home tab.
Margins Displays options used to format the margins of a document. Found on the Page Layout tab.
Numbering Formats a paragraph with a hanging indent and inserts a number and a tab to create a numbered item in a list. Found on the Home tab.
Page Break Inserts a page break at the insertion point. Found on the Insert tab.
Page Margins Creates a page number in the left or right margins. Found in Insert j Page Number.
Page Number Displays a gallery of built-in designs used to add a page number in the document. Found on the Insert tab.
Picture Displays a dialog box used to insert a graphic at the insertion point. Found on the Insert tab.
Picture Border Adds a border to a selected graphic. Found on the Format tab.
Picture Effects Adds effects such as bevels and shadows to a selected graphic. Found on the Format tab.
Picture Shape Changes the shape of a selected graphic. Found on the Format tab.

SAMPLE
Chapter 3 Formatting Documents 113
Position Displays options for lining up a selected graphic on the page. Found on the Format tab.
Recolor Changes the colors in a selected graphic. Found on the Format tab.
Remove Page Numbers Deletes the page number in a document. Found in Insert j Page Number.
Reset Picture Removes the formatting from a selected graphic. Found on the Format tab.
Square Formats a graphic to have text wrap around it. Found in Format j Text Wrapping.
Top of Page Creates a header with a page number. Found in Insert j Page Number.
SAMPLE
114 Chapter 3 Formatting Documents
Review Questions
1. Describe how formatting can affect the usability of a document.
2. a) What are margins? b) What are the default margins in Word?
3. a) How can the margins of a document be changed so the left margin is 2" and the right margin 3"?
b) How long is a line of text after these margins have been set? (Assume an 8.5" x 11" sheet of paper.)
4. Explain what a paragraph formatted with left and right indents of 1" looks like compared to a paragraph with no indents.
5. What is the difference between formatting a paragraph with a 1" left indent using Page Layout j Indent Left and by dragging markers on the ruler?
6. a) Why are paragraphs of text formatted with space after each paragraph?
b) Why are headings formatted with space before the paragraph?
c) How is the space before a paragraph changed?
7. a) Give an example of a document that is typically double spaced.
b) Why would double spacing paragraphs in a document be helpful?
8. How is the formatting of a paragraph changed to double spaced?
9. a) What are tabs used for? b) What does a tab stop do?
10. a) How can you tell where tab stops have been set?
b) List the four types of tab stops and describe each one.
11. What default tab stops will automatically be removed when a tab stop is set at 3” on the ruler?
12. a) List the steps required to set a center tab stop at 2.25".
b) How can the tab stop described in part (a) be moved to 3"?
c) How can the tab stop described in part (a) be removed?
13. How can a center tab stop at 2.5" be changed to a left tab stop at 3"?
14. What type of data would be best aligned using a decimal tab stop?
15. List the steps required to select only the second column of text arranged using tab stops and format it as italic.
16. What type of indent formats the first line of a paragraph farther to the left than the rest of the paragraph?
17. a) List the steps required to format a paragraph with a hanging indent of 0.25".
b) Give an example of when a hanging indent is useful.
18. Draw what the markers on the ruler would look like after a paragraph has been formatted with a first line indent of 0.5".
19. Compare and contrast hanging and first line indents.
20. List the steps required to format six paragraphs as a bulleted list of six items.
21. When would a numbered list be used instead of a bulleted list?
22. How can steps 2 and 3 of a numbered list of five items be indented farther?
23. a) What is a header? b) What is a footer? c) List three kinds of information that is often
included in a header or footer. d) How can the insertion point be quickly
moved from the header to the footer?

SAMPLE
Chapter 3 Formatting Documents 115
24. a) List the steps required to have Word print a centered page number in the footer on each page in a document.
b) How can the document in part (a) be changed so that the page number does not print on the first page?
25. Explain why including the date and time in the header is helpful.
26. List three sources of graphics.
27. a) What is clip art? b) List the steps required to add clip art about
trees at the insertion point in a document.
28. a) List the steps required to size a graphic smaller and center it.
b) How can a graphic be deleted? c) Once inserted, can a graphic be moved? If
so, how?
29. a) What is pagination? b) How is pagination changed? c) Other than changing margins, what else can
affect a document’s pagination?
30. a) List two ways to insert a page break. b) How is a page break deleted?
31. How does the pagination differ between a docu-ment with 1” top, bottom, left, and right margins and a document with 2” top, bottom, left, and right margins?
32. a) What are footnotes used for? b) List the steps required to create a footnote
for a paragraph in a document.
33. a) How can a footnote be deleted? b) What happens to the numbers of the other
footnotes when one is deleted?
34. Compare and contrast uses and formatting of footnotes and endnotes.
35. a) What is a template? b) Give an example of when using a template
could be helpful. Explain why.
36. Describe the usefulness of being able to save a Word document as an HTML file.
True/False
37. Determine if each of the following are true or false. If false, explain why.
a) Margin settings can change from paragraph to paragraph.
b) Indents are often used to set off paragraphs such as a quotation.
c) A paragraph in a new document is double spaced by default.
d) Default tab stops are located at every inch on the ruler.
e) A right tab stop aligns the end of the text at the stop.
f) A hanging indent is part of the standard footnote format.
g) The steps in a recipe should be formatted as a bulleted list, and the ingredients are best formatted as a numbered list.
h) It is possible to have a different header and footer printed on the first page than on the rest of the pages.
i) The keywords clip art are appropriate when searching for clip art of musical instruments.
j) Cut, Copy, and Paste can be used to create copies of or move a selected graphic.
k) Once inserted, page breaks cannot be deleted from a document.
l) Footnotes appear at the bottom of the page by default.
m) A Web page title is text displayed in the title bar of the Web browser.

SAMPLE
116 Chapter 3 Formatting Documents
Exercises
Exercise 1 ————————— INVENTORY, LEARNING JOURNALA portfolio is a collection of work that clearly illustrates effort, progress, and achievement of knowledge and skills. A portfolio can take the form a three-ring binder or similar container, or it can be stored in digital format. Samples of work included in portfolios are often called artifacts. A complete portfolio will also include written reflections about each artifact. Create a portfolio using artifacts created from the exercises in this text. Use a three-ring binder to store the artifacts. The portfolio should contain:
• an inventory of the works produced
• artifacts
• a learning journal, which documents the skills acquired as a result of working through this text and reflects on each artifact
a) Open INVENTORY, which is a Word data file for this text. Replace Name with your name in the footer. Print a copy and place the hard copy at the front of the portfolio. Each time an artifact is added to the portfolio, it should be documented on the inventory sheet. The documentation can be done in pencil or pen initially. When the portfolio is complete, the entries can be typed into the data file.
b) As assignments are completed, select artifacts for the portfolio. The artifacts selected for the portfolio should be “polished copies.” This may require making edits to work that has already been assessed. Select artifacts that illustrate a range of skills and knowledge learned.
c) Each time an artifact is selected, open LEARNING JOURNAL, which is a Word data file for this text, and make an entry in the learning journal to document and reflect on the skills acquired as a result of completing the artifact. In the footer, replace Name with your name. When the portfolio is complete, place a copy of LEARNING JOURNAL after the artifacts.
d) Once a portfolio has enough content to use, it should be considered an archive or master collection. Two other portfolios, a presentation portfolio and a sample are then created and updated frequently. The presentation portfolio has the highest-quality binding and is brought to interviews. A sample portfolio contains a smaller collection of artifacts and is submitted with an application or left after an interview for the company to review. Assemble a presentation portfolio and a sample portfolio based on the content of your archive portfolio.
Exercise 2 ———————————————————— OPENINGSThe OPENINGS document contains several introductions that can be used to start a paragraph. Open OPENINGS, which is a Word data file for this text, and complete the following steps:
a) Choose one of the introductions, delete the rest, then write a paragraph using the remaining introduction as the beginning of the paragraph.
b) Double-space the paragraph.

SAMPLE
Chapter 3 Formatting Documents 117
c) Create a header with a title for the story using the Alphabet built-in design.
d) Create a footer with your name and right align the footer text.
e) Check the document on screen and correct any errors and misspellings.
f) Save the modified OPENINGS and print a copy.
Exercise 3 ———————————————————— WELCOME The WELCOME document contains a letter for new customers. Open WELCOME, which is Word data file for this text, and complete the following steps:
a) Format the title “Marrelli’s Gym” as 18 point, bold, and in a different font, with 24 points of space after the paragraph.
b) Insert BARBELL, which is a graphic data file for this text. Size the picture appropri-ately. Format the graphic with Square text wrapping and position it to the right of the paragraph that begins “Welcome to Marrelli’s Gym.”
c) Change the top and left margins of the document to 2".
d) Create a footer with your name and right align the footer text.
e) Format the paragraphs of text about the gym’s hours at the bottom of the letter with the following tab stops:
• at 1.25" create a left tab stop (for the hours on Monday – Friday)
• at 2.75" create a left tab stop (for the hours on Saturday)
• at 4.25" create a left tab stop (for the hours on Sunday)
f) Format the column titles as italic, and the first column as bold.
g) Save the modified WELCOME and print a copy.
Exercise 4 —————————————————TELECOMMUTING The TELECOMMUTING document contains information about the advantages of telecommuting. Open TELECOMMUTING, which is a Word data file for this text, and complete the following steps:
a) Center align the following headings and format them as 14 point, bold, Tahoma, with 10 points of space before each paragraph:
“Computers in the Home Office”
“The Process of Telecommuting”
“Advantages of Telecommuting”
“Telecommuting in Coral County”
b) Underline the first sentence of the second paragraph that begins “Telecommuting is possible because….”
c) Change the margins to Narrow.
d) Insert a page break before the heading “Telecommuting in Coral County.”
e) Create a header with your name centered.

SAMPLE
118 Chapter 3 Formatting Documents
f) Create a footer with the page number centered.
g) Format the paragraphs of text about the number of people and percentage of popula-tion with the following tab stops:
• at 2" create a right tab stop (for the number of people)
• at 3.5" create a right tab stop (for the percentage of population)
h) The column titles should be centered above the text in the columns. Format only the column titles “Number of People” and “Percentage of Population” to have the follow-ing tab stops:
• at 1.75" create a center tab stop (for “Number of People”)
• at 3.5" create a center tab stop (for “Percentage of Population”)
i) Bold the column titles.
j) Format the line that contains the totals as italic.
k) Create 0.5" left and right indents for the last paragraph on page 1, the one that begins “…if 10% to 20%….”
l) Place a footnote after the period ending the quote indented in part (l). Create the fol-lowing footnote for the quote, formatting it in the standard format as practiced earlier in this chapter:
m) Insert an appropriate clip art in a new paragraph above the heading “Computers in the Home Office.” Center align the graphic. Size the graphic smaller if necessary so that the document prints on two pages.
n) Save the modified TELECOMMUTING and print a copy.
Exercise 5 —————————————————————— Vitamins Vitamins are important for maintaining good health and can be found in many different sources.
a) In a new document, type the following text, separating the columns with single tabs (do not precede the first column with a tab). Your text will not be arranged as shown here until tab stops have been set:
Vitamin Purpose Common Food SourcesA skeletal growth, skin green leafy or yellow vegetablesB1 metabolism of carbohydrates whole grains, liverB12 production of proteins liver, kidney, lean meatC resistance to infection citrus fruits, tomatoesE antioxidant peanut or corn oils
b) Save the document naming it Vitamins.
c) Format all the paragraphs to have no space before or after.

SAMPLE
Chapter 3 Formatting Documents 119
d) Format all the paragraphs with the following tab stops:
• at 1.25" create a left tab stop (for the usage in body)
• at 3.5" create a left tab stop (for the common food sources)
e) Format the “Common Food Sources” column of data, except for the title, as italic.
f) At the top of the document, create a title with the text Learn About Vitamins. Format the title as bold, center aligned, with 24 points of space after.
g) Bold the column titles.
h) Subscript the “1” in “B1” and subscript the “12” in “B12.”
i) Insert an appropriate clip art graphic above the title at the top of the document. Size the graphic smaller if necessary.
j) Create a footer with your name and right align the footer text.
k) Check the document on screen and correct any errors and misspellings.
l) Save the modified Vitamins and print a copy.
Exercise 6 ————————————————— U.S. PRESIDENTSThe U.S. PRESIDENTS document contains a list of United States presidents. Open U.S. PRESIDENTS, which is Word data file for this text, and complete the following steps:
a) Format the entire document with left tab stops at 0.75" and 4" and a right tab stop at 3.5". The text should be arranged in columns similar to:
b) Save the modified U.S. PRESIDENTS.
c) Bold the column titles.
d) Double space all the paragraphs.
e) Create a header with your name and center the header text.
f) Create a footer with the page number centered.
g) Save the modified U.S. PRESIDENTS and print a copy.
h) Save the document as an HTML file and then print a copy from a browser.

SAMPLE
120 Chapter 3 Formatting Documents
Exercise 7 —————————————————— Hawaiian IslandsThe Hawaiian islands are the result of volcano eruptions over a long period of time.
a) In a new document, type the following text, separating the columns with single tabs (do not precede the first column with a tab). Your text will not be arranged as shown here until tab stops have been set:
Island Area (km2) Tallest Peak Peak Height (m)Hawaii 6,501 Mauna Kea 4,139Maui 1,174 Haleakala 3,007Oahu 979 Kaala 1,208Kauai 890 Kawaikini 1,573Molokai 420 Kamakou 1,491Lanai 225 Lanaihale 1,011Niihau 118 Paniau 384Kahoolawe 72 Lua Makika 443
b) Save the document naming it Hawaiian Islands.
c) Format all the paragraphs to have no space before or after.
d) Format all the paragraphs with the following tab stops:
• at 1.5" create a right tab stop (for the area)
• at 2.5" create a center tab stop (for the tallest peak)
• at 4.25" create a right tab stop (for the peak height)
e) In the paragraph with the column titles, change the right tab stop at 1.5" to a center tab stop at 1.25" and change the right tab stop at 4.25" to a center tab stop at 4".
f) Bold the column titles.
g) Format the entire “Tallest Peak” column of data, not the title, as italic.
h) Format all the text as 11 point Candara.
i) Create a header with the text The Hawaiian Islands in 24 point, bold text, center aligned, with 24 points of space after.
j) Superscript the “2” in the column title “Area (km2).”
k) Create a footer with your name and center the footer text.
l) Check the document on screen and correct any errors and misspellings.
m) Save the modified Hawaiian Islands and print a copy.

SAMPLE
Chapter 3 Formatting Documents 121
Exercise 8 —————————————————— Science ReviewThe science class needs a review sheet to help study for a test.
a) In a new document, type the following text, separating the columns with single tabs (do not precede the first column with a tab). Your text will not be arranged as shown here until tab stops have been set:
Measurement Units Symbol FormulaArea square meter m2 m2Heat joule J N x mPower watt W J/sForce newton N kg x m/s2Pressure pascal Pa N/m2Velocity meter per second m/s m/s
b) Save the document naming it Science Review.
c) Format all the paragraphs to have no space before or after.
d) Format all the paragraphs with the following tab stops:
• at 1.5" create a left tab stop (for the units)
• at 3.5" create a center tab stop (for the symbol)
• at 5" create a right tab stop (for the formula)
e) Superscript all four occurrences of “2.”
f) Format the Formula data as Cambria font.
g) At the end of the document, insert three blank paragraphs. Type the following text, separating the columns with single tabs (do not precede the first column with a tab). Your text will not be arranged as shown here until tab stops have been set:
Formula NameC2H2 acetyleneH2O waterK2SO4 potassium sulfateNH3 ammoniaCH4 methaneC6H6 benzene
h) Format the new paragraphs to have no space before or after.
i) Format the new paragraphs to have only one tab stop, a left tab stop at 1".
j) In the new paragraphs, subscript all occurrences of numbers.
k) Format the Formula data as Cambria font.
l) At the top of the document, create a title with the text Science Review Sheet. Format the title as bold, center aligned, with 24 points of space after.
m) Bold all of the column titles in the document.
n) Create a header with your name and left align the header text.
o) Check the document on screen and correct any errors and misspellings.
p) Save the modified Science Review and print a copy.

SAMPLE
122 Chapter 3 Formatting Documents
Exercise 9 öö —————————————— Entertainment ReviewThe review created in Chapter 2, Exercise 9 needs additional formatting before the article can be submitted. Open Entertainment Review and complete the following steps:
a) Format the body of the review as double spaced.
b) Create a header with the text CRITIC'S CHOICE and center the text. Format the text as bold and 14 points.
c) Create a footer with your name and right align the footer text.
d) Save the modified Entertainment Review and print a copy.
e) Save the document as an HTML file and then print a copy from a browser.
Exercise 10 öö ——————————————————— PROPOSALThe Coral Research proposal modified in Chapter 2, Exercise 10 needs to be formatted. Open PROPOSAL and complete the following steps:
a) Change the top and bottom margins to 1.25" and the left and right margins to 1.5".
b) Insert a page break before the heading “Computerized Guide.”
c) Format the paragraphs below the “BUDGET” heading with the following tab stops:
• at 0.75" create a left tab stop
• at 4.5" create a decimal tab stop
d) Format the three numbered paragraphs of stages on page 2 as a numbered list.
e) Insert a page break before the heading “Notes” at the bottom of page 2.
f) Create a header with your name and center the header text.
g) Create a footer with the page number centered.
h) Save the modified PROPOSAL and print a copy.
Exercise 11 ——————————————————————— E-TailE-tail stands for electronic retailing. An e-tailer sells goods and products online. Many e-tailers, such as amazon.com, do not have a corresponding “brick and mortar” establishment. E-tail is considered a B2C (business to consumer) form of e-commerce.
a) In a new document, type E-Tail and press Enter.
b) Type By Name replacing Name with your name and then press Enter.
c) Format the title and byline as centered. Format the title as 20 points and bold, with 6 points of space after. Format the byline as italic with 24 points of space after.
d) In new paragraphs below the title and byline, type the following text:

SAMPLE
Chapter 3 Formatting Documents 123
e) Brainstorm with another student to come up with advantages and disadvantages of purchasing goods and products online.
f) Below “Advantages include:” create a bulleted list with three advantages of purchasing online and then press Enter.
g) Type Disadvantages include: and then press Enter.
h) Create a bulleted list with three disadvantages of purchasing online.
i) Save the document naming it E-Tail and print a copy.
Exercise 12 ——————————————————————EtiquetteUsing electronic communication devices requires following a certain etiquette. For example:
Telephone CallsAlways state your name and the purpose of the call.
Cellular PhoneRefrain from talking on the phone while driving.
SpeakerphoneBe sure there is no background noise.
VoicemailSpeak slowly and clearly.
E-mailUse meaningful subject lines.
a) In a new document, type the title Electronic Communication Etiquette, press Enter, and then type the devices and rules listed in this exercise.
b) Center align the title and format it as 20 point, bold, Consolas, with 24 points of space after. Bold the device names.
c) Brainstorm in small groups to generate three additional etiquette rules that apply to each device. Add the additional etiquette rules in separate paragraphs below the appropriate device name.
d) Format the etiquette rules under each title as a bulleted list.
e) Create a header with your name and right align the header text. Add a footer with the date and center the footer text.
f) Save the document naming it Etiquette and print a copy.

SAMPLE
124 Chapter 3 Formatting Documents
Exercise 13 —————————————————— Frozen DessertsMany cultures have a frozen dessert that is considered a special treat for both children and adults. Four frozen desserts and their countries of origin are:
Dessert Countrykulfi Indiaais kacang Malaysiagelato Italylimber Puerto Rico
a) Use books and the Internet to research two of the four frozen desserts listed above. Find information on the cultural traditions, dessert ingredients, flavors, recipes, and other facts. Keep track of the sources.
b) In a new document, write an introductory paragraph that indicates the report is about frozen desserts. After the introductory paragraph, write a paragraph for each of the two desserts, discussing cultural traditions and describing the dessert.
c) After the descriptive paragraphs, include a recipe for each dessert. Format the recipe steps in numbered lists and apply any other formatting to make the recipes attractive and easily readable.
d) Cite the sources of information, including the recipe sources, using footnotes. Format footnotes in the standard format as practiced earlier in this chapter.
e) Add page breaks where needed to make the document more readable.
f) Add a footer with your name and the page number right aligned.
g) Save the document naming it Frozen Desserts and print a copy.
Exercise 14 ————————— Screenplay, SCREENPLAY RUBRICProducing a movie requires a screenplay, which is a document that includes the script for the actors and descriptions of what the audience will see. A screenplay is formatted in a particular way:
• Courier font, 12 point
• 8.5-inch x 11-inch paper
• a header with a page number in the upper-right corner on all pages except page 1
• top and bottom margins set between 0.5" and 1"
• left margin set to between 1.2" and 1.6" (wider than right margin to allow for binding)
• right margin set between 0.5" and 1"
• Left indent of 1.5" for the character names
• Left indent of 0.5" for the dialogue (words the characters speak)
The Courier font in size 12 is used as a way to measure the length of the screenplay. A one-page screen-play in this font and size with the margin settings stated above averages one minute of screen time. A screenplay averages 110 pages. The start of a screenplay could look similar to:

SAMPLE
Chapter 3 Formatting Documents 125
a) Develop an appropriate story idea for a screenplay. The screenplay should include dialogue between at least two characters.
b) In a new document, apply the screenplay formatting as listed in this exercise.
c) Compose a screenplay that is a minimum of five pages in length. Note that the name of the scene and the character names are typically typed in capital letters.
d) Type your name after the last paragraph of the screenplay.
e) Save the document naming it Screenplay and print a copy.
f) A rubric is used to assess the quality of a document. Open SCREENPLAY RUBRIC, which is a Word data file for this text. It currently lists two assessment criteria. Brainstorm in small groups to generate three additional assessment criteria.
g) Place the insertion point in the blank paragraph above “Additional Comments.” Add the additional assessment criteria and corresponding scale. Format the three additional assessment criteria as a numbered list.
h) Create a header with your name and right align the header text. Add a footer with the date and center the footer text.
i) Save the modified SCREENPLAY RUBRIC and print a copy.
j) Exchange screenplays with a classmate. Use the rubric to peer edit your classmate’s screenplay.
k) Reflect on the design of the rubric. Does it appropriately assess the screenplay? Make any appropriate revisions.

SAMPLE
126 Chapter 3 Formatting Documents
Exercise 15 —————————————————— CAMPING TIPSThe CAMPING TIPS document contains a list of helpful information on camping. Open CAMPING TIPS, which is a Word data file for this text, and complete the following steps:
a) Format the entire document, except the title, as a numbered list.
b) Format the list of items after the first camping tip as a bulleted list. Use Home j Increase Indent to indent the list of items after the first tip farther so that it is a sublist of the first camping tip.
c) Format the items in the bulleted list to have 12 points of space after.
d) Create a header with your name and right align the header text.
e) Save the modified CAMPING TIPS and print a copy.
Exercise 16 —————————————————SCIENCE MUSEUM The SCIENCE MUSEUM document contains information on a museum. Open SCIENCE MUSEUM, which is a Word data file for this text, and complete the following steps:
a) Format the exhibits under each of the three departments in the museum as bulleted lists.
b) Create 0.5" left and right indents for the paragraph that begins “It is my dream that the Sunport Science Museum….”
c) Place a footnote after the period ending the quote indented in part (b). Create the fol-lowing footnote for the quote, formatting it in the standard format as practiced earlier in this chapter:
d) Format the document with a 2” top margin.
e) Insert an appropriate clip art graphic in the document. Format the clip art with Square text wrapping. Move the graphic to the right of the document’s title. Size the picture if necessary so it fits above the line in the title.
f) Create a header with your name and right align the header text.
g) Save the modified SCIENCE MUSEUM and print a copy.
Exercise 17 ———————————————— SUNPORT CAMPING The SUNPORT CAMPING document contains a short article on the recent Sunport Camping Symposium. Open SUNPORT CAMPING, which is a Word data file for this text, and complete the following steps:
a) Format the symposium specials, starting with “Johnson Cooking” and ending with “The Camp Grounds Company,” as a bulleted list.
b) Format the two book titles in the paragraph after the bulleted list as italic.

SAMPLE
Chapter 3 Formatting Documents 127
c) Place footnotes after the punctuation marks at the end of each book title. Create the following footnotes, formatting each in the standard format as practiced earlier in this chapter:
d) Create a header with your name and right align the header text.
e) Save the modified SUNPORT CAMPING and print a copy.
Exercise 18 ————————————————— Birthday TraditionsBirthdays are celebrated in different ways around the world:
Africa Instead of celebrating a child’s birthday, in African nations an initiation ceremony is held for a group of children. During the ceremony they learn about the customs and beliefs of their tribe.
Brazil The earlobe of the birthday child is pulled once for each year they have been alive.
China The birthday child pays respect to the parents and receives a money gift. The birthday is celebrated at a lunch with friends and relatives, and noodles are served to represent a long life.
Denmark A flag is flown outside the house when someone is having a birthday. The birthday child wakes up to find gifts around their bed.
Mexico A piñata is filled with surprises. The birthday child, blindfolded, hits the hanging piñata until it breaks open.
Nepal For good luck, rice yogurt with coloring in it is placed on the forehead of the birthday child.
Russia A birthday pie with a birthday greeting carved into the crust is the traditional food.
Scotland The birthday child receives one pound note (money) for each year they have been alive plus an additional pound for good luck.
Vietnam Everybody celebrates their birthday on New Year’s day. Children receive “lucky” money in red envelopes.
Within each country, families also have their own traditions. In the United States, common family birthday traditions are:
• The birthday child is presented with a cake decorated with their name. The cake has candles on it, and the child makes a wish and blows out the candles.
• The birthday child chooses the restaurant or dinner menu for that evening.
• The birthday child receives a rose or other item for each year they have been alive.
• The cake or a meal is served on a special birthday plate.
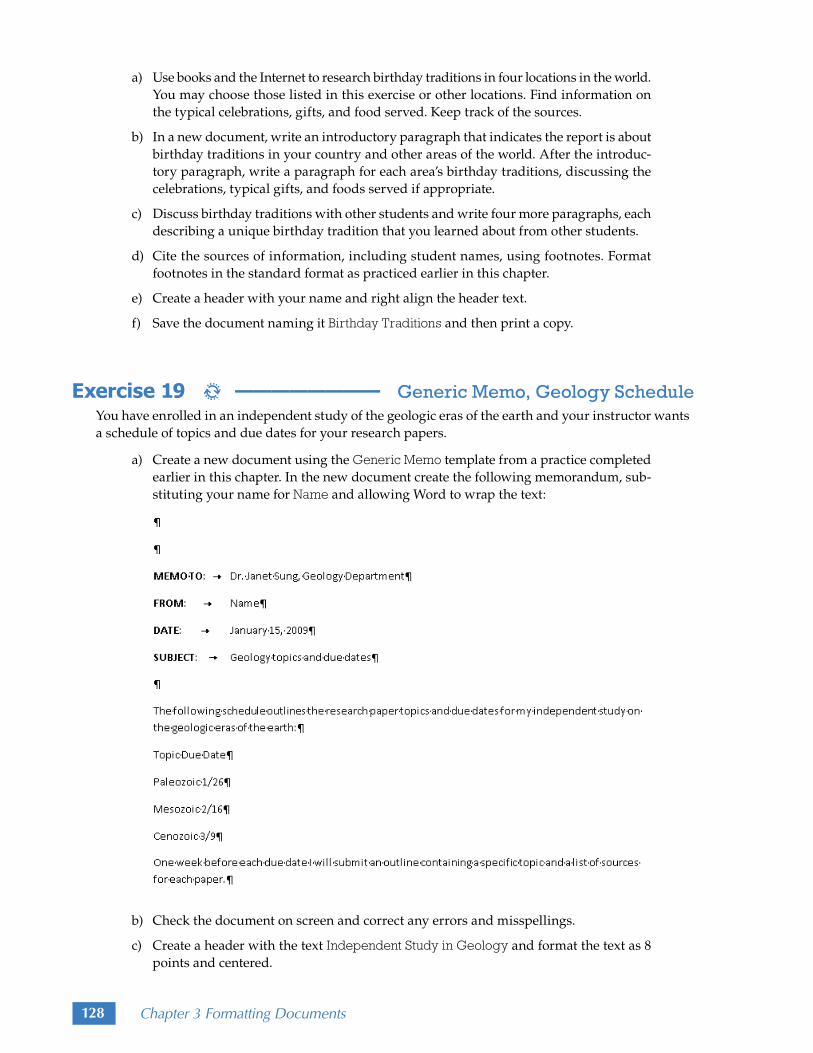
SAMPLE
128 Chapter 3 Formatting Documents
a) Use books and the Internet to research birthday traditions in four locations in the world. You may choose those listed in this exercise or other locations. Find information on the typical celebrations, gifts, and food served. Keep track of the sources.
b) In a new document, write an introductory paragraph that indicates the report is about birthday traditions in your country and other areas of the world. After the introduc-tory paragraph, write a paragraph for each area’s birthday traditions, discussing the celebrations, typical gifts, and foods served if appropriate.
c) Discuss birthday traditions with other students and write four more paragraphs, each describing a unique birthday tradition that you learned about from other students.
d) Cite the sources of information, including student names, using footnotes. Format footnotes in the standard format as practiced earlier in this chapter.
e) Create a header with your name and right align the header text.
f) Save the document naming it Birthday Traditions and then print a copy.
Exercise 19 öö ———————— Generic Memo, Geology Schedule You have enrolled in an independent study of the geologic eras of the earth and your instructor wants a schedule of topics and due dates for your research papers.
a) Create a new document using the Generic Memo template from a practice completed earlier in this chapter. In the new document create the following memorandum, sub-stituting your name for Name and allowing Word to wrap the text:
b) Check the document on screen and correct any errors and misspellings.
c) Create a header with the text Independent Study in Geology and format the text as 8 points and centered.

SAMPLE
Chapter 3 Formatting Documents 129
d) Edit the data and column titles in the listing of research papers so that there is a single tab between each paper topic and due date, and no space after the paragraphs.
e) Format the paragraphs about the topics and due dates with a center tab stop at 1.5".
f) Format the column titles “Topic” and “Due Date” as italic.
g) Bold the data in the “Topic” column.
h) Save the document naming it Geology Schedule and print a copy.
Exercise 20 ————————————————— Scannable ResumeA résumé summarizes accomplishments, education, and work experience. Many companies scan résumés using an optical character reader ( OCR) into a computerized database. They can then search the database of resumes for keywords that describe the qualifications required for a position. This is an efficient way to sort through hundreds of résumés. When submitting a résumé, it is a good idea to check with the company’s Human Resources department to see if the company scans résumés, since the content and format of a scannable résumé differs greatly from that of a traditional résumé.
Scannable résumés consist of keyword summaries that contain job-related acronyms and terminology and are written using nouns instead of action verbs.
A scannable résumé has to be formatted so that it can be read properly by the OCR. Formatting used on traditional résumés, such as shading and lines, should be avoided because it can be misinterpreted. A scannable résumé should contain as little punctuation as possible. If punctuation is used with a word that may be a keyword, a space should be placed before the punctuation mark. A search for the word management might not recognize management, with a comma or management. with a period.
Guidelines for creating a scannable résumé are:
• Use white or other light-colored paper.• Send the original copy, not photocopies.• Do not use graphics, shading, bold, italic or underline formatting. Use all capital
letters for headings.• Avoid vertical lines, and if horizontal lines are used to separate parts of the resume,
include space between the line and text.• Use standard fonts such as Calibri, Arial, or Times New Roman.• Do not fold or staple the resume.• Put your name at the top of each page.• Use left alignment.• Use separate lines for address information.• Do not use a hollow bullet ( ) because it could be interpreted as the letter “o.” Use
a regular bullet • or preferably * or -.
In a new document, create a scannable résumé using the No Spacing style by completing the following steps:
a) In a scannable résumé, all capital letters are used for the name in the heading, which is center aligned. Type the following text and format the paragraphs as centered:
THOMAS YOUNG43 Main Street
Miami FL 33056305-555-7879
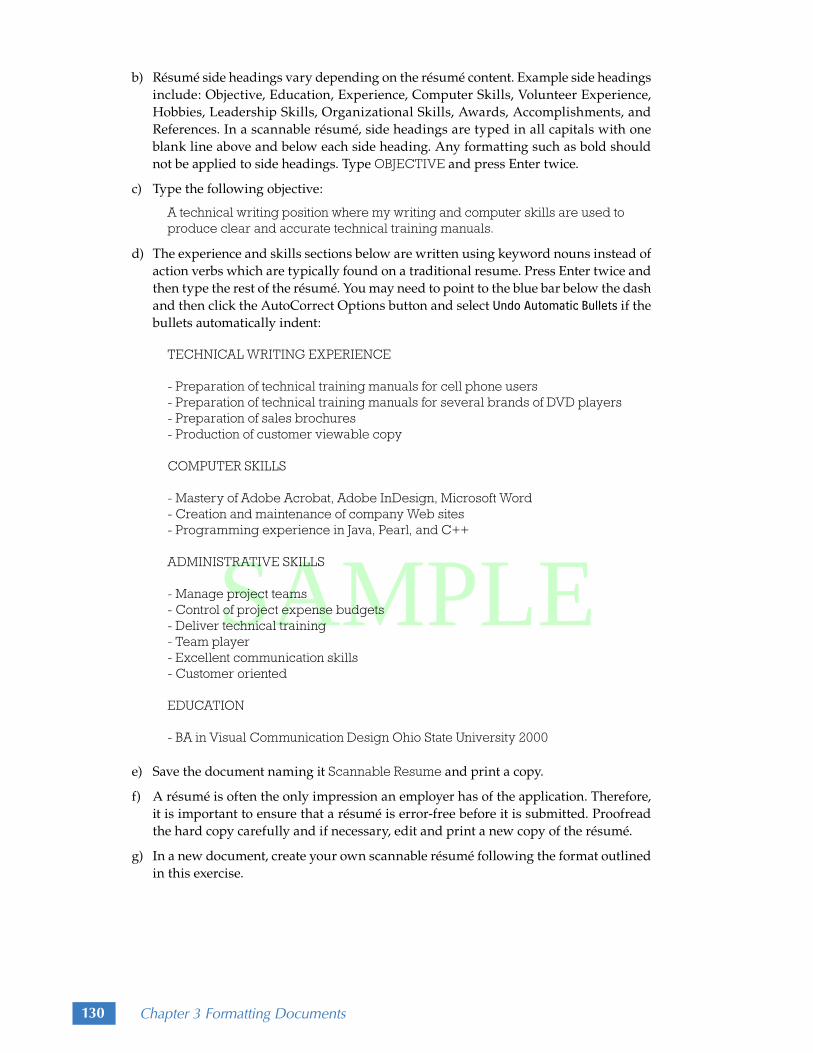
SAMPLE
130 Chapter 3 Formatting Documents
b) Résumé side headings vary depending on the résumé content. Example side headings include: Objective, Education, Experience, Computer Skills, Volunteer Experience, Hobbies, Leadership Skills, Organizational Skills, Awards, Accomplishments, and References. In a scannable résumé, side headings are typed in all capitals with one blank line above and below each side heading. Any formatting such as bold should not be applied to side headings. Type OBJECTIVE and press Enter twice.
c) Type the following objective:
A technical writing position where my writing and computer skills are used to produce clear and accurate technical training manuals.
d) The experience and skills sections below are written using keyword nouns instead of action verbs which are typically found on a traditional resume. Press Enter twice and then type the rest of the résumé. You may need to point to the blue bar below the dash and then click the AutoCorrect Options button and select Undo Automatic Bullets if the bullets automatically indent:
TECHNICAL WRITING EXPERIENCE
- Preparation of technical training manuals for cell phone users- Preparation of technical training manuals for several brands of DVD players- Preparation of sales brochures- Production of customer viewable copy
COMPUTER SKILLS
- Mastery of Adobe Acrobat, Adobe InDesign, Microsoft Word- Creation and maintenance of company Web sites- Programming experience in Java, Pearl, and C++
ADMINISTRATIVE SKILLS
- Manage project teams- Control of project expense budgets- Deliver technical training- Team player- Excellent communication skills- Customer oriented
EDUCATION
- BA in Visual Communication Design Ohio State University 2000
e) Save the document naming it Scannable Resume and print a copy.
f) A résumé is often the only impression an employer has of the application. Therefore, it is important to ensure that a résumé is error-free before it is submitted. Proofread the hard copy carefully and if necessary, edit and print a new copy of the résumé.
g) In a new document, create your own scannable résumé following the format outlined in this exercise.

SAMPLE
Chapter 3 Formatting Documents 131
Exercise 21 ——————————————————— Basic Resume A résumé summarizes accomplishments, education, and work experience. A traditional résumé is a printed document that is typically one page in length and lists a person’s educational background, pre-vious job experiences, skills obtained through education and work experience, and accomplishments, such as memberships, awards, and activities.
In a new document create a résumé for yourself. Your résumé should contain the following:
• Four sections of information with the following titles: Education, Experience, Skills, and Accomplishments. The information in each section should be indented paragraphs.
• At least one bulleted or numbered list.
• A header with your name, address, and phone number.
• A footer with the text References available upon request.
Format the résumé appropriately, using emphasized text, two different fonts, two or three different sizes, and tabs and tab stops. Check the document on screen for errors and misspellings and make any corrections. Save the document naming it Basic Resume and print a copy.
Exercise 22 ———————————————————Logo Proposals When an advertising agency or graphic design company is hired to design a logo, three or more logos are usually shown to the client as a proposal. The client then chooses the design they like the best, or asks for further changes until they are satisfied with the design.
a) In a new document, in the first paragraph, insert the picture file LOGO, which is a graphic data file for this text. Press Enter four times, and then Copy and Paste the graphic so that there are three logos on the page, with a blank paragraph between each logo:
b) Use options on the Format tab to modify each of the logos. Experiment with various looks to come up with three very different logos. Crop at least one of the logos.
c) In a blank paragraph below each graphic, describe the modifications.
d) Create a footer with your name centered.
e) Save the document naming it Logo Proposals and print a copy.

SAMPLE
132 Chapter 3 Formatting Documents
Exercise 23 ——————————————— Return Address Labels Multiple labels that contain the same text can easily be created in Word. This feature is useful for cre-ating return address labels for use on envelopes. When printing a labels document, special adhesive paper with multiple labels on each page is used in the printer. The Avery® brand of adhesive labels is widely used, and the dimensions of many of its labels have been included in Word.
a) Create a new document and then click Mailings j Labels. A dialog box is displayed.
b) In the Labels tab of the dialog box, select Options. A dialog box is displayed.
1. Select Page printers.
2. In the Label vendors list, select Avery US Letter.
3. In the Product number list, select 5267 and then select OK. The dialog box is removed.
c) In the Address box, type your first and last name and then press Enter. The insertion point is moved to the next line.
d) Type your street address, press Enter, then type your city, state, and zip (or province and postal code).
e) Select Full page of the same label and then select the New Document button. The dialog box is removed and a new document with labels is displayed.
f) Select Home j Select j Select All. All of the text in the document is selected. Change the font size to 8. The label text is now completely displayed in each label.
g) Save the document naming it Return Address Labels and print a copy.
Exercise 24 ————————————————————Career IdeasYour guidance counselor would like to see a list of computer-related careers that interest you.
a) Access the Careers supplement at www.Lpdatafiles.com and read about computer-related careers. Choose two careers that interest you.
b) In a new document type the names of the careers that interest you, each in a separate paragraph.
c) Save the document naming it Career Ideas.
d) Conduct a search on the Internet to find an appropriate bachelor degree program for each career.
e) In the Word document, below each career create a bulleted list with the degree program location (college name), the number of credits required for the degree, and the tuition cost per credit or per course.
f) Interview a professional in each occupation to learn more about preparing for the career. In the Word document, add a paragraph below each bulleted list describing what you learned from the interview. Include information about who you interviewed and where the interview took place.
g) At the top of the document, create a title with the text Name’s Career Ideas replacing Name with your name. Format the title as bold, center aligned, with 24 points of space after.
h) Save the modified document and print a copy.

SAMPLE
Chapter 3 Formatting Documents 133
i) Show a parent the printed document. Discuss the two careers, degree programs, and your interviews. In the Word document, add a paragraph at end reflecting on your discussion with your parent. Format the paragraph with 24 points of space above.
j) Save the modified document and print a copy.
Exercise 25 —————————————————— Wednesday BlogA blog is a short term for a weblog, which is a piece of writing similar to a journal entry. The blog is then posted to a Web site that uses blogging software. Blog and blogging are also used to indicate writing and posting the blogs. A blog account is required to post a blog, and can be found at Web sites such as:
www.moveabletype.comradio.userland.comwww.blosxom.comwww.blogger.com
Writing a blog is an easy way of expressing personal thoughts, as well as personal opinions, com-plaints, and experiences. News can be conveyed in a blog. Some blogs are meant to be seen by anyone with Internet access, and other blogs are set up for only a private circle of account holders to view. Companies and academic groups use blogs to expand discussions, manage teams, and keep informa-tion flowing.
Word documents can be published as blog posts, and blog posts can be created from scratch in Word. To post an open Word document, select j Publish j Blog. A blog post document is created from the open document. To create a new, empty blog post, select New Blog Post in the New Document dialog box.
A blog post consists of a title and entry below it:
Titles of blogs are not necessarily descriptive, although the title usually indicates what kind of informa-tion is in the blog. A title that is a popular phrase or a creatively written statement usually indicate that the blog is a personal thought. A title that is more business-like indicates serious content.
a) Select New blog post in the New Document dialog box and then select Create. A new blog post is created. If the Register a Blog Account dialog box is displayed, select Register Later.
b) Click the text Enter Post Title Here and type: I’m on Exercise 25
c) Place the insertion point in the blank paragraph below the title and line. Type at least two paragraphs of your thoughts and experiences with this chapter, text, exercise, or this class.
d) Save the document by selecting j Save, naming it Wednesday Blog.
e) Select j Print to print a copy.
SAMPLE
134 Chapter 3 Formatting Documents
Exercise 26 ——————————————————— Goal ChecklistBulleted lists are typically formatted with a solid, round bullet (•). Word allows you to format bulleted lists with other characters as well.
a) In a new document, create a bulleted list of at least 5 goals you have set for yourself. Goals can be as simple as “run a mile without stopping” or as dramatic as “travel to every country.”
b) Select all the paragraphs in the bulleted list, and the click in Home j Bullets . A gallery is displayed. Select Define New Bullet. A dialog box is displayed.
1. Select Symbol. A dialog box is displayed. Find a square box symbol (such as � or �) to use as a checklist box, and click the symbol.
2. Select OK, and then select OK again. The bulleted list now has a square box to check off for each item.
c) Format the bulleted list as 14 point Cambria.
d) Create a header with your name centered. Format your name as 18 point and bold.
e) Save the document naming it Goal Checklist and print a copy.