core2 u s e r g u i d e
TRANSCRIPT

Core2U s e r G u i d e

Unpacking and InspectionAfter unpacking the system modules, save all packing materials in case you ever need to ship the units. Thoroughly inspect the modules and packingmaterials for signs of damage. Report any damage to the carrier at once; report equipment malfunction to your dealer.
Lexicon Part # 070-13748
Copyright 1999, Lexicon Inc.All Rights Reserved.
Lexicon Inc.3 Oak ParkBedford MA 01730-1441Telephone 781-280-0300Fax 781-280-0490www.lexicon.com
Outdoor Antenna GroundingIf an outside antenna is connected to the receiver, be sure the antenna system is grounded so as to providesome protection against voltage surges and built-up static charges. Section 810 of the National ElectricalCode, ANSI/NFPA No. 70-1984, provides information with respect to proper grounding of the mast andsupporting structure, grounding of the lead-in wire to an antenna-discharge unit, size of groundingconductors, location of antenna-discharge unit, connection to grounding electrodes, and requirements forthe grounding electrode. See figure below.
Power Lines An outside antenna should be located away from power lines.Power Service GroundingElectrode System(NEC Art 250, Part H)
Antenna Lead-inWire
Antenna DischargeUnit (NEC Section810-20)
Grounding Conductors(NEC Section 810-21)
Ground Clamps
NEC — National Electrical Code
ElectricServiceEquipment
GroundClamp
Le présent appareil numérique n'émet pas de bruits radioélectriques dépassant les limites applicables aux appareils numériques de la class B prescrites dans leRèglement sur le brouillage radioélectrique édicté par le ministère des Communications du Canada.
This equipment generates and uses radio frequency energy and if not installed and used properly, that is, in strict accordance with the manufacturer's instructions, maycause interference to radio and television reception. It has been type tested and found to comply with the limits for a Class B computing device in accordance with thespecifications in Subpart B of Part 15 of FCC Rules, which are designated to provide reasonable protection against such interference in a residential installation. However,there is no guarantee that interference will not occur in a particular installation. If this equipment does cause interference to radio or television reception, which can bedetermined by turning the equipment OFF and ON, the user is encouraged to try to correct the interference by one or more of the following measures:
Reorient the receiving antennaRelocate the computer with respect to the receiverMove the computer away from the receiverPlug the computer into a different outlet so that the computer and receiver are on different branch circuits.
If necessary, the user should consult the dealer or an experienced radio/television technician for additional suggestions. The user may find the following booklet preparedby the Federal Communications Commission helpful: "How to identify and Resolve Radio/TV Interference Problems." This booklet is available from the U.S. GovernmentPrinting Office, Washington, DC 20402, Stock No. 004-000-00345-4.
Communications Notice
"ADAT" is a trademark of the Alesis Corporation."Cool Edit Pro" is a trademark of Syntrillium."Type IV is a trademark of dbx Corporation.

Table of Contents1 Getting Started
Introduction ................................................................................................ 1System Requirements ................................................................................. 2
2 InstallationPrecautions ................................................................................................ 3Hardware Installation ................................................................................... 3
Setup • Install the Card • Cables/ConnectionsSoftware Installation .................................................................................... 6
Install Supported Third Party Software • Install the LexiconStudio Driver for Windows • Running the Setup.exe Program
Updating Drivers .......................................................................................... 7Remove the Old Software • Update Studio Driver • ReinstallSetup.exe
3 Using the LexPanelCore2 Tab .............................................................................................. 11
Analog Input • dbx Type IV™Punch Tab .............................................................................................. 16
Configuring the Punch Tab • The MIX Level Control • TheMonitor Buttons
Clock Source Tab ...................................................................................... 18
4 Using Cool Edit ProInstalling Cool Edit Pro .............................................................................. 19Assigning I/O in Cool Edit Pro ................................................................... 20Optimizing Multitrack Performance in Cool Edit Pro ................................. 21
5 TroubleshootingCommon Problems and Solutions ............................................................. 23Optimizing Windows for Audio Applications .............................................. 26
6 Specifications

Lexicon Part # 070-13748
Lexicon Inc.3 Oak ParkBedford MA 01730-1441Telephone 781-280-0300Fax 781-280-0490www.lexicon.com

1
1
Getting StartedLexicon Studio Core2 User Guide
1Getting Started
IntroductionThank you for your purchase of the Core2, Lexicon's 24-bit multitrack digital audio recorder, designedto give you the highest possible performance in your computer-based hard disk recording system.
Your Core2 package includes:• a Core2 PCI card in an anti-static pouch
• a disposable anti-static wrist strap
• a breakout connector box
• a Core2 audio connector cable
NOTE: The Core2 cable is a shielded audio cable that has been manufactured specifically for usewith the Core2. Use of any other cable will substanitially reduce audio quality and may otherwiseadversely affect performance.
• a CD containing the Core2 drivers, Syntrillium Software's Cool Edit Pro™ and a Read Medocument with any late-breaking information.
• the Core2 User Guide (this document)
The latest updates in both software and documentation are available on our website atwww.lexicon.com.

Getting Started
2
2
Lexicon
System RequirementsThe following systems are the minimum required for working with the Core2:
• an IBM-PC or compatible computer with PCI architecture expansion slots, a Pentium micropro-cessor (200MHz or faster), and minimum 64MB of RAM running Windows 95 or later
• a fast, high capacity IDE or SCSI hard disk drive
• peripheral audio equipment such as a mixer, power amplifier, DAT recorder, etc.

3
3
InstallationLexicon Studio Core2 User Guide
2Installation
Precautions• Turn off and unplug your computer.
• Use the anti-static wrist strap provided with your system and make sure that you are groundedduring the entire installation process to prevent static charges that can damage components.
• Put the anti-static bags containing your cards near your computer to avoid walking around witha card and generating static electricity after it is removed from its bag.
• Before handling any Lexicon Studio cards, discharge any personal static electricity that may beon your clothes or body by touching a grounded metal surface, such as the power supply caseinside your computer.
• Handle the cards only by their edges, as you would a CD. Avoid touching the pins on the bottomedge of the cards.
• Save the anti-static bag containing your Lexicon audio card. This prevents static electricity fromdamaging sensitive electronic components on the card.
Hardware InstallationAs some Lexicon Studio software is installed into directories of your audio control software, youshould install and verify that your audio software launches properly before installing Lexicon Studio(even though it will not be audio-capable until installation of the Lexicon Studio system). Please referto your audio software manual for details on installation, and then proceed with Lexicon Studiohardware and software installation.
Installation
4
4
Lexicon
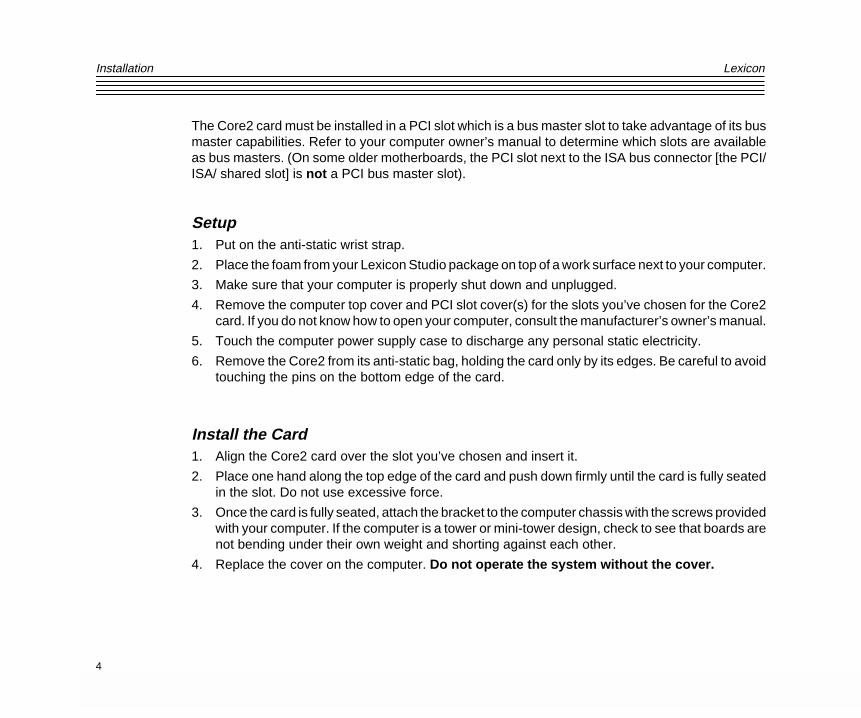
The Core2 card must be installed in a PCI slot which is a bus master slot to take advantage of its busmaster capabilities. Refer to your computer owner’s manual to determine which slots are availableas bus masters. (On some older motherboards, the PCI slot next to the ISA bus connector [the PCI/ISA/ shared slot] is not a PCI bus master slot).
Setup1. Put on the anti-static wrist strap.
2. Place the foam from your Lexicon Studio package on top of a work surface next to your computer.
3. Make sure that your computer is properly shut down and unplugged.
4. Remove the computer top cover and PCI slot cover(s) for the slots you’ve chosen for the Core2card. If you do not know how to open your computer, consult the manufacturer’s owner’s manual.
5. Touch the computer power supply case to discharge any personal static electricity.
6. Remove the Core2 from its anti-static bag, holding the card only by its edges. Be careful to avoidtouching the pins on the bottom edge of the card.
Install the Card1. Align the Core2 card over the slot you’ve chosen and insert it.
2. Place one hand along the top edge of the card and push down firmly until the card is fully seatedin the slot. Do not use excessive force.
3. Once the card is fully seated, attach the bracket to the computer chassis with the screws providedwith your computer. If the computer is a tower or mini-tower design, check to see that boards arenot bending under their own weight and shorting against each other.
4. Replace the cover on the computer. Do not operate the system without the cover.

5
5
InstallationLexicon Studio Core2 User Guide
Cables/Connections1. Use only the proprietary Lexicon cable (provided) to connect the Core2 card to the Lexicon
Core2 connector box.
2. With the computer powered down, attach the cable between the connector on the back of theCore2 card and the Computer port on the connector box.
3. Connect your external audio devices to the connector box, or to the optical connectors on theCore2 card itself.
The connector box houses four unbalanced 1/4" analog inputs and eight unbalanced 1/4" analogoutputs, as well as a coaxial S/PDIF input and output. The coaxial input can also be used as aWord Clock input. (See Chapter 3.)
The back plate of the Core2 card carries the optical connectors. These can be configured (viathe Control Panel) to accept either ADAT™ or S/PDIF formats.
The Core2 can run in a variety of modes which affect the number and type of available I/O. Theseoperating modes are described in detail in Chapter 3: Core2 Basics.
Connecting the Core2 Card to the connector box.
INPUTS
1 3
2 4
1 3
2 4
OUTPUTS S/PDIFIN
OUT
(WORD CLOCK)5 7
6 8

Installation
6
6
Lexicon
Software Installation
Install Supported Third Party Audio SoftwareThe Core2 requires compatible front-end software (such as Syntrillium Software's Cool Edit Pro) tooperate. Please refer to your particular software installation guide for assistance. As Lexicon Studioinstalls software within directories of your front-end software, you should install your audio softwarefirst and verify that it launches properly before installing Lexicon Studio (even though it will not beaudio-capable until installation of the Lexicon Studio system).
If you are installing a later version of Lexicon Studio software over your current Studio software, pleaseskip to the next section entitled Updating Drivers.
Install the Lexicon Studio Driver for Windows1. With your Lexicon Studio hardware and third party audio software installed, power up your
computer. Once your computer is fully booted, Windows will identify your Core2 as a new PCImultimedia device. In the event of booting problems, refer to the troubleshooting section of thisuser guide.
2. The Windows Update Device Driver Wizard will appear. Insert the “Lexicon Studio:Core2: Drivers& Documentation” CD-ROM , and click the Next > button, allowing Windows to perform a searchfor the Lexicon Studio driver.
3. Windows will find the driver information for the Lexicon Studio Sound System on the CD-ROM.If it does not, you may need to Browse to it. If you encounter problems locating the first file, checkto make sure the path is correct, then click OK. Click the Finish button.
4. When the drivers are loaded, you will be prompted to restart your computer. You should choosenot to restart at this time and proceed with these instructions. Windows will prompt you twice torestart. Select No at both prompts.

7
7
InstallationLexicon Studio Core2 User Guide
Running the Setup.exe Program1. Insert the “Lexicon Studio Core2: Drivers & Documentation” CD-ROM if you haven’t already.
2. Open the contents of the CD-ROM and double-click on Setup.exe to launch the Installer.
3. Click Next > at the Installer welcome screen.
4. At the summary screen, select the desired software and click Next > to choose it.
5. Click Next > to begin the installation.
6. Click Finish to complete the installation.
7. Cold boot your computer (even if you’ve already restarted after installing the Core2 Drivers).
To remove or update this software, remove the install by using the Add/Remove Programs controlpanel, highlighting file, and selecting Remove. This control panel is located at Start/Settings/ControlPanel/Add/Remove Programs.
Updating DriversIf you are installing a newer version of Lexicon Studio software over your current software, follow thesteps outlined below.
Remove the Old SoftwareAs Lexicon Studio software is registered through the Windows Add/Remove Programs control panel,it must be completely removed to install a newer version. You should never have 2 different versionsof the software installed simultaneously.
1. Go to Start/Settings/Control Panel /Add/Remove Programs.
2. Scroll down to Lexicon Core2.
3. Click the Add/Remove button.
4. Click the Yes button when asked “Are you sure you want to completely remove Lexicon Core2and all of its components?”.

Installation
8
8
Lexicon
5. Click OK to close the control panel.
Update Studio Driver If you have a CD-ROM or have downloaded Lexicon Studio drivers with a higher revision number thanthose currently installed in your system, you should choose to update your driver. To do so, follow thedirections below.
1. Go to Start / Settings / Control Panel / System.
2. Click on the Device Manager tab..
3. Open the directory for Sound, Video and Game Controllers.
4. Highlight Lexicon IDS Sound System by clicking on it.
5. Click the Properties button.
6. Select the Driver tab within the Properties page.
7. Click the Update Driver... button.
9
9
InstallationLexicon Studio Core2 User Guide
8. Windows will ask if you want to search for the driver. Select Yes (Recommended).
9. Windows will search the drive from which a driver was last loaded. If you installed drivers fromfloppy disk, it will check only the floppy drive. If you have loaded the updated drivers from differentmedia, you will need to click the Other Locations... button and Browse to the CD-ROM for thenew driver. If you encounter problems locating the first file, check to make sure the path is correct,then click OK.
10. Click the Finish button.
11. Windows will prompt you to restart. Select No when prompted and continue with theseinstructions.
Reinstall Setup.exe1. Insert the “Lexicon Studio Core2: Drivers & Documentation” CD-ROM if you haven’t already.
2. Open the contents of the CD-ROM and double-click on Setup.exe to launch the Installer.
3. Click Next > at the Installer welcome screen.
4. At the summary screen, select the desired software and click Next > to choose it.
5. Click Next > to begin the installation.
6. Click Finish to complete the installation.
7. Cold boot your computer (even if you’ve already restarted after installing the Core2 Drivers).

Installation
10
10
Lexicon

11
11
Using the LexPanelLexicon Studio Core2 User Guide
Using the LexPanelAll Core2 I/O controls are accessed via the Core2 Control Panel. The Control Panel can be accessedby double clicking on the Lexicon Studio icon in the Taskbar or from within an ASIO application (suchas Cubase VST). The Control Panel allows you to select the number and type of active channels, thecurrent clock source and sample rate mode, as well as punch routing.The method of selecting tabs for different pages will be familiar to users of Windows and otherMicrosoft products. The selections are Core2, Punch, and Clock Source. Note that the Clock Sourcetab will not be present when using an ASIO application.
Core2 TabThis tab lets you determine which Core2 I/O streams are active. An active stream becomes availableas a clock source, as a source/destination for Punch, and for use in the audio application.
3

Using the LexPanel
12
12
Lexicon
Each I/O button on the Routing tab will turn on all of the corresponding inputs or outputs. Selectionswhich are precluded by current selections appear in gray. A check box labeled Optical appears nextto the S/PDIF buttons. When this box is checked, the optical connectors on the Core2 card will be setto the S/PDIF format — and the ADAT buttons will be unavailable for selection (gray).
Below is a table of possible configurations:
Option Coax CoaxNumber Analog In Analog Out S/PDIF In S/PDIF Out Optical In Optical Out
1 X X - - ADAT ADAT
2 X X X X - -
3 X X - - S/PDIF S/PDIF
4 X X - X ADAT -
5 X X X - - ADAT
Press Apply or OK to save routing changes.
If you are using the Wave drivers, and make any changes to the Routing Tab in the Lexicon controlpanel, you must restart Windows in order to have these changes take effect.
If the ASIO drivers are being used, it is not necessary to restart Windows. Simply quit then re-launchthe audio application to have the routing changes take effect. In Cubase, blank labels on the Input andOutput buses indicates that the application must be restarted. If you are using Cubase and havelaunched the Lexicon Control Panel from the Windows taskbar, you must quit Cubase before makingchanges to the Routing Tab.
NOTE: At least one Input pair and one Output pair must be enabled in order to launch Cubase. If nostreams are active, an error message will indicate that the ASIO Lexicon Studio V4.2 driver could notbe loaded. If this occurs, quit Cubase, launch the LexPanel from the Windows taskbar, turn on oneor more I/O streams, then re-launch Cubase.

13
13
Using the LexPanelLexicon Studio Core2 User Guide
Analog Input LevelsThe level of the Analog Inputs can be controlled by on-screen faders with the level displayednumerically at the bottom. A level setting of 0dB sets unity gain from the analog input to the analogoutput. A setting of 0dB corresponds to -10dBV, 18dB below digital full-scale.
The Link button between fader pairs allows them to be linked as a stereo pair for convenient identicalgain setting. The left fader value takes precedence when Link is used to make the faders operate atthe same level.
Control click on the Link button to link the fader heads while maintaining their relative levels.
Control click on a fader head to set the fader (or linked fader pair) to 0dB.
To enter gain levels numerically, double-click on a numeric field, then enter a value.

Using the LexPanel
14
14
Lexicon
dbx Type IVThe Core2 card comes equipped with the dbx Type IV Conversion System, featuring on-board TapeSaturation Emulation (TSE™). Type IV enhances the dynamic range of A/D converters by providinga logarithmic “Type IV Over Region” that extends the useable dynamic range beyond the linear range.TSE captures the sound of an analog tape machine in the saturation region.
Type IV On Type IV Off
Type IV is turned on and off on the Core2 card via four jumpers located on the card itself. The cardis shipped with all of these jumpers in the “in” position (Type IV on). The LED’s under the Type IV logoshould be illuminated to indicate that each is active.To turn Type IV off on a channel:
1. Remove the Core2 card from the computer. Follow the precautions noted in the installationinstructions.

15
15
Using the LexPanelLexicon Studio Core2 User Guide
2. Move the desired jumper to the “out” position. (The jumper nearest the edge of the card is forAnalog Input 1.)
3. Replace the Core2 card in the computer, reboot, and launch the Lexicon Control Panel. Thecorresponding LED under the Type IV logo should be off (indicating that Type IV is inactive onthis channel).
Punch TabThis page lets you select input Sources for Punch or overdub recording and output monitorDestinations for the sources selected for Punch or overdub recording. The Punch feature lets youperform overdub or punch recording by directly connecting to a Lexicon Studio interface — no externalmixer is required.
All computer operating systems have a delay when applications use host processing. The delay willvary depending on the buffer size of the audio hardware. This means that, when playing along withpreviously recorded tracks, the track you are playing will sound delayed while you are performing. Thisdelay can be overcome by using an external mixer, or by using the Punch feature.

Using the LexPanel
16
16
Lexicon
The punch feature mixes the input signals directly with the outputs selected for your monitor system(speakers or headphones) to avoid the inherent processing delay from the card to the computerapplication and back.
Unlike monitoring through a tape deck where the input is typically monitored when the transport is inStop or Record and muted during Play, the input signal is monitored all the time.
Configuring the Punch feature1. Select Enable Punch to turn on monitoring.
2. Select as many input sources as you like, clicking multiple selections with the shift or Ctrl key.Note that only those I/O selections which are currently enabled in the Routing tab will appear asSource and Destination selections.
3. Select the outputs you are using for monitoring. (Often the analog left and right outputs will beconnected to an amp and speakers — digital connection to a mixer is, of course, also possible.)A mono mix of the selected inputs will be sent to the outputs.
4. If you are using Cubase, select Global Disable from the System Setup dialog to turn off themonitoring through the application so that a delay is not heard from the input signal.
The MIX Level ControlMix Level allows you to adjust the volume of the selected Punch sources that are mixed with the VSToutput assigned to the same outputs (usually “Master”).
NOTE: If multiple sources are being summed, the Mix Level may need to be lowered to avoiddistortion. In such cases, try an initial setting of 40.

17
17
Using the LexPanelLexicon Studio Core2 User Guide
The Monitor ButtonsWhen using an ASIO application (such as Cubase), the available sources and destinations of Punchare those which are active in Cubase. For example, to route Punch from the LDI-10T A/D 1&2 to LDI-10T D/A 1&2, you must activate the corresponding input and output bus in Cubase. Remember thatthe Lexicon Control Panel must be exited, then re-launched, each time a change is made to theCubase active streams list.
When using the Wave drivers, when the Monitor button is turned on, all channels will be availablefor selection as Punch sources/destinations. When the Wave audio application in in Play, only thosechannels which are in use in the audio application are available to Punch routing. This is true evenwhen the audio application has been configured to keep its audio channels open in Stop. (Refer tothe specific application's User Guide for details on how to set this up.)
When there is no audio application running (or when the application is in Stop and has not beenconfigured to keep the audio channels open), all channels are available to Punch routing — providedthe Monitor button is turned on.
The audio channels are held by whichever application window is in front. For example, if both CoolEditPro and the LexPanel are open, and the LexPanel is active, the audio channels are held by the Lexiconapplication. When CoolEdit Pro is brought to the front, it will hold the audio channels. This allows youto use the MMIO Punch/Monitor feature with a seamless transition between applications.

Using the LexPanel
18
18
Lexicon
Clock Source TabThis tab will appear if you are using the Wave Control Panel. If you are using an ASIO application,clock source selection is made within the application.
If you are using a digital input , you must ensure that the Core2 and the external device aresynchronized. There are three ways to accomplish this:
1. Make the external device the master and the Core2 the slave, by designating the external deviceas the Clock Source.
2. Make the Core2 the master by selecting Internal as the Clock Source, and setting up the externaldevice to synchronize to the Core2 digital output.
3. Use a Word Clock source, such as a digital mixer, as the master and synchronize both the Core2and external devices to it. In this case, select WC RCA as the Core2 Clock Source.
Note that the coaxial input can be used as a Word Clock input. If your Word Clock source usesa BNC connector, you must use a BNC-to-RCA adapter for this connection.
As there is no incoming clock with an analog input, use the Internal setting.

19
19
Using Cool Edit ProLexicon Studio Core2 User Guide
Using Cool Edit Pro
Installing Cool Edit ProIncluded with the Core2 is a special version of Syntrillium Software's Cool Edit Pro, a powerfulmultitrack audio recording and editing application. To install this software:
1. Insert the Lexicon Studio Core2 CD.
2. Press Start, and select Run... from the menu.
3. Select Browse...Click on the box labeled Look In: at the top of the window that appears. Thiswill cause a list of your disk drives to appear.
4. Select your CD-ROM drive.
5. Locate a folder called Syntrillium and double click to open it.
6. Locate the file called SETUP, select it and run it.
The SETUP program will copy all of the necesary files to your hard drive. It will also add a programcalled Cool Edit Pro - Core2 to the Program listings available from the Start button menu.
Cool Edit Pro comes with very thorough on-line manual/help. We suggest that you familiarize yourselfwith the items under the Quick Reference heading in the program's Help menu.
4

Using Cool Edit Pro
20
20
Lexicon
Assigning Core2 I/O in Cool Edit ProCore2 inputs and outputs are assigned to tracks in two different ways, depending on the view (stereowaveform or multitrack) in which you are working.
In the stereo waveform view, select Options/Settings/Devices. In the window that appears, you candefine Waveform Playback and Waveform Record devices. Simply highlight the Core2 inputs andoutputs you want to use in the appropriate fields. These settings will apply for all files that you playor record when in the stereo waveform view.
In the multitrack view, inputs and outputs are assigned for each individual track. Before makingassignments, you must set up Preferred Multitrack Devices. To do this,
1. Click on either of the small numeral 1's at the far left of the track display to open the PlaybackDevice window.
2. Click on the Device List button to access a list of Preferred Multitrack Devices.
3. In each Playback field, assign a stereo Core2 output stream.
4. In each Record field, assign a stereo Core2 input stream.
5. Click OK on each window to back out to the Multitrack screen.
As these device settings are saved as Preferences in Cool Edit Pro, they will be used for allsubsequent sessions until you change them.
To make the playback and record device assignments for a specific track,
1. Click anywhere in the gray area at the far left of the track display to open the Track Info window.
2. Click on the arrows in the Playback Device and Record Device fields to select the desired inputsand outputs.

21
21
Using Cool Edit ProLexicon Studio Core2 User Guide
Optimizing Multitrack Performance in Cool Edit ProBecause background mixing requires significant computer processing power, you may experienceaudio dropouts in multitrack playback during large sessions — particularly if background mixing isincomplete when playback is initiated. Although there are several things you can do to improve this,if you have a slower machine, you may still have to wait for a time before hitting Play when workingwith very large sessions.
Careful adjustment of Playback Buffer Size and Background Mixing Priority Level (in Options/Settings/Mutitrack) with reference to the Mix Gauge can improve efficiency. The Background MixPriority must be high enough to keep the mix ahead of playback, but not high enough to slow downyour computer's performance. Generally, you should keep this setting as low as possible while stillkeeping the Mix Gauge relatively filled. Raising the Buffer Size consumes more computer memory,and can adversely affect computer performance.
Adjust these setings by small amounts, using decimal increments/decrements as follows. Whendropouts occur toward the end of background mixing (the Mix Gauge indicates mixing is more thanthree-quarters through), try reducing the Playback Buffer Size and raising the Background MixingPriority Level (higher values reduce the priority level). If dropouts occur when the Mix Gauge is nearempty, increase Playback Buffer Size and lower Background Mixing Priority Level.
The optimal settings for these controls will vary from session to session, with the number of tracksand the number of output devices.
Cool Edit Pro will take more time to perform background mixing when you have tracks assigned tomultiple sets of Core2 ouputs. In these cases, Cool Edit Pro creates a separate mix for each outputdevice (each Core2 channel pair). If your system's performance is affected, you can temporarilyassign all tracks to a single channel-pair while monitoring to speed things up. If you do this, werecommend checking 32-bit Pre-mixes mode in the Settings/Multitrack screen. When monitoringto multiple output devices, 16-bit Pre-mixes is the recommended mode.
Note that the 16-bit and 32-bit modes are playback settings only — the data on your disk stays at theresolution at which it was recorded.

Using Cool Edit Pro
22
22
Lexicon

23
23
TroubleshootingLexicon Studio Core2 User Guide
Troubleshooting
Common Problems and Solutions
Power Up ProblemsIf the computer will not power up after initially installing a Core2, the Core2 or another expansion cardmay be partially dislodged from the expansion slot on the motherboard. Symptoms may includekeyboard lights on, power indicator lit, or the hard drive spinning. Remove the Core2 and verify thatthe system boots without it installed. Verify that the expansion cards are seated securely in the slots.Remove all peripheral devices from the Core2 including the connector box and cable. Replace theCore2 board in the PCI slot and reboot the computer.
Installation & Hardware RecognitionThe Core2 is not recognized by Windows 95 when first installed.Make sure you have a Plug and Play ready BIOS that complies with V2.1 of the PCI specification.Load the default values of the BIOS and try installing the card again.
The Core2 appears in the Device Manager with no resources assigned.Enter the system BIOS. Restart the computer and watch for a message telling you which key to pressto enter your setup. Depending on the version and type of BIOS, locate the Plug and Play section anda parameter called Plug and Play OS Install, Plug and Play Aware, or something similar. Set thisparameter to No.
Computer crash and reboot when Lexicon IDS is removed from the Device Manager.Go into the Device Manager, open the System devices category, highlight the PCI bus entry and clickthe Properties button. Under the IRQ steering tab make sure IRQ Steering is unchecked.
5

Troubleshooting
24
24
Lexicon
Notes:Windows versions 4.00.950 and 4.00.950A will not exibit this problem. These versions do not havean IRQ steering tab or the option to enable Windows to steer IRQs. IRQ steering is done by the BIOS.
Windows versions 4.00.950B and 4.00.950C will exibit this problem only if the option to enable IRQSteering is enabled. Windows, by default, does not have this option enabled.
(Refer to Article number Q182604 in the Microsoft knowledgebase for a complete description of PCIbus IRQ steering.)
Installer can not find the first file during Lexicon Studio installationAt the start of the installation process, after Windows has identified the new hardware, it searches forthe drivers. In some cases Windows will not search the correct drive, and you must manually specifythe path to the A:\ drive (if installing with floppies) or the D:\ drive if installing from CD-ROM by clickingthe Browse button. Once you have done this, click Finish. All of the drivers will be copied from theproper drive.
Studio sharing an IRQ with ‘IRQ Holder for PCI Steering’ in Device ManagerThis is normal. An IRQ Holder for PCI Steering may be displayed when you view the System Devicesbranch of Device Manager. An IRQ Holder for PCI Steering indicates that an IRQ has beenprogrammed to PCI mode and is unavailable for ISA devices, even if no PCI devices are currentlyusing the IRQ.
Various problems if you have incorrectly updated your Lexicon Studio softwareThe following problems may appear if you incorrectly update Lexicon Studio drivers:
1. Clicking on the Launch Lexpanel icon in the System Tray causes the following message “Couldnot bring up Control panel” (with OK button)
2. No driver file appear in the Lxstudio Folder
Reason:Update Driver was performed incorreclty. Selecting NO, for ‘Do you want windows to search for a newdriver?’ causes the Device Driver Wizard to use the old .inf file from the previous version installed.

25
25
TroubleshootingLexicon Studio Core2 User Guide
To remedy this problem:
Run the Device Driver Wizard again as follows:1. From the Device manager select Sound, Video and Game controllers.
2. Double click on Lexicon Studio Core2 System.
3. Select the Driver tab
4. Select Update driver
5. Select YES (recommended) when the update Device Driver Wizard window opens.
6. Continue normally with the driver update
Audio ErrorsIf your audio application does not boot, check the following:
1. Is the card present under the Device Manager? To check, go to the Window’s Control Panel anddouble click on SYSTEM. This will bring up the System Properties window. Click on the DeviceManager tab and find the Sound, Video and Game controller icon (or Multimedia). Expand thecategory and look for Lexicon IDS Sound System. A yellow exclamation point next to LexiconStudio Sound System indicates your driver has been improperly installed.
2. Is an IRQ assigned? Is memory I/O assigned? Highlight the Lexicon Core2 and click on theProperties button. This brings up the LexiconCore2 Properties page. Click on the Resources tab.You will see a box called Resource Settings. If an IRQ and Memory are assigned, they will bedisplayed here. Also look below at the Conflicting device box to see if any conflicts are listed.
Pops and clicks• If you have a PCI-based VGA board , screen redraws may create pops, clicks or crashes. Turn
VGA acceleration off. The Graphics accelerator slider is accessed by pressing the Graphicsbutton in the Performance page of the System properties box. This may solve the problem.
• Contact the VGA card manufacturer and obtain the most recent drivers for that board and to reportthe problem.

Troubleshooting
26
26
Lexicon
• Minimize any unnecessary windows that are constantly redrawing
• Use an AGP (Accelerated Graphics Port) video card if your motherboard supports this.
• Verify that the SCSI card drivers are up to date.
• Verify all audio and data cables are securely fastened to their respective connectors.
• Try another Word clock source. Switch the word clock from internal to external or vice versa.
Poor System PerformanceA computer with a fast CPU does not guarantee high performance. If your system is not performingas well as it should be, try some of these suggestions:• Quit any open applications other than your audio software.
• Use a fast IDE drive for your audio. Getting audio off the PCI bus creates more bandwidth for theLexicon Studio System. You might also try a fast SCSI drive with a PCI SCSI controller, whichwill yield performance almost as high as the IDE due to the faster speed of SCSI.
• Add memory.
Optimizing Windows for Audio ApplicationsFollowing are some suggestions that may improve your computer’s performance as a dedicateddigital audio workstation. Some of these suggestions disable some Windows 95 optimization featuresand may slow the overall performance of your system when using non-audio applications.
Add MemoryAdding RAM to your computer will reduce the chance that Windows needs to use Virtual Memory.
Defragment Your Hard DrivesDefragment your drives on a regular basis.

27
27
TroubleshootingLexicon Studio Core2 User Guide
Run Scan Disk RegularlyScan disk can detect and fix problems before they become fatal.
Disconnect Any Mapped Drives That Are No Longer Connected To YourComputerDrives will appear in Explorer with a red “x” under them if the drive is no longer connected to yoursystem.
Verify no Drives are CompressedControlPanel/System/Performance: Make sure it says “Not Installed” after Disk Compression
Disable Write-Behind Disk CachingSets the number of kilobytes that Win95 reads ahead. (Reading ahead makes the audio drive workharder than necessary.)
Graphics Hardware AccelerationIn non-AGP computer systems (computers using VGA cards), graphics acceleration settings canforce your video card to hog the PCI bus. Crackling and zippering in the audio while opening andmoving windows is a warning sign of this.
Try lowering the acceleration settings of your graphics hardware. This is done by going to Start/Settings/Control Pane/System, then selecting the Performance tab and clicking the Graphicsbutton. A slider in this control panel allows you to select the amount of hardware acceleration. Tryusing Basic Acceleration Functions or No Accelerator Functions to reduce noise from PCIburden within your system.
Read-Ahead OptimizationIf you find that you are getting noise when adding more tracks of hard disk audio, try this to optimizeyour system and increase the number of tracks within your system.

Troubleshooting
28
28
Lexicon
This control panel can be found by opening Start/Settings/ Control Panel/System, then selectingthe Performance tab and clicking the File System button. This control panel optimizes theperformance of your disk drives for particular applications. For audio systems, it is best to set thetypical role for the machine to be a Desktop System or File Server. In either case, make sure yourRead-Ahead Optimization is set for None.
Set Virtual Memory To A Fixed AmountIf you have sufficient memory it is possible to completely turn off Virtual Memory. If not, set this to 50-100MB.
Use A Dedicated Drive For AudioUse the fastest drive available to you. Any drive sold as an AV drive will probably work. Try beforeyou buy.
Disable Screen SaversScreen savers, TSRs and Timeout features should be disabled. Disable any program or task thatruns in the background.
Disable Virus Protection SoftwareVirus protection software typically runs in the background of the computer, taking up processing timefrom the CPU. Make sure your virus protection software is disabled while running your audioapplications, but enable it periodically to check your system for viruses.
Keep Your Drivers Up To Date (vga, midi, etc.)Contact your card manufacturer for any updates that are available. Keep the old drivers on hand inthe event that the new drivers cause more problems.

29
29
TroubleshootingLexicon Studio Core2 User Guide
Compatibility Mode In Control panel/System/Performance if Win95 tells you it is running in “Compatibility Mode” it meansthat Windows drivers are not being used for some device. Try to resolve the problem.
Edit System FilesEditing of Windows and DOS system files should be attempted by experienced personnel only.
Autoexec.bat & Config.sys -Settings for network drivers, CD-ROMS, video cards and the mouse may need to remain in these filesbut all other entries should be remarked out by placing REM in front of the line.
win.ini -Load= or Run= should have no values after them.
Set Disk Caching To A Fixed AmountEdit the system.ini [vcache] MinFileCache=x and MaxFileCache=x. Where x = 10-25% of the totalsystem memory in Kilobytes.
MS Plus• Disable “show window content while dragging” in Control Panel/Display/Plus.
• Disable low disk space notification in the System Agent and suspend the System Agent.
• Remove DriveSpace3 from Add and Remove programs
Power Management SystemsSome computers enable certain settings for power management of hard drives when they are not inuse, dropping them into low power mode. Disable these settings for optimum performance. You willfind these settings in Settings/Control Panel/Power.

Troubleshooting
30
30
Lexicon
Your particular BIOS may also have power management settings. These should also be disabled.Refer to your BIOS manual or contact its manufacturer for information on how to accomplish this.
TIP: Back up your system on a regular basis
31
31
SpecificationsLexicon Studio Core2 User Guide
Specifications
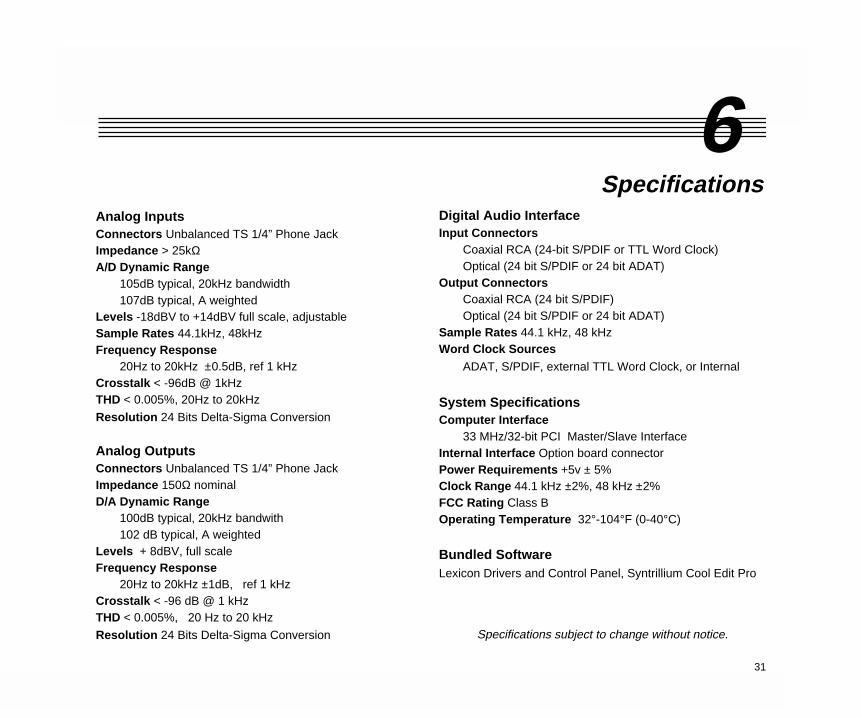
6Analog InputsConnectors Unbalanced TS 1/4” Phone JackImpedance > 25kΩA/D Dynamic Range
105dB typical, 20kHz bandwidth107dB typical, A weighted
Levels -18dBV to +14dBV full scale, adjustableSample Rates 44.1kHz, 48kHzFrequency Response
20Hz to 20kHz ±0.5dB, ref 1 kHzCrosstalk < -96dB @ 1kHzTHD < 0.005%, 20Hz to 20kHz
Resolution 24 Bits Delta-Sigma Conversion
Analog OutputsConnectors Unbalanced TS 1/4” Phone JackImpedance 150Ω nominalD/A Dynamic Range
100dB typical, 20kHz bandwith102 dB typical, A weighted
Levels + 8dBV, full scaleFrequency Response
20Hz to 20kHz ±1dB, ref 1 kHzCrosstalk < -96 dB @ 1 kHzTHD < 0.005%, 20 Hz to 20 kHz
Resolution 24 Bits Delta-Sigma Conversion
Digital Audio InterfaceInput Connectors
Coaxial RCA (24-bit S/PDIF or TTL Word Clock)Optical (24 bit S/PDIF or 24 bit ADAT)
Output ConnectorsCoaxial RCA (24 bit S/PDIF)Optical (24 bit S/PDIF or 24 bit ADAT)
Sample Rates 44.1 kHz, 48 kHzWord Clock Sources
ADAT, S/PDIF, external TTL Word Clock, or Internal
System SpecificationsComputer Interface
33 MHz/32-bit PCI Master/Slave InterfaceInternal Interface Option board connectorPower Requirements +5v ± 5%Clock Range 44.1 kHz ±2%, 48 kHz ±2%FCC Rating Class BOperating Temperature 32°-104°F (0-40°C)
Bundled SoftwareLexicon Drivers and Control Panel, Syntrillium Cool Edit Pro
Specifications subject to change without notice.
Specifications
32
32
Lexicon