olen bogert bsn rn cen cpen tcrn ccrn
TRANSCRIPT
Olen Bogert
BSN RN CEN CPEN TCRN CCRN
This abbreviated document has been prepared for speaker presentation purposes only and can not be substituted for AT 3 course
content. Rights to all images, content, and concepts presented here are retained and may not be reproduced without the expressed
written consent of the author(s), and may not be used or otherwise implemented for commercial or other institutional use.
v. 041820

Welcome to the AT 3 course - [PART-1]! This course is intended to prepare the experienced emergency provider to care for critically ill and injured patients in a
dynamic team environment. The content presented will expose the learner to the core components of the ideal trauma
team, highlight anticipated challenges, and discuss techniques used to maximize the safety, efficiency, and streamlined
outcomes common in highly effective trauma resuscitations. To maximize learning potential, each learner is required to
prepare themselves for the course with the resources provided and arrive to the course ready to participate in a number
of simulated roles and situations outside of their typical job parameters. Please pick up your copy of the Student Packet
from the ED administrative office at least seven (7) days prior to class.
STUDENT PACKET CONTENT
● AT 3 skills validation form
● Team role cards
● Presentation worksheets
● Scavenger hunt worksheet
● Trauma nomenclature form
● Procedure/tray guidelines
● Trauma criteria form
● TNP flowsheet
● Trauma charting flowsheet
● Course completion instructions
PRE-COURSE PREPARATION
1. Review & Read: Student Packet contents
2. Complete “Self Assessment Code” column of AT 3 Skills Validation form
3. View all online skill review videos - follow the following link:
https://www.youtube.com/playlist?list=PL8GX8hSyMOdK1yfhvlG70MUYK6awJnrGN
4. Review: Society of Trauma Nurses learning slides w/ instructor notes available through CLICK-4-HELP
COURSE DAY EXPECTATIONS
● Bring Student Manual to class w/pen or pencil
● Dress code: medical scrubs
● All pre-course preparations completed as above
ANTICIPATED COURSE SCHEDULE
1. Introductions and student expectations
2. AT 3 presentation and activities
3. Team simulation performance expectations
4. Team simulations with debriefs
5. Final debrief and discussion
6. Skills validation form review
7. Post-course completion review
v. 031920

1
AT3 Skills Validation Form v. 031920
Name:
Evaluator: Initials:
Self Assessment Code [SAC] Validation Options [VO]0 = No knowledge or experience V = Verbalizes topic/skill knowledge and understanding
1 = Need guidance/reorientation O = Observation of performance of listed skill
2 = Can perform independently
3 = Able to educate/resource for others
[V] = Skills video available
Critical Skills Evaluation SAC VO Date Initials
RN/EDT1. Describes role of trauma team members2. Demonstrates appropriate use of PPE3. Demonstrates appropriate set up trauma room for receiving
patients4. Describes priority of care, intervention, and evaluation of the
arrived trauma patient5. Placement/maintenance of cervical stabilization6. Describes importance of manual BP and temperature
monitoring7. Trauma cabinet location and supplies8. Trauma Arrest
• Adult code cart
• Pediatric code cart
• Roles & priorities in traumatic arrest9. Procedure Trays & Kits:
• Tube thoracostomy tray
• Atrium chest drainage kit [V]
• Pigtail chest catheter
• Pericardiocentesis
• Emergency cricothyrotomy
• Open thoracotomy tray
• Triple lumen/Cordis central line
• Arterial line
• Stryker compartment pressure kit

2
10. Airway/Breathing
• Bag valve mask
• Jaw thrust [V]
• OPA/NPA insertion [V]
• Supraglottic airway insertion [V]
• Intubation assist [V]
• Bronchoscope assist [V]
• Surgical airway assist
• Pediatric airway supplies
• Chest tube securement/dressing/drainage [V]11. Temperature Management
• Warmed blankets
• Forced air warming blanket [V]
• Esophageal/rectal temp monitoring [V]
• Arctic sun [V]12. Splinting & Immobilization
• Traction splints [V]
• Fiberglass/plaster splinting13. Wound Care
• Pressure dressing [V]
• Wound packing [V]
• Burn dressing14. Hemorrhage Control
• Extremity tourniquets [V]
• Pelvic binder [V]
• Junctional pressure devices (FemoStop or SJT device) [V]
• Hemostatic materials15. Hemodynamics
• Intraosseous access [V]
• EJ or USG-IV access
• Belmont warmer/infuser [V]
• Arterial/CVP setup and zeroing [V]
• Alaris pump priming [V]
• Pressure bag infusion [V]
• Burn injury fluid guidelines
• Permissive hypotension

3
16. Orthopedic Injury Management
• Pelvic fracture
• Femur fracture
• Extremity fracture
• Limb amputation
• Compartment syndrome17. Traumatic Brain/Spinal Injury Management
• Skull fracture
• Epidural/subdural hematoma
• Cervical spinal fracture
• Thoracic/lumbar spinal fracture18. Cardiothoracic Trauma Management
• Rib/sternal fractures
• Flail chest
• Pneumothorax/tension pneumothorax
• Hemothorax
• Blunt chest injury
• Pericardial tamponade
• Aortic injury
• Diaphragmatic rupture19. Abdominal Trauma Management
• Splenic injury
• Hepatic injury
• Renal injury
• Bowel/Bladder rupture
• Visceral hemorrhage20. Managing Trauma in Pregnancy
• Placental abruption
• Uterine rupture
• Premature labor
• Maternal positioning
• Fetal monitoring (FHT or EFM)21. Penetrating Injury Management
• Gunshot wounds
• Stab/slashing wounds
• Impalements

4
22. Pediatric Trauma Considerations
• Circulatory assessment
• Fluid/blood resuscitation
• Lund & Browder chart
• Non-accidental trauma
• Broselow tape
23. Other Trauma Concepts
• Electrocution
• Evidence preservation
• Log-roll vs. team lift for posterior assessment [V]
• Drowning/near drowning
Critical Skills Evaluation SAC VO Date Initials
ED NURSE ONLY1. Utilizes Trauma Activation Criteria to initiate alert and response
teams2. Complete activation, PMH, and prehospital documentation on
flowsheet3. Complete GCS assessment; records Height/Weight4. Complete Primary and Secondary Survey on flowsheet5. Identify appropriate interventional and reassessment
expectations6. Invasive temperature monitoring7. NG/OG insertion8. Endotracheal tube assessment9. Ventilator Settings/Troubleshooting
• High alarms [V]
• Low alarms [V]10. Pharmacology/Medication Administration
• Drug Assisted Intubation (DAI) kits A & B [V]
• Ketamine (pain and sedation)
• Commonly used drugs in trauma
• Tetanus vaccination
• Acute trauma pain management
• Pediatric syringe & stopcock dosing [V]11. Blood Administration
• Rapid Infusion Catheter (RIC) exchange [V]
• Trauma/MTP blood administration
• MTP charting/signature requirements
• Crossmatched blood administration

● Coordinate with team members to ready trauma room with appropriate equipment
● Ensure room temp is elevated and team PPE is in place
● Review team assignments and initiate introductions of team members
AT PATIENT ARRIVAL...● Document prehospital data and interventions● Document known PMH● Document and readback initial MANUAL BP
and VS as reported by team members● Initiate and document PRIMARY SURVEY
call-out with lead provider● Coordinate MTP need and initiation● Delegates tasks as indicated
● SET expectation for roles, closed-loop communication, and silent room practice
● Document known activation data● Record names of team members on trauma
flowsheet
● Document interventions, medications, and other data points of resuscitation
● Maintain coordination of team dynamics and communication
● Coordinate with trauma providers, XR, CT, and OR for patient care planning
● Accompany and supervise pt during imaging● Coordinate patient admission
● Announce name and role to Trauma RN-1● Ensure C-spine immobilization during care● Place oxygen via NRB @ 15Lpm; place nasal
cannula @ 15Lpm if rapid intubation anticipated● Obtain VS immediately at patient arrival
including MANUAL BP, temperature, HR, RR, and SpO2 every 5-10 minutes within the first hour
● Remove clothing to expose patient and start warming procedures, ensure normothermia
○ Warm IVF○ Room temp management○ Radiant heating pads○ Warming blankets/insulation○ Heat loss minimization
● Place patient on monitor and set frequency q. 5-10 minutes as indicated
● Assists with Primary/Secondary Survey with GCS reported to RN-1
● Communicates with patient regarding goals and planning of care
● Manage MTP and blood product administration● Verbalize and administer medications as
ordered using closed-loop communication to Primary Provider and RN-1 (Recorder/Lead)
● Monitor core temperature during resuscitation● Assist with tasks on Designated Side:
○ IV/IO access x2○ Obtain blood sampling○ Central venous access○ Arterial access & monitoring○ Chest tube insertion & drainage
● Place NG/OG as indicated● Place temp foley as indicated● Assist EDT and Trauma Provider members with
tasks as indicated
● Announce name and role to Trauma RN-1● Assist with prep of trauma room and donning of
PPE for the team● Ensure C-spine immobilization during care● Place oxygen via NRB @ 15Lpm; place nasal
cannula @ 15Lpm if rapid intubation anticipated● Obtain VS immediately at patient arrival
including MANUAL BP, temperature, HR, RR, and SpO2 every 5-10 minutes within the first hour
● Remove clothing to expose patient and start warming procedures, ensure normothermia
○ Warm IVF○ Room temp management○ Radiant heating pads○ Warming blankets/insulation○ Heat loss minimization
● Place patient on monitor and set frequency q. 5-10 minutes as indicated
● Assist with tasks on Designated Side:○ IV/IO access x2○ Obtain blood sampling○ Central venous access○ Arterial access & monitoring○ Chest tube insertion & drainage
● Ensure Type & Cross band is correct and placed to pt wrist
● Assist with splinting and immobilization● Collect and bag patient belongings, provide to
security as indicated● Maintain chain of custody if forensic evidence if
suspected or found

● Announce name and role to Trauma RN-1● Supervise initial trauma resuscitation and
interventions● Prioritize care planning and communication with
radiology, blood bank, and OR● Combined trauma care with Emergency
Provider
● Announce name and role to Trauma RN-1● Lead initial stabilization of patient and complete
primary interventions as indicated● Complete and call out Primary and Secondary
assessment findings to Trauma RN-1● Combined trauma care with Trauma Surgeon● Ensure trauma protocols and additional orders
are placed for progression of care● Communicate with other specialty providers
immediate needs and plan of definitive care
● Announce name and role to Trauma RN-1● Maintain presence at head of bed● Place initial oxygen and basic airway adjunct as
indicated● Initiate capnography monitoring● Manage airway and breathing within scope of
practice● Assist with basic and advanced airway
management as indicated● Manage mechanical ventilation● Draw and send ABG if ordered● Assist and accompany during patient transport

MATCH TASKS & ROLES (select all that apply) 1. Places monitoring devices during ini�al pa�ent contact. ▢ Nurse-1 ▢ Nurse-2 ▢ ED Technician ▢ Resp Therapy ▢ ED Provider ▢ Trauma Surgeon 2. Announces name and role to recording lead upon arrival to resus room. ▢ Nurse-1 ▢ Nurse-2 ▢ ED Technician ▢ Resp Therapy ▢ ED Provider ▢ Trauma Surgeon 3. Obtains blood sampling. ▢ Nurse-1 ▢ Nurse-2 ▢ ED Technician ▢ Resp Therapy ▢ ED Provider ▢ Trauma Surgeon 4. Places NRB at 15 Lpm to adult pa�ents upon arrival to resus room. ▢ Nurse-1 ▢ Nurse-2 ▢ ED Technician ▢ Resp Therapy ▢ ED Provider ▢ Trauma Surgeon 5. Removes pa�ent clothing and places warming measures. ▢ Nurse-1 ▢ Nurse-2 ▢ ED Technician ▢ Resp Therapy ▢ ED Provider ▢ Trauma Surgeon 6. Places orders for interven�on, imaging, and treatment during resus. ▢ Nurse-1 ▢ Nurse-2 ▢ ED Technician ▢ Resp Therapy ▢ ED Provider ▢ Trauma Surgeon 7. Obtains IV or IO access. ▢ Nurse-1 ▢ Nurse-2 ▢ ED Technician ▢ Resp Therapy ▢ ED Provider ▢ Trauma Surgeon 8. Manages massive transfusion of blood and serum products during resus. ▢ Nurse-1 ▢ Nurse-2 ▢ ED Technician ▢ Resp Therapy ▢ ED Provider ▢ Trauma Surgeon 9. Obtains manual BP upon pa�ent arrival and reports to team leaders. ▢ Nurse-1 ▢ Nurse-2 ▢ ED Technician ▢ Resp Therapy ▢ ED Provider ▢ Trauma Surgeon 10. Places rigid cervical collar if indicated or ordered by provider. ▢ Nurse-1 ▢ Nurse-2 ▢ ED Technician ▢ Resp Therapy ▢ ED Provider ▢ Trauma Surgeon 11. Assists staff with donning of PPE. ▢ Nurse-1 ▢ Nurse-2 ▢ ED Technician ▢ Resp Therapy ▢ ED Provider ▢ Trauma Surgeon 12. Assists ED or trauma providers with Primary/Secondary survey. ▢ Nurse-1 ▢ Nurse-2 ▢ ED Technician ▢ Resp Therapy ▢ ED Provider ▢ Trauma Surgeon 13. Reports medica�on administra�on to team lead for recording. ▢ Nurse-1 ▢ Nurse-2 ▢ ED Technician ▢ Resp Therapy ▢ ED Provider ▢ Trauma Surgeon 14. Assists with wound care, splin�ng, and other interven�ons as assigned. ▢ Nurse-1 ▢ Nurse-2 ▢ ED Technician ▢ Resp Therapy ▢ ED Provider ▢ Trauma Surgeon 15. Places core temperature monitoring devices during ini�al resuscita�on. ▢ Nurse-1 ▢ Nurse-2 ▢ ED Technician ▢ Resp Therapy ▢ ED Provider ▢ Trauma Surgeon
Give an example of using the Shared Mental Model [SMM]: _________________________________________________ __________________________________________________________________________________________________ __________________________________________________________________________________________________ __________________________________________________________________________________________________ __________________________________________________________________________________________________ Give an example of a 3-Step-Summary [3SS]: _____________________________________________________________ __________________________________________________________________________________________________ __________________________________________________________________________________________________ __________________________________________________________________________________________________ __________________________________________________________________________________________________ Give an example of Task-Switching: _____________________________________________________________________ __________________________________________________________________________________________________ __________________________________________________________________________________________________ __________________________________________________________________________________________________ __________________________________________________________________________________________________

EFFECTIVE TEAMS vs SOURCES OF CONFLICT Place a star next to each item associated with effec�ve teams - Circle each poten�al cause of team conflict.
LABEL EACH POSITION WITH THE APPROPRIATE TEAM ROLE - ADULT & INFANT:
❏ RN-1 ❏ RN-2 ❏ EDT-1 ❏ EDT-2 ❏ ED Doc ❏ Trauma Doc ❏ RT

TRAUMA SCAVENGER HUNT
❏ Face shield masks
❏ Adult CODE cart
❏ Pediatric CODE cart
❏ Pediatric interven�on cart
❏ Manual BP cuffs
❏ BVM PEEP valves
❏ NRB Mask
❏ Nasal cannula with EtCO 2
❏ Oropharyngeal airway
❏ Nasopharyngeal airway
❏ Main ED intuba�on trays
❏ Senior ED intuba�on trays
❏ NG/OG tubes + syringes
❏ Main US machine
❏ Senior US machine
❏ US sterile probe covers
❏ Supraglo�c (LMA) airways
❏ Fiberop�c bronchoscope & monitor
❏ Glidescope
❏ Surgical airway supplies
❏ Needle cricothyrotomy kit
❏ Chest tube dressing supplies
❏ Atrium CT drainage kits
❏ Pediatric airway supplies
❏ Infant warmer
❏ Air warmer blankets
❏ Arc�c Sun + pads
❏ Internal temperature probes
❏ Foley catheter kits (temp monitoring)
❏ Trac�on splints (Sager/Hare)
❏ Fiberglass splin�ng material
❏ Extremity tourniquets
❏ Pelvic binder
❏ IO needle kits
❏ Cervical collars
❏ 3-way stop cocks
❏ Arterial pressure transducer kits
❏ Arterial line inser�on kits
❏ Chest tube tray
❏ Pigtail chest catheter tray
❏ Atrium chest drainage kits
❏ Pericardiocentesis kit
❏ Open thoracotomy tray (open chest)
❏ Triple lumen central line kits
❏ Cordis/introducer kits
❏ Stryker compartment pressure kit
❏ Rapid Infusion Catheter (RIC) kits
❏ Belmont rapid infuser
❏ Belmont tubing kit
❏ Cheetah NICOM + extra chest leads
In-Hospital Units
❏ CAT scan
❏ Opera�ng Room entry
❏ Interven�onal radiology
❏ Invasive cardiology (cath lab)
❏ Central Distribu�on

Advanced Trauma Teams Training: PART-1
Presentation Outline (v. 031920)
What are Dynamic Teams?
Dynamic teams are made of individuals of variable training that may not be familiar with their assigned role, may not be
familiar with the standards of communication during the resus, and may share the same goals of the team but have
variable understandings of the process.
How do we Manage Dynamic Teams?
▫ Model team leadership
▫ Review allocation of roles
▫ Review role expectations
▫ Practice closed-loop communication
▫ Emphasize the Shared Mental Model [SMM]
▫ Tasking checklists
▫ 3-Step-Summary [3SS]
Key Characteristics of Leadership:
Situational Awareness
▫ A big picture view of the process and anticipation of error or complication
▫ Avoids fixation on tasks or distracting elements that are not the current priority
Mindfulness
▫ Adopting a leadership mentality will all associated responsibilities
▫ Awareness of team dynamics and the leader’s role in shaping the mood of the resus environment
A Common Problem...
Team leaders are often expert providers and may become distracted trying to assist or participate in hands-on care. This
“task-switching” prevents the leader from participating completely in either task, leads to error & delay, and imparts
confusion on other team members in the absence of a clear leadership role.
Expectations of the Team Lead:
▫ Clearly identified to other team members
▫ Positioned in an area of clear vision
▫ Reaffirms roles and expectations
▫ Clearly and calmly spoken
▫ Positive in communication
▫ Assertive in demeanor
▫ Effectively summarizes and reorients as indicated

Team Member Expectations
▫ Identify name and role to Trauma RN-1
▫ Don appropriate PPE while in resus room
▫ Wear role sticker and badge for identification
▫ Speak only to report interventions, findings, voice concerns, or seek clarification
▫ Interact in a mutually respective and professional manner
▫ Depart the trauma room when excused by Team Lead or tasking is no longer needed
Team Briefing
Team leads will address the assembled team members and use known information to summarize priorities, an
anticipated course of care, and destination planning. Preparations are reviewed and an opportunity to ask questions or
voice concerns is provided prior to the patient’s arrival.
Team Briefing - first 30 seconds:
▫ Type of patient
▫ Type of trauma/injury
▫ Causative mechanism
▫ Severity/stability
▫ Provider’s level of concern
▫ Known/potential injuries
▫ Priorities and anticipated course of care
Effective Teams…
Allocate Tasks to Individuals:
Naming individuals with tasks reinforces roles, provides efficiency in tasking, and cements personal responsibility for
completion of duties assigned.
Provide Concrete Time Frames:
Setting timed goals focuses the team dynamic, reduces idle conversation, and minimizes distraction as each member
keeps the clock in mind.
Effective Teams…
Closed Loop Communication:
Instructions given will be read back; findings reported will be read back; care planning will be summarized.
This minimizes error and contributes to the SMM
Other Elements of Success:
Mutual trust
Mutual performance monitoring
Backup behaviors
Adaptability

Sources of Conflict
Too much help:
▫ Excess staff “helping” in the resus room is often more distracting and leads to breakdown in the organized
approach to care.
▫ Problems include intrusiveness, distraction, incorrect prioritization, opinion conflicts, and incorrect interventions
Sources of Conflict
Cognitive Emergency Reaction:
▫ When faced with stressors, people may revert to ingrained, dogmatic, or reactionary habits
▫ Examples: aggressiveness, non-constructive criticality, task focusing, tunnel-vision, loss of situational awareness
Sources of Conflict
Distraction:
▫ Staff members or consults not part of the initial team briefing may repeat questions already addressed, call out
findings already noted, and frequently fail to adhere to the expectations and decorum of communication put
forth by the team leader
Sources of Conflict
Conflicting opinions:
▫ Trauma and ED providers may not agree on the best course of care or intervention for an abnormal or
emergency finding.
▫ Specialty providers may request imaging prior to surgery while another may request direct OR admit
Sources of Conflict
Inappropriate Intrusiveness:
▫ Senior or more assertive staff may micromanage others of dictate interventions outside their role
▫ Opinions may be offered that are not appropriate and may result in power struggles or intimidation
The majority of conflict during any trauma resus will arise from…
** POOR COMMUNICATION **
Sources of Conflict
Individual factors:
▫ Fatigue, individual stressors, time on shift, and prior experiences all contribute to interpersonal conflict
▫ These factors slow cognition, shorten tempers, retard critical thinking, and reduce the individual's ability to cope
with stress
Sources of Conflict
Hierarchy:
▫ Senior providers and team members may dominate others less experienced or new to the team
▫ Newer or less experienced members of the team may be less like to report errors, challenge wrong decisions, or
interrupt flawed thinking pathways
Sources of Conflict
Knowledge factors:
▫ Knowledge deficits can precede stress and anxiety

▫ Lack of familiarity with policy, procedure, or other team members can cause interpersonal frustration
▫ Prioritization may differ between individuals with varying knowledge focuses
Sources of Conflict
Toxic personalities:
▫ Egotism, narcissism, and sociopathy may be seen in any team member, regardless of specialty
▫ Excessively passive, introverted, or avoidant personalities may cause issue as well, as they may be less apt to
speak up or act independently when warranted
Resolution Techniques…
Be Nice:
Extend niceties to force the urge to reciprocate.
Nice people are harder to be mean to and peer pressure will reinforce the imbalance
Be Authoritative:
Being overly collaborative and accommodating may undermine progress - be directive and tell rather than ask.
Stay Objective:
Redirect subjective arguments by focusing on the facts, the current priorities of care, and the patient as the victim of
disagreement.
Resolution Techniques
Ask for Help:
Asking shows a willingness to include individuals in the team process.
Keep the request narrow to avoid a runaway power shift.
Physical Gestures:
Not that kind of gesture…
A simple handshake or welcoming gesture when team members arrive creates and inclusive environment.
Power of the Group:
Deindividualization of disagreements or arguments helps put focus back of the best interests of the patient - reinforces
each team member as part of the group.
Resolution Techniques
Review the SMM:
Reviewing the goals of care, using the 3SS if needed, reinforces mission trajectory and reinforces the need for a cohesive
team approach.
Change the Context:
Summarize or restate the issue in question - it could be a simple misunderstanding or error made during
communication.
Pre-supposition:
Restate any issues in question as fact to imply inherent truth to the idea.
Ideas stated as truth, versus opinion, are harder to argue against.
Resolution Techniques
Ask for Clarification:
Pausing to request clarification can expose errors in judgement, help redirect the care process, or otherwise defuse a
growing conflict.
Seek Another Opinion:
If there is disagreement between providers, a third outside opinion is warranted and may provide justification in either
direction.
Refer to Policy:
Referencing protocol or policy can solidify arguments when there is a question of process or procedure.
When all else fails, have policy on your side.

TRAUMA NOMENCLATURE STANDARDIZATION Acknowledge “Acknowledge 100 mcg Fentanyl IV Push, now.”
“Acknowledge absent breath sounds on right and prepare chest tube tray.” “Manual blood pressure 84/56, please acknowledge. Affirma�ve, start MTP.”
Affirma�ve (yes) “Confirm posi�ve FAST exam of right upper quadrant. Affirma�ve”
Nega�ve (no) “Bleeding controlled with tourniquet? Nega�ve.” “Confirm menta�on unchanged from last assessment. Nega�ve, pt now unresponsive to pain.”
Read Back “Read back primary assessment findings please.” “Read back verbal medica�on order please.”
Say Again “I say again, collect 2 units PRBC in a trauma cooler from lab.” “Say again �me of fentanyl administra�on.” “Say again ET tube size and depth.” “Say again etomidate and sux dosage.” “I say again, quiet in the room please.”
Stand By “Can you confirm ET tube placement? Stand by…” “Confirm eFAST findings. Stand by…”
That is Correct “Con�nue C-spine immobiliza�on? That is correct.” “Confirm palpable step-off of mid thoracic spine. That is correct”
Unable “Unable to establish IV access, IO will be placed.” “Unable to establish a response to painful s�muli.”
Abort “Abort intuba�on a�empt, resume bag mask oxygena�on and prepare for cricothyrotomy.”
Cancel “Cancel normal saline bolus, ini�ate MTP.” “Cancel CT scan and contact OR for immediate transfer.”
Correc�on “End �dal reading 31… correc�on end �dal reading 28.” “ET tube depth 23cm at the lips… correc�on 22cm at the gums.”
Confirm “Confirm: radial pulses are absent in le� extremity.” “Confirm number and type of blood units administered thus far, please.” “Confirm OR ready to receive pa�ent.” “Confirm IV placed to le� AC 16 gauge. Affirma�ve” “Confirm wound loca�on, size, and depth please.”
Request “Request current oxygena�on satura�on.” “Request current �me to OR ready.” “Request ready of chest tube tray and two collec�on kits, please.”
Resume “Resume intuba�on, second a�empt.” “Resume primary assessment please.” “Resume trac�on and prepare to splint with posterior long leg.”
Time “Time since last analgesia?” “Time to OR ready?”
Con�nue “Con�nue MTP un�l further advised.” “Con�nue wound packing and pressure, prepare for OR transfer.”
Go Ahead “Request for task clarifica�on. Go ahead…” “Request to review assessment findings and plan of care. Go ahead…”
Maintain “Team lead, maintain hemodynamic stabiliza�on and prepare for OR admit.” “RT, maintain mild hyperven�la�on on vent.”

● Chest tube tray● Additional silk suturing material● Lidocaine 1% for injection● 10mL syringe, 1 ½” 22ga.
needle, blunt needle● Sterile gloves/gown/face
shield/drapes● Bedside US machine with probe
cover● Chest drainage kit
1. Place tray on bedside stand; place trash can on provider’s working side
2. Position patient with arm raised over head on side of tube placement
3. Sterile drop any additional equip onto tray
4. Ensure collection device ready to connect
5. Premedicate patient for pain r/t procedure and lung reinflation
6. After tube placement assess adequate drainage, reevaluate lung sounds, verify chamber bubbling
7. Seal and dress tubing insertion site
8. Verify tubing path and integrity9. Record chest tube placement in
EPIC10. Record initial fluid output:
a. If initial output of blood >1500mL prepare for MTP and possible open chest procedure
b. If output of blood >400 mL in first 60min, notify provider and prepare for MTP
11. Ensure post-placement CXR to confirm placement


● Pigtail catheter kit● Chest tube tray● Lidocaine 1% for injection● 10mL syringe, 1 ½” 22ga.
needle, blunt needle● Sterile gloves/gown/face
shield/drapes● Chest drainage kit
1. Place tray on bedside stand; place trash can on provider’s working side
2. Position patient with arm raised over head on side of tube placement
3. Ensure collection device ready to connect
4. Premedicate patient for pain r/t procedure and lung reinflation
5. After tube placement assess adequate drainage, reevaluate lung sounds, verify chamber bubbling
6. Seal and dress tubing insertion site
7. Verify tubing path and integrity
7. Record chest tube placement in EPIC
8. If large blood volume noted in tubing, notify provider for additional intervention
9. Coordinate order for CXR to confirm placement

OPTIONALTRAY

● Drainage kit● Wall suction regulator, canister &
tubing● ½” fabric, silk, or foam tape
1. Remove kit contents and fluid syringe
2. Confirm drain suction set to 20 mmHg
3. Inject fluid syringe into designated port per kit instructions
4. Rotate base support or open hanging loops from collection chamber and position upright
5. Assist connection of chest tube to collection chamber tubing
6. Tape tubing allowing maximum visualization of tubing inner content
7. Connect wall suction to designated port on collection chamber and ensure suction at minimum 80 cmH2O or greater at regulator
8. Visualize bubbling or active drainage into collection chamber
9. Note initial and continued output q. 60min

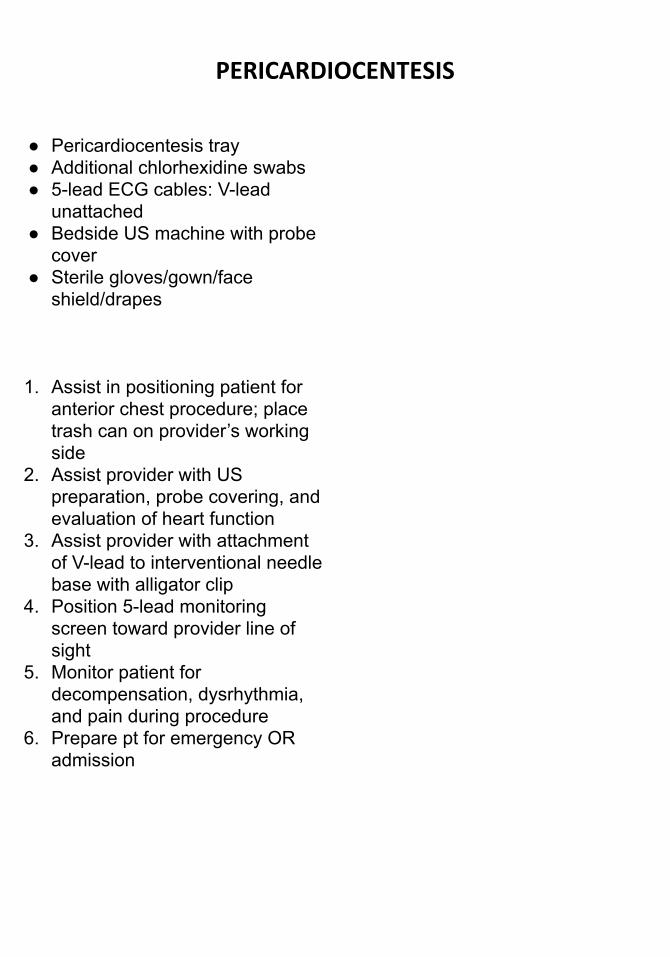
● Pericardiocentesis tray● Additional chlorhexidine swabs● 5-lead ECG cables: V-lead
unattached● Bedside US machine with probe
cover● Sterile gloves/gown/face
shield/drapes
1. Assist in positioning patient for anterior chest procedure; place trash can on provider’s working side
2. Assist provider with US preparation, probe covering, and evaluation of heart function
3. Assist provider with attachment of V-lead to interventional needle base with alligator clip
4. Position 5-lead monitoring screen toward provider line of sight
5. Monitor patient for decompensation, dysrhythmia, and pain during procedure
6. Prepare pt for emergency OR admission

DO NOT CONFUSE WITH THORA-PARA
TRAY
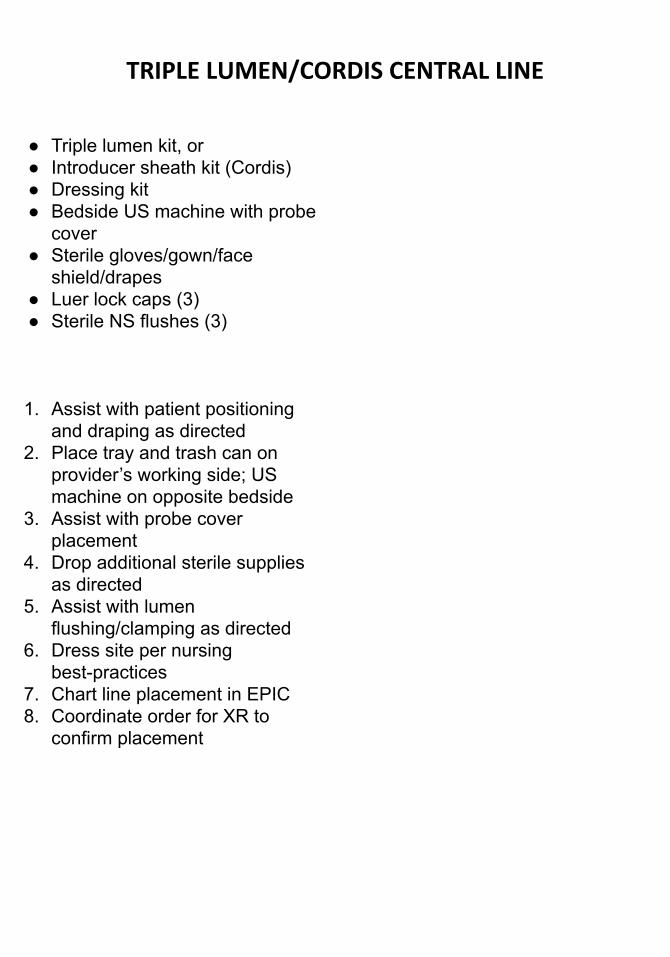
● Triple lumen kit, or● Introducer sheath kit (Cordis)● Dressing kit● Bedside US machine with probe
cover● Sterile gloves/gown/face
shield/drapes● Luer lock caps (3)● Sterile NS flushes (3)
1. Assist with patient positioning and draping as directed
2. Place tray and trash can on provider’s working side; US machine on opposite bedside
3. Assist with probe cover placement
4. Drop additional sterile supplies as directed
5. Assist with lumen flushing/clamping as directed
6. Dress site per nursing best-practices
7. Chart line placement in EPIC8. Coordinate order for XR to
confirm placement


● #11 scalpel● Adult/pediatric bougie (flexible
introducer)● Surgical pen● Endotracheal tubes or intubation
tray● Sterile gloves/gown/face
shield/drapes● Color/waveform capnometry● Numerous 4x4 gauze pads● Hi-flow suction device
(Yankauer, Big-Tip)● Optional: Melker Kit
1. Assist with airway maintenance and positioning during preparation
2. Prepare BVM with EtCO2 colemetry or waveform device
3. Assist as directed during procedure
4. Provide minimum 6 PPV breaths following tube placement to verify CO2 return, chest rise, and bilateral lung sounds
5. Chart airway in EPIC6. Coordinate order for CXR to
confirm placement

OPTIONALTRAY

● Arterial line tray● Wire-guided arterial needle● Volar hand support● Sterile gloves/gown/face
shield/drapes● Bedside US machine with probe
cover● Pressure transducer kit + fluids● Normal saline flush (2)
1. Assist with patient positioning and draping as directed
2. Prepare transducer line - use flush technique if line placement in progress
3. Ensure securement of arterial catheter post-placement
4. Position volar hand support5. Reposition limb restraint to palm
if in place6. Zero, perform square-wave test,
and transduce line to verify placement
7. Chart line placement in EPIC


● Open chest tray● Wide surgical stapler● 20fr foley catheter (2)● Large chest tube (1)● NS flushes (6)● 1L bottle NS● Chlorhexidine swabs (3) or
iodine bottle (1)● Sterile gloves/gown/face shield● Hi-flow suction device
(Yankauer, Big-Tip)● Bedside US machine with probe
cover● Cautery pen
1. Assist in positioning patient for anterior chest procedure; place trash can on provider’s working side; have bedside US available if requested
2. Assist with airway/breathing, chest tubing, and infusion monitoring as indicated
3. Administer generous analgesia/anesthesia PRN
4. Respond to provider instruction as directed
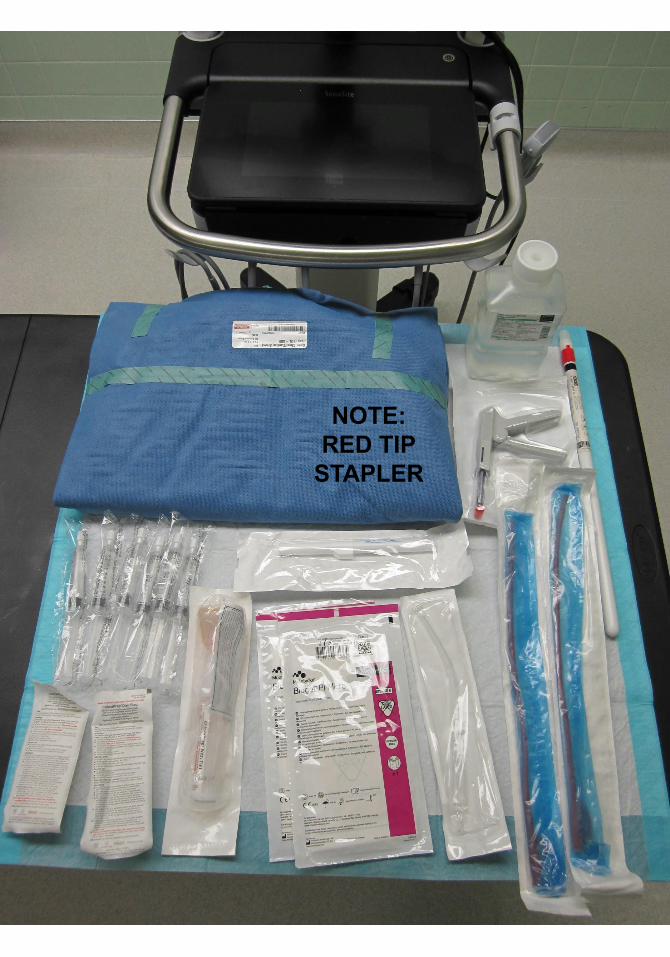
NOTE: RED TIP
STAPLER

● Stryker box with manometer and needles
● Sterile gloves/gown/face shield● Chlorhexidine Swabs (1)● Local anesthesia as ordered
1. Assist provider with patient positioning as directed
2. Provide patient with reassurance and comfort during procedure
3. Clean and return items to proper storage


Physiological Indicators (Adult) Systolic BP <90 Respiratory rate <10 or >29 sustained GCS ≤ 12 Unable to adequately ventilate a patient Respiratory arrest or intubation Traumatic Paralysis Traumatic Arrest Requiring blood transfusion or
vasopressors to maintain blood pressure
Physiological Indicators (PEDS <15) Tachycardia for age plus poor perfusion
(cap refill > 2 seconds) Systolic BP not appropriate for age
(70+[2 x age]) Respiratory rate not appropriate for age GCS motor score < 5
Anatomic Indicators:
Penetrating injuries to:
• Head, neck, torso
• Extremities proximal to elbow or knee
Amputation proximal to wrist or ankle
Fractures:
• Bilateral femur fractures
• Unstable pelvis
Motor Vehicle Crash (MVC) With ejection High speed (>55mph) Unrestrained with rollover Death in the same compartment Major vehicle damage (>12” of intrusion
into the passenger compartment, or extrication and patient with injuries)
Falls (Falls measured from the patient’s feet) ≥ 15 feet ≥ 2 x height if a child age ≤ 6 years
Motorcycle Crash (MCC/ATV) Crash speed > 35 mph
Geriatric Patients (≥ 65 years of age) with 2 out of 3 of the following: SBP < 110 Anticoagulation Therapy (Anti-platelets not included)
Head injury with LOC
Other: Non-Accidental Trauma (NAT) in
pediatric patients Pedestrian or bicyclist struck by a car at
speed >20 mph Ejection from an animal Blast or explosion
Other Considerations: Consider Trauma Consult
Age < 5 or > 65 Co-Morbid conditions Anticoagulation Presence of intoxicants Pregnancy > 20 weeks Three or more rib fractures Bicycle, skateboard, or rollerblade injuries Burns: 2nd or 3rd degree and/or to face, hands, feet, groin, or inhalation
Full Trauma Team Activation (FTTA) Criteia Limited Trauma Team Activation (LTTA) Criteria
Limited Trauma Team Activation (LTTA)
If the injury is >12 hours old, do not initiate a
Trauma Activation unless patient is unstable;
instead consider “Trauma Consult”
*May activate a LTTA/FTTA at any time per physician discretion.
*Any field activation will be honored.

TRAUMA NURSING PROCESS [TNP]
INITIAL CONSIDERATIONS Activate the trauma team, PPE, Consider Decontamination, Special Equipment? 60 Seconds of Silence [SSS] for EMS Report or HPI Uncontrolled Hemorrhage? → C-ABC Initial LOC – Alertness
AIRWAY Assessment
Obstruction – Edema – Emesis – Bleeding – FB – Vocalization – Deformity Management
Jaw Thrust – Chin Lift Suction OPA – NPA Definitive Airway
BREATHING Assessment
Rate – Volume – WOB – Symmetry – Breath Sounds Chest Wall Intact – Color – SubQ Air JVD – Tracheal Deviation
Management Apply Hi-flow Oxygen Reposition – BVM – Vent Occlusive Dressings – Needle Decompression – Chest Tube
CIRCULATION Assessment
Central/Peripheral Pulses – Skin Temp/Color – Diaphoresis – Cap Refill Hemorrhage
Management Large Bore IVx2 – IO – USGIV Warm Crystalloid 20ml/kg – MTP – Vasopressors – Permissive Hypotension Direct Pressure – Binders – Fx Reduction/Splinting
DIABILITY Assessment
GCS – Pupils Management
Oxygenate – Reposition – Decrease ICP ENVIRONMENT/EXPOSURE
Assessment Remove Clothing – Inspect Skin
Management Passive/Active Warming Measures Maintain Elevated Room Temp
FULL SET VS/FIVE ADJUNCTS/FAMILY PRESENCE
VS + Manual BP/MAP + Temp LMNOP: Labs – Monitor – Naso/Orogastric Tube – Oximetry ≥94% (avoid hyperoxia) – Pain Family Liaison
GIVE COMFORT Anxiety/Pain Interventions Splinting – Positioning – RICE
Hx & HEAD-2-TOE AMPLE: Allergies – Medications – PMH – Last Oral Intake – Events Leading up to Injury DCAP-BTLS: Deformity – Crepitus – Abrasion – Penetration – Burn – Tenderness – Laceration – Swelling CMSx4 Extremities
INSPECT POSTERIOR Team Lift or Log Roll with C-spine Precautions (only if stable spine & pelvis or r/o penetrating trauma)
NEED FOR TRANSPORT/TRANSFER?
RE-EVALUATE 1O/2O ELEMENTS AS APPROPRIATE v. 022220
CONSIDERATIONS Loose Teeth/Dentures
Basal Skull Fx Lefort Fx
Inhalants/Burns Aspiration
CONSIDERATIONS Shock
Tension Pneumo/Hemo ETT Placement
Chest Wall Injury
CONSIDERATIONS Shock
Heart Sounds Blunt Injury or Infarct
Tourniquets Hot/Cold Skin
CONSIDERATIONS CHI/Axonal Injury
Hypoxia/Hypoperfusion CVA/ICH
Toxins/Ingestions


POST-COURSE: [PART-1]
Thank you for participating in [PART-1] of the Advanced Trauma Teams Training course. It’s our hope that you found the
information and activities applicable to your clinical practice, and hope you make the decision to continue your training
by attending [PART-2] of the course. The second half of the course will continue review of practical skills and equipment
knowledge necessary to function as part of a dynamic trauma team. Look for future dates in HealthStream and do not
forget to complete the following tasks to receive your [PART-1] certificate of completion:
● Return to HealthStream and complete the post-course evaluation
● Complete the post-course exam - 50 questions
● Print your exam results
● Print your certificate of completion
If you plan to attend [PART-2] of the AT 3 course, it is expected that you independently continue your learning and skill
development prior to attending the course. Please utilize your [PART-1] exam results to guide further study and
complete the following tasks prior to attending:
● Review prior trauma education resources (TNCC, ITLS, BTLS, ATLS, etc…)
● Review all AT 3 [PART-1] Student Packet content
Located in the student resource link:
● Review the STN slides and instructor notes
● Review the skills videos