seamanship 2 - coastguardseamanship 2 – version 1 (2013) ©coastguard new zealand 2014 2 overview...
TRANSCRIPT
Seamanship 2 – Version 1 (2013) ©Coastguard New Zealand 2014
1
Seamanship 2
Contents Overview .................................................................................... 2
1. Rope Types ............................................................................. 2
1.1 Laid Ropes ........................................................................... 2
1.1 Braided Ropes ..................................................................... 2
2. Rope Properties ..................................................................... 3
3. Rope Usage............................................................................. 4
3.1 Mooring Lines ..................................................................... 4
3.2 Towing Rope ....................................................................... 4
3.3 Anchor Rope ....................................................................... 4
3.4 Life Ring Rope ..................................................................... 4
4. Care and Maintenance ........................................................... 4
5. Basic Knots ............................................................................. 5
5.1 Round Turn and Two Half Hitches ...................................... 6
5.2 Bowline ............................................................................... 7
5.3 Clove Hitch .......................................................................... 8
5.4 Double Sheet Bend ............................................................. 9
5.5 Rolling Hitch ...................................................................... 10
6. Ropes on Deck ...................................................................... 11
6.1 Berthing and Leaving Berth .............................................. 11
6.2 Securing Lines ................................................................... 13
7. Messenger Lines ................................................................... 16
8. Anchoring ............................................................................. 17
8.1 Deploying the Anchor ....................................................... 18
8.2 Weighing the Anchor ........................................................ 18
8.3 Anchor Refuses to Break Free .......................................... 18
Constructive feedback and suggestions for improvements to the SAR
Training Matrix is appreciated. Please email feedback / suggestions to
[email protected] providing as much detail as
possible. Thank you.
The technical
skills covered by
the practical
seamanship
module are
essential for
ensuring safety
and efficiency at
sea
Seamanship 2 – Version 1 (2013) ©Coastguard New Zealand 2014
2
Overview
The technical skills covered by the practical seamanship module are
essential for ensuring safety and efficiency at sea.
1. Rope Types
The properties of a rope determine how useful it is for a given
application. Key properties are strength, weight, weather and chemical
resistance, melting point and elasticity. Whether it floats or sinks is also
an important consideration. Natural fibre ropes have almost exclusively
been replaced by synthetic materials. A hot knife is the preferred
method for cutting synthetic rope.
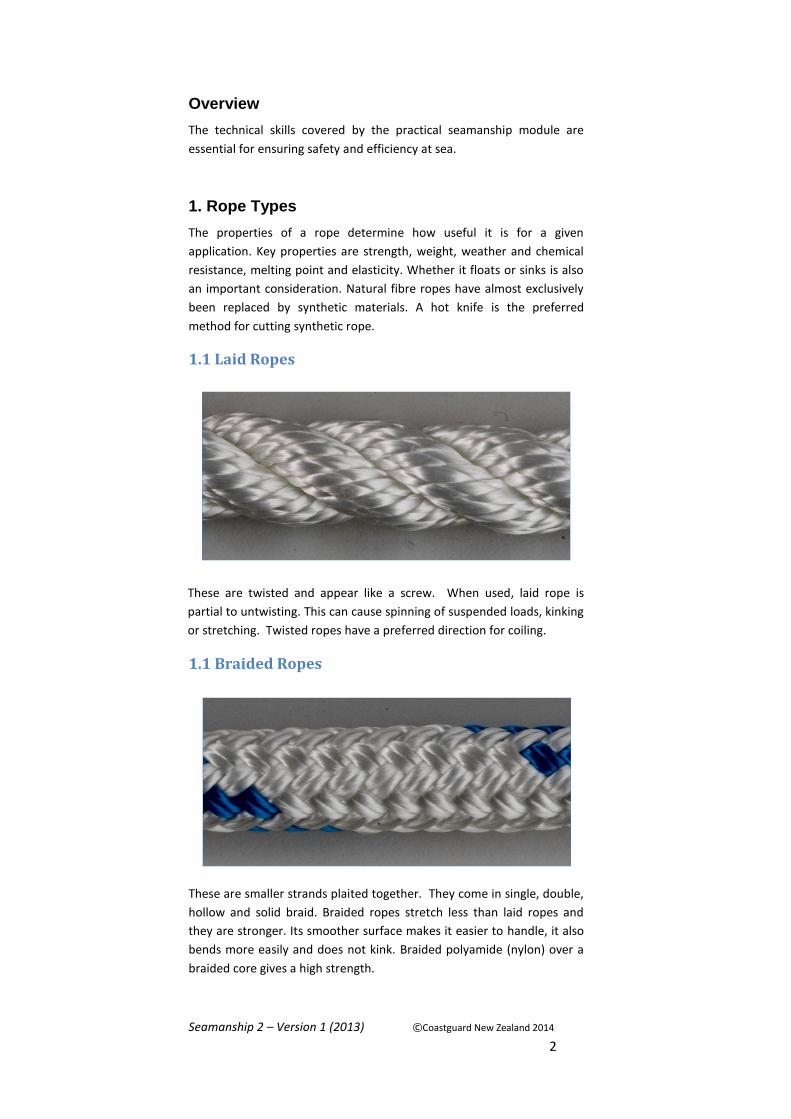
1.1 Laid Ropes
These are twisted and appear like a screw. When used, laid rope is
partial to untwisting. This can cause spinning of suspended loads, kinking
or stretching. Twisted ropes have a preferred direction for coiling.
1.1 Braided Ropes
These are smaller strands plaited together. They come in single, double,
hollow and solid braid. Braided ropes stretch less than laid ropes and
they are stronger. Its smoother surface makes it easier to handle, it also
bends more easily and does not kink. Braided polyamide (nylon) over a
braided core gives a high strength.

Seamanship 2 – Version 1 (2013) ©Coastguard New Zealand 2014
3
2. Rope Properties
The strengths in the table below are examples as a guide
only. Many 3 strand polyethylene ropes are used in
commercial fishing, these are not as strong as similar
polypropylene ropes but have better abrasion and UV
resistance. Polyethylene in a different construction gives Dyneema or
Spectra rope which is stronger than 1x19 stainless wire.
Characteristics of Synthetic fibres used in rope construction
Nylon
(Polyamide) Polypropylene Polyester Polyethylene
Texture
Very smooth and glossy. Has an oily texture when new
A waxy texture. Less slippery than other synthetics.
Softer and easier to handle than nylon
A shiny plastic texture. More slippery than other synthetics
Stretch 46% 35% 25% 35%
Buoyancy Sinks Floats Sinks Floats
Water
Absorption 4% Nil Nil Nil
Behaviour in
water
Does not swell. Equally as flexible. Loses 5 to 10% of its strength whilst saturated
Does not swell. Equally as strong. Equally as flexible.
Does not swell. Equally as strong. Equally as flexible.
Does not swell. Equally as strong. Equally as flexible.
Melting
temperature 250˚C 165˚C 265˚C 125˚C
Burning
characteristics
Melts and burns. White smoke. Yellowish melted falling drops.
Stops burning when removed from flame. Celery-like fishy odour.
Shrinks and burns. When removed from flame continues to burn rapidly.
Melted substance can be stretched into fine thread. Like burning asphalt or paraffin wax.
Melts and burns. Blackish smoke.
Melted falling drops. Stops burning when removed from flame. Oily sooty odour, faintly sweet.
Shrinks, curls and melts. When removed from flame continues to burn slowly.
Melted substance cannot be stretched into fine thread. Like burning paraffin wax.
Resistance to
UV and chafe Moderate Poor Good Poor
Breaking Strain
(10mm line) 2080kg 1425kg 1590kg 930kg
Source:
Scanlan, M. (2002). Safety in Small Craft. Coastguard Boating Education Service, NZ. p80
Consultancy, Design and Engineering Services in Ropes, Textile and Marine Systems.
Burning Characteristics of Synthetic Fibres. Retrieved 9th August, 2013 from
Activity:
Analysing Ropes
• Form teams and
provide each team a
length of each of the
different rope types.
Each team is required
to identify which type
of fibre each rope is
made of by evaluating
the look, feel,
buoyancy and burning
characteristics.
Provide each team with
• Several short
lengths (20cm) of
each of the types of
line
• A copy of ‘Safety in
Small Craft’
• Bucket of water
• A lighter
Seamanship 2 – Version 1 (2013) ©Coastguard New Zealand 2014
4
http://www.tensiontech.com/tools_guides/burning_characteristics.html
3. Rope Usage
3.1 Mooring Lines A typical vessel will have one bow line, one stern line and two spring
lines for berthing purposes. A large vessel may also have breast lines. It
should have two lines slightly more than length of vessel and two lines
slightly more than twice length of vessel. This gives the ability to double
all the lines and have full length doubled springs for springing in and out
of berths. Polyamide (nylon) is the preferred choice for mooring lines for
larger vessels because of its stretch, which causes less damage to
vessel’s cleats & fittings. Coastguard CRV’s often use polyester which is
suitable for mooring small craft.
3.2 Towing Rope Polyester and polypropylene are the most common materials used for
towlines. Polyester is the recommended first choice in keeping with
commercial towing where the minimum stretch in a towline is needed.
Polyester is also preferred because it sinks which makes it less likely to
get caught around rudders or propellers, it is also UV resistant. It needs
to stretch to absorb some of the loading, but not stretch too much.
Polypropylene has a low melting point making it prone to damage when
surging round fittings under load.
3.3 Anchor Rope An anchor rope needs to sink and be very strong. It must also be weather
resistant and stretch without breaking. For these reasons anchor ropes
will usually be made of polyamide (nylon).
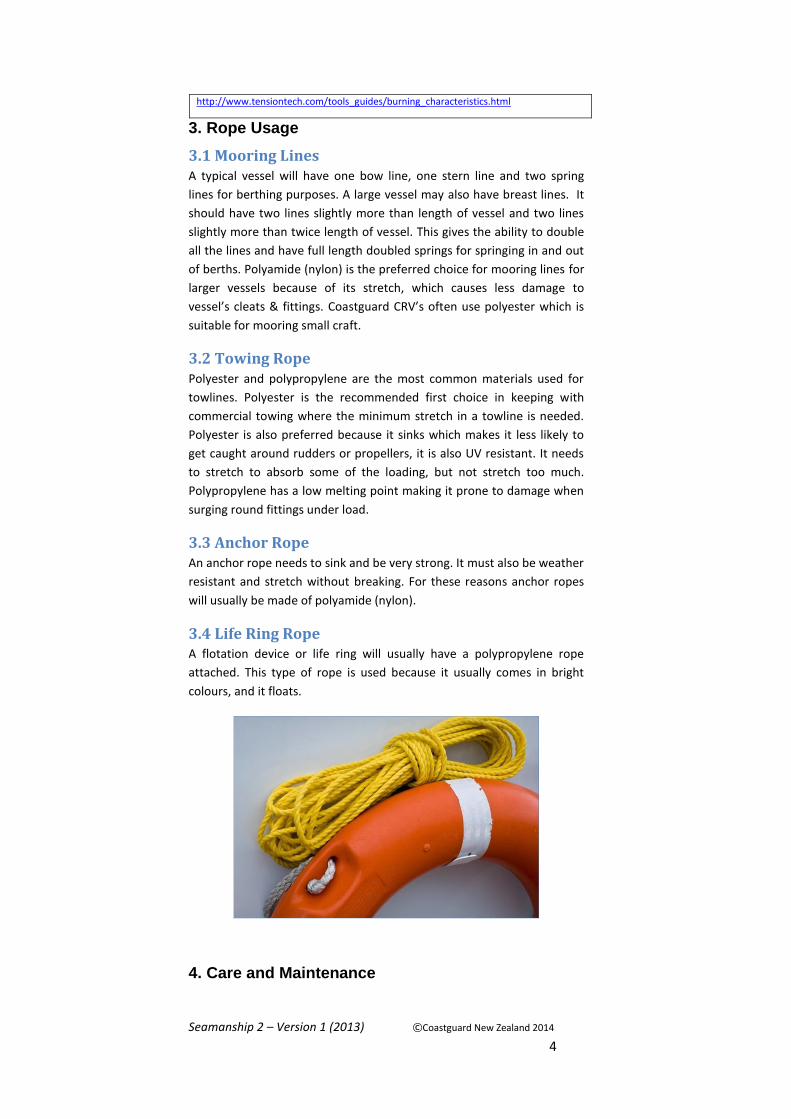
3.4 Life Ring Rope A flotation device or life ring will usually have a polypropylene rope
attached. This type of rope is used because it usually comes in bright
colours, and it floats.
4. Care and Maintenance

Seamanship 2 – Version 1 (2013) ©Coastguard New Zealand 2014
5
Laid ropes should always be coiled in the same direction as the lay, this
will minimise twists in the rope and make the rope less prone to
tangling when next used. Braided ropes also have a memory and
therefore benefit from being coiled the same way every time. Holding
the rope in the left hand and coiling with the right is the best technique
irrespective of whether the person coiling is left or right handed. Rope
should never be coiled around the elbow. Doing so temporarily renders
the rope and one arm useless. This is not a safe or practical state to be
in on a vessel.
Ropes are affected by heat, abrasion, chemicals
and sunlight. Avoid leaving in direct sunlight or
near a source of heat. Avoid contact with
chemicals and sources of ignition. Ensure the
ends are protected against unravelling by using
heat to melt the ends.
Regularly examine ropes for abrasion, chafing,
cuts, kinks, chemical damage, flat or soft spots,
stiffness or other damage, and replace when
worn. Also check the ends, splices and
whippings. Some ropes get used and worn at
one end, by changing the end that is used the
rope will not need to be replaced as quickly. If a
rope has been stretched allow it time to recover
before reeling up or storing.
Rope should be cleaned occasionally by hand in fresh water with pure
soap and then hung to dry. Do not use hard brushes or abrasive
cleaners. When the rope is not in use store it in a dark area where air
can flow around it.
5. Basic Knots
It is important to select the correct knot for the job, tighten the knot,
and allow sufficient free rope as a tail, so that the knot does not pull
undone. A good rule is to leave at least 10 times the width of the rope
as a tail. All knots reduce the overall strength of the rope some by up to
40%. Several knots in a rope will cumulatively reduce its strength.
“Inspecting your
rope should be a
continuous process
of observation
before, during and
after each use. In
synthetic fibre
ropes the amount
of strength loss
due to abrasion
and/or flexing is
directly related to
the amount of
broken fibre in the
rope’s cross
section.”
Image and quote
from Rope Inc.
http://www.ropeinc.c
om/rope-inspection-
retirement.html
Activity:
Rope apps
• Check out the variety
of apps available for
smart phones.
Try some out –
encourage crew to
have access so they
can practise their
knots.
Seamanship 2 – Version 1 (2013) ©Coastguard New Zealand 2014
6
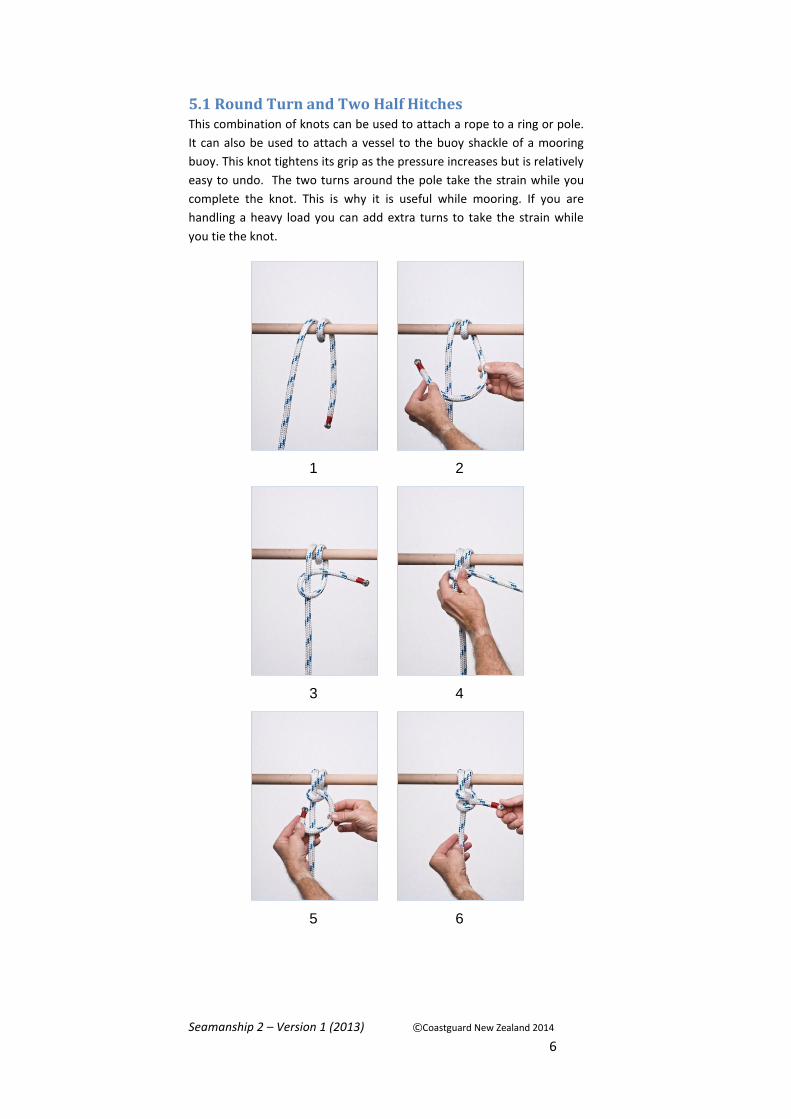
5.1 Round Turn and Two Half Hitches This combination of knots can be used to attach a rope to a ring or pole.
It can also be used to attach a vessel to the buoy shackle of a mooring
buoy. This knot tightens its grip as the pressure increases but is relatively
easy to undo. The two turns around the pole take the strain while you
complete the knot. This is why it is useful while mooring. If you are
handling a heavy load you can add extra turns to take the strain while
you tie the knot.
1
2
3
4
5
6

Seamanship 2 – Version 1 (2013) ©Coastguard New Zealand 2014
7
5.2 Bowline This knot is used to create a loop at the end of a rope. The loop can be
tied around or looped over an object. The knot is easy to untie, however
it cannot be undone while it is under tension. It is typically used for
mooring lines and attaching anchors. (Anchors should be attached by a
round turn & 2 half hitches followed by a bowline.)
It is possible to tie this knot with one hand, which is useful if you are
using the other hand to hold on. The knot is known to slip if not
tightened correctly and may come undone once the load is off. Adding a
half hitch using the end can stop it from slipping.
1
2
3
4
5
6
Seamanship 2 – Version 1 (2013) ©Coastguard New Zealand 2014
8
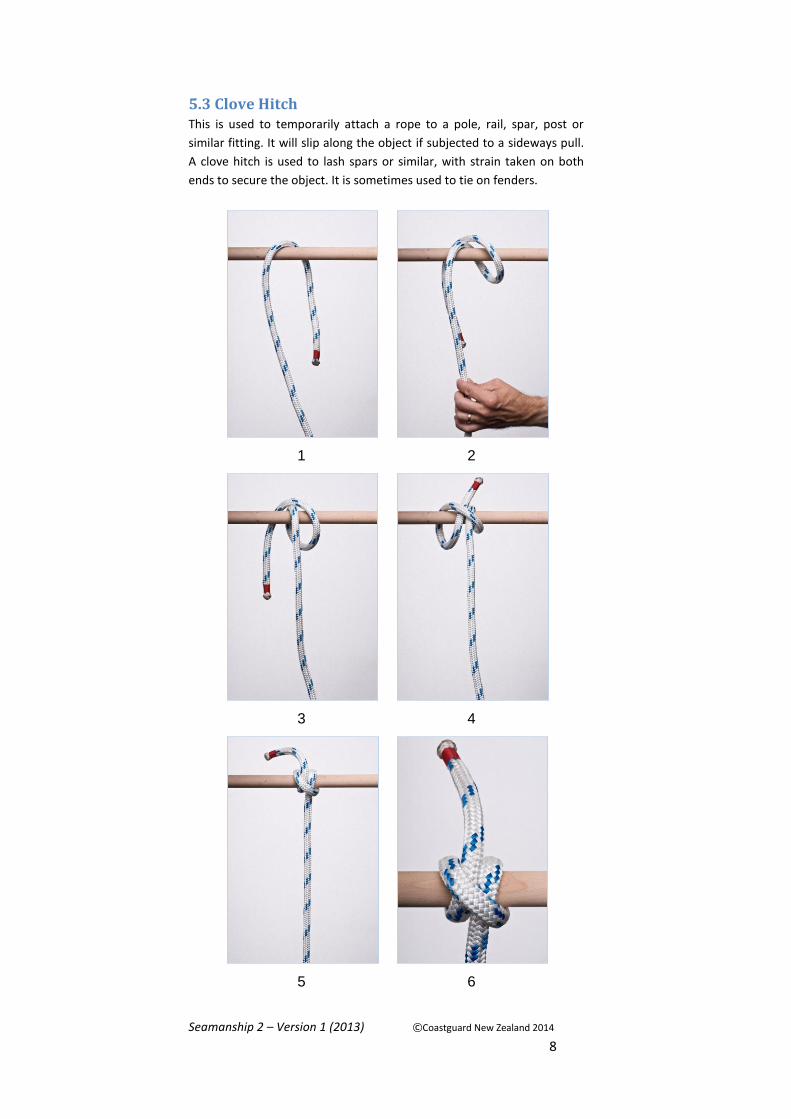
5.3 Clove Hitch This is used to temporarily attach a rope to a pole, rail, spar, post or
similar fitting. It will slip along the object if subjected to a sideways pull.
A clove hitch is used to lash spars or similar, with strain taken on both
ends to secure the object. It is sometimes used to tie on fenders.
1
2
3
4
5
6
Seamanship 2 – Version 1 (2013) ©Coastguard New Zealand 2014
9
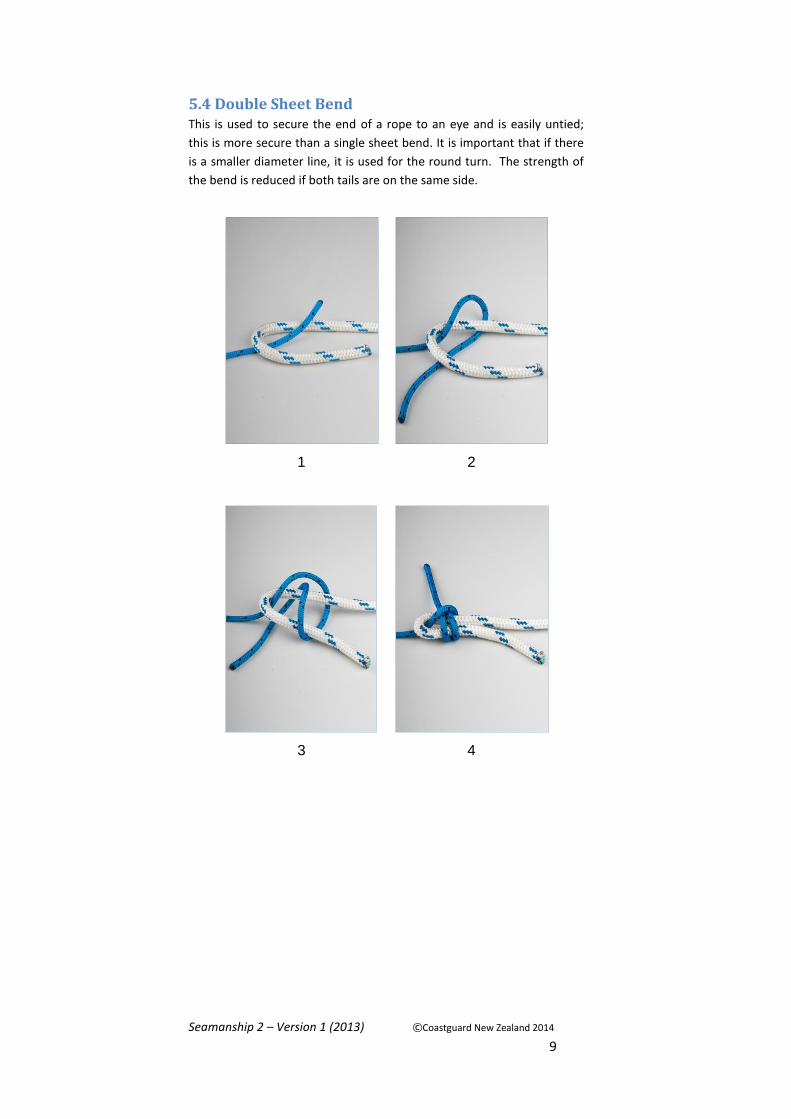
5.4 Double Sheet Bend This is used to secure the end of a rope to an eye and is easily untied;
this is more secure than a single sheet bend. It is important that if there
is a smaller diameter line, it is used for the round turn. The strength of
the bend is reduced if both tails are on the same side.
1
2
3
4
Seamanship 2 – Version 1 (2013) ©Coastguard New Zealand 2014
10
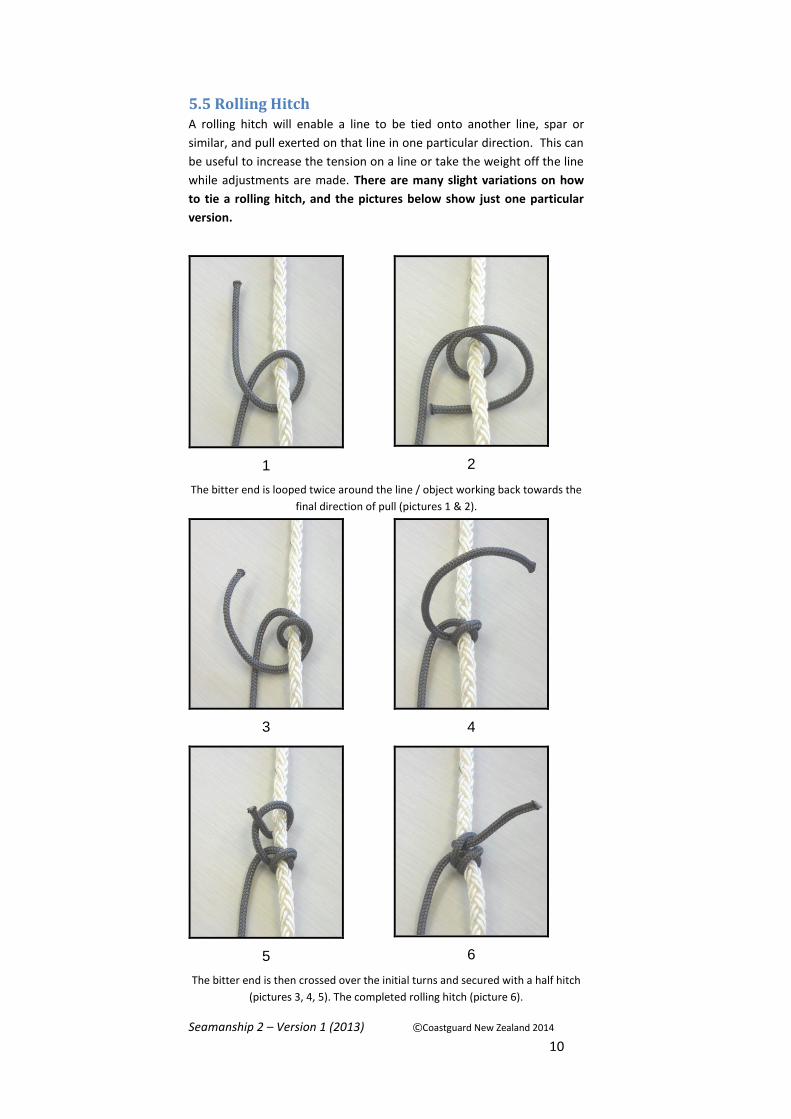
5.5 Rolling Hitch A rolling hitch will enable a line to be tied onto another line, spar or
similar, and pull exerted on that line in one particular direction. This can
be useful to increase the tension on a line or take the weight off the line
while adjustments are made. There are many slight variations on how
to tie a rolling hitch, and the pictures below show just one particular
version.
1
2
The bitter end is looped twice around the line / object working back towards the
final direction of pull (pictures 1 & 2).
3
4
5
6
The bitter end is then crossed over the initial turns and secured with a half hitch
(pictures 3, 4, 5). The completed rolling hitch (picture 6).

Seamanship 2 – Version 1 (2013) ©Coastguard New Zealand 2014
11
Sometimes a single rolling hitch is not sufficient for the load. In which
case a second (and possibly third) rolling hitch can be tied. The method
is the same as described above only this time there must be sufficient
length of line in the bitter end to tie a second rolling hitch above the first
one. The completed double rolling hitch (picture 7).
6. Ropes on Deck
This section covers some of the practical aspects of using ropes on deck.
6.1 Berthing and Leaving Berth The diagram below shows a vessel secured to a berth using six lines.
Smaller vessels may not need breast lines and can be secured with just
four lines.
Bow and Stern Lines
The purpose of the bow and the stern lines is to prevent the vessel from
surging backwards and forwards along the berth, and keep the bow and
stern close to berth. To be effective at preventing surging these lines
should be led out from the bow and stern and secured at points well
forward and well aft of the vessel. If secured short and close they will not
be effective in preventing surging and damage the vessel. They should
also be long enough to take into account the rise and fall of the tide.

Seamanship 2 – Version 1 (2013) ©Coastguard New Zealand 2014
12
Bow Spring and Stern Spring Lines
These are used to assist the bow line and stern line to prevent the vessel
surging along the wharf and in conjunction with the bow & stern lines to
ensure the vessel keeps parallel to berth.
Breast Lines
Generally used for larger vessels, breast lines are lines which run to the
shore perpendicular to the vessel’s centre line and are used to limit how
far away the vessel can get from the wharf. They are not usually needed
unless the vessel is being blown off the berth so that getting on and off is
becoming difficult. They should not be used if the vessel is left
unattended and there will be a large rise or fall in the tide.
Surging
Surging is usually caused through tidal movement such as swells. The
effect of this is to cause the vessel to move or surge. The surging can be
forward and back or up and down.
Surging hazards are common when
berthing alongside another vessel at
sea or alongside a wharf, pontoon or
jetty. This could cause damage to
the vessel’s bulkheads or hull.
Damage can be avoided by using
fenders between the two boats or
the boat and the wharf.
Spring lines will limit the effects of
surge. In a heavy surge it is
detrimental to have tight mooring
lines as the stretch and rebound
may increase over time resulting in
lines parting or fittings pulling out.
Letting Go Lines
This is the term used to release lines from the shore, cleats, bollards or
the vessel. It is usually used when leaving a berth, whether that be a
wharf or from alongside another vessel.
When leaving dock it is necessary to cast off the lines securing the CRV.
These lines must be cast off in the correct order; otherwise the vessel
can be put in danger. The sequence of letting go lines will depend on the
berthing situation. For example, how the vessel is berthed in relation to
the prevailing wind and tide, how much room is available and whether to
let go the bow first or the stern first will be decided by the skipper at the
time based on these facts. Good communication between the skipper,
the helm and the deck crew are essential before letting go. The skipper
should brief the crew as to the plan for letting go, and the words and
signals that are to be used.
Seamanship 2 – Version 1 (2013) ©Coastguard New Zealand 2014
13
Depending on the size of the CRV there may be four lines attached to
bollards on the wharf. Note that removing the lines is typically done in
the reverse order to attaching them when berthing. However if there is a
change in the wind or tide, or a need to spring off, this means they are
often not done in reverse order to coming alongside. Assumptions
should not be made as to what or when to let go. Clear closed loop
communication should always be used.
If there will be no assistant on land to remove the headline from the
bollard, it will be necessary to first set up a rope looped around the
bollard and back to the vessel in its place. This is so that the lines can be
released from the vessel. Once lines are released crew should confirm to
the skipper when lines are clear of the berth and the water.
6.2 Securing Lines This simply means to fix a line or rope to a bollard, cleat or similar object
such as a handrail. For example you may be asked to secure a throwing
line to the vessel’s cleat or handrail. You may also be asked to secure a
bow line or berthing line to the shore. Securing a line to a cleat or double
bollard will involve taking at least three turns in a figure eight pattern.
Alternatively use a bowline or a round turn and 2 half hitches on a single
bollard.
Making Fast
Making fast is to secure a line or rope to a fixed secure point such as a
cleat or bollard. It may also be securing a general purpose line or heaving
line to a hand rail or similar fixture.
Making fast should be done in such a way as to secure the line
effectively, but allow it to be undone easily in due course. Crew should
clearly communicate to the helm and skipper when a line is made fast.
Cleats
Cleats are used for securing ropes and lines and are generally found
around the vessel’s decks and may appear on some bulkheads (walls). An
example of their use would be to secure a heaving line or berthing line.
The Coastguard method is;
Take one full turn around the base of the cleat.
Make a figure of 8 on the cleat
Finally add a second full turn.
Do not make locking knots which may jam.
This is method is known as OXO within Coastguard.

Seamanship 2 – Version 1 (2013) ©Coastguard New Zealand 2014
14
Securing to a cleat
1
2
3
4
Bollards
Bollards are also used to secure berthing lines from the boat to the
shore. They can appear similar in shape to a cleat (double bollard),
although are generally made of cast metal or hard steel and are much
larger, which makes them ideal for berthing. They may be single bollards
which would require a bowline / round turn & 2 half hitches.
Take 3 full turns on the bollard to create enough friction to
hold.
Making figure 8’s on the pins is just to tie it off. The pins are not
made to take the weight.
Do not make locking knots which may jam.
Securing to a bollard
1
2
Seamanship 2 – Version 1 (2013) ©Coastguard New Zealand 2014
15
3 4
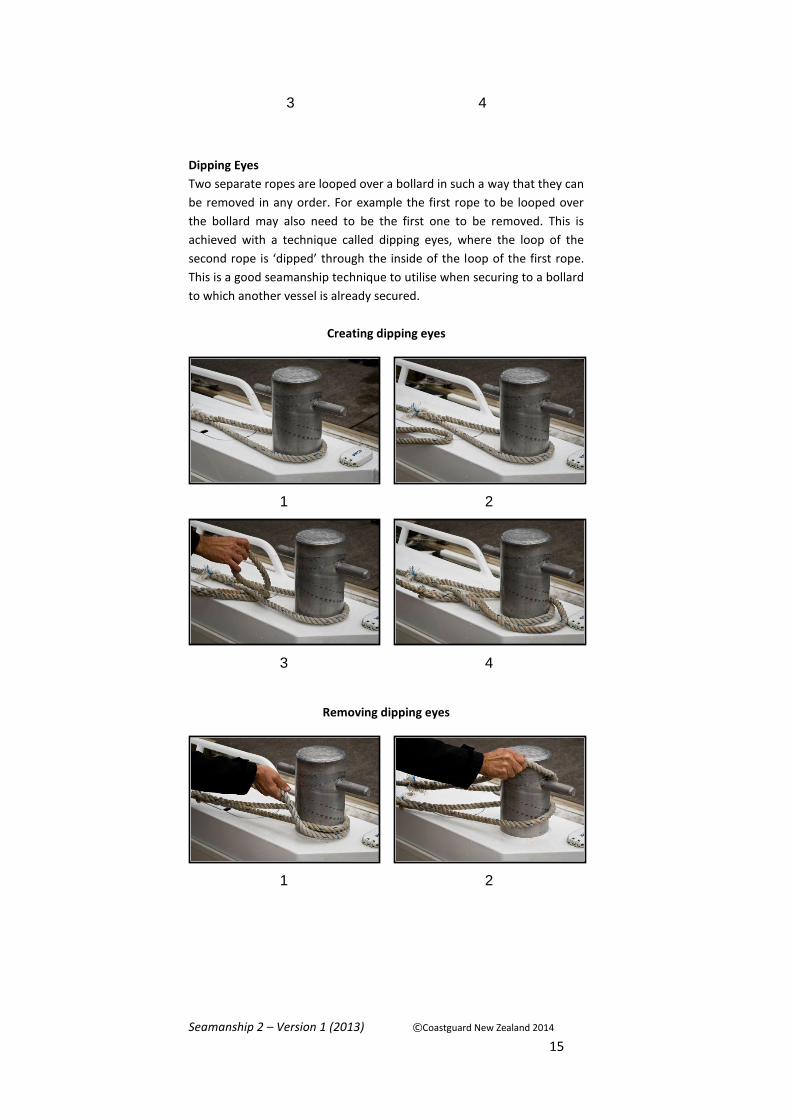
Dipping Eyes
Two separate ropes are looped over a bollard in such a way that they can
be removed in any order. For example the first rope to be looped over
the bollard may also need to be the first one to be removed. This is
achieved with a technique called dipping eyes, where the loop of the
second rope is ‘dipped’ through the inside of the loop of the first rope.
This is a good seamanship technique to utilise when securing to a bollard
to which another vessel is already secured.
Creating dipping eyes
1
2
3
4
Removing dipping eyes
1
2
Seamanship 2 – Version 1 (2013) ©Coastguard New Zealand 2014
16
3
7. Messenger Lines
A messenger line is simply a length of light line attached to the towline
that can be thrown, propelled or floated to a vessel or person. These are
often used to assist with getting people out of the water.
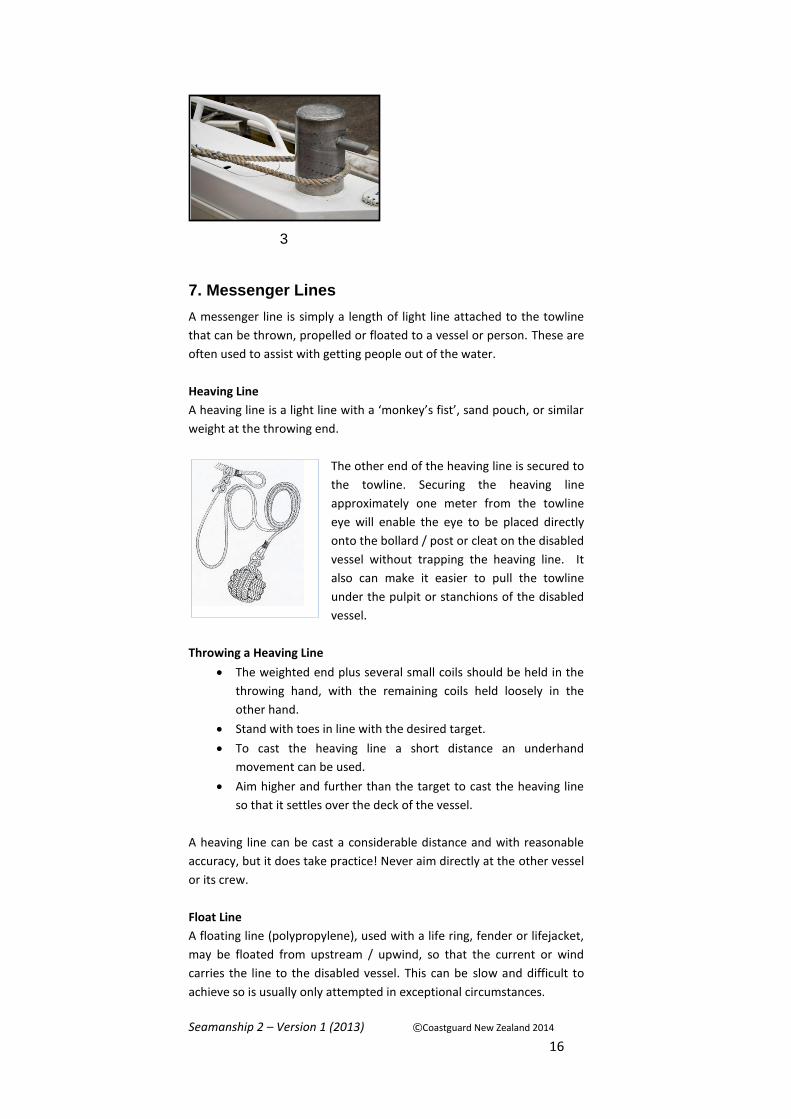
Heaving Line
A heaving line is a light line with a ‘monkey’s fist’, sand pouch, or similar
weight at the throwing end.
The other end of the heaving line is secured to
the towline. Securing the heaving line
approximately one meter from the towline
eye will enable the eye to be placed directly
onto the bollard / post or cleat on the disabled
vessel without trapping the heaving line. It
also can make it easier to pull the towline
under the pulpit or stanchions of the disabled
vessel.
Throwing a Heaving Line
The weighted end plus several small coils should be held in the
throwing hand, with the remaining coils held loosely in the
other hand.
Stand with toes in line with the desired target.
To cast the heaving line a short distance an underhand
movement can be used.
Aim higher and further than the target to cast the heaving line
so that it settles over the deck of the vessel.
A heaving line can be cast a considerable distance and with reasonable
accuracy, but it does take practice! Never aim directly at the other vessel
or its crew.
Float Line
A floating line (polypropylene), used with a life ring, fender or lifejacket,
may be floated from upstream / upwind, so that the current or wind
carries the line to the disabled vessel. This can be slow and difficult to
achieve so is usually only attempted in exceptional circumstances.

Seamanship 2 – Version 1 (2013) ©Coastguard New Zealand 2014
17
Rescue Throw Bags
A standard ‘throw bag’ can also be used as a messenger line. Throw
bags are not as ‘user friendly’ as a dedicated heaving line, because the
towline is attached to the throw bag right next to the crew’s ‘throwing
hand’. They are however made from polypropylene, and can be used as
a floating messenger line. Hold one end of a rescue throw bag in your
hand and throw the bag. The bag can be filled with water for extra
weight.
Line Throwing Device
A rocket line thrower or shoulder line-firing gun may be used to pass a
towline when conditions are such that your vessel cannot get close
enough to the disabled craft to use a heaving line. They are
predominantly used when forced to throw into strong wind. Similar to a
heaving line aim high to allow the line to land over the deck.
8. Anchoring
The anchor should be attached to the chain and warp and the end of the
anchor rode should always be securely fastened to the vessel to assist in
rapid emergency deployment. Before the need arises, the helmsman
should brief the crewmembers on procedures for anchoring.
Anchoring involves good communication between the helmsman and the
crew. With noise from the engine(s) and the wind, it is difficult to hear
voice communication. The Skipper should ensure a pre-arranged set of
hand signals that the crew understands. Keep the signals as simple as
possible.
Having selected a suitable spot, the helmsman should run in slowly,
preferably on some range ashore selected from marks identified on the
chart, or referring the vessel’s position to radar ranges or GPS data to aid
in locating the chosen spot. Use of two ranges will give the most precise
positioning. Later these aids will be helpful in determining whether the
anchor is holding or dragging. The vessel should approach the selected
spot head to the prevailing wind or tide. The CRV should be moving very
slowly astern when the anchor is deployed. As the anchor is lowered into
the water, it is important to know how much rode is paid out when the
anchor hits the bottom. At least one round turn should be taken on the
forward bitt or cleat to maintain control of the rode. The anchor rode
should not be held with hands alone.
Seamanship 2 – Version 1 (2013) ©Coastguard New Zealand 2014
18
8.1 Deploying the Anchor
Station two persons on the forward deck if available.
The anchor should be released just prior to deploying so as to
avoid it bouncing around on deck in adverse weather.
Never step in coils of anchor warp and never heave the anchor
away from vessel.
On the helmsman’s command, lower the anchor over the side.
Once the anchor is on the bottom, take a working turn on the
forward bitt to control how fast and how much anchor rode is
released.
The angle and direction of the rode should be communicated
regularly back to the helm
Once the desired length is paid out (4 - 6 times the depth of
water), make up the anchor rode to the forward bitt.
Check anchor is holding by observing the angle of the warp, the
attitude of the CRV relative to the wind and tide and by using
visual transits or a hand bearing compass. GPS and Radar may
also be used to set up ranges, guard zones or anchor alarms.
8.2 Weighing the Anchor The helmsman should go forward slowly and the anchor rode
should be recovered to avoid fouling the propellers.
Flake the line into the locker as it comes onboard. If being
recovered by hand, a second crewmember can assist with
ensuring there is a working turn on the forward bitt at all times.
When the boat approaches the spot directly over the anchor,
and the rode is tending straight up and down, the anchor will
usually free itself from the bottom.
Communicate to the helm when the anchor is off the bottom
Securely stow all ground tackle as soon as possible.
8.3 Anchor Refuses to Break Free Snub the anchor line around the forward bitt or cleat and
advance the boat a few feet.
Sometimes even this will not free the anchor, and the operator
should run in a wide circle, slowly, to change the angle of pull.
Extreme care should be taken to ensure the anchor line does
not tangle in the propellers during this operation.
Activity:
Anchoring
• Look at the unit SOP
for deploying and
weighing the anchor.
If there is no SOP
then get into groups
and write one.
If there is, then is it
accurate? Does it
reflect practice?
Have you identified
the hazards during
the process of
deploying and
weighing anchor?
How are these
minimised?