printboss form files - wellspring software. misc – this tab provides the option of importing a jpg...
TRANSCRIPT
Training Notes Form Files 1 August 2016
When PrintBoss captures a file or a print job from the accounting software, the PrintBoss Form File (.PBF) is the conductor that controls if and how all the data will be used. This includes:
� Add background graphics and text to the form � Place data from the PrintBoss Bank Record � Select and place graphic/logo/signature files � Reformat using data passed by the accounting software � Add conditions � Manage copies
STANDARD FORM FILES
Standard check form files are provided for several accounting software packages in order to expedite the installation and use of PrintBoss. These forms are installed automatically during the PrintBoss setup process based on the Host Accounting Software selected on the first installation screen. Additional forms can be added by running setup again and selecting a different Host Accounting Software at the top of the window and then selecting the Add Different Accounting Host Files radio button.
A list of accounting software supported by standard forms can be found in Appendix B of this manual as well as on the Support Documents page of our web site. Click the Host Accounting Software folder and select the PrintBoss Product Compatibility List to view this information.
CREATE A NEW FORM FILE
PrintBoss allows you to create new custom forms in addition to the standard forms included with PrintBoss. A form is created to work with the specific data layout received from the accounting software.
� Please see the Installation Notes specific for the accounting software or Chapter 22, Custom Interfaces.
1. Open the PrintBoss Master Application window. 2. Click the Edit menu at the top of the screen and select Form Files to display the
Form Select window (shown at right). The list is already populated with the standard forms available for your specific accounting software. As you add different accounting host files, additional forms will be added to the list.
3. There are two ways to create a new form a. Click the Create button to create a new form with all the appropriate
PrintBoss structure minus the design scripts (the Object tabs are blank). b. Select an existing form close to your needs and select the Copy To
button. This method is described further in the Modify an Existing Form section later in this chapter.
4. Select your new form and click the Editor button. The Editing Form dialog opens. This dialog, also known as the Form Editor, contains several tabs and many options that are described in more detail in Appendix B of this manual. The following are a few common options to review:

a. Settings tab i. Description – Enter a brief description of your new form. It is helpful to include the
name of your accounting software, the function, and a number if you have other forms for the same function. Ex: QB_Chk4 w/CND opt. for QuickBooks check form 4 with Canadian option.
ii. Text / Image Capture Mode – This is an Enterprise feature that allows the form to capture Graphics and Text from the host accounting system. The default is to only capture text.
iii. Form Width, Length – Choose a paper size. The default is 8.5 by 11.0, Letter, Portrait. iv. Copies – Enter the number of copies you want to print in addition to the original form.
These copies are defined on the Multi-Parts & Printers tab. v. Auto-Archiving Completed Records – Select your archiving option. The default is
Overwrite Work File at Start of Batch. b. Special Controls tab
i. Pre-process Assignments – Select this option when you have a command in one of the Objects tabs that needs to be processed before the other commands. The current version of PrintBoss will generate a warning when this option is required.
ii. Archive File Name Suffix – When Auto-Archiving is set to Archive on the Settings tab, add an Archive File Name Suffix to archive by Year, i.e. {YY} or {YYYY}, or Year and Month, i.e. {YYMM}, etc.
c. Block Mirrors tab i. Enable any mirrored blocks – Select this option to create a copy of a section, such as
the check and advice, and display that copy at a specified location on the page. The default is to select the advice and check beginning at 4.1 inches from the top of the page and extending to 10.400 inches, and then display a mirrored copy beginning at 0.2 inches from the top section of the page with a height of 3.800 inches. It may be helpful to view a standard check form as an example of this display.
d. Multi-Parts & Printers tab i. Copies – The copies you selected on the Settings tab will be displayed in this column. ii. Print Time – Select when you want the copy to print. The default is Immediate. iii. Destination Printer/Device – Select a destination printer if it is different from the printer
set as the default for PrintBoss. Other options for the copy may also be selected, such as: 1. Fax 2. Positive Pay 3. PDF 4. Email
iv. Source Tray – Select a source tray for the copy based on the selected printer. Files can be selected if the Copy is set to <Positive Pay File>.

v. Copy Name – Enter a name for the copy. This is optional, though the Copy Name may be used in a script.
e. Comments tab – Enter the date this form was created and document modifications made to this form after the initial creation.
f. RunTime Objects tab – Enter assignments (#Assign commands), grids (#Grid), text labels for grids (#Text), Company Address information (#Text), and Bank information (#Text) in this object script. The MICR Line (#MICR) is often placed here as well. RunTime Objects are processed before the other object scripts, so these items will be placed on the form before other items.
g. Footer Objects tab – Enter signature lines (# Line commands), signatures (#PIC), logos (#PIC), and miscellaneous text (#Text) in this object script. Conditions may be placed on these objects. These items are placed on the form after the RunTime Objects are processed.
h. Misc – This tab provides the option of importing a jpg or bmp file to embed in the PrintBoss form. Use the embedded image with a #PIC command on the RunTime Objects tab to place the embedded image on the form. The source graphic is not needed once the image is embedded in the form. This tab also includes special treatment of key fields during the creation of the PrintBoss Work File. These fall into the following two categories.
i. Key Flds Re-Calc Forward – This section provides options that allow PrintBoss to carry forward or re-calculate values from selected fields under special circumstances. This area is primarily for use by a Wellspring Software Technician.
ii. Key Flds Re-Calc Backwards – This section provides options that allow PrintBoss to process documents backwards immediately after they are processed forward for the purpose of counting or calculating values from the end of a group or file. This area is primarily for use by a Wellspring Software Technician.
i. PDF tab – This tab is only available when PDF is selected as a copy on the Multi-Parts & Printers tab. This PDF feature has no connection to the PDF created by the Email feature.
5. Click OK to save changes made on the Form Editor.
MODIFY AN EXISTING FORM
It is often advisable to start with an existing form that is similar to your needs. This form can be copied to a new name and modified.
1. Open the PrintBoss Master Application window. 2. Click the Edit menu at the top of the window and select Form Files to display the Form Select window. 3. Select the form to be copied, click the Copy To button, and enter a new File Name. The file name cannot
exceed 8 characters.
4. Click OK to create the new copied form file. 5. Select your new form and click the Editor button to modify the form. 6. Click OK to save changes made on the Form Editor.
Details describing the options on the Form Editor can be found in Appendix B of this manual.
NOTE:
Be alert to properties of the original form that may impact the final results of the modified form, such as #RegionMove commands and font overrides that may not be apparent when viewing a form.

MODIFY FROM THE DOCUMENT VIEW
Both the Form Editor and the Document View can be used to modify a form whether it is a copy or a new form. Many users find the Document View more convenient for editing since the objects can be viewed immediately, though certain elements are not accessible through the View.
1. Open the PrintBoss Master Application window. 2. Click the Edit menu at the top of the window and select Form Files. 3. Select your form, and then select a bank record from the drop down menu at the bottom of the Form list.
This will display fields from the bank record. Click View. This opens the View of Form window. Clarity will depend on the monitor's size and resolution.
4. Double click on an object to edit its properties. 5. Click OK on the Properties window to save your changes. 6. Right click anywhere on the form to Insert a new object. 7. Click Close and select Yes to save changes to this form.
Across the top and down the left edge of the View are rulers to indicate coordinates on the page. As you move the cursor over the document, slight line indicators mark the matching coordinates on the rulers and a field above the ruler displays the numeric coordinates. The coordinates are measured in inches from the top left corner of the page.
A light blue border around the edge of the document indicates the margins or unprintable area of the page. This area adjusts according to the LaserJet printer selected within the PrintBoss program and the orientation of the form.
Above the ruler to the far left is a drop down menu to adjust the view’s magnification. This is similar to a zoom.
The Copy Number to the right of the Magnification Percentage allows you to select different copies associated with this form. Zero represents the original document. Use the up arrow to navigate to additional copies if there are multiple copies set for this form. The down arrow navigates back towards the original. Any conditional items based on copy number will be reflected in the View when the copy is selected. Copies are set and defined on the Form Editor, typically on the Footer Objects or RunTime Objects tab.
The button to the right of Matching Coordinates appears when duplex printing is selected on the Special Controls tab of the Form Editor. This button indicates whether the view is of the Front or Back of the page. Click on the button to toggle between sides.
The Dollar Value field is located to the right to the Page Side Selector (or Matching Coordinates when duplex printing is not selected) and is used for testing objects that only appear based on a conditional Amount or Amount Range. Initially, the dollar value is set to 0.00. Enter an amount to test the AmntRange condition when it is used.
� Please see PrintBoss Conditional Commands at the end of this chapter for more information.
NOTE:
All items inserted through the View will be placed at the bottom of the Footer Objects tab of the form. The location of these objects can only be adjusted in the Form Editor. Location and order can affect how the objects appear on a page.
INSERT AN OBJECT IN THE DOCUMENT VIEW
Right click anywhere on View of Form to access the following options:
Zoom Copy Number
Matching Coordinates
Simulated Document Amount
Page Side Selector

EDIT CURRENT OBJECT This option opens the Properties dialog for the selected (highlighted) item in the View.
DELETE CURRENT OBJECT This option deletes the selected (highlighted) object from all copies and accounts that use this form. A prompt will confirm deletion or allow the user to cancel.
COMMENT CURRENT OBJECT This option comments the selected object in the View without actually deleting it. An object cannot be viewed when it is commented. The command will remain on the objects tab of the Form Editor with a pipe symbol (|) at the beginning of the line so it is not processed. A prompt will confirm this action or allow the user to cancel.
INSERT AN OBJECT This option adds an object by opening the appropriate Properties dialog. A brief description of the use of each object follows.
Object Description
Barcode Changes data into a barcode. See #Barcode for more information.
Block Inserts a block on the document. Rectangle (#RECT) is more commonly used.
Canadian Date Formats the document date value according to the Canadian CPA 006 standard format.
Graphic Inserts a #PIC object to place a graphic file, such as a logo, on the document. PrintBoss reads jpg and bmp file types.
Grid – relative Inserts a #GRID object with a standard 4-column advice format. Both Horizontal and Vertical lines can be added to the grid.
Grid – horizontal Inserts a #HGRID object. A #HGrid only draws horizontal lines within the box. #GRID is more commonly used.
Grid – vertical Inserts a #VGRID object. A #VGrid only draws vertical lines within the box. #GRID is more commonly used.
Line Inserts a horizontal line, such as a signature line, on the document. Second signature lines are usually selected from the Misc tab of a Bank Record rather than inserting a new line. This object can also be used to draw vertical lines.
Rectangle Inserts a rectangle. Rectangles are often used with Security Back patterns to hide sensitive information, such as social security numbers.
Secure Seal Inserts an encrypted seal containing information from the check file used as verification by the bank. The bank must have appropriate technology to decipher the encrypted seal.
Signature Inserts a #PIC object to print an electronic signature file.
Text Inserts a #Text object to print static text or text referenced by a variable.

Text – Multi-Line / Vertical
Inserts a #VText command. This is most frequently used to place the words Pay To The Order Of vertically on a check.
Text – secure Displays check amount in blocks or with a pattern and is used to protect against fraudulent changes of the check amount.
SHOW FORM OBJECTS This option displays the objects from the PrintBoss Form File in addition to the captured text from the accounting software when it is selected (check marked).
SHOW BLANKED CAPTURED TEXT This reveals the raw data captured from the accounting software that has been hidden with a PrintBoss command such as #Assign, #RegionMove, or #BlockMove. This option is only useful when editing a work file or archive file.
SHOW INFO PANEL This option opens a panel at the bottom of the View displaying the order and coordinates of both objects and captured data shown in the form. Either click on the desired object or data or use the slider bar to move quickly through objects and data in the order they were placed on the form. The next field displays the order of the item, such as item 47 of 225. The matching coordinates field displays the coordinates of the selected item. The last field displays the text or description of the item.
VIEW RAW CAPTURE This option strips out all of the PrintBoss form elements and reveals only the data from the accounting software in its original format. This option is only useful when editing a form from the work file or archive file.
VIEW REQUEST LIST CAPTURE GROUPS This option opens the Form / Bank Request List Manager and displays the request list entries. Edit or create the request list entries while viewing raw data from a work file to capture coordinates and values. This option is only available while using View Raw Capture. Not all forms use the Form / Bank Request List.
� See Chapter 18, Form Bank / Request List.
DISPLAY ASSIGNMENTS This option opens the form Assignments window containing a list of all available variable assignments for this form.
� See #Assign in the commands section later in this chapter.
EXIT Exit the view of this form. If changes have been made, you will be prompted to save or abandon changes prior to exiting.
EXIT THEN EDIT FORM This option leaves the View of the form and automatically opens the Editor. You will be prompted to save or abandon changes prior to opening the Editor if changes have been made in the View of the form. This is helpful to quickly move from viewing a work file to working in the Form Editor.
FORM EDITOR
The Form Editor has several tabs and options for customizing forms or handling special needs. There are two ways to access the Form Editor after opening the PrintBoss Master Application:
1. Click on the Edit menu and select Form Files. Then highlight a form and click the Editor button. 2. Right click anywhere on a View and choose Exit then Edit Form. PrintBoss will notify you to save changes
before continuing if applicable.
The primary tabs that appear when you open the Editor include:
Settings Comments Misc
Slider Order Matching Coordinates Description

Special Controls Design Time Objects* Block Mirrors RunTime Objects Multi-Parts & Printers Footer Objects
* Design Time Objects only appears in older PrintBoss Forms. It does not appear in the Wellspring Software's currently distributed form files. It was primarily used for backward compatibility.
Other tabs may appear depending on the settings selected in the Form Editor. These include:
Setting Location Tab
Duplex Printing Special Controls tab Page Back Objects
PDF copy Multi-Parts & Printers tab PDF
Positive Pay copy * Multi-Parts & Printers tab Positive Pay / ACH File Editor
Check box under Access Special Controls tab Proprietary
* The PDF and Positive Pay features are Destinations set for a copy on the Multi-Parts & Printers tab of the Form Editor, though Positive Pay opens in a new window rather than as a tab.
A detailed description of the Form Editor is in Appendix B of this manual.
ASSIGNMENTS
Assignments can be either Static or Dynamic. An explanation of these choices follows.
Static Assignments Assign static values to a variable such as DocMisc or EmailCC to set a single value for ALL instances of this variable in the Form. For example, the office manager may need an email copy of all invoices sent by email. The invoice form may contain an entry similar to the following:
#Assign EmailCC, "[email protected]"
A File path and name may also be assigned in PrintBoss version 5.73.5 and above. For example:
#Assign DocMisc, "L:\PDF\{DocRecip}\*.*"
These assignments should be entered near the top of the Footer Objects tab as they contain variables that may have been assigned on the RunTime Objects tab or need to be processed before other items on the Footer Objects tab.
The file path example can be used to create a shortcut in the DocMisc or DocMisc2 fields of the PrintBoss Work File to access all files at the listed path. The * is a wildcard to display all files regardless of the name or file type. A question mark ‘?’ can be used for a single letter. The DocMisc and DocMisc2 fields are limited to 60 characters based on the resolved path.
Dynamic Assignments Dynamic assignments are the heart of automating PrintBoss features. There are 2 ways to create a dynamic assignment. Use one method or the other, not both.
INCLUDE IN SOURCE REPORT Modify the PrintBossMisc or PrintBossMisc2 formula fields to represent a variable in the source report if there is a PrintBoss Trigger. We recommend PrintBossMisc2 be used for E-mail when using this method. The source report is typically crystal reports, though other report writers can be used.
PICKED OFF OF CAPTURED REPORT BY PRINTBOSS This method requires the desired field is displayed somewhere on the source report. PrintBoss can capture this information and blank it out (if desired).
1. Print a document to PrintBoss containing the desired field, such as E-mail address. 2. Click on the File menu and select Open Document Work Files on the PrintBoss Master Application. 3. Select the appropriate form and click Browse.

4. Select a document and click View. 5. Right-click anywhere in the View and select View Raw Capture. 6. Locate the desired field, such as email address, on the page. Double click on the text to open the Captured
Text Command Properties dialog. 7. Select the Click to Assign to Variable bar at the top right of the dialog. 8. Change the Variable Name from ReNameMe to EMailTo or the desired variable name. See Appendix E
for a list of variables currently used in PrintBoss. Other names can be assigned, but do not have an existing function within PrintBoss.
9. Check the following fields: a. Add together fields in horizontal range b. Capture Raw Text Objects Only c. Left Trim d. Right Trim e. Blank Out After Capture (optional – hides the value, such as email address. On the printed
document)
� Some reporting engines (such as the latest Crystal Reports) tend to break up text fields. A
good practice is to click on the +/- button that follows the Horizontal field so it becomes to. Set
the ending coordinate far enough to the right to pick up the entire field, such as a long email
address.
10. Click OK. PrintBoss adds this assignment to the top of the RunTime Objects in the Form. 11. Right-click on the page and click on View Raw Capture to return to the formatted document. 12. Click Close to exit the View and select Yes to save these changes.
� See Chapter 23, Capturing and Assigning Text, for more information.
VARIABLES
There are several variables that may be Assigned in a Form File to define values for various PrintBoss functions. A list of all predefined variables and their purpose is included in Appendix E of this manual.
FORM FILE COMMANDS
PrintBoss Form Files combine data from the accounting software, the PrintBoss bank record, as well as graphics and text to create a final document. The most common commands used to accomplish this task are described in this section. See Appendix B for a list of the remaining commands.
NOTE:
Type the # symbol followed by the command in the appropriate Object tab. Then double click on the text to open a dialog box displaying the parameters and options for the specific command.
#Assign #Assign 'VarName', 'Value' [, CaptXRange, CaptYRange [, Options]]
There are several different assign commands:
� #Assign � #AssignLines � #AssignmentsBlock � #Assigns
Use the #Assign command to assign a value to a variable name. The other assign commands can be found in Appendix B of this manual and assign multiple values.
#Assign uses two methods to assign a value. The first method is to enter a static value in the Variable Value parameter field. The command can be placed in any Object tab when using this method. If an assignment occurs more than once, the last assignment created is always the current one. Assignments are processed in the order they appear in the Objects tab.

The second method is to specify coordinates to capture value(s) from the data supplied by the accounting software. The #Assign command MUST be in the RunTime Objects tab when using this method. The assigned variable can only be referenced in Footer or Page Back Objects since the value is not supplied until the accounting software data is evaluated between the RunTime and Footer sections. Select the Pre-process Assignments box on the Special Controls tab of the PrintBoss form when an assignment needs to be referenced in the RunTime Objects tab. This method is useful for repositioning or reformatting captured data passed by the accounting software. It can also be used to assign the DocNo, DocAmnt, DocRecip, DocDate, DocMisc, DocMisc2, and DocPayee ID field in the work file as well as adding conditional elements. One of the options for this command blanks out the original location of the data after it is captured.
All captured variables can be used in #Text commands, as components of conditional statements, and as components of loops and counters. In addition, they can be used in positive pay scripts, e-mails, fax messages, and as parts of dynamic file names for PDF and Positive Pay files. The dynamic file name feature is only available in the Enterprise edition of PrintBoss.
The following is a description of the parameters for the #Assign command.
VARNAME The Variable Name can be a variable expected by PrintBoss, such as DocNo, or any arbitrary name.
VALUE Only enter a static Variable Value when the CaptXRange and CaptYRange (Capture Coordinates) are not passed to PrintBoss. If CaptXRange and CaptYRange are passed, this parameter is usually left blank. When both the Variable Value and Capture Coordinates exist, PrintBoss will only use the Variable Value when no value is returned for the Capture Coordinates. For example:
#Assign "EmailTo", "[email protected]" – where EmailTo is the VarName and the email address is the Value. No coordinates are assigned.
#Assign "DocNo","", 7.100, 0.65 – where DocNo is the VarName, the Value is blank, CaptXRange is 7.100, and CaptYRange is 0.65
CAPTXRANGE, CAPTYRANGE These are the coordinates of the captured data. You can determine the coordinates for a captured field through the work file.
1. Open the PrintBoss Master Application. 2. Click on the File menu in PrintBoss and select Open Document Work Files. 3. Select the desired work file and click the Browse button.
4. Select a document and click the View button . 5. Right click anywhere on the View and choose View Raw Capture. 6. Double click on the object you want to capture. The Captured Text Command Properties dialog opens.
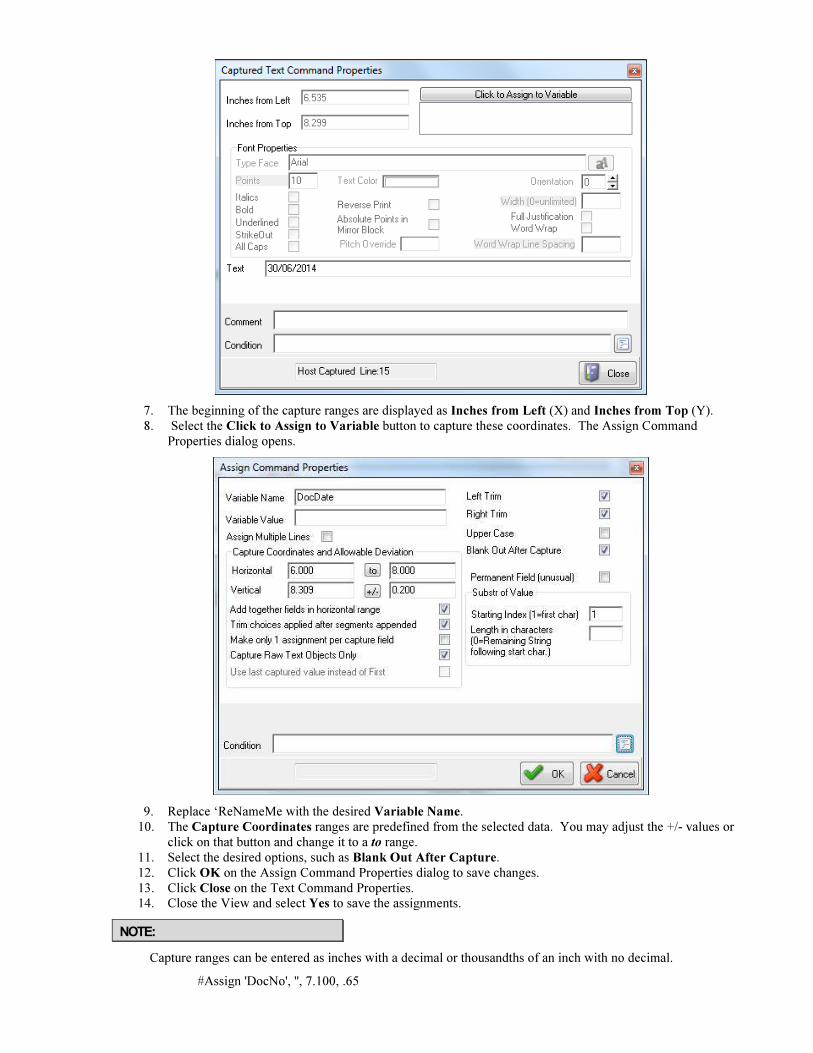
7. The beginning of the capture ranges are displayed as Inches from Left (X) and Inches from Top (Y). 8. Select the Click to Assign to Variable button to capture these coordinates. The Assign Command
Properties dialog opens.
9. Replace ‘ReNameMe with the desired Variable Name. 10. The Capture Coordinates ranges are predefined from the selected data. You may adjust the +/- values or
click on that button and change it to a to range. 11. Select the desired options, such as Blank Out After Capture. 12. Click OK on the Assign Command Properties dialog to save changes. 13. Click Close on the Text Command Properties. 14. Close the View and select Yes to save the assignments.
NOTE:
Capture ranges can be entered as inches with a decimal or thousandths of an inch with no decimal.
#Assign 'DocNo', '', 7.100, .65

Or #Assign 'DocNo', '', 7100, 650
Often the location may vary slightly based on the length of the string. You can assign a range using a dash:
#Assign 'DocNo', '', 7.00-7.200, .65
Alternatively, a slash represents a Plus or Minus (+/-) amount:
#Assign 'DocNo', '', 7.100/.1, .65
The #Assign command is usually entered by clicking on the Click to Assign to Variable button on the Captured Text Command Properties dialog mentioned above. This naturally pulls in all the coordinates and places the new command at the top of the RunTime Objects tab.
The following lists the most common options that may be used with the #Assign command.
OPTIONS
Option Description
1 Make only 1 assignment per capture field. This option is valuable when there are several capture fields close together that may overlap with this assignment range.
A Add together fields in the horizontal range specified by the CaptXRange.
B Blanks out the entire field after the assignment is captured. This prevents the data from displaying in an unwanted location on the document.
L Left trim the captured field (eliminates any blank characters to the left of the captured field).
R Right trim the captured field (eliminates any blank characters to the right of the captured field).
S Trim choices applied after Segments appended.
W Capture raW text objects only. This option only captures items from their original location – not items moved with a #RegionMove or #Block command that might share the same coordinates. This option is checked by default and should be used whenever assigning data captured from the accounting software.
Z Use last captured value instead of first.
� See Chapter 23, Capturing and Assigning Text.
#Barcode #Barcode X, Y, Barcode Height, Options, "Barcode Value"
This command is used to print a Barcode.
The top left corner, center, or top right corner is defined with the X and Y coordinates. The Barcode Height is also assigned.
The following Symbologies can be specified as options.

Symbology Character Type
Code 3 of 9 alphanumeric
UPC Version A numeric only
UPC Version E numeric only
Postnet Code numeric only
Interleaved 2 of 5 numeric only
Codabar numeric only
Code 93 alphanumeric
The option of /SC prints the text characters below the barcode. This option is a check box in the Barcode Command Properties dialog.
The Barcode Value can be either a variable that references captured text or specific characters. For example:
#Barcode 6.7C, 1.000, 0.850, /SYM:C39, "{DocNo}" #Barcode 6.7, 1.000, 1.000, /SYM:PNT, "34580"
The first example centers the Barcode at 6.7 inches horizontally and 1 inch down from the top with a height of 0.85 inches. The symbology is Code 3 of 9 and the variable DocNo defines the Barcode. The second example starts at 6.7 horizontally and 1inch down from the top with a height of 1 inch. The symbology is Postnet Code and the Barcode value is 34580.
#Block #Block X1, Y1, X2, Y2, Fill [, Options]
The Block command is used to place a block on the document. The top left and bottom right corners are defined. By default, a black rectangle is drawn on the form. Options include fill patterns, corner radius, and shaded edges (often used for the top legend row of a table). This command has been replaced by #Rect.
X1, Y1 These coordinates represent the location of the top left corner of the block in inches from the left and top edge of the paper. Coordinates can be entered in thousandths of an inch.
X2, Y2 These coordinates represent the location of bottom right corner of the block.
OPTIONS
Option Description
/OLWnnn Outline in black with nnn thickness
/Rnnn Corner Radius of nnn inches. For example, /R.1 is a 1/10" radius
/STnnn Shade Top nnn inches
/SLnnn Shade Left nnn inches
/SBnnn Shad Bottom nnn inches
/SRnnn Shade Right nnn inches
/SHDnnn Shadow extends nnn inches from block
The following example prints a white box near the top of the page outlined in black with rounded corners.
#Block 3.25, .3, 4.75w, 1.0h, W_, /R.1
FILLER
Filler Description
T Clear
W White (prints Opaque)
S Shade
B Black

G/ or G0 …G9 Gray scale shading from lightest to darkest
P1 or PH Horizontal Line Pattern
P2 or PV Vertical Line Pattern
P3 or PB Backward Diagonal Pattern
P4 or PF Forward Diagonal Pattern
P5 or PR cRrosshatch Pattern
P6 or PA diAgonal Crosshatch Pattern
Color The color codes are too numerous to list. The codes display as numeric strings, for example 0255 is red
NOTE:
Adding an underline following the fill descriptor will outline the block with a black line.
#BlockMove #BlockMove X1, Y1, X2, Y2 [, DestX, DestY [, DestX2, DestY2]]
This command is used to move or remove whole blocks of text captured from the accounting software. This operates the same as the #RegionMove command, except this sets X (or horizontal) boundaries while RegionMove includes the entire width of the page.
Every text object included in the block move needs to have its beginning coordinates inside the block. If only the beginning character of a long string occurs inside the block, the entire string will be treated as part of the block.
� This command must only be placed near the top of the RunTime Objects section. #Block
and #RegionMove commands normally need to be processed prior to all other commands
except #Assign.
X1, Y1 These coordinates define the top left corner of the block to be moved or removed.
X2, Y2 These coordinates define the bottom right corner of the block to be moved or removed.
DESTX, DESTY These coordinates define the top left corner of the destination. When these parameters are not provided, the text objects inside the block are removed (deleted).

DESTX2, DESTY2 These coordinates define the bottom right corner of the destination. The source block will be stretched or reduced to fit this destination block. When these parameters are not provided, the destination block will be the same size as the source.
#CanadianDate #CanadianDate X, Y, Font Size, "date", "Mask"[, Color[, Frame[, DateInMask[, SuppressLegends]]]]
This command formats a date in the style required by the Canadian Payments Association for their image ready standard called the "CPA Standard 006". This command places a letter under each numeral in the date indicating the part of the date it represents. A frame may be selected to appear around or behind the numerals in place of the shading. The word "Date" automatically prints to the left of the formatted date.
The Canadian Date command is automatically triggered by the Canadian Style Date/Amount flag on the Miscellaneous tab of the Bank Edit dialog for most standard PrintBoss forms.
#Grid #Grid X1, Y1, X2, Y2[, Options]
The Grid command creates a frame and draws horizontal and vertical lines within the frame. The coordinates for each line are relative to the frame. Options provide further modifications with corner radius, shadow, edge shading, and line color. In most cases, #Grid is more effective than #HGrid or #VGrid commands since all the lines within the Grid are relative to the top left corner of the grid, allowing the grid to be easily moved or dragged. Use this command to create the advice grid and the Date/Amount grid on a check or the grid for an invoice or packing slip.
X1, Y1 These are the coordinates for the top left corner of the frame in inches from the left and top edge of the paper. The coordinates may be entered in thousandths of an inch.
X2, Y2 These are the coordinates for the bottom right corner of the frame.
XA, XBXZ This parameter represents any number of lines drawn vertically down the frame. Each line is defined as the distance in inches from the left edge of the frame.

YA, YBYZ This parameter represents any number of lines drawn horizontally across the frame. Each line is defined as the distance in inches from the top edge of the frame.
OPTIONS
Corner Radius
/Rnnn where nnn is the radius size. For example, /R.1 is a corner radius of 1/10th of an inch.
Shaded Edges
/STnnn (Shade Top), /SLnnn (Shade Left), /SBnnn (Shade Bottom) or /SRnnn (Shade Right) where nnn is the width of the edge shade in inches.
Shadow Width
/SHDnnn where nnn is the width of the shadow in inches.
Line Color
/0LC followed by a number representing a color. The color number can be 4 to 8 digits.
#Line #Line X1, Y1, X2, Y2[, Fill [, Options]]
The #Line command functions the same as the #Block command and is often used to draw signature lines on checks. A vertical line has identical X1 and X2 coordinates. A horizontal line has identical Y1 and Y2 coordinates. The Y coordinates are labeled as Inches from Top on the Line Command Properties dialog.
#MICR #MICR "MICR string" [, Options [, X [, Y]]]
This command prints the special MICR line at the bottom of a check. Normally, the location is completely calculated by PrintBoss based on the length of the form and position of the check. Options may be used to select middle or top check stock, or use the X and Y to explicitly place the MICR. The MICR string is most often pulled from the Bank List by using the following line in RunTime Objects:
#MICR "{BMICR}"
MICR STRING This string must be entered accurately. Each character (including blank spaces) must be entered exactly as it appears on an existing check. There are three characters that appear on the MICR line of a check that cannot be reproduced with any computer keyboard key. Therefore, we have assigned replacement characters for the MICR line characters listed in the following table:

Symbol Description Represented By Alternate Chars
Transit [ : A
On Us / < C
Dash - = D
Amount $ ; B
Select the ‘Translate ABCD to ‘[$/-‘ on the MICR Command Properties dialog if using the 4th column in the table above.
The left portion of the MICR line is the Check Number. Since this changes from check to check, a variable needs to be entered instead of typing a specific number. The available variables are:
{BChkNo} = Check number pulled from bank record with no leading zeros BBBBBB = 6 digit check number pulled from bank record – left zero filled BBBBBBBB = 8 digit check number pulled from bank record – left zero filled {CChkNo} = Check number captured from accounting software with no leading zeros CCCCCC = 6 digit check number captured from accounting software – left zero filled CCCCCCCC = 8 digit check number captured from accounting software – left zero filled
The following illustrates a common MICR string. Periods are used to represent spaces.
/{CChkNo}/ [123456789[ .123-12345/
OPTIONS
T
Places the MICR line for a top check (3.5" check).
B
This option places the MICR Line for a bottom check relative to the bottom of the form. This is the default value.
Mn.nnn
M places the MICR Line relative to a check section (i.e. perforation) that ends n.nnn inches from the top of the page. For example, an 11" page perforated into sections of 3.5, 3.5, and 4.0, with a check in the middle would be M:7.00. An 11" page perforated into sections of 3.67, 3.67, 3.67, with a check in the middle would be M:7.333.
N
No check number segment of the MICR line is printed. This is used for deposit slips.
BR or Include in Mirror Blocks
This option includes the MICR Line in the check copy (mirrored block) section usually located at the top of the page. The length of the Block Mirrors on the Form Editor may need to be adjusted to include the MICR Line in the source block. The MICR Line will display at full size and not reduced since the characters are not standard text.
Optional Explicit X and Y
This is optional and is rarely used since PrintBoss automatically places a line. If the X is 0 or blank, PrintBoss will place the line relative to the placement of the Routing Number section of the MICR line. When a value for X is passed, the line is explicitly positioned according to the value of X. The same is true for Y. The vertical placement is relative to the bottom of the form when there is no value for Y.
NOTE:
It is best to adjust the placement of the MICR line via the MICR Offset Adjustment fields in the Configuration Settings of PrintBoss. The settings in Configuration are workstation and user specific. Adjusting the placement in the form impacts all users.
#PIC #PIC X, Y, "GraphicFileName" [, Options [, SigDiskDrive]]
This command prints a graphic file at the location specified by the coordinates. It will accept graphic files with the formats of BMP, PCX, JPG, or SIG (Wellspring Software encoded signature file). Graphics can be added using variables, file paths, or as embedded files.

NOTE:
MICR toner is only available in black. If the bank requires MICR ink, all logos printed with the checks will print monochromatic regardless of any color used in the graphic file.
X, Y These coordinates represent the location of the left top corner or the graphic, in inches, from the left top EDGE of the paper. Coordinates may be entered in thousandths of an inch. Variables referencing fields in the Bank Record may also be used (see graphic above for an example).
GRAPHICFILENAME This is the name of the graphic file to print. If no path is provided, PrintBoss will look in the Logos folder of the PrintBoss Home directory. The file extension must be used to help PrintBoss determine the file type. The graphic file may also be added from the Embedded File Select list on the Misc tab of the Form Editor.
OPTIONS Any of the following options can be selected:
Option Description
/600 Forces image to be printed in 600 dpi instead of the default 300
/REV Reverse prints black to white and white to black
/HideErr Does not report file read access errors if they occur
/MIR Includes the graphic in the Block Mirror
Size:nnn Adjusts the size according to this percentage (100=full size, 50=half size, etc)
SizeX:nnn Adjusts the horizontal size to the specified value in inches.
SizeY:nnn Adjusts the vertical size to the specified value in inches.
Transparent Removes the background of the graphic if it is full white.
Watermark Prints graphic with gray instead of black
Watermark:n Same as Watermark except n is replaced by B, M, or L for Bold, Medium, or Light. The value is medium by default. The character > follows B, M, or L for Fine Bold, Medium, or Light.
SIG DISK DRIVE LETTERS PrintBoss checks the listed drive(s) for a security disk when a .sig file is selected. A default drive letter can be assigned under Options\Configuration on the Internal tab. A series of drive letters may be entered and each specified drive will be scanned until the target sig media is found. Commas are not necessary between drive letters

(ex: DEFG). Citrix or Terminal Services paths may be used. Each path must be followed by a semi-colon (Ex: \\TSClient\D; or \\Client\F; or \\Client\F$;). The media may be a CD or USB flash drive when PrintBoss is used locally. CD’s do not work on Terminal or Citrix Servers.
#PrinterOverride PrinterOverride “Name of Windows Printer Driver”
The PrinterOverride command overrides the printer set on the Multi-Parts & Printers tab of the PrintBoss form, including the default printer. This command assigns a specific Windows printer and often includes conditions. For example:
#[C,1][Inu, "St. Louis", ÷{Location}÷]PrinterOverride "HP Color LaserJet 4700 PCL 6"
This example assigns a specific printer only for Copy 1 when the string “St. Louis” is in the Location variable. This command can also be used in #IF/#ElseIF/#EndIf commands.
Enter the exact printer name as it appears in the Windows printer list. Double click on the #PrinterOverride command to select the printer name from a drop down menu to ensure an exact match.
#ProcessPage #ProcessPage [Parameter]
The page (or copy) will process when the parameter evaluates to True and skip when it evaluates to False. Often #ProcessPage will specify the document copy in the condition. For example:
#[Copy, 4]ProcessPage [!Empty, {EmailTo}]
PrintBoss will only examine this condition on the 4th copy and process the page if the variable EmailTo does not resolve to an empty value.
NOTE:
The Pre-process Assignments option MUST be selected on the Special Controls tab of the Form Editor to use the #ProcessPage command (EDIT / FORM FILES / <highlight form> / EDITOR / SPECIAL CONTROLS).We recommend selecting Special from the list.
#Rect #Rect X1, Y1, X2, Y2 [, corner radius[, outline width[, fill of line[, color background[, pattern]]]]]
This command generates a rectangle with control over the size, thickness, and fill of the shape. This is often used to create a patterned rectangle behind a text object to prevent fraudulent changes to a document. A selection of patterns is provided for your use. The most common is the zigzag pattern.
This command is also used for Negative Printing. The Vertical Fade or Horizontal Fade under the ‘Security Back’ drop down menu are the best choices to use for the background. Overlay white lettering with a separate #Text command.

CORNER RADIUS This parameter defines the shape of the corners. No radius is a 90 degree corner. Larger values equate to softer edges.
OUTLINE WIDTH Outline width, or Line Width, defines the width of the rectangle outline.
OUTLINE COLOR SELECT A fill may be defined if the line has a discernible width.
INNER FILL COLOR SELECT Define a background color for the shape. The background color, or Inner Fill Color Select, is behind the security pattern in the center of the rectangle. The default is black.
SECURITY BACK There are several options for the Security Back in the center of the rectangle:
0 = none 1=vertical fade 2= horizontal fade 3= zig zag fine 4 = zig zag medium 5 = zig zag course 6 = half circles fine 7 = half circles medium 8 = half circles course
For example:
#Rect 4.7, 9.8, 8.15, 10.34, 0.10, 0.020, B, W, 3 (shown in the graphic above)
The object masks the signature as:
#RegionMove #RegionMove StartRegion, EndRegion [, StartDestRegion [, EndDestRegion]]
This command is used to move or delete whole regions of text captured from the accounting software. Moved regions can be compressed or expanded proportionately by entering both a start and ending destination.

This operates the same as the #BlockMove command with the exception that the horizontal boundaries are the left and right edges of the page. For example, if the accounting software prints a check with an advice at the top of an 11" page, the #RegionMove can move the advice to the center of the page. If the accounting software is passing two advice sections, use this command to delete one of the advices in order to use the PrintBoss Block Mirror with its compression feature to print the secondary advice section.
NOTE:
This command must only be placed in the RunTime Objects section of the rom. This command, along with the #BlockMove command, should be used prior to other commands except #Assign.
STARTREGION This parameter is also known as the Block Source Dimensions and defines the start of the region in inches from the top of the page.
ENDREGION Define the end of the source region in inches from the top of the page.
BLOCK MOVE MODE This section determines the action for the RegionMove as follows:
• Delete all text occurring in the defined region
• Move all text, same size, to a block with a top corner defined in the Destination section
• Move all text and shrink or expand the text to fit in the destination
• Show the Base Text will display the original text in addition to the Region Move text
STARTDESTREGION This parameter is also known as the Block Destination Dimensions and defines the start of the destination of the selected region in inches from the top of the page. The text within the region will be deleted if this parameter is not defined.
ENDDESTREGION Define the end of the destination of the selected region in inches from the top of the page. The source region will proportionately fit between the destination start and end when this parameter is defined. Otherwise, the region will be moved at its original size.

#SecureText #SecureText X, Y, "<Font>/<Size>/<Style>/<Color>", "<Text>" [, Options]
This command is used to protect against fraudulent changes on a document. All current PrintBoss check forms include this security feature.
There are two options for the Secure Text Type: Custom and Standard Block-Numeric.
CUSTOM This option can be used with both alpha and numeric text. It includes a patterned rectangle behind the text. There are a few patterns to choose from, but the default is ZigZagMed. The rectangle automatically sizes to fit the text.
STANDARD BLOCK-NUMERIC As the name implies, this option can only be used with numeric amounts and is specifically used for the amount of a check. It is nearly impossible to modify the printed check amount with this option.
Enlarged for better viewing
TEXT Normally a variable is entered in the Text field to dynamically update the check amount information for each check in the batch.
#Text
� See Chapter 10, #Text Command.
#VText #VText Xc, Y, Font/Size, Spacing, <Text>
This command prints text on incrementing lines. Each line may be a single character or it may be a phrase in a multi-line text object. One common use is on invoices, credit notes, etc. for the Sold To and Ship To labels in the address boxes. For example:

#VText 4.50c, 2.15, Arial/10, 0.130, "SHIP TO"
This command centers the characters at 4.50 inches from the left edge of the page. The top of the first character starts at 2.15 inches down from the top edge of the page. The top of each character thereafter is 0.13 inches below the top of the previous character.
Another common use is to print a captured address assigned to a multi-line variable called {Address}.
#VText 1.05, 8.1, Arial/10, .15, "{Address}"
Several lines of text can be entered into the VText command separated by commas to indicate line returns. Be sure to use a delimiter such as quotes around the series of text.
#VText 1.040, 8.245, Arial/10, 0.180, "Pay, To The, Order Of"
� See the Multi-Line Variables section later in this chapter for more information.
PRINTBOSS DEFAULT ASSIGNMENTS
A few variables should always be assigned. They are stored in the PrintBoss work file database enabling helpful sorting and locating of records and are often used in conditions within a form. These variables are:
� DocAmnt � DocDate � DocNo � DocRecip
These will automatically be assigned when a PrintBoss Flag Trigger exists in the document (PB#INFO ….). The Flag Trigger may also include DocMisc and DocMisc2. Otherwise, be sure to capture and assign these variables using the #Assign command.
� See Chapter 23, Capturing and Assigning Text.
NOTE:
The {CChkNo} variable is automatically assigned the value of the {DocNo} variable when the Check Number Format on the MICR tab of the bank record begins with C. Similarly, the {BChkNo} variable is automatically assigned when the Check Number Format begins with B.

MULTI-LINE VARIABLES
Normally an assigned or captured variable is a single line of text. Assignments made using #AssignS may contain multiple lines of text with each line separated by a Carriage Return / Line Feed. A few commands accept and process multi-line variables as multiple lines, such as the #VText command. A few standard variables, such as EMailBody, EmailTo, EmailCC, and EmailBCC, also accept multiple lines.
A particular line of a Multi-Line Variable may be referenced by appending a line number enclosed in square brackets as part of the variable reference. For example, the following assignment can be used to capture an unknown number of address lines:
#Assigns AddressLines, 1.0-1.2, 8.0-9.5, BW
The third line can be printed as follows:
#Text 1, 1, Arial/12, ''The third line of the address is: {AddressLines [3]} ''
The zero element returns the total number of elements. Continuing with this example, the following loop prints all the address lines:
#Assign LastLineY, 7.9 #For n= 1 to {AddressLines [0]} #Text 1, {LastLineY+.18}, ''Arial/12'', ''Address Line {n} = {AddressLines [{n}]}'' #Next n
PRINTBOSS CONDITIONAL COMMANDS
Each PrintBoss command can be executed based on a condition that is evaluated at the time the line is processed. For example, a logo may be printed based on the existence of a logo file name in the bank record, or a second signature line on a check may only be printed if the check amount exceeds $1.000.00. The conditional statement is one or more condition expressions with each expression enclosed in brackets [ ]. The condition statement is inserted between the # character and the command name (for example: #[Copy, 1]Text …).
In addition to conditions for commands, several commands accept Conditional Parameters, such as the #ProcessPage [<condition>] command. The conditional parameter is simply a conditional statement that follows the same rules, but is used after the command. It is often helpful to enclose a Conditional Parameter in a delimiter, especially if the conditional statement has multiple condition expressions.
A conditional statement is comprised of a series of condition expressions chained together with an assumed AND or a symbol for OR. Normally, a conditional statement is only one condition expression.
Each condition expression begins with a condition operator followed by a comma and as many parameters as defined by the operator.
More than one condition can be entered by chaining together the bracketed condition expressions. Multiple conditions are considered to be joined by AND unless the OR ‘||’ symbols are added. All AND expressions must be true for the condition to be true.
Ex: #[Copy,12][AmntRange, 0, 200]Text 1,1, Arial/12, "Prints on Copy 1 and 2 if amount is less than 200"
#[!Copy,0][Flagged, {BFlag2}]Text 1,1, Arial/12, "Prints on all Copies but 0 if banks Flag 2 is checked"
ANY CONDITION PRECEDED BY AN EXCLAMATION MARK (!) HAS REVERSED LOGIC.
A double pipe symbol may be inserted between conditions to represent OR with the next condition. Parentheses cannot be used with conditions.
Ex: #[Inu, "Jones","{Comp}"]||[Inu, "ABC", "{Comp}"]Text 1,1, Arial/12, "Jones or ABC in Company Name"
Very complex conditions may require several lines that create variables in stages and then those variables can be used within other conditional statements.
The following is a list of the most common conditional commands and their descriptions. See Appendix B for a list of the remaining commands.

NOTE:
Although it is helpful for us humans to see the condition names spelled out completely, only as many characters as is needed to make the condition unique are required. For example, Fi is enough to register as the FileExists condition, or As is enough to register as the Assigned condition, or E as the Empty condition.
= =, 'String1', 'String2',
This command returns a value of true if String1 is identical to String2 up to the length of String2. For example, comparing "12345" with "123" is true, but "123" compared to "12345" is false.
The Compare Options include:
Option Description
E Exact match rather than stopping at the number of characters in String2
U Converts all characters to upper case before comparing – Not Case Sensitive
T or R Right trim both strings before comparing
A or B Trim Both (or All) sides of each string before comparing
The following example prints the words "No Charge" if the value of the variable {Dept} is equal to "Accounting" and is not case sensitive:
#[=u,'Accounting', {Dept}]Text 1,2.1, 'Arial/12', 'No Charge'
The following is a list of examples showing the effect of the Compare Options:
[=, "12345", "123"] true
[=, "123", "12345"] false
[=e, "12345", "123"] false
[=, "123", "123 "] false
[=t, "123", "123 "] true
[=, "ABC", "abc"] false
[=u, "ABC", "abc"] true
=e, =eu, =u =e, 'String1', 'String2'
Same as = condition with a Compare Option of "e", "eu" or "u" (see the table above under the = condition). The letter ‘e’ requires an ‘Exact’ match and the letter ‘u’ is not case sensitive.
== ==, 'NumericValue1', 'NumericValue2',
Returns true if NumericValue1 is EQUAL to NumericValue2. The numeric values of the items are compared. For example: 0 == 0.00 is true.
<> <>, 'NumericValue1', 'NumericValue2'
Returns true if NumericValue1 is NOT EQUAL to NumericValue2. The numeric values of the items are compared. For example: 1 <> 0.00 is true.
<= <=, 'NumericValue1', 'NumericValue2'
Returns true if NumericValue1 is LESS THAN OR EQUAL TO NumericValue2.

>= >=, 'NumericValue1', 'NumericValue2'
Returns true if NumericValue1 is GREATER THAN OR EQUAL TO NumericValue2.
< <, 'NumericValue1', 'NumericValue2'
Returns true if NumericValue1 is LESS THAN NumericValue2.
> >, 'NumericValue1', 'NumericValue2'
Returns true if NumericValue1 is GREATER THAN NumericValue2.
AmntRange AmntRange, 'LoRange', 'HiRange' [, TestAmount]
Returns true if the Test Amount falls on or within the specified range. {DocAmnt} is used as the test amount when the Test Amount is omitted. There is no upper limit when the HiRange is omitted or set to 0.
The following examples print a second signature line on checks with a {DocAmnt} of 1000.00 dollars or above. The first expression makes use of the exclamation mark "!" to reverse the logic and the second drops the HiRange parameter to remove the upper limit.
#[!AmntRange, 0.1, 999.99]Line 4.7, 9.7, 8.15, 9.7
#[AmntRange, 1000, ]Line 4.7, 9.7, 8.15, 9.7
This same logic can be used with a Hand Check, though the variable for the test amount must be entered. The following example prints the second signature line when it is flagged in the bank record and the amount is at least $0.01:
#[Flagged, {BFlag1}][AmntRange, 0.01, 0, {HChkAmnt}]Line 4.7, 9.5, 8.149, 9.5, B, ,
Another common use is to put a condition on a signature to determine when it prints. The following example will not print a signature when the check amount {DocAmnt} is below $0.01 and above $49,999.99.
Notice the condition was entered directly in the Pic Command Properties dialogue. The button at the end of the Condition field opens a list of the available conditions and their parameters. The condition can be tested in the Form Files' View by entering an amount in the Simulated Document Amount field at the top of the View.
Assigned Assigned, '<Name of assigned variable to test>'
Returns true if the variable is explicitly assigned (i.e. #Assign 'EmailTo', "[email protected]") or assigned through capture coordinates (#Assign 'EmailTo', ' ', 1.5, 4.5). PB#INFO can also be used to assign the variable. DO NOT include braces around the variable name. Note the value of a variable can be blank, but the variable is still considered assigned.
The following example prints the company logo when CompName is assigned.
#[Assigned, 'CompName']PIC 0.30, 7.8, 'CompLogo.bmp'
Captured Captured, '<Name of assigned variable to test>'
Returns true if the variable captured raw data from the accounting software. This is different than the Assigned conditional command. Before a variable can be captured, a command must assign a variable name and define the coordinates used to capture a value. If the raw data never has a text object that falls within those coordinates, then NO data is Captured, but it is Assigned. DO NOT include braces around the variable name.
Copy Copy, 'String of Digits'
Returns true if the form copy number is included in the string of digits, where 0 represents the original copy and 1 through 7 represents copies 1 through 7. Specify each copy number when more than one copy is to be considered. Separators are not required, but any character may be used to separate multiple copy numbers except an asterisk.
If an asterisk (*) appears after a character, the object is only printed in the mirrored block section. This is useful with the BLOCK command that draws a frame on 11" checks. The block should not be printed on the original, but it is nice to have a frame printed on the mirrored block on the top tear off copy.
� See Block Mirror tab earlier in this chapter.
If a B appears after the copy number, the object only prints in the body of the document. It will not appear in the mirrored block section.
NOTE:
If no condition operator is specified inside of the condition braces, the COPY operator is assumed.
Examples:
Conditional Command Description
#[Copy, 23]TEXT 5.00, 9.00, "TM/8", "Duplicate Copy" Prints ‘Duplicate Copy’ on copies 2 and 3
#[COPY, 0*123]Block .250, 7.6, 8.25, 10.5, /R.1 Prints a frame on the mirrored block for copies 1, 2, and 3
#[0*123]Block .250, 7.6, 8.25, 10.5, /R.1 Prints a frame on the mirrored block for copies 1, 2, and 3
#[Copy, 1]TEXT 4.5, 10.5, '5', 'Customer File Copy' Prints ‘Customer File Copy’ on copy 1
#[!C,0]Text 4.4, 10.4, "Arial/14", "** COPY **" Prints **COPY** on all copies except the original
Dates=, DATES>, DATES< Dates=, '<Date1>', '<Date2>’
These conditional commands return true if date1 and date2 compare as indicated by the =, >, or < signs. If date2 is omitted, then the current date is assumed to be date2.
The Windows’ ShortDateFormat is the assumed format for the dates. An alternate format can be specified by appending a semicolon followed by a mask to the date string. For example:
[Dates=, "4/2/16; m/d/y"] This statement evaluates to true when the current date is Apr 2, 2016.

Empty Empty, 'StringToTest'
This returns true if the StringToTest is empty. Use this conditional command with the exclamation mark to reverse the condition. For example:
#[!Empty, ÷{BMisc1}÷]Text 0.3000, 8.200, ‘Arial/8’, ÷{BMisc1}÷ This command prints the text specified in the Bank Misc1 field when BMisc1 is not empty.
#[!Empty,÷{Memo}÷]Text 8.137R, 8.813, 'Arial/9', ÷MEMO: {Memo}÷ This command prints the contents of the Memo field when it is not empty. The Memo field is an assigned field.
False False
This indicates the expression is FALSE and is often helpful in debugging conditional statements.
FileExists FileExists, 'FileName'
This returns true if the file specified by the FileName exists. It is often used with logos and signatures. PrintBoss will look in the Logos folder under the PrintBoss’ Home directory when no path is specified. The following example will print the logo file when it exists:
#[File, '{PDir}\Logos\Logo.BMP']PIC .4, 7.9, '{PDir}\Logos \Logo.BMP'
This condition command is most commonly used when logos are added directly to the Form File instead of through the Bank Record.
Flagged Flagged, 'StringToTest'
This returns true if the StringToTest begins with any of these characters: Y, y, T, t (as in Yes or True). It is often used with the 5 bank variable fields called {BFlag1} … {BFlag5}, though it will work testing any string that can return one yes or true value.
#[Flagged,{BFlag1}]Line 4.7, 9.6, 8.149, 9.6, '' This command prints a second signature line when the BFlag1 field is checked (flagged). The description for the BFlag1 field is 2nd Signature Line and it is located on the Miscellaneous tab of the PrintBoss Bank Edit window.
� See Chapter 8, Bank Accounts.
In In, 'StringFragment', 'StringToSearchIn'
This returns true if the StringFragment exists anywhere in StringToSearch. This search is CASE SENSITIVE. The following example whites out the dollar amounts when an exact match of the word Packing occurs anywhere in the assigned variable DocDesc:
#[In, 'Packing', '{DocDesc}']Block 6.5, 4.5, 8.25, 9.2, W
Inu Inu, 'StringFragment', 'StringToSearchIn'
This returns true if the StringFragment exists anywhere in StringToSearch. This search is NOT case sensitive. The following example whites out the dollar amounts when the word Packing occurs anywhere in the assigned variable DocDesc, regardless of case:
#[Inu, 'PACKING', '{DocDesc}']Block 6.5, 4.5, 8.25, 9.2, W

True True
The condition is TRUE. This is often used in debugging conditional statements.
Type
Type, 'Source Abbreviations'
This returns true when the document Type appears in the Source Abbreviation list and is useful when certain documents are to print only for specific types of source files.
Source
Abbreviation Description
W Work Files
A Archive Files
S Samples in Utilities
H Hand Checks
F Form Editor
The following is an example of disabling a signature from printing when processing archive files:
#[Type, WSHF]SIG 4.7, 9.8, 'Your_Sig.SIG'
Shorten the conditional command with the reverse exclamation mark:
#[!Type, A]SIG 4.7, 9.8, 'Your_Sig.SIG'
View Only This condition sets an object to View, but not to print. This condition can be used to test the contents of a variable prior to printing.
DATE & TIME FORMAT MASKS
Many commands and functions allow the use of date format masks to define how a date is expressed or interpreted. In most cases, the date format is defined in the Windows Regional Settings for the Short Date if a date mask is not specified. Here is a list of the mask symbols:
Mask Description
d Displays the day as a number without a leading zero (1 - 31).
dd Displays the day as a number with a leading zero (01 - 31).
ddd Displays the day as a three character abbreviation (Sun - Sat) using the strings given by the ShortDayNames global variable.
dddd Displays the day as a full name (Sunday - Saturday) using the strings given by the LongDayNames global variable.
ddddd Displays the date using Windows’ ShortDateFormat (no other symbol would be used with these 5 ds).
dddddd Displays the date using Windows’ LongDateFormat (no other symbol would be used with these 6 ds).
m Displays the month as a number without a leading zero (1 - 12). If the m specifier immediately follows an h or hh specifier, the minute rather than the month is displayed.
mm Displays the month as a number with a leading zero (01 - 12). If the mm specifier immediately follows an h or hh specifier, the minute rather than the month is displayed.

mmm Displays the month as a three character abbreviation (Jan - Dec) using the strings given by the ShortMonthNames global variable.
mmmm Displays the month as a full name (January - December) using the strings given by the LongMonthNames global variable.
y or yy Displays the year as a two-digit number (00 - 99).
yyyy Displays the year as a four-digit number (0000 - 9999).
j The Julian date displays the day of the year as a number without a leading zero (1 - 365).
jjj The Julian date displays the day of the year as a number with leading zeros (001 - 365).
h Displays hours without a leading zero 0 - 24 (0 - 12).
hh Displays 2-digit hours with a leading zero 00 - 24 (or 00-12).
n Displays minutes without a leading zero 0 - 59. Note that within a time expression, m will be interpreted as minutes as well.
nn Displays minutes with a leading zero 00 -59. Note that within a time expression, mm will be interpreted as minutes as well.
s Displays seconds without a leading zero 0 – 59.
ss Displays seconds with a leading zero 00 – 59.
t Forces 12 hour clock with a or p in place of t.
T Forces 12 hour clock with A or P in place of T.
tt Forces 12 hour clock with am or pm in place of tt.
TT Forces 12 hour clock with AM or PM in place of TT.
DELIMITING PARAMETERS
Most PrintBoss commands require parameters. Each parameter in a list of parameters is always separated with a comma. If no delimiter is used to enclose a parameter, PrintBoss will trim leading and trailing spaces. In the following example, the final parameter will only be 8 characters long: ''Test 123''.
#Text 4, 5, Arial/12, Test 123
Often it is necessary or safer to delimit parameters in case there may be a comma within the parameter or if you want to retain leading and trailing spaces. This is especially true when you are delimiting variables, like an address, where you can’t be sure of the contents in the evaluated variable. Suppose the above #Text command includes 2 leading and 2 trailing spaces. The final parameter should be 12 characters long. This can be fixed with delimiters.
#Text 4, 5, Arial/12, '' Test 123 ''
The choice of delimiters is very important. If the {CompName} variable in the following line resolves to O’Neil Decorating, Inc and the delimiter chosen is a single quote, a problem would occur.
#Text 4, 5, Arial/12, '{CompName}' This expression evaluates to O.
The CompName would stop at O due to the apostrophe in the name. A different delimiter needs to be used.
#Text 4, 5, Arial/12, «{CompName}» This expression evaluates to O’Neil Decorating, Inc.
PrintBoss recognizes the following characters as delimiters. Delimiters are always used in pairs, though different pairs may be used in the same expression:
Delimiter Description
' Single quote (apostrophe)
'' Double quote (Shift + apostrophe)
~ Tilde (Shift + graves above left Tab key)
[ ] Starting and ending square brackets
÷ Divide symbol entered in PrintBoss editors by pressing CTRL + Apostrophe

« » Double arrows entered in PrintBoss editors by pressing CTRL + Comma for left arrows and CTRL + Period for right arrows
The last two choices are the safest since they are extremely unlikely to occur in a text string. A commonly used short cut is to omit the trailing delimiter if the parameter being delimited is at the end of a line.
