transact - businesssolutions.eu.com user guide.pdf · the steps involved in a transact run are,...
TRANSCRIPT

Transact
SAP Transaction Automation
User Guide
Copyright © 2006 Business Solutions (Europe) Ltd.

Business Solutions Transact
Transact •••• 2
END-USER LICENSE AGREEMENT AND SOFTWARE PRODUCT LIC ENSE IMPORTANT-READ CAREFULLY : This Software License Agreement ("SLA") is a legal agreement between you (either an individual or a single entity) and Business Solutions (Europe) Limited for the software product ‘WinR3 Transact‘ which includes computer software and associated media and printed materials, and may include "online" or electronic documentation ("SOFTWARE PRODUCT" or "SOFTWARE"). By installing, copying, or otherwise using the SOFTWARE PRODUCT, you agree to be bound by the terms of this SLA. If you do not agree to the terms of this SLA, promptly return the unused SOFTWARE PRODUCT to the place from which you obtained it for a full refund.
SOFTWARE PRODUCT LICENSE
The SOFTWARE PRODUCT is protected by copyright laws and international copyright treaties, as well as other intellectual property laws and treaties. The SOFTWARE PRODUCT is licensed, not sold.
1. GRANT OF LICENSE
2. This SLA grants you the following rights:
Systems Software - You may install and use one copy of the SOFTWARE PRODUCT on a single computer at a time and only by one user at a time.
Storage/Network Use - You may also store or install a copy of the SOFTWARE PRODUCT on a storage device, such as a network server, used only to install or run the SOFTWARE PRODUCT on your other computers over an internal network; however, you must acquire and dedicate a license for each separate computer on which the SOFTWARE PRODUCT is installed or run from the storage device. A license for the SOFTWARE PRODUCT may not be used concurrently on different computers.
License Pack - If you have acquired this SLA in a Multi-User License Pack, you may make the number of additional copies of the computer software portion of the SOFTWARE PRODUCT authorized on the printed copy of this SLA, and you may use each copy in the manner specified above.
3. DESCRIPTION OF OTHER RIGHTS AND LIMITATIONS.
Limitations on Reverse Engineering, Decompilation, and Disassembly - You may not reverse engineer, decompile, or disassemble the SOFTWARE PRODUCT, except and only to the extent that such activity is expressly permitted by applicable law not withstanding this limitation.
Separation of Components - The SOFTWARE PRODUCT is licensed as a single product. Its component parts may not be separated for use on more than one computer.
Rental - You may not rent or lease the SOFTWARE PRODUCT.
Software Transfer - You may permanently transfer all of your rights under this SLA, provided you retain no copies, you transfer all of the SOFTWARE PRODUCT (including all component parts, the media and printed materials, any upgrades and this SLA), and the recipient agrees to the terms of this SLA. If the SOFTWARE PRODUCT is an upgrade, any transfer must include all prior versions of the SOFTWARE PRODUCT.
Termination - Without prejudice to any other rights, may terminate this SLA if you fail to comply with the terms and conditions of this SLA. In such event, you must destroy all copies of the SOFTWARE PRODUCT and all of its component parts.
3. UPGRADES
If the SOFTWARE PRODUCT is an upgrade from another product, whether from or another supplier, you may use or transfer the SOFTWARE PRODUCT only in conjunction with that upgraded product, unless you destroy the upgraded product. If the SOFTWARE PRODUCT is an upgrade of a product, you now may use that upgraded product only in accordance with this SLA. If the SOFTWARE PRODUCT is an upgrade of a component of a package of software programs that you licensed as a single product, the SOFTWARE PRODUCT may be used and transferred only as part of that single product package and may not be separated for use on more than one computer.
4. COPYRIGHT
All title and copyrights in and to the SOFTWARE PRODUCT (including but not limited to any images, photographs, animations, video, audio, music, text, and "applets," incorporated into the SOFTWARE PRODUCT), the accompanying printed materials, and any copies of the SOFTWARE PRODUCT, are owned by or its suppliers. The SOFTWARE PRODUCT is protected by copyright laws and international treaty provisions. Therefore, you must treat the SOFTWARE PRODUCT like any other copyrighted material except that you may either (a) make one copy of the SOFTWARE PRODUCT solely for backup or archival purposes, or (b) install the SOFTWARE PRODUCT on a single computer provided you keep the original solely for backup or archival purposes. You may not copy the printed materials accompanying the SOFTWARE PRODUCT.
5. DUAL-MEDIA SOFTWARE
You may receive the SOFTWARE PRODUCT in more than one medium. Regardless of the type or size of medium you receive, you may use only one medium that is appropriate for your single computer. You may not use or install the other medium on another computer. You may not loan, rent, lease, or otherwise transfer the other medium to another user, except as part of the permanent transfer (as provided above) of the SOFTWARE PRODUCT.

Business Solutions Transact
Transact •••• 3
LIMITED WARRANTY
Business Solutions (Europe) Ltd. warrants that (a) the SOFTWARE PRODUCT will perform substantially in accordance with the accompanying written materials for a period of ninety (90) days from the date of receipt, and (b) any hardware accompanying the SOFTWARE PRODUCT will be free from defects in materials and workmanship under normal use and service for a period of one (1) year from the date of receipt. Some states and jurisdictions do not allow limitations on duration of an implied warranty, so the above limitation may not apply to you. To the extent allowed by applicable law, implied warranties on the SOFTWARE PRODUCT and hardware, if any, are limited to ninety (90) days and one year, respectively.
CUSTOMER REMEDIES
Business Solutions (Europe) Ltd.’s and its suppliers' entire liability and your exclusive remedy shall be, at Business Solutions (Europe) Ltd.'s option, either (a) return of the price paid, or (b) repair or replacement of the SOFTWARE PRODUCT or hardware that does not meet the Limited Warranty and which is returned to with a copy of your receipt. This Limited Warranty is void if failure of the SOFTWARE PRODUCT or hardware has resulted from accident, abuse, or misapplication. Any replacement SOFTWARE PRODUCT or hardware will be warranted for the remainder of the original warranty period or thirty (30) days, whichever is longer. Outside the United States, neither these remedies nor any product support services offered by Business Solutions (Europe) Ltd. are available without proof of purchase from an authorized international source.
NO OTHER WARRANTIES
To the maximum extent permitted by applicable law, Business Solutions (Europe) Ltd and it’s suppliers disclaim all other warrantees, either express or implied, including, but not limited to, implied warrantees of merchantability and fitness for a particular purpose, with regard to the software product, and any accompanying hardware. This limited warranty gives you specific legal rights. You may have others, which vary from state/jurisdiction to state/jurisdiction.
NO LIABILITY FOR CONSEQUENTIAL DAMAGES
To the maximum extent permitted by applicable law, in no event shall Business Solutions (Europe) Ltd. or it’s suppliers be liable for any special, incidental, indirect, or consequential damages whatsoever (including, without limitation, damages for loss of business profits, business interruption, loss of business information, or any other pecuniary loss) arising out of the use of or inability to use the software product, even if has been advised of the possibility of such damages. Because some states and jurisdictions do not allow the exclusion or limitation of liability for consequential or incidental damages, the above limitation may not apply to you.
Copyright © 2006 Business Solutions (Europe) Ltd.
Microsoft ®, WINDOWS®, NT®, XP®, Excel® and Outlook® are registered trademarks of Microsoft Corporation.
SAP®, R/2®, R/3®, ABAP®, are registered trademarks of SAP AG

Business Solutions Transact
Transact •••• 4
Contents
Transact 6
Description .........................................................................................6
Who Uses Transact? .........................................................................7
Benefits ..............................................................................................8
Why Not CATT?.....................................................................8
Installing .............................................................................................9
Registering .........................................................................................9
Upgrading...........................................................................................9
Getting Started 10
Making a Recording.........................................................................11
Importing A Recording .....................................................................13
Using The Wizard ............................................................................14
Parameterising The Recording............................................15
Edit The Recording ..........................................................................17
Setting Field Parameters For Data Substitution..................20
Preparing the Data File....................................................................21
Data Files Without Using Excel ...........................................22
Working With Direct Run .................................................................22
Creating a New Run.............................................................22
Executing a Run...................................................................23
Viewing Run Results............................................................24
Working With Batch Input ................................................................25
Generating an Upload File...................................................25
Upload Batch Input File .......................................................27
Executing Batch Input..........................................................28
Using Transact 31
Login.................................................................................................31
Main Screen.....................................................................................31
Sorting By Columns .............................................................32
Grouping By Columns..........................................................32
Add New Recording.........................................................................33

Business Solutions Transact
Transact •••• 5
Parameterisation Wizard .................................................................33
Modify Recording Details.................................................................33
Generate Upload File.......................................................................35
New Direct Run................................................................................36
Direct Run 37
Direct Runs Main Screen.................................................................37
View Run Results.................................................................37
Executing and Copying a Run .............................................38
Deleting a Run .....................................................................38
Saving Errors from a Run to a File ......................................38
Execute Run.....................................................................................38
Executing the Run................................................................39
Run Results......................................................................................40
Save Errors To File ..........................................................................40
Recovering From Terminations .......................................................41
Classify 42
Modules............................................................................................42
Adding a New Module..........................................................42
Deleting a Module ................................................................43
Categories........................................................................................43
Adding a New Category.......................................................43
Deleting a Category .............................................................43
Tips and Tricks 44

Business Solutions Transact
Transact •••• 6
Transact
Description Transact is a powerful SAP transaction automation tool capable of running virtually any SAP transaction any number of times. It takes SAP transaction recordings (made using SAP’s standard transaction recorder), along with data files that you create, to automatically run the recorded transaction - using your data as inputs.
Transact is very simple to learn and usually requires no formal training or consulting. All that is required is knowledge of the SAP transactions to be automated and the documentation provided.
The steps involved in a Transact run are, typically:
• record yourself running the SAP transaction using SAP's standard transaction recorder (SHDB);
• import this recording into Transact and parameterise, in accordance with the data you wish to run;
• prepare a data file for the transaction to be run - in Excel or elsewhere;
• create and execute a ‘Direct Run’ to automatically run your transactions into SAP;
• identify and separate out any failures into an errors file - which can then be fixed and used as the data file for a new ‘Direct Run’.
It’s that simple. No ABAP programming, or programming of any kind, is required. Typically, from concept to completion, the above cycle takes less than 30 minutes! Of course, the recordings are kept and can be used again and again - with as many data files as you like, as often as you like.
As an alternative to using ‘Direct Run’, Transact can also be used to create batch input files, which can then be uploaded to SAP, and run in the standard way (ideal for large volumes of data or for those users who prefer ‘traditional’ methods). However, the advantages of using ‘Direct Run’ are many:
• when using ‘Direct Run’, Transact will run the transactions into SAP directly - without the need to upload any files to SAP and with no batch inputs to be run and analyse.

Business Solutions Transact
Transact •••• 7
• Transact's run results analysis makes it easy to isolate failures and to produce an 'errors' file of your data - ready for you to fix and input back to Transact as another run. Much more effective and efficient than trying to isolate and repair errors from a batch input!
• ‘Direct Run’ also provides the basis for Transact’s run logs. Each run log records who ran the run and when, the recording/transaction run, the data file used and a results summary (number of records in file, number of records run, number of successes and number of fails) – providing full audit and traceability of runs.
The results logs, along with the error extraction capability, provide the tools to manage large data conversion projects as well as the day-to-day master data and transactional data fixes that Transact excels at.
The most common uses of Transact include:
• transactional data creation and correction;
• go-live data conversions for any SAP module;
• master data correction;
• simple interfaces;
• test and/or training data preparation.
However, Transact can be used to run virtually any SAP transaction for any purpose, e.g. deleting/reversing incorrectly entered documents/transactions, stress testing, printing, configuration, pricing conditions, etc. In fact, anything that you would run an SAP transaction to do!
Who Uses Transact? We find that most of our customers originally purchase Transact to assist in data loads prior to go-live but soon find that its most useful role is probably in use by support staff in an already live system. There are a myriad of corrections and fixes that need to be performed in support of a live system – ranging from population of new fields on existing master data to reversing documents resulting from interface files being run twice. Some customers even use it as an interface mechanism, e.g. to create requisitions from Excel files.
To do any of the above normally requires ABAP programs to be written. Transact reduces the lead-time to get a result and also frees up valuable ABAP resource time. So, not only does Transact provide a faster, cheaper solution, it also allows projects and support organisations to put control of data and transactions back into the hands of the people that best know the data and transactions - functional consultants and power users.
Transact also caters for team-working and sharing of recordings by allowing its database to be re-located onto a network drive to be used by all your Transact users. Note that all users will still need a licensed copy of Transact installed on their own PCs.

Business Solutions Transact
Transact •••• 8
Benefits As will become apparent after using the program, the main benefits are a massive reduction in the costs and skills required for data transfer/changes – or indeed any SAP transaction that needs to be run many times. These costs savings come in two parts:
• By giving the functional consultants independence from the ABAP programmers. This means that the functional consultants (i.e. the people that know how the system is supposed to work, know all the dependencies, and know how to drive the transactions correctly) can become responsible for, for example, data conversions. No miscommunications, no misunderstandings, no complex design specifications, no programs, no test specifications or testing. Just a simple definition of what the input data file must contain, a quick recording and a quick test. All under control of the functional consultant.
• By giving ABAP programmers, freedom from these tedious and time consuming tasks. Using the program an ABAP programmer can produce streamlined efficient batch inputs with very little effort.
This tool has been successfully used, on real projects, for almost all data uploads required for SAP Go-Live. Examples of data which can be transferred includes, customers, vendors, materials, equipment, functional locations, HR, projects, standard networks, warehouse management data, FI and CO data (including open items), sales orders, purchase orders etc.. In short, virtually any SAP transaction, for any module, can be recorded and played back by Transact.
Think hard before deciding that your conversions can’t be done this way and start writing ABAP (see the Tips and Tricks section).
Of course, data conversions and uploads are only the most obvious application. These are probably small when compared with the on-going use of the tool, after go-live, for running large numbers of repetitive transactions.
Additionally, Transact's run results analysis makes it easy to isolate failures and can produce an 'errors' file of your data - ready to be fixed and input back for another run. This leads to huge efficiency improvements that just can’t be obtained by other methods.
Why Not CATT?
Why not use CATT? Transact has many advantages over CATT, including:
• Massively simpler, faster to use and much easier to learn.
• More suitable, better managed, environment for creating and changing large amounts of data.
• Does not require “changes to repository or cross-client customizing” to be enabled - i.e. can be run in any system (and no transports!)
• Data loads are much faster to run.

Business Solutions Transact
Transact •••• 9
• Data files can be prepared and batch input files generated, without the need for a connection to an SAP system.
• Isolation of errors and separation into a data file ready to be fixed and re-run is just not possible with CATT.
Installing See the ReadMe file for the latest installation instructions and release notes.
Registering After installing the product, run it and choose Help -> Register from the menu. Follow the instructions for purchasing and registering your product.
The unlicensed version of this product is fully functional but will only create output (generated batch input files) for 5 data records.
Note that it is not necessary to re-download the product after purchasing. The serial number (license key) provided by purchasing will unlock and activate the copy already installed. Please see the ReadMe file for the latest information regarding registration and activation.
Upgrading If you already have WinR3 Standard V2, or WinR3 Professional (any version) you may well have built up a library of recordings that you wish to use with WinR3 Transact.
WinR3 Standard V2, Professional and Transact share the same underlying database so there are two options:
1. Change Transact’s set-up to use your old WinR3 database. To do this choose File -> Set Db Path… and ‘browse’ to the folder containing your existing database (for example, unless you changed the install location when you installed WinR3 Standard this folder will be c:\Program Files\SDi\WinR3 Standard).
2. RECOMMENDED: Backup the database for your newly installed Transact by making a copy of the database file WinR3Data.mdb from your Transact installation folder (unless you changed the location during installation this folder will be c:\Program Files\Business Solutions\Transact). Then copy in to this folder your old WinR3 database (e.g. this will be the file WinR3Data.mdb located in your WinR3 Standard install folder – usually c:\Program Files\SDi\WinR3 Standard).

Business Solutions Transact
Getting Started •••• 10
Getting Started
This section describes the use of Transact by means of an example. The steps to be followed are listed below.
• Making a Recording in SAP.
• Importing the recording.
• Using the ‘Wizard’ to edit the recording to accept input ‘parameters’ from the data file.
• Preparing the data file.
There is then a choice. You can either generate batch input files for upload to SAP, as follows:
• Generate Batch Input File for uploading to SAP.
• Upload Batch Input File to SAP.
• Execute Batch Input.
OR you can use Direct Run to run the transactions directly into SAP – without the need for batch input. As follows:
• Create a New Direct Run
• Execute the Run
• View the Run Results
Using Direct Run provides the major advantage of being able to view and analyse the results from within Transact. You can then use the extract errors to file feature to automatically create a separate data file containing only the failed entries – along with the message describing the reason for the failure. You can then edit this file, correct the errors, and feed back into Transact as another run.
The example follows the creation of several views of a material master record. For your first recording a simpler transaction is recommended, for example blocking a vendor master record (transaction MK05), which has only two screens and very few inputs - e.g. the vendor number, purchasing organisation (optional), blocking checkbox and blocking reason.

Business Solutions Transact
Getting Started •••• 11
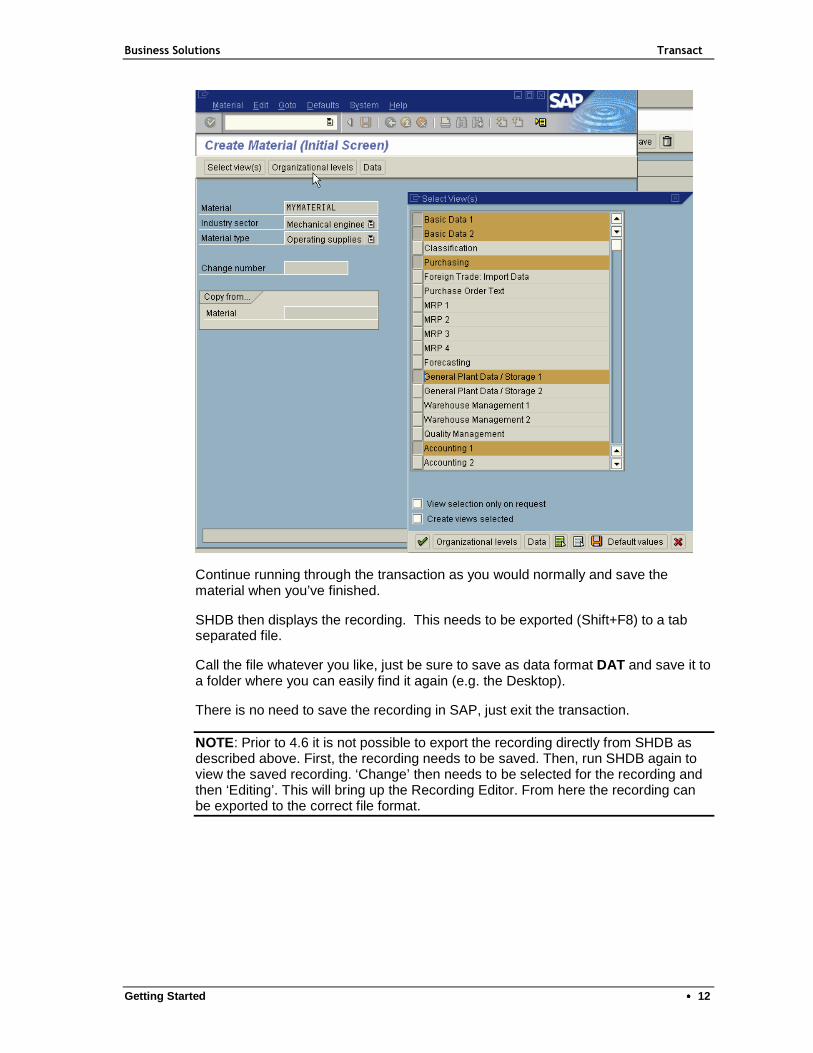
Making a Recording To record the use of a transaction, the standard SAP transaction recorder should be used, that is, run transaction SHDB in your SAP system. Before starting the recording ensure that the screen size is set to the default – as shown below.
To start recording, click the ‘New Recording’ button. Enter a name for the recording and the transaction to record.
Before starting a recording it is important that you are familiar with the transaction and the data to be entered.
This example will follow through the creation of a material master record. To continue, click the ‘Start recording’ button.
Execute the transaction as normal, filling in fields as required. To keep things simple for the example, use: ‘Operating materials’ material type; specify your own material number, and choose only the following views.
NOTE: Your own system configuration may impose different constraints on what you are allowed to enter and what you must enter.
Business Solutions Transact
Getting Started •••• 12
Continue running through the transaction as you would normally and save the material when you’ve finished.
SHDB then displays the recording. This needs to be exported (Shift+F8) to a tab separated file.
Call the file whatever you like, just be sure to save as data format DAT and save it to a folder where you can easily find it again (e.g. the Desktop).
There is no need to save the recording in SAP, just exit the transaction.
NOTE: Prior to 4.6 it is not possible to export the recording directly from SHDB as described above. First, the recording needs to be saved. Then, run SHDB again to view the saved recording. ‘Change’ then needs to be selected for the recording and then ‘Editing’. This will bring up the Recording Editor. From here the recording can be exported to the correct file format.
Business Solutions Transact
Getting Started •••• 13
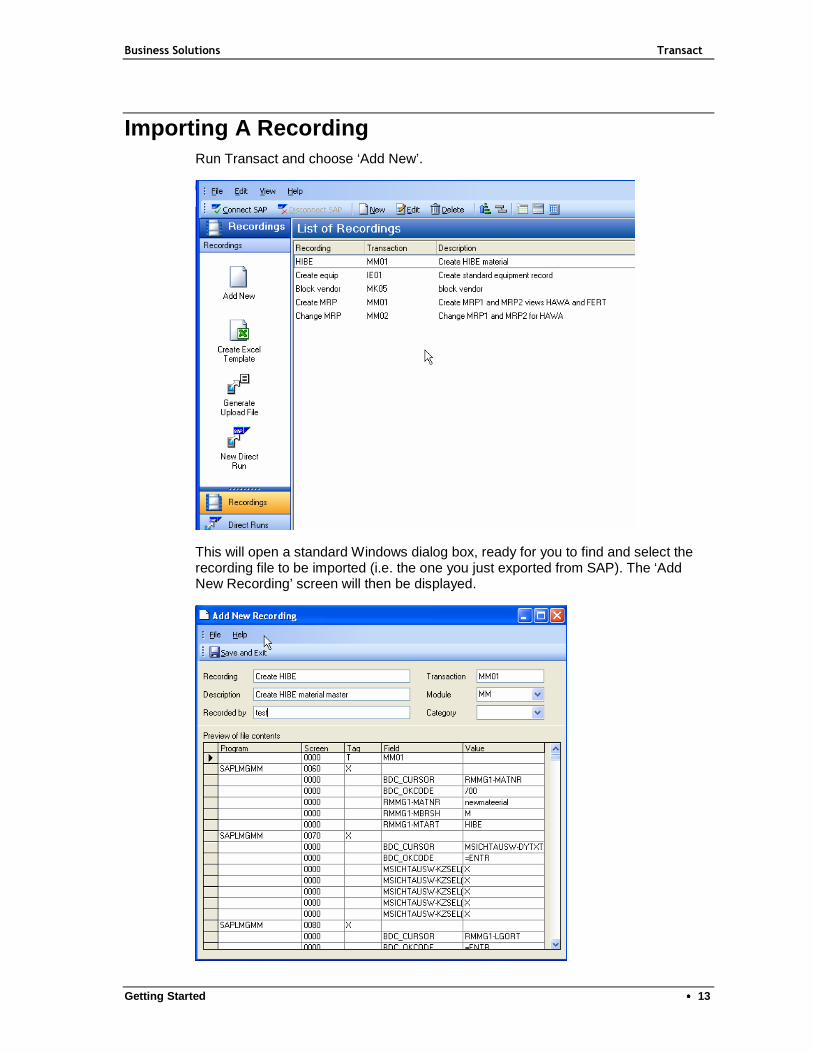
Importing A Recording Run Transact and choose ‘Add New’.
This will open a standard Windows dialog box, ready for you to find and select the recording file to be imported (i.e. the one you just exported from SAP). The ‘Add New Recording’ screen will then be displayed.

Business Solutions Transact
Getting Started •••• 14
Enter a short name for the Recording and a Description. ‘Recorded By’ will default to the User you entered in the Logon screen. The ‘Transaction’ will be read from the recording file. You can also (optionally) enter a module and category for your recording.
Save the recoding by clicking . You will then be given the option of running the Wizard. Choose ‘Yes’ on the pop-up. The parameterisation Wizard will then be displayed.
Using The Wizard The main reason for editing a recording is to ‘parameterise’ it so that data from an input file can be used to replace the ‘fixed’ data that was used when the recording was made.
The Wizard selects and displays only those entries in the recording that represent fields in which data can be entered. These are the fields which can be parameterised and for which data can be entered in the data file. Additionally, the Wizard checks for repeating pairs (fields and data combinations which appear in the recording more than once) and filters these so that the field only appears once. When the recording is parameterised, these fields will automatically be given the same parameter value.
A good first step to do with a new recording is to download the field descriptions from SAP. To do this, click the ‘Get SAP Descriptions’ button, . This will make the recording much easier to work with.

Business Solutions Transact
Getting Started •••• 15
If you have not already logged on to SAP, the logon dialog screens will now be displayed. After downloading the field descriptions the screen will be updated as shown below.
You can see from the screen shot that the data you entered while making the recording is shown in the ‘Value’ column. The ‘Description’ should be the name of the field that you entered the data in (although SAP’s data dictionary can sometimes return some surprising descriptions). You’ll see the in the above example that some of the data entered used the following values:
Material number mymaterial Material type HIBE Plant 1000 Storage location 0001 e.t.c....
Parameterising The Recording
You can now choose which fields to parameterise, which to delete, and which to leave alone. These choices are described below.
• Leave alone Check neither the ‘Parameter’ nor ‘Delete’ checkboxes. In this case, the field will be left in the recording exactly as it was when the recording was made. This option should be chosen for those fields which you wish to have as fixed values. Examples of this, in the above recording, would be the ‘Industry sector’ and ‘Material type’ fields. As the material master views are dependent upon the material type, this recording can only work for the material type used

Business Solutions Transact
Getting Started •••• 16
when making the recording – hence, the material type must be a fixed value. The ‘Checkbox’ fields (which represent the views chosen when making the recording) would also be fixed values. Any other fields which you also wish to be fixed values (e.g. maybe your implementation always uses ‘pc’ unit of measure) should also be left un-checked.
• Delete Fields marked as ‘Delete’ will be deleted from the recording. This option would not normally be used for create transaction, such as the create material master record used in the example. The most common usage would be in change transactions. This is because the SAP transaction recorder (SHDB) records every field that appears on the screen. For example, if you wished to change only the material group of a material master using MM02, the transaction recorder would capture every field that appeared on the screen you recorded (this would typically include, in MM02, material description and base unit of measure as well as other fields). This would give a problem during a run of the recording as (if the fields were left as fixed values) every material in the data file would be given the same description and unit of measure. Fields of this nature must be deleted. Any fields which you do not wish to use as input parameters or as fixed values, should be marked for ‘Delete’.
• Parameter By parameterising a recording we are indicating fields which will have their data read in from an input data file – rather than having a fixed value. Each parameter used is assigned a ‘parameter number’. These parameters, and their numbers, take the form &1, &2, &3 etc.. Note that the parameter number indicates the sequence of the data in the data file (the column) it is not necessarily the sequence in the recording. For example, let’s say our upload data will be in an Excel file. This file will have column A as material number, column B as description and C as the unit of measure. This means that the material number will be parameter &1, the description &2 and the unit of measure &3. These parameter numbers should be used to substitute for these fields in the recording wherever they appear. In the above examples, fields which would typically be examples are: material number; plant; storage location; material description; unit of measure; material group etc..
When you have made your choices, click .
The screen is then updated to show the parameter usage, as shown below. Any fields marked for delete will have been removed from the recording.

Business Solutions Transact
Getting Started •••• 17
When you have finished, click .
The recording will be updated and you will be given the option of creating an Excel Template data file. For the purposes of working through the example, choose ‘Yes’ to create the template.
Edit The Recording The main reason for editing a recording is to ‘parameterise’ it so that data from an input file can be used to replace the ‘fixed’ data that was used when the recording was made.
To edit a recording from the main screen you can:
• Double-click the recording.
• Select the recording and click the ‘Edit’ button from the toolbar, .
• Right-click and choose ‘Edit’.
The Modify Recording Details screen will then open. If not done already, it is suggested that you download the field descriptions from SAP. To do this, click the ‘Get SAP Descriptions’ button, . This will make the recording much easier to work with.
The Modify Recording Details screen shown below is of the example previously parameterised by the Wizard. You will see that some parameters have been used more than once, for example &4 ‘Material description’.

Business Solutions Transact
Getting Started •••• 18
NOTE: Your screen may not look the same as the one above. The screen shot above shows the recording ‘compressed’ with only the data fields visible. This is the default setting when Transact runs for the first time. See later for a description of this functionality.
It is strongly recommended to always use the Wizard for paremeterising and modifying the recordings unless you have a very clear understanding of batch input and what you are trying to achieve. If this is the case, or if you want to learn experiment, then this screen allows you total edit control over the recording.
When editing a recording it is necessary to only parameterise certain ‘data’ fields. The rest of the recording can normally be left as it is. This is why Transact’s default way of running is to compress the recording to show only the data fields which can be parameterised. To view the full recording click the button as shown below.
This will then ‘uncompress’ the recording and show all the records. Note also that the Add and Delete buttons are also now enabled.

Business Solutions Transact
Getting Started •••• 19
To assist you in manually parameterising the recording, aids are provided. Check the check box to activate the aids, as shown below.
There are two aids provided (shown at the bottom of the screen, above). The one on the right keeps track of the fields in the recording that have not yet been parameterised. These will appear as fixed values in the recording unless deleted.

Business Solutions Transact
Getting Started •••• 20
The aid on the left activates when you parameterise a field in the recording body – it will automatically list all other fields in the recording matching the one just parameterised and allow you to automatically parameterise those fields to the same value.
Setting Field Parameters For Data Substitution
By parameterising a recording we are indicating fields which will have their data read in from an input data file – rather than having a fixed value. Each parameter used is assigned a ‘parameter number’. These parameters, and their numbers, take the form &1, &2, &3 etc.. Note that the parameter number indicates the sequence of the data in the data file (the column) it is not necessarily the sequence in the recording.
For example, let’s say our upload data will be in an Excel file. This file will have column A as material number, column B as description and C as the unit of measure. This means that the material number will be parameter &1, the description &2 and the unit of measure &3. These parameter numbers should be used to substitute for these fields in the recording wherever they appear.
Note that the same parameter can be used many times (e.g. the material number may need to be input on several ‘tabs’), in this case just re-use &1 – do not create another parameter and another column in the data file.
To parameterise a field:
• scroll the screen until the field can be seen;
• click the field to be parameterised;
• enter the parameter number.
Note that not all of the fields need be parameterised. For example, if we only intend to use this recording for creating operating supplies (material type HIBE) in plant 1000 and storage location 0001 then there is no need to parameterise these fields – we can just leave them as fixed values.
After setting the required parameters, save your changes and close the window.

Business Solutions Transact
Getting Started •••• 21
Preparing the Data File There are several ways to create a template data file in Excel. From the main screen:
• Single click the recording, to select it, and then click
• Right-click the recording and choose ‘Create Excel Template’.
Alternatively, you will be asked if you wish to create a template when you close the Wizard.
In all cases, a window will be opened prompting you for a location to save the file. The filename will be defaulted to “DATA xxxxxxx.xls”, where xxxxxxx represents the recording name (for example, “DATA Create HIBE.xls”). The filename can be changed to whatever you require. Clicking the save button will save a template data file in the location you selected.
Open the template in Excel, as below.
The above example is a template for the recording created earlier in the wlakthrough. You will see that both the parameter number (&1) and the field description are shown in the header row.
You then add your own data into the spreadsheet (do not leave blank lines).
CAUTION! Be sure that what is in Excel is what you want! As an example, Excel will ‘auto-format’ data that it believes to be number and this automatic change can result in data that you don’t want! For example, if your storage location is 0001 and you enter this in a cell, Excel will automatically change it to 1. This clearly will cause errors on a run (the storage location will be incorrect). To prevent this happening, just precede your entry with a single quote ‘ when typing, i.e. instead of typing 0001 just type ‘0001.

Business Solutions Transact
Getting Started •••• 22
Data Files Without Using Excel
It is not necessary to use Excel as a data source. A tab separated text file can also be used as input – this can be created using any tool you require.
It would usually be fairly normal practice to use the first row as ‘headers’ to describe the columns. Add these headers, along your rows of data. Transact can be instructed to ignore the header row in the data file.
Working With Direct Run
Creating a New Run
As an alternative to batch input, the recordings and data files can be used to create a ‘Direct Run’. This ‘Run’ is an entry on the runs database that tells Transact which data file and recording combination to use.
Each run can be given its own description. For example, the same recording and data file combination may need to be run into a test system/client, QA system and finally production. The description helps you distinguish between these different runs.
Runs can be executed immediately after creation or left until some other time.
To create a new Direct Run, from the main screen either :
• Single click the recording, to select it, and then click
• Right-click the recording and choose ‘New Direct Run’.
You will then be prompted to choose the data file to be associated with the run.
After choosing a file the ‘Create New Direct Run’ screen is displayed.
Enter a description for the run and click .
You will then be prompted to execute the run now (answer Yes) or later (answer No).

Business Solutions Transact
Getting Started •••• 23
Executing a Run
To execute a run at a time other than immediately after creation, from the main screen, click the ‘Direct Runs’ sidebar to display the Direct Runs screen.
To execute a run, either:
• Single click the run, to select it, and then click
• Right-click the run and choose ‘Run Direct’.
Notice that, for a run that has not been executed, the column ‘Records in file’ is shown as zero.
The Prepare Direct Run screen is then shown.

Business Solutions Transact
Getting Started •••• 24
This screen is almost identical to the Generating An Upload File described elsewhere. You can see that, in the above example, the first row of the data file contains the headers. Click . The screen is updated to show:
When you have checked that you have selected the correct recording and data file, and that the parameters match, click on the toolbar to start execution of the run.
Direct Run will now prepare all the data necessary for calling the transactions in SAP. When the data preparation has finished you will be prompted to continue.
Direct Run will then connect to SAP and run the transactions.
Upon completion, a summary will be displayed of the number of records in the data file, the number of records run (i.e. the number of transactions run), the number of errors, and the number of transactions run successfully.
Viewing Run Results
The Direct Runs main screen summarises the runs and their results.
A green light indicates a run that has been completed with no errors, a red light indicates a completed run that contained errors and the ‘no light’ , , indicates a run that has not yet been processed.
To view the details of a run result, you can either:
To execute a run, either:
• Single click the run, to select it, and then click
• Right-click the run and choose ‘Results’.
See Run Results.

Business Solutions Transact
Getting Started •••• 25
Working With Batch Input
Generating an Upload File
The first step in generating the batch input file, from the main screen, is to either:
• Single click the recording, to select it, and then click
• Right-click the recording and choose ‘Generate upload’.
This will then bring up a Windows dialog screen for you to enter the name and location of the data file that you created. After entering this information the Generate Batch Input Session screen will be shown.
This screen is split into 3 sections:
• the top section shows the recording;

Business Solutions Transact
Getting Started •••• 26
• the second section lists the parameterised fields;
• the third section shows the content of the data file.
Now check that the data matches the parameters. You will also notice a check box to indicate whether the first row contains headers. In our case it does so ‘tick’ this box,
This will update the screen as shown.
Note that the headers have now been transferred to the column headings. There are 3 data records.
You are now ready to generate the batch input file. Click the ‘Generate’ button, .
You will then be prompted for a filename to save – you can keep the default or change it. Before generating the file you will be shown the following screen to confirm what is about to be done.
Note: it is important to ensure that you enter your SAP user name correctly in the field provided or the batch input file will not run in SAP!
Click ‘OK’ to generate the file.

Business Solutions Transact
Getting Started •••• 27
Upload Batch Input File
Most functional staff involved in SAP projects usually have some, but limited, experience of batch input. The following sections outline those steps required to import and run the batch input session. For a more comprehensive description refer to SAP’s own help documentation.
Run transaction SM35 and choose ‘Import Session’ (Shift+F11), as below.
Click ‘File from presentation server’ and browse to the file you just generated.
Note that a sensible name can be used in the ‘Object name’ field if so desired (this name is used in the display of the ‘Session Overview’ as the session name - see later). In the screen shot above, CREATEHIBE was used.

Business Solutions Transact
Getting Started •••• 28
Note also that the file format must be DAT.
Clicking the ‘Execute’ button will read in the file and create a new Batch Input session.
A quick check should be made to ensure that the number of transactions matches the number of records in your data file.
Executing Batch Input
This is straightforward SAP usage that many consultants will be familiar with. This section is included for those that are not so familiar with batch input or are infrequent users. Select the newly created session and click ‘Process’.
On the pop-up, choose Background (you may choose to try Foreground the first couple of times) and click the ‘Process’ button.
You can then monitor SM35 until the batch input session has completed.
When it has completed, you can view the results of the run by selecting your batch input session and clicking ‘Analysis’.

Business Solutions Transact
Getting Started •••• 29
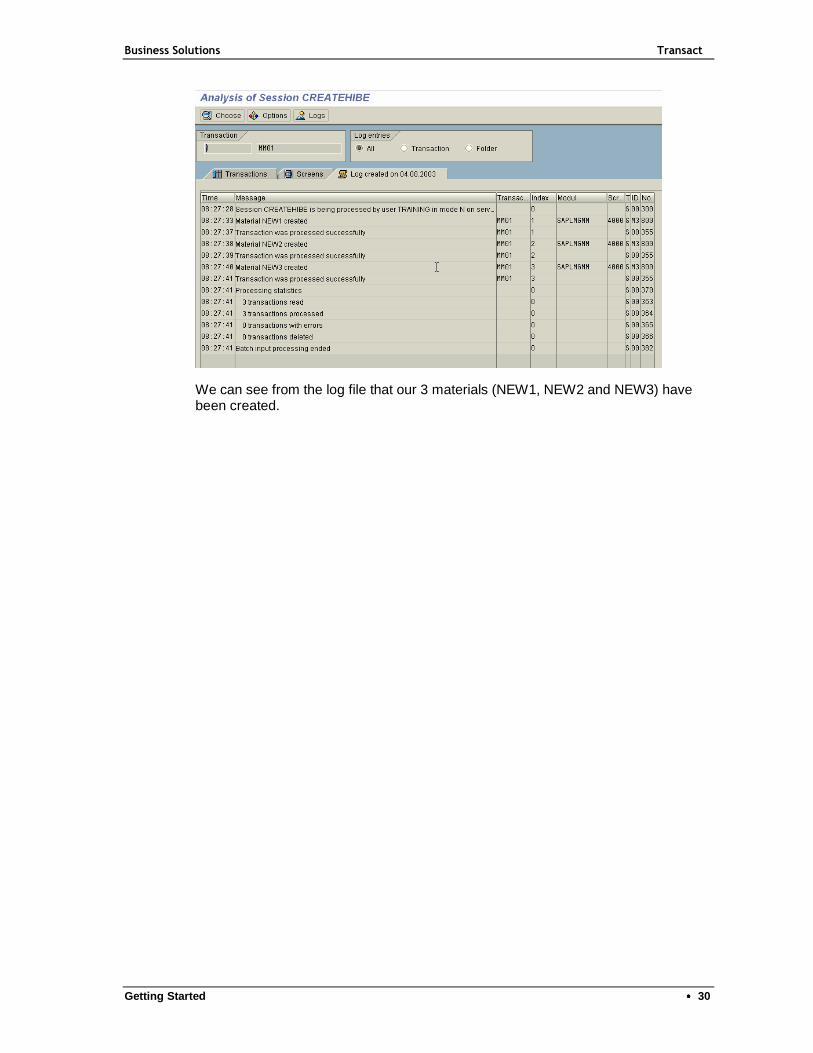
This displays the session analysis screen.
In the screen shot above we can see that all 3 records (transactions) have been processed and that there were no errors (0 incorrect transactions).
For further details, click the ‘Log’ tab.
Business Solutions Transact
Getting Started •••• 30
We can see from the log file that our 3 materials (NEW1, NEW2 and NEW3) have been created.
Business Solutions Transact
Using Transact •••• 31
Using Transact
This section describes all of the different screens and their content.
Login The first screen presented is a login screen. This screen is used merely to obtain a user name to use when storing a new recording to the database and, more importantly, to default when making any connections to SAP. As such, use of your SAP user name is recommended.
This is also a useful field when sorting or grouping recordings.
Main Screen The main control screen for adopts an MS Outlook style user-interface to allow users to quickly navigate the various screens and functions with minimal training.
Just like Outlook, column widths can be changed, and columns can be re-arranged and sorted. Outlook-style ‘Group By’ is also supported.
Toolbar Summary
Connect to SAP Opens windows to guide you through logging on to your SAP system. Note, it is necessary to logon to SAP to use Transact – a logon dialog will automatically be started if choose a function that requires a connection to SAP.
Disconnect from SAP Logs-off the SAP connection.
Open for edit Opens the selected entry for edit, in a new screen.
Delete Deletes the selected entry, e.g. the selected recording.
Sort… Opens the ‘Sort by’ dialog window. See Sorting By Columns.
Group by… Opens the ‘Group by’ dialog window. See Grouping By Columns.
Show ‘Add new row’ Opens the Add New Row section of the screen to allow
creation of new data records.
Show ‘Group by box’ To group by a column, the Group By Box must first be
activated. See Grouping By Columns.

Business Solutions Transact
Using Transact •••• 32
Grid on/off To enable/disable the grid display in the data area of the
screen.
NOTE: To select an entry, simply click its row in the data area of the screen (the selected entry will be highlighted) .
Sorting By Columns
To sort by a particular column, simply click on the column header:
The default for the initial sort is ascending. This is indicated by an up-pointing triangle in the column header:
To sort by descending order just click the column again. A descending sort is indicated by a down-pointing triangle in the column header: .
To sort by more than one column, click the toolbar button ‘Sort…’, .
This runs a pop-up screen which allows up to four different columns to be used for sorting at the same time.
Grouping By Columns
To group by a column, the Group By Box must first be activated. To do this click the
toolbar button .
This will then show the Group By Box on the main screen.
Simply drag the required group by column into the Group By Box area.
To group by more than one column, click the toolbar ‘Group by…’ button, .
This runs a pop-up screen which allows up to four different columns to be used for grouping at the same time.

Business Solutions Transact
Using Transact •••• 33
Add New Recording See also Importing A Recording.
Toolbar Summary
Save and Exit Saves the recording to the database.
Screen Fields
Field Name Description
Recording Name of the Recording. This is a required field.
Example: Create HIBE
Description Description of the Recording. This is a required field.
Example: Create views for HIBE material.
Recorded by The name of the user that made the recording. This is defaulted but can be changed. This is a required field.
Example: training
Transaction Transaction code. This is read automatically from the input recording and can not be changed.
Example: MM01
Module The SAP module related to the transaction.
Example: MM
Category User specified category to facilitate sorting and searching.
Example: Master Data
Parameterisation Wizard For a full description on how to use this screen, see Using The Wizard.
Toolbar Summary
Save and Exit Saves the recording to the database and exits the wizard.
Get SAP Descriptions
Retrieves the description of the recordings fields from the SAP data dictionary. If a logon has not already been made to your SAP system then the logon dialog will be displayed.
Modify Recording Details See also Edit The Recording and Using The Wizard.

Business Solutions Transact
Using Transact •••• 34
Toolbar Summary
Save and Exit Saves the recording to the database.
Get SAP Descriptions
Retrieves the description of the recordings fields from the SAP data dictionary. If a logon has not already been made to your SAP system then the logon dialog will be displayed.
Delete this recording
Deletes the currently open recording.
Screen Fields
This screen is split into two sections, header fields and the recording listing.
Header Section
Field Name Description
Recording Name of the Recording. This field can not be changed. Example: Create HIBE
Description Description of the Recording. Changing is allowed. This is a required field.
Example: Create views for HIBE material.
Recorded by The name of the user that made the recording. Changing is allowed. This is a required field.
Example: training
Transaction Transaction code. This field can not be changed. Example: MM01
Module The SAP module related to the transaction.
Example: MM
Category User specified category to facilitate sorting and searching.
Example: Master Data
Recording Section
Add after selected row
Adds a new blank line to the recording after the currently selected line.
Only available when the full recording is displayed.
Delete selected row
Deletes the currently selected line from the recording.
Only available when the full recording is displayed.
Show fields only/full script
When this button is visible, the recording is shown compressed – with only the parameterisable fields displayed.
Clicking this button will show the full recording.
Show fields only/full script
When this button is visible, the full recording is currently shown.
Clicking this button will compress the recording display to show only the parameterisable fields.

Business Solutions Transact
Using Transact •••• 35
Run Wizard Runs the parameterisation Wizard
Any field in the recording section can be changed but it is strongly recommended that until you become familiar with batch input that the only changes made are those to parameterise fields.
Generate Upload File Toolbar Summary
Generate Starts the creation of the batch input file.
Screen Fields
Only the ‘First row contains headers’ field, , can be changed on this screen.
This screen is split into 3 sections:
• the top section shows the recording;
• the second section lists the parameterised fields;
• the third section shows the content of the data file.
Before generating the upload file you should check that:
• you have opened the correct combination of recording and data file;
• that the same number of parameters exist in the recording and the data file (it is permissible to have more in the data file and only use certain columns – it is not permissible to have fewer);
• that the parameter data in the data file matches up with the fields in the recording;
• if the fist row of the data file contains headings, that the ‘First row contains headers’ checkbox is ticked.

Business Solutions Transact
Using Transact •••• 36
New Direct Run See also Creating a New Run.
Toolbar Summary
Save to database Saves the run to the database.
Screen Fields
Field Name Description
Recording Name of the Recording. This field can not be changed.
Example: Create HIBE
Transaction Transaction code. This field can not be changed.
Example: MM01
Data file name The name of the data file assigned to the run. This field can not be changed.
Example: c:\Data\Vendors.txt
Run description Descriptive name to be assigned to the run. This is a required field.
Example: Load vendors to production client.
After saving the run to the database you will be given the option to process it. See Execute Run.

Business Solutions Transact
Direct Run •••• 37
Direct Run
Direct Run allows the transactions to be run directly into SAP, without the need for batch input. It also provides the basis for the run results logs. This section describes all of the different screens and their content
Direct Runs Main Screen To view the Direct Runs main screen, click the ‘Direct Runs’ button on the left-hand sidebar.
This will open the main Direct Runs screen. Note that Direct Runs can only be created from the ‘Recordings’ main screen (see Creating a New Run).
The screen shot above shows 5 runs. The green light indicates a run that has been completed with no errors, the red light indicates a completed run that contained errors and the ‘no light’ , , indicates a run that has not yet been processed.
View Run Results
See also Viewing Run Results.
Double-clicking a run, or selecting a run and then clicking ‘Run Results’:

Business Solutions Transact
Direct Run •••• 38
will display the detailed results for the run. See also Run Results. If the run selected run has not been processed there will be no results to display.
Executing and Copying a Run
To execute a run, select its entry in the displayed list and click ‘Execute Run’:
or right-click its entry and choose ‘Run Direct’ from the pop-up menu. See Execute Run and Executing a Run.
If the selected run has already been successfully completed, you will be given the option of copying the completed run to a new run. This is a convenient short-cut for creating a new run, for the same recording and data combination, to load your production system, for example, after a test load into your test system.
Deleting a Run
To delete a run, and any associated results logs, select the runs entry in the list and
click ‘Delete’, , or right-click the entry and choose ‘Delete’ from the pop-up menu.
Saving Errors from a Run to a File
To extract the errors from a completed run to file, select the failed run’s entry in the displayed list and click ‘Save Errors To File’:
See Save Errors To File.
Execute Run See also Executing a Run.
Toolbar Summary
Run Transactions using Direct Run
Starts running the transactions into SAP.

Business Solutions Transact
Direct Run •••• 39
Screen Fields
Only the ‘First row contains headers’ field, , can be changed on this screen.
This screen is split into 3 sections:
• the top section shows the recording (in full);
• the second section lists the parameterised fields;
• the third section shows the content of the data file.
Before starting the Direct Run you should check that:
• you have the correct combination of recording and data file;
• that the same number of parameters exist in the recording and the data file (it is possible to have more in the data file and only use certain columns);
• that the parameter data in the data file matches up with the fields in the recording;
• if the fist row of the data file contains headings, that the ‘First row contains headers’ checkbox is ticked.
Executing the Run
To start the run click on the toolbar. Direct Run will then prepare the data it needs to run the transactions. The time needed to do this will vary depending upon the number of transactions to be run and the size of the recording.
When the data has been prepared you will be asked if you wish to continue with the run. If so, press ‘OK’. If Transact does not already have an active connection to your SAP system you will be guided through the logon process.
Once you have logged in successfully the transactions will be run into your SAP system and the results stored in the database.
Upon completion of the run you will be presented with a summary of the run indicating the total number of transactions run, the number of errors and the number of successes.

Business Solutions Transact
Direct Run •••• 40
Run Results See also Viewing Run Results.
Toolbar Summary
Output errors to file
Save the records with errors to a new data file.
Grid on/off Switches the display of the grid overlay on/off.
Screen Fields
No data can be changed on this screen.
The top section of the screen presents the details of the run ‘header’, that is, the name and number of the run along with the transaction, the data file used and other data. A summary of the run results is also shown, consisting of:
• total number of records in the data file;
• the number of records (transactions) run into SAP;
• the number of transactions that succeeded;
• the number of transactions with errors.
The list section of the screen shows the result of every singe data record’s transaction along with, when necessary, the returned error code and a description of the error.
To save the records with errors to a separate file click ‘Output errors to a file’,
. See Save Errors To File.
Note that the list section of the screen can be sorted, in the usual way, so that, if you wish, you can sort all the ‘red lights’ to the top of the list to see all the errors together.
Save Errors To File When saving the errors from a run to a file, Direct Run:
• reads in the original data file (therefore the file must not have been deleted, changed or moved);
• filters from this file all records that had successful transactions;
• outputs records that failed to a file of your choosing.
As an additional column in the output data file, Direct Run adds the description of the error.

Business Solutions Transact
Direct Run •••• 41
Note that any records that were not executed in the original run (because of a PC crash, for example) will also be included in this file.
In this way, Transact isolates your data with errors allowing you to easily assess the reasons for the errors and, if necessary, correct the data and create a new run. Because the error description is added as a column at the end of each row it is not even necessary to delete this column before creating your next run –Direct Run will simply ignore it.
By keeping records of all your runs, Direct Run effectively keeps an audit trail of all transactions run, data loaded successfully and any errors, to help you accurately track the status of your data load projects.
Recovering From Terminations Under certain circumstances, e.g. loss of power to PC, it is possible that a Direct Run may be part-way through a run without being able to save the run summary data (the run summary data is only written to the database when a run has completed).
If you think this has happened to one of your runs, right-click the run in the Run Direct main screen and select ‘Recover’ from the pop-up menu. This will initiate a check of the database for the result of each data record run-in, calculate the overall run results and update the run header with the summary data.
Note that it is most likely that, if a termination does occur during a run, that the run will be shown as ‘Not started’, i.e. as . After recovering the run this will be shown as a completed run (in all likelihood as a failed run, ).
The ‘Run’ concept in Transact, which is to maintain a historical record of all runs, means that any records not run in will need to be run again. This will involve the creation of a new run. To do this, choose the ‘Save Errors To File’ for the run which will create a new data file of the unloaded records (and any fails). This file should be reviewed for failures and corrected if necessary. This file should then be used as the basis for a new run.
Business Solutions Transact
Classify •••• 42
Classify
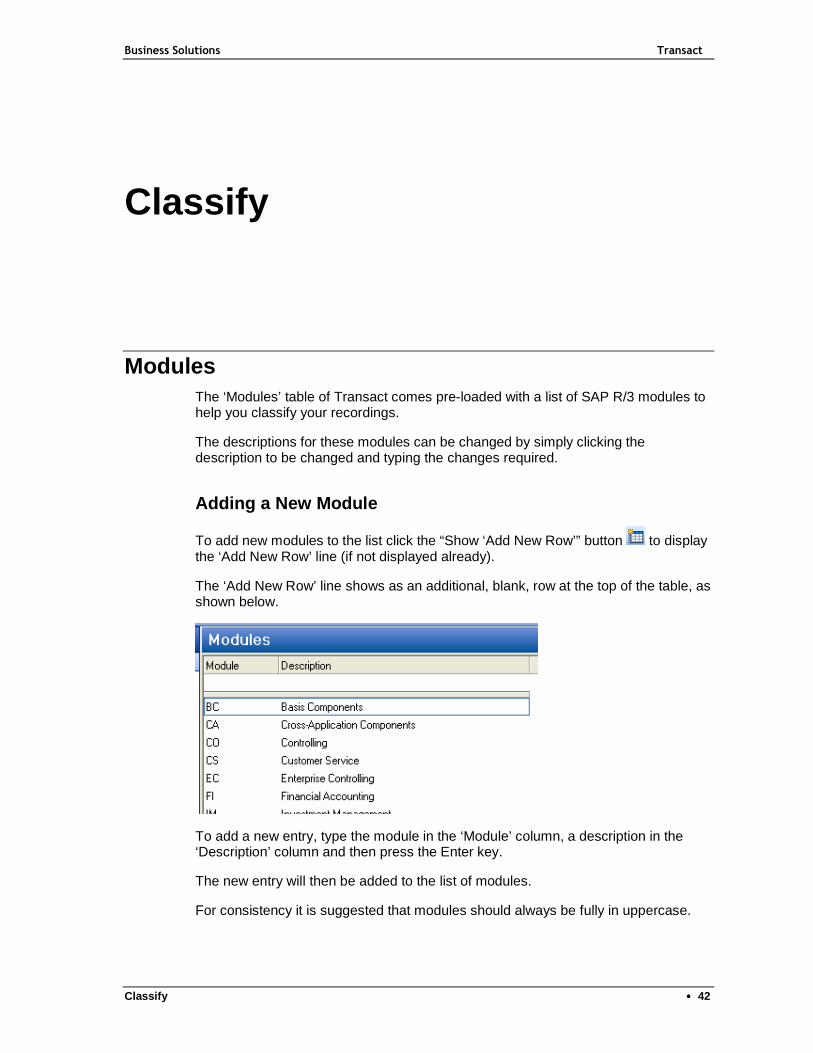
Modules The ‘Modules’ table of Transact comes pre-loaded with a list of SAP R/3 modules to help you classify your recordings.
The descriptions for these modules can be changed by simply clicking the description to be changed and typing the changes required.
Adding a New Module
To add new modules to the list click the “Show ‘Add New Row’” button to display the ‘Add New Row’ line (if not displayed already).
The ‘Add New Row’ line shows as an additional, blank, row at the top of the table, as shown below.
To add a new entry, type the module in the ‘Module’ column, a description in the ‘Description’ column and then press the Enter key.
The new entry will then be added to the list of modules.
For consistency it is suggested that modules should always be fully in uppercase.

Business Solutions Transact
Classify •••• 43
Deleting a Module
To delete a module from the list, select the module by clicking its entry in the list (the selected entry will be highlighted) and then clicking the ‘Delete’ button on the
toolbar, .
Alternatively, right-click the entry in the list and choose ‘Delete’ from the pop-up menu.
Categories The ‘Categories’ table of Transact is delivered empty. It is provided to allow you to define your own categories which you can assign to recordings to simplify searching and sorting.
An example of usage of the categories table may be:
• Master data load
• Transaction data creation
• Data correction/deletion
Another example use could be:
• Acceptance test data load
• Training data load
• Production Data load
Or, of course, any combination of the above and anything else you like.
Adding a New Category
New categories are added using the same method described for adding new
modules, that is, click the “Show ‘Add New Row’” button to display the ‘Add New Row’ line (if not displayed already) and typing in the information for the new entry.
Deleting a Category
To delete a category from the list, select the category by clicking its entry in the list (the selected entry will be highlighted) and then clicking the ‘Delete’ button on the
toolbar, .
Alternatively, right-click the entry in the list and choose ‘Delete’ from the pop-up menu.

Business Solutions Transact
Tips and Tricks •••• 44
Tips and Tricks
Basic use of Transact is very straightforward, but to get the most from this program you sometimes need to use a little imagination.
It should be obvious that master data loads can be created very easily in the manner illustrated in the worked example. A further bit of thought and you might realise that, for example, not every customer master has the same number of partners. This program can not be used to generate a variable number of output lines. That is, if the saved recording on the database says there are 3 partners then there has to be 3 partners in the input data file. A bit of imagination and it should also be obvious that if you have some customers with 3 partners and some with 4 then all you need to do is have two recordings (one with 3 and one with 4) and two input files (one with 3 and one with 4).
This is where adding new lines to a recording and saving as a different recording becomes very useful. You’ll notice, if you save a create customer master with partners, that the ‘variable number of records’ fields will have the form xxxxxxx[01], if you want more or less partners then delete lines or insert new and copy the format. Simple. This can also be used for, for example, different number of items on a purchase order.
Apart from initial data transfer, the program is exceptionally useful in data maintenance - possibly even more so than for initial transfer. The “Oh, dear, these 500 material masters should all have been a different material group” and “whoops, I didn’t mean to create those 300 transfer requirements” types of problems suddenly become a trivial issue taking less than 15 minutes to fix. Problems like these occur very often during go-live preparation and testing.
Sometimes, getting a list of the data to be fixed, e.g. the numbers of the 300 transfer requirements that you’d like to delete, can be tricky. Standard SAP reports and transactions SQVI and SE16/SE16N are very easy tools to select this data and to download to Excel. This can then be used as the basis for an input file
These are simple examples to stimulate the imagination. Think hard and you’ll find you can do all kind of other things!